balance and mobility exercises for physical activity...
TRANSCRIPT

Balance and Mobility Exercises
for Physical Activity Classes

Balance and Mobility Exercises for Physical Activity Classes
BALANCE BASICS
1 Seated Balance
2 Seated Balance with Trunk Leans
3 Seated Balance with Leg Movements (1)
4 Seated Balance with Leg Movements (2)
5 Chair Transfers
6 Standing with Altered Base of Support (1)
7 Standing with Altered Base of Support (2)
8 Shift Around the Clock
9 Lateral Weight Shifts with Head Turns
10 Forward Right & Left Step
11 Four Corner Stepping
12 Foot Drawing
13 Ball Rolls
14 Creek Crossing
15 Walk with Directional Changes and
Abrupt Stops
FANCY FOOTWORK
16 Walk with Altered Base of Support
17 Walk with Head Turns
18 Walk Through Cones
19 Obstacle Negotiation with Cones
20 Variation Course
21 Mambo Steps
22 Side Step
23 Grapevine / Braiding
24 Semi-Tandem & Tandem Walk
25 Figure 8 Walk
26 Spiral Walk
FINE TUNING THE SENSES
27 Visual: Seated Trunk Movements
28 Somatosensory: Seated Trunk Movements
29 Vestibular: Seated Trunk Movements
30 Somatosensory: Shift Around the Clock
32 Visual: Shift Around the Clock
33 Visual: Standing with Altered Base of Support (1)
34 Visual: Standing with Altered Base of Support (2)
35 Somatosensory: Standing with Altered Base of
Support (1)
36 Somatosensory: Standing with Altered Base of
Support (2)
37 Vestibular: Standing with Altered Base of
Support (1)
38 Vestibular: Standing with Altered Base of
Support (2)
39 Somatosensory & Vestibular: Balloon Volleyball
40 Somatosensory: Forward Right & Left Step
41 Somatosensory: Walking with Altered Base of
Support
42 Visual: Walking with Altered Base of Support
43 Vestibular: Walking with Altered Base of Support
44 Somatosensory: Walking with Altered Vision
FUNCTIONAL FROLICS
45 Circle Soccer
46 Give and Take Walk
47 Musical Spots
48 Fast Feet
49 Line Pass
50 Parachute
51 Parachute Push Pull
52 Creek Walk
53 Emily Post Promenade
54 Waiter's Relay
55 Horseshoes with Altered Base
of Support
FIRMING UP THE MUSCLES
56 Strength: Heel Raises
57 Strength: Forward Lunge
58 Strength: Forward / Backward
Leg Lifts
59 Strength: Lateral leg Lifts
60 Strength: Leg Curls
61 Strength: Squats

Center for Successful Aging and the Fall Prevention Center of Excellence, 2009
Balance and Mobility Exercises for Physical Activity Classes
Challenge Level Key
Level 1 for participants at Moderate to High Fall Risk
Level 2 for participants at Low Fall Risk Low Challenge
Moderate Challenge
High Challenge
Do Not Perform
Adherence to challenge level codes should
be strictly followed in group based settings.
L1
L2

Center for Successful Aging and the Fall Prevention Center of Excellence, 2009
Level 1
Table of Exercises
4
High Challenge:
7 Standing with Altered Base of Support (2)
15 Walk with Directional Changes and Abrupt Stops
19 Obstacle Negotiation with Cones
29 MST Vestibular: Seated Trunk Movements
32 MST Visual: Shift Around the Clock
33 MST Visual: Standing with Altered Base of Support (1)
34 MST Visual: Standing with Altered Base of Support (2)
35 MST Somatosensory: Standing with Altered Base of Support (1)
36 MST Somatosensory: Standing with Altered Base of Support (2)
37 MST Vestibular: Standing with Altered Base of Support (1)
38 MST Vestibular: Standing with Altered Base of Support (2)
39 MST Somatosensory & Vestibular: Balloon Volleyball
40 MST Somatosensory: Forward Right & Left Step
41 MST Somatosensory: Walking with Altered Base of Support
45 Circle Soccer
Low Challenge:
1 Seated Balance 2 Seated Balance with Trunk Leans
3 Seated Balance with Leg Movements (1) 30 MST Somatosensory: Pass The Potato 48 Fast Feet
Moderate Challenge:
4 Seated Balance with Leg Movements (2)
5 Chair Transfers 6 Standing with Altered Base of Support (1) 8 Shift Around the Clock 9 Lateral Weight Shifts with Head Turns 10 Forward Right & Left Step
11 Four Corner Stepping 18 Walk Through Cones 20 Variation Course 21 Mambo Steps 22 Side Step
27 MST Visual: Seated Trunk Movements 28 MST Somatosensory: Seated Trunk Movements 31 MST Somatosensory: Shift Around the Clock 50 Parachute 51 Parachute Push Pull
MST = Multisensory Training
L1

Center for Successful Aging and the Fall Prevention Center of Excellence, 2009
Level 2
Table of Exercises
5
Low Challenge:
5 Chair Transfers
6 Standing with Altered Base of Support (1)
8 Shift Around the Clock
9 Lateral Weight Shifts with Head Turns
10 Forward Right & Left Step
11 Four Corner Stepping
12 Foot Drawing
15 Walk with Directional Changes and Abrupt Stops
16 Walk with Altered Base of Support
18 Walk Through Cones
20 Variation Course
21 Mambo Steps
22 Side Step
31 MST Somatosensory: Shift Around the Clock
46 Give and Take Walk
52 Creek Walk
55 Horseshoes with Altered Base of Support: Feet
Together & Split Stance
Moderate Challenge:
13 Ball Rolls
14 Creek Crossing
17 Walk with Head Turns
19 Obstacle Negotiation with Cones
32 MST Visual: Shift Around the Clock
33 MST Visual: Standing with Altered Base of Support (1)
35 MST Somatosensory: Standing with Altered Base of Support (1)
37 MST Vestibular: Standing with Altered Base of Support (1)
40 MST Somatosensory: Forward Right & Left Step
41 MST Somatosensory: Walking with Altered Base of Support
42 MST Visual: Walking with Altered Base of Support
44 MST Somatosensory: Walking with Altered Vision
47 Musical Spots
48 Fast Feet
49 Line Pass
50 Parachute
51 Parachute Push Pull
53 Emily Post Promenade
54 Waiter's Relay
55 Horseshoes with Altered Base of Support: Semi-Tandem
MST = Multisensory Training
L2

Center for Successful Aging and the Fall Prevention Center of Excellence, 2009
Level 2
Table of Exercises
6
High Challenge:
7 Standing with Altered Base of Support (2)
23 Grapevine / Braiding
24 Semi-Tandem & Tandem Walk
25 Figure 8 Walk
26 Spiral Walk
34 MST Visual: Standing with Altered Base of Support (2)
36 MST Somatosensory: Standing with Altered Base of Support (2)
38 MST Vestibular: Standing with Altered Base of Support (2)
39 MST Somatosensory & Vestibular: Balloon Volleyball
43 MST Vestibular: Walking with Altered Base of Support
45 Circle Soccer
55 Horseshoes with Altered Base of Support: Tandem
MST = Multisensory Training
L2

Center for Successful Aging and the Fall Prevention Center of Excellence, 2009 7
Floor to Standing Transfer
Instructions for Activity:
1) Bring (extend) arm up alongside the
head.
2) Bend the opposite leg at the knee.
3) Roll to side lying position (toward the
extended arm). Bring top arm over and
place the hand on the floor.
4) Push to a side sitting position.
5) Roll onto hands and knees.
6) Push to standing using one of the following methods:
Option A
Crawl to an external support to pull up to standing.
Option B
Half-kneel to standing.
Option C
Hand-walk to standing.
A B C

Center for Successful Aging and the Fall Prevention Center of Excellence, 2009
Balance Basics
The balance activities presented in this section are designed to
improve the older adult’s ability to maintain a more upright and
steady position in space (static balance activities) or to move
the body through space with greater control, speed, and
confidence (dynamic balance).
(Rose, 2005, p. 217)

Center for Successful Aging and the Fall Prevention Center of Excellence, 2009 9
Seated Balance
Functional Benefits:
• Improves postural alignment and stability in seated position.
Instructions for Activity:
• Sit on chair with or without armrests with feet hip-width apart.
• Maintain stability for 30 seconds with eyes open.
• Maintain stability for 30 seconds with eyes closed.
Challenge Level:
Hands on chair = Easiest
Hands on thighs = More Difficult
Arms crossed over chest = Most Difficult
Recommended Room Set-up:
• 1 A or 1 B
Equipment:
• Chair with or without armrests
Safety Guidelines:
• Position near wall for safety (if using balance balls).
Reinforcing Verbal Cues:
• Imagine there is a string connected to the top of
your head that is being pulled toward the ceiling.
• Can you sense that your ears are directly above
your shoulders?
• Can you sense that your shoulders are directly
above your hips?
• Can you feel that you have equal weight on both
sides of your buttocks?
• Can you sense that your ankles are directly
below your knees?
• Can you feel your feet in contact with the
floor?
• Can you feel that the pressure is evenly
distributed under both feet?
# 1 L1

Center for Successful Aging and the Fall Prevention Center of Excellence, 2009 10
Seated Balance with Trunk Leans
Functional Benefits:
• Improves postural alignment and stability in seated position.
• Increases strength and flexibility of the trunk and hip muscles.
• Improves ability to reach in multiple directions.
Instructions for Activity:
• Sit tall on chair with or without armrests with feet hip-width apart.
• If using a ball, hold ball with two hands.
• Perform trunk movements as instructed below.
- Lateral Rotations. With ball, extend arms to each side of rotation.
- Forward & Backward Leans. With ball, extend arms forward.
- Diagonal Forward & Backward Leans. With ball, extend arms so ball
is over or beyond the knee in the direction of lean.
Repetitions:
• 3 repetitions each direction with center stop
• 3 repetitions each direction with no center stop
Recommended Room Set-up:
• 1 A or 1 B
Equipment:
• Chair with or without armrests
• Small exercise ball (optional)
Safety Guidelines:
• Position near wall for safety (if using balance balls).
Reinforcing Verbal Cues:
• Sit tall with the feet flat on the floor before beginning
each trunk movement. Keep hips directed forward.
• Perform exercise slowly.
• Keep eyes directed forward & fixed on a vertical target
at eye level.
• Perform each movement through as complete a range
of motion as possible while maintaining balance.
• Maintain an extended upper body position throughout
the rotation or lean.
• Breathe evenly throughout exercise.
Rotation:
• As you turn trunk to the right, be aware of the weight
remaining on the left side
Forward and Backward:
• Can you feel more tension in the thighs as you lean
forward, and less as you lean backward?
Diagonal:
• Bring the nose over the knee as you lean the trunk
forward and on the diagonal.
# 2 L1

Center for Successful Aging and the Fall Prevention Center of Excellence, 2009 11
Seated Balance with Leg Movements (1)
Functional Benefits:
• Improves postural alignment and stability in seated position.
• Improves strength of muscles of the trunk, legs, and feet.
Instructions for Activity:
• Sit tall on chair with or without armrests with feet hip-width apart.
• Perform leg movements as instructed below.
- Heel Lifts
- Toe Lifts
- Combination Heel and Toe Lifts
- Ankle Circles (heel in contact with floor).
Repetitions:
• 10 repetitions each of the following sequences.
– Simultaneous
– Alternating
– Double and single on verbal commands
Recommended Room Set-up:
• 1 A or 1 B
Equipment:
• Chair with or without armrests
Safety Guidelines:
• Position near wall for safety (if using balance balls).
• Modify hand position to maximize stability on more difficult progressions.
(See Exercise #1)
Reinforcing Verbal Cues:
• Keep your body tall and your gaze
focused forward on a vertical target.
Heel Lifts
• Weight should shift to the balls of the
feet as the heels leave the floor.
Toe Lifts
• Weight should shift to the heels of the
feet as the toes lift up from the floor.
Combination Lifts
• For combination heel and toe lifts:
Weight should first shift to the ball of the
feet as the heels leave the floor and
then back to the heels as the toes are
lifted off the floor.
Ankle Circles
• Keep heel in contact with the floor.
# 3 L1

Center for Successful Aging and the Fall Prevention Center of Excellence, 2009 12
Seated Balance with Leg Movements (2)
Functional Benefits:
• Improves postural alignment and stability in seated position.
• Improves strength of muscles of the trunk, legs, and feet.
Instructions for Activity:
• Sit tall on the chair.
• Perform leg movements as instructed below.
1) Seated Marches (vary height of marches)
2) Single Leg Extensions
Repetitions:
• 10 repetitions each leg for each exercise
Recommended Room Set-up:
• 1 A or 1 B
Equipment:
• Chair with or without armrests
Safety Guidelines:
• Modify hand position to maximize stability on more difficult
progressions. (See Exercise #1)
• Do not introduce next progression until previous one can be
performed without imbalance.
• Position near wall for safety (if using balance balls).
Reinforcing Verbal Cues:
• Keep your body tall and direct your
gaze forward.
• Shift weight through the hip to the
opposite side before lifting the leg.
Challenge Level:
• Require a more difficult starting arm
position.
• Increase the number of repetitions of
each exercise.
• Increase or decrease the speed at
which the exercise must be
performed.
# 4 L1

Center for Successful Aging and the Fall Prevention Center of Excellence, 2009 13
Instructions for Activity:
Chair Transfers Inside Circle
• Arrange chairs in a circle (chairs facing the center of the circle), one
chair per participant, with one additional chair.
- Level 1 participants move one at a time. When the first
participant sits, the second participant will begin the transfer.
- Moving in a clockwise direction, each participant moves to the
next chair.
- Repeat until participants return to their starting chair.
- Repeat in counter-clockwise direction.
Chair Transfers Outside Circle (Level 2 only)
• Arrange chairs in a circle (chairs facing out from the center of the
circle), one chair per participant.
- Moving in a clockwise direction, each participant moves to the
next chair.
- Repeat until participants return to their starting chair.
- Repeat in counter-clockwise direction.
- Increase challenge by adding music. Participants will sit down
when the music stops (musical chairs).
Equipment:
• Chairs
• Music (optional for Level 2)
Safety Guidelines:
• Position near wall for safety (if using balance balls).
Reinforcing Verbal Cues:
• Stand tall with your head
erect and your ears
directly above your
shoulders after rising
from chair.
• Focus your eyes on a
vertical target directly in
front of you.
• Be sure you can feel the
chair with your legs
before you sit down.
Inside
Circle
Outside Circle
Chair Transfers # 5 L1 participants should perform
while holding onto assistive device.
L1 L2

Center for Successful Aging and the Fall Prevention Center of Excellence, 2009
L1 participants should perform
while holding onto assistive device.
Standing with Altered Base of Support (1)
14
Reinforcing Verbal Cues:
• Stand tall and imagine that the top of the head is being pulled
toward the ceiling by a string.
• Keep the eyes directed forward and focused on a vertical target at
eye level.
Split Stance
• Shift weight forward through the hips as you bring the foot forward.
Challenge Levels (for participants not in need of assistive device):
Hand on chair = Easiest
Arms at the side = More Difficult
Arms crossed over chest = Most Difficult
# 6
1. Feet together
(Heels and toes together.)
Functional Benefits:
• Increases stability when standing in reduced or altered base of support.
• Improves body awareness and control in standing position.
Instructions for Activity:
• Stand with feet hip-width apart, ears directly above the shoulders and shoulders directly above the hips.
1) Feet Together
• Move feet together so that the heels and toes are touching
if possible. Hold position for 15 seconds with eyes open.
2) Split Stance
• Bring left foot directly forward so that the left heel is even
with the toes of the right foot.
• Shift weight in forward direction until hips are between the
heel of the front foot and the toes of the rear foot. Hold
position for 15 seconds with eyes open.
• Repeat standing exercise with opposite foot forward.
• Increase the hold by 5 seconds (as stability improves) to a
maximum of 30 seconds.
Safety Guidelines:
• Position near wall for safety.
• L1 participants should perform while holding onto assistive
device
• L2 participants may hold on to chair for added stability..
• DO NOT PROGRESS to more challenging position until lower
challenge position is mastered successfully.
Recommended Room Set-up:
• 3 a, 3b, or 4
2. Split Stance
(Front heel even with toes of rear foot.)
Equipment:
• Chair
L1 L2

Center for Successful Aging and the Fall Prevention Center of Excellence, 2009
Standing with Altered Base of Support (2)
15
Reinforcing Verbal Cues:
• Stand tall and imagine that the top of the head is being pulled
toward the ceiling by a string.
• Keep the eyes directed forward and focused on a vertical target at
eye level.
• Shift weight forward through the hips as you bring the foot forward.
Challenge Levels (for participants not in need of assistive device):
Hand on chair = Easiest
Arms at the side = More Difficult
Arms crossed over chest = Most Difficult
# 7
Equipment:
• Chair
Functional Benefits:
• Increases stability when standing in reduced or altered base of
support.
• Improves body awareness and control in standing position.
Instructions for Activity:
• Stand tall with ears directly above the shoulders and shoulders directly above the hips.
• Start with feet hip-width apart, arms at sides.
3) Semi-Tandem
• Bring one foot directly ahead of the other with space between
the heel of the front foot and the toes of the back foot.
• Perform with the opposite foot forward.
4) Tandem
• Bring one foot directly ahead of the other so that the heel of
the front foot is touching the toes of the back foot.
• Perform with the opposite foot forward.
Hold each position for 15 seconds. Increase the hold by 5 seconds (as stability improves) to a maximum of 30 seconds..
Safety Guidelines:
• Position near wall for safety.
• L1 participants should perform while holding onto assistive device
• L2 participants may hold on to chair for added stability..
• DO NOT PROGRESS to more challenging position until lower
challenge position is mastered successfully.
Recommended Room Set-up:
• 3 a, 3b or 4
L1 participants should perform
while holding onto assistive device.
3. Semi-Tandem position
(Front foot ahead of the rear foot with small space between feet)
4. Tandem
(Heel of front foot touching toes of back foot)
L1 L2

Center for Successful Aging and the Fall Prevention Center of Excellence, 2009
Shift Around the Clock
16
Functional Benefits:
• Improves body awareness and control in standing position.
Instructions for Activity:
• Begin standing with feet hip-width apart.
• Shift weight to one direction by sliding hips and shoulders to that
direction. Hold for 3 seconds, return to midline.
• Participants lean to various positions on an imaginary clock
face.
• First few repetitions go from:
- 12 to 6 with center stop (forward / backward)
- 3 to 9 with center stop (side to side)
• For later repetitions progress to:
- No stop at center
- Varying directions
- 12 to 3 ; 6 to 9
- 1 to 7; 11 to 5
Repetitions:
• 3-5 repetitions to each direction.
Challenge Levels:.
• Change arm position (see exercise #6)
Recommended Room Set-up:
• 3 a, 3b or 4
Equipment:
• Chair
Safety Guidelines:
• Position near wall for safety.
• Keep heels and toes on floor.
Reinforcing Verbal Cues:
• Imagine there is string connected to the top of your head that
is being pulled toward the ceiling.
• Keep you chin and shoulders level.
• Keep your toes and heels on the floor at al times.
• Remember to lean from your ankles and keep your back
straight.
• Shift weight to one direction by sliding hips and shoulders to
that direction.
• Move the shoulders and hips together.
# 8
12
6
9 3
12
6
9 3
12
6
9 3
12
6
9 3
L1 participants should perform
while holding onto assistive device.
L1 L2

Center for Successful Aging and the Fall Prevention Center of Excellence, 2009
Lateral Weight Shifts with Head Turns
17
Functional Benefits:
• Improves body awareness and control in standing position.
Instructions for Activity:
• Stand with feet hip-width apart.
• Shift weight through hip to one side while turning the head to the
same side. Return the head and hips to midline. Perform weight
shift and head turn to the opposite side.
• Repeat exercise but turn head to opposite side of weight shift.
• Sequence can be progressed to omit the midline stop, turning the
head directly from one side to the other.
Repetitions:
• 5 times for each direction.
Recommended Room Set-up:
• 3 a, 3b or 4
Safety Guidelines:
• Slow down or stop the head movements in the event of dizziness.
• Position near wall for safety.
Reinforcing Verbal Cues:
• Maintain tall posture, but keep knees slightly
flexed throughout weight shifts.
• Focus your eyes on a new vertical target at
eye level each time you turn your head.
• “Slide” the hips as though they were on a tray.
• Keep your shoulders in line with the hips.
# 9
L1 participants should perform
while holding onto
assistive
device.
L1 L2

Center for Successful Aging and the Fall Prevention Center of Excellence, 2009
Forward Right & Left Step
18
Functional Benefits:
• Increases lower body muscle strength.
• Improves agility during stepping and walking.
Instructions for Activity:
• Stand with feet hip-width apart.
• Place spots as depicted in photo.
• Shift weight onto left foot and step forward with right foot,
bending the knee as the right foot contacts the floor.
• Shift weight back through the left hip and step backwards with
the right foot.
• Move the spot ahead of the left foot. And perform stepping
sequence with the left leg stepping forward.
Repetitions:
• Repeat 5 times with each leading leg..
Challenge Levels:
• Change arm position.
• Increase distance of spot.
• Replace forward spot with Dyna Discs® (Level 2 only).
Safety Guidelines:
• Position near wall for safety.
Recommended Room Set-up:
• Level 1: 3 a, 3b or 4
• Level 2: 2, 3a, 3b or 4
Reinforcing Verbal Cues:
• Stand tall with shoulders level,
and chin parallel to floor.
• Shift weight through hip to
opposite side BEFORE stepping
forward or backward.
• Shift weight forward through the
hips as the foot steps forward.
• Shift weight backward through the
hips as the foot step back.
• Focus your eyes on a vertical
target at eye level.
# 10
Equipment:
• Chair
• Spots (optional)
• Dyna Discs® (optional)
L1 participants should perform
while holding onto
assistive
device.
L1 L2
Center for Successful Aging and the Fall Prevention Center of Excellence, 2009
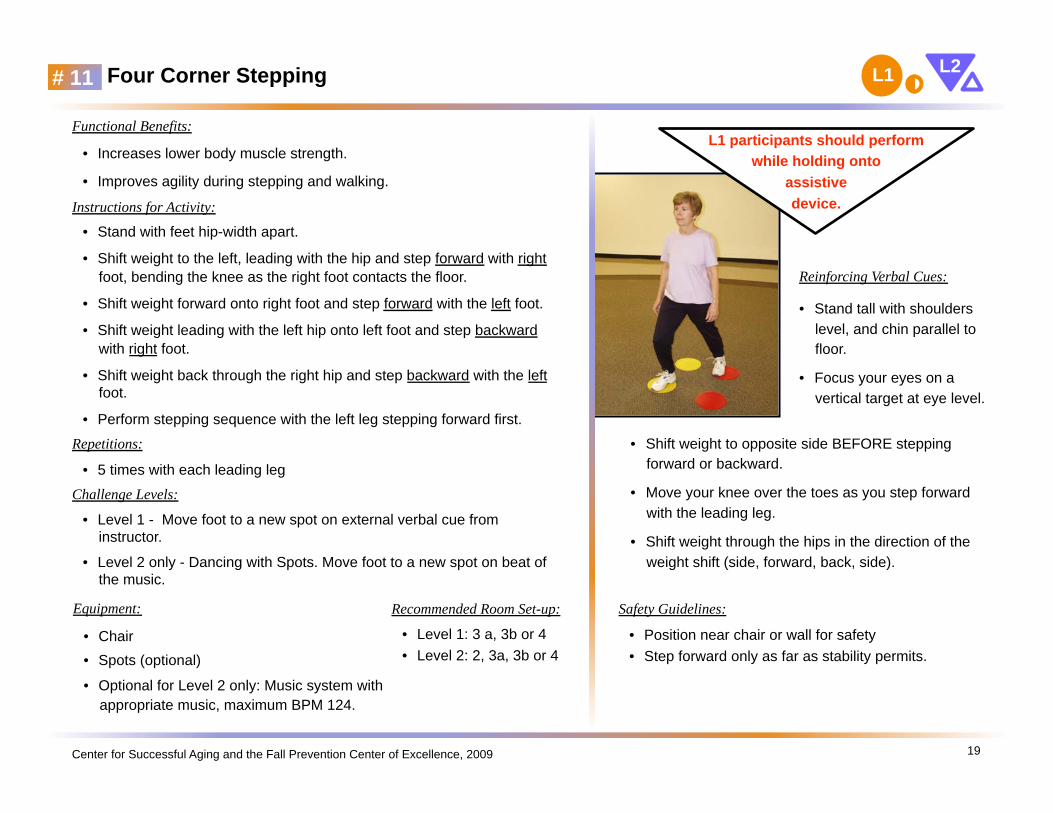
Four Corner Stepping
19
Reinforcing Verbal Cues:
• Stand tall with shoulders
level, and chin parallel to
floor.
• Focus your eyes on a
vertical target at eye level.
Functional Benefits:
• Increases lower body muscle strength.
• Improves agility during stepping and walking.
Instructions for Activity:
• Stand with feet hip-width apart.
• Shift weight to the left, leading with the hip and step forward with right
foot, bending the knee as the right foot contacts the floor.
• Shift weight forward onto right foot and step forward with the left foot.
• Shift weight leading with the left hip onto left foot and step backward
with right foot.
• Shift weight back through the right hip and step backward with the left
foot.
• Perform stepping sequence with the left leg stepping forward first.
Repetitions:
• 5 times with each leading leg
Challenge Levels:
• Level 1 - Move foot to a new spot on external verbal cue from
instructor.
• Level 2 only - Dancing with Spots. Move foot to a new spot on beat of
the music.
# 11
Recommended Room Set-up:
• Level 1: 3 a, 3b or 4
• Level 2: 2, 3a, 3b or 4
Equipment:
• Chair
• Spots (optional)
• Optional for Level 2 only: Music system with
appropriate music, maximum BPM 124.
Safety Guidelines:
• Position near chair or wall for safety
• Step forward only as far as stability permits.
• Shift weight to opposite side BEFORE stepping
forward or backward.
• Move your knee over the toes as you step forward
with the leading leg.
• Shift weight through the hips in the direction of the
weight shift (side, forward, back, side).
L1 participants should perform
while holding onto
assistive
device.
L1 L2

Center for Successful Aging and the Fall Prevention Center of Excellence, 2009 20
Foot Drawing # 12
Functional Benefits:
• Increases lower body muscle strength.
• Improves agility during stepping and walking.
Instructions for Activity:
• Stand with feet hip-width apart.
• Shift weight to one side (stance leg), leading with the hip. Using
the opposite foot, draw the following:
Circle
Square
Triangle
Write name
• Perform using the other side as the stance leg.
Repetitions:
• 2 times with each pattern, with each leg
Recommended Room Set-up:
• 3a, 3b, or 4
Equipment:
• Chair
Safety Guidelines:
• Position near chair or wall for safety.
Reinforcing Verbal Cues:
• Stand tall with shoulders level, and chin parallel
to floor.
• Focus your eyes on a vertical target at eye level.
• Slide your hips sideways so that your weight is
on the supporting leg.
• Be sure to maintain slightly flexed knee on
supporting leg.
• Keep your shoulders in line with the hips.
L2

Center for Successful Aging and the Fall Prevention Center of Excellence, 2009 21
Ball Rolls # 13
Functional Benefits:
• Increases lower body muscle strength.
• Improves weight shift abilities.
Instructions for Activity:
• Stand with feet hip-width apart.
• Shift weight to one side (stance leg), leading with the hip. Place
the opposite foot on top of the ball.
• Move the ball with the foot in the directions instructed below:
Forward and back
Side to side
Circle clockwise
Circle counter-clockwise
• Perform using the other side as the stance leg.
Repetitions:
• 2 times each direction, each leading leg.
Recommended Room Set-up:
• 3a, 3b, or 4
Equipment:
• Chair
• Small non-weighted exercise ball
Safety Guidelines:
• Position near chair or wall for safety.
• Instruct participants to hold onto chair while placing ball for
added stability
Reinforcing Verbal Cues:
• Stand tall with shoulders level, and chin
parallel to floor.
• Focus your eyes on a vertical target at eye
level.
• Slide your hips sideways so that your
weight moves over the supporting leg.
• Be sure to maintain slightly flexed knee on
supporting leg.
• Keep your shoulders in line with the hips.
L2

Center for Successful Aging and the Fall Prevention Center of Excellence, 2009 22
Creek Crossing
Functional Benefits:
• Improves ability to increase stride length during walking.
• Increases lower body strength and ability to step over
obstacles.
• Improves trunk stability during dynamic activities.
Instructions for Activity:
• Begin by standing behind the first line of tape (representing
the banks of a creek) at the narrowly spaced end.
• Step across the second line of tape with one leg, followed by
the other leg. Turn and return to the starting side, leading with
the opposite leg.
• Repeat the stepping activity, moving further down the “creek”
with each step.
• Try not to get your feet “wet”.
Repetitions:
• 1-2 times down the length of “creek”
Safety Guidelines:
• Step only as far as stability permits.
Recommended Room Set-up:
• 9
Equipment:
• Masking tape (color should provide sharp contrast to floor)
Reinforcing Verbal Cues:
• Stand tall with shoulders level, and chin parallel
to floor.
• Focus your eyes on a vertical target at eye level.
• Keep the shoulders and hips facing forward as
you step across the “creek”.
• Lead with the hips, not the nose.
• Slightly flex the knees on each landing.
# 14 L2

Fancy Footwork
The activities presented in this section are designed to improve
overall coordination and agility through activities that require
walking at different speeds using a variety of gait patterns.
(Rose, 2005, p. 224)

Center for Successful Aging and the Fall Prevention Center of Excellence, 2009 24
Walk with Directional Changes & Abrupt Stops
Functional Benefits:
• Improves ability to turn while moving (turning at a street corner, at the
end of the market aisle, or maneuvering through crowds).
Instructions for Activity:
Stop and Go
• Participants will walk across or around the room making abrupt stops
and starts on instructor’s command (i.e., “Red Light, Green Light”).
Directional Changes
• While walking, participants will change direction on instructor’s
command. Ask participants to make:
- Turns
- Turns
- Full Turns
Repetitions:
• 2 times across room for each type of turn
Recommended Room Set-up:
• 7 (waves)
Equipment:
• None
Safety Guidelines:
• Position near wall for safety
• Check and modify for dizziness
Reinforcing Verbal Cues:
• (Before beginning the activity)
Find a new vertical target with each turn.
• Walk tall with your head erect and your ears
directly above your shoulders.
• Focus your eyes on a target directly in front
of you and walk directly toward it.
• Widen your base of support when you stop
quickly.
# 15
L1 participants should perform
while holding onto
assistive
device.
L1 L2

Center for Successful Aging and the Fall Prevention Center of Excellence, 2009 25
Functional Benefits:
• Helps develop a more flexible gait pattern.
• Improves stability during dynamic activities.
Instructions for Activity:
Have participants walk across the room using a:
• Narrow step
• Wide step
• Combined narrow and wide step
(8 steps narrow, 8 steps wide). Increase or decrease the number
of steps using each gait pattern to match abilities of the
participants.
• Step-to walk.
- Participants take a long step with the right leg and then a short
step with the trailing left leg so that the feet are even. Lead with
the right leg each time.
- Repeat with the left leg leading.
• Forward toe walking
Repetitions:
• Once /twice length of room for each step pattern
Recommended Room Set-up:
• 7
Equipment:
• None
Safety Guidelines:
• Position near wall for safety
Reinforcing Verbal Cues:
• Keep your body as tall as
possible with your chin
parallel to the floor and
ears directly above the
shoulders.
• Keep your eyes focused
forward on a vertical
target at eye level.
• Feel the heel make
contact with the floor first
followed by pressure
moving toward the toes
as you push off from
floor (unless toe
walking).
# 16 Walk with Altered Base of Support L2

Center for Successful Aging and the Fall Prevention Center of Excellence, 2009
Walk with Head Turns
26
Functional Benefits:
• Improves stability during dynamic activities.
• Improves ability to turn the head while moving, i.e., checking for traffic
while crossing street, walking through the market aisle, or turning to talk
to someone while walking.
Instructions for Activity:
Instructor uses verbal commands for head turns while participants are
walking across the room, i.e., “Turn head right, center, left.”
Issue commands to pace each activity based on participant abilities.
Walking with Head Turns
– Right … Center… Left (brief pause at midline)
– Right… Left (no midline pause)
Walking with Vertical Head Movements
– Up… Center… Down
– Up… Down (no center stop)
Safety Guidelines:
• Instruct participants to walk at a comfortable pace.
• Increase the number of counts if more supervision is needed.
Recommended Room Set-up:
• 7
Equipment:
• None
Reinforcing Verbal Cues:
• (Before beginning the activity)
Find a new vertical target with each
head turn.
• Maintain “tall” posture as you walk.
• Keep your eyes focused forward on a
vertical target at eye level.
# 17 L2

Center for Successful Aging and the Fall Prevention Center of Excellence, 2009 27
Walk Through Cones
Functional Benefits:
• Improves ability to turn during dynamic activities
(turning at a street corner, at the end of the
market aisle, maneuvering through crowds).
Instructions for Activity:
• Place the cones across the room so that they
form an “S” shape pattern.
• Instruct the participants to walk towards a cone
and then turn around the cone to head back in
the opposite directions.
• Remind the participants to anticipate reaching
the cone and plan ahead to negotiate the cone.
• As the participants complete a turn around a
cone, they should focus on a new vertical target
Equipment:
• Cones
Safety Guidelines:
• Position near walls for safety
Reinforcing Verbal Cues:
• Walk tall with your head erect and your ears directly
above your shoulders.
• Focus your eyes on a target in front of you and walk
directly toward it.
• Find a new vertical target with each turn.
• Widen your base of support if you stop quickly.
• Anticipate the next cone.
# 18 L1 participants should perform
while holding onto assistive device.
L1 L2

Center for Successful Aging and the Fall Prevention Center of Excellence, 2009 28
Functional Benefits:
• Improves ability to turn during dynamic activities (turning at
a street corner, at the end of the market aisle, maneuvering
through crowds).
Instructions for Activity:
Zig-Zag Course:
• Have participants negotiate a walking course comprised of
8 to 10 cones set at different distances apart.
• Begin with the cones approximately 5 to 10 feet apart and
at a 45 degree angle to each other.
• Gradually reduce the distance between the cones so that
the turning radius is reduced. Encourage participants to
look forward to the next cone and try and maintain a
consistent cadence (speed) and stride length as they move
through the course.
Slalom Walking Course:
• Place the cones in a straight line approximately 5 feet apart
and have each participant move through the course while
maintaining the same cadence and stride length.
Equipment:
• Cones
Safety Guidelines:
• Position near wall for safety
Reinforcing Verbal Cues:
• Walk tall with your head erect and your
ears directly above your shoulders.
• Focus your eyes on a target in front of
you and walk directly toward it.
• Find a new vertical target with each turn.
• Widen your base of support if you stop
quickly.
• Anticipant the next cone.
# 19 Obstacle Negotiation with Cones
Zig-zag
Course
Slalom
Course
L1 participants should perform
while holding onto assistive device.
L1 L2

Center for Successful Aging and the Fall Prevention Center of Excellence, 2009 29
Variation Course
Functional Benefits:
• Helps develop a more flexible gait pattern.
• Improves stability during dynamic activities.
Instructions for Activity:
• Place cones in each corner of the room. The
participant will use a different walking pattern for
each length of the room.
• Across the room (place masking tape on the
floor)
- Wide to narrow walk
• Down the room
- Step-to walk leading with the right leg
• Across the room – Toe walk
• Down the room – Step-to walk leading with the
left leg
Recommended Room Set-up:
• Use perimeter of room
Equipment:
• Cones
Safety Guidelines:
• Position near walls for safety
Reinforcing Verbal Cues:
• Walk tall with your head erect and your ears directly above your
shoulders.
• Focus your eyes on a target directly in front of you and walk
directly toward it.
• Find a new vertical target with each turn.
• Widen your base of support when you stop quickly.
Step-together leading with right leg
Step-together leading with left leg
Wide
to Narrow
Toe
Walking
L1 participants should perform
while holding onto assistive device.
# 20 L1 L2

Center for Successful Aging and the Fall Prevention Center of Excellence, 2009 30
Mambo Steps
Functional Benefits:
• Increases lower body strength.
• Improves coordination.
Instructions for Activity:
Begin with feet hip-width apart.
Mambo Left:
(1) Bring left foot forward in front of right, shifting weight
onto forward leg.
(2) Step in place with the right foot, shifting weight onto right leg.
(3) Return left foot to starting position.
Mambo Right:
(1) Bring right foot forward in front of left, shifting weight onto forward leg.
(2) Step in place with the left foot, shifting weight onto
left leg.
(3) Return right foot to starting position.
Combination Mambo:
(1) One Mambo Right
(2) One Mambo Left
Repetitions:
• 4 times each Mambo Right and Mambo Left
• 2 times Combination Mambo Step
As practice progresses, hip rotation with forward step can be
increased.
Recommended Room Set-up:
• 2, 3a, or 3b
Equipment:
• None
Reinforcing Verbal Cues:
• Focus your eyes forward on a vertical target at eye level.
• Step forward only as far as stability permits.
• Bend the knee on landing.
• Don’t forget to breathe.
1
2
3
1
2
3
# 21 L1 participants should perform while
holding onto assistive device.
L1 participants will bring leading foot directly
forward instead of to midline as illustrated below.
L1 L2

Center for Successful Aging and the Fall Prevention Center of Excellence, 2009
L1 participants should perform
while holding onto assistive device.
Side step
31
# 22
Functional Benefits:
• Increases strength of hip and thigh muscles.
• Improves agility for lateral stepping activities such as getting to
a seat in the theatre, or squeezing through a tight space.
• Improves lateral stability and lowers risk for sideways falls.
Instructions for Activity:
• Step sideways in one direction a certain number of steps.
• Repeat to the opposite direction.
Increase or decrease the number of steps to match abilities of the
participants.
Level 1 participants will perform single side steps using their
assistive device.
Repetitions:
• 4-8 times each direction
Recommended Room Set-up:
• 7
Equipment:
None
Safety Guidelines:
Position near walls for safety.
Reinforcing Verbal Cues:
• Focus your eyes on a vertical target at eye level.
• Keep your hips and shoulders facing forward.
L1 L2

Center for Successful Aging and the Fall Prevention Center of Excellence, 2009
Grapevine / Braiding
32
Functional Benefits:
• Increases strength of hip and thigh muscles.
• Improves agility for lateral stepping activities such as getting to a seat in
the theatre, or squeezing through a tight space.
• Improves lateral stability and lowers risk for sideways falls.
Instructions for Activity:
a) Grapevine / Half-Braid
• Step sideways to the right and move the left foot directly behind the right
foot (midline). Repeat 1 time. To end the sequence, step again to the right
and tap the left foot next to the right. Repeat in the opposite direction.
• Perform same sequence by moving the trailing foot directly in front
(midline) of the leading leg (but not beyond leading leg).
As ability increases, more repeat steps can be added.
b) Full Braid
• Alternate one of each, moving the trailing foot in front of, and then behind
the leading leg
Recommended Room Set-up:
• 7
Safety Guidelines:
• Begin by moving ONLY to midline.
• Discontinue activity if there is discomfort in the hip region.
Reinforcing Verbal Cues:
• Keep your hips and
shoulders aligned and
facing forward.
• Focus your eyes forward on
a vertical target at eye level.
• Flex knees slightly as
trailing leg reaches midline
position.
# 23 L2

Center for Successful Aging and the Fall Prevention Center of Excellence, 2009 33
Semi-Tandem & Tandem Walk
Functional Benefits:
• Increases lateral stability when moving forward.
• Improves ability to walk between narrow spaces.
• Improves body awareness during dynamic activities.
Instructions for Activity:
Start with one foot at the beginning end of a masking tape line.
a) Semi-Tandem
- Begin walking along the tape line by placing one foot directly
ahead of the other with space between the heel of the front foot
and the toes of the back foot. Continue walking to end of tape.
b) Tandem
- Begin walking along the tape line by placing one foot directly in
front of the other so that the heel of the front foot is touching the
toes of the back foot. Continue walking to end of tape.
Safety Guidelines:
• Position participants near wall for added safety
Recommended Room Set-up:
• 7
Equipment:
• Masking tape (optional)
• Chairs, if needed for stability
Reinforcing Verbal Cues:
• Focus your eyes
forward on a vertical
target at eye level.
• Keep shoulders and
hips level.
• Make sure the hips
move forward with
each step.
# 24 L2

Center for Successful Aging and the Fall Prevention Center of Excellence, 2009
Figure 8 Walk
34
Functional Benefit:
• Improves ability to turn during dynamic activities (turning at a
street corner, at the end of the market aisle, or maneuvering
through crowds).
Instructions for Activity:
• Walk at a comfortable speed in a direction that creates the
shape of the number 8.
Repetitions:
• 2 times in each direction.
Recommended Room Set-up:
• 11
Equipment:
• Small plastic traffic cones
Safety Guidelines:
• Walk close to a wall if support is needed.
• Stop activity if participant becomes dizzy.
Reinforcing Verbal Cues:
• Keep your body tall with shoulders level, and
chin parallel to floor.
• Focus your eyes forward on a vertical target
at eye level as you complete the Figure 8.
• Try to walk smoothly and continuously.
8
# 25 L2

Center for Successful Aging and the Fall Prevention Center of Excellence, 2009
Spiral Walk
35
Functional Benefit:
• Improves ability to turn while moving, i.e., turning at a street corner, at the end
of the market aisle, or maneuvering through crowds.
Instructions for Activity:.
• Create a gradually decreasing spiral pattern as you walk in smaller and smaller
circles on each revolution.
• Pause in the center, and then walk out in a gradually increasing spiral pattern to
return to the starting point.
• Perform in the opposite direction.
Repetitions:
• 2 times in each direction.
Recommended Room Set-up:
• 11
Equipment:
• None
Safety Guidelines:
• Allow ample space between participants.
• Decrease size of circles as stability permits. Start with wide spiral pattern (more
steps) and progress to tighter spiral (fewer steps) after practice.
• Stop activity if participant becomes dizzy.
Reinforcing Verbal Cues:
• Keep your body tall with shoulders
level, and chin parallel to floor.
• Focus your eyes on a new vertical
target at eye level during each
revolution of the spiral.
# 26 L2

Fine Tuning the Senses
The activities presented in this section are designed to
optimize the use of each of the three sensory systems
that contribute to balance (visual, somatosensory, and
vestibular systems).
(Rose, 2005, p. 219)

Center for Successful Aging and the Fall Prevention Center of Excellence, 2009 37
Multisensory Training: Visual (Seated Trunk Movements)
Reinforcing Verbal Cues:
• Sit tall with the feet flat on the floor.
• Perform exercise slowly, through as
complete a range of motion as possible
while maintaining balance.
• Maintain an extended upper body position
throughout activity.
• Keep eyes directed forward on a vertical
target at eye level.
• Select a new vertical target when
changing direction of rotation and
diagonal lean.
• Feet on compliant surface.
• Eyes open.
# 27
Safety Guidelines:
• Advise participants to sit down carefully
onto the Dyna-Disc™
• Instruct participants to hold on to chair
while instructor places foam under feet.
Functional Benefits:
• Improves ability to maintain balance by using visual inputs more
effectively.
Instructions for Activity:
• Sit tall on chair with or without armrests with a Dyna-Disc™ or pillow
on the seat. Position feet hip-width apart.
• Place foam pad under feet of each participant.
• If using a ball, hold ball with two hands.
• Perform trunk movements as instructed below.
- Lateral Rotations. (With ball, extend arms to each side of rotation.)
- Forward & Backward Leans. (With ball, extend arms forward.)
- Diagonal Forward & Backward Leans. (With ball, extend arms so
ball is over the knee in the direction of lean.)
Repetitions:
• 3 repetitions each direction with center stop
• 3 repetitions each direction with no center stop
Recommended Room Set-up:
• 1a or 1b
Equipment:
• Chair with or without armrests
• Dyna-Disc™ or pillow
• Small exercise ball (optional)
• Airex™ or foam pad
L1

Center for Successful Aging and the Fall Prevention Center of Excellence, 2009 38
Multisensory Training: Somatosensory (Seated Trunk Movements)
Reinforcing Verbal Cues:
• Sit tall with the feet flat on the floor.
• Perform exercise slowly, through as complete a range of motion
as possible while maintaining balance.
• Maintain an extended upper body position throughout activity.
Rotation:
• Feel the pressure increase under the foot on the side opposite
to the trunk rotation.
• Feel the tension increase in the leg on the side opposite to the
rotation.
Forward and Backward Lean
• Feel the pressure increase under the front of both feet as you
lean forward.
• Feel the pressure move to the heels as you lean backward.
• Feel the tension change in your thighs as you lean forward and
then backward.
Diagonal Forward and Backward Lean
• Feel the pressure increase under the foot and in the leg of the
side to which you lean.
• Feel the pressure move to the heel as you lean backward.
• Feel the tension in your thigh increase as you move the trunk forward over the leg, and decrease as you move the trunk
backward.
• Feet on firm surface.
• Vision reduced, or removed.
# 28
Functional Benefits:
• Improves ability to maintain balance by using somatosensory
inputs more effectively.
• Increases stability in environments of reduced or absent lighting
(darkened room, movie theater, getting up at night).
Instructions for Activity:
• Sit tall on chair with or without armrests with feet hip-width apart.
• Change vision by wearing sunglasses or closing eyes.
(Open eyes before progressing to the next sequence.)
• If using a ball, hold ball with two hands.
• Perform trunk movements as instructed below.
- Lateral Rotations. (With ball, extend arms to each side of
rotation.)
- Forward & Backward Leans. (With ball, extend arms
forward.)
- Diagonal Forward & Backward Leans. (With ball, extend
arms so ball is over the knee in the direction of lean.)
Repetitions:
• 3 repetitions each direction with center stop
• 3 repetitions each direction with no center stop
Recommended Room Set-up:
• 1a or 1b
Equipment:
• Chair with or without armrests
• Small exercise ball (optional)
• Sunglasses
L1

Center for Successful Aging and the Fall Prevention Center of Excellence, 2009 39
Multisensory Training: Vestibular (Seated Trunk Movements)
Reinforcing Verbal Cues:
• Sit tall with the feet flat on the floor.
• Perform exercise slowly, through as
complete a range of motion as possible
while maintaining balance.
• Maintain an extended upper body
position throughout activity.
• Feet on compliant surface.
• Vision reduced, or removed.
# 29
Repetitions:
• 3 repetitions each direction with center stop
• 3 repetitions each direction with no center stop
Recommended Room Set-up:
• 1a or 1b
Safety Guidelines:
• Advise participants to sit down
slowly on Dyna-Disc™
• Instruct participants to hold to
chair while instructor places
foam under feet.
• Participants must open eyes if
dizzy, or if experiencing
extreme instability.
Equipment:
• Chair with or without armrests
• Dyna-Disc™ or pillow
• Small exercise ball (optional)
• Airex™ or foam pad
• Sunglasses
Functional Benefits:
• Improves ability to maintain balance by using vestibular inputs more effectively.
• Increases stability in environments of reduced or absent lighting, and soft flooring
(carpet, lawn, sand).
Instructions for Activity:
• Sit tall on chair with or without armrests with a Dyna-Disc™ or pillow on seat.
• Position feet hip-width apart.
• Place foam pad under feet
• Change vision by wearing sunglasses or closing eyes. (Open eyes before
progressing to the next sequence.)
• If using a ball, hold ball with two hands.
• Perform trunk movements as instructed below.
- Lateral Rotations. (With ball, extend arms to each side of rotation.)
- Forward & Backward Leans. (With ball, extend arms forward.)
- Diagonal Forward & Backward Leans. (With ball, extend arms so ball is over
the knee in the direction of lean.)
L1

Center for Successful Aging and the Fall Prevention Center of Excellence, 2009 40
Multisensory Training: Somatosensory (Pass the Potato)
Functional Benefits:
• Improves ability to maintain balance by using somatosensory
inputs more effectively.
• Increases stability in environments of reduced or absent lighting
(darkened room, movie theater, getting up at night).
• Increases stability in busy visual environments.
Instructions for Activity:
• Sit tall on chair with or without armrests with feet hip-width apart.
• Using both hands, pass the ball or balloon to next person. Use
both hands to receive object. Perform the following in both a
clockwise and counter-clockwise direction:
- Waist level pass
- High pass
- Low pass
Challenge Level
• Increase the pacing (Hot Potato)
Repetitions:
• 4 times in each direction for each passing method.
Recommended Room Set-up:
• 6c
Equipment:
• Chair
• Small ball or balloon
Reinforcing Verbal Cues:
• Sit tall on your chair or ball.
• Keep your feet apart and flat on the floor.
• Turn from the waist to pass the ball.
# 30
Safety Guidelines:
• Participants must keep both feet on the floor.
• Provide assistance to anyone with limited range of motion.
L1

Center for Successful Aging and the Fall Prevention Center of Excellence, 2009 41
Reinforcing Verbal Cues:
• Imagine there is a string connected to the top of your head that is
being pulled toward the ceiling.
• Can you feel more pressure under the front of the feet as you shift
forward?
• Can you feel the pressure move to the heels as you shift backward?
• Does the pressure increase under your right foot as you shift to the
right?
• Does the pressure increase under your left foot as you shift to the left?
When you return to the center:
• Can you feel your weight evenly distributed across both feet?
• Can you sense that your shoulders, hips and ankles are aligned?
Multisensory Training: Somatosensory
(Shift Around the Clock)
Functional Benefits:
• Improves ability to maintain balance by using
somatosensory inputs more effectively.
• Increases stability in environments of reduced or
absent lighting (darkened room, movie theater, getting
up at night).
Instructions for Activity:
• Begin standing with feet hip-width apart.
• Change vision by wearing sunglasses or closing
eyes.
• Shift weight to one direction by sliding hips and
shoulders to that direction. Hold for 3 seconds, return
to midline.
• Participants lean to various positions on an imaginary
clock face (See exercise #8).
Repetitions:
• 3 repetitions to each direction with midline stop.
• 3 repetitions to each direction with no midline stop.
Challenge Levels:.
• Change arm position (see exercise #6).
Recommended Room Set-up:
• 3 a, 3b or 4
Equipment:
• Chair
Safety Guidelines:
• Position near wall for safety.
• Keep heels and toes on floor.
# 31 L1 is performed in one-to-one setting only.
• Feet on firm surface.
• Vision reduced, or removed.
12
6
9 3
12
6
9 3
12
6
9 3
12
6
9 3
L1 L2

Center for Successful Aging and the Fall Prevention Center of Excellence, 2009 42
Reinforcing Verbal Cues:
• Imagine there is string connected to the top of your
head that is being pulled toward the ceiling.
• Keep your eyes directed forward at a vertical
target that is eye-level.
Multisensory Training: Visual
(Shift Around the Clock)
Functional Benefits:
• Improves ability to maintain balance by using visual inputs
more effectively.
• Increases stability when standing on soft surfaces (lawn,
sand, thick carpet).
Instructions for Activity:
• Stand on foam pad with feet hip-width apart.
• Keep eyes open.
• Shift weight to one direction by sliding hips and shoulders to
that direction. Hold for 3 seconds, return to midline.
• Participants lean to various positions on an imaginary clock
face (See exercise #8).
Repetitions:
• 3-5 repetitions to each direction.
Challenge Levels:.
• Change arm position (see exercise #8).
Recommended Room Set-up:
• 3 a, 3b or 4
Equipment:
• Chair
Safety Guidelines:
• Position near wall for safety.
• Instruct participant to hold onto chair while stepping up onto
the foam pad.
• L1 participants should perform while holding onto chair or
assistive device in one-to-one setting.
# 32
• Eyes open.
• Feet on compliant surface.
12
6
9 3
12
6
9 3
12
6
9 3
12
6
9 3
L1 is performed in one-to-one setting only.
L1 L2

Center for Successful Aging and the Fall Prevention Center of Excellence, 2009 43
Multisensory Training: Visual (Standing with Altered Base of Support - 1)
# 33
1. Feet together
Functional Benefits:
• Improves ability to maintain balance by using visual inputs more
effectively.
• Increases stability when standing on soft surfaces (lawn, sand,
thick carpet).
Instructions for Activity:
Stand on foam pad with feet hip-width apart.
1) Feet Together
• Move feet together so that the heels and toes are touching if
possible. Hold position for 15 seconds with eyes open.
2) Split Stance
• Bring left foot directly forward so that the left heel is even
with the toes of the right foot.
• Shift weight in forward direction until hips are halfway
between the heel of the front foot and the toes of the rear
foot. Hold position for 15 seconds with eyes open.
• Repeat standing exercise with opposite foot forward.
• Increase the hold by 5 seconds (as stability improves) to a
maximum of 30 seconds.
As stability improves, increase the challenge level of the arm
position (see exercise #6)
Recommended Room Set-up:
• 3 a, 3b or 4
Equipment:
• Chair
• Airex™ or foam pad
2. Split Stance
Reinforcing Verbal Cues:
• Stand tall with ears, shoulders and hips aligned.
• Keep your eyes on a vertical target directly in front of
you at eye level.
• For split stance: Shift weight forward through the hips as
you bring the foot forward.
Safety Guidelines:
• Position near wall for safety.
• Place chair next to participant.
• Instruct participant to hold onto chair while stepping up onto
the foam pad.
• L1 is more appropriate for one-to-one settings
• DO NOT PROGRESS to more challenging position until lower
challenge position is mastered successfully.
• Feet on compliant surface.
• Eyes open.
L1 is performed in one-to-one setting only.
L1 L2

Center for Successful Aging and the Fall Prevention Center of Excellence, 2009 44
Multisensory Training: Visual (Standing with Altered Base of Support - 2)
# 34
Functional Benefits:
• Improves ability to maintain balance by using visual inputs more
effectively.
• Increases stability when standing on soft surfaces (lawn, sand,
thick carpet).
Instructions for Activity:
Stand on foam pad with feet hip-width apart.
3) Semi-Tandem
• Bring one foot directly ahead of the other with space between
the heel of the front foot and the toes of the back foot.
• Perform with the opposite foot forward.
4) Tandem
• Bring one foot directly ahead of the other so that the heel of
the front foot is touching the toes of the back foot.
• Perform with the opposite foot forward.
As stability improves, increase the challenge level of the arm position (see exercise #6)
Safety Guidelines:
• Position near wall for safety.
• Place chair next to participant.
• Instruct participant to hold onto chair while stepping up onto the
foam pad.
• DO NOT PROGRESS to more challenging position until lower
challenge position is mastered successfully.
Recommended Room Set-up:
• 3 a, 3b or 4
Equipment:
• Chair
• Airex™ or foam pad
Reinforcing Verbal Cues:
• Stand tall with ears, shoulders and hips aligned.
• Keep your eyes on a vertical target directly in
front of you at eye level.
• Shift weight forward through the hips as you bring the
foot forward.
3. Semi-Tandem
4. Tandem
• Feet on compliant surface.
• Eyes open.
L1 is performed in one-to-one setting only.
L1 L2

Center for Successful Aging and the Fall Prevention Center of Excellence, 2009 45
Multisensory Training: Somatosensory (Standing with Altered Base of Support - 1)
# 35
1. Feet together
Functional Benefits:
• Improves ability to maintain balance by using somatosensory
inputs more effectively.
Instructions for Activity:
Stand with feet hip-width apart.
Change vision by wearing sunglasses or closing eyes. (Open
eyes before progressing to the next sequence.)
1) Feet Together
• Move feet together so that the heels and toes are touching if
possible. Hold position for 15 seconds with eyes open.
2) Split Stance
• Bring left foot directly forward so that the left heel is even
with the toes of the right foot.
• Shift weight in forward direction until hips are halfway
between the heel of the front foot and the toes of the rear
foot. Hold position for 15 seconds with eyes open.
• Repeat standing exercise with opposite foot forward.
• Increase the hold by 5 seconds (as stability improves) to a
maximum of 30 seconds.
As stability improves, increase the challenge level of the arm
position (see exercise #6)
Recommended Room Set-up:
• 3 a, 3b or 4
Equipment:
• Chair
• Sunglasses
2. Split Stance
Reinforcing Verbal Cues:
• Stand tall with ears, shoulders and hips aligned.
Feet Together
• Feel your weight evenly distributed across both feet.
Split Stance
• Shift weight forward through the hips as you bring the foot
forward..
• Can you feel pressure from the floor evenly under the front and
the back foot?
• Can you feel equal tension in the front leg and the back leg?
Safety Guidelines:
• Position near wall for safety.
• Place chair next to participant.
• DO NOT PROGRESS to more challenging position until lower
challenge position is mastered successfully.
L1 is performed in one-to-one setting only.
L1 L2

Center for Successful Aging and the Fall Prevention Center of Excellence, 2009 46
Multisensory Training: Somatosensory (Standing with Altered Base of Support - 2)
# 36
Functional Benefits:
• Improves ability to maintain balance by using somatosensory
inputs more effectively.
Instructions for Activity:
Stand with feet hip-width apart.
Change vision by wearing sunglasses or closing eyes.
(Open eyes before progressing to the next sequence.)
3) Semi-Tandem
• Bring one foot directly ahead of the other with space
between the heel of the front foot and the toes of the
back foot.
• Perform with the opposite foot forward.
4) Tandem
• Bring one foot directly ahead of the other so that the heel
of the front foot is touching the toes of the back foot.
• Perform with the opposite foot forward.
As stability improves, increase the challenge level of the arm position (see exercise #6)
Safety Guidelines:
• Position near wall for safety.
• Place chair next to participant.
• DO NOT PROGRESS to more challenging position until lower
challenge position is mastered successfully. Recommended Room Set-up:
• 3 a, 3b or 4
Equipment:
• Chair
• Sunglasses
Reinforcing Verbal Cues:
• Stand tall with ears, shoulders and hips aligned.
• Shift weight forward through the hips as you bring the foot
forward.
• Can you feel pressure from the floor evenly under the front and
the back foot?
• Can you feel equal tension in the front leg and the back leg?
Tandem
• Can you feel the heel of the front foot in contact with the toes
of the back foot?
3. Semi-Tandem
4. Tandem
L1 is performed in one-to-one setting only.
L1 L2

Center for Successful Aging and the Fall Prevention Center of Excellence, 2009 47
Multisensory Training: Vestibular (Standing with Altered Base of Support - 1)
#37
1. Feet together
Functional Benefits:
• Improves ability to maintain balance by using vestibular
inputs more effectively.
Instructions for Activity:
• Stand on foam pad with feet hip-width apart.
• Change vision by wearing sunglasses or closing eyes.
(Open eyes before progressing to the next sequence.)
1) Feet Together
• Move feet together so that the heels and toes are
touching if possible. Hold position for 15 seconds with
eyes open.
2) Split Stance
• Bring left foot directly forward so that the left heel is
even with the toes of the right foot.
• Shift weight in forward direction until hips are halfway
between the heel of the front foot and the toes of the
rear foot. Hold position for 15 seconds with eyes open.
• Repeat standing exercise with opposite foot forward.
• Increase the hold by 5 seconds (as stability improves)
to a maximum of 30 seconds.
As stability improves, increase the challenge level of the
arm position (see exercise #6)
Recommended Room Set-up:
• 3 a, 3b or 4
2. Split Stance
Reinforcing Verbal Cues:
• Stand tall with ears, shoulders and hips aligned.
• For split stance: Shift weight forward through the hips as
you bring the foot forward.
Safety Guidelines:
• Position near wall for safety.
• Place chair next to participant.
• Instruct participant to hold onto chair while stepping up onto
the foam pad.
• DO NOT PROGRESS to more challenging position until lower
challenge position is mastered successfully.
• Feet on compliant surface.
• Vision reduced, or removed.
L1 is performed in one-to-one setting only.
L1 L2
Equipment:
• Chair
• Airex™ or foam pad
• Sunglasses

Center for Successful Aging and the Fall Prevention Center of Excellence, 2009 48
Multisensory Training: Vestibular (Standing with Altered Base of Support - 2)
# 38
Functional Benefits:
• Improves ability to maintain balance by using vestibular inputs more
effectively.
Instructions for Activity:
• Stand on foam pad with feet hip-width apart.
• Change vision by wearing sunglasses or closing eyes. (Open
eyes before progressing to the next sequence.)
3) Semi-Tandem
• Bring one foot directly ahead of the other with space between
the heel of the front foot and the toes of the back foot.
• Perform with the opposite foot forward.
4) Tandem
• Bring one foot directly ahead of the other so that the heel of
the front foot is touching the toes of the back foot.
• Perform with the opposite foot forward.
As stability improves, increase the challenge level of the arm position (see exercise #6)
Recommended Room Set-up:
• 3 a, 3b or 4
Equipment:
• Chair
• Airex™ or foam pad
• Sunglasses
Reinforcing Verbal Cues:
• Stand tall with ears, shoulders and hips aligned.
• Shift weight forward through the hips as you bring the foot
forward.
3. Semi-Tandem
4. Tandem
Safety Guidelines:
• Position near wall for safety.
• Place chair next to participant.
• Instruct participant to hold onto chair while stepping up onto the foam pad.
• DO NOT PROGRESS to more challenging position until lower challenge position is mastered successfully.
• Feet on compliant surface.
• Vision reduced, or removed.
L1 is performed in one-to-one setting only.
L1 L2

Center for Successful Aging and the Fall Prevention Center of Excellence, 2009 49
Multisensory Training: Somatosensory & Vestibular
(Balloon Volleyball)
Functional Benefits:
Somatosensory
Activity performed on firm surface.
• Improves stability when vision is needed for another task (reading, walking, crossing street).
Vestibular
Activity performed with feet on foam pads.
• Improves stability when eyes are needed for another task while standing on soft or uneven surfaces
Instructions for Activity:
• Begin by forming a small circle (3-5 people per group).
• Keep the balloon aloft by gently tapping to each other.
• 1 – 2 participants stand on foam if appropriate for abilities of the group.
Safety Guidelines:
• Reach only as far as stability permits to safety to tap the balloon.
• Alternate participants who stand on foam. Foam can be rotated
throughout the activity.
Recommended Room Set-up:
• 6b (standing
• 6c (seated)
Equipment:
• Airex® or foam pads
• Non-slip material to prevent foam slipping on floor
• Balloons
Reinforcing Verbal Cues:
• Balance and safety come first. Reach only within
a safe distance.
• If you feel a loss of balance, cease focusing your
eyes on the moving balloon and focus on a
stationary target at eye level until you regain your
balance.
• Do not step off the foam to reach the balloon.
# 39
L 2
L1 is performed in seated
position only, on chairs with armrests. !
L1 L2

Center for Successful Aging and the Fall Prevention Center of Excellence, 2009 50
Multisensory Training: Somatosensory (Forward Right & Left Step)
# 40
Functional Benefits:
• Improves ability to maintain balance by using somatosensory
inputs more effectively.
• Increases stability in environments of reduced or absent lighting
(darkened room, movie theater, getting up at night).
Instructions for Activity:
• Stand with feet hip-width apart.
• Change vision by wearing sunglasses or closing eyes.
(Open eyes before progressing to the next sequence.)
• Shift weight onto left foot and step forward with right foot,
bending the knee as the right foot contacts the floor.
• Shift weight back through the left hip and step backwards with
the right foot.
• Perform stepping sequence with the left leg stepping forward.
Repetitions:
• Repeat 5 times with each leading leg..
Challenge Levels:
• Change arm position.
• Increase distance of spot.
Safety Guidelines:
• Position near wall or next to chair for safety.
Recommended Room Set-up:
• 3a, 3b or 4
Equipment:
• Chair
Reinforcing Verbal Cues:
• Stand tall with shoulders level, and chin
parallel to floor.
• Shift weight to opposite side, leading with the
hips, BEFORE stepping forward or backward.
Can you feel your hips and shoulders
sliding together over to your stance leg?
• Shift weight forward through the hips as the
foot move forward.
Can you sense that the knee moves over
the toes in the forward step.
• Shift weight through the hips as the foot
moves backward .
• When you return to the starting position, can
you feel pressure from the floor evenly under
both feet?
• Feet on firm surface.
• Vision reduced, or removed.
L1 is performed in one-to-one setting only.
L1 L2

Center for Successful Aging and the Fall Prevention Center of Excellence, 2009 51
Multisensory Training: Somatosensory (Walk with Altered Base of Support)
Functional Benefits:
• Improves ability to maintain balance by using somatosensory inputs more
effectively.
• Increases stability when moving through environments of reduced or absent lighting,
i.e., darkened room, movie theater, getting up at night.
Instructions for Activity:
Change vision by wearing sunglasses or closing eyes. (Open eyes at completion
of each walk.)
Have participants walk across the room using a:
• Narrow step
• Wide step
• Combined narrow and wide step
¯ (8 steps narrow, 8 steps wide). Increase or decrease the number of steps
using each gait pattern to match abilities of the participants.
• Step-to walk.
¯ Participants take a long step with the right leg and then a short step with the
trailing left leg so that the feet are even. Lead with the right leg each time.
¯ Repeat with the left leg leading.
• Forward toe walking
Repetitions:
• Once /twice length of room for each step pattern
Recommended Room Set-up:
• 7
Equipment:
• None
Reinforcing Verbal Cues:
• Can you sense that your body is as tall
as possible with your chin parallel to the
floor and ears directly above the
shoulders?
• Can you feel the heel make contact with
the floor first followed by pressure
moving toward the toes as you push off
from floor? (Toe walking excluded.)
# 41
• Feet on firm surface.
• Vision reduced, or removed.
Safety Guidelines:
• Position near wall for safety
L1 is performed in one-to-one setting only.
L1 L2

Center for Successful Aging and the Fall Prevention Center of Excellence, 2009 52
Multisensory Training: Visual (Walk with Altered Base of Support)
# 42 L2
Functional Benefits:
• Improves ability to maintain balance by using visual inputs more effectively.
• Increases stability when standing on soft surfaces, i.e., lawn, sand, thick carpet
Instructions for Activity:
Have participants walk across an exercise mat, or other compliant surface, using a:
• Narrow step
• Wide step
• Combined narrow and wide step
¯ (8 steps narrow, 8 steps wide). Increase or decrease the number of steps
using each gait pattern to match abilities of the participants.
• Step-to walk.
¯ Participants take a long step with the right leg and then a short step with the
trailing left leg so that the feet are even. Lead with the right leg each time.
¯ Repeat with the left leg leading.
• Forward toe walking
Repetitions:
• Once /twice length of compliant surface for each step pattern
Recommended Room Set-up:
• 7
Equipment:
• Exercise mats (wide) or eggcrate foam
Safety Guidelines:
• Position near wall for safety
Reinforcing Verbal Cues:
• Keep your body is as tall as
possible with your chin parallel
to the floor and ears in line with
the shoulders.
• Keep your eyes directed
ahead at a vertical target that
is eye level.
• Feet on compliant surface.
• Eyes open.
Add compliant surface
L2

Center for Successful Aging and the Fall Prevention Center of Excellence, 2009 53
Multisensory Training: Vestibular (Walk with Altered Base of Support)
# 43
Functional Benefits:
• Improves ability to maintain balance by using vestibular inputs more effectively.
• Increases stability in environments of reduced or absent lighting, and soft flooring
(carpet, lawn, sand).
Instructions for Activity:
Change vision by wearing sunglasses or closing eyes. (Open eyes at completion
of each walk.)
Participants walk across an exercise mat, or other compliant surface, using a:
• Narrow step
• Wide step
• Combined narrow and wide step
- (8 steps narrow, 8 steps wide).
- Increase or decrease the number of steps using each gait pattern to match
abilities of the participants.
• Step-to walk.
¯ Participants take a long step with the right leg and then a short step with the
trailing left leg so that the feet are even. Lead with the right leg each time.
¯ Repeat with the left leg leading.
• Forward toe walking
Repetitions:
• Once /twice length of compliant surface for each step pattern
Recommended Room Set-up:
• 7
Equipment:
• Exercise mats (wide) or eggcrate foam
Reinforcing Verbal Cues:
• Keep your body is as tall as possible
with your chin parallel to the floor and
ears in line with the shoulders.
• Feet on compliant surface.
• Vision reduced, or removed.
Safety Guidelines:
• Position near wall for safety
• Eyes are open when stepping
up onto and off of the
compliant surface.
Add compliant surface
L2

Center for Successful Aging and the Fall Prevention Center of Excellence, 2009 54
Multisensory Training: Somatosensory (Walk with Altered Vision)
Functional Benefits:
• Improves stability when moving in visually distracting, dark or dimly lit
environments.
Instructions for Activity:
Divide the class into two groups positioned at opposite ends of the room (refer to Set-
Up #7). Participants engage in the following activities as they cross the room.
1. Tossing Ball – Each participant tosses a ball from hand-to-hand, or two
participants toss ball to each other while walking.
2. Reading – participants read aloud
3. Wearing Sunglasses or Walking with Eyes Closed
Safety Guidelines:
• Instruct participants to walk at a comfortable pace.
• Advise participants to stop if a dropped ball rolls into their path.
• Adopt a close “spotting” position behind certain participants, if needed,
during the eyes closed activities.
• Reduce the number of participants in each line if more supervision is
needed.
Recommended Room Set-up:
• 7
Equipment:
• Non-weighted ball (4” – 6” in diameter)
• Sunglasses
• Large print reading material (jokes, poems, etc.)
Reinforcing Verbal Cues:
• Maintain “tall” posture as you walk.
• When reading, keep chin level.
• When walking with eyes closed:
Feel the floor with each step as you walk
Feel the heel contacting the floor first, and
then the toes.
Ball Tossing, Reading, Wearing Sunglasses, Eyes Closed
# 44 L2

Functional Frolics
These activities are designed to reinforce the skills
learned in the Balance Basics, Fine Tuning the
Senses, and Fancy Footwork sections.

Center for Successful Aging and the Fall Prevention Center of Excellence, 2009 56
Circle Soccer
Instructions for Activity:
Level 1 is performed seated.
Level 2 is performed standing.
• Begin by forming a small circle (3-5 people per group).
• One person gently kicks the ball to another in the circle.
• The recipient stops (traps) the ball first with one foot, then kicks the
ball with the instep of the other foot to the next recipient.
Safety Guidelines:
• Position chairs next to each person if needed.
• Maintain a safe pace.
• Be sure each person stops the ball before attempting to kick it.
Recommended Room Set-up:
• 6a (standing)
• 6c (seated)
Equipment:
• Non-weighted ball approximately 6” in diameter
• Chairs
Programming:
This activity is best combined with exercises:
3, 4, 6, 7, 10, 12, 13 Reinforcing Verbal Cues:
• Hold onto the chair next to you if you need added
stability when kicking the ball.
• Remember to stop the ball before kicking it.
# 45 L1 L2
L1
L2

Center for Successful Aging and the Fall Prevention Center of Excellence, 2009 57
Give and Take Walk
Instructions for Activity:
• Instructor places objects on each chair of one row. Use objects
of different heights and weights (plastic cup, hand towel,
quarter, small book, brush, etc.)
• Participant will:
o Walk between 2 rows of chairs
o Retrieve an object from the chair on one side.
o Walk to next chair on the opposite side and place object
on chair.
o Continue until last chair is reached
Equipment:
• Chairs
• Bean bags or other pick-up objects (on each chair of one row)
Safety Guidelines:
• Arrange adequate space between chairs and between rows.
• Check for dizziness from turning and bending.
Programming:
This activity is best combined with exercises:
15, 17, 18, 19,
Reinforcing Verbal Cues:
• Walk tall with your head
erect and your ears in
line with your shoulders.
• Focus your eyes on a
target directly in front of
you and walk directly
toward it.
• Widen your base of
support when you stop to
pick up or set down
object.
# 46 L2

Center for Successful Aging and the Fall Prevention Center of Excellence, 2009 58
Instructions for Activity:
• Ask participants to walk around the room while trying to avoid stepping on the colored
spots while the music is playing.
• When the music stops, ask participants to find the nearest spot and stand on it.
• If possible participants can stand with feet together on the spots. Participants should
focus their eyes forward on a vertical target when standing with feet together on a spot.
• Spacing between spots should allow for smooth and safe paths for participants to walk.
There should be a few spots placed near the walls and/or chairs and the less stable
participants should be encouraged to walk to these spots when the music stops.
Equipment:
• Spots
Safety Guidelines:
• Set up a few spots near a wall and/or chair.
• Remind participants that there is a “no touching rule” and they should not bump other
participants to get to a spot.
• Remind participants that their balance and safety are their number 1 priority.
• Encourage participants to widen their base of support as they stop to stand on the spot.
Programming:
This activity is best combined with exercises:
11, 12, 15, 17, 25
Reinforcing Verbal Cues:
• Walk tall with your head erect
and your ears in line with your
shoulders.
• Focus your eyes on a target
directly in front of you and walk
directly toward it.
Musical Spots # 47 L2

Center for Successful Aging and the Fall Prevention Center of Excellence, 2009 59
Fast Feet # 48
Functional Benefits:
• This activity is designed to improve the participant’s central processing speed as well as movement speed. Having participants perform longer movement sequences also stimulates memory.
Instructions for Activity:
The goal of this activity is to move the foot to the designated spot and back to
the starting position as quickly as possible.
• Position three colored spots in a semi-circle in front of and at a comfortable
distance from the participants
(Level 1 participants are seated on a chair)
(Level 2 participants are standing)
• Place one spot directly in front of the right foot, one in front of the left foot
and one midway between the two spots.
• When the instructor calls “Right”, the participant quickly moves the right foot
forward to contact the right spot and then immediately returns the foot to its
original starting position. When “Left” is called, the left foot is moved forward
to contact the left spot, and when “Middle” is called, the participant can
choose either foot to contact the middle spot.
• As the activity progresses, the instructor can begin to announce directions in
combination (e.g., right, middle, right, left) so that the participant must
perform a sequence of movements as quickly as possible.
Programming:
This activity is best combined with exercises:
6, 7, 10, 21
Equipment:
• Chairs
• Spots
Safety Guidelines:
• Be sure to encourage your Level 1
participants to hold onto the seated
surface until they feel stable enough
to place their hands on their thighs.
Reinforcing Verbal Cues:
• Sit or stand tall with your head erect
and your ears in line with your
shoulders.
L1 L2

Center for Successful Aging and the Fall Prevention Center of Excellence, 2009
Line Pass
60
Functional Benefits:
• Improves ability to reach for objects at various heights and
directions.
Instructions for Activity:
Position group into lines of 4-6, all facing the same direction.
Arrange each line from shortest to tallest. First person in the line
has the ball.
• Stand with feet hip-width apart.
• With both hands, pass the ball to the person behind you.
• The last person then passes the ball forward.
• Passes can be any of the following:
Side to side, waist level, high, low or alternating. (Pass the
ball on the opposite side from which you receive the ball.)
Over the head.
Between the legs
Once introduced, this activity can be performed on foam pads to increase
the challenge (for appropriate individuals).
Recommended Room Set-up:
• 12
Equipment:
• Non-weighted and weighted balls
• Foam pads and non-slip material
Safety Guidelines:
• Position participants close enough to each other in the line so
that passing can be performed safely.
• Some individuals may need to modify the passing method due to
limited shoulder mobility, neck or back problems.
• Review standing balance test to determine which participants
should stand on foam surface.
Reinforcing Verbal Cues:
• Stand with feet apart.
• Remember to use two hands.
• When passing the ball to the side, shift your weight onto the
leg opposite the side to which you are passing the ball.
• When passing the ball between the legs, bend the knees
and keep head level to maintain balance.
# 49
Standing on Firm Surface
Standing on Foam
Programming:
This activity is best combined with exercises:
6,17, 8, 9, 33
L2

Center for Successful Aging and the Fall Prevention Center of Excellence, 2009 61
Parachute
Functional Benefits:
• Increases agility and upper and lower body strength.
Instructions for Activity:
Level 1 Seated Only
Waves: Participants hold onto parachute with both hands, facing the center. Lift
and lower the parachute to different heights.
Popcorn: Place balloons, balls or bean bags in center of parachute and make
waves to toss the “popcorn.” The goal is to “toss popcorn” up but not off the
parachute.
Bounce Around: The group works together to move a bean bag across each
panel of the parachute.
Level 2 Standing
Waves
Popcorn
Bounce Around
Bounce Off: Divide group into two teams, Red Team on one side of parachute
and Blue Team on the other, and place both a red and blue ball on the parachute.
Each team tries to bounce their ball off the parachute.
Gait variations (tip toe, wide walk, long steps, marches)
Squats: Group squats down, then stands and lifts the parachute on count of 3.
Change places: participants holding a specific color panel walk underneath the
lifted parachute to the other side.
Programming:
This activity is best combined with exercises:
16, 17, 22, 41
Safety Guidelines:
• Remind participants that safety
always comes first.
• Provide options for those with
limited shoulder mobility.
Recommended Room Set-up:
• 6b (standing)
• 6c (seated)
Equipment:
• Parachute
• Bean bags
• Balls or balloons
# 50 L1 L2

Center for Successful Aging and the Fall Prevention Center of Excellence, 2009 62
Parachute Push Pull
Functional Benefits:
• Increases agility and upper and lower body strength.
Instructions for Activity:
Level 1 performs the activity seated.
Level 2 performs the activity standing.
Divide group into two teams, the YES team on one side, the NO
team on the other.
The YES team shouts “yes” as they pull the parachute toward
them. The NO team responds by shouting “no” and pulls the
parachute toward them.
Each team becomes louder as the tugs become stronger.
Safety Guidelines:
• Remind participants that safety always comes first.
• Monitor the strength of the tugs so that the game does not become too
forceful.
• Instruct participants to move feet if needed to maintain stability.
Recommended Room Set-up:
• 6b (standing)
• 6c (seated)
Equipment:
• Parachute
Reinforcing Verbal Cues:
• Safety always comes first.
• Stand with your feet shoulder-width apart (or
wider for more stability).
• Take a step(s) if necessary to maintain balance.
• Remember to move through your hips as you
shift your weight forward or backward.
# 51
Level 2 only performs standing.
Programming:
This activity is best combined with exercises:
6, 7, 8, 9, 35, 36
Level 1 performs seated.
L1 L2

Center for Successful Aging and the Fall Prevention Center of Excellence, 2009 63
Creek Walk
Functional Benefits:
• Improves ability to move efficiently and confidently through space.
• Improves ability to adjust to changes and obstacles in the
environment (curbs, steps, moving from sidewalk to lawn, sand, or
gravel).
Instructions for Activity:
• Begin at one end of the “creek bed” and step from “rock” to
“rock” (spots).
• Spacing between spots can be increased or decreased to make the
activity more or less challenging.
• Participants may also step onto the “bank” if necessary (outside the
tape).
Challenge Levels:
• Stop to pick up objects on the “creek bed” between the rocks.
• To increase the level of difficulty, stability of “rocks” can be altered by
substituting “Dyna Discs® ” for spots, if available.
Safety Guidelines:
• All participants must have previous experience (from earlier classes)
standing on each of the surfaces or obstacles in the course.
• Limit each group to 8 people per course.
• If possible, set up each course next to a wall.
• Instructors should position themselves close to the most difficult
obstacles.
Recommended Room Set-up:
• 8
Equipment:
• Tape
• Spots
• Bean bags
• Foam pads
• Dyna- Discs®
Reinforcing Verbal Cues:
• Safety always comes first.
• Focus your eyes forward
on a vertical target at eye
level as you move
forward.
• Shift weight to opposite
leg BEFORE stepping in
any direction.
• Move your knee over the
toes when stepping up
onto an elevated surface.
# 52
Programming:
This activity is best
combined with exercises:
10, 11, 14, 16, 41
L2

Center for Successful Aging and the Fall Prevention Center of Excellence, 2009
Emily Post Promenade
64
# 53
Functional Benefits:
• Reinforce correct posture and body alignment.
Instructions for Activity:
• Place a bean bag on top of the head and walk across the
room. If bean bag drops while walking, stop and return bean
bag to top of head (widen base of support when bending to
pick up).
• Pass the bean bag on to the next person.
Repetitions:
• 1-2 times across the room
• Optional: add cognitive task by asking etiquette questions;
“On which side of the plate should you set the fork?”
Equipment:
• Bean bags
Safety Guidelines:
• Maintain a safe pace when crossing the room.
• Emphasize completion of task, not speed.
Recommended Room Set-up:
• 7
Programming:
This activity is best combined with exercises:
10, 11, 15, 16
Reinforcing Verbal Cues:
• Keep your posture “Emily Post” perfect.
• Lift your chest and pull your shoulders back and
down as you walk.
• Focus your eyes forward on a vertical target at
eye level as you walk across the room.
L2

Center for Successful Aging and the Fall Prevention Center of Excellence, 2009 65
Waiter’s Relay
Functional Benefits:
• Improves posture and dynamic stability when carrying objects.
Instructions for Activity:
Divide class into teams of 4-5, half of each team on opposite sides of the room.
Give a tray with items on it to the first person from each team.
• Carry the tray across the room as quickly (and safely) as you can
without “spilling” the contents.
• You can carry the tray with one hand along side your head, or in
front of you with both hands.
• Give the tray to the next person on your team when you reach the
other side.
Safety Guidelines:
• Remind participants that safety always comes first. (Maintain a safe
pace when crossing the room.)
• Emphasize completion of task, not speed.
Recommended Room Set-up:
• 7
Equipment:
• Light tray or dish (substitute clip board, binder, or other flat surface)
• Plastic cups (with or without popcorn inside)
Programming:
This activity is best combined with exercises:
10, 11, 15, 16
Reinforcing Verbal Cues:
• Maintain good posture with shoulders
level, and chin parallel to floor.
• Look straight ahead at your
destination.
• Be aware of the proximity of other
“waiters” around you.
# 54 L2

Center for Successful Aging and the Fall Prevention Center of Excellence, 2009
Horseshoes with Altered Base of Support
66
# 55
Functional Benefits:
• Increases stability when standing in reduced or altered
base of support.
• Improves body awareness and control in standing
position.
• Improves hand eye coordination
Instructions for Activity:.
• Participants pair up in twos.
• One partner throws the horseshoe while standing with
feet apart, the other partner retrieves it.
• With each successful throw, the participant advances to
the next level of altered base of support.
• Participants exchange positions every 4 throws.
• Goal is to see which partner reaches highest challenge
level of altered base of support within 16 attempts.
• If horseshoes are not available, this can be performed by
tossing a bean bag into a circle (spot) or square (marked
with tape).
Safety Guidelines:
• DO NOT PROGRESS to more challenging position until
lower challenge position is mastered successfully.
Recommended Room Set-up:
• 13
Equipment:
• Soft horseshoes
OR
• Bean bags
• Spots or tape
2. Split Stance
3. Semi-Tandem
4. Tandem
1. Feet together Reinforcing Verbal Cues:
• Stand tall and imagine that
the top of the head is being
pulled toward the ceiling by
a string.
• Keep the eyes focused on
the goal while throwing.
• Immediately upon
completion of throw, focus
ahead on vertical target at
eye level.
Feet Together
• Keep weight evenly
distributed across both feet.
Split Stance
Semi-Tandem and Tandem
• Shift weight through the
hips as the foot steps
forward. Programming:
This activity is best
combined with exercises:
6, 7, 35, 36, 41
L2

Firming Up The Muscles
These activities will improve lower body strength.

Center for Successful Aging and the Fall Prevention Center of Excellence, 2009
Heel Raises
68
Functional Benefits:
• Strengthens the muscles of the calf (important for stepping up onto and
off curbs, climbing stairs).
Instructions for Activity:
• Stand tall with the feet flat on the floor and hip-width apart. Breathe in.
• Slowly lift heels of both feet off the floor. Breathe out as the heels lift.
• Hold the position for 5 seconds, breathing evenly, then slowly lower the
heels to the floor.
• Add ankle weights (2– 4 lbs.) to increase resistance when appropriate.
Repetitions:
• 8 times. As practice continues, increase by 2 repetitions until 12
repetitions are reached.
• As students’ leg strength increases, return to 8 repetitions, adding a second set of 8. Increase each set to 10 repetitions, followed by 12
repetitions when ready.
Equipment:
• Chairs
• Leg weights, 2– 4 lbs. (optional)
Safety Guidelines:
• Hold onto the back of a chair or wall for additional support.
Recommended Room Set-up:
• 3
Reinforcing Verbal Cues:
• Stand tall with your back straight.
• Move as slowly as possible, but
maintain body control.
• Breathe out as you lift the heels.
• Direct eyes forward to focus on a
vertical target.
# 56 L1 L2

Center for Successful Aging and the Fall Prevention Center of Excellence, 2009
Forward Lunge
69
Functional Benefits:
• Improves lower body muscle strength and endurance.
• Strengthens leg muscles for stepping and walking.
Instructions for Activity:
• Stand with feet hip-width and shift weight by sliding the hip and shoulder over the
left leg. Step directly forward with the right foot.
• Keep both knees slightly bent and bring the left knee towards the floor, stopping
when the right knee is above the right toes. Hold for 3-5 counts.
• Slowly return to the starting position and repeat with the opposite leg.
• Add ankle weights (2– 4 lbs.) to increase resistance when appropriate.
Repetitions:
• 8 times on each side. As practice continues, increase by 2 repetitions until 12
repetitions are reached.
• As students’ leg strength increases, return to 8 repetitions, adding a second set of
8. Increase each set to 10 repetitions, followed by 12 repetitions when ready.
Equipment:
• Chairs
Safety Guidelines:
• Touch the chair if added stability is needed.
Recommended Room Set-up:
• 3
Reinforcing Verbal Cues:
• Stand tall, your shoulders level
and your chin parallel to floor.
• Make sure the forward knee does
not go beyond the forward toes.
• Focus eyes forward on a vertical
target at eye level.
• Breathe evenly throughout the
exercise.
# 57 L1 L2

Center for Successful Aging and the Fall Prevention Center of Excellence, 2009
Forward/Backward Leg Lifts
70
Functional Benefits:
• Strengthens muscles needed for mobility tasks such as standing, walking,
climbing stairs.
Instructions for Activity:
• Stand with feet hip width apart and hold onto the side of a chair or wall for
support. Shift weight by sliding the hip and shoulder over one leg. Breathe in.
• Slowly raise the other leg straight out in a forward direction. Breathe out as
the leg is raised.
• Breathe in and lower the leg back to the floor; pause momentarily before
extending the leg in a backward direction. Breathe out as the leg is lifted
backward.
• Lower the leg to the starting position while breathing in.
• Add ankle weights (2– 4 lbs.) to increase resistance when appropriate.
Repetitions:
• 8 times on each side. As practice continues, increase by 2 repetitions until 12
repetitions are reached.
• As students’ leg strength increases, return to 8 repetitions, adding a second
set of 8. Increase each set to 10 repetitions, followed by 12 repetitions when
ready.
Safety Guidelines:
• Hold onto the back of a chair or wall for additional support.
• Be sure to avoid bending at the hips by not raising the leg too high in either
direction.
Equipment:
• Chairs
• Leg weights, 2– 4 lbs. (optional)
Reinforcing Verbal Cues:
• Stand tall with your shoulders level
and chin parallel to floor.
• Focus your eyes forward on a
vertical target at eye level.
• Keep knees slightly flexed
throughout the exercise.
• Feel the tension along the front of
your thigh as the leg lifts forward.
• Feel the tension along the back of
your thigh as the leg lifts backward.
Recommended Room Set-up:
• 3
# 58 L1 L2

Center for Successful Aging and the Fall Prevention Center of Excellence, 2009
Lateral Leg Lifts
71
Functional Benefits:
• Strengthens muscles at the side of the thigh.
• Improves lateral stability and lowers risk for sideways falls.
Instructions for Activity:
• Stand with the feet hip-width apart and hold onto a wall or chair for support.
Shift weight by sliding the hip and shoulder over one leg. Breathe in.
• Slowly raise the other leg out to the side, leading with the heel. Toes are
pointed forward. Breathe out as the leg is raised.
• Slowly return the leg to the starting position. Breathe in as the leg is lowered.
• Add ankle weights (2– 4 lbs.) to increase resistance when appropriate.
Repetitions:
• 8 times on each side. As practice continues, increase by 2 repetitions until 12
repetitions are reached.
• As students’ leg strength increases, return to 8 repetitions, adding a second set
of 8. Increase each set to 10 repetitions, followed by 12 repetitions when ready.
Equipment:
• Chairs
• Leg weights, 2– 4 lbs. (optional)
Safety Guidelines:
• Maintain a leg lift height that allows for proper body alignment. (Do not tilt the
body to the side.)
• Touch the chair if added stability is needed.
Recommended Room Set-up:
• 3
Reinforcing Verbal Cues:
• Stand tall, shoulder above hip of
standing leg.
• Focus eyes forward on a vertical
target at eye level.
• Feel the tension along the outside of
your thigh as the leg lifts.
# 59 L1 L2

Center for Successful Aging and the Fall Prevention Center of Excellence, 2009
Leg Curls
72
Functional Benefits:
• Strengthens calves and (hamstring) back thigh muscles.
• Improves ability to walk and climb stairs.
Instructions for Activity:
• Stand with the feet hip-width apart. Hold onto the back of a chair and stand tall.
Shift weight by sliding the hip and shoulder over one leg. Breathe in.
• Slowly flex (bend) the other knee, raising the leg behind you. Do not allow the
thigh of the lifted leg to move in front of the thigh of the standing leg (keep the
knees even). Breathe out as the knee bends.
• Return the leg slowly to the starting position. Breathe in.
• Add ankle weights (2– 4 lbs.) to increase resistance when appropriate.
Repetitions:
• 8 times on each side. As practice continues, increase by 2 repetitions until 12
repetitions are reached.
• As students’ leg strength increases, return to 8 repetitions, adding a second set of
8. Increase each set to 10 repetitions, followed by 12 repetitions when ready.
Safety Guidelines:
• Touch the chair if added stability is needed.
Equipment:
• Chairs
• Leg weights, 2– 4 lbs. (optional)
Reinforcing Verbal Cues:
• Stand tall, shoulder above hip of
standing leg.
• Focus eyes forward on a
vertical target at eye level.
• Feel the tension at the back of
the thigh as the leg bends.
• Keep the knee of the bending
leg even with the knee of the
standing leg.
Recommended Room Set-up:
• 3
# 60 L1 L2

Center for Successful Aging and the Fall Prevention Center of Excellence, 2009
Squats
73
Functional Benefits:
• Increases lower body muscle endurance and strength.
• Improves activities such as getting up from a chair, getting
out of the car, rising from a kneeling position.
Instructions for Activity:
• Stand tall with the feet flat on the floor and hip-width apart.
Breathe in.
• Slowly lower your hips into a squat position. Breathe out as
you lower the body.
• Hold the position for 5 to 10 seconds while breathing evenly,
then slowly return to the starting position.
Repetitions:
• 8 times on each side. As practice continues, increase by 2
repetitions until 12 repetitions are reached.
Equipment:
• Chairs
Safety Guidelines:
• Do not let the knees go past the toes.
Recommended Room Set-up:
• 3
Reinforcing Verbal Cues:
• Feel the tension increase in the thighs as
you lower the hips.
• Make sure the knees do not go beyond
the toes.
• Move as slowly as possible, but maintain
body control.
• Focus eyes forward on a vertical target at
eye level.
• Keep back straight throughout exercise.
# 61 L1 L2
Balance and Mobility Exercises for
Physical Activity Classes
Sample Set-Up Diagrams

Center for Successful Aging and the Fall Prevention Center of Excellence, 2009 75
A
Set-Up # 1
B
Suggested Activities:
o Seated Trunk Leans
o Seated Leg Movements

Center for Successful Aging and the Fall Prevention Center of Excellence, 2009
Set-Up # 2
76
, ) o o
, ) o o
, ) o o
, ) o o
, ) o o
, ) o o
, ) o o
Wall (if available)
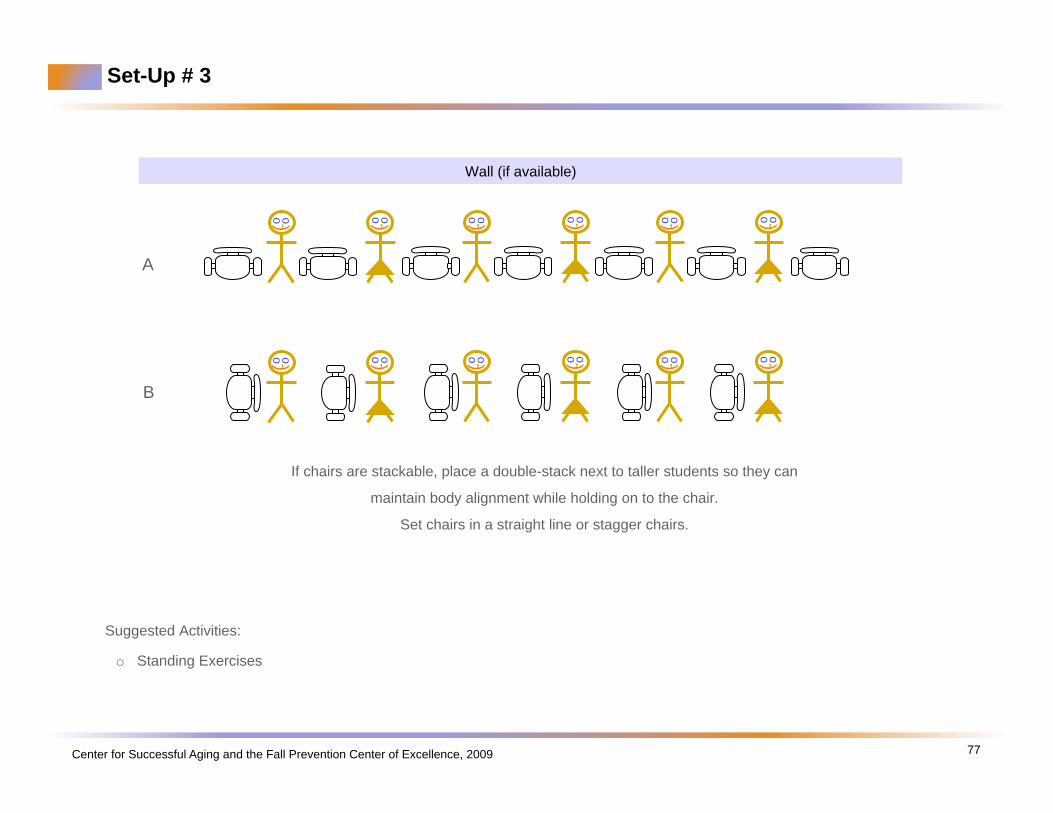
Center for Successful Aging and the Fall Prevention Center of Excellence, 2009
Set-Up # 3
77
, ) o o
, ) o o
, ) o o
, ) o o
, ) o o
, ) o o
If chairs are stackable, place a double-stack next to taller students so they can
maintain body alignment while holding on to the chair.
Set chairs in a straight line or stagger chairs.
Wall (if available)
, ) o o
, ) o o
, ) o o
, ) o o
, ) o o
, ) o o
A
B
Suggested Activities:
o Standing Exercises

Center for Successful Aging and the Fall Prevention Center of Excellence, 2009
Set-Up # 4
78
Class participants stand behind chairs or next to chairs.
Chairs can arranged in a line or a semi-circle.
Set chairs in a straight line or stagger chairs.
, ) o o
, ) o o
, ) o o
, ) o o
, ) o o
, ) o o
, ) o o
Wall (if available)
Suggested Activities:
o Standing Exercises

Center for Successful Aging and the Fall Prevention Center of Excellence, 2009
Set-Up # 5
79
If chairs are stackable, place a double-stack next to taller students so they can
maintain body alignment while holding on to the chair.
Set chairs in a straight line or stagger chairs.
, ) o o
, ) o o
, ) o o
, ) o o
, ) o o
, ) o o
A
, ) o o
, ) o o
, ) o o
, ) o o
, ) o o
, ) o o
B
Wall (if available)
Suggested Activities:
o Standing Exercises with steps or foam pads

Center for Successful Aging and the Fall Prevention Center of Excellence, 2009
, ) o
o
, ) oo Groups of 4 to 8
B
Set-Up # 6
80
Suggested Activities:
o Pass the Potato
o Circle Soccer
o Parachute
o Push Pull
,
) oo
, ) oo Groups of 4 to 8
A
Groups of 4 to 8
C

Center for Successful Aging and the Fall Prevention Center of Excellence, 2009
Set-Up # 7
81
Wave 1 Wave 3 Wave 4 Wave 2
Suggested Activities:
o Walking/Moving Activities
, ) o o
, ) o o
, ) o o
, ) o o
, ) o o
, ) o o
, ) o o
, ) o o
, ) o o
, ) o o
, ) o o
, ) o o
The number of people per wave is determined by
the level of difficulty of the activity and the ability level of the participants.

Center for Successful Aging and the Fall Prevention Center of Excellence, 2009
Set-Up # 8
82
Use spots or dyna-discs depending on challenge level desired.
Vary spacing of “rocks” to change the challenge of stepping.
Wall (if available)
Suggested Activities:
o Creek Walk

Center for Successful Aging and the Fall Prevention Center of Excellence, 2009
Set-Up # 9
83
Suggested Activities:
o Creek Cross

Center for Successful Aging and the Fall Prevention Center of Excellence, 2009
Set-Up # 10
84
Suggested Activities:
o Four Corner Stepping
o Dancing with Spots
, ) o o
, ) o o
, ) o o
, ) o o
, ) o o
, ) o o

Center for Successful Aging and the Fall Prevention Center of Excellence, 2009
Set-Up # 11
85
Suggested Activities:
o Figure 8 Walk
o Spiral Walk
Participants line up in groups.
, ) o o
, ) o o
, ) o o
, ) o o
, ) o o
, ) o o
, ) o o
One or two people at a time perform the activity.
Allow ample space between people.

Center for Successful Aging and the Fall Prevention Center of Excellence, 2009
Set-Up # 12
86
Suggested Activities:
o Line Pass
, ) o o
, ) o o
, ) o o
, ) o o
, ) o o
, ) o o
, ) o o
Wall (if available)
Participants line up behind each other by height.
Facing
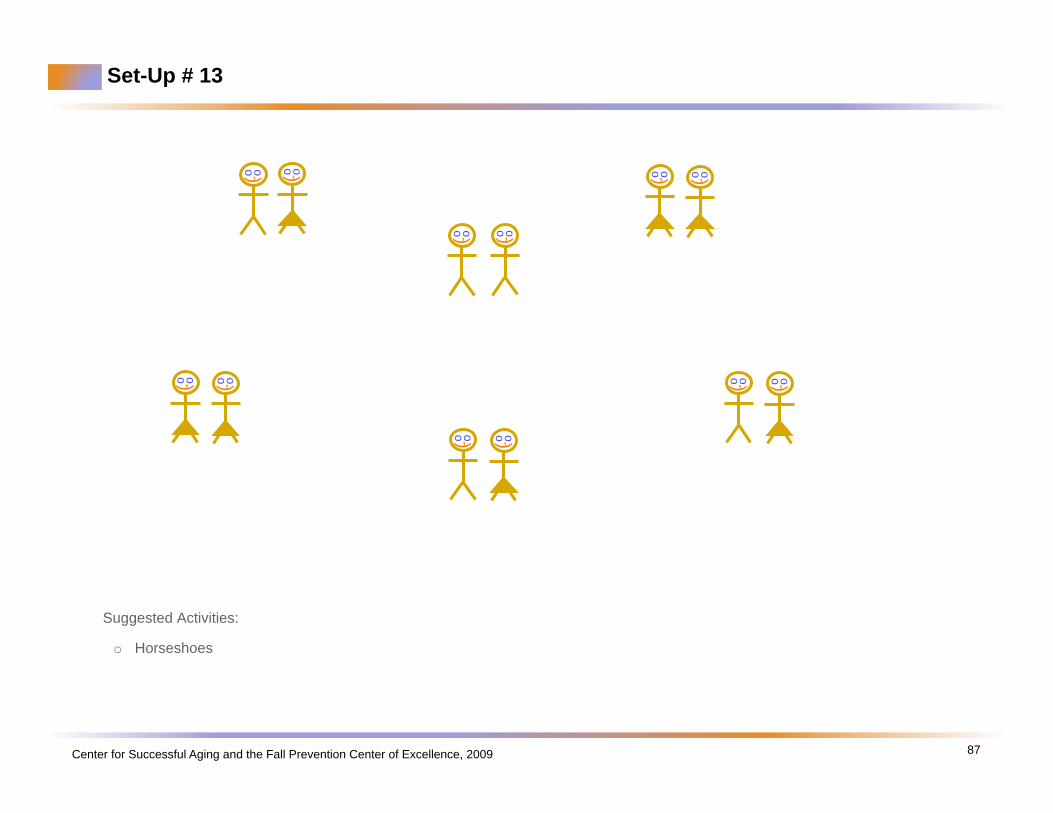
Center for Successful Aging and the Fall Prevention Center of Excellence, 2009
Set-Up # 13
87
, ) o o
, ) o o
, ) o o
, ) o o
, ) o o
, ) o o
, ) o o
, ) o o
, ) o o
, ) o o
, ) o o
, ) o o
Suggested Activities:
o Horseshoes