backup tab user guide - backupassist tab user guide . ... the backup tab provides access to a set of...
TRANSCRIPT
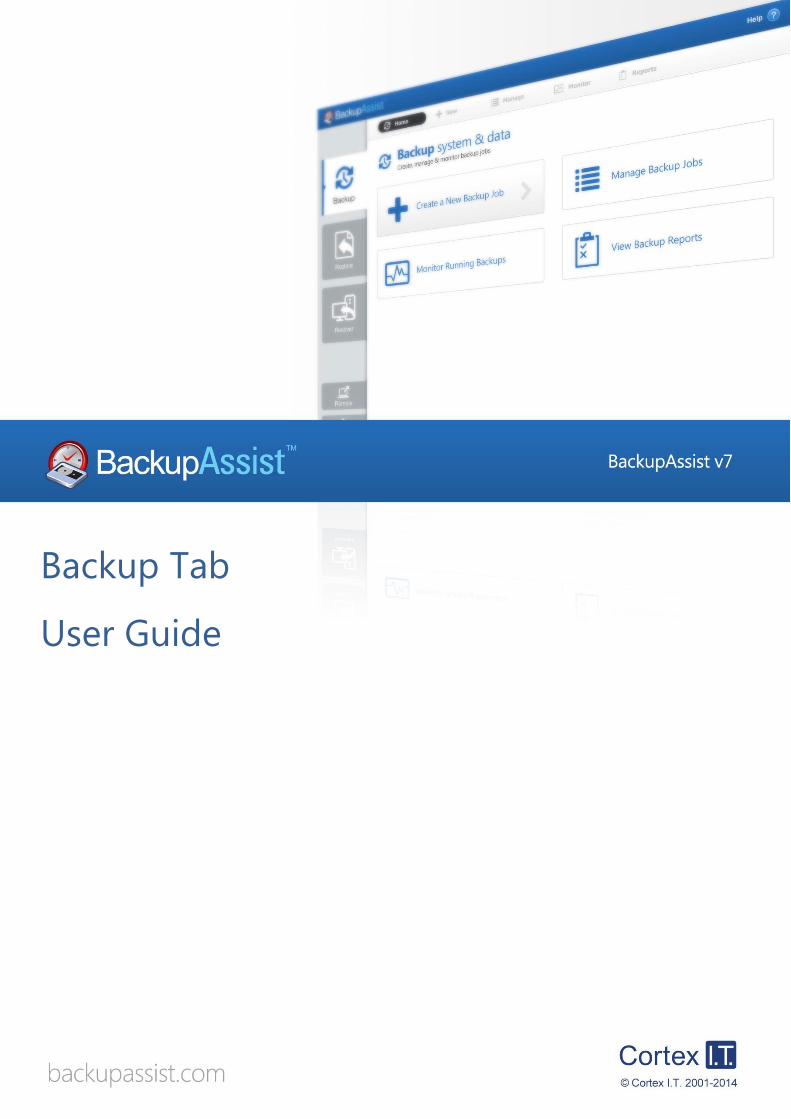
Backup Tab
User Guide

BackupAssist Backup Tab © Cortex I.T. 2001-2015 User Guide: Version April 2 2014
1
Contents
1. Introduction ..................................................................................................................................... 2
Documentation .................................................................................................................................................................. 2
Licensing ............................................................................................................................................................................... 2
Overview ............................................................................................................................................................................... 2
2. Create a New Backup ...................................................................................................................... 3
3. Manage backup jobs ....................................................................................................................... 4
Using the Edit menu ........................................................................................................................................................ 5
Overview ........................................................................................................................................................................ 5
Destination .................................................................................................................................................................... 5
Calendar ......................................................................................................................................................................... 5
Scheduling .................................................................................................................................................................... 6
Notifications ................................................................................................................................................................. 8
Scripts .......................................................................................................................................................................... 10
4. Monitor live backups ................................................................................................................... 12
5. View backup reports .................................................................................................................... 13
6. Support and Resources ................................................................................................................ 14
Contacting Technical Support ................................................................................................................................... 14
Learn more – The Welcome Screen ........................................................................................................................ 14

BackupAssist Backup Tab © Cortex I.T. 2001-2015 User Guide: Version April 2 2014
2
1. Introduction
The Backup tab provides access to a set of powerful backup tools, which are used to
protect both data and applications, including Exchange, SQL, SharePoint, Active Directory
and Hyper-V environments.
Documentation
This whitepaper covers all aspects of the BackupAssist Backup tab, and can be used in conjunction with
other BackupAssist guides, which provide a comprehensive documentation set.
For information on the BackupAssist Restore tab, see the BackupAssist Restore Tab User Guide
For information on the BackupAssist Recover tab, see the BackupAssist Recover Tab User Guide
For information on BackupAssist Remote Access, see the Central Administration User Guide
Licensing
BackupAssist requires a license once the initial trial period has expired. Please contact your local
BackupAssist reseller or distributor for pricing information, or visit www.BackupAssist.com.
For instructions on how to activate / deactivate license keys, visit out Licensing BackupAssist page.
Overview
The Backup tab has four menu items used to create, manage, monitor and report on backups.
The New option is used to access the five types of backup jobs that can be run. These backup jobs are
documented in their own whitepapers and a summary of each is provided below. The Manage,
Monitor and Reports options are documented in detail in this whitepaper.
Figure 1: BackupAssist Backup tab

BackupAssist Backup Tab © Cortex I.T. 2001-2015 User Guide: Version April 2 2014
3
2. Create a New Backup
The New menu will open the Create a new backup job screen. There are 5 types of backups to choose
from, and a description of each type is provided below. All of these backup types are administered
using the Manage, Monitor and Reports menus.
BackupAssist is VSS-aware, so File Protection, File Archiving and System Protection backups can detect
and backup Volume Snapshot Service (VSS) applications such as Exchange, SQL and SharePoint.
System Protection
This feature creates an image backup that can be used to restore files and applications. Depending
on the data selection made, it can also be used to perform a bare-metal recovery, when used with
a bootable media created using RecoverAssist. System Protection backups apply to installations of
BackupAssist on Windows 2008 or later machines. Older versions of Windows will use NTBackup.
File Protection
This feature backs up data using file replication and includes support for Rsync, a technology that
can back up data to a host across the internet. Rsync requires the BackupAssist for Rsync Add-on.
File Archiving
This feature compresses data as it is backed up and saves it as a ZIP file. This saves space and
allows for the use of encryption and password protection on the archive file. The feature includes
the ability to back up to tape media, which requires an add-on license.
Exchange Mailbox Protection
Exchange Mailbox Protection (Exchange Mailbox Add-on) is fully supported but superseded by
Exchange Granular Restore (licensed as the Exchange Granular Add-on). Exchange Granular
Restore uses System Protection, File Protection and File Archiving backups to restore mail items.
SQL Server Protection
This feature backs up SQL Server databases. These backups can be used to restore individual
databases to a specific point in time, or an entire SQL server (including the Master Database). SQL
Server Protection requires the BackupAssist SQL Add-on.
Figure 2: BackupAssist Backup tab – Create a new backup job screen

BackupAssist Backup Tab © Cortex I.T. 2001-2015 User Guide: Version April 2 2014
4
3. Manage backup jobs
The Manage menu is used to run and administer your backups. The options include
configurations that are not available during the creation of the backup job.
When the Manage menu is selected, a list of all backup jobs will be displayed, along with the results of
the last backup, when the backup started, its duration and if the backup job is currently active or
disabled.
Figure 3: BackupAssist Backup tab – Manage screen
The Manage menu can be used to action the selected backup job, as follows:
Report will open the most recent backup report for the selected backup job.
Run will start the backup job. You will be prompted to Rerun a past backup or to Run a future
backup now. If you select a future backup, you will be asked to provide the date. Once the backup
has started, the screen will change to the Monitor view.
Enable / disable will change the active status of the backup job. This option can be used to
disable a backup job so it will not run, or to enable a job so it will run as scheduled.
Edit is used to change the backup job‟s configurations. The selections made during the creation of
the backup job can be changed here. This menu is examined in detail in the next section.
Clone will create a copy of the backup job, and provide a field to enter a new name.
Delete will delete the backup job from BackupAssist.
BackupAssist Backup Tab © Cortex I.T. 2001-2015 User Guide: Version April 2 2014
5
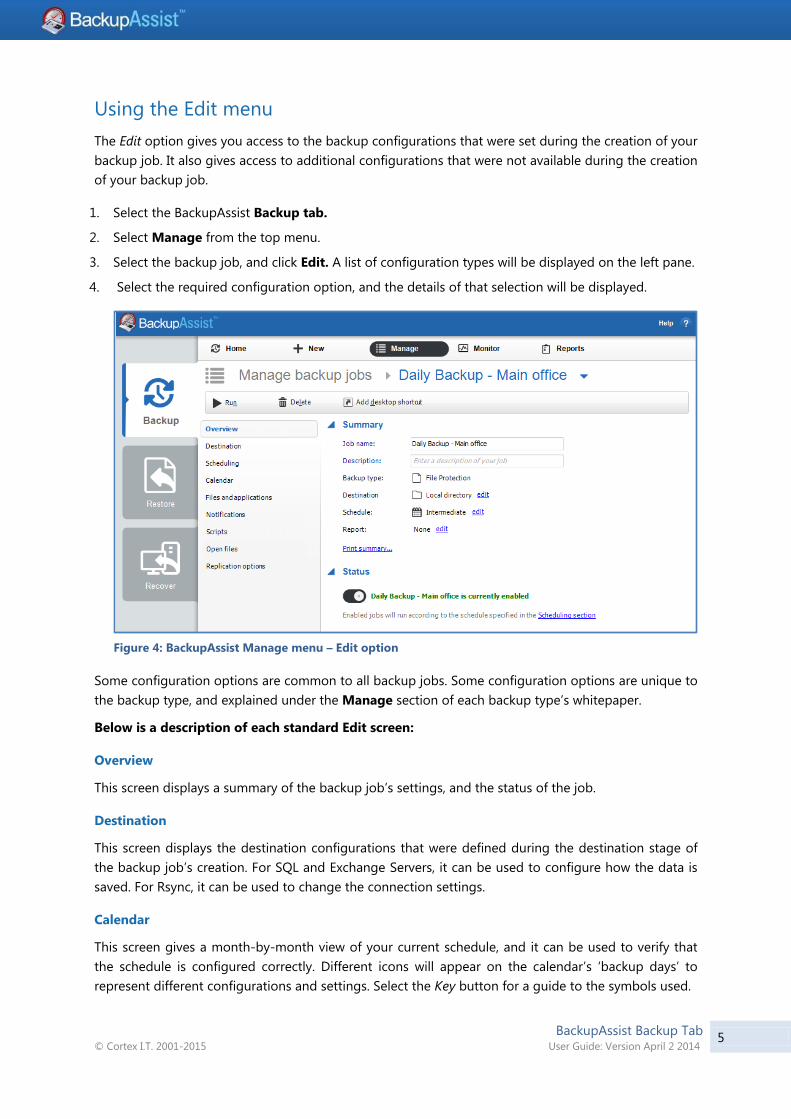
Using the Edit menu
The Edit option gives you access to the backup configurations that were set during the creation of your
backup job. It also gives access to additional configurations that were not available during the creation
of your backup job.
1. Select the BackupAssist Backup tab.
2. Select Manage from the top menu.
3. Select the backup job, and click Edit. A list of configuration types will be displayed on the left pane.
4. Select the required configuration option, and the details of that selection will be displayed.
Figure 4: BackupAssist Manage menu – Edit option
Some configuration options are common to all backup jobs. Some configuration options are unique to
the backup type, and explained under the Manage section of each backup type‟s whitepaper.
Below is a description of each standard Edit screen:
Overview
This screen displays a summary of the backup job‟s settings, and the status of the job.
Destination
This screen displays the destination configurations that were defined during the destination stage of
the backup job‟s creation. For SQL and Exchange Servers, it can be used to configure how the data is
saved. For Rsync, it can be used to change the connection settings.
Calendar
This screen gives a month-by-month view of your current schedule, and it can be used to verify that
the schedule is configured correctly. Different icons will appear on the calendar‟s „backup days‟ to
represent different configurations and settings. Select the Key button for a guide to the symbols used.

BackupAssist Backup Tab © Cortex I.T. 2001-2015 User Guide: Version April 2 2014
6
Scheduling
This option is used to modify your backup schedule. A backup schedule determines when your backup
jobs run and whether the backup is a daily or an archive backup. Combinations of daily and archive
backups provide the most flexible and robust data protection.
Archive backups (not to be confused with the File Archiving backup type) are run periodically (e.g.
weekly, monthly) and retained for long periods. They provide a secure, historical backup and the ability
to restore early versions of data a long time after the backup was made.
Daily backups are run through the week (e.g. Monday to Friday) and provide backups that can be
used to restore recent data. They are often overwritten during each media rotation.
If you have scheduled jobs overlapping, they will be placed in a queue and run one at a time.
Backups run after midnight are usually for data from the previous day, to be part of the previous
day‟s backup. To ensure the correct backup applies to the correct day, BackupAssist treats a day as
being 6.00am to 5.59am (not 12.00am to 11.59pm). E.g. 2.30am on Tuesday is considered Monday.
BackupAssist provides a selection of schemes to select from during the creation of your backup job.
These schemes provide popular combinations of daily and archive backups that can be customized
using the Scheduling screen. This screen contains Scheduling options and Archiving options to modify
your existing scheme, and two pop-up windows: Select new a schedule and Customize schedule.
Scheduling options
This option allows you to set the time and the days of the week that your backups take place. Your
selections will apply to both daily and archive backups (which run in place of daily backups).
Archiving options
The selection will appear if your current scheme includes archive backups. There will be runtime
options for each type of archive backup in your scheme (e.g. weekly, monthly). When you select the
day you wish your archive backup job to run, it will run in place of the daily backup for that day
(weekly runs in place of daily, monthly runs in place of a weekly etc.). The day selected must also be
ticked under Scheduling options.
Figure 5: Manage backup job - Edit Schedule screen
BackupAssist Backup Tab © Cortex I.T. 2001-2015 User Guide: Version April 2 2014
7
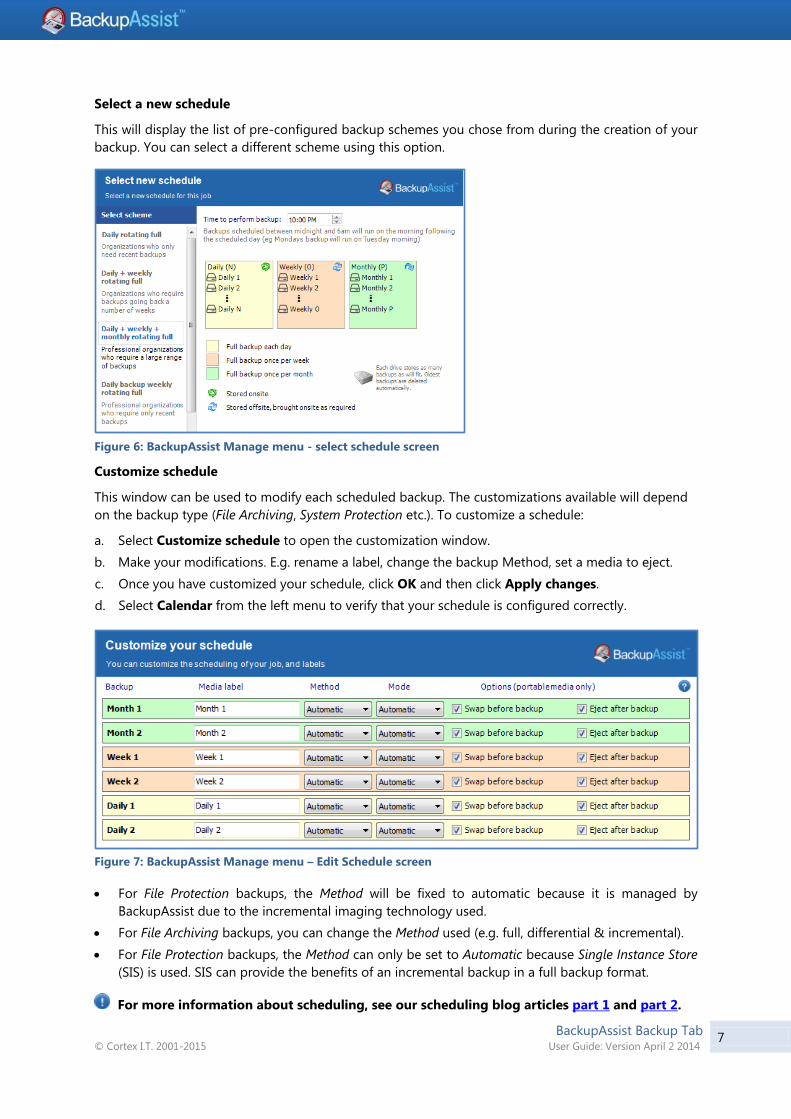
Select a new schedule
This will display the list of pre-configured backup schemes you chose from during the creation of your
backup. You can select a different scheme using this option.
Figure 6: BackupAssist Manage menu - select schedule screen
Customize schedule
This window can be used to modify each scheduled backup. The customizations available will depend
on the backup type (File Archiving, System Protection etc.). To customize a schedule:
a. Select Customize schedule to open the customization window.
b. Make your modifications. E.g. rename a label, change the backup Method, set a media to eject.
c. Once you have customized your schedule, click OK and then click Apply changes.
d. Select Calendar from the left menu to verify that your schedule is configured correctly.
Figure 7: BackupAssist Manage menu – Edit Schedule screen
For File Protection backups, the Method will be fixed to automatic because it is managed by
BackupAssist due to the incremental imaging technology used.
For File Archiving backups, you can change the Method used (e.g. full, differential & incremental).
For File Protection backups, the Method can only be set to Automatic because Single Instance Store
(SIS) is used. SIS can provide the benefits of an incremental backup in a full backup format.
For more information about scheduling, see our scheduling blog articles part 1 and part 2.
BackupAssist Backup Tab © Cortex I.T. 2001-2015 User Guide: Version April 2 2014
8
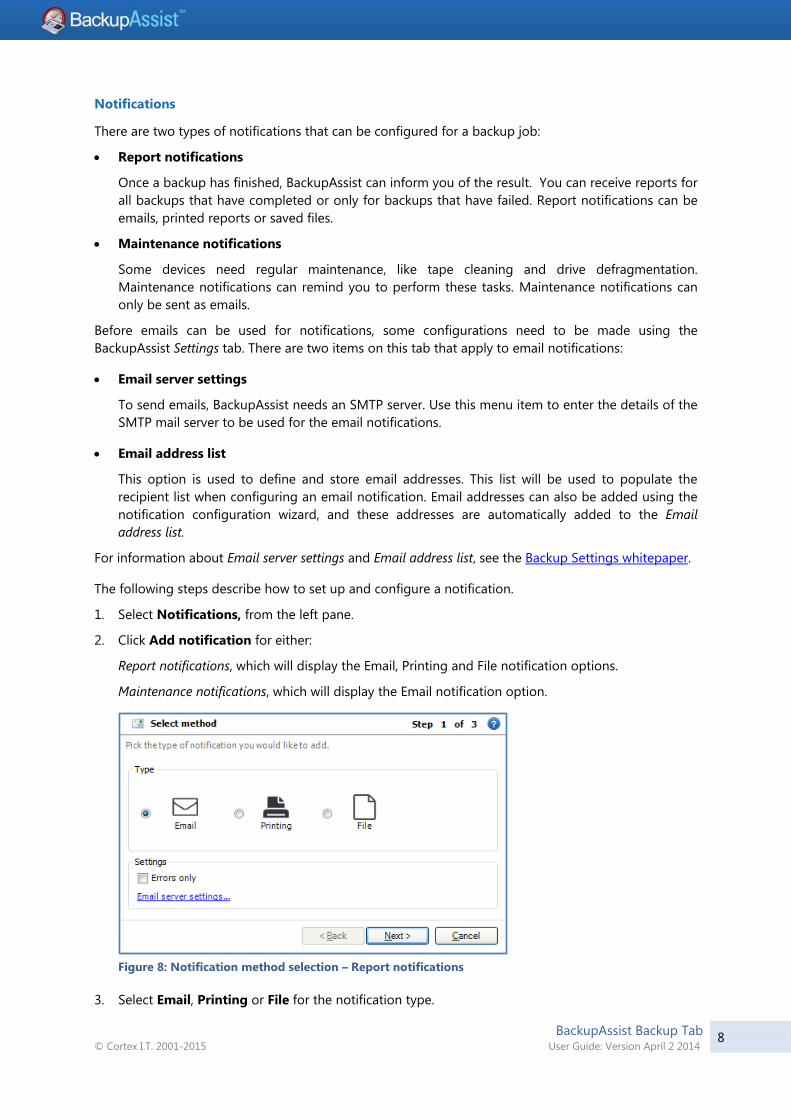
Notifications
There are two types of notifications that can be configured for a backup job:
Report notifications
Once a backup has finished, BackupAssist can inform you of the result. You can receive reports for
all backups that have completed or only for backups that have failed. Report notifications can be
emails, printed reports or saved files.
Maintenance notifications
Some devices need regular maintenance, like tape cleaning and drive defragmentation.
Maintenance notifications can remind you to perform these tasks. Maintenance notifications can
only be sent as emails.
Before emails can be used for notifications, some configurations need to be made using the
BackupAssist Settings tab. There are two items on this tab that apply to email notifications:
Email server settings
To send emails, BackupAssist needs an SMTP server. Use this menu item to enter the details of the
SMTP mail server to be used for the email notifications.
Email address list
This option is used to define and store email addresses. This list will be used to populate the
recipient list when configuring an email notification. Email addresses can also be added using the
notification configuration wizard, and these addresses are automatically added to the Email
address list.
For information about Email server settings and Email address list, see the Backup Settings whitepaper.
The following steps describe how to set up and configure a notification.
1. Select Notifications, from the left pane.
2. Click Add notification for either:
Report notifications, which will display the Email, Printing and File notification options.
Maintenance notifications, which will display the Email notification option.
Figure 8: Notification method selection – Report notifications
3. Select Email, Printing or File for the notification type.

BackupAssist Backup Tab © Cortex I.T. 2001-2015 User Guide: Version April 2 2014
9
4. Configure the notification
The instructions below are for the configuration of each notification type:
BackupAssist can use your email server to send notifications to any number of recipients. The
SMTP server to be used must be entered into the BackupAssist setting tab item, Email server
settings.
a. Select Email, and click Next.
b. Create a subject line for the report. You can use custom variables to have a dynamic
subject line, such as the job name, the status of the job and the date. The window will
present the format, %JOB_NAME% : %STATUS%. Custom variables can be selected from
the list. Click next.
c. Specify the recipients for the backup report.
Figure 9: Backup notification configuration – email recipient selection
You can select email recipients for this backup report, using the list provided. This list is
taken from the Email address list, option in the BackupAssist Settings tab. The Select
recipients window can also be used to add new email addresses.
Printing
Reports can be sent to a printer to provide you with a hardcopy of the backup result. The
printer must be set up in Windows under Control Panel > Printers & Faxes.
Be sure the Backup User Identity (BUI) has the printer defined and accessible. When defining a
job under another user, a printer may show up but not when the job is executed under the
BUI, unless it is defined.
Select the printer(s) you want to print to.
File
BackupAssist can export the report as a file. This can be useful for servers that may not have
email or printer access. You can export the file to a directory for later access or for the purpose
of archiving.
a. Set your file name. You can use custom variables to have a dynamic subject line, such as
the job name, the status of the job and the date. Similar to “Email: Step b)”
b. Specify the location for the file to be saved to. You can also specify the format the file is
saved in: HTML or Text.
5. Click Finish, once the notification type has been configured.

BackupAssist Backup Tab © Cortex I.T. 2001-2015 User Guide: Version April 2 2014
10
Scripts
Most users should be able to use BackupAssist without adding custom scripts. The software was
designed to include all the options needed to set up a best-practice backup strategy. Before adding
custom scripts, please check the options in the console and the help files. It could be the case that the
function you require is already available elsewhere in the program. Where possible, you should use
inbuilt options rather than custom scripts. If you think your requirement is common enough that it
should be in the program, please send us an email at [email protected].
Some users will have requirements specific to their backup strategy. For those users we have provided
the ability to add custom scripts to BackupAssist. Custom scripts can be used for a number of
purposes: to copy or compress backup files, to integrate with command line programs, to restart
services, authenticate to remote machines and deleting files from a directory
There are four separate sections for adding scripts to BackupAssist:
Before each backup - This script runs before any other step of the backup. You can add scripts
here for authenticating to network resources, setting up backup folders or suspending programs
that could interfere with the backup, such as anti-virus applications.
After each backup - This script runs after all the other steps in the backup process have been
completed. You can add scripts here to disconnect from network resources, restart any programs
that were previously suspended, or to perform any number of post-backup operations.
After each successful backup - This script runs before the „After each backup‟ script, but only if
the backup completed successfully. You can enter commands here that you only want executed if
the backup succeeded, such as copying the backup file to another location, or compressing the
backup file.
After each failed backup - This script runs just before the „After each backup‟ script, but only if
the backup fails to complete. This is useful if you want to send a network broadcast alerting
someone quickly to a failed backup, or to clean-up folders and quarantine failed backups.
Figure 10: Manage jobs menu – scripts screen

BackupAssist Backup Tab © Cortex I.T. 2001-2015 User Guide: Version April 2 2014
11
Variables: BackupAssist also offers users a number of environment variables that can easily be
incorporated into scripts. These variables help you to powerfully customize backup scripts and perform
different commands depending on conditional variables.
1. Click Insert variable. (You can insert as many additional variables as required.)
2. Choose a variable from the list. The variable will be inserted into your script, with percentage signs.
Scripts that are run before each backup can make use of any of the following variables:
COMPUTER_NAME - the name of the computer performing the backup.
JOB_NAME - the name of the backup job set in the „Overview‟ section.
TIME - the current time, e.g. „11:30:00 AM‟.
DAY - the day of the month, e.g. „12‟ for the twelfth day of the month.
MONTH - the month of the year, e.g. „5‟ for May.
YEAR - the year e.g. „2007‟
DATE - the date using your system‟s date format, e.g. „08/24/2007‟ for America.
FILE_DATE - a file friendly year - month - day format for the date, e.g. „2007-08-24‟.
FILE_TIME - a file friendly 24 hour time format e.g. „15.09‟ for 9 minutes past 3pm.
WEEKDAY - a short description of the current day of the week e.g. „Mon‟
BACKUP_LABEL - the label that BackupAssist has given this backup; this does not necessarily match tape labels
or filenames. E.g. „Week 2‟, „Monday‟ or „Month 1‟.
BACKUP_METHOD - a variable describing whether the backup‟s is overwrite or append.
FREQUENCY_TYPE - whether this is a monthly, weekly, yearly, quarterly or daily backup.
IS_MEDIA_CHANGE - whether the media was to be changed before the backup.
EJECT_AFTER_BACKUP - whether the media is to be ejected after the backup („true‟ or „false‟).
MEDIA_LABEL - same as the backup label.
BACKUP_FILENAME - the filename of the backup including the full path e.g. „D:\Backups\Monday.bkf‟
Scripts that are run after each backup can make use of the following variables:
BACKUP_SIZE - the size of the backup in bytes.
RUN_LENGTH - the amount of time the backup took to run.
STATUS - whether the backup succeeded or failed.
You should typically test all scripts in a command prompt environment before entering them into your
backup job's configuration. See the in-screen help option to scripting guidelines.
Reporting: You can determine how a failed script is flagged within the backup report by using the On
script failure report drop-down menu. The options available are:
No error- If the script fails to execute the overall status of the backup job will not be affected.
Minor warning: If the script fails to execute a minor warning will be logged and then displayed in the backup
report.
Major warning: If the script fails to execute a major warning will be logged and displayed in the backup report.
Error- If the script fails to execute an error will be logged and then displayed in the backup report. The job will
also terminate at this point before completing any further processes. This is useful for the Before backup script
if you want to stop the backup job from running if the script fails.
Important: Once a backup job has been created with scripting, it should be tested. To test your backup
job, manually create a backup using the Run option in the Manage screen.

BackupAssist Backup Tab © Cortex I.T. 2001-2015 User Guide: Version April 2 2014
12
4. Monitor live backups
The Monitor menu will display the details of a backup job running in real-time. It can
also be used to view the progress information of completed backup jobs.
This is the default screen when a scheduled backup is run, or when a backup is run ad-hoc. The
information is displayed in real-time and any checks, changes and error are displayed as they occur.
Figure 11: BackupAssist - Monitor Running Backup Jobs screen
Below is a description of each key function:
Jobs in Progress will display the currently running backup. The progress of the backup will be
displayed in the middle pane. If multiples jobs are scheduled to run on the same installation of
BackupAssist, the jobs will be queued and run in the order they were submitted.
Recent jobs will show the progress summary and the details summary that were created when the
backup job was run. Once a backup job has completed, it will move to the recent jobs list.
Cancel backup can be used to stop a backup that has started running.
The refresh button can be used to update the information displayed. Although real-time progress
is shown when a backup job runs, this option can force a display update.
BackupAssist Backup Tab © Cortex I.T. 2001-2015 User Guide: Version April 2 2014
13
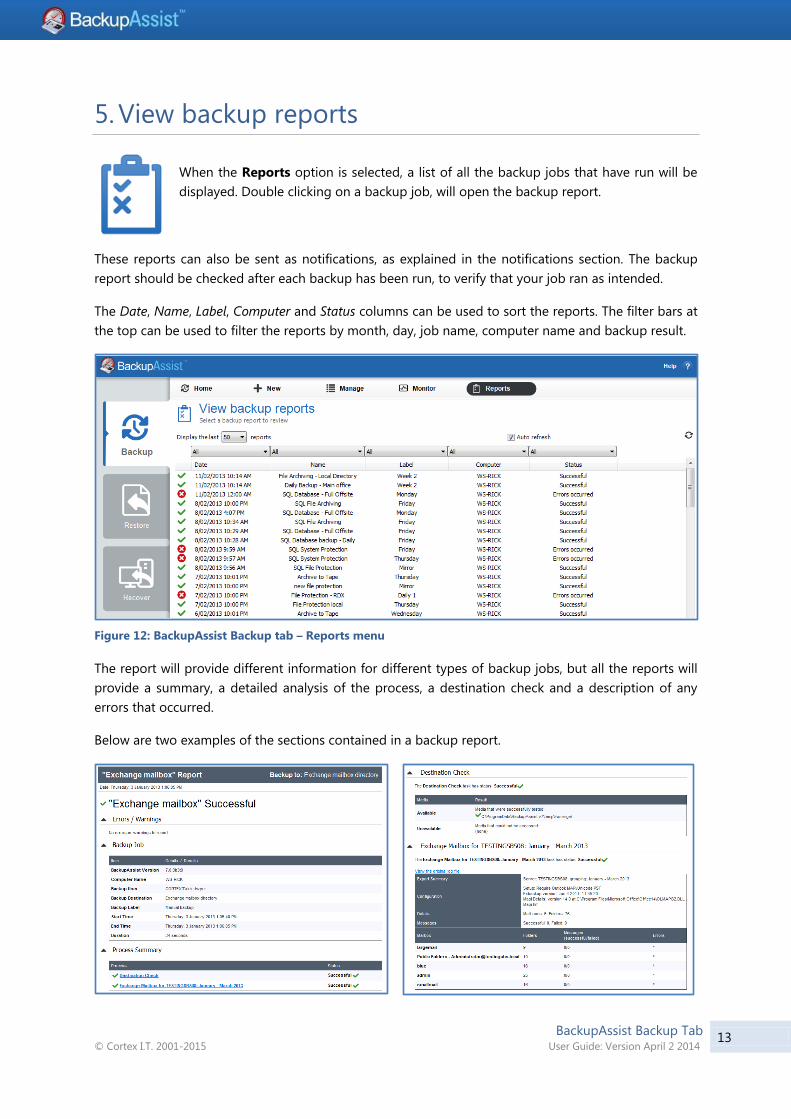
5. View backup reports
When the Reports option is selected, a list of all the backup jobs that have run will be
displayed. Double clicking on a backup job, will open the backup report.
These reports can also be sent as notifications, as explained in the notifications section. The backup
report should be checked after each backup has been run, to verify that your job ran as intended.
The Date, Name, Label, Computer and Status columns can be used to sort the reports. The filter bars at
the top can be used to filter the reports by month, day, job name, computer name and backup result.
Figure 12: BackupAssist Backup tab – Reports menu
The report will provide different information for different types of backup jobs, but all the reports will
provide a summary, a detailed analysis of the process, a destination check and a description of any
errors that occurred.
Below are two examples of the sections contained in a backup report.
BackupAssist Backup Tab © Cortex I.T. 2001-2015 User Guide: Version April 2 2014
14
6. Support and Resources
Contacting Technical Support
Should you have any questions regarding either BackupAssist or the Backup tab, please email
[email protected] and we will respond to you as soon as possible.
Similarly, if you have any suggestions for additional functionality in BackupAssist, or new products or
add-ons, please also forward your feedback to [email protected]
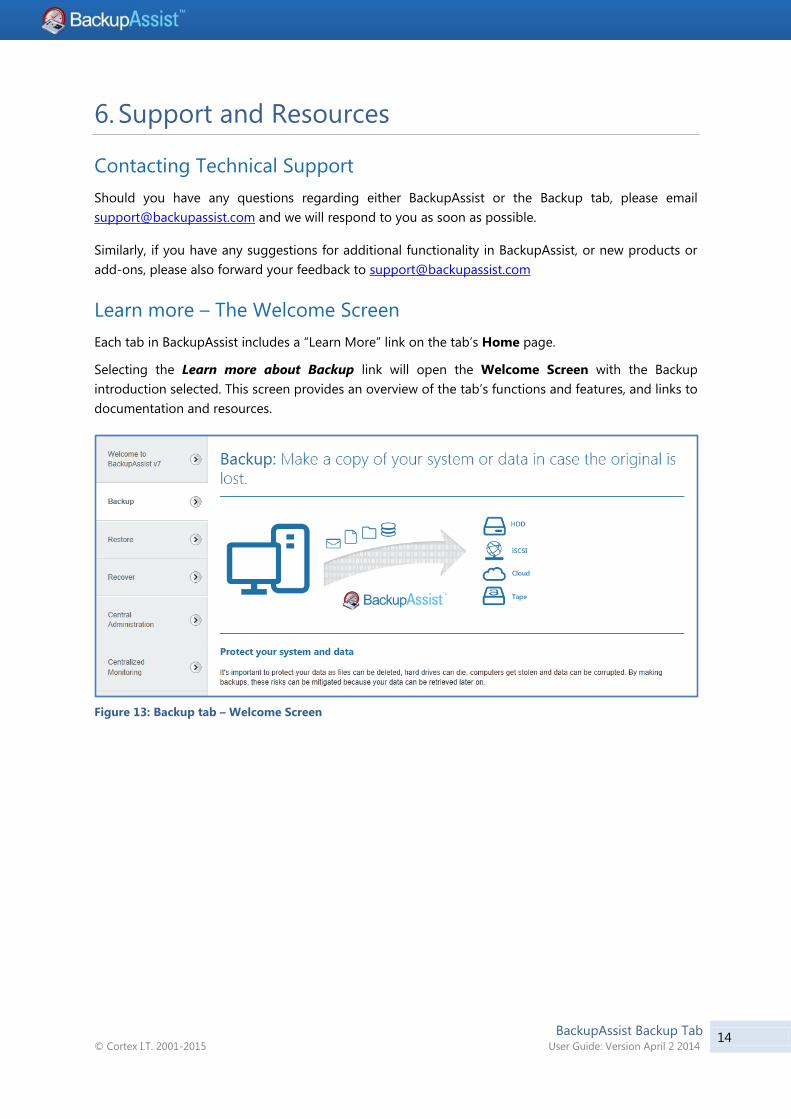
Learn more – The Welcome Screen
Each tab in BackupAssist includes a “Learn More” link on the tab‟s Home page.
Selecting the Learn more about Backup link will open the Welcome Screen with the Backup
introduction selected. This screen provides an overview of the tab‟s functions and features, and links to
documentation and resources.
Figure 13: Backup tab – Welcome Screen