mitchell1/shopkey integrator version 1buymitchell1.com/quickbooks/qbint.pdf · new quickbooks...
TRANSCRIPT
Mitchell1/ShopKey Integrator Version 1.1

Mitchell1/ShopKey IntegratorVersion 1.1.0
Table of Contents
Important Guidelines ..................................................................................... 3 Installation of Integrator 1.1 Software.......................................................... 4 Account Authentication............................................................................... 10 Startup Settings ........................................................................................... 11 Synchronization Process ............................................................................ 13
Appendix A ................................................................................................... 27 Appendix B ................................................................................................... 32 Appendix C ................................................................................................... 37
2

Mitchell1/ShopKey IntegratorVersion 1.1.0
Important Guidelines
Before running Integrator 1.1 please be advised of the following:
• Administrative rights are required on the computer to install the application.
• Integrator 1.1 is designed to synchronize your Shop Management system with a
new QuickBooks Company File. Any attempt to synchronize with a pre-existing Company File will likely create undesired results. If you wish to create a new QuickBooks Company File, and you do not know how to do this, please see Appendix B. Note: Users upgrading from Integrator 1.0 are not required to create a new Company File.
• Make sure to create a copy of your existing company file and perform all
installations and test operations on that copy. Note: Backing up your QuickBooks Company File(s) periodically is recommended to protect your Company File from errors and/or corruption in the event of system failure.
• If your QuickBooks Company File requires that you login with a password, you
must login as the Administrator when opening QuickBooks for the first time following the installation of Integrator 1.1. This is only necessary for the initial launch of QuickBooks following the installation of Integrator 1.1. You may login with any account for subsequent logins.
System Requirements
You must have OnDemand5 or ShopKey5 Management software version 5.9, or newer, installed on your computer as well as the US version of QuickBooks Pro 2007, or newer. Mitchell 1 strongly recommends QuickBooks Pro 2007 for use with the Quickbooks Integrator. Additional requirements:
• Operating System: Windows 2000 / XP • System memory recommendation: 256 MB minimum, 512 MB, or more,
recommended. • QuickBooks Pro (US Edition) 2007. The Canadian edition of QuickBooks is not
currently supported. • Internet connection is required during installation and periodically during
subsequent synchronization for account verification.
3

Mitchell1/ShopKey IntegratorVersion 1.1.0
Installation of Integrator 1.1 Software NOTE: Before installing Integrator 1.1, please verify that you have enabled all of the
appropriate QuickBooks settings as described in Appendix A and have read and understand all items listed under Important Guidelines on the previous page. Insert the installation CD into your CD/DVD-ROM drive and the Setup Menu will appear. Click on Install QuickBooks Integrator v.1.1 to begin the installation. Note: If auto run is disabled on your PC, explore the QB Integrator Installation CD and double click on ‘Setup.exe’.
Click Yes to start the installation process
4

Mitchell1/ShopKey IntegratorVersion 1.1.0
The installation process will begin.
Click Next to continue.
5

Mitchell1/ShopKey IntegratorVersion 1.1.0
Click Yes to accept the license agreement
Enter your name and your Company’s name in the provided fields. Click Next when finished.
6

Mitchell1/ShopKey IntegratorVersion 1.1.0
The default installation folder is displayed. To install to a custom location, click Browse. Click Next to continue.
Once installation is complete, you must enable QuickBooks to receive data from Integrator 1.1. Place a check in the ‘Open QuickBooks’ checkbox and click Finish.
7
Mitchell1/ShopKey IntegratorVersion 1.1.0
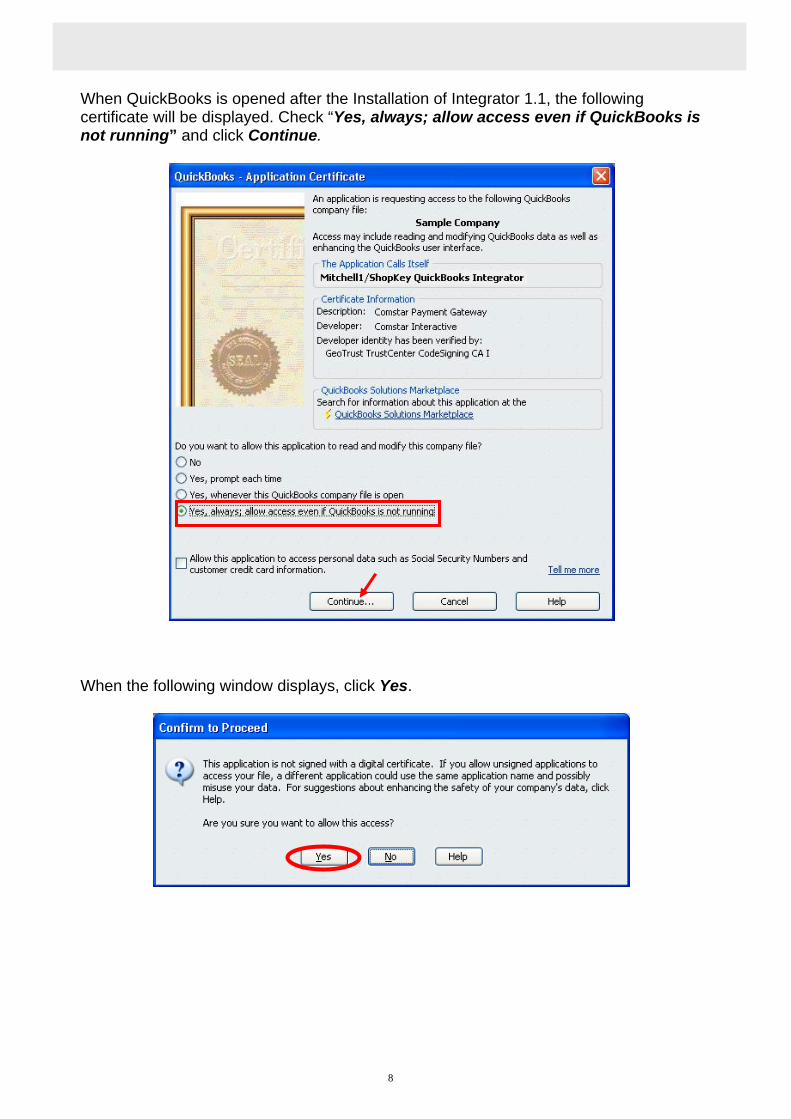
When QuickBooks is opened after the Installation of Integrator 1.1, the following certificate will be displayed. Check “Yes, always; allow access even if QuickBooks is not running” and click Continue.
When the following window displays, click Yes.
8

Mitchell1/ShopKey IntegratorVersion 1.1.0
When the ‘Access Confirmation’ window displays, Click Done.
A new group of menu items will be created under Company -> Mitchell1/ShopKey QuickBooks Integrator:
QuickBooks is now enabled to receive data from Integrator 1.1. You must now authenticate your Integrator 1.1 account.
9

Mitchell1/ShopKey IntegratorVersion 1.1.0
Account Authentication
When Integrator 1.1 is launched for the first time, you will see the following dialog prompting you for your Mitchell1/ShopKey Account Number:
Fill in your account number and click Save and Close. QB Integrator 1.1 will then verify your shop’s account status.
Note: You may also change the account number by choosing the Mitchell1/ShopKey QB Integrator > Company Settings option from the ‘Company’ menu.
Your Integrator 1.1 account has now been authenticated. You must now set up Integrator 1.1’s Startup Settings to allow synchronization with QuickBooks.
10

Mitchell1/ShopKey IntegratorVersion 1.1.0
Startup Settings Once you have provided your account number, you will be prompted to set up the default settings before synchronization.
Press Yes if you wish to use the default settings (recommended). A dialog box will display the progress of the setup. Once the default settings are applied, the Startup Settings dialog box is displayed. Here you can link the Mitchell1/ShopKey application to the QuickBooks accounts:
Select Import to import and save your settings.
11

Mitchell1/ShopKey IntegratorVersion 1.1.0
In this dialog box you can also link the Mitchell1/ShopKey payment methods to QuickBooks methods, by selecting the Link Payment Method tab:
To link/create the payment methods select Link. In this dialog you can also Un-link the linked accounts and payment methods, and set your Mitchell1/ShopKey account number.
Selecting the Backup tab allows you to specify a backup directory.
12
Mitchell1/ShopKey IntegratorVersion 1.1.0
A default backup directory is provided. Users may change the location of their backup files by clicking the Browse button then selecting a location for the backup files and then clicking Save (see above).
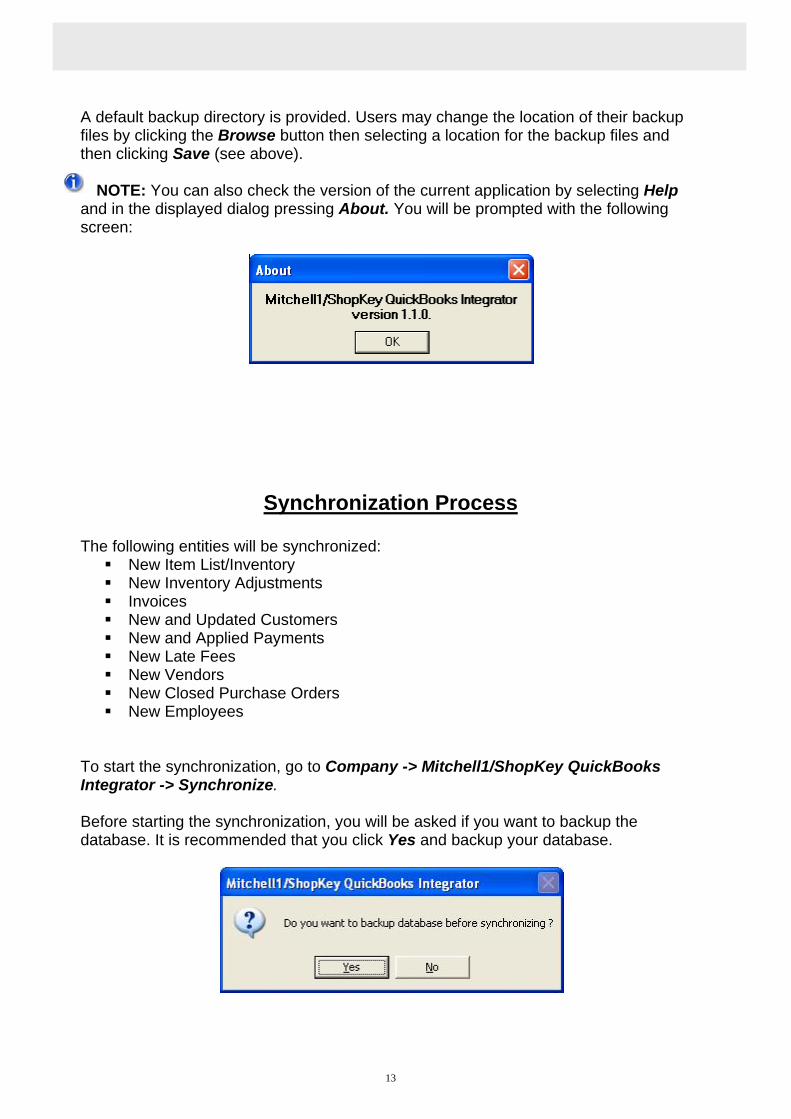
NOTE: You can also check the version of the current application by selecting Help
and in the displayed dialog pressing About. You will be prompted with the following screen:
Synchronization Process The following entities will be synchronized:
New Item List/Inventory New Inventory Adjustments Invoices New and Updated Customers New and Applied Payments New Late Fees New Vendors New Closed Purchase Orders New Employees
To start the synchronization, go to Company -> Mitchell1/ShopKey QuickBooks Integrator -> Synchronize. Before starting the synchronization, you will be asked if you want to backup the database. It is recommended that you click Yes and backup your database.
13

Mitchell1/ShopKey IntegratorVersion 1.1.0
When the backup is finished, the following message will prompt you:
Next, the application will verify the object existence in QuickBooks:
If there are missing or renamed objects, you will be warned about them here.
14
Mitchell1/ShopKey IntegratorVersion 1.1.0
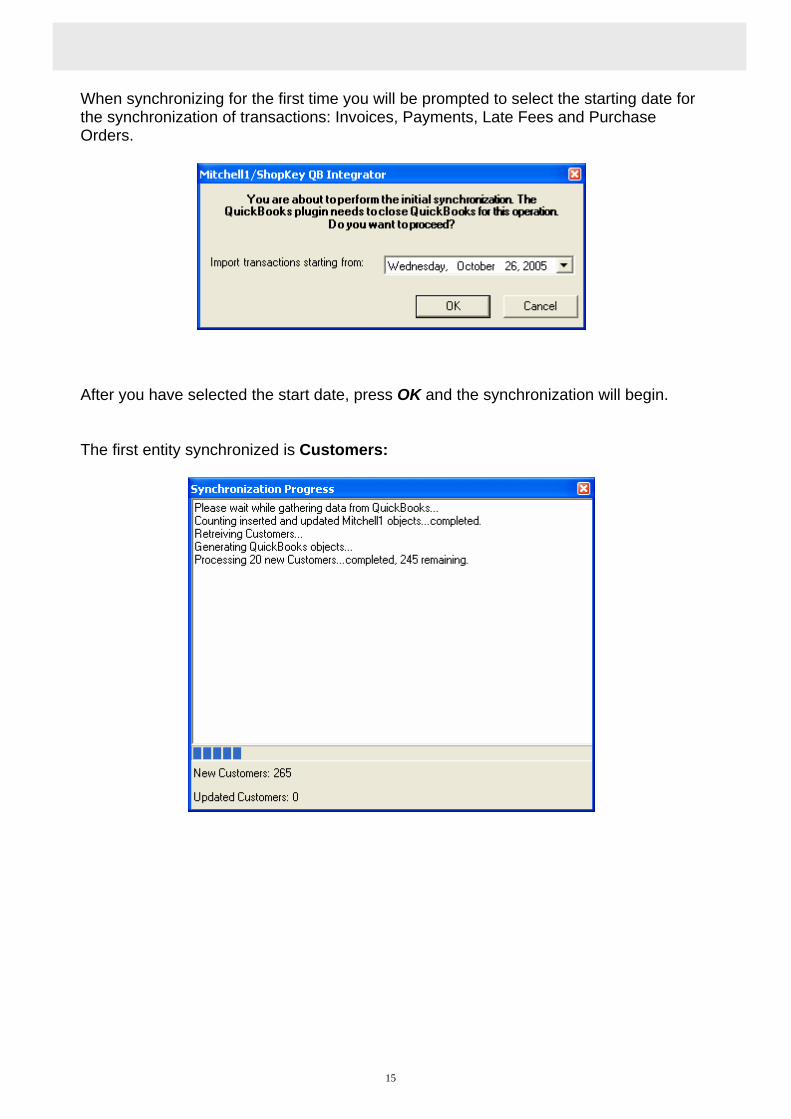
When synchronizing for the first time you will be prompted to select the starting date for the synchronization of transactions: Invoices, Payments, Late Fees and Purchase Orders.
After you have selected the start date, press OK and the synchronization will begin. The first entity synchronized is Customers:
15

Mitchell1/ShopKey IntegratorVersion 1.1.0
After Customers, the Employees will be synchronized:
After Employees, the Vendors will be synchronized:
16
Mitchell1/ShopKey IntegratorVersion 1.1.0
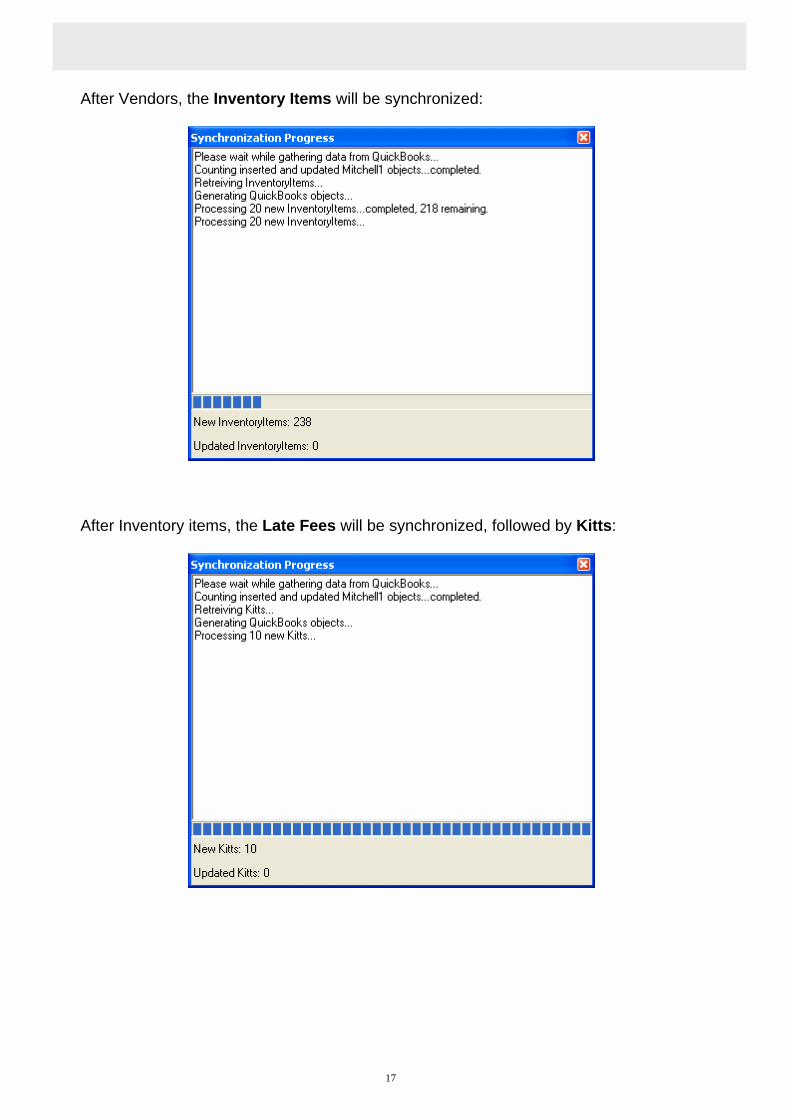
After Vendors, the Inventory Items will be synchronized:
After Inventory items, the Late Fees will be synchronized, followed by Kitts:
17

Mitchell1/ShopKey IntegratorVersion 1.1.0
After Kitts, the Invoices will be synchronized:
After Invoices, the Payments will be synchronized:
18

Mitchell1/ShopKey IntegratorVersion 1.1.0
After Payments, the Inventory Adjustment is synchronized.
Once the initial synchronization is complete, you will receive the following message:
The Shop Management and QuickBooks databases have been successfully synchronized.
You may now view the transferred information within QuickBooks.
19

Mitchell1/ShopKey IntegratorVersion 1.1.0
View Synchronized Objects To see the synchronized Customers and Vehicles, go to Customers > Customer Center. The vehicles appear as Jobs (sub-items) of Customers.
To see the synchronized Vendors, go to Vendors > Vendor Center:
20

Mitchell1/ShopKey IntegratorVersion 1.1.0
To see the synchronized Employees, go to Employees >Employees Center:
To see the synchronized Inventory Items and Kits (applies to Inventory versions of Management program. ie: Manager Plus or Shopkey Management), go to Lists > Item List
21

Mitchell1/ShopKey IntegratorVersion 1.1.0
To see the synchronized Invoices, go to Customers > Create Invoices and use the Next/Previous buttons to navigate between them:
To see the synchronized Purchase Orders, go to Vendors > Create Purchase Orders and use the Next/Previous buttons to navigate between them:
22
Mitchell1/ShopKey IntegratorVersion 1.1.0
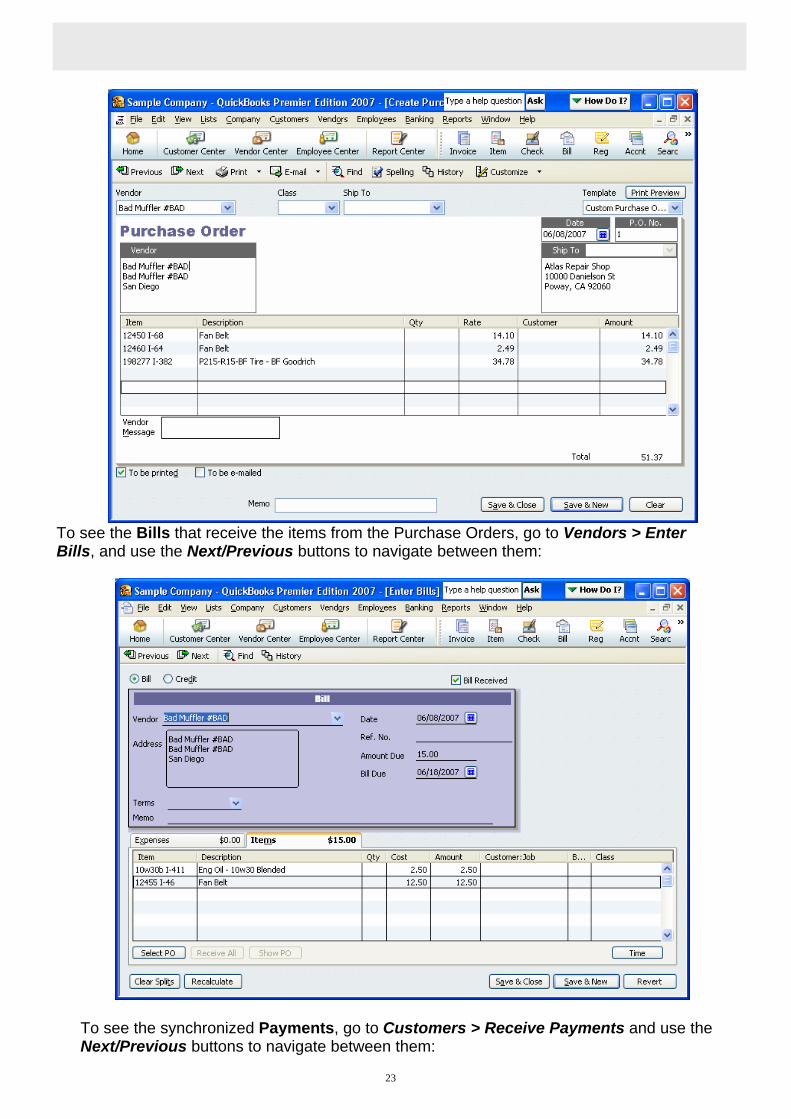
To see the Bills that receive the items from the Purchase Orders, go to Vendors > Enter Bills, and use the Next/Previous buttons to navigate between them:
To see the synchronized Payments, go to Customers > Receive Payments and use the Next/Previous buttons to navigate between them:
23

Mitchell1/ShopKey IntegratorVersion 1.1.0
To see the synchronized Late Fees, go to Customer > Create Statements:
24

Mitchell1/ShopKey IntegratorVersion 1.1.0
Select the Statement Period, the Customers to be included in the Statements and any other preferences for the Statement Report and press Preview, Print or E-mail when you have finished:
To see the Inventory Adjustments, go to Vendors > Inventory Activities > Adjust Quantity/Value on Hand and use the Next/Previous buttons to navigate between them:
25

Mitchell1/ShopKey IntegratorVersion 1.1.0
26
Mitchell1/ShopKey IntegratorVersion 1.1.0
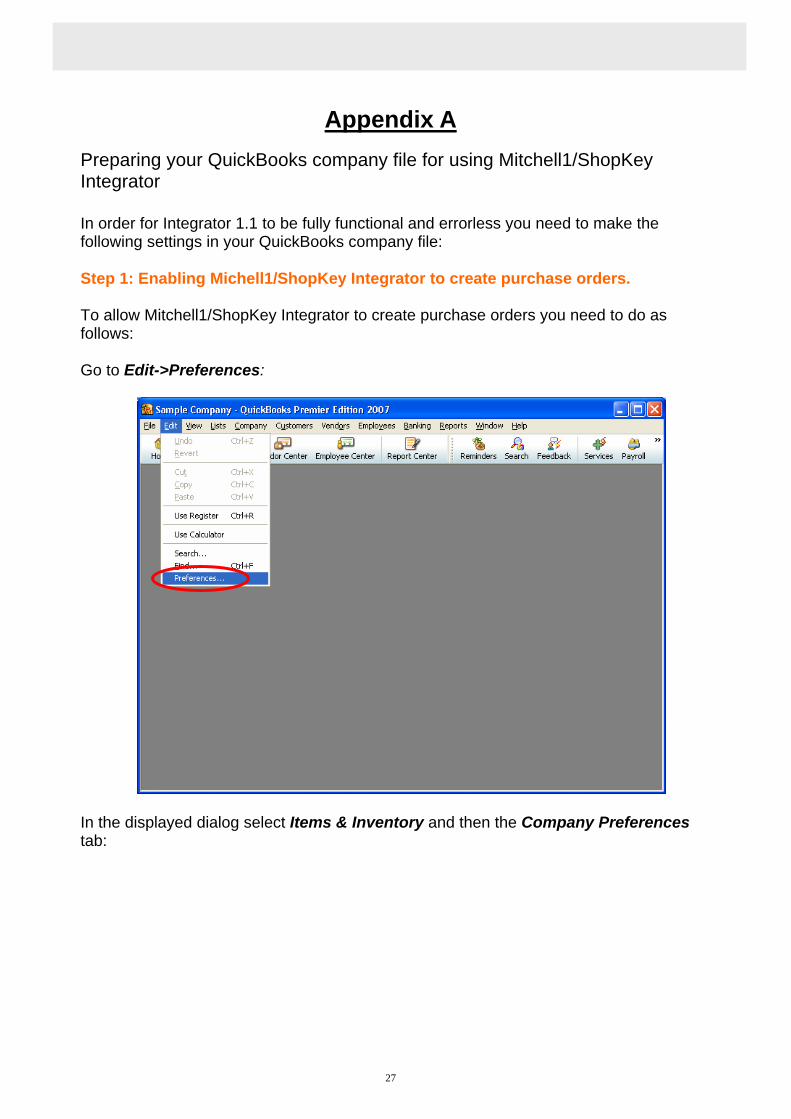
Appendix A Preparing your QuickBooks company file for using Mitchell1/ShopKey Integrator In order for Integrator 1.1 to be fully functional and errorless you need to make the following settings in your QuickBooks company file: Step 1: Enabling Michell1/ShopKey Integrator to create purchase orders.
To allow Mitchell1/ShopKey Integrator to create purchase orders you need to do as follows: Go to Edit->Preferences:
In the displayed dialog select Items & Inventory and then the Company Preferences tab:
27

Mitchell1/ShopKey IntegratorVersion 1.1.0
In this tab check the Inventory and purchase orders are active checkbox; click OK.
NOTE: If you do not enable Inventory and purchase orders are active, the next error message will prompt you:
28

Mitchell1/ShopKey IntegratorVersion 1.1.0
Step 2: Enabling Mitchell1/ShopKey Integrator to use sale taxes on Invoices
To allow Mitchell1/ShopKey Integrator to use sale taxes on the Invoices it creates, follow the steps described below: In QuickBooks go to Edit->Preferences:
In the displayed dialog box select Sales Tax and then the Company Preferences tab:
29

Mitchell1/ShopKey IntegratorVersion 1.1.0
In the Do You Charge Sales Tax section select Yes.
In the Set Up Sales Tax Items section, at Your most common sales tax item box, press the down arrow and select <Add New>:
30
In the New Item dialog box:
- Leave the default selection in the Type section (Sales Tax Item) - Write “Generic Tax” in the Sales Tax Name field - Click OK

Mitchell1/ShopKey IntegratorVersion 1.1.0
In the Preferences window, at the Your most common sales tax item section, select the tax Generic Tax, and press OK:
NOTE: If you do not allow the application to use sales taxes, the next error message will prompt you:
31

Mitchell1/ShopKey IntegratorVersion 1.1.0
Appendix B Creating a new QuickBooks company file Open QuickBooks and go to File -> New Company:
32
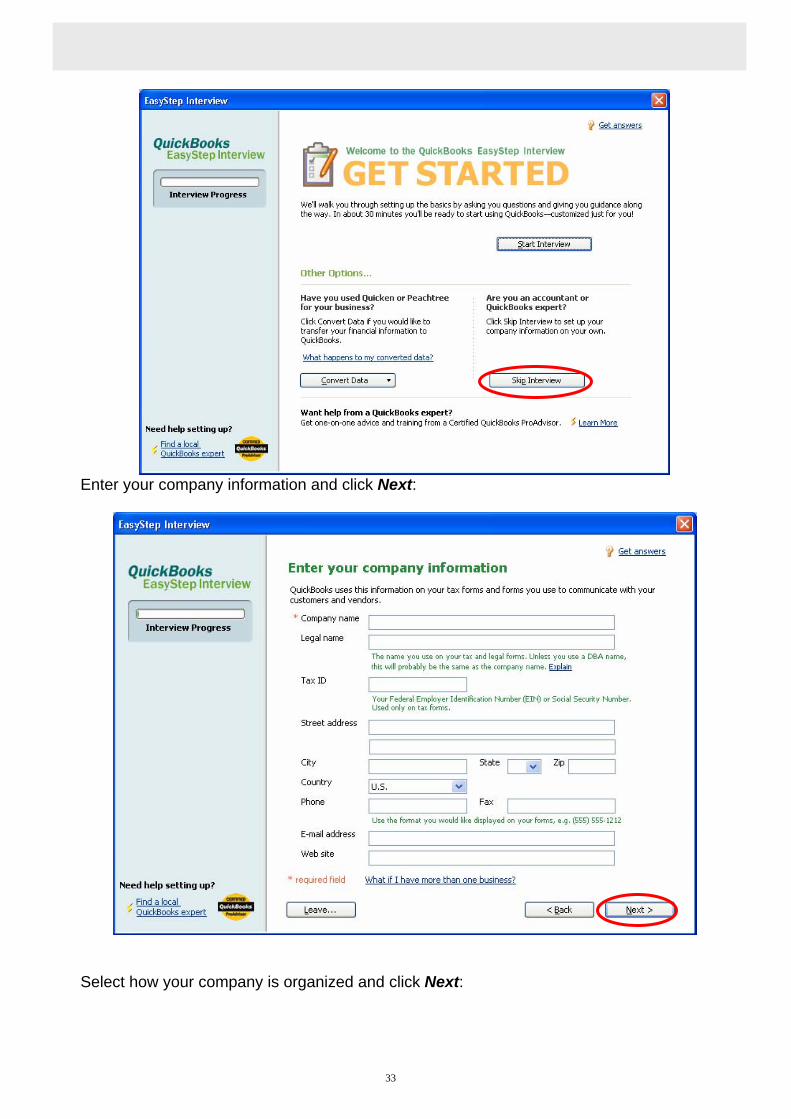
In order to shorten the process of creating a QuickBooks company file, click Skip Interview:
Mitchell1/ShopKey IntegratorVersion 1.1.0
33
Enter your company information and click Next:
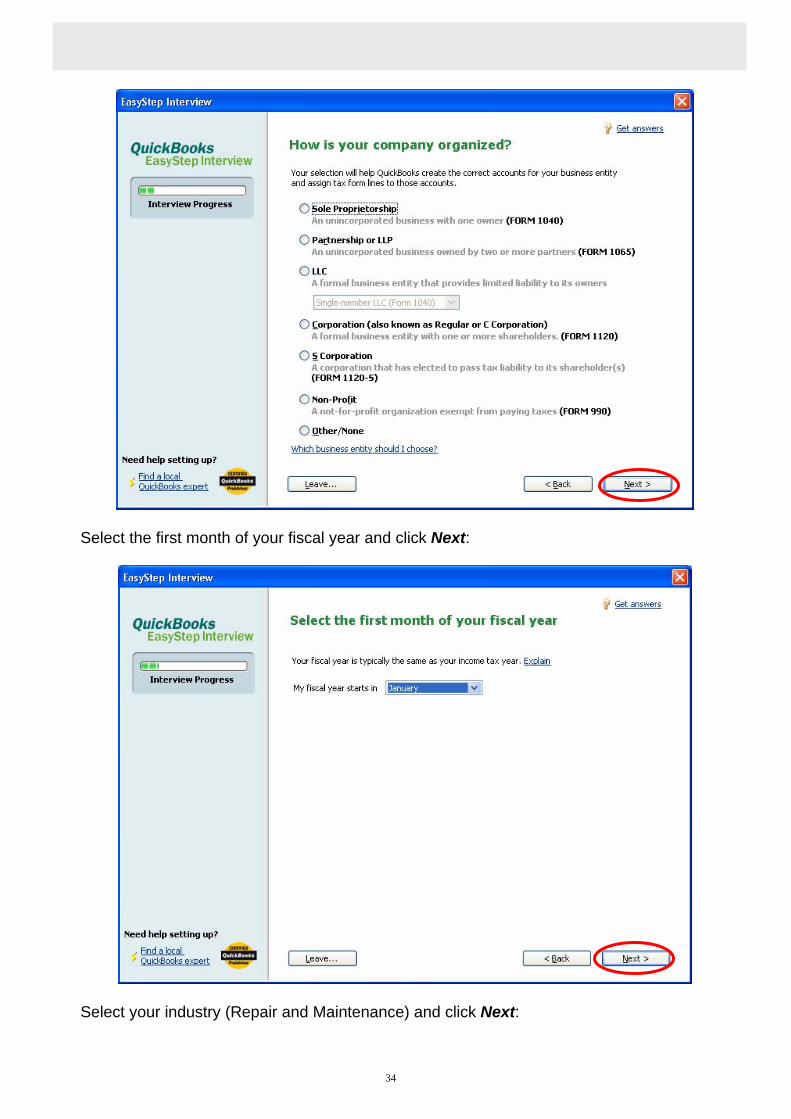
Select how your company is organized and click Next:
Mitchell1/ShopKey IntegratorVersion 1.1.0
34
Select the first month of your fiscal year and click Next:
Select your industry (Repair and Maintenance) and click Next:

Mitchell1/ShopKey IntegratorVersion 1.1.0
35
Click Finish:

Mitchell1/ShopKey IntegratorVersion 1.1.0
Select a location for your company and click Save:
36

Mitchell1/ShopKey IntegratorVersion 1.1.0
Appendix C Uninstalling Integrator 1.1
To uninstall Integrator 1.1, close QuickBooks, then go to Start -> Settings -> Control Panel -> Add/Remove Programs, select Mitchell1/ShopKey QB Integrator and click Remove.
37

Mitchell1/ShopKey IntegratorVersion 1.1.0
38