axiamote xrun / xdata user guide · pdf fileaxiamote xdata / xrun user guide 8. device...
TRANSCRIPT

Axiamote xRun / xData
User Guide
www.axiamo.com
Axiamote xData / xRun User Guide 1
Table of Contents
Welcome3 What's Included3 Safety Information3 Your Axiamote3 Charging4 Push Button4 Color LED
Software Setup5 Android7 Windows7 Linux
Getting Started8 Powering On8 Connecting The Axiamote Sensors
Using Axiamote9 Measurements10 Device Calibration10 Data Storage10 Managing Data
Maintaining the Axiamote11 Battery Care11 Water Damage11 Cleaning
Warranty & Service12 Axiamo Limited Warranty Information12 Warranty Period12 Exclusions and Limitations
Regulations And Conformity
Axiamote xData / xRun User Guide 2

WelcomeCongratulations on your purchase of the Axiamo professional motion sensor with 10degrees of freedom motion tracking.
What's Included1. Axiamote Motion Sensor
2. USB Cable
3. Velcro Strap
4. Warranty 365 days
Safety InformationSee Battery Care for important battery care and battery safety information.
Your AxiamoteA Micro USB Connector
Charge your Axiamote sensor
Wired communication
B Push Button
LED status indication
Control the Axiamote
ChargingThe Axiamote has an internal rechargeable Lithium battery. Connect the provided MicroUSB cable to any USB Charger or Computer to start charging (5V / min. 100mA).
The LEDs will indicate the charging process with a color transition from Red to Green.When the battery is fully charged, this animation will stop and a periodic white blink willindicate the successful charging.
You always can check the current battery level by short pressing the push button. TheLED will flash three times in a color indicating the current battery level.
Axiamote xData / xRun User Guide 3
A
B

A full charging process from Empty to Full needs about 2 to 3 hours. Although after 2hours the battery is charged to around 90%.
If the battery gets low, the periodic white blink is changed to a periodic red blink toindicate charging is necessary.
Push ButtonThe push button has several functions:
• Short pressing
Indicate the current battery level. Described in chapter Charging.
• Long pressing
Power on the device. Press until the LED lights up in a color.
Power off the device. Press until the Red light goes off.
Color LEDThe LED indicates the current device status:
҈҈ ҈҈ ҈҈periodical white blink Device is in idle mode and ready to use. Power off if un-
used for long time.
҈҈ ҈҈ ҈҈blink in colors Multiple combinations possible. Meaning of colors:
Green: Device is samplingRed: Device is recordingBlue: Device is streaming over Bluetooth
Axiamote xData / xRun User Guide 4
Fully Charged Empty

Software Setup
AndroidSince the Axiamo App is not yet in the Play Store, it has to be downloaded and installedmanually:
a) Download the Axiamo App from the Downloads page.
http://www.axiamo.com/downloads
b) Before installing the app, you will need to allow apps from Unknown sources.
c) Then install the downladed .apk application.
Axiamote xData / xRun User Guide 5

Windowsa) Download the Axiamo App from the Downloads page.
http://www.axiamo.com/downloads
b) Unzip the file to your desired location.
c) In the bin folder, double click on: AxiaDesk.exe to start the App.
Important note:
It is vital to check that the USB Win drivers have successfully been installed onto the PC.To ensure this:
1. Close the Axiamo App and reconnect the Axiamote using the USB cable. 2. A pop up will ask for the proper driver, which you can find in the recources folder. 3. If no pop up appears, you can also initiate the driver installation process from the
Device Manager in “Control Panel”.
LinuxAxiamo supports Ubuntu as Linux distribution.
Prerequisites:
Before installing please make sure your user is member of the plugdev group:
$ sudo usermod -a -G plugdev <YourUserName>
Unless you need it, please uninstall the “modem-manager” software which comes withUbuntu, since it interferes with the Axiamo USB devices:
$ sudo apt-get purge modem-manager
Then the normal installation process can be done with:
a) Download the Axiamo App from the Downloads page.
http://www.axiamo.com/downloads
b) Unzip the file to your desired location.
c) In the bin folder, double click on Axiamo to start the App.
Axiamote xData / xRun User Guide 6

Getting Started
Powering OnTo power on the Axiamote, long press the push button until the LED starts to illuminate.During boot up, different colors may be indicated. The Axiamote will regularly blink whiteas soon it has finished the boot up routine.
You can power off the sensor anytime by long pressing the button. Keep pressing thebutton until the Red LED goes off.
Connecting The Axiamote SensorsThe Axiamote Motion Sensor is capable of USB as well as Bluetooth for data connection.Both ways offer exactly the same functionality for data connection. However chargingrequires the USB to be connected to a powered USB plug.
USB Connection is supported with AxiamoApp for Windows and Linux. To connectthe Axiamote, just plug the Micro USBcable to the Sensor and the Computer.
Bluetooth Connection is supported on allplatforms. In Android, you will have to pairthe Axiamote Sensors for the first time,then the Software will recognize theAxiamote Sensors.
In the Axiamo App, press on Scan to startscanning for devices. The number ofconnected deviceswill be indicated onthe bottom left.
Axiamote xData / xRun User Guide 7
ConnectedDevices
Scan for Devices

Using Axiamote
MeasurementsThe procedure to configure and start measurements is the same for all measurement types:
a) Create your User (only required once)To allow multiple users using theAxiamote, the measurements areseparated to individual users.
b) Select your User
c) Select the measurement type
d) Configure the measurement parameters
e) Start recording / streaming
Axiamote xData / xRun User Guide 8
Device CalibrationTo get the best precision, it is recommended to calibrate the device before everymeasurement. Every IMU has a small long term drift which can be largely eliminatedthrough pre measurement calibration.
To calibrate your device, make sure it is positioned horizontally on a flat surface and it isnot moved at all while calibration.
Then open the Axiamo App and press the calibration button. The device will indicate thecalibration with a color burst from red to green. When the animation has finished yourdevice has compensated all offsets and is ready for the measurement.
Data StorageThe Axiamote has internal flash memory of 1GB (1024 Megabytes) enough for numerousmeasurements (strongly dependent on the measurement configuration).
Normally previous measurements are not deleted when starting a new measurement.From time to time it is necessary to clean up the internal flash memory to free memory.This can be done by clicking on Delete internal memory in Apps Basic→ .
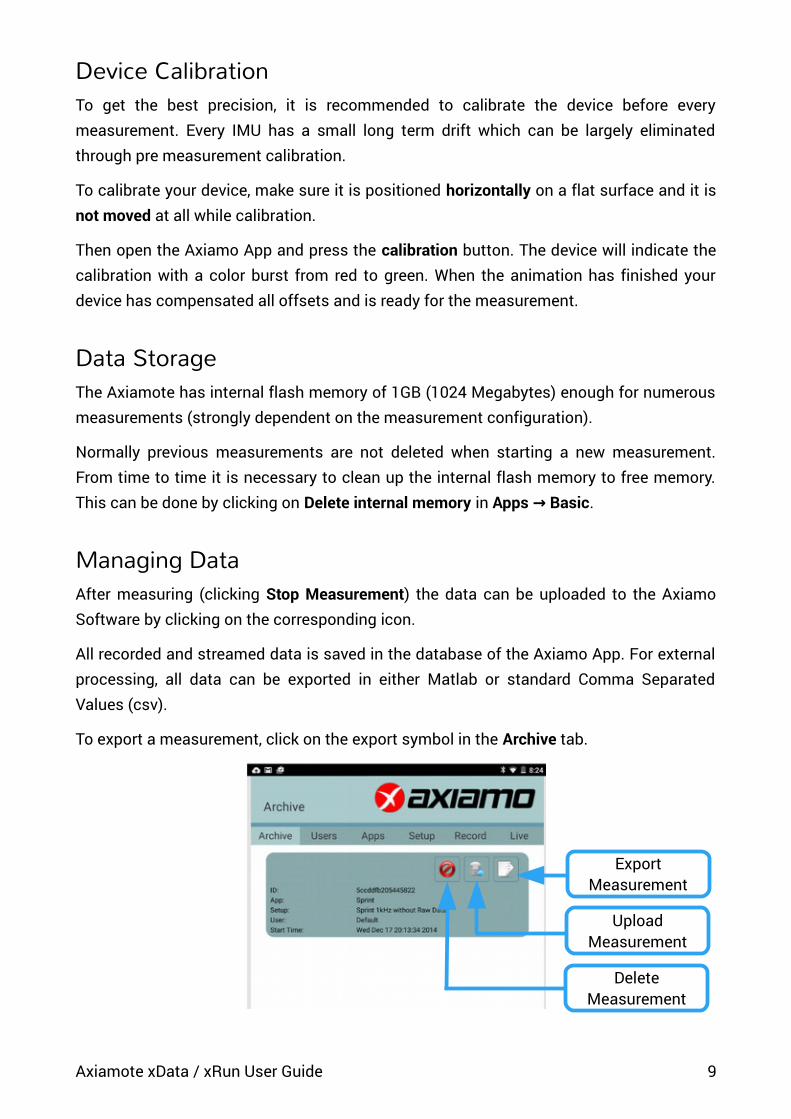
Managing DataAfter measuring (clicking Stop Measurement) the data can be uploaded to the AxiamoSoftware by clicking on the corresponding icon.
All recorded and streamed data is saved in the database of the Axiamo App. For externalprocessing, all data can be exported in either Matlab or standard Comma SeparatedValues (csv).
To export a measurement, click on the export symbol in the Archive tab.
Axiamote xData / xRun User Guide 9
UploadMeasurement
ExportMeasurement
DeleteMeasurement

Maintaining the Axiamote
Battery CareAxiamote Sensors contain rechargeable lithium polymer batteries. Follow theseinstructions and guidelines to maintain the battery lifespan.
Warning: If you do not follow these guidelines, the battery life could be shortened andthere is risk of damage to your Axiamote, risk of fire, risk of electrolyte leaks andchemical burns or even risk of injury.
Battery Care Guidelines
• Recharge the battery at least once every 6 months
• Do not expose Axiamote Sensors to high temperatures (> 60°C) or high humidity(> 90% RH)
• Do not disassemble, puncture or incinerate the Axiamote device.
If the casing of the device breaks and the battery is exposed, keep the battery away fromchildren. Contact your local recycling authority to properly dispose of the device &battery.
Battery Lifespan
• The battery lasts for approximately 300 charge cycles. If charged on a weeklybasis, the battery should last for at least 5 years.
• The battery is non-replaceable. If the battery charge length is noticeably muchshorter than before, your Axiamo product may have reached its end of life. Contactyour local recycling authority to properly dispose of the device and battery.
Water DamageThe Axiamote Sensor is not waterproof! Do not use under water or it will be irreparablydamaged. Water damage is not part of the warranty and will not be replaced.
CleaningTo clean the device, use a moist tissue. Be sure to not put any water into the device.
Axiamote xData / xRun User Guide 10
Warranty & ServiceBe sure to visit our support pages to find online help, FAQs and manuals for your product.
Axiamo Limited Warranty InformationThis product is warranted to the original purchaser to be free from defects of quality,materials or workmanship at the time of delivery for the Limited Warranty Period (seebelow). During the Limited Warranty Period, Axiamo GmbH will, at its sole discretion,remedy such defects free of charge either by a) repairing, or b) replacing, or c) refundingthe original purchase price (excluding taxes, shipping, handling, duties, and similaramounts), subject to the terms and conditions of this Limited Warranty.
Warranty PeriodThe Limited Warranty Period will automatically expire without notice, and this LimitedWarranty is not enforceable, if:
1. the product has been opened or otherwise tampered with
2. the product has been serviced by a person other than Axiamo GmbH
3. the serial number has been removed, altered or made illegible in any way
4. the product was not purchased from Axiamo GmbH or any authorized resellers
Exclusions and LimitationsThis Limited Warranty does not cover, and customers will not be entitled to any claimunder this Limited Warranty or otherwise for:
• problems arising from abuse or rough, careless, or improper handling (and withoutlimiting the foregoing, damage resulting from bending or dropping the product willbe deemed the result of abuse or improper use)
• problems arising from misuse contrary to intended or recommended use
• problems arising from alteration of the Axiamo product, such as moisture or waterdamage sufficient to affect the proper function of the product, and damage to theproduct case or visible cracking of the face
Axiamote xData / xRun User Guide 11
Regulations And Conformity
EU RESIDENTS: Do not dispose of this product as unsorted municipal waste. It is yourresponsibility to return this product to your local recycling service.
If there are electrostatic disturbances in the environment, the product may malfunction ordisplay an error. In this case, reset the product or relocate to an area without suchdisturbances.
Designed and produced in Switzerland
Axiamote xData / xRun User Guide 12