aws setup guidelines - visualizationpoloclub.gatech.edu/.../hw3/awssetupguidelines.pdf · applying...
TRANSCRIPT
AWS Setup Guidelines For CSE6242 HW3, this doc has an updated version of the guidelines by Diana Maclean
What we will accomplish? This guideline helps you get set up with the Amazon Web Services (AWS, a “cloud” platform) where you will run large-scale analysis on big data. Here are you will learn to do
1. Create an AWS account (to get access to EC2, Elastic MapReduce and S3 storage). 2. Create storage buckets on S3 (to save outputs and logs of MapReduce jobs). 3. Create a key pair (required for running MapReduce jobs on EC2). 4. Get Access Keys (also required for running jobs on EC2). 5. Redeem your free credit (worth $100). 6. Set up a CloudWatch Usage Alert 7. Familiarize yourself with S3, EC2 and EMR (by doing a sample MapReduce run). 8. PIG Debugging 9. Instructions for Windows users
1. Create an AWS account
● Go to AWS website and sign up for an account. ● For now, please enter the required details, including payment details (you will need a
valid credit card or debit card to sign up). Please follow Step 5 to redeem the $100 credits.
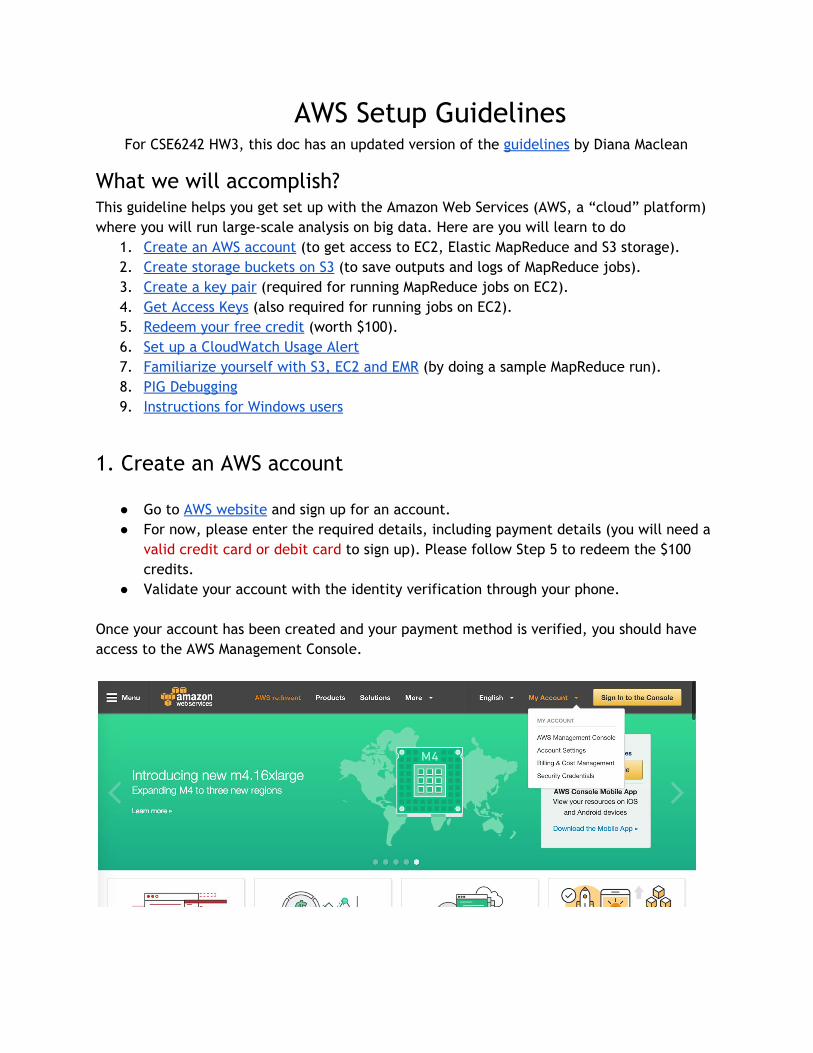
● Validate your account with the identity verification through your phone. Once your account has been created and your payment method is verified, you should have access to the AWS Management Console.

You AWS Management Console should look like this:
We will be using the services highlighted in red. (S3, EC2 and EMR)
2. Create storage buckets on S3 We need S3 for two reasons: (1) An EMR workflow requires the input data to be on S3. (2) An EMR workflow output is always saved to S3. Data (or objects) in S3 are stored in what we call “buckets”. You can think of buckets as folders. All S3 buckets need to have unique names. You will need to create some buckets of your own to (1) store your EMR output and (2) store your log files if you wish to debug your EMR runs. Once you have signed up, we will begin by creating the log bucket first.

i. In the AWS Management Console click on S3 under All services → Storage. In the S3 console, click on Create Bucket.
ii. Create a logging bucket: Click on Create Bucket and enter for following details.
Bucket name format cse6242-<gt-username>-logging Region Select “US Standard” in the Region dropdown.
Click on Create (not Set Up Logging >). Note: Please select “US Standard” only. If you have buckets in other regions, data transfer charges would apply. iii. A new bucket will appear in the S3 console. Clicking on it will show you that it is empty.
iv. Create the main bucket: Go back to the main screen (clicking on All Buckets). Again, click on Create Bucket and enter for following details.
Bucket name format cse6242-<gt-username> Region Select “US Standard” in the Region dropdown.

Since we will link this bucket to our logging bucket, the regions for the two buckets should be the same. We will link our logging bucket to the one we are creating now, so click on Set Up Logging >. Click on Enabled to enable logging, and start typing in the name of your logging bucket. It should appear in the drop down menu, select it. Clear the Target Prefix field and click Create.
We are done creating the two buckets at this point.

3. Create a key pair Note: Select the region on the top right as US East (N. Virginia) since the data bucket is stored in this region. When you run jobs on EMR, you will need to have a valid public/private key pair. To create your first key pair, click on EC2 under Compute in the AWS Management Console.
You should see a link stating 0 Key Pairs under Resources. Click on this.

You will be given an option to Create Key Pair. Name your key pair as you wish. Upon providing a name and clicking on Create, your private key (a .pem file) will automatically download. Save it in a safe place where you will be able to find it again (IMPORTANT, do not lose this file)
If you need to access your public key, you will be able to find it in the same place where you found your account credentials. Amazon keeps no record of your private key, and if you lose it, you will need to generate a new set.

If your computer runs Windows, use the steps in the following link to convert your .pem file to a .ppk file for use with PuTTY. Read the section titled Converting Your Private Key Using PuTTYgen. If you use the AWS Management Console, you would typically not be required to access your private key. However, you will be asked to name your access key pair and the private key each time you run an EMR job. If you wish to log into the master node running your MapReduce job, you will need your .pem file (you will need this in case you wish to run an interactive PIG job flow). To log on to the master node (you can find the address of the master node from the MapReduce dashboard), you will need to do the following: Note: Do not copy paste the command from this pdf as your command may fail due to the presence of special characters.
$ ssh hadoop@<master-node-address> -i <path-to-pem-file>/<pem-file-name>.pem
4. Get Access Keys Click on My Security Credentials under your username (top right). Click on Continue to Security Credentials.
Click on Access Keys → Create a new Access Key. Download the Access Key file (do not lose this file). Now you are ready to run a MapReduce job.

5. Redeem your free credit To add the credit to your account, you will need your unique Credit Code obtained after applying for the AWS Educate program for Students (follow the steps at the start of HW3). Once you have your code, Click on your name (top right corner) → Click on My Account. Click on Credits. Enter the Code into the Promo Code text box, and click Redeem.

Please contact the CSE6242 instructors immediately if this does not work. You can check the credit remaining by clicking on the Bills from your account page or by returning to this page. Sometimes this can take a while to update, so don’t be surprised if recent changes are not immediately apparent. We will set up a monitor in the next step which is triggered when you utilize half of the credit.
6. Set up a CloudWatch Usage Alert Make sure your region (in the upper right corner of the screen) is set to: US East (US Standard). Test whether this email alert is working before scheduling in practice. That is, out of $100, when your credit balance goes below say $95, schedule a test alert and make sure it works. Remember this alert works only once. So once you get an alert for $95, you schedule the next alert for $70 and the next one for $60 and so on. Turn on Alerts
1. Go to My Billing Dashboard page.
2. Under Preferences, check the box labeled Receive Billing Alerts
Turn on Custom Alerts Now we need to create a custom alarm so that it tells you when you have spent money.
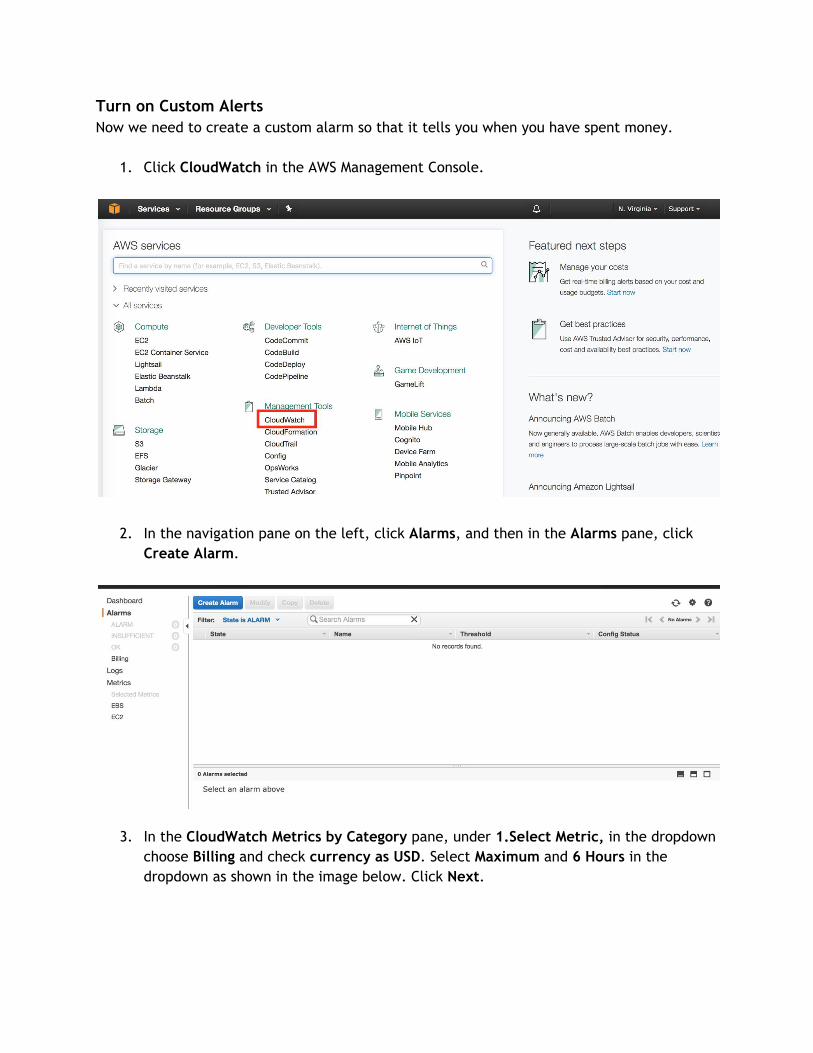
1. Click CloudWatch in the AWS Management Console.
2. In the navigation pane on the left, click Alarms, and then in the Alarms pane, click Create Alarm.
3. In the CloudWatch Metrics by Category pane, under 1.Select Metric, in the dropdown choose Billing and check currency as USD. Select Maximum and 6 Hours in the dropdown as shown in the image below. Click Next.

4. Fill out the alarm details and click New List next to Send notification to: and enter your name and email.
You have now created an alert that will bother you when you pass $50. Consider making another alert which is activated when you use up $90 so that you do not get charged!

7. Familiarize yourself with S3, EC2 and EMR
1. Click on Elastic MapReduce(EMR) link in the Analytics section of the AWS Console. 2. Under Step 1 : Software and Steps , Select only Hadoop and Pig and from the options
and unselect others in the Software Configuration options menu. 3. In the Add Steps, choose Step Type Pig Program and then click Configure.
1a. Fill the form with details as provided in the box and image below.
Name : (any name)
Script S3 Location: s3://cse6242-<gt-username>/pig-small.txt (upload the script here) OR s3://cse6242-<gt-username>/pig-big.txt
Input S3 Location: s3://cse6242-2017spring-bigrams-small/* OR s3://cse6242-2017spring-bigrams-big/*
Output S3 Location: s3://cse6242-<gt-username>/output-pig-small (don’t create the output folder) OR s3://cse6242-<gt-username>/output-pig-big
Action on failure : Terminate (else you may be charged even if the task fails)
Create an S3 bucket cse6242-<gt-username> and upload all pig scripts here. Do not create any output folder as given in the box above as they are created automatically. Each time you run your code, ensure you delete all the new output folders created or have different output

folder names for each run. (eg: output1-pig-big, output2-pig-big, etc) Summary: Upload your script to an S3 location and select the location of your script from the list of items available at Script S3 Location. For the S3 output Location you should specify the bucket and an additional unique folder for each new run. Now, click Save.
Note:
● Ensure that you first test your code on the smaller dataset. (not larger) ● Each time you run the code, it may take a couple of hours to terminate. ● To test and debug your code step by step, refer to the Debugging section at the end of
the document. This is highly recommended if you are not familiar with Pig. 2. For Step 2 : Hardware configuration, modify the EC2 instances as per your needs and select Next. (One Master instance and 1-15 Core instances should be sufficient. You may face Bootstrapping errors if you exceed a certain limit of core instances)

View 1 : Using VPC (Virtual Private Cloud)
The costs listed in pricing are charged on an hourly rate, based on the number and type of nodes in your cluster. 3. For Step 3 : General Cluster Settings, type a cluster name of your choice, and add the correct path to the logging folder (created in Step 2). Check Logging, Debugging and Termination protection as shown in the image below. Click Next.

4. For Step 4 : Security, select your key pair and click Create Cluster to run the application.
5. The cluster must start running as follows,
You now can view the status of your application in this “Cluster Details” screen. It takes several minutes for the whole process to run. Provisioning - Amazon locates resources for your application Bootstrapping - Amazon sets up and configures the nodes to run your application Running - Runs and writes to your output bucket. Terminating - Amazon deconstructs the setups you used for the application You can track its progress once it’s been created. After the application terminates, you could go back to the S3 output bucket you chose. The

results will be written to the output folder. You should have several partxxxx files in the output folder. These are texts of the output! You have just successfully completed a MapReduce job flow on AWS and are ready for large scale data analytics.
8. Debugging A very important part of running Pig Scripts on AWS is the ability to also run your code directly on the master node. You can run your script step by step and identify the exact step where an error occurred. The steps to debug are given below.
1. You must repeat all the steps in Section 7, except with three modifications: a. Ensure that you verify the script location, its input and output path. Do this
each time you create/clone a cluster (many students make a mistake here) b. Modify the action on failure option to “Continue” c. Uncheck the “Auto-terminate cluster after….” option.
Note : You must revert back these changes after debugging else you may leave the clusters running forever and you will be charged for this.

2. Once the cluster is running, you can open the TCP Port of your Master node to allow SSH connections. Click on the security group of your master node.
Add an entry for SSH in the inbound tab of your master node with the exact details as follows.

You can now SSH into your master node. 3. To SSH, first copy the command as follows.

Modify the path to your .pem file and run the command on your terminal. (ensure that the file permissions of your .pem file is set to 400). 4. You will now be logged into the master node. Type pig to be able to run commands on the pig shell. 5. Run your code line by line and spot the errors! Use commands such as illustrate, describe and dump to debug your code.
9. Instructions for Windows Users
1. Open PuTTY on your computer. On the cluster's page you'll see the term Master
DNS. Under host name in PuTTY, type hadoop@DNS, where DNS is the
aforementioned master DNS.
2. On the left toolbar, go to connection → SSH → Auth and upload the private key
you should have generated earlier (the .ppk file).
3. Click Open, then Yes to the popup.
4. You should see a hadoop shell. Type pig and press enter to get started.