avl 12 harness dobby loom - avl looms
TRANSCRIPT

AI/L LOOMSn llltl:Ns & \'l()l I I II L(X)\lS l\(
I}UII,DEI(S OF FINE HANDI.OOMS& PnODUCTION WEAVING EQUIPMEN'|
Weqving Instruc tions

INTRODUCTION
In many ways, Ahrens & Violette looms are innovative in the weavingfield. Jim Ahrens, a mechanical engineer with over forty years ofprofessional hand and power loom weaving experience, designed the looms.His search for a hand loom that would function more efficiently thanthose presently available led him to years of research. He studied old,and in many cases, nearly for5lotten loom designs and weaving techniques,especially those of the guild masters of Europe. Jim's design is rnade upof the most workable features of the numerous hand and po\^7er operatedlooms that he has worked on and studied over the years. The result is a
uniquely engineered hand loom. Each feature of the Ahrens & Violetteloom has been chosen to reduce time and effort and maximize professionalresults.
Learning to warp and weave on an AVL Loom will mean learning some newprocedures and techniques even for the experienced weaver. Since thelooms will not function to their full capacity unless care is taken todress and operate them properly, it is greatly worth your while to studythe following instructions in detail. The time taken to make theseprocedures your o\^7n will result in increasing your weaving speed andefficiency which will lead to a greater enjoyment of the entire weavingexperience.
The information presented in the following pages represents what I havelearned directly from Jim Ahrens coupled with my own experience workingon the looms over the past eight years.
S incere ly ,
' Robin Violette
12 HARNESS DOBBY LOOM
TABLE OF CONTENTS
WINDING ON THE WARP ..... PAGE
Unfolding the loomPlanning the warp lengthPreparing the warpInstalling auxiLLary warp rollerUsing the raddleUsing the groove in Lhe warp beamPreparing paper for winding onWinding warp onto warp bearn
THREADING, SLEYING, AND TYING ON aaaaaaaaaa
Folding the loomPreparing for threadingRaising the harnessesS leyingUsing the temporary apronTying on
SETTING THE TENSION DEVICE
13
17
19PEGGING THE DOBBY UNIT........ raaaaaa
tabby chainPegging and inserting aDrawing up a peg planpegging a pattern chain
ADJUSTING THE SPRING LEVERS
WEAVING PROCEDURES
Using the treadlesAdvancing the clothWeaving in the heading and lease sticksChanging the dobby chainUsing a long length of chainMoving the chain backwardsRemoving Ehe temporary apronRemovinpl part of the weaving from loomExtending the end of the warp
TROUBLE SHOOTTNG ..... ...........,. 36
BOOK LrST..... ..... 37
28
30

WINDING ON THE TARP
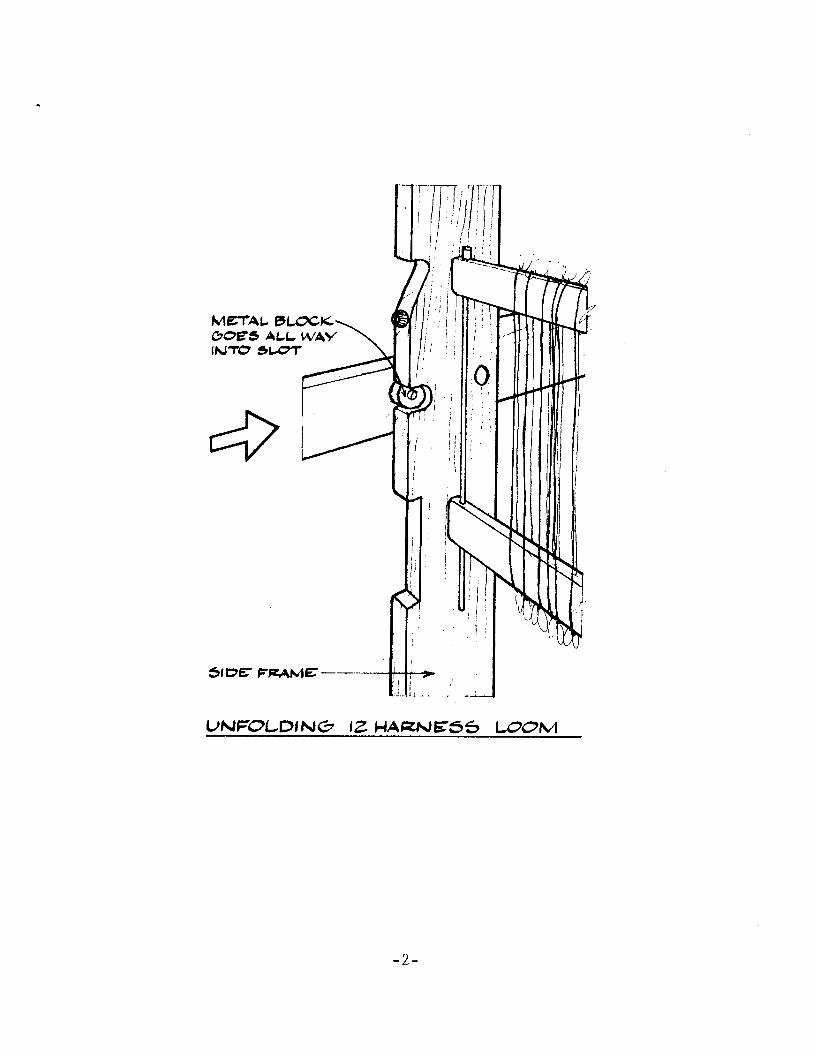
1. Your new Dobby Loom comes boxed fu1ly assembled in its foldedposition. After removing the loom from its container it can be openedup to the weaving position by first loosening the two aluminum handlesat the side of the loom. These handles secure the side arms that holdthe cloth and warp beam. Now with the handles loose the arms can belifted up into a horizontal position. Notice that bolted onto theinside of each arm is a round metal bushing. These bushings are goingto fit into the two corresponding slots in the front edge of the loornsides. See drawing on next page. So now push forward on the clothbeam so that the loom arms slide forward; keep pushing until chebushings are all the way into their slots. Check to make sure thatthe front edges of the bushings are touching Lhe back of the slots.Good; now simply retighten the two handles.
The next step is to distribute the heddles over the harnesses. Thelooms are shipped from the factory with two bunches of heddles on eachharness. Simply distribute the heddles evenly over the length of theharness, and then cut the top and bottom eyes (see diagram, page 3)freeing the heddles from each other.
The last thing you must do to prepare the loom is to install the warpbeam handle which came packed 1oose. Simply bolt the handle to theright end of the warp beam with the bolt and nut provided. The loomis now ready to be warped.
2. First, plan your warp width and length. Avoid having a warp that istoo long as this would make the wound-on warp so fat that it wouldchange the shed ang1le, thus creating tension problems in the weaving.Here are some guidelines to use in determining your warp length: Useup to 40 yards for a very fine warp material, up to 30 yards for a
medium fine warp material, up to 20 yards for a medium thick material,and up to 10 yards for a thick warp material. Also keep in mind that
-1-
Mg'TA, Ct-oCt<OO€S ALL WAVtN70
'|,sT
Str'E. FB\ME
Ur{,F()LE)ItrJC" t7 S.lPrg|Ng53 lpOM
-2-
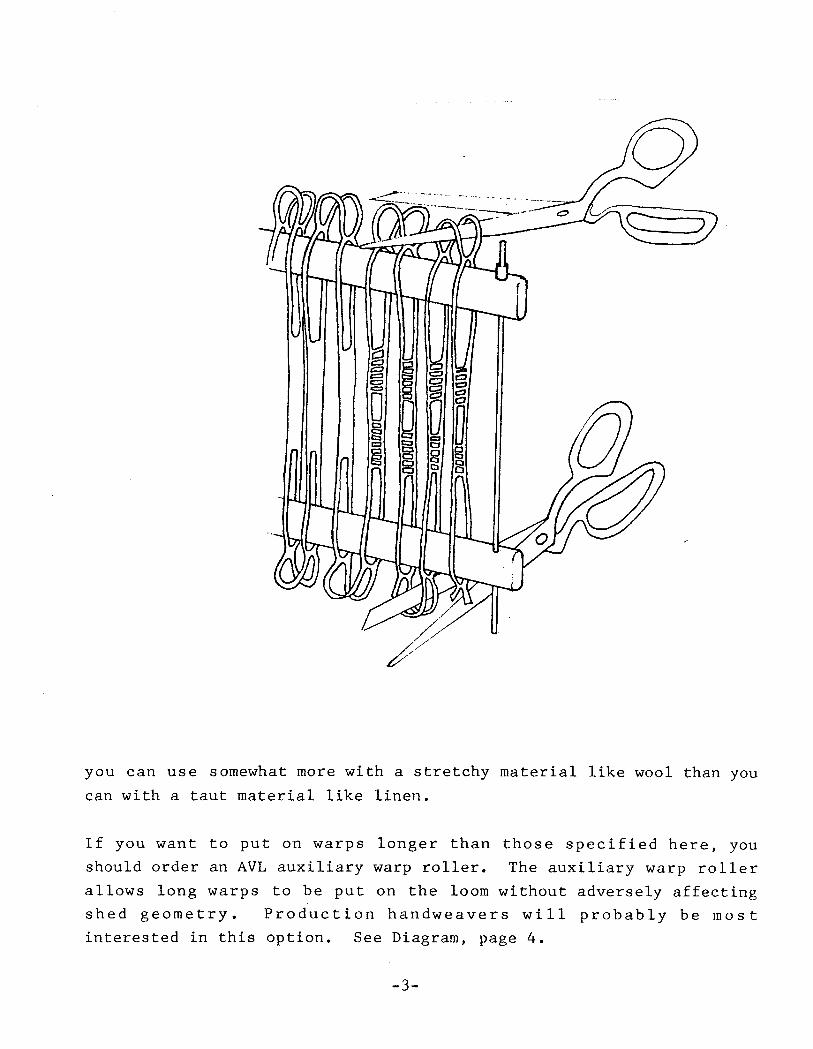
you can use somewhat more vrith a stretchy material like wool than youcan with a taut material like linen.
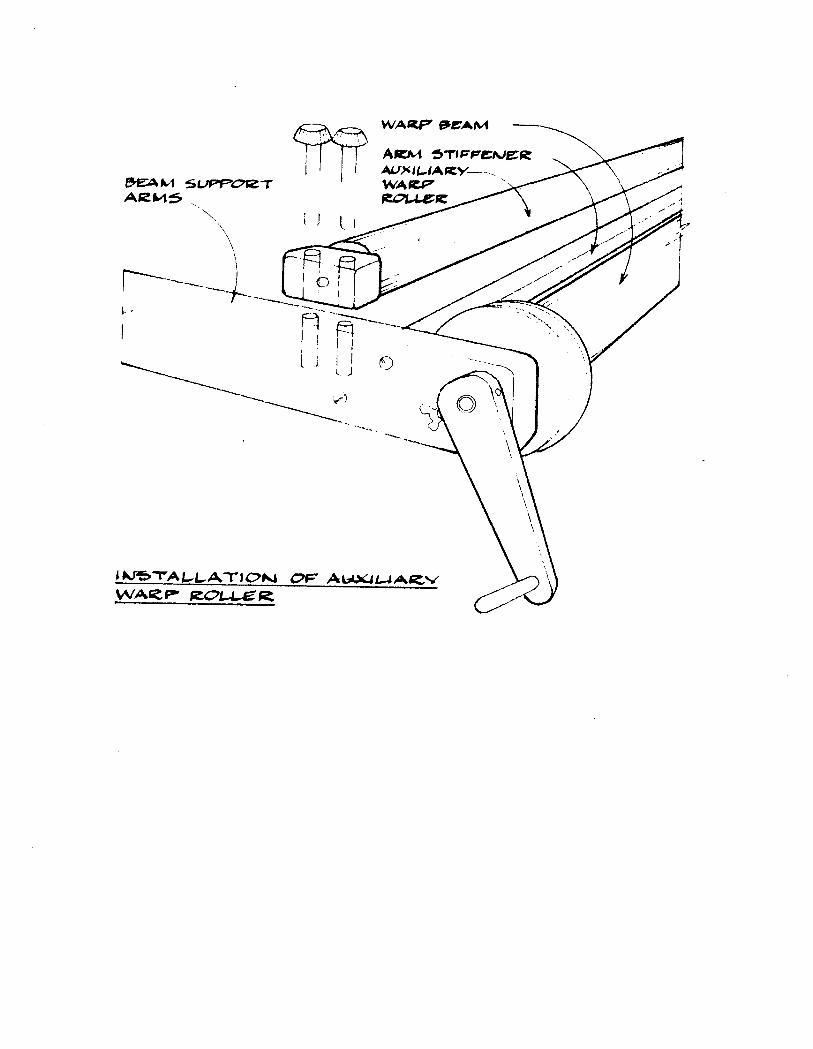
If you \^rant to put on warps longer than those specif ied here, youshould order an AVL auxiliary warp roller. The auxiliary warp rollerallows long warps to be put on the loom without adversely affectingshed geometry. Production handweavers will probably be mos tinterested in this option. See Diagrarn, page 4.
-3-
a'Aw stt??oe:rA'C.)45
lvA*F QEAM
A-M SAIFFENER,AL'XILIABY-..,wA37FOuEE
\I
1--*l..--',
L,-
I
'-_.-tlH-I 'r
l!t
tj
E-.-.---r---tlllrrJ
I X 'T L.LAA IC)rrJ OF A|JJ(II-J A\ey\NA€? PE'JER
N')
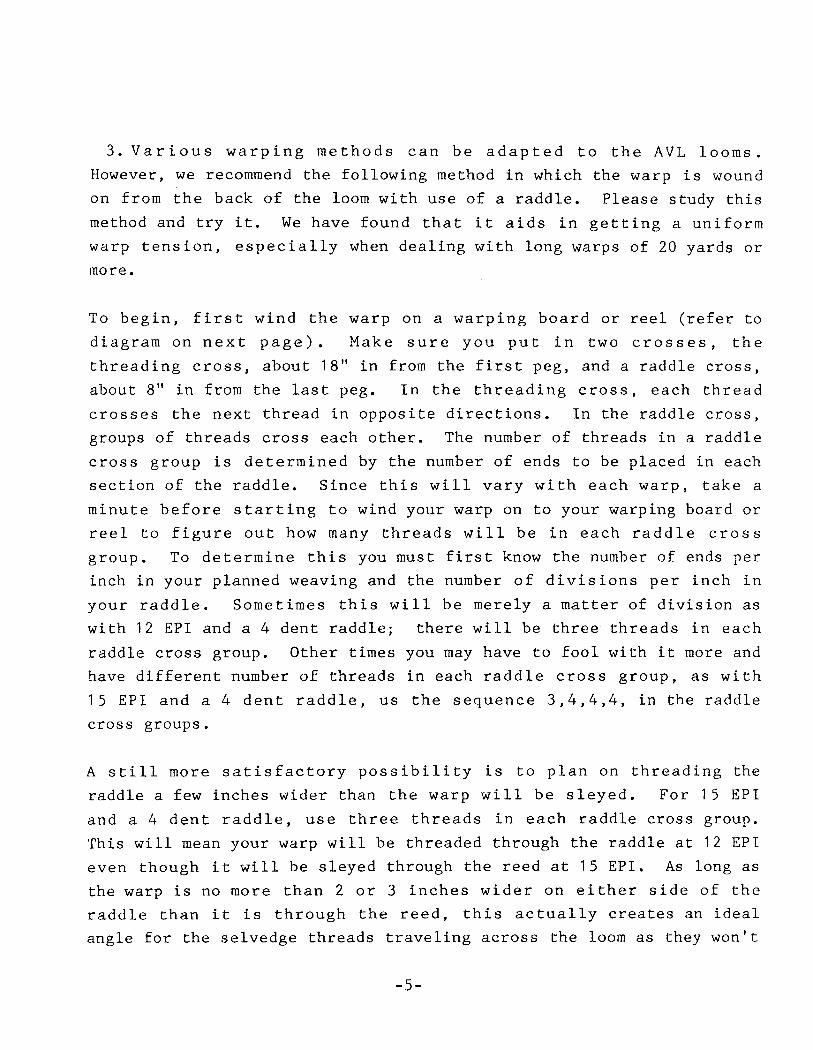
3. Various warping methods can be adapted to the AVL looms.However, w€ recommend the following method in which the warp is woundon from the back of the loom with use of a raddle. Please study thismethod and try it. We have found that iL aids in getting a uniformwarp tension, especially when dealing with long warps of 20 yards ormore.
To begin, first wind Lhe warp on a warping board or reel (refer todiagrarn on next page). Make sure you put in two crosses, thethreading cross, about 18" in from the first peg, and a raddle cross,about 8" in from the last peg. In the threading cross, each threadcrosses the next thread in opposite directions. In the raddle cross,groups of threads cross each other. The number of threads in a raddlecross group is determined by the number of ends to be placed in eachsection of the raddle. Since this will vary with each r^/arp, take a
minute before starting to wind your warp on to your warping board orreel to figure out how many threads will be in each raddle crossgroup. To determine this you must first know the number of ends perinch in your planned weaving and Lhe number of divisions per inch inyour raddle. Sometimes this will be merely a matter of division as
wirh 12 EPI and a 4 dent raddle; there will be Lhree threads in eachraddle cross group. Other times you may have to fool with it more and
have different number of threads in each raddle cross group, ds with15 EPI and a 4 dent raddle, us the sequence 3,4,4,4, in the raddlecross groups.
A still more satisfactory possibility is to plan on threading theraddle a few inches wider than the warp will be sleyed. For 15 EPI
and a 4 dent raddle, use three threads in each raddle cross group.This will mean your warp will be threaded through the raddle at 12 EPI
even though it will be sleyed through the reed at 15 EPI. As long as
the warp is no more than 2 or 3 inches wider on either side of theraddle than it is through the reed, this actually creates an idealangle for the selvedge threads traveling across the loom as they won't
-5-
f- TH,€EP\7NQ C,FOS€-
RAPPLS qO55
C*Oe'?
WAP:"${e EC'AR,,D W'TH TWOCRffiEsWARP Of{
-6-
be ben! by the draw-in at the web of the fabric. Never plan onthreading the raddle Lhinner than the warp will be sleyed or theselvedge threads will be very bent and poor tension will result.
4, As you are winding your warp onto the warping board or reel, it is a
good idea to use a counting thread at the raddle cross to keep countof your warp threads. If you are using 4 threads in each raddle crossgroup, you know you will have 16 threads when four raddle groupsintersecL. As the winding process proceeds keep the raddle crossgroups somewhat spaced apart and forward on the pegs so that you cansee thein easily, until 4 raddle cross groups are complete. Then twinethe counting thread once around aLL 4 groups making a bundle and pushit together and back on the pegs. Continuing in this manner it shouldbe easy to count Lhe number of bundles, (in our example, we have 16
threads in each bundle). Divide the number of threads in each bundleinto the total warp ends needed to find out how many bundles will beneeded. When you ate sure you have the correct number of warpthreads, remove the counting thread.
5. Now secure both crosses and make TIGHT choke ties. Do NOT cut the end
loops; instead secure them firmly with two or three ties so that theloops can not fall apart. This will save you time later. Then remove
the warp from the warping board by chaining (or better sLill using a
drum or other device for keeping the warp taut) from the treadingcross to the raddle cross.
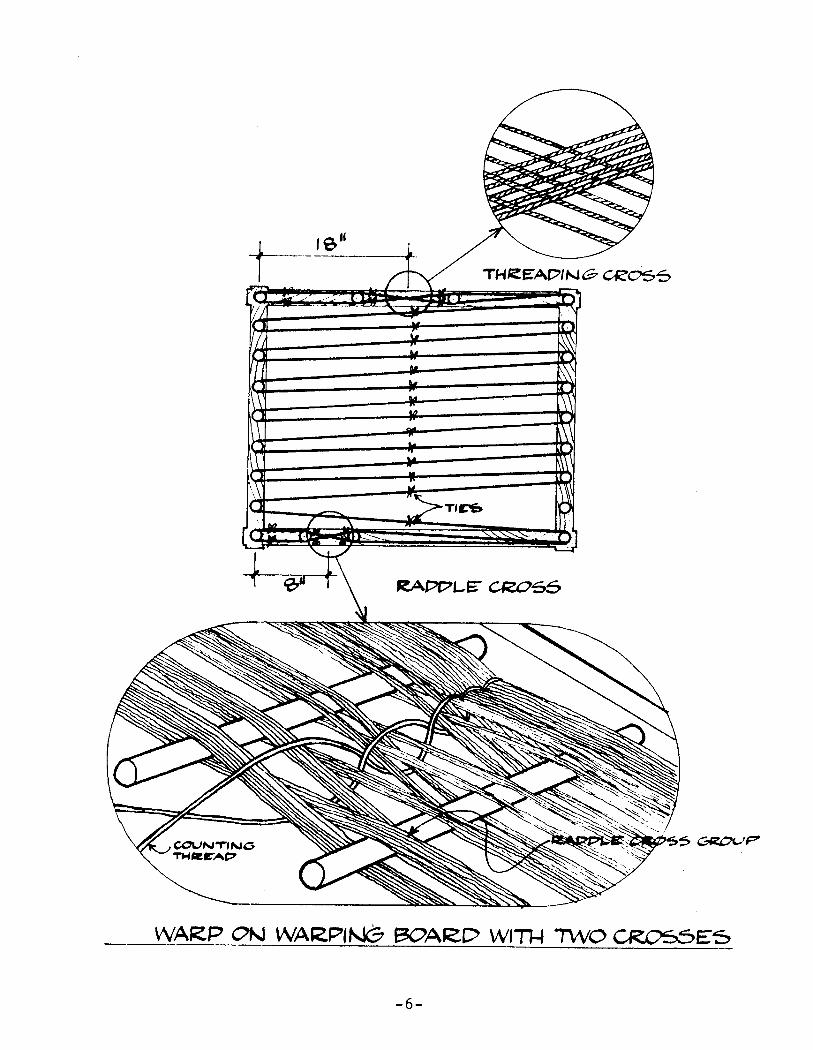
6. Place two thin 3/16" lease sticks in Lhe raddle cross and securetogether wich string through the holes in the ends of the sticks.Then place one of the fatter 7/16" warp sticks in the end of the loopof the warp closest to the raddle cross. If you secured the loopproperly this only takes a second, otherwise you have a mess.
-7-
E TOP USEPSPTPCETA6 THSEAP
wAz.e 5'ncr<
TAc'NGAINAY FROVIwehvEE
<-- RAPPLC C,aD6 C.rcOUp
LEASZ ST\C*3 11y1
PA,ePLe CCp35
THEEA?IWPPLE
Take a long piece of string and run it across the warp stick, throughthe holes in both ends, around the other side and tie it together,forming a security cord so the loops can not slide off. Now removethe original ties from the ends loop and raddle cross and spread thewarp out on the sticks.
7. Working at a table, distribute yarns through the raddle by dropplngeach raddle cross group into a dent in the raddle as in the diagram.Make sure the warp is centered and secure. If you are using a slidingraddle cover, secure it with 2 or three cord ties so iE cantc comeoff. Now remove the raddle cross sticks when this is completed,
-8-
8. Now secure the raddle to the back of the loom. If you have an Ahrens& Violette raddle, simply slip it into the set of holes that areunderneath Lhe warp beam. If you are using some other raddle, youwill need two 1/4" pieces of doweling six inches long. Insert theseinto the same holes and then tie your raddle to these.
Making sure the loops in the end of the warp are distributed evenlyalong the warp stick, place the stick into the groove in the warpbeam. If an unusually thick warp is used, apply pressure or even ahammer if necessary. Secure the stick in the groove by binding oneither side of the warp with string. Note here, that the purpose ofthe grooved warp beam is not only to eliminate the time spent eitherlashing sticks together, or cutting and tying ends at the back of Eheloom, but more importantly, to create a warp roll which is smooth andfree of lumps and bumps. This feature is a great aid in creating aneven tension in the weaving and creating professional results,especially with longer and finer warps. (A special system will bedescribed later for extending the last few feet of the warp so thatthere is very little warp waste).
Next prepare paper for winding between warp layers. Again, for themost professional results, and few tension problerns, w€ suggest thatthe warp be as smooth, tight, and compact as possible. This wouldmean not using corrugated paper or sticks as they will make the woundon warp too fal and/or lumpy. Corrugated paper is just too soft andthe warp can never be wound tight enough with it. A heavy wrappingpaper works well, 70 lb Kraft paper is good. It is not necessary toadd to the bulk of the wound on warp by winding paper throughout, asa tightly wound warp eliminates any cutting of one layer of warp intoanother. Actually with a tightly wound warp the papers' only purposeis to support the edge yarns so they will not fall off themselves andcreate a poor selvedge tension. An 18" long length of paper wound inabout every 1 1/2 yards of the warp is sufficient for this. So cuclengths of Paper 1 8" long and at least 3 or 4 inches wider than the
a
10.
-9-
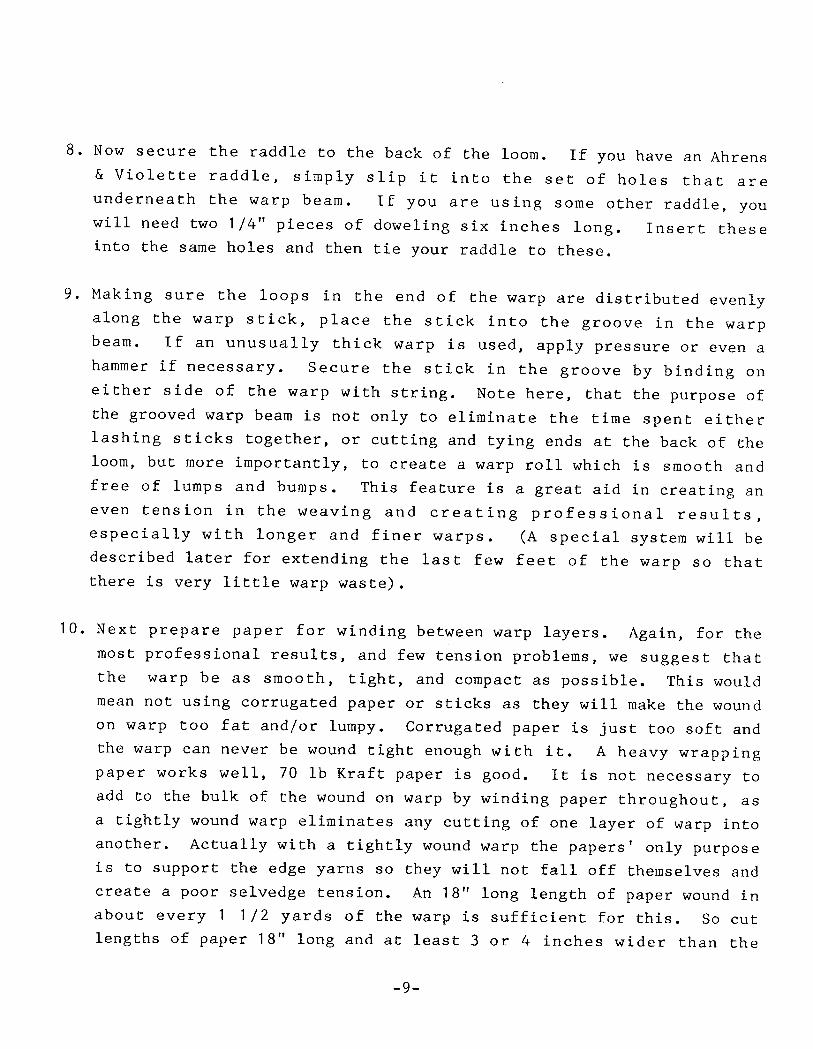
warp width, and enough to have one about every yard and a half of thewarp. If you are going to be using smooth slippery warp yarns likefine linens or perle cottons, the edge yarns are going to need extrahelp in order not to slip off themselves. To do this, cut your paper4 inches wider than the warp width and then fold over the edges an
inch on each side. Be sure the warp is wound between the two foldededges, but not overlapping them .
/,vvAR.P WITTH-r_ .- .____.__.r._
//
PEEPAP.EP 7Are8. WITH IOLVEP EPQT
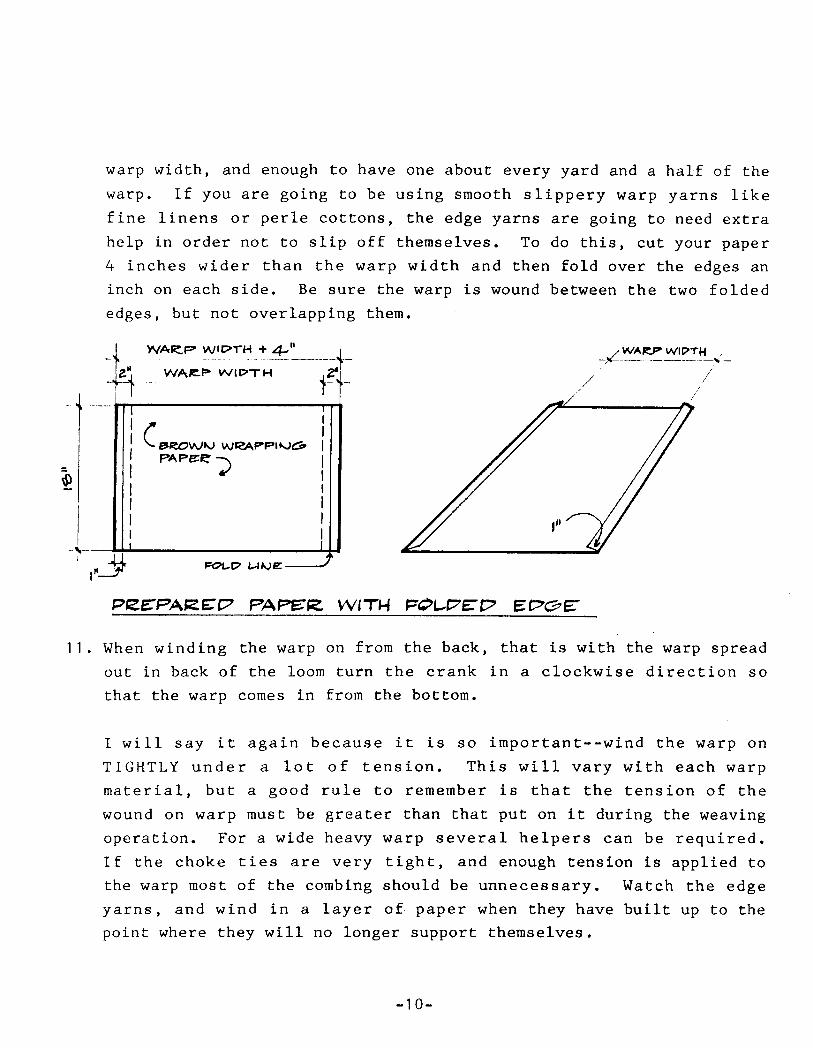
11. When winding the warp on from the back, that is with the warp spreadout in back of the loom turn the crank in a clockwise direction sothat Lhe warp comes in from the bottom.
I will say it again because it is so important--wind the warp on
TIGHTLY under a lot of tension. This will vary with each lTarpmacerial, but a good rule to remember is that the tension of thewound on warp must be greater than that put on it during the weavingoperation. For a wide heavy warp several helpers can be required.If the choke ties are very tight, and enough tension is applied tothe warp most of the combing should be unnecessary. Watch the edgeyarns, and wind in a layer of paper when they have built up to thepoint where they will no longer supporL themselves.
WARP I41II?TH + +
'^/ARF I^/IPTH
(r"o-", we*??rro"A?e< )
-1 0-
WAJP'P 6TtCK(tNGRoa/E tN BEAM)
!r/AR,P BAM
ZAP?LE
WA,R',P
WINDIN@ ON THE WARP
12. If your warp has wound on nice and even without a lot of combing, trythis method for winding on the last tr^7o or three yards of warp: Puta square warp stick through the loop in the end and put in the two
thin lease sticks in the threading cross. Tie all sticks so theycan't fall out and put a heavier stick through the loop to pul1 on.
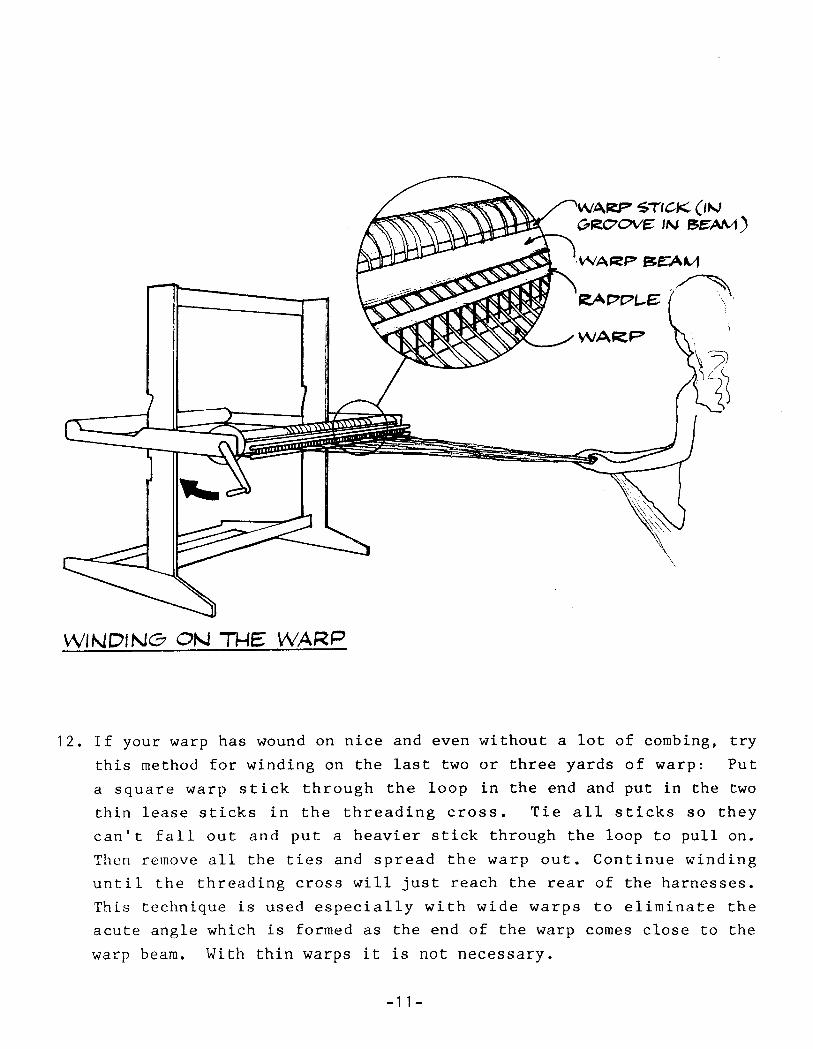
Then remove all the ties and spread the warp out. Continue windinguntil the threading cross will just reach the rear of the harnesses.This technique is used especially wirh wide warps to eliminate theacute angle which is formed as the end of the warp comes close to thewarp beam. With thin warps it is not necessary.
-1 1-
13. When the warping is completed, free the warp from the raddle. If youhave an AVL raddle first untie the security strings, lift the raddletop off, and remove the warp from the raddle. Afterwards replace thetop on the raddle and leave it in its place on the back of the loomif so desired, it will not interfere with the weaving process.
-12-

THREADING, SLEYING, AND TYING ON
1. To prepare for threaditg, first lift out the beater, then place theloom in its folded position by first loosening the two aluminumhandles at the side of the loom. Pull forward on the cloth beam untilthe round metal bushings which are bolted onto the inside of each armmove out of their corresponding slots in the front edges of the loomsides, Then push down on the cloth beam until the aluminum handles atthe side of the loom slide all the way to the end of their slotsnearer the back of the loom retighten the handles.
2. With lengths ofbar near the warpheddles. Remove
ends so they willfrom the bottommove easily.
string, tie the threading cross sticks to the crossbeam, so that the cross is even with the eyes of thethe square stick from the end loop and cut the warpbe ready for threading. Then unfasten the chains
of the lower harness sLicks so that the heddles will
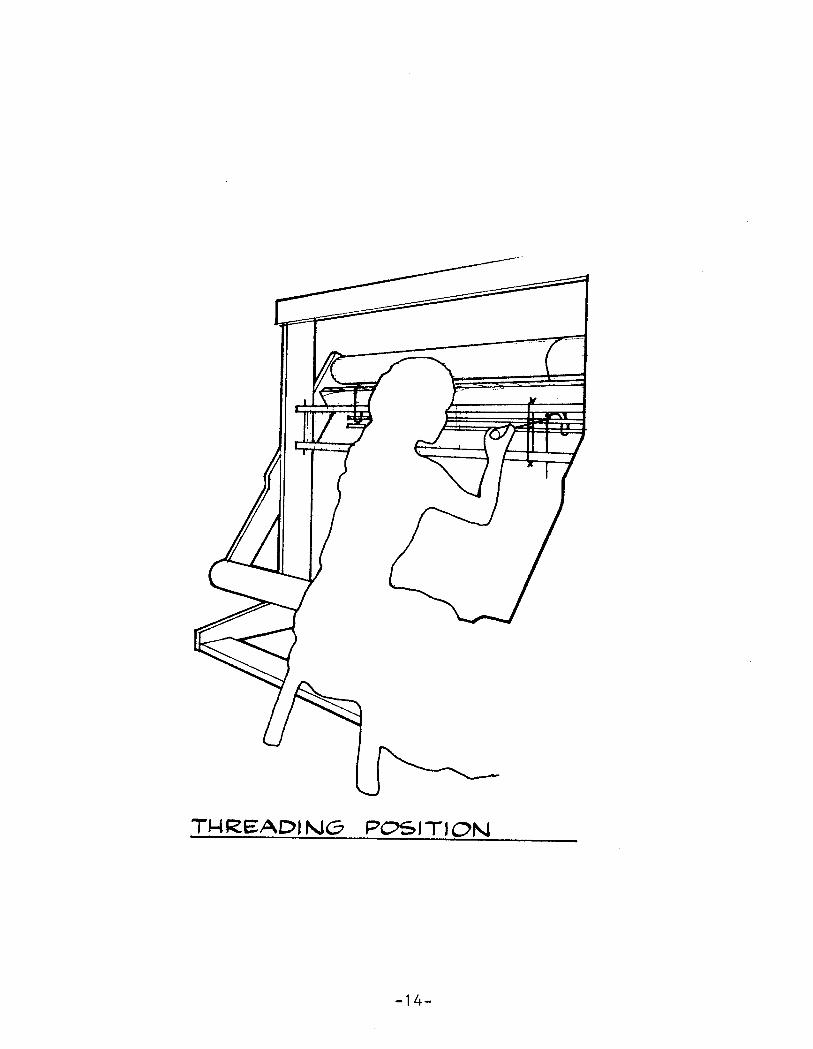
3. Place a small stool in front of the loom to be sat on for threading.The threading seat should be just the right size so that the heddleeyes are at just your eye level or a little higher. They should neverbe lower, or you will have a difficult time threading. For tallerpeople, it may be necessary to raise the harnesses. To accomplishthis, first make sure there is no chain in the dobby unit. Thensimply press down on the right treadle and the harnesses will raise.Use a block of wood as a brace between the treadle and the bottomcross piece, so as to keep the harnesses raised. By the way, with theharnesses raised it may not be necessary to unhook the chains from thebottom of the harness sticks, 8s there will be less pressure holdingche heddles tight, See diagram of Threading Position on next page.
4. After the heddles are threaded, open the loom up to its weavingposition. Replace the beater, and secure it in a middle position
-1 3-
TI{R,EAPIN@ PO.5'T'ON
-1 4-
AMENDMENT
Paragraph 5, page 15, is incorrect.paragraph.
Please replace with the following
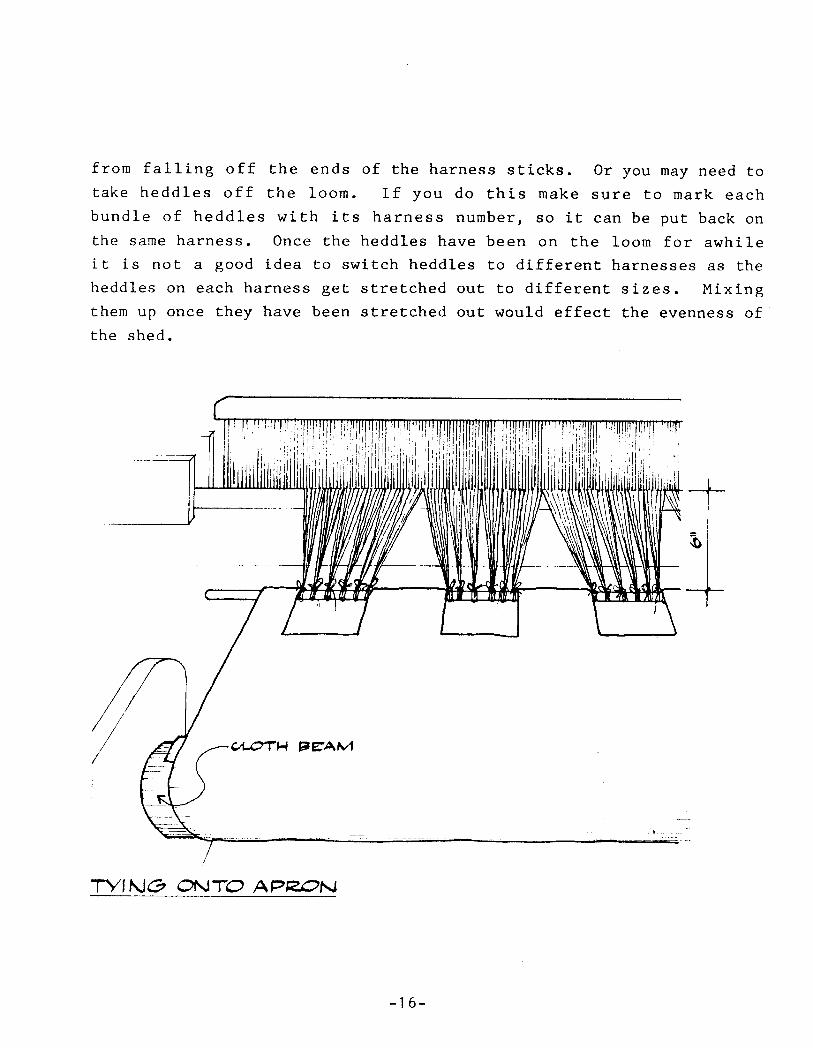
5. Now take up the cloth apron that comes with the loom. We call this atemporary apron because it is not attached to the loom and it will beremoved early on in the weaving process. Notice that it has Ewohemmed ends. One is a'hem with openings in it and the opposite end aplain hem. Take the two square wooden sticks and slide one into eachof the hemmed ends. Place the end without openings, with its stick,into the groove in the warp beam. Then you simply wrap the apronaround the beam, 4s in the diagram, until the stick in the end withopenings can be extended over the top of the beam to within 6" of thebeater in its rearward position (see diagram next page).
You -may cut-tli" paragr_aph out and affix it over the incorrect paragraphin the manual if you wish
5.
using binding cords. The top of the beaterreed slanted forward providing an excellent0ther sleying positions are possible dependingyou.
is then removed and thepos ition for s leying.on whaL works best for
After sleying is completed, make sure that the harnesses are in theirlowered position and/or all the chains are attached to the boctomeyelets of the harnesses before continuing with Lying on. Make surethat the chains are attached to the right harnesses or the loom won'twork properly.
Now take up the cloth apron that comes with the loom. We call this atemporary apron because it is not attached to the loom and it will beremoved early on in the weaving process. Notice thaL it has cwohemmed ends. one is a hem with openings in it and the opposite end aplain hem. Take one of the metal rods and slide it into the hem withopenings. Place Lhe opposite end of the apron flat along the clothbeam and wrap it around the cloth bearn as in the diagram until themetal rod can be extended over the top of the beam to within 6" of thebeater in its rearward position (see diagram next page).
The warp is now tied on to the metal rod inside the openings. Tie theyarns on evenly and tautly, but you need not spend a long time fussingwith them as once you have set the tension device and woven in twoflat sticks (instructions for all this is coming up next) your warpthreads will automatically have a completely even and perfect tension.
At this point make sure that the unused heddles are all pushed to thefar sides of the harness sticks between the hooks and the ends of theharness sticks. For balance there should be near to equal numberedgroups of unused heddles on both sides of each harness. In somecases, as when you have a very wide warp with a lot of unused heddleson the ends of the harnesses, you may need to tie each group of unusedheddles into a tight bundle with tie-tapes or string, to keep them
6.
7.
-15-
from falling off the ends of the harness sticks. Or you may need totake heddles off the loom. If you do this make sure to mark eachbundle of heddles wiLh its harness number, so it can be put back onthe same harness. Once the heddles have been on the loom for awhileit is not a good idea to switch heddles to different harnesses as theheddles on each harness get stretched out to different sizes. Mixingthem up once they have been stretched out would effect the evenness ofthe shed.
CI-OTH FEA.,\/T
-1 6-

Warp tension is controlled bywhich insures a constant tensadjusted, and the warp beam isadvanced.
SETTING THE TENSION DEVICE
a special spring-actuated lension drumion aL all times. The tension is easilyreleased automaticallv as the cloth is
1. First famiLiarLze yourself with the tension device which is located on
the right end of the warp beam as you are looking at. it seated at thefront of the loorn. Notice that it consists of a wooden drum aroundwhich a rope is wrapped three times, one end of the rope beingattached to a large spring underneath and the other end attached to a
smaller spring on top. FurLher note that between the end of the ropeand the small spring on top ls a small adjusting cord held in positionby a plastic clamp. See diagram below.
FTAUSct$y1p
-17 -

2. Now move the warp forward three or four inches using the front ratchethandle, and then feel your warp for tension. If it is too loose,increase tension by pulling the two ends of the adjusting cordattached to the small upper spring. If the warp tension is too tight,decrease tension by letLing the adjusting cord out by pressing in onthe plastic clamp. Then move the warp forward another three or fourinches and check again to see Lf the tension is what you want.Continue this process until the desired tension is achieved. Noticethat each time a new tension adjustment is made the warp must be movedforward before the tension is set. Once the correct tensionadjustment is made, however, it will be maintained automatically asthe weaving is advanced. You will find that you can weave with lesswarP tension with an automatic tension system than with a conventionalratchet system.
3. In making these adjustments at times the warp will be wound too farforward. To wind it back on the warp beam unlock the front ratchethandle so that the front tension is released, then go to the back ofthe loom and turn the back roller clockwise so that the warp is woundback onto the warp beam. Check to make sure the rope has not becomecrossed on the drum. Then wind the warp forward agaLn with the frontratcheL handle until the warp tightens and is in the correct position.
-18-
PEGGING THE DOBBY UNIT
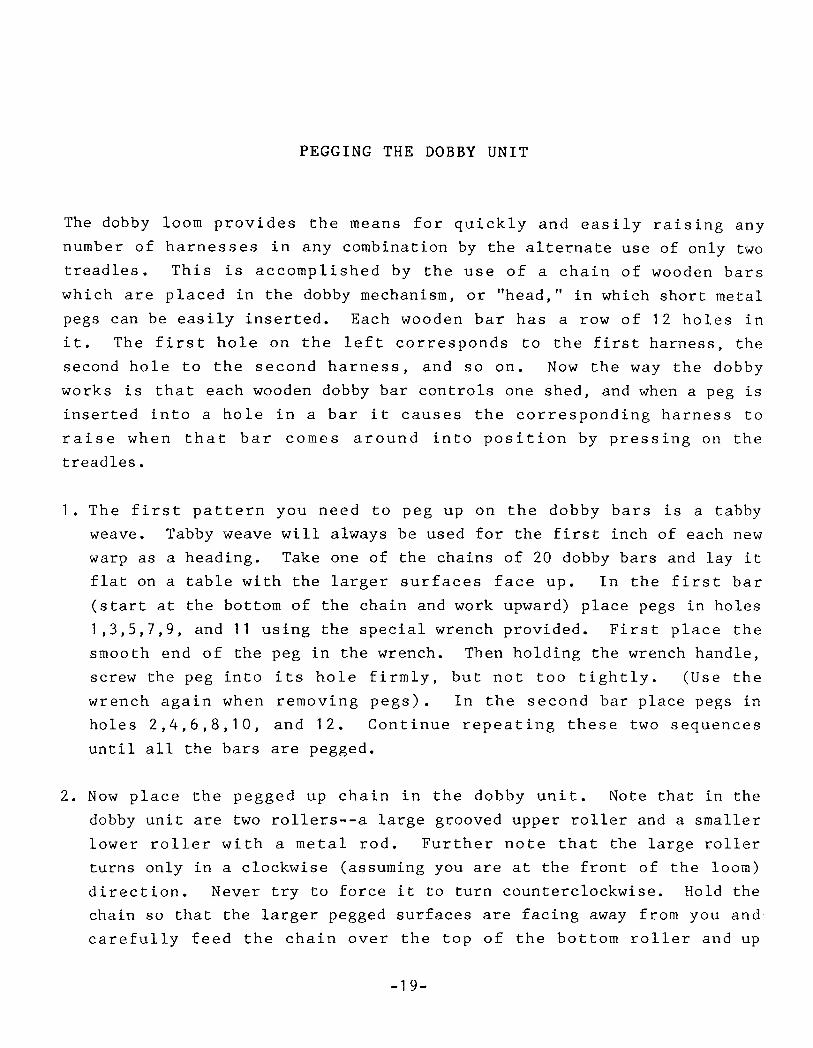
The dobby loom provides the means for quickly and easily raising anynumber of harnesses in any combination by the alternate use of only twotreadles. This is accomplished by the use of a chain of wooden barswhich are placed in the dobby mechanism, or "head, " in which short metalpegs can be easily inserted, Each wooden bar has a row of 12 holes init. The first hole on the left corresponds to the first harness, thesecond hole to the second harness, and so on. Now the way the dobbyworks is that each wooden dobby bar controls one shed, and when a peg isinserted into a hole in a bar it causes the corresponding harness co
raise when that bar comes around into position by pressing on thetreadles .
1. The first pattern you need to peg up on the dobby bars is a tabbyweave. Tabby vreave will always be used for the first inch of each new
warp as a heading. Take one of the chains of 20 dobby bars and lay itflat on a table with the larger surfaces face up. In the first bar(start at the bottom of the chain and work upward) place pegs in holesI ,3,5,7,9, and 'l 1 using the special wrench provided. First place thesmooth end of the peg in the wrench, Then holding the wrench handle,scre\^/ the peg into its hole firmly, but not too tightly. (Use thewrench agaLn when removing pegs). In the second bar place pegs inholes 2,4,6,8,10, and 12. Continue repeating these two sequencesuntil al1 the bars are pegged.
2. Now place the pegged up chain in the dobby unit. Note that in thedobby unit are two rollers--a large grooved upper roller and a smallerlower roller with a metal rod. Further note that the large rollerturns only in a clockwise (assuming you are at the front of the loom)direction. Never try to force it to turn counterclockwise. Hold thechain so that the larger pegged surfaces are facing away from you and
carefully feed the chain over the top of the bottom roller and up
-1 9-
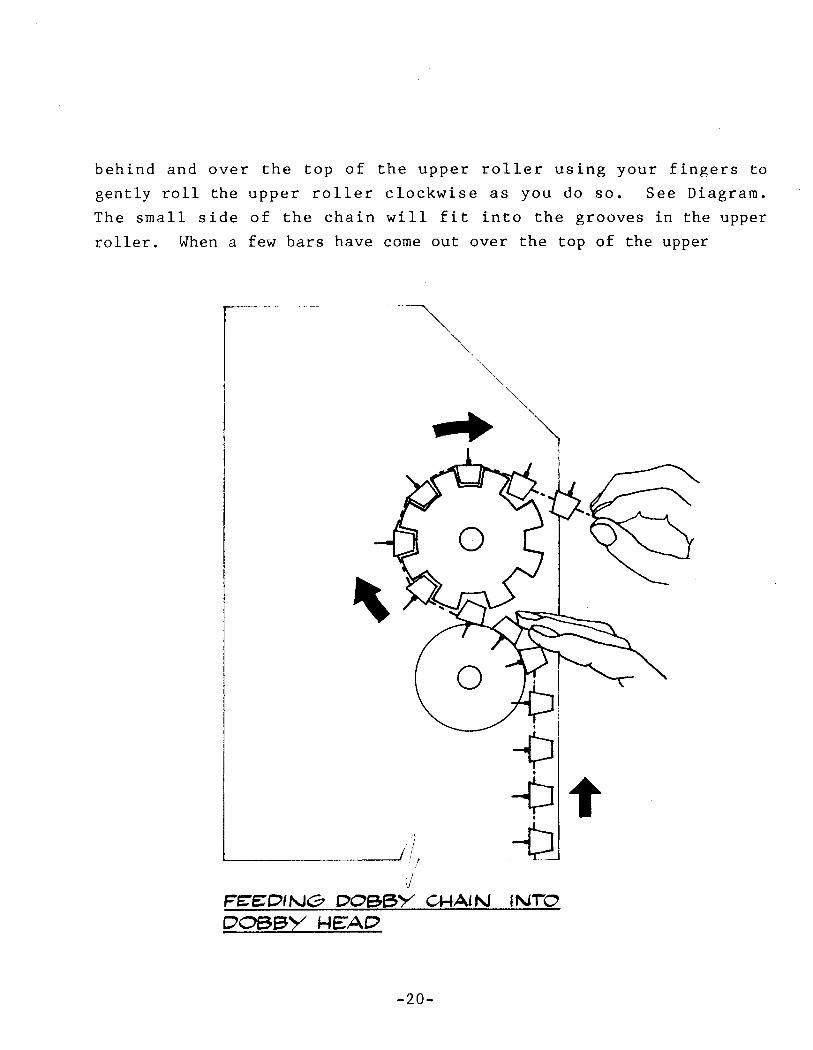
behind and over the top ofgently roll the upper rollerThe small side of the chainroller. When a few bars have
the upper roller using your fingers toclockwise as you do so. See Diagram.will fit into the grooves in the uppercome out over the top of the upper
\
FEEANE DOggY C.HAIN INTODOBg
-20-

roller, give thern a pull to make more chain available. Fasten thechain together to form a continuous circle using plastic tie tapes,jewelry hooks, or string. Make two ties similar in size to the metalconnecting loops between the bars. If using string make sure it isstrong and wind it around two times making a tight square knot aftereach turn.
3. Next you will probably want to peg up another chain with a more
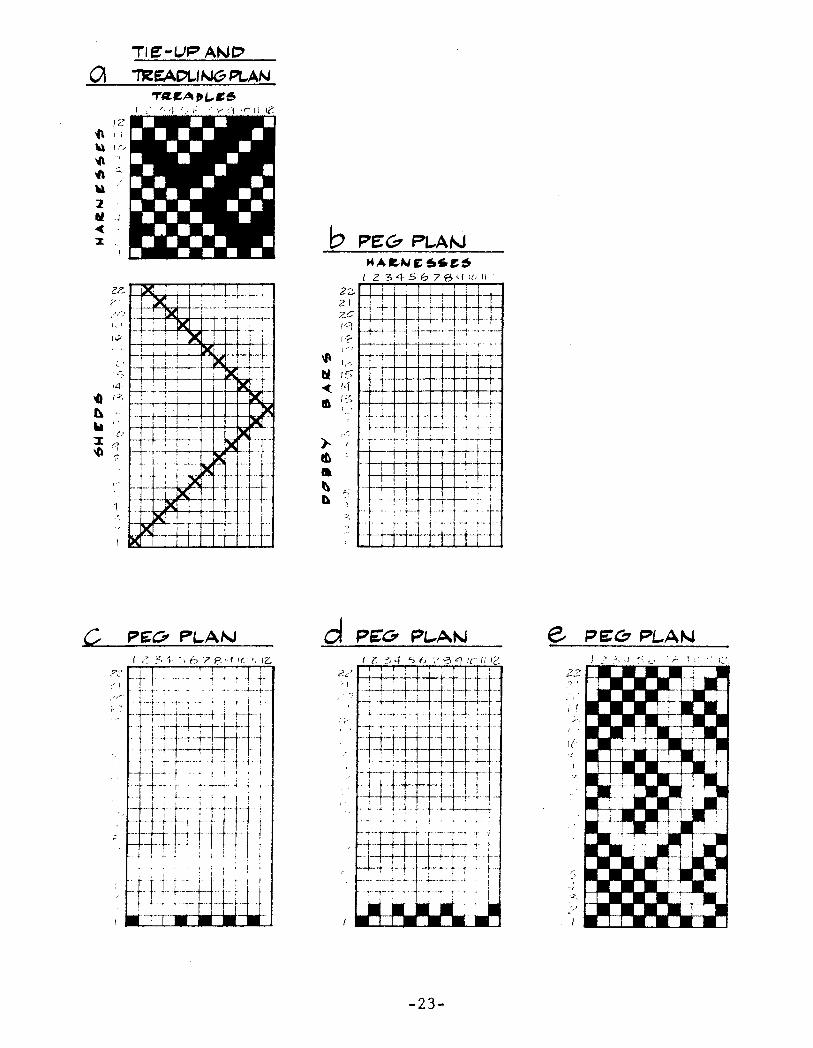
complex weave structure. (A'l 2 harness point twill is an easy one totry first.) The first step is to draw up a "p.g plan" which is a
graph that shows the order in which the pegs are inserted into thedobby bars. The peg plan takes the place of the tie-up and treadlingplans used with conventional treadle type looms. Use the followingprocedure for determining your peg plan:
First determine the tie-up and treadling plan for the weave
structure you will by using as you would for a conventionaltreadle loom. Diagram (a) on page 23 is an example showing a
typical pattern with its tie-up on top, and its treadlingplan below; the threading plan is not shown. In the tie-upeach vertical column represents one treadle (numbered 1'12from left to right), and each horizontaL row represenLs a
harness (numbered 1-12 from bottom to top). Squares arefilled in showing which harnesses are to be tied to each
treadle. Please note that the filled in squares representraised harnesses.
a.
In the treadling plan below each horizontaL row representsone shed and they are numbered from bottom to top in theorder they will be used when weaving. At each shed an X isplaced in a vertical column representing the treadle which isto be used. Make sure your treadling plan represents one
complete repeaL of all the sheds needed to weave yourpattern.
-21 -
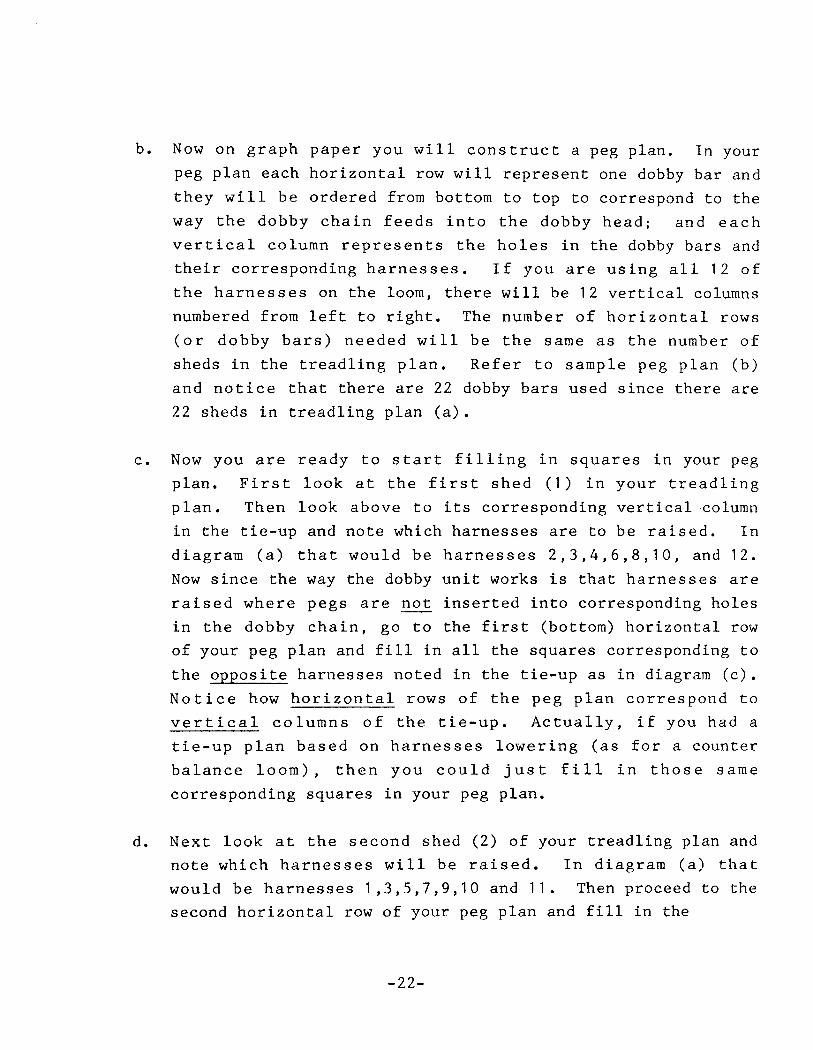
b. Now on graph paper you will construct a peg plan. In yourpeg plan each horizontal row will represent one dobby bar andthey will be ordered from bottom to top to correspond to theway the dobby chain feeds into the dobby head; and eachvertical column represents the holes in the dobby bars andtheir corresponding harnesses. If you are using all 12 ofthe harnesses on the loom, there will be 12 vertical columnsnumbered from left to right. The number of horizontal rows(or dobby bars) needed will be the same as the number ofsheds in the treadling plan. Refer to sample peg plan (b)and notice Lhat there are 22 dobby bars used since there are22 sheds in treadling plan (a).
Now you are ready to start filling in squares in your peg
plan. First look at the first shed (1) in your treadlingplan. Then look above to its corresponding vertical columnin the tie-up and note which harnesses are to be raised. Indiagram (a) that would be harnesses 2,3,4,6,8,10, and 12.Now since the way the dobby unit works is that harnesses areraised where pegs are not inserted into corresponding holesin the dobby chain, Bo to the first (bottom) horizontal rowof your peg plan and fill in all the squares corresponding tothe opposite harnesses noted in the tie-up as in diagram (c).Notice how horizontal rows of the peg plan correspond tovertical columns of the tie-up. Actually, if you had a
tie-up plan based on harnesses lowering (as for a counterbalance loom), then you could just fill in those same
corresponding squares in your peg plan.
Next look at the second shed (2) of your treadling plan and
note which harnesses will be raised. In diagram (a) thatwould be harnesses 1,3,5,7,9,10 and 11. Then proceed to thesecond horizontal row of your peg plan and fill in the
c.
d.
-22-
W]iZgADLIX/{iA-An
TecADrSS
IO PEO PLANH A?N E
'AE'
?EO PLAN PAC, PLAN
-23-

?EO PLAN
7L'I
2621
z-t'1-!)
2'Z
zzz-l
t,.11
:?
ltal
ta>
t4t'2,
I
;a
1
I
-24-
squares corresponding to these harnesses as we have done in diagram(d).
Continue in this same manner until all the sheds of yourtreadling plan have been recorded on the peg plan as we havedone in diagram (e). Diagram (f) on page 24 shows the same
tie-up as in diagram (a) with a different treadling plan andits corresponding peg plan.
4. Here are some additional points to keep in mind when making up yourpeg plan:
e.
a. At least Lwenty dobby bars must be used at once in order forthe dobby unit to function properly, so if the number ofdobby bars or sheds in the treadling plan is less thantwenty, they should be repeated several times. As an
example, for a tabby weave which has only two sheds, repeatthe pegging ten times so that you will be using twenty bars.
When the dobby chain is placed in the dobby unit it will forma continuous loop, so visuaLLze your peg plan as circular.Check your peg plan to see that if the first shed follows thelast shed the weaving pattern will turn out correctly. Ifyou make the mistake of making the first shed and the lastshed the same, then when the chain is placed in the dobbyunit two sheds exactly the same will follow each other.
There are times when you will find it helpful to use a
completely pegged-in dobby bar to mark your place in yourpattern, for instance, if you need to know where thebeginning of a patLern is. If all the holes in a bar arepegged in, then at that shed no harnesses will rise. If youare going to use this technique, make sure to fill in a wholerow on your peg plan.
b.
c.
-25-
d. When us ing two shuttle weaves where there is a tabby shed inbetween each pattern shed, the tabby sheds are often notincluded on conventional treadle p1ans. Don't forget that on
the peg plan for such a weave, a tabby shed must be filled inbetween every pattern shed.
Rernember that with a dobby loom the number of combinations ofraised harnesses is linited only by how many dobby bars youwish to use. On treadle type looms the number ofcombinations available is limited by how many treadles theloom has. As you gain more experience working with peg planstry designing right on the peg plan itself, adding raisedharnesses wherever it suits the needs of your design,
e.
5. Now peg your pattern up on dobby bars. The number of bars needed isdetermined by the number of rows in your peg plan. If you need totake off bars from the chain, unfasten the metal connecting loops witha long nosed plier. If you need to add bars to the chain use a longnosed plier to reconnect the metal loops; it is easiest, however, tofasten them together with plastic tie tapes, jewelry hooks, or string.Again, if using string, make sure it is strong and wrapped aroundtwice with two knots.
Always start pegging the bottom bar first corresponding to the bottomrow of your peg plan and work upwards. IL is a good idea to mark theleft end of the bottom bar with an rrxrf since it will be placed towardthe front of the loom when placed in the dobby unit, otherwise it iseasy to get the chain turned around backwards which would make yourweaving pattern turn out all wrong. Keep this pegged-up chain asideuntil it is time to place it in the dobbv unit.
6. Here are some tips for handling your dobby chains. First of all, keep
one length of chain pegged with tabby weave in a handy location. Thisway you can quickly do tabby weave whenever necessary without having
-26-
to repeg it each time, As you develop a repertoire of weavingpatterns which you will be using over again, keep a notebook of theirpeg plans as well as other weaving information and give each weavingpattern a number. If you have lots of dobby chain, you can just leavethe chain pegged-,rp ready to be used at any time; and each will be
easy to identify if you write its number on a tag which is tied to thefirst dobby bar. Keep your pegged-up chain in a box, or hang thern on
the wa1l, If you do not have a lot of extra chain, here is a littletrick that saves tirne if you are going to be repegging a pattern overagain. Cut cardboard strips about the same length and width of thedobby bars. Make a guide by punching 12 holes in one strip, so thatwhen that strip is held over a dobby bar the holes in the strip arealigned with the holes in the dobby bar. Use the guide to punch holesin the other strips corresponding to the way the dobby bars arepegged. Use them to quickly and easily repeg the dobby bars.
-27 -
t.
ADJUSTING THE SPRING LEVERS
The springs of the spring lever return system should be adjusted sothat there is positive harness return, i.e. the harnesses are stayingall the way down in their bottom position, with the least amount ofeffort needed to raise the harness. This will vary according to theweight of the warp. In general, lightweight, less dense, loosertensioned warps with a smaller weaving width will need very lictlespring tension to assure positive harness return; whereas heavier,denser, tighter tensioned, and wider warps will need more springtension. To tell if the harnesses are returning all the way, open
several sheds by working the treadles. To open the shed press down onthe right treadle. When closing the shed, make sure the left treadlegoes all the way down. Watch the unlifted harnesses and if the topsof their heddles become loose and tend to move around, then springtension should be increased, but just enough to get the harnesses tostay down and no more or your treadling effort will be made greaterthan it has to be.
To adjust the spring tension, simply unhook the spring and then rehookit one chain link shorter. This tightens the spring and makes it pulldown harder on that particular harness. Test the warp again by doingsome more treadling and if more spring tension is still needed, tryone or more chain links less. With a medium tight warp it may be
necessary to remove the chain links and use only the spring, Underunusual conditions (perhaps a very tight rug warp) two springs on some
or all of the harnesses may be necessary. If all the springs are setthe same, the back harnesses will have a looser tension than thefront. This is because the back spring levers and their hooks arelonger since the back harnesses travel farther when a shed is made.
Accordingly the back spring levers might have to be adjusted shorterto give the same tension as the front ones. It may even be necessaryto cut springs down if you need extra tension back there. The
2.
-28-

important thing to remember is that the system is designed so that itcan be "fine Luned" for each particular warp, so experiment with it.The loom comes with sixteen chains and sixteen springs. If extrasprings are needed you can use 1 0" screen door springs which can bepurchased in almost any hardware store; you can also get extra chainthere.
-29 -
l.
WEAVING PROCEDURES
With everything properly adjusted, w€aving is an easy and enjoyableprocess, Sit up straight and comfortably at the loom so that yourbody remains stationary while your arms and legs work the loom. Startby pushing downward on the right treadle so that a shed is open andthrow the shuttle. Pull the beater forward with a quick wristmovement, then close the shed and open a nerr one by f irst pressingdownward on the left treadle then the right treadle again in rapidsuccession. The left treadle not only closes the shed, but advancesthe bars in the dobby unit. Even though it seems as if the lefttreadle goes down almost on its own, it is very important to press itall the way down with the left foot, otherwise the next dobby bar may
not advance completely in the dobby box and this will cause errors.
To advance the cloth you simply wind it forward by using Lhe ratchethandle while the beater is in its forward position. Make sure thefell of the cloth does not go beyond the beater in order not to have
to wind it backwards (see number 5 of SETTING THE TENSION DEVICE ifthis occurs). This easy, rapid rnethod of advancing the cloth makes itpractical to wind the cloth up about every two inches of weaving. By
maintaining this two inch weaving space the swing of the beater and
the shed angle are kept more nearly constant, and this makes it much
easier to weave a uniform fabric.
At the onset of weaving, first weave in 1 " of a strong, medium weight,weft wirh a tabby weave. Check the tabby weave for errors. Anyerrors in the threading or sleying will show up here and it is an
excellent time to make correcLions. In case of threading error, usethe following method for insertion of a new heddle:
2.
3.
- 30-
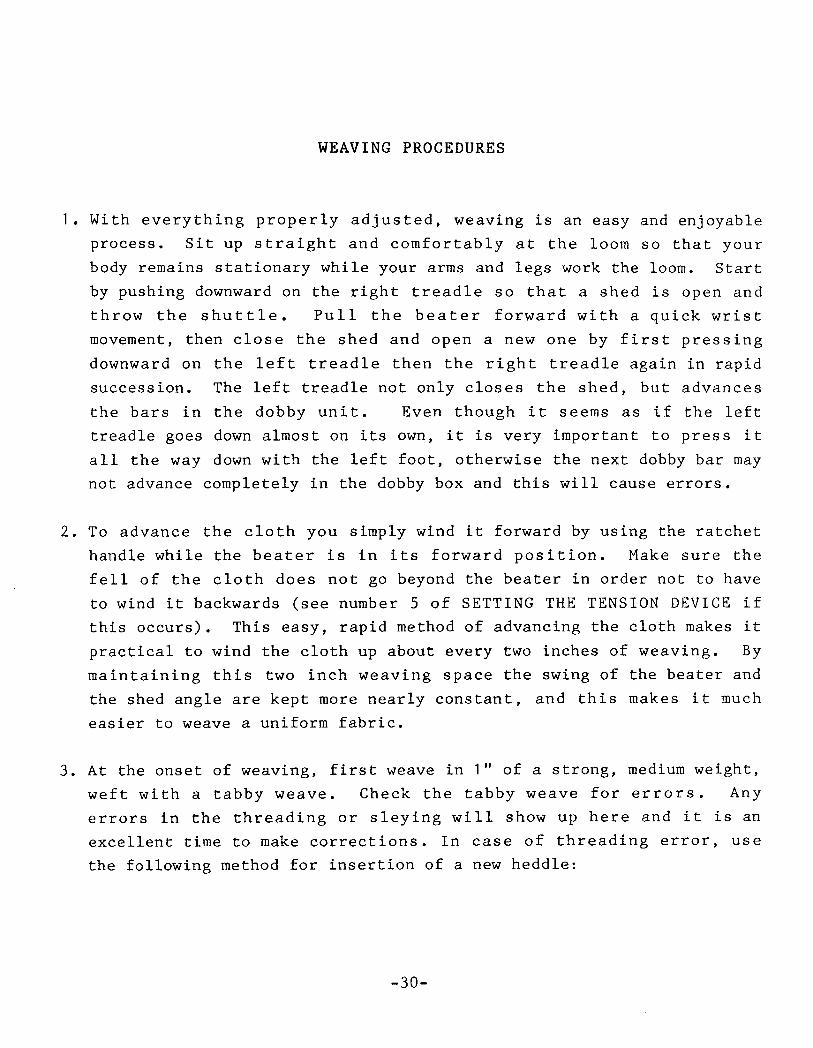
a.
b.
Slip the top loop of the new heddle around the top harness
stick and bring it through the top loops of all the heddlesuntil it reaches the place needed.
Take the bottom loop of the new heddle through the bottom
loop of all the heddles, around the bottom harness stick, and
back through the bottom loops of all the heddles untll itreaches its place. (See Dlagram below.)
Af€ryl qN_q_w HEPP\E
-31 -
7.
4- Next weave in two thin lease sticks on alternate sheds, followed byanother 1 /2" of tabby weave. Cloth strips are unnecessary, as che twowoven-in lease sticks will even out the warp for you.
5. Now remove the tabby chain from the dobby box. To do this simplyuntie the tietapes or string, then gently pul1 downward on rhe chainuntil it all rolls out of the box. Place your pattern chain into thebox by feeding it between the two rollers and behind and over the toproller rnaking sure the bar containing the first shed goes into the boxfirst with the hole corresponding to harness one placed toward thefront of the loom.
6. Now proceed with your planned weaving until the woven-in lease stickshave wound around the roller about 1 l/+ times, in other words, untilthe woven cloth overlaps the lease sticks on the roller.
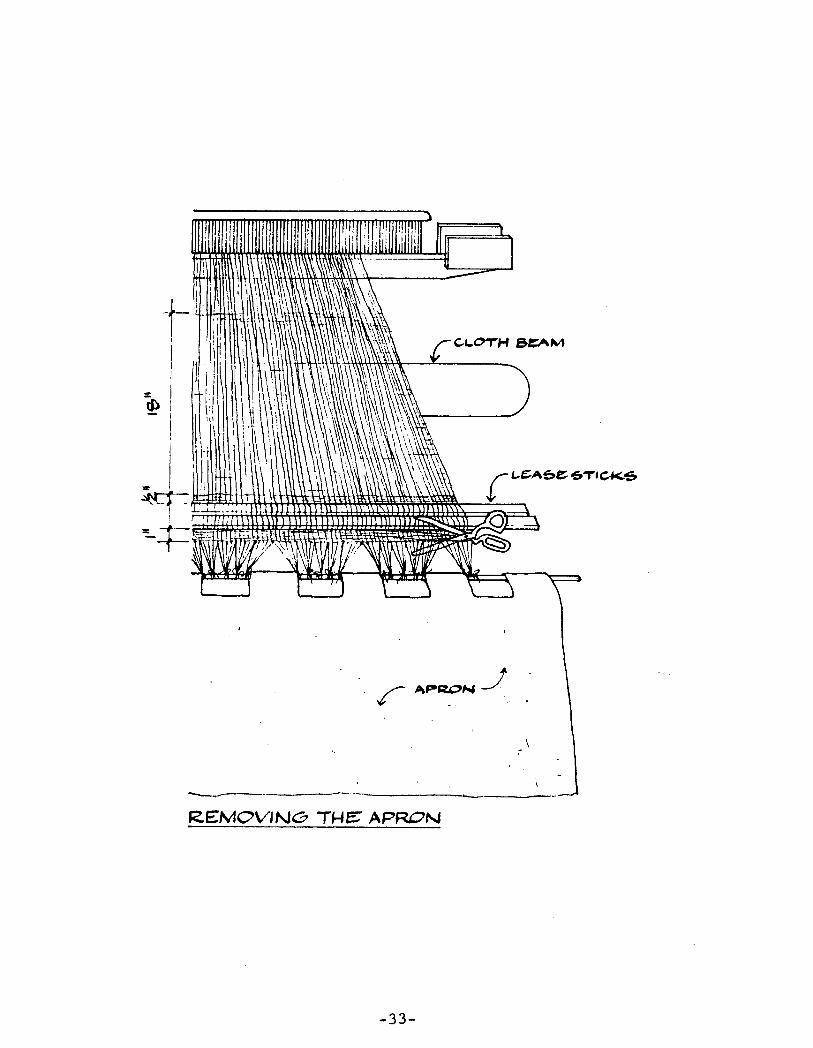
Then release the ratchet on the cloth beam and unwind the weaving backto the beginning. Unwind the weaving and apron from the front roll.Then remove the apron by cutting off the knots which tied the warp tothe rnetal bar, but do NOT cut off the tabby hem or the woven-in leasesticks from the end of the warp (see diagram next page).
Fold the two thin woven-in lease sticks together and place them in thegroove in the front cloth beam rnaking sure the cloth is centered inthe loom. Wind the weaving back on the cloth beam holding the leasesticks in Place until the weaving is wound back over itself and holdsitself in place. Take up the tension by using the ratchet handleuntil the warp tightens and continue weaving.
9. If you are using 60 bars or more, the weight of Lhis chain may causethe dobby head to skip a bar as it is advanced. If you are using along length of dobby chain and you experience this skipping, you'11
8.
-32-
CLO'TH B.EAM
Le^be.9A,C..t<3
I/^ AlPF]c|^{ J
v
R,EMC,V'Ng. THE APRr:N
-33-

need to. suspend an auxiLLary roller (a rolling pin suspended betweentwo chair backs works) so that it will support some of the weight ofthe bars.
10. If for some reason you should make a mistake or have some need toturn the chain backwards, this is possible. Notice that on the lefts ide of the dobby box is an index wheel which is actuated by a hookedmetal arm, If you pull gently on the metal arm, it will disengagefrom the wheel and you can turn the upper grooved roller a
counterclockwise direction. If you turn the ro1ler counterclockwiseslowly, you will hear a click as the last bar slips back into place.This way you can go backwards as many sheds or bars as necessary.Remember, do not try to force the chain to move backwards unless thearm is disengaged from the wheel,
1 1. If you want ro remove part of the weaving from the loom before thewarp is woven off, use the following procedure:
3. When the piece to be removed has been woven, weave one inchof tabby.
b. Weave in two lease sticks followed by 1 /2" of tabby as in 4
above.c. Start new weaving. t4'
d. Weave until the lease sticks are wound 1 1 /4 times around thefront cloth beam.
e. Unwind and cut off the piece to be removed just below thetabby hem and woven-in lease sticks as above.
f. Follow step 8 above.
This method takes very little time, there is practically no waste,and a uniform warp tension is maintained.
-34-
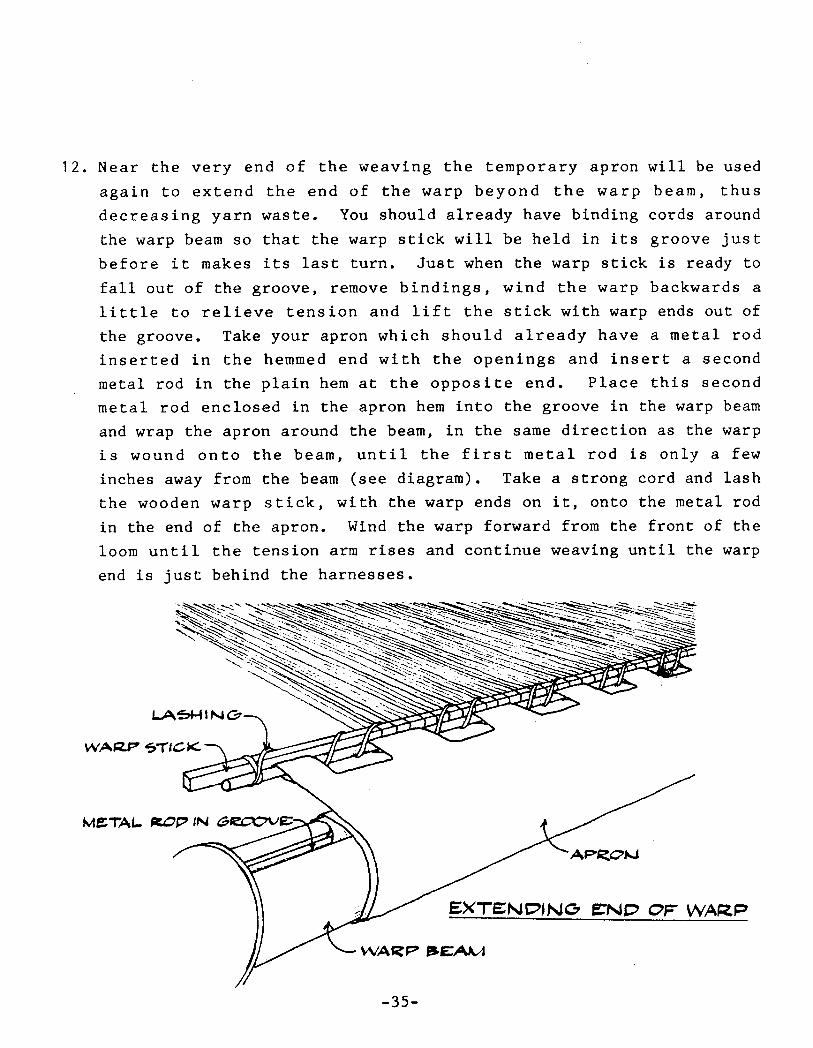
12. Near the very end of the weaving the temporary apron will be used
again to extend Lhe end of the r^rarp beyond the \^rarp beam, thusdecreasing yarn waste. You should already have binding cords around
the warp beam so that the warp sElck will be held in lts groove justbefore it makes its last turn. Just when the warp stick is ready tofall out of the groove, remove bindings, wind the warp backwards a
little to relieve tension and lift the stick with warp ends out ofthe groove. Take your apron which should already have a metal rodinserted in che hemmed end with the openings and insert a second
metal rod ln the plaln hem at the opposlte end. Place this secondmetal rod enclosed in the apron hem into the groove in the warp beam
and wrap the apron around the beam, in the same direction as the warp
is wound onto the beam, untl1 the firsE metal rod ls only a fewinches away from the beam (see diagram). Take a strong cord and lashthe wooden warp stick, with the warp ends on it, onto the metal rodin the end of the apron. Wtnd the warp forward from the front of theloom until the tension arm rises and continue weaving until the warp
end is just behind the harnesses.
L.^g-1tN@
Yr'52P iIlCK
Mf,TAL 30? IN
A?<c'J
!vAE? FEALl
- 35-
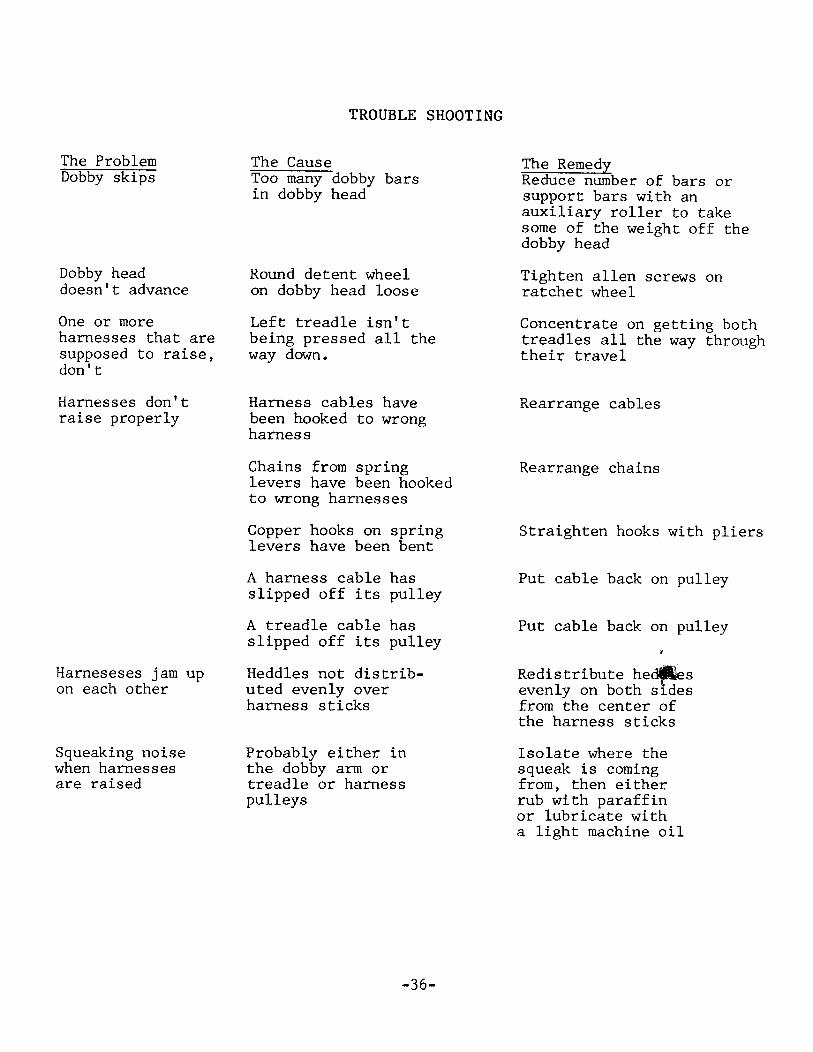
The ProblemDo55y ;EIF5
Dobby headdoesn't advance
One or moreharnesses that aresupposed to raise,don't
Harnesses don'traise properly
Harneseses jam upon each other
Squeaking noisewhen harnessesare raised
TROUBLE SHOOTING
The CauseToo many dobby barsin dobby head
Round detent wheelon dobby head loose
Left treadle isn'tbeing pressed all theway dovrn.
Harness cables havebeen hooked to wrongharness
Chains from springIevers have been hookedto wrong harnesses
Copper hooks on springIevers have been bent
A harness cable hasslipped off its pulley
A treadle cable hasslipped off its pulley
Heddles not distrib-uted evenly overharness sticks
Probably either inthe dobby ar:rn ortreadle or harnesspulleys
The RemedvReduce number of bars orsupport bars with anauxiliary rol1er to takesome of the weight off thedobby head
Tighten allen screws onratchet wheel
Concentrate on getting bothtreadles all the way throughtheir travel
Rearrange cables
Rearrange chains
Straighten hooks with pliers
Put cable back on pulley
Put cable back on pulley
Redistribute hed&sevenly on both stdesfrom the center ofthe harness sticks
Isolate where thesqueak is comingfrom, then eitherrub with paraffinor lubricate witha light machine oil
-36-
BOOKLIST
Here are some books containing information on multi-harness weaves and/ordobby looms. If you want to order any of them write to Ken Colwell, TheLooms at the Brewery, Far End Shake Rag Street, Mineral Point, Wisconsin53565 and ask about their availability and for a current price list.
Sixteen Harness Twills by Irene Wood about $S
Robin & Russ Handweaver, 533 N. Adams St. McMinnwille, OR 97128Lots of 16 harness twills, some 12 harness twills, showing tie-upsand phoLos of samples, information for designing your own twills.
Weaving with Foot-Power Looms by Edward R. Worst about $4.50Dover Publications, Inc., 1 80 Varisk St., N.Y., NY 10014
Some 10-12 harness twills, also one of few books with explanationof compound double weave.
Anstadc Designs by Ruth Holroyd about $40Bond Press, Inc., Hartford, CT
Facsimile of original book, second volume moderatesdone, many 16 and more harness twills plus many block
Shuttlecraft Book of American Hand-Weaving by Atwater about $1 5
I,lacmi l lanOlder book with older lreaves, mostly four harness, but has 4,5,and 6 block twills, summer-and-winter, and double weaves.
, beautifullydes igns .
-37 -
Keep Me lrtrarm One Night by Burnharn & Burnham about $:OUniversity of Toronto PressBeautiful book, ffiostly coverlets, explanation of various weaves,many examp les , drafts given. Few po int twi lls , overshot ,
summer-and-winter, double weaves, chapter on multiple shaftsincludes star and diamond and other things worth exploring.
l,,lanual of Swedish Handweaving by Cyrus-Zetterstrom about $15Chas. T. Branford Co., Newton Centre, MA 02159Explanation of dobby, a few drafts, etc., good explanation ofvarious weaves.d
Designing of the Loom by Mary Kirby about $6
Select Books, 5969 Wilbur Ave. , Tarzana, CA 91356
Chapter of 16 harness looms, a few drafts specifically for dobby.Many things not seen elsewhere,
A Handbook of Weaves by Oelsner about $5 sDover Publications rfAll multiple shaf t work. 1875 illustrations of fl$orns many
appropriate for dobby. I think originally published*in 1 875 forthe industry.
Weaving Techniques for The Multiple-Harness Loom by Pierre Ryallabout $1 0
Van Nostrand Reinhold Co., 135 t,tr. 50th St. N.Y., NY 10020
Original French, Like Oelsner with mostly drawdowns, no drafcs as
such.
-38-

More Than FouE by Laughlin abour $1 0
Nothing specifically for dobby but a variety of complex weavesexp lained .
Hand weaving and cloth Design by Marianne straub about $1 5
Viking PressVery concise information from dressing the loom through a widevariety of weaves. Chapter on the dobby.
Handloom Weaving Technology by Allen A. Fannin about $:OAvailable from Van Nostrand Reinhold Co., 'l 35 W. 50th St., N.y.,NY 1 0020
The best book we've found that covers the operating principles ofdobby looms.
-39-