autodesk and red one workflow guide (for final cut users)
TRANSCRIPT
8/14/2019 Autodesk and Red One Workflow Guide (for Final Cut Users)
http://slidepdf.com/reader/full/autodesk-and-red-one-workflow-guide-for-final-cut-users 1/11
Autodesk®
Autodesk and the RED ONE™ CameraWorkow Guide
Ecient Workow rom Shooting toOnline into Autodesk Visual Eects,Finishing, and Grading Applications.
8/14/2019 Autodesk and Red One Workflow Guide (for Final Cut Users)
http://slidepdf.com/reader/full/autodesk-and-red-one-workflow-guide-for-final-cut-users 2/11
Using the camera is just the beginning o the
process. Moving the Red digital media through the
post-production process and necessary color space
conversions or nishing purposes is presenting
acilities with new challenges.
Autodesk recognizes the importance o RED digital
media in today’s productions, and has developed
this document to help acilities more easily and
saely navigate around the potential pitalls o
an all-digital worklow and to show you how to
smoothly bring RED ONE™ Camera ootage into
Autodesk® Smoke®, Autodesk® Inerno®, Autodesk®
Flame®, Autodesk® Flint®, and Autodesk® Lustre®
by careully considering editorial and interchangedecisions, project settings, deliverable ormats, color
space conversions, and more.
This document describes an ecient RED-to-Autodesk
nishing products workow, and outlines important RED
concepts. This will help production and post-production
teams using Autodesk products make decisions that
give the best possible results.
Furthermore, this document presents important
observations about the RED camera color processing,
which were noted during testing with the RED ONE™
camera.
As the camera and the accompanying sotware
evolve, new workow options may appear. The
workow presented here has been optimized or
the currently available sotware, and images shot
on a RED ONE™ with rmware Build 16.
In order to keep up to date on the latest news
in the world o RED, you are encouraged to visit
their website regularly (www.red.com).
You should also browse the oicial user orum,
RedUser (www.reduser.net). RED team members
are regulars on RedUser, and you will oten ind
what you are looking or by browsing the orums.
Some Important Concepts
R3D™ Files
RED ONE™ uses a proprietary RAW le ormat (R
that is compressed using the wavelet-based REDCO
codec. There are two resolution settings in the ca
REDCODE™ 28 and REDCODE™ 6. These reso
settings represent the average data rate in M
when recording at 4K using a 16:9 aspect ratio.
is saved in the RD™ ile ormat, which can t
be rendered-out to another ormat using a RE
application or a third-party tool.
The digital media can be recorded on a 20GB
removable RED DRIVE™ hard drive or on 8GB and
REDFLASH™ compact ash cards. The RED DRIVEcan be mounted on a Mac® computer or a PC via
FireWire® serial bus 400, 800, or USB 2. REDFLAS
compact ash cards can be mounted on a Mac or P
with a ast CF card reader (like Lexan® or SanDisk®
cards)—usually through FireWire 800 or USB 2.
Each clip is saved in a separate older as an RD™ l
camera also generates our Apple® QuickTime® pro
(see sidebar) that can be used in QuickTime-nat
applications such as Final Cut Pro® (FCP).
The RED ONE™ camera can record up to our
channels o uncompressed, 24-bit, 48Khz
audio. They are saved inside the same RD™
containing the corresponding image.
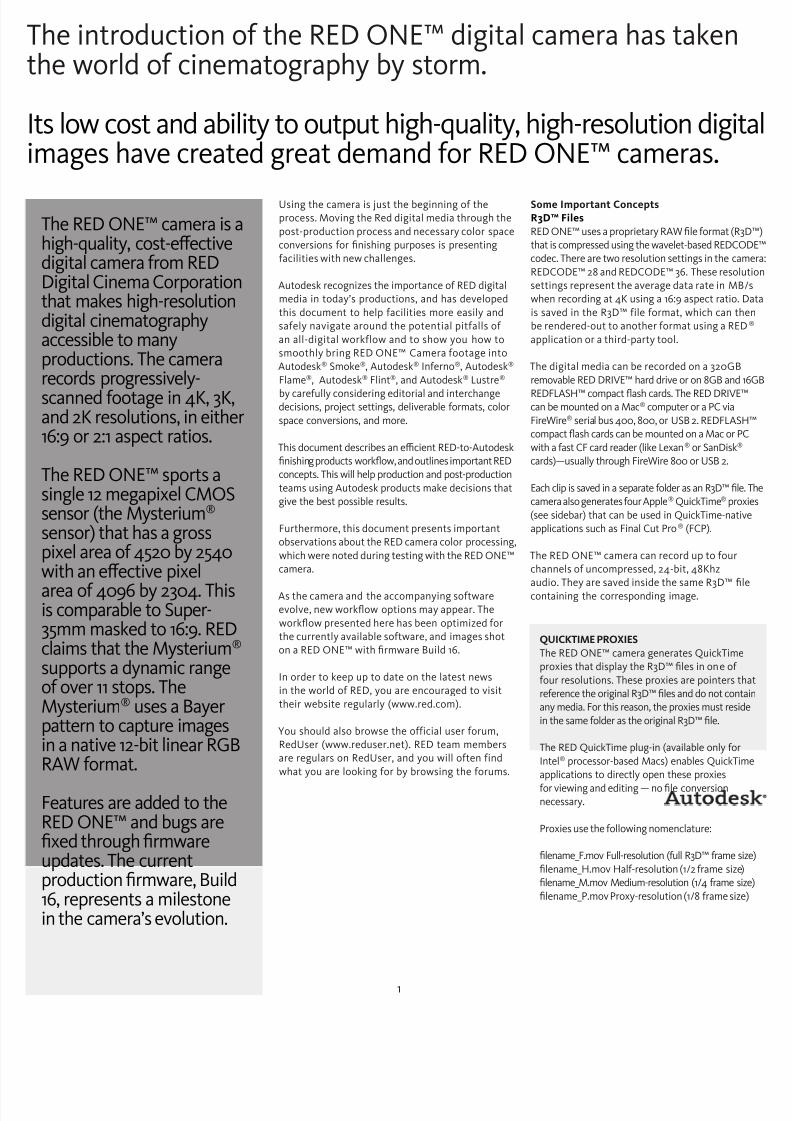
The introduction o the RED ONE™ digital camera has takenthe world o cinematography by storm.
ts low cost and ability to output high-quality, high-resolution digitmages have created great demand or RED ONE™ cameras.
The RED ONE™ camera is ahigh-quality, cost-eectivedigital camera rom REDDigital Cinema Corporationthat makes high-resolutiondigital cinematographyaccessible to manyproductions. The camerarecords progressively-scanned ootage in 4K, K,and 2K resolutions, in either16:9 or 2:1 aspect ratios. The RED ONE™ sports asingle 12 megapixel CMOSsensor (the Mysterium® sensor) that has a grosspixel area o 4520 by 2540with an eective pixel
area o 4096 by 204. Thisis comparable to Super-5mm masked to 16:9. REDclaims that the Mysterium® supports a dynamic rangeo over 11 stops. TheMysterium® uses a Bayerpattern to capture imagesin a native 12-bit linear RGBRAW ormat.
Features are added to theRED ONE™ and bugs arexed through rmwareupdates. The currentproduction rmware, Build16, represents a milestonein the camera’s evolution.
1
QUICKTIME PROXIES
The RED ONE™ camera generates QuickTime
proxies that display the RD™ les in one o
our resolutions. These proxies are pointers t
reerence the original RD™ les and do not con
any media. For this reason, the proxies must resi
in the same older as the original RD™ le.
The RED QuickTime plug-in (available only or
Intel® processor-based Macs) enables QuickTi
applications to directly open these proxies
or viewing and editing — no le conversionnecessary.
Proxies use the ollowing nomenclature:
lename_F.mov Full-resolution (ull RD™ rame s
lename_H.mov Hal-resolution (1/2 rame size
lename_M.mov Medium-resolution (1/4 rame s
lename_P.mov Proxy-resolution (1/8 rame siz
8/14/2019 Autodesk and Red One Workflow Guide (for Final Cut Users)
http://slidepdf.com/reader/full/autodesk-and-red-one-workflow-guide-for-final-cut-users 3/11
RED ONE™ and Timecode
he RED ONE™ camera records each clip with two
mecode tracks: Time o Day (TOD) and Edge Code.
When shooting, choose one o these settings or
he primary timecode because some applications
annot read both timecode tracks. The timecode you
hoose is set in the TimeCode menu o the camera
nd shows up on the camera’s external displays. The
amera’s displayed timecode is also the one used in
he QuickTime proxies that the camera generates.
OD will use the real time o day or can be
am-synced via the camera’s Genlock port. A clip will
ave continuous timecode rom start to nish, but
he next clip will have a non-continuous start time.his is similar to FreeRun mode on broadcast cameras.
dge Code starts at 1:00:00:0 0 and is continuous
or each clip on a given magazine. When a dierent
magazine is loaded into the camera Edge Code
esets to 1:00:00:0 0, so close attention should be
aid to media management, as several clips will
ave the same timecode. This is similar to REC Run
mode on broadcast cameras.
ach digital magazine is given a reel number, rom
01 to 999, which is important to the optimal
workow we will be discussing. The reel number
must, o course, be careully monitored during data
ranser. QuickTime proxies use the RD™ lename
s the reel number in FCP, which helps when
elinking QuickTime les to the right RD™ le.
Format
Autodesk applications will accept 4K, K, and 2K pro
Time code
Select TOD as the primary timecode track. Time
generated by the RED ONE™ camera is non-drop
Reel numbers
Make sure that the Incremental Reel option is
checked and properly congured so that each
has a unique name. Set the reel number to 00
the start o every new project.
Other camera settings
Use the deault exposure and color temperature setThe RED ONE™ converts R AW image data to
various color spaces in order to support previe
on set, however, unmodied RAW data is recor
to storage. Standard settings on the camera are
20 and a 5000K color temperature. These sett
are stored as metadata and serve as a starting
or later color space and ormat conversion u
the RED sotware tools, or or post-production
using Smoke, Flame, or Lustre.
Backup your digital media
Optionally back up your iles to separate phy
media, keeping the same older hierarchy as
magazine. It’s much easier to keep track o y
media by placing each day’s magazines in a sep
older. Consider keeping several copies o your
(preerably in separate physical locations).
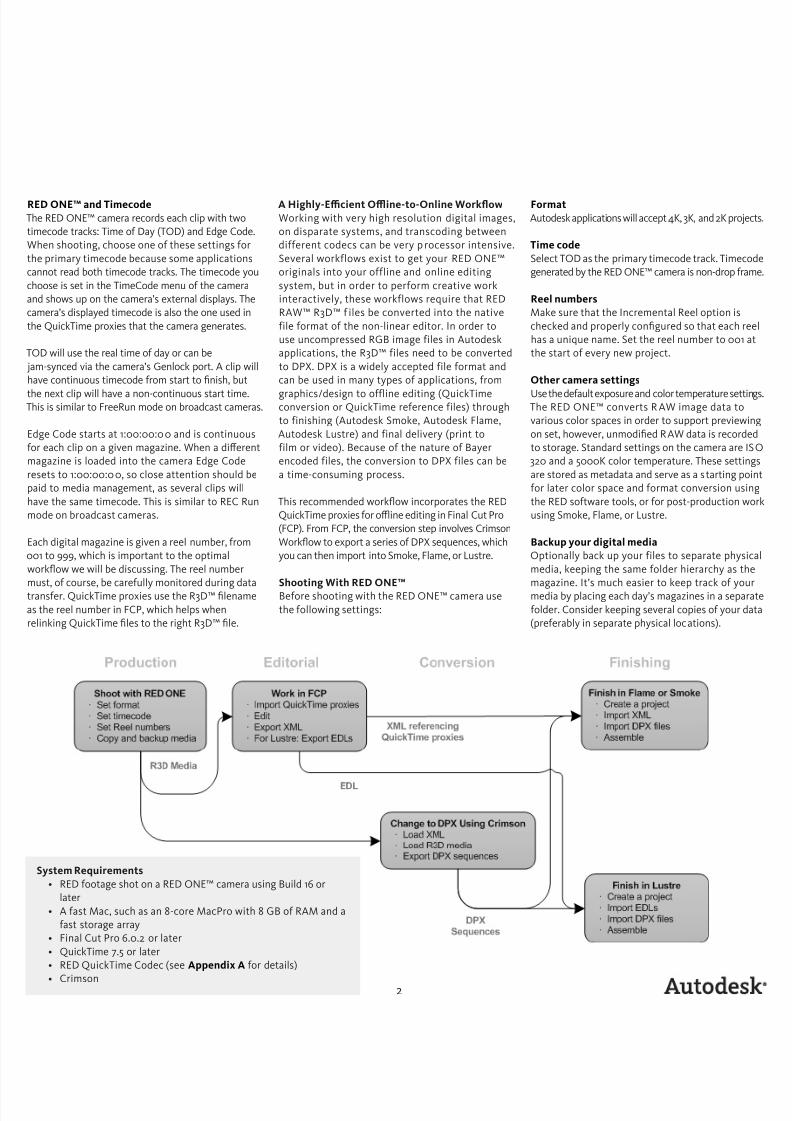
A Highly-Ecient Oine-to-Online Workow
Working with very high resolution digital images,
on disparate systems, and transcoding between
dierent codecs can be very p rocessor intensive.
Several worklows exist to get your RED ONE™
originals into your oline and online editing
system, but in order to perorm creative work
interactively, these worklows require that RED
RAW™ RD™ iles be converted into the native
ile ormat o the non-linear editor. In order to
use uncompressed RGB image iles in Autodesk
applications, the RD™ iles need to be converted
to DPX. DPX is a widely accepted ile ormat and
can be used in many types o applications, rom
graphics/design to oline editing (QuickTimeconversion or QuickTime reerence iles) through
to inishing (Autodesk Smoke, Autodesk Flame,
Autodesk Lustre) and inal delivery (print to
ilm or video). Because o the nature o Bayer
encoded iles, the conversion to DPX iles can be
a time-consuming process.
This recommended workow incorporates the RED
QuickTime proxies or ofine editing in Final Cut Pro
(FCP). From FCP, the conversion step involves Crimson
Workow to export a series o DPX sequences, which
you can then import into Smoke, Flame, or Lustre.
Shooting With RED ONE™
Beore shooting with the RED ONE™ camera use
the ollowing settings:
2
System Requirements
RED ootage shot on a RED ONE™ camera using Build 16 or•
later
A ast Mac, such as an 8-core MacPro with 8 GB o RAM and a•
ast storage array
Final Cut Pro 6.0.2 or later•
QuickTime 7.5 or later•
RED QuickTime Codec (see• Appendix A or details)
Crimson•
8/14/2019 Autodesk and Red One Workflow Guide (for Final Cut Users)
http://slidepdf.com/reader/full/autodesk-and-red-one-workflow-guide-for-final-cut-users 4/11
Working In Final Cut Pro
mport QuickTime proxies into Final Cut Pro
here are several methods o editing your
ontent in FCP. One reliable method is to use the
QuickTime proxies generated by the camera. These
roxies contain the synced audio rom the shoot.
Make sure that you do not modiy your proxy
lenames or the RD™ lenames. Instead, use the
arious comment columns to identiy your clips.
mport the proxies directly into FCP, either by
rag-and-dropping them into a bin, or by using the
ILE > IMPORT OPTION.
electing a proxy resolution beore importepends on the speed o your editing system. The
medium-resolution proxies (ending in _M. mov)
work best under most circumstances.
dit
When inserting a proxy clip into a new sequence,
CP will prompt you to change the resolution o
he sequence to match that o the ootage.
lick Yes, then, in the RT menu, select a low quality to
void as much playback stutter as possible.
While real-time debayering is very processor-intensive,
is still a simple way to edit ootage with synchronized
ound rom the original camera recording.
or another editorial approach in Final Cut Pro,
ee Appendix C.
Flame or Smoke workow involves exporting
nly an XML le. For a Lustre workow, you also
eed to export one or more EDLs, so limit your
dit to one video track. I you must edit using
everal tracks, you will have to make as many
uplicates o your sequence as you have video
racks and remove any additional video rom the
uplicates. You will end up with several XML les,
ne per video track.
Export an XML File or Flame, Smoke, or Lustre
Once you are done editing, export an XML o
the nal sequence.
Select the sequence in the browser.
Choose File Export XML…
Select Apple XML Interchange Format, version 2.
Do not select Include Master Clips•
Outside Selection
Check Save project with latest clip•
metadata (recommended)
Make sure that you name your XMLle properly, since you will be applying
modications to it. For example, i editing a
music video called Code Unknown, you could
name your le code_unknown_edit.xml.
This XML le points to the QuickTime proxies
that you used or your ofine editing (in this
case, movies that are not at the ull resolution
the RED camera is capable o delivering).
Export EDL Files or Lustre
Pare down your XML sequence to make it
more EDL-riendly.
Make as many duplicates o it as you have
tracks, and prepare video-only sequences,
careully naming each one.
For each EDL sequence:
Select the sequence to export in the Brows
Choose File Export EDL…
Type in a title or the EDL.
Select CMX 600 as a ormat.
In the Audio Mapping box, set the our aud
tracks to None.
Repeat these steps or each video track’s
corresponding sequence.
8/14/2019 Autodesk and Red One Workflow Guide (for Final Cut Users)
http://slidepdf.com/reader/full/autodesk-and-red-one-workflow-guide-for-final-cut-users 5/11
xporting DPX Sequences Using Crimson
Workow
Use the Crimson Workow application to convert
D™ media to DPX sequences.
Open the Crimson application. At the top o the interace,
ick Choose to open your XML le. Then, careully ollow
he steps or each o the ollowing sections.
Match section
lick the + button to select the root older where
our RD™ les reside.
lick the Match button to reconnect your original
media to your edits. In the bottom table, make sure
ll o your edits are matched to the proper RD™ le;
hey will be marked with a Found or Multi status.
rame section
elect your output rame size. For video and HD
workows, select the proper standard or high denition
rame size (such as HD1080p). For lm workows,
elect a 2K or 4K output size (such as 2K 2:1 or 4K 2:1).
Make sure that you set the appropriate settings
nder Scaling Operation or your output size.
or Resample, select a resampling lter (such as
Mitchell or Lanczos).
olor section
et all Gamma and Color Space settings. See
etting Color Space below.
REDline™ section
et the Rendering Output Path or your DPX les
making sure that you choose a older on your
torage that is accessible to Smoke, Flame, or Lustre).
required, set the appropriate handles.
et File Specication to: EVENT#Z/F#&.E (this will
ender a DPX sequence, named according to the RD™
le and a rame number, in a separate older per event).
Under Render Settings, or Quality select Full
Debayer and or Output Format select DPX.
Make sure that Use TOD/TC is selected.lick the Render with REDLine button. This will
tart the conversion process.
or more inormation about Crimson, see Appendix B.
or more inormation on REDline™ and other RED
pplications, see Appendix A.
4
Video Deliverable
I your primary deliverable is video, then set Gamma to Rec709 and Color Space to REDspace™.
Setting the Color Space to REDspace™ rather than Rec709 seems counter-intuitive; however in our
tests, setting it to Rec709 gave results that were ar too saturated. I the scenes were lit or ISO 20
you would nd that converted images look dark. This does not necessarily mean that the images wer
underexposed. It does mean that you have to begin your grading session with an overall gamma boo
Use the Brightness parameter to brighten everything during the conversion process. A value o abou
2.5 in Crimson is a good starting point. (The Brightness control in REDCINE™ is 10x more sensitive, s
use a value o about 25.)
Another important point about the Rec709 Gamma setting is that the converted images contain all the
highlight inormation that was captured by the camera. One might assume that using one o the log Gam
settings would export images with more highlight inormation, but this does not seem to be the case.
Film Deliverable
I your primary deliverable is lm, we assume you will be using a print lm simulation 3D-look up
table (LUT) (such as rom Autodesk® Lustre® Color Management) or grading. The goal is to conve
your images into something resembling a Cineon ®-style scan rom color negative lm. Because th
characteristics o the RED ONE™ are so dierent rom lm negative, and b ecause o the limitedcolor processing exibility o Crimson, this is not entirely possible.
To get the tone scale approximately correct, set Gamma to PDLog985 . This results in images
that have the correct contrast but look about two stops over-exposed. Unless a shot is very
underexposed, set the Exposure parameter to -2.0. This puts a normally exposed gray at a 10-bit
value o about 470 (as per convention).
Set the Color Space parameter to either CameraRGB or REDspace™. Colors will seem washed out
compared to lm capture. To correct this, try using the Saturation parameter to boost saturation.
A air amount is needed, but going above 0.2 can start to cause clipping artiacts in saturated
colors. Crimson can display the individual RGB channels. This is a good way o detecting i too
much saturation boost has clamped detail in certain colors. (The Saturation control in REDline™,
REDALERT!, and Crimson is zero-based rather than one-based. For REDCINE™, use 1.2.)
Setting Color Space
Ater you have loaded your clips, Crimson Workow
displays the various color settings that were stored
as metadata in your RD™ les. These will vary
depending on how the camera was congured at the
time o shooting. The settings or each clip will control
the rendering o the les rom camera RAW to some
other color space. For example, i you set Kelvin to
200, Crimson will white balance the images so that
gray objects lit with tungsten light (color temperature
o 200K) will have roughly equal red, green, and blue
pixel values. Likewise, i you set ISO (speed/sensitivity)
higher than 20, Crimson will boost the exposure o
the images (make them lighter).
You can override the color settings or the currently
selected clip. However, or settings like ISO and Kelvin,
i they were correctly congured during the shoot, you
shouldn’t need to override them. Nevertheless, you
may want to override the Gamma and Color Space
settings that will congure what color space you
convert your images to.
The best values to use will depend on a variety
o actors. Here are some pointers to get you
started.
Lighting or Video
I the director o photography lit the scenes
according to a video style o working, then
you should leave Gamma and Color Space as
they are so that converted images resemble
what was seen on the HD monitor on set.
However, be aware that i using REDspace™
gamma, you may have limited exibility in colo
grading because the highlights will be somewha
compressed. For more inormation on RED Colo
Processing, see Appendix D.
Lighting or Film
I the DP lit the scenes according to a lm style
o working (relying on a light meter rather than
a video monitor), then there are several option
depending on whether your primary deliverabl
is lm or video.
8/14/2019 Autodesk and Red One Workflow Guide (for Final Cut Users)
http://slidepdf.com/reader/full/autodesk-and-red-one-workflow-guide-for-final-cut-users 6/11
inishing with Smoke or Flame
Create a new project
reate a new project with settings that match the
xact rame size o your DPX sequences.
HD projects use the usual HD ormats, but or lm
se these values:
Aspect ratio: 2 or 1.777 78, depending i your•
rame size was 2:1 or 16:9
Bit Depth: 10-bit•
Field order: Progressive•
Graphics Processing: 16 -bit FP Graphics•
Width/Height: rame size o RED ootage (see table)•
mport the DPX sequences
In the Library, create a new reel to import•
your ootage, and select it.
Click Import Image.•
Set the image ormat to DPX.•
Under Clip Media, set your Sot-Import Full•
Res option on or o.Under Clip Metadata, select Tape From File•
Header and File Header Timecode.
Navigate to the root older containing the•
DPX sequence olders.
Turn on the Scan Subdirectories option; you•
should see your DPX sequences in the Files
browser.
Select all o your sequences and click Load.•
Clips are created rom the DPX les in the selected•
reel.
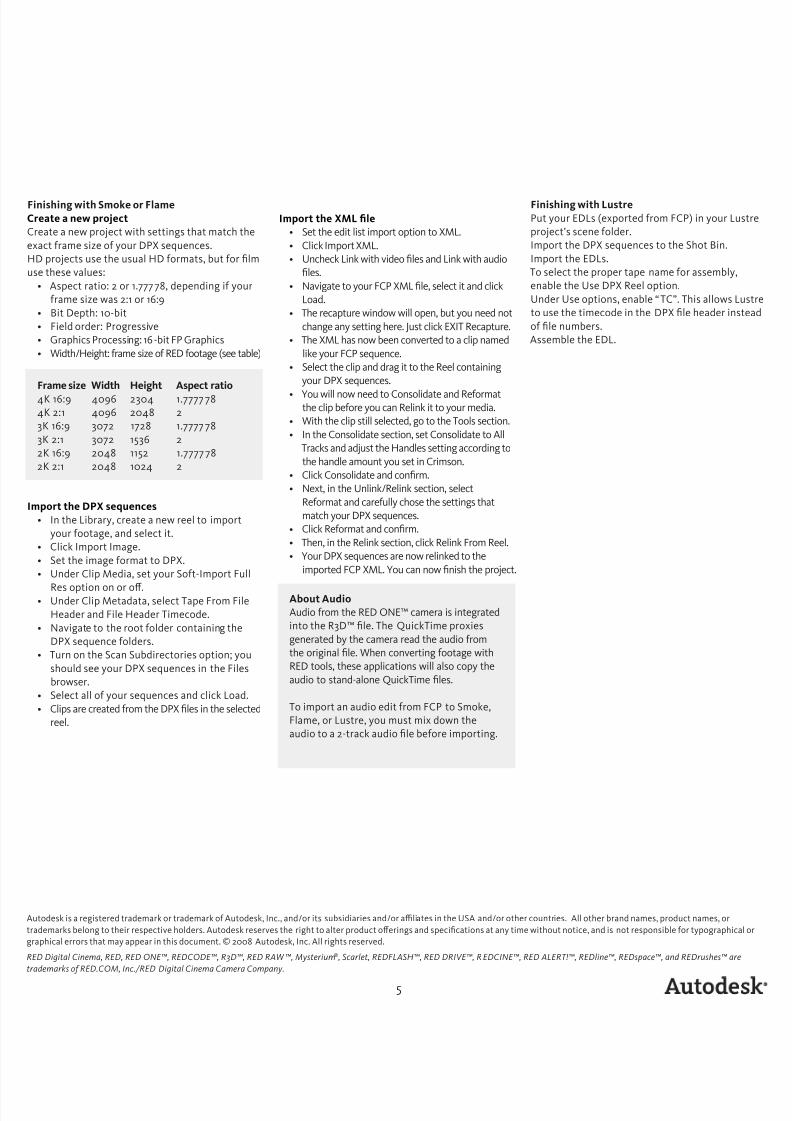
Frame size Width Height Aspect ratio
4K 16:9 4096 204 1.7777 78
4K 2:1 4096 2048 2
K 16:9 072 1728 1.7777 78
K 2:1 072 156 2
2K 16:9 2048 1152 1.7777 78
2K 2:1 2048 1024 2
Import the XML fle
Set the edit list import option to XML.•
Click Import XML.•
Uncheck Link with video les and Link with audio•
les.
Navigate to your FCP XML le, select it and click•
Load.
The recapture window will open, but you need not•
change any setting here. Just click EXIT Recapture.
The XML has now been converted to a clip named•
like your FCP sequence.
Select the clip and drag it to the Reel containing•
your DPX sequences.
You will now need to Consolidate and Reormat•
the clip beore you can Relink it to your media.
With the clip still selected, go to the Tools section.•
In the Consolidate section, set Consolidate to All•
Tracks and adjust the Handles setting according to
the handle amount you set in Crimson.
Click Consolidate and conrm.•
Next, in the Unlink/Relink section, select•
Reormat and careully chose the settings that
match your DPX sequences.
Click Reormat and conrm.•
Then, in the Relink section, click Relink From Reel.•
Your DPX sequences are now relinked to the•
imported FCP XML. You can now nish the project.
About Audio
Audio rom the RED ONE™ camera is integrated
into the RD™ le. The QuickTime proxies
generated by the camera read the audio rom
the original le. When converting ootage with
RED tools, these applications will also copy the
audio to stand-alone QuickTime les.
To import an audio edit rom FCP to Smoke,
Flame, or Lustre, you must mix down the
audio to a 2-track audio le beore importing.
ED Digital Cinema, RED, RED ONE™, REDCODE™, R3D™, RED RAW ™, Mysterium® , Scarlet, REDFLASH™, RED DRIVE™, R EDCINE™, RED ALERT!™, REDline™, REDspace™, and REDrushes™ are
ademarks of RED.COM, Inc./RED Digital Cinema Camera Company.
Finishing with Lustre
Put your EDLs (exported rom FCP) in your Lu
project’s scene older.
Import the DPX sequences to the Shot Bin.
Import the EDLs.
To select the proper tape name or assembly,
enable the Use DPX Reel option.
Under Use options, enable “ TC”. This allows L
to use the timecode in the DPX le header ins
o le numbers.
Assemble the EDL.
utodesk is a registered trademark or trademark o Autodesk, Inc., and/or its subsidiaries and/or aliates in the USA and/or other countries. All other brand names, product names, or
ademarks belong to their respective holders. Autodesk reserves the right to alter product oerings and specications at any time without notice, and is not responsible or typographic
raphical errors that may appear in this document. © 2008 Autodesk, Inc. All rights reserved.
5
8/14/2019 Autodesk and Red One Workflow Guide (for Final Cut Users)
http://slidepdf.com/reader/full/autodesk-and-red-one-workflow-guide-for-final-cut-users 7/11
he RED applications are an integral part o this
workow, as they are necessary or opening RD™
les. They can be downloaded reely rom the RED
website. Be sure to check www.red.com to get the
atest versions o their applications.
RED ALERT!™
ED ALERT!™ is an Intel Mac-only application that
s used to quickly look at ootage and apply a color
orrection or color space change beore exporting
n RD™ le to another ormat.
he RED ALERT!™ interace oers you tools to
xamine your ootage in ull resolution, shot by
hot. Batch processing o clips is implemented
hrough REDline™ and REDrushes™, but you still
eed to use RED ALERT!™ to create a look (based
n exposure, saturation, contrast, and brightness)
or your ootage. Remember that RED ALERT!™ is
ot a ull-blown color timing sotware; its purpose
s to do a one-light process on your clips beore
ditorial begins.
ED ALERT!™ lets you:
Examine your ootage in ull resolution, with a•
zebra pattern and a histogram
Choose a color space and an output LUT•
Color time ootage by enabling you to adjust•
settings such as ISO, exposure, and saturation
Dene in and out points on a clip beore•
exporting
Export the clip as a 4K or 2K DPX sequence•
Export the clip as a QuickTime movie using a•
variety o codecs and rame sizes (or editorial
in Final Cut Pro or example)
When a clip is opened in RED ALERT!™, an RSX le
s saved alongside the RD™ le, using the same
lename. It contains the additional metadata added
o the RD™ le in RED ALERT!™, such as a look, in
nd out points, ISO settings and Output LUT. This
SX le can be used in REDrushes™ and REDline™.
ooks can be saved as presets, to be reused
n other shots opened in RED ALERT!™. A
aved preset is called an RLX le and saved
n UserLibraryApplication SupportRED
lert!Presets.
One very useul eature o RED ALERT!™ is its
bility to instantaneously generate new QuickTime
roxies rom RD™ les. For example, let ’s sayuser wants to edit in Final Cut Pro with the
QuickTime proxies, but wants to add a look to
is ootage beore he imports it into FCP. He can
pen the RD™ les in RED ALERT!™, color time
ach shot, and produce new QuickTime wrappers
or the media. One benet o this workow is the
bility to import the real time QuickTime proxies
n FCP, without incurring a lengthy render.
eore installing a new version o RED ALERT!™,
make sure you delete the previous version. RED
LERT!™ is installed in the Applications older.
here is no separate preerence le to delete.
lso, use the Apple Disk Utility to repair your
Macintosh® computer HD’s permissions.
REDLINE™
REDline™, an Intel Mac-only application, is a
command-line interace or RED ALERT!™, which
supports batch-processing o clips, and Apple
QMaster distributed rendering. It runs rom the
Apple Terminal window.
Since there is no GUI or this application, in Terminal,
type redline to get a list o available parameters.
REDline™ installs automatically with RED ALERT!™.
Beore installing a new version o REDline™,
make sure you delete the previous version, which
is installed in /usr/sbin. There is no separate
preerence le to delete. Also, use the Apple Disk
Utility to repair your Macintosh HD’s permissions.
REDRUSHES™
REDrushes™, an Intel Mac-only application, is a
batch export utility based on the RED ALERT!™
engine. It enables a user to load a list o RD™
les and transorm them into another ormat
(QuickTime, DPX sequence or Ti sequence). Itenables you to:
Choose the debayer quality (lower debayer•
quality yields a aster render)
Add a look to the output ootage (developed•
in RED ALERT!™ or in the camera)
Make sure the proper timecode track ollows•
the new media (Edge Code or External/TOD)
Crop and scale to t a certain ormat or aspect•
ratio (like 1080p HD with or without letterbox)
Create subolders or each clip (useul i •
exporting DPX sequences)
Burn in timecode or rushes and dailies•
REDrushes™ installs automatically with RED
ALERT!™. Beore installing a new version o
REDrushes™, make sure you delete the previous
version, which is installed in the Applications
older. There is no separate preerence le to
delete. Also, use the Apple Disk Utility to repair
your Macintosh HD’s permissions.
REDCINE™
REDCINE™ is a digital telecine application,
available or Intel-based Macs and or the
Windows® operating system. Using REDCINE™,
you can import RD™ les and apply basic color
correction, resize and reormat settings to your
images. Unlike RED ALERT!™, REDCINE™ lets youimport and view multiple shots.
Beore using REDCINE™ or the rst time, you can
watch the video tutorials oered by RED, since a
manual is not provided. They can be ound on the
RED website, in the support section.
The application has our main areas, which you can
access rom the button list on the let.
Project
The Project settings let you:
Create, load and save project (a project•
consists o a series o shots and various color
correction options applied to these shots
Load one or multiple shots•
Modiy the project’s ormat settings (siz•
aspect ratio and rame rate) as well as co
space and gamma settings
Add guides, borders and timecode or Ed•
Code burn-in.
It is very important to select the correct outp
ormat at this stage. I you want to use REDCI
to output 4K or 2K DPX les, be sure to select
right ormat, aspect ratio and rame rate.
Shot
In this section, you can read metadata ino ab
your clip, such as timecode, length, rame size
rate. You have the option o reraming your sh
and applying scaling. To apply a scaling actor
the loaded shots, rst click the All button, the
select a scaling method.
Color
The color section is where you apply a one-ligcolor correction to each shot. Color balance,
saturation, exposure and ISO settings let you
preliminary color adjustments to clips. The op
low-pass lter (OLPF Compensation) tools ena
you to add noise reduction, sharpening and de
adjustment. Note that the RED ONE™ camera
not apply noise reduction to images it produc
Color settings and looks can be copied and pasted
shot to shot, as well as saved as presets (.RCC
To see the shot’s original RAW data, use the C
button at the top o your screen to turn o any c
correction. This way you’ll know i you’re clipping
Output
This is where you select the output ormat and
location. Shots can be rendered out o REDCI
as image sequences (DPX, Cineon, Ti, JPEG,
OpenEXR or Targa® le ormat) or as QuickTim
les (with several codecs oered).
You can speciy the output path and debayeri
quality. You may also opt to add burned-in
timecode and other inormation.
NOTE : when using REDCINE™ to convert R D
les to another ormat, the audio doesn’t ollo
LibraryREDCINE™ has a library that lets you organize
clips in dierent series and sequences. You ca
also create multiple copies o a shot to visualiz
dierent looks.
It is customary to trash your settings and proj
presets any time you update the application.
On Mac OS® X operating system, these settin
can be ound here:
MACINTOSH HD > LIBRARY > REDCINE
On a PC, the settings can be ound at
C:\DOCUMENTS AND SETTINGS\ALL USERS
APPLICATION DATA\REDCINE
6
Appendix A: RED Applications
8/14/2019 Autodesk and Red One Workflow Guide (for Final Cut Users)
http://slidepdf.com/reader/full/autodesk-and-red-one-workflow-guide-for-final-cut-users 8/11
rimson is a third-party Mac-only application
hat contributes to an ecient RED workow by
roviding a method to turn your Final Cut Pro XML
ata into a virtual telecine pull list, with handles.
his new telecine XML le can then be used in
EDCINE™ to perorm a best-light color correction
n edited selects and batch export the ootage in
whatever ormat is required or nishing.
7
Appendix B: Crimson
Appendix C: Another FCP Editorial Option
Appendix D: RED Color Processing
Crimson also allows you to use REDline™ to output your
les, with the added benet o a distributed rendering
option that uses the Apple QMaster technology.
Crimson can be downloaded rom
www.crimsonworkow.com. A ree demonstration
version allows you to process the rst ve clips in
your XML.
You will nd a very inormative video on how
to use Crimson on the company’s website. It is
recommended that you watch the tutorial and
careully read the detailed instructions on how
use the application beore doing anything.
Be aware that Crimson can be nicky with com
sequences, so make sure your edit does not co
anything complex such as speed changes.
or very long projects, or when editing RED
ootage on a slower machine such as a MacBook®
ro computer with FireWire hard drives, some
ditors will chose to convert their entire ootage to
less CPU-taxing QuickTime ormat.
Using one o the RED applications, you can convert
he RD™ les into another QuickTime ormat,
uch as DVCPRO HD, Applr Uncompressed les, or
pple ProRes 4:2:2. With the appropriate hardware
ideo cards, you may also use the uncompressed
odecs rom AJA or BlackMagic Design.
utodesk applications do not natively support
roRes. Use a DVCPRO HD ormat or your ofine,
r a 10 -bit QuickTime ormat (Apple, AJA or BMD)
ecause you can import those QuickTime les to
Autodesk applications and keep your entire edit,
audio included, as a reerence.
In this workow, you would edit ofine using
standalone QuickTime les, then use Crimson
to convert your XML and output DPX sequences
beore importing them into the Autodesk
application o your choice.
The key to the success o this workow is to keep the
original RD™ lename in your QuickTime lename,
since Crimson searches or the RD™ lename.
For example:
A011_C001_0820SG_001.RD™ becomes A011_
C001_0820SG_001_DVCPROHD.mov
PROS (o this option)
Faster Mac response during editorial•
Smaller le sizes•
QuickTime les can be imported in Smok•
with sound, as a reerence
CONS
Long render times when converting RD™•
Requirements : FCP 6.0. 2 or later, RED•
QuickTime codec
he color processing in the RED camera and its
ssociated sotware is not extensively documented.
his section details some observations we made
uring tests.
s stated previously, the RED camera records RAW
mages and the settings o the camera are saved
s metadata that is used to convert the images
ither on set or monitoring, or later in one o the
ED sotware applications or post-production. A
st o these settings can be seen in the Color tab o
rimson, the RED ALERT!™ and REDCINE™ interace,
r the help text or REDline™.
hese metadata settings can be categorized as
ontrolling camera conguration (e.g. ISO, Kelvin,
int, Gain), color space conversion (Gamma, Color
pace), and “look” or creative control (e.g. exposure,
aturation, contrast, brightness, and the black, toe,
mid, knee, and white XY curve points). However, in
ractice, the categories are blurred since all o these
controls aect the resulting color conversion rom
camera RAW values. None o these controls have
any eect on what is actually recorded; they only
serve as a starting point or how the RAW values get
converted.
The two controls that ostensibly dene the color
space to which the RAW values are converted are
the gamma and color space settings. It appears
that the Gamma setting selects among several
1d-LUTs that control the tone scale o the resulting
images and that the Color Space setting selects
among several x matrix options that control the
placement o the red, green, and blue primaries.
Note that both gamma and color space have options
labeled REDspace™ and Rec709 and that the
eect is dierent depending on whether you have
selected it as a gamma value or a color space value.
Furthermore, it is not necessary to keep these
choices in synchronization, and indeed, we ound
we got better results when we did not. (see page 6 )
One o the most important aspects o the RED
system to understand is the relationship betw
luminance values in the scene and the resultin
pixel values in the images produced by the RE
applications. This tonal relationship is control
by the gamma setting and is illustrated in the
next several gures. The ollowing results wer
obtained with color space set to CamRGB. In
general, the results or the red, green, and blu
channel will vary depending on the chromatic
o the gray scale one shoots and the value o t
Kelvin settings; so to keep things simple, we s
only the red channel.

8/14/2019 Autodesk and Red One Workflow Guide (for Final Cut Users)
http://slidepdf.com/reader/full/autodesk-and-red-one-workflow-guide-for-final-cut-users 9/118
ote: The exposure axis o these gures has a zero label to indicate the luminance o a mid-gray
bject when lit or ISO 20. Speed rating o digital cameras (or lm or that matter) is an area
some debate. The “normal” exposure reerence was based on the shape o the REDspace™
amma option (i.e. the camera deault setting), the 20 ISO exposure recommendation in the
amera user manual, as well as technical standards in this area. When shooting lm, one essentially
icks a “sensor” depending on the expected lighting situation. With the RED, one has a sensor with a
xed speed and makes a noise trade-o in post-production, not unlike pushing a lm stock. This
rade-o is made via the ISO or Exposure settings. (It is our understanding that changing the
SO setting on the RED camera does not aect capture, only post-processing.)
Figure 2. By manually subtracting the pixvalue rom a shot with the lens cap on, wegot Figure 2. This shows a response that iindeed nearly linear with respect to sceneluminances. The camera specicationsclaim a 12-bit A/D converter, and indeed,we see almost 12 stops o dynamic rangebetween black and the clipping point. It isworth noting that, although this responsecan be measured in a laboratory setting,with appropriate pixel averaging, thebottom three to our stops o dynamicrange are quite noisy and may be o limiteuse or real-world image capture. Indeed,as we will see next, most o the gammasetting options compress this part o thetone scale heavily.
Figure 1. The result o settinggamma to Linear. This graphshows some residual darkcurrent, since the minimumpixel value is about 800 (out o 6555). The behavior near blackis dependent upon the blackshading operation, which is doneas part o the camera calibration.
We ran the black shading severalhours beore this part o ourtesting was done, and the cameradark current may have risen duringthat time.
8/14/2019 Autodesk and Red One Workflow Guide (for Final Cut Users)
http://slidepdf.com/reader/full/autodesk-and-red-one-workflow-guide-for-final-cut-users 10/11
9
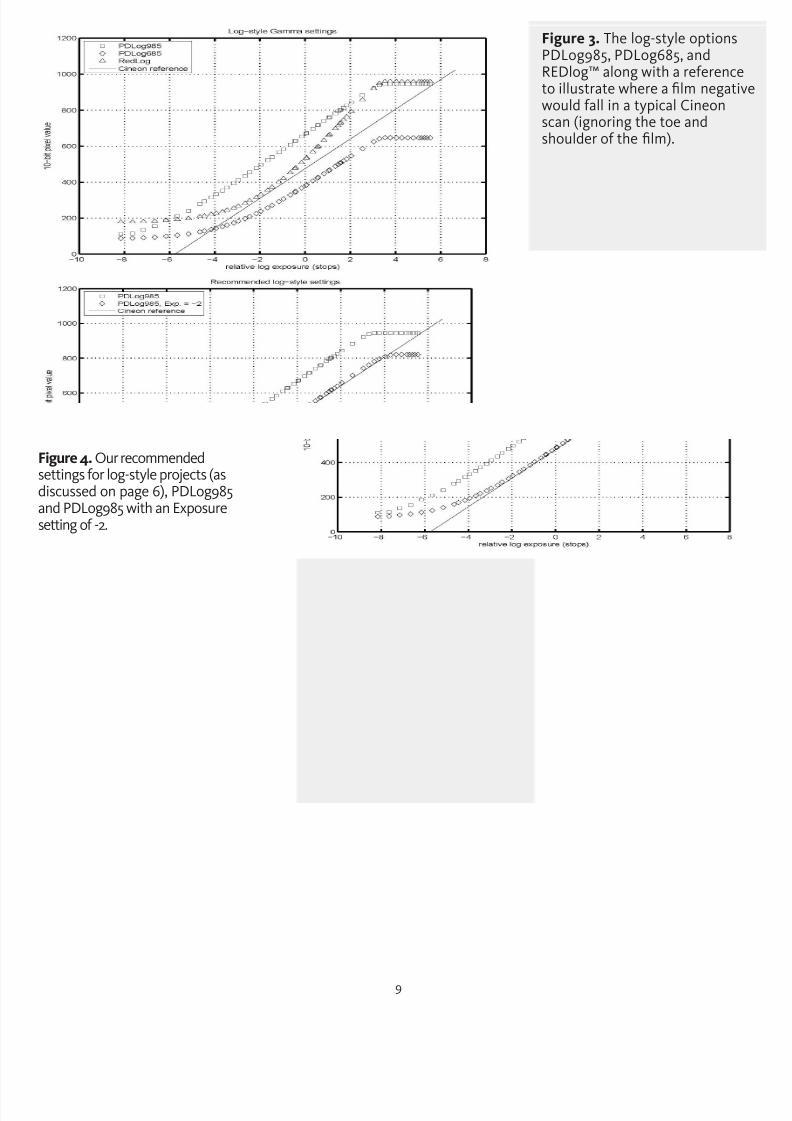
Figure 3. The log-style optionsPDLog985, PDLog685, andREDlog™ along with a reerenceto illustrate where a lm negatiwould all in a typical Cineonscan (ignoring the toe andshoulder o the lm).
Figure 4. Our recommendedsettings or log-style projects (asdiscussed on page 6), PDLog985and PDLog985 with an Exposuresetting o -2.
8/14/2019 Autodesk and Red One Workflow Guide (for Final Cut Users)
http://slidepdf.com/reader/full/autodesk-and-red-one-workflow-guide-for-final-cut-users 11/11
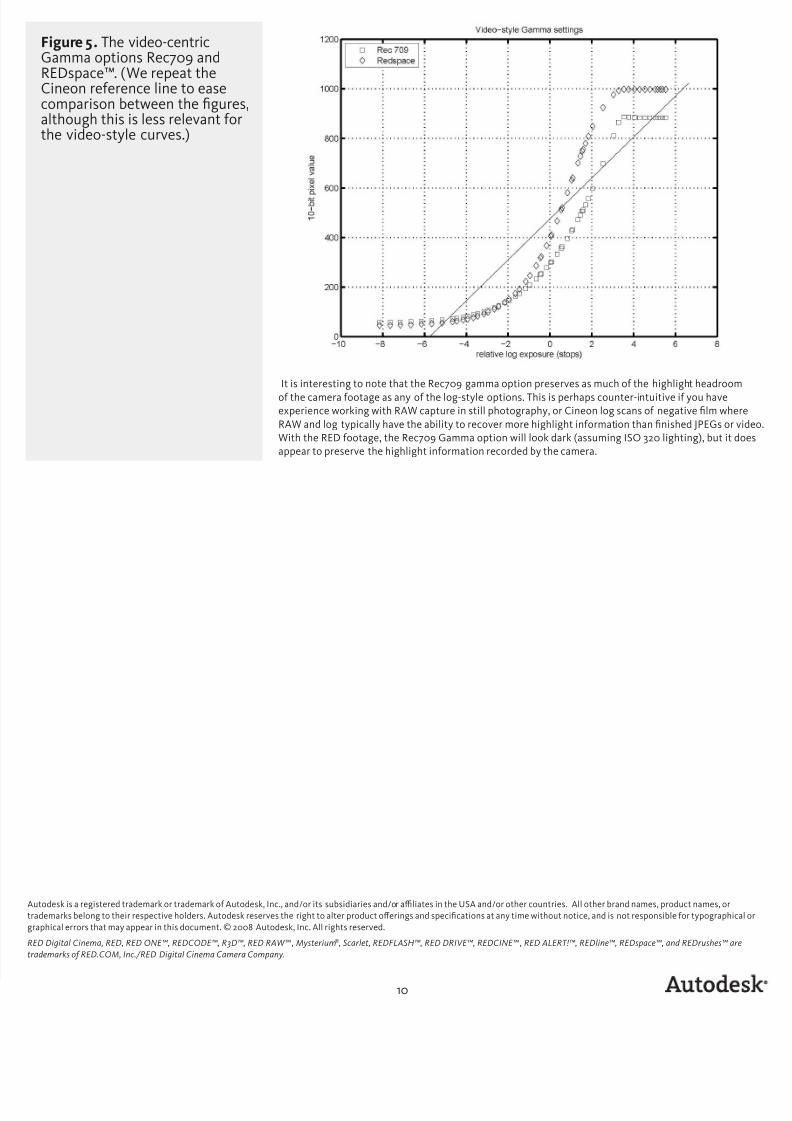
It is interesting to note that the Rec709 gamma option preserves as much o the highlight headroom
o the camera ootage as any o the log-style options. This is perhaps counter-intuitive i you have
experience working with RAW capture in still photography, or Cineon log scans o negative lm whe
RAW and log typically have the ability to recover more highlight inormation than nished JPEGs or v
With the RED ootage, the Rec709 Gamma option will look dark (assuming ISO 20 lighting), but it d
appear to preserve the highlight inormation recorded by the camera.
Figure 5. The video-centricGamma options Rec709 andREDspace™. (We repeat theCineon reerence line to easecomparison between the gures,although this is less relevant orthe video-style curves.)
ED Digital Cinema, RED, RED ONE™, REDCODE™, R3D™, RED RAW™ , Mysterium® , Scarlet, REDFLASH™, RED DRIVE™, REDCINE™ , RED ALERT!™, REDline™, REDspace™, and REDrushes™ are
rademarks of RED.COM, Inc./RED Digital Cinema Camera Company.
utodesk is a registered trademark or trademark o Autodesk, Inc., and/or its subsidiaries and/or aliates in the USA and/or other countries. All other brand names, product names, or
rademarks belong to their respective holders. Autodesk reserves the right to alter product oerings and specications at any time without notice, and is not responsible or typographic
raphical errors that may appear in this document. © 2008 Autodesk, Inc. All rights reserved.