authenticate clients using smart card - eventtracker · the purpose of this document is to help...
TRANSCRIPT
EventTracker 8815 Centre Park Drive
Columbia MD 21045 www.eventtracker.com
Publication Date: Jul. 15, 2016
Configure IIS Web Server Authenticate Clients using Smart Card
EventTracker: Authenticate Clients using Smart Card
1
Abstract
The purpose of this document is to help users configure IIS Web Server to authenticate clients using Smart Card. Smart Card can be used for network access, in addition or in alternative to user IDs and passwords, a networked computer equipped with a smart card reader can reliably identify the user.
Audience
EventTracker users who wish to provide additional security and control over user credentials using smart cards.
The information contained in this document represents the current view of Prism Microsystems Inc. on the issues discussed as of the date of publication. Because Prism Microsystems must respond to changing market conditions, it should not be interpreted to be a commitment on the part of Prism Microsystems, and Prism Microsystems cannot guarantee the accuracy of any information presented after the date of publication.
This document is for informational purposes only. Prism Microsystems MAKES NO WARRANTIES, EXPRESS OR IMPLIED, AS TO THE INFORMATION IN THIS DOCUMENT.
Complying with all applicable copyright laws is the responsibility of the user. Without limiting the rights under copyright, this paper may be freely distributed without permission from Prism, as long as its content is unaltered, nothing is added to the content and credit to Prism is provided.
Prism Microsystems may have patents, patent applications, trademarks, copyrights, or other intellectual property rights covering subject matter in this document. Except as expressly provided in any written license agreement from Prism Microsystems, the furnishing of this document does not give you any license to these patents, trademarks, copyrights, or other intellectual property.
The example companies, organizations, products, people and events depicted herein are fictitious. No association with any real company, organization, product, person or event is intended or should be inferred.
© 2013 Prism Microsystems Corporation. All rights reserved. The names of actual companies and products mentioned herein may be the trademarks of their respective owners.

EventTracker: Authenticate Clients using Smart Card
2
Table of Contents Smart Card ............................................................................................................................................. 3
Windows 2003 Server ............................................................................................................................ 4
Configure IIS to enable PKI Authentication ....................................................................................... 4
Steps to setup Smart Card Authentication in IIS once the Web Server has been PKI enabled ....... 4
Create IIS Certificate Trust List (CTL) ................................................................................................. 7
Windows 2008 / 2008 R2/ 2012 R2 Server ........................................................................................ 13
Configure IIS to enable PKI authentication ..................................................................................... 13
Steps to setup Smart Card Authentication in IIS once the Web Server has been PKI enabled. .... 13
Enable SSLAlwaysNegoClientCert ................................................................................................... 18
Apply Smart Card Authenticate Update .............................................................................................. 19
Smart Card Settings............................................................................................................................. 19
Execute EventTracker Configuration Utility ........................................................................................ 28
Run updated EventTracker users list .................................................................................................. 29
EventTracker: Authenticate Clients using Smart Card
3
Smart Card Interactive logon can be configured to require smart card authentication for greater security.
Smart cards are credit card sized plastic cards that contain integrated circuit chips. Smart cards are used to store user’s certificates and private keys, enabling easy transport of these credentials. Smart cards can perform sophisticated public key cryptography operations, such as digital signing and key exchange.
You can deploy smart cards and smart card readers to provide stronger user authentication and security for a range of security solutions, including logging on over a network, secure Web communication, and secure e-mail.
Smart cards provide tamper-resistant authentication through onboard private key storage and processing. The private key is used in turn to provide other forms of security related to digital signatures and encryption.
Source:
http://technet.microsoft.com/en-us/library/cc938841.aspx
Useful links:
http://ewh.ieee.org/r10/bombay/news5/SmartCards.htm
http://technet.microsoft.com/en-us/library/cc962052.aspx
http://technet.microsoft.com/en-us/library/dd277375.aspx
http://web.mit.edu/ecom/Spring1997/gr12/2USES.HTM
EventTracker: Authenticate Clients using Smart Card
4
Windows 2003 Server Configure IIS to enable PKI Authentication
The steps in this procedure assume that a Secure Sockets Layer (SSL) certificate has already been installed. For more information about adding SSL, please refer How to Secure IIS Web Server with SSL.
Membership in the local Administrators group, or equivalent, is the minimum required to complete this procedure.
The Web Server will need to be aware of and fully integrated into your Enterprise PKI solution:
• Install Trusted CAs in the Trusted Roots Certificate Stores. • Configure Certificate Revocation to work with IIS (CRL/OCSP etc.)
Steps to setup Smart Card Authentication in IIS once the Web Server has been PKI enabled
1 Generate an SSL Certificate Request for the Root Web Site.
Get the Request signed by a Certificate Authority (CA), most likely you will use your internal Root Certificate Authority (CA) or Intermediate CA.
2 In IIS, right-click EventTracker web site and select Properties on the shortcut menu.
3 Click the Directory Security Tab.
4 In the Secure Communications section, click Edit.
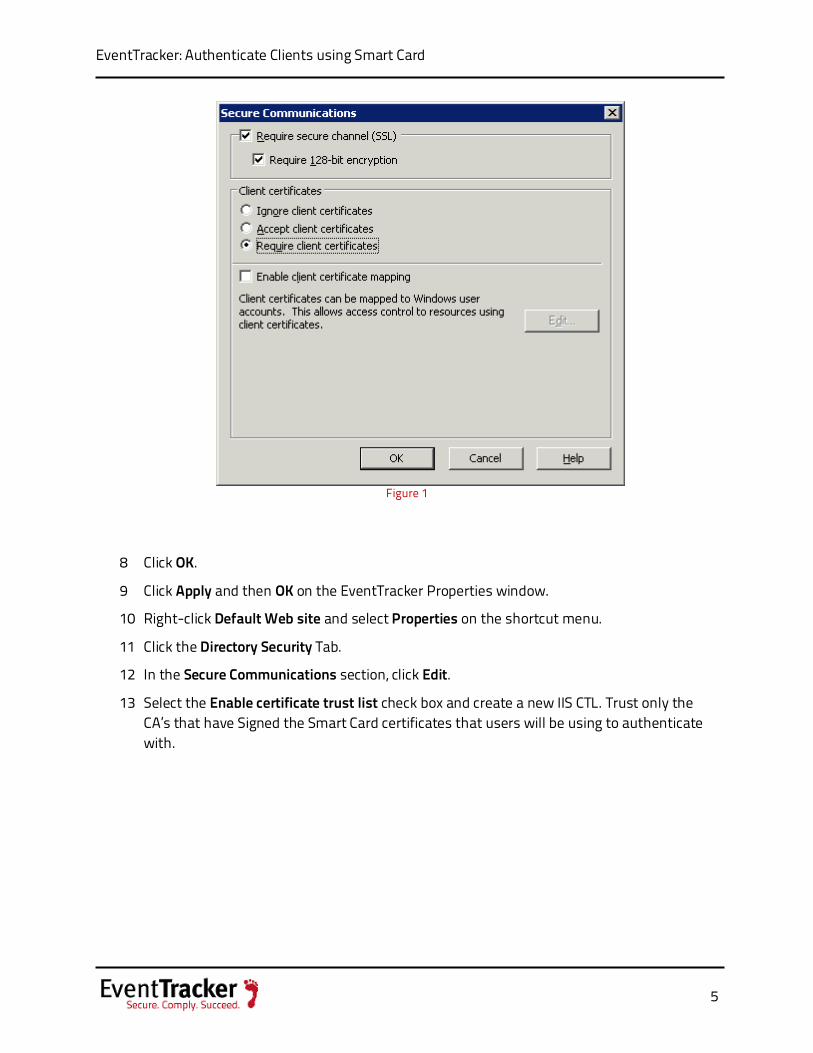
5 Select the Require Secure Channel (SSL) check box.
6 Select the Require 128-bit encryption check box.
7 Under Client Certificates select the Require Client Certificates option.
EventTracker: Authenticate Clients using Smart Card
5
Figure 1
8 Click OK.
9 Click Apply and then OK on the EventTracker Properties window.
10 Right-click Default Web site and select Properties on the shortcut menu.
11 Click the Directory Security Tab.
12 In the Secure Communications section, click Edit.
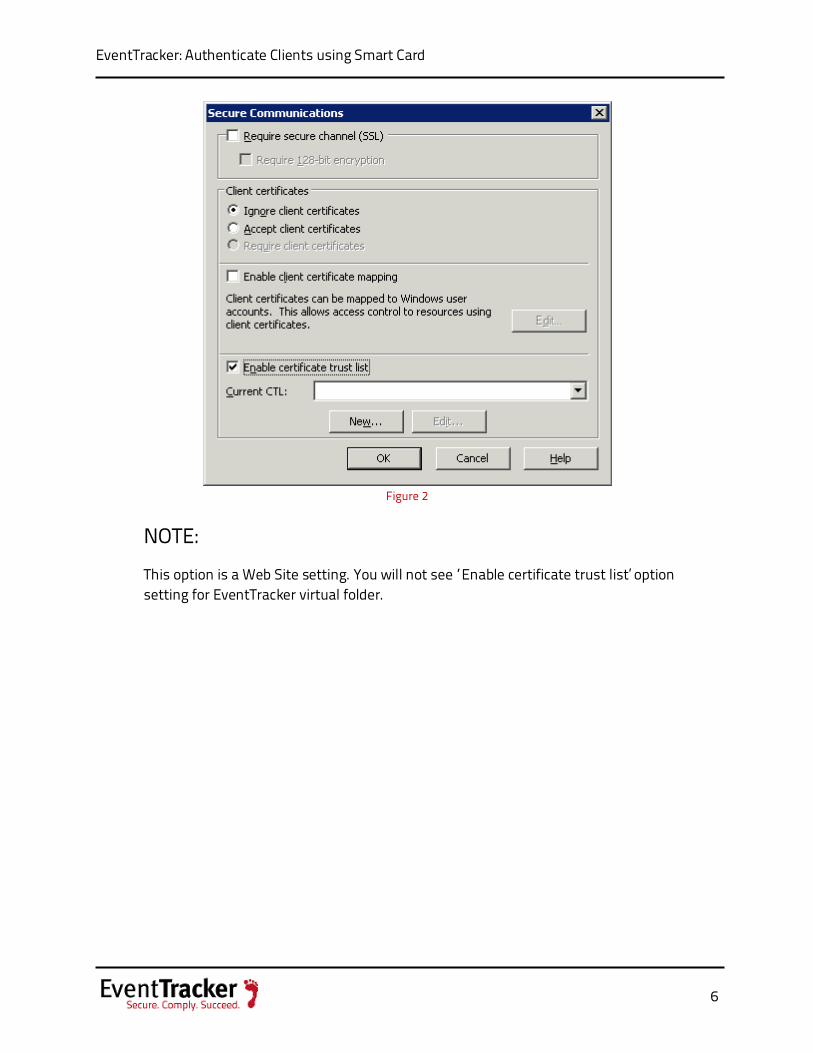
13 Select the Enable certificate trust list check box and create a new IIS CTL. Trust only the CA’s that have Signed the Smart Card certificates that users will be using to authenticate with.
EventTracker: Authenticate Clients using Smart Card
6
Figure 2
NOTE:
This option is a Web Site setting. You will not see “Enable certificate trust list’ option setting for EventTracker virtual folder.
EventTracker: Authenticate Clients using Smart Card
7
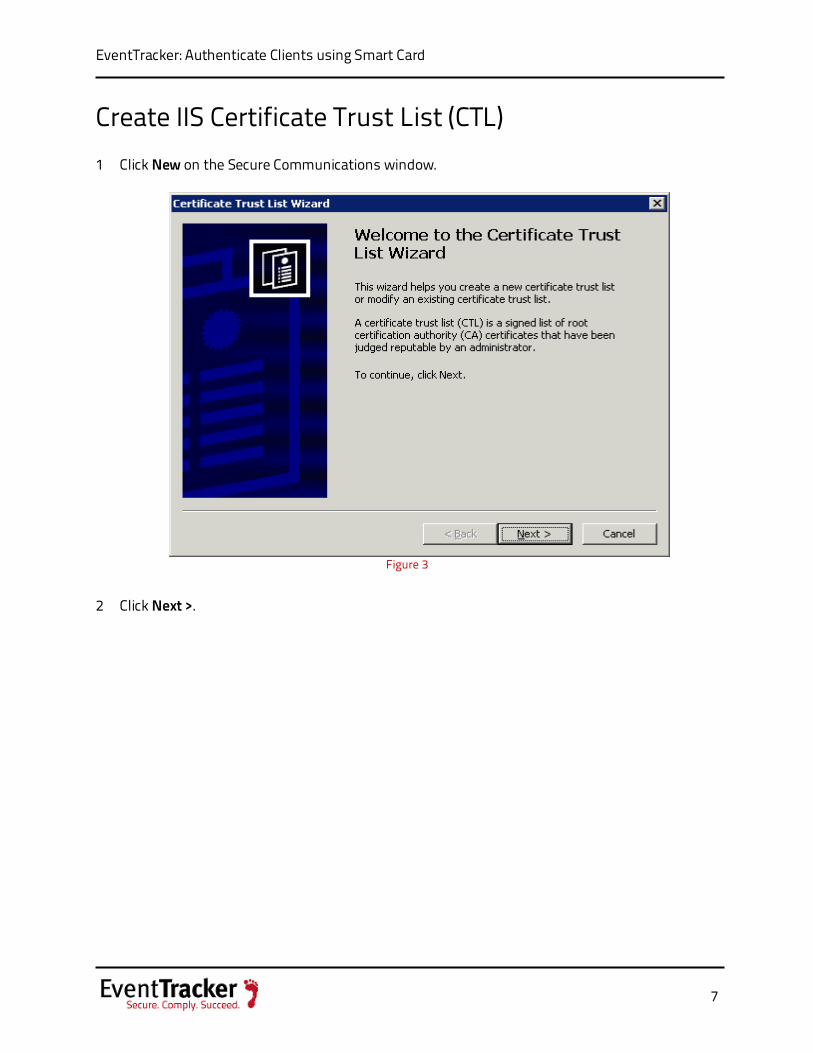
Create IIS Certificate Trust List (CTL) 1 Click New on the Secure Communications window.
Figure 3
2 Click Next >.
EventTracker: Authenticate Clients using Smart Card
8
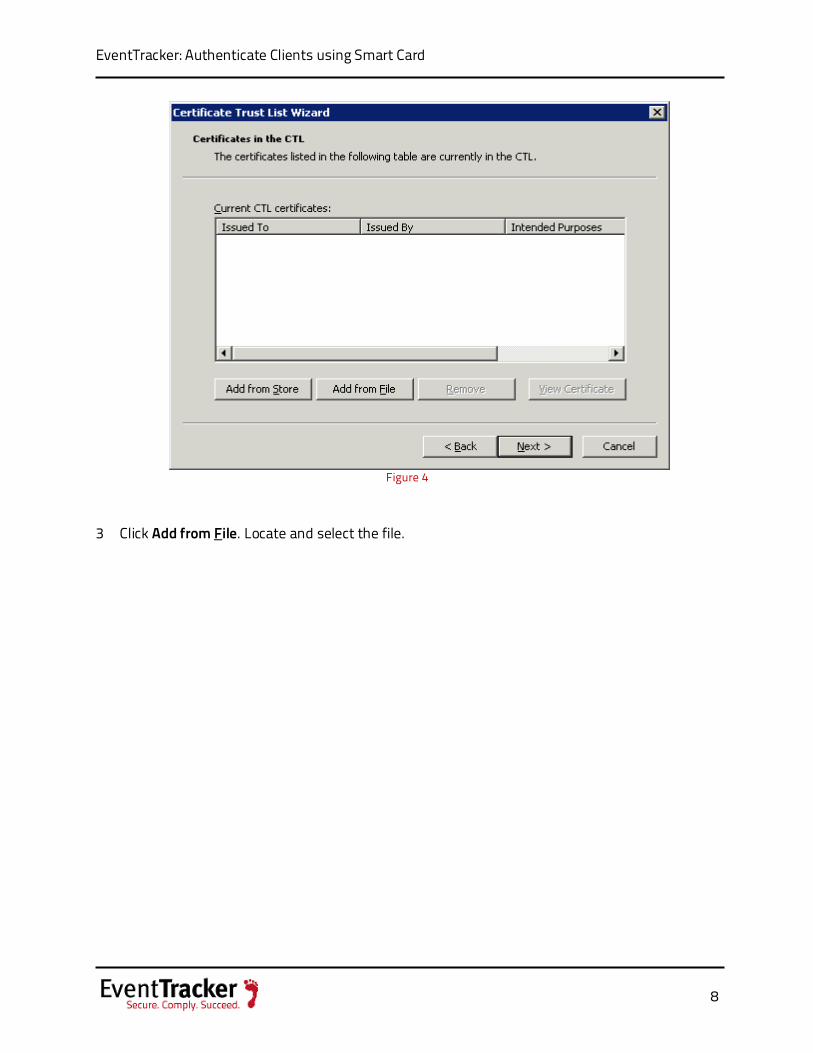
Figure 4
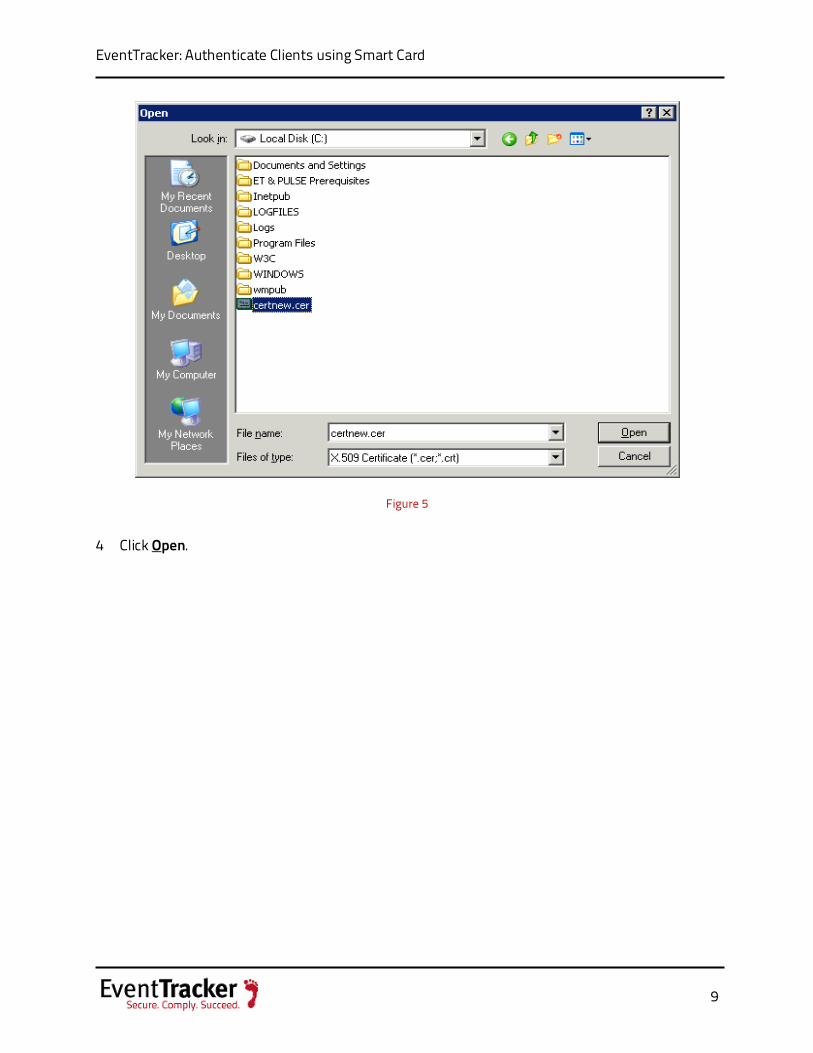
3 Click Add from File. Locate and select the file.
EventTracker: Authenticate Clients using Smart Card
9
Figure 5
4 Click Open.
EventTracker: Authenticate Clients using Smart Card
10
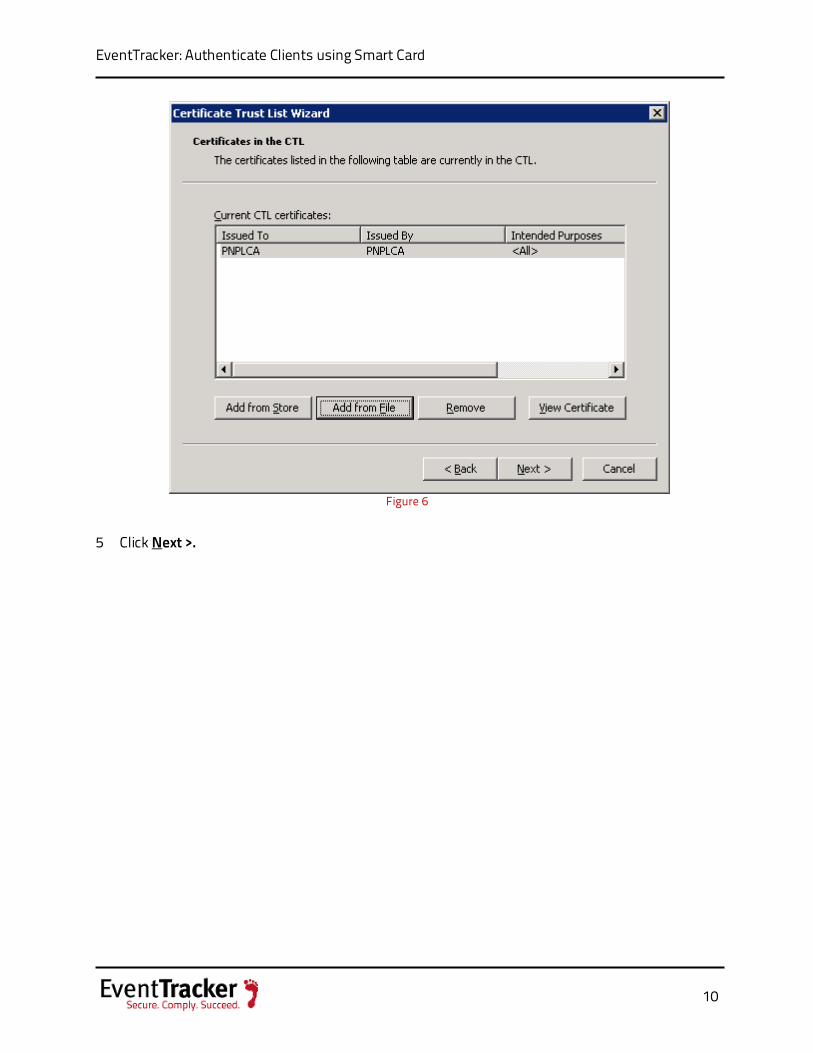
Figure 6
5 Click Next >.
EventTracker: Authenticate Clients using Smart Card
11
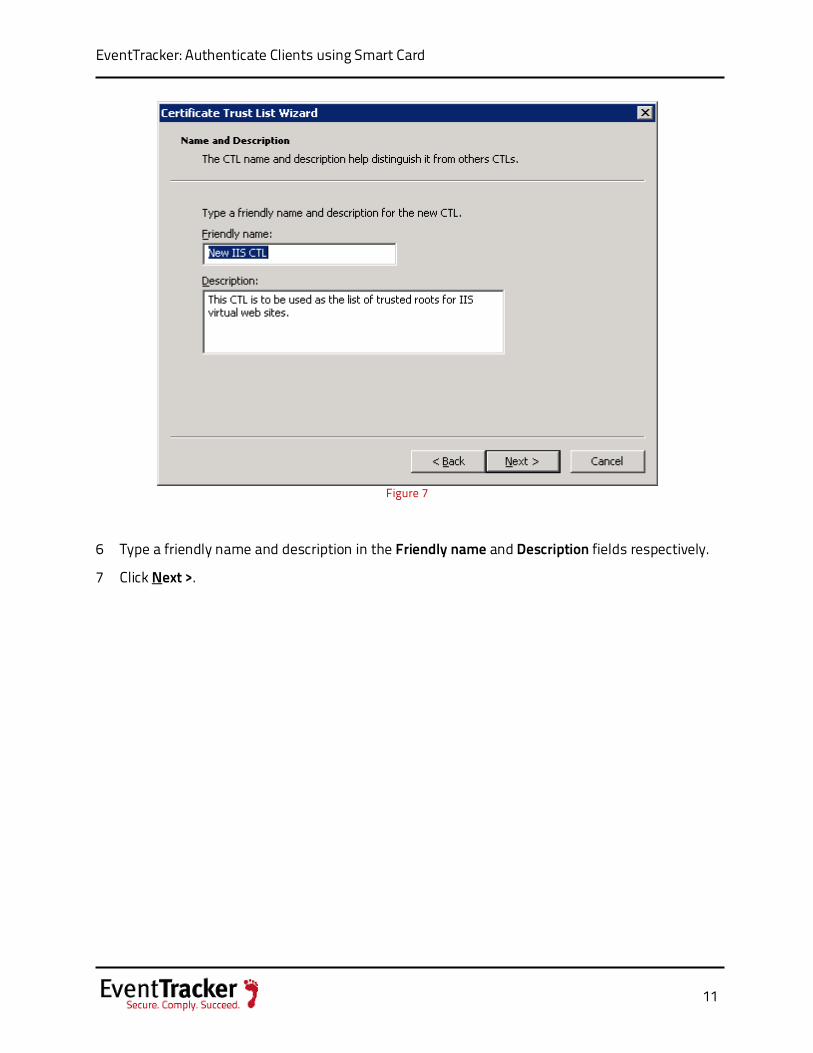
Figure 7
6 Type a friendly name and description in the Friendly name and Description fields respectively.
7 Click Next >.
EventTracker: Authenticate Clients using Smart Card
12
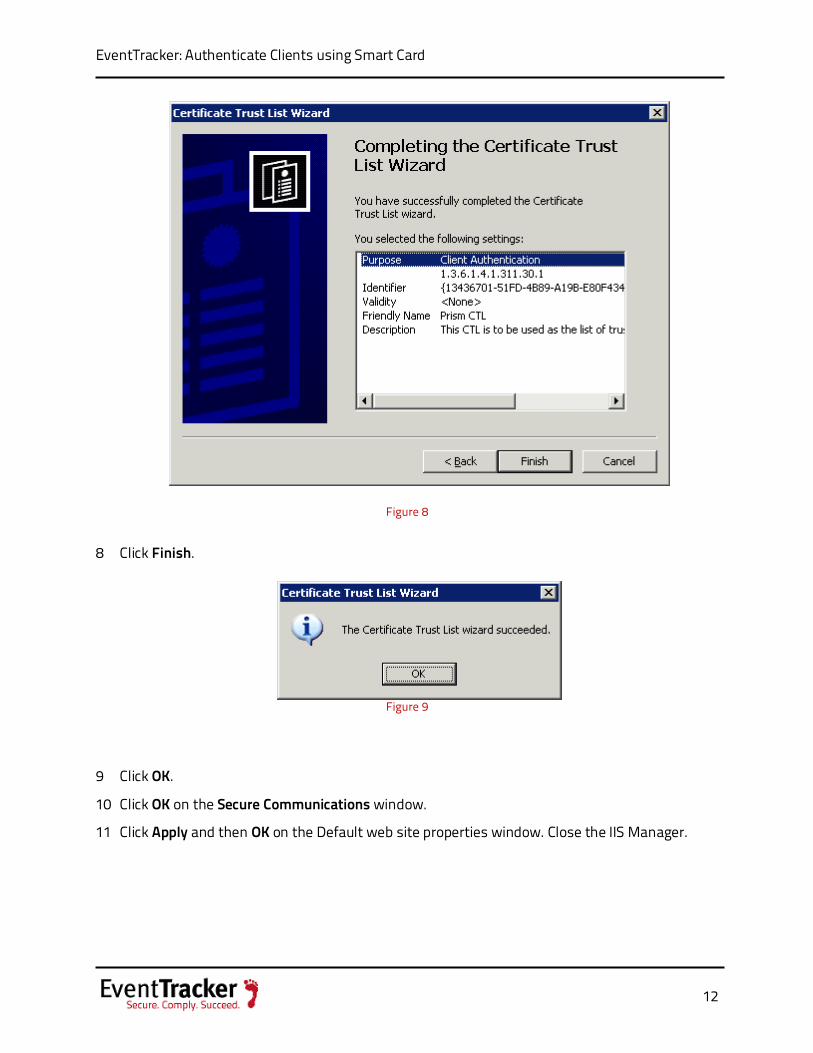
Figure 8
8 Click Finish.
Figure 9
9 Click OK.
10 Click OK on the Secure Communications window.
11 Click Apply and then OK on the Default web site properties window. Close the IIS Manager.
EventTracker: Authenticate Clients using Smart Card
13
Windows 2008 / 2008 R2/ 2012 R2 Server Configure IIS to enable PKI authentication
The steps in this procedure assume that a Secure Sockets Layer (SSL) certificate has already been installed. For more information about adding SSL, please refer How to – Secure IIS Web Server with SSL.
Membership in the local Administrators group, or equivalent, is the minimum required to complete this procedure.
The Web Server will need to be aware of and fully integrated into your Enterprise PKI solution:
• Install Trusted CAs in the Trusted Roots Certificate Stores. • Configure Certificate Revocation to work with IIS (CRL/OCSP, etc.)
Steps to setup Smart Card Authentication in IIS once the Web Server has been PKI enabled.
1 Generate an SSL Certificate Request for the Root Web Site.
Get the Request signed by a Certificate Authority (CA), most likely you will use your internal Root Certificate Authority (CA) or Intermediate CA.
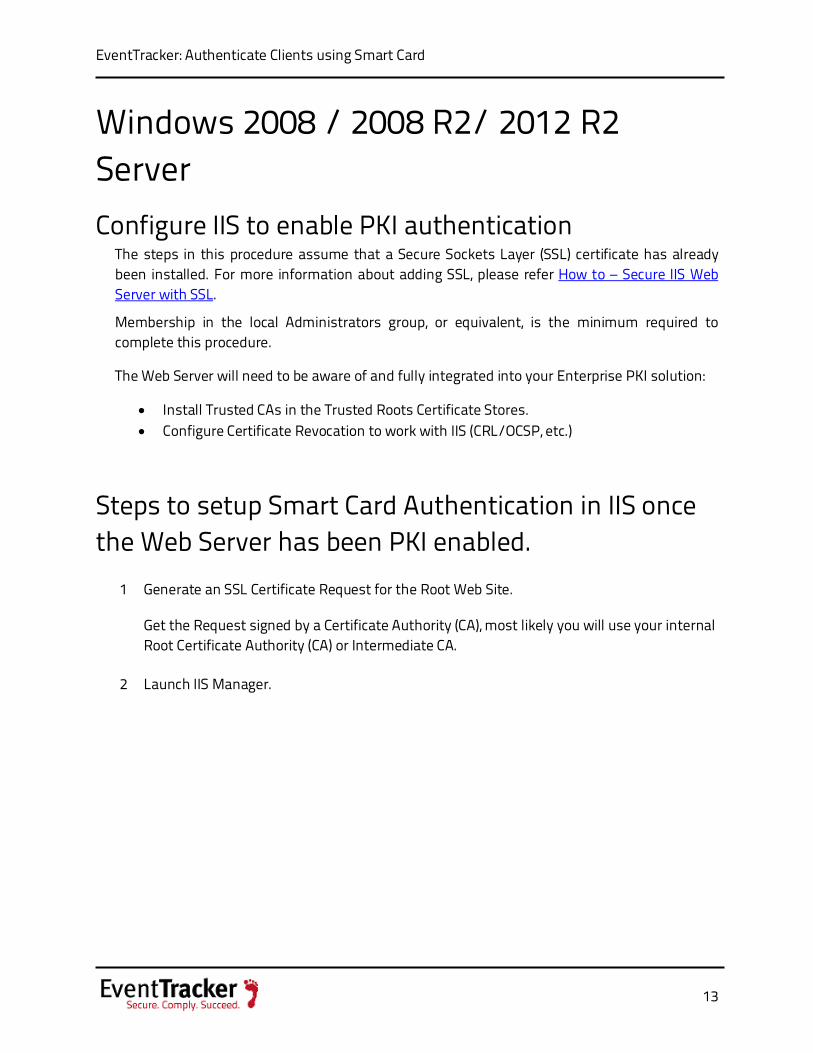
2 Launch IIS Manager.
EventTracker: Authenticate Clients using Smart Card
14
Figure 10
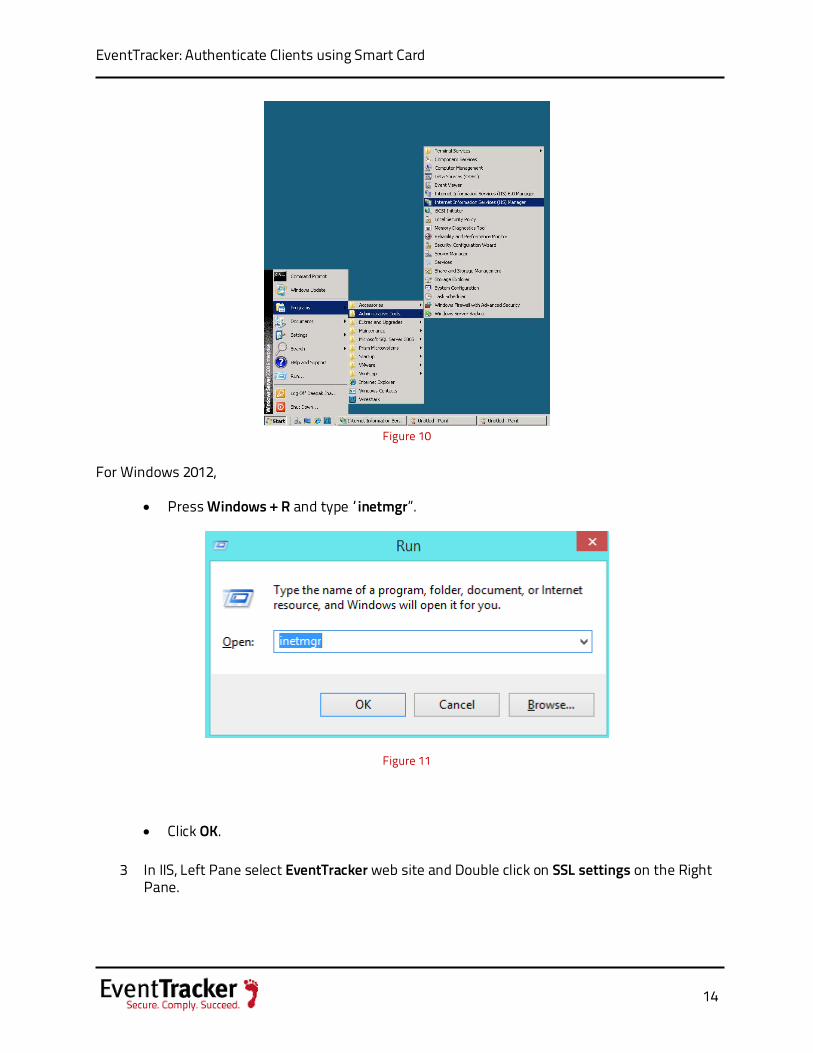
For Windows 2012,
• Press Windows + R and type “inetmgr”.
Figure 11
• Click OK.
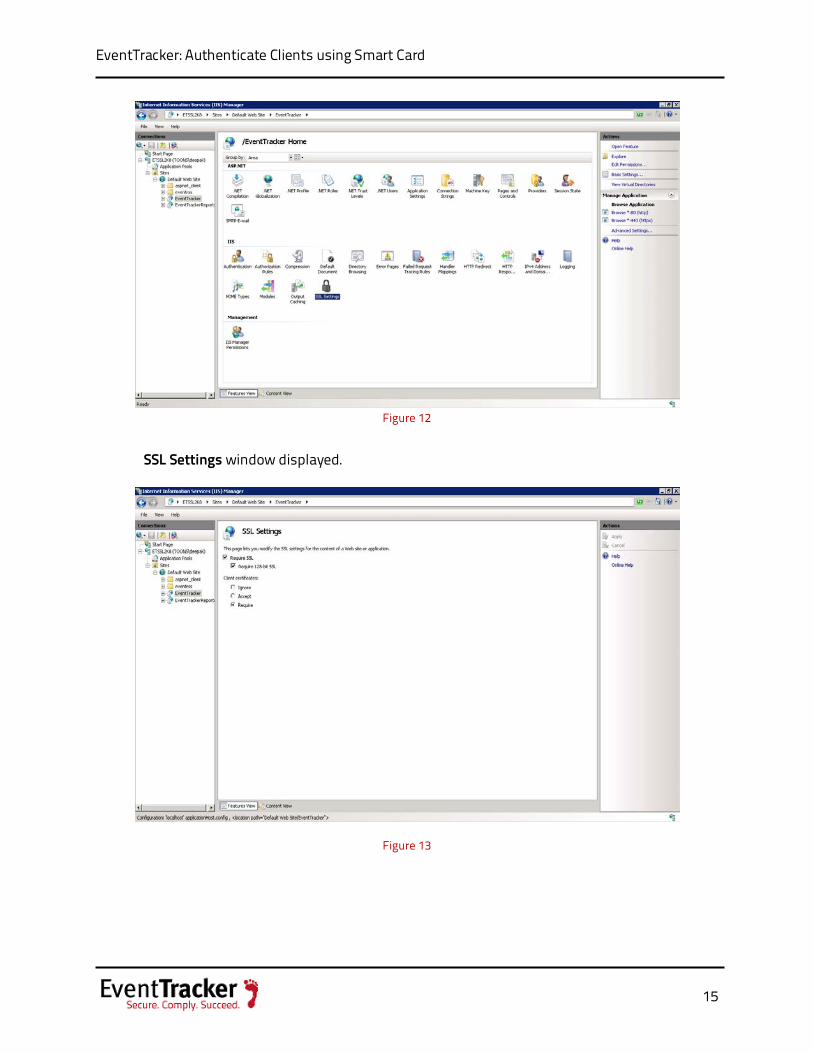
3 In IIS, Left Pane select EventTracker web site and Double click on SSL settings on the Right Pane.
EventTracker: Authenticate Clients using Smart Card
15
Figure 12
SSL Settings window displayed.
Figure 13
EventTracker: Authenticate Clients using Smart Card
16
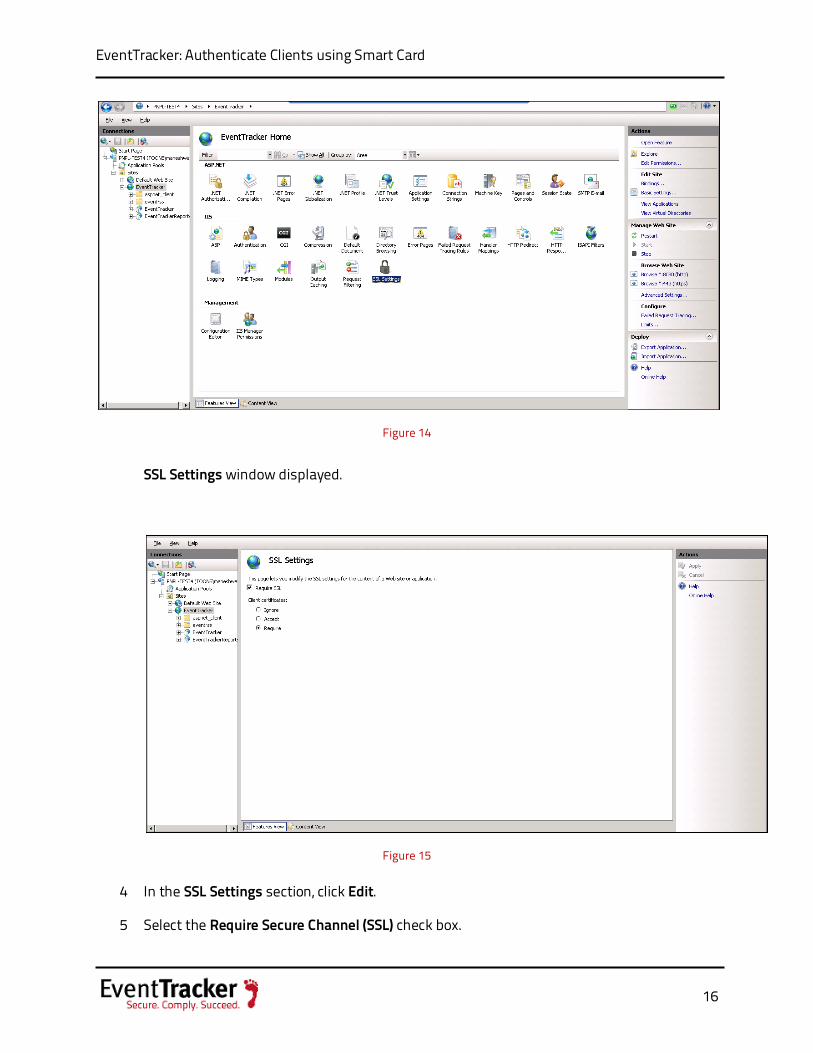
Figure 14
SSL Settings window displayed.
Figure 15
4 In the SSL Settings section, click Edit.
5 Select the Require Secure Channel (SSL) check box.
EventTracker: Authenticate Clients using Smart Card
17
6 Select the Require 128-bit encryption check box.
NOTE:
In 2008 R2, this option is not available.
7 Under Client Certificates select the Require Client Certificates option.
8 Click Apply in the Action pane.
EventTracker: Authenticate Clients using Smart Card
18
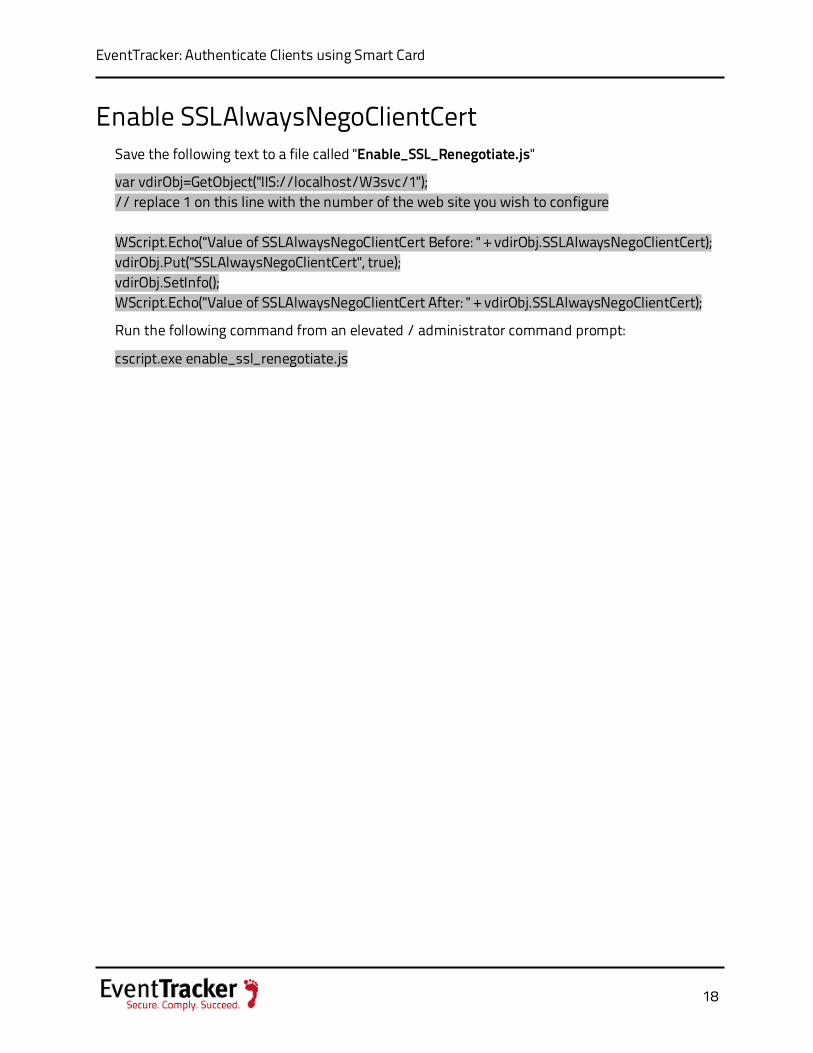
Enable SSLAlwaysNegoClientCert Save the following text to a file called "Enable_SSL_Renegotiate.js"
var vdirObj=GetObject("IIS://localhost/W3svc/1"); // replace 1 on this line with the number of the web site you wish to configure WScript.Echo("Value of SSLAlwaysNegoClientCert Before: " + vdirObj.SSLAlwaysNegoClientCert); vdirObj.Put("SSLAlwaysNegoClientCert", true); vdirObj.SetInfo(); WScript.Echo("Value of SSLAlwaysNegoClientCert After: " + vdirObj.SSLAlwaysNegoClientCert);
Run the following command from an elevated / administrator command prompt:
cscript.exe enable_ssl_renegotiate.js
EventTracker: Authenticate Clients using Smart Card
19
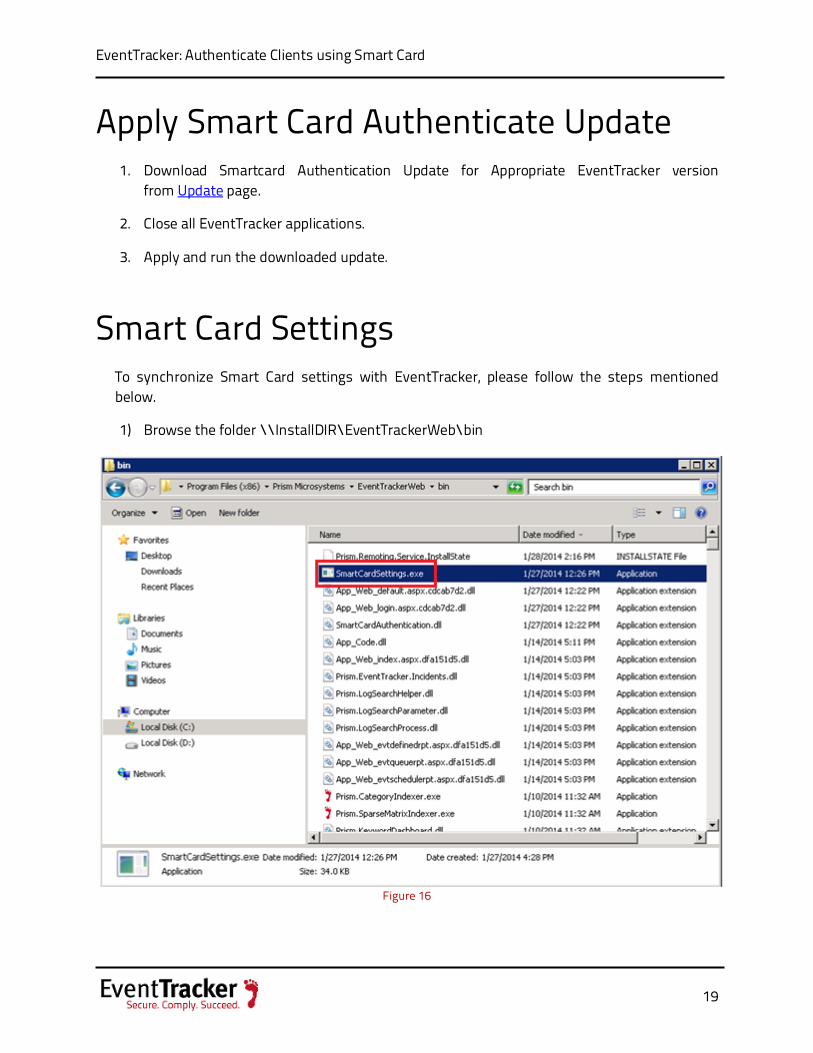
Apply Smart Card Authenticate Update 1. Download Smartcard Authentication Update for Appropriate EventTracker version
from Update page.
2. Close all EventTracker applications.
3. Apply and run the downloaded update.
Smart Card Settings To synchronize Smart Card settings with EventTracker, please follow the steps mentioned below.
1) Browse the folder \\InstallDIR\EventTrackerWeb\bin
Figure 16
EventTracker: Authenticate Clients using Smart Card
20
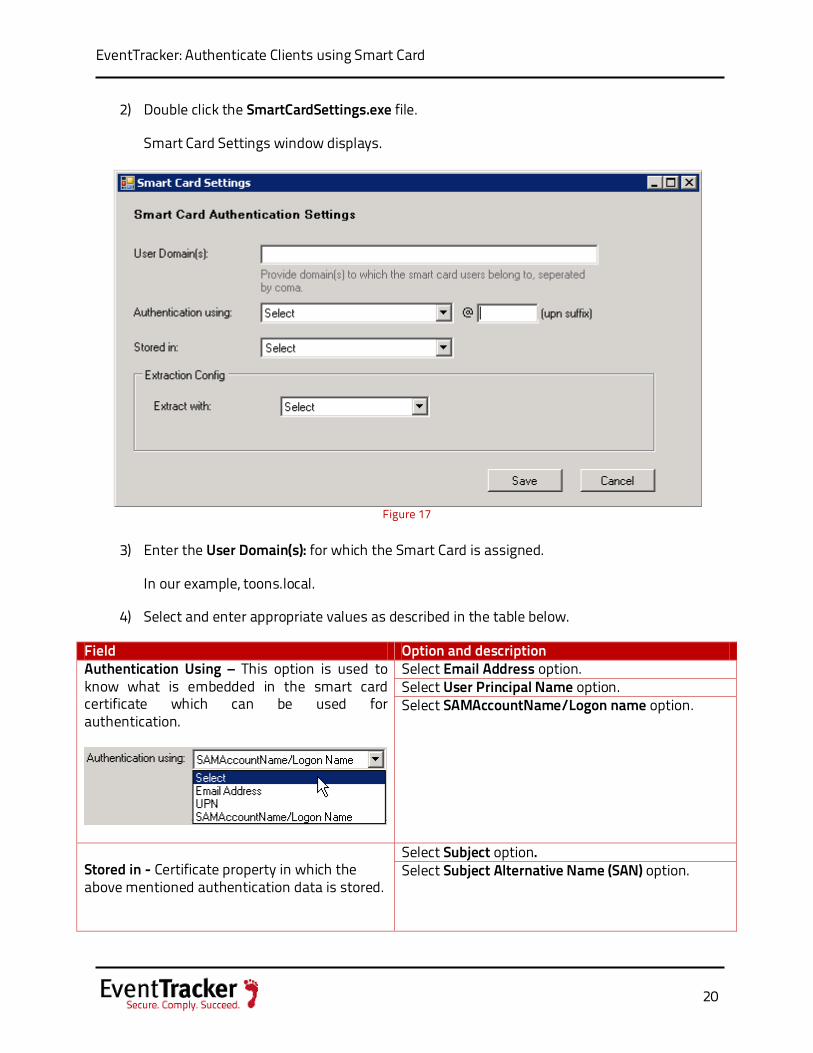
2) Double click the SmartCardSettings.exe file.
Smart Card Settings window displays.
Figure 17
3) Enter the User Domain(s): for which the Smart Card is assigned.
In our example, toons.local.
4) Select and enter appropriate values as described in the table below.
Field Option and description Authentication Using – This option is used to know what is embedded in the smart card certificate which can be used for authentication.
Select Email Address option. Select User Principal Name option. Select SAMAccountName/Logon name option.
Stored in - Certificate property in which the above mentioned authentication data is stored.
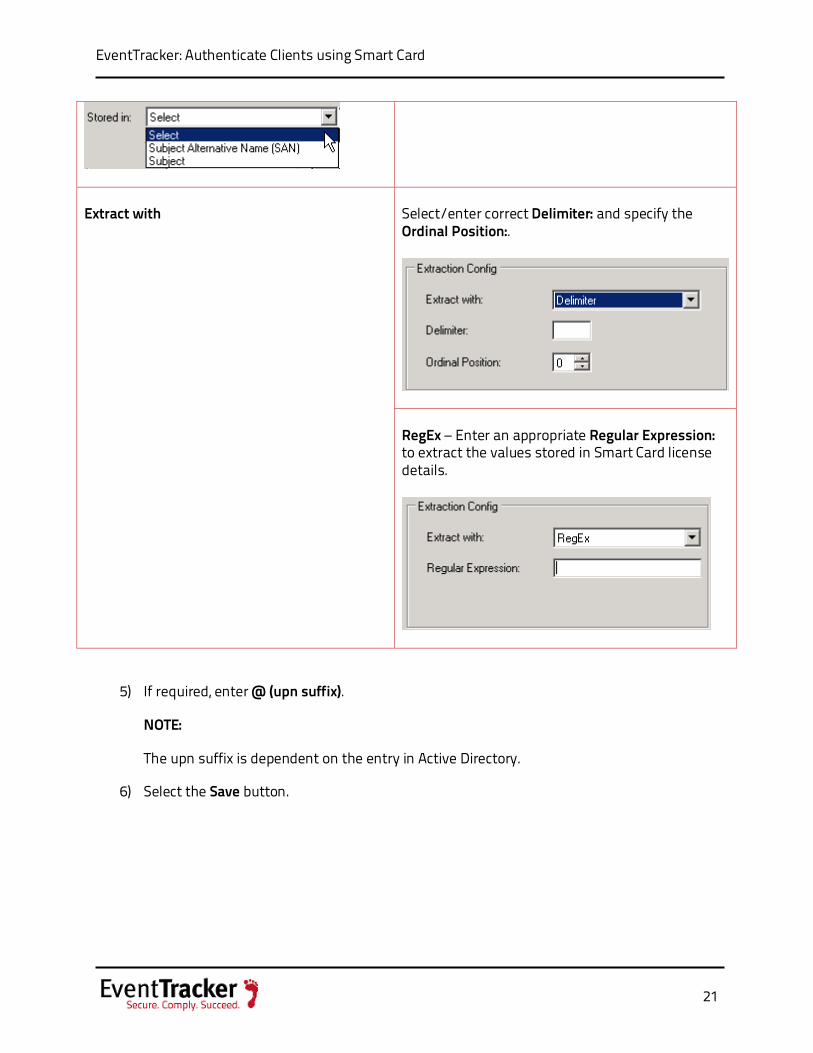
Select Subject option. Select Subject Alternative Name (SAN) option.
EventTracker: Authenticate Clients using Smart Card
21
Extract with
Select/enter correct Delimiter: and specify the Ordinal Position:.
RegEx – Enter an appropriate Regular Expression: to extract the values stored in Smart Card license details.
5) If required, enter @ (upn suffix).
NOTE:
The upn suffix is dependent on the entry in Active Directory.
6) Select the Save button.

EventTracker: Authenticate Clients using Smart Card
22
NOTE: Authentication Using UPN: For DoD customers as per the Common Access Card (CAC) standards, the certificates
will have UPN of the user stored in the Subject Alternate Name (SAN) property of the certificate. Hence the smart card settings should be as below.
Figure 18 : Sample Certificate
Smart Card Settings for DoD customers is given below. Refer Figure 19.

EventTracker: Authenticate Clients using Smart Card
23
Figure 19: Smart Settings
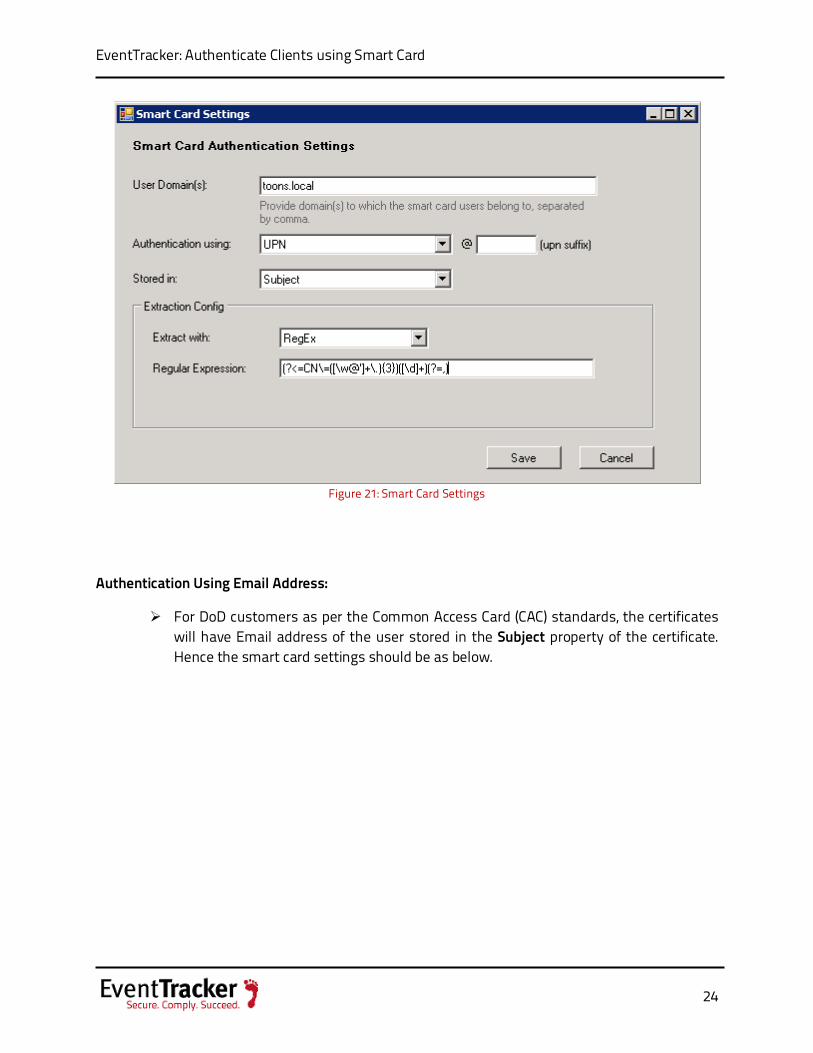
When UPN of the user is stored in the Subject property of the certificate (as illustrated in the sample certificate – refer Figure 20), the smart card settings should be as in Figure 21.
Figure 20: Subject Details
EventTracker: Authenticate Clients using Smart Card
24
Figure 21: Smart Card Settings
Authentication Using Email Address:
For DoD customers as per the Common Access Card (CAC) standards, the certificates will have Email address of the user stored in the Subject property of the certificate. Hence the smart card settings should be as below.

EventTracker: Authenticate Clients using Smart Card
25
Figure 22: Sample Certificate
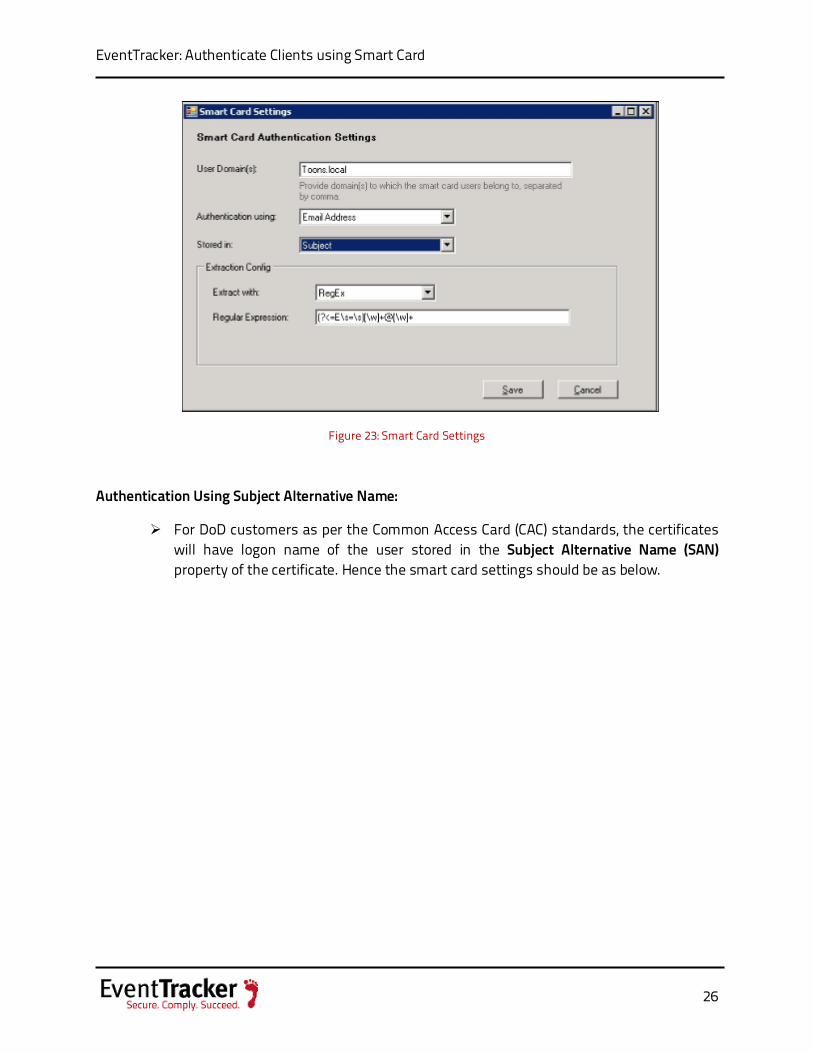
When the email address of the user is stored in the Subject property of the certificate (as illustrated in the sample certificate – refer Figure 19), the smart card settings should be as in Figure 23.
EventTracker: Authenticate Clients using Smart Card
26
Figure 23: Smart Card Settings
Authentication Using Subject Alternative Name:
For DoD customers as per the Common Access Card (CAC) standards, the certificates will have logon name of the user stored in the Subject Alternative Name (SAN) property of the certificate. Hence the smart card settings should be as below.
EventTracker: Authenticate Clients using Smart Card
27
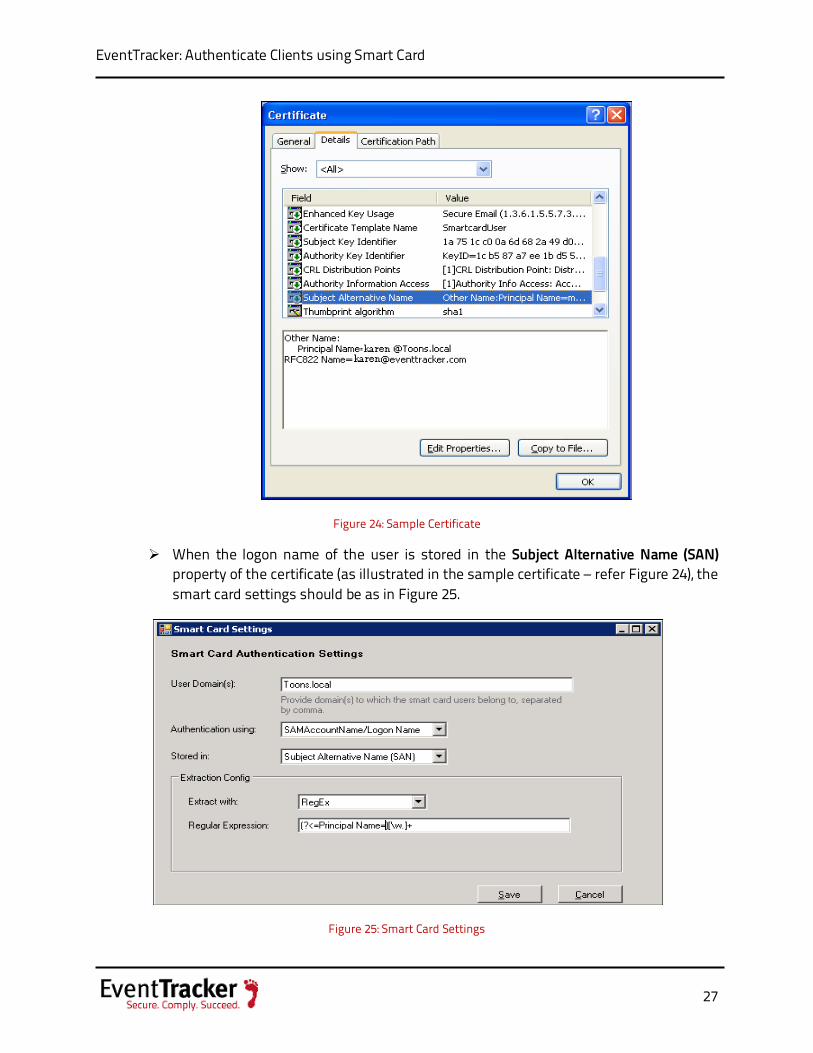
Figure 24: Sample Certificate
When the logon name of the user is stored in the Subject Alternative Name (SAN) property of the certificate (as illustrated in the sample certificate – refer Figure 24), the smart card settings should be as in Figure 25.
Figure 25: Smart Card Settings
EventTracker: Authenticate Clients using Smart Card
28
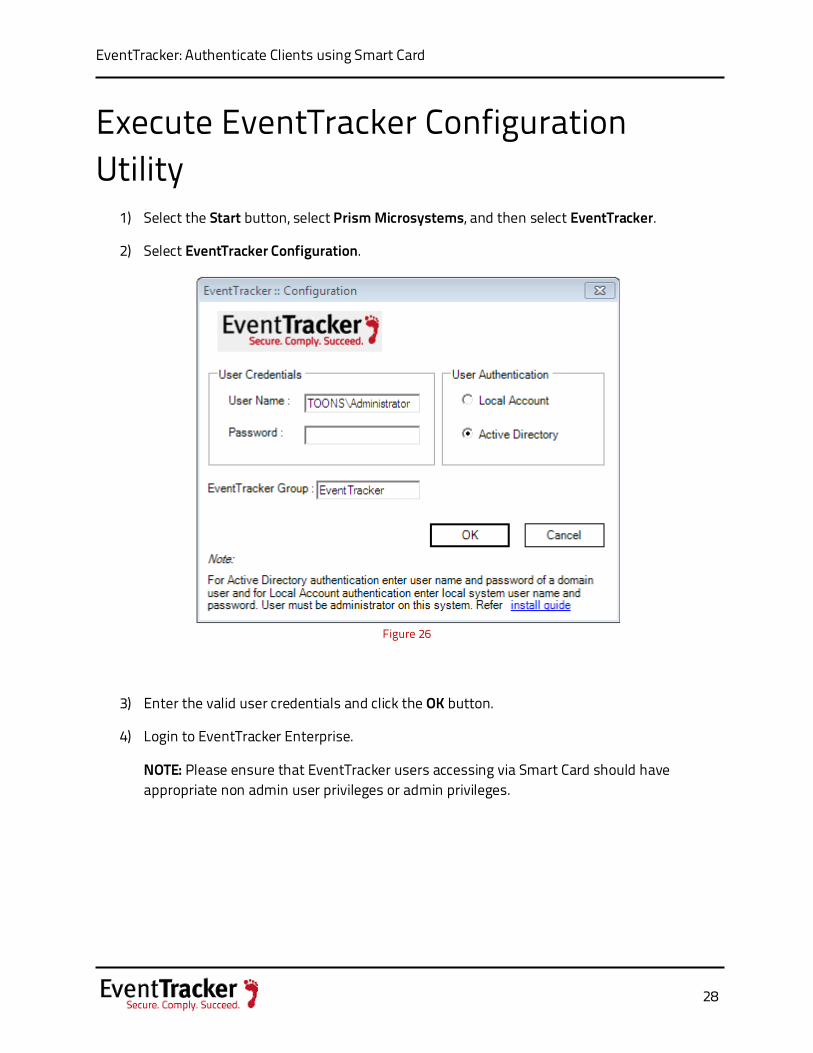
Execute EventTracker Configuration Utility
1) Select the Start button, select Prism Microsystems, and then select EventTracker.
2) Select EventTracker Configuration.
Figure 26
3) Enter the valid user credentials and click the OK button.
4) Login to EventTracker Enterprise.
NOTE: Please ensure that EventTracker users accessing via Smart Card should have appropriate non admin user privileges or admin privileges.
EventTracker: Authenticate Clients using Smart Card
29
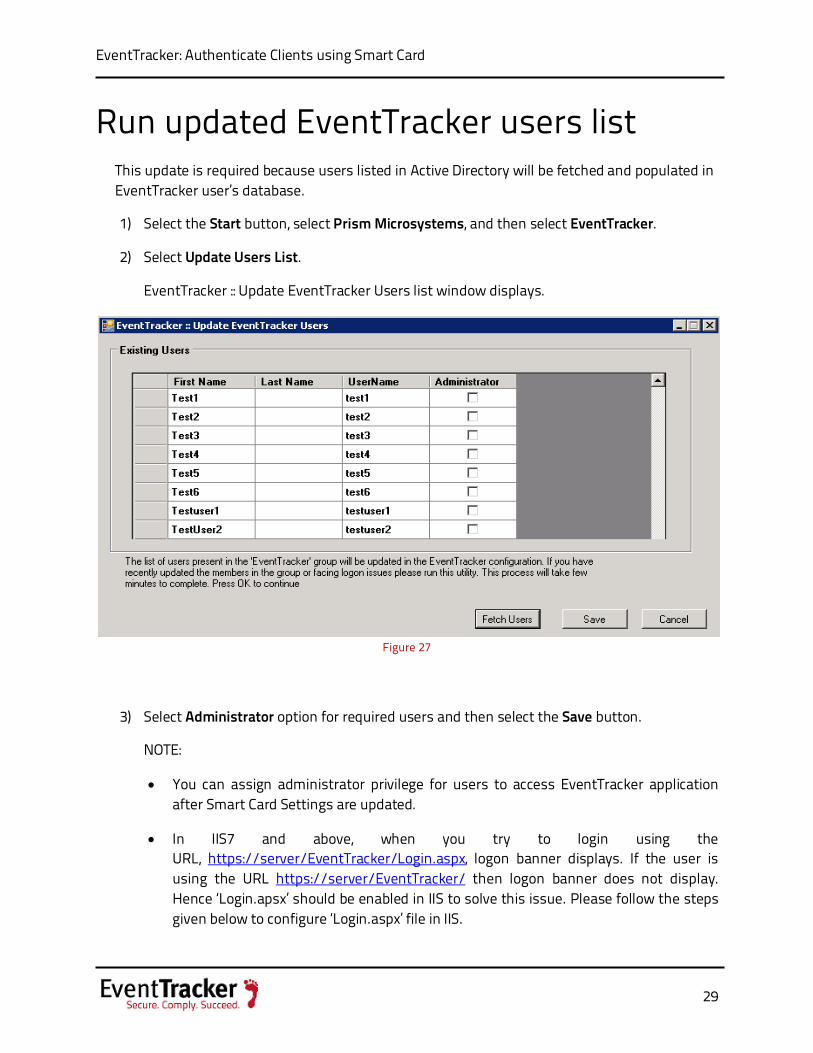
Run updated EventTracker users list This update is required because users listed in Active Directory will be fetched and populated in EventTracker user’s database.
1) Select the Start button, select Prism Microsystems, and then select EventTracker.
2) Select Update Users List.
EventTracker :: Update EventTracker Users list window displays.
Figure 27
3) Select Administrator option for required users and then select the Save button.
NOTE:
• You can assign administrator privilege for users to access EventTracker application after Smart Card Settings are updated.
• In IIS7 and above, when you try to login using the URL, https://server/EventTracker/Login.aspx, logon banner displays. If the user is using the URL https://server/EventTracker/ then logon banner does not display. Hence ‘Login.apsx’ should be enabled in IIS to solve this issue. Please follow the steps given below to configure ‘Login.aspx’ file in IIS.
EventTracker: Authenticate Clients using Smart Card
30
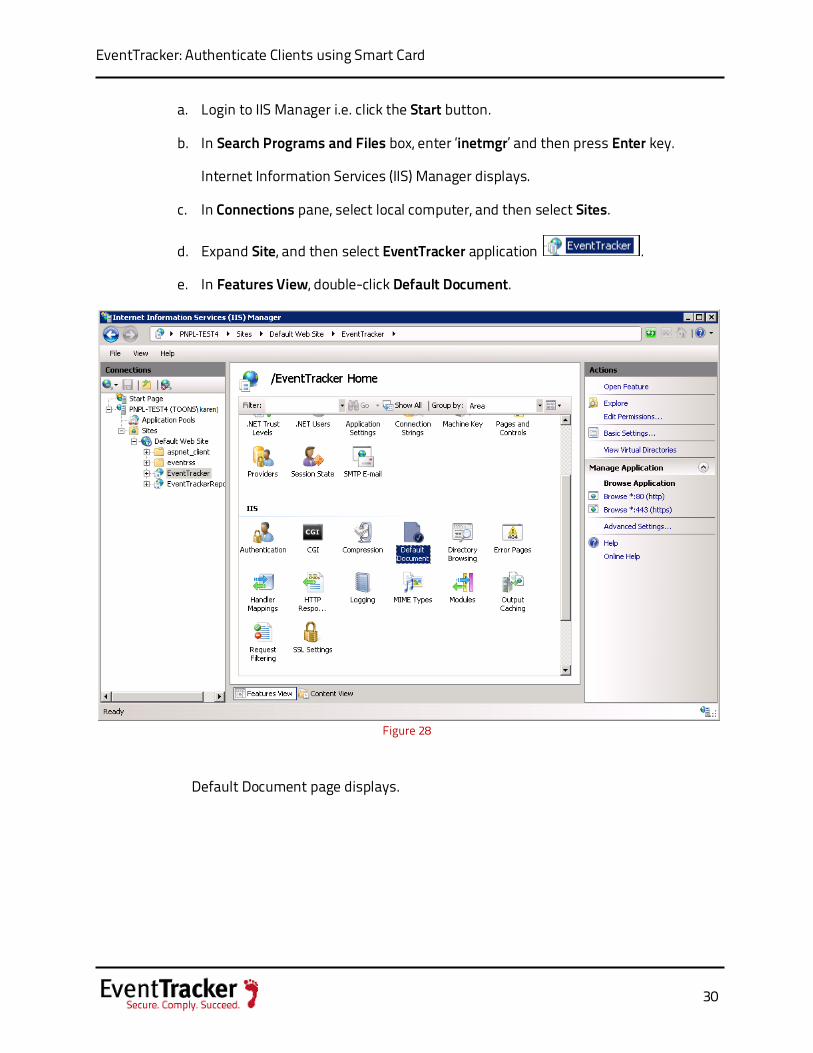
a. Login to IIS Manager i.e. click the Start button.
b. In Search Programs and Files box, enter ‘inetmgr’ and then press Enter key.
Internet Information Services (IIS) Manager displays.
c. In Connections pane, select local computer, and then select Sites.
d. Expand Site, and then select EventTracker application .
e. In Features View, double-click Default Document.
Figure 28
Default Document page displays.

EventTracker: Authenticate Clients using Smart Card
31
Figure 29
f. In Actions pane, click the Add… button.
Add Default Document window displays.
g. Enter Name: as ‘Login.aspx’ and then click the OK button.
Figure 30
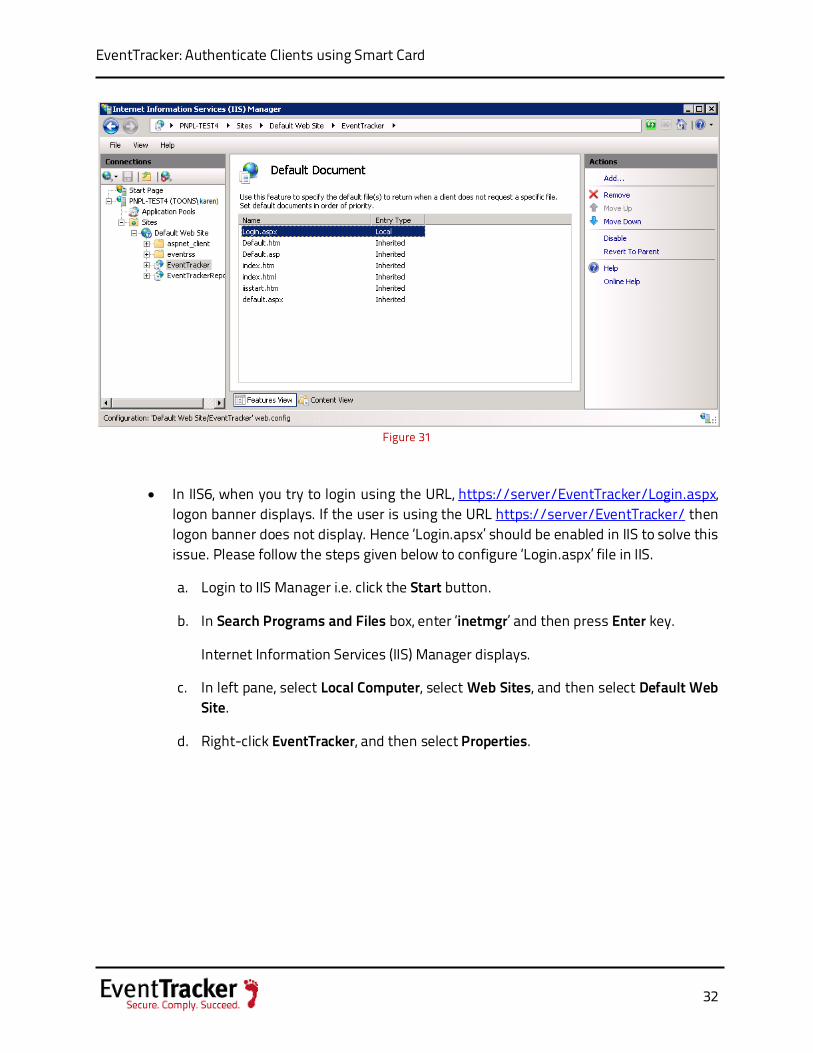
The added document displays in Default Document view.
EventTracker: Authenticate Clients using Smart Card
32
Figure 31
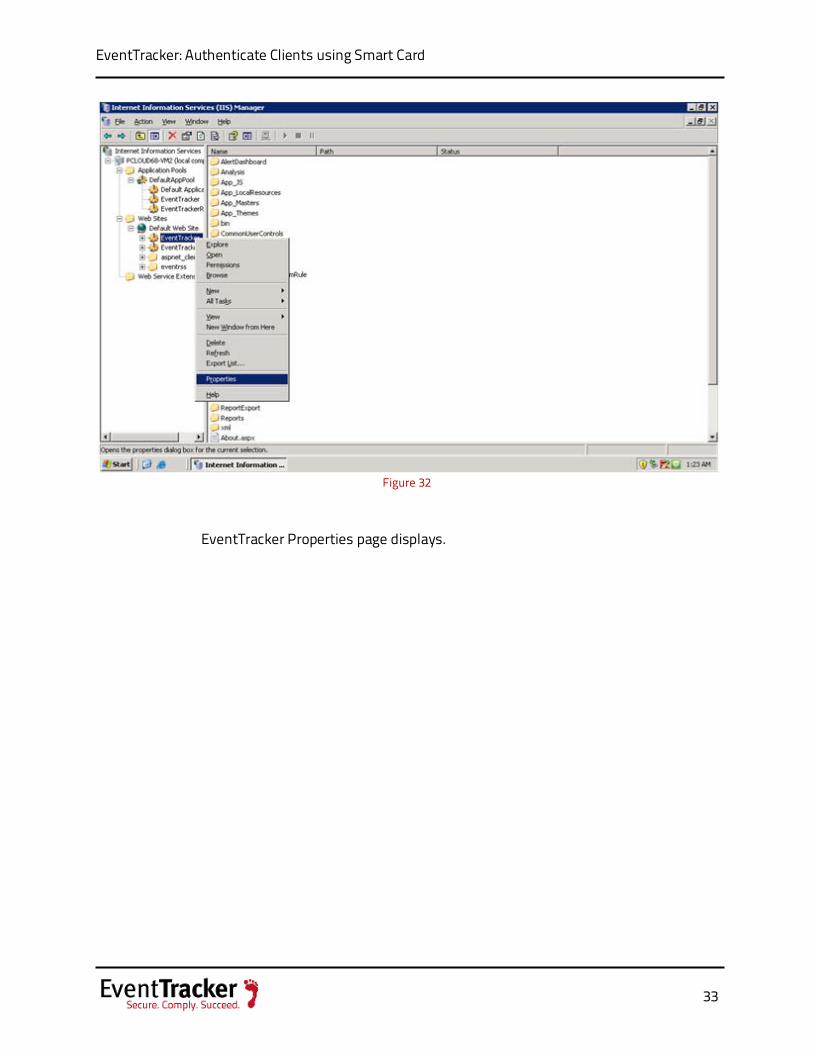
• In IIS6, when you try to login using the URL, https://server/EventTracker/Login.aspx, logon banner displays. If the user is using the URL https://server/EventTracker/ then logon banner does not display. Hence ‘Login.apsx’ should be enabled in IIS to solve this issue. Please follow the steps given below to configure ‘Login.aspx’ file in IIS.
a. Login to IIS Manager i.e. click the Start button.
b. In Search Programs and Files box, enter ‘inetmgr’ and then press Enter key.
Internet Information Services (IIS) Manager displays.
c. In left pane, select Local Computer, select Web Sites, and then select Default Web Site.
d. Right-click EventTracker, and then select Properties.
EventTracker: Authenticate Clients using Smart Card
33
Figure 32
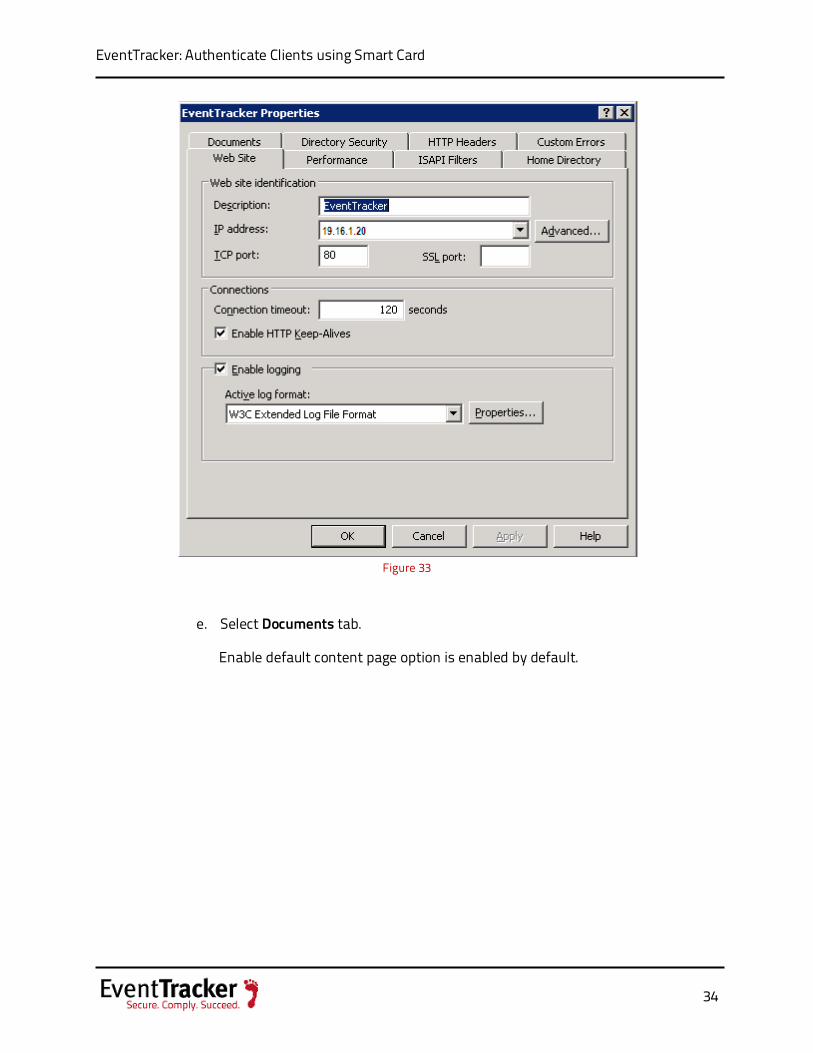
EventTracker Properties page displays.
EventTracker: Authenticate Clients using Smart Card
34
Figure 33
e. Select Documents tab.
Enable default content page option is enabled by default.
EventTracker: Authenticate Clients using Smart Card
35
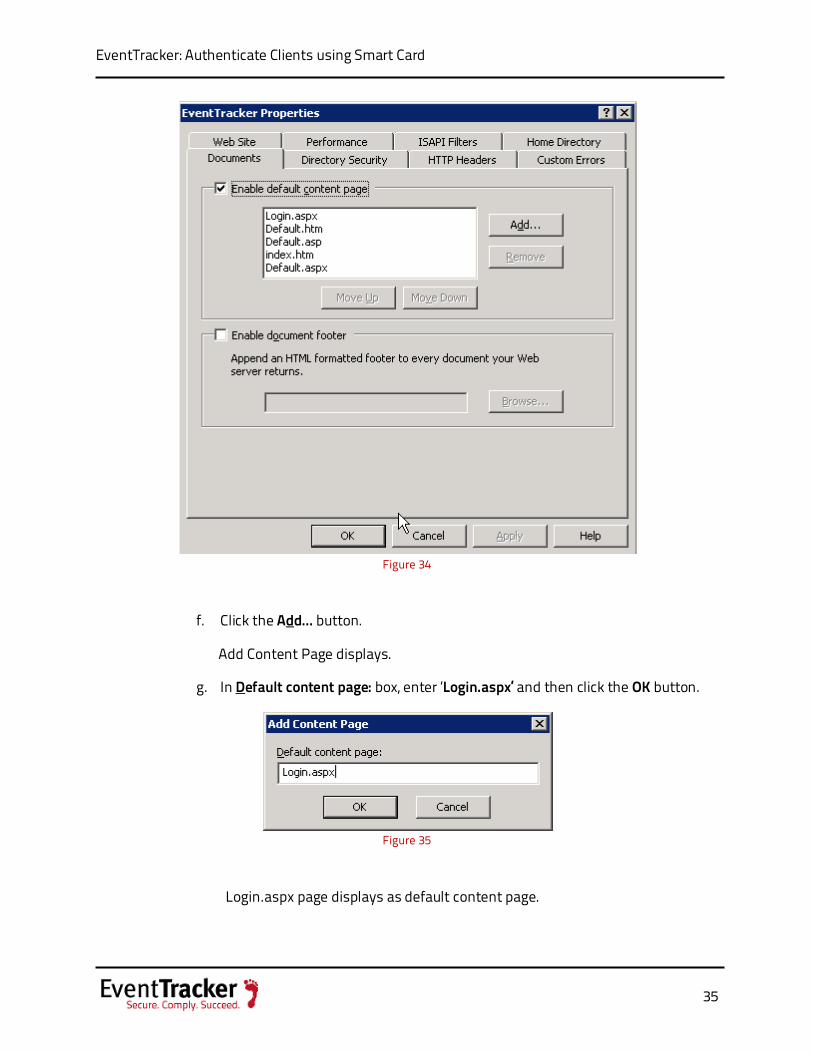
Figure 34
f. Click the Add… button.
Add Content Page displays.
g. In Default content page: box, enter ‘Login.aspx’ and then click the OK button.
Figure 35
Login.aspx page displays as default content page.
EventTracker: Authenticate Clients using Smart Card
36
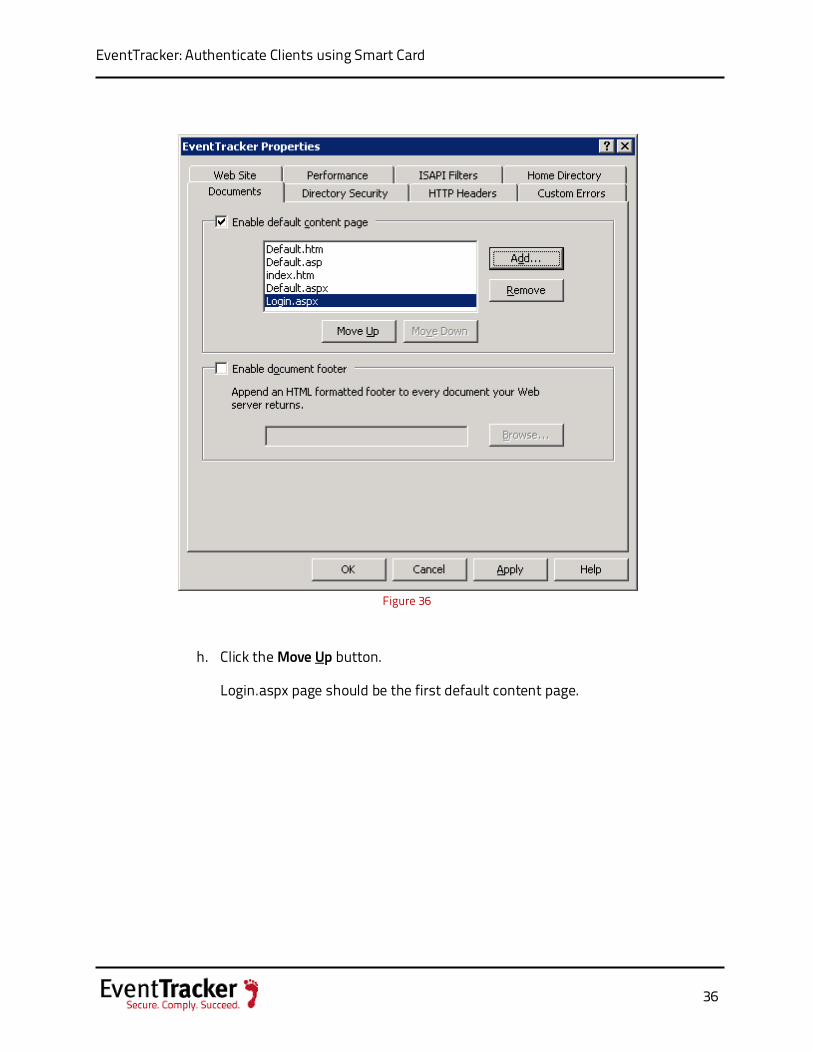
Figure 36
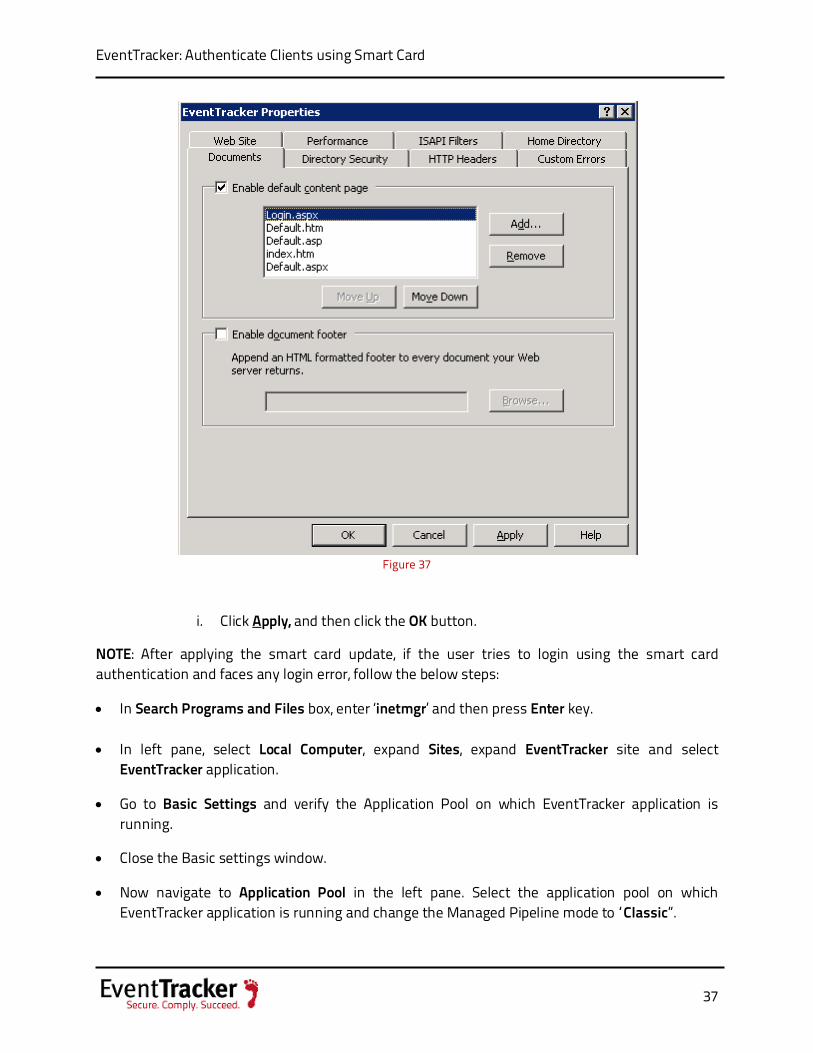
h. Click the Move Up button.
Login.aspx page should be the first default content page.
EventTracker: Authenticate Clients using Smart Card
37
Figure 37
i. Click Apply, and then click the OK button.
NOTE: After applying the smart card update, if the user tries to login using the smart card authentication and faces any login error, follow the below steps:
• In Search Programs and Files box, enter ‘inetmgr’ and then press Enter key.
• In left pane, select Local Computer, expand Sites, expand EventTracker site and select EventTracker application.
• Go to Basic Settings and verify the Application Pool on which EventTracker application is running.
• Close the Basic settings window.
• Now navigate to Application Pool in the left pane. Select the application pool on which EventTracker application is running and change the Managed Pipeline mode to “Classic”.