arrl-ohio.org connect 2020... · web viewthe top line provides the ability to change the viewing...
TRANSCRIPT

ARES Connect – 2020ARES Connect is a software data base that communicates events, allows user registration in events, records participation in events and provides user qualifications/training data.
Calendar and Event List allow users to register for event while providing leadership with an estimate of event attendance.
System enables recording members participation in events that is valuable when collaborating with served partner organizations/agencies.
Leadership uses the data based to maintain records of qualifications/training, contact information, and unique capabilities for leadership select of individuals for possible special activities.
When fully implemented, ARES Connect can eliminate monthly reports, already being accomplished in several Sections.
Login:
https://arrl.volunteerhub.com/lp/XXX XXX = two or three digit abbreviation for Section (ie.. OH, WNY, EPA, KY, IN)
o Username – always your FCC callsigno Password – selected by users
If password is misplaced, try Forgot password? Challenge remains contact Section Emergency Coordinator or ARES Connect Liaison
for temporary password to be activated.
List of Contents:
Procedure PageDashboard - Visual 2Overview of Each Dashboard Functions: 2Frequency Connect Applications for SECs, ECs. and Connect Administrators 5
Create New Event - not in the Master list 5Create Recurrence Event - not in the Master list 6Potential Challenge Finding Events 9Add Users to Event 11Record Hours for Completed Event 14Adding User 15Placing New Volunteer into Subgroup 17Determining Users Participation - Events & Hour 18Collect Summary Data for Reports - Manually 19How to reserve slots for a user group 21Setting an event up to use the Kiosk Mode 24Event Kiosk Use 25Events Monitor – Details necessary to understand before activating 27Events Monitor – Administrative Setup 28Events Monitor – User Access to Prior Events 29
Feedback to expand or improve this document is appreciated please forward it to both [email protected] and [email protected] Revision A
1

Dashboard:The Dashboard provides quick access to all functions within the ARES Connect. The list below provides a summary of functions and contains. Frequent Applications used for ARES Connect administration activities are provided by process to perform in ARES Connect, as listed in the content above.
Note: This Dashboard can be reached at any time while using ARES Connect by clicking on the three-gold bar on the top left-hand side of the page.
Overview of Each Dashboard Functions:
Dashboard – Click to open a List of Events from current date forward for the next 50 events. There is access to the Create Event and Sell All Events sections along the top.
Events are displayed by title with sub-text indicating the originator, County or Section. The date, local time, and estimated duration from event creation are listed. Clicking on the three gold color dots on the right will open a box that provides shortcut access to View Event, Edit Event, Preview Event, Open Sign in Sheet, Export Sign in Sheet, View Related Instances, and Delete Event.
Events - Click for immediate access to the Event with the ability of finding or filter events, plus the ability of viewing events as a list or calendar on the top line right side. It also has a shortcut link to Create Event. Opening an event with a click on the title will provide more information. Clicking on the three gold color dots on the right will open a box that provides shortcut access to View Related Instances and Delete Event.
Event Groups - Click to open a List of Event Groups including Counties subcategories of Communications Emergency, Community Event, Exercise, Meeting, Net, SKYWARN, and Training, as well as Section subcategories that are used for reporting. The ability of finding events and/or filter events within a sub-category are possible.
2

Overview of Each Dashboard Functions - Continued
Recurrence Master - Click to open access to the event recurrence masters list. Clicking on an Event will provide a list of scheduled events from current date forward. The top line provides the ability to change the viewing start date or select Next Year, Next Month, Today, Last Month, This Year, Last Year, or All.
Clicking the “Add Instances” gold color bar provides access to the tools to setup a recurring event on Daily, Weekly, Monthly, or Yearly basis with start and end dates.
Users - Click to gain access to a list of all Section Users including names, email, user group membership. The top permits filtering the list for your needs including.
Entering call sign will provide individuals data. Clicking on the three gold color dots on the right will open a box that provides shortcut access to some admirative function, please remember never to Delete a user locally or at Section level, it has to be accomplished at the ARRL Headquarters level.
Clicking Filter, Funnel, provides access to a series of filter tools including Select User Group Note ~ Drop down of Approval Process for Levels, New Volunteers, Section Administration, each County Administration, and select subcategories.
The top right corner provides a Create New User gold color bar provides access tool, while another will appear later in the summary.
User Groups - Click to gain access to a list of User Groups including Approval Process for Levels, New Volunteers, Section Administration, each County Administration, Self-Selected Groups, and each County Volunteers. Clicking on the three gold color dots on the right will open a list, example as list of County Volunteers will be available. Clicking on the three gold color dots on the top right of the list can access local print options.
Deduplicate – Does not appear to be activate for ARES Connect
Approve Hours – Seems to be useful if volunteers report hours for group approval when inputted by volunteers. ARES Connect are approved within the Event section by Emergency Coordinators
Donation Page – Does not appear to be activate for ARES Connect
Reports – Section contains Formatted Reports and Unformatted Reports that can be extracted from the ARES Connect Data Base.
Formatted Reports tools can extract the following:o Birthdays – within date range and Section or specific County teamo Event Participation by Event (V1) – within date range selects all events, Users, and
hours from subcategories such as County team or Section Useful for preparing monthly reports.
o Event Participation by Event (V2) – within date range selects all participants (Users), and hours from subcategories such as County team or Section.
o Event Participation by User – within date range, User Group, and Event Group selects all Users, email address and participation – duration, number of events, and hours.
o Event Summary (V1) – within date range and Event Group selects each Event, data/time, contact, users and hours from subcategories such as County team or Section. Useful for preparing monthly reports.
3

Overview of Each Dashboard Functions - Continued
o Event Summary (V2 - within date range and Event Group selects each Event, data/time, contact, users and hours from subcategories such as County team or Section.
o Last User Activity – lists user activity for a specific date.o Multi-Event Sign-In Sheet – provides Multiple Event Sign-In Sheet for County team or
Section for a specific data range May be useful for some exercises/drills and training sessions.
o User Group Membership – for User Group, such as County, provides a list of all member that are within the ARES Connect data base with call sign, name, email, level and positions, if any. Useful for ECs and AECs.
Unformatted Reports tools can extract the following:o Raw Event Registration Data – providing details on events, user groups, users, and
hours in CSV format. Being used by at least one Section to produce the Monthly report numerical data while requires all Counties provide all event data, users and hours.
o User Roster - providing details on user participation in events and hours with output in CSV format.
User Forms - Does not appear to be activate for ARES Connect
Kiosk – Can be activated in setting and used for local volunteers input without effecting your account, such as at a meeting, training or event.
Settings – Can enable the Kiosk and SAVE
Volunteer View – provide and current event list to enables Users to sign-up or to check if they have previously signed up for the event.
Classic Admin – Scheduled to be removed on or about January 1st, 2020
R – 02/26/2020
4

Frequency Connect Applications for SECs, ECs. and Connect Administrators:
Create New Event Note - This for New Events not in the Master list.
Click Events on Dashboard to access events and click on the Create Event gold box at top:
Select an Event Type – either One-Time Event or Recurrence Master.o Create New Event One Time Event provides tool for inputting event information step by step.
Enter the following data: Event Name Event Group ~ Group responsible for event, such as Local County or Section. Points ~ recognition points, if used in the Section. Date & Time ~ using calendar, and local time with AM or PM. Event Details ~
o Short Description – it will appear on event list and calendar.o Detailed Description – it can contain more information on event.Hint ~ Copy short to Detailed and add additional information, such as net frequency and tone.
Location ~ indicate location of the event as necessary. Hint ~ If an unusual location for the team, it is possible to display a map location by checking the box below.
Event Contact ~ name of individual who is the coordinator of event. Event Slot Limit ~ maximum number of users allowed
Hint ~ useful if there is a limit, such as room seating. Allow Users to Self-Register ~ indicate ‘Yes’, if you desire users/participants to sign
themselves up for the event. Hint ~ Provides leadership the ability to know approximate attendance at events and ability to print an Event Roster.
Self-Cancellation Cut-off ~ select desired process from drop down menu for time limit.
Event Visibility ~ control visibility of the event if registration is disabled, with drop-down.
Continued
5

Hours Self-Reporting ~ control if self-reporting of hours by users is permitted or blocked. If allowed they still must be approved by leadership. If blocked leadership must input the hours after the event.
Email Notifications ~ Three Choiceso Confirmation Message ~ If you desire to send a confirmation message, such as
thank you or more details, enter the message in the text box, PLUS check the box below Send confirmation/cancellation email to event contact.
o Reminder Email ~ If you desire to send a reminder message type it into the text box. Note: The default setting is Automatically send reminder to registered users 3 days prior to the event. Clicking on the “3 Day” permits it to be modified.
o Thank You Email ~ If you desire to send a thank you email after the event, enter the text in the box. Note: The default setting is ‘Automatically send thank-you email 24 hours after the event completes. Hint ~ Thank-you notes are usually appreciated by all.
Waivers ~ Not normally utilized. SAVE
o Create New Recurrence Master provides tool for inputting information step by stepHint ~ This is ideal for any Events the happen more than one. It saves time and effort overall. Since once a Recurrent Master event is created, it can be saved and retrieved from DASHBOARD “Recurrent Master list, modified as necessary, usually dates, and reactivated.
Enter the following data: Event Name Event Group ~ Group responsible for event, such as Local County or Section. Points ~ recognition points, if used in the Section. Date & Time ~ using calendar, and local time with AM or PM. Event Details ~
o Short Description – it will appear on event list and calendar.o Detailed Description – it may contain more information on event.
Hint ~ Copy short to Detailed and add additional information, such as net frequency and tone.
Location ~ indicate location of event as necessary. Hint ~ If unusual locations for team it is possible to display a map location by checking the box below.
Continued Enter Registration Details: continued
6

Event Contact ~ name of individual who is the coordinator of event. Event Slot Limit ~ maximum number of users allowed.
Hint ~ useful if there is a limit, such as room seating. Allow Users to Self-Register ~ indicate Yes, if you desire users/participants to sign
themselves up for the event. Hint ~ Provides leadership the ability to know approximate attendance at events and ability to print an Event Roster.
Self-Cancellation Cut-off ~ select desired process from drop down menu for time limit.
Event Visibility ~ control visibility of the event if registration is disabled, with drop-down
Hours Self-Reporting ~ control if self-reporting of hours by users is permitted or blocked. If allowed they still must be approved by leadership. If blocked leadership must input the hours after the event.
Email Notifications ~ Three Choiceso Confirmation Message ~ If you desire to send a confirmation message, such as
thank you or more details, enter the message in the text box, PLUS check the box below ‘Send confirmation/cancellation email to event contact’
o Reminder Email ~ If you desire to send a reminder message type it into the text box. Note: The default setting is ‘Automatically send reminder to registered users 3 days prior to the event’. Clicking on the 3 Day permits it to be modified.
o Thank You Email ~ If you desire to send a thank you email after the event, enter the text in the box. Note: The default setting is Automatically send thank-you email 24 hours after the event completes.
Waivers ~ Not normally utilized. SAVE & CONTINE ~ Hint ~ Save & Continue is at the top right corner.
Note ~ Master of Event created need to have Instances established.
Click on Add Instances for selections.
7

Select the Instance Pattern.
o Enter Start Time and End Time.o Repeats ~ choices, Daily, Weekly, Monthly or Yearly.o Repeats Every ~ choices, Days of the Week
Add Instance Dates.
Select Starts On ~ date desired to start the event Select Ends Two Choices
o End After ___ instances. Example indicated 3.o End by ~ could be used for end date.
Hint ~ ideal for setting up recurrent event long time into future.
Example has a training event being held Weekly, on Tuesdays, starting on March 24 and ending in 3 weeks.
Select ADD at the top of the screen Then Select Exit.
8

SAVE at the completion that is now at the top right corner.
Return to DASHBOARD click on Recurrence Masters to verify
Clicking on 3 Gold Dots on the Right-Hand side of the event will allow returning to the Instances screens for future editing. Hint ~ Recurrence Event can be retrieved and edited from the DASHBOARD Recurrence Masters list. Significant time saver.
9

Potential Challenge Finding Events
When opening Events, the event occurred prior to those appearing on either List or Calendar, simple Click on the Funnel Symbol.
Opens search screen that can filter/find different Dates, Event Groups, Event Contacts, Recurrence Master, and etc.
To change date range on the screen simply type desired date and Click on the Funnel Symbol. The process takes a few seconds to complete the search.
Example below moved date back to 01/01/2020 for the entire Section.
Hint ~ Other searches within Events can be accomplished similarly.
10

Add Users to Event Process used to add users to a created event by Connect Administrator.
Click Events on Dashboard to access events list and select the Events list and locate event:
o Click on Event Name to open Registered User screen
Note: Registered Users screen can be utilized to Register Users (+) Record Hours and send messages- Text or Email.
Click on the + Registered A Users to open user search window.
Type the Call sign of the User and the users name will appear.
11

Either Click on name or press enter on keyboard will move name and call to Existing User window.
Then Click Gold Box Register User that adds the user to the event
Repeat procedure above for each attendee, if Users pre-register for an Event their names will be on the list when initially opened
Note ~ Following screen shows three users adder to this event.
12

If a pre-registered User was not able to attend the Event, the individual can be Removed from the Event by Clicking on the Three Gold Dots to the Right of the Users name where a dropdown box allows Edit Registration or Remove from Event.
Hint ~ 1) If you are adding users after an Event plus the Hours. This is the screen, while you may have to scroll to the top of the screen for access to the Record Hours window. 2) Another means for reaching member within a Subgroup, such as County can be achieved through Gold Box Add Reservation and select the specific subgroup.
13

Record Hours for Completed Event If entering through the Dashboard Click Events and select the specific event from the Event list. If hours are to be added immediately following Registered Users, scroll to the top of page and Click
box Record Hours and the flowing widow appears.
o Enter event hours in the boxes to the right of each users’ name.Note ~ If your event, such as a net, had individuals presently not in data base, thus did not appear when call letters were entered, their hours should be added in the Anonymous box.
o Press SAVE at top of the windowHint ~ 1) Typing number into box, then press ‘Tab” key will speed the process. 2) Since event total does not add until SAVE at the top of the window is pressed, the total can be verified by reentering the Record Hour window to observed Event Total, sample of totals below.
14

Adding User
From Dashboard Click on Users that provides a list of users
o Click on Gold Box Create New User for the create new user widow.
o Enter as much of the following information as possible. New Users FCC Call Sign for Username Password, if user or establish a temporary Password that should be changed by user
on first entry into Connect. Full Name Home Address County Email Opt-In - Should be Yes, if the user desired to receive Reminders, Thank you,
and other message from the system. Primary Phone number Alternate Phone number License Class Years Licensed HF – Dropdown ~ Does the operator use HF? Net Control - Dropdown ~ Does the operator have experience as NCS? CW – Dropdown ~ Does the operator have experience with CW? Radio Email – Dropdown ~ Does the operator have experience with radio email,
such as Winlink? APRS – Dropdown ~ Does the operator have experience with APRS. Packet – Dropdown ~ Does the operator have experience with Packet.
15

Mesh Networking – Dropdown ~ Does the operator have experience with Mesh Networks?
FLDGI – Dropdown ~ Does the operator have experience with FLDGI software. Digital Voice – Dropdown ~ Does the operator have experience with digital voice
systems, such as DMR, and Fusion/C4FM? Message Handling – Dropdown ~ Does the operator have experience with traffic
handling? ARRL Field Appointments – list appointments such as AEC, ASEC, VE,
Instructor, etc. EC-001 - Dropdown ~ Has user completed the ARRL EC-001 “Introduction to
Amateur Radio Emergency Communications” course? EC-016 - Dropdown ~ Has user completed the ARRL EC-001 “Public Service
Emergency Management for Radio Amateurs’ course? PR-101 - Dropdown ~ Has user completed the ARRL PR-101 “Public Information
Officer” course? SKYWARN - Dropdown ~ Has user completed the NWS SKYWARN basic
training? AUXCOMM - Dropdown ~ Has user completed the DHS Auxiliary
Communications training program? 100 - Dropdown ~ Did user completed the FEMA ICS-100 course? 200 - Dropdown ~ Did user completed the FEMA ICS-200 course? 300 - Dropdown ~ Did user completed the FEMA ICS-300 course? 400 - Dropdown ~ Did user completed the FEMA ICS-400 course? 700 - Dropdown ~ Did user completed the FEMA ICS-700 course? 800 - Dropdown ~ Did user completed the FEMA ICS-800 course? FEMA Professional Development Series - Dropdown ~ Did user completed the
FEMA the entire series of course? CPR – Dropdown ~ Has user completed CPR training or refresher training in the last
2 years? First Aid - Dropdown ~ Has user completed First Aid training or refresher training
in the last 2 years? AED - Dropdown ~ Has user completed AED training or refresher training in the last
2 years? COML - Dropdown ~ Has user completed DHS Communication Leader training? COMT - Dropdown ~ Has user completed DHS Communication Technician
training? Notes – indicate as appropriate. Select User Group – Qualification Level, Administrative Team, member ships, and
team, County. SAVE User’s file at bottom
Hint ~ It is usually easiest to do this with a user or set it up with temporary password provide access to user so they can complete the details.
16

Placing New Volunteer into Subgroup
If the prior Adding User was fully completed the User’s Subgroups were inputted. If it was not accomplished during Adding User process or if updates or changes are necessary,
o From Dashboard Click on Users that provides a list of users. Enter calls sign of User and press enter key to view a user’s details.
Click on Edit in the upper right corner to enter the edit window on the right.
Review Subgroups from Qualification Level to Volunteero If one must be Deleted Click on the X to the right of the Subgroup, it will immediately
be deleted.o To Add a Subgroup or replace deleted subgroup, use the Select User Group
dropdown menu all are listed. SAVE edits with the Gold Box SAVE on the top of the Window.
17

Determining Users Participation Total Event & Total Hours
From the Dashboard Click on Users and enter the call sign in the Find in this List, the press the enter key on keyboard. The User should appear as follows:
Click the Three Gold Dots to the right of the user and a dropdown box will appear.
Note ~ The drop-down box provides access to View User, Edit User, Change Password, Send Text to User, Email User, Find Duplicate, Delete User, and Print History.
Click on View User, the next screen will provide a complete User history including Total Events, Total Hours, Total Points, used by some Sections, List of Participated Events with hours for each, current first, and the Users Subgroups on right.
18

Collect Summary Data for Reports
Note ~ There are two methods of collecting data from Monthly Reports. The first, Manual, consists of viewing data on screen and recording for the reporting process. The second, Automated, extract data from Connect database to an Excel file where it is filtered to provide Monthly Report data.
Ultimate, goal is to eliminate field monthly reports by having all data entered Collect so that Section Leadership and ARRL Headquarters’ staff can administer reporting processes.
Manual Method
Click Reports on Dashboard to access Reports:o Click on Event Participation by Event
Select Date Range - typically the month for County or Section report. Select Event Group – such as County or Section. If it is desired to Show Users leave Show User box checked. If it is not necessary to show
users, rather Events and Hours, uncheck the Show User box Click View Report.
Note ~ Screen will show the Date of events, Events, Number of Participates, and Hours for each event, plus Total. Please realized it could be multiple pages, check bottom of first page, example below. This could be used to prepare the County Mouthy Report to Section.
19

20

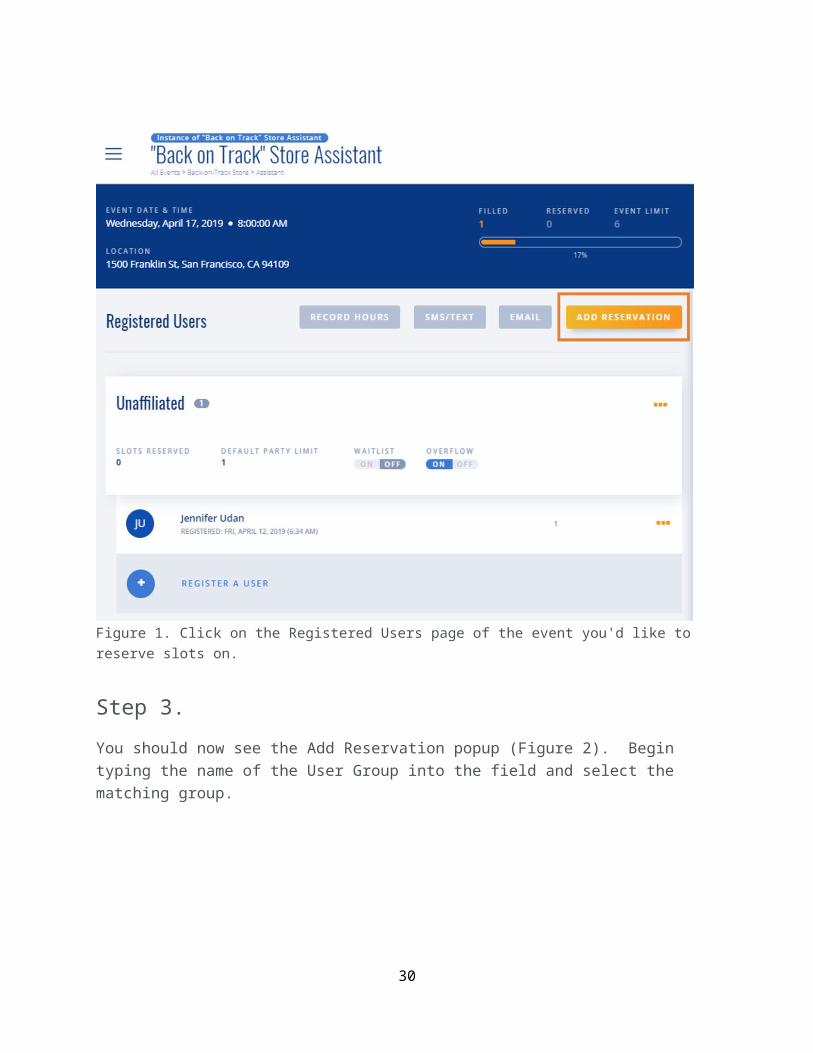
How to reserve slots for a user group?User group reservations allow you to silo off part or all of an event for members of a particular user group only. You can reserve slots for a user group within the Registered Users page of a specific event.
Step 1.From the Events page, click on the event you want to make a reservation for.
Step 2.Click on the Add Reservation button (Figure 1).
21

Figure 1. Click on the Registered Users page of the event you'd like to reserve slots on.
Step 3.You should now see the Add Reservation popup (Figure 2). Begin typing the name of the User Group into the field and select the matching group.
Figure 2. Select a user group, then click the Register User Group button.
Step 4.Click on the Register User Group button (Figure 2 above).
Step 5.Enter the number of slots you want to reserve in the Slots Reserved field (Figure 3).This is the number of slots you want to guarantee that ONLY members of the selected user group are able to register for. Members who do not belong to the selected user group will not be able to sign up for these slots. For instance, if your event has a total Event Slot Limit of 20 and you reserve 12 slots for Wells Fargo, 8 slots will still be open to the general public (via Unaffiliated Users).
22

Figure 3. Enter the number of slots that will be taken by members of your group in the Slots Reserved field.
Step 6.Click the Save button to save your changes.
23

Setting an event up to use the Kiosk Mode
Sign in as Administrator and go to the Dashboard and select Events. o Setup the Event as you would normally do includes Name of Event, Group, Date/Time….o SAVE the event
NOTE: The contact person named in this event will be the only person that can setup the Kiosk. SM/SEC Admins do have the ability to override the contact and set it to any person, but for the Kiosk to be setup, that person must be an Admin.
Setting up the Kiosk
Select the device, PC or Tablet, that will be used for the Kiosk, at Evento Sign into the Device and Connect Administrator and go to the Dashboard and select Kiosk.o Click on dark blue Activate box will be appearing on the bottom right corner of the page
o Sign in to Contact as Administrator with logon and password.
o Select ON position for Enable this Device to Be Used as a Kiosk o Set Time Zone for your Event location with dropdown.
24

o Select the Event Group with dropdown such as Richland – 139OH Community Event
o Select Name Tag Printer, if planning on printing Name Tags, or left to the default None.o Select Show QR Code for Mobile Devine Check-in, allowing those with QR readers on their
smartphones to check into the event quickly and easily.o Click on the Save box on the top right corner of the page. A green check mark and the words
Kiosk.
Note ~ Settings have been saved. Will appear on the top left corner of the page. Now that the Kiosk and Event have been setup.
Event Kiosk Use
Signing into Connect select Dashboard and then Kiosk. Volunteer who is already registered for the Event can simply activate their QR Code reader app
on their phone and check-in to the event. If haven’t registered for the Event or don’t have a QR Code reader app on your phone, you
simply select the I Already Have An Account and then click on the Find My Account and type in your call sign then click on the blue Continue button.
25

Note ~ The system will pull up your name and ask you Is this you? and if it is, then click on the blue Continue box once again. It will now list events and ask which event are you participating in today? Click on the event that you are participating in and then click on the blue Continue button once again. The message will now appear that You are now checked in. You then click on the gray Exit box and you’re finished. Either way that you check in, once you have been accepted at the Kiosk, your time is automatically recorded, and no further action is required.
You can also use this Kiosk to sign up new volunteers. You simply select the I Don’t Have an Account to Create an Account and the volunteer goes through the process of answering all the questions. Once completed, the volunteer is now registered as a New Volunteer and will be waiting to be properly vetted into the system.
26

Events Monitor User Group - Please understand the following before initiating your Sections “Events Monitor” User Grouping
The “Events Monitor” User Group was designed to allow volunteers to be able go backward on the calendar and register for and add time to any event in the past. In order to create this feature, it was necessary to heavily modify an already existing Admin group.
In doing so, certain features of the existing Admin grouping could not be filtered down to allow only changes for a single individual. As such, this does allow the volunteer some extra abilities that you may not feel are appropriate for your volunteers to use. The Events Monitor group is selectable (on/off) for each volunteer, and it is up to the SEC/SM Admins to either select or not to select this option for their volunteers.
Here is what Events Monitor does allow a volunteer to do.
With the Events Monitor turned on for a volunteer, they can go and “view only” any user in their Section.
View any Event (past, present or future) within their Section.
They do have the ability to add or subtract volunteers, add time or change time to any volunteer, add a User Group as a reservation to an Event and utilize the “Approve Hours” part of the Dashboard.
They have the ability to utilize the Kiosk mode on their cell phone, computer or tablet, but they would have to be the Contact person for that event in order for this mode to be utilized.
Allowing a volunteer, the ability to add other volunteers and their time to an event is not always a bad thing. There are times where the Admin will setup an event and not be able to attend the event. Usually there is a person assigned to the “sign-up” sheet and they would have the ability to add those folks who attended the event and add their time without needing to relay this information to an Admin where they would have to enter it themselves.
Nets are another good example of this. A Net Control is not always the event Admin. The Net Control person has the list of names of who checked in and they know how much time was recorded for the net. Having this person be able to directly add persons and time to the event saves the Admin time and allows for more accurate and timely reporting.
There is also the ability for these volunteers to setup and utilize the “Kiosk” mode. Making checking into an event almost automatic for the volunteers.
27

Here’s what volunteers cannot do.
It does not allow these particular Admins to do anything with User Groups.
They cannot create, modify or delete Events.
They have no ability to run reports, other than for their own account.
It does not allow them to add new volunteers or modify any existing volunteers profile account, including their own.
In general, most volunteers will usually leave these additional features alone, especially if you properly explain to them that you don’t want them adding anyone other than themselves or changing anyone else’s time to any events. Tampering with another person’s account, unless authorized, is never acceptable, but please be advised that any current Admin already has the ability to tamper with events and or time, as well as falsely create users at will. You as the SEC/SM Admin have the responsibility to your Section to properly audit the system by regularly monitoring the entry of volunteers, events and time being recorded.
The SEC/SM Admins have the ability to “undo” any action that a volunteer or Admin might do if they choose to tamper with the system.
Events Monitor
The Events Monitor feature in ARES Connect is a specifically designed User Group that when assigned gives Users the ability to go past events and register themselves and Record Hours to the Event. This feature must be setup by the Section Administrator, SM or SEC through the creation of a Sub-Administrative level of control to permit volunteer Users access.
Administrative Setup of Events Monitor – Only for Section level AdministratorsNote ~ Events Monitor can only be setup by a Section level administrator, Section Manager or Section Emergency Coordinator. The setup must be competed one User at a time. It may be easiest to accomplish when volunteers are being initially setup as ARES Connect Users.
Sign in as Administrator open the Dashboard and select Users.
o Click on the DOTS to the right of the User’s name to open the Users Account.
28

o Click on Edit User and scroll to the Select User Group, then type Events in the text box.
o Click on Section Events Monitor when it appears moving it to the Users account.o Click SAVE on the upper right corner. The Events Monitor is complete for this User.
Repeat process for each User. This is easiest to accomplish when first setting up a User.
USERS Access to Events Monitor for Recording Prior Event
Log into Welcome to ARES Connect with username and password.
o Click on Administer, if the administer tab is not next to your name, it is not setup. Setup can only be accomplished by a Section Level ARES Connect represeative.
29
o Click on Dashboard menu select Events.
o Click on Filter/Funnel to open calendar. Example returned to beginning of the month.
o Click on Filter/Funnel to view calendar at desired date. Example returning to beginning of the month.
o Select the Event Name to open the event.
30

o Click on + Register A User that open window to type a call sign
o Click on Name/Call or press Enter on keyboard to enter name in Exiting User boxo Click Register User to add the user into the Event on a prior dateo Scroll to the top of the window, Click on Record Hours for Record Hours window
31

o Enter Hours for your participation in the Evento Press SAVE in upper right corner of the window
Feedback to expand or improve this document is appreciated please forward it to both [email protected] and [email protected]
32