architecture is the thoughtful making of space
TRANSCRIPT

Sketch book
Project 1
Jimmie Luong
n0522804
"Architecture is the thoughtful making of space"-louis kahn

Positive space vs. negative space
"We move through negative spaces and dwell in positive spaces. Positive spaces are almost always preferred by people for lingering and social interaction. Negative spaces tend to promote movement rather than dwelling
in place." -Matthew Frederick
Space is called positive space if it is occupied by people and their interactions with it (i.e. placement of figures).
Negative space is what remains after figure placement and is also known as 'unshaped'.
Positive Space
Negative Space
Explanation of what positive and negative space is.

3
Content
P4-7 Site visitP8 Digital PaintingsP9-11 SketchesP12-13 Research summeryp14-17 Book ideasP18-19 Prototype
REVIew day: P20 Peer Review P21 Tutor Review P22 Self Assessment P23 Summery of revew day
P24-27 Planing of the A2 bookp28-29 Making of the bookp30 Blog link


5
Site visitSite visit notes:-Water looks dirty-Empty (prob due to a weekend plus it's rainy)-Quiet-Lost in own world-Strange/ odd-Insecure-Reminded me of zombie movie-Very peacefull-Romance/romantic?


7
Canal Lock
I found the canal lock to be most in-tresting.It reminded me of my childhood: my school trip to the canal and the lock for the first time and also with an add-ed bonus I got to go on a canal boat whilst the lock was in operation too! Regent Canal in London is very similar in both respects in the sense it is also "forgotten" and "abandoned.

Digital painting

9
These are sketches of the canal lock and how it works.I found the lock to be most intrseting and simple in nature.
it is simply a means of moving a boat from one level to another.
research sugest this lock is over 140 years old.
Sketches


11
Sketches

N
May not be to scale
All these photos show how much the canal has changed over the last two centuries.
As we can see these photo show how the canal has helped the industrial revolution with aiding in the transport of goods.
At its peak, it could transport over 5 million tones of coal per hour from the mines in Derbyshire and Nottinghamshire
1930
1928
1836

13
Research SummaryResearch: History
-Nottingham canal was created in stages: -First couple of miles of the canal opened on July 30th 1793 -This included River Trent to the centre of Nottingham -1796 canal was finished -Used to move goods (Coal mainly but others too) to Notts -1797 The Grantham Canal opened and joined to Nottingham Canal -Canals were profitable enterprises until the coming of the Industrial revolution -1840's Railway competition arrived; Canal owner sell-out/bought-out -Canals and inland waterway system was transferred to the British Waterways Board (now British Waterways) due to new law: Transport Act of 1962-15 miles long with 20 lock-Used to transport coal from mines from midlands-Often used to ship gunpowder to the mines of Derbyshire and Nottinghamshire
Interpretation:
The canal made a significant contribution to the industrial revolution before the invention and perfection of steam locomotives, which then consequently lead to the death of the canal. This being said the canal is very much alive today with people making a business out of renting boats or even an imitation of a "floating market" like in Asia.Overall the canal is now slowly being restored to its former self and people are using it today for recreational purposes.

Binding of the Book
Book binding ideas
I wanted to bind the book with rope/ string like the Japanese’s style.

15
Ideas for the A2 book

Before I decided on the content I had to choose the book style whether it will be fold out, pop up etc. I ended up choosing a simple book layout with layering and a foldout (and/or a popup perhaps).
17
Page Ideas

Making of the prototype
Cutting out the map was extremely time consuiming but it was worth it in the end.i then layered the map with tracing paper in order to give the layering effect like photoshop.

19
Prototype panel DesignProject 1
When I went to site, I felt like the once backbone of the in-dustrial revolution now for-gotten piece ofengineering andconstruction.
The simplicity of the canal is only seen in its true form of somewhat straight lines to traverse the uneven terrain.
My thoughts whilst on site:>Quiet>Green>Water looks dirty>Retired/old people>Forgotten importance>Abused/vandalised
To illustrate my emotions and thouights into a book, I shall follow the theme ofsimplicity, form and space.
By doing this I will show:>How we use the land>How we move around>How efficent we are>To see if there is anyimprovements to be made
The making
NNOT TO SCALE
this is my first prototype for the panel which I will use for Monday Pinup to get a review and how to
improve it.
I achievedthis by firstly figureing out whati wanted to display without cluttering up the panel
with uneeded information
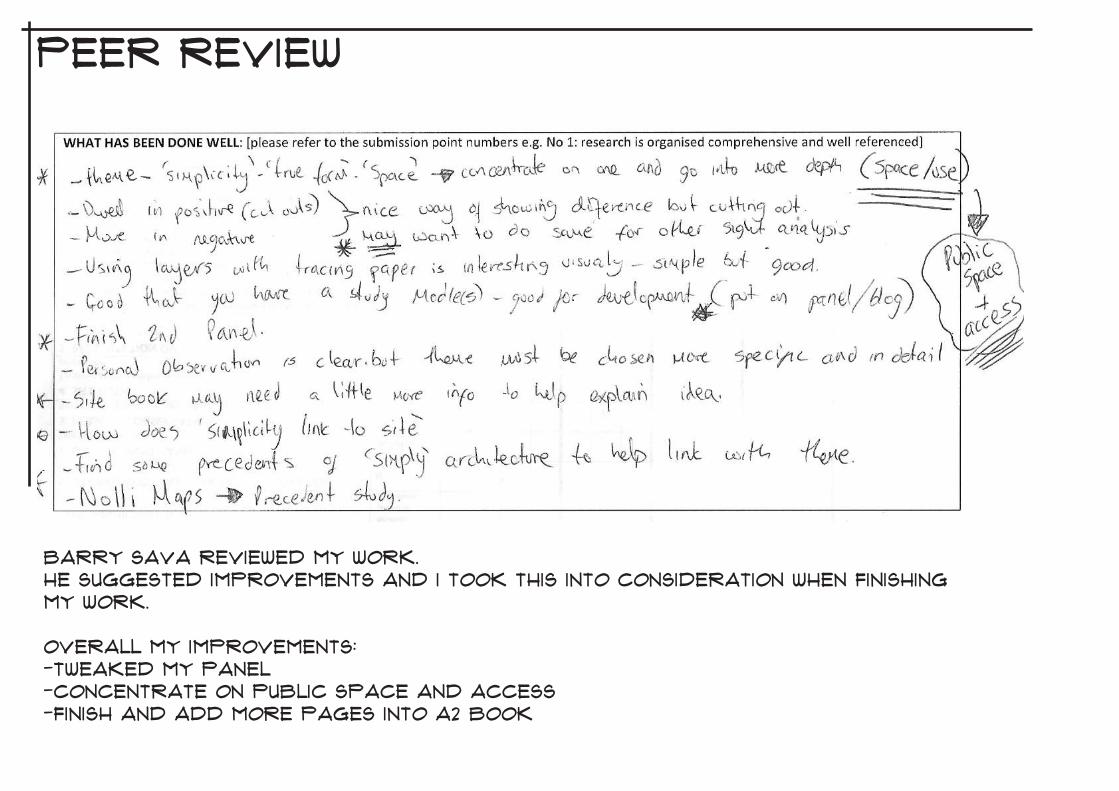
Peer Review
Barry sava reviewed my work.He suggested improvements and I took this into consideration when finishing my work.
Overall my improvements:-Tweaked my panel-Concentrate on public space and access-Finish and add more pages into A2 book

21
Tutor Review
My Tutor reviewed my work and gave critical feedback, which I acted upon immediately. My over all improvements:-Defined my work-Researched into Nolli work -Tweak my sketchbook

Self assessment
Overall I thought the review went ok as I saw ways how I could improve my sketchbook, panel and book after looking at my peers.
Thinks I could do to improve from my overall experience on pinup:-Use better visuals-Learn to use CAD more-Use better programs (i.e. Adobe InDesign)-Concentrate on a finer detail rather than broad detail-Tutor said to be more Subjective than Objective

23
Pin Up Summery
Overall summery:
Content:-Admittedly I did not have enough content as I wanted and this is down to poor time management.-The quality of my stuff was somewhat under my own standard and could be significantly better quality.-My panel is greatly better than last year when I would have a poorly laid out panel, which would be unclear and be cluttered.
Presentation:-My presentation this time round is oddly short and somewhat "bland" and this could be due to the fact I was confused with the project by the time it came to my turn.-I felt unsure in my own idea and this came across in my presentation.
Impressions of the day:-Day went well and was a learning curve.-Somewhat now know what to do-Got to know my fellow college (new faces in the class)-Getting to understand the ropes of the project and what is expected.
Given grade for pinup review:Tutor = low 2:2Peer = low 2:1Self = Mid 3rd

Using the Japanese book binding technique I will bind the book in an "Arrow" configuration or perhaps another if I find another appropriate. Above is the
Holes to be punched out.
Planing of the book

25
Ideas so far:
Page 1 = CoverPage 2 = Site picturesPage 3 = Map of site access and area of high densityPage 4 = Plan with sections/ perspectives Page 5 = Cut out map with layers

I have decided on the design of the book and i want to keep it simple and elegant.
So far I have worked out how the first few pages will look however I am still working on the contents of the pages.

27
Prototype: book binding
I tested my stencil, which I made on Adobe Illustrator to see if I drew it right, as there is a specific amount of holes to be punched out as
well as the position of it.
Here we can see I made not enough holes firstly and also the placement of the holes was also wrong. I quickly rectified that and we can see
the new stencil bellow.

Construction of the book
I clamped it down with Bulldog clips to secure it.I thought about how to punch out the holes however conventional hole punchers will vaporise if they even attempt to punch this 12mm thick book so I just took out my handy drill..
Drilling the holes was easy as I had an Argos book as a sacrifice piece under the book.After I drilled it I cleaned the holes and got rid of the stencil..
Next comes the long painstaking stage of binding it together.

29
Finished Product
After a few hours of book binding and getting wrong twice, i finally got there and it is done.
the final finished product.
More information can be seen on my blog at:
http://jimmieluongyr2.weebly.com/project-1.html