application notes for configuring altitude uci from
TRANSCRIPT

PG; Reviewed:
SPOC 5/1/2013
Solution & Interoperability Test Lab Application Notes
©2013 Avaya Inc. All Rights Reserved.
1 of 59
Altitude_CMR62
Avaya Solution & Interoperability Test Lab
Application Notes for Configuring Altitude uCI™ from
Altitude Software with Avaya Aura® Communication
Manager R6.2 and Avaya Aura® Application Enablement
Services R6.2 – Issue 1.0
Abstract
These Application Notes describe the configuration steps for provisioning Altitude uCI™ from
Altitude Software with Avaya Aura® Communication Manager R6.2 and Avaya Aura®
Application Enablement Services R6.2 to control Agents logged into Avaya Aura®
Communication Manager.
Information in these Application Notes has been obtained through DevConnect compliance
testing and additional technical discussions. Testing was conducted via the DevConnect
Program at the Avaya Solution and Interoperability Test Lab.

PG; Reviewed:
SPOC 5/1/2013
Solution & Interoperability Test Lab Application Notes
©2013 Avaya Inc. All Rights Reserved.
2 of 59
Altitude_CMR62
1. Introduction
These Application Notes outline the steps necessary to configure Altitude uCI™ from Altitude
Software with Avaya Aura® Communication Manager R6.2 and Avaya Aura® Application
Enablement Services (AES) R6.2 to control Agents logged into Avaya Aura® Communication
Manager.
Altitude uCI™ (Unified Customer Interaction) is an IP based contact centre management
solution, with both predictive dialing and multi-channel inbound capabilities. Altitude
uSupervisor is a supervision and management tool that manages, monitors, and allows real-time,
as well as historical, reporting of multimedia customer interactions. Altitude uAgent provides a
workspace for multimedia contact centre customer service representatives in windows and web
environment. This tool integrates with business applications to present and manipulate customer
data in real time, while offering media handling capabilities for inbound or outbound phone calls,
e-mails, or chat requests. The Altitude Telephony Gateway is the component that implements
Computer Telephony Integration (CTI) functionality, according to the protocol and specifics of
each voice switch. The Altitude IVR enables integrated IVR applications, with seamless transfer
of voice and data to the contact centre. Altitude IVR uses SIP trunks to connect to Avaya Aura®
Communication Manager via Avaya Aura® Session Manager.
2. General Test Approach and Test Results
The interoperability compliance testing evaluates the ability of Altitude uCI™ to gain telephony
functionality on Communication Manager via AES. Testing involves two Altitude uCI™ agents
logging in going ready and answering calls as well as being able to make outbound predictive
calls from the Altitude uCI™ desktop. Agents utilize the telephony functionality on
Communication Manager using the Altitude uCI™ Client desktops.
DevConnect Compliance Testing is conducted jointly by Avaya and DevConnect members. The
jointly-defined test plan focuses on exercising APIs and/or standards-based interfaces pertinent
to the interoperability of the tested products and their functionalities. DevConnect Compliance
Testing is not intended to substitute full product performance or feature testing performed by
DevConnect members, nor is it to be construed as an endorsement by Avaya of the suitability or
completeness of a DevConnect member‟s solution.

PG; Reviewed:
SPOC 5/1/2013
Solution & Interoperability Test Lab Application Notes
©2013 Avaya Inc. All Rights Reserved.
3 of 59
Altitude_CMR62
2.1. Interoperability Compliance Testing
The interoperability compliance testing included feature and serviceability testing. The feature
testing focused on verifying uCI™ Agent desktop handling of CTI messages in the areas of call
control, event notification and routing. Various types of calls including intra-switch, PSTN,
outgoing and incoming calls are tested. The following call types are tested:
Agent State Control with uAgent
Basic Inbound/Outbound Calls
Basic Hold/Transfer Functionality
Inbound Agent Skillset calls
Outbound Power Dial
Outbound native Predictive, with opt-out on nuisance
Outbound Predictive with SIP trunk to Altitude Call Classifier
Call Flows with SIP IVR
Defence/Failover Testing
2.2. Test Results
All test passed successfully.
2.3. Support
Support from Avaya is available by visiting the website http://support.avaya.com and a list of
product documentation can be found in Section 11 of these Application Notes. Support from
Altitude is available at http://www.altitude.com.

PG; Reviewed:
SPOC 5/1/2013
Solution & Interoperability Test Lab Application Notes
©2013 Avaya Inc. All Rights Reserved.
4 of 59
Altitude_CMR62
3. Reference Configuration
Figure 1 shows the network topology during compliance testing. The Altitude uCI™ Server was
placed on the Avaya Telephony LAN. The AES provides the Altitude uCI™ server CTI
capability on Communication Manager. An agent running the Altitude uCI™ software is used to
answer/make the calls in a call centre environment. SIP trunks between the Altitude uCI™
Server and Session Manager connect the Altitude Communication Server on Altitude uCI™ to
Communication Manager. The Altitude Communication Server is used both for IVR and
predictive dialing.
Figure 1: Network solution of Altitude uCI™ R8.1 and Avaya Aura® Communication
Manager R6.2 with Avaya Aura® Session Manager R6.2 and Avaya Aura® Application
Enablement Services R6.2
PG; Reviewed:
SPOC 5/1/2013
Solution & Interoperability Test Lab Application Notes
©2013 Avaya Inc. All Rights Reserved.
5 of 59
Altitude_CMR62
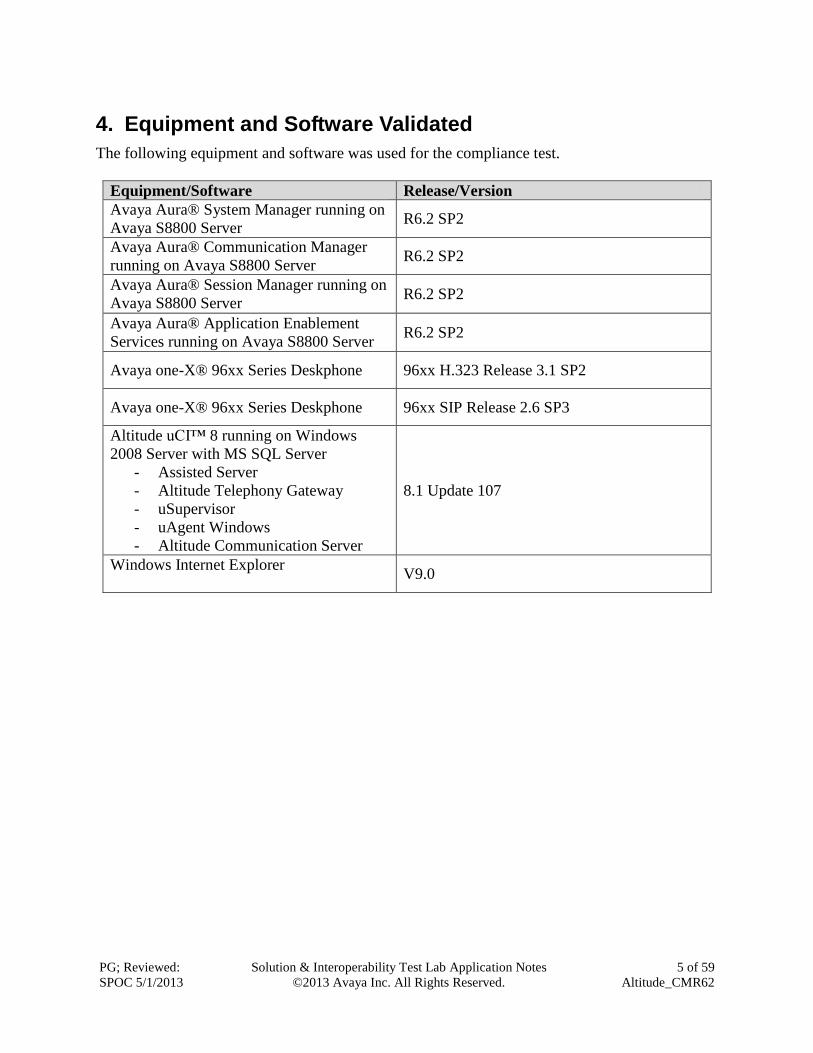
4. Equipment and Software Validated
The following equipment and software was used for the compliance test.
Equipment/Software Release/Version
Avaya Aura® System Manager running on
Avaya S8800 Server R6.2 SP2
Avaya Aura® Communication Manager
running on Avaya S8800 Server R6.2 SP2
Avaya Aura® Session Manager running on
Avaya S8800 Server R6.2 SP2
Avaya Aura® Application Enablement
Services running on Avaya S8800 Server R6.2 SP2
Avaya one-X® 96xx Series Deskphone 96xx H.323 Release 3.1 SP2
Avaya one-X® 96xx Series Deskphone 96xx SIP Release 2.6 SP3
Altitude uCI™ 8 running on Windows
2008 Server with MS SQL Server
- Assisted Server
- Altitude Telephony Gateway
- uSupervisor
- uAgent Windows
- Altitude Communication Server
8.1 Update 107
Windows Internet Explorer
V9.0

PG; Reviewed:
SPOC 5/1/2013
Solution & Interoperability Test Lab Application Notes
©2013 Avaya Inc. All Rights Reserved.
6 of 59
Altitude_CMR62
5. Configure Avaya Aura® Communication Manager
It is assumed that a fully functioning Communication Manager is present with the necessary
licensing. For further information on the configuration of Communication Manager please see
Section 11 of these Application Notes.
The following sections go through the configuration of:
System features
Feature Access Codes
Hunt Groups, Call Vectors and Vector Directory Numbers
Class of Restriction
Agent Logins
Agent Stations
Phantom Stations
Node-Names
Transport Link for Avaya Aura® Application Enablement Services Connectivity
CTI link for TSAPI Service
5.1. Verify System Features
Use the display system-parameters customer-options command to verify that Communication
Manager has permissions for features illustrated in these Application Notes. On Page 3, ensure
that Computer Telephony Adjunct Links? is set to y as shown below.
display system-parameters customer-options Page 3 of 11
OPTIONAL FEATURES
Abbreviated Dialing Enhanced List? y Audible Message Waiting? y
Access Security Gateway (ASG)? n Authorization Codes? y
Analog Trunk Incoming Call ID? y CAS Branch? n
A/D Grp/Sys List Dialing Start at 01? y CAS Main? n
Answer Supervision by Call Classifier? y Change COR by FAC? n
ARS? y Computer Telephony Adjunct Links? y
ARS/AAR Partitioning? y Cvg Of Calls Redirected Off-net? y
ARS/AAR Dialing without FAC? y DCS (Basic)? y
ASAI Link Core Capabilities? n DCS Call Coverage? y
ASAI Link Plus Capabilities? n DCS with Rerouting? y
Async. Transfer Mode (ATM) PNC? n
Async. Transfer Mode (ATM) Trunking? n Digital Loss Plan Modification? y
ATM WAN Spare Processor? n DS1 MSP? y
ATMS? y DS1 Echo Cancellation? y
Attendant Vectoring? y

PG; Reviewed:
SPOC 5/1/2013
Solution & Interoperability Test Lab Application Notes
©2013 Avaya Inc. All Rights Reserved.
7 of 59
Altitude_CMR62
On Page 6, verify the following customer options are set to y as shown below.
ACD? to y
Vectoring (Basic)? to y
Expert Agent Selection (EAS)? to y
display system-parameters customer-options Page 6 of 11
CALL CENTER OPTIONAL FEATURES
Call Center Release: 6.0
ACD? y Reason Codes? y
BCMS (Basic)? y Service Level Maximizer? n
BCMS/VuStats Service Level? y Service Observing (Basic)? y
BSR Local Treatment for IP & ISDN? y Service Observing (Remote/By FAC)? y
Business Advocate? n Service Observing (VDNs)? y
Call Work Codes? y Timed ACW? y
DTMF Feedback Signals For VRU? y Vectoring (Basic)? y
Dynamic Advocate? n Vectoring (Prompting)? y
Expert Agent Selection (EAS)? y Vectoring (G3V4 Enhanced)? y
EAS-PHD? y Vectoring (3.0 Enhanced)? y
Forced ACD Calls? n Vectoring (ANI/II-Digits Routing)? y
Least Occupied Agent? y Vectoring (G3V4 Advanced Routing)? y
Lookahead Interflow (LAI)? y Vectoring (CINFO)? y
Multiple Call Handling (On Request)? y Vectoring (Best Service Routing)? y
Multiple Call Handling (Forced)? y Vectoring (Holidays)? y
PASTE (Display PBX Data on Phone)? y Vectoring (Variables)? y
5.2. Define Feature Access Codes (FAC)
Use the change feature-access-codes command to define the required access codes. On Page 5
define a FAC for each of the following:
Aux Work Access Code: When activated this feature will set the ACD agent to an
Auxilary work state, this is the default state for an agent upon first login.
After Call Work Access Code: When activated this feature will set the ACD agent to an
ACW or „not ready‟ work state, this is the default state for an agent upon call completion
when using manual-in.
Login Access Code: This feature allows ACD agents to log in to an extension.
Logout Access Code: This feature allows ACD agents to log out of an extension.
Manual-in Access Code: When activated this feature will set the ACD agent to a state
where they are available to handle calls, upon completion of a call the agent will be
unavailable until the feature is activated again.
change feature-access-codes Page 5 of 10
FEATURE ACCESS CODE (FAC)
Call Center Features
AGENT WORK MODES
After Call Work Access Code: *36
Assist Access Code: *37
Auto-In Access Code: *38
Aux Work Access Code: *39
Login Access Code: *40
Logout Access Code: *41
Manual-in Access Code: *42

PG; Reviewed:
SPOC 5/1/2013
Solution & Interoperability Test Lab Application Notes
©2013 Avaya Inc. All Rights Reserved.
8 of 59
Altitude_CMR62
5.3. Administer Hunt Groups, Call Vectors and Vector Directory Numbers
In order for calls to be routed to agents, Hunt Groups (skills) Vectors and Vector Directory
Numbers (VDN) must be configured.
5.3.1. Hunt Groups
Enter the add hunt-group n command where n in the example below is 33. On Page 1 of the
hunt group form, assign a Group Name and Group Extension valid under the provisioned dial
plan. Set the following options to y as shown below.
ACD to y
Queue to y
Vector to y
add hunt-group 33 Page 1 of 4
HUNT GROUP
Group Number: 33 ACD? y
Group Name: Altitude Inbound Queue? y
Group Extension: 3330 Vector? y
Group Type: ucd-mia
TN: 1
COR: 1 MM Early Answer? n
Security Code: Local Agent Preference? n
ISDN/SIP Caller Display:
Queue Limit: unlimited
Calls Warning Threshold: Port:
Time Warning Threshold: Port:
On Page 2, set the Skill field to y as shown below.
add hunt-group 33 Page 2 of 4
HUNT GROUP
Skill? y Expected Call Handling Time (sec): 180
AAS? n
Measured: none
Supervisor Extension:
Controlling Adjunct: none
Timed ACW Interval (sec):
Multiple Call Handling: none

PG; Reviewed:
SPOC 5/1/2013
Solution & Interoperability Test Lab Application Notes
©2013 Avaya Inc. All Rights Reserved.
9 of 59
Altitude_CMR62
Repeat the step above to create a hunt group for an outbound service, hunt group 34 is shown
below.
add hunt-group 34 Page 1 of 4
HUNT GROUP
Group Number: 34 ACD? y
Group Name: Altitude Outbound Queue? y
Group Extension: 3340 Vector? y
Group Type: ucd-mia
TN: 1
COR: 1 MM Early Answer? n
Security Code: Local Agent Preference? n
ISDN/SIP Caller Display:
Queue Limit: unlimited
Calls Warning Threshold: Port:
Time Warning Threshold: Port:
On Page 2, set the Skill field to y as shown below.
add hunt-group 34 Page 2 of 4
HUNT GROUP
Skill? y Expected Call Handling Time (sec): 180
AAS? n
Measured: none
Supervisor Extension:
Controlling Adjunct: none
Timed ACW Interval (sec):
Multiple Call Handling: none
5.3.2. Vectors
Enter the add vector n command, where n is the vector number. Enter the vector steps to queue
to skill 33 as shown below. Skill 33 relates to the skill enabled hunt group configured previously.
add vector 3 Page 1 of 6
CALL VECTOR
Number: 3 Name: Altitude In
Multimedia? n Attendant Vectoring? n Meet-me Conf? n Lock? n
Basic? y EAS? y G3V4 Enhanced? y ANI/II-Digits? y ASAI Routing? y
Prompting? y LAI? y G3V4 Adv Route? y CINFO? y BSR? y Holidays? y
Variables? y 3.0 Enhanced? y
01 adjunct routing link 1
02 wait-time 5 secs hearing silence
03 queue-to skill 33 pri m
04 wait-time 999 secs hearing ringback

PG; Reviewed:
SPOC 5/1/2013
Solution & Interoperability Test Lab Application Notes
©2013 Avaya Inc. All Rights Reserved.
10 of 59
Altitude_CMR62
The above step may also be used to create a Vector for the Outbound service, shown below
add vector 4 Page 1 of 6
CALL VECTOR
Number: 4 Name: Altitude Outb
Multimedia? n Attendant Vectoring? n Meet-me Conf? n Lock? n
Basic? y EAS? y G3V4 Enhanced? y ANI/II-Digits? y ASAI Routing? y
Prompting? y LAI? y G3V4 Adv Route? y CINFO? y BSR? y Holidays? y
Variables? y 3.0 Enhanced? y
01 adjunct routing link 1
02 wait-time 5 secs hearing silence
03 queue-to skill 34 pri m
04 wait-time 999 secs hearing ringback
5.3.3. Vector Directory Numbers (VDN)
Enter the add vdn n command, where n is an available extension number. On Page 1 assign a
Name for the VDN and set the Vector Number to the relevant vector.
add vdn 3300 Page 1 of 3
VECTOR DIRECTORY NUMBER
Extension: 3300
Name*: Altitude Inbound
Destination: Vector Number 3
Attendant Vectoring? n
Meet-me Conferencing? n
Allow VDN Override? n
COR: 1
TN*: 1
Measured: none
VDN of Origin Annc. Extension*:
1st Skill*:
2nd Skill*:
3rd Skill*:
The above step may also be used to create a VDN for the Outbound service, shown below
add vdn 3400 Page 1 of 3
VECTOR DIRECTORY NUMBER
Extension: 3400
Name*: Altitude Outbound
Destination: Vector Number 4
Attendant Vectoring? n
Meet-me Conferencing? n
Allow VDN Override? n
COR: 1
TN*: 1
Measured: none
VDN of Origin Annc. Extension*:
1st Skill*:
2nd Skill*:
3rd Skill*:

PG; Reviewed:
SPOC 5/1/2013
Solution & Interoperability Test Lab Application Notes
©2013 Avaya Inc. All Rights Reserved.
11 of 59
Altitude_CMR62
5.4. Administer Class of Restriction
Enter the change cor 1 command where 1 corresponds to the Class of Restriction assigned to the
agent login IDs in Section 5.5. On Page 1, set the Direct Agent Calling to y. This will allow
agents to be called directly once they are logged in.
change cor 1 Page 1 of 23
CLASS OF RESTRICTION
COR Number: 1
COR Description: Default
FRL: 0 APLT? y
Can Be Service Observed? y Calling Party Restriction: none
Can Be A Service Observer? y Called Party Restriction: none
Time of Day Chart: 1 Forced Entry of Account Codes? n
Priority Queuing? n Direct Agent Calling? y
Restriction Override: all Facility Access Trunk Test? n
Restricted Call List? n Can Change Coverage? n n
5.5. Administer Agent Logins
Enter the add agent-loginID n command; where n is an available extension number. Enter a
descriptive name for the agent in the Name field. Ensure the COR field is set to 1 which relates
to the COR configured in Section 5.4. The Auto Answer field is set to station except for those
logins that will be used for outbound services. In that case, the field will be set to all.
add agent-loginID 4401 Page 1 of 3
AGENT LOGINID
Login ID: 4401 AAS? n
Name: Altitude Agent 1 AUDIX? n
TN: 1 LWC Reception: spe
COR: 1 LWC Log External Calls? n
Coverage Path: AUDIX Name for Messaging:
Security Code:
LoginID for ISDN/SIP Display? n
Password:
Password (enter again):
Auto Answer: station
MIA Across Skills: system
On Page 2, assign a skill to the agent by entering the relevant hunt group number created in
Section 5.3.1 for SN and entering a skill level of 1 for SL. In this case, an agent is able to handle
both inbound and outbound calls is created. Set the Direct Agent Skill to the Inbound hunt
group 33.
change agent-loginID 4401 Page 2 of 3
AGENT LOGINID
Direct Agent Skill: 33 Service Objective? n
Call Handling Preference: skill-level Local Call Preference? n
SN RL SL SN RL SL SN RL SL SN RL SL
1: 33 1 16: 31: 46:
2: 34 1 17: 32: 47:

PG; Reviewed:
SPOC 5/1/2013
Solution & Interoperability Test Lab Application Notes
©2013 Avaya Inc. All Rights Reserved.
12 of 59
Altitude_CMR62
5.6. Configure Agent Stations
For each station that agents will log in to, enter the command change station n, where n is the
station extension. On Page 4, the following buttons must be assigned as shown below:
aux-work – Agent is logged in to the ACD but is not available to take a call.
manual-in – Agent is available to accept ACD calls.
after-call – Agent state after the ACD call is completed. The agent is not available.
release – State when the call is dropped.
change station 2000 Page 4 of 5
STATION
SITE DATA
Room: Headset? n
Jack: Speaker? n
Cable: Mounting: d
Floor: Cord Length: 0
Building: Set Color:
ABBREVIATED DIALING
List1: List2: List3:
BUTTON ASSIGNMENTS
1: call-appr 5: manual-in Grp:
2: call-appr 6: after-call Grp:
3: call-appr 7: release
4: aux-work RC: Grp: 8::
5.7. Display Node-Names IP
Display the procr IP Address by using the command display node-names ip and noting the IP
address for the procr and the AES (aes62vmpg).
display node-names ip Page 1 of 2
IP NODE NAMES
Name IP Address
SM100 192.168.50.16
aes62vmpg 10.10.40.10
default 0.0.0.0
g250-dcp 192.168.50.18
procr 192.168.50.13

PG; Reviewed:
SPOC 5/1/2013
Solution & Interoperability Test Lab Application Notes
©2013 Avaya Inc. All Rights Reserved.
13 of 59
Altitude_CMR62
5.8. Configure Transport Link for Avaya Aura® Application Enablement Services Connectivity
To administer the transport link to AES use the change ip-services command. On Page 1 add an
entry with the following values:
Service Type: should be set to AESVCS
Enabled: set to y
Local Node: set to the node name assigned for the procr in Section 5.7.
Local Port Retain the default value of 8765.
change ip-services Page 1 of 4
IP SERVICES
Service Enabled Local Local Remote Remote
Type Node Port Node Port
AESVCS y procr 8765
Go to Page 4 of the ip-services form and enter the following values:
AE Services Server: Name obtained from the AES server, in this case aes62vmpg
Password: Enter a password to be administered on the AES server
Enabled: Set to y
Note: The password entered for Password field must match the password on the AES server in
Section 6.2. The AE Services Server should match the administered name for the AES server,
this is created as part of the AES installation, and can be obtained from the AES server by typing
uname –n at the Linux command prompt.
change ip-services Page 4 of 4
AE Services Administration
Server ID AE Services Password Enabled Status
Server
1: aes62vmpg ******** y idle
2:
3:
5.9. Configure CTI Link for TSAPI Service
Add a CTI link using the add cti-link n command. Enter an available extension number in the
Extension field. Enter ADJ-IP in the Type field, and a descriptive name in the Name field.
Default values may be used in the remaining fields.
add cti-link 1 Page 1 of 3
CTI LINK
CTI Link: 1
Extension: 2002
Type: ADJ-IP
COR: 1
Name: aes62vmpg

PG; Reviewed:
SPOC 5/1/2013
Solution & Interoperability Test Lab Application Notes
©2013 Avaya Inc. All Rights Reserved.
14 of 59
Altitude_CMR62
6. Configure Avaya Aura® Application Enablement Services
Application Enablement Services enable Computer Telephony Interface (CTI) applications to
control and monitor telephony resources on Communication Manager. Application Enablement
Services receive requests from CTI applications, and forwards them to Communication Manager.
Conversely, Application Enablement Services receive responses and events from
Communication Manager and forwards them to the appropriate CTI applications.
This section assumes that installation and basic administration of the Application Enablement
Services server has been performed. The steps in this section describe the configuration of a
Switch Connection, creating a CTI link for TSAPI, and a CTI user. For further information on
Avaya Application Enablement Services please refer to Section 11 of these Application Notes.
6.1. Configure Switch Connection
Launch a web browser, enter https://<IP address of AES server> in the URL, and log in with
the appropriate credentials for accessing the Application Enablement Services Management
Console page.
PG; Reviewed:
SPOC 5/1/2013
Solution & Interoperability Test Lab Application Notes
©2013 Avaya Inc. All Rights Reserved.
15 of 59
Altitude_CMR62
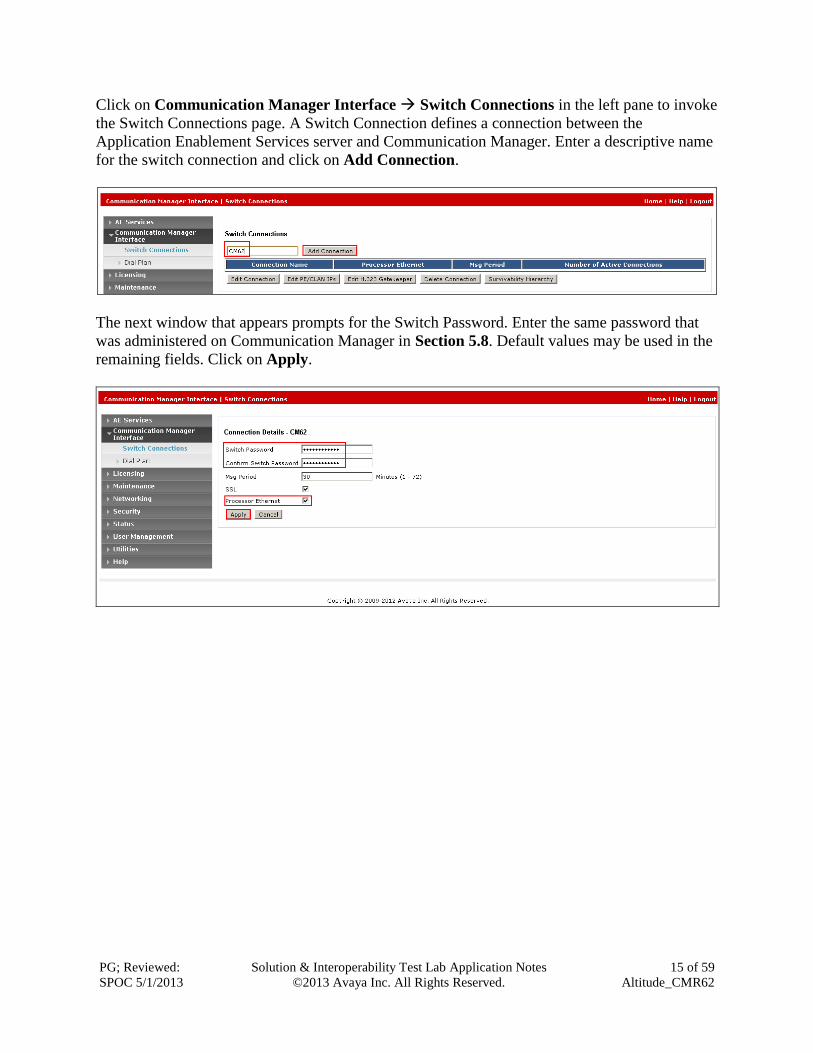
Click on Communication Manager Interface Switch Connections in the left pane to invoke
the Switch Connections page. A Switch Connection defines a connection between the
Application Enablement Services server and Communication Manager. Enter a descriptive name
for the switch connection and click on Add Connection.
The next window that appears prompts for the Switch Password. Enter the same password that
was administered on Communication Manager in Section 5.8. Default values may be used in the
remaining fields. Click on Apply.

PG; Reviewed:
SPOC 5/1/2013
Solution & Interoperability Test Lab Application Notes
©2013 Avaya Inc. All Rights Reserved.
16 of 59
Altitude_CMR62
After returning to the Switch Connections page, select the radio button corresponding to the
switch connection added previously, and click on Edit PE/CLAN IPs.
Enter the IP address of procr used for Application Enablement Services connectivity from
Section 5.7, and click on Add Name or IP.

PG; Reviewed:
SPOC 5/1/2013
Solution & Interoperability Test Lab Application Notes
©2013 Avaya Inc. All Rights Reserved.
17 of 59
Altitude_CMR62
6.2. Configure TSAPI CTI Link
Navigate to AE Services TSAPI TSAPI Links to configure the TSAPI CTI link. Click
the Add Link button to start configuring the TSAPI link.
Select the switch connection using the drop-down menu. Select the switch connection
configured in Section 6.1. Select the Switch CTI Link Number using the drop-down menu.
The CTI link number should match with the number configured in the CTI-link in Section 5.9.
Click Apply Changes.

PG; Reviewed:
SPOC 5/1/2013
Solution & Interoperability Test Lab Application Notes
©2013 Avaya Inc. All Rights Reserved.
18 of 59
Altitude_CMR62
6.3. Configure CTI User
Navigate to User Management Add User. On the Add User page, provide the following
information:
User Id
Common Name
Surname
User Password
Confirm Password
Select Yes using the drop-down menu on the CT User field. This enables the user as a CTI user.
Click the Apply button (not shown here) at the bottom of the screen to complete the process.
Default values may be used in the remaining fields.

PG; Reviewed:
SPOC 5/1/2013
Solution & Interoperability Test Lab Application Notes
©2013 Avaya Inc. All Rights Reserved.
19 of 59
Altitude_CMR62
Once the user is created, navigate to the Security Security Database CTI Users List
All Users page. Select the User ID created previously, and click the Edit button to set the
permission of the user.
Provide the user with unrestricted access privileges by checking the Unrestricted Access check
box. Click the Apply Changes button.

PG; Reviewed:
SPOC 5/1/2013
Solution & Interoperability Test Lab Application Notes
©2013 Avaya Inc. All Rights Reserved.
20 of 59
Altitude_CMR62
Navigate to the Security Security Database Tlinks page and verify the Tlink name. The
following screen shows the Tlink used during the compliance test.

PG; Reviewed:
SPOC 5/1/2013
Solution & Interoperability Test Lab Application Notes
©2013 Avaya Inc. All Rights Reserved.
21 of 59
Altitude_CMR62
7. Configure Avaya Aura® Session Manager
The Altitude uCI™ solution uses SIP IVR and so a SIP Entity must be created for the Altitude
SIP IVR in Session Manager. In order to make changes in Session Manager a web session to
System Manager is opened. Navigate to http://<System Manager IP Address>/SMGR, enter the
appropriate credentials and click on Log On as shown below.
7.1. Administer SIP Domain
SIP domains are created as part of Session Manager basic configuration. There will be at least
one SIP domain for which System Manager is the authoritative SIP controller. In these sample
notes it is devcon.avaya. Navigating from the Home screen, under the Elements section click
Routing Domains New enter the domain Name, set the Type as sip and click Commit.

PG; Reviewed:
SPOC 5/1/2013
Solution & Interoperability Test Lab Application Notes
©2013 Avaya Inc. All Rights Reserved.
22 of 59
Altitude_CMR62
7.2. Administer Location
Session Manager uses the origination location to determine which dial patterns to look at when
routing a call. Navigate to Home Elements Routing Locations New enter an
identifying Name, as shown below.
At the bottom of the same page the Location Pattern is defined. Click Add and enter the IP
address range used to logically identify the location. In this case the IP Address Pattern is
192.168.50.* as shown below. Click Commit when done.

PG; Reviewed:
SPOC 5/1/2013
Solution & Interoperability Test Lab Application Notes
©2013 Avaya Inc. All Rights Reserved.
23 of 59
Altitude_CMR62
7.3. Configuration of Altitude SIP Entity
Log into System Manager as described above, click on SIP Entities in the left window and New
in the main window highlighted below.
Enter the information for the new SIP entity as shown below and click on Commit once
finished.

PG; Reviewed:
SPOC 5/1/2013
Solution & Interoperability Test Lab Application Notes
©2013 Avaya Inc. All Rights Reserved.
24 of 59
Altitude_CMR62
Add a new entity link by selecting Entity Links from the left window and New from the main
windows as shown below.
Enter the information for the Altitude Entity link selecting UDP as the Protocol. Click Commit
once finished.

PG; Reviewed:
SPOC 5/1/2013
Solution & Interoperability Test Lab Application Notes
©2013 Avaya Inc. All Rights Reserved.
25 of 59
Altitude_CMR62
Enter a new routing policy for Altitude by selecting Routing Policies in the left window and
New in the main window and shown below.
Enter a suitable Name and click on Select highlighted under SIP Entity as Destination.
Select the Altitude SIP Entity and click on Select.

PG; Reviewed:
SPOC 5/1/2013
Solution & Interoperability Test Lab Application Notes
©2013 Avaya Inc. All Rights Reserved.
26 of 59
Altitude_CMR62
With the SIP Entity as Destination now selected click on Commit.
To add a new Dial Pattern, select Dial Patterns from the left window and New in the main
window.

PG; Reviewed:
SPOC 5/1/2013
Solution & Interoperability Test Lab Application Notes
©2013 Avaya Inc. All Rights Reserved.
27 of 59
Altitude_CMR62
Enter the number to be routed into Pattern and select length of the number in digits. Enter the
SIP Domain as was configured above. Select Add under the Originating Locations and
Routing Policies.
Select the location (DevconLAB) that was created above and the Routing Policy (Altitude).

PG; Reviewed:
SPOC 5/1/2013
Solution & Interoperability Test Lab Application Notes
©2013 Avaya Inc. All Rights Reserved.
28 of 59
Altitude_CMR62
Now with the correct Originating Locations and Routing Policies selected, click on Commit
top finish.

PG; Reviewed:
SPOC 5/1/2013
Solution & Interoperability Test Lab Application Notes
©2013 Avaya Inc. All Rights Reserved.
29 of 59
Altitude_CMR62
8. Configure Altitude uCI™ Assisted Server
Note: Windows Internet Explorer R9.0 is the only supported version with this release of Altitude
uCI™.
Open a web session to http://<server IP Address>/uSupervisorWebApp. Enter the proper
credentials and select the Assisted Server to log into and click on Login.
Once logged in select Configuration as highlighted below.

PG; Reviewed:
SPOC 5/1/2013
Solution & Interoperability Test Lab Application Notes
©2013 Avaya Inc. All Rights Reserved.
30 of 59
Altitude_CMR62
Expand More Options in the left window and select Telephony Gateways.
Select the “+” icon that is highlighted below to add the Avaya Telephony Gateway.

PG; Reviewed:
SPOC 5/1/2013
Solution & Interoperability Test Lab Application Notes
©2013 Avaya Inc. All Rights Reserved.
31 of 59
Altitude_CMR62
Select Avaya Communication Manager TSAPI (EAS) as the Model from the drop down
menu.

PG; Reviewed:
SPOC 5/1/2013
Solution & Interoperability Test Lab Application Notes
©2013 Avaya Inc. All Rights Reserved.
32 of 59
Altitude_CMR62
A name for the gateway is mandatory in this case Avaya Test was chosen. Auto startup is
ticked by default to automatically launch the gateway. The process name is left as the default
selection. Under Switch Connection enter the information as shown below, this is information
that is used to connect to the AES this can be obtained from the AES as shown in Section
6.3.Click on the + icon highlighted beside Site to add a new site.

PG; Reviewed:
SPOC 5/1/2013
Solution & Interoperability Test Lab Application Notes
©2013 Avaya Inc. All Rights Reserved.
33 of 59
Altitude_CMR62
Select the + con highlighted below.
Enter a suitable name for the new site and click on Finish.

PG; Reviewed:
SPOC 5/1/2013
Solution & Interoperability Test Lab Application Notes
©2013 Avaya Inc. All Rights Reserved.
34 of 59
Altitude_CMR62
Highlight the newly created site and click on Select.

PG; Reviewed:
SPOC 5/1/2013
Solution & Interoperability Test Lab Application Notes
©2013 Avaya Inc. All Rights Reserved.
35 of 59
Altitude_CMR62
Select Next without filling in any information.

PG; Reviewed:
SPOC 5/1/2013
Solution & Interoperability Test Lab Application Notes
©2013 Avaya Inc. All Rights Reserved.
36 of 59
Altitude_CMR62
These settings are typical for most Contact Centre‟s but can be changed by the Contact Centre
administrator at any stage depending on how the agents are to answer the calls. Select Next.

PG; Reviewed:
SPOC 5/1/2013
Solution & Interoperability Test Lab Application Notes
©2013 Avaya Inc. All Rights Reserved.
37 of 59
Altitude_CMR62
Click on the + icon highlighted below. Select the extension range that is to be monitored, using
the extensions as configured in Section 5.6. Tick the Use ACD Login box as shown below.
Click on Next once finished.

PG; Reviewed:
SPOC 5/1/2013
Solution & Interoperability Test Lab Application Notes
©2013 Avaya Inc. All Rights Reserved.
38 of 59
Altitude_CMR62
There were no routing points configured for this specific compliance testing so click on Next.

PG; Reviewed:
SPOC 5/1/2013
Solution & Interoperability Test Lab Application Notes
©2013 Avaya Inc. All Rights Reserved.
39 of 59
Altitude_CMR62
If there are stations or VDN‟s that need to be permanently monitored regardless of Agent login
these are selected below, in this case none were selected. Click Next to continue.

PG; Reviewed:
SPOC 5/1/2013
Solution & Interoperability Test Lab Application Notes
©2013 Avaya Inc. All Rights Reserved.
40 of 59
Altitude_CMR62
If there are virtual stations that are required for predictive outbound campaigns these are added
here. Click Next to continue.

PG; Reviewed:
SPOC 5/1/2013
Solution & Interoperability Test Lab Application Notes
©2013 Avaya Inc. All Rights Reserved.
41 of 59
Altitude_CMR62
A call classifier was setup for outbound campaigns for predictive dialing. Select the + icon and
enter the IP Address of the Altitude Communication Server in this case it will be the same as the
Altitude Assisted Server and the Device is the number that was created in the Communication
Server. The Dialing prefix is the number used to get to the PSTN from the Altitude
Communication Server. An outbound rule was created in the Altitude Communication Server to
route calls with this prefix to the Session Manager, using the same dialing prefix. Click on
Finish once completed.

PG; Reviewed:
SPOC 5/1/2013
Solution & Interoperability Test Lab Application Notes
©2013 Avaya Inc. All Rights Reserved.
42 of 59
Altitude_CMR62
8.1. Configuring Campaigns
Log in to Altitude uCI™ Supervisor as done above in Section 7. Select Campaigns from the left
window and select the + icon in the main window.
Enter a suitable Name for the campaign and click on the “Search” icon highlighted under
Service.

PG; Reviewed:
SPOC 5/1/2013
Solution & Interoperability Test Lab Application Notes
©2013 Avaya Inc. All Rights Reserved.
43 of 59
Altitude_CMR62
Click on the New icon highlighted and enter a suitable Name for the service and click on Finish.
Once saved select the newly created campaign as highlighted.

PG; Reviewed:
SPOC 5/1/2013
Solution & Interoperability Test Lab Application Notes
©2013 Avaya Inc. All Rights Reserved.
44 of 59
Altitude_CMR62
Select Business RulesTelephonyTelephony Gateways. Click on new icon.
Assign the newly created telephony gateway to this campaign as shown in the screen below.
PG; Reviewed:
SPOC 5/1/2013
Solution & Interoperability Test Lab Application Notes
©2013 Avaya Inc. All Rights Reserved.
45 of 59
Altitude_CMR62
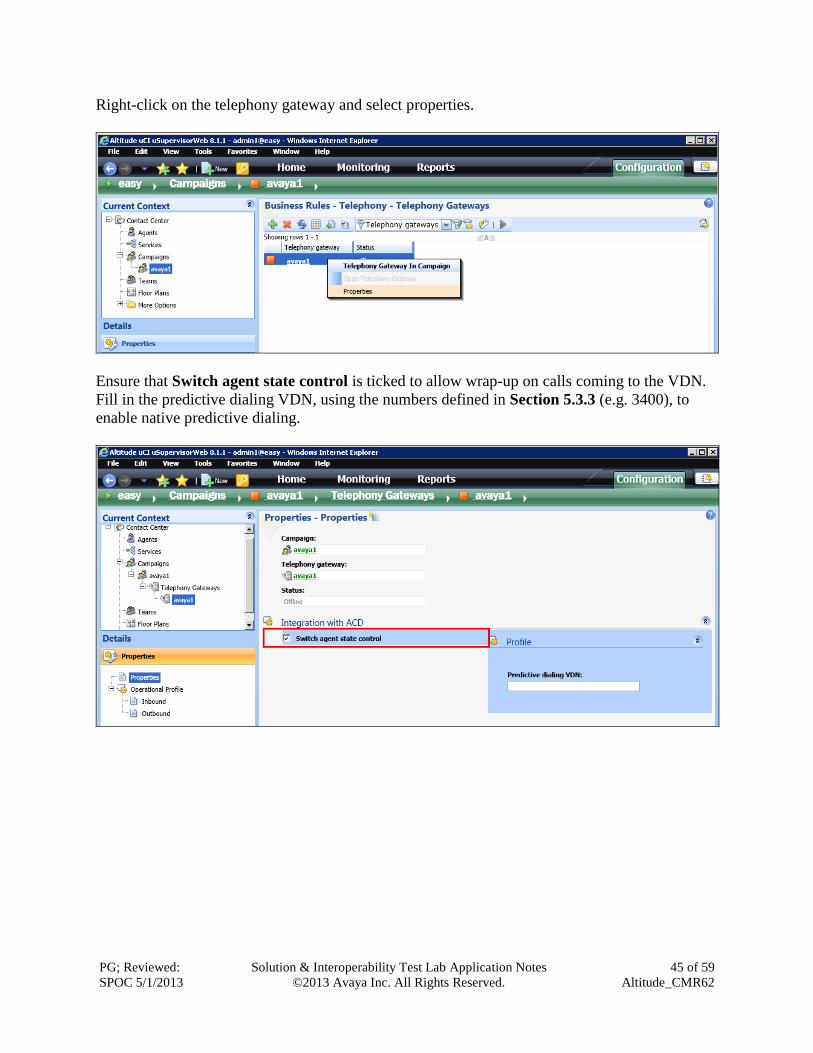
Right-click on the telephony gateway and select properties.
Ensure that Switch agent state control is ticked to allow wrap-up on calls coming to the VDN.
Fill in the predictive dialing VDN, using the numbers defined in Section 5.3.3 (e.g. 3400), to
enable native predictive dialing.

PG; Reviewed:
SPOC 5/1/2013
Solution & Interoperability Test Lab Application Notes
©2013 Avaya Inc. All Rights Reserved.
46 of 59
Altitude_CMR62
Select Inbound under Operational Profile in the left column as highlighted below. VDN 3300
is added to Dnis and Monitored Devices by clicking on the + icons for each (not shown).

PG; Reviewed:
SPOC 5/1/2013
Solution & Interoperability Test Lab Application Notes
©2013 Avaya Inc. All Rights Reserved.
47 of 59
Altitude_CMR62
8.2. Adding Agents to Assisted Server
Select Contact CenterCenter in the left window and NewAdd an Agent in the right window.
Enter the suitable credentials noting the Switch agent id is 4400 as configured in Section 5.5.

PG; Reviewed:
SPOC 5/1/2013
Solution & Interoperability Test Lab Application Notes
©2013 Avaya Inc. All Rights Reserved.
48 of 59
Altitude_CMR62
8.3. Configuring Altitude Communication Server
Open a web session to the Communication Server using http://<Communication Server IP
Address>:8080. Enter the proper credentials and click on Login.

PG; Reviewed:
SPOC 5/1/2013
Solution & Interoperability Test Lab Application Notes
©2013 Avaya Inc. All Rights Reserved.
49 of 59
Altitude_CMR62
Once logged in click on Configuration Helpers and SIP based IVRs.

PG; Reviewed:
SPOC 5/1/2013
Solution & Interoperability Test Lab Application Notes
©2013 Avaya Inc. All Rights Reserved.
50 of 59
Altitude_CMR62
Enter the information for the Session Manager into SIP trunk(S) IP address(es), enter the
number of trunks to be created and click on Generate. Note the number entered for the Hunt
group is that which was entered into the dial pattern in Section 7.3.
The example below assumes that the following items were already configured in Altitude uCI™:
An Altitude Communication Server telephony gateway, assigned to a campaign targeting
IVR agents;
IVR agents with extensions 1500-1509, assigned to the same campaign;
IVR script assigned to the same campaign.

PG; Reviewed:
SPOC 5/1/2013
Solution & Interoperability Test Lab Application Notes
©2013 Avaya Inc. All Rights Reserved.
51 of 59
Altitude_CMR62
The screen below shows the SIP trunks being generated. Click on OK once completed.

PG; Reviewed:
SPOC 5/1/2013
Solution & Interoperability Test Lab Application Notes
©2013 Avaya Inc. All Rights Reserved.
52 of 59
Altitude_CMR62
8.4. Setup of Call Classifier on Communication Server
Under Devices Select the Add icon beside Call Classifiers.
Enter the number that was entered in Section 8 in the „Add call classifier devices‟ screen (6000).

PG; Reviewed:
SPOC 5/1/2013
Solution & Interoperability Test Lab Application Notes
©2013 Avaya Inc. All Rights Reserved.
53 of 59
Altitude_CMR62
9. Verification Steps
The following steps can be taken to ensure that connections between Communication Manager,
AES, and Altitude uCI™ are configured correctly. The steps described in this section are enough
to verify delivery of inbound agent skillset calls. For other features and call flows, consult the
Technical Documentation of both products.
9.1. Verify Avaya Aura® Communication Manager CTI link
Verify the status of the administered CTI link by using the status aesvcs cti-link command.
Verify the Service State is established for the CTI link number administered in Section 5.10, as
shown below.
status aesvcs cti-link
AE SERVICES CTI LINK STATUS
CTI Version Mnt AE Services Service Msgs Msgs
Link Busy Server State Sent Rcvd
1 no down 0 0
4 4 no aes established 15 15
9.2. Verify Avaya Aura® Application Enablement Services CTI link
From the Application Enablement Services Management Console web pages, verify the state of
the TSAPI Service is set to ONLINE by selecting Status from the left pane.

PG; Reviewed:
SPOC 5/1/2013
Solution & Interoperability Test Lab Application Notes
©2013 Avaya Inc. All Rights Reserved.
54 of 59
Altitude_CMR62
9.3. Verify Altitude Server is running correctly
Log in to the Supervisor web session as shown in Section 7 above. Navigate to configuration and
select Telephony Gateways in the left column. The following screen shows that two gateways
are currently in operation avaya1 and acs1.
Open a log file located at C:\ProgramData\Altitude\Altitude uCI 8.1\Altitude Assisted
Server\easy\Logs.
If there are any issues with connecting to the AES server then this will be displayed in the log
file.

PG; Reviewed:
SPOC 5/1/2013
Solution & Interoperability Test Lab Application Notes
©2013 Avaya Inc. All Rights Reserved.
55 of 59
Altitude_CMR62
9.4. Verify Altitude uCI™ Client has call control
Log in to the Agent uCI. Enter the proper credentials and click on Log in.
Enter the extension number to be monitored and click on Start.

PG; Reviewed:
SPOC 5/1/2013
Solution & Interoperability Test Lab Application Notes
©2013 Avaya Inc. All Rights Reserved.
56 of 59
Altitude_CMR62
The following screen appears once logged in correctly.

PG; Reviewed:
SPOC 5/1/2013
Solution & Interoperability Test Lab Application Notes
©2013 Avaya Inc. All Rights Reserved.
57 of 59
Altitude_CMR62
Once a call is delivered to the VDN the following screen is popped to the agent.

PG; Reviewed:
SPOC 5/1/2013
Solution & Interoperability Test Lab Application Notes
©2013 Avaya Inc. All Rights Reserved.
58 of 59
Altitude_CMR62
10. Conclusion
These Application Notes describe the configuration steps required for Altitude uCI™ from
Altitude Software with Avaya Aura® Communication Manager R6.2 and Avaya Aura®
Application Enablement Services R6.2 to control Agents logged into Avaya Aura®
Communication Manager. All test cases were completed successfully. Please refer to Section 2.2
for test results and observations.
11. Additional References
This section references documentation relevant to these Application Notes. The Avaya product
documentation is available at http://support.avaya.com where the following documents can be
obtained.
[1] Administering Avaya Aura® Communication Manager, Document ID 03-300509
[2] Avaya Aura® Communication Manager Feature Description and Implementation,
Document ID 555-245-205
[3] Avaya Aura® Application Enablement Services Administration and Maintenance Guide Release 6.2
All information on the product installation and configuration of Altitude uCI™ can be found at
http://www.altitude.com

PG; Reviewed:
SPOC 5/1/2013
Solution & Interoperability Test Lab Application Notes
©2013 Avaya Inc. All Rights Reserved.
59 of 59
Altitude_CMR62
©2013 Avaya Inc. All Rights Reserved.
Avaya and the Avaya Logo are trademarks of Avaya Inc. All trademarks identified by ® and
™ are registered trademarks or trademarks, respectively, of Avaya Inc. All other trademarks
are the property of their respective owners. The information provided in these Application
Notes is subject to change without notice. The configurations, technical data, and
recommendations provided in these Application Notes are believed to be accurate and
dependable, but are presented without express or implied warranty. Users are responsible for
their application of any products specified in these Application Notes.
Please e-mail any questions or comments pertaining to these Application Notes along with the
full title name and filename, located in the lower right corner, directly to the Avaya
DevConnect Program at [email protected].