andover data entry project handbook
TRANSCRIPT
8/6/2019 Andover Data Entry Project Handbook
http://slidepdf.com/reader/full/andover-data-entry-project-handbook 1/16
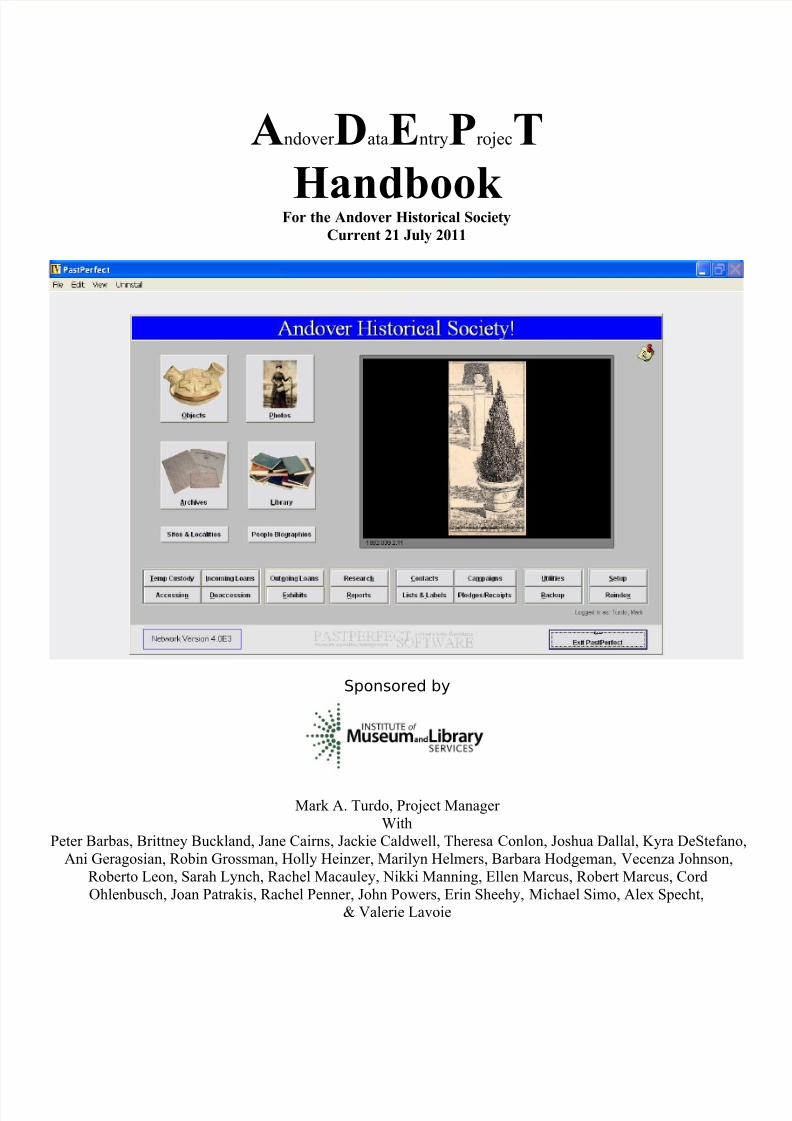
Andover DataEntryProjecT
Handbook For the Andover Historical Society
Current 21 July 2011
Sponsored by
Mark A. Turdo, Project Manager
WithPeter Barbas, Brittney Buckland, Jane Cairns, Jackie Caldwell, Theresa Conlon, Joshua Dallal, Kyra DeStefano
Ani Geragosian, Robin Grossman, Holly Heinzer, Marilyn Helmers, Barbara Hodgeman, Vecenza Johnson,
Roberto Leon, Sarah Lynch, Rachel Macauley, Nikki Manning, Ellen Marcus, Robert Marcus, Cord
Ohlenbusch, Joan Patrakis, Rachel Penner, John Powers, Erin Sheehy, Michael Simo, Alex Specht,& Valerie Lavoie

8/6/2019 Andover Data Entry Project Handbook
http://slidepdf.com/reader/full/andover-data-entry-project-handbook 2/16
A ndover D ata E ntry P rojec T at a Glance We are responsible for transferring collections information from paper files to the
PastPerfect database, while addressing relevant curatorial challenges.
We…
• are a temporary, parallel IMLS grant-funded project• are focused solely on the Society’s objects collection
• realize that our work also affects the work of the rest of the Society
• are information curators (not object or research curators)
• balance the quality of each record with the need to finish a quantity of records
• complete each record to the best of our ability within the confines of the source material(s)
• work closely with the collections committee and data entry sub-committee to address
curatorial questions, challenges, and needs
• recognize that collections research is a perpetual pursuit and is never complete, and by
extension neither is a collections database• understand this process is an evolutionary one, which will continue to evolve long after the
project’s conclusion
• understand that the PastPerfect database is not similar to a Google or wiki tool or a
Microsoft product and are mindful that the database’s potential end users may be
Trained Users: who are very familiar with PastPerfect
Experienced Users: who have worked with PastPerfect before
Inexperienced Users: who have not worked with PastPerfect
Goals• To provide increased & efficient access to the Society’s collection for staff, volunteers, and
the Andover community
• To provide a maximum amount of data through a minimum number of fields
• To capture collections information that might otherwise be lost
• To assemble all of the paperwork for each object into a single file while decreasing the
Society’s dependence on paper
• To leave the collections better organized than we found them
• To protect the collection by reducing the need to handle objects
• To create a mission-focused collections review and refinement tool• To create a data entry manual and a user’s manual for the benefit of future staff and
researchers

8/6/2019 Andover Data Entry Project Handbook
http://slidepdf.com/reader/full/andover-data-entry-project-handbook 3/16
General Notes1. Use your head – read everything, question what you see, and make sure it makes sense.
2. We are focused on entering information for the object collections only.
3. Our approach to the data entry is:
If it’s in the file we enter it.If it’s not we leave the field blank.
If it’s contradictory we try to resolve it.
4. Please remember to click the EDIT key before making any changes to a record.
• Exception: select the cm measurement on the Objects Catalog before clicking edit
5. For worksheets which postdate the accession number (e.g. an item numbered 1973.025.3
which has a worksheet dated 1985) do not use the name and date on the worksheet for the
ACCESSIONED BY name and DATE and the CATALOGED BY Name and DATE• Use that information for the CONDITION BY name and DATE
6. Format all dates as MM/DD/YYYY (e.g. 02/04/1999)
Except DATE field which is formatted as YYYY/MM/DD
Except RECEIVED field on Accession screen will take all date formats
(one-, two-, or three-part dates)
7. Use a forward slash (/) not a comma (,) to separate items in ACCESSIONED BY,
CATALOGED BY & MATERIALS fields.
8. Spell out all words, unless abbreviation appears on the object. Except:
• Use Postal abbreviations for states (e.g. MA for Massachusetts)
• Use periods for name initials when surname is spelled out but do not use a space
between initials (e.g. L.A. Roberge)
• Do not use periods for inititials only (e.g. LAR, USA)
9. Spell out all numbers from one to ten. All other numbers may be keyed in as numerals.
10. Make sure the cursor is always at the top far left of each field.
11.For Muli-part accessions:
• If pieces make a whole item, .1a, .1b, .1c, etc.
• If distinct pieces make a complete item (a uniform consisting of shirt, jacket, and
pants), use .1a, .1b, .1c, etc.
• Set lexicon to reflect the collection (i.e. a shirt, jacket, and pants would all be
designated uniform)

8/6/2019 Andover Data Entry Project Handbook
http://slidepdf.com/reader/full/andover-data-entry-project-handbook 4/16
12.To cut & paste use the following keyboard shortcuts
• Control+X = cut
• Control+C = copy
• Control+V = paste
• Control+U = undo
• Control+R = redo
13. When sorting the records into numeric order set them as follows:
• Accessions Screen Sorted by Accessn(num)
• Objects Catalog Sorted by Objectid(num)
14. A yellow Authority File box will appear at the bottom of the
screen after you select designated fields. By right clicking on that field a pre-filled
Authority File will open. Double-click the desired entry to fill the field.
15. Please review all materials in the file as there may be information recorded in other
places than those listed below.
16. When you have completed and saved all changes to each screen, please press the
SPELL check button and make any necessary corrections.
17. As always if you have any questions, comments, or concerns please share them.

8/6/2019 Andover Data Entry Project Handbook
http://slidepdf.com/reader/full/andover-data-entry-project-handbook 5/16
Accessions Screen
1. Don’t Update Deed of Gift or Thank You Letter: Check box (next to change # button)
2. Received As: Gift (donation), Purchase, or Found in Collection (unknown source)
3. Source: aka donor; From Gift Receipt or Gift Agreement
• Format as Last Name, First Name Middle Name/Initial
• Use “Unknown” when donor information is unavailable
4. Contact: If Source is a company, enter name of the contact person; otherwise leave blank5. Address, City, State, ZIP, Phone Number: From Gift Receipt or Agreement
6. Received By: Staff name on Gift Receipt
7. Accessioned By: AKA Cataloged By, from Worksheet.
• If more than one full name and the other’s initials
• separate with a forward slash (/)
8. Received: From Gift Receipt (field can take one-, two-, or three-part date)
9. Accessioned: From Worksheet
• For two part date enter “01” for day (e.g. MM/01/YYYY)
• For year only enter “01/01/YYYY”10.Deed of Gift Sent: From Gift Agreement (top near donor’s name & address)
11.Deed of Gift Returned: From Gift Agreement (next to donor’s signature)
12.Description of Accession: From Gift Receipt or Agreement
• Should be brief and in list format
• Use numeral to denote multiples (e.g. 2 chairs)
8/6/2019 Andover Data Entry Project Handbook
http://slidepdf.com/reader/full/andover-data-entry-project-handbook 6/16
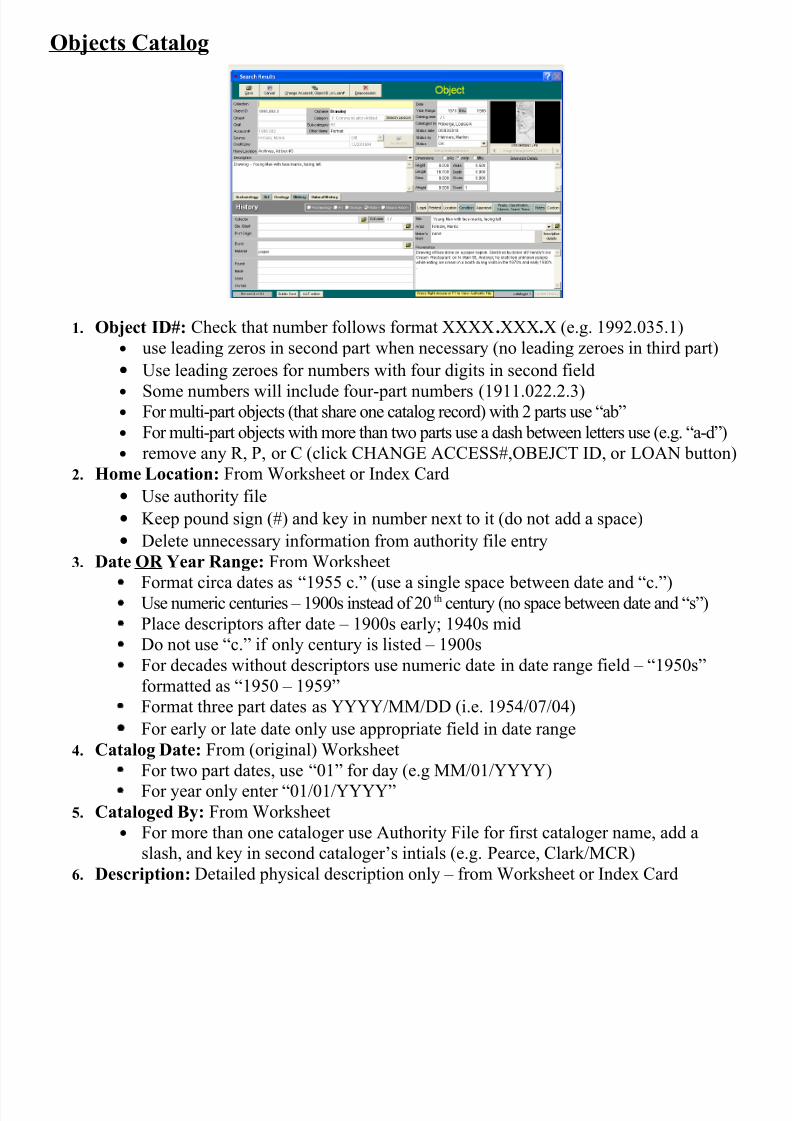
Objects Catalog
1. Object ID#: Check that number follows format XXXX.XXX.X (e.g. 1992.035.1)
• use leading zeros in second part when necessary (no leading zeroes in third part)
• Use leading zeroes for numbers with four digits in second field
• Some numbers will include four-part numbers (1911.022.2.3)• For multi-part objects (that share one catalog record) with 2 parts use “ab”
• For multi-part objects with more than two parts use a dash between letters use (e.g. “a-d”)
• remove any R, P, or C (click CHANGE ACCESS#,OBEJCT ID, or LOAN button)
2. Home Location: From Worksheet or Index Card
• Use authority file
• Keep pound sign (#) and key in number next to it (do not add a space)
• Delete unnecessary information from authority file entry
3. Date OR Year Range: From Worksheet
•Format circa dates as “1955 c.” (use a single space between date and “c.”)• Use numeric centuries – 1900s instead of 20 th century (no space between date and “s”)
• Place descriptors after date – 1900s early; 1940s mid
• Do not use “c.” if only century is listed – 1900s
• For decades without descriptors use numeric date in date range field – “1950s”
formatted as “1950 – 1959”
• Format three part dates as YYYY/MM/DD (i.e. 1954/07/04)
• For early or late date only use appropriate field in date range
4. Catalog Date: From (original) Worksheet
• For two part dates, use “01” for day (e.g MM/01/YYYY)
• For year only enter “01/01/YYYY”5. Cataloged By: From Worksheet
• For more than one cataloger use Authority File for first cataloger name, add a
slash, and key in second cataloger’s intials (e.g. Pearce, Clark/MCR)
6. Description: Detailed physical description only – from Worksheet or Index Card

8/6/2019 Andover Data Entry Project Handbook
http://slidepdf.com/reader/full/andover-data-entry-project-handbook 7/16
Objects Catalog - Continued
7. Dimensions: From Worksheet or Index Card
• use Dimension Details field for multiple dimensions8. Click History Tab & History Radio Button
9. Pl[ace] of Origin: From Worksheet
10. Material: From Worksheet
11. Artist: Same as maker or creator; from Worksheet
12. Maker’s Mark Note: From Worksheet
• Does not include personal labels (i.e. an owner’s mark)
13. Provenance: History of the creation, use, and ownership of an object; From Worksheet
14. Appraisal: From worksheet, index cards, or other paperwork. May include insurance
values, antique dealer appraisals, etc. See Appendix C for more information15. Condition: From Worksheet – choose term from pull down menu
16. Condition Date: Same date as Cataloged date
• For two part dates, use “01” for day
17. Condition By: Same as Cataloged By For
• For two part dates, use “01” for day
• For multiple conditions or conservation reports click Add New Report (bottom of
screen) See appendix ___???? For more information on entering multiple reports
18. People/Classification/Subjects/Search Terms: From Worksheet or Index Card
• People: related names other than donor’s
• Subjects: related common nouns (e.g. war)• Search Terms: related proper nouns (e.g. World War I)
19. Setting Object Status: Only used for objects we have looked for or were deaccessioned
• Status Date: Date you did or did not find an object or it was deaccessioned
• Status By: Name of person setting status (Last Name, First Name)
• Status: “Ok” (if it’s located), “Missing” (if it can’t be found), or “Deaccessioned”
8/6/2019 Andover Data Entry Project Handbook
http://slidepdf.com/reader/full/andover-data-entry-project-handbook 8/16
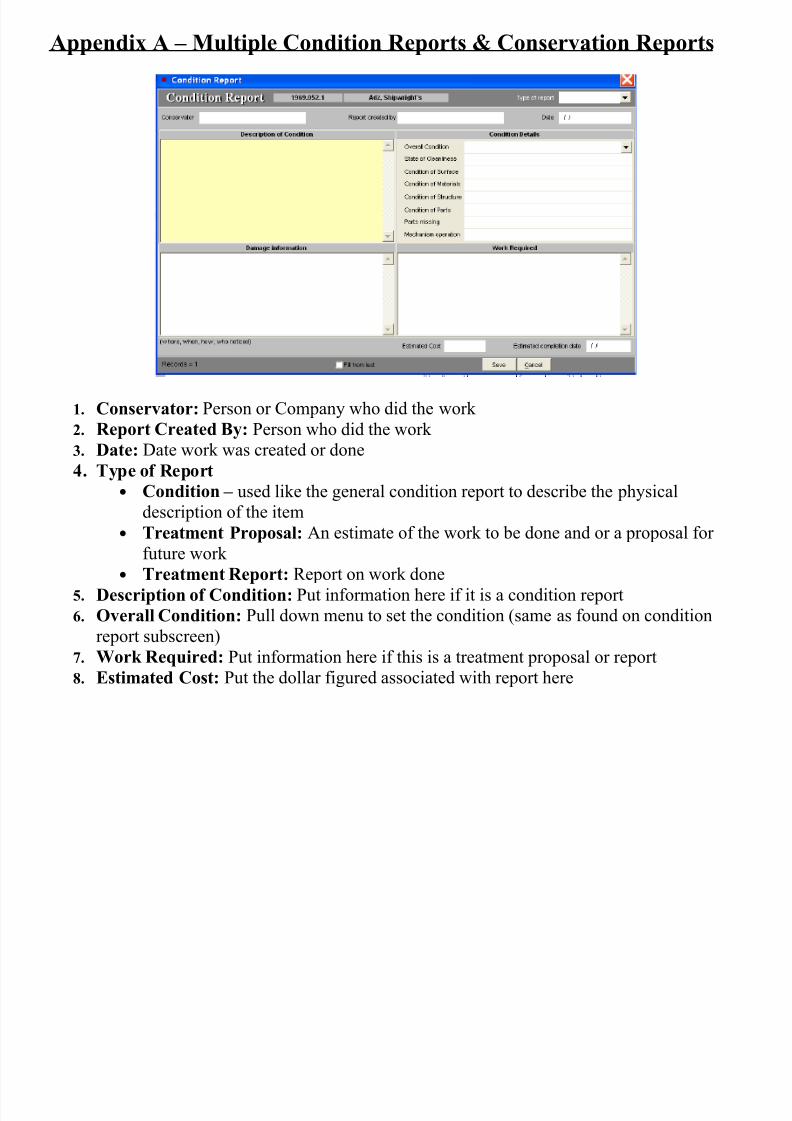
Appendix A – Multiple Condition Reports & Conservation Reports
1. Conservator: Person or Company who did the work
2. Report Created By: Person who did the work
3. Date: Date work was created or done
4. Type of Report
• Condition – used like the general condition report to describe the physical
description of the item
• Treatment Proposal: An estimate of the work to be done and or a proposal for
future work
• Treatment Report: Report on work done
5. Description of Condition: Put information here if it is a condition report6. Overall Condition: Pull down menu to set the condition (same as found on condition
report subscreen)
7. Work Required: Put information here if this is a treatment proposal or report
8. Estimated Cost: Put the dollar figured associated with report here
8/6/2019 Andover Data Entry Project Handbook
http://slidepdf.com/reader/full/andover-data-entry-project-handbook 9/16
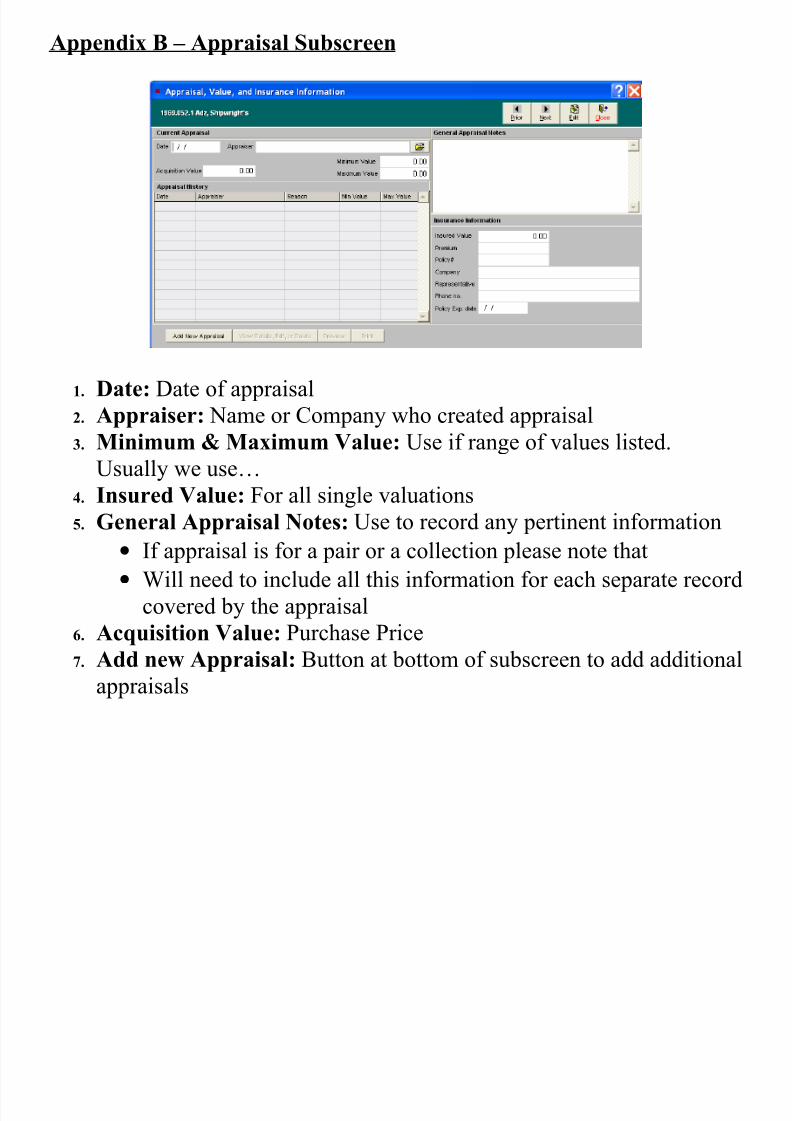
Appendix B – Appraisal Subscreen
1. Date: Date of appraisal2. Appraiser: Name or Company who created appraisal
3. Minimum & Maximum Value: Use if range of values listed.
Usually we use…
4. Insured Value: For all single valuations
5. General Appraisal Notes: Use to record any pertinent information
• If appraisal is for a pair or a collection please note that
•
Will need to include all this information for each separate recordcovered by the appraisal
6. Acquisition Value: Purchase Price
7. Add new Appraisal: Button at bottom of subscreen to add additional
appraisals
8/6/2019 Andover Data Entry Project Handbook
http://slidepdf.com/reader/full/andover-data-entry-project-handbook 10/16
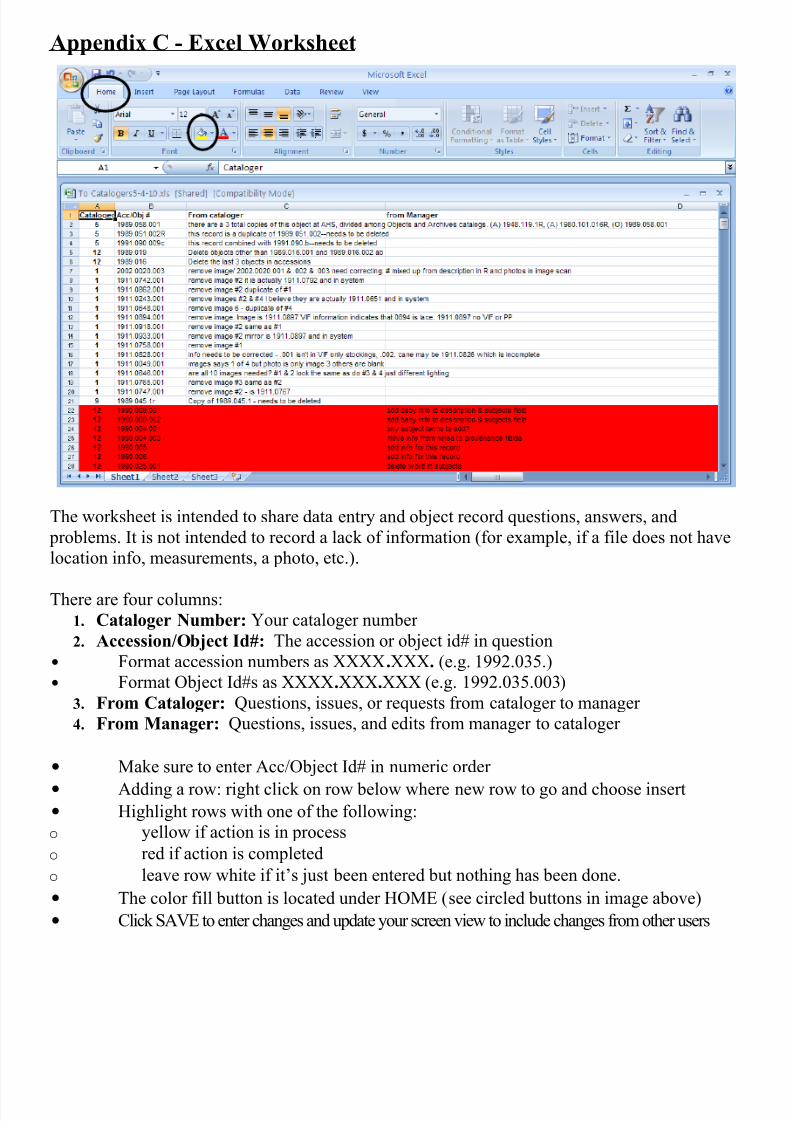
Appendix C - Excel Worksheet
The worksheet is intended to share data entry and object record questions, answers, and
problems. It is not intended to record a lack of information (for example, if a file does not have
location info, measurements, a photo, etc.).
There are four columns:
1. Cataloger Number: Your cataloger number
2. Accession/Object Id#: The accession or object id# in question
• Format accession numbers as XXXX.XXX. (e.g. 1992.035.)
• Format Object Id#s as XXXX.XXX.XXX (e.g. 1992.035.003)
3. From Cataloger: Questions, issues, or requests from cataloger to manager
4. From Manager: Questions, issues, and edits from manager to cataloger
• Make sure to enter Acc/Object Id# in numeric order
• Adding a row: right click on row below where new row to go and choose insert• Highlight rows with one of the following:
o yellow if action is in process
o red if action is completed
o leave row white if it’s just been entered but nothing has been done.
• The color fill button is located under HOME (see circled buttons in image above)
• Click SAVE to enter changes and update your screen view to include changes from other users
8/6/2019 Andover Data Entry Project Handbook
http://slidepdf.com/reader/full/andover-data-entry-project-handbook 11/16
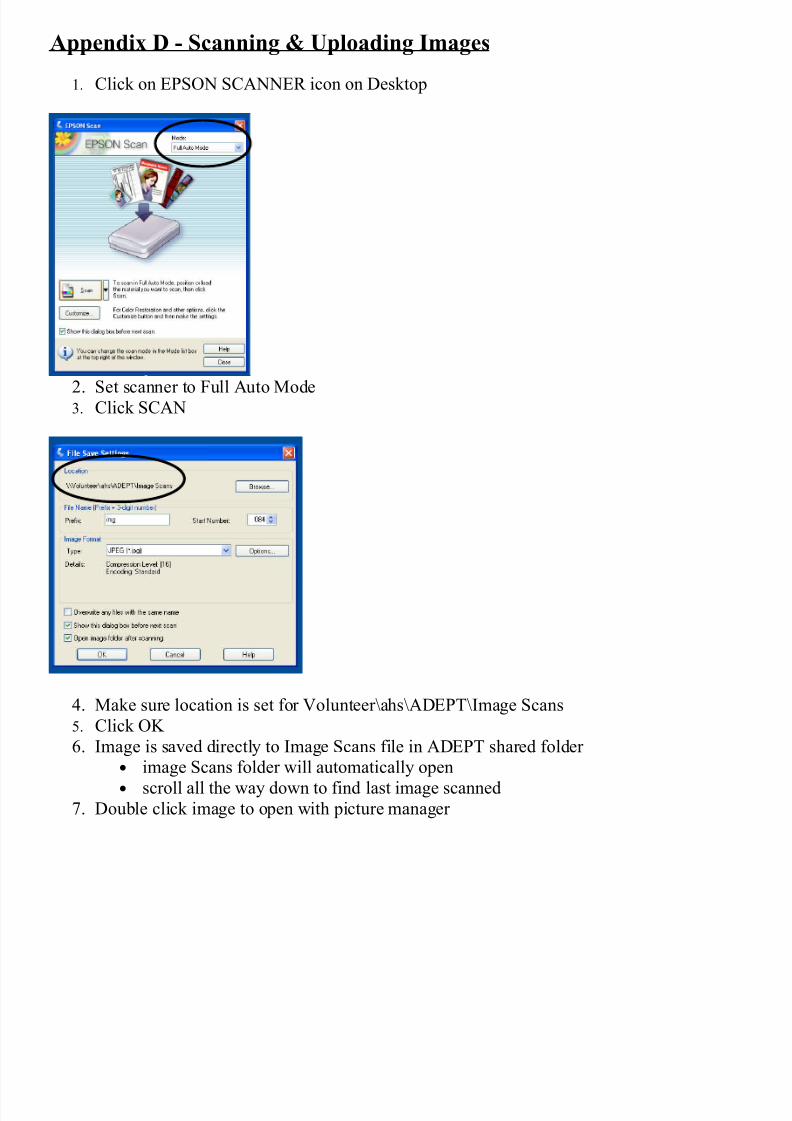
Appendix D - Scanning & Uploading Images
1. Click on EPSON SCANNER icon on Desktop
2. Set scanner to Full Auto Mode3. Click SCAN
4. Make sure location is set for Volunteer\ahs\ADEPT\Image Scans
5. Click OK
6. Image is saved directly to Image Scans file in ADEPT shared folder
• image Scans folder will automatically open
• scroll all the way down to find last image scanned7. Double click image to open with picture manager

8/6/2019 Andover Data Entry Project Handbook
http://slidepdf.com/reader/full/andover-data-entry-project-handbook 12/16
8. Right click image and choose RENAME
9. File Name box will appear to the right - enter object id #
• Number formatted as XXXX.XXX.XXX
• If there are multiple images of one item, use object id# and a dash number withleading zero (e.g. 2010.005.001-03 is the third image of that item)
10. Click OK
11. Crop (as close to object or image as possible) if necessary
12. Close
13. On PastPerfect Objects Catalog Screen click IMAGE MANAGEMENT bar
• Must be in view mode – will not work in edit mode
14. Click ATTACH IMAGE button
15.Click image from list
16.Close metadata screen
17.Once attached Exit out of Image Management screen
18. Go back to image scans folder and drag and drop image into its appropriate folder

8/6/2019 Andover Data Entry Project Handbook
http://slidepdf.com/reader/full/andover-data-entry-project-handbook 13/16
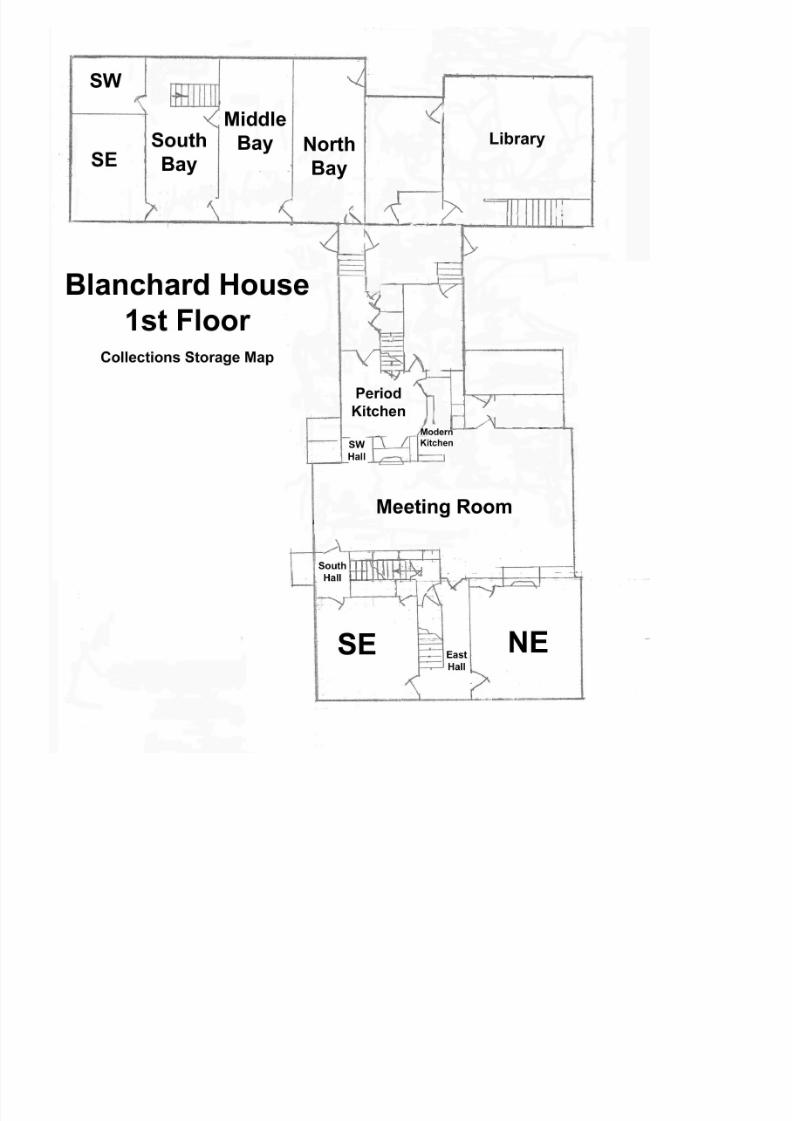
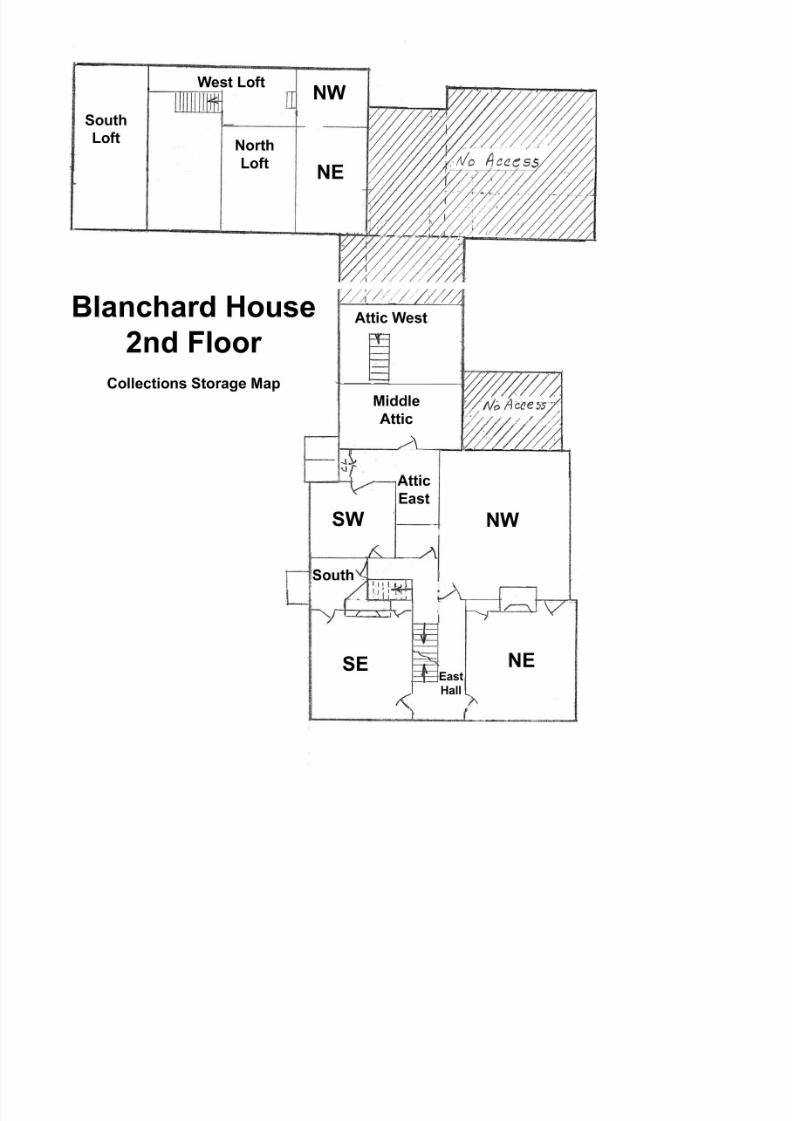
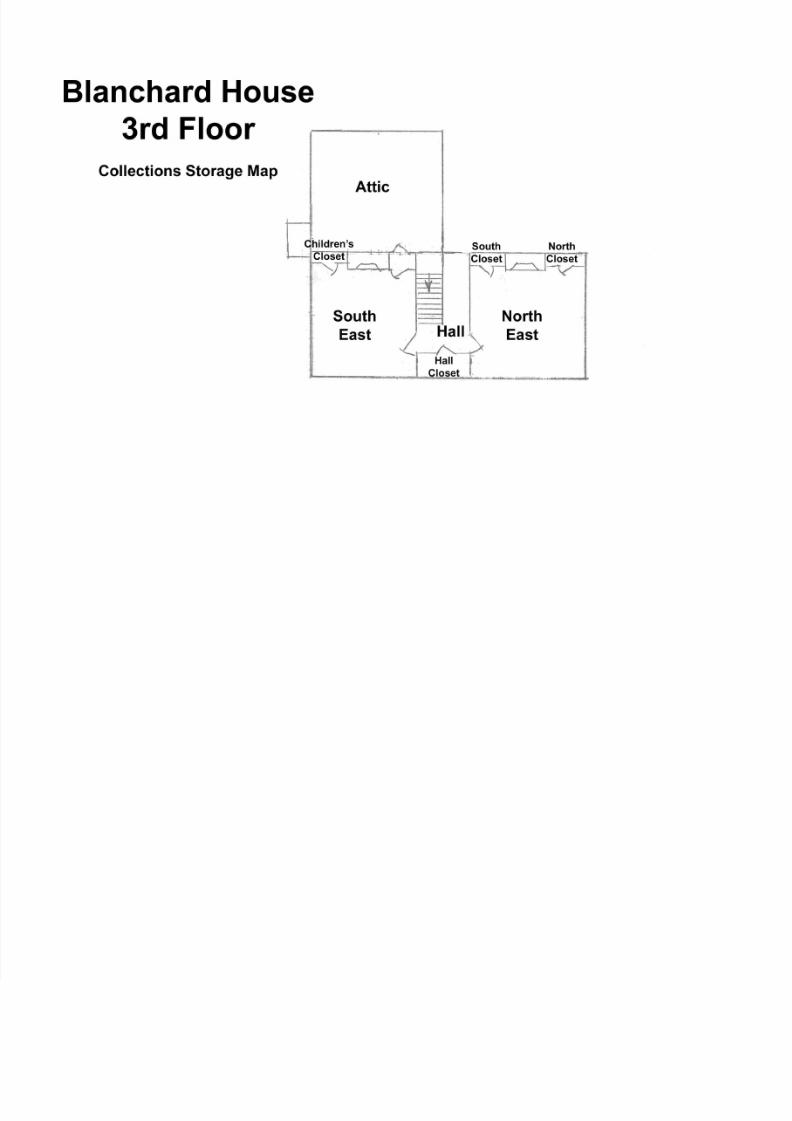
Appendix E – Location Storage Guide
8/6/2019 Andover Data Entry Project Handbook
http://slidepdf.com/reader/full/andover-data-entry-project-handbook 14/16
8/6/2019 Andover Data Entry Project Handbook
http://slidepdf.com/reader/full/andover-data-entry-project-handbook 15/16
8/6/2019 Andover Data Entry Project Handbook
http://slidepdf.com/reader/full/andover-data-entry-project-handbook 16/16