and other welded and machined parts can usually be ...a.moirier.free.fr/construction/construction...
TRANSCRIPT
It is a fact. Most wood aircraft canbe built cheaper than metal or compos-ite kit aircraft . . . and with relativeease, too, for a number of reasons:
1. Almost any aspiring first-timebuilder is quite likely to be familiarwith wood and would be comfortableworking with it, especially since only afew common workshop tools are allthat are needed.
2. Most wooden aircraft are builtfrom raw materials, therefore, there areno added costs for kit fabrication,mold and jig development and, ofcourse, amortization.
3. Often overlooked, too, are thevery expensive crating and shippingcosts for the bulky prefabricated kitcomponents. These savings are veryreal and provide the opportunity to
start construction almost immediatelyon your dream aircraft.
Quite the opposite seems to be truefor a number of the newer compositedesigns for which deposits may be re-quired simply to get your name on along waiting list with a rather vaguedelivery date.
Unfortunately for the builder who islooking for so-called "quick-build"kits, there are none for wood aircraftdesigns. For that matter, complete con-struction kits are rarely available forwood aircraft. . . one notable excep-tion is the sophisticated and expensivehigh performance Falco.
The amateur building movement,however, is changing very rapidly asmore and more eager builders arriveon the scene. As a result, recently a
number of light and ultralight woodaircraft designs are now also being of-fered in kit form.
Included in this group are designslike the Loehle Corporation designs —5151 Mustang, P-40 and Sport Parasol.
Another prominent producer of woodkits is TEAM, Inc. Its fleet of wood kitdesigns is becoming very popular withthe cost conscious builders eager to getairborne. Their simple economical kitdesigns include the miniMAX, Hi-MAX and a number of others. Most ofthese lightplane kit designs have beenselling for less than $4,000.
But, unfortunately, if you want tobuild a more powerful, higher perfor-mance wood aircraft, you will probablyhave to build much of it from raw ma-terials. That is, you will have to expendmore time for shopping and for pur-chasing your own lumber, plywood,glue and other construction materials.In other words, you will be tradingmore of your personal time for moneyyou will not have to spend on expen-sive kit components.
Nevertheless, in some instancespartial wood and materials kits for anumber of popular designs are avail-able from: Wicks Aircraft Supply(Catalog orders 1-800/221-9425) andAircraft Spruce & Specialty (Catalogorders 1-800/824-1930).
These are partial material kits forwood designs like the Barracuda, Celer-ity, Corby CJ-1 Starlet, GP-4, andOsprey amphibian — these may beavailable from either company. Thesepackaged material sources for the listeddesigns can be very helpful in getting agood jump-start on your project.
In addition, difficult-to-fabricateparts such as engine mounts, landinggear components
73

and other welded and machined partscan usually be purchased from spe-cialized sources listed in the plans.
After you order some wood and glue,then what? Just where do you start?
Although the classic approach tobuilding an airplane is to begin withthe smaller less expensive tail sur-faces, a surprising number of buildersof wood aircraft prefer to start con-struction with the fuselage first. Not abad idea at all. After all, cutting andfitting pieces of wood for the fuselageis no different than cutting and fittingpieces of wood for the tail surfaces.
At least starting with the fuselagewill give you something that looks likean airplane sooner. Besides, it offersyou the opportunity to sit in it and do alittle advanced planning ... and maybea bit of daydreaming.
TYPES OF FUSELAGESFrom a construction point of view,
wood fuselages may be classified intwo broad categories:
1. The relatively easy-to-build fourlongeron slab sided type. This typecan be streamlined by fairing it withformers and stringers over which acovering of fabric, fiberglass and/orplywood skins may be applied.
2. The second is the more difficultto build semi-monocoque, round oroval, type fuselage where the outerplywood skins carry a major part ofthe stresses. Very few homebuilt de-signs fall into this category. In the U.S.the Falco and a one-of-a-kind Lock-heed Vega replica come to mind.
Of the two construction types, thefour longeron slab sided fuselage de-signs are by far the most numerous,most popular, most economical andthe easiest to build.
Their top longerons are generallylevel with the thrust line making it asimple matter to erect the two simpleflat fuselage sides by jigging them up-side down on a large flat plywoodwork table. It is then a simple matterto cut, fit and gusset the various crossmembers and diagonals.
A semi-monocoque fuselage, on theother hand, has to be built around nu-
74

merous labor-intensive round or ellipti-cal bulkheads cut out of solid plywoodsheet or laminated of 1/8" wood strips.Each of these bulkheads must then bepositioned, aligned accurately andclamped to a separate assembly jig.
Needless to say, a careful levelingand alignment of this type of fuselageis more demanding than the simplecenterline alignment required of a slabsided fuselage.
In either case, it does indeed mattervery much that your fuselage be accu-rately assembled around a well markedcenterline on your work table or in yourassembly jig so you can maintain theproper symmetrical shape and alignmentof the fuselage during construction.
Unless a specific type of jig or workbench is described in the plans, mostbuilders find that a long work bench(28" to 30" tall) surfaced with two4x8x3/4" plywood sheets provides theideal work surface.
Such a bench will probably be muchlonger and wider than absolutely nec-essary to accommodate the fuselagelayout but the extra space all around isa tremendous asset.
it will give you plenty of workspacefor cutting your material and allow youto lay tools, parts and stuff where it canbe handily reached no matter what endof the fuselage you happen to be work-ing on at the time.
BEFORE YOU CUT ITThe experienced builder will always
assure himself that he doesn't ruin anexpensive sheet of plywood by cuttingoff part of it for some small parts ... orfor that matter, inadvertently cuttingshort a long strip of wood that was in-tended to be used as a longeron.Therefore, keep the following in mind:
1. Plywood sheets. Always cut out,label and set aside your roughly cutlarge fuselage skins/bulkheads beforeyou start cutting away smaller piecesfrom those expensive plywood sheets.You will still have plenty of material leftover for gussets, plates and the like.
2. Select your best wood strips forlongerons. Tape them together and setthem aside until needed. This will helpassure that you don't accidentally cutand use the long pieces for other parts.
YOUR WORKING TOOLSYou can get started on your project
using the ordinary hand tools you un-
doubtedly already have on hand.Begin your preconstruction prepara-
tions by cleaning, sharpening andadjusting your cutting tools (knives,chisels, plane blades, etc.). Your blockplane, if you have one, should be keptrazor sharp.
Also, prepare several sandingblocks. These are useful for levelingdried glued joints. One sanding blockshould be long enough to span acrossthe maximum width between the upperand lower longerons of the assembledfuselage sides. A typical sanding block
75

can be made by gluing #80 grit sand-paper to one side of a straight 3/4"board about 3" wide, using contact ce-ment or rubber cement.
A couple of shorter sanding blockswould also be handy to have around.For example, one of the shorter sand-ing blocks could be fitted with a coarsegrade of sandpaper (#35 or #40 grit)for rough leveling of glue joints andsimilar clean-up work.
Often a large (10" or 12") bastard-cut file is more effective in levelingdried glued joints than sandpaper.Sandpaper tends to ride over thebumps and sand away the surroundingareas. A file will not do this. You willfind that your clean-up and leveling ofdried glue drops and lumps may bequicker and easier using a file insteadof sandpaper.
In order of importance and fre-quency of use, I find the followingtools and equipment to be very useful:
1. A 10" bench saw. Building awood fuselage from raw materialsmakes the availability of a bench sawessential for dimensioning your lum-ber to size for the longerons, uprights,diagonals and various filler blocks.Equip your saw with a 10" satin cutblade (combination or trim type) andyou should be able to get nice smoothcuts that will not have to be planed orsanded before gluing. 1 prefer a 10"bench saw . . . not a radial arm saw,because I find that ripping long strips(longerons, etc.) with a radial arm sawis a bit more difficult.
2. A saber saw for rough cutting ofparts from large plywood sheets.
3. A band saw with a metal cuttingblade. You can cut wood, plywood andaluminum on it without any speed re-duction.
4. A large 9-12" disc sanderequipped with a self-adhesive backed#80 grit sanding disk is ideal. How-ever, some builders might prefer abelt/bench sander instead. It all de-pends on what you have and what youare used to using.
5. A drill press.6. A good, 3/8" capacity, electric
drill.7. You should also have an ad-
justable height roller stand to supportlong lengths of wood you may have torip on your bench saw. This is an es-sential aid when working alone.
If your plans have a "Bill of Materi-als," consider yourself fortunate as it
76

will give you a fairly good idea of howmuch plywood and wood you will need. . . and in what sizes. Nevertheless,most materials lists are seldom com-plete and often do not allow for wasteor for miscellaneous extra needs.
Your materials list will, therefore,generally be "short" a few odd sizesand pieces. This is where a bench sawbecomes valuable for custom cuttingextra various odd sized pieces, asneeded, instead of having to order moredimensioned stock for your project.
PREPARING A SLAB SIDEFUSELAGE JIG
Lay out fuselage side dimensionsfull size directly onto the plywoodwork surface using a #2 soft pencil, ora fine point Sharpie pen. Since youwill have to build each of the two sidesin the same jig to ensure exact dupli-cation, your outline blocks should besecurely nailed or screwed to the table.
Use short wood blocks to accu-rately position every upright anddiagonal piece in the side frames. Theblocks of wood should have a slightlysmaller thickness than the longeronsand uprights. This will ensure that anysqueezed out glue will not fuse the air-craft gussets or plywood skins andframes to the jig blocks making the re-moval of the fuselage frame from thejig extremely difficult.
Incidentally, it is better not to locatethe jig blocks exactly at the joint cen-ters, as instinct might tell you to do.Instead, locate the small blocks aboutan inch away from each intersection tosimplify sliding wax paper under thejoint and, later, to allow better accessfor prying the fuselage frame out ofthe jig. This is sometimes difficult todo after the gussets or plywood skinhave been glued in place.
When building each side separately,you must be alert to avoid making two"left sides" or two "right sides." Besure you apply the plywood skin orgussets to the correct side on each ofthe frames. With all the blocking inplace, load the jig by slipping in thelongerons and begin cutting and fit-
77

ting the various uprights and diago-nals. Since you will have to make twoduplicate side frames, why not cut andlabel two identical uprights or diago-nals at the same time for each locationto ensure that both sides will be exactduplicates
A small dovetail saw is ideal to usefor smoothly cutting and fitting thespruce longerons, uprights and diago-nals.
Coat the ends of the uprights anddiagonals with glue as you slip them inpermanently. Although an unrein-forced end grain joint is a rather weakglued joint, the glue film does helpseal the wood and keeps moisture out.The full strength of a wood joint istypically developed by adding gussetsor a plywood skin overlay.
Use the type of glue recommendedin your instructions.
Although rescorcinol glue isassumed to be the superior glue, it isnot. That is, it is not unless the joint isalmost perfect and properly clamped.Furthermore, it is temperature sensi-tive and the wood and surrounding airmust be at least 70° F to yield aneffective joint.
For these reasons, quite a few home-builders prefer to use an epoxyadhesive such as T-88. It toleratesmuch lower working temperatures,doesn't require high clamping pres-sures nor, thanks to its gap fillingqualities, perfect joints.
If a hardwood like ash, birch or oakis specified for a particular blocking or
member, by all means comply with theinstruction. Obviously, additionalstrength must be needed in that partic-ular area to take engine loads, landinggear loads, etc.
On the other hand, do not "rein-force" areas you think may need it. Youcould be wrong . . . unless you canback it up with engineering know-howand experience. All you may be doing
is adding useless weight — and weightdoes accumulate fast if careful controlis not maintained over the sizes andtypes of materials specified in theplans and instructions.
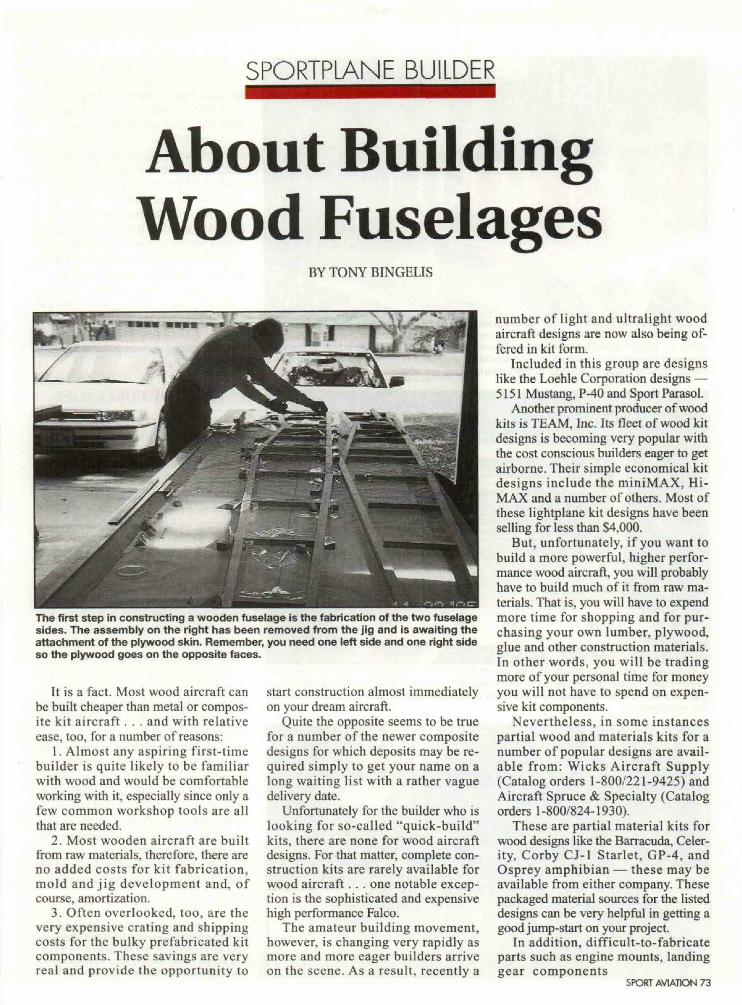
Compare the structures illustrated inthe accompanying photos and you willsee that, although designs vary, thewood construction methods used arequite simple, similar and well proven.^
78