an introduction to layouteditor - layouteditor a versatile...
TRANSCRIPT

An Introduction to LayoutEditor
M. A. Hopcroft

An Introduction to Layout EditorBy M. A. Hopcroft
version 1.0, December 2007Copyright c©2007All rights reserved
On the cover: layout for a CMOS dual seven-segment LED driver designed by the
author, displayed in LayoutEditor.

Introduction
LayoutEditor is a software tool for creating designs for microfabrication, suchas integrated circuits (IC) and micro-electro-mechanical systems (MEMS). Thesoftware was created by Jurgen Thies (jurgenthies at juergenthies dot de) andis an open-source project, distributed under the General Public License (GPL).Development began in 2004, and after three years, it has acheived an outstand-ing level of capability and features that make it suitable for everyday use withsmall to medium size projects. Comparable commercial products, such as L-Editor Cadence Virtuoso, typically cost $1000’s per user. Furthermore, LayoutEdi-tor is the only such tool that can be used on all three major operating systems(Linux, Mac OS X, and Windows).
This document is a beginners tutorial that is intended to help a first-timeuser get started using LayoutEditor. LayoutEditor already includes extensiveHTML-based documentation which is sufficient for an experienced designer whois learning a new tool. Some explanation of basic layout concepts is given inChapter 1, but this tutorial is not a complete introduction to the topic of IC orMEMS design.
About the Document Author
Matthew A. Hopcroft (hopcroft at mems dot stanford dot edu) has been work-ing in IC and MEMS research since 1998. He received the B.Sc. in ComputerEngineering from The George Washington University, in 1998, the M.Phil. de-gree from the Engineering Department, Cambridge University, in 2002, andthe Ph.D. in Mechanical Engineering from Stanford University in 2007. Heis currently a Research Specialist affiliated with the Berkeley MicromechanicalAnalysis and Design group and the Berkeley Sensor and Actuator Center atthe University of California at Berkeley. His research interests include MEMSmaterial property measurements, microscale and portable power systems, andmicromechanical resonators.
iii

iv
About the Software Author
Jurgen Thies (layout at juergenthies dot de) has been working in IC and MEMSresearch since 1995. He received the Dipl.-Ing. Univ. degrees in ElectricalEngineering from the University of Dortmund in 1995. From 1995–1998 he didresearch in the subject of microtechnology at the Leibniz University of Hannover.Since 1998 he has been working on thin film technology in an industrial company.In 2004 he began the programing of the LayoutEditor in his private time. Sincethen, he has continued to develop the LayoutEditor independent of any companyor institution.
Conventions Used in the Text
Several text styles are used to indicate different things in this document.
A menu item File/Save is the Save command on the File menu.A keyboard key <Ctrl> is the Control key on the keyboard.Source code int main () is source code or command line entries.A cell name box1 is the name of a cell.A hyperlink Hyperlinks to other documents are blue.

Contents
1 What is Layout? 11.1 Microfabrication . . . . . . . . . . . . . . . . . . . . . . . . . . . 11.2 Choosing a Drawing Tool . . . . . . . . . . . . . . . . . . . . . . 3
2 Starting LayoutEditor 52.1 Downloading and Installing . . . . . . . . . . . . . . . . . . . . . 52.2 First Look at LayoutEditor . . . . . . . . . . . . . . . . . . . . . 62.3 Assigning Layers . . . . . . . . . . . . . . . . . . . . . . . . . . . 7
3 Drawing and Selecting 93.1 Drawing Simple Shapes . . . . . . . . . . . . . . . . . . . . . . . 93.2 Selecting . . . . . . . . . . . . . . . . . . . . . . . . . . . . . . . . 93.3 Properties . . . . . . . . . . . . . . . . . . . . . . . . . . . . . . . 113.4 Showing and Hiding Layers . . . . . . . . . . . . . . . . . . . . . 113.5 Scrolling and Zooming . . . . . . . . . . . . . . . . . . . . . . . . 123.6 Advanced Drawing . . . . . . . . . . . . . . . . . . . . . . . . . . 12
3.6.1 Boolean Operations . . . . . . . . . . . . . . . . . . . . . 123.6.2 Move to Layer . . . . . . . . . . . . . . . . . . . . . . . . 123.6.3 Moving and Rotating . . . . . . . . . . . . . . . . . . . . 133.6.4 Command Line Operations . . . . . . . . . . . . . . . . . 13
4 Macros 154.1 Macro Programming . . . . . . . . . . . . . . . . . . . . . . . . . 154.2 The Technology Macro . . . . . . . . . . . . . . . . . . . . . . . . 164.3 Keyboard Equivalents . . . . . . . . . . . . . . . . . . . . . . . . 17
5 Hierarchical Design 195.1 What are Cells? . . . . . . . . . . . . . . . . . . . . . . . . . . . . 195.2 Selecting and Viewing Cells . . . . . . . . . . . . . . . . . . . . . 225.3 Creating, Adding, and Deleting Cells . . . . . . . . . . . . . . . . 22
6 Conclusion 25
A Keyboard Command Keys 27
v

vi CONTENTS

Chapter 1
What is Layout?
An explanation of layout begins with microfabrication. The term “microfab-rication” refers to techniques that can simultaneously fabricate large numbersof devices with dimensions on the micron (10-6 m) scale. It is the technologythat is used to make integrated circuits (IC), such as a typical computer mi-croprocessor, which contains millions of individual transistors fabricated in aspace the size of your fingernail. Microfabrication techniques can also be usedto make micro-electro-mechanical systems (MEMS), also called microsystems(MST), which are mechanical devices with micron-scale dimensions. Some well-known MEMS devices are the accelerometers used for activating automobileairbags, or the array of millions of tiny mirrors used in some projectors andtelevisions (the Texas Instruments DMDtm).
The microfabrication technologies used for IC and MEMS fabrication useplanar fabrication techniques which create features (or “patterns”) in two di-mensions in a thin layer of material. The device is built up in a series of thinlayers deposited on top of each other. The successive deposition of layers cre-ates the third dimension. The device design, which consists of the sequence ofpatterns in the thin layers, is drawn as a series of two-dimensional drawingsusing a computer program. The process of creating these drawings is “layout”,and the final result is “the layout”. LayoutEditor (LE) is a software tool forcreating layouts for IC and MEMS fabrication.
1.1 Microfabrication
Microfabrication is based on lithographic pattern transfer. This is illustratedin Figure 1.1. First, a thin layer of a structural material is deposited on asubstrate (a). Next, a photo- sensitive polymer, called photoresist, is depositedon top of the material (b). The photoresist is then exposed to UV light througha photomask (“mask”), which blocks the light in certain areas (c). In theareas where the photoresist is exposed to UV, it undergoes chemical changeswhich make it vulnerable to being dissolved by a developer (d). Now, the
1

2 CHAPTER 1. WHAT IS LAYOUT?
underlying material layer is exposed in areas defined by the mask. When theentire structure is exposed to an etchant, only the exposed areas of the structurallayer are attacked (e). When the remaining photoresist is removed, the originalmaterial layer has been patterned according to the design on the mask (f). Anew material layer can now be deposited on top of the patterned layer. Thiscycle (deposition and pattern transfer) is repeated as many times are necessary.In a modern IC process, there may be as many as 50 layers. Each layer requiresa mask, and the complexity of a microfabrication process is described in thenumber of “mask levels”. In academic MEMS research, 1 or 2 level processesare not uncommon.
Figure 1.1: A thin film layer patterned by lithographic pattern transfer (cross-section).
A microfabricated device is defined by its masks, and the designs for themasks are drawn using a layout tool. The masks are glass plates covered witha thin layer of chrome. When a mask is made, the chrome is patterned usinga lithographic etching process such as shown in Figure 1, except that the pho-toresist is patterned using an electron-beam pattern generator (“e-beam”). Thee-beam can pattern the photoresist very precisely (better than UV exposure),and so the masks are a very close replica of the layout file. E-beam is sometimesused for other microfabrication steps instead of UV exposure, but it is expen-sive and slow, so it is generally only used for devices that require extremely highprecision.

1.2. CHOOSING A DRAWING TOOL 3
1.2 Choosing a Drawing Tool
The layout file for a mask is simply a drawing of the features you want on themask, and so in theory you can use any drawing program you like. The authorhas known people who have used AutoCAD, SolidWorks, Powerpoint, etc., orwritten computer code to generate features directly. In general, if your design isvery simple, almost any drawing tool will do. However, if you need micron-scaleprecision, or have a complex design with a large number of elements, then youwill need a layout tool such as LayoutEditor. Layout software is designed tohandle very large numbers of shapes with very high precision, and can generatethe output files that mask-making equipment understands.
There are two common standard formats for handling layout data: CIF andGDSII. CIF file format (Caltech Intermediate Format) is a human-readable text-based format, which makes it useful for home-grown automatic layout generatorsoftware (its easy to write code that generates a text file). The GDSII file format(Graphic Data System), is often called “GDS” or “binary stream” format. It isa binary file format, which allows for more efficient storage than a text-basedformat. Recently, a new file format has been designed by the SemiconductorEquipment and Materials Institute to replace GDSII. The new format, OASIS(Open Artwork System Interchange Standard), is expected to replace GDS inthe future. LayoutEditor supports all of these file formats natively. The DXFfile format (Drawing Exchange Format), is a proprietary format developed byAutoDesk (makers of AutoCAD). DXF format is supported by many non-layoutCAD programs, and LayoutEditor can import DXF files.
When choosing a drawing program, you will have to consider how you willget your drawing file into CIF or GDSII format (in the future, OASIS) in orderto transmit it to the mask-making service. Many programs support importand export into these formats, but of course every conversion step introducescomplexity and potential for error. LayoutEditor uses GDSII as its standardformat, so there are no conversion issues.
A layout tool must support a certain amount of complexity and workflow fea-tures. For example, if you plan to draw 1000 rectangles with varying dimensionsand spacing, it would be good if your drawing tool had a keyboard commandfor rectangle! Even better if there were keyboard commands for determiningthe dimensions and spacing, and a facility for automatically creating arrays.The use of different drawing layers, hierarchical design, customisable layer ap-pearances, command line input, and so on are all important requirements for alayout tool. Again, for simple designs, any tool will do. But for complex designs,fully-featured tool is a must. LayoutEditor has the features and functionalityfor a complex small to medium size project. Almost any project that any oneindividual would undertake can be handled by LayoutEditor.

4 CHAPTER 1. WHAT IS LAYOUT?
Chapter 2
Starting LayoutEditor
LayoutEditor (LE) is an Open Source project which is distributed for free.Because no one is paid to maintain the software or help you install it, you mayhave to work a little harder to get the software installed than you would if youpaid someone for the software. But do not be intimidated by this! A lot of workhas been put into LE, and for 95% of people, the installation process will beeasy and straightforward. Basically, just download and double-click.
2.1 Downloading and Installing
LE can be downloaded from http://layout.sourceforge.net. LE is available asbinary (i.e., compiled and ready-to-use) packages for Mac OS X, Linux, andWindows. If you download the binary package, you should be able to double-click and start LE like any other program. If this works, you can skip ahead tothe next section. However, for various legal and technical reasons, there is noinstaller program that ensures that your computer has the necessary software(in addition to LE) in order to run, and so LE may not work immediately afterdownload.
LayoutEditor is compiled using three external software libraries: FreeType,Qt, and zlib. You may have to install these libraries on your computer in orderfor LE to run.
Libraries used by LayoutEditorFreeType http://freetype.orgQt http://trolltech.com/products/qtzlib http://www.zlib.net/
Follow the instructions for installing these libraries, and then try LE. Inparticular, the default installation of Mac OS X (10.4) does not include Freetypeor Qt. If you need further assistance after reading the documentation, the LEdiscussion forums (http://sourceforge.net/forum/?group id=121668) are a goodplace to start.
5

6 CHAPTER 2. STARTING LAYOUTEDITOR
The last part of installation is choosing a location for two directories: theDocumentation directory and the Macro directory. Pick some locations that areconvenient for you1 and move the files there (you will specify the location in thenext section). You can open the LE documentation in the web browser of yourchoice, or using the browser included in LE. You may find that you prefer usingyour web browser, because you can set bookmarks and use familiar commands.
A three-button mouse (preferably with clickable scroll wheel) is stronglyrecommended for LE.
2.2 First Look at LayoutEditor
When LayoutEditor starts, the drawing window is opened with the view settingsfrom the previous session (or the factory default settings if opened for the firsttime). The program window looks like Figure 2.1.
Figure 2.1: The main window of LayoutEditor. A simple layout is open.
The toolbar at the top contains buttons which represent the most often usedcommands. On the left is the Layer toolbar, which allow you to see and modifythe status of individual drawing layers. The Mouse Help bar is at lower left.This toolbar changes, depending on the command that is active, to indicate thecommands performed by various mouse actions. At the bottom of the window
1For example, on OS X, /Library/Application Support/layout/

2.3. ASSIGNING LAYERS 7
are status bars that show the coordinates for the location of the cursor, the gridsize, and the numbers of items that are currently selected.
The toolbars can be re-arranged to your preference by dragging them bytheir title bar. They can also float as away from the edge of the window aspalettes. The Mouse Help bar is especially important, as some of the mouseactions in LE may be different than you are used to.
Like most programs, LE has a Preferences window or Setup Dialog, foundin the Utilities menu.2 In this dialog box, categories are listed on the left side.You can set various preferences like background color, measurement units, fileformats, and so on. For the purposes of this introduction, lets leave these set-tings with the default values. If you change some settings and want to returnto the defaults, you can use the command Utilities/Macros/Setup/factory setup.An important setting in the Setup Dialog is the location of the directories forDocumentation and Macros. Specify them in the Installation category.
Exercise 1: Start LEStart LE, and verify the location of the toolbars, mouse help, andstatus bar. Toolbars can be enabled and disabled by right-clicking inthe empty space in the upper toolbar. Toolbars can be re-arrangedby dragging them by their title bar. Next, open the Setup Dialog andchoose the Units category. Observe that the “User Units” are set to10-6 m (1 µm), and the database units are set to 10-9 m (1 nm). Thismeans that your design will be measured in microns, and that thesmallest resolution that can be drawn will be one nanometer. Thesesettings are adequate for most designs, as only specialized equipmentcan support resolutions greater than 1 nm.
The majority of menu commands in LE have keyboard equivalents, whichare shown in the menus. Experienced designers quickly become familiar withthe keyboard shortcuts for commonly used commands. Changing the keyboardequivalents to your preference is discussed in Section 4.3.
When using LE, the <Escape> key always cancels an operation. It alsodismisses any dialog boxes (especially error reporting dialogs) that do not haveany buttons.
2.3 Assigning Layers
The first task before starting a layout is to assign the drawing layers. Eachlayer represents a different mask in your final design. In addition, it is commonpractice to assign other layers to use as drawing elements (such as outline boxesor centering guides). Layers in a GDS file are numbered 0-127. You can alsoassign names to the layers to make them more meaningful. There are no rulesabout the numbering of layers, just pick a numbering scheme that makes senseto you. Typically the layers are numbered in the order that they will be used
2For LE on OS X, the Setup Dialog is the Preferences window, and located on the Appli-cation menu, as usual. All other menu items are the same for all operating systems.

8 CHAPTER 2. STARTING LAYOUTEDITOR
in fabrication. I like to use 50-59 as non-mask drawing elements, and then usemultiples of 5 for the mask layers (5, 10, 15, 20, etc). This way, I can easilyinsert new layers in the correct order if the design changes. Once you havedecided on a layer numbering system, write it down. Then you can disable theunused layers so that it is easy to find the ones you need on the Layer toolbarand in the menu.
The properties for each layer (name, color, fill pattern) can be modified.Choose the layer from the Layer menu, and select Properties on the sub-menu.Or, left-click and hold on the layer in the Layer toolbar and the same sub-menuwill appear.
Exercise 2: Setting up drawing layersStart by disabling all of the layers. Go to the Layer menu, Technology,Disable Layers. In the dialog box, type 0 127 (put a space betweenthe two values). This will disable all the layers between 0 and 127.Now go to the Layers Menu, Technology, Enable Layers. Type 10and press enter. Layer 10 should now appear on the Layer toolbar,and in the Layer menu. Repeat for layers 15 and 50. Now lets uselayer 50 for a drawing elements layer. Go to Layer 50 on the Layermenu. On the sub-menu, choose Properties. In the name box, type”50 - Drawing”. Set the color to be white with no fill. Click ok. Next,click and hold on Layer 10 in the layer toolbar. Choose Propertiesfrom the pop-up menu and set layer 10 to be ”10 - oxide”. Make itblue, with a striped fill. Right-click anywhere in the drawing window.Go to the layer menu on the pop-up menu, and set layer 15 to be”15 - poly”. Make it red, with a dot fill.

Chapter 3
Drawing and Selecting
The basic operations in the LE drawing window involve drawing shapes andthen selecting them in order to manipulate them further.
3.1 Drawing Simple Shapes
Lets begin by drawing some simple shapes. First, choose a layer to draw inby clicking on the appropriate Layer button in the Layer toolbar. This layerbecomes the ”Active Layer”. The drawing commands are in the Draw menu.Choose Box, and note how the Mouse Help toolbar changes to show the currentcommand. Click on the drawing window to define one corner of the box. Movethe mouse and click again to define the opposite corner. The box appears,filled in with the color and shading for the Active Layer. When drawing, the<Shift> key will constrain the mouse to movement to 45 degree increments.Press <Escape> to cancel the box command without completing it.
The same procedure is applied to drawing Paths and Polygons- select thecommand from the menu or toolbar, then draw in the drawing window usingmouse clicks. Use the middle mouse button to finish polygons. Paths, sometimescalled “wires”, are just a long continuous trace with a fixed width. The widthof paths is set in the Setup Dialog. For text, choose the text command, thenclick at the location for the text to be inserted. Enter the desired text in thedialog box that appears. The size of text is set in the Setup Dialog.
There are several options for Drawing circles and curves, and they aregrouped on a different menu: Utilities/Circular Utilities/. Circles are approxi-mated with polygons, and the number of points used is set in the Setup Dialogunder Defaults.
3.2 Selecting
The basic drawing commands are examples of command-first commands,where the command is chosen, and then the location for the result is indicated
9

10 CHAPTER 3. DRAWING AND SELECTING
with the mouse in the drawing window. The opposite type of command is aselect-first command. In a select-first command, items in the drawing windoware selected, and then a command is chosen to be applied to those items. If theresult of the command will be a new shape or feature, then the feature will becreated in the active layer. Therefore, for many operations the first step is tochose the active layer by clicking on the layer button in the Layer toolbar.
Figure 3.1: Selecting shapes by Form. The two rectangles forming a cross at theupper right are selected. The horizontal part of the cross below is highlighted,ready for selection.
Selecting items is an important part of creating layouts, so there is a menuspecifically for selection operations, called Select. The first three commands onthe menu allow you to select by Point, by Form, or by Cell.
• Point Select mode works like the select most people are familiar with- youcan click and drag a box to select points inside the box. You can use thismode to select points (vertices) and edges of shapes.
• Form Select mode is more specific: it only selects whole boxes, polygons, orpaths. For example, choose Select/Form select, and move the mouse nearthe box you drew. Notice how it ”lights up” when the mouse is nearby.Click when the box is highlighted to select it. This is the most commonmethod of selecting objects and likely to be one of your most commonlyused commands.

3.3. PROPERTIES 11
• Cell Select mode only selects cells. Cells are groups of features in yourdrawing. Cells and hierarchical design are discussed in Chapter 5.
An example of shapes selected using Form select is shown in Figure 3.1.Notice how the shape near the mouse is highlighted, ready for selection. Youcan continue to select shapes and add to the current selection by highlightingand clicking. In addition to selecting highlighted shapes, you can select shapesby holding the mouse button and dragging a box. Only shapes completelyenclosed in the box are selected. If you press <Shift> while dragging a box, allshapes with at least one point inside the box are selected.
As you select things, notice that the number of items you have selected isupdated in the Select Indicator toolbar (Figure 3.2). This helps you know ifyou have selected the items of interest.
Figure 3.2: The Select Indicator toolbar (lower right corner of the LE window).Two polygons are selected. The spacing between grid points is 20 µm.
In order to cancel a selection operation, or to deselect all of the currentlyselected features, use Select/Deselect All.
3.3 Properties
An important item on the Draw menu is Properties. Properties is a ”command-first” command, but it uses a kind of hybrid Select mode (Form and Cell) inorder to determine what it acts on. The Properties dialog allows you to changethe properties of a form or cell, such as the location, orientation, size, layer, etc.This can save a lot of tedious mouse work- for example, you can draw a boxapproximately where you want it, and then set the exact location of the box bytyping the coordinates into the Properties dialog.
3.4 Showing and Hiding Layers
When you start drawing, all of the layers are visible by default. However, itis often useful to hide some layers, so that you can more easily work in someother layer. The commands for controlling the visibility of layers are on thesub-menu for each layer on the Layers menu: Show, Hide, Show All, and HideOthers. You can also left-click and hold on the layer in the Layer toolbar andthe same sub-menu will appear.

12 CHAPTER 3. DRAWING AND SELECTING
3.5 Scrolling and Zooming
Your design will likely become larger than your screen, and scrolling and zoom-ing the view window will quickly become important. Scrolling can be accom-plished in two ways: with the arrow keys, or by holding the right mouse buttonand moving the mouse. Both scroll functions are always available, no mat-ter what command is active. Note that there are two ways of thinking aboutscrolling with arrow keys- either moving the ”viewing window” over the drawing,or moving the drawing underneath the view window. You can chose betweenthese options in the Setup Dialog, under View, General, Swap Scroll Direction.
Zooming can always be accomplished with the scroll wheel if your mouse hasone. More zoom commands are on the Zoom menu. Zoom/Zoom is a command-first command- choose Zoom/Zoom, then click and drag to define a box for thenew zoom. Zoom Full sets the view to include all of the elements in the window.Zoom Select sets the view to include all of the items that are selected.
Notice that as you change the zoom, the grid points in the drawing windowchange. This is the Grid/Auto command, and Auto is the default setting. Thespacing between grid points is shown in the Status bar (Figure 3.2). You canchange the grid spacing manually using the other commands on the Grid menu.
3.6 Advanced Drawing
Boxes and Paths are fine, but eventually you will have to draw some morecomplex shapes.
3.6.1 Boolean Operations
Boolean operations are important part of any complex drawing, and LE canhandle a variety of complex boolean operations on rectangles and polygons.The Boolean operators are found in Utilities/Boolean Tools. The Boolean Toolsare select-first commands. First, decide which layer the result of the operationshould be created in, and make that layer the active layer by clicking on it inthe Layer toolbar. Next, chose Select/Form select and select the first feature toact on. Identify this selection as Part A using the command Utilities/BooleanTools/Set A. Note that the selection you made becomes deselected. Next, selectthe feature for Part B, and identify it using Utilities/Boolean Tools/Set B. Again,the selected features are deselected. Now, chose a boolean operation from theBoolean Tools menu: Join (A + B), Union (A * B), Difference (A − B or B −A), or Exclusive Or (A xor B). The result is created as a polygon on the activelayer, selected and ready for further manipulation.
3.6.2 Move to Layer
Often a shape or feature needs to be repeated on several layers, or layer numberschange as the design evolves. You can change the layer for individual shapes

3.6. ADVANCED DRAWING 13
using the Draw/Properties. However, for a large number of shapes, there is aretwo specific commands: Draw/Change Layer/Move to Layer and Draw/ChangeLayer/Copy to Layer. These are select-first commands: first, chose the layer thatthe features will move to, and make that the active layer by clicking on it in theLayer toolbar. Next, select the features you want to move.
3.6.3 Moving and Rotating
Moving objects is a relatively common operation. Moves, on the menu Draw/Move/,are select-first commands. Select the object to move, then use Draw/Move/Moveto specify the amount and direction with two mouse clicks in the drawing win-dow. Draw/Move/Move By allows you to enter the distance to move in X andY. Draw/Move/Move X and Move Y use subsequent mouse clicks to define themove, but move only in the X or Y direction.
Draw/Move/Move Point is a command-first command that modifies an ex-isting shape by moving only a corner. Chose the command, and then click toselect the point (the select mode will be select the corners of forms). If youmove the corner of a box, the aspect ratio is maintained, but if you move thecorner of a polygon, the shape is deformed.
Alternatively, the coordinate location of the corners of a box or polygon canbe accessed from the Draw/Properties dialog, and so moving can be accomplishedby entering new values here.
Rotating is accomplished with Draw/Rotate. Click to define a center pointfor the rotation, then enter the degrees of rotation.
3.6.4 Command Line Operations
All of the drawing capabilities of LE can be accessed through a command-lineinterface. This can increase your design efficiency enormously by reducing mouseusage and placing features exactly where you want them. The command line isa toolbar which is off by default. To enable it, right-click in the empty spacearound the toolbars and select Command Line from the pop-up menu. Once thecommand line is enabled, press <Tab> at any time to switch the focus to it.
The command line syntax is a simplified version of the macro syntax, dis-cussed in the next chapter. Bascially, it is like C without any braces, commas, orsemicolons (each command is only one line). Each action will typically requireseveral commands, entered one after the other. For example, in order to drawa box, you first specify one point for a corner:
p(10,10)
and then another point for the opposite corner
p(20,20)
and then give the “box” command,
box

14 CHAPTER 3. DRAWING AND SELECTING
and the box appears, drawn in the active layer. For a circle (circle), the twopoints specify the center and the radius. You can essentially do all of the drawingcommands, substituting p (point) commands for mouse clicks. You can alsomove points after they have been created, or create points relative to previousones, which cannot be done with a mouse. The drawing commands available tothe command line are listed in the LE documentation in class drawingField.

Chapter 4
Macros
Macros are an important part of LE’s functionality, although the beginning LEuser can get quite far without worrying about them. Macros are basically smallprograms written in a C++ -style syntax that LE understands. In fact, someof the menu commands discussed already, such as Enable Layers or factory setupare macros. Macros are simply ASCII text files with the extension “.layout”.
4.1 Macro Programming
Macros provide programming access to all of the functionality of LE. As youcan imagine, this allows you to implement almost limitless custom operations.For example, you could write a macro to find all boxes greater than a certainwidth and change their layer, or to create a certain kind of structure that isscaled depending on a parameter that the user enters.
The macro commands are accessed through the Utilities/Macros menu. Youcan record a sequence of actions as a macro, or you can write your own us-ing your favorite text editor. Advanced macro programming requires someexperience with C or C++, but a beginner can get pretty far by recordingmacros and then editing the result, and by looking at the examples in the Util-ities/Macros/Samples menu. The LE documentation lists the macro commands(classes) that are available.
Macro programming uses C++ -style syntax. Macros must begin with threelines and contain a main function:
#!/usr/bin/layout#name=your_macro_name#help=help_for_your_macro
int main() {...}
15

16 CHAPTER 4. MACROS
The #name value is the name that appears in the Macro menu. Standardvariable types int, double, bool, and void are allowed. There are also specialtypes string, point, and pointArray. Pointers are allowed. Flow controlstatements such as for, while, and if are allowed, but switch and enum are not.See the LE documentation and the sample macros (Utilities/Macros/Samples) formore information. When troubleshooting macros, the <Escape> key closes theerror window.
4.2 The Technology Macro
The most common macro is the “Technology Macro”. This is a macro thatcontains the commands to set up the layers in the way that you want to seethem.1 For example, the Technology Macro for the layer setup from Exercise 2would look like:
#!/usr/bin/layout#name=technology file: tech.layout#help=technology file automatically generated
int main() {
layers::enableAllLayer();layers::num[1].disable();layers::num[2].disable();layers::num[3].disable();layers::num[4].disable();layers::num[5].disable();layers::num[6].disable();layers::num[7].disable();layers::num[8].disable();layers::num[9].disable();layers::num[10].name="10 - oxide";layers::num[10].setStyle(11);layers::num[10].setColor(220,111,16);layers::num[11].disable();layers::num[12].disable();layers::num[13].disable();layers::num[14].disable();layers::num[15].name="15 - Poly";layers::num[15].setStyle(29);layers::num[15].setColor(194,26,172);....
}
1This is analogous to the Setup File in L-Edit or the Technology File in Cadence.

4.3. KEYBOARD EQUIVALENTS 17
You can generate a Technology Macro using the command Layers/Technology/Generate Technology Macro. Technology Macros become important when you areworking on more than one design, or viewing someone else’s design. When yousend a GDS file to someone else, you should also send a Technology Macro sothat they can view the design in the same way that you see it. In order to load aTechnology Macro, simply execute the macro by using Utilities/Macros/ExecuteMacro.
4.3 Keyboard Equivalents
Using the keyboard equivalents for LE commands (“keyboard shortcuts”) isan important part of working efficiently. Many people have strong preferencesabout which keys should be used for which sort of command. You can customizeyour keyboard shortcuts by creating a sort of “key preferences macro”:
#!/usr/bin/layout#name=My Personal Preferences: key_pref.layout#help=Settings for user MH
int main(){
bool b;// Note: If a key is already in use,// change it or blank it before assigning new key// For example, Use Z for zooming, Cadence-styleb=layout->setShortcut("&Remove Small Edges","");b=layout->setShortcut("&Zoom Mouse","Z");b=layout->setShortcut("&Zoom Out","Shift+Z");
}
When changing keyboard shortcuts, preface every command with a &, andspell it exactly as shown in the LE menus, including punctuation (e.g., “&Attach...”).For modifier keys, use the following spellings:
ShiftCtrlAltHomeEndPgUpPgDownInsSpaceDelBackspace

18 CHAPTER 4. MACROS
See Appendix A for a list of default keyboard equivalents.
Chapter 5
Hierarchical Design
Hierarchical design is an important feature of complex designs. Many studentor beginner layouts are simple enough that the design can be completed withoutusing hierarchical design, but I urge you to learn it and use it, even for simpledesigns, as you will certainly it as your designs increase in complexity. Moreover,all layout tools, including LE, are based on hierarchical design, so you need tounderstand the basics in order to use the software effectively.
5.1 What are Cells?
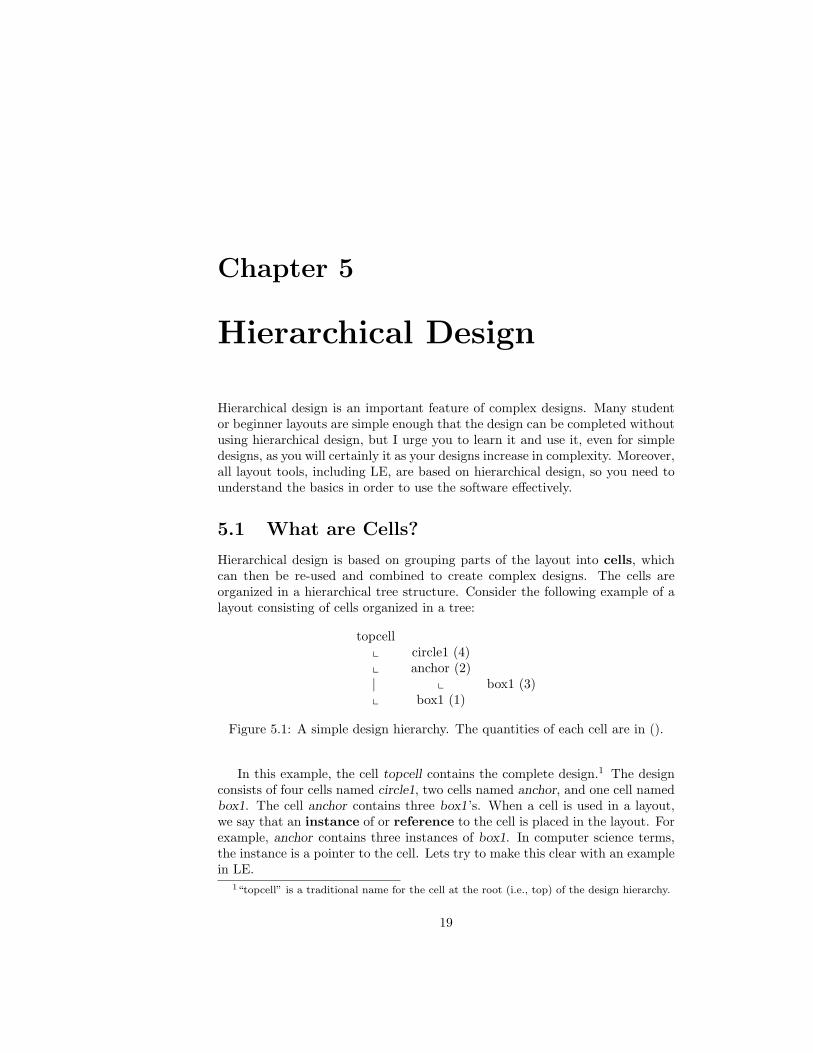
Hierarchical design is based on grouping parts of the layout into cells, whichcan then be re-used and combined to create complex designs. The cells areorganized in a hierarchical tree structure. Consider the following example of alayout consisting of cells organized in a tree:
topcellx circle1 (4)x anchor (2)| x box1 (3)x box1 (1)
Figure 5.1: A simple design hierarchy. The quantities of each cell are in ().
In this example, the cell topcell contains the complete design.1 The designconsists of four cells named circle1, two cells named anchor, and one cell namedbox1. The cell anchor contains three box1’s. When a cell is used in a layout,we say that an instance of or reference to the cell is placed in the layout. Forexample, anchor contains three instances of box1. In computer science terms,the instance is a pointer to the cell. Lets try to make this clear with an examplein LE.
1“topcell” is a traditional name for the cell at the root (i.e., top) of the design hierarchy.
19

20 CHAPTER 5. HIERARCHICAL DESIGN
Start LE with a new file open. Notice that the drop-down menu in thecenter of the toolbars says noname. This is the name of the cell that you areviewing, referred to as the current cell. Draw two boxes in different layers, oneinside the other (something like Figure 5.2). Rename this cell to “box1”, usingCell/Cellname.
Figure 5.2: The cell box1.
Now create another new cell and rename it anchor. Now, the anchor consistsof some boxes. We want to add a reference to the cell box1 in anchor. From theDraw menu, choose Cellref. From the dialog, choose box1. Click in the drawingto place the cell. You can also place arrays of cells using Draw/Cellrefarray.Choose Draw/Cellrefarray and choose box1 again. Now, click in the drawingto indicate the beginning of the array, and click again to indicate the spacingbetween cells in the array (the distance between the first and second clicksdefines the array spacing). Now, you will see two dialog boxes asking for thenumber of elements in the array in the X and Y directions. Chose 2 in X and 1in Y. Your view should look similar to Figure 5.3.
Now, go to the drop-down menu in the Cell toolbar and select box1, makingit the current cell. Add a third box to the drawing (Figure 5.4). Return to thecell anchor using the drop-down menu. Notice that all of the instances of box1reflect the changes that were made (Figure 5.5).
Now we have created the anchor and box1 cells, with a part of the hierarchyshown in Figure 5.1. You can view the hierarchy for your design in LE usingthe command Cell/Select Cell (list) (this view does not show the quantity of cellreferences, just the tree structure). Use the arrow to expand each cell to see thecells it references.
At first glance, cells might seem like an elaborate version of copy & paste.However, the use of cells allows for more powerful operations. For example,you might be designing several devices on a mask which use a common ground

5.1. WHAT ARE CELLS? 21
Figure 5.3: The cell anchor, with three instances of box1.
Figure 5.4: The cell box1, after adding another rectangle.
pad. If you find out that the size of the ground pad has changed, you cansimply update the ground pad cell, and all of your designs will be automaticallyupdated. You can also share common cells between members of a design team,and easily keep them all updated. There are also significant memory usage andcomputer performance advantages for layouts that use cells over layouts thatdraw every feature as a new shape (a “flat” design).
The cell hierarchy clearly has advantages for layouts with large amounts ofrepeated features. However, even in designs with smaller amounts of repetition,cells can be useful. Anytime you draw more than one copy of a feature, or

22 CHAPTER 5. HIERARCHICAL DESIGN
Figure 5.5: The cell anchor, after modifying box1.
repeat a feature with common parts, consider using cells to make your designeasier to manage.
5.2 Selecting and Viewing Cells
Cells can be selected for commands using Select/Cell select. In this mode, thecomplete cell nearest the cursor will be highlighted, as shown in Figure 5.6.Note that cell arrays are selected as a single item. Cells also have a Propertiesdialog.
You can change the current cell (the cell you are viewing in the drawingwindow) using the drop-down menu on the Cell toolbar. If you want to edita cell that is visible in the current view of a different cell, use the commandCell/Select Cell (graphical). Then click on the cell of interest (you will be inCell select mode) and it will become the main view. You can also choose a cellto view/edit from the list generated by Cell/Select Cell (list).
5.3 Creating, Adding, and Deleting Cells
Cells can be created in three ways.
• You can create a blank new cell with Cell/New Cell. The cell is namednoname, and you can rename it using Cell/Cellname.
• Any collection of existing shapes can be “grouped” into a cell using Cell/Group.This is a select-first command. After the command is chosen, the selectedshapes will become the cell noname 1. Use Cell/Cellname to rename thecell.

5.3. CREATING, ADDING, AND DELETING CELLS 23
Figure 5.6: Using Cell select mode. A single cell is highlighted.
• You can create a copy of the current cell using Utilities/Global Tools/Copy Cur-rent Cell. The new cell is named [cellname] copy.
Cells can be imported from a separate file using the command File/Attach.All of the cells in the selected file will be added to the open file.
Instances of cells are deleted from a drawing using Cell/Delete Cell. This is aselect-first command; select the cell, then choose the delete command. There isno menu command to delete individual cells from a design file, but the commandUtilities/Global Tools/Strip Unneeded will remove all cells from the file that arenot instanced in the current cell. Make your top cell the current cell beforeusing this command.
Instances of cells in a drawing can also be converted to shapes. This is called“flattening” a cell. The commands Cell/Cell Flat and Cell/Cell Flat Multilevel areselect-first commands. Cell/Cell Flat flattens the selected cells, but does notflatten cells referenced inside of those cells. Use Cell/Cell Flat Multilevel toflatten a cell and all the cells inside it.

24 CHAPTER 5. HIERARCHICAL DESIGN

Chapter 6
Conclusion
This tutorial has covered the essentials of using LayoutEditor for layout design.With the topics covered here, you should be able to complete simple layoutsand create files suitable for mask fabrication. You can:
• Start LE and set up the layers according to your needs;
• Draw basic shapes and combine them into more complex shapes usingBoolean, Rotation, and Move operations;
• Organize your design in a hierarchical fashion in order to use and sharecommon cells and handle duplication efficiently.
Some of the advanced programming features (command line and macros)have been introduced. LE also includes many more advanced features, such as3D rendering and design rule checking, that have not been discussed here. Moreinformation is available in the LE documentation (Help/Help and Help/WhatsThis?), and you can always discuss LE in the Sourceforge discussion forums.
25

26 CHAPTER 6. CONCLUSION

Appendix A
Keyboard Command Keys
The default keyboard equivalents for LE commands are given in the followingtable (only commands with default keyboard shortcuts are shown). Changingthese settings is discussed in Chapter 4.
27

28 APPENDIX A. KEYBOARD COMMAND KEYS
LayoutEditor Keyboard Command EquivalentsBy Menu By Key
Menu Command Key Command KeyFile New N Scale 0
Open... O Size Adjust 1Attach... I Bezier 2nd 2Update... U Bezier 3rd 3Save S A+B 5Save As... <Shift> + S A*B 6Screenshot... <Shift> + <Print> A-B 7Print... <Print> B-A 8
Select Point select <Ins> AxorB 9Form select <Home> Zoom Out -Cell select <PgUp> Select All ’Point deselect <Del> Area ”Form deselect <End> Down ↓Cell deselect <PgDown> Left ←Select All ’ Right →Select Visible <Space> Up ↑Deselect All <Backspace> Screenshot <Shift> + <Print>
Zoom Left ← Grid Coarser <Right → Grid Finer >Up ↑ Set A (Down ↓ Set B )Zoom Mouse * Zoom Mouse *Zoom In + Ruler ,Zoom Out - Zoom Fit /Zoom Fit / Show Grid ;Zoom 1:1 % Delete Cell \
Grid Select Grid G Round Elements #Grid Finer > Zoom 1:1 %Grid Coarser < Deselect All <Backspace>Grid Automatic = Point deselect <Del>Show Grid ; Form deselect <End>
Cell Select Cell (list) F3 Form select <Home>Cellname F4 Point select <Ins>New Cell F5 Cell deselect <PgDown>Delete Cell \ Cell select <PgUp>Cell Flat F9 Print <Print>Group F8 Select Visible <Space>Undo F6 Zoom In +Redo F7 Grid Automatic =

29
LayoutEditor Keyboard Command EquivalentsBy Menu By Key
Menu Command Key Command KeyDraw Path L Help F1
Box B Whats This? <Shift> + F1Polygon P Select Cell (list) F3Cell R Cellname F4Cellarray A New Cell F5Text T Undo F6Copy C Redo F7Move M Group F8Move By <Shift> + M Cell Flat F9Rotate <Shift> + R Update Macros F11Mirror X Cellarray AMove to Layer W Box BCopy to Layer Y Copy CMerge V Delete DCut Q Circle EDelete D Sector FProperties <Shift> + P Select Grid G
Utilities Remove Small Edges Z Polygon Arc HRound Elements # Attach... IScale 0 Arc JSize Adjust 1 Spiral KSet A ( Path LSet B ) Move MA+B 5 Move By <Shift> + MA*B 6 New NA-B 7 Open... OB-A 8 Polygon PAxorB 9 Properties <Shift> + PCircle E Cut QSector F Cell RPolygon Arc H Rotate <Shift> + RArc J Save SSpiral K Save As... <Shift> + SBezier 2nd 2 Text TBezier 3rd 3 Update Cells... URuler , Merge VArea ” Move to Layer WUpdate Macros F11 Mirror X
Help Help F1 Copy to Layer YWhats This? <Shift> + F1 Remove Small Edges Z