alenti - arjo.com
TRANSCRIPT

Alenti
04.CD.05_18EN • 05/2019
INSTRUCTIONS FOR USE
Design Policy and Copyright® and ™ are trademarks belonging to the Arjo group of companies.© Arjo 2019.As our policy is one of continuous improvement, we reserve the right to modify designs withoutprior notice. The content of this publication may not be copied either whole or in part without theconsent of Arjo.
WARNINGTo avoid injury, always read this Instructions for Use and accompanied documents before using the product.
Mandatory to read the Instructions for Use

3
Foreword ...................................................................................4Intended Use .............................................................................5Safety Instructions .....................................................................6Preparations ..............................................................................7Part Designations ......................................................................8Product Description/Function ..................................................10
Control Panel .......................................................................10Hand Control .......................................................................10Positioning Handle, Transfer Handles, Hand Rest and Handle Arms ........................................................................11Central Brakes .....................................................................11Backrest ...............................................................................11Emergency Stop ..................................................................12Automatic Safety Stop .........................................................12Emergency High/Low ..........................................................12Battery Charger ...................................................................12
Accessory Description .............................................................13Scale (optional) ....................................................................13Bedpan and Bedpan Holder (optional) ................................13Leg Support (optional) .........................................................14
Safety Belt ...............................................................................15Transfer the Patient .................................................................18
From a Standing Position ....................................................18To a Standing Position ........................................................19From a Standing and Raising Aid ........................................20To a Standing and Raising Aid ............................................21From Wheelchair .................................................................22To Wheelchair .....................................................................23To the Toilet .........................................................................24From Bed - Sitting ................................................................24To Bed - Sitting ....................................................................26From Bed - Laying Down .....................................................26To Bed - Laying Down .........................................................28
Bathe the Patient .....................................................................30To Bath ................................................................................30From Bath ............................................................................32
Cleaning and Disinfection Instructions ....................................34Battery Instructions ................................................................. 37Care and Preventative Maintenance .......................................38Troubleshooting ......................................................................42Alarms .....................................................................................43Technical Specifications ..........................................................44Dimensions .............................................................................46List of Standards and Certificates ...........................................47Labels on the Alenti Lift ...........................................................48Electromagnetic Compatibility .................................................50Parts and Accessories ............................................................52
Contents

4
Foreword
Thank you for purchasing Arjo equipment.Your Alenti® lift and hygiene chair is part of a series of quality products designed especially for hospitals, nursing homes and other health care use.
We are dedicated to serving your needs and providing the best products available along with training that will bring your staff maximum benefit from every Arjo product.
Please contact us if you have any questions about the operation or maintenance of your Arjo equipment.
Please read this Instructions for Use thoroughly!Please read this Instructions for Use (IFU) in its entirety before using your Alenti lift and hygiene chair. Information in the IFU is crucial to the proper operation and maintenance of the equipment and will help protect your product and make sure that equipment performs to your satisfaction. Some of the information in this IFU is important for your safety and must be read and understood to help prevent possible injury.
Unauthorized modifications on any Arjo equipment may affect its safety. Arjo will not be held responsible for any accidents, incidents or lack of performance that occur as a result of any unauthorized modification to its products.
Report Unexpected Operations or EventsContact your local Arjo representative if any unexpected operations or events occur. The contact information appear on the last page of this IFU.
Serious incidentIf a serious incident occurs in relation to this medical device, affecting the user, or the patient then the user or patient should report the serious incident to the medical device manufacturer or the distributor. In the European Union, the user should also report the serious incident to the Competent Authority in the member state where they are located.
Service and SupportA service routine must be performed on your Alenti liftevery year by Arjo qualified personnel to make sure the safety and daily operation of your product. See section Care and Preventative Maintenance on page 38.
If you require further information, please contact your local Arjo representative who can offer comprehensive support and service programs to maximize the long term safety, reliability and value of the product.
Contact your local Arjo representative for replacement parts. Your service representative stocks the parts you will need. The telephone number appears on the last page of this Instructions for Use (IFU).
Complementary InformationA set of Quick Guides/Posters accompanies this IFU.
Please note that the Quick Guides/Posters do not replace the information in this IFU. The IFU contains additional important safety instructions.
Definitions in this IFU:
Means:Safety warning. Failure to understand and obey this warning may result in injury to you or to others.
Means:Failure to follow these instructions may cause damage to all or parts of the system.
Means:This is important information for the correct use of this system or equipment.
Means:The name and address of the manufacturer.
WARNING
CAUTION
NOTE
5
Intended Use
This equipment must be used in accordance with these safety instructions. Anyone using the equipment must also have read and understood the instructions in thisInstructions for Use (IFU).If there is anything you are not sure about, contact your Arjo representative.
This equipment is intended for lifting and transporting residents to and from a bathroom in a care facility and to assist with the bathing process. Alenti must be used by appropriately trained caregivers with adequate knowledge of the care environment, its common practices and procedures, and in accordance with the guidelines in the Instructions for Use (IFU)
Resident AssessmentWe recommend that facilities establish regular assessment routines. Caregivers should assess each resident according to the following criteria prior to use:
• The resident’s weight should not exceed the Safe Working Load of 182 kg / 400 lbs.
• The resident should be active or semi-active (i.e. able to sit upright self-supporting on the side of a bed or toilet).
• The resident should understand and respond to instructions to stay seated in an upright position.
If a resident does not meet these criteria an alternative lift and hygiene chair shall be used.
Lifetime of EquipmentThe equipment must only be used for the purposes stated above.
The lifetime of this equipment is ten (10) years and the service life of the safety belt is two (2) years. Depending on the storage of the battery, the use frequency and the charging intervals, the service life of the battery is 2-5 years.
The lifetime and service life are as stated providing that the preventative maintenance are being carried out in accordance with the instructions for care and maintenance in this IFU.
Depending on level of wear some equipment parts such as castors and hand control may need to be replaced during the equipment’s lifetime according to information in the IFU.
6
Safety Instructions
WARNINGTo avoid the device in use from tipping, do not raise or lower other equipment close to it and be aware of stationary object when lowering.
WARNINGTo avoid the device from tipping and the patient from falling, do not use the equipment on floor with recessed drains, holes or slopes exceeding a ratio of 1:50 (1.15°).
WARNINGTo avoid the patient from falling, always make sure that the device is in the lowest possible position before attempting to transfer, dress or undress the patient.
WARNINGTo avoid explosion or fire, never use the equipment in oxygen rich environment, in presence of heat source or flammable anaesthetic gases.
WARNINGTo avoid entrapment, make sure to keep the patients hair, arms and feet close to the body and use designated grab supports during any movement.
WARNINGTo avoid injury, make sure that the patient is not left unattended at any time.

7
Preparations
Actions Before First Use (9 steps)1 Make sure to check the Alenti lift for transport
damages.
2 Check that all parts of the product are supplied. Compare with the Parts Designation list in this IFU. If any part is missing or damaged - DO NOT use the product.
3 Read the IFU.
4 Unpack the battery charger and install it according to the Battery Charger IFU.
5 Perform a functionality test according to section Care and Preventative Maintenance on page 38.
6 Disinfect the product according to section Cleaning and Disinfection Instructions on page 34.
7 Find a dry area with good ventilation for storing the Alenti lift.
8 Choose a designated area where the IFU should be kept and is easily accessible at all times.
9 Make sure to have set up routines for assistance and rescue in case of a patient emergency.
NOTEIf you have any questions, please contact your local Arjo representative for support and service. The contact numbers appear on the last page of this IFU.
Actions Before Every Use (4 steps)1 Check that all parts are in place. Compare with the
Parts Designation list in this IFU.
2 If any part is missing or damaged - do NOT use the product.
4 Make sure the battery is charged.
The Alenti Lift DirectionsThe driving direction during transfer is according to the illustration below.
The directions right, left, front and back in this IFU are given below.
3 WARNINGTo prevent cross-contamination, always follow the disinfection instructions in this IFU.
Right
Left
Back
Front

8
1 Positioning handle
2 Hand control
3 Lift pillar
4 Hand rest - handle arm
5 Backrest - handle arm
6 Hand rest
7 Backrest
8 Transfer handles
9 Safety belt
10 Seat
11 Central Brakes
12 Scale (optional)
13 Control panel
14 Emergency High/Low
15 Battery release button (Emergency stop)
16 Battery
17 Bedpan (optional)
18 Bedpan holder handle (optional)
19 Bedpan holder (optional)
20 Leg support bar with straps (optional)
Applied part: Type B. (seat including all attached parts to it)
Protection against electric shock in accordance with IEC 60601-1.
Part Designations

9
8
11
2
1
3
10
12
9
13
14
15
16
17
19
2018
754 6
20

10
Control PanelThe control panel has four control buttons. (See Fig. 1)
• Press the Raise button (up arrow) to raise the Alenti lift.
• Press the Lower button (down arrow) to lower the Alenti lift.
• Press the Brake button (dark red button with a P) to activate the brakes. A flashing LED light indicates when the brakes are active. The LED light will later turn itself off.
• Press the Brake Release button (green brake symbol) to release the brakes.
Hand Control The hand control has an integrated hook which makes it easy to attach to various parts of the Alenti lift. (See Fig. 2)
• Unhook the hand control and hold it in your hand.
• Press the Raise button (up arrow) on the hand control in order to raise the Alenti lift.
• Press the Lower button (down arrow) on the hand control in order to lower the Alenti lift.
• Press the Brake button (dark red button with a P) to activate the brakes.A flashing LED light indicates when the brakes are active. The LED light will later turn itself off.
• Press the Brake Release button (green brake symbol) to release the brakes.
Fig. 1
Raise Lower
Brake Brake Release
LED Light
Button Button
ButtonButton
Fig. 2
Lower Button
Raise Button
Brake Button
Brake Release
LED Light
Button
Product Description/Function

11
Positioning Handle, Transfer Handles, Hand Rest and Handle Arms (See Fig. 1)
• Use the positioning handle for positioning the Alenti liftnear a bath or bed.
• Use the transfer handles during transfer.
• The hand rest is for the patient to hold on to with his or her hands. The hand rest is also used as an attachment for the backrest.
• The handle arms can be folded backwards during stationary transfers and during bath.
Central BrakesThe brakes are two cylinders, placed under the chassis, operated from the control panel or the hand control.
The brake action is achieved when the cylinders descend and make contact with the floor.
Backrest• The backrest can be attached on both hand rests.
• Attach the backrest by pressing it down on the hand rest (A).(See Fig. 2)
• Remove the backrest by pulling it upwards (B). (See Fig. 2)
Before placing the patient in the Alenti lift:
• Choose from which side of the bathtub the Alenti lift will be positioned.
• If the Alenti lift will be positioned on the left side of the bathtub, place the backrest on the left hand rest.
If the Alenti lift will be positioned on the right side of the bathtub, place the backrest on the right hand rest.
Fig. 1
Transferhandles
Positioninghandle
Hand rest
Foldable handle arms
Fig. 2
A
B
12
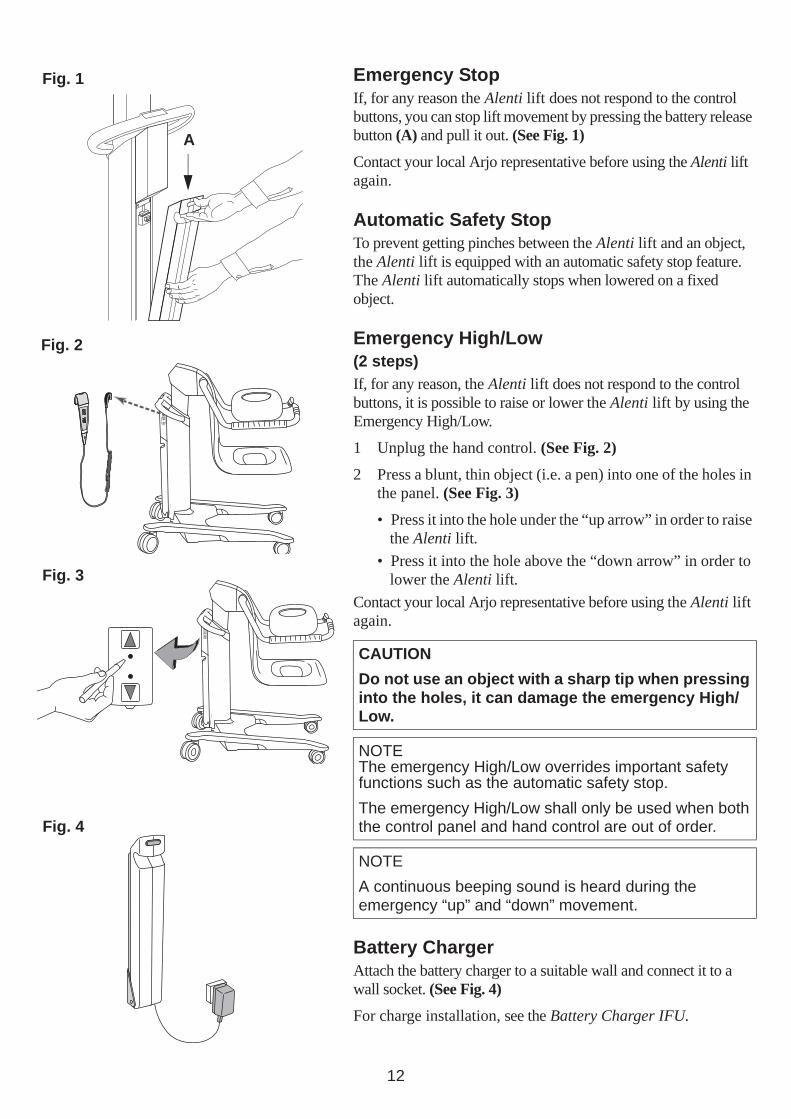
Emergency Stop If, for any reason the Alenti lift does not respond to the control buttons, you can stop lift movement by pressing the battery release button (A) and pull it out. (See Fig. 1)
Contact your local Arjo representative before using the Alenti liftagain.
Automatic Safety StopTo prevent getting pinches between the Alenti lift and an object, the Alenti lift is equipped with an automatic safety stop feature. The Alenti lift automatically stops when lowered on a fixed object.
Emergency High/Low (2 steps)If, for any reason, the Alenti lift does not respond to the control buttons, it is possible to raise or lower the Alenti lift by using the Emergency High/Low.
1 Unplug the hand control. (See Fig. 2)
2 Press a blunt, thin object (i.e. a pen) into one of the holes in the panel. (See Fig. 3)• Press it into the hole under the “up arrow” in order to raise
the Alenti lift.• Press it into the hole above the “down arrow” in order to
lower the Alenti lift.Contact your local Arjo representative before using the Alenti liftagain.
Battery ChargerAttach the battery charger to a suitable wall and connect it to a wall socket. (See Fig. 4)For charge installation, see the Battery Charger IFU.
CAUTIONDo not use an object with a sharp tip when pressing into the holes, it can damage the emergency High/Low.
NOTEThe emergency High/Low overrides important safety functions such as the automatic safety stop. The emergency High/Low shall only be used when both the control panel and hand control are out of order.
NOTEA continuous beeping sound is heard during the emergency “up” and “down” movement.
Fig. 1
A
Fig. 2
Fig. 3
Fig. 4

13
Scale (optional)The scale is located on the Alenti lift pillar. (See Fig. 1)
To use the scale, if available, refer to the Scale IFU.
Bedpan and Bedpan Holder (optional)(3 steps)
1 Fit the bedpan into the holder.(See Fig. 2)
2 The bedpan holder fits onto the back of the seat of the Alentilift. (See Fig. 3)
3 Fold up the bedpan holder handle in to a locked position. (See Fig. 4)
WARNINGTo avoid entrapment or pinching of genitals, make sure there is enough clearance during movement over the bathtub edge, toilet, bedpan or other furniture.
Fig. 1
Fig. 2
Fig. 3
Fig. 4
Accessory Description

14
Leg Support (optional)The leg support assists caregivers when providing foot care to a patient seated in the Alenti lift.
• Attach the leg support to the hand rest and the bar between the patient's legs, against the flat rim under the seat (A).(See Fig. 1)
• Thread the straps plastic fasteners onto the bar according to the illustration. (See Fig. 2)
• All foot care provided to a patient sitting at the Alenti lift, must be performed with the Alenti lift in a lowered position.
• To avoid back strain, we recommend that the caregiver sits down while performing the foot care. (See Fig. 3)
• The height of the legs can be adjusted by using a series of holes in the straps attached to the leg support bar.
When adjusting the straps make sure that:
• the patient’s legs are in an ergonomic height for the sitting caregiver and
• the patient is comfortable.
Fig. 1
A
Fig. 2
Fig. 3

15
Safety Belt (14 steps)Use the safety belt at all times. Exceptions can be made while patient is securely positioned in the bathtub and during stationary transfers to and from the Alenti lift.
The safety belt helps the patient stay positioned properly on the seat.
Always inspect the safety belt before use, to make sure it is in good condition, without any loose threads, tears or other defects.
Always attach the safety belt before the patient is seated in the Alenti lift.
1 Attach the backrest by pressing it down on the hand rest (A). (See Fig. 1)
2 Turn the safety belt stop plate (B) so it gets entirely in contact with the safety belt. (See Fig. 2)
3 Insert the safety belt end through the hole in the seat. (See Fig. 3)
4 The safety belt stop plate (B) will self look at the back of the seat, preventing the safety belt from coming loose from the seat. (See Fig. 4)
Continue with the steps on the next page.
Fig. 1
A
Fig. 2
B
B
Fig. 3
Fig. 4
B
Safety Belt
16
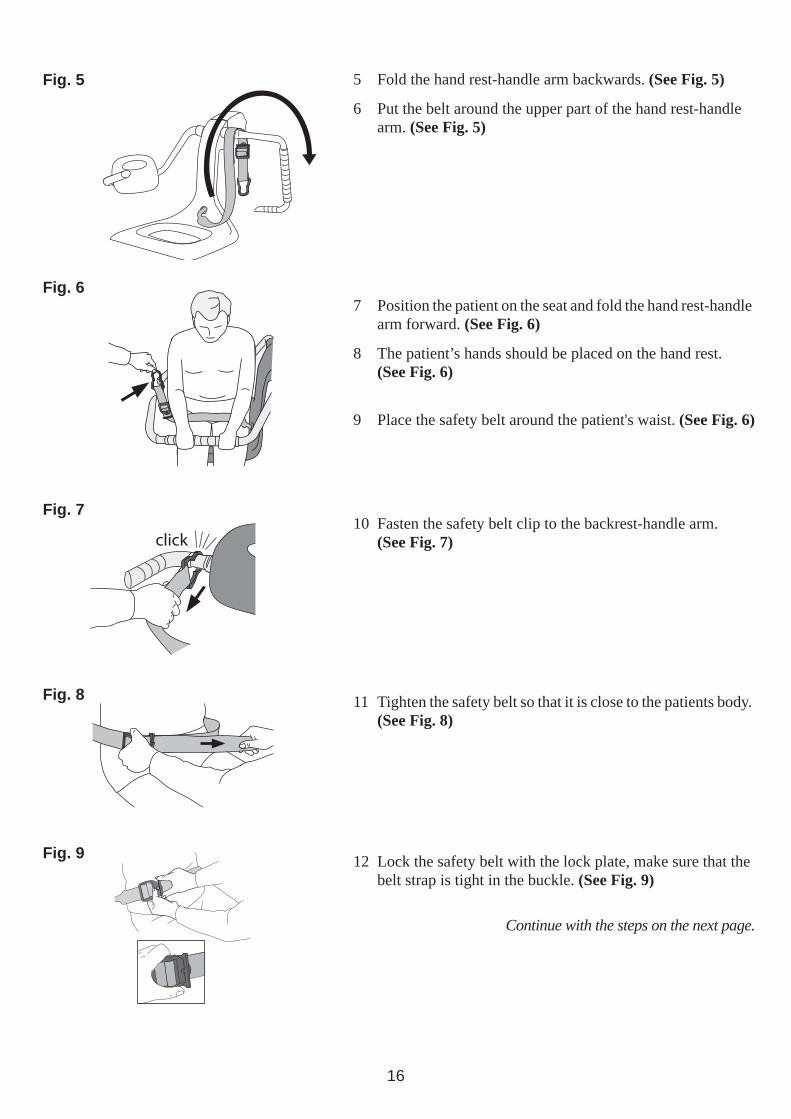
5 Fold the hand rest-handle arm backwards. (See Fig. 5)
6 Put the belt around the upper part of the hand rest-handle arm. (See Fig. 5)
7 Position the patient on the seat and fold the hand rest-handle arm forward. (See Fig. 6)
8 The patient’s hands should be placed on the hand rest.(See Fig. 6)
9 Place the safety belt around the patient's waist. (See Fig. 6)
10 Fasten the safety belt clip to the backrest-handle arm. (See Fig. 7)
11 Tighten the safety belt so that it is close to the patients body. (See Fig. 8)
12 Lock the safety belt with the lock plate, make sure that the belt strap is tight in the buckle. (See Fig. 9)
Continue with the steps on the next page.
Fig. 5
Fig. 6
Fig. 7
click
Fig. 8
Fig. 9

17
Make sure the patient is in an upright position in the centre of the seat with his or her:
• buttocks at the back of the seat,• back against the backrest and• hands on the hand rest. (See Fig. 10 and 11)
14 When loosen the safety belt, unlock the locking plate and loosen the belt strap. (See Fig. 12 and 13)
13 WARNINGTo avoid falling, make sure that the patient is positioned correctly and that the safety belt is being used, properly fastened and tightened.
WARNINGTo avoid the patient from falling out of the device, make sure that the armrest are folded down during transfer.
NOTEWhen the safety belt is not in use, put the safety belts hook end around the top of the hand rest-handle arm.Make sure that the safety belt do not touch the floor.
Fig. 10
Fig. 11
Fig. 13
Fig. 12
18
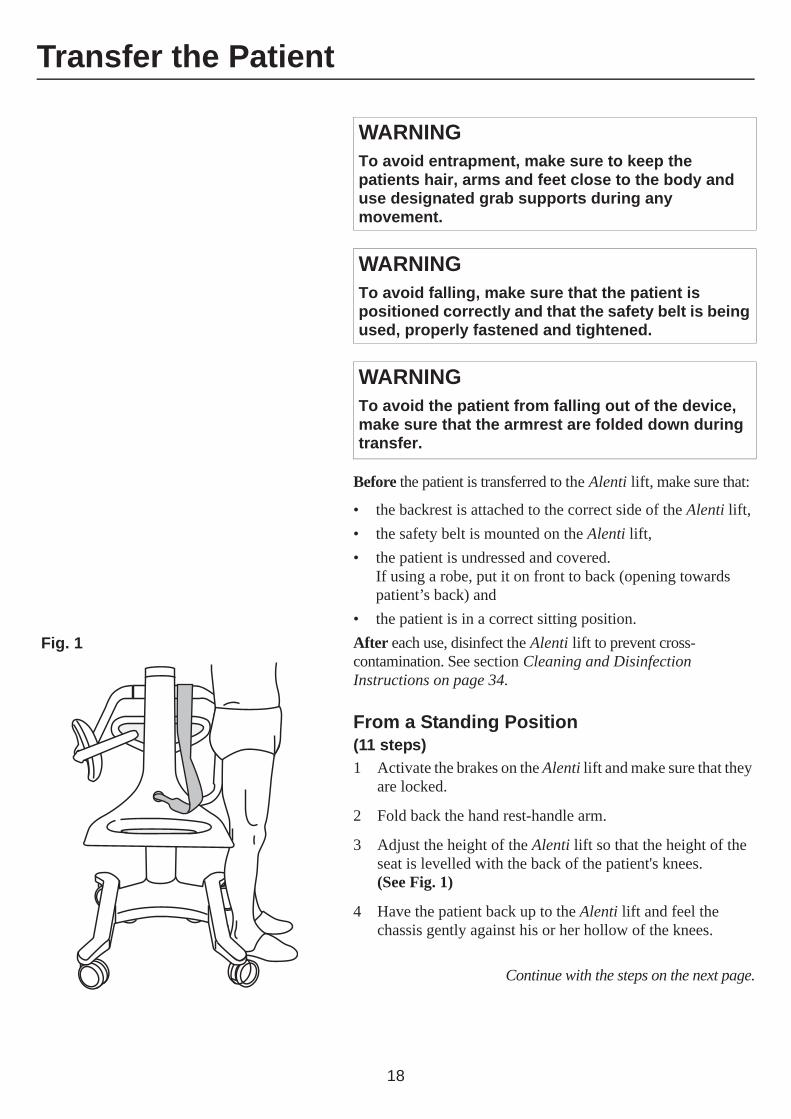
Before the patient is transferred to the Alenti lift, make sure that:
• the backrest is attached to the correct side of the Alenti lift, • the safety belt is mounted on the Alenti lift,• the patient is undressed and covered.
If using a robe, put it on front to back (opening towards patient’s back) and
• the patient is in a correct sitting position.After each use, disinfect the Alenti lift to prevent cross-contamination. See section Cleaning and Disinfection Instructions on page 34.
From a Standing Position(11 steps)1 Activate the brakes on the Alenti lift and make sure that they
are locked.
2 Fold back the hand rest-handle arm.
3 Adjust the height of the Alenti lift so that the height of the seat is levelled with the back of the patient's knees. (See Fig. 1)
4 Have the patient back up to the Alenti lift and feel the chassis gently against his or her hollow of the knees.
Continue with the steps on the next page.
WARNINGTo avoid entrapment, make sure to keep the patients hair, arms and feet close to the body and use designated grab supports during any movement.
WARNINGTo avoid falling, make sure that the patient is positioned correctly and that the safety belt is being used, properly fastened and tightened.
WARNINGTo avoid the patient from falling out of the device, make sure that the armrest are folded down during transfer.
Fig. 1
Transfer the Patient
19
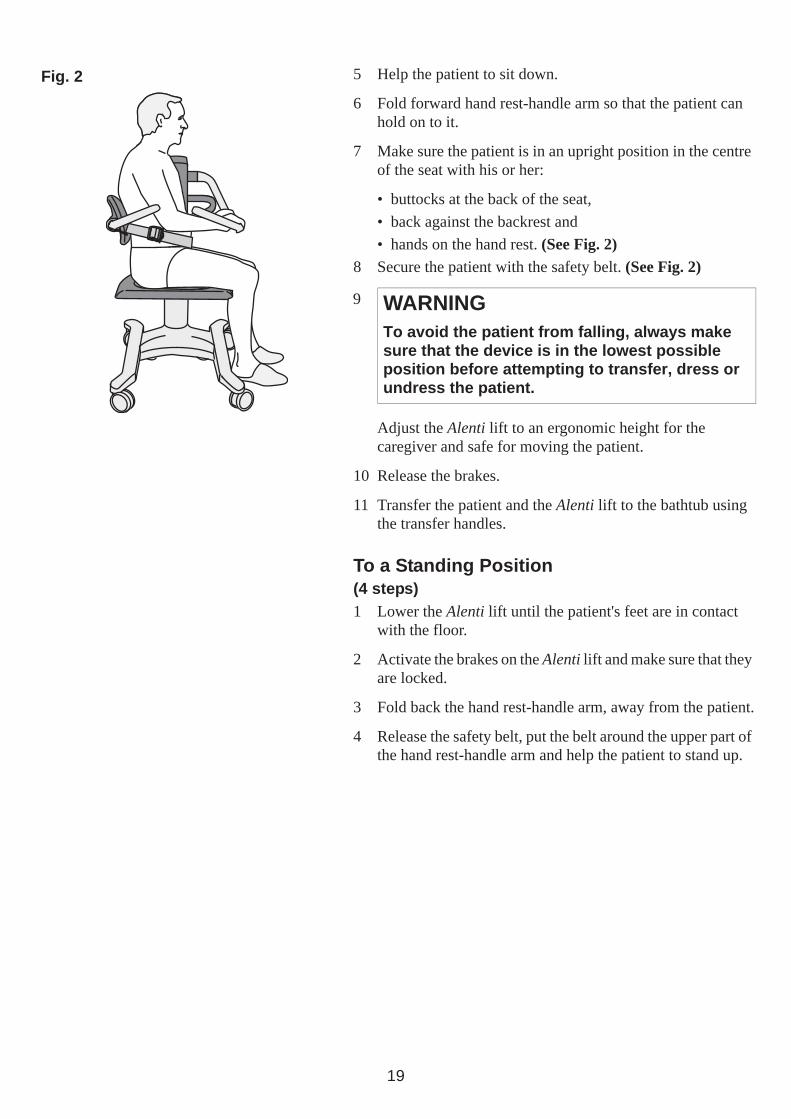
5 Help the patient to sit down.
6 Fold forward hand rest-handle arm so that the patient can hold on to it.
7 Make sure the patient is in an upright position in the centre of the seat with his or her:
• buttocks at the back of the seat,• back against the backrest and• hands on the hand rest. (See Fig. 2)
8 Secure the patient with the safety belt. (See Fig. 2)
Adjust the Alenti lift to an ergonomic height for the caregiver and safe for moving the patient.
10 Release the brakes.
11 Transfer the patient and the Alenti lift to the bathtub using the transfer handles.
To a Standing Position (4 steps)1 Lower the Alenti lift until the patient's feet are in contact
with the floor.
2 Activate the brakes on the Alenti lift and make sure that they are locked.
3 Fold back the hand rest-handle arm, away from the patient.
4 Release the safety belt, put the belt around the upper part of the hand rest-handle arm and help the patient to stand up.
9 WARNINGTo avoid the patient from falling, always make sure that the device is in the lowest possible position before attempting to transfer, dress or undress the patient.
Fig. 2

20
From a Standing and Raising Aid (14 steps)Arjo has compatible standing and raising aids that can be used with the Alenti lift. They are Sara 3000 and Sara Plus.
1 Fold back the Alenti lift hand rest-handle arm.
2 Position the standing and raising aid with the patient in front of the Alenti lift seat.
3 Make sure the Alenti lift is as close as possible to the standing and raising aid, with the patient’s back towards the Alenti lift seat. (See Fig.3)
4 Activate the brakes on the Alenti lift and make sure that they are locked.
5 Lower the patient until he or she is sitting on the Alenti liftseat. (See Fig. 3)
6 Unhook the sling.
7 Fold forward the Alenti lift hand rest-handle arm so that the patient can hold on to it.
8 Raise the Alenti lift until the patient's feet are free from the standing and raising aid.
9 Remove the sling from the patient.
Make sure the patient is in an upright position in the centre of the seat with his or her:
• buttocks at the back of the seat,• back against the backrest and• hands on the hand rest.
Continue with the steps on the next page.
10 WARNINGTo avoid falling, make sure that the patient is positioned correctly and that the safety belt is being used, properly fastened and tightened.
WARNINGTo avoid the patient from falling out of the device, make sure that the armrest are folded down during transfer.
Fig. 3

21
11 Secure the patient with the safety belt.
12 Remove the standing and raising aid.
Adjust the Alenti lift to an ergonomic height for the caregiver and safe for moving the patient. (See Fig. 4)
14 Release the Alenti lift brakes.
To a Standing and Raising Aid (11 steps)1 Lower the Alenti lift.
2 Face patient towards the standing and raising aid.
3 Leave the Alenti lift brakes unlocked.
4 Activate the brakes on the standing and raising aid.
5 Fold back the Alenti lift hand rest-handle arm, away from the patient.
6 Position the patient’s feet onto the standing and raising aid foot support.
7 Remove the safety belt and put the belt around the upper part of the hand rest-handle arm.
8 Put the sling around the patient.
9 Attach the sling to the standing and raising aid.
10 Gently raise the standing and raising aid.
11 Release the brakes of the standing and raising aid and slowly move it and the patient away from the Alenti lift.
13 WARNINGTo avoid the patient from falling, always make sure that the device is in the lowest possible position before attempting to transfer, dress or undress the patient.
Fig. 4

22
From Wheelchair (10 steps)The Alenti lift is compatible with most generic wheelchair models.
For a patient to be able to move from a wheelchair to the Alentilift and vice versa, the patient must be strong enough to move himself or herself sideways and/or be able to stand up.(See Fig. 5)
1 Apply the brakes on the wheelchair.
2 Fold back the Alenti lift hand rest-handle arm.
3 Position and lower the Alenti lift seat so that it is lower than the wheelchair seat. (See Fig. 5)
4 Activate the brakes on the Alenti lift and make sure that they are locked.
5 The patient can now move himself or herself from the wheelchair to the Alenti lift.
6 Fold forward the Alenti lift hand rest-handle arm so that the patient can hold on to it.
Make sure the patient is in an upright position in the centre of the seat with his or her:
• buttocks at the back of the seat,• back against the backrest and• hands on the hand rest. (See Fig. 6)
Continue with the steps on the next page.
WARNINGTo avoid falling during transfer, always make sure that the brakes are applied on all equipment being used.
7 WARNINGTo avoid falling, make sure that the patient is positioned correctly and that the safety belt is being used, properly fastened and tightened.
WARNINGTo avoid the patient from falling out of the device, make sure that the armrest are folded down during transfer.
Fig. 5
Fig. 6

23
Secure the patient with the safety belt.
9 Adjust the Alenti lift to an ergonomic height for the caregiver and safe for moving the patient.
10 Release the Alenti lift’s brakes.
To Wheelchair (6 steps)1 Position the Alenti lift’s front towards the side of the
wheelchair. (See Fig. 7)
2 Adjust the Alenti lift to an appropriate height for the transfer. In some cases, it’s easier to transfer if the Alenti lift seat is higher than the wheelchair seat.
3 Activate the brakes on both the Alenti lift and the wheelchair.
4 Take of the safety belt and put the belt around the upper part of the hand rest-handle arm.
5 Fold back the hand rest-handle arm, away from the patient.
6 The patient can now transfer seats from the Alenti lift to the wheelchair. (See Fig. 7)
8 WARNINGTo avoid the patient from falling, always make sure that the device is in the lowest possible position before attempting to transfer, dress or undress the patient.
Fig. 7

24
To the Toilet (3 steps)
The Alenti lift can be used regardless of whether the toilet is attached to the wall or to the floor. (See Fig. 8)
1 Position the Alenti lift’s front directly over the toilet bowl. (See Fig. 9)
2 Lower the Alenti lift seat and activate the brakes.
3 Make sure to disinfect the Alenti lift after each use to preventcross-contamination. (See Fig. 10)See section Care and Preventative Maintenance on page 38.
From Bed - Sitting (11 steps)The Alenti lift is compatible with most generic hospital beds with a clearance of 150 mm (5 7/8”).
For the patient to be able to move directly from the bed to theAlenti lift and vice versa, the patient must be strong enough to move himself or herself sideways and/or be able to stand up.
1 Make sure that the wheel brakes on the bed are locked.
2 Let the patient sit upright on the side of the bed.
3 Fold back the Alenti lift hand rest-handle arm, away from the patient.
Continue with the steps on the next page.
WARNINGTo avoid entrapment or pinching of genitals, make sure there is enough clearance during movement over the bathtub edge, toilet, bedpan or other furniture.
WARNINGTo avoid falling during transfer, always make sure that the brakes are applied on all equipment being used.
Fig. 8
Fig. 9
Fig. 10
25
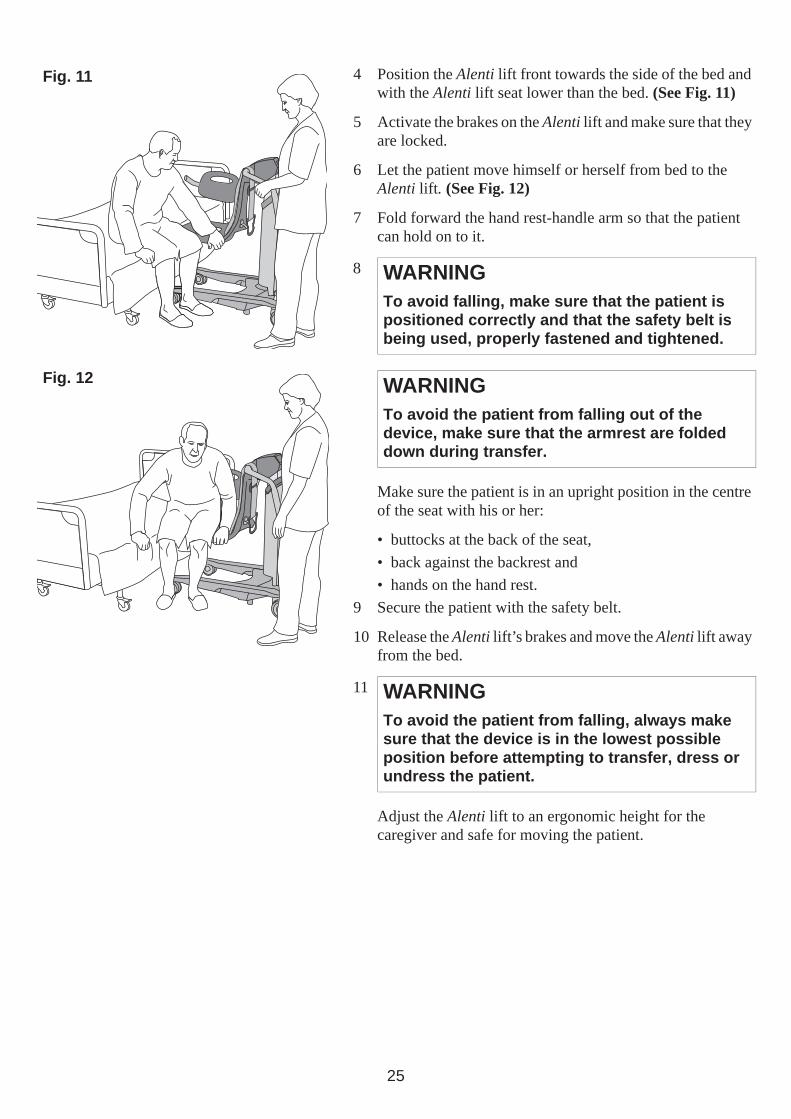
4 Position the Alenti lift front towards the side of the bed and with the Alenti lift seat lower than the bed. (See Fig. 11)
5 Activate the brakes on the Alenti lift and make sure that they are locked.
6 Let the patient move himself or herself from bed to the Alenti lift. (See Fig. 12)
7 Fold forward the hand rest-handle arm so that the patient can hold on to it.
Make sure the patient is in an upright position in the centre of the seat with his or her:
• buttocks at the back of the seat,• back against the backrest and• hands on the hand rest.
9 Secure the patient with the safety belt.
10 Release the Alenti lift’s brakes and move the Alenti lift awayfrom the bed.
Adjust the Alenti lift to an ergonomic height for the caregiver and safe for moving the patient.
8 WARNINGTo avoid falling, make sure that the patient is positioned correctly and that the safety belt is being used, properly fastened and tightened.
WARNINGTo avoid the patient from falling out of the device, make sure that the armrest are folded down during transfer.
11 WARNINGTo avoid the patient from falling, always make sure that the device is in the lowest possible position before attempting to transfer, dress or undress the patient.
Fig. 11
Fig. 12
26
To Bed - Sitting (8 steps)1 Adjust the Alenti lift to an appropriate height for the
transfer. In some cases, it’s easier to transfer if the Alenti lift seat is a little bit higher than the bed.
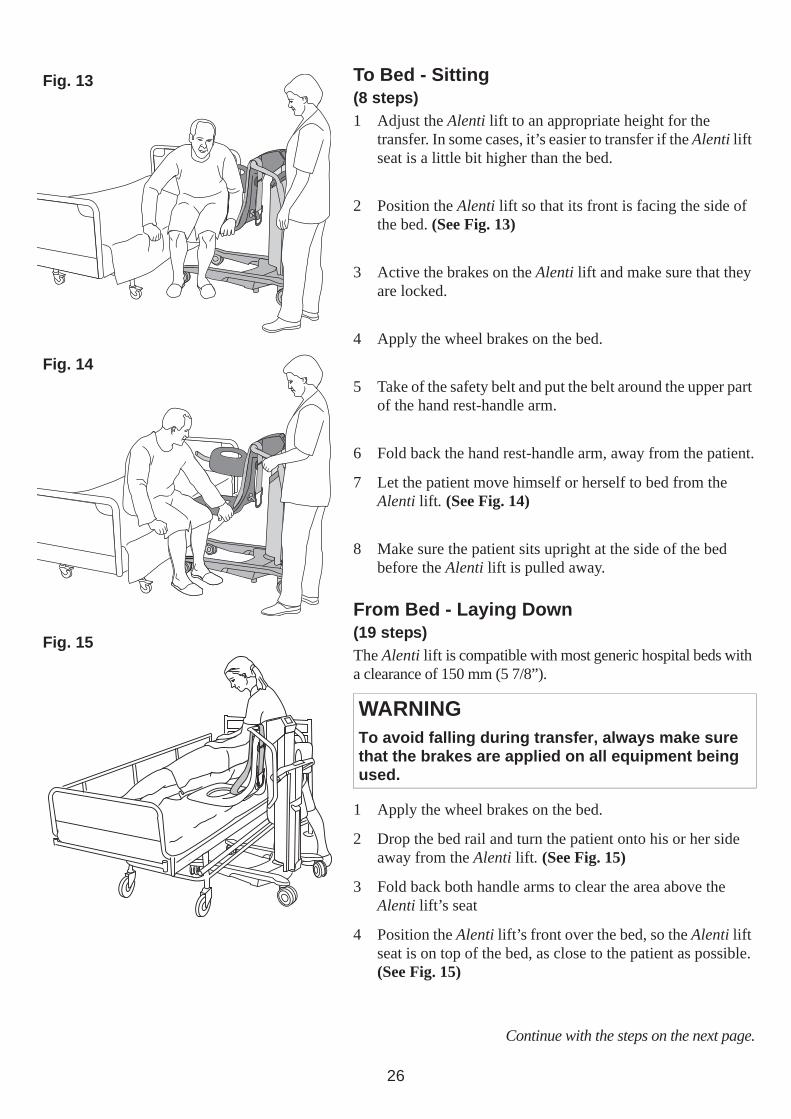
2 Position the Alenti lift so that its front is facing the side of the bed. (See Fig. 13)
3 Active the brakes on the Alenti lift and make sure that they are locked.
4 Apply the wheel brakes on the bed.
5 Take of the safety belt and put the belt around the upper part of the hand rest-handle arm.
6 Fold back the hand rest-handle arm, away from the patient.
7 Let the patient move himself or herself to bed from the Alenti lift. (See Fig. 14)
8 Make sure the patient sits upright at the side of the bed before the Alenti lift is pulled away.
From Bed - Laying Down (19 steps)The Alenti lift is compatible with most generic hospital beds with a clearance of 150 mm (5 7/8”).
1 Apply the wheel brakes on the bed.
2 Drop the bed rail and turn the patient onto his or her side away from the Alenti lift. (See Fig. 15)
3 Fold back both handle arms to clear the area above the Alenti lift’s seat
4 Position the Alenti lift’s front over the bed, so the Alenti liftseat is on top of the bed, as close to the patient as possible.(See Fig. 15)
Continue with the steps on the next page.
WARNINGTo avoid falling during transfer, always make sure that the brakes are applied on all equipment being used.
Fig. 13
Fig. 14
Fig. 15

27
5 Lower the seat so that it presses firmly against the bed.
6 Activate the brakes on the Alenti lift and make sure that they are locked.
7 Turn the patient onto his or her back and make sure that he or she is positioned correctly on the seat.
8 Fold forward the hand rest-handle arm so that the patient can hold on to it.
9 Help the patient to sit upright, either manually or by raising the head end of the bed. (See Fig. 16)
10 Lean the patient forward.
11 Fold forward the backrest-handle arm and make sure it is behind the patient’s back for support.
Make sure the patient is in an upright position in the centre of the seat with his or her:
• buttocks at the back of the seat,• back against the backrest and• hands on the hand rest.
Continue with the steps on the next page.
12 WARNINGTo avoid falling, make sure that the patient is positioned correctly and that the safety belt is being used, properly fastened and tightened.
WARNINGTo avoid the patient from falling out of the device, make sure that the armrest are folded down during transfer.
Fig. 16
28
13 Secure the patient with the safety belt.
14 Raise the Alenti lift’s seat to a height enough to move the Alenti lift away from the bed.
15 Release the Alenti lift’s brakes.
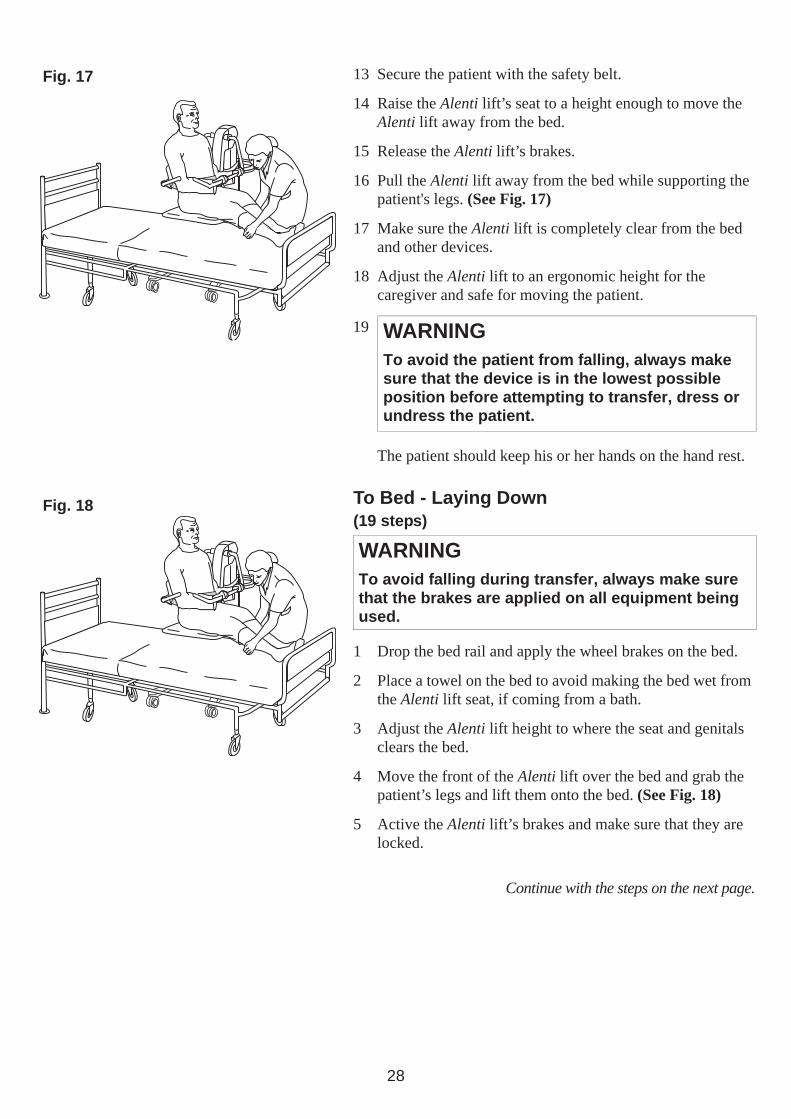
16 Pull the Alenti lift away from the bed while supporting the patient's legs. (See Fig. 17)
17 Make sure the Alenti lift is completely clear from the bed and other devices.
18 Adjust the Alenti lift to an ergonomic height for the caregiver and safe for moving the patient.
The patient should keep his or her hands on the hand rest.
To Bed - Laying Down (19 steps)
1 Drop the bed rail and apply the wheel brakes on the bed.
2 Place a towel on the bed to avoid making the bed wet from the Alenti lift seat, if coming from a bath.
3 Adjust the Alenti lift height to where the seat and genitals clears the bed.
4 Move the front of the Alenti lift over the bed and grab the patient’s legs and lift them onto the bed. (See Fig. 18)
5 Active the Alenti lift’s brakes and make sure that they are locked.
Continue with the steps on the next page.
19 WARNINGTo avoid the patient from falling, always make sure that the device is in the lowest possible position before attempting to transfer, dress or undress the patient.
WARNINGTo avoid falling during transfer, always make sure that the brakes are applied on all equipment being used.
Fig. 17
Fig. 18

29
Lower the Alenti lift so that the seat gets pressed firmly on the bed. Make sure no body parts get pinched between the seat and bed.
7 If needed, raise the head end of the bed to support the patient’s back. (See Fig. 19)
8 Take of the safety belt and put the belt around the upper part of the hand rest-handle arm.
9 Lean the patient forward and place the patient’s hands on the hand rest.
10 Fold back the backrest-handle arm, away from the patient.
11 Assist the patient to lean back against the bed.
12 Fold back the hand rest-handle arm.
13 If the head end of the bed has been raised, lower it back down.
14 Make sure the patient lays down flat on the bed before turning him or her to their side away from the Alenti lift andits seat. (See Fig. 20)
15 Raise the Alenti lift seat to separate it from the bed.
16 Release the Alenti lift’s brakes.
17 Move the Alenti lift away from bed.
18 Roll the patient from the side to his or her back.
19 Pull the bed rail up.
6 WARNINGTo avoid entrapment or pinching of genitals, make sure there is enough clearance during movement over the bathtub edge, toilet, bedpan or other furniture.
Fig. 19
Fig. 20
30
To Bath (14 steps)
The Alenti lift is compatible with the Arjo System 2000 bath range and Century baths from year 2004 and up.
1 Lower the bathtub to its lowest position.
2 Adjust the Alenti lift’s height to where the seat and genitals clears the bathtub rim.When adjusting the Alenti lift height make sure there is sufficient sideways clearance between the Alenti lift and the bathtub.
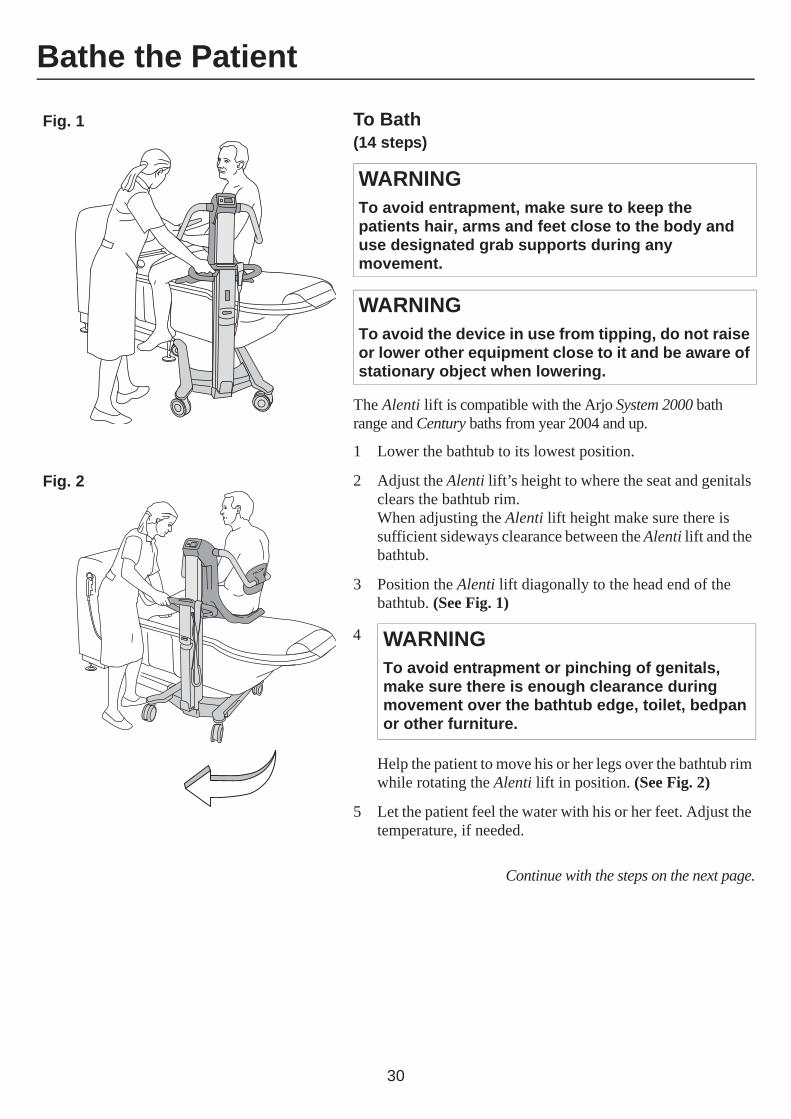
3 Position the Alenti lift diagonally to the head end of the bathtub. (See Fig. 1)
Help the patient to move his or her legs over the bathtub rim while rotating the Alenti lift in position. (See Fig. 2)
5 Let the patient feel the water with his or her feet. Adjust the temperature, if needed.
Continue with the steps on the next page.
WARNINGTo avoid entrapment, make sure to keep the patients hair, arms and feet close to the body and use designated grab supports during any movement.
WARNINGTo avoid the device in use from tipping, do not raise or lower other equipment close to it and be aware of stationary object when lowering.
4 WARNINGTo avoid entrapment or pinching of genitals, make sure there is enough clearance during movement over the bathtub edge, toilet, bedpan or other furniture.
Fig. 1
Fig. 2
Bathe the Patient
31
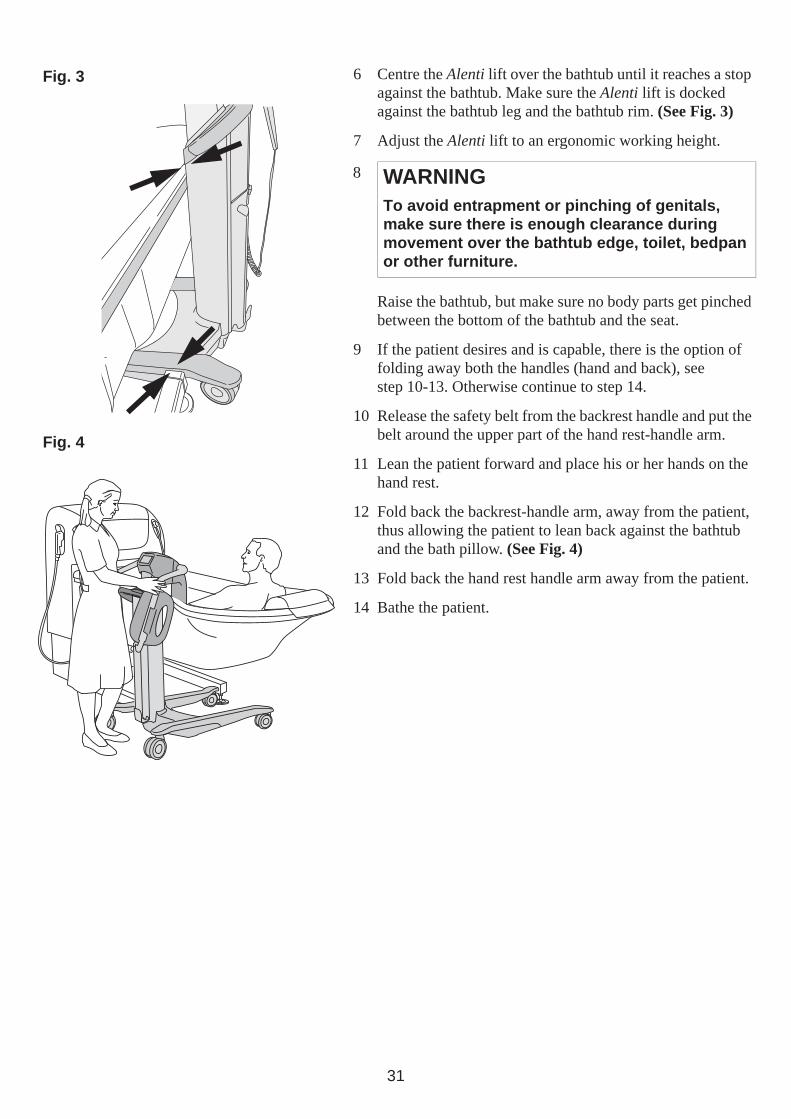
6 Centre the Alenti lift over the bathtub until it reaches a stop against the bathtub. Make sure the Alenti lift is docked against the bathtub leg and the bathtub rim. (See Fig. 3)
7 Adjust the Alenti lift to an ergonomic working height.
Raise the bathtub, but make sure no body parts get pinched between the bottom of the bathtub and the seat.
9 If the patient desires and is capable, there is the option of folding away both the handles (hand and back), see step 10-13. Otherwise continue to step 14.
10 Release the safety belt from the backrest handle and put the belt around the upper part of the hand rest-handle arm.
11 Lean the patient forward and place his or her hands on the hand rest.
12 Fold back the backrest-handle arm, away from the patient, thus allowing the patient to lean back against the bathtub and the bath pillow. (See Fig. 4)
13 Fold back the hand rest handle arm away from the patient.
14 Bathe the patient.
8 WARNINGTo avoid entrapment or pinching of genitals, make sure there is enough clearance during movement over the bathtub edge, toilet, bedpan or other furniture.
Fig. 3
Fig. 4
32
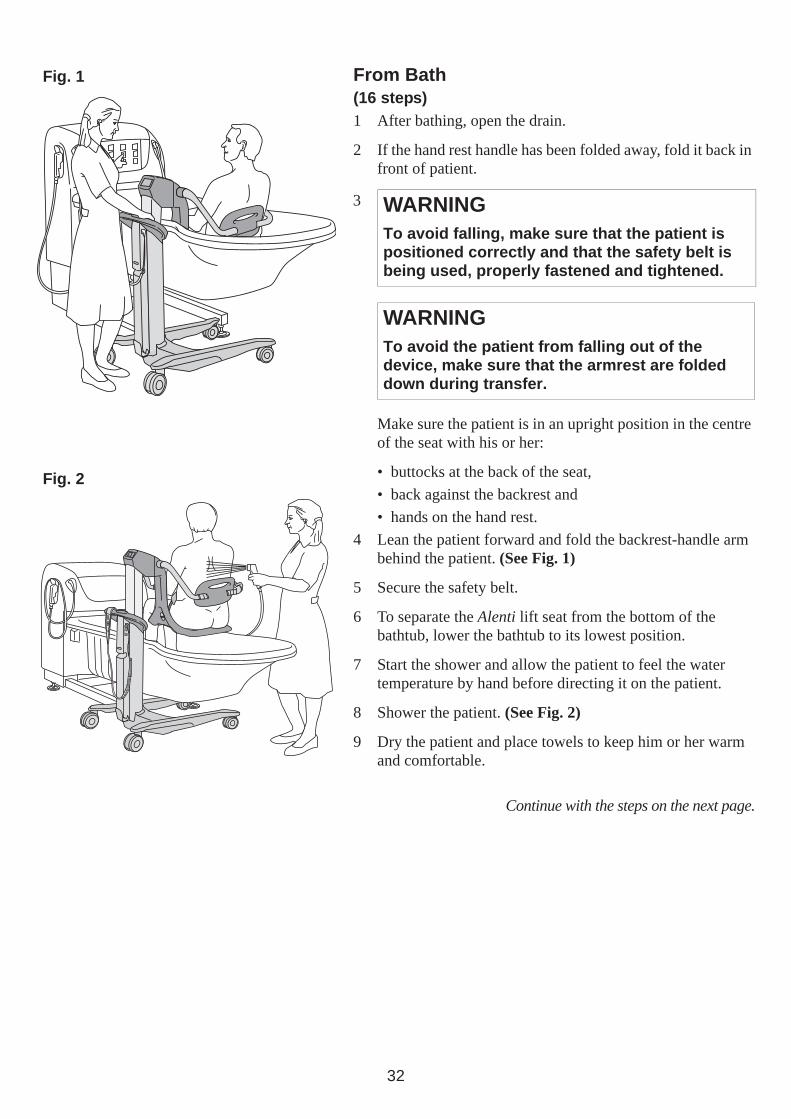
From Bath (16 steps)1 After bathing, open the drain.
2 If the hand rest handle has been folded away, fold it back in front of patient.
Make sure the patient is in an upright position in the centre of the seat with his or her:
• buttocks at the back of the seat,• back against the backrest and• hands on the hand rest.
4 Lean the patient forward and fold the backrest-handle arm behind the patient. (See Fig. 1)
5 Secure the safety belt.
6 To separate the Alenti lift seat from the bottom of the bathtub, lower the bathtub to its lowest position.
7 Start the shower and allow the patient to feel the water temperature by hand before directing it on the patient.
8 Shower the patient. (See Fig. 2)
9 Dry the patient and place towels to keep him or her warm and comfortable.
Continue with the steps on the next page.
3 WARNINGTo avoid falling, make sure that the patient is positioned correctly and that the safety belt is being used, properly fastened and tightened.
WARNINGTo avoid the patient from falling out of the device, make sure that the armrest are folded down during transfer.
Fig. 1
Fig. 2

33
10 Make sure that the patient is in an upright position in the centre of the seat.
11 Raise the Alenti lift to a position where the seat clears the edge of the bathtub rim.
Shower the patient's feet and dry them. Also dry the underside of the seat, to prevent water from dripping on the floor when moving the Alenti lift away from the bathtub.
Help the patient to move his or her legs over the bathtub rim while rotating the Alenti lift away from the bathtub. (See Fig. 3)
Make sure the Alenti lift is completely clear from the bathtub and other devices to avoid undesired contact between these.
15 Lower the Alenti lift until the patient’s feet are in contact with the chassis.
16 Make sure to disinfect the Alenti lift after each use to prevent cross-contamination. (See Fig.4) See section Cleaning and Disinfection Instructions on page 34.
12 WARNINGTo avoid the patient from falling, always make sure that the device is in the lowest possible position before attempting to transfer, dress or undress the patient.
13 WARNINGTo avoid entrapment or pinching of genitals, make sure there is enough clearance during movement over the bathtub edge, toilet, bedpan or other furniture.
14 WARNINGTo avoid the device in use from tipping, do not raise or lower other equipment close to it and be aware of stationary object when lowering.
Fig. 3
Fig. 4

34
Cleaning and Disinfection Instructions
For the best results, only use Arjo branded disinfectant.If you have any questions regarding disinfecting the equipment or wish to order disinfectant (see Parts and Accessories on page 52), contact you local Arjo representative.
The following procedure should be carried out after every use and at the end of the day.
WARNING
To avoid eye and skin damage, always use protective glasses and gloves. If contact occurs rinse with plenty of water. If eyes or skin becomes irritated, contact a physician. Always read the IFU and the Material Safety Data Sheet (MSDS) of the disinfectant.
WARNINGTo prevent cross-contamination, always follow the disinfection instructions in this IFU.
WARNINGTo avoid eye or skin irritation, never disinfect in the presence of a patient.
CAUTIONTo avoid damage on the equipment only use Arjo branded disinfectants.
Accessories for Disinfecting the AlentiLift• Protective gloves• Protective glasses• Spray bottle with disinfectant• Spray bottle with water• Cloth wet and dry• Disposable towels• Soft bristled brush• Long handled soft bristled brush

35
Always Follow these 17 Steps for Cleaning and DisinfectionRemoving visual residue (step 1-3 of 17)1 Remove the backrest and safety belt and place them at the
bottom of the bathtub. (See Fig. 1)
2 Position the Alenti lift over the bathtub and lower it down.
3 Clean:
• the upper part of the Alenti lift (start from top and move downwards)
• all removed parts from visible residue with a cloth soaked in water. Alternatively shower with water using a brush and/or wipe with a cloth.
Cleaning (step 4-11 of 17)4 Put on protective gloves and glasses.
5 Most Arjo baths are equipped with a spray handle for disinfecting purposes. Read the bath instructions on how to use the disinfectant. Check the level of the disinfectant.
6 If you do not have the integrated disinfection equipment, you can use a spray bottle containing disinfectant mixed according to the printed instructions on the disinfectant bottle.
7 Spray disinfectant on (See Fig. 2):
• the upper part of the Alenti lift• all removed parts Use a brush soaked in disinfectant and scrub thoroughly, especially on handles and hand control.
8 Shower with water (approx. 25 °C (77 °F)) or spray with plenty of water and wipe off with a clean cloth to remove all disinfectant.
9 Soak a cloth in disinfectant and wipe all other areas of the Alenti lift, such as chassis.
10 Wet a new cloth with water and remove all traces of disinfectant from all other areas of the Alenti lift. The cloth should occasionally be rinsed in running water when removing disinfectant.
11 If all disinfectant cannot be removed, spray water on the affected part and wipe off with disposable towels. Repeat until all disinfectant has been removed.
Continue with the steps on the next page.
Fig. 1
Fig. 2
36
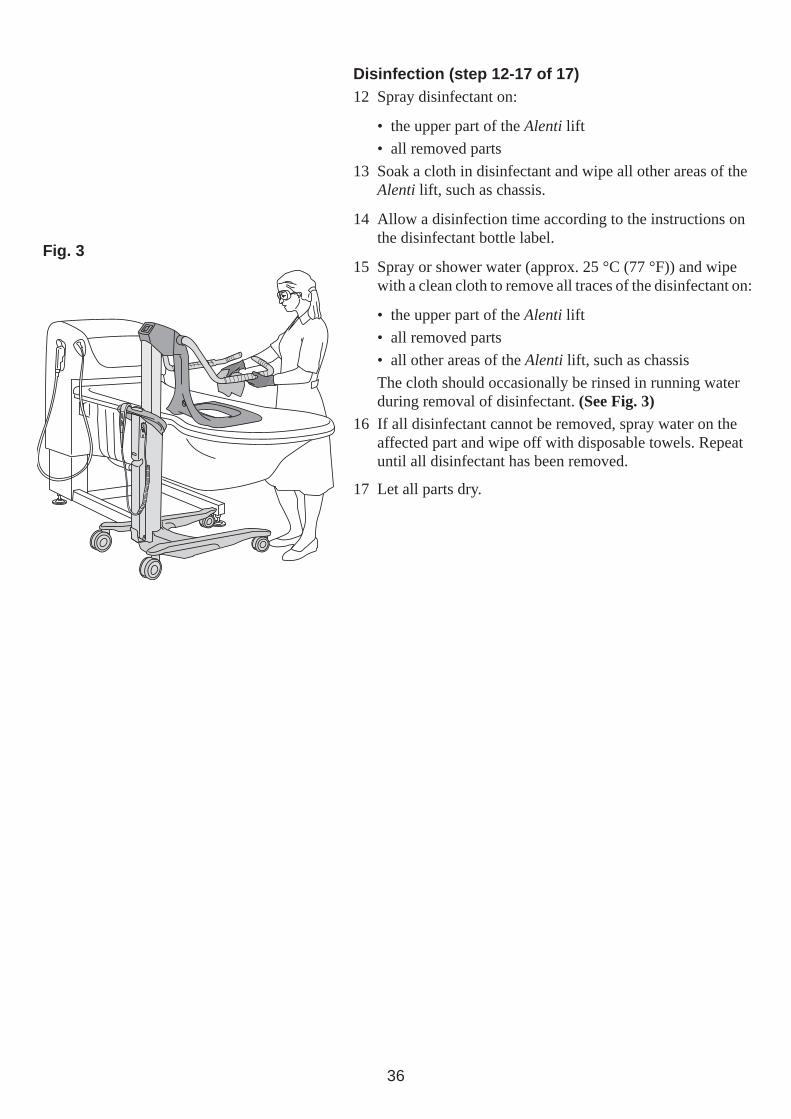
Disinfection (step 12-17 of 17)12 Spray disinfectant on:
• the upper part of the Alenti lift• all removed parts
13 Soak a cloth in disinfectant and wipe all other areas of the Alenti lift, such as chassis.
14 Allow a disinfection time according to the instructions on the disinfectant bottle label.
15 Spray or shower water (approx. 25 °C (77 °F)) and wipe with a clean cloth to remove all traces of the disinfectant on:
• the upper part of the Alenti lift• all removed parts• all other areas of the Alenti lift, such as chassisThe cloth should occasionally be rinsed in running water during removal of disinfectant. (See Fig. 3)
16 If all disinfectant cannot be removed, spray water on the affected part and wipe off with disposable towels. Repeat until all disinfectant has been removed.
17 Let all parts dry.
Fig. 3

37
• Be careful not to drop the battery.
• Contact the appropriate local authority for advice when disposing of batteries.
• Check label on the battery.
Low Charge WarningA buzzer sound will go off when the battery reaches a low charge. The battery should then be recharged as soon as possible.
Storage of Battery
• The battery is delivered charged but we recommend you to recharge the battery when received due to a slow self discharge.
• The battery will slowly self discharge when not used.• A battery in storage and transport and should be in a
temperature range of -0 °C to +30 °C (32 °F to 86 °F), cooler temperatures will extend its service life.
• For maximum battery performance do not store the battery above 50 °C (122 °F).
Installation of charger:
See NDA-X200, Battery Charger IFU.
How to change the battery:
See NDA-X200 Battery Charger IFU.
WARNINGTo avoid bodily injury, do NOT crush, puncture, open, dismantle or otherwise mechanically interfere with the battery.• Should the battery casing crack and cause
contents to come in contact with skin or clothing, rinse immediately with plenty of water.
• If contents come in contact with the eyes, rinse immediately with plenty of water and seek medical attention.
• Inhalation of the contents can cause respiratory irritation. Provide fresh air and medical attention.
Battery Instructions

38
The Alenti lift is subject to wear and tear, and the following actions must be performed when specified to make sure that the product remains within its original manufacturing specification.
PREVENTIVE MAINTENANCE SCHEDULE
WARNINGTo avoid malfunction resulting in injury, make sure to conduct regular inspections and follow the recommended maintenance schedule. In some cases due to heavy use of the product and exposure to aggressive environment more frequent inspections should be carried out. Local regulations and standards may be more stringent than this recommended maintenance schedule.
NOTEProduct cannot be maintained and serviced while in use with the patient
CAREGIVER OBLIGATIONS Action/Check EveryDAY
EveryWEEK
Every 2nd YEAR
Disinfect XCheck of mechanical attachments XVisually check the safety belt/leg strap XCheck hand control and cable XCheck and clean castors XCheck brake function and brake pads XVisually check battery charger and battery XVisually check all exposed parts XCheck for corrosion and damage XPerform functionality test XReplace safety belt X
WARNINGTo avoid injury to both the patient and the caregiver, never modify the equipment or use incompatible parts.
Care and Preventative Maintenance

39
Caregiver ObligationsCaregiver obligations shall be carried out by personnel with sufficient Alenti lift knowledge following the instructions in this IFU.
Every Day• Disinfect. The Alenti lift has to be disinfected immediately
after every use. Arjo disinfectants should be used in recommended concentrations. See section Cleaning and Disinfection Instructions on page 34.
Every Week• Check the mechanical attachments by placing a foot on
the chassis and pull the seat upwards with both hands. (See Fig. 1)No gaps between the chassis and seat are allowed.
• Visually check the safety belt and leg straps. Check the complete length for fraying, cuts, crack, tears, that no inner fabric is showing and that no other damage is visible. (See Fig. 2)
If the safety belt is damaged in any way, replace it.• Check hand control and cable: Visually check the
condition of the hand control and its cable. If it is cut or damaged, replace it. (See Fig. 3)
Fig. 1
Fig. 2
Fig. 3
40
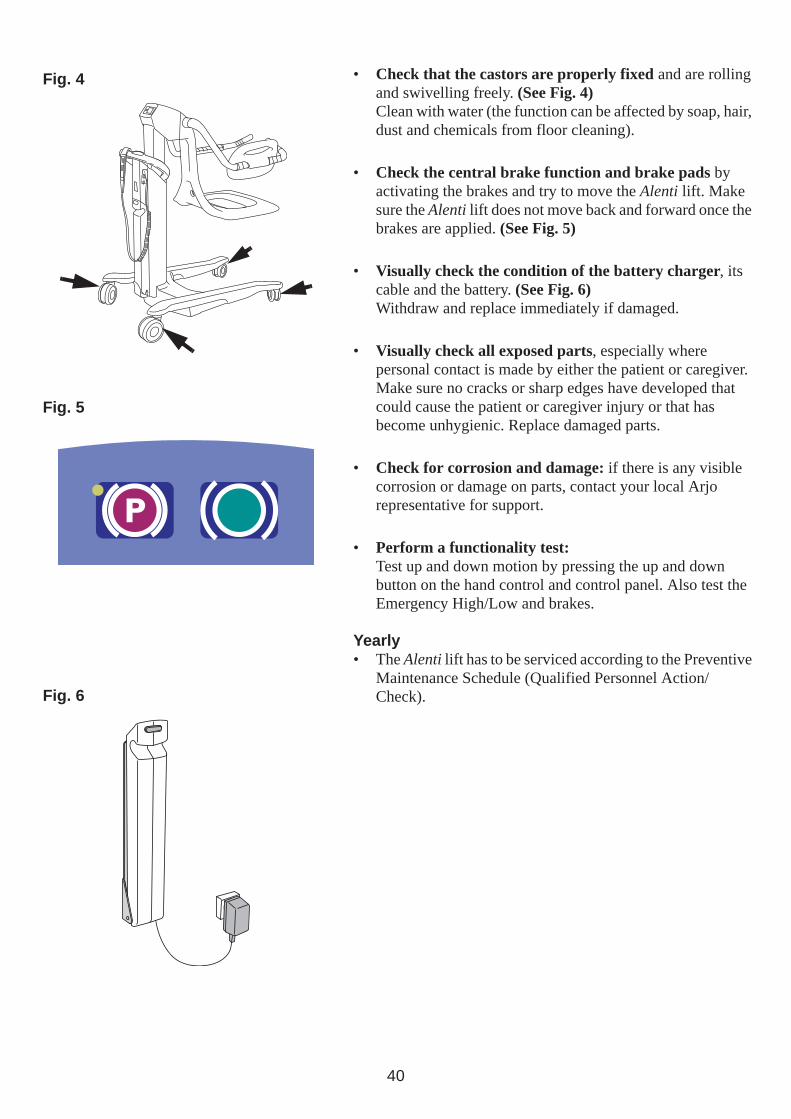
• Check that the castors are properly fixed and are rolling and swivelling freely. (See Fig. 4)Clean with water (the function can be affected by soap, hair, dust and chemicals from floor cleaning).
• Check the central brake function and brake pads by activating the brakes and try to move the Alenti lift. Make sure the Alenti lift does not move back and forward once the brakes are applied. (See Fig. 5)
• Visually check the condition of the battery charger, its cable and the battery. (See Fig. 6)Withdraw and replace immediately if damaged.
• Visually check all exposed parts, especially where personal contact is made by either the patient or caregiver. Make sure no cracks or sharp edges have developed that could cause the patient or caregiver injury or that has become unhygienic. Replace damaged parts.
• Check for corrosion and damage: if there is any visible corrosion or damage on parts, contact your local Arjo representative for support.
• Perform a functionality test:Test up and down motion by pressing the up and down button on the hand control and control panel. Also test the Emergency High/Low and brakes.
Yearly• The Alenti lift has to be serviced according to the Preventive
Maintenance Schedule (Qualified Personnel Action/Check).
Fig. 4
Fig. 5
Fig. 6

41
WARNINGTo avoid injury and/or unsafe product, the maintenance activities must be carried out at the correct frequency by qualified personnel using correct tools, parts and knowledge of procedure. Qualified personnel must have documented training in maintenance of this device.
QUALIFIED PERSONNEL Action/Check Every YEAR Every 2nd YEARReplace brake pads XPerform a safe working load test (local requirements) XLubricate inner profile XCheck battery and battery charger XCheck scale calibration (if attached and not verified) XCheck all vital parts for corrosion/damage XPerform full feature functionality test XCheck mechanical attachments XCheck that the latest upgrades have been implemented XCheck the safety stop function XCheck the emergency High/Low function XInspect castors XReplace guide pieces, lower bushing and outer profile seal XReplace the plastic cross on the actuator X
NOTEAll checkpoints in table CAREGIVER OBLIGATIONS Action/Check on page 38 are to be checked when performing the checkpoints in table QUALIFIED PERSONNEL Action/Check on page 41.
42
PROBLEM ACTION
The Alenti lift raises or lowers after the hand control button or the control panel button is released.
1 Pull the battery out and remove the patient from the Alenti lift.
2 Remove the hand control and put the battery back. If the failure is gone, replace the hand control.
3 If the failure still occurs, contact qualified personnel.
The Alenti lift does not raise or lower when the hand control button or the control panel button is pressed.
1 Make sure the battery is connected correctly to the Alenti lift.
2 Make sure the battery has sufficient charge, the battery charger lamp located on the Alenti lift turns green when the battery is fully charged.
3 Make sure the Alenti lift has not been lowered onto a fixed object.If this occurs the automatic safety stop function will turn on.
4 Use the Emergency High/Low to remove patient from the Alenti lift.Contact qualified personnel.
The Alenti lift functions only operate with the use of the control panel, not the hand control.
1 Make sure that the hand control connection is properly connected to the socket.
2 If the problem persists, replace the hand control.
The Alenti lift raises and stops by itself.
Make sure that the safe working load of 182 kg (400 lbs) is not exceeded. The lowering function will still operate during this scenario.
The Alenti lift is hard to manoeuvre. 1 Make sure that the brakes are released.
2 Make sure that the castors roll and swivel freely. If not, remove the patient from the Alenti lift and contact qualified personnel.
If the brakes are not functioning. 1 Make sure that the Alenti lift is flat on a levelled surface (floor surface must not exceed a slope ratio of 1:50).
2 If the brake alarm sounds, try moving the Alenti lift to a flat levelled surface and re-apply brakes. If the alarm continues, contact qualified personnel.
If the optional integrated scale is not operating.
1 Make sure the battery is connected correctly to the Alenti lift.
2 Make sure the battery has sufficient charge. The battery charger lamp located on the Alenti lift turns green when the battery is fully charged.
3 If the problem persists, contact qualified personnel.
The scale is showing TILT. 1 Make sure the Alenti lift is on a flat levelled surface.
2 If the problem persists, contact qualified personnel.
The scale is showing no other error codes than TILT.
Contact qualified personnel.
It is only possible to lower the lift. The lifting device of this equipment is equipped with a a safety nut. If the safety nut will be activated it will only be possible to lower the equipment into a safe position. In case of this scenario stop using the equipment and contact authorized service personnel for repair of the equipment.
Troubleshooting

43
ALARM ACTIONThe Alenti lift has three different alarm signals which indicate different faults.
1 Low battery signal If the raise button (up arrow) is pressed the alarm will sound for up to 10 s at rate of one beep per second.
Recharge the battery.
If the alarm continues contact your local Arjo service technician.
2 Brake fault If any of the buttons are pressed the alarm will sound for up to 10 s at a rate of 4 beeps per second. The LED on the control panel and the hand control will also light up.
This alarm indicates a brake failure. Try moving the Alenti lift to a flat levelled surface and re-apply brakes.
If the alarm continues contact your local Arjo service technician.
3 Circuit board fault This alarm will continue to sound up to 5 s at a rate of 4 beeps per second, followed by a 30 s pause. The alarm can only be stopped by removing the battery.
This alarm indicates a fault in the circuit board. If the alarm starts while the patient is using the Alenti lift, complete the immediate task such as bathing or transfer. Then contact your local Arjo service technician.
NOTEIf the problem can not be solved with the written troubleshooting actions, please contact an Arjo authorized service technician.
Alarms

44
Alenti lift hygiene chair Model CDB 81XXSafe Working Load (SWL) (Max patient weight) 182 kg (400 lbs.)
Weight of lift 67 kg (148 lbs.)
Maximum weight of lift(lift, power drive and scale)
72 kg (159 lbs)
Colour Grey/ bordeaux-red/blue
Medical equipment Type
Sound level < 65 dB A
Mode of operation ED maximum 10%; Maximum 2 minutes ON; Minimum 18 minutes OFF
Operating forces of controls 2.7 N
Battery No. NDA0100-XX Sealed lead-acid battery 24 V, 4 Ah
Battery charger NDA 1200-EU, NDA 2200-GB, NDA 4200-US, NDA 6200-AU and NDA8200-INT
Protection class IP X4
Insulation class Class II
Degree of fire protection In accordance with standard EN/ISO 60601-1
Pollution degree 2
Operation, transport and storageAmbient temperature range Operation
+10 °C to +40 °C (+ 50 °F to 104 °F) Transport and Storage–10 °C to +50 °C (+14 °F to +122 °F)
Relative humidity range 30% - 75% Operation10% - 80% Transport and Storage
Atmospheric pressure range 700 - 1060 hPa Operation500 - 1060 hPa Transport and Storage
Allowed combinationsThe Alenti lift integrates with the following products:
Arjo equipment:Sara 3000, Sara Plus, System 2000, Malibu 1600 and Malibu 1700
Generic Wheel Chair:Most models
Generic Hospital Beds:Most models with min bed to floor clearance 150 mm
No other combinations are allowed.
Technical Specifications
45
RecyclingThe device should be recycled according to national regulations
Package Wood, corrugated cardboard and plastic are recyclable
End of Life Disposal• All batteries in the product must be recycled separately. Batteries are to be disposed in
accordance with national or local regulations.• Slings including stiffeners/stabilizers, padding material, any other textiles or polymers or plastic
materials etc. should be sorted as combustible waste.• Lift systems having electrical and electronic components or an electrical cord should be
disassembled and recycled per Waste of Electrical and Electronic Equipment (WEEE) or inaccordance with local or national regulation.
• Components that are primarily made up of different kinds of metal (containing more than 90%metal by weight) for example sling bars, rails, upright supports, etc., should be recycled as metals.
NOTEAll material used in the Alenti lift complies with established biocompatibility standards and have been tested accordingly (ISO 10993-5).The body supporting material in the seat and backrest is PUR (polyurethane).

46
110 (4 3/4”)
415
(16
3/8”
)47
0 (1
8 1/
4”)
1010 (39 3/4”)1237 (48 3/4”)
425
(16
3/4”
)
1040
(41”
) 1560
(61
3/8”
)
1070
(42
1/8”
)350 (13 3/4”)
1025
(40
3/8”
)
1040
(41”
) - 1
640
(64
5/8”
)21
60 (8
5”)
35 (1
3/8
”)
478 (18 7/8”)640 (25 1/4”) 1110 (43 3/4”)
mm (inches)Stroke: 590 mm (23 1/4”)Minor measurement deviations might occur between products.
Dimensions

47
STANDARD/CERTIFICATE DESCRIPTION
EN/IEC 60601-1:2005
AMD1:2012
Medical Electrical Equipment - Part 1: General Requirements for Basic Safety and Essential Performance
ANSI/AAMI ES60601-1 (2005)
AMD 1 (2012)
Medical Electrical Equipment - Part 1: General Requirements for Basic Safety and Essential Performance
CAN/CSA-C22.2 No. 60601-1:14 Medical Electrical Equipment - Part 1: General Requirements for Basic Safety and Essential Performance
ISO 10535:2006 Hoists for the transfer of disabled persons -- Requirements and test methods
List of Standards and Certificates

48
Labels on the Alenti LiftLabel explanation
Symbol explanation
Battery Label States safety and environmental information for the battery.
Data Label States technical performance and requirements, e.g. Input Power, Input Voltage and maximum Patient Weight etc.
Identification Label
States the product identification, serial number and year and month of manufacturing.
SWL Safe Working Load Total mass of equipment
including its safe working load.
Lifting stroke590 mm (23 1/4”)
24V DC Supply voltage
MAX: 200 VA Maximum power
Fuse F1 - F10AL 250 VFuse F2 - T2.5AL 250 V
IP X4 Degree of Protection(i.e. the product is protected against splashing water)
Type BApplied part: protection against electrical shock in accordance with IEC 60601-1
ED MAX 10% Mode of operation for Hi/Lo function:ED maximum 10%; Maximum 2 minutes ON; Minimum 18 minutes OFF
NDA0100-XX Product number of the battery CE marking indicating
conformity with European Community harmonised legislation
Figures indicate Notified Body supervision.
A battery is the power source of this equipment.
254 kg/559 lbs
72 kg/159 lbs
182 kg/400 lbs
Read the IFU before use
Separate electrical and electronic components for recycling in accordance with the European Directive 2012/19/EU (WEEE)
Classified by Underwriters Laboratories Inc. with respect to electrical shock, fire, mechanical, hazards and other specified hazards only in accordance with the Approvals and List of Standards.
Environmental danger - contains lead.Not for disposal
Recyclable
Name and address of the manufacturer
Manufacturing date
Max Maximum capacity of the weighing instrument
Min Minimum capacity of the weighing instrument
e Verification scale interval Metrology mark, indicating
compliance with Directive 2014/31/EU (NAWI) yy = year(For Class III scales only)
Model number
Serial number
Indicates min / max temp for use of weigh scales
Indicates the product is a Medical Device according to EU Medical Device Regulation 2017/745
Pb
0126Myy

49
Data label
Approval label
Battery label
Identification Label
Applied Part
Scale label
50
Product has been tested for compliance with current regulatory standards regarding its capacity to block EMI (electromagnetic interference) from external sources.
Some procedures can help reduce electromagnetic interferences:
• Use only Arjo cables and spare parts to avoid increased emissions or decreased immunity which can compromise the correct functioning of the equipment.
• Ensure that other devices in patient-monitoring and/or life-support areas comply to accepted emissions standards.
Intended Environment: Professional Healthcare Facility Environment
Exceptions: HF Surgical Equipment and the RF Shielded room of an ME SYSTEM for magnetic resonance imaging
WARNINGWireless communications equipment such as wireless computer network devices, mobile phones, cordless telephones and their base stations, walkie-talkies, etc. can affect this equipment and should be kept at least 1.5 m away from the equipment.
WARNINGUse of this equipment adjacent to or stacked with other equipment should be avoided because it could result in improper operation. If such use is necessary, this equipment and the other equipment should be observed to verify that they are operating normally.
Guidance and manufacturer’s declaration – electromagnetic emission
Emission test Compliance Guidance
RF emissions CISPR 11 Group 1This equipment uses RF energy only for its internal functions. Therefore its RF emissions are very low and are not likely to cause any interference in nearby electronic equipment.
RF emissions CISPR 11 Class B
This equipment is suitable for use in all establishments, including domestic establishments and those directly connected to the public low voltage power supply network that supplies buildings used for domestic purposes.
Electromagnetic Compatibility (EMC)

51
Guidance and manufacturer’s declaration – electromagnetic immunity
Immunity test IEC 60601-1-2 test level Compliance level Electromagneticenvironment – guidance
Electrostatic discharge (ESD)
EN 61000-4-2
±2kV, ±4kV, ±8kV, ±15kV air
±8kV contact
±2kV, ±4kV, ±8kV, ±15kV air
±8kV contact
Floors should be wood, concrete or ceramic tile. If floors are covered with synthetic material, the relative humidity should be at least 30%.
Conducteddisturbancesinducted by RF fields
EN 61000-4-6
3V in 0,15 MHz to 80 MHz
6V in ISM and amateur radio bands between 0,15 MHz and 80 MHz80% AM at 1 kHz
3V in 0,15 MHz to 80 MHz
6V in ISM and amateur radio bands between 0,15 MHz and 80 MHz80% AM at 1 kHz
Portable and mobile RF communications equipment should be used no closer to any part of the product, including cables, than 1.0 m, if the transmitter’s output power rating exceeds 1Wa
Field strengths from fixed RF transmitters, as determined by an electromagnetic site survey, should be less than the compliance level in each frequency rangeb.Interference may occur in the vicinity of equipment marked with this symbol:
Radiated RF electromagneticfield
EN 61000-4-3
Professional Healthcare environment3 V/m80 MHz to 2,7 GHz80% AM at 1 kHz
Professional Healthcare environment3 V/m80 MHz to 2,7 GHz80% AM at 1 kHz
Proximity fields from RF wireless communicationsequipment
EN 61000-4-3
385 MHz - 27 V/m
450 MHz - 28 V/m710, 745, 780 MHz - 9V/m 810, 870, 930 MHz - 28 V/m 1720, 1845, 1970, 2450 MHz - 28 V/m5240,5500, 5785 MHz - 9V/m
385 MHz - 27 V/m
450 MHz - 28 V/m710, 745, 780 MHz - 9V/m 810, 870, 930 MHz - 28 V/m 1720, 1845, 1970, 2450 MHz - 28 V/m5240,5500, 5785 MHz - 9V/m
Electrical fast transient/burst
EN 61000-4-4
±1kV SIP/SOP ports
100 kHz repetition frequency
±1kV SIP/SOP ports
100 kHz repetition frequency
Power frequency Magnetic field
EN 61000-4-8
30 A/m
50 Hz or 60 Hz
30 A/m
50 Hz
Power frequency magnetic fields should be at levels characteristic of a typical location in a typical commercial or hospital environment.
a Field strengths from fixed transmitters, such as base stations for radio (cellular/cordless) telephones and land mobile radios, amateur radio, AM and FM radio broadcast and TV broadcast cannot be predicted theoretically with accuracy. To assess the electromagnetic environment due to fixed RF transmitters, an electromagnetic site survey should be considered. If the measured field strength in the location in which the product is used exceeds the applicable RF compliance level above, the product should be observed to verify normal operation. If abnormal performance is observed, additional measures may be necessary.b Over the frequency range 150 kHz to 80 MHz, field strengths should be less than 1 V/m.

52
CDA2100-01Electronic Scale
CDA1500-7 BedpanCDA1104-90 Bedpan holder
CDA1300-04Leg support and leg straps
For disinfectant contact the Arjo local representative
CDA1450-035Safety belt
Parts and Accessories

53
Intentionally left blank

54
Intentionally left blank

AUSTRALIAArjo Australia Pty Ltd78, Forsyth StreetO’ConnorAU-6163 Western AustraliaTel: +61 89337 4111Free: +1 800 072 040Fax: + 61 89337 9077
BELGIQUE / BELGIËArjo NV/SAEvenbroekveld 16BE-9420 ERPE-MERETél/Tel: +32 (0) 53 60 73 80Fax: +32 (0) 53 60 73 81E-mail: [email protected]
BRASILArjo Brasil Equipamentos Médicos LtdaRua Marina Ciufuli Zanfelice, 329 PB02 Galpão - LapaSão Paulo – SP – BrasilCEP: 05040-000Phone: 55-11-3588-5088E-mail: [email protected]: [email protected]
CANADAArjo Canada Inc.90 Matheson Boulevard WestSuite 300CA-MISSISSAUGA, ON, L5R 3R3Tel/Tél: +1 905 238 7880Free: +1 800 665 4831 InstitutionalFree: +1 800 868 0441 Home CareFax: +1 905 238 7881E-mail: [email protected]
ESKÁ REPUBLIKAArjo Czech Republic s.r.o.Na Strzi 1702/65140 00 PrahaCzech RepublicPhone No: +420225092307e-mail: [email protected]
DANMARKArjo A/SVassingerødvej 52DK-3540 LYNGETel: +45 49 13 84 86Fax: +45 49 13 84 87E-mail: [email protected]
DEUTSCHLANDArjo GmbHPeter-Sander-Strasse 10DE-55252 MAINZ-KASTELTel: +49 (0) 6134 186 0Fax: +49 (0) 6134 186 160E-mail: [email protected]
ESPAÑAArjo Ibérica S.L.Parque Empresarial Rivas Futura, C/Marie Curie 5Edi� cio Alfa Planta 6 o� cina 6.1-.62ES-28521 Rivas Vacia, MADRIDTel: +34 93 583 11 20Fax: +34 93 583 11 22E-mail: [email protected]
FRANCE Arjo SAS2 Avenue Alcide de GasperiCS 70133FR-59436 RONCQ CEDEXTél: +33 (0) 3 20 28 13 13Fax: +33 (0) 3 20 28 13 14E-mail: [email protected]
HONG KONG Arjo Hong Kong LimitedRoom 411-414, 4/F, Manhattan Centre,8 Kwai Cheong Road, Kwai Chung, N.T.,HONG KONGTel: +852 2960 7600Fax: +852 2960 1711
ITALIAArjo Italia S.p.A.Via Giacomo Peroni 400-402IT-00131 ROMATel: +39 (0) 6 87426211Fax: +39 (0) 6 87426222E-mail: [email protected]
MIDDLE EASTArjo Middle East FZ-LLCOf� ce 908, 9th Floor, HQ Building,North Tower,Dubai Science Park, Al Barsha SouthP.O Box 11488, Dubai, United Arab EmiratesDirect +971 487 48053Fax +971 487 48072Email: [email protected]
NEDERLANDArjo BVBiezenwei 214004 MB TIELPostbus 61164000 HC TIELTel: +31 (0) 344 64 08 00Fax: +31 (0) 344 64 08 85E-mail: [email protected]
NEW ZEALANDArjo Ltd34 Vestey DriveMount WellingtonNZ-AUCKLAND 1060Tel: +64 (0) 9 573 5344Free Call: 0800 000 151Fax: +64 (0) 9 573 5384E-mail: [email protected]
NORGEArjo Norway ASOlaf Helsets vei 5N-0694 OSLOTel: +47 22 08 00 50Faks: +47 22 08 00 51E-mail: [email protected]
ÖSTERREICHArjo GmbHLemböckgasse 49 / Stiege A / 4.OGA-1230 WienTel: +43 1 8 66 56Fax: +43 1 866 56 7000
POLSKAArjo Polska Sp. z o.o.ul. Ks Piotra Wawrzyniaka 2 PL-62-052 KOMORNIKI (Pozna )Tel: +48 61 662 15 50Fax: +48 61 662 15 90E-mail: [email protected]
PORTUGALArjo em PortugalMAQUET Portugal, Lda. (Distribudor Exclusivo)Rua Poeta Bocage n.º 2 - 2G PT-1600-233 LisboaTel: +351 214 189 815Fax: +351 214 177 413E-mail: [email protected]
SUISSE / SCHWEIZArjo AG Fabrikstrasse 8PostfachCH-4614 HÄGENDORFTél/Tel: +41 (0) 61 337 97 77Fax: +41 (0) 61 311 97 42
SUOMIArjo Scandinavia ABRiihitontuntie 7 C02200 EspooFinlandPuh: +358 9 6824 1260E-mail: Asiakaspalvelu.� [email protected]
SVERIGEArjo International HQHans Michelsensgatan 10SE-211 20 MALMÖTel: +46 (0) 10 494 7760Fax: +46 (0) 10 494 7761E-mail: [email protected]
UNITED KINGDOMArjo UK and IrelandHoughton Hall ParkHoughton RegisUK-DUNSTABLE LU5 5XFTel: +44 (0) 1582 745 700Fax: +44 (0) 1582 745 745E-mail: [email protected]
USAArjo Inc.2349 W Lake Street Suite 250US-Addison, IL 60101Tel: +1 630 307 2756Free: +1 80 0 323 1245 InstitutionalFree: +1 800 868 0441 Home CareFax: +1 630 307 6195E-mail: [email protected]
Address page - REV 24: 04/2019
www.arjo.com

At Arjo, we are committed to improving the everyday lives of people affected by reduced mobility and age-related health challenges. With products and solutions that ensure ergonomic patient handling, personal hygiene, disinfection, diagnostics, and the effective prevention of pressure ulcers and venous thromboembolism, we help professionals across care environments to continually raise
ArjoHuntleigh ABHans Michelsensgatan 10 211 20 Malmö, Swedenwww.arjo.com