ak90-f - avfimg.com · ak90-f english language / langue française leaflet no. / notice n° 464824...
TRANSCRIPT

AK90-FEnglish language / Langue française
Leaflet No. / Notice n° 464824 rev 00
Read through ALL instructions before commencing installation.If you have any questions about this product or issues with installation contact the customer services help line before returning this product to the store.
STOP
ATTENTION
Lisez toutes les instructions avant de débuter l'installation.Si vous avez des questions sur ce produit ou des problèmes d'installation, contactez l'assistance client avant de ramener le produit en magasin.
CUSTOMER SERVICES HELP LINE NUMBER:NUMÉRO DE L'ASSISTANCE CLIENT:
1-800 667 0808 (USA)10kg22lbs
AVF Incorporated. 3187, Cornerstone Drive, Eastvale, CA91752, USA.

Tools RecommendedOutils recommandés
Boxed PartsPièces empaquetées
A A
B
B
C
C
D
E
D
E

F x2
J1 x2
J6 x2
J11 x2
G x2
J2 x2
J7 x2
J12 x2
H x2
J3 x2
J8 x2
K x2
I1 x6
J4 x4
J9 x2
L x4
I2 x4
J5 x2
J10 x2
M x2
M5
12m
m
M4
12m
m
M4
16m
m
M5
10m
m
M5
16m
m
M6
10m
m
M6
12m
m
M6
16m
m
M8
10m
m
M8
12m
m
M8
16m
m
M8
25m
m
N x2

Introduction
Before you begin please take time to read through this introduction and instructions tofamiliarise yourself with the product and to also help you select the best way to attachyour Soundbar. This instruction manual covers many different configurations and is verycomprehensive. Please do not be put off by this as you will only need to follow a few steps.
This introduction gives you a basic idea as to what steps are involved in mounting yourSoundbar to your TV.
Avant de commencer, veuillez prendre le temps de lire cette introduction ainsi que lesinstructions pour vous familiariser avec le produit, mais également pour vous aider àchoisir la meilleure manière de fixer votre Soundbar. Ce manuel d'utilisation aborde denombreuses configurations différentes et est très exhaustif. Veuillez ne pas renoncer àcette lecture étant donné que vous n'aurez besoin de suivre que quelques étapes.
Cette introduction vous procure une idée de base s'agissant des étapes nécessairespour installer votre Soundbar sur votre téléviseur.
X1
X2
X3
Measure your TV and Soundbar fixing holesMesurez les trous de fixation de votre téléviseur et du Soundbar
Prepare the Soundbar Mount BracketPréparez le support de montage du Soundbar
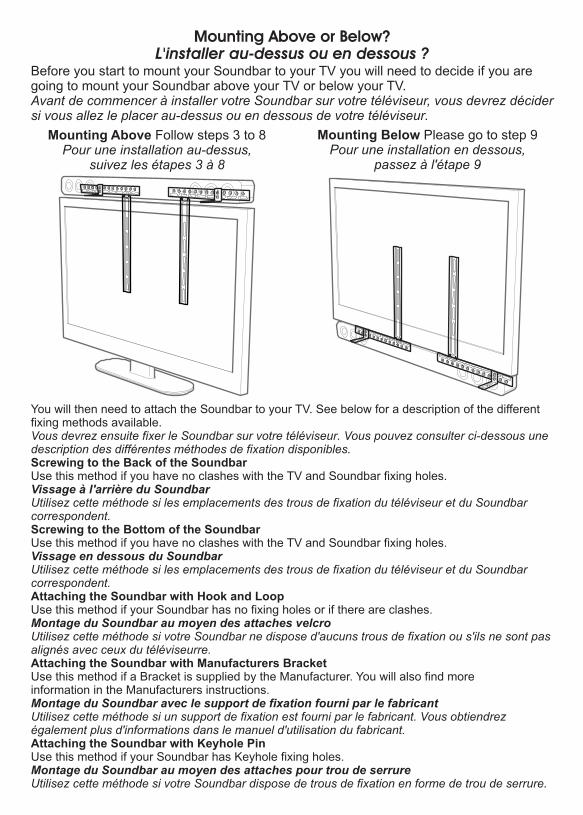
Before you start to mount your Soundbar to your TV you will need to decide if you aregoing to mount your Soundbar above your TV or below your TV. Avant de commencer à installer votre Soundbar sur votre téléviseur, vous devrez décidersi vous allez le placer au-dessus ou en dessous de votre téléviseur.
Mounting Above Follow steps 3 to 8Pour une installation au-dessus,
suivez les étapes 3 à 8
Mounting Below Please go to step 9Pour une installation en dessous,
passez à l'étape 9
You will then need to attach the Soundbar to your TV. See below for a description of the differentfixing methods available.Vous devrez ensuite fixer le Soundbar sur votre téléviseur. Vous pouvez consulter ci-dessous unedescription des différentes méthodes de fixation disponibles.Screwing to the Back of the SoundbarUse this method if you have no clashes with the TV and Soundbar fixing holes.Vissage à l'arrière du SoundbarUtilisez cette méthode si les emplacements des trous de fixation du téléviseur et du Soundbarcorrespondent.Screwing to the Bottom of the SoundbarUse this method if you have no clashes with the TV and Soundbar fixing holes.Vissage en dessous du SoundbarUtilisez cette méthode si les emplacements des trous de fixation du téléviseur et du Soundbarcorrespondent.Attaching the Soundbar with Hook and LoopUse this method if your Soundbar has no fixing holes or if there are clashes.Montage du Soundbar au moyen des attaches velcroUtilisez cette méthode si votre Soundbar ne dispose d'aucuns trous de fixation ou s'ils ne sont pasalignés avec ceux du téléviseurre.Attaching the Soundbar with Manufacturers BracketUse this method if a Bracket is supplied by the Manufacturer. You will also find moreinformation in the Manufacturers instructions.Montage du Soundbar avec le support de fixation fourni par le fabricantUtilisez cette méthode si un support de fixation est fourni par le fabricant. Vous obtiendrezégalement plus d'informations dans le manuel d'utilisation du fabricant.Attaching the Soundbar with Keyhole PinUse this method if your Soundbar has Keyhole fixing holes.Montage du Soundbar au moyen des attaches pour trou de serrureUtilisez cette méthode si votre Soundbar dispose de trous de fixation en forme de trou de serrure.
Mounting Above or Below?L'installer au-dessus ou en dessous ?

Measure your TV and Soundbar fixing holesMesurez les trous de fixation de votre téléviseur et du Soundbar1
Measure the width of the fixing holes on theback of your TV (X1) and the back or bottomof your Soundbar (X2) or the length of yourSoundbar (X3) if it has no fixing holes.Mesurez l'espacement des trous defixation à l'arrière de votre téléviseur(X1) et au dos ou en dessous devotre Soundbar (X2), ou bien lalongueur du Soundbar (X3) s'il neprésente pas de trous de fixation.
X1
X2
X3
B B B
300mm 200mm
X1 X1
700mm
X2
300mm
X2
Example shows soundbar with no fixing holes.Les exemples montrent un Soundbar nedisposant pas de trous de fixation.
300mm
X1
A A A A
B B
If your TV fixing holes and Soundbar fixing holes are equalyou will not be able to screw directly to the back or bottom ofyour Soundbar. In this case you will need to use a different method for attaching.Si les trous de fixation de votre téléviseur et de votre Soundbar correspondent, vous ne serezpas en mesure de procéder à un vissage directement à l'arrière ou en dessous de votreSoundbar. Dans ce cas, vous devrez utiliser une méthode différente de fixation.
Before you attach horizontal bracket B to vertical bracket A use measurements X1 and X2or X1 and X3 to decide the best configuration. Please see below for examples.Avant de fixer le support horizontal B au support vertical A, utilisez les mesures X1 et X2ou X1 et X3 pour choisir la meilleure configuration. Vous trouverez ci-dessous des exemples.
Examples show soundbarwith fixing holes.Les exemples montrentun Soundbar disposantde trous de fixation.
X3
800mm
AA

Prepare the Soundbar Mount BracketPréparez le support de montage du Soundbar2
Use measurements X1 & X2 or X3 from Step 1Utilisez les mesures X1 et X2 ou X3 obtenues lors de la 1re étape
H x2
A
B
B
H
H
Before you start to mount your Soundbar to your TV you will need to decide if you are going tomount your Soundbar above your TV or below your TV. Avant de commencer à installer votre Soundbar sur votre téléviseur, vous devrez décider si vousallez le placer au-dessus ou en dessous de votre téléviseur.
Mounting Above Follow steps 3 to 8Pour une installation au-dessus,
suivez les étapes 3 à 8
Mounting Below Please go to step 9Pour une installation en dessous,
passez à l'étape 9
Mounting Above or Below?L'installer au-dessus ou en dessous ?

You only need to follow one of steps 3 to 7 if you have chosen to have your Soundbar mountedabove your TV.
Please select your method of attaching your Soundbar to your TV and follow the appropriate steps.
Screwing to the Back of the SoundbarScrewing to the Bottom of the Soundbar
Attaching the Soundbar with Hook and LoopAttaching the Soundbar with Manufacturers Bracket
Attaching the Soundbar with Keyhole Pin
- Step 3- Step 4- Step 5- Step 6- Step 7
Mounting AboveMontage au-dessus
Vous avez uniquement besoin de suivre l'une des étapes 3 à 7 si vous avez choisi de placer votrSoundbar au-dessus de votre téléviseur.
Veuillez choisir votre méthode de fixation du Soundbar à votre téléviseur et suivezles étapes correspondantes.
Vissage à l'arrière du SoundbarVissage en dessous du Soundbar
Montage du Soundbar au moyen des attaches velcroMontage du Soundbar avec le support de fixation fourni par le fabricant
Montage du Soundbar au moyen des attaches pour trou de serrure
- Étape 3- Étape 4- Étape 5- Étape 6- Étape 7
Screwing to the Back of the SoundbarVissage à l'arrière du Soundbar3
Attach the brackets to the back of your Soundbar using suitable screw and reducer combinations.Attachez l'applique au dos de votre Soundbar en utilisant une combinaison de vis, deséparateurs et de joints adaptés
J10 x2
J7 x2J4 x2
J1 x2
I1 x2
F x2
I1 x2
I2 x2
F x2
I1 x2
F x2 F x2
Screw diameterdependant
Dépendant dudiamètre de la vis
I1 I2
J1/J4/J7/J10
F

Screw diameterdependant
Dépendant dudiamètre de la vis
If you are attaching your Soundbarto a free standing TV please use thisstep in conjunction with step 8
Si vous fixez votre barre audio sur untéléviseur sans support, veuillezsuivre cette étape en association avecl'étape 8.
If you are attaching your Soundbarto a wall mounted TV please use thisstep in conjunction with the instructionsprovided with your TV wall mount.
Si vous fixez votre barre audio sur untéléviseur mural, veuillez suivre cetteétape en association avec lesinstructions fournies avec votresupport mural.
The brackets and the screwsshown in grey are only an example.These are supplied by the TVwall mount manufacturer.
Les supports et les vis indiqués engris ne constituent qu'un exemple.Ceux-ci sont fournis par le fabricantde votre support mural pour téléviseur.
J2/J5/J8/J11/J12
I2I1
N
Free Standing TVTéléviseur sans support
Wall Mounted TVTéléviseur sur support mural

Screwing to the Bottom of the SoundbarVissage en dessous du Soundbar
Attaching Shelf BracketsFixation des supports de tablette
Attaching SoundbarFixation du Soundbar
Screw diameter dependantDépendant du diamètre
de la vis
4
J9 x2J6 x2J3 x2
J1 x2
I1 x2I1 x2
I2 x2
I1 x2 K x2
J4
C
LI1
i
ii
I1 I2
J1/J3/J6
J9K
Attach the brackets to the bottom of your Soundbar using suitable screw and reducer combinations.Attachez l'applique de votre Soundbar en utilisant une combinaison de vis, deséparateurs et de joints adaptés
en dessous

Screw diameterdependant
Dépendant dudiamètre de la vis
The brackets and the screwsshown in grey are only an example.These are supplied by the TVwall mount manufacturer.
Les supports et les vis indiqués engris ne constituent qu'un exemple.Ceux-ci sont fournis par le fabricantde votre support mural pour téléviseur.
J2/J5/J8/J11/J12
I1 I2
N
If you are attaching your Soundbarto a free standing TV please use thisstep in conjunction with step 8
Si vous fixez votre barre audio sur untéléviseur sans support, veuillezsuivre cette étape en association avecl'étape 8.
If you are attaching your Soundbarto a wall mounted TV please use thisstep in conjunction with the instructionsprovided with your TV wall mount.
Si vous fixez votre barre audio sur untéléviseur mural, veuillez suivre cetteétape en association avec lesinstructions fournies avec votresupport mural..
Free Standing TVTéléviseur sans support
Wall Mounted TVTéléviseur sur support mural

Attaching the Soundbar with Hook and LoopMontage du Soundbar au moyen des attaches velcro5
iAttaching Shelf Brackets and Hook and Loop PadsFixation des supports de tablette au moyen des attaches velcro
J4
C
LI1
D/E
Screw diameterdependant
Dépendant dudiamètre de la vis
J2/J5/J8/J11/J12
I1 I2
If you are attaching your Soundbarto a free standing TV please use thisstep in conjunction with step 8
Si vous fixez votre barre audio sur untéléviseur sans support, veuillezsuivre cette étape en association avecl'étape 8.
Free Standing TVTéléviseur sans support

Free Standing TV or Wall Mounted TVTéléviseurs sans support ou avec support mural
This step is for Free Standing or Wall Mounted MethodCette étape concerne la méthode à suivre pour les téléviseurs
sans support ou sur support mural
i
ii
The brackets and the screwsshown in grey are only an example.These are supplied by the TVwall mount manufacturer.
Les supports et les vis indiqués engris ne constituent qu'un exemple.Ceux-ci sont fournis par le fabricantde votre support mural pour téléviseur.
N
If you are attaching your Soundbarto a wall mounted TV please use thisstep in conjunction with the instructionsprovided with your TV wall mount.
Si vous fixez votre barre audio sur untéléviseur mural, veuillez suivre cetteétape en association avec lesinstructions fournies avec votresupport mural.
Wall Mounted TVTéléviseur sur support mural

Attaching the Soundbar with Manufacturers BracketMontage du Soundbar avec le support de fixation fourni par le fabricant
Attaching manufacturers bracket. Please note this bracket is not included.The image below shows an example of a bracket.Fixation du support fourni par le fabricant. Veuillez noter que ce support n'est pasinclus. L'image ci-dessous montre un exemple de support.
6
i
I1
J4
L
Screw diameterdependant
Dépendant dudiamètre de la vis
J2/J5/J8/J11/J12
I1 I2
If you are attaching your Soundbarto a free standing TV please use thisstep in conjunction with step 8
Si vous fixez votre barre audio sur untéléviseur sans support, veuillezsuivre cette étape en association avecl'étape 8.
Free Standing TVTéléviseur sans support

This step is for Free Standing or Wall Mounted TV
Attach your Soundbar as per the manufacturers instructions
Cette étape concerne la méthode à suivre pour les téléviseurssans support ou sur support mural
Fixez votre Soundbar en suivant les instructions du fabricant
N
The brackets and the screwsshown in grey are only an example.These are supplied by the TVwall mount manufacturer.
Les supports et les vis indiqués engris ne constituent qu'un exemple.Ceux-ci sont fournis par le fabricantde votre support mural pour téléviseur.
If you are attaching your Soundbarto a wall mounted TV please use thisstep in conjunction with the instructionsprovided with your TV wall mount.
Si vous fixez votre barre audio sur untéléviseur mural, veuillez suivre cetteétape en association avec lesinstructions fournies avec votresupport mural..
Wall Mounted TVTéléviseur sur support mural
Free Standing TV or Wall Mounted TVTéléviseurs sans support ou avec support mural

Attaching to Soundbar with Keyhole PinMontage du Soundbar au moyen des attaches pour trou de serrure7
Screw diameterdependant
Dépendant dudiamètre de la vis
The brackets and the screwsshown in grey are only an example.These are supplied by the TVwall mount manufacturer.
Les supports et les vis indiqués engris ne constituent qu'un exemple.Ceux-ci sont fournis par le fabricantde votre support mural pour téléviseur.
J2/J5/J8/J11/J12
I1 I2
N
Free Standing TVTéléviseur sans support
If you are attaching your Soundbarto a free standing TV please use thisstep in conjunction with step 8
Si vous fixez votre barre audio sur untéléviseur sans support, veuillezsuivre cette étape en association avecl'étape 8.
If you are attaching your Soundbarto a wall mounted TV please use thisstep in conjunction with the instructionsprovided with your TV wall mount.
Si vous fixez votre barre audio sur untéléviseur mural, veuillez suivre cetteétape en association avec lesinstructions fournies avec votresupport mural..
Wall Mounted TVTéléviseur sur support mural

8
You will only needto use this step ifyou are attachingyour Soundbar toa free standing TV
Vous ne devreztenir compte decette étape que sivous fixez votrebarre audio surun téléviseursans support
Attaching Soundbar Bracket to TVFixer les supports de la barre audio au téléviseur
J8 x2J5 x2
J2 x2
I1 x2I1 x2
I2 x2
I1 x2
J11/J12 x2
I1 I2
J2 J5 J8 J11 J12
ScrewdiameterdependantDépendantdu diamètrede la vis
G x2 I1 x2 M x2
I1
MG
Free Standing TV or Wall Mounted TVTéléviseurs sans support ou avec support mural
This step is for Free Standingor Wall Mounted MethodCette étape concerne laméthode à suivre pour lestéléviseurs sans supportou sur support mural
Attach the brackets to the back of your TV using suitable screw and reducer combinations.Attachez l'applique au dos de votre téléviseur en utilisant une combinaison de vis, de séparateurset de joints adaptés

Screwing to the Back of the SoundbarScrewing to the Bottom of the Soundbar
Attaching the Soundbar with Hook and LoopAttaching the Soundbar with Manufacturers Bracket
Attaching the Soundbar with Keyhole Pin
- Step 9- Step 10- Step 11- Step 12- Step 13
Vous avez uniquement besoin de suivre l'une des étapes 9 à 13 si vous avez choisi de placer votreSoundbar en dessous de votre téléviseur.
Veuillez choisir votre méthode de fixation du Soundbar à votre téléviseur et suivezles étapes correspondantes.
Vissage à l'arrière du SoundbarVissage en dessous du Soundbar
Montage du Soundbar au moyen des attaches velcroMontage du Soundbar avec le support de fixation fourni par le fabricant
Montage du Soundbar au moyen des attaches pour trou de serrure
- Étape 9- Étape 10- Étape 11- Étape 12- Étape 13
You only need to follow one of steps 9 to 13 if you have chosen to have your Soundbar mountedbelow your TV.
Please select your method of attaching your Soundbar to your TV and follow the appropriate steps.
J10 x2
J7 x2
I1 x2
F x2 F x2
Mounting BelowMontage en dessous
Screwing to the Back of the SoundbarVissage à l'arrière du Soundbar
J4 x2
I1 x2
F x2
9
J1 x2
I1 x2
I2 x2
F x2
Screw diameterdependant
Dépendant dudiamètre de la vis
J1/J4/J7/J10
F
I1 I2
Attach the brackets to the back of your Soundbar using suitable screw and reducer combinations.Attachez l'applique au dos de votre Soundbar en utilisant une combinaison de vis, de séparateurset de joints adaptés

J2/J5/J8/J11/J12
I1 I2
N
Screw diameter dependantDépendant du diamètre de la vis
The brackets and the screwsshown in grey are only an example.These are supplied by the TVwall mount manufacturer.
Les supports et les vis indiqués engris ne constituent qu'un exemple.Ceux-ci sont fournis par le fabricantde votre support mural pour téléviseur.
If you are attaching your Soundbarto a free standing TV please use thisstep in conjunction with step 14
Si vous fixez votre barre audio sur untéléviseur sans support, veuillezsuivre cette étape en association avecl'étape 14.
Free Standing TVTéléviseur sans support
Wall Mounted TVTéléviseur sur support mural
If you are attaching your Soundbarto a wall mounted TV please use thisstep in conjunction with the instructionsprovided with your TV wall mount.
Si vous fixez votre barre audio sur untéléviseur mural, veuillez suivre cetteétape en association avec lesinstructions fournies avec votresupport mural..

i
ii
Screwing to the Bottom of the SoundbarVissage en dessous du Soundbar
Attaching Shelf BracketsFixation des supports de tablette
Attaching SoundbarFixation du Soundbar
10
Screw diameterdependant
Dépendant dudiamètre de la vis
I1 I2
J1/J3/J6
J9K
J4
C
L
I1
J9 x2J6 x2J3 x2
J1 x2
I1 x2I1 x2
I2 x2
I1 x2 K x2
Attach the brackets to the bottom of your Soundbar using suitable screw and reducer combinations.Attachez l'applique de votre Soundbar en utilisant une combinaison de vis, deséparateurs et de joints adaptés
en dessous

J2/J5/J8/J11/J12
I2I1
N
Screw diameter dependantDépendant du diamètre de la vis
The brackets and the screwsshown in grey are only an example.These are supplied by the TVwall mount manufacturer.
Les supports et les vis indiqués engris ne constituent qu'un exemple.Ceux-ci sont fournis par le fabricantde votre support mural pour téléviseur.
If you are attaching your Soundbarto a free standing TV please use thisstep in conjunction with step 14
Si vous fixez votre barre audio sur untéléviseur sans support, veuillezsuivre cette étape en association avecl'étape 14.
Free Standing TVTéléviseur sans support
Wall Mounted TVTéléviseur sur support mural
If you are attaching your Soundbarto a wall mounted TV please use thisstep in conjunction with the instructionsprovided with your TV wall mount.
Si vous fixez votre barre audio sur untéléviseur mural, veuillez suivre cetteétape en association avec lesinstructions fournies avec votresupport mural..

i
11
SD/SE
SJ4
SC
SL
SI1
Attaching the Soundbar with Hook and LoopMontage du Soundbar au moyen des attaches velcro
Attaching Shelf Brackets and Hook and Loop PadsFixation des supports de tablette au moyen des attaches velcro
Screw diameter dependantDépendant du diamètre de la vis
J2/J5/J8/J11/J12
I2I1
If you are attaching your Soundbarto a free standing TV please use thisstep in conjunction with step 14
Si vous fixez votre barre audio sur untéléviseur sans support, veuillezsuivre cette étape en association avecl'étape 14.
Free Standing TVTéléviseur sans support

N
The brackets and the screwsshown in grey are only an example.These are supplied by the TVwall mount manufacturer.
Les supports et les vis indiqués engris ne constituent qu'un exemple.Ceux-ci sont fournis par le fabricantde votre support mural pour téléviseur.
Wall Mounted TVTéléviseur sur support mural
If you are attaching your Soundbarto a wall mounted TV please use thisstep in conjunction with the instructionsprovided with your TV wall mount.
Si vous fixez votre barre audio sur untéléviseur mural, veuillez suivre cetteétape en association avec lesinstructions fournies avec votresupport mural..
Free Standing TV or Wall Mounted TVTéléviseurs sans support ou avec support mural
This step is for Free Standing orWall Mounted MethodCette étape concerne la méthodeà suivre pour les téléviseurs sanssupport ou sur support mural
ii
i

i
12 Attaching the Soundbar with Manufacturers BracketMontage du Soundbar avec le support de fixation fourni par le fabricant
Attaching manufacturers bracket. Please note this bracket is not included.The image below shows an example of a bracket.Fixation du support fourni par le fabricant. Veuillez noter que ce support n'est pasinclus. L'image ci-dessous montre un exemple de support.
I1
J4
L
J2/J5/J8/J11/J12
I2I1
Screw diameter dependantDépendant du diamètre de la vis
If you are attaching your Soundbarto a free standing TV please use thisstep in conjunction with step 14
Si vous fixez votre barre audio sur untéléviseur sans support, veuillezsuivre cette étape en association avecl'étape 14.
Free Standing TVTéléviseur sans support

This step is for Free Standingor Wall Mounted Method
Cette étape concerne la méthodeà suivre pour les téléviseurs
sans support ou sur support mural
Fixez votre Soundbar en suivantles instructions du fabricant
Attach your Soundbar as perthe manufacturers instructions
The brackets and the screwsshown in grey are only an example.These are supplied by the TVwall mount manufacturer.
Les supports et les vis indiqués engris ne constituent qu'un exemple.Ceux-ci sont fournis par le fabricantde votre support mural pour téléviseur.
N
Wall Mounted TVTéléviseur sur support mural
If you are attaching your Soundbarto a wall mounted TV please use thisstep in conjunction with the instructionsprovided with your TV wall mount.
Si vous fixez votre barre audio sur untéléviseur mural, veuillez suivre cetteétape en association avec lesinstructions fournies avec votresupport mural..
Free Standing TV or Wall Mounted TVTéléviseurs sans support ou avec support mural

13 Attaching to Soundbar with Keyhole PinMontage du Soundbar au moyen des attaches pour trou de serrure
The brackets and the screwsshown in grey are only an example.These are supplied by the TVwall mount manufacturer.
Les supports et les vis indiqués engris ne constituent qu'un exemple.Ceux-ci sont fournis par le fabricantde votre support mural pour téléviseur.
N
Screw diameter dependantDépendant du diamètre de la vis
J2/J5/J8/J11/J12
I1 I2
Wall Mounted TVTéléviseur sur support mural
If you are attaching your Soundbarto a wall mounted TV please use thisstep in conjunction with the instructionsprovided with your TV wall mount.
Si vous fixez votre barre audio sur untéléviseur mural, veuillez suivre cetteétape en association avec lesinstructions fournies avec votresupport mural..
If you are attaching your Soundbarto a free standing TV please use thisstep in conjunction with step 14
Si vous fixez votre barre audio sur untéléviseur sans support, veuillezsuivre cette étape en association avecl'étape 14.
Free Standing TVTéléviseur sans support

14
Attach the brackets to the back of your TV using suitable screw and reducer combinations.Attachez l'applique au dos de votre téléviseur en utilisant une combinaison de vis, de séparateurset de joints adaptés
J8 x2J5 x2
J2 x2
I1 x2I1 x2
I2 x2
I1 x2
J11/J12 x2
J2 J5 J8 J11 J12
G x2
I1 x2 M x2
I1 I2
ScrewdiameterdependantDépendantdu diamètrede la vis
G I1 M
You will only needto use this step ifyou are attachingyour Soundbar toa free standing TV
Vous ne devreztenir compte decette étape que sivous fixez votrebarre audio surun téléviseursans support
Attaching Soundbar Bracket to TVFixer les supports de la barre audio au téléviseur
Free Standing TV or Wall Mounted TVTéléviseurs sans support ou avec support mural
This step is for Free Standingor Wall Mounted MethodCette étape concerne la méthode àsuivre pour les téléviseurs sanssupport ou sur support mural