air actuated tensioner - benetech · user’s failure to inspect equipment ... grinding or drilling...
TRANSCRIPT

Air Actuated Tensioner
Maintenance Guide

P a g e | 2
! IMPORTANT !
BENETECH, INC. HEREBY DISCLAIMS ANY LIABILITY FOR, BUT NOT LIMITED TO:
IMPROPER INSTALLATION OF EQUIPMENT IMPROPER SIZING OF EQUIPMENT DAMAGE DUE TO CONTAMINATION OF MATERIAL USER’S FAILURE TO INSPECT EQUIPMENT USER’S FAILURE TO MAINTAIN EQUIPMENT USER’S FAILURE TO TAKE REASONABLE CARE OF THE EQUIPMENT INJURIES OR DAMAGE RESULTING FROM USE OR APPLICATION OF THIS PRODUCT
CONTRARY TO INSTRUCTIONS AND SPECIFICATIONS CONTAINED HEREIN.
BENETECH, INC.’S LIABILITY SHALL BE LIMITED TO REPAIR OR REPLACEMENT OF EQUIPMENT SHOWN TO BE DEFECTIVE.
! SAFETY ! Review and understand all safety rules given herein along with local and Governmental standards and regulations. Know and understand the American National Standards Institute (ANSI) z244.1-1982 lockout/tagout procedures, the American National Standard for Personnel Protection - Lockout/Tagout of Energy Sources - Minimum Safety Requirements and the Occupational Safety and Health Administration (OSHA) Federal Register, Part IV, 29 CFR Part 1910, Control of Hazardous Energy Source (Lockout/Tagout); Final Rule. Also observe all local and Governmental regulations concerning entry into confined spaces, welding, cutting, grinding, wash-down procedures and all Personal Protective Equipment (PPE) regulations.
The following notations are used throughout in this manual.
! DANGER ! Danger: Denotes immediate hazards that will result in severe personal injury or death.
! WARNING ! Warning: Denotes hazards or unsafe practices that could result in personal injury.
! IMPORTANT ! Important: Denotes instructions that must be followed for proper installation and/or
operation of equipment.
NOTE Note: Denotes general items to assist the reader/ installer/ operator.
*** Please pay close attention to all of these items and warnings.
They have been included here for your safety and for ease of installation.

P a g e | 3
All safety rules defined in this document and all owner/employer as well as State and Federal safety rules must be strictly adhered to when working on/with this, or any, conveyor plow system.
! DANGER ! Do not touch or go near the conveyor belt or conveyor accessories when the belt is running. Your body or clothing can get caught and you can be pulled into the conveyor, resulting in severe injury or death
! DANGER ! Before installing, servicing, or adjusting the plow, turn off AND lock out/tag out all energy sources to the conveyor and conveyor accessories according to ANSI standards. Failure to do so could result in serious injury or death.
! DANGER ! If this equipment is to be installed in an enclosed area, observe all confined space entry regulations and test the atmosphere for gas levels and dust content levels before using a cutting torch, welding equipment or electric hand tools. Using a torch, welding, grinding or drilling in an area with gas or dust may cause an explosion and/or fire resulting in serious injury or death.
! WARNING ! Before using a cutting torch, welders, or grinding equipment, cover the conveyor belt with a fire retardant/resistant cover. Make sure a water source/fire hose is readily available AND OPERATIONAL. Failure to do so can allow the belt to catch fire.
! WARNING !
Conveyor plows are heavy and may require two people to lift. Attempting to lift the plow without assistance could result in injuries or damage to the equipment.
1

P a g e | 4
Before Installing Air Actuators
1. Inspect ALL shipping containers for damage and correct number of items (skids, pallets, cartons, boxes, etc.) being delivered. Report damage and/or shortages to delivery service immediately and fill out delivery service’s claim form. Keep ALL damaged goods for examination. Benetech Inc is NOT responsible for damage occurring during transit.
2. All Benetech Inc. Belt Cleaners are shipped from our facilities partially assembled. Care should be taken while dissembling the units to ensure no parts are lost or damaged as the equipment is moved to its desired location. Dispose of shipping containers in an approved manner. 3. If any items are missing, IMMEDIATELY contact BENETECH, INC. or an authorized representative. 4. Gather tools. Minimum tools required for installation are:
Tape measure/ String Torch/Hole Saw Level/Straight Edge Welder/Drill Open/Box End Wrenches Socket Set Marker/Soapstone (Welders chalk)
5. If using a cutting torch or welding, test atmosphere for gas level or dust content. Cover conveyor belt with fire retardant cover. Verify locations of fire extinguishers and operational water hoses prior to begin cutting/welding operations.
! WARNING ! Before installing equipment, turn off AND lock out/tag out all energy sources to the conveyor and conveyor accessories according to ANSI standards and local plant regulations. Failure to do so could result in serious injury or death. If equipment will be installed in an enclosed area, the atmosphere in the structure/area must be tested for gas levels and dust content levels before using a cutting torch, welding equipment, grinding equipment or electric powered tools. Using a cutting torch, welding, drilling or grinding in an area with gas or dust may cause an explosion.

P a g e | 5
Pneumatic System Arrangement
The Benetech Air Actuated tensioners are available for Benetech Primary belt cleaners and Secondary
Belt Cleaners. They are capable of automatically adjusting to proper blade tension which reduces the
need for manual re-adjustment.
This guide is intended to explain the correct operation of the air system. For Belt Cleaner and Tensioner
installation instructions, see the installation manual for the belt cleaner that you have purchased.
Shown below is the correct layout for the Air Actuator System.
! NOTE ! The hoses leading to the Actuators must be exactly the same length. If they are not the same
length, unequal pressure will be distributed to each Actuator.
Air Actuators
Pressure
gauges
Pressure
Regulators
To Air Supply
Purge Valve
Check Valve
Purge Valve
Check Valve

P a g e | 6
Pressurizing the Actuators
1. Open the valve to the air supply. This may be a pressurized tank or it may be a plant air supply.
Plant air is always preferred, but in locations without access, a pressurized tank may have been
provided.
Open Valve

P a g e | 7
2. Open the pressure regulators 1/4 turn.
3. Open the gauge valves to the correct pressure level shown on page 12. These knobs PULL
DOWN to unlock and press upward to lock. Unlock the knob and turn it slowly to avoid
overfilling the actuator. The Actuators are installed using one-way check valves, therefore they
must be bled using a separate valve.
Pressure Regulator Pressure Regulator
Pressure Gauge Pressure Gauge

P a g e | 8
4. After opening the pressure gauge valve, the actuator will inflate. Do this for both air actuators
(one or two on each side of the chute) making sure not to over pressurize them.
Inflated Actuator
Check valve
Purge Valve

P a g e | 9
Depressurizing the Actuators
1. Because the actuators are installed using check valves, they will stay inflated once the air supply
is shut off. To relieve the actuators of pressure, start by shutting the air supply valve.
2. Shut the pressure regulators. Turn them to the right until they stop. It should not be more than
¼ turn.
Close valve
Close valve
P a g e | 10
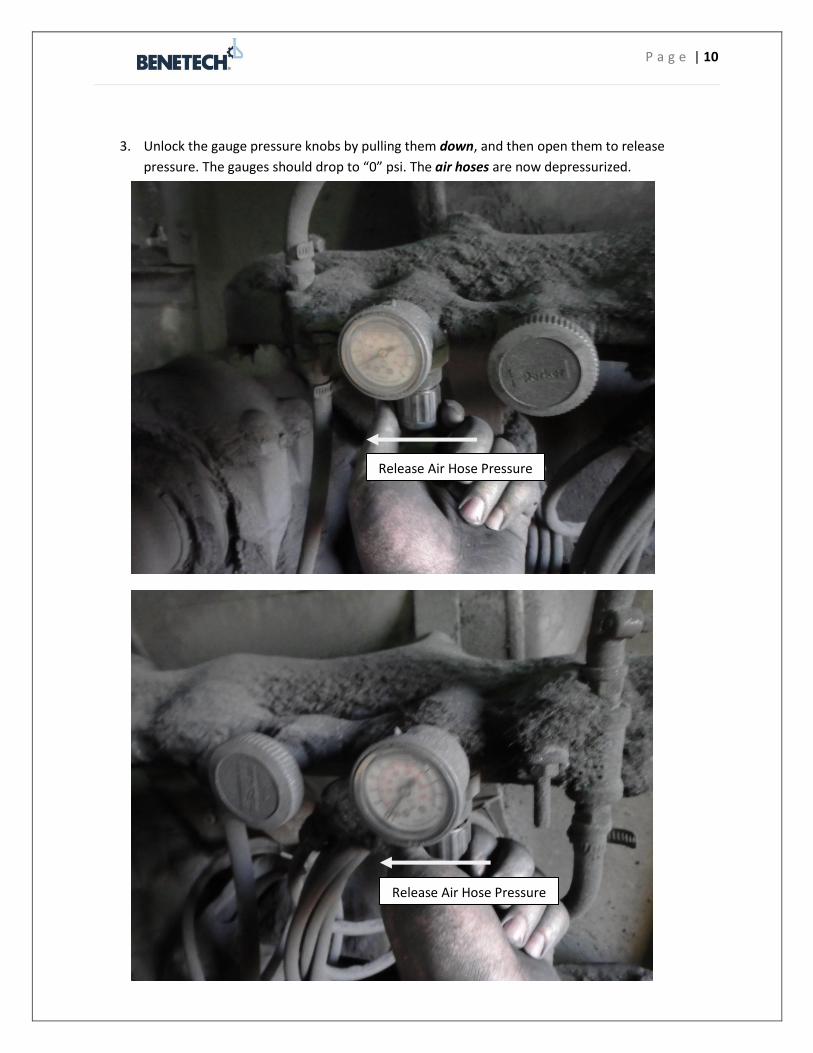
3. Unlock the gauge pressure knobs by pulling them down, and then open them to release
pressure. The gauges should drop to “0” psi. The air hoses are now depressurized.
Release Air Hose Pressure
Release Air Hose Pressure

P a g e | 11
4. Once the valves are shut and the air supply is off, the actuator purge valves need to be opened.
The purge valves are located on the bottom of the actuator. To open, simply turn them counter
clockwise. If it is not possible to do this by hand, it may be necessary to turn them using a
wrench.
! IMPORTANT ! The pressure gauges display the current pressure level of the AIR HOSES. The actuators may
actually be pressurized higher than this because the check valve causes them to retain pressure.
For Example: If the pressure is turned to 50psi, the actuators will inflate to 50psi.
If the pressure is then turned down to 35psi, the actuator will retain the 50psi level unless the purge valve is opened to relieve the extra pressure.
Purge valve opens
counterclockwise

P a g e | 12
Recommended Pressure
The chart below displays the required air pressure for various belt cleaner arrangements. In some cases
a single sided Air Actuated Tensioner may be used, in which case the air pressure is doubled. Dual
Tensioners (One on each side of the belt cleaner) split the pressure between both sides of the chute.
! WARNING ! Excessive tensioning can create premature wear of blades, damage to conveyor belt and excessive heat.
! DANGER ! Excessive heat created by excessive friction due to blades being improperly tensioned can create situations were fire and or explosions can occur
! WARNING ! Failure to remove tools from installation area and conveyor belt before turning on energy source can cause serious injury to personnel and damage to belt.
! WARNING ! Do not touch or go near conveyor belt or conveyor accessories when conveyor belt is running. Body or clothing can get caught and pull body into conveyor belt, causing severe injury or death.
Recommended Air pressure for Secondary Tensioners
Belt Width Inches
Belt Width MM
# Of Blades Single Tensioner
PSI
Dual Tensioner
PSI
18 457 4 21 10
24 610 5 26 13
30 762 7 36 18
36 914 8 42 21
42 1067 10 60 30
48 1219 12 70 35
54 1371 13 84 42
60 1524 15 98 49
72 1829 17 114 57
84 2133 21 120 60
P a g e | 13
Periodic Maintenance for Air Actuated BXS1
Periodic Maintenance is required to ensure the proper performance of Benetech Air Actuated BXS1
Secondary Belt Cleaners. Below is an outline of Weekly and Monthly maintenance checks as well as
trouble shooting information.
Weekly Maintenance
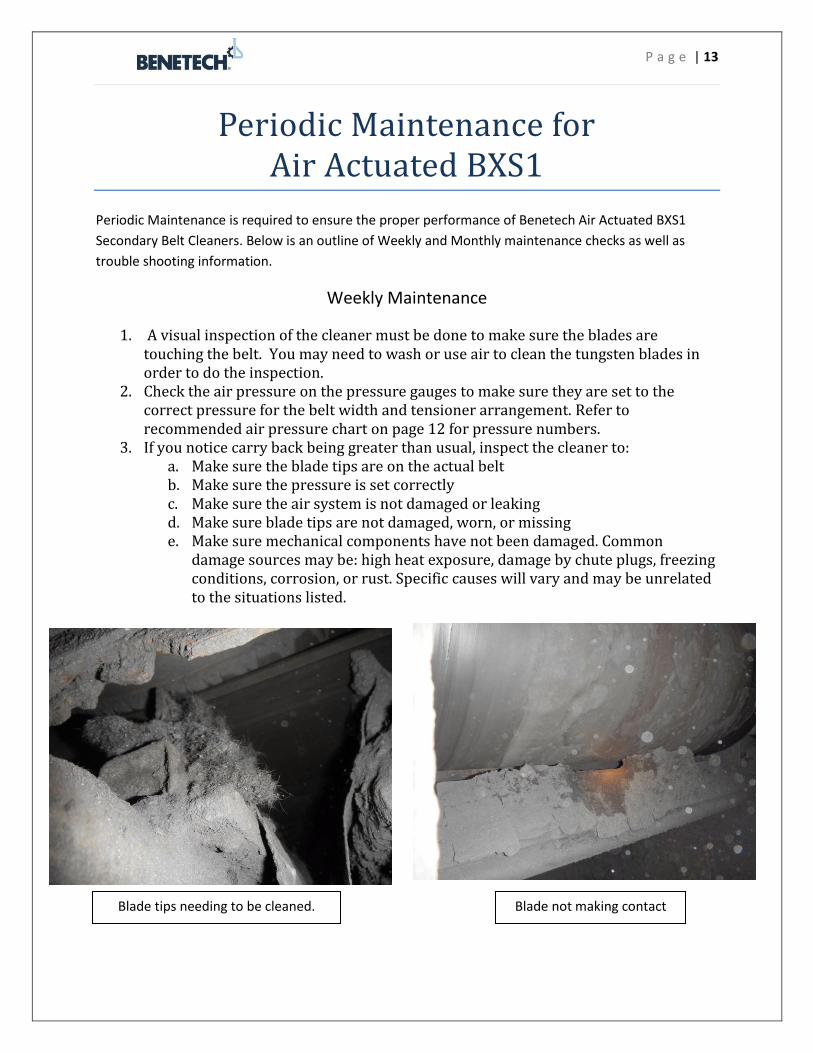
1. A visual inspection of the cleaner must be done to make sure the blades are touching the belt. You may need to wash or use air to clean the tungsten blades in order to do the inspection.
2. Check the air pressure on the pressure gauges to make sure they are set to the correct pressure for the belt width and tensioner arrangement. Refer to recommended air pressure chart on page 12 for pressure numbers.
3. If you notice carry back being greater than usual, inspect the cleaner to: a. Make sure the blade tips are on the actual belt b. Make sure the pressure is set correctly c. Make sure the air system is not damaged or leaking d. Make sure blade tips are not damaged, worn, or missing e. Make sure mechanical components have not been damaged. Common
damage sources may be: high heat exposure, damage by chute plugs, freezing conditions, corrosion, or rust. Specific causes will vary and may be unrelated to the situations listed.
Blade tips needing to be cleaned. Blade not making contact

P a g e | 14
Monthly Maintenance
1. The belt cleaners should be disengaged by closing the regulators and bleeding the actuators by following the procedure outlined on page 9. Air supply should be cut off from the actuator before opening the purge valves to bleed the pressurized air.
2. Inspect the tungsten blade tips to make sure they are in good operating order. Wash or use air to clean the tungsten blades in order to do the inspection. If the blade tips are damaged, worn, or missing, they will need to be replaced to continue good performance.
3. Check the tension arms for full range of movement. Dirt and corrosion can cause the metal components to bind at times, which will limit blade contact.
4. If blade and cleaner assembly is in good operating order, engage the system by following the procedure outlined on page 6.
! IMPORTANT ! If the cleaner is not in good operating order, remove it from service until you get the parts to
fix it. Once the cleaner is restored to operating order, you may put it back into service.
Benetech, Inc.
2245 Sequoia drive, Suite 300
Aurora Illinois 60506
P: 630-844-1300 F: 630-844-8690
www.benetechusa.com
Correctly Tensioned blades making
good contact with the belt.