advanced link manager user guide
TRANSCRIPT

Advanced Link Manager User Guide

Advanced Link Manager User GuideCopyright © 2005 - 2012 Caphyon Ltd. All Rights Reserved.
While every precaution has been taken in the preparation of this document, Caphyon Ltd. assumes no responsibility for errors or omissions, or fordamages resulting from the use of the information contained herein.


Table of Contents1. Introduction ............................................................................................................ 1
Frequently Asked Questions .................................................................................................. 12. Step-by-Step Tutorials .............................................................................................. 2
Getting Started ................................................................................................................... 2Basic Tutorial ..................................................................................................................... 6Advanced Tutorial ............................................................................................................... 8Find new link partners ........................................................................................................ 14Find new link partners by backlinks ...................................................................................... 24
3. The User Interface ................................................................................................. 29Main Menu ...................................................................................................................... 29Main Toolbar ................................................................................................................... 38Left-Side Panels ................................................................................................................ 39Quick actions panel ........................................................................................................... 40
4. Managing Projects ................................................................................................. 46Project Manager ................................................................................................................ 46Project Details .................................................................................................................. 46Reports ........................................................................................................................... 46Scheduled Tasks ............................................................................................................... 46Events ............................................................................................................................. 46Backups .......................................................................................................................... 46Creating a New Project ...................................................................................................... 46Project Settings ................................................................................................................. 47Renaming a Project ........................................................................................................... 47Deleting a Project .............................................................................................................. 47Duplicating a Project ......................................................................................................... 47Backup ........................................................................................................................... 47Restore ........................................................................................................................... 48Remove data .................................................................................................................... 49Address Book ................................................................................................................... 49FTP Profiles ..................................................................................................................... 50
5. Updating Projects .................................................................................................. 52Updating a Project ............................................................................................................. 52Gather links from Search Engines ........................................................................................ 52Gather only number of links from Search Engines ................................................................... 53Gather indexed pages from Search Engines ............................................................................ 54Import links from file ......................................................................................................... 54Verify Link Status ............................................................................................................. 54Gather rank ...................................................................................................................... 55Update reciprocal links ....................................................................................................... 55Verify Link Status (Forced) ................................................................................................. 55Update Multiple Projects .................................................................................................... 55Manually add referrers ....................................................................................................... 56The Update Progress Tab .................................................................................................... 57Current Updates ................................................................................................................ 59Current Multiple Updates ................................................................................................... 59History ............................................................................................................................ 59Find link partners .............................................................................................................. 61Search Engine and Keywords .............................................................................................. 61Refining the results ............................................................................................................ 62Find link partners by backlinks ............................................................................................ 65Search Engine and Keywords .............................................................................................. 65Refining the results ............................................................................................................ 65Competitive Analysis ......................................................................................................... 66
iv

6. Project Settings ..................................................................................................... 68Managing Domains ........................................................................................................... 68Selecting Search Engines .................................................................................................... 72Keywords ........................................................................................................................ 73Preferences ...................................................................................................................... 74Proxy settings ................................................................................................................... 77Email Settings .................................................................................................................. 78Client emails .................................................................................................................... 80
7. Scheduler ............................................................................................................. 82The scheduler wizard ......................................................................................................... 82Scheduling a project update ................................................................................................. 82Scheduling report generation ............................................................................................... 84Scheduling backups ........................................................................................................... 84View Scheduled Tasks ....................................................................................................... 84
8. Interactive Reports ................................................................................................. 87Domain Information .......................................................................................................... 87Domain Details ................................................................................................................. 90Email Composer ............................................................................................................... 91Message History ............................................................................................................... 92Reciprocal Details ............................................................................................................. 92Unverified Referrers .......................................................................................................... 92Referrers ......................................................................................................................... 97Backlinks Evolution ........................................................................................................ 104Search Engine Evolution .................................................................................................. 108Link Text ...................................................................................................................... 113The Keyword Analysis Tool .............................................................................................. 116Compare View ............................................................................................................... 117Overview View .............................................................................................................. 119The Email Client ............................................................................................................. 119The Broken Links report ................................................................................................... 121The Indexed Pages report .................................................................................................. 122Reciprocal linking ........................................................................................................... 123
9. Printable Reports ................................................................................................. 124Input ............................................................................................................................. 125Output .......................................................................................................................... 125Destination .................................................................................................................... 128Summary ....................................................................................................................... 130
10. The Event Logger .............................................................................................. 132The Event Logger ........................................................................................................... 132Detailed Event Information ............................................................................................... 133
11. Generate Link Pages ........................................................................................... 135Link Page HTML Layout .................................................................................................. 136Link Categories .............................................................................................................. 138
12. User Profiles and Access Groups ........................................................................... 139User Profiles .................................................................................................................. 139Access groups ................................................................................................................ 139
13. Header and Footer .............................................................................................. 140The Header .................................................................................................................... 140The Footer ..................................................................................................................... 141
14. Global Preferences ............................................................................................. 143Application .................................................................................................................... 143Email Settings ................................................................................................................ 146FTP settings ................................................................................................................... 149Performance ................................................................................................................... 150Proxy Settings ................................................................................................................ 154Report preferences .......................................................................................................... 155Keyword Analysis ........................................................................................................... 156
15. Proxy servers manager ........................................................................................ 159
Advanced Link Manager User Guide
v

Proxy servers manager ..................................................................................................... 15916. Website Crawler ................................................................................................ 160
Website Crawler ............................................................................................................. 16017. Google Maps Webpages Importer ......................................................................... 162
Google Maps Webpages Importer ...................................................................................... 16218. Webpage Analyzer ............................................................................................. 164
Webpage Analyzer .......................................................................................................... 16419. Notes ............................................................................................................... 166
Notes ............................................................................................................................ 16620. Search Engines Additional Parameters ................................................................... 167
Search Engines Additional Parameters ................................................................................ 16721. Analyze Domain Quality ..................................................................................... 168
Analyze Domain Quality .................................................................................................. 16822. Referrer Categories ............................................................................................ 169
Referrer Categories ......................................................................................................... 169Referrer Subcategories ..................................................................................................... 171
23. Install Server Edition Guide ................................................................................. 173Windows ....................................................................................................................... 173Mac OS X ..................................................................................................................... 173Linux ............................................................................................................................ 173Red Hat Distributions ...................................................................................................... 173Debian Distributions ........................................................................................................ 174Server Configuration ....................................................................................................... 175Connect Advanced Link Manager client to server .................................................................. 177
Advanced Link Manager User Guide
vi

Chapter 1. IntroductionWelcome to the Advanced Link Manager User Manual. This chapter provides an overview of the fea-tures and benefits of Advanced Link Manager as well as the organization of this book.
Advanced Link Manager is a tool that will help you check your web site link popularity on all majorsearch engines. It saves you long hours of tedious work, while tracking down web pages linking to yoursite. Advanced Link Manager generates tabular and graphical reports that will help you to quickly checkwhere you stand in terms of link popularity in comparison to your competitors as well as other major on-line players.
Advanced Link Manager is the tool of choice for SEOs, webmasters and site owners that demand high-quality reports measuring the volume and quality of web pages linking to them.
Frequently Asked QuestionsWe have compiled a list of Frequently Asked Questions on our website:
http://www.advancedlinkmanager.com/faqs.html
If you encounter a problem with Advanced Link Manager it is recommended that you first consult thislist before adding a ticket on our support center:
http://www.advancedlinkmanager.com/support-center.html
1

Chapter 2. Step-by-Step TutorialsWhen launching Advanced Link Manager for the first time, its features, settings and capabilities mayseem a little overwhelming. That is why we have created this tutorial, an intuitive, concise but, neverthe-less, comprehensive manual which is intended to ease you in, to help you quickly get started on monitor-ing web pages that link to you in one or multiple search engines, according to your preferences. As auser, you will be given a wide range of possibilities, as Advanced Link Manager can easily be adjustedto your particular needs, without its precision and transparency being affected.
The tutorial requires some interaction between you and the application. However, this may not be al-ways possible at the same time you are reading the tutorial. You can either switch between the Help taband the application, or you can download the PDF version of this user guide and follow it from there.You can also print the page you are interested in from the PDF document. Please visit our websitedownload page for the PDF version of this manual:
http://www.advancedlinkmanager.com/user-guide/pdf/en/alm_en.pdf
Getting Started1. Creating a New Project
Creating a new Advanced Link Manager project involves having a clear image of its utility and func-tionality on the part of the user. Therefore, you first need to know the exact domain of the website youare interested in. As an example, we have chosen for this tutorial the news service field as the startingpoint.
Go to [Project] -> [New Project] and the "New Project Wizard" dialog will pop up displaying the "Do-main Setup" screen. Here we'll type in "www.bbc.com" as being "our" site (which we'll refer to here astarget domain). It is its link popularity we want to monitor.
2

Click the [Next >>] button to proceed to the last screen in "New Project Wizard", then click on the[Finish] button to complete "New Project Wizard" and load the project in Advanced Link Manager.Next, the application prompts with a dialog, asking to enter the name of the project. The default projectname is the domain of the website, but it can be manually changed.
Step-by-Step Tutorials
3

After clicking [OK], our project has been successfully created and the application will ask whether wewant to start a project update. By default, the search engines added to the project are Bing and Google,and the update will run for these two search engines, and our website www.bbc.com.
The next time we want to update our project we need to bring up the "Update dialog".
2. Updating a projectTo update the current project go to [Update] -> [Start] menu item. The "Update" dialog will pop up.
We'll get into more details about what this dialog does later. For now, just click the [Start] button to startthe update.
The update consists of two steps:
• First it will look for pages (in each of the search engines from our project) that contain a link to ourwebsite, excluding our own website.
A "Progress" tab will show up, where we can follow the update's progress.
Step-by-Step Tutorials
4

• Next it will check whether the web pages found are actually linking to our website. Once the update iscomplete you will be able to see all the information gathered in the Interactive Reports. We will dis-cuss more about the reports in the next tutorial.
3. Monitoring our competitionNow let's say we also want to monitor some of our competitors. Let's go to [Project] -> [Project Set-tings]. The Project Settings dialog will pop up with the Domains tab selected by default. Let's add twomore websites to the list: "www.cnn.com" and "news.google.com". What we need to do is simply writethe domain names and click [Add].
Click on the [OK] button to save the new changes. We have just added the competition's domains in our
Step-by-Step Tutorials
5

project, but there is currently no data gathered for these new domains. So we need to update the projectusing the "Start update" icon from the toolbar. This second update will only update the data for the twonew domains we just added. When the update is complete, we can monitor the referrers of both our siteand our competitors' sites on the chart views and reports.
Next, check out the Basic Reporting tutorial to learn how to read the data from the reports.
Basic Tutorial1. Checking the quality of our referrers
Almost all major search engines that exist today, rank a web page based on the number and the qualityof links that point to that web page. The quality of the links directly affects the position of our websitefor relevant keyword searches. It is thus very important to keep track of the quality links we alreadyhave while trying to get more quality links in the meantime.
The Unverified Referrers report gives us a comprehensive view of our referrers as they are reported bythe search engines.
It is very important to understand that the referrers listed in this report may not have a link to our web-site. The referrers displayed here are reported by the search engines to have a link to our website. Thesearch engines crawled the page at some point in time and found a link to our website, but that link mayhave since been removed or more links may have been added meanwhile. That is the reason why theyare called Unverified Referrers. In the next tutorial, we will talk about the Referrers report, which willprovide us with accurate information about our existing links.
The Unverified Referrers report allows you to sort the referrers which will make identifying them aneasy task:
• Sort referrers by importance.
Using the "Rank" column we can sort the referrers by their rank. We can now easily see the most im-portant referrers. Referrers with high rankings will cast a more powerful "vote" to our pages increas-
Step-by-Step Tutorials
6

ing their relevance in search engine results.
Click on the "Rank" column header to sort referrers by their Rank.
• Sort referrers by IP.
Click on the "IP Address" table column header to sort referrers by their IP address. You now can eas-ily see the referrer domains with the same IP address. This is a valuable indicator of the quality ofyour referrers. If one of your pages is linked from multiple websites or webpages with the same IP ad-dress, it will not rank as well as if it were linked from multiple IP addresses.
2. Filtering referrersSometimes the number of web pages reported by the search engines as linking to your website can beoverwhelming. Filtering these web pages using a certain criteria will help in most cases. Here are someof the filters that can help you with this task:
• Filter referrers by rank.
Using the "Rank filter" we can filter out the referrers that have a lower rank. We can thus limitourselves to monitoring only the important referrers.
If you are not interested in monitoring referrers that have a low rank, you can safely delete them. Justfilter them by rank below 3 (for example) and then right click on the report and choose [Remove] ->[Selected].
• Filter invalid referrers.
The referrer information in the search engines can sometimes be outdated. As a result, we will have alot of referrers that are invalid (the referrer web page no longer exists). The "NotFound" filter fromthe Display drop down will help us with this task. Once we select this filter, we are presented with thelist of invalid referrers. If you see a website that is supposed to be linking to yours in this list, youmay want to get in touch with the webmaster and tell him about that. Otherwise we can safely deletethese referrers, to unclutter the list.
• Filter referrers by domain.
Let's say you want to see only the links linking to you from a certain referrer domain.
It's pretty easy, just:
• 1) select your website's domain in the left panel,
• 2) choose the "Domains" value in the "Filter by:" list box,
• 3) type in the domain of your choice in the "Filter by:" text box.Now you can see all web pages with matching domain names that were reported as linking to yourweb site.
Next, check out the Referrers Tutorial to learn how you can manage the real referrers of your website.
Step-by-Step Tutorials
7

Advanced TutorialThis tutorial will guide you through some more advanced features of Advanced Link Manager and willexplain in more detail the ones you've been introduced to so far in the Basic Reporting tutorial.
The Referrers ReportThe Referrers Report is a tabular report that displays the web pages that actually point to your target do-main along with a lot of related useful information.
The quality of both your referrers and the links pointing to your website (which are also known as back-links) are powerful factors that affect the position of your website for relevant keyword searches. TheReferrers report will show you a comprehensive view of your backlinks and how their importance isranked in the search engines.
Note
The information contained in this report will only be available after the second step of the update has beencompleted. This step is the one that checks whether your referrers are actually linking back.
The Referrers report is tied to a date: the date when the update was made. Thus the report will display(for each selected domain) the backlinks information for the date when the update took place.
When an update is currently running, you can still access the old data by going back to a previous date.The "Date" drop-down list box in the top right corner of the Referrers report allows you to select thedate for which the information is displayed:
Step-by-Step Tutorials
8

The first drop-down selects the date you wish to compare to, referred to from now on as the previousdate. The second drop-down selects the current date that the information is displayed for.
1. Checking the quality of your referrers and the numberof backlinks
With the Referrers report you can easily spot out the referrers casting the most valuable "votes" for you.Identifying those important referrers will be a lot easier if you sort the referrers using the available cri-teria:
• Sort referrers by rank.
Click on the "Rank" table column header to sort referrers by their Rank. You now can easily see refer-rer domains with high rankings.
This is a valuable indicator of the quality of your referrers because referrers with high rankings willcast a more powerful "vote" to your pages thus increasing their relevance in search engine results.
• Sort referrers by Alexa rank.
Click on the "Alexa Rank" table column header to sort referrers by their Alexa traffic rank value. Thisinformation is collected through the Alexa Toolbar from the users.
The lower the Alexa traffic rank, the more powerful the "vote" casted to your page is. This is becausea lower Alexa traffic rank for a referrer (indicating a greater number of visitors and page views forthat website) will increase the chance of getting more traffic to your web pages.
• Sort referrers by the number of outbound links.
Step-by-Step Tutorials
9

This is the overall number of links to other websites from the referrer URL/domain.
Click on the "Outbound Links" table column header to sort referrers by their outbound links number.You now can easily spot referrer domains with fairly big outbound links number.
The greater the overall numbers of outbound links, the least powerful the "vote" casted to your pageis. This is because having many outbound links decreases the power of the "vote" casted by a webpage.
• Sort referrers by the number of backlinks.
Click on the "Backlinks" table column header to sort referrers by the number of their backlinks (theseare the links pointing to your website). You can now easily see referrer domains with high number oflinks pointing to your website.
The Referrers report also gives you information about how the number of backlinks change between twoupdates. This information is presented in the following columns:
• Added.
The "Added" column contains the number of links (pointing to your domain from a web page) thathave not been detected in the currently selected previous update.
• Removed.
The "Removed" column contains the number of links (pointing to your domain from a web page) thathave been detected in the currently selected previous update, but not in the currently selected date.
• Normal.
The "Normal" column contains the number of links (pointing to your domain from a web page) thatwere detected in both the currently selected date and the previous one.
Monitoring the changes of the number of backlinks between two given dates allows you to easily figureout whether your efforts to increase the link popularity of your website have proven to be successful.
2. Checking the quality of your backlinksThe Referrers report can also display detailed information about each of your backlinks. Just select a re-ferrer and see its backlink details displayed in the lower right panel.
For each backlink you have comprehensive information available:
• Link Text.
Step-by-Step Tutorials
10

This is the text contained in the hyperlink. This is a valuable indicator of the quality of your back-links. This is because search engines consider the text contained in a backlink very important. If thistext contains keywords you are trying to compete for, your relevance in search engine results will def-initely improve.
• URL Title.
This is the title of the referring page. This is a valuable indicator of the quality of your backlinks. Thisis because the title of the page is very important for search engines. Having a link from a web pagethat has a title which contains keywords you are trying to compete for, may bring you more trafficfrom people searching for these keywords.
• No follow.
A "Yes" value indicates that the link to your website is not going to be considered by search enginesin rank calculations, although traffic is not prevented to be referred to you.
The value "Yes" appears only if:
• a given backlink from a referrer page has a rel="nofollow" hyperlink attribute set or
• a given referrer page has the content="nofollow" META tag attribute set in the header.
• Status.
This is the status of the backlink. It can be one of the following values: "Added", "Removed" or "Nor-mal", allowing you to monitor the dynamics of the backlink.
• Type.
This is the type of the link. It can be either "Text" or "Image".
3. Filtering backlinksSometimes the number of backlinks to a website can be overwhelming. Filtering the backlinks using acertain criteria will help in most cases.
One of the filters that you can use is the status of a backlink:
Step-by-Step Tutorials
11

Examples:
• Filter your "No follow links" .
Let's say you want to spot the websites having "no follow" links to you.
It's easy, just:
• - select your website's domain in the left panel and
• - choose the "No follow links" value in the display filter.Now you can see who is linking to you using "No follow" attribute in links.
You may be interested to get in touch with those websites about that. This is because when a searchengine sees a 'no-follow' attribute in a hyperlink, it will not follow it, nor consider the destination pagein page rank calculations.
• Filter your "Removed links".
Let's say you want to find out which of your referrers has removed links to you since the currently se-lected previous update.
It's easy, just make sure your website is selected the left panel and choose the "Removed" value in thedisplay filter.
Now you if you see any such websites you may be interested to get in touch with those websites aboutthat.
Step-by-Step Tutorials
12

Additionally you can filter the backlinks by domain name, URL or link text. Just select one of the threecriteria available, enter the text you are looking for and Advanced Link Manager will filter out the refer-rers and links that do not match the given text.
Examples:
• Filter your links by text.
Let's say that one of your most important keywords are "latest news". Since the link text affects yoursearch engine rankings, you may be interested in finding who's linking to you using those keywords inlink text.
It's pretty easy, just:
• - select your website's domain in the left panel,
• - choose the "Link Text" value in the "Filter by:" list box and
• - type in the "latest news" in the "Filter by:" text box.Now you can see who is linking to you using these keywords in links text.
However, you may also want to find out who's linking to your competitors using the "latest news"keywords in link text. Just change the selection in the left panel to the competitor's websites you areinterested in.
Some of the websites that are linking now just to your competitors could also be linking to you. In thisregard, you may consider contacting such prospective referrer and suggest the text you want in thelink and also which page you want the link from.
• Filter your "Text" links from a referrer domain .
Let's say you want to see only the "Text" (as opposed to "Image") links from a certain referrer do-main.
It's pretty easy, just:
• - select your website's domain in the left panel,
• - choose the "Domains" value in the "Filter by:" list box,
Step-by-Step Tutorials
13

• - type in the domain of your choice in the "Filter by:" text box and
• - choose the "Text" value in the display filter.Now you can see the "Text" links pointing to you from the matching domain.
Find new link partnersThis tutorial will guide you though the steps that will help you promote your website by getting morelink partners.
As an example we will presume for this tutorial that we have a software product, let's say an image edit-or.
First we need to have an idea where we can get links from. Because we have a software product we canget new links from:
• Download websites
• Software review websites
Having the places from where we can get links in mind, now we need to brainstorm some keywords touse when searching for new link partners.
These keywords will help us retrieve a list from search engines with potential link partners. We will usethe Find link partners wizard to retrieve a list of URLs from search engines.
When looking to find download and software review websites as potential link partners we can start withthese two keywords:
• image editor download
• image editor review
Now that we have everything that we need let's start find some potential link partners.
Go to the [Update] menu and select [Find link partners...] and the "Find link partners" wizard will openin a new window. The first step is to choose the search engine used to gather potential link partners thatmatch the selected keywords. Then enter the keywords in the "Search" section.
Note
Some of the search engines available in the list will allow you to set advanced settings, like: "AdvancedSearch" and "Language".
Step-by-Step Tutorials
14
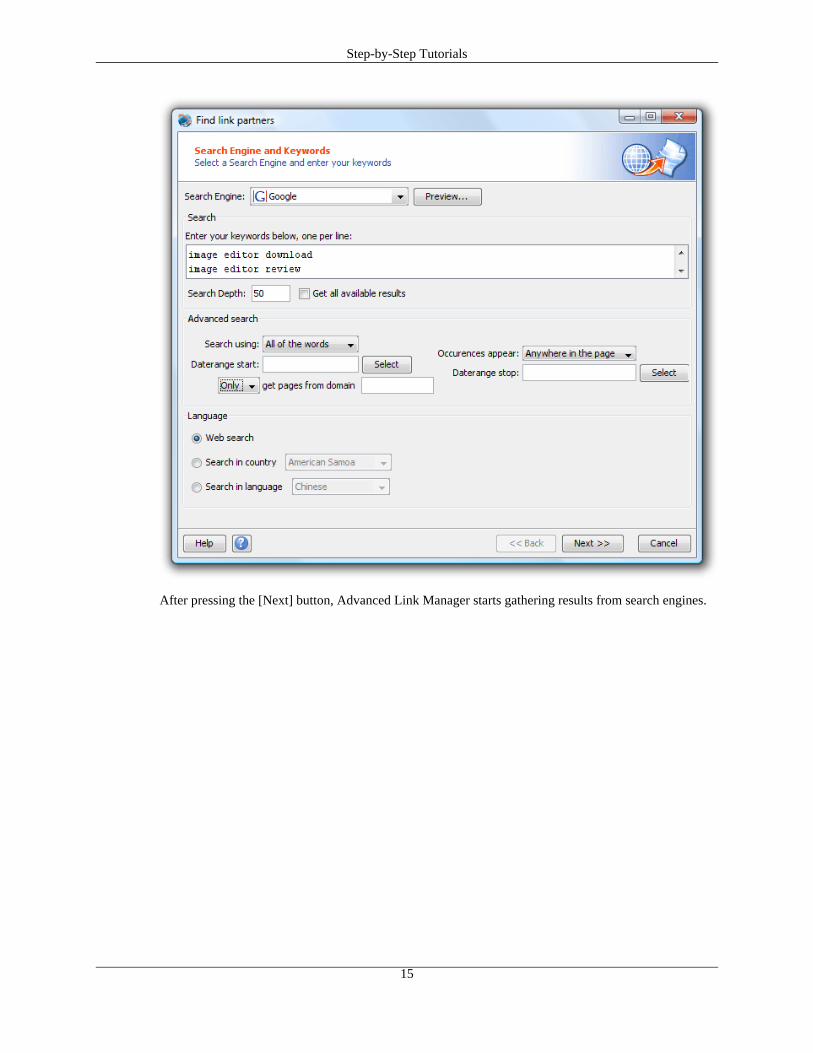
After pressing the [Next] button, Advanced Link Manager starts gathering results from search engines.
Step-by-Step Tutorials
15
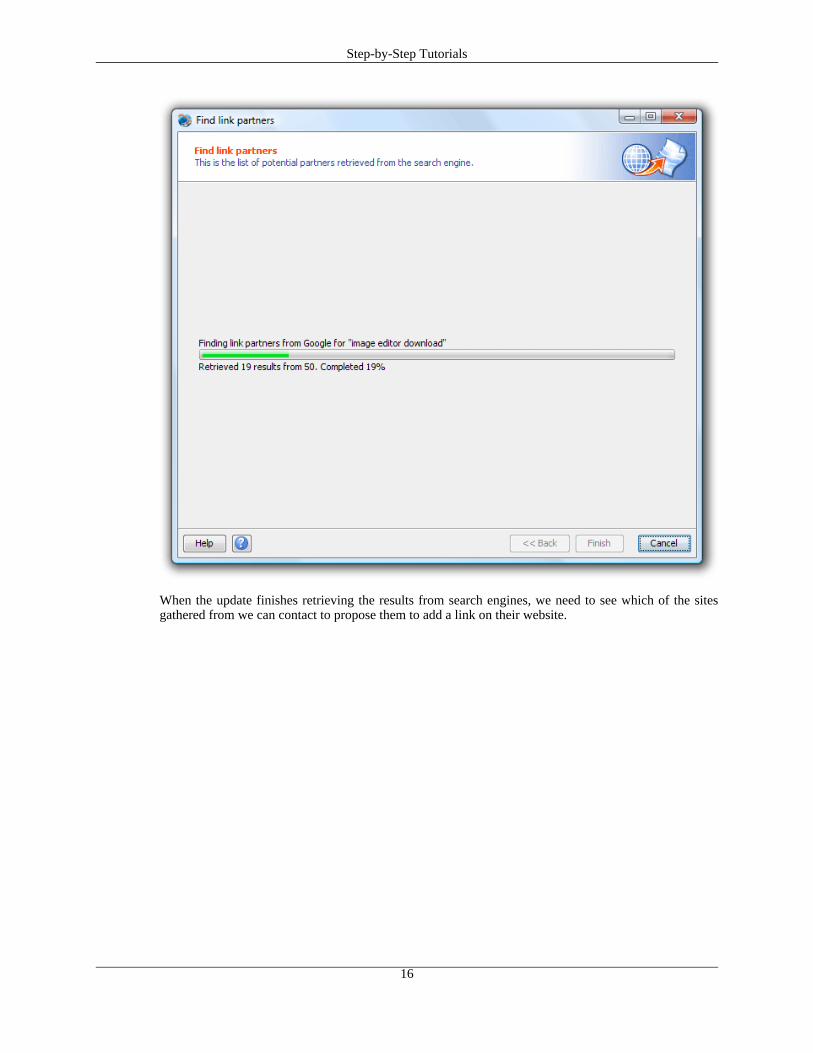
When the update finishes retrieving the results from search engines, we need to see which of the sitesgathered from we can contact to propose them to add a link on their website.
Step-by-Step Tutorials
16

In order to filter the potential link partners we will first use the [Visibility] column. The visibilitycolumn will tell us how much exposure these websites get. The higher the visibility score, the more ex-posure they get.
You can also decide which website is relevant to you by retrieving additional information, like the num-ber of outbound links, onsite links or page size.
Step-by-Step Tutorials
17
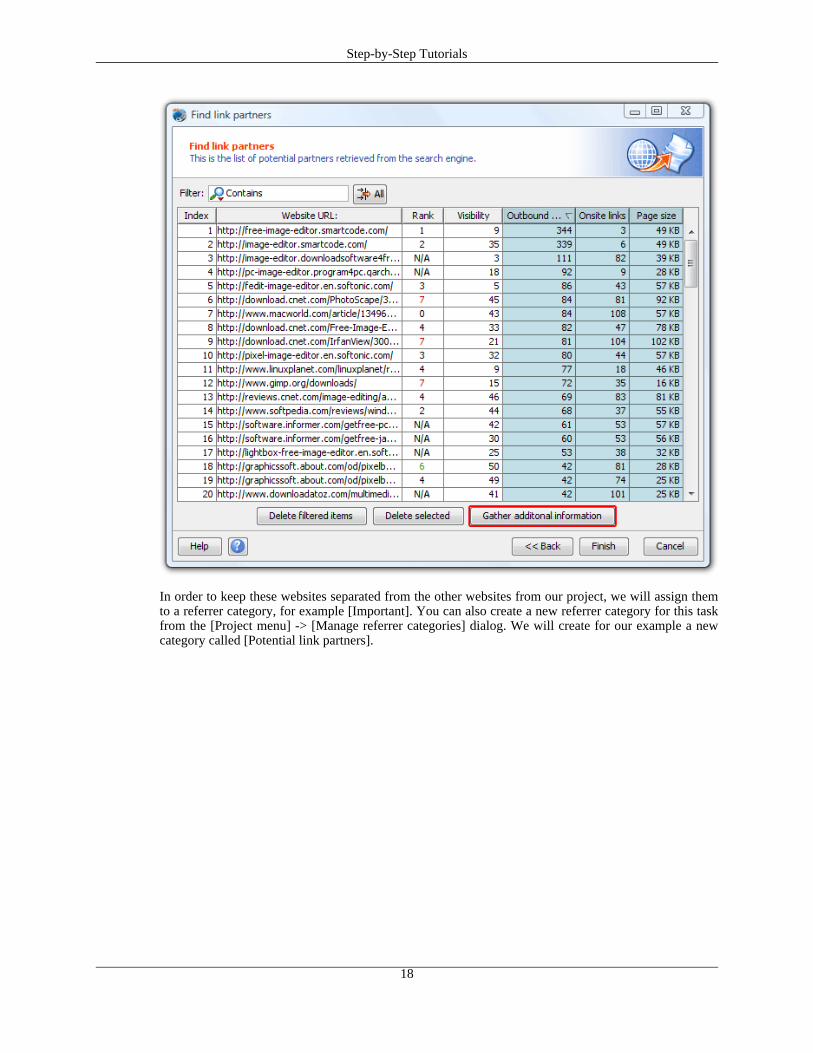
In order to keep these websites separated from the other websites from our project, we will assign themto a referrer category, for example [Important]. You can also create a new referrer category for this taskfrom the [Project menu] -> [Manage referrer categories] dialog. We will create for our example a newcategory called [Potential link partners].
Step-by-Step Tutorials
18

Now click on the [Finish] button and the wizard will add all the URLs found in the projects as Unveri-fied Referrers and their domains will be visible in the Domain Information report.
Step-by-Step Tutorials
19

At this moment we can apply the category filter to the Domain Information report in order to see the do-mains that we just added. So, select the [Potential link partners] category from the category filter.
Step-by-Step Tutorials
20

Now that we have the list of domains, the next step is contact them. In this way we will get in touch andlet them know our intentions. But to do that, we need contact information.
To get contact information, all we need to do, is to select the domains that we want to retrieve the do-main information for, right click over one of the domains and select the [Update domain information]. Inthe status bar of the application you will see the progress of the domain information retrieval.
Step-by-Step Tutorials
21

When the update finishes and we have the contact information, we can write emails to the webmasters ofthe new websites added. Just select the domain and switch to the email composer tab in the lower sec-tion of the report.
Step-by-Step Tutorials
22

Here you can write the emails by hand or use the predefined email templates available. You can alsocreate your own email templates and use them in future. Just click the Email template button and chooseone of the available templates or click on Manage email templates in order to create a new one.
A link exchange discussion can have many stages, so in order to know exactly where we stand in our re-lation with the wanted link partner, we will set a contact status for this possible referrer. Just check the"and set status to" option next to the send button and select one of the predefined statuses, or create yourown status using the [Project menu] -> [Manage status information] dialog.
Step-by-Step Tutorials
23

Click the [Send] button in order to send your email, and continue to the next domain.
By switching to the [Message history] you can see all the messages sent to the webmaster of the selecteddomain.
At this moment you should be able to successfully search for new link partners, retrieve contact inform-ation and build relationships with your potential link partners.
Find new link partners by backlinksThis tutorial will guide you though the steps that will help you promote your website by getting morelink partners by analyzing the backlinks of your competitors.
As an example we will presume for this tutorial that we have a software product, let's say an image edit-or. We will use our targeted keywords to find our competitors and then get information about their back-links.
Step-by-Step Tutorials
24

First we will need to use our targeted keywords and check the backlinks of our competitors. In our ex-ample we will use the following keywords:
• Image editor
Now that we have everything we need let's start find some potential link partners by analyzing competit-or's backlinks.
Go to the [Update] menu and select [Find link partners by backlinks...] and the "Find link partners back-links" wizard will open in a new window. The first step is to choose the search engine used to gather po-tential link partners that match the selected keywords. Then enter the keywords in the "Search" section.
Note
Some of the search engines available in the list will allow you to set advanced settings, like: "AdvancedSearch" and "Language".
After pressing the [Next] button, Advanced Link Manager starts gathering results from search engines.
When the update finishes retrieving the results from search engines, we need to see which of the sitesgathered we can use to analyze their backlinks. Delete the one you consider not to be relevant.
Step-by-Step Tutorials
25

To gather backlinks only for some URLs, select the ones you do not need and then use the [Delete selec-ted] button to delete them.
Select the [Next] button and the [Find link partners by backlinks] wizard will gather the backlinks fromthe pages you selected on the previous step and the relation with them.
Step-by-Step Tutorials
26

Once the update finishes a list with all the backlinks from the pages you selected will be displayed. Se-lect the [Gather additional information] button and the [Outbound links], [Onsite links] and [Page size]will be added to the list.
By selecting an website URL you will see to which pages that URL links. Those targets may be yourcompetitors and if that URL link to them it may be possible to link also to you.
To filter the websites gathered we will first use the number of [Links] column. The links column will tellus what chances we have to get a link from that URL. The higher the number of links, the more chanceswe have to get a link.
You can also decide which website is relevant to you by retrieving additional information, like the num-ber of outbound links, onsite links or page size.
From the list you can open the URL in browser, copy link address, delete selected URLs or assign URLsto a referrer category.
In order to keep these websites separated from the other websites from our project, we will assign themto a referrer category, for example [Important]. You can also create a new referrer category for this taskfrom the [Project menu] -> [Manage referrer categories] dialog. We will create for our example a newcategory called [Found directories].
Step-by-Step Tutorials
27

Now click on the [Add as referer URLs] button and the wizard will add all the URLs found in theprojects as [Unverified Referrers] and their domains will be visible in the [Domain Information] report.
From here you can check the added URLs to see if they have a submit page or contact the website own-ers to get a link by filtering the URLs in the [Found directories] category.
Step-by-Step Tutorials
28

Chapter 3. The User InterfaceMain Menu
The main menu provides access to all the functions of Advanced Link Manager.
Project menu
• New Project - pops up the New Project Wizard which allows you to easily create a new AdvancedLink Manager project.
• Project Settings - pops up the Project Settings dialog where you can set your domains, search engines,and the preferences related to the link gathering process.
• Manage project lists - allows you to group project under a single name and then use this list of
29

projects when you update or backup projects.
• Manage referrer categories - allows you to group the referrers by your own categories.
• Manage status information - allows you to create your own status information about the answers youreceive from webmasters.
• Manage trigger templates - allows you to define an action template which will execute an action onthe referrer URL that match the selected filters after each project update.
• Project Manager - allows you to see an overview of all the projects.
• Rename project - allows you to rename the current project.
• Delete Project - allows you to delete the current project.
• Duplicate Project - saves the current project and all the data associated with it under a different name.
• Backup - creates a backup copy for the active project. See the Backup page for more details.
• Restore - replaces the current project with an existing backup copy. See the Restore page for more de-tails.
• Remove Data - removes data from the current project for the selected time range.
Update menu
The User Interface
30

• Start - displays the Update dialog where you can choose how you want to update your project.
• Pause/Resume - pauses/resumes the currently running update.
• Stop - terminates the current update.
• Manually add referrers - pops up the Manually add referrers dialog to allow you to enter referrersmanually, import them from a file or from a website.
Find link partners - allows you to find potential partners on search engines results, using their mostadvanced search criteria.
• Gather links from Search Engines - starts to gather the referrers from the search engines for you targetdomains.
• Gather only number of links from Search Engines - starts to gather only the estimated backlink count
The User Interface
31

from the search engines.
• Verify Link Status - starts to check the previously gathered referrer URLs for backlinks to your targetdomains, but only for those referrers that were not already updated on the current date.
• Verify Link Status (Forced) - starts to check the previously gathered referrer URLs for backlinks toyour target domains, ignoring whether they were updated or not on the current date.
• Update selected domains - updates only the currently selected domains; the information for the otherdomains that have not been updated is taked from the last update. The domain selection is on the leftside panel.
• Update selected URLs - it works just like the one above, the only difference is that only updates theselected URLs not the entire domain.
• Update multiple projects - allows you to select multiple projects to update.
Scheduler
• New scheduled task - allows you to schedule a new task. See the Scheduler chapter for more details.
• View scheduled tasks - displays a dialog with all the scheduled tasks created so far. Here you can addor edit an existing task. You can also change the authentication for the Windows scheduler.
Reports
The User Interface
32

• Generate multiple reports - allows you to specify one or more reports to be generated immediately.
• Report Name - When you click on the name of a report, the application will generate that report im-mediately.
Edit reports
The User Interface
33

• New report - starts the report wizard to create new report.
• Manage reports - displays a list of all reports that you created so far, and allows you to see a summarydescription for each of them.
• Report Name - When you click on the name of a report, the report wizard will open so you can edit itsproperties.
Bookmarks
• Bookmarks this report - Bookmark a customized report.
• Manage Bookmarks - Manager bookmarked reports.
Tools
The User Interface
34

• Update Progress - Displays information about the progress o a current update.
• Website crawler - Opens the Website crawler tool
• Google Maps Webpages Importer - Opens the Google Maps Webpages Importer tool.
• Webpage Analyzer - Opens the Webpage Analyzer tool.
• Analyze Domain Quality - Opens the Analyze Domain Quality tool.
• Event Log Viewer - Opens the Event Log Viewer.
• Notes - Opens the Notes tool.
• Generate Link Pages - Opens the Generate Link Pages tool.
Options
The User Interface
35

• Preferences - allows you to set the global preferences of the project. See the Global Preferences pagefor more details.
• Address Book - allows you to add and edit the email addresses in your address book. See the AddressBook page for more details.
• FTP Profiles - allows you to add, remove and edit your FTP profiles. See the FTP Profiles page formore details.
• Headers and Footers - allows you to add customized headers and footers to your reports.
• Manage link page HTML layout - allows you to customize the HTML layout for yourlink pages.
• Manage link categories - allows you create link categoriesfor your referrers.
• Manage access groups - allows you to add, remove or edit Access Groups
• Manage proxy servers - allows you to add, remove or edit the Proxy servers
• Browser manager - allows you set the default browser that will open the HTML reports.
• Reports layout - allows you to choose a restricted set of UI reports that will be displayed.
• Layout - Default. The Default layout cannot be deleted and it contains all the reports available inAdvanced Link Manager
The User Interface
36

• Layout - Manage layouts. Opens the layout manager where you can add, remove and edit your lay-outs
• User profiles - allows you to select and manage the user profiles
• Edit contact details - allows you to edit your contact details.
Help
The User Interface
37

• Advanced Link Manager Assistant - displays the Advanced Link Manager Assistant.
• Help Index - displays the help index window.
• Context help - displays the context help.
• Report error - allows you to send an error report to the Advanced Link Manager team so we can helpyou with troubleshooting and improve our product.
• System properties - displays your system properties.
• Purchase - opens in your default browser the purchase page of the Advanced Web Ranking Website.
• Register - allows you to register this product. You will be prompted for the registration ID you re-ceived by email after purchasing.
• About - displays a message box containing information about the product version, the search enginesupdate versions, and your registration information.
Main ToolbarThe Main Toolbar, located below the Main Menu, provides easy access to common and frequently usedfunctions. Each icon is a button that acts as a shortcut to a related function. Hold the cursor over an iconto display a context label that will give you a hint as to its function. Click on an icon to use its function.
Start Update - pops up the Update dialog. By clicking on the arrow to the right of thisicon, the Update popup will show with all the options that you can also find in UpdateMenu.
Pause Update - pauses the update in progress.
The User Interface
38

Stop Update - stops the update in progress.
Add referrers manually - allows you to add referrers manually.
Find link partners - allows you to add referrers using the full power of advanced searchfrom the search engines.
New Project - creates a new project.
Delete Project - deletes the current project.
Duplicate Project - duplicates the current project.
Project Settings - changes the settings for the current project.
New Report - brings up the report wizard that will allow you to specify exactly whichdata you want to appear in the report as well as the report type, data range and destina-tion of the report. By clicking on the arrow to the right, a list with all available reports isdisplayed. See the report wizard for more details.
Scheduler - displays a dialog that allows you to see and manage all the scheduled tasksthat you have created.
Global Preferences - pops up the Global Preferences dialog.
Address Book - here's where you can add, edit or remove the contacts that you need tosend emails to.
FTP Profiles - here's where you can add, remove or modify the FTP profiles that you up-load reports to.
Help - clicking on this icon will bring up this Help window.
Project - here's where you can choose your active project in the workspace. You can also search for aproject by clicking on the name of the project and typing the text that should be contained in the projectname that you are looking for.
Left-Side PanelsThe Panels placed on the left side of the screen allow you to interact with the currently selected interact-ive report and customize them in real time.
You can edit the information contained in each panel by clicking on the button in the up-per right corner of the panel.
You can select all the items contained in a panel by clicking on the icon.
The User Interface
39

The Domains panelThis panel allows you to select which target domain you want to be used for the current report. It isavailable for all interactive reports.
The Referrers panelThis panel allows you to select which referrers you want to be used for the current Backlinks Evolutionchart. It is available only in the Referrers Evolution report.
In the Referrers panel, you can select one or more URLs by clicking on them while pressing the Controlor the Shift key. If you want to select all the referrers, just click on the small button from the top-right ofthe panel.
The Search Engines panelThis panel allows you to select which Search Engines you want to be graphically represented in the"Search Engine Evolution" report.
In the "Search Engines panel", you can select one or more search engines by clicking on them whilepressing the Control or the Shift key. If you want to select all the search engines, just click on the smallbutton from the top-right of the panel.
Quick actions panelThe Quick actions panel provides quick access to important functions of Advanced Link Manager.
Domain Information quick action
The User Interface
40

Domains
• Update domain information - Updates the information for a domain, selected from the referrer domainlist, in order to display additional information in the Domain details panel.
• Show reciprocal details - Displays reciprocal details for two selected domains.
• Check reciprocal status - Checks the reciprocal status for two selected domains.
• Ignore links from this domain - Deletes all the links from the selected domain.
• Do not ignore links from this domain - Keeps the links from a selected domain.
Items
• Show all items - Displays every potential link partner website and status available.
• Show contacted - Displays the domains that have been contacted before (as part of your link exchangecampaign).
• Show contact available - Displays only the domains for which contact information is available.
• Show drafts - Displays the domains that have an email composed but not sent.
• Show reciprocal linking - Displays the domains that you've exchanged links with.
The User Interface
41

• Select all - Select all the domains available in the Domain Information report.
Unverified Referrers quick actions
Domains
• Ignore links from this domain - Deletes all the links from the selected domain.
• Do not ignore links from this domain - Keeps the links from a selected domain for future updates.
Updates
• Update selected referrers - Manually updates the selected referrers.
• Update new referrers - Updates only the new referrers.
Items
• View contact details - Display the Domain details from the Domain Information report.
• Show all items - Displays every potential link partner website and status available.
Referrers quick actions
The User Interface
42

Items
• Compare link popularity - This view displays a comparison between your website and a competitorwebsite. You can see the links that you have in common, or the links that only your competitor has.
• Export to CSV - Exports the current report into a CSV file that can be opened later with a CSV com-patible software.
• Copy link address - Copies the selected link address to clipboard.
Backlinks Evolution quick actions
Chart
• Show All Data in Range - Displays all the data in the selected range
• Save as... - Saves the chart view into a .png or JPEG file. Note that the files will contain only the cur-rent view of the chart (so be sure to save the right section of your chart).
Search Engine Evolution quick actions
The User Interface
43

Items
• Show search engine references - When the Referrers by Search Engine option is selected displays thesearch engine references for a selected link text.
• Show comparison data - When the Search Engines Overview option is selected shows the comparisondata.
• Hide comparison data - When the Search Engines Overview option is selected hides the comparisondata.
• Group by search engines - Groups the data from the report by search engines as columns and theURLs as rows.
• Group by Domains - Groups the data from the table by URLs as columns and the search engines asrows.
Link text quick actions
Items
• Show search engines references - Displays the search engine references for a selected link text.
Help quick actions
The User Interface
44

Link popularity
• View my links - This view displays the referrers that are linking to your site. It will also show you thelinks that were recently added or removed.
• Analyze links evolution - This chart displays a time evolution of the number of links to your website.
• Analyze links text - This view displays all the links to your website grouped by the link text.
• Compare link popularity - This view displays a comparison between your website and a competitorwebsite. You can see the links that you have in common, or the links that only your competitor has.
• View search engine statistics - This view displays all the links to your website grouped by the searchengine that reported them. The chart allows you to see how many links are reported by each searchengine in time.
Link campaign
• Find link partners - This wizard allows you to easily find new link partners using data from the majorsearch engines. It displays the highest ranking websites for the keywords you are targeting allowingyou to add them to your project as potential partners.
• Send link exchange requests - This view allows you to send link exchange requests using the integ-rated email composer.
• Add referrers - This dialog allows you to add new referrers. You can add them manually, import themfrom a file or import them from a website. These mew referrers will be added to the Unverified Refer-rers list and you can see them using the Manually Added filter.
The User Interface
45

Chapter 4. Managing ProjectsProject Manager
The Project Manager can show you an overview of all the projects that you created so far, allowing youto assign them to categories. It will also give you important information about your projects such as thecreation date, last backup date, last update date and project size.
You can also see at a glance whether the project you are interested in has been updated and when. If ithasn't been updated, you can look in the Events section and see whether something went wrong, orwhether the update was never started at all.
The Project Manager is only available in the Enterprise version. You can access it from the Project menuwhile in the application, or you can have it start before the application by unchecking the [Chooseproject at startup] option in the Application section of the global preferences.
Project DetailsThe Details panel shows you all the details about your project, such as keywords, search engines, andwebsites. It also tells you the current project preferences such as the search depth, the location of the re-ports, or whether or not you use a proxy for this project.
ReportsThe Reports section of the Project Manager displays all the reports created within this project along withdetailed information about each of them such as input data (search engines, keywords, websites), outputdata (format, chart, legend, filters, sorting, columns, etc.), destination (folder, emails and FTP servers)and deployment information.
Scheduled TasksThe Scheduled Tasks section displays all the tasks created within this project along with detailed in-formation about each of them, such as status, type, kind, start date, time, repeat and next run date.
EventsThe Events section displays all the events created within this project. It will tell you the event type, thesource of the event, and the date and time it appeared. The events help you stay on top of everything thathappens within Advanced Link Manager. It will tell you whether the update went fine, or whether thatreport you scheduled was sent to the client successfully. It can even send you an email automaticallywhen certain event types occur.
BackupsThe Backups section displays all the backups for the currently selected project. It will tell you the datethe backup was created, the starting date and the end date for the data contained in the backup.
Creating a New ProjectWhen working with Advanced Link Manager, you are concerned with various entities like Search En-gines, Target Domains, Referrers and backlinks. Within the application, these are grouped together un-
46

der a Project.
You can create a new project using the [Project] -> [New Project] menu. This will startthe New Project Wizard.
Project SettingsThe Project Settings menu enables you to edit the list of domains, modify the list of the search enginesused for your project and setup other data gathering related options.
Renaming a ProjectYou can rename a project by using the [Project] -> [Rename Project] menu. After youfinished entering the name, please use the OK button and the project will be immedi-ately renamed and its new name will take the place of the old one in"Project" dropdown.
Deleting a ProjectYou can delete a project by using the [Project] -> [Delete Project] menu or by clickingon the associated toolbar button. After the project is removed, the next available projectis loaded. If no other project exists, the New Project Wizard is started automatically.
Duplicating a ProjectYou can duplicate a project by using the [Project] -> [Duplicate Project] menu. This fea-ture allows you to quickly create a project that is similar to a different project that youhave already created.
Note
If a project with the same name as your chosen name already exists you will be asked if you wish to over-write. Overwriting a project will cause the loss of all the data within it.
BackupYou can access the Backup dialog box by selecting [Project] -> [Backup...] from theMain Menu.
Managing Projects
47

The Backup dialog box allows you to backup the current project or all projects.
You can select which folder to save backups to by pressing the [Browse] button. This folder will be re-membered and all the scheduled backups will be saved there. This will also be the default folder wherethe backups are restored from.
RestoreYou can access the Restore Backups dialog box by selecting [Project] -> [Restore...]from the Main Menu.
The Restore Backups dialog box allows you to manage your backups by either restoring them or remov-ing them completely from your computer.
Managing Projects
48

You can choose to restore projects from a different folder than the backup folder by pressing the[Browse] button. This folder will only be remembered while this dialog box is open. The backup folderwill always be the default restore folder.
Remove data
This dialog allows you to remove data from the current project for the selected time range.
Click on the [Set date] buttons to choose the start or end day. The Begin checkbox automatically sets thetime range to start on the day the project was created. The Today checkbox automatically sets the timerange to stop on the current day.
Address BookThe Advanced Link Manager Address Book is the place where you can store all the names and email ad-dresses of the people you want to send reports to. You can use the contacts you enter here when specify-ing the destination of a report.
You can access the Address Book from the toolbar button, or by selecting [Options] ->[Address Book...] from the Main Menu.
In the Address Book dialog box you can add, remove and modify contacts.
To Add a contact, press the [Add] button. The Add Contact dialog box will appear and you can enter theFirst Name, Last Name, Email and Company for a contact.
Managing Projects
49

To Remove a number of contacts, first select them, then press the [Remove] button.
To Modify a contact, first select it, then press the [Modify] button.
FTP ProfilesThe Advanced Link Manager FTP Profiles is the place where you can store all the profiles of the FTPservers that you want to upload reports to.
You can access the FTP Address Book from the toolbar button, or by selecting [Options]-> [FTP Profiles] from the Main Menu.
In the FTP Profiles dialog you can add, remove or modify profiles.
To Add a profile press the [Add] button. The "Add FTP profile" dialog will appear and you can enter theName of the profile, the FTP Server and Port, the User, the Password, the Remote folder and the Con-nection mode. If your machine connects to the Internet through a proxy server, you are allowed to enterthe proxy settings in the same dialog, by enabling the "Use a Proxy Server" option.
Managing Projects
50

In order to Remove a profile, first select it and then press the [Remove] button.
In order to Modify a profile, first select it and then press the [Modify] button.
Managing Projects
51

Chapter 5. Updating ProjectsUpdating a Project
Advanced Link Manager gathers and stores link data every time a project is updated. You can initiate anupdate either from the "Update" menu or by clicking on the Update toolbar button.
The Update dialog allows you to tell the application what type of data you wish to update. The followingoptions are available:
• Gather links from Search Engines
• Gather only number of links from Search Engines
• Import referrers from a local file
• Verify Link Status
• Gather rank
• Update reciprocal links
Gather links from Search EnginesThe "Gather links from Search Engines" option tells the application to look for web pages that may bepointing to your domain pages. After the update is complete the Unverified Referrers report will show
52

the pages that the search engines report as linking to you.
All the search engines that are checked in the Project Settings are selected by default. If you want tochange that, just press the "Select..." button and select only the desired search engines. Deselecting allsearch engines will automatically select all of them.
The referrers that are found in this update stage are the ones that are reported by the search engines tolink to you. These referrers come straight from the search engine index. And since the search engines donot always have their index up to date, these referrers may no longer link to you. You can see the list ofreferrers gathered at this stage in the Unverified Referrers report.
Advanced Link Manager also verifies each and every referrer to see if they actually link to you. This isdone in the Verify Link Status update stage. To see the real (verified) referrers look at the Referrers re-port instead.
Note
The referrers added to your project by the "Gather links from Search Engines" update method have theirstatus set to "Automatically added".
Gather only number of links from Search En-gines
The "Gather number of links from Search Engines" can be used whenever you want to check only thesearch engine estimated number of backlinks. If you click on the Search Engine Evolution tab, you cansee a graphical representation of the evolution of the estimated number of backlinks over time.
This type of update will not gather any referrers from the search engines. It is only useful for trackingthe estimated number of backlinks as reported by the search engines without having to go through theexhaustive search for the referrers as reported by the search engines.
Updating Projects
53

Gather indexed pages from Search EnginesThe "Gather indexed pages from Search Engines" can be used whenever you want to check the indexedpages from search engines. If you click on the Indexed Pages tab, you can see the pages from yourproject websites that have been found in the search engine's index (for the search engines that supportthis feature).
This type of update will gather any referrers from the search engines. When you select this option, the"Gather only number of links from Search Engines" one is disabled.
Import links from fileIf you have a text file with referrers this option will help you import them into your project. Just pressthe "Select..." button and the "Import links from files" dialog will pop up.
Here you can select the files you want to import links from.
Note
The imported URLs are added to your project as referrers for all the target domains in your project.
If the imported URLs are already present in the project as referrers you will be able to see them in the Un-verified Referrers report by means of filters. They will be now shown when applying the "Manually added"filter (event it they were previously after applying the "Manually added" filter).
Verify Link StatusThe "Verify Link Status" option enables the application to collect the following information:
• The number of backlinks.
This is the number of incoming links from each referrer page.
Updating Projects
54

• The type of each backlink.
A backlink can be either a text link or an image link.
• Total number of outbound links (links leading offsite) for each referrer page.
The number of outbound links can be useful to show the link relevance. Let's say that you have onereferrer with 3 outbound links of which one of them links to you and some another referrer that has100 outbound links and one of them links to you. The relevance of the first backlink is much higherthan the second one due to the high number of links leading offsite from the second referrer.
• The "No Follow" status of every backlink.
This is a very important piece of information. The links that have this status set to "Yes" are ignoredby the search engines when they crawl that referrer web page, hence it will not be taken into accountin search engine ranking calculations.
Gather rankThe "Gather rank" option instructs the application to collect the rank of the referrer page from the searchengines that support this feature.
This option is available only if you have the "Site Rank" plugin installed on your computer. If you donot have the plugin installed and try to enable this option Advanced Link Manager will prompt you todownload the plugin. Enabling the plugin requires an application restart.
Update reciprocal linksThis option tells the application to determine whether the links between your website and a partner web-site are reciprocal. After the update is complete the Domain Information report will display the actual re-ciprocal link status.
This option also instructs the application to parse the link pages from your domain looking for outboundlinks to your partners. You only need to enable this option if you add or remove links from your linkpages and you would like the application to parse them again.
Verify Link Status (Forced)Normally Advanced Link Manager verifies only the links from the referrers that were not already up-dated for the current date. However with this update you can force Advanced Link Manager to verify allthe referrer links, regardless if they have been updated or not in the current day.
Update Multiple ProjectsUsing this feature, you can select multiple projects to automatically update one after another. You caneither use a "Project list" or just select the projects you want to update from a list containing all youravailable projects.
Updating Projects
55

• Project list.
You can use any of the "Project lists" available.
• Time gap between projects.
You can change the sleep time period used by the process between every project update.
Manually add referrersWhen you click on the "Manually add referrers" item, you will be presented with a dialog box. This dia-log box can be used to manually add referrers for the one, more or all target domains.
Updating Projects
56

You can add referrers for the desired target URL by selecting it in the lower panel. Not selecting any tar-get in the lower panel will cause the referrer to be added to all target domains.
• Add - adds the URL from the text box to the referrers list
• Remove - removes the referrer URL from the list
The Update Progress TabThe "Update Progress" tab is displayed in the main window when an update is started. When the "Gatherlinks from search engines" is in progress, it lists the pairs of domains and the search engines used togather the referrers data. When the "Verify Link Status" update is running, the " Update Progress" tab isshowing the current progress of the analyzed referrer links.
Updating Projects
57

Either the "Gather links from search engines" or "Check Links" is running, the following items may ap-pear in the "Update Progress" tab:
• Waiting.
No page has been retrieved yet.
• Receiving data...(NN% complete).
Shows the percentage of received pages.
• Received NN of NN (100% complete).
Reached end of results" -shows the total number of results retrieved at the end of the search for a par-ticular search engine-target URL combination.
• Checking for links.
The application is analyzing the referrer to extract the links information needed to update the Refer-rers report.
• Done.
The analysis of the page has been completed.
• Failed to gather results.
The search engine did not respond with the requested data. Advanced Link Manager will retry to in-terrogate it as many times as you entered in the "Number of retries if a connection fails" text box loc-ated in the [Preferences]->[Performance] tab.
Updating Projects
58

• Sleeping between pages.
Advanced Link Manager is sleeping between the searches performing a search engine friendly requestto the search engines.
During the update, progress information is displayed containing: the start time, the estimated stop, thetime remaining and the percentage of completed searches. At the end there is displayed: the total time,the number of retrieved pages and the number bytes retrieved.
When the update is complete Advanced Link Manager checks again all the searches and retries thosethat have not been completed successfully. The number of retries is specified in the Performance tab ofthe Preferences.
Current UpdatesThe [Current Updates] tab displays real time update information about manual or scheduled updates.
Current Multiple UpdatesThe [Current Multiple Updates] tab displays real time update information about multiple updates.
HistoryThe [History] tab displays information about all the updates done in Advanced Link Manager for allprojects.
Updating Projects
59

To make the browsing easier through the history, Advanced Link Manager allows you to use a couple ofuseful filters:
Date. The [Date] filter allows you to select different update dates from the drop-down list:
• All - displays the updates done in Advanced Link Manager from all dates
• Today - displays all the updates done today
• Yesterday - displays all the updates done yesterday
• Last Week - displays all the updates done last week
• Last Month - displays all the updates done last month
• Specific update dates - displays the updates done in a selected day
Status. The [Status] filter allows you to select different states of an update:
• All - displays all the updates done in Advanced Link Manager for all their statuses
• Not Started - displays only the updates not started
• Complete - displays only the updates which are completed
• Incomplete - displays only the updates which are not completed yet
• Manually Stopped - displays only the updates which are manually stopped
Launched From. The [Launched From] filter allows you to select how the update was started:
• All - displays all the updates done in Advanced Link Manager for all the started types
• Manual Update - displays single updates manually started
• Scheduled Update - displays single updates started by the Scheduler
• Multiple Manual Update - displays multiple updates manually started
• Multiple Scheduler Update - displays multiple updates started by the Scheduler
Name. The [Name] filter allows you to select the updates by Project Name (single updates) or ProjectList (multiple updates):
• All - displays all the updates, even if they were single or multiple.
• Project Name - displays a list with single updates
• Project List - displays a list with multiple updates
Note
Updating Projects
60

To display all the updates done in Advanced Link Manager on all periods, please make sure that you havefor all filters the [All] option selected.
Resume incomplete updates
In the [History] tab you can resume Multiple Updates with the status [Incomplete]. To do this, just rightclick on the name of the Project list and select the [Update remaining projects] option.
Note
The projects updated on the day you resume the update will appear in the Update History with the datewhen the resume is selected.
Note
This option is available only for Multiple Update which have the status [Incomplete].
Find link partnersThe Find link partners wizard will help you gather more referrers using the most advanced search fromeach of the available search engines. The wizard is available via the [Update] -> [Find link partners...]menu item.
Nowadays, only a few search engines still tell you who your referrers are. And even those that do, theycan't give you the entire list of your referrers. That's where the Find link partners wizard comes to help.It allows you to search any of the available search engines, using their most advanced search criteria, tolook for additional referrers that may already link to you, or for future partners that you may want to ex-change links with.
But the best way to understand how the Find link partners can help is probably to see an actual example:
Search Engine and KeywordsThe first step of the Find link partners wizard gathers information about what you wish to find. It willask you for the search engine and the keywords you are looking for and the details of the search:
Updating Projects
61

For this example, let's choose Google as the search engine. We are looking to find websites that couldlink to us. Therefore we will search Google for "sport news". Let's set the search depth to 20 as we areonly interested in the top 20 search engine results.
Then we tell Google to search using "The exact phrase" so we don't get results from "news" or "sport",and we are looking for the pages that have the keyphrase in the title of the page so we set the option "Oc-curences appear:" to "In the title of the page".
Refining the resultsThe second step of the Find link partners wizard is preceded by an intermediary stage in which Ad-vanced Link Manager connects to the search engine and retrieves the results we asked for.
Updating Projects
62

After the urls have been retrieved, the wizard will show us the top 20 results found on the search engine.The URLs are shown in the order the search engine displayed the results.
Updating Projects
63

Now we have the results we asked for, but it may not be exactly what we need. So we need to eliminateany unwanted results before we add the good ones into our project. To help us with this task, the applic-ation lets us order the referrers by rank (if the SiteRank plugin is installed). If we're not interested inpages that have a very low rank, we can select these websites and click the "Delete selected" button toremove them from the list. Alternatively, we can exclude the sites that have a low rank using the "Filterby rank" filter and selecting "above 4" to select all the pages with the rank higher than 4.
There is also a text filter available. This can be used when you choose to gather many referrers from thesearch engine. Let's say you choose a search depth of 500. After all the results are retrieved, you maywant to exclude your competitors. You just type a part of their name in the filter textbox and only the re-ferrers matching the criteria will be shown. Now you can select all of them and remove them from thelist by pressing "Delete selected".
You can also exclude referrers that you have filtered out using the "Delete filtered items" button.
Once you are satisfied with the results, all you need to do is press "Finish" and the new potential linkpartners will be added to the project. You can always see these new potential referrers in the UnverifiedReferrers report by selecting the "Potential" option in the "Display" drop down.
Updating Projects
64

Find link partners by backlinksThe Find link partners by backlinks wizard helps you gather potential link partners using advancedsearch and backlinks check. The wizard is available from the [Update] menu, [Find link partners bybacklinks...]
By analyzing your competitor's backlinks you can find new potential resources of links, so this is whyyou can use [Find link partners by backlinks...] to conduct competitive analysis.
Search Engine and KeywordsThe first step in getting new link partners is similar with [Find link partners] and requires you to selectthe search engine that will be used to gather results and the keywords for which you are looking to findnew link partners.
Refining the resultsThe second step of the [Find link partners by backlinks] wizard is preceded by an intermediary stage inwhich Advanced Link Manager connects to the search engine and retrieves the results we asked for.
After the URLs have been retrieved, the wizard will show us the number of results found in the searchengine set from the [Search Depth] option. The URLs are shown in the order the search engine displayedthe results.
Updating Projects
65

By selecting Gather additional information, Advanced Link Manager will display additional informationabout the links gathered from search engines like [Outbound links], [Onsite links] and [Page size]
When you finish analyzing and press the [Next] button, the [Find link partners by backlinks] wizard willgather the backlinks from the pages you selected on the previous step and the relation with them.
Competitive AnalysisOnce the update finishes you will see a list with all the backlinks from the pages you selected. If you se-lect the [Gather additional information] button then [Outbound links], [Onsite links] and [Page size] willbe added to the list.
If you select an website URL you will see to which pages that URL links. Those targets may be yourcompetitors and if that URL link to them it may be possible to link also to you.
From the list you can open the URL in browser, copy link address, delete selected URLs or assign URLsto a referrer category. When you decided which of those URLs can be potential link partners assignthem to a referrer category to help you later when trying to contact them.
Updating Projects
66

After you assign URLs to a specific referrers category and finish analyzing them, select the [Finish] but-ton and all the URLs will be added to the [Unverified referrers] interactive report. If you have addedsome of the URLs to a specific referrer category, then you can filter them in the [Unverified referrers]report.
Following this step, you can start now contacting potential new link partners.
Updating Projects
67

Chapter 6. Project SettingsYou can change the settings of a project from the Project -> Project Settings menu. Here you can editthe list of domains, search engines and other settings that are associated with the current project.
Managing DomainsIn the Domains tab of the Project Settings dialog box you can add, remove and import domains.
Domains can be sorted by website or by position. While the [Sort by website] option displays the do-mains alphabetically, [Sort by position] displays the domains in the order they are added. You canchange this order by moving a domain up or down in the list. To do this, select the [Sort by position] op-tion, then the domain and use the arrows from the bottom of the window to move them.
In order to Add a domain, first input it in the edit box, then press the [Add] button. To remove a domain,just select it from the list and click on the "Remove" button.
When you add a new domain, the [Index] page is added by default. But you can add more pages later byclicking on the "Domain Pages..." button.
68

Each page has two attributes that you can set from this list:
• Link Page.
If this attribute is set, the application treats this page as a link page and parses it for external links toyour partners. This counts when calculating the reciprocal link status.
• Exclude.
If this attribute is set, the application will no longer search for links to this page in the search engines.This is useful in case you have a link page that does not have incoming links and you do not wish tolook for referrers that point to this page.
Additionally you can set Advanced Link Manager to automatically add new found URLs for each do-main and you can choose from three available options:
• Project Settings.
This option uses the project default settings from the [Preferences] tab
• Always add.
This option will always add new found URLs for your selected domain
• Never add.
Project Settings
69

This option will never add new found URLs for your selected domain
A domain can have one or more pages. If you have more than one name that points to the same website,then you need to add this name to the domain aliases list.
• Domain Pages.
This is the place where you can edit the pages that you wish to track incoming links for. If you wish totrack a certain web page separately, you need to add it to this list.
The index page of the domain is added by default. This is regarded as a special page, and will appearas [Index Page] in the list. If you remove the index page, you can add it later by adding a new pagewith the name "/" (forward slash).
• Domain Aliases.
This is the place where you can add aliases to your website. The most well known case is when awebsite can be refered as its domain name or with the www prefix. Example:
• www.domain.com
• domain.com
This special case is handled by default in Advanced Link Manager so you don't have to add it your-self.
• Index Aliases.
This is the place where you can add aliases of your main index page of your website. The Index Ali-ases list contains all the possible names of the [Index Page], so if any of these pages will be found in
Project Settings
70

the link URL, they will treated as [Index Page]. If your index page has a name that is not part of the[Index Aliases] list, just add it to the list and the next update will show it correctly.
Note
The Index Aliases features can be exclusively used for the project domains.
The Import button is used to import web pages into an existing domain. There are two ways to importthese pages:
• Import from a web page.
Enables you to import all the pages that are linked from a certain web page. The wizard spiders theweb page you provide and finds all the links to other web pages.
• Import from a search engine.
Enables you to import all the pages from your domain that a search engine is aware of.
Project Settings
71

When you are presented with the result as a list of pages, you can edit them before importing them intoyour project by removing the ones that you don't need. Adding an already existing page to a domain willnot cause the page to be duplicated.
Selecting Search Engines
Project Settings
72

In the Search Engines tab of the Project dialog box you can select which search engines you are inter-ested in. This panel is similar to the one in the New Project wizard. It will display all the available en-gines with a check box next to them indicating their selection status. Only the selected engines will beavailable in the main frame for data gathering or viewing.
You can temporarily deactivate search engines from a project. The data for the inactive search engines isnot removed, but rather hidden from the reports. Also, when updating the project, the inactive search en-gines are skipped from the update. Reactivating a search engine simply makes it visible and updatableagain.
In order to deactivate or activate a search engine, go to the "Search Engines" tab of the "Project Set-tings" dialog box and left click on a Search Engine. Press OK when you have finished.
KeywordsIn the Keywords tab of the Project Settings window, you can select the keywords you are targeting andlook to improve rankings in search engines.
The keywords you are selecting here are used to filter your referrers in the [Referrers] report and linktexts in the [Link text] report.
Project Settings
73

• Add. Adds the keyword you enter in the Keywords input.
• Edit. Let's you change the color of the keyword and the filter method by choosing [Contains] or[Exact match].
• Import. Let's you import a list of keywords from a file.
• Remove. Removes the selected keywords.
To filter the referrers which contain or have the exact match of your keywords select the [Keywords] fil-ter, previous to the [Category] selection in the [Referrers] and [Link text] reports.
Preferences
Project Settings
74
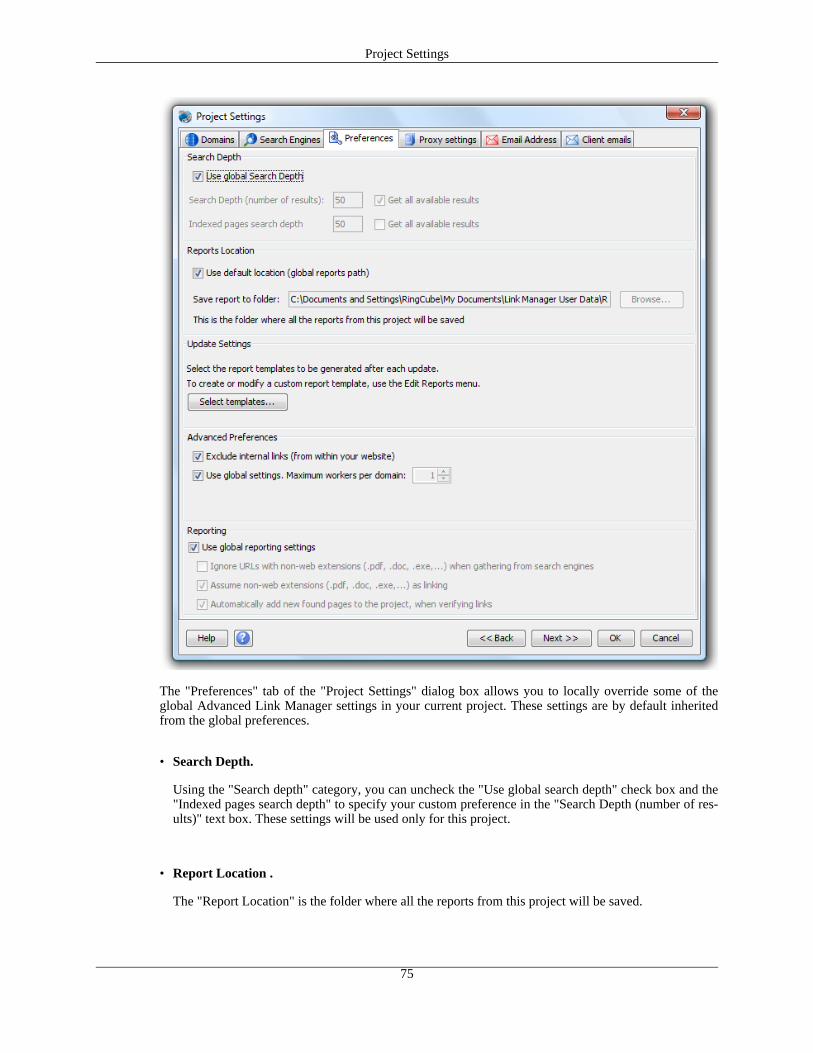
The "Preferences" tab of the "Project Settings" dialog box allows you to locally override some of theglobal Advanced Link Manager settings in your current project. These settings are by default inheritedfrom the global preferences.
• Search Depth.
Using the "Search depth" category, you can uncheck the "Use global search depth" check box and the"Indexed pages search depth" to specify your custom preference in the "Search Depth (number of res-ults)" text box. These settings will be used only for this project.
• Report Location .
The "Report Location" is the folder where all the reports from this project will be saved.
Project Settings
75
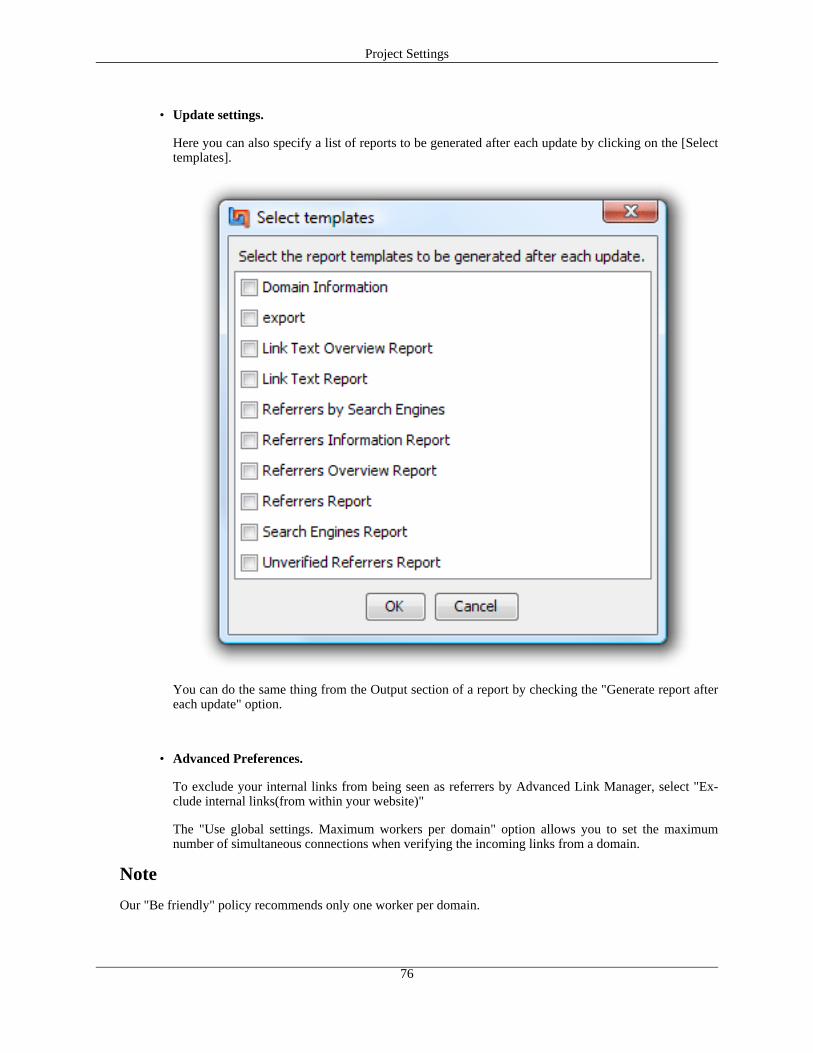
• Update settings.
Here you can also specify a list of reports to be generated after each update by clicking on the [Selecttemplates].
You can do the same thing from the Output section of a report by checking the "Generate report aftereach update" option.
• Advanced Preferences.
To exclude your internal links from being seen as referrers by Advanced Link Manager, select "Ex-clude internal links(from within your website)"
The "Use global settings. Maximum workers per domain" option allows you to set the maximumnumber of simultaneous connections when verifying the incoming links from a domain.
Note
Our "Be friendly" policy recommends only one worker per domain.
Project Settings
76

• Reporting.
The Reporting settings allows you to use the global settings or tailor them for individual projects.
From here you can set Advance Link Manager to:
• Ignore URLs with non-web extensions when gathering from search engines
• Assume non-web extensions as linking
• Automatically add new found pages to the project, when verifying links
Proxy settings
The "Proxy settings" tab of the "Project Settings" dialog box allows you to select a list of proxy serversfrom the global Advanced Link Manager proxy settings list to be used in your current project. These set-tings are by default inherited from the global preferences.
• Use application settings.
Check this box if you wish to use the global Advanced Link Manager proxy settings in your currentproject.
• Do not use proxy servers.
Check this box if you do not want to use proxy server. The connection to the internet will be done dir-ectly.
• Use selected proxy servers.
Use only the selected proxy servers
Project Settings
77

Email Settings
These settings can be used to send and receive link exchange emails and send reports to your clients.This email account is available in both Domain information report and the integrated Email client
SMTP settings
• Email Address.
Enter your email address here.
• SMTP Server.
Enter your SMTP server, either using its name or its IP address.
• SMTP Port.
Enter the SMTP port. The default value is 25 for no secure connection and 465 for SSL connection.
Project Settings
78

SMTP AuthenticationIf your SMTP server requires authentication, you need to enter your user name and password here.
Advanced Link Manager can use a secure connection when sending emails through the SMTP server.For this you can use either the TLS or SSL encryption, depending on what your SMTP server requires.
Email aliases
If you have more than one contact person for this email address you need to enter their names here, eachon a new line.
Use global email settings for sending reportsThis option inherits the settings for sending reports from Global Preferences. If you want to configuredifferent email accounts for different projects, uncheck this option.
Note
Advanced Link Manager will use the same settings for sending reports as for sending link requests.
POP3 and IMAPHere you can setup your project POP3 or IMAP incoming email account. This account will be availablein the Email Client report where you can receive email using it.
• POP3.
Selecting this option will make this account use the POP3 protocol to retrieve emails
• IMAP.
Project Settings
79

Selecting this option will make this account use the IMAP protocol to retrieve emails
• Mail server.
Specify the mail server this account connects to retrieve emails
• Username.
Specify the user name used to connect to the mail server
• Password.
Specify the password needed to authenticate the selected user on the mail server
• Use secure connection.
If your server requires a secure connection check this option and SSL will be used to connect to theserver
Client emails
Project Settings
80

The client emails settings help you to keep track and manage all your clients email addresses used tosend printable reports for the project. To use these email addresses you need to add the "Client emails"item to the to list when selecting to send a report by email. In this way you will not need to manuallyenter the email addresses of the clients that you want to receive specific reports.
Note
A report will be sent to all email addresses added in the "Client emails" list.
When adding emails to the Client emails list you have three options available:
• Manually add the name and email address for each client.
• Automatically import the contacts from your Address Book.
• Import the contacts from a file.
Project Settings
81
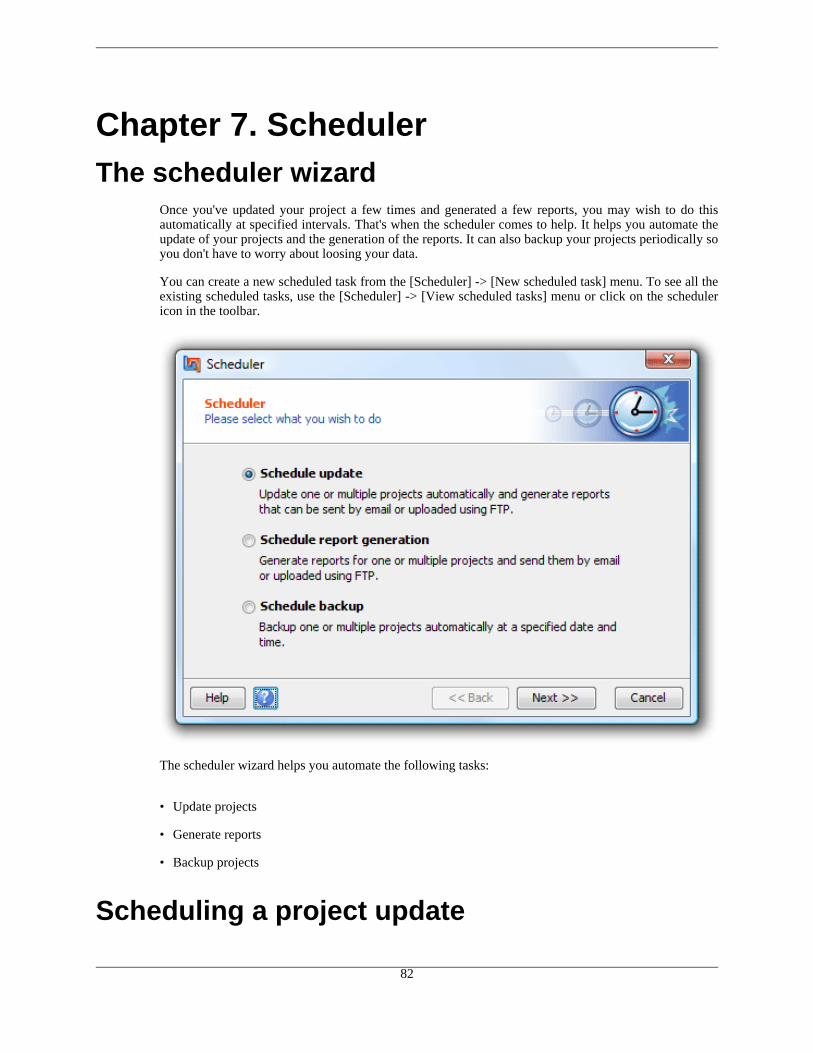
Chapter 7. SchedulerThe scheduler wizard
Once you've updated your project a few times and generated a few reports, you may wish to do thisautomatically at specified intervals. That's when the scheduler comes to help. It helps you automate theupdate of your projects and the generation of the reports. It can also backup your projects periodically soyou don't have to worry about loosing your data.
You can create a new scheduled task from the [Scheduler] -> [New scheduled task] menu. To see all theexisting scheduled tasks, use the [Scheduler] -> [View scheduled tasks] menu or click on the schedulericon in the toolbar.
The scheduler wizard helps you automate the following tasks:
• Update projects
• Generate reports
• Backup projects
Scheduling a project update
82

The scheduler can help you automate the update of your project at a specified interval. When you chooseto create an update task in the scheduler wizard, you have three options:
Updating a single projectUpdating a single project is pretty straight forward. You select the type of the update, the date and time,and how frequently you wish to update this project. You then have the option of generating reports im-mediately after the update is complete. For this, you can either select the reports you wish to generatefrom a list or instruct the application to generate all the reports that you specified to be generated aftereach update. (This list can be edited in the Preferences tab of the Project Settings.)
The final step of the Scheduler wizard presents you with a summary of all the options that will be usedto create the scheduled task. Just verify that everything is correct and press the Finish button to createthe task. (You can view and edit the task later using the [Scheduler] -> [View scheduled tasks] menu.)
Updating multiple projectsThe updating of multiple projects automatically using the scheduler is one of the most powerful featuresof Advanced Link Manager. It allows you to specify a list of projects to be updated one after another,and generate reports for each of them as needed.
When you update multiple projects, you are asked to choose which project list you wish to update. Thisis the list of projects that you wish to update. By default, there is only one predefined list called "AllProjects", but you can create your own list of projects using the "Manage project lists" button.
Note
Scheduler
83

The "All projects" list is a virtual list that cannot be edited or removed. It will always contain all your exist-ing projects.
Just like in a simple update task, you have the option of generating reports immediately after the updateis complete. But since you are updating multiple projects, you are now able to specify the reports thatshould be generated for each of the projects in the list. In the tree that appears, the parent items are theprojects, and the reports are their children.
You also have the option to generate all the reports that you specified to be generated after each update.(This list can be edited for each of the projects separately in the Preferences tab of the Project Settings.)
Scheduling report generationThe scheduler can help you automate the generation of the reports at a specified interval. When youchoose to create a "generate report" task in the scheduler wizard, you have three options:
• generate reports for the current project
• generate reports for a specified project
• generate reports for multiple projects
The wizard will take you through the same steps as when updating a project. The only difference is thatthere is will be no update. Only the reports that you select will be generated. This is useful in case youwish to update your project every day but generate the reports only once a week.
Scheduling backupsThe scheduler can also backup your projects for you automatically, so you can rest assured that you al-ways have a backup copy in case of emergency. When you choose to create an "backup" task in thescheduler wizard, you have three options:
• backup the current project
• backup a specified project
• backup multiple projects
The wizard will take you through the same steps as when updating a project. The only difference is thatinstead of an update, your project will be archived to take less space and then stored in a special foldercalled "backup", inside the data folder.
View Scheduled TasksYou can view all the scheduled tasks by clicking on this toolbar button or by selectingthe [Scheduler] -> [View Scheduled Tasks...] menu.
Scheduler
84

This dialog allows you to see all the scheduled tasks generated by Advanced Link Manager. If you wantto modify a scheduled task, just double click on it or select it and press the "Modify" button.
If you want to remove one or more tasks from the scheduler, select them and press the "Remove" button.
If you want to schedule a new task, just press the "New" button and select the type of the task.
A filter is available for the "Scheduled Tasks" dialog which allows you to sort the sched-uled tasks by three criteria:
• Scheduled Name
• Scheduled Type
• Project Name
CalendarThe Calendar allows you to see all the scheduled tasks for a selected month. The daily tasks will beshown in red, weekly in green, monthly in blue and on time tasks in black.
Scheduler
85

Scheduler
86

Chapter 8. Interactive ReportsAdvanced Link Manager presents the information gathered from search engines in a set of interactive,easy to use reports. Each report can be viewed by clicking on the corresponding tab in the upper sidepanel of the main frame.
There are six tabular reports: Domain Information, Unverified Referrers, Referrers, BacklinksEvolution, Search Engine Evolution and Link Text. For three of them (Backlinks Evolution, Search En-gine Evolution and Link Text) a graphical rank evolution chart is also available.
In the tabular reports, you can sort the table rows by clicking on the column headers and you can reorderthe columns by grabbing and dragging them by their headers.
An empty report usually means that there is no data available for the selected domain(s).
Domain Information
This report displays contact and reciprocal link information for all potential partner websites available inyour project. For each domain, the following information is available:
• Rank.
This is the rank associated with each web page by the Google search engine. It enables you to seewhich are your most important referrers. It can take values from 0 to 10, where 10 is the highestvalue. The N/A status means that the referrer is not ranked by Google.
• Alexa Rank.
This is the traffic rank associated with each web page by the Alexa search engine. It enables you tosee which are your most important referrers. It can take any value from but 1 is the highest value. TheN/A status means that the referrer is not ranked by Alexa.
87

• Reciprocal status.
Displays the reciprocal status between the selected website domain and the referrer domain that is dis-played in the current line. The status may have one of the following values:
• Not Linking.
There is no link from you to your partner website, and the partner web site does not link to yourwebsite.
• Link to.
One or more of your web pages are pointing to the partner website.
• Link from.
One or more of the partner web pages are pointing to your website.
• Reciprocal.
There is a link from one or more of your web pages to your partner website and there is also a linkfrom one or more of the partner web pages to your website.
• Contact status.
Displays the status that is currently assigned to describe the current progress of your link exchangecampaign.
• Domain age.
This is the age of the domain computed from the date the domain was registered until today. N/Ameans that the domain information was not gathered for this domain. You can gather informationabout a domain trough the context menu "Update domain information" menu item.
• Compete rank. This is the rank gathered from Compete.com for a selected domain. It can help yousee how valuable are your existing referrers or potential link partners. The lower the rank is, the morevaluable the referrer/potential link partner is.
• Compete visits. Represents the total number of visits returned by Compete.com for a specific do-main.
• Compete visitors. Represents the total number of visitors returned by Compete.com for a specificdomain.
The "Display" drop-down list box in the top left corner of the Domains view allows you to filter the databy using the criteria you are interested in.
FiltersThe following filters are available to help you find the domains you are interested in:
• All items.
Displays everything, every potential link partner website and status available.
• Contact available.
Interactive Reports
88
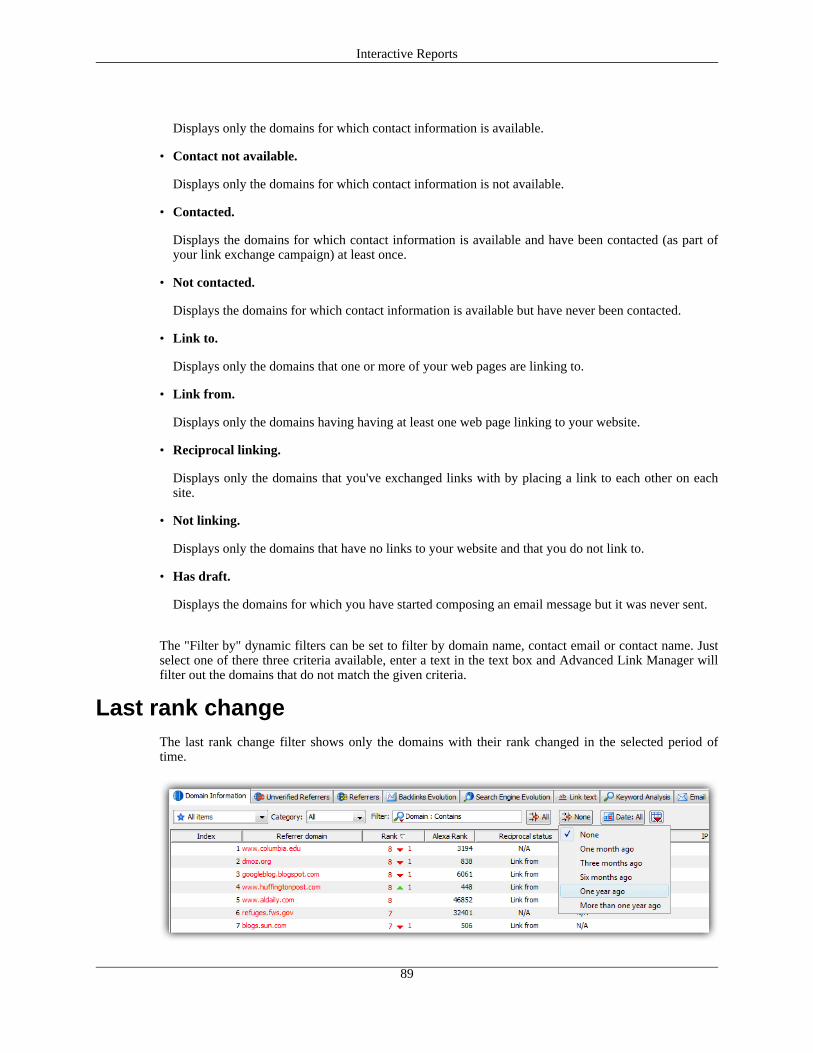
Displays only the domains for which contact information is available.
• Contact not available.
Displays only the domains for which contact information is not available.
• Contacted.
Displays the domains for which contact information is available and have been contacted (as part ofyour link exchange campaign) at least once.
• Not contacted.
Displays the domains for which contact information is available but have never been contacted.
• Link to.
Displays only the domains that one or more of your web pages are linking to.
• Link from.
Displays only the domains having having at least one web page linking to your website.
• Reciprocal linking.
Displays only the domains that you've exchanged links with by placing a link to each other on eachsite.
• Not linking.
Displays only the domains that have no links to your website and that you do not link to.
• Has draft.
Displays the domains for which you have started composing an email message but it was never sent.
The "Filter by" dynamic filters can be set to filter by domain name, contact email or contact name. Justselect one of there three criteria available, enter a text in the text box and Advanced Link Manager willfilter out the domains that do not match the given criteria.
Last rank changeThe last rank change filter shows only the domains with their rank changed in the selected period oftime.
Interactive Reports
89

Domain DetailsThe Domain Details panel displays the following information for the selected link partner website:
• Last updated.
The most recent date when you have updated the domain information for this particular partner web-site.
• Last contacted.
The most recent date when you have contacted this website (as part of your link exchange campaign).
• Status.
The status describes the current progress of your link exchange campaign. You can use the Statusdrop down list to change it whenever you see fit. For example, after you send your first link requestemail to a potential link partner you may set the status to "Waiting for answer to link request mail". Ifyou wish to change/add/delete a status message, use the [Project]->[Manage contact statuses...] menu.
• Description.
The description of your link partner website as provided by Alexa.
• Link from DMOZ directory.
Shows the categories in which the link partner website is included in the DMOZ directory.
• Link from Yahoo directory.
Shows the categories in which the link partner website is included in the Yahoo directory.
• Registered.
The date when the link partner domain was registered.
• Updated.
The most recent date when the link partner domain was updated.
• Expires.
The date when the link partner domain expires.
Most whois servers provide information about the Registered/Updated/Expires dates. If this is the case,then the dates are retrieved automatically by Advanced Link Manager. If this information is not avail-able from the whois server, the word "Never" appears and you can set this date yourself by clicking onit. You can only edit these dates manually if they haven't already been fetched automatically from a
Interactive Reports
90

whois server.
To refresh the whois information for a potential link partner domain just right click the domain in theDomain Information table and select the "Update domain information" option.
Email ComposerThe Email Composer allows you to send link request emails to the webmaster of the selected referrerdomain.
You can choose the recipient email from the "To:" list, which is automatically populated from the whoisserver. You can edit the contact information anytime by clicking on the Address Book icon on the rightside.
The Email Composer was designed to save you precious time when editing the link exchange emails.Here are some of the features that will help you with this task:
• Email template.
This button will open a popup menu that will allow you to select an email template. To manage theemail templates select the "Manage email templates" item instead.
• Quick text.
This button will insert a previously saved text that you often use when writing emails. To manage thequick texts select the "Manage quick text" item instead.
• Insert variable.
This button will allow you to insert the value of a commonly used term like Name or Address into theemail composer. These variables have default values that you need to change the first time you usethem. To edit these variables later just go to [Options]->[Edit contact details].
• Send and set status to:
When you send an email, you can also change the status to a new value using this option.
Interactive Reports
91

Message HistoryThe message history tab shows all the emails you sent as part of your link exchange campaign.
Reciprocal DetailsIf you click on the reciprocal status column for the selected referrer, a dialog will pop up with detailedinformation about the links between you and the selected referrer.
A green arrow shows a link from the referrer page to your page and a red arrow shows a link from yourpage to the referrer page. When both arrows appear, the link is reciprocal between the same pages.
First of all, this will help you understand why Advanced Link Manager has assigned that reciprocalstatus. Secondly, you will see all the links from you to your referrer or the other way around.
You also have the ability to see the links from your perspective or from the perspective of your referrerby switching betwen the two tabs.
Unverified ReferrersThe "Unverified Referrers" report displays the web pages that have been reported by the search enginesto have a link to your website.
These referrers come straight from the search engine index. And since the search engines do not alwayshave their index up to date, these links may no longer exist. To see the real (verified) referrers look atthe Referrers report instead.
Interactive Reports
92

For each referrer, the following information is displayed in the corresponding column:
• Rank.
This is the rank associated with each web page by the Google search engine. It enables you to seewhich are your most important referrers. It can take values from 0 to 10, where 10 is the highestvalue. The N/A status means that the referrer is not ranked by Google.
• Alexa Rank.
This is the traffic rank associated with each web page by the Alexa search engine. It enables you tosee which are your most important referrers. It can take any value from but 1 is the highest value. TheN/A status means that the referrer is not ranked by Alexa.
• Quality ratio.
This is the referrer quality ratio computed using the formula selected by you in the Application prefer-ences
• Outbound links.
This is the number of outgoing links found in the referrer URL.
• Date Added.
This is the date that the referrer was added to your project.
• Status.
Enables you to see the update status of each referrer. It can have the following values: Updated orNever Updated, Redirect, Exceeded Size, Unauthorised, Timed Out and Not Found.
Interactive Reports
93

• Last Updated.
This is the date that the referrer was last updated and the status has been changed.
• IP Address.
This is the IP address associated with the referrer website.
The "Display" drop-down list box in the top left corner of the Unverified Referrers Report allows you tofilter the data by using the criteria you are interested in.
FiltersThe following filters are available:
• All items.
Displays everything, every URL and change available.
• Potential.
Displays the referrers found with the Find link partners wizard.
• Linking back.
Displays the referrers that link back to the selected domain or URL.
• Not linking back.
Displays the referrers that do not link back to the selected domain or URL.
• Never Updated.
Interactive Reports
94

Only displays the URLs that have not been checked.
• Previously Updated.
Displays only URLs that have been already analyzed. The ones that are not found will be omitted.
• Not Found.
It displays all the URLs that have been checked and not found to be existent.
• Automatically added.
Displays only the URLs that have been automatically found by the search engines you selected foryour current project
• Manually added.
Displays only the URLs that have been manually added by the user using the Manually add referrers...from the "Update" menu item or the "Add" context menu item from the "Referrers" tab.
• Removed.
Displays a list containing the manually removed URLs. These URLs are kept within the project's datato exclude them from future search results. They can be restored by right-clicking on them and choosethe "Restore" menu item
There is also a "Filter by" filter which can be used to filter your referrers list.
Type one of the active URLs of your project in the filter box and the chart will display only the line forthe specified URL.
The Unverified Referrers report was also designed to be a manager for referrers. If you right click onany referrer a context menu will appear that will give you access to all the actions required for managingthe referrers.
Interactive Reports
95

The context menu contains the following features:
• View contact details. Opens the Domain Information report.
• Add referrer. Adds the referrer for all domains.
• Copy link address. It copies the selected referrer address into your clipboard.
• Ignore links from this domain. Ignores all the links from the selected domain.
• Update Selected URLs. It analyzes the selected referrers.
• Update Visible URLs . It analyzes all the referrers.
• Remove. Removes the selected referrer from the referrers list.
• Assign to referrer category. Assigns the selected referrer to one of the categories you have.
• Whois. It opens up a web browser page with URL information, collected from the WHOIS database.
• Whois DMOZ. It opens up a web browser page with URL information, collected from the DMOZdatabase.
• Whois Yahoo Directory. It opens up a web browser page with specific URL information, collectedfrom the Yahoo Directory.
• Web Archive. It opens up a web browser page with the visual history of the selected website.
• Google Cache. It open us a web browser page and displays the selected URL directly from theGoogle cache system.
• Google Cache (no images). It open us a web browser page and displays the text version of the selec-ted URL directly from the Google cache system.
Interactive Reports
96

• Detailed WHOIS. It opens up a web browser page and displays detailed information about the selec-ted URL. This information is collected from the WHOIS database.
Note
The referrers that will appear in the "Unverified Referrers Report" may not link to the target referrer theywere gathered for. You can know if they do link after a Verify Link Status update in the Referrers Report
Last rank changeThe last rank change filter shows only the unverified referrers with their rank changed in the selectedperiod of time.
ReferrersThe Referrers Report
The "Referrers Report" displays the web pages that have been verified and are definitely linking to yourwebsite. This information is only available after you've ran an update that had the "Verify Link Status"option enabled.
Interactive Reports
97

The Referrers Report is tied to a date: the date when a Verify Link Status update was run for the project.That means that the report will display the related information for the date when the update took place.
When a new "Verify Link Status" update is executed, you can still access the old data by going back to aprevious date (when the update was done). The "Date" drop-down list box in the top right corner of theReferrers Report allows you to select the date for which the information is displayed.
For each referrer domain/URL you have the following information available:
• Rank.
This is the rank of the referrer domain/URL and can take values between 0 and 10. The higher the bet-ter.
• Alexa Rank.
This is the Alexa Traffic Rank that Alexa is collecting through the Alexa Toolbar from the users. Thelower the better.
• Quality ratio.
This is the referrer quality ratio computed using the formula selected by you in the Application prefer-ences
Interactive Reports
98

• Outbound links.
This is this is the overall number of off site links for the referrer URL/domain.
• Backlinks.
This is the number of links from the referrer URL page pointing to one of your target URLs.
• Added.
This is the number of links from the referrer URL page pointing to one of your target URLs in this up-date, but not in the previous one.
• Removed.
This is the number of links from the referrer URL page pointing to one of your target URLs in theprevious update, but not in this one.
• Normal.
This is the number of links from the referrer URL page pointing to one of your target URLs for boththis update and the previous one.
Detailed information on the referrers pointing to your target domain is shown in the lower right panel inReferrers Report. This panel displays information concerning the selected referrer domain/URL in theupper right panel.
For each link you have the following information available:
• Link Text.
This is the text contained in the anchor tag of the link.
• URL Title.
This is the title of the referrer page.
• No follow.
This indicates - by means of a "Yes" value - whether either:
• a given backlink from a referrer page has a rel="nofollow" hyperlink attribute set or
• a given referrer page has content="nofollow" "META" tag attribute set in header
This means that the search engines are instructed not to consider such a backlink in rank calculationsand to ignore backlinks from such a referrer page.
Interactive Reports
99

• Status.
This is the status of the backlink. It can be one of the following values: "Added", "Removed" or "Nor-mal".
• Type.
This is the type of the link. It can be either text or image.
FiltersThe filters in the Referrers Report can be:
• Display filters.
• Dynamic filters.
Display Filters
The display filters can be:
• All.
Displays everything, all the referrer URLs and backlinks.
• Normal.
Interactive Reports
100

Displays only the referrers that contain backlinks with a "Normal" status.
• Added.
Displays only the referrers that contain backlinks with an "Added" status.
• Removed.
Displays only the referrers that contain backlinks with a "Removed" status.
• Text links.
Displays only the referrers containing backlinks with text as the anchor content.
• Image links.
Displays only the referrers containing backlinks with images as anchor content.
• No follow links.
Displays only the referrers containing backlinks that have a rel="nofollow" hyperlink attribute set.
• Removed all links.
Displays only the referrers that have only removed links.
Dynamic FiltersThe dynamic filters can be set to filter by domain name, URL or link text. Just select one of there threecriteria available, enter a text in the text box and Advanced Link Manager will filter out the referrers andlinks that do not match the given text.
You can also sort the data available by all the information available, just by clicking on the columnheader.
The context menuThe context menu contains the following items:
• Collapse all nodes. - collapse the Referrers report to show only the referrer domains.
Interactive Reports
101

• Expand all nodes. - expands all referrer domains, showing all the referrer URLs from all the do-mains.
• Open URL in browser. - opens the selected referrer URL in the system default browser.
• Copy link address. - copies in the system clipboard the address of the selected referrer URL.
• Export to CSV. - exports the Backlinks data to CSV format
Referrer operationsOne of the most powerful features of the Referrers Report is the referrers operations.
In the "Operation" drop down we have the following operations available:
• Union.
The union operation will display a set of referrers which contains the referrers that link to the domainsselected in the "Primary domains" and the referrers that link to the domains selected in the "Secondarydomains".
• Difference.
The difference operation will display a set of referrers which contains the referrers that link only tothe domains selected in the "Primary domains" and do not link to the domains selected in the "Second-ary domains".
This operation is useful when you want to see which referrers you have to your domains and yourcompetitors do not.
• Intersection.
The intersection operation will display a set of referrers which contains the referrers that link to boththe domains selected in the "Primary domains" and the domains selected in the "Secondary domains"at the same time.
This is useful when you want to see which referrers link to you and your competitors (i.e. web direct-ories)
Referrers viewsAdvanced Link Manager allows you to view the Referrers report in different ways.
The Referrers report has the following views available:
• Referrers by domain. - displays for each domain selected the Referrers report grouped by domain
• Referrers by URL. - displays for each domain selected the Referrers report sorted by the exact URLthat has a link to your website
• Referrers Overview. - displays for a selected domain the Referrers and checks if another domainfrom your project has a link from the same referrer
Interactive Reports
102

• Referrers by category and rank. - displays for a selected domain the Referrers grouped by categoryand page rank
• Referrers by IP address. - displays for a selected domain the Referrers grouped by the IP addressblock
Last rank changeThe last rank change filter shows only the referrers with their rank changed in the selected period oftime.
Interactive Reports
103

Backlinks EvolutionThe Advanced Link Manager "Backlinks Evolution" allows you to track the evolution of your links intime via a chart.
This chart will contain information about the number of referrers of the selected URL collected from allthe active search engines of your project, for the selected period of time.
In the Chart view, the number of referrers is represented on the vertical axis, while time is representedon the horizontal one.
The Legend at the bottom of the chart allows you to better understand the information depicted in thechart. The Legend displays a color for every selected domain. This color is used to draw the graphicalevolution (lines or dots) of that specific domain.
Note that in the Backlinks Evolution chart there is a line for each one of the selected domains. You canselect as many domains as you want to compare their progress over time. Each selected domain will berepresented by a unique color, automatically assigned by the Advanced Link Manager.
If you select more than one referrer URL, each line of the chart will represent the sum of links from thereferrer URLs selected for each of the selected target domains/URLs
The "Backlinks Evolution" report contains two filters which can be used to better understand the pro-gress of your targeted domains:
• Position Range. The "Position Range" filter can be used to zoom on a customized position range:
Interactive Reports
104

• "1 To 10","1 To 50", "1 To 100", "1 To 500" and "1 To 1000". Displays the selected positionrange
• Custom Range. Displays a dialog window where you can enter the minimum and the maximumposition values which will be used by the vertical axis of the chart.
• Date Range. It can be used to select the time range used to represent the graphical data. You have 7options to select from:
Interactive Reports
105

• All Data. The horizontal axis of the chart will contain all the available dates.
• Last Week. The horizontal axis of the chart will contain only the last week's available dates.
• Last Month. The horizontal axis of the chart will contain only the last month's available dates.
• Last Three Months. The horizontal axis of the chart will contain only the available dates from thelast three months.
• Last Six Months. The horizontal axis of the chart will contain only the available dates from thelast six months.
• Last Year. The horizontal axis of the chart will contain only the available dates from the last year.
• Custom Range. Displays the "Date Range" dialog box where you have the possibility to custom-ize the dates where the evolution chart starts and/or ends:
• Begin. If you check it, your chart evolution will start with the date when you made your first up-date.
Interactive Reports
106

• Today. If you check it, your chart evolution will end with today's date.
• Set Date. You can use the calendar to select either the begin or the end date for the evolutionchart.
A context menu is available for the chart, with the following options:
• Save As.
Saves the chart view into a .png or JPEG file. Note that the file will contain only the current view ofthe chart (so be sure to save the right section of your chart).
• Print.
Allows you to print the chart view.
• Zoom In .
You can magnify the chart view on both axes. The area that will be zoomed in has its center in thepoint where you click with your mouse.
If you want to magnify only a certain area, click with the left button of your mouse to specify the topleft point and drag it to select the desired area.
• Zoom Out .
Interactive Reports
107

You can decrease the chart view on both axes. The area that will be zoomed out has its center in thepoint where you click with your mouse.
• Show All Data In Range.
Redraws the chart so it fits all the data into the view. The same effect can be achieved by double-clicking on the chart, or by drag and dropping with your mouse from a lower position to a higher one.
Search Engine EvolutionThis report allows you to track the estimated number of referrers (the number of pages reported by asearch engine to have a link to your website). There are three views available in this report:
• Search Engines Overview.
• Referrers by Search Engine.
• Search Engines Evolution Chart.
Switching between the views is done from the toolbar at the top-left corner of the tab.
Search Engines OverviewThe Search Engines Overview has two views:
• Order by Search Engines
• Order by URLs
These views can be switched from the drop-down combo from underneath the tab toolbar. These viewsare not like the chart view. Instead they compare two selected dates and show the changes, if any.
On both views you will have the display filter with the following items available:
• All - this is the default filter which will show all items
• Moved up - shows only the items that have moved up.
• Moved down - shows only the items that have moved down.
• Changed - shows only the items that have moved up or down.
Order by Search EnginesIn this view, the data will be organized with the search engines as columns and the URLs as rows.
Interactive Reports
108

For this view there is some extra information available. This information is used for comparison only, itdoes not concern the current project. This information can be found in the Advanced Link Manager datafolder, the "data" folder, in the "comparedata.xml". You can customize this file at your will..
Order by URLsIn this view, the data will be organized with the URLs as columns and the search engines as rows.
Referrers by Search EngineThis view displays the referrers for the selected domain grouped by the search engine that reportedthem.
You can select all the search engines, in which case you will see all the links to your website, or you canselect one or more search engines to restrict the referrers to those that were reported by the selectedsearch engines.
By default, you will see all unique referrers from all the selected search engines. If you wish to see thecommon referrers that were reported by two or more search engines, just change the display mode toshow only the common referres. This can be done from the first button above the Search Engine inputpanel.
Search Engines Evolution ChartThis chart displays a time evolution of the estimated number of referrers reported by the selected searchengines.
In the Chart view, the number of search engine results is represented on the vertical axis, while time isrepresented on the horizontal one.
The Legend at the bottom of the chart allows you to better understand the information depicted in thechart. The Legend displays a color for every selected search engine used in your project. This color isused to draw the graphical evolution (lines or dots) of that specific search engine.
Note that in the "Search Engine Evolution" Chart view there is a line for each one of your project'ssearch engines. Each search engine will be represented by a unique color, automatically assigned by theAdvanced Link Manager.
Interactive Reports
109

The "Search Engine Evolution" report contains two filters which can be used to better understand theprogress of your estimated number of results:
• Position Range. The "Position Range" filter can be used to zoom on a customized position range:
• "1 To 500","1 To 1000", "1 To 5000", "1 To 10000", "1 To 50000" and "1 To 100000". Dis-plays the selected position range
• Custom Range. Displays a dialog window where you can enter the minimum and the maximumposition values which will be used by the vertical axis of the chart.
• Date Range. It can be used to select the time range used to represent the graphical data. You have 7options to select from:
Interactive Reports
110

• All Data. The horizontal axis of the chart will contain all the available dates.
• Last Week. The horizontal axis of the chart will contain only the last week's available dates.
• Last Month. The horizontal axis of the chart will contain only the last month's available dates.
• Last Three Months. The horizontal axis of the chart will contain only the available dates from thelast three months.
• Last Six Months. The horizontal axis of the chart will contain only the available dates from thelast six months.
• Last Year. The horizontal axis of the chart will contain only the available dates from the last year.
• Custom Range. Displays the "Date Range" dialog box where you have the possibility to custom-ize the dates where the evolution chart starts and/or ends:
• Begin. If you check it, your chart evolution will start with the date when you made your first up-date.
Interactive Reports
111

• Today. If you check it, your chart evolution will end with today's date.
• Set Date. You can use the calendar to select either the begin or the end date for the evolutionchart.
A context menu is available for the chart, with the following options:
• Save As.
Saves the chart view into a .png or JPEG file. Note that the file will contain only the current view ofthe chart (so be sure to save the right section of your chart).
• Print.
Allows you to print the chart view.
• Zoom In .
You can magnify the chart view on both axes. The area that will be zoomed in has its center in thepoint where you click with your mouse.
If you want to magnify only a certain area, click with the left button of your mouse to specify the topleft point and drag it to select the desired area.
• Zoom Out .
You can decrease the chart view on both axes. The area that will be zoomed out has its center in the
Interactive Reports
112

point where you click with your mouse.
• Show All Data In Range.
Redraws the chart so it fits all the data into the view. The same effect can be achieved by double-clicking on the chart, or by drag and dropping with your mouse from a lower position to a higher one.
Search Engine Evolution viewsThe application allows you to view the Search Engine Evolution report in three different ways.
The Search Engine Evolution report has the following views available:
• Search Engines Overview. - displays an overview of the number of incoming links for each searchengine, and the total number of incoming links summed up for all search engines, for a selected peri-od of time
• Referrers by Search Engine. - displays the referrers for a selected domain and search engine
• Search Engine Evolution Chart. - displays a chart with the evolution of incoming links over a se-lected period of time
Link TextThe Link Text Report shows an overview of the text contained in the anchor tag of a backlink. This re-port has two views:
• The Tree View.
This is a hierarchical view that shows the link text as parent and the referrers as chilidren.
Interactive Reports
113

The lower panel of this view shows detailed information about the links such as the link type, the pos-ition of the link in page, and whether or not it has the no follow attribute set. There is also informationabout the referrer contained, such as the page title and the number of outbound links in that page.
The following display filters are available:
• All links.
Displays all the links regardless of their nature.
• Text links.
Displays only the links with text as the anchor content.
• Image links.
Displays only the links with images as anchor content.
• No follow links.
Displays only the links that have a rel="nofollow" hyperlink attribute set.
The dynamic text filters can also be used for additional filtering of the URLs and the Link Text.
Interactive Reports
114

• The Chart.
This is a pie chart that shows the link text that is used more often when linking to your page. It showsthe share of the pie for each link text from the total number of links that point to your website.
In the lower panel there is a legend of the above pie chart. Selecting an item in the legend will causethe slice that belongs to that item to detach from the chart for more visibility.
The following display filters are available:
• Top 5.
Displays only the first 5 link texts that and groups all others in a single section called "Others".
• Top 10.
Displays only the first 10 link texts that and groups all others in a single section called "Others".
• Top 15.
Displays only the first 15 link texts that and groups all others in a single section called "Others".
Interactive Reports
115

Link Text viewsAdvanced Link Manager allows you to view the Link Text report in different views.
The Link Text report has the following views available:
• Link Text Tree. - displays the Referrers grouped by the link text used in the referrers link for a se-lected domain
• Link Text Overview. - displays all the link text used by the referrers for a selected domain
• Link text Chart. - displays a pie chart showing the percentage of each link text used by the referrers
Last rank changeThe last rank change filter shows only the referrers with their rank changed in the selected period oftime.
The Keyword Analysis ToolThe Keyword analysis tool is useful for finding out various keywords related information like keyworddensity, occurrences in the page, occurrences in the anchor text and the word count of each phrasefound. Before seeing any results you should analyze your websites. To do that you need to press the"Analyze websites" button from the upper region of the report
Pressing the down arrow button next to the "Analyze websites" button will show an update contextmenu with the following options:
• Analyze all websites. This will start an update of the current day for all the websites in the project.
• Import history for all websites from WayBackInTimeMachine. This will start an update for allthe websites in the project that will import from WayBackInTimeMachine all the available changedates.
• Analyze selected websites. This will start an update of the current day for the websites selected inboth left side input panels.
Interactive Reports
116

• Import history for the selected websites from WayBackInTimeMachine. This will start an updatefor the selected websites from both left side input panels that will import from WayBackInTimeMa-chine all the available change dates.
Compare ViewThis panel contains two sections for each selected URL. In the upper section you will see an analysis ofthe general URL information. The information presented here contains the URL title, IP address, parentdomain, page size and a meta information analysis. The lower section displays the words and phrasesfound in the page text along with the time they occurred in the text, anchors and their densities
The Keyword Analysis tool has two ways of displaying the analysis data. The first is a side by side com-parison of two different web pages. To do that, select two different web pages in the left side input pan-els.
The second way is to compare two different analysis dates of the same domain. In this mode theKeyword Analysis tool will display the differences between the two selected days.
The Keyword Analysis tool allows you to set up various parsing parameters. You can set these paramet-ers by pressing the Options button.
Interactive Reports
117

In the Options panel you can specify the maximum number of words in a phrase. You can also specifythe maximum and minimum density percent that will determine the coloring of the density column.
Definitions
Occurrences. Represents the number of times a keyword is present in the selected page.
Density. The density represents the appearance percent of a keyword or phrase compared with the totalnumber of words present on that web page. So if a word appears 10 times in the page and the page con-tains 100 words, the density is 10%. The same goes for phrases(groups of words). If a phrase appears 10times and contains 3 words, the words appear 30 times, and if the page contains 100 words, the densityof the 3 words phrase is 30%.
Prominence. The prominence represents how well a keyword or phrase is placed in a sentence. If akeyword is the first word in a sentence, it has 100% prominence. If the keyword is in the middle of thesentence then it has 50% prominence and if it is the last it has 0% prominence. In the case a keyword ap-pears two times in the same sentence, then the prominence is the average of those two occurrences. Forexample, if the keyword appears first and last in the sentence, then the prominence is (100% + 0%)/2 =50%.
What text is considered for Keyword Analysis
Interactive Reports
118

Entire text. The Entire text view displays as keywords and phrases, the content of title tag, meta de-scription and keywords tags, anchor tags, ALT tags, H tags and body copy.
Title. The title tag is extracted from the web page and it's content is displayed as keywords and phrases.
Links. The anchor tags are extracted from the web page and their contents is displayed as keywords andphrases.
Img ALTs. The ALTs attributes are extracted from the img tags and their contents is displayed askeywords and phrases.
Meta keywords/description. The content attribute of the meta tag with the attribute name equal tokeywords/description is extracted, and it's content is displayed as keywords and phrases.
Headings. The H tags are extracted from the web page and their contents are displayed as keywordsand phrases.
Overview ViewThis view displays an overview of the changes made to specific pages of your website or your competit-ors websites.
The Keyword Analysis Overview lets you select what changes you want to be displayed in the report,being them for the entire text, changes made for the title, link, Img ALTs meta information or headings.
The Email ClientThe email client provides POP3 and IMAP email retrieving connectivity and SMTP email sending foryour configured accounts. There are three incoming (POP3 or IMAP) configurations available: the glob-al settings available via Options menu->Preferences->Email panel, the project settings available viaProject menu->Project settings>Email panel and the contact details settings available via the Optionsmenu->Edit contact details->Email panel.
Pressing the "Retrieve emails" button will start retrieving the emails from your configured email ac-counts. To stop retrieving the emails just press the "Stop" button next to the "Retrieve emails" button.
The Folders panel contains a folder for each incoming email settings, one for the Sent emails and aTrash folder. This panel will also show which folder contains unread emails and how many they are.
Interactive Reports
119

The sent contains the email messages you sent from within Advanced Link Manager via the Domain in-formation report Email composer or via the Email client Write email dialog. Note that all messages canbe moved from one folder to another or deleted except the messages that were sent from the Domain in-formation report Email composer.
The Toolbar contains buttons for the following action:
Retrieve emails - Retrieves the emails from the configured POP3 or IMAP accounts.
Stop - Stops the email retrieving.
Compose - Opens the email composer allowing the user to compose and send an email.
Reply - Opens a reply message for the currently selected email message.
Forward - Opens a forward message for the currently selected email message.
Print - Prints the selected email message to a specified printer.
Export to file - Exports the selected email message to a text file.
Move to trash - Moves the selected email message to the trash folder.
The message panel displays brief information about the email message like from, to, subject, date andsize. Clicking the columns of this list will sort the message accordingly. The message selected in this listwill be displayed in the message panel below.
The filter panel from the left side of the toolbar helps you filter the available messages by all fields.
Interactive Reports
120

The message panel displays the content of the email message along with the all header informationavailable: from, to, subject, cc, bcc and date.
Note
The integrated email client reads only the plain text from within your messages. To see or download the at-tachments of your emails you must use another email client.
To setup periodical checks for new mail use the global email settings
The Broken Links reportThe Broken Links report helps you if your pages contain broken or invalid links. This retrieves the linksfrom your project pages and checks if the URLs they point to still exists. If it does not exist it will con-sider it a broken link.
The report presents the following columns:
• The Project URL. This is the URL contained in your project that was checked for links validity
• The External link. This is the URL that one of the links from your Project URL links to
• The status. The status can be broken or normal
Interactive Reports
121

The check for broken links is done on demand, by pressing the green button "Check for broken links".
You also have the ability to filter the links by three criteria:
• All. All links will be displayed regardless of their status.
• Normal. This filter will show only the links that have been found valid.
• Broken. This filter will show only the links that have been found broken or invalid.
The dynamic text filter will show the links who have at least one of their URLs (project URL or externallink) matching the text filter.
The Indexed Pages reportThis report presents the pages from your project websites that have been found in the search engine's in-dex (for the search engines that support this feature). Basically this is a site:www.domain.com search onthe search engines that support this command and it returns the pages that the search engines indexedfrom your website.
The columns presented by the report are:
• The URL. The page found in the search engine index
Interactive Reports
122

• The Search engine. The search engine that returned that page
A dynamic text filter is available that will remove from the display the URLs that do not contain the fil-ter text.
Indexed pages viewsAdvanced Link Manager allows you to view the Indexed pages report in different views.
The Indexed pages report has the following views available:
• Indexed Pages. - displays the URL of the indexed page and the search engine where that specificpage is indexed for a selected domain
• Indexed Pages Overview. - displays the total number of indexed pages and the number of indexedpages for each search engine for a selected domain
• Indexed Pages Evolution. - displays a chart with the evolution of indexed pages over a selected peri-od of time
Reciprocal linkingThe Reciprocal linking report evaluates multiple way link exchange between you and your link ex-change partners.
This helps you keep track of your link exchange campaigns, when having three way, four way link ex-change, or more.. Let's say that you own two domains, domainA.com and domainD.com, and one ofyour link exchange partners owns domainB.com and domainC.com. A three way link exchange wouldlook like this:
• domainA.com links to domainB.com.
domainB.com links to domainD.com.
A four way link exchange would look like this:
• domainA.com links to domainB.com.
domainC.com links to domainD.com.
The reciprocal linking report displays the status of this kind of link exchange, if the link exchange chainis OK or if it is broken somewhere. In this way you can see at any time if one of you partners removedthe link from their website.
Interactive Reports
123

Chapter 9. Printable ReportsAdvanced Link Manager can also present the information gathered from search engines as printable re-ports in the following formats: HTML, PDF, CSV and XML . There following reports are created by de-fault in any new project: Domain Information Report, Unverified Referrers Report, Referrers Report,Referrers Overview Report, Link Text Report, Link Text Overview Report, Referrers Information Re-port, Referrers by Search Engine Report and Search Engines Report. To create a new report, you can usethe Report wizard which will help you create printable reports customized to your own needs.
The first step of the wizard allows you to choose one of the three types of reports available:
• Domain Information Report.
This report shows only the referrer domains from your project and various information about themsuch as: IP, Rank, Alexa Rank, Domain age
• Unverified Referrers Report.
This report shows the referrers as they were gathered from the search engines. These referrers maynot link back to your website.
• Referrers Report.
This report shows only the referrers that link back to your website, with detailed information aboutthem.
• Referrers Overview Report.
This report shows only the referrers that link back to your website, with a side-by-side comparison ofyour competititon.
• Search Engines Report.
This report shows the evolution of the number of links to your targets as provided by the search en-gines.
• Link Text Report.
This report shows the top link texts and the referrers they come from.
• Link Text Overview Report.
This report shows an overview of the links count for each link text and each website in your project
• Referrers by Search Engine Report.
This report shows the referrers verified by the Verify link status update and the Search Engines thatreported them
• Referrers Information Report.
This report displays detailed information about the referrers from you project such as: IP, URL title,Page Rank, Referrer Category, Tag and Meta information
124

InputThe second step of the report wizard allows you to set the input data needed to generate the report.
First of all we need to select a date as the report current date. Here we can choose an exact date when anupdate was made. For convenience, a "Last update" date is also available so you can generate the reportfor the day the last update was made.
If we want to compare the curent day data with the data from an earlier date, all we need to do is checkthe "Show changes compared to" option and select a date from the drop down list. Here too you canchoose "Previous update" and the report will always consider the previous update date as the comparis-on date.
There are two types of input data: Domains and Search Engines. By default all the domains and searchengines are included in the report. To choose only some of them, uncheck the "Include all domains" op-tion for example and use the "Select..." button that appears on the right side to select only the domainsyou are interested in.
OutputThe next step of the wizard allows us to edit the output settings of the report:
Printable Reports
125

Here we can set the the format the report will be generated. On the right side of the format drop downlist, we have a "Preview" button that allows us to see exactly how the report will look like. Try changingany option or a filter and press the "Preview" button to see how Advanced Link Manager will displaythe report.
Filters and SortingIn this section you can choose the column the report will be ordered by as well as the order (ascendingor descending). You can also filter out the referrers you don't need using the rank, status or any other fil-ter available. The "Exclude empty sections" option will prevent the report to display sections that areempty because the filter excluded all data from them.
LayoutThe "Insert charts" option allows you to include the graphical evolution charts in the report. When thisoption is enabled, the "Setup..." button on the right side will allow you to change additional options forthe charts.
Printable Reports
126

Here you can select the date range you wish to see in the charts as well as the range of the links count.The "Show legend" options lets you add a legend at the end of the chart.
Unckeching the "Show all columns" option will enable the "Select..." button on it's right side that willallow you to select the columns you wish to appear in the report..
Printable Reports
127

Check the "Use header footer template" option if you want to use a "Header and Footer" template withthis report. When the option is checked, the header and footer templates drop list will be enabled andyou can choose one of the templates available. You can press the "Setup..." button on the right side ofthe list to manage your header and footer templates.
If the "Color URLs in reports" option is enabled, all the URLs from the report will be colored with theirdesignated colors from the project settings.
DestinationThe next step of the wizard allows us to edit the destination of the report:
Printable Reports
128

Report DescriptionIn the Report Description section you can choose the title of the report and the report name. The reportwill be saved to your hard disk using this name and it can be set to a certain name, or it can be a templet-ized name formed of the name of the template, the name of the project and the date it was created. If youwish to set a custom name for the report just uncheck the "Use default name" checkbox. Unchecking the"Append date" checkbox will also exclude the date from the name of the report.
Destination SettingsIn this section you can choose the destination of the generated report. You can select one or more destin-ations from the three available destinations:
• Local folder.
To save the report to a local folder just check the "Save to folder" option. To create separate foldersfor report type, year and month check the "Create separate folders for report type, year and month"option. The text field above this option will show you the report save folder path. This path is used byall the report templates from this project. If you want to change this path, just press the "Select..." but-ton which will take you to the "Project settings" dialog where you can choose the desired folder.
• Email.
To send the report to a list of emails select the "Send by email" option. When you press the Next but-
Printable Reports
129

ton, the wizard will take you to an additional step where you can choose the contacts you wish to sendthis report to.
• FTP Server.
To upload the report to a list of FTP servers, select the "Upload report to FTP server" option. Whenyou press the Next button, the wizard will take you to an additional step where you can choose theFTP profiles you wish to upload this report to.
SummaryThe final step of the Report wizard is where you can see an overview of the report data, before you saveany changes you made to the report template:
Printable Reports
130

If you wish to generate the report after creation, make sure the "Generate the report when the wizard fin-ishes" option is checked before you press the "Finish" button.
Printable Reports
131

Chapter 10. The Event LoggerIf you happen to use Advanced Link Manager every day and you have many projects that are updatedregularly using the scheduler, you may lose track of what's happening behind the scene. That's where theEvent Logger comes to help. It will tell you exactly what happened, at what time, and whethereverything went fine or not. It can even send you an email automatically when certain event types occur.
The Event LoggerThere are many events that are logged by the Event Logger. Here's a list of actions that can add an entryto the list:
• Scheduled Updates
• Multiple Scheduled Updates
• Sending Emails
• FTP Uploads
• Generating Reports
• Application Errors
All the events are presented to you in the Event Log Viewer:
Knowing what happens is especially useful when running updates from the scheduler because the updateis done in the background, so you have no way of knowing what actually happened.
As you can see from the picture above, you have the option to display all the logged events, or you can
132
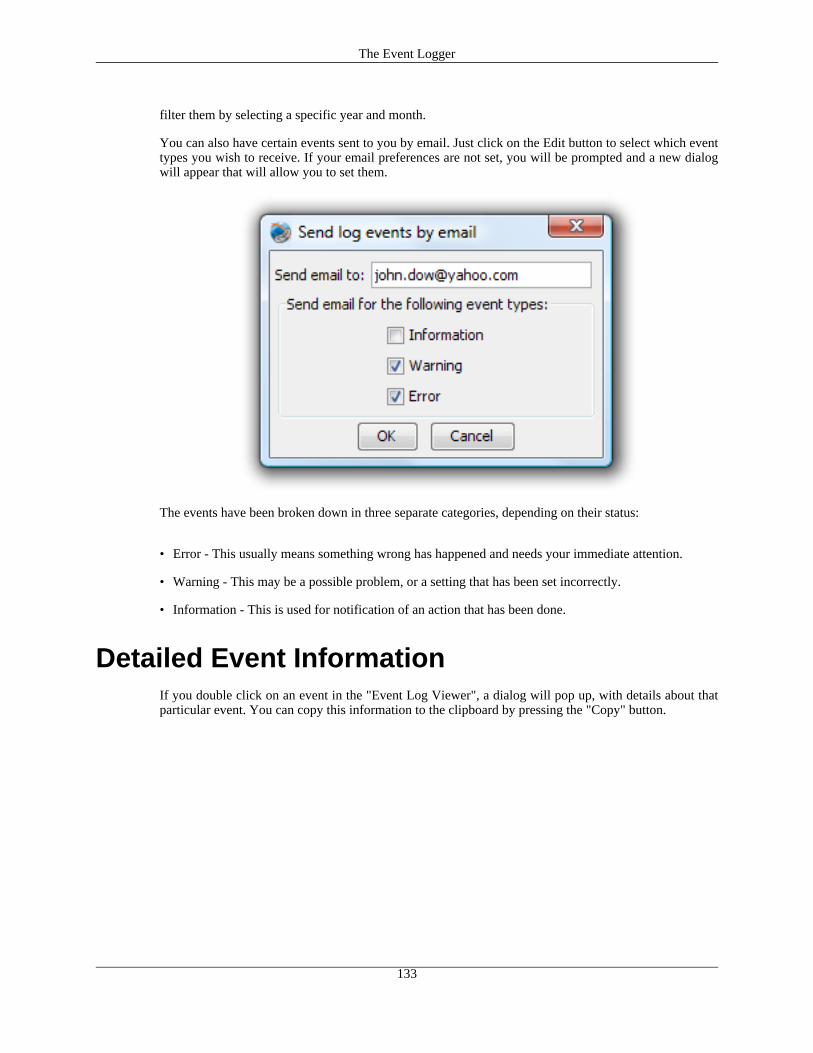
filter them by selecting a specific year and month.
You can also have certain events sent to you by email. Just click on the Edit button to select which eventtypes you wish to receive. If your email preferences are not set, you will be prompted and a new dialogwill appear that will allow you to set them.
The events have been broken down in three separate categories, depending on their status:
• Error - This usually means something wrong has happened and needs your immediate attention.
• Warning - This may be a possible problem, or a setting that has been set incorrectly.
• Information - This is used for notification of an action that has been done.
Detailed Event InformationIf you double click on an event in the "Event Log Viewer", a dialog will pop up, with details about thatparticular event. You can copy this information to the clipboard by pressing the "Copy" button.
The Event Logger
133

The Event Logger
134

Chapter 11. Generate Link PagesAdvanced Link Manager gives you the ability to generate web pages with links to your partners and up-load them automatically to your website.
Generating link pages in Advanced Link Manager is easy. All you need to do is assign links to a cat-egory and then go to the [Tools] -> [Generate link pages] menu to access the wizard.
To assign a link to a category just right click on a link in the Unverified Referrers report and choose As-sign to link category. If no category is created, or if you want to create a new category, choose New inthe above menu.
It is important to understand that there are two types of categories in Advanced Link Manager. There-fore you need to assign the link to a link category, and not to a referrer category, which is used for otherpurposes.
Once you have assigned the links to your categories you can begin generating your link pages.
Access the link page generator wizard by going to the [Tools] -> [Generate link pages] menu. The firststep of the wizard allows you to select an existing template, or create a new one if none exists.
If you need to create a new template, select "New Template" and click on Next. The following step al-lows you to define the layout of the link page. Once you define a template, you can use it later to gener-ate your link pages.
Defining a link page layout consists of selecting how the categories will be shown (all in one page, oreach category in its own page), how many links you want to show on each page, and how the HTMLpage should look when generated.
135

For the HTML page layout, you also have the ability to define templates. A default template exists thatcan help you get started right away, but you can always create a new one to customize the look and feelof your link pages.
The next step of the wizard allows you to specify how the links and their respective categories will besorted.
The final step of the wizard allows you to define the location of your link page(s). By default they aresaved in a folder, but you can upload them to your website using a predefined FTP template.
When the wizard finishes, the link pages are generated. You are then presented with a dialog that allowsyou to generate the link pages again in case you wish to change something, or edit the HTML template,to match the same look and feel as your website.
Link Page HTML LayoutThe link pages HTML layout can be customized and the changes can be saved in a template for lateruse. To access the link page HTML layout manager, go to [Options] and click on the [Manage link pageHTML layout] menu.
Generate Link Pages
136

There are two templates created by default, one for each type of layout: all categories in one page andeach category in its own page. When you create a new template, you can begin with one of these tem-plates and then customize them to your needs.
To customize the HTML code, click on the section you wish to change. An HTML editor will openwhere you can edit your changes. Click OK to save the changes and then Preview to see if everythinglooks as it should.
There are two HTML sections that you can customize: Index page and Category page. These are twoseparate entities when you create the link pages with one category per page. However, when you chooseto display all categories in the same page, these two entities combine to give you the same result in onepage.
Generate Link Pages
137

Link CategoriesTo generate link pages you need to assign the links to a category first. If that category is not already cre-ated, you can create it from the categories manager. Go to the [Options] menu and then click on[Manage link categories] to access it.
The link categories manager shows detailed information about the selected category in the main view.Here you can create a new category, edit or remove the selected one.
To assign links to a category use the context menu from the Unverified Referrers report.
Generate Link Pages
138

Chapter 12. User Profiles and AccessGroupsUser Profiles
Advanced Link Manager allows you to have a custom profile for each user. Along with the added secur-ity coming from the authentication window, you also have the ability to manage what rights the usershave to the stored data.
Each user is assigned to an Access Group and inherits the rights defined in the access group.
The most important feature that comes with the addition of user profiles is the ability to store each user'spreferences separately, such as proxy and email server, API keys and all other global settings that areavailable within the application.
You can access the user profiles manager from the [Options] menu.
Access groupsThe access groups allow the Administrator to define groups of users that have the same rights.
The users can be restricted from updating projects, changing the project preferences and many other op-erations. A full list with the restrictions allowed by Advanced Link Manager is available within the NewAccess Group dialog.
You can access the manager from the [Options] menu.
Note
Upon an Access Group removal, all the users belonging to that group must be moved to another accessgroup. Advanced Link Manager will prompt the Administrator for the new access group.
139

Chapter 13. Header and FooterThe Header and Footer template allows you to add custom headers and footers to your reports.
To create a header and footer template select [Options] -> [Headers and Footers] -> [New Header andFooter...].
The Header
The Default header contains:
• The name of your Company
• The address of your Company
• The web address of your Company
140
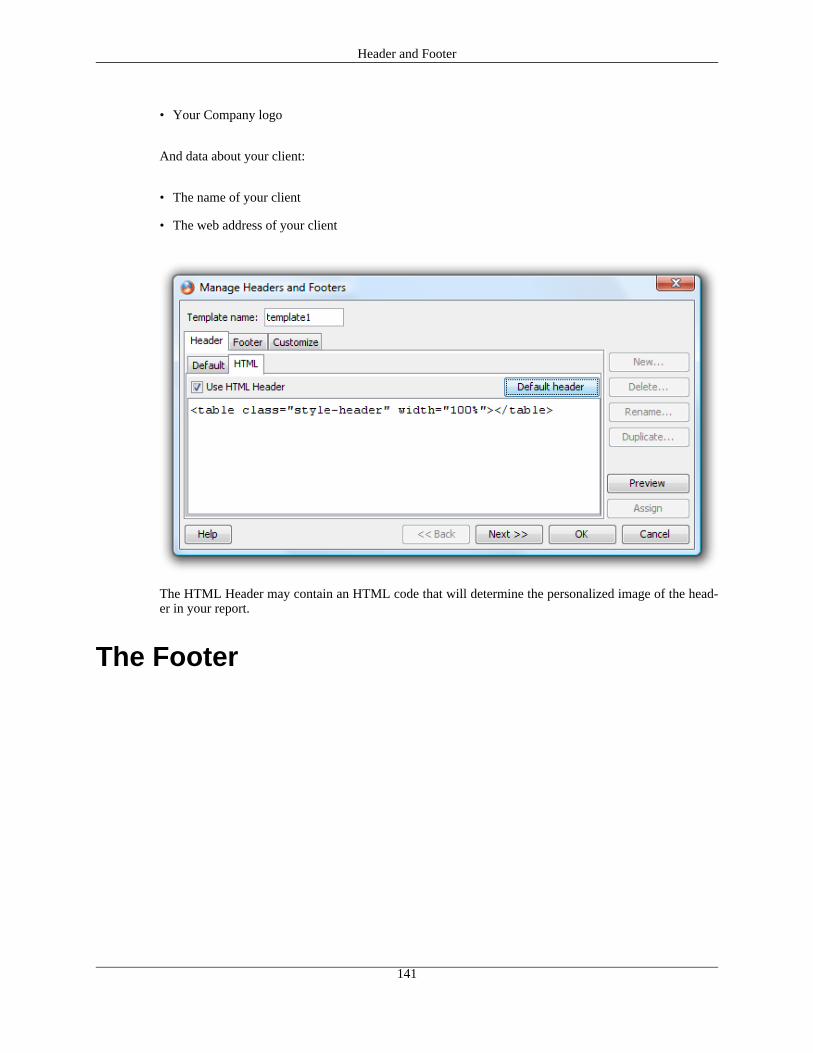
• Your Company logo
And data about your client:
• The name of your client
• The web address of your client
The HTML Header may contain an HTML code that will determine the personalized image of the head-er in your report.
The Footer
Header and Footer
141

The custom footer may contain any information you want to add to the report.
• You can add your company's web address by checking the option at the bottom.
• You can put a default text in your footer by pressing the [Default Footer Text] button.
• If you want to preview your Header and Footer template in HTML format, press the [Preview] button.
The HTML footer may contain an HTML code that will determine the personalized image of the footerin your report.
Header and Footer
142

Chapter 14. Global PreferencesThe Advanced Link Manager Preferences allows you to specify settings that apply to the entire applica-tion, changing and customizing the behaviour in accordance with your requirements.
You can access the Global Preferences from the toolbar button, by using the keyboardshortcut Ctrl+P or by selecting [Options] -> [Preferences...] from the Main Menu.
Application
Application Settings
• Data Folder.
This tab allows you to change the location of the folder where Advanced Link Manager keeps its data.When you press the [OK] button, the path to the old data folder is renewed by the path of the new datafolder.
143

• Reports folder.
This setting allows you to select the application default reports saving folder.
• Choose project at startup.
If you want the next time Advanced Link Manager starts to be prompted with the available projectfrom your data folder, check this option.
• Display success message on FTP upload.
Check this option if you want to be notified when the reports set to be uploaded on FTP servers finishuploading.
• Show Advanced Link Manager Assistant after loading a project.
Check this option if you want to be prompted with the Advanced Link Manager Assistant each time aproject is loaded.
• Show Advanced Link Manager Assistant after an update is done.
Check this option if you want to be prompted with the Advanced Link Manager Assistant each time aproject finishes updating.
• Use Java look and feel.
Use the default Metal Java look and feel.
Note
This option requires Advanced Link Manager restart.
• Display the view description on the view buttons.
Check this option if you want to see the description of the report views next to the view's icon.
Global Preferences
144

ReportingIgnore URLs with non-web extensions when gathering from search engines. By selecting this op-tion Advanced Link Manager will ignore, when gathering the results from search engines, any URLswith non-web extension. This type of URLs will not be present in any report.
Assume non-web extensions as linking. This option will make Advanced Link Manager assume thatall non-web extensions are linking to your website and will see all of them as referrers.
Automatically add new found pages to the project, when verifying links. By selecting this optionAdvanced Link Manager will automatically add to your project any new page of your website foundwhen verifying links from referrers.
Chart settingsExclude search engines with 0 links count from the charts. This option will cause Advanced LinkManager to ignore the 0 links count search for the search engines chart. This option is useful if a searchengine fails due to a parsing error and the link count drops from a high value to 0. After the search en-gine is fixed the chart will no longer show a drop spike for that search engine if this option is checked.
Referrers quality ratioHere you can select which formula will be used to determine the referrers quality ratio from the Refer-rers Report.
Global Preferences
145

Use PR divided by the total number of outbound links. Since the PR is the higher the better, thehigher the ratio is, the better the referrer is.
Use Alexa Rank divided by the total number of outbound links. Since the Alexa Rank is the lowerthe better, the lower the ratio is, the better the referrer is.
Rank colorIn this section you can choose the colors you want for the Rank columns all over the application and inthe printable reports.
Color foreground. Use this option if you want the text to be colored in the Rank column
Color background. Use this option if you want the background to be colored instead of the text in theRank column
Email Settings
Global Preferences
146

The following fields have to be filled in if you wish to receive emails with the reports:
SMTP settings
• Email Address.
Enter your email address here.
• SMTP Server.
Enter your SMTP server, either using its name or its IP address.
• SMTP Port.
Enter the SMTP port. The default value is 25 for no secure connection and 465 for SSL connection.
SMTP AuthenticationIf your SMTP server requires authentication, you need to enter your user name and password here.
Advanced Link Manager can use a secure connection when sending emails through the SMTP server.For this you can use either the TLS or SSL encryption, depending on what your SMTP server requires.
Global Preferences
147

POP3 and IMAPHere you can setup your global POP3 or IMAP incoming email account. This account will be availablein the Email Client report where you can receive email using it.
• POP3.
Selecting this option will make this account use the POP3 protocol to retrieve emails
• IMAP.
Selecting this option will make this account use the IMAP protocol to retrieve emails
• Mail server.
Specify the mail server this account connects to retrieve emails
• Username.
Specify the user name used to connect to the mail server
• Password.
Specify the password needed to authenticate the selected user on the mail server
Global Preferences
148

• Use secure connection.
If your server requires a secure connection check this option and SSL will be used to connect to theserver
• Check for mail every X minutes.
Set Advanced Link Manager to automatically check for new mails every X minutes
• Check for mail on application startup.
Set Advanced Link Manager to automatically check for new mails each time it starts
FTP settings
Here you can setup some of the FTP connection parameters.
• Number of times to retry if FTP server busy.
If the FTP server is busy try to reconnect for the specified number of times. The FTP connectiontimeout will be respected on each retry.
Global Preferences
149
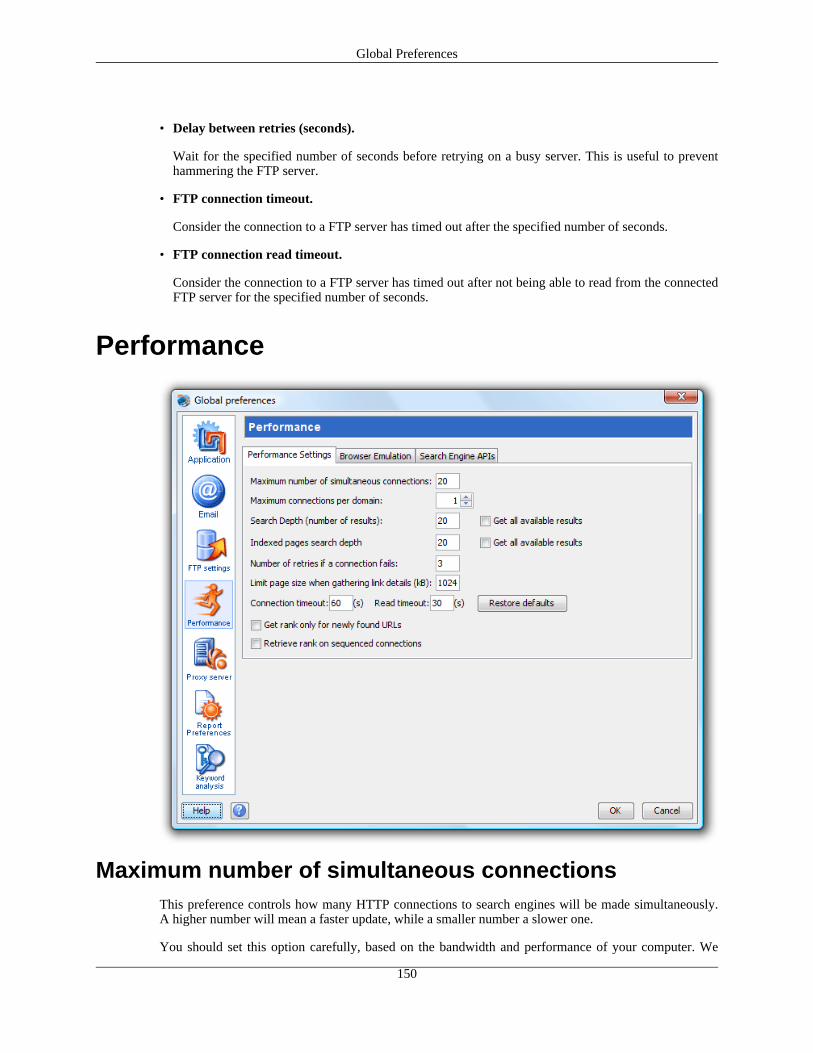
• Delay between retries (seconds).
Wait for the specified number of seconds before retrying on a busy server. This is useful to preventhammering the FTP server.
• FTP connection timeout.
Consider the connection to a FTP server has timed out after the specified number of seconds.
• FTP connection read timeout.
Consider the connection to a FTP server has timed out after not being able to read from the connectedFTP server for the specified number of seconds.
Performance
Maximum number of simultaneous connectionsThis preference controls how many HTTP connections to search engines will be made simultaneously.A higher number will mean a faster update, while a smaller number a slower one.
You should set this option carefully, based on the bandwidth and performance of your computer. We
Global Preferences
150

strongly recommend a conservative setting. A higher setting may easily consume all the bandwidth ofyour Internet connection and/or your CPU cycles.
Maximum connections per domainIncrease this option if your projects include referrer domains with large numbers of referrers.
Search depthThis preference controls the number of referrers downloaded by Advanced Link Manager for each of theproject URLs. Note that higher settings may significantly slow down your updates .
Indexed pages search depthThis preference controls the number of search results downloaded by Advanced Link Manager from thelist of indexed pages, for each project domain in selected search engines. Note that higher settings maysignificantly slow down your updates.
Number of retries if a connection failsThis preference controls the number of times the application tries to connect to a search engine in theevent of a connection failure or timeout.
Limit page size when gathering link detailsThis preference controls the maximum size a single web page is allowed to have. If the page exceedsthis size, the download will stop and only the data downloaded so far will be taken into account. Thelinks will only be searched for in the part that is downloaded, the rest of the page will be ignored.
Connection timeoutThis preferences controls the timeout of a connection attempt to either a search engine or an URL.
Read timeoutThis preferences controls the timeout of a read attempt to either a search engine or an URL.
Get rank only for newly found URLsThis option tells Advanced Link Manager to gather the Page Rank only for new Unverified Referrersfound in the search engines.
Retrieve rank on sequenced connectionsThis option is strongly recommended if you have selected more that 5 maximum simultaneous connec-tions or if you are updating the rank for multiple URLs by selecting them in the Unverified Referrers re-port.
Global Preferences
151

Be nice to Search EnginesWhen this preference is on, Advanced Link Manager will exercise the lightest possible load on thesearch engines resources by mimicking a human action as close as possible. For that, it will avoid simul-taneously sending two different queries to the same search engine and it will make pauses betweendownloading two pages from an engine.
It is very important to keep this preference checked. Because automated querying can impose a veryhigh load on the search engines, some of them may take action against users abusing their services.
Random delay between queriesIf the "Be nice to Search Engines" option is selected, you can specify here the upper and the lower limitsof a random time interval that Advanced Link Manager will wait in between two consecutive queries.
Sleep after a number of searchesIf the "Sleep [number] minutes after [number] searches" option is selected the application will stop gath-ering data from the search engines for the specified number of minutes after the specified number ofsearches. A search means a keyword looked up on a search engine, with the specified number of resultsretrieved.
Sleep after a number of failed connections
Global Preferences
152
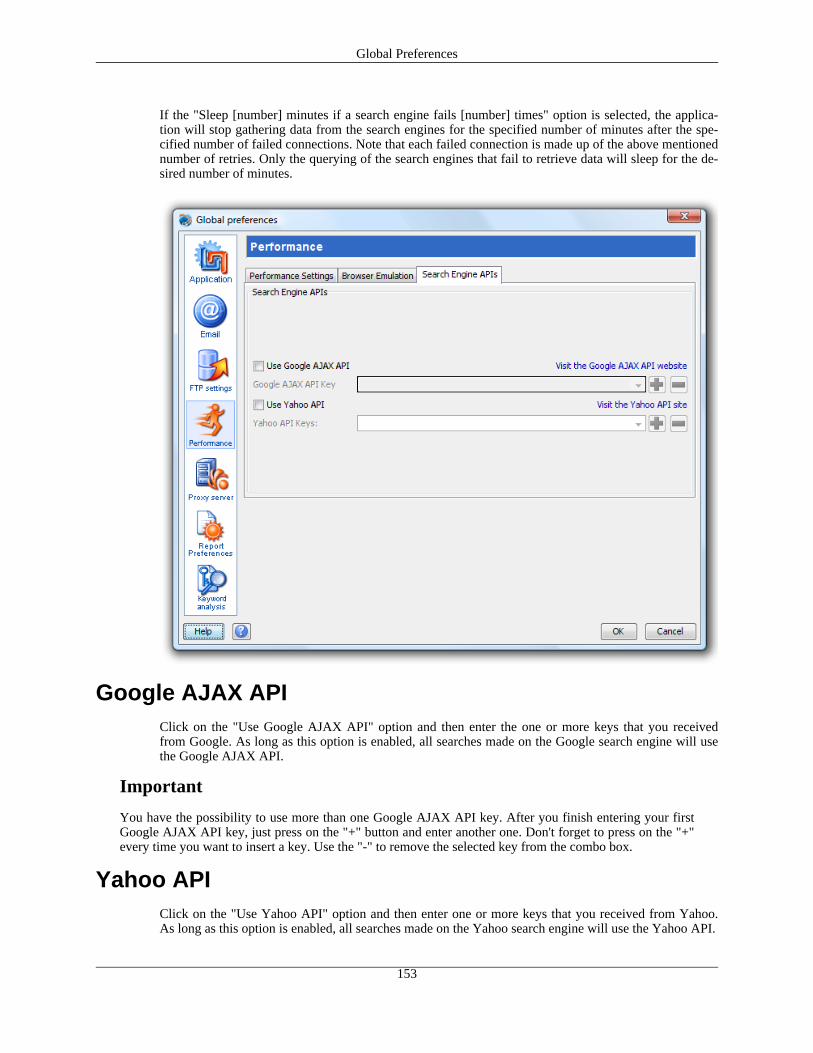
If the "Sleep [number] minutes if a search engine fails [number] times" option is selected, the applica-tion will stop gathering data from the search engines for the specified number of minutes after the spe-cified number of failed connections. Note that each failed connection is made up of the above mentionednumber of retries. Only the querying of the search engines that fail to retrieve data will sleep for the de-sired number of minutes.
Google AJAX APIClick on the "Use Google AJAX API" option and then enter the one or more keys that you receivedfrom Google. As long as this option is enabled, all searches made on the Google search engine will usethe Google AJAX API.
Important
You have the possibility to use more than one Google AJAX API key. After you finish entering your firstGoogle AJAX API key, just press on the "+" button and enter another one. Don't forget to press on the "+"every time you want to insert a key. Use the "-" to remove the selected key from the combo box.
Yahoo APIClick on the "Use Yahoo API" option and then enter one or more keys that you received from Yahoo.As long as this option is enabled, all searches made on the Yahoo search engine will use the Yahoo API.
Global Preferences
153

Important
You have the possibility to use more than one Yahoo API key. After you finish entering your first YahooAPI key, just press on the "+" button and enter another one. Don't forget to press on the "+" every time youwant to insert a key. Use the "-" to remove the selected key from the combo box.
The Yahoo API is still in Beta stage so its parameters could change over time until a stable version is re-leased.
Proxy Settings
Some organizations require their users to use a proxy server to access the Internet. If this is your case,
Global Preferences
154

then you need to fill in the fields below:
• Use a Proxy Server.
Check this box if you want to use a proxy server.
• Manage proxy servers.
This button will display the Proxy servers manager where you can add, remove or edit your applica-tion proxy servers. Advanced Link Manager can connect to the search engines using multiple proxyservers. This way the speed of the update process increases by the number of diffent proxy serversspecified, without interfering with the search engine friendly policy.
When connecting via a proxy server you have three additional options available:
• Do not use direct connection.
If this option is selected, Advanced Link Manager will use only the proxy servers for all connections.
• If proxy fails use direct connection.
When Selecting this option Advanced Link Manager will use direct connection only if the configuredproxies fail.
• Add direct connection to the proxy list.
This option adds direct connection to the proxy list and Advanced Link Manager uses it simultan-eously along with the configured proxy servers.
Report preferences
Global Preferences
155

CSV separatorThis separator will be used to separate the values in rows in a CSV report. The most commonly usedseparator for the CSV format is the Tabulator.
CSV extensionThis option is useful if you want to import the CSV reports in a spreadsheet office application. Some ofthese applications will display a separator selection wizard only if the file that will be imported is con-sidered a text file, so you will need to change the extension from the default "csv" extension to "txt" ex-tension
Trim spaces from the file namesBy default the reports are saved in files that contain spaces in their names (i.e. Search Engine Evolu-tion). Since many users want to upload their reports on web servers this option gives a better compatibil-ity with the file naming convetions.
Keyword Analysis
Global Preferences
156
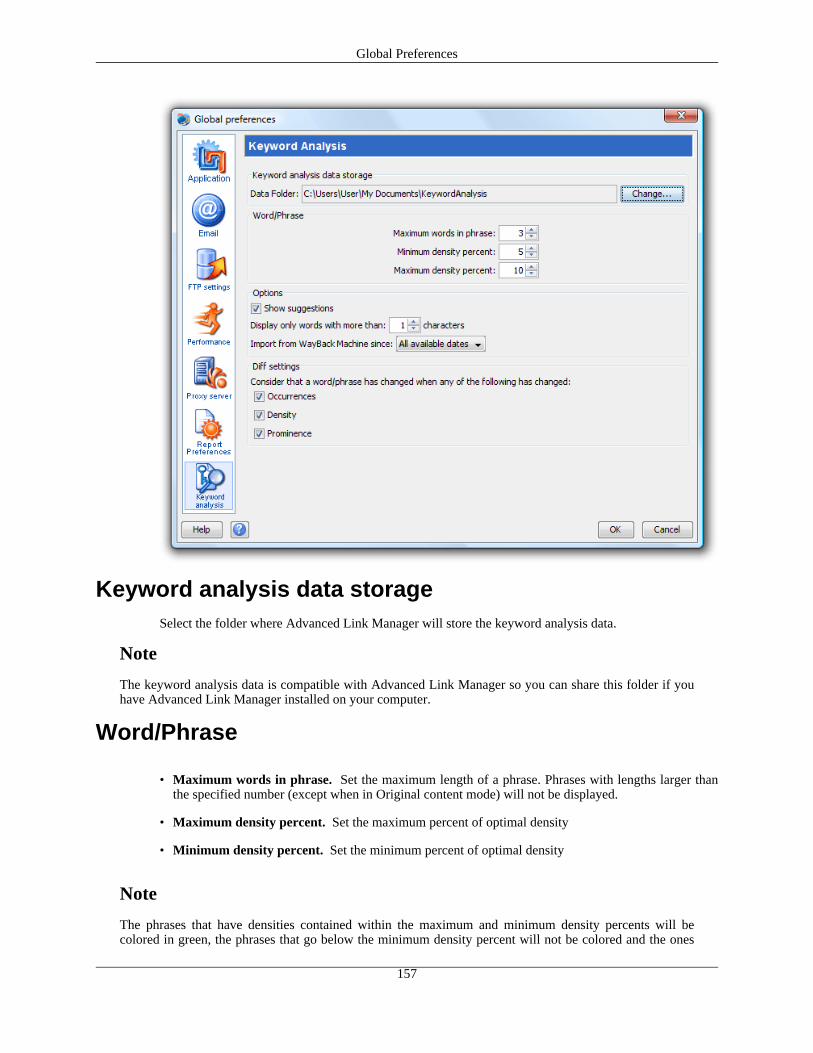
Keyword analysis data storageSelect the folder where Advanced Link Manager will store the keyword analysis data.
Note
The keyword analysis data is compatible with Advanced Link Manager so you can share this folder if youhave Advanced Link Manager installed on your computer.
Word/Phrase
• Maximum words in phrase. Set the maximum length of a phrase. Phrases with lengths larger thanthe specified number (except when in Original content mode) will not be displayed.
• Maximum density percent. Set the maximum percent of optimal density
• Minimum density percent. Set the minimum percent of optimal density
Note
The phrases that have densities contained within the maximum and minimum density percents will becolored in green, the phrases that go below the minimum density percent will not be colored and the ones
Global Preferences
157

that exceed the maximum density percent (considered spam) will be shown colored in red.
Options
• Show suggestions. Sometimes the size of a page is too large, the number of characters contained in ameta tag is too big or a meta tag is missing. Enabling this option will show you our advice regardingthis issues.
Note
This is only our opinion on these subjects and should be regarded as such
• Display only words with more than X characters. Do not display the words that contain less thanthe specified number of characters.
Note
Even if these words are not shown they are still take into consideration when the density and proeminencepercents are computed.
Diff settingsSelect which of these criteria should be considered as a phrase change.
• Occurences. Consider that a phrase has changed if the number of occurences in the page haschanged.
• Density. Consider that a phrase has changed if it's density in the page has changed.
• Proeminence. Consider that a phrase has changed if it's proeminence in the page has changed.
Note
These settings can be locally overridden from the Keyword analysis tool.
Global Preferences
158

Chapter 15. Proxy servers managerProxy servers manager
The proxy servers manager allows you to define one or more proxy servers that will be used by Ad-vanced Link Manager when retrieving results from the search engines.
The following actions are available:
• Add. Shows the new proxy settings dialog where you can add a new proxy server to the application
• Edit. Shows the edit proxy server dialog where you can change the settings of the currently selectedproxy server
• Remove. Removes the selected proxy server from the application
• Set default. Sets the currently selected proxy server as the default application proxy server
Note
The default proxy settings are used to download new search engine updates, and any other connections be-sides the connections to the search engines
159

Chapter 16. Website CrawlerWebsite Crawler
The Website Crawler tool allows you crawl your entire website or pages until reaching a specific leveland provide information about each crawled page:
• Page Rank
• HTTP Response
• Page Title
• Outbound links - which represent the number of external links
• Onsite links - which represent the total number of internal links
• Size of the page
• Meta Description
• Meta Robots
• Meta Keywords
• Meta author
• Robots no follow
160

Once retrieved and analyzed the results, they can be exported as Google Sitemap(XML) or YahooSitemap(TXT).
Additionally, you can add selected crawled URLs to a list from where you can add as project URLs, re-ferrer URLs or export to a file. You can do this by selecting one of the buttons from the bottom of Web-site Crawler.
Website Crawler
161
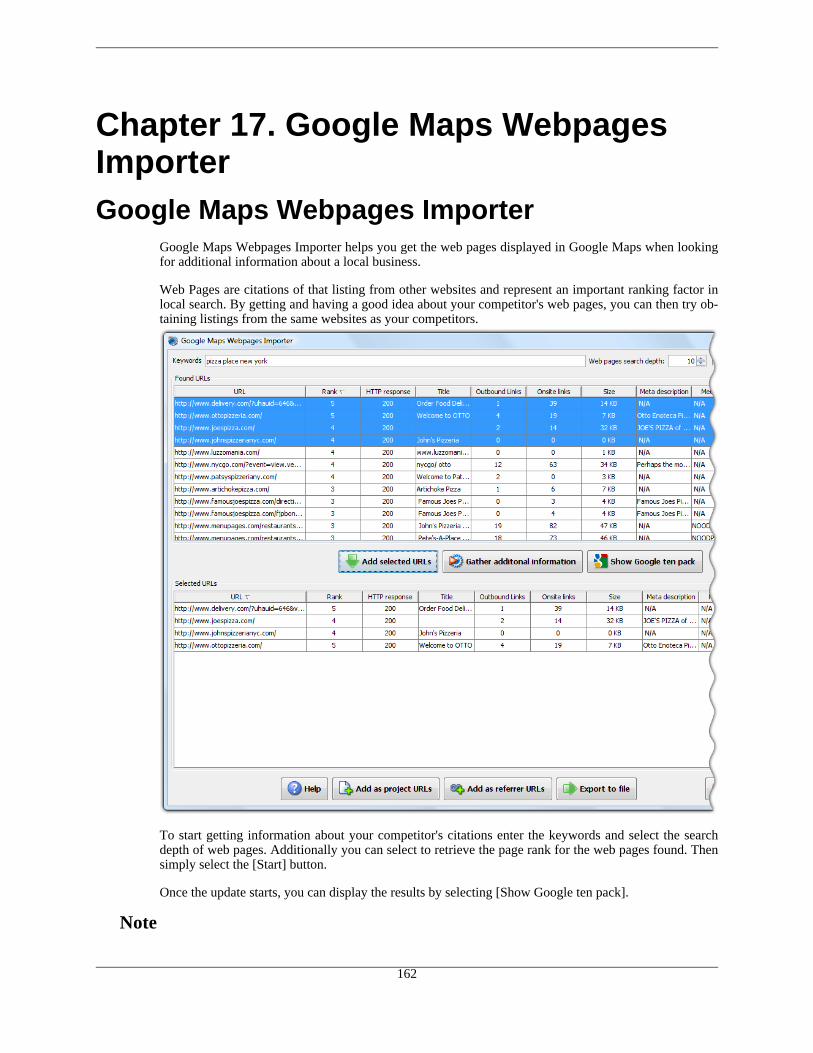
Chapter 17. Google Maps WebpagesImporterGoogle Maps Webpages Importer
Google Maps Webpages Importer helps you get the web pages displayed in Google Maps when lookingfor additional information about a local business.
Web Pages are citations of that listing from other websites and represent an important ranking factor inlocal search. By getting and having a good idea about your competitor's web pages, you can then try ob-taining listings from the same websites as your competitors.
To start getting information about your competitor's citations enter the keywords and select the searchdepth of web pages. Additionally you can select to retrieve the page rank for the web pages found. Thensimply select the [Start] button.
Once the update starts, you can display the results by selecting [Show Google ten pack].
Note
162

[Show Google ten pack] will display the same results you see in Google Maps after you click [Local busi-ness results for ...] in Google Web Search.
When the update finishes Google Maps Webpages Importer can display additional information about theretrieved URLs if the [Gather additional information] button is selected:
• Page Rank
• HTTP Response
• Page Title
• Outbound links - which represent the number of external links
• Onsite links - which represent the total number of internal links
• Size of the page
• Meta Description
• Meta Robots
• Meta Keywords
• Meta author
Once analyzed the URLs gathered from Google Maps, you can select the ones you consider valuableand worth trying to get a listing from and then add them to the [Selected URLs] list. From here you canadd as project URLs, referrer URLs or export to a file. Just select one of the buttons from the bottom ofGoogle Maps Webpages Importer.
Google Maps Webpages Importer
163

Chapter 18. Webpage AnalyzerWebpage Analyzer
The Webpage Analyzer let's you analyze pages of your website or potential link partner's websites. Itcan be also used to analyze your competitor's websites.
To analyze the pages you can manually enter their URLs, import them from a file or by parsing an URL.The last option will import all the existing links in the page from the specified URL.
Once the URLs are added to the list, press the [Gather additional information] button and Webpage Ana-lyzer will automatically start to gather information about your URLs which you can analyze.
When the update finishes Webpage Analyzer will display the additional information gathered fromsearch engines:
• Page Rank
• HTTP Response
• Page Title
• Outbound links - which represent the number of external links
• Onsite links - which represent the total number of internal links
• Size of the page
• Meta Description
• Meta Robots
• Meta Keywords
• Meta author
• Robots no follow
164

Once you finish analyzing and refining the URLs, you can add them as project URLs, as referrer URLsor export to a file by selecting one of the buttons at the bottom of Webpage Analyzer.
Webpage Analyzer
165

Chapter 19. NotesNotes
You can add notes to your project to remind you for some actions you took in the past or that you wishto take in the future. These notes appear in the charts as vertical lines on the date they are set.
To add a note, go to the Tools -> Notes dialog menu and add a new note. Alternatively, you can add anote by right clicking on any chart.
Notes can also have a priority such as Normal, To Do and Important:
• Normal Notes.
Normal notes show up as a black vertical lines in charts.
• Important Notes.
Important notes show up as a red vertical lines in charts.
• To Do Notes.
To Do Notes show up as blue vertical lines in chart. The difference between To Do notes and the oth-er notes is that if you launch the application on the day the note was set, you will be presented with adialog that will show you the contents of the note.
166

Chapter 20. Search Engines AdditionalParametersSearch Engines Additional Parameters
Search Engines Additional Parameters allows you to improve the search engines queries by adding addi-tional parameters which will tailor the search engine results.
To add new search engine parameters go to the [Options] menu and select [Setup search engines para-meters]. A new window will appear which contains a list with all the search engines available in Ad-vanced Link Manager. To add new parameters select the specific search engine and edit the parametersfrom the [Additional parameters] column.
Important
Please use this feature carefully because entering wrong parameters for search engines may affect the res-ults returned by search engines.
167

Chapter 21. Analyze Domain QualityAnalyze Domain Quality
Analyze Domain Quality lets you analyze the quality of one or multiple domains you owe or domains ofyour potential link partners. It helps you discover which domains are worth getting links from and whichare not.
Columns like Page Rank, Links count average or Ranking average can help you see the differencesbetween the domains you are analyzing.
To access the Analyze Domain Quality tool go to the [Tools] menu and select [Analyze Domain Qual-ity]. A new window will open which will let you add one or multiple domains to be analyzed. You canadd domains manually, import them from a file or by parsing an URL.
When you finish entering your domains, just press the [Analyze domains quality] button and AdvancedLink Manager will start gather information about the domains you entered. It lets you see important in-formation about a domain including page rank, meta information, indexed pages average, the average oftotal links, ranking average, search engine/keywords hits and Compete rank, visits and visitors.
Once you finish analyzing the domains you entered, you can add them as project URLs, as referrer do-mains or export them to a file.
168

Chapter 22. Referrer CategoriesReferrer Categories
Referrers categories allow you to assign domains, unverified referrers or referrers to a specific category.This can later help you filter and see in your reports only domains and referrers from a specific category.For each category you can set up colors and priorities.
To assign a domain/referrer to a category simply right click on the domain/referrer, select the [Assign toreferrer category] option and finally select the respective category.
169

To create a category, first select from the [Project] menu the [Manage referrer categories] option. A newwindow will appear which allows you to add, edit or remove categories. The referrer categories manageralso allows you to import or export categories. This option is useful when you create categories for aproject and later want to import them to another project.
Referrer Categories
170

Click on the [Add] button to add a new category and tailor it for your needs:
• Parent category. Use this option when you want to create a subcategory
• Name. Select a name for your category
• Color. Assign to your category a color so it can be easily identifiable
• Priority. Select the priority of your category from 0 to 10, 0 having the highest priority in the referrercategories manager
When you finish, just press the [OK] button to save your settings and create a new category.
Referrer SubcategoriesWhen you add a category just select as a parent category an existing one and the new category will becreated as a subcategory of the existing one.
Referrer Categories
171

Referrer Categories
172
Chapter 23. Install Server Edition GuideWindows
When you install Advanced Link Manager, you need to do a "Custom" install and select the [ALM Serv-er] option. This way, the Advanced Link Manager server will be installed too. It will be automaticallyregistered as a service and started by the installation package. There is no action required from you tostart the service.
Once you finnish setting up the server use the following instructions to connect your client license to theserver: Connect Advanced Link Manager client to server.
Mac OS XThe Advanced Link Manager installation package contains three options: the Advanced Link Managerclient, the Advanced Link Manager server and Advanced Link Manager. To install the server make surethat option is checked in the installation wizard.
If the Advanced Link Manager server is installed, it will be automatically registered as a service andstarted by the installation package. There is no action required from you to start the service.
Once you finish setting up the server use the following instructions to connect your client license to theserver: Connect Advanced Link Manager client to server.
LinuxThe Advanced Link Manager linux distribution contains three options: the Advanced Link Manager cli-ent, the Advanced Link Manager server and Advanced Link Manager. All of them will be installed auto-matically, but the server is not started automatically after the installation is complete. However, the linuxdistribution comes with a script that will allow you to easily start the server. The script is called 'almserv-er.sh' and is located in the folder where Advanced Link Manager is installed.
If you wish to start the server at the system startup, you need to add this script to the startup sequence ininitd. This is accomplished differently on different Linux distribution, so we have included two ex-amples below.
Important
The following commands are examples of how you can register/start/stop/unregister the 'almserver' servicewith your system. You need to be logged in as root for these commands to work.
Red Hat DistributionsThe Red Hat distributions use the 'chkconfig' command to activate and deactivate services. To registerthe 'almserver' service with your system so that it starts up every time your computer starts, use only thefollowing sequence of commands. You only need to do this once.
• Create Symbolic Link in /etc/init.d:
ln -s /path/to/Advanced Link Manager/almserver.sh /etc/init.d/almserver
173

• Register the service:
chkconfig --add almserver
• Start the service:
/etc/init.d/almserver start
To stop, restart, turn off or unregister almserver use the respective command from the list below:
• Stop the almserver service (stop the service temporarily):
/etc/init.d/almserver stop
• Restart the almserver service:
/etc/init.d/almserver restart
• Turn the service off (do not start the service at computer start up):
chkconfig almserver off
• Unregister the service (remove the service from your system)
chkconfig --del almserver
Debian DistributionsThe Debian distribution uses the 'update-rc.d' command to activate and deactivate services. To registerthe 'almserver' service with your system so that it starts up every time your computer starts, use only thefollowing sequence of commands. You only need to do this once.
• Create Symbolic Link in /etc/init.d:
ln -s /path/to/Advanced Link Manager/almserver.sh /etc/init.d/almserver
• Register the service:
update-rc.d almserver defaults
Install Server Edition Guide
174

• Start the service:
/etc/init.d/almserver start
To stop, restart or unregister almserver use the respective command from the list below:
• Stop the almserver service (stop the service temporarily):
/etc/init.d/almserver stop
• Restart the almserver service:
/etc/init.d/almserver restart
• Unregister the service (remove the service from your system)
update-rc.d -f almserver remove
Once you finnish setting up the server use the following instructions to connect your client license to theserver: Connect Advanced Link Manager client to server.
Server ConfigurationThere are two ways to configure the Advanced Link Manager Server, one using the ALM Server inter-face and the second one by editing the [server.xml] file.
The [server.xml] file can be found under the [ALM User Data] directory.
By default [server.xml] looks like this:
<?xml version="1.0" encoding="UTF-8"?><CONFIG><HOST>Host IP address</HOST><PORT>7777</PORT><LOG_FILE_LEVEL>INFO</LOG_FILE_LEVEL><PERMISSIONS/></CONFIG>
From this file you can set the IP address of your server as the host, the listen port and the log file level.
If you later need to start/stop the service manually, or change any of its configuration properties, here iswhat you need to do:
Install Server Edition Guide
175
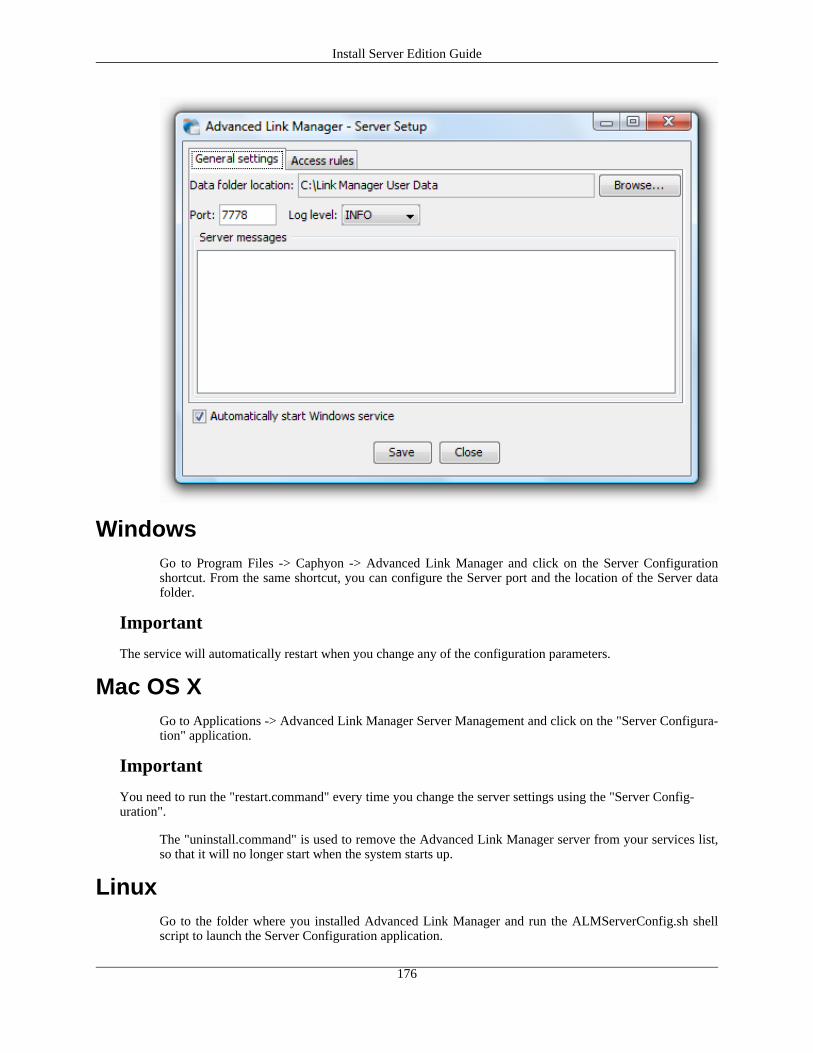
WindowsGo to Program Files -> Caphyon -> Advanced Link Manager and click on the Server Configurationshortcut. From the same shortcut, you can configure the Server port and the location of the Server datafolder.
Important
The service will automatically restart when you change any of the configuration parameters.
Mac OS XGo to Applications -> Advanced Link Manager Server Management and click on the "Server Configura-tion" application.
Important
You need to run the "restart.command" every time you change the server settings using the "Server Config-uration".
The "uninstall.command" is used to remove the Advanced Link Manager server from your services list,so that it will no longer start when the system starts up.
LinuxGo to the folder where you installed Advanced Link Manager and run the ALMServerConfig.sh shellscript to launch the Server Configuration application.
Install Server Edition Guide
176

You need to restart the almserver service in order for the changes to take effect:
/etc/init.d/almserver restart
Important
Once you finish setting up the server use the following instructions to connect your client license to theserver: Connect Advanced Link Manager client to server.
Connect Advanced Link Manager client to serv-er
To connect the Advanced Link Manager client to the server, open the client application and go to Op-tions -> Preferences and select the Application tab. Here, select "Remote Connection" and enter theserver name or IP address of the server and click on OK to connect. If this is the first time you connectto this server, use Administrator with no password when prompted to log in.
Each new user that will need to connect to the Server data base, needs to do the same steps (go to Op-tions -> Preferences menu, Application tab and select the "Remote connection" option).
Install Server Edition Guide
177

Note
Each additional user will require an additional license.
Install Server Edition Guide
178