adding the sample review fit page
TRANSCRIPT
Last Update 9/24/13 1
Adding the Sample Review Fit Page
The vendor should measure and comment on all samples sent into Eddie Bauer.In addition, Proto, Fit Approval, Pre Production Seal and TOP (exception basis) samples all require these measurementsand comments to be uploaded into the spec package.
This is done by adding (when necessary) and completing the Sample Review Fit Page for Each Measurement Page. Allsamples are entered on the original Sample Review Fit Page. Do not add extra Sample Review Fit Page.
In addition, various tracking dates are also entered by both vendor and Product Developer in order to keep track of thevarious samples as they progress through the pre-production stages.
The Product Developer will add the Measurement page(s) to the spec pack. The Vendor will add the Sample Review Fitpage prior to the sample review process. The Measurement page must be added prior to adding the Sample Review Fitpage. A Sample Review Fit Page is required for Regular and Plus samples only, unless otherwise requested by theProduct Developer.
The Vendor and Product Developer will enter their sample comments, sign and date… in date sequence, in the Vendorcomment area on the form directly.
Adding the Sample Review Fit Page(s) to Spec Pack
Step 1
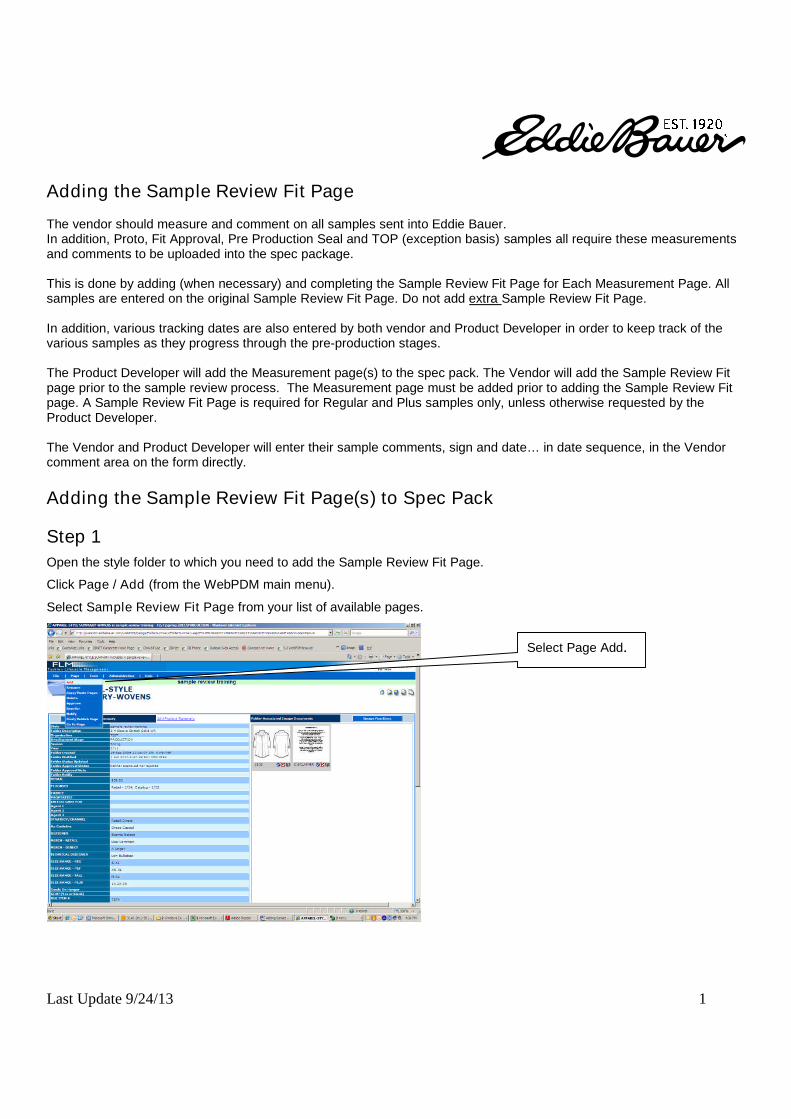
Open the style folder to which you need to add the Sample Review Fit Page.
Click Page / Add (from the WebPDM main menu).
Select Sample Review Fit Page from your list of available pages.
Select Page Add.

Last Update 9/24/13 2
Step 2Click on the drop down list and select Sample Review Fit Page.Rename the page if needed, for example Sample Review Fit – Reg or Plus.The vendor only adds a Sample Review fit page if they see a Measurement Page – Reg and Plus, unless the ProductDeveloper has specifically requested for additional pages to be added.Click AddBy default, the new Page Name will be identical to the one that you select. However, you can rename it; to do this, typethe new name in the Page Name text field (example Sample Review – Regular).This capability is needed when multiple Sample Review Pages are needed.
Step 3After Adding the Sample Review Fit page, the available options come into view.Select and Click on the Measurement Page you wish to link to the Sample Review Fit page.Click Next.
SampleReviewFit Page0913
Prior to clicking on Add, you canrename the page here if required
Do not use pagenotify.
Last Update 9/24/13 3
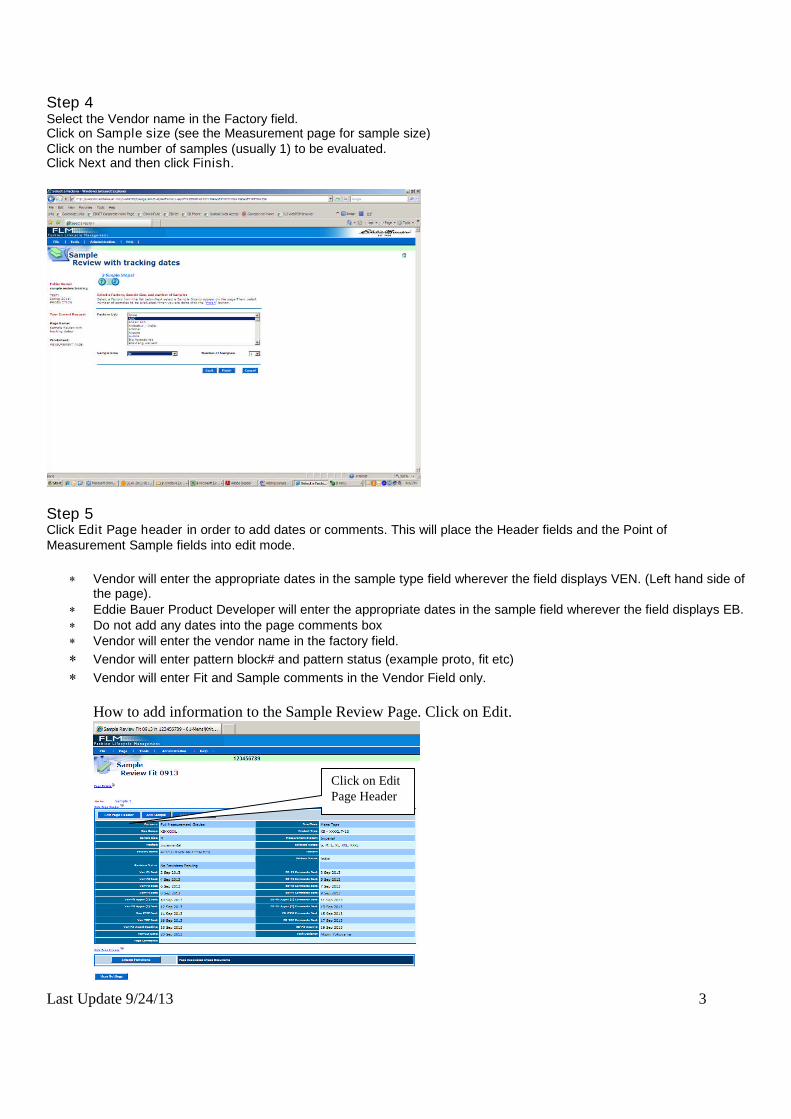
Step 4Select the Vendor name in the Factory field.Click on Sample size (see the Measurement page for sample size)Click on the number of samples (usually 1) to be evaluated.Click Next and then click Finish.
Step 5Click Edit Page header in order to add dates or comments. This will place the Header fields and the Point ofMeasurement Sample fields into edit mode.
Vendor will enter the appropriate dates in the sample type field wherever the field displays VEN. (Left hand side ofthe page).
Eddie Bauer Product Developer will enter the appropriate dates in the sample field wherever the field displays EB. Do not add any dates into the page comments box Vendor will enter the vendor name in the factory field.
Vendor will enter pattern block# and pattern status (example proto, fit etc)
Vendor will enter Fit and Sample comments in the Vendor Field only.
How to add information to the Sample Review Page. Click on Edit.
Click on EditPage Header

Last Update 9/24/13 4
View of Sample Review Fit page in edit mode.
Required Sample Types Date Fields:
Ven-P1 Sent EB-P1 Comments SentVen-P2 Sent EB-P2 Comments SentVen-P3 Sent EB-P3 Comments SentVen-P4 Sent EB-P4 Comments SentVen-Fit Apprv (1) EB –Fit Apprv (1) Comments SentVen-Fit Apprv (2) EB –Fit Apprv (2) Comments SentVen-PSSP Sent EB-PSSP Comments SentVen-TOP Sent EB-TOP Comments SentVen-Fit Appr’d Deadline EB-TD Fit Appv’dVen Cut Date EB-Tech DesignerRequired Information for various Sample Types:Vendor (Ven) Fields to Enter.Tech Designers (EB) Fields to Enter
Click on magnifying glass andselect vendor name.
EB ProductDeveloper entersdate for each sampletype’s comment sent.
Vendor enters dates for eachsample type sent.

Last Update 9/24/13 5
Step 6Add the and Vendor’s Points of Measure values and the Sample’s Review Comments
Go to (Click) the appropriate sample number
The Sample’s Number’s clicked… will come into view. The Sample’s Point of Measurement grid will come into focus..
Click on Click on Edit(s) to place the Sample Review Page in Edit.
Click on the appropriatesample number.
Click on Edit (s) to place thesample in edit mode.

Last Update 9/24/13 6
Entering the Sample’s point of measure on the Sample Review Fit Page.
When starting with a new page, select Sample 1’s type from the Sample Type drop down list.Under the column labeled Sample 1; the Vendor will enters the points of measurements for the sample item.The vendor enters the measurements under Vendor sample. All sample comments are entered in the Vendorcomment area, in date sequence
Column / Field Headings
Evaluation Size The sample size selected when Sample Review page was added.
Vendor Sample The column where the vendor enters the measurements from the sample
Vendor Delta The vendor’s measurement difference from the spec (when sample is not withintolerance).
Sample The column where the EB enters the measurements from the sample.
Delta The EB measurement difference from the spec (when the sample is not withintolerance).
Revised Spec (EB use only) If a revision is made to a POM, the revision will link back to the AML MeasurementSpecification Worksheet and re-grade measurements accordingly.The revised measurement will not update the current AML Measurement Evaluationpage, because you will need a history of your evaluations. However, If you add anotherAML Measurement Evaluation page, that page will reflect revised measurements.
Note: The fraction “hot keys” are the same as those used in the Measurement Specification Worksheet.
Function Key F1 F2 F3 F4 F5 F6 F7
Fraction Value 1/8 ¼ 3/8 ½ 5/8 3/4 7/8
Note: Decimals will automatically convert to fractions on the Imperial page.
Do not enter comments inthe Sample commentsarea.
Enter all sample commentsin the Vendor Commentsarea. Vendor and EBProduct Developer entersample in VendorComments box. Reviewcomments are written, datedand sign off in datesequence.
Select Sample typefrom drop down iconand click OK.
Vendor enters the Point ofMeasurement value here.

Last Update 9/24/13 7
If a sample does not fall within the specified tolerances (defined on the Measurement page), the measurementis displayed as plus or negative red.
Save file. Update Sample Review comes into focus. Note Vendor Delta 1 and Delta 1 are included on theworksheet. See definition above.
Step 6Adding a New sample for the Sample Review Page Fit
To add a new Sample, click on Add Sample. Another sample will be added in numeric sequence.
The Sample Review Fit page comes into view in edit mode.Scroll down the page to the new sample, in this case sample 2. Enter the required information (as with Sample)1. Sample Type, Vendor Comment in date sequence, and Sample 2’s point of measurement values.
Click on Add Sample Box
Reminder: Unless Requested bythe Tech Designer, Add sampleto Sample Review Fit Page. Donot add a New Page.

Last Update 9/24/13 8
Repeat the process described for Sample 1 above.Scroll down to bottom of Sample Review and Save.
Sample 2
Click onthe Savebutton