abstract - columbia universityhgs/research/projects/ng911-text/report.pdf · to check if the local...
TRANSCRIPT

Abstract
Introduction
iOS
The NG911 iPhone app used the PJSIP library, an open-source SIP stack for instant messaging and multimedia communication, and was built on top of Apple’s Cocoa frameworks. The app also presents the user with the choice of instant-message-style messaging or a real-time text experience, each with its own unique user interface.
On launch, an alert is presented to the user, asking if the user is intending to use the emergency communication app. This prevents accidental emergency contact, either through a user’s pocket, or by inadvertently pressing the app’s icon on the homescreen. This is necessary because upon launch, the initial LoST request, used to locate the closest SIP server, is sent in order to set up the electronic infrastructure necessary to send and receive SIP messages.
If the app has not been launched before, the prompt will ask if the user prefers real-time text or instant message based messaging; after one is selected, it’s stored in the settings bundle (found in the “Settings” app), where the user can toggle between the two modes. The user can also change the size of the text in the settings bundle, in case the user has bad vision.
Because the app requires some sort of Internet connection, whether it be 3G or WiFi, the app uses Apple’s Reachability class, which provides some custom methods to check to see whether or not an application is connecting to the Internet or not, and if so, what type of connection the app is using. If the app does not have an active Internet connection (i.e. if the phone doesn’t have any cell service and there is no WiFi connection available), the app pops an alert and lets the user know, and exits automatically.
The instant-messaging user interface looks and behaves a lot like the iPhone’s native text messaging application, iMessage. The messages are displayed in a UITableView for a uniform representation, and sent and received messages are indicated by blue and red backgrounds respectively using customized UITableViewCells. All messages are timestamped and displayed until the user clears the conversation (or until the app itself restarts).
The instant messaging section of the app also allows the user to send image messages in order to convey more quickly (and with less text and effort) a given situation to a call taker. This is done using the iPhone’s native Camera and Photos apps, and the user is able to either take a new photo or to select one from his or her saved images, which will be sent to the call taker as well as be displayed in a message cell on the user’s side.

The real-time text interface is simply two text boxes, one if which is editable for the user to communicate with the call taker. The user types into the bottom box, whose text is displayed for the call taker in real time, and his subsequent response is displayed in real time on the user’s iPhone as well.
In both of these interfaces, a “quick response” button is available; upon pressing this button, the user will be presented with a modal view containing three buttons, one containing a police car, one a fire truck, and one an ambulance. These buttons can be used to send a quick message to alert the call taker of exactly what you need.
Along with the text typed by the user, the message contains a PIDF-LO component, containing the user’s geographical coordinates in XML format. The user’s geolocation is captured using the CoreLocation framework, and is tracked throughout the lifetime of the app, ensuring that it captures any significant location change. This allows emergency personnel to respond quickly to the user’s location even if the user is not able to give his location. PJClient
All of the application’s interaction with the network is done through one object called PJClient. This class initiates the pjsip stack as well as the UDP and TCP transports. Depending on the mode it is started in, it can also start a thread for handling real time text. Because using pjsip is very resource intensive, this class is implemented as a singleton object. The class will create only one instance and return it every time it is requested. This is done using the following class method:
+(PJClient *) sharedPJClient; Then it must be initialized with a CLLocation object that it uses in the LoST request using the following method:
-(void) initClientWithLocation:(CLLocation *)location; This will initialize the pjsip library and any resources it requires. The initialization sequence is different for IM and real time text. PJClient looks in the settings bundle for the current mode. Once you have a reference to the shared instance of PJClient, you can use it to communicate by first implementing the PJClientMessageDelegate protocol. This is defined as follows: Optional methods:

-(void) messageReceivedFrom:(NSString *)sender WithContent:(id)content;
Called every time an instant message is received with the user ID of the sender
and the content of the message.
-(void) realtimeMessageReceivedwithContent:(NSString *)content;
Called every time a packet containing a realtime text character(s) is received.
This should appended to the end of any previous text.
-(void) realtimeBackspaceReceived;
Called whenever the sender has pressed backspace.
-(void) realtimeReturnReceived;
Called whenever the sender presses the return key.
Required methods:
-(void)didFinishLoadingWithStatus:(int) status;
This will get called when PJClient has finished loading. The status parameter
should be equal to 0 if successful.
For sending messages, PJClient has two methods that can be used.
For Instant Message mode:
-(int) sendMsg:(Message *)msg to:(NSString*) dest;
For real time text mode:
-(void) charTyped:(const char *)str;
Also, PJClient has the following properties:
id<PJClientMessageDelegate> delegateCLLocation *currentLocation;NSString *pidfString;
Any object that wishes to use PJClient should set itself as the delegate in order to be
notified when incoming message are received.

We also use a class called LostClient for LoST requests. This class can be initialized normally and then using the following method, get the SIP URI of the closest PSAP.
-(NSString *) lostRequestWithLatitude:(double) latitude longitude:(double) longitude;
Implementation Details Instant messages were sent using SIP MESSAGES. Once the user pressed the ‘Send’ button after entering some text, the view controller would create an instance of the Message class and store the text as an NSString in that class. It would then pass along that Message instance to the method:
sendMsg:(Message *)msg to:(NSString*) destThe PJClient instance would then extract the contents of the message and, along with the PIDF location information, send a SIP MESSAGE to the PSAP server. Real-time text was implemented to conform with T140 protocol (RFC 4103) which describes how to send text over an RTP connection. The first step involves sending a SIP INVITE with the SDP descriptors necessary to allow real-time text. This is sent in the form of a multipart UDP packet that contains both the SDP and the PIDF location information. This gives the emergency operator the location of the caller. Once the server responds with a 200/OK message, the PJClient will create an extra thread to handle RTP packet sending. Whenever the user enters a character (including backspace and return), the view controller will call the method:
charTyped:(const char *)strThis will add that particular character to a buffer that is being continously monitored by the RTP thread. At each transmission interval, the thread will check this buffer for any new characters. If it finds any, it will package them into an RTP packet and send it to the server.The pjsip library will notify the PJClient if an RTP message is received which will process it and call the appropriate delegate method. The view controller will then update the screen with the new characters.

Android Introduction:
The Android client provides means of communicating with the 9-1-1 call taker using text messaging and image transmission. The app has two modes of text messaging, Instant Messaging and Real-Time Messaging. The app also supports transmission of location data to the 9-1-1 call taker to quickly dispatch help. Application Features : 1. Instant Messaging 2. Real-Time Messaging 3. Image Transmission 4. Location Transmission. Application flow:
When the application is launched for the first time by the user, it prompts the user for his name. This name is stored persistently within the application for future use. The application then checks if data connectivity is currently supported by the application. If there is no data connectivity then the user is informed that there is currently no data connectivity and is provided with the option of calling 9-1-1 directly or exiting the app. On the other hand, if there is data connectivity, then the application queries the LoST server to check if the local PSAP supports NG 911. If not, the user is once again provided the same interface which allows the user to place a direct call to 911 or exit the app.
Once network connectivity and PSAP support is confirmed, the chat user-interface is displayed to the user. The user has the option of switching between instant messaging and real-time messaging using a radio-button. This switching can be done on the fly without losing the conversation flow.

The instant-messaging provides a traditional bubble style chat UI to the user. Also,
if a particular message was not received by the 9-1-1 call taker, the user is appropriately informed about the same.
The real-time messaging is initialized during launching the application. After
receiving the result of the LoST querying, the main thread starts a new thread to send SIP INVITE message to get the SDP session information. The new thread finishes after making the RTP session between the application and the call taker automatically.
In either of the modes, the user is presented with an option of sending an image
to the 9-1-1 call taker to better describe the situation. The user can invoke the camera by

pressing the camera icon.The application also updates the user’s location to the 9-1-1 call taker. Along with
the first message to the call taker, either using instant or real-time, the location data is send along with the message. Future location updates are sent to the call taker if the user communicates using instant messaging. That is, if the location of the user is updated, only then the location details are re-sent to the call taker. Implementation details: 1. Instant Messaging
The instant messaging mode uses SIP protocol for communication. It uses the SIP ‘MESSAGE’ method for sending instant messages across. The application uses the MJSIP library for implementing this SIP protocol. [ISSUE : We had two Java libraries that supported the SIP protocol, namely, JSIP and MJSIP. Initially, we implemented the JSIP library. However, Android version 2.3.3 introduced built-in SIP library, but without the ‘MESSAGE’ extension needed for IM. This library had the same naming conventions as the JSIP, leading to naming conflict on version 2.3.3 and above. Hence the application would be only compatible on versions before 2.3.3. To get rid off these compatibility issues, we switched to the MJSIP library.]
The application sends SIP MESSAGES to the server in the stand-alone mode. These messages are sent over the default UDP protocol. Once sent, the application listens for the “200 OK” response from the server to ensure successful transmission. For each message we set a 4 second time-out. If the 200 OK response is not received from the server within this time, we push a notification to the user that message sending failed.
2. Real-Time Messaging
The Real-Time messaging uses T140 Protocol on the RTP session. To manage the SDP information for making the RTP session, we create UserAgent class, which manages a local SDP information and a SDP information from the server. To implement this part, we followed SipDroid’s method of managing SDP information. To handle T140 Protocol, we referenced T140Handler class, which is used by SIPc. Additionally, we modified MJSIP’s SIP INVITE messaging sending part to send the PIDF-LO object at the same time; however, the location information should be already sent if a user uses the instant SIP message first. In this case, MJSIP’s INVITE messaging part works normally. The hard thing was that we had to debug the Real-Time Messaging on the real device, not the emulator because of the RTP session. Sometimes, the Real-Time messaging characters were missed, or sent several times. To check this problem, we used ‘tcpdump’ on the real device.

3. Image TransmissionThe underlying protocol in image transmission is TCP by way of the SIP stack.
Invoking the built-in camera API meant that the user would incur an additional click to approve the photo, once shot. Given that this is an emergency app, the primary goal is to minimize communication time between the user and the NG911 call taker. With this in mind, we decided to implement a custom camera interface which directly sends the image as soon as it is shot. We obtain a byte array of the image as soon as it is shot, and send the byte array as a tcp packet to the call taker.
Once we have get the image binary data, we invoke the SipStack. However, the SipStack had a limitation that it could only send data encoded in strings and not binary. So we had to modify the SipStack (MjSIP) to accept binary data. So once we have the image binary data, we switch the stream from UDP to TCP and send this binary data to the server. 4. Location Transmission
In order to send the location details to the call taker, we set up a location listener that constantly checks for changes in location. This listener provides us with two options: to set the frequency of location update checks(in milliseconds), and to set the minimum change of distance(in metres) to consider it as a location change. For testing, we set both these parameters to 0 but to deploy in the real world, these value will need to be updated to an optimum value. If set too low, it will cause the app to slow down and drain out the battery faster and on the flip side, if set too high, say 10000 metres and 100000 seconds, the call taker may not be updated frequently enough.
Based on these settings, the Android run-time notifies the application of any location update. Once updated, the application sends this location as a PIDF-LO object along with the first SIP Message or SIP INVITE (whichever is first), by creating a multi-part message. If the user decides to use the Instant-Messaging mode, future location changes are buffered in the application. If there is a new location in the buffer which hasn’t yet been notified to the PSAP, it is sent along with the next SIP message, if any. This ensures that the application keeps updating the PSAP of location changes without sending too many messages. 5. LoST Querying
To get the nearest PSAP server, we have to send the query to the LoST server with the current location. This is done by LostConnector class. After acquiring the current GPS, sending the LoST querying is called automatically. Based on the query result, the application also initializes the Real-Time messaging session automatically. 6. User-Interface Implementation

The layout we have implemented follows closely on requirements and layout of TIPCon by Omnitor. The layout consists of a vertically oriented layout with the lowest quarter as controls. These controls include text input for the user to send the message, and a radio group to switch between Instant messaging and real time text. Additionally, we place a camera button in this quarter. The rest of the screen space is left for displaying the chat. We implement a bubble list with an orange bubble for outgoing messages, blue bubbles for incoming messages, and a red bubbles for error messages. When in rtt mode, a Text box (say rttTextBox) is present above the radio button control group, where the text that the call taker is typing is currently displayed.
We choose the vertical layout since it best fits the screen size of an Android phone.
This suits both RTT and Instant messaging(by way of SIP) really well. This also matches Omnitor’s requirements for RTT messaging in the following manner: The bubble list shows only text that is finalized. What the user is currently typing, appears only on his/her input text field, and what the call taker is currently typing, appears only on the text box(rttTextBox) dedicated for it. Only when the call taker finalizes text by hitting the enter button, does the text get pushed up to the bubble list. Similarly, the user’s text gets pushed up to the bubble list only on end of input entry as described in the Omnitor requirements sheet. This includes hitting the “enter” button, a brief period(currently set to 4 seconds) of inactivity after a period “.” , and when the input text box reaches its horizontal limit and needs to wrap around to the next line. If the user enters text in RTT mode and does not perform and “end of input” action, then after a brief period of inactivity(10 s), the user is displayed a message prompting him/her to complete the text. Another point worth noting is that the “send” button is disabled when in RTT mode to clearly indicate to the user that the text is sent real time.
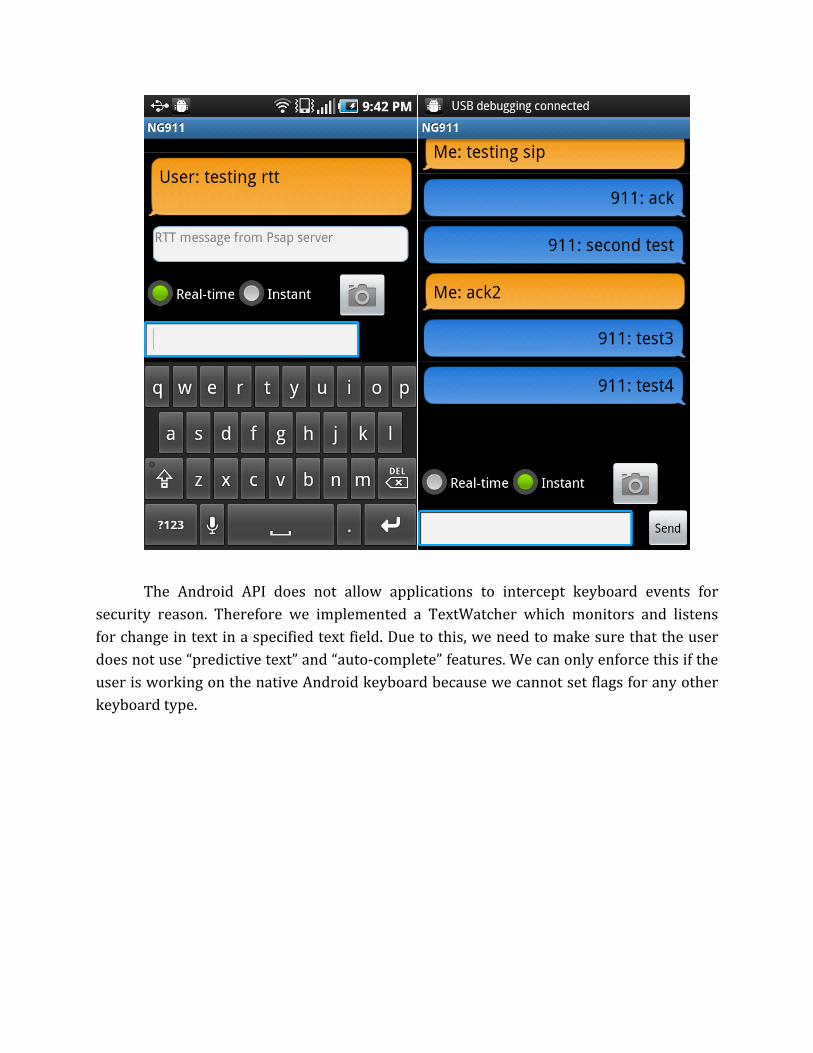
The Android API does not allow applications to intercept keyboard events for
security reason. Therefore we implemented a TextWatcher which monitors and listens for change in text in a specified text field. Due to this, we need to make sure that the user does not use “predictive text” and “auto-complete” features. We can only enforce this if the user is working on the native Android keyboard because we cannot set flags for any other keyboard type.
Server
server platform: Apache Tomcat + Mobicents, here is a simple guide for developing a simple SIP application with Mobicents and Eclipse (http://ben-touron.blogspot.com/2009/11/developping-simple-sip-application-with.html) Architecture
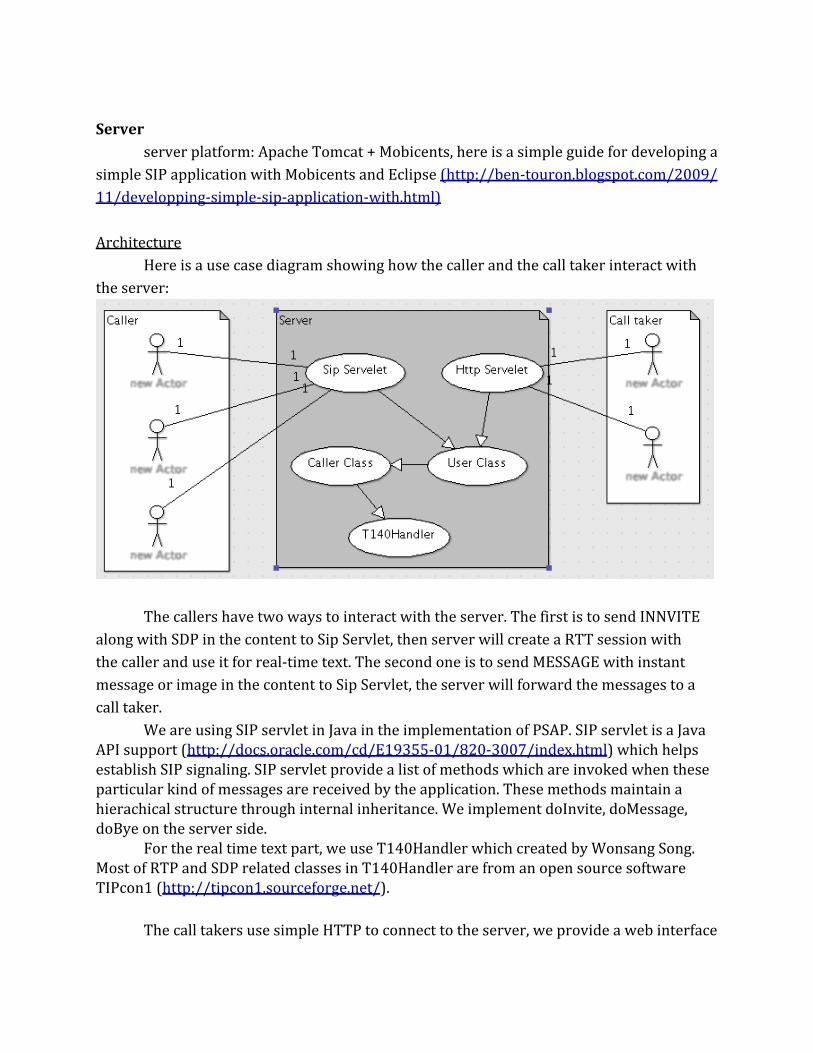
Here is a use case diagram showing how the caller and the call taker interact with the server:
The callers have two ways to interact with the server. The first is to send INNVITE
along with SDP in the content to Sip Servlet, then server will create a RTT session with the caller and use it for real-time text. The second one is to send MESSAGE with instant message or image in the content to Sip Servlet, the server will forward the messages to a call taker.
We are using SIP servlet in Java in the implementation of PSAP. SIP servlet is a Java API support (http://docs.oracle.com/cd/E19355-01/820-3007/index.html) which helps establish SIP signaling. SIP servlet provide a list of methods which are invoked when these particular kind of messages are received by the application. These methods maintain a hierachical structure through internal inheritance. We implement doInvite, doMessage, doBye on the server side.
For the real time text part, we use T140Handler which created by Wonsang Song. Most of RTP and SDP related classes in T140Handler are from an open source software TIPcon1 (http://tipcon1.sourceforge.net/).
The call takers use simple HTTP to connect to the server, we provide a web interface

(http://ng911-svr1.cs.columbia.edu:8080/NG911/) for the following purposes: To enable username and password log in for security purposes.
○ User can register a username one the sever and use it to log in.○ Use seesion to store information when user log in.○ Clear the seesion and log user out when user close the browser tab/window.○ If the server does not receive any request from a user within 5 minutes,
server will log the user out. To notify a call taker about a new incoming message.
○ The caller tab will show yellow color when receiving a new message from the caller.
To provide an interface for call takers to chat with callers○ Support instant messaging and real-time text types of chat interface for the
call taker. Show the image sent by caller.
○ Provide a thumbnail of the image. click it will open a new window with the real size image.
Provide text format of the caller’s information○ name, ip, message type(RTT or SIP), location (longitude, latitude)
To point the location of the emergency caller on the Google Map on the web Interface.
○ Use a marker on google map to show the position of the caller.
Below is the web interface work flow:
We have used Java Server Pages to develop the web front-end interface of the
application. In addition, we are using JavaScript, Ajax, JQuery to create dynamic pages. Since we support real time text, our client web interface must be very dynamic. Hence, we are using AJAX to keep on retrieving data from the server and only updates the pertinent part of the web page. Also, we are using Google Map API (http://code.google.com/apis/

maps/documentation/javascript/) to display the location of the caller on the web interface of the call taker. In our application, we are extracting the latitude and longitude values from the INVITE or MESSAGE message received from the caller and show it on the screen. Problems, concerns and future works
1. To make the real-time text and instant messaging work like real-time and instant, the way we are doing now is every 1 second, the page will send a request to the server and ask if there are new messages, if so, use Ajax to update some portion of the page. By doing this, it might cause a lot traffic on the server.
2. Support RTT and Instant message from the same person at the same time. If we treat SIP and RTT from the same IP as different users, then there is a chance they will be mapped to different call takers, which is very weird. And if we treat them as a same user, then we have to decide which method should the call taker use to send out the message (RTT or IM), which is very tricky since the caller might keep changing between IM and RTT, and there's no way for the server to decide how should we send message at any point.
3. Log everything and save them to database.4. Refine the user interface.5. Include and extract the phone number from the header.
References