aaw december 2015 (2) - wordpress.com · december dec. 1 bd. mtg. dec. 10 christmas party june june...
TRANSCRIPT

American Association of Woodturners, Seattle Chapter, December, 2015
Seattle’s AAW Web Site
www.seattlewoodturners.org
Christmas Party!
Big Reminder: this year’s Christ-mas Celebration is the FIRST Thursday of December, De-cember 3, instead of our normal sec-ond Thursday of the month. DON’T FORGET!! As usual, we will be sharing regular party food, we will be enjoying a Yankee Gift Ex-change. The meet-ing will start as nor-mal at 6:45 PM. Bring your goodies by then, please. SEE YOU THERE!
I would like to thank Vern Tator for dem-onstrating the lidded box on short notice at Novem-ber’s meeting. He was worried that he would not do a good job being last minute and all but, Vern did a great job! Thanks Vern!
I was told the amount of money col-lected for the wood raffle last month was a record for the prized Myrtle. Good job to everyone for the purchase of the tick-ets.
The voting for the board positions was held last month and there were many new faces at the board meeting. I want to thank everyone that came to vote for the new people.
I know parking was an issue at last month’s meeting and we have been investi-gating other options to help out. Members can help by car pooling with other turn-ers that might live close to you. This parking problem is a rare occurrence and we hope it will not happen again.
The Saw Dust Session last month again was one of the best the club has ever had. Everyone got to work on their ornaments and other projects with every lathe that was available. It also was wonderful to have John Moe and Hal Johnson mentoring the group. Thank you gentlemen for you help again. It was great to have many new members show up to ask questions about equipment and tools. We will not be having a Saw Dust Session this month be-cause we all need to get those turned Christmas pre-sents done.
The Christmas party this month will have a gift exchange like no other I have ever seen. Please bring a “wood turning type gift” about $20.00 if you wish to
Page 3, top

2015 CALENDAR SEATTLE AAW January
Jan 7 bd mtg
Jan 9 Club mtg.-Derek Weidman on Turned Sculp-ture
February Feb 3 bd mtg
Feb 12 Club mtg.- Safety Discussion; Raffle of Derek Weidman’s work.
Sawdust Session-Wood Prep
March Mar.3 bd. mtg.
Mar 12 Club mtg. Vern Ta-tor is making pepper mills
Mar. 31 bd. mtg.
August Aug 4 bd. mtg.
Aug 13 Eric Lofstrom end grain boxes
Aug 16 Annual Club Picnic from 12 noon to 5 PM Beads of Courage Boxes is this year’s competition
September Sept 1 bd. mtg.
Sept. 10 John Shrader Spherical salt/pepper shak-ers
BEGIN THINKING HOW YOU
CAN HELP YOUR CLUB
BOTH ELECTED AND VOL-
UNTEER JOBS
October September 29 bd. mtg.
Oct. 8 David Lutrick on Olio and Banjo Duets.
Oct. 10 Sawdust Session on Christmas Ornaments
SIGN UP TO HELP OUT THE CLUB
April Mar. 31 bd. mtg. (note: this is the April bd. Mtg.)
April 9 Tool Swap and Ex-pert Panel Discussion
April 25 (possibly 24 also) Giuilio Marcolongo hands on workshop
May May 5 bd mtg
May 14 Club mtg. Jay Shepard air brushing
May 16 Sawdust Session on Wood Prep
July June 30 bd mtg. (note: this is the July bd. Mtg.)
July 9 mini demonstrations by members
November Nov 3 bd. mtg.
Nov. 12 Stephen Hatcher with new techniques
Nov. 14 Stephen Hatcher Sawdust Session
SIGN UP TO HELP OUT THE
CLUB
December Dec. 1 bd. mtg.
Dec. 10 Christmas Party
June June 2 bd mtg
June 11 Jon Magill (assisted by John Moe) rose engine decoration
June 13 Sawdust Session on chain saw safety
June 30 bd mtg
Seattle Mentors
Below are listed the current mentors for Seattle Woodturners. They want to help! They
Bob Sievers (off-center work) [email protected] (360) 897-8427
Allan Rumpf (beginning spindle work) [email protected] (425) 788-4656
Hal Johnson [email protected] (425) 788-2221
Corey Markus [email protected] (425) 432 5435
Jack Wayne [email protected] (425) 488-9561
Les Dawson (beginning work) [email protected] (425) 432-3879
John Moe [email protected] (425) 643-4522
Gary Clarke (segmented work) [email protected]
John Shrader [email protected] (425) 653-3504
Vern Tater [email protected] 206-453-367
Steve Sergev [email protected], (425) 868-5666
David Lutrick [email protected] 425 557 9571
TOPS TOPS TOPS TOPS TOPS TOPS
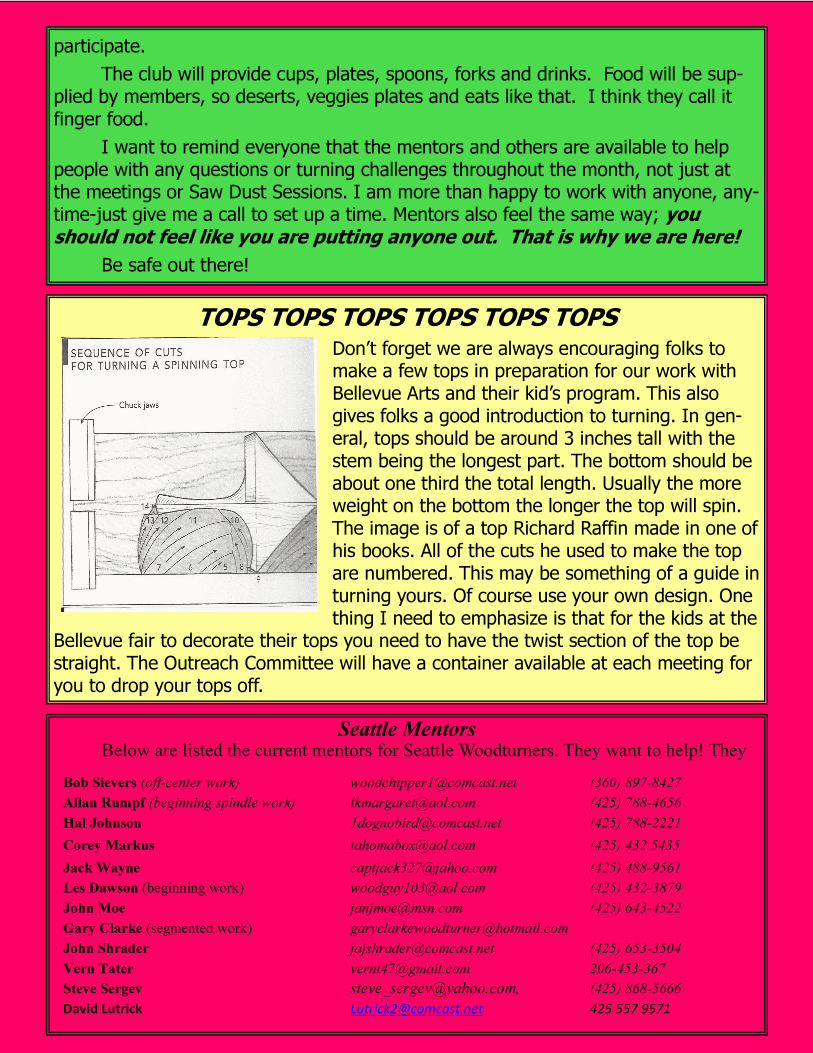
Don’t forget we are always encouraging folks to make a few tops in preparation for our work with Bellevue Arts and their kid’s program. This also gives folks a good introduction to turning. In gen-eral, tops should be around 3 inches tall with the stem being the longest part. The bottom should be about one third the total length. Usually the more weight on the bottom the longer the top will spin. The image is of a top Richard Raffin made in one of his books. All of the cuts he used to make the top are numbered. This may be something of a guide in turning yours. Of course use your own design. One thing I need to emphasize is that for the kids at the
Bellevue fair to decorate their tops you need to have the twist section of the top be straight. The Outreach Committee will have a container available at each meeting for you to drop your tops off.
participate.
The club will provide cups, plates, spoons, forks and drinks. Food will be sup-plied by members, so deserts, veggies plates and eats like that. I think they call it finger food.
I want to remind everyone that the mentors and others are available to help people with any questions or turning challenges throughout the month, not just at the meetings or Saw Dust Sessions. I am more than happy to work with anyone, any-time-just give me a call to set up a time. Mentors also feel the same way; you should not feel like you are putting anyone out. That is why we are here!
Be safe out there!

Reminder: Seattle Woodturners is now accepting your 2016 $35.00 renewal via Pay-Pal: http://seattlewoodturners.org/pay-membership-dues/ See instructions below or send me email with questions. After 1/1/2016, the Seattle Woodturners 2016 renewal will be $40.00.
We hope that as a current member of Seattle Woodturners, you plan to renew your mem-bership in 2016. Practically speaking, nearly all Club revenue is generated through membership dues to support hall rental costs, demonstration fees, outreach programs, audio/video equipment upgrades, Club trailer/tool purchases and maintenance, and other miscellaneous expenses in-curred to run the Club. For 2016 membership dues, your Board has agreed that membership payment before 1/1/2016 will remain $35.00/year, and payment after 1/1/2016 will be paid at the regular rate of $40.00/year. This year we’ve made several changes regarding how you can make your 2016 payment, including adding the ability for you to pay your dues electronically using PayPal. In fact, you are encouraged to use PayPal as the preferred method of making your 2016 renewal payment for sev-eral reasons, including: you pay when and from wherever you choose; you do not require a Pay-Pal account to make your payment using PayPal; you no longer have to wait in line (or try to find the Treasurer) at monthly meetings to make your payment; and, PayPal provides detailed transac-tion records to keep our accounting and membership lists as accurate as possible. To pay your 2016 membership dues using PayPal, complete these 4 steps: [1]Open this link, as found on our web site:
http://seattlewoodturners.org/pay-membership-dues/
[2] Click the 'Buy Now' button
[3] To pay using your credit card or debit card, click 'Check
Out'
OR
To pay using your PayPal account, click 'Check Out with
PayPal'
[4] Complete the checkout process, and make your $35.00 pay-
ment
Beginning this January, new membership cards will be available at Monthly Meetings. Remember that after 1/1/2016 dues will be paid at the regular $40.00 rate. Please bring your questions to Jim Steck at our meeting. Thanks for continuing to support Seattle Woodturners. Thanks all, Jim Steck, Treasurer (on behalf of the Seattle Woodturners Board)

Thirty Years-WOW!
In 1986 a bunch of dusty folks got together at Denver Ullery’s shop at Overlake School to talk woodturning. Out of those discussions came the vaunted Seattle Wood-turners which eventually became one of the early starting groups of the American As-sociation of Woodturners. As a part of that celebration Peter Palmer will be research-ing our history. If you have pictures, any “STUFF” from those early times let Peter know and he would like to include it in his developing study.
Community Outreach Takes On a New Project
Hello fellow woodturners. A brief statement from the Outreach team. We de-cided a hand built treadle lathe would draw some interest at street fairs and other gatherings wood turners may frequent. It’s a good conversion piece and one that would draw interest to “Seattle Woodturners”. The Outreach team has been working on a treadle lathe design for a few weeks and we think we have a design we can work with. BUT, you know how the best made plans can go. Our goal is to have a portable piece of equipment that mimics some lathes from the past century.
We looked at various plans and videos, and there is no shortage of plans in the world. We looked at much older designs that we saw in an Alan Lacer and Frank White AAW article about “Old Sturbridge Village” from September 1996. They were interesting but most are for use in stationary situations.
We liked a Roy Underhill design and used a lot of his ideas but still made some modifications. Ed French has put the design in CAD form on the computer and we are now in the cutting stage. I had an oak tree cut into slabs 18 mos. ago that are
two inches thick. They have been air drying outside and we think they are ready for the saw.
The design is one we can also modify for a pole lathe and with some other modifi-cations have a bike attached for peddle power. The pole lathe may well be the earli-est designed wood turning lathe. In England there is a national club of “Bodgers and green wood turners “who use exclusively the pole lathe in their turning.
We hope to have a working model by February.
STAY TUNED!
Mike Hughes

Thanks again
to George
McNeil fo
r doing his u
sual
great job on pictu
res!


WOW! It looks as if there was a lot of neat things happening at November’s Sawdust Session.


Cubes in a Sphere (Fred Holder) In the July/August 2004 issue of The Woodturner Magazine, published in England, there was an advertisement for the Stoneleigh Turning competition for 2004. The featured picture at the top of the page intrigued me and I had to know how to do it. It was obvious from the photo that the original blank was a sphere with six equally spaced stepped holes. This gave the effect of decreasing-sized cubes inside the sphere. The sphere in the photo had six levels of cubes. Apparently the ball in the photograph was somewhere in the neighborhood of 3-1/2" in diameter. There are at least a couple of ways to do this project: drill steps with Forstner drills or draw circles of the appropriate size and then, using a square end scraper, cut the holes to the proper depth. Since I normally make the Chinese Ball from 2-1/2" spheres and have a chuck to hold that size sphere, I opted to use that size. I had no idea what size drills to use, so I began to experiment. My first attempt provided a ball with three steps plus a hole in the middle, but the holes didn’t intersect one another to give the desired effect of cubes inside the sphere. I finally worked out that the proper depth for a step was 1/2 of 3/8" or 3/16" and the diameter change of drill size needed to change by 3/8" as the drill size changes larger or smaller. At first this didn’t seem to work. Then I realized that the original size of the sphere should have been about 2-1/4". I com-pensated and drilled the first hole 5/16" deep and all of the others 3/16" deep from the bottom of the preceding hole.
Picture 1: This was my first successful attempt to make this project. It is made from Elm and
has an African Blackwood base. All holes were
drilled with Forstner bits.
In the Beginning
To begin this project, you must choose a spot on the end grain to be the north pole. Then, using this as the starting point, lay out six equally spaced holes on the surface of the sphere. As shown in Figure 1, a straight line from the north pole position to the equator of the sphere is determined by the formula x (radius on x axis) squared plus y (radius on the y axis) squared equals z squared. “z” is the length of a straight line from the north pole to any point on the equator.

Figure 1. This shows a method of determining the
dimension to set your pencil compass to lay out
the six equally spaced holes.
This formula simplifies down to z equals the radius times the square root of 2 (or 1.414). For the 2-1/2" sphere, set your pencil compass to the 1/2 of the diameter of the sphere; i.e., 1.25" times 1.414, to obtain a value of 1.7675". Here is where one of the first inaccuracies can come into play. It is unlikely that one can set a pencil com-pass to that precise number. I made up a flexible cardboard template of that length as determined with my digital calipers. Laying the template from the north pole across the surface, I marked three locations about 120 degrees apart on what would be the equator. Then measuring from each of these locations, I made a mark near the south pole. I selected the center of these three marks to be the south pole. I then mounted the sphere between centers on the lathe and drew a circle around it at the equator location. I engaged the indexing pin and marked one of the holes. I moved 90 degrees (six holes on my Nova DVR 3000 index head) and made another mark. Two more equal moves and I had four equally spaced holes marked on the equator line. At this point, I was ready to start drilling holes. If you can manage to set your pencil compass to the 1.7675" dimension, you can easily layout the holes with the compass. Select a pole position and insert the point. Draw a line around the sphere. On that line select some point and draw an-other circular line around the sphere. Now at one of the intersections of these two lines, draw another line around the sphere. This gives you a location for the other pole position and four equally spaced lines on the equator line. Of course, all of this assumes that the ball is perfectly round.
Picture 2. In this photo, the tail center is being
used to align the ball on center before the chuck
is tightened.

Mount your sphere in the chuck with one of the positions aligned with the axis of rotation of the lathe de-termined by inserting the tailstock center into the intersection of the lines. Lock the chuck down and re-place the tailstock center with the drill chuck and a 1-1/2" Forstner drill bit mounted in it. Drill into the sphere until the outside edges of the Forstner drill bit is ready to cut the surface of the sphere. Make a mark on the side of the drill bit that is 5/16" from the surface of the sphere. Drill down to this line. Check to make sure that your hole is 5/16" deep. If it is, use a fine point pen to mark a line on the drill bit to indicate the depth of cut. This is for use on the other five outside holes. Figure 2 shows the relationship of any four holes drilled on the equator at each drill depth.
Figure 2. This drawing shows what is happen-
ing inside the sphere if a cross section was
taken through the center of any four holes.
Note: If the wood is fairly hard and heats up while drilling, I suggest that you arrange to flow air onto the wood and drill bit while drilling to prevent heat cracks and possible failure of the project. You now have a decision to make. You can align each of the other holes and drill the 1-1/2" hole for each of them before changing to the next smaller size drill. Or you can drill holes with all of the drills with this set up. I’m personally not sure which is the safest. I have done it both ways and had failures doing it both ways.
Picture 3: This set up shows the operation of drilling the first step at any
given position. Note the mark on the drill which was made after the first
hole was drilled in the ball.

Picture 4: By drilling two adjacent holes, you can check to ensure that you are drill-ing to the proper depth to obtain the optimal overlap of the holes to create the effect
of cubes.
All of the rest of the holes to be drilled must be 3/16" deep from the bottom surface of the previous hole and in each case they are 3/8” smaller than the preceding hole. Therefore, the next size down drill is 1-1/8” in diameter. I recommend that you back off your tailstock spindle as far as it will go and make a mark on it to indicate zero. Then make a mark again when the tailstock spindle has moved out 3/16". With the tail-stock spindle set to the first mark, move the tailstock assembly in until the drill bottoms against the surface of the previous hole. Lock down the tailstock assembly and drill in until the 3/16" mark appears. Retract the drill and check the depth of the hole. If the drill slips in the chuck or the tailstock slips on its mounting, your hole will not be the right depth. Therefore, I recommend checking each hole for depth. The next hole to drill is the 3/4" hole. It should also be drilled 3/16" deep. Repeat this operation for the 3/8" drill and you are ready for the next hole location.
Picture 5. This photo shows that all of the first holes have been drilled and then the other levels on this hole have also been drilled.
When all holes are drilled, you should be able to look into the holes and see what looks like decreasing sizes of cubes all connected to the previous layer at their points. A project such as this requires a stand. You could simply make a little egg cup-type stand to set it in; however, it would be hard to keep the item

oriented properly using this type of mounting. Therefore, I felt a permanently attached base would be bet-ter. I turned the base for the one illustrated in the photo at the beginning of this article out of African Blackwood. I turned a small tenon on the top of the base and drilled a matching hole in the sphere. This hole needs to be located in the center of one of the triangular area between three holes. This gives the best orientation, in my opinion, for the finished project. What I’ve just described is how I did the first one of these, made out of a 2-1/2” sphere. Unfortunately, my 40+ year old mathematics doesn’t seem to allow me to work out the formula to determine how deep the first hole needs to be drilled on any size of sphere and what size diameter hole is required. I thought I could just use the same formula going up in size as I do in going down in size, but something didn’t seem to work here either. What I have determined is that by drill-ing two adjacent holes of an estimated size, I can determine at what depth that size hole will overlap and give the desired opening at the interception. Using this method, I was able to increase the size of the sphere slightly to give four steps in the sphere. I had to use a different size starting drill, which changed all of the other drills used. Each drill still had to be 3/8” smaller than the previous one and was drilled into the sphere 3/16” deep from the previous level. In this case, the last hole drilled was 1/2” instead of 3/8” as for the smaller sphere. This project required me to make up a larger chuck out of three inch PVC compression fitting.
Picture 6. This photo illustrates the first successful version of this project and the
number two version which is made from a larger sphere and contains four steps in-
side each hole.

Making the Ball Chuck
Picture 7. This photo shows the basic components of the ball chuck that I use. Left to
right: screw on cap, plywood washer to fit between the sphere and the cap, male part
of the PVC compression fitting is fitted with a hardwood block with a spherical re-
cess. This one has sandpaper glued in to grip.
My first chuck of this type was made from a 3” PVC compression coupling. I cut off one end to make a very nice chuck. I glued a 1 inch, 8 tpi nut into a block of elm and turned it to fit inside the coupling, glued the wood into the coupling, inserted four screws to help the glue, turned a hemispherical depression for a 2-1/2” sphere in the elm, turned a piece of 1/4” plywood to fit inside the lid, put the lid and plywood onto the chuck body and turned a hole in the plywood to fit onto a 2-1/2” ball. I then drilled a hole to insert a piece of 3/8” dowel to use as a lever for tightening and loosening the cap, glued a 3” sanding disk into the bottom of the hole (after cutting slots all of the way around), and I had a very serviceable ball chuck. The only problem was that the cap was too big for my hand and I had problems screwing it down and loosening it. I repeated the operation with a 2” compression coupling and used a Oneway Chuck insert instead of a 1 inch 8 tpi nut. Now I have a chuck with a screw-on lid that I can hand tighten and loosen and that can be adapted to any lathe that I can buy a Oneway Chuck insert for. It works great. These chucks are very easy to make. It takes me about an hour to make one. I’ve found that either a One-way Stronghold Chuck Insert or a piece of cross grain oak with 8 tpi threads to fit a Nova Chuck Insert work very well for me. However, you can mount the wooden block onto a dedicated faceplate to fit your lathe. Another thing that I’m doing these days is to coat the spherical hollow with hot melt glue. I then take a round nose scraper and spread the glue evenly on the surface of the spherical hollow. When I’m ready to chuck up a sphere, I turn on the lathe and sand the spherical hollow lightly with 80-grit sandpaper. This slightly warms the glue surface and allows it to grip the sphere very firmly. I should caution, do not warm it too much or you may find your sphere permanently attached to your chuck. Have fun with this new way to decorate a sphere!
NOTE: This article was written by our own Fred Holder. I am not sure when he wrote this, but he has been noted in our club as a bit of an expert in making this project.

Beads of Courage Boxes Still Needed
So far we have about 10 Beads of Courage boxes turned in to Children’s Hospital. They say they can use up to 30 a year, so your work is still needed!
Remember, these kids go through some hella-cious tests and procedures. They earn many of these special beads. We need to make them top scale projects. Of great importance also is to be sure your box meets the size requests: 6” diameter and 5” height. You can fudge of these sizes only a little. It has been my experience that I often get a “design opportunity” for many of my turnings. Plan for that.
Art fair Booth Materials for sale
For Sale: Award-winning art fair booth package. This booth won one of the ten $1,000 Carol Duke Awards at the 2011 Bellevue Arts Fair out of a total of 325 booths. The pack-age includes everything you need to professionally display small to medium sized art ob-jects. It include the frame, flame retardant drapes, flooring, lights, table, modular ped-estals, awning and side curtains. With the awning and side pan-els installed, the booth is weather proof. The pedestals are light but plastic and break down to 1/4 of the volume shown for storage and shipping. Retail price for all components is $2,600. John is selling the package for $1,300.
Contact John Shrader at 425-736-0477 or
shraderor-

CorrosionX was invented in cooperation with the Navy in 1993. The Navy wanted to fight rust in both freshwater and saltwater environments. What makes CorrosionX so effective — in a sea of lubricants (no pun intended) — is a concept called Polar Bonding. Polar Bonding is the attraction of positive molecules in the oil to the nega-tive molecules (and vice versa) of any ferrous or non-ferrous metal, leaving a slick coat on each surface. I use a Powermatic 3520 for my own wood-turning projects. If you're familiar with that Lathe, you'll know it's the model with the sliding head stock, which is very heavy. The tail stock weighs a whopping 50 pounds, and eve-rything else on this lathe is heavy and hard to slide. Like most woodturners, I used to use paste wax on the bed rails. Then a few years ago, I was introduced to Cor-rosionX for the first time, and I applied copious amounts of it to the bed rails of the Powermatic, and proceeded to do some sanding. After a few moments I could see that the sawdust stuck to the bed rails, so I began to worry that CorrosionX might not be effective. I took a rag and wiped off the sawdust. What I did not know at the time, because of the polar bonding effect, the oil was still there in a coating thin enough to make everything slide well, yet not gather debris. Later I took apart my tail stock and treated it with Corrosion X. A visiting club member noticed how easy it was to crank my tail stock, and ask how I did it. I gave him some of my own supply of CorrosionX to try at home. He called me the next day. To his delight his tail stock was working smoothly. I only re-treat my lathe every few months. I use it on my chucks of every size, and I've recently been successful using it as bar oil on a chain saw. It has been the best penetrating oil I have ever used, and I have tried everything on the market over the years. It works because the oil is always seeking untreated metal. It will inhibit rust from developing, and free-up the most stubborn of rusted bolts. In the workshop I use it on all steel tables, table saws, ban saws, and my drill press. It is great on bearings, and is not affected by electronics, so it can be used to improve the waterproofness of remote control cars, boats and planes. Beyond the shop it is good on locks, trailer hitches, and garage doors. It can be used on anything involving metal-to-metal contact, like squeaky car door or trunk hinges. All it takes is a drop of it, and it works its way to the spots that are making the noise. Corrosion Technologies has over 100 products, and many are variations of the founding product CorrosionX, each with a money back Guarantee. Here's a selection of my favorite ones:
Bearing oil (Speed X) Fishing reel oil (Reel X) Rust remover Corrosion X Corrosion X Heavy duty Car polish (Rejex)
Marine products
Wood Turners Friend Great for lubrication, rust prevention, Penetrating. Use on bed rails, Chucks Tailstock, Drill press, Ta-ble saws, Band saws. Sticks to metal like a magnet.
http://corrosionx.com/corrosionx.html www.greatgunoil.com
425-990-0202
This info is from member Dick Watson. I think he sells it.

Bow River Craft Woods: We supply woodturners, bow makers, luthiers, carvers and woodworkers with figured, spalted, burl and specialty wood. We have bowl blanks in MANY sizes . Turning squares range from 2x2 to 8x8 in various lengths. Burls are cut to squares or slabs. We have in stock: big leaf maple, oak, acacia, cascara, chestnut, pacific yew, yellow cedar, walnut, magnolia, pear, apple and cherry. We are located at 11443 Mcsween Road Chilliwack, B.C. Canada Our Phone # is 604-795-3462 Fax # 604-795-
4058 e-mail [email protected] web address is www.bowrivercraftwoods.com WOODCRAFT: Easy on and off I-5 at Exit 162 (“Corson/Michigan”). Woodcraft Seattle features one of the largest inventories of turning tools and supplies in the Northwest? Woodcraft also stocks a wide variety of turning stock and woodworking power tools, accessories, books and supplies. Classes are also offered. Additionally, show your membership card making available a 10% dis-count. (some exclusions apply) 5963 CORSON SOUTH, SEATTLE 206 767 6394
Rocklers Show your membership card making available a 10% discount. 3823 STONE WAY NORTH, SEATTLE 206 634 3222 OR 345 TUKWILA PARKWAY, TUKWILA 206 244 9161
Packard Woodworks, Inc-specialists in all types of turning supplies and woodturning tool WWW.packardwoodworks.com 1 800 683 8876 Craft Supply, USA-specialists in all types of turning supplies and woodturning tools. WWW.WOODTURNERSCATALOG.COM
Equipment Sales and Surplus is an outlet for repaired and overstocked tools and equipment.Specialize in Jet, Powermatic and
Performax equipment. 1801 West Valley Highway North 253 804 3211
WANT ADS
This space is set aside for members to advertise free of charge to sell or purchase tools, wood, etc. Get your ad
to Les Dawson by the third Thursday of the month for inclusion in the next newsletter.
MORE WOODTURNING
The magazine for turners. Published 10 times a year by Fred Holder. One yr: $35.00; Two yrs: $70.00; Three yrs $105.00. Electronic version $25/yr. delivered from More Woodturning online at:www.morewoodturning.net Lots of great information for your browsing pleasure. More Woodturning PO Box 2168Snohomish WA 98291-2168 Phone: 360-668-0976email: [email protected]
Packard Woodworks, Inc-specialists in all types of turning supplies and woodturning tool WWW.packardwoodworks.com 1 800 683 8876
Very gently used, just collecting dust, prices firm: Jet benchtop Table saw JBTS-10LS-2 , Fixed
Stand/Storage Shelf $225.00 Jet 6” Open stand jointer (JJ-60S) Two Way Tilting Fence $250.00 DEWALT
DW788 20-Inch Variable-Speed Scroll Saw w/stand & light, blades included $400.00 Call Corey Markus
at 425-432-5435 2pm & 7pm (night worker) or [email protected].
Bow River Craft Woods: We supply woodturners, bow makers, luthiers, carvers and woodworkers with figured, spalted, burl and specialty wood. We have bowl blanks in MANY sizes . Turning squares range from 2x2 to 8x8 in various lengths. Burls are cut to squares or slabs. We have in stock: big leaf maple, oak, acacia, cascara, chestnut, pacific yew, yellow cedar, walnut, magnolia, pear, apple and cherry. We are located at 11443 Mcsween Road Chilliwack, B.C. Canada Our Phone # is 604-795-3462 Fax # 604-795-4058 e-mail [email protected] web address is
www.bowrivercraftwoods.com
WOODCRAFT: Easy on and off I-5 at Exit 162 (“Corson/Michigan”). Woodcraft Seattle features one of the largest inventories of turning tools and supplies in the Northwest? Woodcraft also stocks a wide variety of turning stock and woodworking power tools, accessories, books and sup-plies. Classes are also offered. Additionally, show your membership card making available a 10% discount. (some exclusions apply) 5963
CORSON SOUTH, SEATTLE 206 767 6394
• Rocklers Show your membership card making available a 10% discount. 832 NE Northgate Way Seattle, WA 98125 OR 345 TUKWILA PARKWAY, TUKWILA
Craft Supply, USA-specialists in all types of turning supplies and woodturning tools. WWW.WOODTURNERSCATALOG.COM
Equipment Sales and Surplus in Auburn is an outlet for repaired and overstocked tools and equipment. They specialize in Jet,
Powermatic and Performa equipment. 1801 West Valley Highway North 253 804 3211
WANT ADS
This space is set aside for members to advertise free of charge to sell or purchase tools, wood, etc. Get your ad
to Les Dawson by the third Thursday of the month for inclusion in the next newsletter.
AJ’s Custom Portable Saw Milling Custom milling services of your logs, portable or bring them here. Bowl blanks and furniture wood for sale. Limited hauling of logs. Special pricing for Club Members.
JET JWBS-14CS Bandsaw with Riser and Jet re-saw fence. $500. Includes 14 misc. blades. Contact Ross Nooney at 206-510-2730 or [email protected].
A 1640 OneWay for sale. Purchased in 2007 from craft supplies. It has been used by one person, Ar-nold Bowman, and is in excellent condition. I also have tools that are compatible for this lathe for woodturning. He has a dust control also attached which works quite well. Can be viewed by appoint-ment only. Stacy Bowman 253 589 1783
Walnut lumber for sale. Air dried under cover for at least 10 years. Beautiful wood, some highly fig-ured. Can be turned or made into magnificent furniture. All pieces were cut slightly over-sized, in order to have a net standard size following planing or jointing. Boards range from 5-6 ft to 11 feet long, widths are from 6 inches to 11 1/2 inches. Thickness ranges from approximately 1 inch to 2 2/3 inches. Approximately 400 board feet all from one tree. Price: $7:50 per board foot. Prefer one sale of total amount. Call Jack Frost for more information: 425-432-0588
Wanted to purchase: Tools for my Woodturning workshop. 14" Bandsaw; 1 HP or larger
(110V/220V) similar to a Grizzly G0550. Wood Lathe: 2 HP or larger, similar to a Powermatic 3520
or a Jet 1642. Blades, chucks, etc. for the above. Jim Kief (P) 425-885-4471 (E)

Head Wood Rat
Vern Tator
Hospitality
Jim Remington
Sealer
Steve Sergev
Program Chair
Jim Steck
Photographer
George McNiel
Communications Director
Dan Robbins
de_robbins @hotmail.com
Librarian
Biz Jaskovsky
Treasurer
Steve Gary
Seattle Chapter AAW Officers / Contact Persons 2016
President
A.J. Mearns
Next Club Meeting: December 10, 2015 @ 6:00 PM (social time) and 6:45 (meeting time); 4330 148th Ave. NE; Redmond, WA 98052
Vice President
Jack Wayne [email protected]
Secretary
Greg Raab
Community Outreach
Mike Hughes ; Jim Kief [email protected] ;chab/[email protected]
Safety Officer
Jack Wayne
Inventory Control
Jim Kief [email protected]
Members-at-Large
Vern Tator; Jim Jaskovsky
[email protected] [email protected]
Sound
Lawrence Brown
Sawdust Sessions
A.J. Mearns
Trailer Puller
Jim Hogg
Newsletter Editor
Les Dawson
Videographers
Ryan Pederson; Bob Holzgraf