aap - valo user guide
TRANSCRIPT

PRINT GARAGE USER GUIDE
Powered by

TABLE OF CONTENTS Introduction ..................................................................................................................................................... 1
Using The Site ................................................................................................................................................ 1
Accessing the AAP Print Garage Site ......................................................................................................... 2
Browsing the Catalog .................................................................................................................................. 5
Adding Items to Your Shopping Cart .......................................................................................................... 8
Customize an Item – (DIY Users Only) ...................................................................................................... ..10
Customize an Item – Business Stationery ( F o r C a r q u e s t I ndep end e n t users o nly) . . . . . . . . . . . . 14
Subscribing to an Out of Stock Item ............................................................................................................. 17
Placing An Order .......................................................................................................................................... 18
Review Your Items .................................................................................................................................... 19
Review or Enter Shipping Address ........................................................................................................... 20
Payment Method ....................................................................................................................................... 25
Finalize Your Order ................................................................................................................................... 28
View and Copy Previous Orders .................................................................................................................. 30
Order History Details ................................................................................................................................. 31
Manage Shipping Addresses ........................................................................................................................ 32
Contact Support ............................................................................................................................................ 32

1
I N T R O DU C T I ON
The new Print Garage is an easy-to-use global B2B eCommerce platform allowing users to order ready-
made, branded marketing tools and materials to help grow your business. Print Garage will include Retail
and Professional marketing tools, specialty products, event/seasonal sale materials, personalized stationery,
program signage, permanent décor replacements and more!
Print Garage gives Advance and Carquest Store Teams and Professional Teams the opportunity to add or
replenish sales tools and collateral with a quick turnaround to react to competitor and customer situations
across the country.
New Print Garage Features and Benefits:
• A single site for marketing materials that is easily accessible for all users.
• Fresh content, branding, usability and opportunities to increase field activation.
USING THE SITE
When working on the Print Garage Site, you can:
• Access your Commerce site
• Browse the catalog
• Add items to your shopping cart
• Place an order
• Add items to your Favorites list
• View and copy previous orders
• Manage shipping addresses
• Contact Support

2
ACCESSING THE AAP PRINT GARAGE SITE
To access the AAP Print Garage Commerce site, navigate to https://aap.inwk.com/.
Provide your username (your email address) and password, then click Go to log in.
If this is your first time accessing Print Garage, please set your password by clicking the Reset your
password link. You will be prompted to enter your username (your email address).
Click Go to generate an email that will allow you to enter a custom password and access the site.
If you receive the message “We cannot find a record for this username,” please follow the instructions below
to Create an Account.

3
Self-Registration Form
Navigate back to the main login page by clicking the logos in the top left corner. Once there, click on the
Create an Account link under the login fields.
Complete the form by filling out all required information.
Enter the email address you wish to use for your account and create a password for your account. The email
address submitted here will become your Print Garage site username.

4
Note: emails with the domain @advance-auto.com will be automatically approved for site access
Select your User Group from the dropdown menu at the bottom of the form. This is based on your company
division.
Click Submit to complete the form. Your account creation form will be submitted for approval. Once your
account has been approved, you will receive an email confirming your ability to login.

5
BROWSING THE CATALOG
To find a specific item, you can browse through the categories on the left side of the screen or enter a
keyword in the search field at the top of the screen.
6
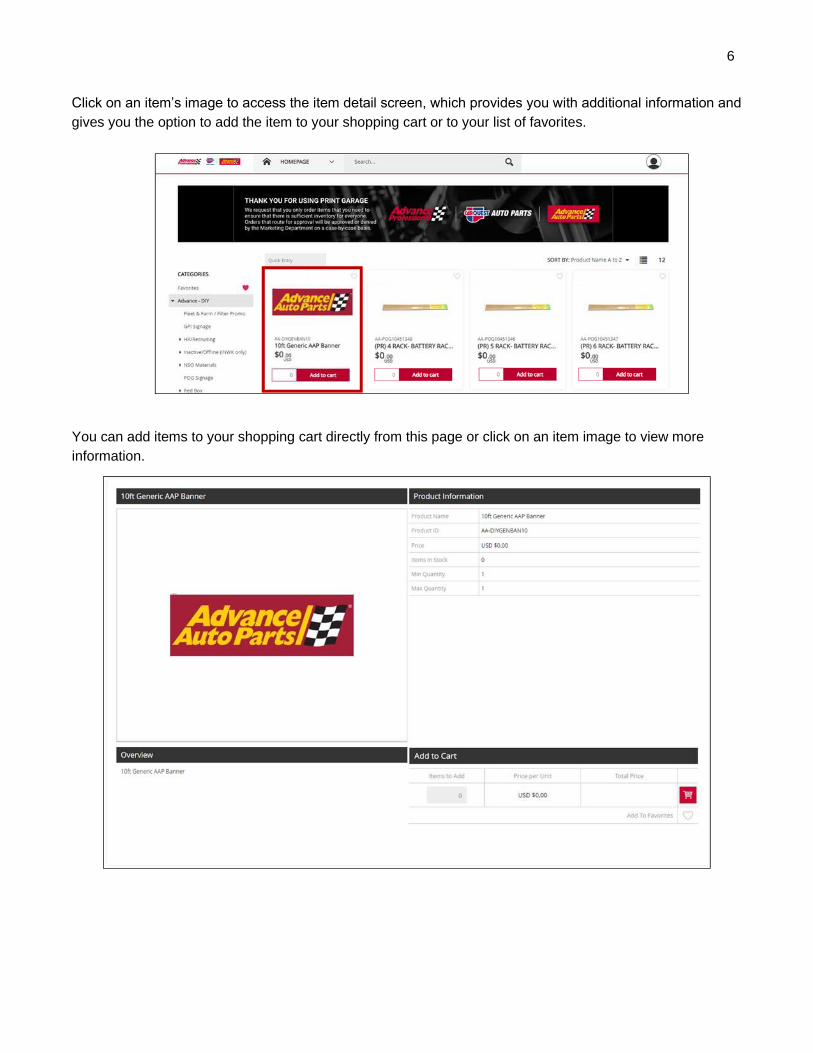
Click on an item’s image to access the item detail screen, which provides you with additional information and
gives you the option to add the item to your shopping cart or to your list of favorites.
You can add items to your shopping cart directly from this page or click on an item image to view more
information.

7
Adding Items to Your Favorites List
If you will be ordering a certain item frequently, click the Add To Favorites heart to add it to your Favorites
list to make it easy to find in the future.
You can see the list of all your favorite items by clicking Favorites in the Categories menu. Click the heart
to remove it from your favorites.

8
Important: When entering the desired quantity for your order, be sure to look at the pack size of the
item. Items are often ordered in packs, not individually.
ADDING ITEMS TO YOUR SHOPPING CART
There are three ways to add an item to your shopping cart:
1. From the catalog page, enter the quantity in the field provided and click Add to cart .

9
AA-DIYGENBAN10
3. On the catalog page, enter the Item Code/SKU into the Quick Entry Field. Provide the quantity
and click the shopping cart button.
4. On the item detail screen, enter the desired quantity in the Add to Cart area and click the
shopping cart button.

10
CUS TOM IZ E AN ITEM –
(DIY USERS ONLY)
Some items require customization on the item detail screen before ordering.
To open the item detail screen for customization, click on Configure underneath the item’s image.
To customize an item on the item detail screen, click on the pencil icon next to the item image to bring up
the custom form.

11
Once the customization form appears:
1. Enter your personalized information into the form on the left.
2. To save your information, enter a name in the “Quick Fill” field below the page numbers and click on “Save Quick Fill”. This will allow you to load info onto the same item at a later visit.
3. To load a saved quick fill, click the down arrow at the top left, next
to the words “Choose Quick Fill” and select the name you previously saved. This will load all saved data.
4. To view your imprint, click “Update” The image on the right will update to show your entered information.

12
\
5. The tool bar above the image can be used to flip through the images, alter how you view the imprint,
including zoom in/out by percentage, zoom in/out by slider, full screen view, and view at actual size
(1:1).
6. Once you’re satisfied with your imprint, click the “Approve/Checkout” button which saves your
imprint and activates the Shopping Cart button. You will not be able to place an order until the
Approve/Checkout button is clicked. The form customization window will close afterwards.
7. Enter a quantity to order in the “Items to Add” field. The quantity entered should be greater than or
equal to the “Min. Quantity” listed in the item information in the upper right.
8. To add the item to your cart, click the Shopping cart button. You will be prompted to Confirm or Cancel on the proof. Click “Confirm” and the item will be added to your cart. If this is the first item added to your cart, the Shopping Cart/Checkout icon will appear in the upper-right corner of the screen.
9. Once you click the button Confirm, the item will get sent to your shopping cart together with the template that you approved and the image you see will switch back to the default one. Do not be alerted by that fact, you can be sure that the information you entered was not lost, it was simply moved to the shopping cart.
10. Once you go into your shopping cart, you will have one more opportunity to review the details you
have entered into the template, by simply clicking the little magnifying glass

13
11. If you are satisfied with the template, you can click Next and continue the checkout process. If you want to make any edits to the template, please return and reenter the details.

14
CUS TOM IZ E AN ITEM – BUSINESS
S T A T I ON ER Y (For Carquest Independent users only)
Some items require customization on the item detail screen before ordering.
To open the item detail screen for customization, click on Configure underneath the item’s image.
To customize an item on the item detail screen, click on the pencil icon next to the item image to bring up
the custom form.

15
Once the customization form appears:
12. Enter your personalized information into the form on the left.
13. To save your information, enter a name in the “Quick Fill” field below the page numbers and click on “Save Quick Fill”. This will allow you to load info onto the same item at a later visit.
14. To load a saved quick fill, click the down arrow at the top left, next
to the words “Choose Quick Fill” and select the name you previously saved. This will load all saved data.
15. To view your imprint, click “Update” The image on the right will update to show your entered information.

16
\
16. The tool bar above the image can be used to flip through the images, alter how you view the imprint,
including zoom in/out by percentage, zoom in/out by slider, full screen view, and view at actual size
(1:1).
17. Once you’re satisfied with your imprint, click the “Approve/Checkout” button which saves your
imprint and activates the Shopping Cart button. You will not be able to place an order until the
Approve/Checkout button is clicked. The form customization window will close afterwards.
18. Enter a quantity to order in the “Items to Add” field. The quantity entered should be greater than or equal to the “Min. Quantity” listed in the item information in the upper right.
19. To add the item to your cart, click the Shopping cart
button. You will be prompted to Confirm or Cancel on the proof. Click “Confirm” and the item will be added to your cart. If this is the first item added to your cart, the Shopping Cart/Checkout icon will appear in the upper- right corner of the screen.
20. The same logic applies here, once you click the “Confirm” button, your approved template will be moved to the shopping cart and then image you would see on the page will switch to the default one. The details you have entered have been saved, though, and you are able to review them one more time once you move to the shopping cart by clicking on the small magnifying glass.

17
S U B S C R I B I N G TO AN OUT OF STOCK ITEM
If an item is Out of Stock, you will also have the option to sign up to be notified via email when the item is
back in stock and available for ordering again.
On the catalog page, click on the item image to open the item detail page.
On the item detail page, in the bottom right, enter your email address & click Subscribe to be notified.
To access and manage the list of all your notification subscriptions, hover
over your user icon and select Subscribed Items.

18
PL ACING AN ORDER
When you have added all the necessary items to your shopping cart, hover over the cart icon in the upper
right corner of the screen and select Checkout. This launches the checkout screen.
When the Checkout page opens, you will be prompted through several steps.
After completing each step, click the Next button to proceed.

19
REVIEW YOUR ITEMS
On the Items screen, you can
1. Remove all items from your shopping cart by clicking Clear
2. Modify item quantities in the Quantity field
3. Remove individual items by clicking the X button for the line item
4. Continue adding items to your cart before checking out by clicking the Continue Shopping
button
5. Continue with the purchasing process by clicking the Next button

20
Note: Always confirm the address is correct. If you have a default shipping address saved in your user
profile, the shipping address may default to this location.
REVIEW OR ENTER SHIPPING ADDRESS
On the Shipping Address page you can enter the location where the items will be shipped.
Click the Open Address Book link to select from a list of addresses in the Corporate Address Book or
saved in your user profile

21
To narrow the list of displayed addresses, enter the desired criteria in the Search By area and click Search.
Toggle between the Corporate or Personal Address Books by clicking the buttons above the address list
in the right-hand menu.
Select the desired shipping address from either list, click Ok to add it to your order. Click Next to proceed to
the Delivery page.

22
In the Open Address Book section, there are several buttons
Cancel: Closes the Address Book.
Refresh: Refreshes the addresses displayed in the Address Book.
Grid: Displays the addresses in a grid format.
List: Displays the addresses in a list format.
Ok: Selects the highlighted address.
Results Displayed: Selects the number of results displayed on the page (6, 12, or 24).

23
To narrow the list of displayed addresses, enter the
desired criteria in the Search By area and click Search.
Select the desired shipping address from either the
Address Book, click Ok to add it to your order.

24
Once your shipping address is complete, you must select a Shipping Account from the dropdown
menu before proceeding.
Click Next to proceed to the Payment page.

25
Please Note: All items will ship on UPS Ground. The Cost Center field is required for reconciliation of
shipping charges.
PAYMENT METHOD
If your cart total amounts to more than $0, you will be prompted to pay by Credit Card.
If your cart total is $0, you will be prompted to pay by Internal Billing, or Bill to My Account.
Credit Card payments:
1. On the Payment page, make sure to select the cost
center from the dropdown for shipping.
2. Next, enter your Billing Address for the credit card that’s being used for payment. Click Next to
enter the full Credit Card Details.

26
Please Note: Your card will be charged an initial deposit for on-demand items. As a security measure, this eCommerce site validates credit card information including Billing Address with
the credit card issuer. If you receive an error (declined message or "Order Placement Error") when
attempting to place an order with a credit card, please ensure that the Billing Address matches exactly the
information on your statement or validate the address with the issuing bank.
3. On the Payment Information page, enter the Credit Card Information and click Next to Finalize
your order.

27
Please Note: All items will ship on UPS Ground.
Internal Billing payments:
On the payment page, select your Internal Billing number from the Cost Center dropdown menu.
Click Next to proceed to the Checkout Confirmation screen.
28
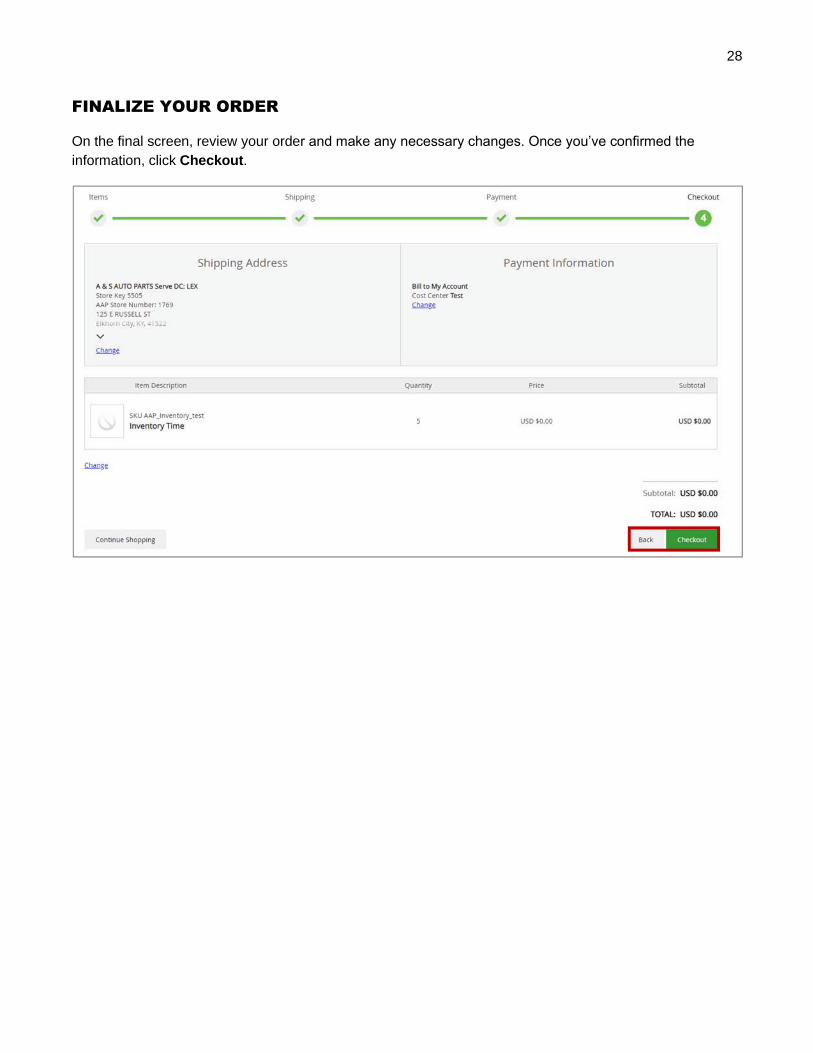
FINALIZE YOUR ORDER
On the final screen, review your order and make any necessary changes. Once you’ve confirmed the
information, click Checkout.

29
An Order Confirmation screen will appear with the option to print on the bottom right corner.
You will also receive an email copy of your order confirmation at the email address on your account. If you
need to contact InnerWorkings regarding the order for any reason, please reference your order number.

30
VIEW AND COPY PREVIO US ORDERS
To access a list of all orders you have placed, hover over your user icon and
select Order History.
On the Order History screen, you can filter order by date or status or search by keyword.

31
ORDER HISTORY DETAILS
Click to bring up an order’s confirmation screen, which lists all the included items. At the
bottom of the screen, click the shopping cart to add all these items to your cart, or the print button
to print the screen.

32
To add a new address, click the Add icon . To modify an existing address, click the Gear icon .
MANAGE SHIPP ING A DD R ESS E S
To modify the shipping addresses available at checkout, hover over your User icon and select Address
Book.
Your saved shipping addresses display, along with your default address in a larger, bolder red font.
CONTACT SUPPORT
To contact InnerWorkings Support with questions or requests regarding the Print Garage site, please send
an email to [email protected].