a reference manual for
TRANSCRIPT


a reference manual for
o S / A +
an Operating System for Atari Computers +an Operating System for Advanced users
The programs, disks, and manuals comprisingOS/A+ are Copyright (c) lQ82,1983 byOptimized Systems Software, Inc.
This manual is Copyright (c) 1982,1983 byOptimized Systems Software, Inc.1173-D Saratoga-Sunnyvale Rd.San Jose, CA 95129
This manual revised June, 1983
All rights reserved. Reproduction or translation ofany part of this work beyond that permitted by sections107 and 108 of the United States Copyright Act withoutthe permission of the copyright owner is unlawful.

PREFACE
OS/A+ is the result of the efforts of several persons,and we believe that proper credit should be given. Theoriginal Apple version of the console processor (CP)and the original version ("version 2") of the FileManager System (which is, of course, identical withAtari's DOS 2.0S) were written by Paul Laughton, ex ofShepardson Microsystems, Inc., who also authored theoriginal Apple DOS (version 3.1). The current versionsof all other portions are primarily the work of MarkRose, of OSS, with the collaboration of Bill Wilkinsonand Mike Peters.
We realize that OS/A+ is not the most sophisticated,most complete, operating system for any and allmicrocomputers, but we believe that the inherent powerand flexibility that it exhibits within its compactsize are a good match for the size and features of themachines it is intended for.
TRADEMARKS
The following trademarked names are used in variousplaces within this manual, and credit is hereby given:
OS/A+, BASIC A+, MAC/65, and C/65 are trademarks ofOptimized Systems Software, Inc.
Atari, Atari 400, Atari 800, Atari Home Computers, andAtari 850 Interface Module are trademarks ofAtari, Inc., Sunnyvale, CA.

TABLE OF CONTENTS
OS/A+ Command Summary
Chapter 1
Chapter 22.12.22.32.42.52.62.7
Chapter 33.13.23.33.43.53.63.73.83.93.10
Chapter 44.04.14.24.34.44.54.64.74.84.94.104.114.124.134.14
Introduction
Getting Started with OS/A+Overview of OS/A+The OS/A+ Console ProcessorSystem RequirementsWhy Two Versions of OS/A+ ?Booting UpLegal File & Device NamesCP Commands
How ToGlossaryBooting the Master DisketteCreating a STARTUP.EXC FileDuplicating a DisketteConfiguring the DriveFormatting a Diskette - Ver 2Formatting a Diskette - Ver 4Copying FilesUse of COPY24Use of SDCOPY
Intrinsic Commands@CARtridgeDIRectoryENDERAseLOAdNOScreenPROtectREMarkRENameRUNSAVeSCReenTYPeUNProtect
1
22455668
99111315222426293339
42434445464748495051525354555657

Chapter 55.15.25.35.45.55.65.75.85.95.105.115.125.135.145.155.16
Chapter 66.16.26.36.46.4.16.4.26.5
Chapter 77.17.27.37.47.57.67.77.87.97.107.11
TABLE of CONTENTS (cont)
Extrinsic CommandsADOSBASICC65CLRDSKCONFIGCOPYCOPY24DODUPDBLDUPDSKHELPINITINITDBLMAC65RS232SDCOPY
Batch processingoverview of Batch Processing.EXC File FormatIntrinsic Commands for .EXCStopping Batch FilesStops by OS/A+Stops by User Programs
STARTUP.EXC: A Special File
BASIC and OS/A+The Basic CLOSE stmtThe Basic ENTER stmtThe Basic GET stmtThe Basic INPUT stmtThe Basic LIST stmtThe Basic LOAD stmtThe Basic OPEN stmtThe Basic PRINT stmtThe Basic PUT stmtThe Basic SAVE stmtThe Basic XIO stmt
5860616263646668707172737576777980
8181828283838384
858687888991929396979899

Chapter
Chapter
88.18.1.18.1.28.1.38.28.2.18.2.28.2.38.2.48.2.58.2.68.38.3.18.3.28.3.38.3.4
99.19.1.19.1. 29.1.39.29.2.19.2.29.2.39.2.49.2.59.2.6
TABLE of CONTENTS (cont)
Assembly Language and OS/A+Interfacing to I/O RoutinesStructure of the IOCBsThe I/O CommandsError Codes Returned
Manipulation of OS/A+SYSEQU.ASMOS/A+ Memory LocationExecute ParametersDefault Drive LocationExtrinsic ParametersRUNLOC
Device HandlersDevice Handler TableRules for Writing HandlersRules for Adding to OS/A+An Example Program
Disk File StructureVersion 2 File StructureData SectorsDisk DirectoryVolume Table of Contents
Version 4 File StructureThe VTOCThe DirectoryThe File MapBuffer AllocationAdding Drives Under Ver. 4READ/WRITE Sector Routines
104105105110114115115115116116117118118118119121123
125125126127129130133134136137138139
Chapter 10 -- Version Differences 14010.1 Features Unique to version 4 14110.2 Differences: Atari DOS & OS/A+ 142
Appendix
Appendix
A --A.lA.2A.3
B --B.lB.2B.3
Customizing OS/A+Buffer AllocationSpecifying Existing DrivesSaving Your Modified Version
System Memory MapsAtari Zero Page MapSystem Memory Map (Ver. 2)System Memory Map (Ver. 4)
145145146146
147147147148
Appendix C -- ErrorsC.l Types of ErrorsC.2 Error Code Meanings
149149150

INTRINSIC COMMAND SUMMARY
Transfer control to a cartridge
DIR [Dn:][file-name] [output file-spec]View the disk directory
END Stop batch execution from withinan execute file
ERA [Dn:]file-name Remove files from a disk
LOAD [Dn:]file-name Load disk files into,memory
NOScreen Turn off command echo to screenduring batch
PRO [Dn:]file-name Protect files from accidentalerasure, writing, or renaming
REM any characters Print remarks to the screen duringbatch execution
REN from-file-name to-file-nameRename a file to a new name
RUN [hex-address] Transfer control to an addressin memory
SAVE file-spec start-address end-addressSave a portion of memory to adisk file
SCR Cause batch commands to be echoedto the screen
TYP [Dn:]file-name [output-file]Type a text file to the screenor another file
UNP [Dn:]file-name
@
Dn:
Remove the protection caused bythe PRO command
Begin execution of a batch file
Change the default drive number

ADOS
BASIC
C65
CLRDSK
EXTRINSIC COMMAND SUMMARY
Allow access to version 2 andversion 4 files at the same time
Load and execute BASIC A+
Load and execute the C/65 compiler
Initialize a diskette like theAtari 810 disk drive does.
CONFIG [parmI parm2 ... J [-N]Change the status of a configu-rable drive
COpy source-file destination-file [-FQSW]or
COpy file [-FQSW] Copy files.
COPY24 source-file destination-file [-FQWD]Transfer files from version 2 toversion 4 diskettes (& vice versa)
DO command[;command;command ... ]or
DO
DUPDBL
DUPDSK
HELP
INIT
INITDBL
MAC65
RS232
Perform a sequence of commands
Duplicate a double density diskette
Duplicate a diskette
Provide a MENU of system commands
Format a diskette
Format a double density disketteon a single drive
Load and execute the MAC/65 macroassembler
Install the serial device handlers("Rn:") for use with the Atari 850Interface Module.
SDCOPY source-file destination-file [-FQRV]Copy single density files to doubledensity diskettes

CHAPTER 1: HOW TO USE THIS MANUAL
Anxious to try OS/A+? Can't wait to wade through allthis? No matter what your prev10us background, wesuggest you read chapter 2, which gives an overview ofOS/A+ and its commands. At that point, if you arestill relatively inexperienced, you will want to readchapter 3, which gives step-by-step instructions forcommon OS/A+ operations.
If you are a more experienced user, you should readchapters 4, 5, and 6, which cover all the OS/A+commands in detail and present an explanation of batchprocessing under OS/A+. Users interested in writingprograms for use under OS/A+ will also be interested inchapters 7, 8, and 10, which cover using OS/A+ fromBASIC and assembly language.
For users interested in more deeply understanding theinternal workings of OS/A+, chapter 9 providesinformation on the way OS/A+ manipulates disk files.
Even if you are not skipping ahead,skim through unfamiliar material atplan to come back later when you'reunderstand the system.
you may want tofirst reading; butready to really
Anyway, put your OS/A+ master disk (WITH write protecttab on, PLEASE!) into Drive One , turn on your system,and try us!
P.S. Maybe the first command you want to learn is"DUPDSK" (section 5.10), to back up your valuablesystem master. Surprised? OS/A+ is NOT copyprotected. We hope you are considerate of our rightsso that we may continue to be considerate of yourconvenience.
--1--

CHAPTER 2: GETTING STARTED WITH OS/A+
2.1 OVERVIEW OF OS/A+
The purpose of OS/A+ is to provide a way for your Ataricomputer to communicate with your disk drives, printer,or other computer products. OS/A+ contains commandsand utilities which allow you to:
1. Organize information into files on yourdiskettes.
2. Access this information with ease andprecision.
3. Make use of other applications programs (e.g.BASIC A+, MAC/65, BUG/65, Atari BASIC, etc.).
4. Pass control of the computer between theOperating System (OS/A+), Cartridges, andprograms stored on disk.
OS/A+ was originally an accident, brought about by thefact that that we developed Atari's DOS and Atari'sBASIC on an Apple II computer. To simulate Atari'sindeed excellent OS ROMs, we wrote our own simple CIO(Central Input/Output) system. From there, it was onlylogical that we install a Console Processor similar tothat of Digital Research's CP/M (their trademark).Then when we introduced BASIC A+, we moved the "Cp"over to the Atari, and prestol There was born OS/A+version 1.0 for the Atari.
This manual actually describes two products:OS/A+ version 2 for Atari ComputersOS/A+ version 4 for Atari Computers
OS/A+ (and, naturally, Atari's OS) utilizes a softwareconcept which is built around a structured and layeredscheme. In particular, application programs areexpected to make calls to the OS via the Central InputOuptput routine ("CIO"). In turn, CIO is a dispatcherWhich examines the application program's request androutes the necessary subrequests to the appropriatedevice driver{s).
On the Atari, the device drivers may in turn call theSIO (Serial Input/Output) routines to perform theactual channel communications with devices on theserial bus (obvious exceptions include the screen andkeyboard, which do not require serial bus service).Finally, the device (on the serial bus) receives theSIO request and performs the actual I/O needed. Thediagram on the next page illustrates this process.
--2--

above
ApplicationProgram
1,
BASIC UserProgram
II
BASIC A+II
Any ONE of theI
CIO
ConsoleProcessor(OS/A+)
I1
1DiskDeviceDriver
1
SIO
Ilisk drive)
IPrinterDeviceDriver
I
I(printer)
IKeyboardDeviceDriver
I(Atari keyboard)
ScreenDeviceDriver,
'TV/monitor)
Figure 2-1Overview of OS/A+
Generally speaking, there is no reason anyone or moreportions of this hierarchical structure cannot bereplaced with another, equivalent section of code. Onthe Atari computer, in fact, the FMS (or FileManagement System) itself is "added" to the defaultstructure only if a disk drive is present at power-ontime. Several manufacturers, for example, haveproduced their own printer or screen drivers, replacingthe Atari-supplied drivers with minimal effect.
--3--

Unfortunately, we cannot say that any given portion maybe replaced with NO effect, simply because anunfortunately high portion of software written for theAtari violates the hierarchy (by direct calls to deviceroutines, or worse). These violators are by no meansin the majority, or we might have no hope of everproducing an improved Atari system. However, we shouldbe aware of at least the most important of these (quitefrankly) poorly written programs and maintain whatcompatibility that we can when we change the system.
Generally, the worst offenders are programs such asVISICALC and MICROSOFT BASIC, both of which makeassumptions about memory layout and disk usage.However, these programs (and most others) are shippedwith an operating system intact on the disk on whichthey reside. Thus, although we may not force them totake advantage of the expanded capabilities that ourdevice drivers may offer, at least we need onlymaintain compatibility with a standard Atari 800 and810 Disk Drive to allow their usage on otherwiseimproved products.
2.2 THE OS/A+ CONSOLE PROCESSOR (CP)
As you might recall from Figure 2-1, the CP (ConsoleProcessor) is NOT a priveleged part of the system. CPfunctions as an easy-to-use interface between the humanat the keyboard and the machine level of the CIO calls.
In section 2.1 we mentioned that any portion of theOS/A+ system could be replaced without change to any ofthe other sections. This is perhaps most true of theCPo For example, in a dedicated run-time environmentit has no reason to exist. Others have written anequivalent CP and placed it under the Atari DOS system,but we believe that the CP of OS/A+ is a verywell-designed, well-executed human interface,especially considering that it occupies less than 800bytes of your precious memory.
--4--

2.3 SYSTEM REQUIREMENTS
Although both versions of OS/A+ for the Atari will runnicely in 32K bytes of RAM, it isn't realistic to useless than 40K or 48K and expect to do useful work withmost languages and/or applications. Obviously, withhath versions at least one disk drive is required. Twodisk drives are highly recommended. The Atari version4 system requires (and only runs on) double density orlarger disk drives.
2.4 WHY TWO VERSIONS OF OS/A+ ?
Because we like to add to the confusion, of course.Seriously, when we originally produced Atari DOS, wewrote it to Atari specifications. There is more detailon this subject in Chapter 9, but suffice to say thereal problem with Atari's FMS (and hence with OS/A+version 2) is that it was never designed to handledisks larger than 256 Kilobytes. But now Percom DataCompany, Software Publishers, and others have addeddouble sided, double-density disks to their catalog,with capacities of nearly 400 Kilobytes.
Given that we need to access more than 256K bytes perdisk and/or file, how can we expand on the Atarisystem? An obvious solution is to introduce theconcept of "logical disks", wherein a larger drivemight contain two or more disjoint segments, eachwholly allocated to imitate an 810 disk system. Anyonewho has tried the Corvus equivalent of this scheme willrecognize the inadequacies of this solution.
So, given that we will no longer be compatible withAtari products, why not seize this opportunity to "doit right"? Why not produce a wholly different filemanager system that is not bound by the restrictions ofAtari DOS? This is the path we have chosen.
Thus we come to OS/A+ version 4, a mapped file system.Since we wrote not only Atari DOS but also Apple DOS,we naturally thought of an extension on the Applescheme as the logical step up from Atari DOS andversion 2 of OS/A+. We do not know if it might everhappen, but using our version 4 scheme would,presumably, enable a manufacturer to offer disk systemswhich were MEDIA and FILE COMPATIBLE on both Apple andAtari (and perhaps other 6502 systems).
--5--

2.5 BOOTING UP (and returning to CP)
When an OS/A+ disk is booted, the CP is immediatlyentered. of OS/A+ from the cartridge 1Snormally done through the use of the DOS command (i.e.,the BASIC command for this is DOS). Some cartridges donot allow DOS-type exits and thus OS/A+ cannot be usedwith these cartridges.
In any case, when the CP is entered it will clear thescreen and display:
OSS OS/A+ ATARI VERSION x.xxDl: <cursor>
The Dl: is the command prompt. It serves two purposes.Firstly, it tells the user it is ready to accept acommand. Secondly, it is a reminder of the defaultdisk drive. The default drive, in this case, being thefamilar file spec for drive 1.
2.6 DISK FILES AND FILENAMES
Most CP commands and parameters deal with files of onesort or another. OS/A+ requires files be specifiedwith a filename of the form:
<device>: <optional-file-name>
The file-specifier may be any valid file name and maycontain the "wild-card" characters '?' and '*' Aquestion mark ('?') will match any character in a filename, while an asterisk ('*') will match any string ofzero or more characters. For example, DIR *AB.C??will match and list XAB.CXX AB.CUR BEOBAB.CNN etc.
The rules for valid file names are:- Version 2
One to Eight characters optionallyfollowed by a period and a one to threecharacter extender.- Only characters A-Z and 0-9 are allowed.Also, the first character must bealphabetic.
Version 4- One to Thirty characters- All characters are valid except CTRLcharacters, RETURNs, and commas (,).
NOTE: under version 4 of OS/A+ the file spec necessaryto refer to all files on a disk is just "*", not "* *"
--6--

Device names under OS/A+ are very simplistic: theyconsist of a single letter optionally followed by asingle digit used to define a specific device when morethan one of the same kind exist (Ex.- Dl: or D2:).Traditionally (and, in the case of Atari disk files, ofnecessity) the device name is followed by a colon. Thefollowing devices are implemented under standard OS/A+:
E: Theconsole
keyboard/screenoutput.
editor device. The normal
K: The keyboard alone.editing of user input.
Use this device to bypass
S: The screen alone. Can be either characters (ala E:)or graphics.
P: On the Atari, the printer.driver allows only one printer.
C: The cassette recorder.
The standard device
D: The disk file manager, which also usually requires afile name.
Other device names are possible (e.g., for RS-232interfaces), and in fact the ease with which otherdevices may be added is another mark for the claim thatOS/A+ is a TRUE operating system. The structure ofdevice drivers is material for a later section (8.4),but we should like to point out that, on the Atari, theOS ROM includes drivers for all the above except thedisk.
To work with the disk file TEST.ORG on disk drivenumber 1, the operating system requires that the filespec Dl:TEST.ORG be used. Having to always specify theDl: can be tedious, especialy if most of the user'sfile work is on a single drive, CP is designed toprefix all filenames appearing in a CP command linewith the default drive - if and only if a device hasnot been explictly specified. In the case ofDl:TEST.ORG, the user could enter only TEST.ORG for afile name and allow CP to prefix it with the defaultdrive. Thus TEST.ORG becomes Dl:TEST.ORG in the OS/A+system. If TEST.ORG happened to be on drive two andthe default drive was drive one, the user could enterD2:TEST.ORG: and CP would see that the user hasexplicitily specified a device and would thus notappend the default drive device to that file name.
--7--
If the user needs to work a great deal with files ondrive two, he can change the default drive to avoid thenow necessary D2: prefix typing. When the systemprompts Dl:<cursor>, the user can respond withD2:<return> to change the default drive to the D2:device. The next CP prompt line will show D2:<cursor>.Now files accessed on drive one will require theexplict Dl: prefix typing, while files on drive twowill not require prefix typing. Only devices of theform Dn: (where n = 0-7) are allowed as default drives.OS/A+ does not check to insure that the new defaultdrive actually exists. The user's first indication ofan invalid default drive will occur when OS/A+ attemptsto access a file on the invalid device (via userccmrnand). The error message "INVALID DEVICE" willindicate the situation. The user should then set thedefault device to a valid disk unit. The defaultdevice change command is one of the many intrinsic CPcommands.
2.7 CP Commands
CP has three general classes, or groups, of commands.The classes are intrinsic commands, extrinsic commands,and execute commands. Intrinsic commands are executedby means of resident code that got loaded into thesystem when OS/A+ was booted up. Extrinsic commandsare commands that are external to the system. That is.the code that is used to execute the command must beloaded into the system from the disk at the time thecommand is issued. The Execute subset of commandsprovide for the batch execution of both intrinsic andextrinsic CP commands from a particular file.
The intrinsic commands are explained and defined inChapter 4, and the extrinsic commands may be found inChapter 5. Since the execute commands are a subset ofthe intrinsic they may be found in Chapter 4 too, andwill be noted as useful in execute files. They arealso discussed in Section 6.3.
--8--

CHAPTER 3: HOW TO
Section 3.1
GLOSSARY
Words you need to understand before you begin reaoingthis manua 1.
Version 2 The name for our operating system thatis upward compatible with Atari DOS2.0s, with some added features such asthe ability to handle double density.
Version 4 The name for ourOperating System.
advanced Disk
Single density A stanoaro for storingoiskette. Atari 810 disksingle density disk drives.
data on adrives are
Double Density Twice the standard.diskette will storedata stored ondiskette.
A double densitytwice the amount ofa single density
Double Sided
Single drive
Double drive
A disk drive able to use both sioes ofa diskette to store data.
A hardware unit that can hold only onediskette at a time.
A hardware unit that can halo twodiskettes at one time.
System diskette A diskette that contains the diskoperating system and all, some or noneof the utilities that are used with it.
Master diskette The original diskette that comes withyour disk drive. Any disketteduplicated from this diskette wouldalso be called a master diskette.
Boot, Booting Putting a system diskette in the numberI disk drive and turning on the system.
--9--

fOl: }
**.*
[RETURN]
Anything that is between these bracesis meant to be a prompt by thecomputer. For example, the instruction/ Type (Ol:}CONFIG 20 / means that withthe 01: prompt on the screen you wouldtype in CONFIG 20.
This is the universal filename. Whenyou see this filename in a command lineit can be replaced by any and all otherfilenames. For example, the commandline / COPY 01:**.* 02: / means thatall the files on the diskette in drive1 will be copyed to the diskette indrive 2.
This symbol represents a carriagereturn. Whenever it is encounteredpush the RETURN key on the keyboard.
--10--
Section 3.2
BOOTING the MASTER DISKETTE
STEP BY STEP:
1) Configure drive(s) (via switches etc) according tomanufacturer's directions.
2) Insert an OS/A+ master diskette in drive 1 and closethe door (make sure master diskette has writeprotect tab in place.)
3) Turn on the drive(s). Wait for the motor to stop.
4) If you will be using a cartridge based systemslanguage (e.g., OSS BASIC or OSS ACTION! or AtariBasic), insert the cartridge in the computer.
5) Turn ON the computer.
6) Wait. Watch and read the screen. (Remember if thescreen information is scrolling too fast you maypause by hitting CNTL-l. See Atari's OperatorManual. )
COMMENTARY:
For those of you who own Percom, Software Publishers,Rana or Micro Mainframe disk drives, the switchsettings for the master drive (Drive 1, Dl:) are notimportant. When the OS/A+ master diskette is insertedinto drive 1 and the machine turned on, the drive willsense the density of the diskette and configure itselfproperly.
The Atari 810 disk drive operates in single densitymode only. When using OS/A+ Version 2 with thesedrives, step 1 should be omitted.
For all versions of OS/A+, you will notice that as thesystem is booting some lines of inverse video are beingwritten to the screen. These are from a file calledSTARTUP.EXC, and is part of the booting operation (moreon this file later).
When the system has completed executing the STARTUP.EXCfile you will be looking at a menu. At this point youmay choose one of the numbers to do a particularcommand or answer with the number 9 to get control ofthe system.
--11--
In any case, when the Dl: prompt appears you have beengiven control of the operating system, and the bootprocess will have been completed.
NOTE: the CNTL-l sequence is executed by pushing downthe CTRL key on the left side of the keyboard and atthe same time pushing down the number 1 key.
--12--

Section 3.3
Booting up directly into a BASIC program
STEP BY STEP:1) Boot master diskette2) If you want the startup file on another disk, placethat disk in the drive at this time.
3) Type the command:[Dl:}TYPE E: Dl:STARTUP.EXC [RETURN]
The first three steps above are required to create theSTARTUP.EXC file. When these steps have been executedthe screen will be blanked out and the cursor will bein the top left hand corner of the screen. You are nowready to enter the STARTUP.EXC command line.
4) Type the command:
DO CAR;RUN"D:MENU" [RETURN]
Note the filename MENU is a fictitious filename.Please replace this name with a name of a programthat is on your disk. Also note that your BASICprogram must also have been SAVEd to the disk beforeit can be used in a STARTUP.EXC file.
5) Type the character:(cntl-3)
To perform the CNTL-3 function, press the key markedCTRL on the left hand side of the keyboard while atthe same time pressing down the number 3 key. Whenstep 5 has been executed the file STARTUP.EXC willactually be written to the disk and control will goback to the operating system and the Dl: prompt.
6) In answer to the Dl: prompt type DIR, to get adirectory of the disk. Now if any of the fileslisted below are not on your diskette, theSTARTUP.EXC file will not work properly.
DOS.SYSDO.COMSTARTUP.EXCyour BASIC program file that was used in the
STARTUP.EXC file
--13--

7)Last but not least, before you tryout this newlycreated diskette by switching the power off and on,make sure the BASIC cartridge is in it's properslot.
COMMEMTARY
The theory behind the STARTUP.EXC file is to make adiskette boot up and .execute a program automaticly. Ofcourse most people will be using this with the BASICcartridge and BASIC programs as shown in the aboveexample. For those of you with Atari DOS theSTARTUP.EXC file operates along the same principles asthe AUTORUN.SYS file.
--14--
Section 3.4
DUPLICATING A DISKETTE
Version 2, with one disk
STEP BY STEP
1) Boot master diskette2) For Software Publishers disk drives only:
Type the command:(Dl:}CONFIG lS[RETURN]
3) Type the command:(Dl:}DUPDSK[RETURN]
To the following prompts answer as shown:4) {SOURCE DISK DRIVE (1,2,3,4):} l[RETURN]5) {DESTINATION DISK DRIVE (1,2,3,4):} lrRETURN]6) {FORMAT DESTINATION DISK (y OR N):} yrRETURN]7) {Put Source Disk in Drive 1
When Ready, Hit RETURN} rRETURN]8) Swap source and destination disks as directed by
prompts.
COMMENTARY:
Duplicating a diskette with a single disk drive is alittle more time consuming than with two disk drivesbut no less accurate. To begin with, boot the OS/A+version 2 master diskette. If you are using theSoftware Publisher disk drive then you must proceedwith step 2 since some of these disk drives do notremain in the single density mode when booted.
Once the system is booted and configured properly, theduplicate diskette command can be given (step 3).Remember, the master diskette must still be in drive 1when the [RETURN] is typed in step 3, otherwise a FILENOT FOUND error will occur. After the DUPDSK utilityhas been loaded from the master diskette you'll noticethe prompt as in step 4. This prompt is asking youwhat disk drive your source diskette will be in.Follow step 4's answer and don't worry if your sourceis not in drive 1 yet; the program will wait for you toinsert it before it starts duplicating (step 7).
Since this is a single drive duplication, thedestination disk drive will also be drive 1 (Step 5).
--15--

disks. At this time takeinsert your destinationDUPDSK will format theThen the duplication
The prompt in step 6 is used in case your destinationdisk is new. We recommend that, whether your disk isnew or not, you answer the prompt in step 6 with aY[RETURN]. Formatting an oln diskette that has alreadybeen used before will guarantee that all the old fileshave been completly erased.
Step 7 is where you may take out the master disketteand insert the diskette that you wish to duplicate.After the rRETURN] in step 7, the DUPDSK program takescontrol and reads in as much of the disk as possible.
When the prompt:
Put Destination Disk in Drive 1When Ready, Hit RETURN
appears it is time to swapout your source diskette anddiskette and hit [RETURN).diskette before writing to it.process will begin.
Note: It might be a good idea to label the diskettesbefore you start so that the possibility of mixing upyour SOURCE and DESTINATION diskettes is greatlyreduced.
--16--

Version 2 with two disk drives
STEP BY STEP:
1) Boot master diskette2) For Software Publishers disk drives only:
Type the command:(Dl:}CONFIG IS[RETURN]
3) Type the command:(Dl:}CONFIG 2S[RETURN]
4) Type the command:(Dl:)DUPDSK[RETURN]
To the following prompts answer as shown:5) (SOURCE DISK DRIVE (1,2,3,4):) l[RETURN]6) (DESTINATION DISK DRIVE (1,2,3,4):) 2rRETURN]7) (FORMAT DESTINATION DISK (y OR N):) Y[RETURN]8) (Put Source Disk in Drive 1
Put Destination Disk in Drive 2When Ready, Hit RETURN} [RETURN]
COMMENTARY:
First boot a system diskette. For those of you withAtari disk drives, go to to step 4.
If you have a Software Publishers disk drive youfirst configure drive 1 (See step 2).
If you have a non-Atari drive that is softwareconfigurable, you must configure drive 2 accordingly(step 3). Remember, version 2 can also handle doubledensity, and some drives support two or more densities.Non-Atari disk drive users should be very careful tomake sure both drives are configured properly.
Once the drives are properly configured (if necessary),the duplicate diskette command can be given (step 4).Remember, the master diskette must still be in drive 1when the [RETURN] is typed in step 4; otherwise a FILENOT FOUND error will occur.
After the DUPDSK utility has been loaded from themaster diskette you'll notice the prompt as in step 5.This prompt is asking you what disk drive your sourcediskette will be in. Follow step 5's answer and don'tworry if your source diskette is not in drive 1 yet,the program will wait for you to insert it before itstarts duplicating (step 8).
Since this is a two drive duplication, the destinationdisk drive will be drive 2 (Step 6).
--17--

The prompt in step 7 is used in case your destinationdisk is new. We recommend that whether your disk isnew or not, you answer the prompt in step 7 with aY[RETURN]. Formatting an old diskette that has alreadybeen used before will guarantee that all the old fileshave been completly erased.
In step 8 you take out the master diskette and insertthe diskette that you wish to duplicate. After the[RETURN] in step 8, the DUPDSK program takes controland within a minute or so the diskette in drive 2 willhave an exact duplicate of the diskette in drive 11
--18--
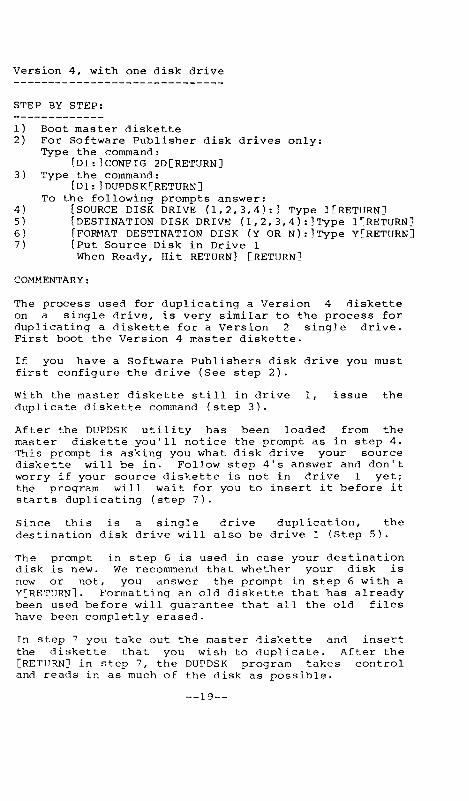
Version 4, with one disk drive
STEP BY STEP:
1) Boot master diskette2) For Software Publisher disk drives only:
Type the command:(Dl: JCONFIG 2D[RETURN]
3) Type the command:[Dl: JDUPDSK(RETURN]
To the following prompts answer:4) [SOURCE DISK DRIVE (1,2,3,4):J Type l[RETURN]5) [DESTINATION DISK DRIVE (1,2,3,4):JType l[RETURN]6) DESTINATION DISK (y OR N):JType7) [Put Source Disk in Drive 1
When Ready, Hit RETURNJ [RETURN]
COMMENTARY:
The process used for duplicating a Version 4 disketteon a single drive, is very similar to the process forduplicating a diskette for a Version 2 single drive.First boot the Version 4 master diskette.
If you have a Software Publishers disk drive you mustfirst configure the drive (See step 2).
With the master diskette still in drive 1,duplicate diskette command (step 3).
issue the
After the DUPDSK utility has been loaded from themaster diskette you'll notice the prompt as in step 4.This prompt is asking you what disk drive your sourcediskette will be in. Follow step 4's answer and don'tworry if your source diskette is not in drive 1 yet;the program will wait for you to insert it before itstarts duplicating (step 7).
Since this is a single drive duplication, thedestination disk drive will also be drive 1 (Step 5).
The prompt in step 6 is used in case your destinationdisk is new. We recommend that whether your disk isnew or not, you answer the prompt in step 6 with aY[RETURN]. Formatting an old diskette that has alreadybeen used before will guarantee that all the old fileshave been completly erased.
In step 7 you take out the master diskette and insertthe diskette that you wish to duplicate. After the[RETURN] in step 7, the DUPDSK program takes controland reads in as much of the disk as possible.
--19--
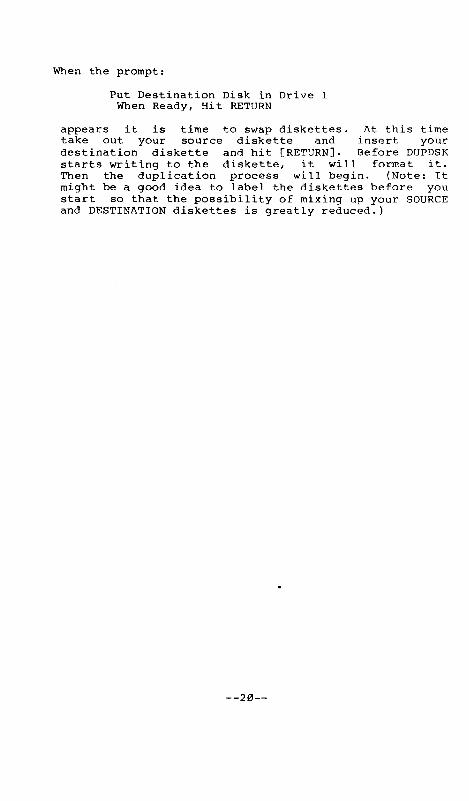
When the prompt:
Put Destination Disk in Drive 1When Ready, Hit RETURN
appears it is time to swap diskettes. At this timetake out your source diskette and insert yourdestination diskette and hit [RETURN]. Before DUPDSKstarts writing to the diskette, it will format it.Then the duplication process will begin. (Note: Itmight be a good idea to label the diskettes before youstart so that the possibility of mixing up your SOURCEand DESTINATION diskettes is greatly reduced.)
--20--
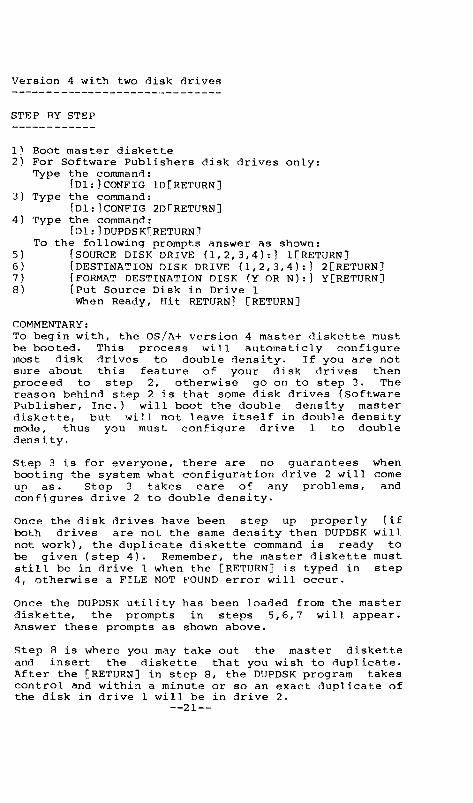
Version 4 with two disk drives
STEP BY STEP
1) Boot master diskette2) For Software Publishers disk drives only:
Type the command:(Dl:}CONFIG ID[RETURN]
3) Type the command:(Dl:}CONFIG 2DrRETURN]
4) Type the command:(Dl:}DUPDSKrRETURNl
To the following prompts answer as shown:5) (SOURCE DISK DRIVE (1,2,3,4):} l[RETURN]6) (DESTINATION DISK DRIVE (1,2,3,4):} 2[RETURN]7) {FORMAT DESTINATION DISK (y OR N):} Y[RETURN]8) {Put Source Disk in Drive 1
When Ready, Hit RETURN} [RETURN]
COMMENTARY:To begin with, the OS/A+ version 4 diskette mustbe booted. This process will automaticly configuremost disk drives to double density. If you are notsure about this feature of your disk drives thenproceed to step 2, otherwise go on to step 3. Thereason behind step 2 is that some disk drives (SoftwarePublisher, Inc.) will boot the double density masterdiskette, but will not leave itself in double densitymode, thus you must configure drive 1 to doubledensity.
Step 3 is for everyone, there are no guaranteesbooting the system what configuration drive 2 willup as. Step 3 takes care of any problems,configures drive 2 to double density.
whencomeand
Once the disk drives have been step up properly (ifboth drives are not the same density then DUPDSK willnot work), the duplicate diskette command is ready tobe given (step 4). Remember, the master diskette muststill be in drive 1 when the [RETURN] is typed in step4, otherwise a FILE NOT FOUND error will occur.
Once the DUPDSK utility has been loaded from the masterdiskette, the prompts in steps 5,6,7 will appear.Answer these prompts as shown above.
Step 8 is where you may take out the master disketteand insert the diskette that you wish to duplicate.After the [RETURN] in step 8, the DUPDSK program takescontrol and within a minute or so an exact duplicate ofthe disk in drive 1 will be in drive 2.
--21--

Section 3.5
Configuring the drive
This section is for people who have disk drives thatare software configurable. If you have only Atari 810disk drive(s), ignore this section.
The CONFIG command is used to CONFIGure disk drivesthat are capable of either single or double density(or, in some cases, single or double sided) operations.
Some disk drives are capable of handling a variety ofdifferent configurations (e.g. a double sided, doubledensity disk drive can usually ALSO handle singlesided, single density diskettes and single sided,double density diskettes). In order to control thevarious options available, the user must utilize theCONFIG command.
Generally, drive 1 (the boot drive) will automaticallybe configured to match the density of the bootdiskette. CAUTION: Some controllers, such as theSoftware Publishers unit, do not configure the diskdrive upon boot up.
For the Software Publishers disk drives and/or anyadditional non-Atari disk drive that you may haveattached to your system, the CONFIG utility should beused to match the configuration of your disk drive(s)to the configuration of your diskettes.
For example:
To set up disk drive 2 (D2:), so that it canread single sided, double density diskettes,use the following command (with the masterdiskette in drive 1).
(Dl:}CONFIG 2D [RETURN]
--22--
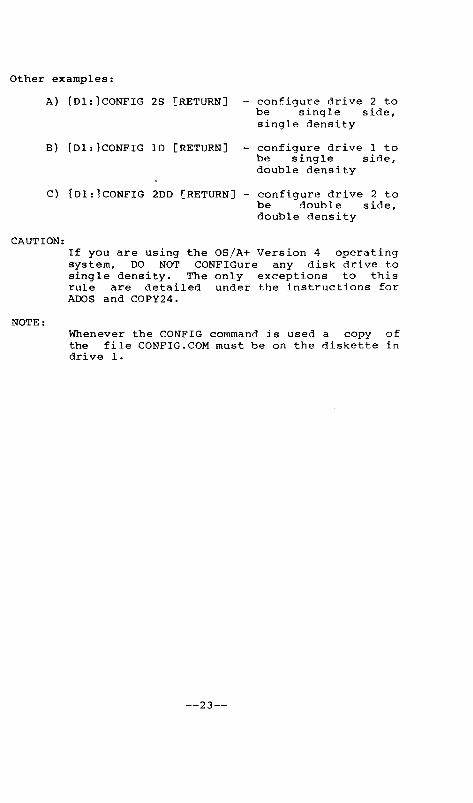
Other examples:
A) {Dl:}CONFIG 2S [RETURN] - configure drive 2 tobe single side,single density
B) {Dl:lcONFIG 10 [RETURN] - configure drive 1 tobe single side,double density
C) {Dl:}CONFIG 200 [RETURN] - configure drive 2 tobe double side,double density
CAUTION:If you are using the OS/A+ Version 4 operatingsystem, DO NOT CONFIGure any disk drive tosingle density. The only exceptions to thisrule are detailed under the instructions forADOS and COPY24.
NOTE:Whenever the CONFIG command is used a copy ofthe file CONFIG.COM must be on the diskette indrive 1.
--23--

Section 3.6
Formatting a new Version 2 diskette:
STEP by STEP:
1) Boot master diskette2) Type the command:
(Dl:}INIT [RETURN]3) To the prompt:
(1) FORMAT DISK ONLY.}(2) FORMAT DISK AND WRITE DOS.SYS.}(3) WRITE DOS.SYS ONLY.}(4) RETURN TO OS/A+.}
(ENTER FUNCTION NUMBER: <CURSOR>}Type, 2 [RETURN]
4) To the prompt:(ENTER DRIVE (1,2,3 OR 4): <CURSOR>}
Type, l[RETURN]
5) To the prompt:(FUNCTION 2; DRIVE 1}
(ARE YOU SURE (y OR N): <CURSOR>}
Insert a brand new diskette in drive 1 and TypeYrRETURN].
COMMENTARY
The process for formatting a brand new diskette is notas complicated as it looks. The numerous prompts arethere to help guide you in creating this new diskette,and not to cause you confussion.
As with all our previous examples, the first step is toboot the OS/A+ Version 2 master diskette. The reasonfor this is that the proper utility for formatting anew diskette (INIT.COM) will always be on thisdiskette.
When the master diskette has finished booting and theDl: prompt is on the screen, you are ready to issue thefollowing command (step 2):
(Dl:}INIT [RETURN]
--24--
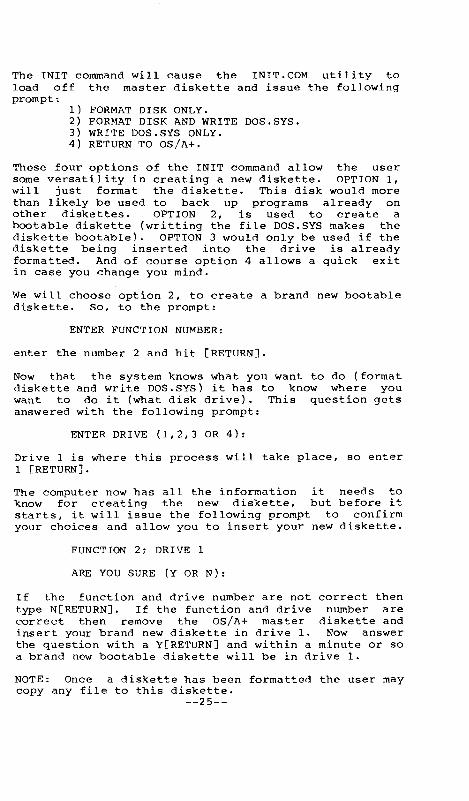
The INIT command will cause the INIT.COM utility toload off the master diskette and issue the followingprompt,
1) FORMAT DISK ONLY.2) FORMAT DISK AND WRITE DOS.SYS.3) WRITE DOS.SYS ONLY.4) RETURN TO OS/A+.
These four options of the INIT command allow the usersome versatility in creating a new diskette. OPTION 1,will just format the diskette. This disk would morethan likely be used to back up programs already onother diskettes. OPTION 2, is used to create abootable diskette (writting the file DOS.SYS makes thediskette bootable). OPTION 3 would only be used if thediskette being inserted into the drive is alreadyformatted. And of course option 4 allows a quick exitin case you change you mind.
We will choose option 2, to create a brand new bootablediskette. So, to the prompt:
ENTER FUNCTION NUMBER:
enter the number 2 and hit [RETURN].
Now that the system knows what you wanL to do (formatdiskette and write DOS.SYS) it has to know where youwant to do it (what disk drive). This question getsanswered with the following prompt:
ENTER DRIVE (1,2,3 OR 4):
Drive 1 is where this process will take place, so enter1 [RETURN].
The computer now has all the information it needs toknow for creating the new diskette, but before itstarts, it will issue the following prompt to confirmyour choices and allow you to insert your new diskette.
FUNCTION 2; DRIVE 1
ARE YOU SURE (y OR N):
If the function and drive number are not correct thentype N[RETURN]. If the function and drive number arecorrect then remove the OS/A+ master diskette andinsert your brand new diskette in drive 1. Now answerthe question with a Y[RETURN] and within a minute or soa brand new bootable diskette will be in drive 1.
NOTE: Once a diskette has been formatted the user maycopy any file to this diskette.
--25--

Section 3.7
Formatting a new Version 4 diskette:
STEP by STEP:
1) boot OS/A+ Version 4 master diskette.
2) Type the command:[Dl:}INIT [RETURN]
3) To the prompt:DRIVE NUMBER ?
Type, 1 [RETURN]
4) To the prompt :INSERT DISK INTO DRIVE 1AND HIT RETURN WHEN READY
Remove your master diskette and insert a brand newdouble density diskette and type l[RETURN].
5) To the prompt:INITIALIZATION COMPLETEINIT ANOTHER DISK?
Type N[RETURN]. This causes control to pass back tothe operating system
6) Remove newly formatted diskette and reinsert OS/A+master diskette.
7) Type the command:(Dl:}COPY Dl:DOS.SYS Dl: -SW[RETURN]
8) To the following prompt:Insert disk(s) to be copiedand hit return when ready
just type [RETURN]
9) To the following prompt:Insert 'to' disk and hit return
Put your newly formatted diskette in drive 1 and type[RETURN]
--26--

As with all ourboot the OS/A+for this isnew diskettediskette.
COMMENTARY:
previous examples, the first step is toVersion 4 master diskette. The reasonthat the proper utility for formatting a(INIT.COM) will always be on this
When the master diskette has finished booting and theDl: prompt is on the screen, you are ready to issue thefollowing command:
{Dl:}INIT [RETURN]
This command will cause the INIT.COM utility to loadoff the master diskette and issue the following prompt:
DRIVE NUMBER ?
This prompt is asking, in what disk drive will theformat process be performed. Answer this prompt with al[RETURN], for disk drive number 1.
Now that the system knows what it is doing (formattinga new double density diskette), and where it will bedoing it (disk drive number 1), the next prompt will beissued.
INSERT DISK IN DRIVE 1AND HIT RETURN WHEN READY
It is now time to remove your OS/A+ master diskette andinsert you brand new double density disk. When you hit[RETURN] the system will start formatting the diskettein drive 1, so be sure to remove the master firstbefore hitting [RETURN]
When the initialization is complete the system issuesthe next prompt.
INITIALIZATION COMPLETEINIT ANOTHER DISK?
Type N[RETURN] to get control of the operating system.With the Dl: prompt on the screen, remove your newlyformatted diskette and place it aside for a moment.Now reinsert your OS/A+ master diskette and type thefollowing command:
{Dl:}COPY Dl:DOS.SYS Dl: -SW [RETURN]
--27--
•
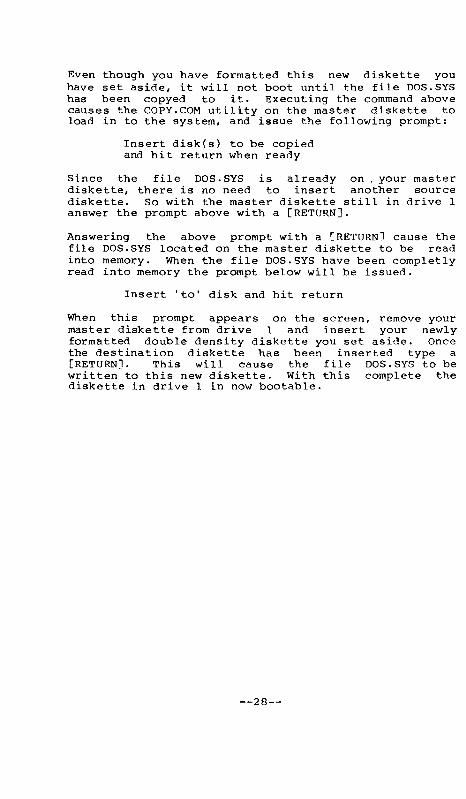
Even though you have formatted this new diskette youhave set aside, it will not boot until the file DOS.SYShas been copyed to it. Executing the command abovecauses the COPY.COM utility on the master diskette toload in to the system, and issue the following prompt:
Insert disk(s) to be copiedand hit return when ready
Since the file DOS. SYS is already on, your masterdiskette, there is no need to insert another sourcediskette. So with the master diskette still in drive Ianswer the prompt above with a [RETURN].
Answering the above prompt with a [RETURN] cause thefile DOS.SYS located on the master diskette to be readinto memory. When the file DOS.SYS have been completlyread into memory the prompt below will be issued.
Insert 'to' disk and hit return
When this prompt appears on the screen, remove yourmaster diskette from drive I and insert your newlyformatted double density diskette you set aside. Oncethe destination diskette has been inserted type a[RETURN]. This will cause the file DOS.SYS to bewritten to this new diskette. With this complete thediskette in drive 1 in now bootable.
--28--

Section 3.8
Copy files with only one drive
STEP BY STEP:
1) Boot master diskette2) Type the command:
(Ol:}COPY 01:**.* 01: -SWQ [RETURN]3) To the following prompt:
Insert disk(s) to be copiedand hit return when ready
insert your source disk in drive 1 and hit [RETURN]4) Follow the prompts answering either Y or N with a
[RETURN].
COMMENTARY:
The COPY command is used to copy a single file ormutiple files from one disk to another. But, beforeyou can do any copying you must put a disk in drive 1that has a copy of the utility COPY.COM, whether thefiles you want to copy are on that disk or not. Thisis done by using the master diskette.
Now, with the master diskette in drive 1, the commandline (step 2) can be issued to the operating system.This command line,
(Ol:}COPY 01:**.* 01: -SWQ [RETURN]
tellsdrivedisk)disk.
the computer to COPY all the files on the disk in1 (source disk) to another disk (destinationthat you will be subsituting with the source
the command line, calledsome information about-S flag tells the COPYdrive COPY. If you haveflag must always be used.
The letters at the end offlags, give the copy utilitythis particular copy. Theutility that this is a singleonly one disk drive the -S
The -W flag, tells the system to Wait before itactually starts to perform the copy. Remember, that instep 1 the master diskette is in drive 1. If the -Wflag is not used in step 2 the system will load theCOpy utility off the master diskette and assume thatthe master diskette is also your source diskette forCOPYing. When the -W flag is used the COpy utility isloaded from the master diskette and the system willWait for you to insert the proper source diskette.
--29--
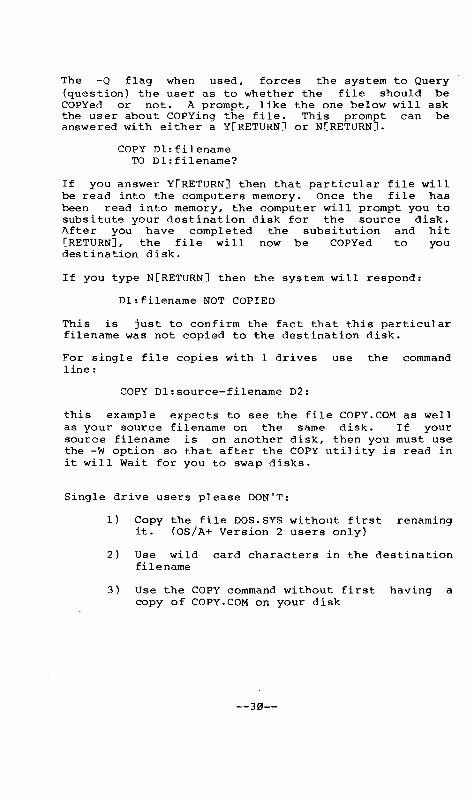
The -Q flag when used, forces the system to Query(question) the user as to whether the file should beCOPYed or not. A prompt, like the one below will askthe user about COPYing the file. This prompt can beanswered with either a Y[RETURNl or N[RETURN].
COpy DI:filenameTO Dl:filename?
If you answer Y[RETURN] then that particular file willbe read into the computers memory. Once the file hasbeen read into memory, the computer will prompt you tosubsitute your destination disk for the source disk.After you have completed the sUbsitution and hit[RETURN], the file will now be COPYed to youdestination disk.
If you type N[RETURN] then the system will respond:
Dl:filename NOT COPIED
This is just to confirm the fact that this particularfilename was not copied to the destination disk.
For single file copies with I drives use the commandline:
COpy DI:source-filename D2:
this example expects to see the file COPY.COM as wellas your source filename on the same disk. If yoursource filename is on another disk, then you must usethe -W option so that after the COPY utility is read init will Wait for you to swap disks.
Single drive users please DON'T:
1) Copy the file DOS.SYS without first renamingit. (OS/A+ Version 2 users only)
2) Use wild card characters in the destinationfilename
3) Use the COpy command without first having acopy of COPY.COM on your disk
--30--

COPY with 2 drives
STEP BY STEP:Configurable drive users with OS/A+ Ver 4
1) Boot master diskette2) Type the command:
(Ol:}CONFIG 20 [RETURN]3) Type the command:
(Ol:}COPY 01:**.* 02: -WQ [RETURN]
Configurable drive users with OS/A+ Ver 21) Boot master diskette2) Type the command:
(ol:lcONFIG 2S [RETURN]3) Type the command:
(Ol:}COPY 01:**.* 02: -WQ [RETURN]
Atari 810 Users with OS/A+ Ver 21) Boot master diskette2) Type the command:
(ol:lcOPY 01:**.* 02: -WQ [RETURN]
COMMENTARY:
You will notice that in all three examples above, thefirst step is to boot the master diskette. The reasonfor this is that the utility COPY.COM will always be onthis diskette, and before we do any COPYing we mustfirst load the COPY.COM utility. So whether you areusing Atari disk drives or Percoms please boot themaster diskette before any COPYing is performed.
In our Percom examples above, you will notice that Step2 uses the CONFIG command. This command is used tomake sure that your destination disk drive (02:) isconfigured the same as your source disk drive (01:).In fact after the CONFIG command is executed a chartwill be printed on the screen so that you can see thatboth disk drives have the same configuration. In theexample with the Atari disk drive there is no CONFIGcommand because the Atari disk is non-configurable.Because of this you cannot use the 810 disk drive andthe COPY command with OS/A+ Version 4.
Once
lineyour
the disk drive has been configured properly thecommand is ready to be executed. The COpy commandin all these examples, will copy all the files ondiskette in drive 1 to the diskette in drive 2.
--31--

The letters at the end of the command line, calledflags, give the copy utility some information aboutthis particular copy. The -W flag, tells the system toWait before it actually starts to perform the copy.Remember, that in step 1 the master diskette is indrive 1. If the -W flag is not used in step 3 thesystem will load the COpy utility off the master
diskette and assume that the master diskette is alsoyour source diskette for COPYing. When the -W flag isused the COpy utility is loaded from the masterdiskette and the system will Wait for you to insert theproper source diskette.
The -Q flag when used, forces the system to Query(question) the user as to whether the file should beCOPYed or not. A prompt, like the one below will askthe user about COPYing the file. This prompt can beanswered with either a Y[RETURN] or N[RETURN].
COPY Dl:filenameTO Dl:filename?
If you answer Y[RETURN] then that particular file willbe COPYed to the diskette in drive 2.
If you type N[RETURN] then the system will respond:
Dl:filename NOT COPIED
This is just to confirm the fact that this particularfilename was not copied to the destination diskette.
--32--

Section 3.9
Use of COPY24 with one disk drive
STEP BY STEP:
1) Boot OS/A+ Version 4 master diskette2) Type the command:
{Dl:}ADOS [RETURN]3) Type the command:
(Dl:}COPY24 Al:**.* Dl: -Q [RETURN]To the following prompt:
Insert disk(s) to be copiedand hit return when ready
4) Insert Atari DOS or OS/A+ Version 2 diskette
COMMENTARY:
This utility is for users with OS/A+ Version 4 only.If you are using another version of the operatingsystem please skip this section, as it does not applyto you.
The COPY24 utility is for file conversion. Since OS/A+Version 4 has a file structure different from Atari DOS2.0S and OS/A+ Version 2, files created under the latertwo 2 systems must be converted before they will workunder the Version 4 system.
To convert either Atari DOS or OS/A+ Version 2 files tothe OS/A+ Version 4 system, begin with booting themaster diskette. Doing this eliminates the need to gosearching for the particular utilities that are neededfor the conversion.
To do this conversion the utility ADOS must first beloaded into the system (step 2). ADOS is actually thefile manager that is part of the Atari DOS and OS/A+Version 2 operating system and will be used to readfiles from those diskettes so that they can beconverted.
Once ADOS has been loaded the actual command line forthe conversion can be issued to the system (step 3).This command line,
{Dl:}COPY24 Al:**.* Dl: -Q [RETURN]
--33--
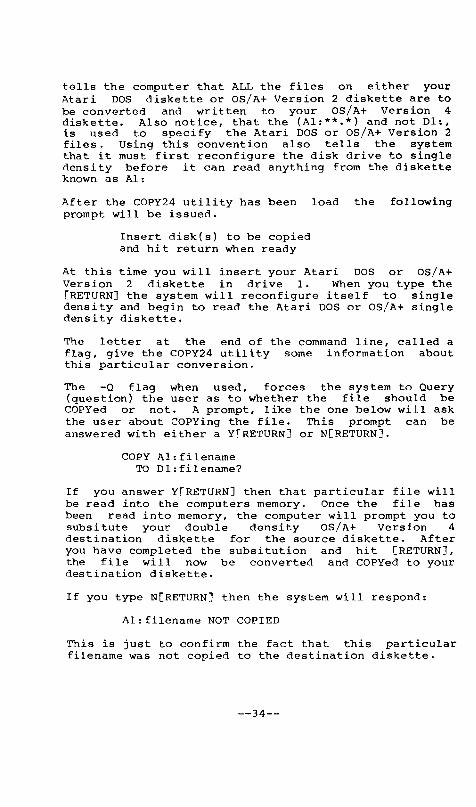
tells the computer that ALL the files on either yourAtari DOS diskette or OS/A+ Version 2 diskette are tobe converted and written to your OS/A+ Version 4diskette. Also notice, that the (Al:**.*) and not Dl:,is used to specify the Atari DOS or OS/A+ Version 2files. Using this convention also tells the systemthat it must first reconfigure the disk drive to singledensity before it can read anything from the disketteknown as AI:
After the COPY24 utility has been load the followingprompt will be issued.
Insert disk(s) to be copiedand hit return when ready
At this time you will insert your Atari DOS or OS/A+Version 2 diskette in drive 1. When you type the[RETURN] the system will reconfigure itself to singledensity and begin to read the Atari DOS or OS/A+ singledensity diskette.
The letter at the end of the command line, called aflag, give the COPY24 utility some information aboutthis particular conversion.
The -Q flag when used, forces the system to Query(question) the user as to whether the file should beCOPYed or not. A prompt, like the one below will askthe user about COPYing the file. This prompt can beanswered with either a Y[RETURN] or N[RETURN].
COPY Al:filenameTO Dl:filename?
If you answer Y[RETURN] then that particular file willbe read into the computers memory. Once the file hasbeen read into memory, the computer will prompt you tosubsitute your double density OS/A+ Version 4destination diskette for the source diskette. Afteryou have completed the subsitution and hit [RETURN],the file will now be converted and COPYed to yourdestination diskette.
If you type N[RETURN] then the system will respond:
AI: filename NOT COPIED
This is just to confirm the fact that this particularfilename was not copied to the destination diskette.
--34--

For single file copies with 1 drive use the followingcommand line after the ADOS utility has been loaded:
COPY24 AI:source D1:destination
This form (where "source" must be the name of a singledensity Atari DOS or OS/A+ Version 2 file and"destination must be the name of your double densityOS/A+ Version 4 diskette) expects to see the fileCOPY24.COM on your OS/A+ Version 4 diskette that is indrive 1.
Single drive users please DON'T:
1) Copy the file DOS.SYS with COPY242) Use wild card characters in the destination
filename3) Use the COPY24 command without first having a
copy of COPY24.COM on your diskette4) Use the COPY24 utility without first loading
the ADOS utility.5) Use the CONFIG command for single drive
copying. COPY24 performs the configuration tosingle density immediately before copying thefile.
--35--
USE of COPY24 with 2 drives
STEP BY STEP:1) Boot OS/A+ Version 4 master diskette2) Type the command:
(Ol:)CONFIG 2S[RETURN]3) Type the command:
(Ol:)AOOS[RETURN]4) Type the command:
(01:)COPY24 A2:**.* 01: -WQrRETURN]
COMMENTARY:
This utility is for users with OS/A+ Version 4 only.If you are using another version of the operatingsystem please skip this section, as it does not applyto you.
As is the case with all our examples, the first step isto boot the master diskette. The reason for using thisdiskette is that all the utilities provided with theoperating system are on this diskette.
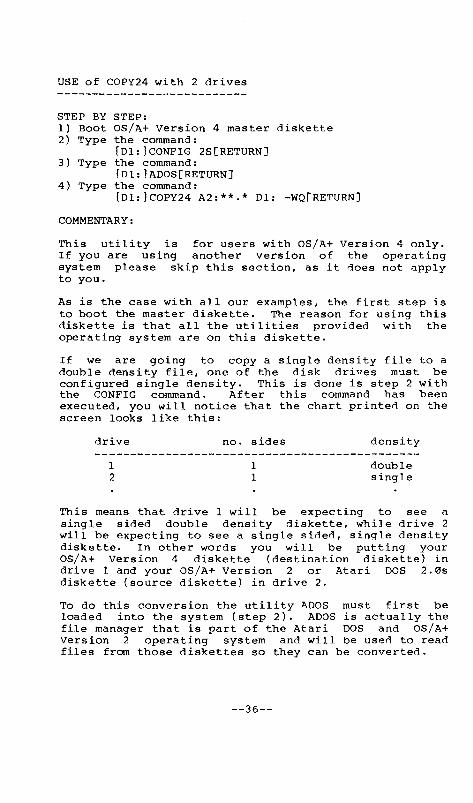
If we are going to copy a single density file to adouble density file, one of the disk drives must beconfigured single density. This is done is step 2 withthe CONFIG command. After this command has beenexecuted, you will notice that the chart printed on thescreen looks like this:
drive
12
no. sides
11
density
doublesingle
This means that drive 1 will be expecting to see asingle sined double density diskette, while drive 2will be expecting to see a single sided, single densitydiskette. In other words you will be putting yourOS/A+ Version 4 diskette (destination diskette) indrive I and your OS/A+ Version 2 or Atari DOS 2.0sdiskette (source diskette) in drive 2.
To do this conversion the utility ADOS must first beloaded into the system (step 2). ADOS is actually thefile manager that is part of the Atari DOS and OS/A+Version 2 operating system and will be used to readfiles from those diskettes so they can be converted.
--36--

Once ADOS has been loaded the actual command line forthe conversion can be issued to the system (step 3).This command line,
COPY24 A2:**.* Dl: -WQ[RETURN]
tells the computer that ALL the files on either yourAtari DOS diskette or OS/A+ Version 2 diskette are tobe converten and written to your OS/A+ Version 4diskette. Also notice, that the (A2:**.*) ann not D2:,is used to specify the Atari DOS or OS/A+ Version 2files. Using this convention also tells the systemthat the diskette known as A2: is single density.
After the COPY24 utility has been load the followingprompt will be issued.
Insert disk(s} to be copiedand hit return when ready
At this time you would insert your Atari DOS or OS/A+Version 2 diskette in drive 2 and your OS/A+ Version 4diskette in drive 1. (Note: we would suggest that anewly initialized OS/A+ Version 4 diskette be placed indrive 1 at this time.)
The letters at the end of the command line, calledflags, give the copy24 utility some information aboutthis particular copy. The -W flag, tells the system toWait before it actually starts to perform thecoversion. Remember, that in step 1 the masterdiskette is in drive 1. If the -W flag is not used instep 4 the system will loan the COPY24 utility off themaster diskette and assume that the master diskette isalso your destination diskette for the converted filesWhen the -W flag is used the COPY24 utility is loadedfrom the master diskette and the system will Wait foryou to insert the proper source and nestinationdiskettes.
The -Q flag when used, forces the system to Query(question) the user as to whether the file should beconverted or not. A prompt, like the one below willask the user about converting the file. This promptcan be answered with either a Y[RETURN] or N[RETURN].
COpy Dl:filenameTO Dl:filename?
If you answer Y[RETURN] then that particular file willbe converted and written to the OS/A+ Version 4diskette, in drive 1.
--37--
If you type N[RETURN] then the system will say:
Al:FILENAME NOT COPIED
This is just to confirm the fact that this particularfilename was not copied to the destination disk.
Please DON'T:
1) Copy the file DOS.SYS with COPY242) Use wild card characters in the destination
filename3) Use the COPY24 command without first having a
copy of COPY24.COM on your diskette4) Use the COPY24 utility without first loading
the ADOS utility.
--38--
STEP BY1) Boot2) Type
Section 3.10
Single density to Double density copy (SDCOPY)with 1 drive
STEPOS/A+ Version 2 master diskettethe command(Dl:}INITDBL[RETURN]
3) Remove master diskette and insert a blank diskinto drive 1.
4) To the following prompts answer as shown:DRIVE TO INITIALIZE? l[RETURNJINSERT DISK AND HIT RETURN [RETURN]
5) Reinsert master diskette6) Type the command:
(Dl:}SDCOPY Dl:**.* Dl: -WQ [RETURN]7) To the following prompt answer as shown:
Insert disk(s) to be copiedand hit return when ready[RETURN]
COMMENTARY
This command is for OS/A+ Version 2.1 users only. Ifyou are not using this version of the operating systemplease skip this section.
The utility SDCOPY is used to make double densitycopies of your single density files. However, beforeSDCOPY can be used correctly, the user must first setup properly.
To begin with, boot the OS/A+ Version 2.1 diskette.Doing this eliminates the need to go searching for thediskette that has the proper utilities on it.
With the master diskette in drive 1 use the INITDBLcommand to create a double density formatted diskette(steps 2-6). When the prompt in step 4 appears inserta brand new double density diskette, then hit [RETURN].
When the disk drive motor turns off, takenewly formatted double density disk and layside. This diskette will be your destinationwhen using the SDCOPY utility.
out yourit to thediskette
Reinsert your OS/A+ Version 2.1 master diskette, andtype the command line in step 6. This command line.
(Dl:}SDCOPY Dl:**.* Dl: -WQ [RETURN]
--39--

tells the computer to COPY all the files on the disk indrive 1 (source diskette) to your double densitydiskette (destination diskette) that you will besubsituting with the source diskette.
The letters at the end of the command line, calledflags, give the SDCOPY utility some information aboutthis particular copy. The -W flag, tells the system toWait before it actually starts to perform the copy.Remember, that in step 5 the master diskette is indrive 1. If the -W flag is not used in step 6 thesystem will load the SDCOPY utility off the masterdiskette and assume that the master diskette is alsoyour source diskette for COPYing. When the -W flag isused the SDCOPY utility is loaded from the masterdiskette and the system will Wait for you to insert theproper source diskette.
The -Q flag when used, forces the system to Query(question) the user as to whether the file should beCOPYed or not. A prompt, like the one below will askthe user about COPYing the file. This prompt can beanswered with either a Y[RETURN] or N[RETURN].
COpy Dl:filenameTO Dl:filename?
If you answer Y[RETURN] then that particular file willbe read into the computers memory. Once the file hasbeen read into memory, the computer will prompt you tosubsitute your double density destination diskette forthe source diskette. After you have completed thesubsitution and hit [RETURN], the file will now beCOPYed to you destination diskette.
If you type N[RETURN] then the system will say:
Dl:FILENAME NOT COPIED
This is just to confirm the fact that this particularfilename was not copied to the destination diskette.
For single file SDCOPies use the command line:
SDCOPY Dl:source filename Dl:
this example expects to see the file SDCOPY.COM as wellas your source filename on the same diskette. If yoursource filename is on another diskette, then you mustuse the -W option so that after the SDCOPY utility isread in it will Wait for you to swap diskettes.
--40--
Single drive users please DON'T:
1) SDCOPY the file DOS.SYS without firstrenaming it.
2) Use wild card characters in the destinationfilename.
3) Use the SDCOPY command without first having acopy of SDCOPY.COM on your diskette.
--41--

CHAPTER 4 - INTRINSIC OS/A+ COMMANDS
The intrinsic commands described in this chapter areexecuted via code that was loaded into the system atbootup time. These commands do not require the loadingof programs to perform their functions (as do extrinsiccommands). The following is a summary of the mostoften used intrinsic commands:
DIRECTORYPROTECTUNPROTECTERASERENAMELOADSAVERUNCARTRIDGE
TYPE
- List Directory- Protect a file (from change or erase)Unprotect a file
- Erase (delete) a file- Renames a file- Load a binary file- Save a binary fileExecute a program at some address
- Run Atari cartridge in the "A"cartridge slot (Atari users only)
- Type a text file to the screen
(The default drive change command,considered an intrinsic command.)
Dn: , is also
I
All intrinsic commands may be abbreviated to their fijthree characters. As a matter of fact, OS/A+ only looksthe first three characters while testing for an intrincommand. Each of the commands will be covered in detlater in this manual; however, to give you a feel ofintrinsic commands, let's look at the DIRECTORY commaWhile looking at these examples, assume the DI: isdefault device and has been placed on the screen by CPo
DI:DIRECTORY list all files of disk on drive oneDI:DIRECTDI:DIRTYDI:DIRDI:DIR ** *DI:DIR DI:DI:DIR DI:**.*DI DIR D2: list all files of disk on drive twoDI:DIR D2:**.*DI:DIR *.OBJ files with extension .OBJ on drive oneDI:DIR D2:*.ASM files with extension .ASM on drive two
--42--
Section 4.0
command:
purpose:
usage:
arguments:
Description
@
This command begins execution of a batchcommand file
@file-name
The name of a .EXC file containing CPcommands. The name should be usedWITHOUT the .EXC extension.
The @ command tells OS/A+ to begin taking commands froma batch file. This file is a text file which maycontain both intrinsic and extrinsic OS/A+ commands.For example, suppose the file TEST.EXC contains thefollowing commands:
DIR D:DIR D2:END
Issuing the command@TEST
would tell OS/A+ to start taking commands from the fileTEST.EXC. At that point, a directory listing of drive1 would be given, followed by a listing of files ondrive 2.
See sections 3.3 and 6.1 for more information oncreating and using batch files.
NOTE: The .EXC extension should NOT be given as part ofthe file-name when issuing the @ command. The command@GEORGE is sufficient to begin execution of the fileGEORGE.EXC. In fact, an error will result if thecommand @GEORGE.EXC is tried.
NOTE: A CAR command, when encountered within a batchfile will stop batch execution.
--43--

Section 4.1
command:
purpose:
users:
usage:
arguments:
Description
CAR
This command transfers control to acartridge
Atari users only
CAR
none
The CAR command allows the user to enter a cartridgefrom OS/A+. The cartridge will retain control of thesystem until a DOS command is executed from thecartridge.
CAUTION: Some cartridges do not allow DOS-type exitsand thus OS/A+ cannot be used with these cartridges.
WARNING: If no cartridge is present, using this commandmay cause the keyboard to lock up, rendering themachine useless. To rectify this condition, turn offthe computer power and reboot the system.
--44--
Section 4.2
command:
purpose:
usage:
arguments:
Description
DIRectory
The command allows the user to view thedisk directory
DIR [Dn:][file-name] [output file-spec]
optional file specifieroptional output file specifier
The DIR command searches the disk directory of thespecified disk (or the current default drive, if Dn: isomitted) for all files matching the file-specifier.The names of all files matching the specifier are thenprinted to the screen, together with the length of thefile (in sectors). An asterisk preceding the file'sname indicates that the file is protected from erasure,writing, or renaming.
The file-specifier may be any valid file name (seesections on file structure) and may contain the"wild-card" characters '?' and '*'. A question mark('?') will match any character in a file name, whilean asterisk ('*') will match any string of zero or morecharacters. For example,
DIR *AB.C??will match and list
XAB.CXXAB.CURBEOBAB.CNNetc.
If the output file name is specified, thelisting will be sent to that file insteadscreen. For example, the command
DIR Dl: P:will send to the printer a listing of alldrive 1.
--45--
directoryof to the
files on

Section 4.3
command:
purpose:
usage:
arguments:
Description
END
Stop batch execution from within anexecute file
END
none
The END commandfrom a batch filecommmands. Thisbatch file.
causes OS/A+ to stop reading commandsand to resume prompting the user forcommand has no effect outside of a
--46--

Section 4.4
command:
purpose:
usage:
arguments:
Description
ERAse
This command removes files from a disk
ERA [Dn:]file-name
a file specifier string
The ERA command permanently removes files from a disk.All files matching the file-specifier string on thespecified drive (or the current default drive, if Dn:is omitted) will be erased from the disk. These fileswill no longer be shown when a DIR command is issued,nor will they be available for any type of file access.
WARNING: As this command causes the irreversibledeletion of files from the disk, it should be used withcare. Use the PROtect command to guard files againstaccidental erasure.
Examples:
ERASE *.BAKwill erase all files with an extensionof .BAK that are unprotected and thatreside on the current default drive.
ERA D2: DUP . SYSwill erase the file named DUP.SYS fromdisk in disk drive number 2.
Notes:If ERAse does not find any erasable files thatmatch the specifier, it will return a FILE NOTFOUND error.
--47--

Section 4.5
command:
purpose:
usage:
arguments:
Description
LOAd
Load disk files into memory
LOAD [Dn:]file-name
a file specifer
The LOAD command allows the user to load binary loadimage files into user memory. The files must becompatible with the normal binary object files used bythe normal host computer operating system. That is:
For Atari users, each segment of the memory image filemust be preceeded by two addresses, the starting andending addresses in RAM memory of the segment. Theentire file must be preceeded by two bytes with allbits on ($FF, $FF). This format is identical to thatproduced by Atari's Assembler/Editor Cartridge and mostupgraded products (including ACT!ON and MAC/65 fromOSS) .
--48--

Section 4.6
command:
purpose:
usage:
arguments:
Description
NOScreen
Turns off command echo to screen duringbatch
NOS
none
Normally, all commands encountered during batchexecution are echoed to the screen as if they weretyped in by the user. The NOS command can be used toprevent this echo. All commands within an execute filewill then no longer be echoed until the execute file isstopped for any reason or a SCR command is encountered.
This command only effects commands encountered in batchmode.
--49--

Section 4.7
command:
purpose:
usage:
arguments:
Description
PROtect
This command protects files from acciden-tal erasure, writing, or renaming
PRO [Dn:Jfile-name
a file specifier
The PRO command allows the user to protect one or morefiles from any erasure, writing, or renaming. . Allfiles matching the file-specifier will be protected.The system marks a protected file by placing anasterisk next to its name whenever a DIR command isused. The UNP command can be used to disable theprotection, when desired.
--50--

Section 4.8
command:
purpose:
usage:
arguments:
Description
REMark
Prints remarks to the screen duringbatch execution
REM any characters
a string of zero or more characters
The REM command performs no operation whatsoever. Itssole purpose is to provide a means of easily printingmessages to the screen from an executing batch file(see section on batch execution). When encounteredduring batch execution, the command line containing theREM command will be echoed to the screen, unless theNOScreen command has been previously issued.
--51--

Section 4.9
command:
purpose:
usage:
arguments:
Description
REName
Rename a file to a new name
REN from-file-name to-file-name
two file names
The REN command will search the specified disk (or thedefault drive, if Dn: is not specified) for a filewhose name matches the specified f r om-c f i Le-cname., Ifthe file is found, its name will be changed to theindicated to-file-name. An error occurs if thefrom-file is not found on the disk. The to file-nameshould NOT be preceeded by a disk drive specifier.
WARNING: The REName commandwild-card characters ( "*", "?")Such usage may permanentlydirectory.
should not be used within the file names.damage your diskette
WARNING: Under version 2 and Atari Dos 2.08, it ispossible to use the rename command to create two fileswith the same name. If this condition occurs, use theCOpy command with the query (-Q) option to transfer thetwo files to separate disks where they may then berenamed back.
--52--
Section
command:
purpose:
usage:
4.10
RUN
This command transfers control to anaddress in memory
RUN [hex-address]
arguments:
Description
an optional hexadecimal address
The RUN command immediately causes OS/A+ to perform ajump to the indicated address (or to the addresscontained in the OS/A+ RUNLOC, if no address is given).The hex-address, if present, must consist of 3 or 4hexadecimal digits.
The address in RUNLOC is set any time an extrinsiccommand is issued or a program is loaded using the LOADcommand. Therefore, the RUN command may be used toreenter a program such as BASIC after leaving theprogram through a DOS command.
IMPORTANT NOTE:
Most standard OS/A+ interactive system programs willset RUNLOC to point to their warmstart entry point.Thus, for example, if the user returns to DOS in orderto perform an INTRINSIC command, he/she may reenter thesystems program by simply typing RUN. At the currentwriting, BASIC A+ and MAC/65 (for example) both followthis protocol: simply type RUN from CP to reenter attheir warmstart points.
--53--

Section
command:
purpose:
usage:
4.11
SAVe
Save a portion of memory to a disk file
SAVE file-spec start-address end-address
arguments:
Description
a file specifiera hexadecimal starting addressa hexadecimal ending address
The SAVE command allows the user to write portions ofmemory to disk files in standard binary file format.The two addresses define the portion of memory to bewritten to disk; the second address must be greaterthan or equal to the first. A file which has been'saved' may be later returned to memory using the LOADcommand.
Example:
At the time of this writing, the BASIC A+ user with anAtari computer having 48K Bytes of RAM could patch thedistribution copy of BASIC A+ and save the new patchedversion to disk via
SAVE NEWBASIC.COM 8400 BC00
(PLEASE verify these addresses in your BASIC A+ manual;they ARE subject to change.)
--54--

Section
command:
purpose:
usage:
4.12
SCReen
Cause batch commands to be echoed to thescreen
SCR
arguments:
Description
none
The SCR command causesbatch execution to becommand may be used tocommands.
commands encountered duringechoed to the screen. The NOSturn off the echo of batch
This command only effects commands encountered in batchmode.
--55--

Section
command:
purpose:
usage:
4.13
TYPe
This command types an ascii or atasciifile to the screen or another file
TYP [Dn:]file-name [output-file]
arguments:
Description
filename - the name of any text file.output-file an optional output file.
The TYPe command allows the user to copy text files tothe screen or another file. If the optional outputfile is not specified, the text file indicated will becopied to the screen. For example, to view thecommands in the STARTUP.EXC file on your ass masterdiskette, issue the command
TYP STARTUP.EXC
If the optional output fi.le is specified, the text filewill be copied to the output file. For example, tocopy the STARTUP.EXC file to the printer, issue thecommand
TYP STARTUP.EXC P:
The TYPe command may also be used to copy text filesfrom one disk file to another by using a disk file nameas the output file.
--56--

Section
command:
purpose:
usage:
4.14
UNProtect
This command removes the protectioncaused by the PRO command
UNP [Dn:]file-name
arguments:
Description
a file specifier
The UNP command allows the user to remove the writeprotection caused by the PRO command so that files mayagain be erased, renamed, or written to. All filesmatching the file-specifier on the specified drive (orthe current default drive, if Dn: is omitted) will beaffected. These files will no longer be shown with apreceding asterisk when the DIR command is used.
--57--
CHAPTER 5: EXTRINSIC OS/A+ COMMANDS
The extrinsic commands are programs that are run byOS/A+. Any binary file containing the .COM extensionmay be used as an OS/A+ extrinsic commano. The OS/A+COpy command is one such extrinsic command. If youperform the OS/A+ DIRECTORY command on the masterdiskette, you will see a file named COPY.COM. Theprogram in the COPY.COM file is what is executeo whenthe COpy command is typed.
Remember, extrinsic commands are external to theoperating system. Whenever an extrinsic commann isexecuted from OS/A+, the system MUST go looking on thediskette for a .COM file associated with the particularextrinsic command issued and load that file into thesystem. For example, when the extrinsic command DUPDSKis executed the system will go looking on the diskettein drive 1 for a file call DUPDSK.COM. If thecommand's .COM file is not on the diskette the systemwill return a FILE NOT FOUND error. So remember:whenever you issue an extrinsic command to the systemits .COM file must be on the diskette for the commandto execute properly.
Whenever the user types a command to OS/A+, the command(first three characters only) is compared to theintrinsic command list. If the command is not in theintrinsic list, it is assumeo to be extrinsic. Aconsequence of this is that no extrinsic commandprogram may start with three characters which match anyof the intrinsic commands. For example, a programnamed "PROCESS3.COM" could not be call by simply typing"PROCESS3" , since OS/A+ would view that as theintrinsic command "PROtect". Solutions:
(1) Rename the extrinsic command file.(2) Type the commands:
LOAD PROCESS3.COM [RETURN]RUN [RETURN]
--58--

To process an extrinsic command, OS/A+ will:
1) Prefix the command with the default device (ifa device is not specified).
2) Attach the .COM extension to the command.3) Open the generated file spec for input.4) Test file for program of proper LOAD file format.5) Load and execute the program.
NOTE: (i) If any element of the procedure fails,various error messages will result.
(ii) Step 1 of the procedure implies that a devicemay be specified. This is in fact the case.
Never explicitly specify the .COM extension as part ofthe command. The command COPY.COM will result in afile spec of Dl:COPY.COM.COM, which is invalid.
Some extrinsic commands (such as COPY) are supplied byOSS. The number of possible extrinsic commands is not,however, limited to these few; commands may be writtenby the user to perform virtually any function. If youare intrested in writing your own extrinsic commands,see Chapter 8.
If an extrinsic command (i.e., a program running inRAM) has control, the program may generally be rerun orreentered by simply using the RUN command withoutparameters. Execptions to this rule are the extrinsiccommands COPY, COPY24, SDCOPY and CONFIG.
This chapter gives a description of each extrinsiccommand supplied as a standard part of an OS/A+ systemmaster diskette (except that some commands may bespecific to particular versions or packages).
--59--

Section 5.1
command:
purpose:
users:
usage:
arguments:
options:
Description
ADOS
This command allows access to version 2and version 4 files at the same time
Atari version 4 users only
ADOS
none
none
This program installs OS/A+ version 2 along withversion 4. This allows the user to access version 4disks as On: while accessing version 2 disks as An:.The usage of this command does require more memory forthe DOS, so the low memory pointer (LOMEM, $2E7) willbe moved up accordingly. In order to restore thesystem to its former state (i.e., version 4 only),press the system reset key.
After using ADOS to install the version 2 file system,you may use COPY24 to copy version 2 files to version 4diskettes, or vice versa.
WARNING: The DUPDSK and INIT commands must not be usedwhile the ADOS command is in effect! This will resultin a system crash.
WARNING: If the CONFIG command is issued while ADOS isinstalled, the ADOS command must again be issued.
--60--

Section 5.2
command:
purpose:
users:
usage:
arguments:
options:
Description
BASIC
This command loads and executes theBASIC A+ language
BASIC A+ disk owners only
BASIC [Dn:][file-name]
optionally, the name of a savedBASIC A+ program
none
This command loads and executes the file BASIC.COM,which is the BASIC A+ language. If the optional filename is specified, BASIC A+ will automatically load andexecute that file.
NOTE: The file must have previously been 'SAVE'd fromBASIC A+. Refer to the BASIC A+ manual for informationspecific to the language.
*** FOR MORE INFORMATION, SEE YOUR BASIC A+ MANUAL ***
--61--

Section 5.3
command:
purpose:
users:
usage:
arguments:
C65
this command loads and executes the OSSC/65 compiler
C/65 owners only
C65 source-file destination-file [-TJ
two file specifiers
option:
Description:
-T include C/65 source Text inassembler output
This command loads and executes the file C65.COM, theOSS small-C compilier. Two filenames are required.The first file given must be the name of a text filecontaining C/65 source code and statements. The secondfile specified will be created (or reused, if italready exists), and the compiler will writeMAC/65-compatible assembly language to it.
Option
If the -T option is specified, the MAC/65 file willcontain the user's C/65 text lines. Each source lineprecedes the assembly code it generates, if any.
*** FOR MORE INFORMATION, SEE YOUR C/65 MANUAL ***
--62--

Section 5.4
command:
purpose:
users:
usage:
arguments:
options:
Description:
CLRDSK
To initialize a diskette like the Atari810 disk drive does.
Non-Atari disk drive users with OS/A+Version 2
CLRDSK
none
none
This utility is only supplied with OS/A+ Version 2 fornon-Atari disk drives. It is used to force yournon-Atari disk drive to initialize a diskette justlike the Atari 810 disk drive does. Hopefully anyprogram that does not work with a diskette initializedin your non-Atari disk drive will work after youinitialize the diskette using the CLRDSK utility.
NOTE: CLRDSK formats the diskette first, then writeszeroes to all sectors execpt the directory, boot andVTOC sectors.
--63--

Section 5.5
command:
purpose:
users:
usage:
arguments:
CONFIG
Allows the user to change the status ofa configurable drive
OS/A+ users with configurable drives
CONFIG [parmI parm2 ... J [-NJ
an optional list of paramaters whichdefine the desired status of drives inthe system
options:
Description
-N no drive configuration tablewill be displayed
If no parameters are given, this command simply reportsthe status of all drives currently attached to theAtari computer.
If one or more parameters are given, they are presumedto be requests to configurable disk drives to configurethemselves. A parameter consists of a single numericdigit (in the range of 1 to 8) followed by one or twoalpha characters (the "Mode"). The digit is presumedto be a disk drive number (corresponding to Dl: throughD8:). The legal character combinations usable as Modesare as follows:
Mode Meaning
S Configure this drive as a Single density,single sided drive.
D Configure this drive as a Double density,single sided drive.
DD Configure this drive as a Double density,Double sided drive.
Options
Normally, the CONFIG command will list out the currentdrive configuration. Using the -N option will causethis table to be omitted.
--64--
Section 5.5
Example:
(CONFIG Continued)
CONFIG 10 200requests that 01: be configured as doubledensity, single sided, while 02: willbecome double density, double sided.
NOTES:
If a configuration request is made, the file managersystem is reinitialized and the system status isreported, as if the command CONFIG with no parametershad been given.
If a configuration request is invalid (e.g., if thedrive is not capable of being configured via software),the command will report an error.
WARNING: The CONFIG command should be issued BEFORE theADOS command. If CONFIG is used while ADOS isis installed, the ADOS command MUST be repeated.
--65--

Section 5.6
command:
purpose:
usage:
arguments:
COpy
This program copies files. Note thecautions listed below.
COpy source-file destination-file [-FQSWJor
COpy file [-FQSW]
one or two file specifiers
options:
Description
-F-Q-S-W
force overwrite of existing filequery before each file transfersingle disk copywait for user response beforecopying
The copy program copies one or more files withoutchanging the source file. In the first form, all filesmatching the source-file specifier would be copied toriles indicated by the destination specifier, which maybe on the same or a different disk. In the secondform, the files indicated by the file name would becopied to files having the same name on the same drive.This enables the copying of files on a single disksystem. The source and destination file specifiersshould be of one of the following forms:
1) [Dn:]file-name2) Dn:
In form 1, the drive specifier (Dn:) is optional; thecurrent default drive will be assumed if no drivespecifier is given. In the second form, all files fromthe indicated drive would be copied to or from anotherdisk.
Options
The -F option causes the program to overwrite anexisting file if it has the same name as a destinationfile to be copied. If this option is not specified,files whose destination names already exist will not becopied.
--66--

Section 5.6 (COPY continued)
The -Q option causes the program to ask the userwhether to copy each file.
The -5 option indicates to the program that it mustperform the copy on a single drive. Copy will promptthe user to insert source and destination disks at theproper time.
The -W option indicates that the program must wait forthe user to insert the proper disks before initiatingthe copy.
CAUTION:
Do NOT use COpy in conjuction with the ADOS command tocopy FROM version 2 diskettes TO version 4 diskettes.Instead, use the COPY24 command utility found on yourVersion 4 Master Diskette.
Examples:COpy *.*
will copy all files on the current disk on thecurrent drive to another disk on the samedrive. The system will prompt the user whenthe diskette needs to be swapped. Generally,DUPDSK is a more effective and faster means ofperforming this function.
COpy *.COM D3: -Fwill copy all files having an extension of".COM" from the current disk drive to drive 3(which could be the same as the current drive;caution) . If the fi t e (s) already exist ondrive 3, they will be erased and rewritten.
COpy D2:C*.* DI: -Qwill ask the user if he wants to copy each filestarting with the letter "CD from drive 2 todrive 1-
COPY DI:TEST D2:NEWTESTwill copy the file TEST on drive 1 to the fileNEWTEST on drive 2.
COpy DI:TEST DI:NEWTEST -Swill perform a single disk copy of TEST toNEWTEST.
--67--

Section 5.7
command:
purpose:
users:
usage:
arguments:
COPY24
transfer files from version 2 toversion 4 diskettes (and vice versa)
Atari owners with OS/A+ version 4 only
COPY24 source-file destination-file [-POWD
source and destination file specifiers
options:
Description:
-P-0-W-D
force overwrite of existing filesquery before each file copywait for response before copyingthe version 2 disk (whether sourceor destination) is a Double Densitydisk
The COPY24 command allows users to transfer filesbetween the version 2 (or Atari DOS) and version 4 filesystems. In order to use this utility, the disk drivesmust have already been places into the proper modeusing the CONPIG command (single drive users ignorethis step). Then the ADOS command must be issued toallow OS/A+ to access version 2 diskettes. At thispoint, the COPY24 command may be issued.
In order to specify the direction of file transfer, thefile specifier of the version 2 files should be of theform An:filename, while the version 4 specifier shouldbe of the form Dn:filename. If the source drive is thesame as the destination drive, COPY24 will prompt forthe user to swap disks as necessary.
Options:
The "-p". "-0", and "-w" options function exactly asthey do in the COPY command (see the preceding sectionon the COpy command).
The "-D" option may be used when it is desired tospecify that the Version 2 diskette was formatted andwritten as a double density diskette (whether by OS/A+version 2 or by Atari DOS 2.0 patched to enable doubledensity).
--68--

Section 5.7 (COPY24 contd.)
Examples:
The commandCOPY24 A2:*.* 01:
would copy all files on the version 2 disk in drive twoonto a version 4 diskette in drive one.
The comandCOPY24 Al:TEST Ol:NEWTEST
would copy the file TEST from a single density versiontwo diskette to the file NEWTEST on a version 4diskette. COPY24 would automatically switch the diskdrive unit from single density to double density asneeded during the copy process.
The commandCOPY24 Al:TEST
would function exactly as thethat the version 2 diskette into be double density by the -0
--69--
Ol:NEWTEST -0previous example, exceptthis case is specifiedoption.

Section 5.8
command:
purpose:
usage:
arguments:
options:
Description
DO
This command allows the user to performseveral operations with one command line
DO command[;command;command ... ]or
DO
optionally, a list of commands separatedby semi-colons
none
This DO command allows the user to issue severalccrnmands on one line. These commands are notrestricted to OS/A+ intrinsic and extrinsic commands.however. For example, the following DO command wouldload the BASIC language, enter a previously 'list'edprogram, and run the program:
DO BASIC;ENTER "D:PROGRAM";RUN
In the second form of the DO command, the DO programwill prcrnpt the user for a list of commands, one at atime, saving these away for use. The entry of just acarriage return when prompted for a command will causethe entire list of commands to be executed.
The DO command may also be used to run a BASIC programupon booting the system (similar to the AUTORUN.SYSfunction of Atari DOS) by placing a DO command withinthe STARTUP.EXC file (see chapter 6 on batchprocessing). For example, placing the following withinthe STARTUP.EXC file will cause the BASIC program"MENU" to be run upon booting the system:
DO CAR;RUN "Dl:MENU"
--70--

Section 5.9
command:
purpose:
users:
usage:
arguments:
options:
Description
DUPDBL
This program provides fast copying ofentire double density diskettes
ONLY Atari owners using version 2 OS/A+AND ONLY those using double density disks
DUPDBL
none
none
The DUPDBL program will prompt the user for source anddestination drives, and will ask whether to format thedestination disk. The entire source disk will then becopied to the destination disk in a manner somewhatfaster than the copy utility would provide. The twodisks, however, MUST be double density OS/A+ diskettesformatted under version 2 of OS/A+ (or Atari DOS 2.0Sas patched for double density). IF the destinationdrive is the same as the source drive, the program willprompt the user to swap disks during the duplicationprocess.
--71--
Section
command:
purpose:
users:
usage:
5.10
DUPDSK
This program provides fast copying ofentire floppy disks of the same size andtype
Atari owners: all versions and diskettesEXCEPT double density disksunder version 2 OS/A+
DUPDSK
arguments:
options:
Description
none
none
The DUPDSK program will prompt the user for source anddestination drives, and will ask whether to format thedestination disk. The entire source disk will then becopied to the destination disk in a manner somewhatfaster than the copy utility would provide. The twodisks, however, must be of the same size and type. Ifthe destination drive is the same as the source drive,the program will prompt the user to swap disks duringthe duplication process.
CAUTION: Do NOT attempt to use DUPDSK to duplicatedouble density diskettes under version 2 of OS/A+.Unpredictable and disastrous results may occurl DO useDUPDBL (see previous section) for this purpose.
--72--

Section 5.11
command:
purpose:
usage:
arguments:
options:
Description
HELP
This program provides a MENU of systemcommands to help the beginning user.
HELP
none
none
are numbered from 1 to 9. Totype a digit from 1 to 9,(Any invalid choice will exit
Although we firmly believe that the command system ofthe OS/A+ Console Processor (CP) is superior to a menuapproach, we can readily understand how the wealth offlexibility offered may overwhelm the new user.Therefore, we have provided this HELP command whichprovides menu access to the most frequently used systemcommands ,
To use the menu, simply type HELP (followed by aRETURN) any time the CP system prompt appears (usuallyDl:, followed by the cursor).
The available optionschoose an option, simplyfollowed by a RETURN.the menu, back to OS/A+.)
Note that each of these options (except number 9) areexactly equivalent to an OS/A+ CP command. In the listwhich follows, the menu option is followed by its OS/A+equivalent and a short description of its effect.
2.
CAR
COPY
Runs any cartridge plugged into theleft cartridge slot. Always does a"cold start" of the cartridge.
Allows the user to specify two filenames.Will copy a file from the "FROM" file tothe "TO" file. use of ambiguous(wild card) names. Use "*" and "?" infilenames with caution.]
--73--

3.
4.
5.
6.
DIR
COPY
ERA
PRO
Allows the user to specify a filename(including an ambiguous filename with"*" or "?") and then lists all filesWhich match the given name. If justRETURN is given instean of a filename,will list all files on the "current"nisk drive. [See section 2.2 for infoon how to change the "current" disk.]
"Duplicate a File". Special access intothe COPY utility to copy a single fileusing a single disk drive. Not asfast as option 2, but for use on systemswith only one nisk drive.
Allows the user to specify a filename.Erases the named file if it is on thecurrent disk and if it is not protecten.
Allows the user to specify a filename.Sets the system status for the namedfile to "Protected" if the file exists.[Protected files cannot be ERAsed orwritten to. J
7. REN Allows the user toand a TO filename.file (if it existsto the TO filenamealready exist) .
specify a FROM nameRENames the FROMand is not protected)(if it does not
8.
9.
UNP Allows the user to specify a filename.Resets the system "protected" statusfor the named file if it exists.
Exit to OS/A+. An unnecessary option,actually, since a simple RETURN willexi t also.
--74--
Section 5.12
command:
purpose:
usage:
arguments:
options:
Description
INIT
This program initializes floppy disksso that they may be read fromor written to
INIT
none
none
The INIT utility allows the user to format a floppydisk so that it may be read or written by programs.Under version 2, the user will be prompted forinformation on exactly how to initialize the disk(i.e., with or without a system file, etc.). Underversion 4, a system file, DOS.SYS, is not written bythe init program. In either case, the program willprompt for a drive to init. When the initializationprocess is complete, the floppy disk may now be used tostore data. Under OS/A+ version 4, use COpy or DUPDSKto transfer a DOS.SYS file to the new disk, if desired.
--75--

Section
command:
purpose:
users:
usage
5.13
INITDBL
This utility is used to initialize adouble density diskette so that they canbe read from and written to in doubledensity.
OS/A+ version 2 users with a singlenon-Atari disk drive.
INITDBL
arguments:
options:
Description:
none
none
NOTE: The INITDBL utility is unnecessary for users withmore than one disk drive. Instead, just use thestandard INIT utility (see section 5.12).
The utility INITDBL is to be used on a one drive systemto initialize a double density diskette and writeDOS. SYS to it.
To use this utility, boot the master diskette. Typethe INITDBL command, and answer the prompt with thenumber 1. Before you type [RETURN], replace the masterdiskette with your new unformatted double densitydiskette. When the INITDBL utility is finished thedisk drive with still be configured single density. Toget a directory of your new double density diskette,CONFIGure the disk drive to double density and type theDIR command.
--76--

Section
command:
purpose:
users:
usage:
5.14
MAC65
Loads and executes the MAC/65 macroassembler
MAC/65 disk owners only
MAC65 [filel [file2 [file3 J ] [-A][-D] ]
arguments: an optional set of one to three filename,construed to be the source, listing, andobject files (respectively) of a MAC/65assembly.
options:
Description:
-A-D
source file is Asciiassembly must be Disk-to-Disk
This command loads and executes the file MAC65.COM, theass Macro Assembler/Editor. If no filenames are given,MAC/65 will be invoked in its interactive (Editor)mode. Programs or text may then be edited and/orassembled. See the MAc/65 manual for further details.
If one or more files are specified, MAC/65 will beinvoked in its "batch" mode. That is, it will performa single assembly and then return to OS/A+. Generally,this command line will perform the assembly in a mannerequivalent to giving the "ASM" command from the MAC/65Editor. That is, if only one filename is given, it isassumed to be the source file, implying that thelisting will go to the screen and the object code willbe placed in memory (but only if requested by the .OPTOBJ directive). If a second filename is given, it isassumed to be the name of the listing file. Only ifall three filenames are given will the object code bedirected to the file specified.
NOTE: if an assembly needs no listing but does need anobject file, the user may specify E: as the listingfile, thus sending the listing to the screen.
--77--
Section 5.14 (MAC65 continued)
Options
The -A option is used to specify that the source fileis not a standard MAC/65 SAVEd file but is instead anAscii (or Atascii) file. This is equivalent to usingthe interactive Editor mode of MAC/65 to use thesequence of commands "ENTER#D ... " and" ASM , ... ".
The -D option is used to specify that the assembly MUSTproceed from disk to disk. If this option is notgiven, the source file is LOADed (or ENTERed) beforethe assembly, and then the assembly proceeds with thesource in memory (generally producing improved speed ofassembly). If, however, the source file is too largeto be assembled in memory, the user may use this optionto allow assembly of even very large programs. (Andremember, even if the source fits, the macro and symboltables must reside in memory during assembly also.)
NOTE: the -D option can NOT be used in conjunction withthe -A option. The source file assembled under the -Doption MUST be a properly SAVEd (tokenized) file.
*** FOR MORE INFORMATION, SEE YOUR MAC/65 MANUAL ***
--78--

Section 5.15
command:
purpose:
users:
usage:
arguments:
options:
Description:
RS232
installs the serial device handlers("Rn: ") for use with the Atari 850Interface Module.
Atari users with 850 Modules
RS232
none
none
Using the command RS232 from OS/A+ is functionallyequivalent to using Atari's AUTORUN.SYS file (whichboots the R: handlers at power on time under AtariDOS). The driver for the various RS232 functions isloaded at LOMEM, LOMEM is moved, and the R: device ishooked into the handler table.
After giving the RS232 command, if the Dn: promptreappears BELOW the line containing the "RS232"command, the Interface Module has loaded its softwareproperly. If, however, the screen clears and the Dn:prompt appears at the TOP of the screen, something wentwrong during the loading process. Unfortunately, thesoftware in the Interface Module does not return ausable error code, preferring instead to do a systemwarmstart (hence the cleared screen).
CAUTION: due to a bug in the software in the 850Interface Module, hitting RESET will destroy the properLOMEM pointer, effectively ignoring the space occupiedby the RS232 handlers.
CAUTION: the 850 Interface Module is sometimes toointelligent for its own good. In particular, onecannot generally reload the software from the modulewithout turning the module off and back on again.
--79--

Section
command:
purpose:
users:
usage:
5.16
SDCOPY
This program is used to copy singledensity files to double density files.
Atari owners using OS/A+ version 2 only.
SDCOPY source-file destination-file [-FQR
arguments: one or two file specifers
options:
Description:
-F-Q-R-v
force overwrite of existing filequery before each file transferreverse orientation of copyverbose
The utility SDCOPY is for OS/A+ Version 2 owners withnon-Atari disk drives only. The purpose of thisutility is to copy a single density source file to adouble density destination file. This utility worksthe same way as the COpy utility execpt for the -Roption.
The -R option is used to reverse the orientation of thecopy. That is instead of copying from a single densitysource file to a double density destination, theorientation is reversed and the copy goes from a doubledensity source file to a single density destinationfile.
NOTE: the SDCOPY utility can only be used with one diskdrive. If you want to copy from single density todouble density between two different drives, just usethe CONFIG command to set the drives up properly anduse the normal COPY utility.
--8f1J--

Chapter 6 Batch Processing
6.1 An Overview of Batch processing
You may often find yourself repeating the same group ofcommands over and over. OS/A+ allows you to put thesecommands into a file with special capabilities.Thisfile may be used by typing a single command which willcause all the commands in that file to be executed.This can save quite a bit of your time and energy sinceyou won't constantly be typing the same string ofcommands.
Let's suppose that you wrote a setthat had to be run in sequence.two ways:
of BASIC programsYou could do this in
1. Issue the CP extrinsic BASIC command (thusexecuting BASIC.COM), then from BASIC runeach program one at a time. If the runningtime of the BASIC programs was very long youmight sit at the key board for hours just totype RUN every once in awhile.
OR
2. Create a BATCH file containing the OS/A+commands required to run the BASIC programs.You would then enter one command that wouldfree you from the keyboard for more important(or fun) things.
The second method is obviously preferable as it isquicker and can be repeated easily.
Any text file with the filename extension .EXC can beused as an OS/A+ batch execute file. The execution ofthe file is invoked much like the extrinsic commands,except the command is preceeded with a commercial "at"symbol ("@"). To execute the EXECUTE file DEMO.EXC onthe Dl: default device, type:
Dl :@DEMO
CP will open the file spec Dl:DEMO.EXC for input andthen set up OS/A+ to read it line by line executing theCP commands just as if they were being entered from thekeyboard.
--81--

6.2 .EXC File Format
An execute file is simply a text file. Each line ofthis text file will become a CP command when executed.
The three basic rules of the text file lines are:1) they must contain valid OS/A+ Console Processor
commands2) they must be shorter than 128 characters in
length3) they must end in a carriage return
(ATASCII $9B).
OS/A+ allows the commands inpreceeded by numbers and blanks.the command lines to be numbereddocument their purposes.
an execute file to beThis feature allowsfor readability and to
The command file lines: LOAD OBJ.TEST <return>and
100 LOAD OBJ.TEST <return>
are the same to OS/A+ OS/A+ scans the line for thefirst non- numeric, non-blank character before startingto scan the command word. Virtually any text editor,including the editor of MAC/65, can be used to createand modify execute files.
NOTE: One may also create an execute file (or, for thatmatter, any text file) by using "TYP E: <diskfile>".(TYPE will clear the screen, at which time you simplytype in your text, line by line. You terminate thecopy by pressing CTRL-3 on the Atari, the end of filesignal for the E: device.)
6.3 Intrinsic Commands for .EXC Files
OS/A+ has four special intrinsic commands designed foruse exclusively with execute files. These commandsare:
REMARKSCREEN
NOSCREEN
END
Remark or comment (does nothing)Turn on Echo of execute filecommand lines to the screen.(Default mode)Turn off Echo of execute filecommand linesStop executing the execute fileand return OS/A+ to keyboardentry mode (the cpl.
--82--

See the section on intrinsic commands for a moredetailed explanation of these commands.
6.4 Stopping Batch Files
an execute file is being processed, variousconditions occur which will warrant a halt in thebatch execution. These conditions may occur because ofsystem-detected errors or because of a user programdetecting a condition it considers hazardous to thesystem's health.
6.4.1 Stops by OS/A+
Humans are not quite perfect in the eyes of computersand sometimes make mistakes. OS/A+ commands specifiedin error will generate error messages. If OS/A+discovers an error while executing an EXECUTE file, itwill print the error message as usual and STOPexecuting the EXECUTE file. Note that this error stoponly occurs if the error is found by OS/A+, not justbecause a program generates an error.
Execution of an execute file will also stop after theCARTRIDGE commmand is executed.
6.4.2 Stops by User Programs
It is sometimes desirable for a program in a chain ofexecuting programs to stop the execute process. Theusual reason for this is that the program has detectedan error severe enough to invalidate the processesperformed by the following program(s). The continuedexecution of the execute files is provided for by asingle byte flag within OS/A+. If a program sets thisbyte to zero, then upon returning to OS/A+ (DOS or CPBASIC statements) the execute file execution willimmediately stop. The execute flag is located 12 bytesfrom the start of OS/A+, which is pointed to by memorylocation 10 ($0A). The following Basic program segmentwill turn off the execute file and return to OS/A+.
1000101010201030
CPADR = PEEK(11)*256 + PEEK (10)EXCFLG = CPADR + 12POKE EXCFLG,0DOS
--83--

6.5 STARTUP.EXC: A Special File
The execute filename STARTUP.EXC has special meaningsin the OS/A+ system. When the system is first booted(power up), OS/A+ will search the directory of thebooted disk volume for a file named STARTUP. EXC. IfSTARTUP.EXC is on the booted volume, OS/A+ will executethat file before requesting keyboard commands.
--84--

CHAPTER 7
GETTING STARTED WITH OS/A+ and Atari BASIC
Now we are really ready to start explaining some of theOS/A+ capabilities. But first, let's get the hardwareset up right and things put in their proper places.Right off, put the master diskette in a safe place,take the copied master diskette and put that in drive1, put your BASIC cartridge in the left cartridge slot,and turn the power ON again.
Since you sucessfully made a copy of the master disk,we'll assume that the system booted properly (if itdidn't, try everything again with a new blank diskettebefore calling us).
Now, though, when the system finally presents you withthe HELP menu, you can use selection 1, "enterCARtridge". If you do so, you should see BASIC'sfamiliar READY prompt, and all is well. (Incidentally,you could also have used selection 9 to go to the CPcommand level and then issued the CAR command. More onthis soon.)
Suppose, though, that you wanted to return to the CPcommand level. Why do that? Well from the CP you canlist all files on a diskette via DIRectory, RENamefiles, PROtect files and so on, without losing anyBASIC program that you might have already typed in.
In fact any of the intrinsic commands (found in chapter4 of the OS/A+ manual) may be used from the CP withoutharming even a line of what you may have typed in whilein BASIC. To get back to your program just type CAR.You will be back in BASIC, and any program you in isstill there.
So, from the Dl: prompt in OS/A+, CAR will put you inBASIC (make sure the cartridge is there first). Niceand neat. But how do we get from BASIC to the CP?Simple: From the READY prompt in BASIC, the DOS commandwill put you back in the as, where you can do anyintrinsic commands without losing any of the BASICstatements you might have already typed in.
The following sections describe the most common BASICcommands and statements which affect files on the disk.Please note that these commands should be issued whileusing the BASIC cartridge, or ass BASIC. That isthese commands should be typed immediately after theREADY prompt.
--85--

Section 7.1
command:
purpose:
users:
usage
argument:
description:
CLOSE
This command disassociates thenumber (channel) and file whichassociated by a previousstatement.
Atari BASIC users with OS/A+
CLOSE #fn
fn - file number 1-7
filewereOPEN
After CLOSEing a file number, the user may no longerperform I/O (e.g, via PRINT, INPUT, etc.) on the fileWhich had been associated with that channel.
NOTE: a file OPENed for any form of output (modes B,9,or 12) should ALWAYS be closed before the diskettecontaining it is removed or changed. The most commoncause of crashed Atari Diskettes is failure to observethis rule.
NOTE: Atari BASIC does NOT consider it an error toCLOSE a channel that is not OPEN, so it is often goodpractice to end a program segment by a line such as thefollowing:
999 FOR I=l TO 7 : CLOSE #I : NEXT I
NOTE: both the END and RUN statements close all files(except file #0, the keyboard/screen), and can be usedto advantage for this purpose when desired.
--B6--

Section 7.2
command: ENTER
purpose: This command isBASIC programthe disk.
used to retrieve athat has been LISTed to
users:
usage:
argument:
description:
Atari BASIC users with OS/A+
ENTER filespec
filespec - the name of the file you aregoing to ENTER.
The ENTER command is used to retrieve a BASIC programthat has been LISTed to the disk. As the program isbeing ENTERed into BASIC's user area, each line will bechecked for proper syntax and converted into theinternal (tokenized) form used by BASIC.
If a syntax error is encountered, the offending linewill be listed with the suspected error location ininverse video.
NOTE: The line with the error will, nevertheless, beplaced in program memory. In such a case, your programmust be corrected before you can RUN it.
CAUTION: ENTER does NOT clear the user memory space.Therefore, if you wish to ENTER a new program, use NEWfirst. (Actually, this can be a handy feature when youwish to merge two programs together.)
EXAMPLE10 PRINT "THIS IS PROGRAM 1"LIST "D:PROGl"10 PRINT "THIS IS PROGRAM 2"LIST "D:PROG2"NEWENTER "D:PROGl"LIST[and the computer will LIST the following:
10 PRINT "THIS IS PROGRAM 1" ]NTh'ENTER "D:PROG2"RUN[and the computer will respond with:
THIS IS PROGRAM 2 ]
--87--
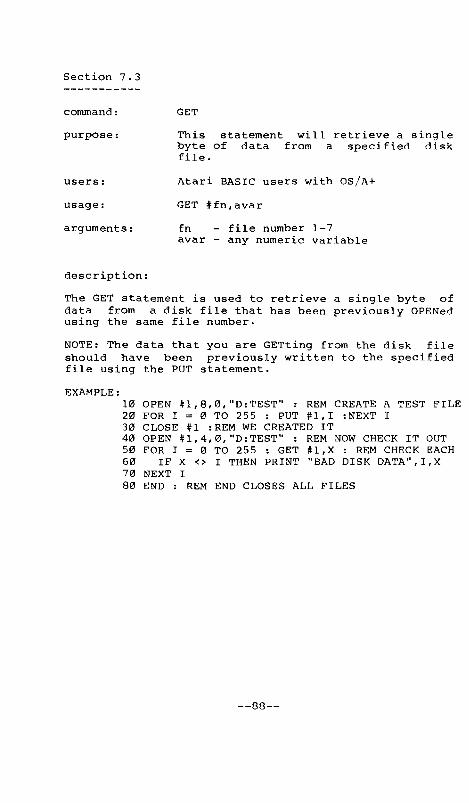
Section 7.3
command:
purpose:
users:
usage:
arguments:
description:
GET
This statement will retrieve a singlebyte of data from a specified diskfile.
Atari BASIC users with OSjA+
GET #fn,avar
fn - file number 1-7avar - any numeric variable
The GET statement is used to retrieve a single byte ofdata from a disk file that has been previously OPENedusing the same file number.
NOTE: The data that you are GETting from the disk fileshould have been previously written to the specifiedfile using the PUT statement.
EXAMPLE:1020304050607080
OPEN #1,8,11l,"D:TEST" : REM CREATE A TEST FILEFOR I = 0 TO 255 : PUT #1,1 :NEXT ICLOSE #1 :REM WE CREATED ITOPEN #1,4,0,"D:TEST" : REM NOW CHECK IT OUTFOR I = 0 TO 255 : GET #l,X : REM CHECK EACHIF X <> I THEN PRINT "BAD DISK DATA",I,X
NEXT IEND : REM END CLOSES ALL FILES
--88--
Section 7.4
command:
purpose:
INPUT
This command is usedfrom the specifiedkeyboard) .
to request datafile number (or
users:
usage:
arguments:
description:
Atari BASIC users with OS/A+
INPUT f#fn,} var f,var ..• }
fn - file number 1-7var - either numeric or string
When the INPUT statement is used without the fn option,data will be requested from the keyboard. You willnotice a "?" appearing on the screen prompting you forthe keyboard input. See your Atari BASIC ReferenceManual for more details.
When the file number (#fn) argument is used, data willcome in the form of ATASCII lines from the file thathas been previously successfully OPENed using the samefile number. Otherwise, the action of INPUT isvirtually identical to the action when INPUTing datafrom the keyboard. That is, a string input isterminated by an ATASCII RETURN character and a numericinput by either the RETURN or a comma within a line.
NOTE: The INPUT statement cannot (generally) read aline that is longer the 127 characters in length. Ifyou PRINT a line to the disk that you will later wantto INPUT, it is best to limit the size of the PRINTedline to 127 characters or less.
--89--

EXAMPLE10 DIM LlNE$(15)20 OPEN #1,8,0, "Dl:INPUT.SMP" : REM CREATE A FIL30 FOR I = 1 TO 2040 PRINT #1: "THIS IS LINE #":I : REM WRITE THE D50 NEXT I60 CLOSE #1 : REM CLOSE THE FILE YOU JUST CREATE70 OPEN #1,4,0, "Dl:INPUT.SMP" : OPEN FOR READ ON80 FOR I = 1 TO 2090 INPUT #1,LINE$ : REM GET THE FIRST LINE100 IF LlNE$(15) <> STR$(I) THEN GOTO 500110 PRINT LINE$120 NEXT I130 CLOSE #1 : REM CLOSE THE FILE140 PRINT "SUCESSFUL USE OF THE INPUT STMT"150 STOP500 REM WE GET HERE FROM LINE 100510 PRINT "UNSUCCESSFUL USE OF INPUT"520 END : REM ANOTHER WAY TO CLOSE THE FILE
--90--

Section 7.5
command:
purpose:
users:
usage:
arguments:
description
LIST
This command will LIST the programcurrently in memory to the screen (orto the file specified).
Atari BASIC users
LIST [filespec]LIST [filespec,] linenol [,lineno2]
filespec - the name of the file you aregoing to LIST to the disk.
linenol - beginning line numberlineno2 - ending line number
The LIST command is probably one of the most commonlyused commands in BASIC. Most people know that the LISTcommand, when given all by itself, will LIST theirprogram to the screen. Even when beginning and endingline numbers are given the results are predictable.
Now with OS/A+ the LIST command can do even more. Whenused with a filespec, the LIST command will LIST yourprogram to the disk instead of the screen. Thecontents of this file will contain text characters andcan take up a large amount of disk space if you have alarge program.
If you use the option where two line numbers are given,then only the lines from linenol to lineno2 (inclusive)will be LISTed to the filespec.
If you use the option where only onegiven, then ONLY that line willfilespec.
line number isbe LISTed to the
NOTE: The ability to LIST a range of lines to the diskprovides a convenient method of moving a subroutine(for example) to another program.
See also Section 7.2 on the ENTER command.
--91--

Section 7.6
command:
purpose:
users:
usage:
arguments:
description:
LOAD
This command will get a program thathas been SAVEd to the disk and put itin BASIC's memory.
Atari BASIC users with OS/A+ or DOS 2.0s
LOAD filespec
filespec - The name of the file youwish to LOAD.
LOAD iscanmand.SAVEd tobe done asprogram is
used in conjunction with the BASIC SAVEOnly programs which have been previouslydisk may be LOADed. No syntax checking willyour program is being LOADed. because thealready in internal format.
Generally. if you wish to keep a program on the disk.you SAVE it. Then. later. when you wish to look at it.modify it. or RUN it. you can LOAD it. BASIC does notremember the name that you use when you LOAD a program.so you can SAVE it again either under the same name (inwhich case the original version is lost) or underanother name.
Also. see the RUN command for an alternative method ofLOADing a program which will simply be RUN and notmodified.
EXAMPLE:10 PRINT "THIS IS PROGRAM 1"SAVE "D:PROGl"10 PRINT "THIS IS PROGRAM 2"SAVE "D:PROG2"LOAD "D: PROGl"LIST[and the computer will list the following:
10 PRINT "THIS IS PROGRAM 1" ]RUN "D:PROG2"[and the computer will respond with:
THIS IS PROGRAM 2 ]
--92--

Section 7.7
command:
purpose:
users:
usage:
arguments:
description:
OPEN
This command prepares a file for accessand assigns it a file number.
Atari Basic users with OS/A+
OPEN #fn,aexpl,aexp2,filespec
fn - file number 1-7aexpl - I/O mode
4 - input6 - directory access8 - output9 - append12 - input/output
aexp2 - device dependent value(usually 0)
filespec - a proper OS/A+ filename
The OPEN statement allows a diskfor that matter} to be linked(channel) for future reference ininput/output instructions (e.g.,CLOSE) .
COMMENTS on arguments:
file (or any device,to a file numberconnection with filePUT,GET,INPUT,PRINT,
The fn argument allows for a number between 1 and 7.The number 0 is reserved for the screen and can not beused in Atari BASIC (though it is allowed in BASIC A+).After a file has been OPENed with a given fn, allreferences to that file must be made using that samefn.
The aexpl argument allows the user to OPEN a file for aspecific "mode", according to the following table:
Mode 4: will OPEN the specified file for inputonly. Thus you can only retrieve datafrom the specified file.
--93--

Mode 6: allows you to access the directory onthe disk.
Mode 8: is the opposite of mode 4. That is,data can only be stored to the specifiedfile. See below for notes when usingmode 8.
Mode 9: is used to add data to the specifiedfile. The data that is added will beginat the current end of the specifiedfile.
Mode 12:is used toinput ANDstored andfile.
access the specified file foroutput. Thus data can beretrieved from the specified
NOTE: After OPENing a file, the specified file numberis used to designate the file in other I/O statements.Two OPENed files cannot have the same file number, butit is possible to OPEN the same file with two differentfile numbers. Generally, such a double OPEN will havedisastrous results. BEWARE:
NOTE: Ifspecifiedspecifiedspecifiednew fileyou.
a file is OPENed for output (aexpl=8) and thefile does not exist then a file with thename will be created for you. If the filealready exists, it will be destroyed and awith the specified name will be created for
NOTE: A file OPENedappended to underDOS. Excepting foropened in mode 9increased.
for update (aexpl=12) can NOT beversion 2 of OS/A+ or under Atariversion 4 OS/A+ files, only fileswill allow a file's size to be
NOTE: Modes 13 and 5 are also possible under version 4OS/A+. Their usage, however, is best left to advancedusers; refer to section 8.2.2 for more details ofextended meanings of aexpl and aexp2 under version 4.
NOTE: Mode 6 might, for example, be used from BASIC tofind what files are on a disk and thereby allow a menuselection. The following program will allow a menuselection of all BASIC SAVEd programs on drive 1,providing that the program names do NOT have anextension (i.e., the programs should not have beenSAVEd as "D:name.ext OO but simply as "D:name OO
) .
--94--

EXAMPLE:
100 OPEN #1,6,0,"0:*" : OIM LN$(40)110 FOR I = 1 TO 20 : INPUT #1, LN$120 IF LN$(2,2)=" " THEN PRINT I,LN$(3,10)130 CLOSE #1 : OPEN #1,6,0, "0:*"140 PRINT : PRINT "WHAT PROGRAM TO RUN ";150 INPUT J : IF J>=I THEN GOTO 140160 FOR I = 1 TO J : INPUT #I,LN$ : NEXT I170 CLOSE #1 : LN$ (1, 2) "0: "180 RUN LN$(I,10)
NEXT I
Try typing this in and then saying SAVE "D:MENU".Later, you can use the program by typing RUN "O:MENU".
--95--

Section 7.8
command:
purpose:
users:
usage:
arguments:
description:
This command puts the ASCII equivalentsof the given expressions to the filespecified or the screen.
Atari BASIC users with OS/A+
PRINT [#fn (;}] exp [(,}exp ... ] {,}
fn - file number 1-7exp - the expression can either be a
string enclosed in double quotes,a string variable, or a numericvariable.
When a file number is used with the PRINT command, thespecified variables are PRINTed to the disk file thathas been previouly OPENed using the same file number.
NOTE: Characters are PRINTed to a disk file in a manneridentical to the way characters are PRINTed to thescreen if the file number option is not used.
NOTE: A "," after the #fn causes tabbing before thefirst character is PRINTed. A ":" does not cause thetabbing. Normanlly, the semicolon should be used.
See also INPUT.
--96--

Section 7.9
command:
purpose:
users:
usage:
arguments:
description:
PUT
this statement is used to store asingle byte of data to a specified file
Atari BASIC users with OS/A+
PUT #fn,avar
fn - file number 1-7avar - an arithmetic varaible
The PUT statement is used to output a single byte ofdata to a specified file. The file number used in thePUT statement must be one that has been previously usedin the successful OPEN of a file.
NOTE: Data that has been stored in a file using the PUTstatement can usually only be retrieved using the GETstatement.
See also GET.
--97--

Section 7.10
command:
purpose:
users
usage:
arguments:
description
SAVE
This command will store a BASIC programon disk in internal format (notATASCII) .
Atari with OS/A+
SAVE filespec
filespec - filename you wish to SAVEyou program under.
The SAVE command is used to SAVE your BASIC program inits internal format. This format is usually smallerthen the text form of your program and will take upless room on your disk. All programs SAVEd to the diskmust be reentered using the LOAD or RUN commands.
See descriptions of LOAD and RUN for more examples andfurther explanations.
--98--

Section 7.11
command:
purpose:
users:
XIO
This is BASIC's catch-all Input/Outputcommand. If BASIC doesn't provide afunction to access a particular featureof a device or file, some form of XIOcan probably be used to do so.
Atari BASIC users with OS/A+.
usage: XIO subcommand,filespec
!lfn, auxl, aux2,
arguments: subcommand see descriptions below.
descriptions:
fn -- a file number. In contrast tomost OS/A+ I/O commands, XIO oftenrequires that the file number bethat of an UN-OPENed channel. Thesubcommand dictates the usagehere, so see descriptions below.
auxl and aux2 -- generally zero. Thesevalues are passed to OS/A+unchanged (and thence to thedevice being accessed), so theindividual device(s) may requireother values. None of theexamples given in this section usethese values.
filespec -- a proper OS/A+ file name.
Although, as noted, XIO can be used for severalpurposes, we will restrict our discussion here to thosefour subcommands most useful to the Atari BASICprogrammer. For more detail, we suggest chapter 5 ofthe OS/A+ reference manual and other sources, such asthe Atari 850 Interface Module manual.
The subcommands to be discussed will each be treated asa separate BASIC command.
--99--

subcommand:
purpose:
usage:
arguments:
description:
RENAME
May be used to rename disk files.
XIO 32, ffn, 0, 0, filespec
fn -- the file number of an UN-OPENedchannel.
filespec -- a proper OS/A+ file namefollowed by, in the same BASICstring, a comma and a second filename. The second file name mayNOT include a disk drivespecifier.
It is suggested that "fn", the file number, be 7, sincethat channel is normally reserved for system I/Ofunctions (which this certainly is). The only thingstrange about this subcommand is the form of thefilespec. Some examples follow:
XIO 32,t7,0,0,"D:TEST.SAV,OLDTEST.SAV"DIM FL$ (100)INPUT FL$FL$(LEN(FL$)+l) ",BACKUP"XIO 32,t7,0,0,FL$
Again, note that the second file name in both examplesis NOT preceded by a disk drive specifier.
-100-
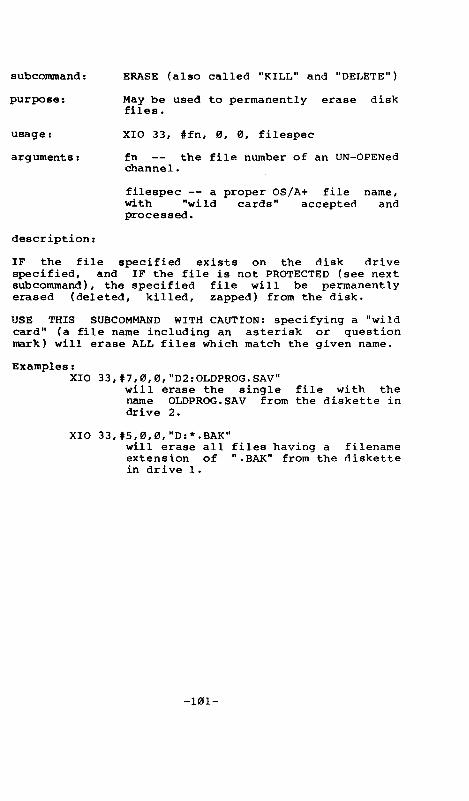
subcommand:
purpose:
usage:
arguments:
description:
ERASE (also called "KILL" and "DELETE")
May be used to permanently erase diskfiles.
XIO 33, tfn, filespec
fn the file number of an UN-OPENedchannel.
filespec -- a proper OS/A+ file name,with "wild cards" accepted andprocessed.
IF the file specified exists on the disk drivespecified, and IF the file is not PROTECTED (see nextsubcommand), the specified file will be permanentlyerased (deleted, killed, zapped) from the disk.
USE THIS SUBCOMMAND WITH CAUTION: specifying a "wildcard" (a file name including an asterisk or questionmark) will erase ALL files which match the given name.
Examples:XIO
will erase the singlename OLDPROG.SAV fromdrive 2.
file with thethe diskette in
XIOwill erase all files having aextension of ".BAK" from thein drive 1.
filenamediskette
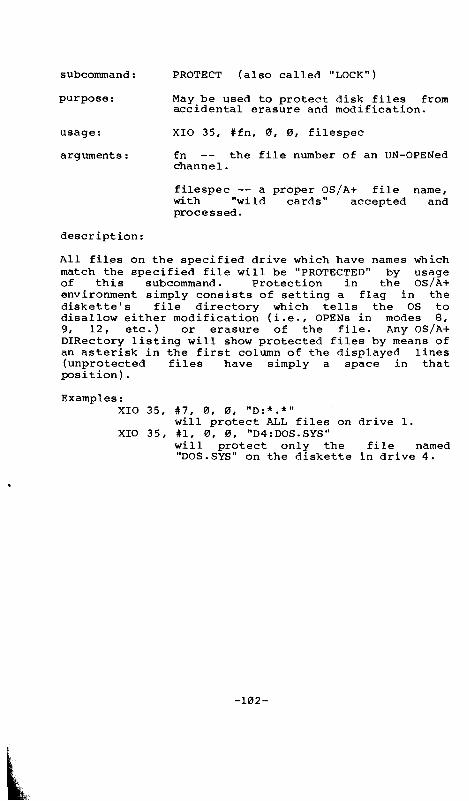
subcommand:
purpose:
usage:
arguments:
description:
PROTECT (also called "LOCK")
May be used to protect disk files fromaccidental erasure and modification.
XIO 35, #fn, 0, 0, filespec
fn the file number of an UN-OPENedchannel.
filespec -- a proper OS/A+ file name,with "wild cards" accepted andprocessed.
All files on the specified drive which have names whichmatch the specified file will be by usageof this subcommand. Protection ln the OS/A+environment simply consists of setting a flag in thediskette's file directory which tells the OS todisallow either modification (i.e., OPENs in modes B,9, 12, etc.) or erasure of the file. Any OS/A+DIRectory listing will show protected files by means ofan asterisk in the first column of the displayed lines(unprotected files have simply a space in thatposition) .
Examples:XIO 35, #7, 0, 0, "D:*.*"
will protect ALL files on drive 1.XIO 35, #1, 0, 0, "D4:DOS.SYS"
will protect only the file named"DOS. SYS" on the diskette in drive 4.
-102-

subcommand:
purpose:
usage:
arguments:
description:
UNPROTECT (also called "UNLOCK")
May be used to unprotect disk files toallow subsequent erasure andIlDdification.
XIO 36, #fn, 0, 0, filespec
fn the file number of an UN-OPENedchannel.
filespec -- a proper OS/A+ file name,with "wild cards" accepted andprocessed.
All files on the specified drive which have names whichmatch the specified file will be "UNPROTECTED" by usageof this subcommand. Protection in the OS/A+environment simply consists of setting a flag in thediskette's file directory which tells the OS todisallow either modification (i.e., OPENs in modes 8,9, 12, etc.) or erasure of the file. Any OS/A+DIRectory listing will show UNprotected files by meansof a space in the first column of the displayed lines(protected files have an asterisk in that position).
Examples:XIO 35, #7, 0, 0, "D2:*.COM"
will unprotect all files on drive 1Which have a filename extension of".COM" .
XIO 35, #1, 0, 0, "Dl:OOS.SYS"will unprotect only the file named"DOS.SYS" on the diskette in drive 1(this step is necessary before erasingthat file, as you might do to gain morespace on the diskette).
-103-
Chapter 8: Assembly Language and OS/A+
As mentioned in Section 2.1, OS/A+ is designed as alayered operating system. Application programs(including languages such as BASIC A+) are expected tocall the operating system "properly", through thesystem call vector (labeled "CIa" in SYSEQU.ASM). Inturn, the CIa will determine which device is to receivewhat I/O request and handles most of the worktransparent to the calling program.
If a program restricts itself to proper calls to CIausing labels provided in SYSEQU.ASM, the program shouldtransfer virtually without change from one version ofOS/A+ to another. (Probably the only other areas ofchange would involve memory map usage and the length offile names--12 bytes under version 2 and 30 bytes underversion 4.)
In any case, here with is a description of the properassembly language calling sequnces and parameters underOS/A+.
--104--

8.1 Interfacing to I/O Routines
8.1.1 The Structure of the IOCB's
When a program calls the OS through location "CIO", OSexpects to be given the address of a properly formattedIOCB (Input Output Control Block). For simplicity, wehave predefined 8 IOCB's, each 16 bytes long, and thecalling program specifies which one to use by passingthe IOCB number times 16 in the 6502's X-register.Thus, to access IOCB number four, the X-register shouldcontain $40 on entry to OS. Notice that the IOCBnumber corresponds directly to the file number in BASIC(as in PRINT #6, etc.). The IOCB's are located from$0340 to $03BF on the Atari (but you really should usethe equates from the disk file "SYSEQU.ASM" rather thanrelying on hard-coded addresses.)
When the OS gets control, it uses the X-register toinspect the appropriate IOCB and determine just what itwas that the user wanted done. Figure 8-1 gives theOS/A+ standard name for each field in the IOCB alongwith a short description of the purpose of the field.Study the figure before proceeding.
The user program should NEVER touch fields ICHID,ICDNO,ICSTA and ICPUT, as they are set by the OS. Inaddition, unless the particular device and I/O requestrequires it, the program should not change ICAUXIthrough ICAUX6. The most important field is theone-byte command code, ICCOM, which tells the operatingsystem what function is desired.
--105--

FIGURE 8-1
IOCB STRUCTURE
FIELDNAME
ICHID
ICDNO
ICCOM
ICSTA
ICBADR
ICPUT
ICBLEN
OFFSETWITHINIOCB(bytes)
1
2
3
4
6
8
SIZEOFFIELD(bytes)
1
1
1
1
2
2
2
PURPOSE OF FIELD
SET BY OS. Index into devicename table for currently OPENfile, set to $FF if no fileopen on this IOCB.
SET BY OS. Device number(e.g., 1 for "Dl:xxx" or 2 for"D2:yyy")
The COMMAND request from userprogram. Defines how rest ofIOCB is formatted.
SET BY OS. Last status returnedby device. Not necessarily thestatus returned via STATUScommand request.
BUFFER ADDRESS. A two byteaddress in normal 6502 low/highorder. Specifies address ofbuffer for data transfer oraddress of filename for OPEN,STATUS, etc.
SET BY OS. Address minus one ofdevice's put-one-byte routine.Possibly useful when high speedsingle byte transfers areneeded.
BUFFER LENGTH. Specifiesmaximum number of bytes totransfer for PUT/GET opera-tions. NOTE: this length isdecremented by one for eachbyte transfered.
--106--

lCAUXl
lCAUX2
lCAUX3lCAUX4
lCAUX5
ICAUX6
10
11
12
14
15
1
1
2
1
1
Auxiliary byte number one. Usedin OPEN to specify kind of fileaccess needed. Some drivers canmake additional use of thisbyte.
Auxilliary byte number two.Some serial port functions mayuse this byte. This and allfollowing AUX bytes are forspecial use by each devicedriver.
For disk files only: where thedisk sector number is passed byNOTE and POINT. (These bytescould be used separately byother drivers.
For disk files only: the byte-within-sector number passed byNOTE and POINT.
A spare auxilliary byte.
FIGURE 8-1
IOCB STRUCTURE
--107--

1--------------------------------------------------------II IOCB field name 1 1 I 2 I 3 1 4 I 5 I 6 I 7 1, 1 I I I I I 1 , 1I I I' I I I I I I BUFFER I PUT-A- II I C I C 1 C I C I ADDRESS I .BYTE I1 1 HID' cis I I I ADDRESS ,'Type of I liN 1 0 I T I I 1 , 1'command 1 D I 0 1 M I A I ICBADR 1 ICPUT ,1--------------------------------------------------------I10PeN I * 1 * 1 3 I * 1 filenamel * 11--------------------------------------------------------IICLOSE 1 * I I 12 I * I I ,1--------------------------------------------------------IIdynamic 1 I 1 'I 1 1ISTATus 1 1 * 1 13 1 *' filename I I1--------------------------------------------------------I1Get TeXT I 1 I 1 I I 1IRecord 'I 1 5 1 * 1 buffer I 11--------------------------------------------------------IIPut TeXT 1 1 I I 1 , 1IRecord 1 I '9' * 1 buffer I 11--------------------------------------------------------I1Get BINary 1 1 1 I I 1 1IRecord I I 1 7 I * 1 buffer 1 I1--------------------------------------------------------IIPut BINary 1 1 , I 1 1 1IRecord I 1 I 11 I *' buffer' 11--------------------------------------------------------I1 EXTENDED COMMANDS: DISK FILE MANGER ONLY I1--------------------------------------------------------IIREName 1 I * 1 32 1 * 1 filename 1 11--------------------------------------------------------IIERAse 1 I * 1 33 1 * I filename I 11--------------------------------------------------------IIPROtect I 1 * I 35 1 * I filename' 11--------------------------------------------------------IIUNProtect I 1 * 1 36 1 *' filename 1 11--------------------------------------------------------IINOTE I I I 38 1 * I 1 ,1--------------------------------------------------------IIpOINT 1 1 I 37 1 * 1 1 I1--------------------------------------------------------I
'* 'LEGEND: Set by OS when thiscommand is used
'buffer' Address of a data buffer'filename' Address of a filename
Figure 8-2 loeB Field Usage

1--------------------------------------------------------I1 8 I 9 I 10 1 11 1 12 I 13 I 14 I 15 I IOCB field name I1 I 1111111111111 1I BUFFER , C 1 C 1 C 1 C 1 C 1 C I 1I LENGTH I A 1 A I A! A! A 1 A I (as given in II 1 1 U I U I U lui U lui SYSEQU. ASM) 1Illxlxlxlxlxlxl 1I ICBLEN ! 1 1 2! 3! 4 I 5 I 6 I COMMAND NAMES I1--------------------------------------------------------I1 Imodel 1 1 I 1 1 COPN I1--------------------------------------------------------II I 1 1 1 I 1 1 CCLOSE I1--------------------------------------------------------I1 'I! I 1 I 1 11 I 1 1 , 1 I 1 CSTAT 11--------------------------------------------------------II 1 1 I 1 I I 1 II length 1 I 1 1 1 I 1 CGTXTR !1--------------------------------------------------------I1 I 1 I , 1 1 I I1 length I I I I I I 1 CPTXTR 1
1--------------------------------------------------------I1 I 1 , 1 1 'I II length I 1 I 1 1 1 1 CGBINR I1--------------------------------------------------------I1 1 I I I 1 I I II length I I 1 I I I 1 CPBINR !1--------------------------------------------------------I1 ( See section 8.1. 2 ) I
1--------------------------------------------------------I1 I I I 1 , , I CREN I1--------------------------------------------------------II 1 1 1 , I , 'CERA !1--------------------------------------------------------I1 I I 1 I I 1 I CPRO 1
1--------------------------------------------------------I1 I I I I I I 1 CUNP I1--------------------------------------------------------I1 I 1 1 sec num Ibytel I CNOTE 11--------------------------------------------------------I, 1 I I sec num Ibytel 1 CPOINT 11--------------------------------------------------------I
'length''mode'"se c num ''byte'
Length of a data bufferMode of OPEN (i.e., read, write, etc.)Sector number, see section 8.1.2Byte in sector, see section 8.1.2
Figure 8-2(con't.)
--109--

8.1.2 The I/O Commands
Figure 8-2 provides a table of I/O commands and theirusage of the various fields of the IOCB's. The firstseven are OS/A+ oriented and will be dealt with in partA) of this section. The last six are File Managerspecific and are discussed in part B).
Most of the commands manipulate a device in some way,so maybe we should talk about them for a moment.Device names under OS/A+ are very simplistic: theyconsist of a single letter optionally followed by asingle digit used to define a specific device when morethan one of the same kind exist (Ex.- Dl: or D2:).Traditionally (and, in the case of Atari disk files, ofnecessity) the device name is followed by a colon. Thefollowing devices are implemented under standard OS/A+:
E: The keyboard/screen editor device. The normalconsole output.
K: The keyboard alone. Use this device to bypassediting of user input.
S: The screen alone. Can be either characters (ala E:)or graphics.
P: On the Atari, thedriver allows only
printer. Theone printer.
standard device
C: The cassette recorder.
D: The disk file manager, which also usually requires afile name.
Other device names are possible (e.g., for RS-232interfaces), and in fact the ease with which otherdevices may be added is another mark for the claim thatOS/A+ is a TRUE operating system. The structure ofdevice drivers is material for a later section (8.3),but we should like to point out that, on the Atari, theOS ROM includes drivers for all the above except thedisk. In fact, the drivers account for over SK bytesof the ROM code. The screen handler, with all itsassociated editing and GRAPHICS modes, occupies about3K bytes of that.
--110--

A) The Standard OS/A+ Commands
The OS itself only understands a few fundamentalcommands, but OS/A+ also provides for extended commandsnecessary to some devices (XIO in BASIC). In any case,each of these fundamental commands deserves a shortdescription.
OPEN
Open a device (synonyms: file, IOCB, channel) for readand/or write access. OS expects ICAUXl to contain abyte that specifies the mode of access:
ICAUXl456891213
MODERead OnlyRead Only AppendRead Directory OnlyWrite OnlyWrite Only AppendRead/Write (Update)Read/Write Append/Update
NOTE: modes 5 and 13 are only available on version 4 ofOS/A+ (more information about them, 6, and 9 may befound in part B). The name of the device (and, for thedisk, the file) must be given to OS; this isaccomplished by placing the ADDRESS of a stringcontaining the name in ICBADR.
CLOSE
Terminate access to a device/file. Only the commandmust be given.
STATUS
Request the status of a device/file. The device caninterpret this request as it wishes, and pass back a(hopefully) meaningful status. As with OPEN, theADDRESS of a filename must be placed in ICBADR.
GET TEXT
A powerful command, this causes the OS to retrieve("GET") bytes one at a time from a device/file alreadyOPENed until either the buffer space provided by theuser is exhausted or a RETURN character (Atari $9B) isencountered. The user specifies the buffer to use byplacing its ADDRESS in ICBADR and its maximum size(length) in ICBLEN.
--111--

PUT TEXT
The analogue of GET TEXT, OS outputs characters one ata time until a RETURN is encountered or the buffer isempty. Requires ICBADR and ICBLEN to be specified.
GET DATA
Extremely flexible command, this causes OS to retrieve,from the device/file previously OPENed, the number ofbytes specified by ICBLEN into the buffer specified byICBADR. NO CHECKS WHATSOEVER ARE PERFORMED ON THECONTENTS OF THE TRANSFERRED DATA.
PUT DATA
Similar to GET DATA, except that OS will output ICBLENbytes from the buffer specified by ICBADR Again, nodata checks are performed.
--112--

B) Commands Unique to the Disk File Manager System
Figure 8-2 shows several OS/A+ system commands not yetdiscussed. These "extended" commands are accessed viathe extended request routine in a device driver'shandler table (see section 8.3 for details on deVicedrivers). However, some of these extended commands asimplemented for the disk device in the File ManagerSystem are important enough to deserve their ownsections. We'll examine each of the extended diskoperations in a little detail:
ERASE, PROTECT, and UNPROTECT
Also known as Delete, Lock, and Unlock, these threecommands simply provide OS with a channel number (i.e.,the X-register contains IOCB number times 16), acommand number (ICCOM), and a filename (viaICBADR). When OS passes control to the FMS, an attemptis made to satisfy the request. Note that the filenamemay include "wild cards", as in "D: *. ??S" (which willaffect all files on disk drive one which have an'S' asthe last letter of their filename extension).
RENAME
Very similar to ERASE, et aI, in usage. The onlydifference is in the form of the filename. Proper formis: "[Dn:]oldname.ext,newname.ext" Note that the diskdevice specifier is not and CAN NOT be given twice.
NOTE and POINT
Other than OPEN, these are the only commandsencountered in standard OS/A+ which use any of theAUXilliary bytes of the IOCB. For these commands, theuser specifies the channel number and command numberand then receives or passes file pointer informationvia three of the AUX bytes. ICAUX3/ICAUX4 are used asa conventional 6502 LSB/MSB 16-bit integer: theyspecify the current (NOTE) or the to-be-made-current(POINT) sector within an already OPENed disk file.ICAUX5 is similarly the current (NOTE) orto-be-made-current (POINT) byte within that sector. Inthe case of OS/A+ version 4, the word "sector" might bemore properly replaced with the word "page", since theNOTE/POINT addressing always uses 256 byte pages,regardless of the physical sector size.
--113--

FMS Extensions of the OPEN Command
Open is not truly an extended operation, but for diskI/O we need to know that the FMS allows two additional"modes" beyond the fundamental as modes.If ICAUXI contains a 6 when OS/A+ is called for OPEN,then the disk DIRECTORY is opened (instead of a file)for read- only access. The address ICBADR nowspecifies the file (or files, if wild cards are used)to be listed as part of a directory listing. Note thatFMS expects this type of OPEN to be followed by asuccession of GETREC (get text line) as calls.If ICAUXI contains a 9, the specified file is opened asa write-only file, but the file pointer is set to thecurrent end-of-file. CAUTION: version 4 FMS onlyappends on sector boundaries (it links a new sector tostart the append, so there may be used space on the oldlast sector).
Finally, under version 4specifying that the file bemode. See Appendix A.lmeanings of other bits inversion 4 of OS/A+.
8.1.3 Error Codes Returned
FMS, mode 13 is also legal,opened in "Append/Update"for more details on theI CAUX1 and ICAUX2 under
On from any as call, the Y-register contains thecompletion code of the requested operation. A code ofone (1) indicates "normal status, everything is okay".(I know, why not zero, which is easier to check for.Remember, we based this on Atari's as ROMs, which aregood, not perfect.) By convention, codes from $02 to$7F (2 through 127 decimal) are presumed to be"warnings". Those from $80 to $FF (128 through 255decimal) are "hard" errors. These choices facilitatethe following assembly language sequence:
JSR CIOVTYABMI OOPS
call the as; check error code
if $80-$FF-, it must be an error
In theory, OS/A+ always returns to the user withcondition codes set such that the TYA is unnecessary.In practice, that's probably true; but a littleparanoia often leads to longer life of both humans andprograms.
--114--

8.2: Manipulation of OS/A+
The writer of assembly language code will most likelyneed to interface with the Atari Operating System (OS)in some way. If the assembly code is to become anextrinsic command, there may be a need to interface toOS/A+. See section 8.2 for further information aboutthe OS interface.
are writing software designed to interface withyou may need to examine and/or modify certainmemory locations or access certain routinesOS/A+. This section lists and describes thosefeel are the most useful.
If youOS/A+,specialwithinthat we
8.2.1 SYSEQU.ASM
Every OS/A+ master disk contains an assembler sourcefile, SYSEQU.ASM, that has various commonly used AtariOS and OS/A+ system equates. This file may be includedin an assembly language program via the OSS MAC/65include function (.INCLUDE #Dl:SYSEQU.ASM): however, itexists on the master disk as a text file and must be'ENTER'ed into MAC/65 and then 'SAVE'ed back to thedisk.
8.2.2 OS/A+ MEMORY LOCATION
OS/A+ on the Atari is designed to be placed just afterthe Atari File Manager. Since the actual location ofOS/A+ may vary with different versions of a filemanager, a fixed location has been assigned to point toOS/A+. The location CPALOC($0A on the Atari) containsthe address of the OS/A+ warmstart entry point. MostAtari programs should return to OS/A+ by JMPing to theaddress contained in CPALOC.
--115--
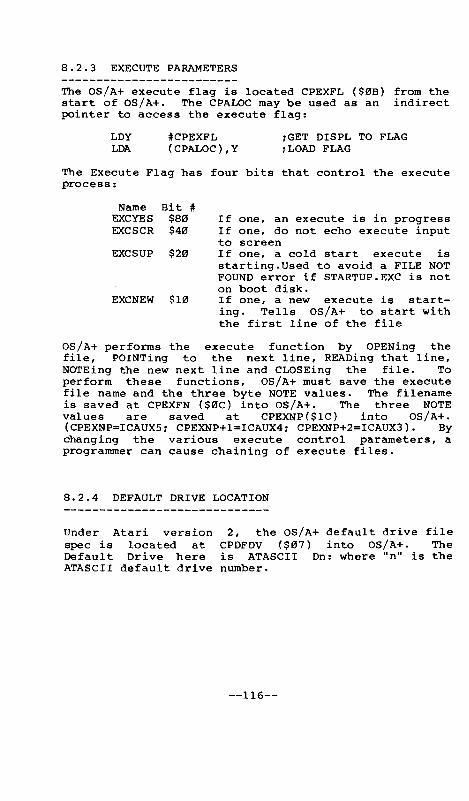
8.2.3 EXECUTE PARAMETERS
The OS/A+ execute flag is located CPEXFL ($0B) from thestart of OS/A+. The CPALOC may be used as an indirectpointer to access the execute flag:
LDYLDA
#CPEXFL(CPALOC), Y
DISPL TO FLAGFLAG
The Execute Flag has four bits that control the executeprocess:
NameEXCYESEXCSCR
EXCSUP
EXCNEW
Bit #$80$40
$20
$10
If one, an execute is in progressIf one, do not echo execute inputto screenIf one, a cold start execute isstarting.Used to avoid a FILE NOTFOUND error if STARTUP.EXC is noton boot disk.If one, a new execute is start-ing. Tells OS/A+ to start withthe first line of the file
OS/A+ performs the execute function by OPENing thefile, POINTing to the next line, READing that line,NOTEing the new next line and CLOSEing the file. Toperform these functions, OS/A+ must save the executefile name and the three byte NOTE values. The filenameis saved at CPEXFN ($0C) into OS/A+. The three NOTEvalues are saved at CPEXNP($lC) into OS/A+.
CPEXNP+2=ICAUX3). Bychanging the various execute control parameters, aprogrammer can cause chaining of execute files.
8.2.4 DEFAULT DRIVE LOCATION
Under Atari versionspec is located atDefault Drive hereATASCII default drive
2, the OS/A+ default drive fileCPDFDV ($07) into OS/A+. Theis ATASCII Dn: where "n" is thenumber.
--116--

8.2.5 EXTRINSIC PARAMETERS
The extrinsic commands may be called with parameterstyped on the command line. The OSS command
Ol:COPY FROMFILE 02:TO FILE
is an example of this. The entire command line issaved in the OS/A+ input buffer located at CPCMDB ($40)bytes into OS/A+ and is available to the user. Sincemost command parameters are file names, OS/A+ providesa means of extracting these parameters as filenames.The routine that performs this service begins at CPGNFN($03) bytes into OS/A+. The routine will get the nextparameter and move it to the filename buffer at CPFNAM($21) bytes in OS/A+. If the parameter does notcontain a device prefix, then OS/A+ will prefix theparameter with the default drive prefix. The firsttime COpy calls CPGNFN the file spec "Dl:FROMFILE" isplaced at CPFNAM. The second time COpy calls CPGNFNthe file spec "D2:TO FILE" is placed in CPFNAM. IfCPGNFN were to be called more times, then the defaultfile spec would be set into CPFNAM at each call. Todetect the end of parameter condition, the user maycheck the CPBUFP ($0A into OS/A+) cell. If CPBUFP doesnot change often a CPGNFN call then there are no moreparameters. The filename buffer is always padded to 16bytes with ATASCII EOL ($9B) characters. The followingexample sets up a vector for calling the get file nameroutine:
CLCLOAADCSTALOAADCSTAGETFN
CPALOC#CPGNFNGETFN+lCPALOC+l#0GETFN+2JMP 0
CPGNFNCPALOC VALUE
AND PLACE INFIELD
JUMP
The following routine gets the next file name toCPFNAM:
LOY #CPBUFP CPBUFPLOA (CPALOC), YPHAJSR GETFN NEXT FILE PARMLDY #CPBUFPPIA FOR NO NEXTCMP (CPALOC), Y PARMBEQ NONEXT BR IF NO NEXTPARMLDY #CPFNAM ELSE GET FILELOA (CPALOC), Y NAME FROM BUFFER
--117--
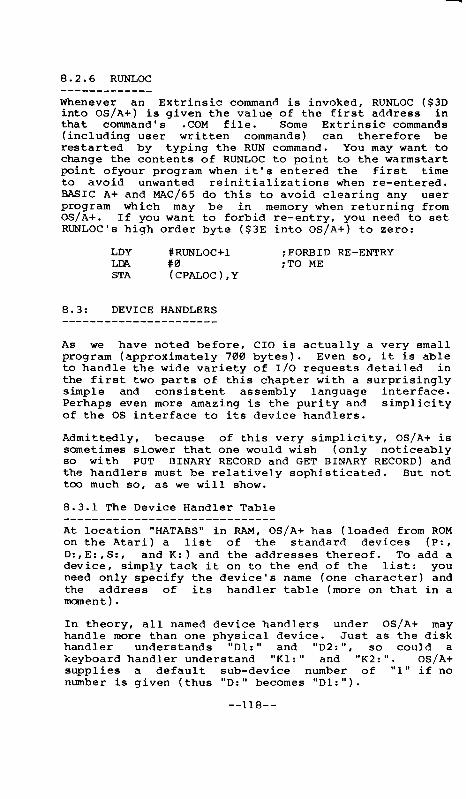
B.2.6 RUNLOC
Whenever an Extrinsic command is invoked, RUNLOC ($3Dinto OS/A+) is given the value of the first address inthat command's .COM file. Some Extrinsic commands(including user written commands) can therefore berestarted by typing the RUN command. You may want tochange the contents of RUNLOC to point to the warmstartpoint ofyour program when it's entered the first timeto avoid unwanted reinitializations when re-entered.BASIC A+ and MAC/65 do this to avoid clearing any userprogram which may be in memory when returning fromOS/A+. If you want to forbid re-entry, you need to setRUNLOC's high order byte ($3E into OS/A+) to zero:
LDYLD/\STA
#RUNLOC+l#3(CPALOC), Y
;FORBID RE-ENTRY;TO ME
B.3: DEVICE HANDLERS
As we have noted before, CIO is actually a very smallprogram (approximately 733 bytes). Even so, it is ableto handle the wide variety of I/O requests detailed inthe first two parts of this chapter with a surprisinglysimple and consistent assembly language interface.Perhaps even more amazing is the purity and simplicityof the OS interface to its device handlers.
Admittedly, because of this very simplicity, OS/A+ issometimes slower that one would wish (only noticeablyso with PUT BINARY RECORD and GET BINARY RECORD) andthe handlers must be relatively sophisticated. But nottoo much so, as we will show.
B.3.1 The Device Handler Table
At location "HATABS" in RAM, OS/A+ has (loaded from ROMon the Atari) a list of the standard devices (P:,D:,E:,S:, and K:) and the addresses thereof. To add adevice, simply tack it on to the end of the list: youneed only specify the device's name (one character) andthe address of its handler table (more on that in amanent) .
In theory, all named device handlers under OS/A+ mayhandle more than one physical device. Just as the diskhandler understands "Dl:" and "D2:", so could akeyboard handler understand "KI:" and "K2:". OS/A+supplies a default sub-device number of "I" if nonumber is given (thus "D:" becomes "DI:").
--l1B--

Following is the layout of the HAndler TABleS on theAtari:
*= $03lAHATABS
. BYTE 'p' the Printer device
.WORD PDEVICE and the address of its driver
.BYTE 'c' the Cassette device
.WORD CDEVICE
. BYTE 'E' the screen Editor device
.WORD EDEVICE
. BYTE 's' the graphics Screen device
.WORD SDEVICE
. BYTE 'K' the Keyboard device
.WORD KDEVICE
. BYTE 0 zero marks the end of thetable
.WORD 0 ; ...but there's room forseveral
. BYTE 0 ., .more deviceset cetera
8.3.2 Rules for Writing Device Handlers
Each device which has its handler address placed intothe handler address table (above) is expected toconform to certain rules. In particular, the driver isexpected to provide six (6) action subroutines and aninitialization routine. (In practice, the currentOS/A+ only calls the initialization routines for itsown pre-defined devices. Since this may change in thefuture, and since one can force the call to one's owninitialization routine, we must recommend that eachdriver include one, even if it does nothing.) Theaddress placed in the handler address table must pointto, again, another table, the form of which is shownbelow (Figure 8.1).
HANDLER.WORD.WORD.WORD.WORD.WORD.WORDJMP
<address of OPEN routine>-l<address of CLOSE routine>-l<address of GETBYTE routine>-l<address of PUTBYTE routine>-l<address of STATUS routine>-l<address of XIO routine>-l<address of initialization routine>
Figure 8-3
--119--

Notice the six addresses Which must be specified; andnote that in the table one must subtract one from eachaddress (the "-1" simply makes CIO' s jobeasier •.. honest). A brief word about each routine isgiven in the following pages.
Device OPEN
The OPEN routine must perform any initialization neededby the device. For many devices, such as a printer,this may consist of simply checking the device statusto insure that it is actually present. Since theX-register, on entry to each of these routines,contains the IOCB number being used for this call, thedriver may examine ICAUXI (via LDA ICAUXl,X) and/orlCAUX2 to determine the kind of OPEN being requested.(Caution: OS/A+ preempts bits 2 and 3 ($04 and $08) oflCAUXl for read/write access control. These bits maybe examined but should normally not be changed.)
Device CLOSE
The CLOSE routine is often even simpler. It should"turn off" the device if necessary and possible.
Device PUT and GET BYTE Routines
The PUTBYTE and GETBYTE routines are just what areimplied by their names: the device handler must supplya routine to output one byte to the device and aroutine to input one byte from the device. HOWEVER,for many devices one or the other of these routinesdoesn't make sense (ever tried to input from aprinter?). In this case the routine may simply RTS andOS/A+ will supply an error code.
Device STATUS Routine
The STATUS routine is intended to implement a dynamicstatus check. Generally, if dynamic checking is notdesirable or feasible, the routine may simply returnthe status value it finds in the user's IOCB. However,it is NOT an error under OS/A+ to call the statusroutine for an unOPENed device, so be careful.
--120--

Device Extended I/O Routine(s)
The XIO routine does just what its name implies: itallows the user to call any and all special andwonderful routines that a given device handler maychoose to implement. OS does nothing to process an XIOcall except pass it to the appropriate driver.
General Comments on Device I/O Routines
In general, the AUXilliary bytes of each IOCB areavailable to each driver. In practice, it is best toavoid ICAUXI and ICAUX2, as several BASIC and OScommands will alter them to their will. Note thatlCAUX3 thru ICAUX5 may be used to pass and receiveinformation to and from BASIC via the NOTE and POINTcommands (which are actually special XIO commands).Finally, drivers should not touch any other bytes inthe IOCBs, especially the first two bytes.
Notice that handlers need not be concerned with PUTBINARY RECORD, GET TEXT RECORD, etc.: OS performs allthe needed housekeeping for these user-level commands.
8.3.3 Rules for Adding Things to OS
1. Inspect the system MEMLO pointer (seeSYSEQU.ASM for the actual location).
2. Load your routine (including needed buffers)at the current value of MEMLO.
3. Add the size of your routine to MEMLO.4. Store the resultant value back in MEMLO.5. Connect your driver to OS by adding its name
and address into the handler address table.6. For Atari handlers only:
Fool OS so that if SYSTEM RESET is hitsteps 3 thru 5 will be reexecuted(because SYSTEM RESET indeed resets thehandler address table and the value ofMEMLO) .
In point of fact, step 2 is the hardest of these toaccomplish. In order to load your routine at whereverMEMLO may be pointing, you need a relocatable (orself-relocatable) routine. Since there is currently noassembler for OS/A+ which produces relocatable code,this is not an easy task. But it may not be necessaryif you are writing code for your own private systeminstead of the general public.
--121--

Step 6 is accomplished by making Atari OS think thatyour driver is the Disk driver for initializationpurposes (by "stealing" the DOSINI vector) and thencalling the Disk's initializer yourself before steps 3thru 5 are performed again.
--122--
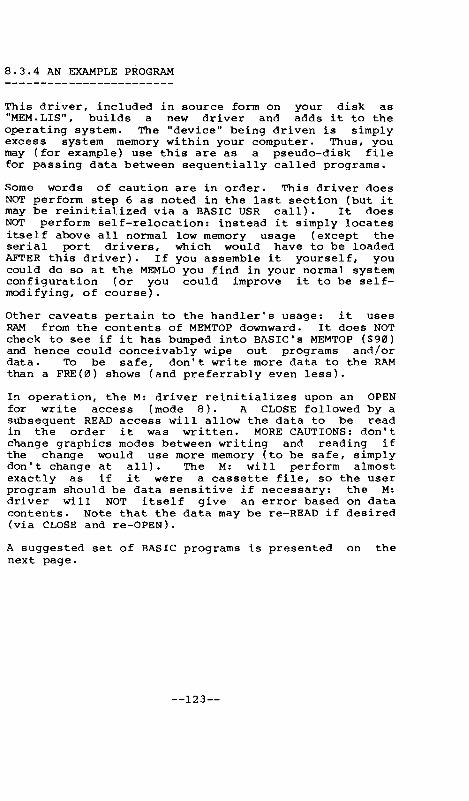
8.3.4 AN EXAMPLE PROGRAM
This driver, included in source form on your disk as"MEM.LIS", builds a new driver and adds it to theoperating system. The "device" being driven is simplyexcess system memory within your computer. Thus, youmay (for example) use this are as a pseudo-disk filefor passing data between sequentially called programs.
Some words of caution are in order. This driver doesNOT perform step 6 as noted in the last section (but itmay be reinitialized via a BASIC USR call). It doesNOT perform self-relocation: instead it simply locatesitself above all normal low memory usage (except theserial port drivers, which would have to be loadedAFTER this driver). If you assemble it yourself, youcould do so at the MEMLO you find in your normal systemconfiguration (or you could improve it to be self-modifying, of course).
Other caveats pertain to the handler's usage: it usesRAM from the contents of MEMTOP downward. It does NOTcheck to see if it has bumped into BASIC's MEMTOP ($90)and hence could conceivably wipe out programs and/ordata. To be safe, don't write more data to the RAMthan a FRE(0) shows (and preferrably even less).
In operation, the M: driver reinitializes upon an OPENfor write access (mode 8). A CLOSE followed by asUbsequent READ access will allow the data to be readin the order it was written. MORE CAUTIONS: don'tchange graphics modes between writing and reading ifthe change would use more memory (to be safe, simplydon't change at all). The M: will perform almostexactly as if it were a cassette file, so the userprogram should be data sensitive if necessary: the M:driver will NOT itself give an error based on datacontents. Note that the data may be re-READ if desired(via CLOSE and re-OPEN).
A suggested set of BASIC programs is presented on thenext page.
--123--

Ending of PROGRAM 1:9900 OPEN #2,8,0,"M:"9910 PRINT #2: LEN(A$)9920 PRINT #2: A$9930 CLOSE #29940 RUN "D:PROGRAM2"
Beginning of PROGRAM 2:100 OPEN #4,4,0,"M:"110 INPUT #4,SIZE120 DIM STRING$(SIZE)130 INPUT #4, STRING$140 CLOSE #4
BASIC A+ users might find RPUT/RGET and BPUT/BGET to beuseful tools here instead of PRINT and INPUT. And, ofcourse, users of any other 1anguage(s) might find thisa handy inter-program communications device.
--124--

CHAPTER 9: FILE STRUCTURE
9.1: Version 2 File Structure
OS/A+ version 2 was produced to provide the maximumcompatibility possible with Atari's DOS 2.0s. In fact,the FMS used is identical to that used by Atari (for asimple reason: we wrote Atari's DOS). For reasonsknown best to Atari, we were instructed to createAtari's FMS around a linked-sector disk spacemanagement scheme. In essence, this means that thelast three bytes of each sector in a disk file containa link to the next sector in that same file. Thepositive result of this is that one produces arelatively small, memory-resident, disk manager whichis nevertheless capable of dynamically allocatingdiskette space (unlike, for example, a contiguous filedisk manager). The biggest disadvantage of the schemeseems to be that one may not do direct (random) accessto the bytes of such files, as one CAN do with either acontiguous or mapped file allocation technique. Also,a disk error in the middle of a linked file means aloss of access to the rest of the file.
The purpose of the FMS is to organize the 720 datasectors avilable on an 810 (or its double densityequivalent) diskette into a system of named data files.FMS has three primary data structures that it uses toorganize the disk:
1. Volume Table of Contents (VTOC): a single disksector which keeps track of which disk sectors areavailable for use in data files.
2. Directory: a group of eight contiguous sectorsused to associate file names with the location ofthe files' sectors on the disk. Each Directoryentry contains a file name, a pointer to the firstdata sector in the file, and some miscellaneousinformation.
3. Data Sectors: sectors containing the actualdata and some control information that links onedata sector to the next data sector in the file.
NOTE: since double density diskette sectors contain 256bytes whereas single density (810 drive) sectorscontain only 128, certain absolute byte numberreferences may vary depending upon the diskette in use.Throughout this chapter, in such cases, the singledensity number is given followed by the double densitynumber in square brackets [thus].
--125--
•

9.1.1 DATA SECTORS
A Data Sector is used to contain the file's data bytes.Each 128 [256] byte data sector is organized to hold125 [253] bytes of data and three bytes of control.The data bytes start with the first byte (byte 0) inthe sector and run contiguously up to, and including,byte 124 [252]. The control information starts at byte125 [253].
The sector byte count is contained in byte 127 [255].This value is the actual number of data bytes in thisparticular sector. The value may range from zero (nodata) to 125 [253] (a full sector). Any data sector ina file may be a short sector (contain less than 125[253] data bytes).
The left six bits of byte 125 [2531 contain the filenumber of the file. This number correspoinds to thelocation of the file's entry in the Directory.Directory entry zero in Directory sector $169 has afile number of zero. Entry one in Directory sector$169 has a file number one, and so forth. The filenumber value may range from zero to 63 ($3F). The filenumber is used to insure that the sectors of one filedo not get mixed up with the sectors of another file.
The right two bits of byte 125 [253J (and all eightbits of byte 126 [254]) are used to point to the nextdata sector in the file. The ten bit number containsthe actual disk sector number of the next sector. Itsvalue ranges from zero to 719 ($2CF). If the value iszero then there are no more sectors in the file sectorchain. The last sector in the file sector chain is theEnd-Of-File sector. The End-Of-File sector will almostalways be a short sector.
9.1.2 DISK DIRECTORY
The Directory starts at disk sector $169 and continuesfor eight contiguous sectors, ending with sector $170.These sectors were chosen for the directory becausethey are in the center of the disk and therefore havethe minimum average seek time from any place else onthe disk. Each directory sector has space for eightfile entries. Thus, it is possible to have up to 64files on one disk.
--126--

A Directory entry is 16 bytes in size, as illustratedby Figure 9-2. The directory entry flag fieldspecific status information about the current entry.The directory count field is used to store the numberof sectors currently used by the file. The last elevenbytes of the entry are the actual file name. Theprimary name is left justified in the primary namefield. The name extension is left justified in theextension field. Unused filename characters are blanks($20). The Start Sector Number field points to thefirst sector of the data file.
StartingByte #of Field
1
3
513
Lengthof Field(bytes)
1
2
2
83
Purpose of Field
Flag byte. Meanings ofbits:$00 Entry never used$80 Entry was deleted$40 Entry in use$20 Entry protected$02 a version 2 file$01 Now writing fileCount (LSB,MSB) ofsectors in file
Start sector (LSB,MSB)of link chain
File name, primaryFile name, extension
Figure 9-2
Directory Entry Structure
--127--
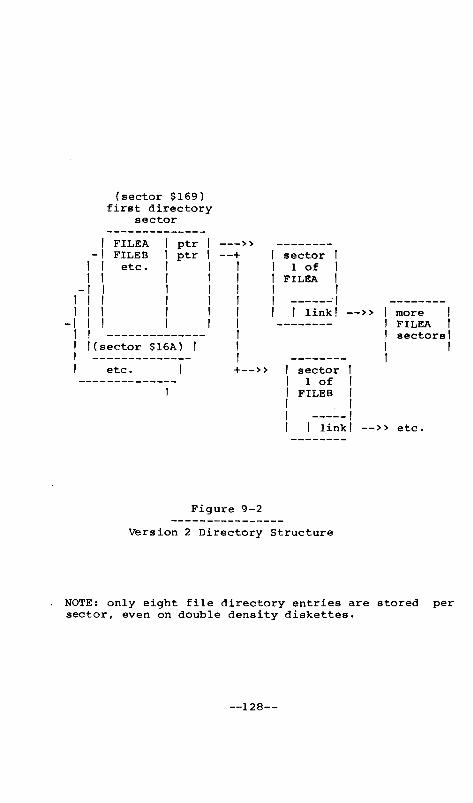
(sector $169)first directory
sector
more IFILEA Isectors I
Isector 11 of IFILEB 1
I-----1I link' --» etc.
sector ,1 of IFILEA I
I------1, link I --»
---»--+
IIIIII,II+--»
ptrptr
FILEAFILEBetc.
1-I1 ,1 I-I I1 I 11 I 1-I 1 I, , --------------I I(sector $16A) II --------------I etc.
Figure 9-2
Version 2 Directory Structure
NOTE: only eight file directory entries are stored persector, even on double density diskettes.
--128--

9.1.3 VOLUME TABLE OF CONTENTS (VTOC)
The VTOC sector ($168) is used to keepdisk sectors are available for data file9-3 illustrates the organization of theThe most important part of the VTOC ismap.
track of whichusage. FigureVTOC sector.the sector bit
The sector bit map is a contiguous string of 90 bytes,each of which contains eight bits. There are a totalof 720 (90 x 8) bits in the bit map--one for eachpossible sector on an 810 diskette. The 90 bytes ofbit map start at VTOC byte ten ($0A). The leftmost bit($80 bit) of byte $0A respresents sector zero. The bitjust to the right of the leftmost bit ($40 bit)represents sector one. The rightmost bit (bit $01) ofbyte $63 represents sector 719.
StartingByte #of Field
o13510
100
Lengthof Field(bytes)
122590
28
purpose of Field
Reserved (for type code)Total number of sectorsNumber of unused sectorsReservedSector usage bit mapEach bit represents aparticular sector:a 1 bit indicates anavailable sector,a 0 bit indicates asector in use.
Reserved (could be usedfor version 2 typeDOS with more than720 sectors per disk)
Figure 9-3
Structure of the VTOC Sector
--129--

9.2 Version 4 File Structure
OS/A+ version 4 is an operating system which providesall the power and flexibility of the Atari CIO scheme,and also uses an advanced File Management System (FMS)to provide fast and effective random access files.OS/A+ version 4, as it appears to the user, isvirtually identical with OS/A+ version 2, except thatit work with disk drives ranging in storage size froml28K bytes to over 15 Megabytes.
OS/A+ version 4 utilizes a mapped file structure whichallows true random access to data files. In such ascheme, special segments of a file act as pointers tothe blocks of data comprising a file. By allowing theuser to specify the size of the data blocks pointed to,OS/A+ is able to handle large and small files and diskswith unsurpasssedspeed and utility.
The OS/A+ random access file managment system treatseach disk under its control as a collection ofcontiguous physical sectors of either 256 or 512 bytesin length, which are numbered starting with sectorzero. These sectors are logicaly grouped into blocksof n sectors in length, where n is a power of twobetween 1 and 128. All files on a disk are allocatedspace in segments of at least one block in length.
--130--

Iptrl1---,I VTOCII
volume table of contents(sector $168)
first directorysector
--> 1 FILEA l pt.r ] --> first block of FILEA's file mapI I I-I I 1 more file map blocksI I FILEB Iptrl --> I link I --> (0 terminates list)-I I etc. I 1 1----1I I I I 1 Iptr I --> first block of FILEBI 1 1 I I 1----11 1 I sector $169 1 Iptr I --> 2nd block of FILEB1 I ------------ 1----1I Isector $16A I letc.1I ------------ I I1 etc. I I first block of------------ , I FILEB's file map
Figure 9-4
Version 4 File Structure
--131--
There arescheme, sothem.
several non-obvious advantages to thisbear with us as we try to explain some of
A. We are able to handle disks with 128, 256, or' 512bytes per sector. (To be truthful, with 128 bytesper sector drives we would use pairs of sectors toemulate 256 byte sectors, since a 128 byte file mapis not really adequate.)
B. We allow each DISK DRIVE to be assigned its own"drive blocking factor". That means that aquadruple density floppy might have blocksconsisting of two 256-byte sectors while a 10 MBdisk might use blocks of four 512-byte sectors.Note that this concept of blocking factors is notnew or unique: CP/M 2.2 allows blocking factors oflKB, 2KB, and 4KB, depending on disk size. We aresimply a little more flexible.
C. We allow each FILE to be assigned its own "fileblocking factor". Thus, even on a floppy with 512byte blocks, a given FILE may use 8 KByte blocks,thus guaranteeing at most one disk read to accessany given sector of the file. (On the Apple IIversion of this product, where the drive blockingfactor is perforce 1 for standard Apple drives, afile blocking factor of 8 2 KByte blocks --essentially doubles random access speed.)
D. Although not yet implemented nor planned for firstrelease, the directory structure is set up in sucha way that, if desired, we could implement multipleand/or hierarchical directories (ala UNIX, forexample). Even CIa (on the Apple II) has beenaltered to support the concept of a default deviceand/or directory.
E. Random access filesUnix-like "LSEEKs""POINT" XIO call inany file.
are easy and practical.are accomplished (via thesection x.xx) to any byte of
F. Except for those rare programs that somehow dependon having 125 bytes of data per sector, currentAtari application programs (including Atari BASICand programs written thereunder) will notice NOCHANGE in their interface with the operatingsystem. Of course, some of the currently unusedoptions will be available to take advantage of suchfeatures as file blocking factors, but they willnot be necessary to the proper functioning of thesystem.
--132--

9.2.1 THE VERSION 4 VTOC
In order to keep track of what blocks on a partiulardisk are available for use, the file manager maintains aspecial section on each disk known as the volume tableof contents, or VTOC. The VTOC on a disk consists of1 or more sectors which contain the bitmap (a longstring of bits in which the Nth bit represents the Nthblock on the disk). Each bit may be turned on or offto free or allocate (respectively) the block itrepresents. Note that the VTOC is the only data areaon the disk allocated by sectors instead of blocks.The format of the VTOC is as follows:
hex offset
o1-234-567-2627
28-2F30-33343536-3738-
value
unusedblock no. of first directory sectorunusedunusedunusedunusedmax. number of pointers in file mapsectors ($7A for disks with 256-bytesectors: $F4 for 512-byte sectordisks)unusedunusedunusedunusedunuseddisk block bit map
--133--

9.2.2 THE DIRECTORY
The disk directory holds information describing theexisting files on a particular disk. The directory isallocated on the disk by disk blocks, each sector ofWhich holds information on a certain number of files (7for 256-byte sectors, 14 for 512-byte sectors). Theblocks themselves are linked, each one holding the diskaddress (block number) of its successor, with the lastblock having a null link (block number 0). Eachentry of the directory describes a particular file. Anentry for a single file contains the file's name, itslength in sectors (see exceptions for DOS 3.3diskettes), its file type byte (see below), and apointer to the start of the file map for that file.
The file name consists of a string of up to 30characters excluding spaces, commas, carriage returns,or nulls. Characters within a directory entry willhave their upper bit inverted. the file name will bepadded at the right with inverse video blanks (hex$M) •
The file type byte is used as follows:
BITS 0-3: file use type -- values 0,1,2, and 4 arecurrently used on the Apple system while only 0 is usedon the Atari.
BITS 4-6: file blocking factor -- a value from 0 to 7(see next section)
BIT 7: file protection -- if this bit is set then thefile is protected from accidental write access,erasure, or renaming. The pointer to the start of thefile map is a two byte value which is the disk blocknumber of the first file map map block.
Format of directory sectors:
hex offset value
o1-2
3-AB-
unusedblock number of next directory block (0 ifthis is the last block)unuseddirectory entries (35 bytes each)
--134--

Format of directory entries:
hex offset
0-123-2021-22
value
block number of first block in file mapfile typefile namelength of file in sectors
--135--

9.2.3 THE FILE MAP
As previously mentioned OS/A+ version 4 utilizes amapped file structure where special portions of a filepoint to the locations on the disk holding the actualdata. These special sections comprise the file map,Which is a singly linked list of disk blocks whichcontain pointers to the data blocks of a file. Eachfile map sector has the following format:
hex offset
o1-2
3-45-67-Bc-
value
unusedblock number of next file map block (zeroif this block is the last)unusedunusedunusedsequential list of block numbers in file(2 bytes per block number)
A pointer to a file block is merely the disk blocknumber of the start of a file block. For mostpurposes, a file block is equivalent in size to a diskblock, However, the file manager allows the user tospecify a file blocking factor which alters the size ofdata blocks for a single file. A file blocking factorof zero implies that file blocks are equivalent to diskblocks. A file blocking factor of 1, though, makesfile blocks equivalent to 8 disk blocks in length.Similarly, a factor of 2 creates file blocks which are16 disk blocks in length. While the use of a fileblocking factor has little or no consequence forsequentially accessed files, it offers 2 distinctadvantages for random access files. First, the size ofthe file map will be reduced, thereby decreasing theaverage number of disk accesses requrired to accessdata. Second, the file's data sectors are likely to beless fragmented on the disk, thereby decresing theaverage head movement required to access data sectors.The only disadvantage of using a file blocking factoris that disk space is allocated much more rapidly thanotherwise, making this technique undesirable for smallfiles.
--136--
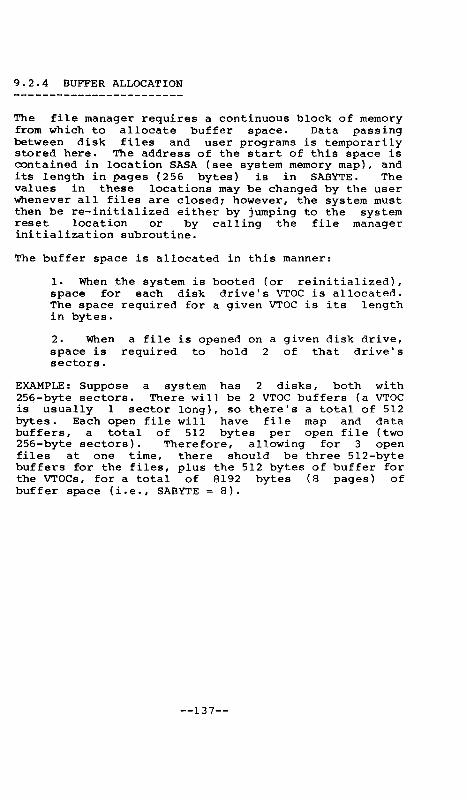
9.2.4 BUFFER ALLOCATION
The file manager requires a continuous block of memoryfrom which to allocate buffer space. Data passingbetween disk files and user programs is temporarilystored here. The address of the start of this space iscontained in location SASA (see system memory map), andits length in pages (256 bytes) is in SABYTE. Thevalues in these locations may be changed by the userWhenever all files are closed; however, the system mustthen be re-initialized either by jumping to the systemreset location or by calling the file managerinitialization subroutine.
The buffer space is allocated in this manner:
1. When the system isspace for each diskThe space required forin bytes.
booted (or reinitialized),drive's VTOC is allocated.a given VTOC is its length
2. Whenspace issectors.
a file is opened on a given disk drive,required to hold 2 of that drive's
EXAMPLE: Suppose a system has 2 disks, both with256-byte sectors. There will be 2 VTOC buffers (a VTOCis usually 1 sector long), so there's a total of 512bytes. Each open file will have file map and databuffers, a total of 512 bytes per open file (two256-byte sectors). Therefore, allowing for 3 openfiles at one time, there should be three 512-bytebuffers for the files, plus the 512 bytes of buffer forthe VTOCs, for a total of 8192 bytes (8 pages) ofbuffer space (i.e., SABYTE = 8).
--137--

9.2.5 ADDING DRIVES
In order to integrate a new disk drive into the system,the disk must first be initialized with the OS/A+verion 4 file structure. Please refer to the sectiondescribing the IN IT utility for instructions on usingINIT. Source code of INIT is available for userscontemplating adding their own disk devices.
In order to access a new drive, it must be installedinto the disk drive table within the file manager.This table consists of 8 entries of 16 bytes eachstarting at location DRVTAB (see memory map). Eachentry in this table contains the folowing information:
byte(s) value
drive type-- l=Apple Disk II0=other disk
12
34-56
9-1011
12-15
reservedsize of disk sectors-- 1=256 byte
2=512 bytedisk blocking factor; sectors/blocksector no. of disk's VTOCno. of sectors in VTOCaddress of read/write sector routineminus one(set by file manager)file map sector size-- $7A for 256 bytesectors; $F4 for 512 byte sectors(set by file manager)
As can be seen, the drive table entry contains theaddress of the routine to read and write sectors on thedisk. This routine may be located anywhere in memory.(See the next section for a description of theparameters to this routine).
Once the drive has been added to the drive table andthe read write sector routine has been loaded, thesystem must be re-initialized by jumping to the systemreset location. The new disk may then be accessed asOn: where the disk is the nth entry in the drive table(n starts from 1).
NOTE: more than one disk drive may be serviced by asingle read/write sector routine.
--138--

THE READ/WRITE SECTOR ROUTINES
Each read/write sector routine receives its parametersthrough the Device Control Block, or DCB (see memorymap). The format of the DCB is as follows:
Byte 0:Byte 1:Byte 2:Byte 3:
Bytes 4-5:Bytes 6-7:Bytes 8-9:Bytes 9-A:
machine oependent (unused on Apple)DCBDRV disk drive number (1-8).DCBCMD command (0=null, l=read, 2=write).DCBSTA status byte (set by read/writesector) .DCBBUF buffer address in low, high order.machine dependent (unused on Apple)machine dependent (unused on Apple)DCBSEC sector number--to be accessed inlow, high order
See the table in Chapter 13 for valid status values.
--139--

CHAPTER 10: VERSION DIFFERENCES
As much as we would like to, we can't produce all threeversions of OS/A+ in such a manner that they will be100% compatible. And, of course, there are also minordifferences between OS/A+ and Atari DOS.
In this chapter we will try to document as many knownmajor differences as we can. We will probably miss oneor two, so please don't hesitate to call or write us ifyou intend to write software which will run on morethan one version of OS/A+. We will try to keep a listof any other differences we (or you) find.
Of course, if you are working entirely within one ofour OS/A+ configurations, most of this is unneededinformation. perhaps you need to be aware only of thedifferences between OS/A+ and your computer's "normal"operating system.
--140--

10.1 FEATURES SPECIFIC TO VERSION 4 OF THE FILE MANAGER
OS/A+ version 4 contains several capabilities andenhancements which are not available under version 2 orAtari DOS. A summary of these added features follows:
10.1.1 RANDOM ACCESS:
As previously mentioned, OS/A+ version 4 allows truerandom access to data files. This capability isprovided through the usage of the NOTE and POINToperating system calls. Unlike its predecessor,version 4 expects the data in ICAUX3-ICAUX5 to be a 24bit RELATIVE position within a file (in mid, high, lowbyte order). This allows the user to use the POINTcommand to easily move to any position within a file of16 megabytes or less in size. Similarly, the datareturned by the NOTE command is a 3 byte RELATIVEposition value which is placed in ICAUX3-ICAUX5 by thefile manager. Notice also that a random access filemay contain "holes" created by writing non-contiguousportions of a file without writing the interveningdata.
10.1.2 FILE TYPES:
Version 4 of OS/A+ also supports a file type byte whichis also used to indicate the file's file map blockingfactor (see section 10.4) and its protection. When afile is created, this byte is set into the file'sdirectory entry; its value is zero by default. Inorder to place a value other than zero into the filetype byte when a file is created, bit 6 of ICAUXI mustbe set (i.e. add $40, or 64, to the mode during anOPEN command). The desired file type must be placed inICAUX2 (the second value in a BASIC open statement).Whenever a file is opened, the current value of itstype byte is returned in ICAUX2.
10.1.3 SUPPRESSING AUTOMATIC FILE CREATION:
Normally, when a file is opened in mode 8, it iscreated, if the file did not previously exist, ortruncated, if it did exist. It is occasionallydesirable to suppress creation or truncation whenopening a file in mode 8, in which case an error wouldoccur when attempting to open a non-existent file. Ifa file is opened in mode 8 and bit 5 of ICAUXI is set(i.e., add $20, or 32, to the mode value), then thecreation or truncation of the file will be prevented.
--141--

10.2 DIFFERENCES: ATARI DOS AND OS/A+
There are very few points of difference between AtariDOS and version 2 of OS/A+, other than the fact thatAtari DOS uses DUP.SYS while OS/A+ uses its CommandProcessor. And, actually, there are few differencesbetween version 2 and version 4 of OS/A+ AS SEEN BY ANAPPLICATIONS PROGRAM (including BASIC A+, etc.). Sincethe differences are generic, rather than specific to aparticular version, they will be discussed by category.
10.2.1 MEMORY USAGE
The only real problem that can exist here is in thelocation of LOMEM, the beginning of user applicationmemory. If a program written for Atari DOS (or OS/A+version 2, for that matter) has assumed a particularLOMEM, it may not run under a version with a higherLOMEM. To illustrate, the following table lists theLOMEM value that will result in each of several casesif we assume a system configuration of 2 disk drivesallowing 3 disk files open at the same time.
version LOMEM contents
Atari DOS 2.0s, $lC00single density disks
Atari DOS 2.0s, $lE80double density disks
OS/A+ version 2, $lF00single density disks
OS/A+ version 2, $2180double density disks
OS/A+ version 4 $2C00
Of course, by changing the contents of SASA and SABYTE(see chapters 12 and 13), the user may change thelocation and number of buffers, so a certain measure ofLOMEM independence may be obtained by, for example,placing the buffers somewhere within an applicationprogram's memory space. However, even this is notfoolproof: examine the memory map of chapter 13 formore details.
--142--

10.2.2 END OF FILE
Atari DOS and OS/A+ version 2 both are capable ofknowing exactly where a file ends, since each sector"knows" (via its 3 byte link information) how manybytes it contains. OS/A+ version 4, however, DOES NOTKNOW exactly where the END OF FILE is. In fact,version 4 will not report end of file until it reachesthe end of the last sector in the file. Normally, thishas little if any effect on a user program.
In particular, if reading text lines, the system willread the last line the same on either version. Then,When an attempt is made to read the first line past theend of file, version 2 reports an immediate error.Version 4, however, will begin passing the trailingzero bytes to CIO. However, CIO will not end thetransfer until it receives an ATASCII RETURN code ($9B)(it expects to return an error 137, truncated record,if the user buffer is too short for all those nullbytes). But the file manager finally returns the endof file signal, and CIO ignores any previous errors toreturn the EOF code.
With binary files, the problem is more subtle, since abinary record of all nulls is perfectly legal.However, most user programs on the Atari will have beenbuilt in such a way as to be aware of how many recordsare in a given file. And, if they have not been sobuilt, there is usually at least one field in therecord Which cannot contain a null result. That fieldmay be checked for nulls as an end of file test.
NOTE: virtually any Atari DOS program which usedindexed files (via NOTE and POINT) will functionproperly under version 4. Of course, programs which"take over" the entire disk may fail, but that isbecause there are 256 bytes per sector and their directSIO calls are now improper, which has nothing to dowith DOS.
--143--

10.2.3 RANDOM ACCESS
This subject has been treated more thoroughly inpreceding sections and pages, but let us at leastmention here that programs using NOTE and POINTproperly under DOS 2.0 or OS/A+ version 2 will need nochanges to move to version 4.
Of course, programs using the direct random accesscapabilities of version 4 (i.e., the ability to POINTrelative to the beginning of a file, without the needto have previously NOTEd) will not transfer back toversion 2. Sorry, but that's the price one must payfor using advanced features.
10.2.4 FILE BUFFERS
In order for OS/A+ to function properly, it requiresspecial segments of memory (called file buffers) to beallocated for the purpose of temporarily holdinginformation passing between disk files and a userprogram. For some purposes, the user may wish to movethese buffers from their default locations (see systemmemory map). All OS/A+ systems use the concept of a"Begin Buffer Allocation Here" address and a locationtelling OS/A+ to "Allocate This Many Buffers". Thelabel SASA in the memory map (or, better, SYSEQU.ASM)defines a word containing the starting address of thebuffers. The label SABYTE defines the number ofbuffers to be allocated.
CAUTION: under Atari DOS and version 2 ofrefers to the number of 128 byte buffersUnder version 4 of OS/A+, SABYTE contains256 byte PAGE buffers to allocate.
OS/A+, SABYTEto allocate.the number of
SECONDARY CAUTION: Remember the allocation requirementsdiffer between single and double density disks underversion 2 and Atari DOS.
10.2.5 SECTORS 1, 2, and 3
To insure compatibility with the Atari Computer bootprocess, OS/A+ (both versions) always reads and writesSectors 1, 2, and 3 in single density (128 byte) mode.This single density "force" occurs at the BSIO level,so programs using BSIO may do so in a compatiblefashion. •
--144--

APPENDIX A - CUSTOMIZING OS/A+
Although OS/A+ was designed and implemented with theaverage user in mind, no one piece of software can everbe all things to all people. For that reason, adegree of flexibility exists over certain aspects ofthe system which allows the user to modify OS/A+ tosuit his own tastes. The following sections describethe most useful modifications which may be performed.
A.l BUFFER ALLOCATION
Both versions of OS/A+ allow the user to specify thestarting address of the system file buffers and thenumber of buffers to be used. The location of thewords which specify these parameters varies betweenversion 2 and version 4 and, in any case, is notguaranteed to remain fixed in future releases.Therefore, it is strongly suggested that the userdesiring to change one or both of these values checkthe file "SYSEQU.ASM", supplied on the OS/A+ disk, tobe sure of the latest system value. As of the printingof this manual, the following locations are in use:
version label location use------- --------
2 SASA $070C start of buffers4 SASA $070F start of buffers2 SABYTE $0709 II of buffers4 SABYTE $0711 II of buffers
Presuming the user wishes to change SABYTE, the firstquestion that needs answered is "How many buffers do Ineed?" The rules follow:
OS/A+ VERSION 2: For single density diskettes, use 1buffer per active drive AND 1 buffer persimultaneously open file. For double densitydiskettes, use 2 buffers per active drive and 2buffers per simultaneously open file. EACH BUFFERIS 128 BYTES LONG.
OS/A+ VERSION 4: For disks with 256 byte sectors (e.g.,floppy disks under double density), use 1 bufferper active drive AND 2 buffers per simultaneouslyopen file. For disks with 512 byte sectors,double both figures. EACH BUFFER IS 256 BYTESLONG.
CAUTION: Note the difference in the size of the buffersspecified by the SABYTE contents.
--145--

A.2 SPECIFYING EXISTING DRIVES
Under version 4, the only way to specify an existentdrive is to add its parameters to the drive table (seeChapter 9). Also, the CONFIGure extrinsic command willconfigure this drive table for you.
Under version 2, the byteconsult SYSEQU.ASM tocontrols which drives arerepresents a given drive.DRVBYT represents drivedrive 2, etc., up to therepresents drive 8.
location DRVBYT (at $70A, butconfirm current location)
active. Each bit of DRVBYTThe least significant bit of1, the next bit representsmost significant bit which
If a bit is DRVBYT is on (set to one), the drive isactive. If a bit is off, the drive is inactive. Thusa value of $05 would imply that "Dl:" and "D3:" areactive.
CAUTION: simply changing the bits in DRVBYT or addinginformation to the disk drive table is NOT sufficientto change the system configuration. After changing thebits, you must cause OS/A+ to reinitialize itself.This may be accomplished by simply hitting the SYSTEMRESET key from the keyboard, or calling the DOSinitialization routine, via DOSINI, from a runningprogram.
A.3 SAVING YOUR MODIFIED VERSION
Saving a modified version of OS/A+ is extremely simple.With version 2, simply use the INIT command and, whenthe menu appears, specify "Write DOS.SYS file only" (orgo ahead and initialize the disk if it is a newdisk ... just be careful not to reinitialize a disk withvaluable goodies on it).
With version 4, the process is both more complicatedand simpler. Since the version 4 boot process simplysearches for the filename "DOS.SYS", any file may berenamed DOS.SYS and the system will attempt to boot it.
Saving a modified OS/A+, then, is as simple as SAVingthe proper segment of memory. For OS/A+ version 4issue the following command from the Dl: prompt.
SAVE Dl:DOS.SYS 700 2400 [RETURN)
--146--

APPENDIX B - SYSTEM MEMORY MAPS
B.1 - ATARI ZERO PAGE MAP:
location
0-9A-BC-DE-4243-494A-7F80-FF80-BFD2-FF
CPALOCDOSINI
usage
system zero pageknown to Atari DOS as DOSVECvector to FMS initializationsystem zero pagefms zero pagesystem zero pageuser and language zero pageBASIC A+ zero pagefloating point zero page
B.2 - ATARI SYSTEM MEMORY MAP-- version 2:
location
100-lFF200-319300-30B31A-33F340-3BF3C0-57F580-5FF600-6FF700-lC7F709 SABYTE70A DRVBYT7filC SASA1C80-1EFF1F00-BFFFC000-FFFF
usage
6502 stack areasystem ramDCB (device control block)device handler tableIOCB's - 8 at 16 bytes eachsystem ramE: text bufferuser ramOS/A+ -- file manager and CPnumber of 128 byte file buffersbit map: accessible drivesaddress of start of buffersfile manager buffers-- default sizeuser, language, and graphics memoryI/O locations and system rom
--147--

B.3 - ATARI SYSTEM MEMORY MAP-- version 4:
location
11313-lFF21313-31931313-313B31A-33F340-3BF3C13-57F5813-5FF61313-6FF71313-lC7F713F SASA712 SABYTE713lC813-lCFFlD1313-23FF241313-2BFF2C1313-BFFFC131313-FFFF
usage
6502 stack areasystem ramDCB (device control block)device handler table10CB's - 8 at 16 bytes eachsystem ramE: text bufferuser ramOS/A+ file manageraddress of start of buffersnumber of 256 byte buffersdisk drive table - 8 entriesread/write sector routineOS/A+ CP -- console processorfile manager buffers-- default sizeuser, language, and graphics memoryI/O locations and system rom
--148--
APPENDIX C - Errors
C.l TYPES OF ERRORS
All OS/A+ operations return a status valueIOSTAT field. OS/A+ convention is that statusof $80 or greater indicate some sort of error.are four fundamental kinds of errors that canwith OS/A+:
Hardware Errors
in thevaluesThereoccur
Such as attempting to read a bad disk, write aread-only disk, etc.
Data Transfer Errors
Errors Which occur when data is transferred between thecomputer and a peripheral device. Examples includeDevice Timeout, Device NAK, Framing Error, etc.
Device Driver Errors
Found by the driver for the given device, as in (forthe DFM) File Not Found, File Locked, Invalid DriveNumber; etc.
OS Errors
Usually fundamental usage problems, such as Bad ChannelNumber, Bad Command, etc.
--149--

ERROR CODEHEX DECIMAL MEANING
$01
$02
$03
$80
1
2
3
128
No error or warning.
Truncated ASCII line. The as did notfind a CR within BUFLEN for ASCII lineI/O.
End of file look ahead. The last bytetransfered from the device driver wasits end-of-file byte. The devicedriver must set this status, so it isbest to verify that the device beingused is capable of returning thisstatus before depending on it.
Operation aborted. Set by DeviceHandler. (Also BREAK abort on Atari.)
$81 129 File already open.to open a channelalready been OPENed.
Program is trying(IOCB) that has
$82
$83
$84
$85
$86
130
131
132
133
134
Device does not exist. The device wasnot found in the as device table.Often caused by forgetting the diskdrive name when usin9 a disk file.
File is write only. Program tried toread from a file which can only be usedfor writing (i.e., file was OPENed withAUXl set to 8 or 9).
Invalid Command. CIa has rejected yourrequested command. (Example: programtried to do XIO to a device which hasno extended operations defined.)
Device/File not open. The IOCB has notbeen OPENed for the operation. MostI/O requests require that the channelbe OPENed before a request can be made.
The IOCB specified is invalid. OnlyIOCB numbers $00, $10, $20, $30, $40,$50, $60, and $70 are valid. From somelanguages, these will be seen aschannels 0 to 7.
--150--

$87
$88
$89
$8A
135
136
137
138
File is read only. Program tried towrite to a file which can only be usedfor reading (i.e., file was OPENed withAUXI specified as 4 or 6.
End of file. No more data in file.
Truncated record error. Usually occursWhen the line you are reading is longerthen the maximum record size specifiedin the Call to CIa (line oriented I/O).Can't occur with binary I/O on version 2OS/A+.
Device timeout error. Usually set bythe serial bus I/O handler ("SIO")because a device did not respond withinthe alloted time as set by the as.
$8B 139 Device NAK error.error.
Atari: serial I/O
$8C
$8D
$8E
140
141
142
serial framing error. Atari: serial I/Oerror.
Cursor out of rang? for specificgraphics mode you are 1n. (Could beused for similar meaning by anon-graphics device.)
Serial bus overflow. Atari: computercould not respond fast enough to serialbus input (SIO error).
$8F 143 Checksum error.serial bus areerror) .
Communications over thegarbled (Atari SIO
$90
$91
$92
144
145
146
1) Device done error. A valid commandon the serial bus was not executedproperly. Atari: disk rotational speedneeds ad-justment. 2) Write protecterror. The diskette has a write protecttab in place.
Illegal screen mode error. Bad graphicsmode number. Other devices: AUXI and/orAUX2 bytes in IOCB are illegal.
This error means the function you triedto do has not been implemented in thedevice handler. (Example: attempt toPOINT with the graphics device.)
--151--

$93 147 Not enough RAM for the graphics mode yourequested. (Could be used by customdrivers for a similar message.)
NOTE: Errors $A0 through $AF are file manager errors.
$A0
$Al
$A2
$A3
$A4
$A5
$A6
$A7
160
161
162
163
164
165
166
167
Either a drive # NOT between 1-8 ordrive was not powered on.
Too many OPEN files. No free sectorbuffers to use for another file.
Disk FULL. No free space left on disk.
Fatal system error. Either DOS has bugor bad diskette.
File mismatch. Bad file structure orPOINT values wrong.
Bad file name. Check for illegal char-acters in file name. Version 4 is moreliberal in this regard than version 2.
The byte count in your POINT Call wasgreater then 125 (for single densityversion 2) or 253 (for double densityversion 2).
The file specified is locked(PROtected). Protected files cannot beerased or written to.
$A8 168 The software interface for thedevice received an invalid(example: tried to accessexistent track or sector).
specificcommanda non-
$A9
$AA
169
170
All space allocated for the directoryhas been used up (too many filenames inuse) .
The file you requested does not appearon this diskette.
$AB 171 You have tried to POINT to a bytefile that is not OPENed for(version 2 only).
in aupdate
$AC
$AD
172
173
Tried to OPEN a DOS 1 file with DOS II(version 2 only).
The disk drive has found bad sectorsWhile trying to format the disk.
--152--
