a guide to face detection in python...implementations of face detection including cascade...
TRANSCRIPT

8/24/2019 A guide to Face Detection in Python - Towards Data Science
https://towardsdatascience.com/a-guide-to-face-detection-in-python-3eab0f6b9fc1 1/26
A guide to Face Detection in PythonMaël FabienApr 5 · 14 min read
Greenland
In this tutorial, we’ll see how to create and launch a face detection algorithm in Python
using OpenCV and Dlib. We’ll also add some features to detect eyes and mouth on
multiple faces at the same time. This article will go through the most basic
implementations of face detection including Cascade Classifiers, HOG windows and
Deep Learning CNNs.
We’ll cover face detection using :
Haar Cascade Classifiers using OpenCV
Histogram of Oriented Gradients using Dlib

8/24/2019 A guide to Face Detection in Python - Towards Data Science
https://towardsdatascience.com/a-guide-to-face-detection-in-python-3eab0f6b9fc1 2/26
Convolutional Neural Networks using Dlib
This article was originally published on my personal blog :
https://maelfabien.github.io/tutorials/face-detection/#
The Github repository of this article (and all the others from my blog) can be found
here :
maelfabien/Machine_Learning_Tutorials
This repo contains exercises, code, tutorials andarticles of my personal blog —…
github.com
IntroductionWe’ll be using OpenCV, an open source library for computer vision, written in C/C++,
that has interfaces in C++, Python and Java. It supports Windows, Linux, MacOS, iOS
and Android. Some of our work will also require using Dlib, a modern C++ toolkit
containing machine learning algorithms and tools for creating complex software.
RequirementsThe first step is to install OpenCV, and Dlib. Run the following command :
pip install opencv-python
pip install dlib
Depending on your version, the file will be installed here :
/usr/local/lib/python3.7/site-packages/cv2
If you encounter some issues with Dlib, check this article.
Imports and models path

8/24/2019 A guide to Face Detection in Python - Towards Data Science
https://towardsdatascience.com/a-guide-to-face-detection-in-python-3eab0f6b9fc1 3/26
We’ll create a new Jupyter notebook / python file and start off with :
import cv2import matplotlib.pyplot as pltimport dlibfrom imutils import face_utils
font = cv2.FONT_HERSHEY_SIMPLEX
I. Cascade ClassifiersWe’ll explore Cascade Classifiers at first.
I.1. TheoryCascade classifier, or namely cascade of boosted classifiers working with haar-like
features, is a special case of ensemble learning, called boosting. It typically relies on
Adaboost classifiers (and other models such as Real Adaboost, Gentle Adaboost or
Logitboost).
Cascade classifiers are trained on a few hundred sample images of image that contain
the object we want to detect, and other images that do not contain those images.
How can we detect if a face is there or not ? There is an algorithm, called Viola–Jones
object detection framework, that includes all the steps required for live face detection :
Haar Feature Selection, features derived from Haar wavelets
Create integral image
Adaboost Training
Cascading Classifiers
The original paper was published in 2001.
I.1.a. Haar Feature SelectionThere are some common features that we find on most common human faces :
a dark eye region compared to upper-cheeks

8/24/2019 A guide to Face Detection in Python - Towards Data Science
https://towardsdatascience.com/a-guide-to-face-detection-in-python-3eab0f6b9fc1 4/26
a bright nose bridge region compared to the eyes
some specific location of eyes, mouth, nose…
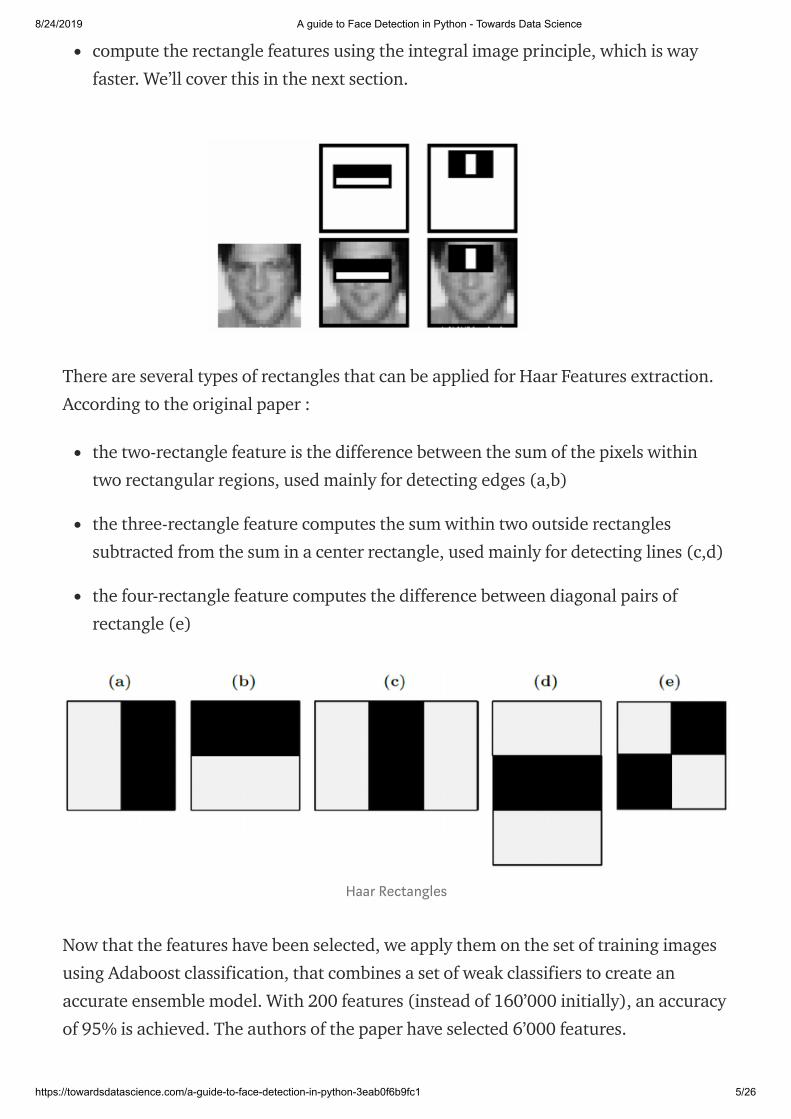
The characteristics are called Haar Features. The feature extraction process will look
like this :
Haar Features
In this example, the first feature measures the difference in intensity between the
region of the eyes and a region across the upper cheeks. The feature value is simply
computed by summing the pixels in the black area and subtracting the pixels in the
white area.
Then, we apply this rectangle as a convolutional kernel, over our whole image. In order
to be exhaustive, we should apply all possible dimensions and positions of each kernel.
A simple 24*24 images would typically result in over 160’000 features, each made of a
sum/subtraction of pixels values. It would computationally be impossible for live face
detection. So, how do we speed up this process ?
once the good region has been identified by a rectangle, it is useless to run the
window over a completely different region of the image. This can be achieved by
Adaboost.
8/24/2019 A guide to Face Detection in Python - Towards Data Science
https://towardsdatascience.com/a-guide-to-face-detection-in-python-3eab0f6b9fc1 5/26
compute the rectangle features using the integral image principle, which is way
faster. We’ll cover this in the next section.
There are several types of rectangles that can be applied for Haar Features extraction.
According to the original paper :
the two-rectangle feature is the difference between the sum of the pixels within
two rectangular regions, used mainly for detecting edges (a,b)
the three-rectangle feature computes the sum within two outside rectangles
subtracted from the sum in a center rectangle, used mainly for detecting lines (c,d)
the four-rectangle feature computes the difference between diagonal pairs of
rectangle (e)
Haar Rectangles
Now that the features have been selected, we apply them on the set of training images
using Adaboost classification, that combines a set of weak classifiers to create an
accurate ensemble model. With 200 features (instead of 160’000 initially), an accuracy
of 95% is achieved. The authors of the paper have selected 6’000 features.

8/24/2019 A guide to Face Detection in Python - Towards Data Science
https://towardsdatascience.com/a-guide-to-face-detection-in-python-3eab0f6b9fc1 6/26
I.1.b. The integral imageComputing the rectangle features in a convolutional kernel style can be long, very long.
For this reason, the authors, Viola and Jones, proposed an intermediate representation
for the image : the integral image. The role of the integral image is to allow any
rectangular sum to be computed simply, using only four values. We’ll see how it works !
Suppose we want to determine the rectangle features at a given pixel with coordinates
(x,y). Then, the integral image of the pixel in the sum of the pixels above and to the left
of the given pixel.
where ii(x,y) is the integral image and i(x,y) is the original image.
When you compute the whole integral image, there is a form a recurrence which
requires only one pass over the original image. Indeed, we can define the following pair
of recurrences :
where s(x,y) is the cumulative row sum and and s(x−1)=0, ii(−1,y)=0.
How can that be useful ? Well, consider a region D for which we would like to estimate
the sum of the pixels. We have defined 3 other regions : A, B and C.
The value of the integral image at point 1 is the sum of the pixels in rectangle A.
The value at point 2 is A + B
The value at point 3 is A + C
The value at point 4 is A + B + C + D.
Therefore, the sum of pixels in region D can simply be computed as : 4+1−(2+3).

8/24/2019 A guide to Face Detection in Python - Towards Data Science
https://towardsdatascience.com/a-guide-to-face-detection-in-python-3eab0f6b9fc1 7/26
And over a single pass, we have computed the value inside a rectangle using only 4
array references.
One should simply be aware that rectangles are quite simple features in practice, but
sufficient for face detection. Steerable filters tend to be more flexible when it comes to
complex problems.
Steerable Filters
I.1c. Learning the classification function with AdaboostGiven a set of labeled training images (positive or negative), Adaboost is used to :
8/24/2019 A guide to Face Detection in Python - Towards Data Science
https://towardsdatascience.com/a-guide-to-face-detection-in-python-3eab0f6b9fc1 8/26
select a small set of features
and train the classifier
Since most features among the 160’000 are supposed to be quite irrelevant, the weak
learning algorithm around which we build a boosting model is designed to select the
single rectangle feature which splits best negative and positive examples.
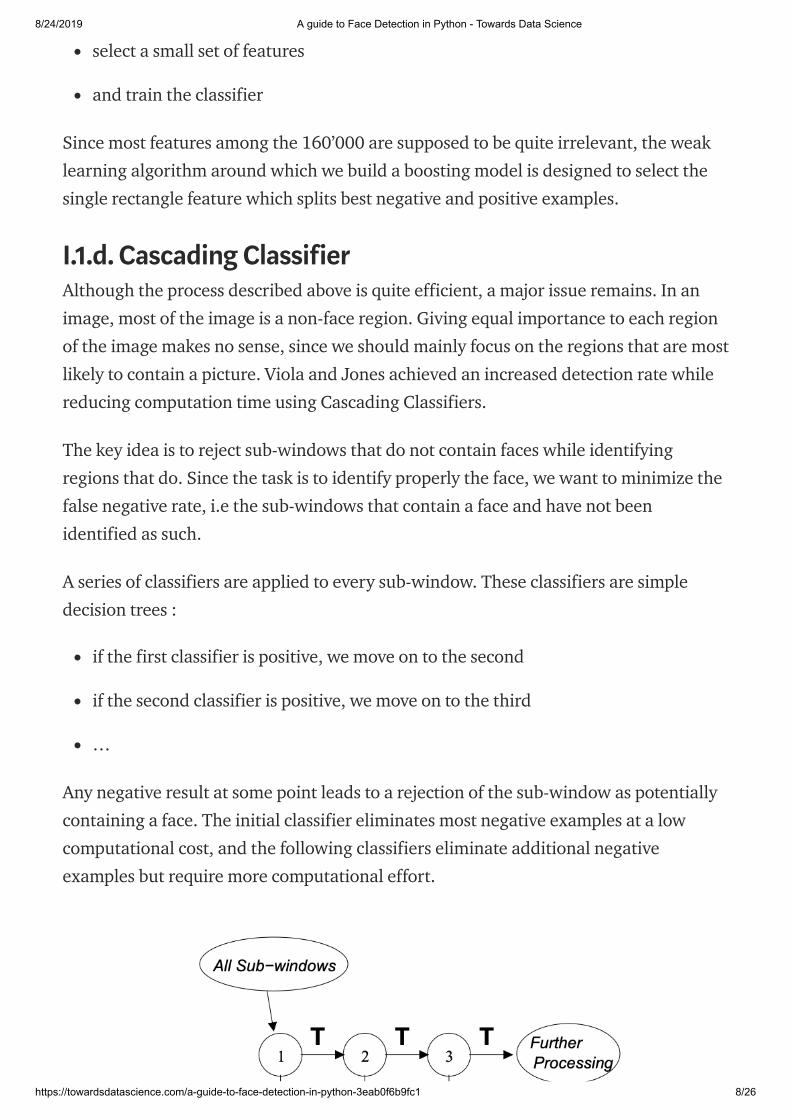
I.1.d. Cascading ClassifierAlthough the process described above is quite efficient, a major issue remains. In an
image, most of the image is a non-face region. Giving equal importance to each region
of the image makes no sense, since we should mainly focus on the regions that are most
likely to contain a picture. Viola and Jones achieved an increased detection rate while
reducing computation time using Cascading Classifiers.
The key idea is to reject sub-windows that do not contain faces while identifying
regions that do. Since the task is to identify properly the face, we want to minimize the
false negative rate, i.e the sub-windows that contain a face and have not been
identified as such.
A series of classifiers are applied to every sub-window. These classifiers are simple
decision trees :
if the first classifier is positive, we move on to the second
if the second classifier is positive, we move on to the third
…
Any negative result at some point leads to a rejection of the sub-window as potentially
containing a face. The initial classifier eliminates most negative examples at a low
computational cost, and the following classifiers eliminate additional negative
examples but require more computational effort.

8/24/2019 A guide to Face Detection in Python - Towards Data Science
https://towardsdatascience.com/a-guide-to-face-detection-in-python-3eab0f6b9fc1 9/26
The classifiers are trained using Adaboost and adjusting the threshold to minimize the
false rate. When training such model, the variables are the following :
the number of classifier stages
the number of features in each stage
the threshold of each stage
Luckily in OpenCV, this whole model is already pre-trained for face detection.
If you’d like to know more on Boosting techniques, I invite you to check my article on
Adaboost.
I.2. ImportsThe next step simply is to locate the pre-trained weights. We will be using default pre-
trained models to detect face, eyes and mouth. Depending on your version of Python,
the files should be located somewhere over here :
/usr/local/lib/python3.7/site-packages/cv2/data
Once identified, we’ll declare Cascade classifiers this way :
cascPath = "/usr/local/lib/python3.7/site-packages/cv2/data/haarcascade_frontalface_default.xml"eyePath = "/usr/local/lib/python3.7/site-packages/cv2/data/haarcascade_eye.xml"smilePath = "/usr/local/lib/python3.7/site-packages/cv2/data/haarcascade_smile.xml"
faceCascade = cv2.CascadeClassifier(cascPath)eyeCascade = cv2.CascadeClassifier(eyePath)smileCascade = cv2.CascadeClassifier(smilePath)

8/24/2019 A guide to Face Detection in Python - Towards Data Science
https://towardsdatascience.com/a-guide-to-face-detection-in-python-3eab0f6b9fc1 10/26
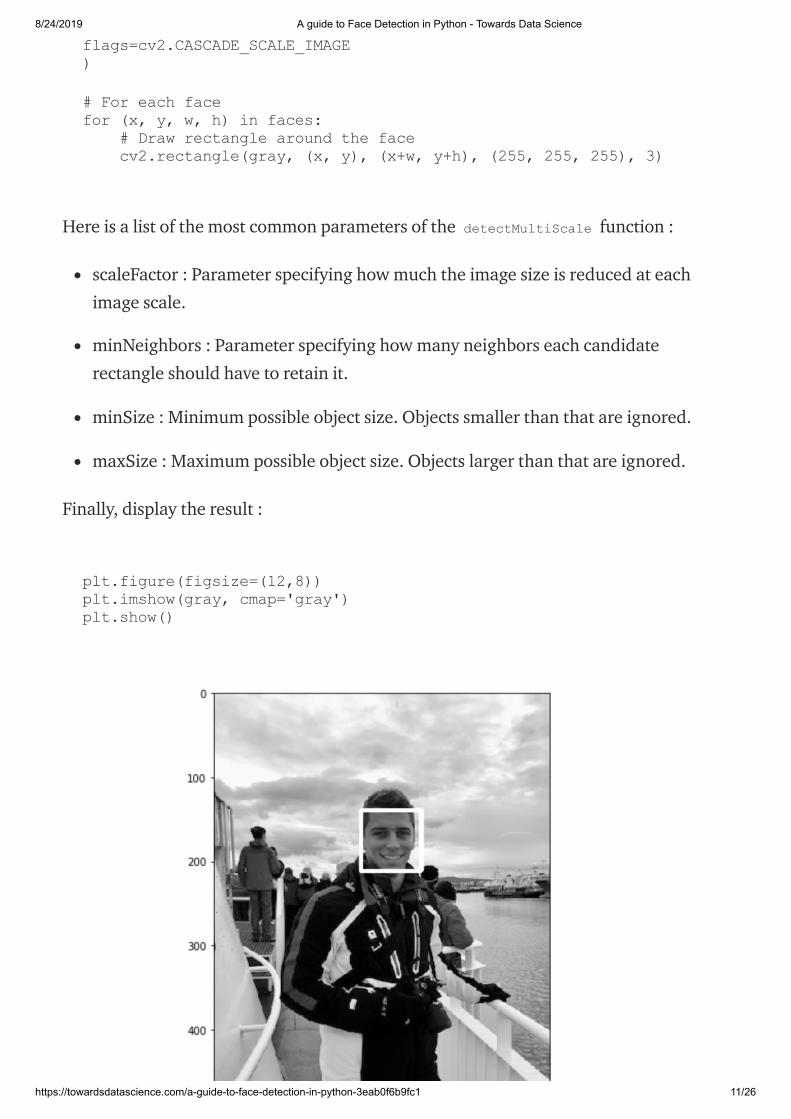
I.3. Detect face on an imageBefore implementing the real time face detection algorithm, let’s try a simple version
on an image. We can start by loading a test image :
# Load the imagegray = cv2.imread('face_detect_test.jpeg', 0)
plt.figure(figsize=(12,8))plt.imshow(gray, cmap='gray')plt.show()
Test image
Then, we detect the face and we add a rectangle around it :
# Detect facesfaces = faceCascade.detectMultiScale(gray,scaleFactor=1.1,minNeighbors=5,
8/24/2019 A guide to Face Detection in Python - Towards Data Science
https://towardsdatascience.com/a-guide-to-face-detection-in-python-3eab0f6b9fc1 11/26
flags=cv2.CASCADE_SCALE_IMAGE)
# For each facefor (x, y, w, h) in faces: # Draw rectangle around the face cv2.rectangle(gray, (x, y), (x+w, y+h), (255, 255, 255), 3)
Here is a list of the most common parameters of the detectMultiScale function :
scaleFactor : Parameter specifying how much the image size is reduced at each
image scale.
minNeighbors : Parameter specifying how many neighbors each candidate
rectangle should have to retain it.
minSize : Minimum possible object size. Objects smaller than that are ignored.
maxSize : Maximum possible object size. Objects larger than that are ignored.
Finally, display the result :
plt.figure(figsize=(12,8))plt.imshow(gray, cmap='gray')plt.show()

8/24/2019 A guide to Face Detection in Python - Towards Data Science
https://towardsdatascience.com/a-guide-to-face-detection-in-python-3eab0f6b9fc1 12/26
Face detection works well on our test image. Let’s move on to real time now !
I.4. Real time face detectionLet’s move on to the Python implementation of the live facial detection. The first step is
to launch the camera, and capture the video. Then, we’ll transform the image to a gray
scale image. This is used to reduce the dimension of the input image. Indeed, instead of
3 points per pixel describing Red, Green, Blue, we apply a simple linear transformation
:
This is implemented by default in OpenCV.
video_capture = cv2.VideoCapture(0)
while True: # Capture frame-by-frame ret, frame = video_capture.read() gray = cv2.cvtColor(frame, cv2.COLOR_BGR2GRAY)
Now, we’ll use the faceCascade variable define above, which contains a pre-trained
algorithm, and apply it to the gray scale image.
faces = faceCascade.detectMultiScale( gray, scaleFactor=1.1, minNeighbors=5, minSize=(30, 30), flags=cv2.CASCADE_SCALE_IMAGE )
For each face detected, we’ll draw a rectangle around the face :

8/24/2019 A guide to Face Detection in Python - Towards Data Science
https://towardsdatascience.com/a-guide-to-face-detection-in-python-3eab0f6b9fc1 13/26
for (x, y, w, h) in faces: if w > 250 : cv2.rectangle(frame, (x, y), (x+w, y+h), (255, 0, 0), 3) roi_gray = gray[y:y+h, x:x+w] roi_color = frame[y:y+h, x:x+w]
For each mouth detected, draw a rectangle around it :
smile = smileCascade.detectMultiScale( roi_gray, scaleFactor= 1.16, minNeighbors=35, minSize=(25, 25), flags=cv2.CASCADE_SCALE_IMAGE ) for (sx, sy, sw, sh) in smile: cv2.rectangle(roi_color, (sh, sy), (sx+sw, sy+sh), (255, 0, 0), 2) cv2.putText(frame,'Smile',(x + sx,y + sy), 1, 1, (0, 255, 0), 1)
For each eye detected, draw a rectangle around it :
eyes = eyeCascade.detectMultiScale(roi_gray) for (ex,ey,ew,eh) in eyes: cv2.rectangle(roi_color,(ex,ey),(ex+ew,ey+eh),(0,255,0),2) cv2.putText(frame,'Eye',(x + ex,y + ey), 1, 1, (0, 255, 0), 1)
Then, count the total number of faces, and display the overall image :
cv2.putText(frame,'Number of Faces : ' + str(len(faces)),(40, 40), font, 1,(255,0,0),2) # Display the resulting frame cv2.imshow('Video', frame)
And implement an exit option when we want to stop the camera by pressing q :
if cv2.waitKey(1) & 0xFF == ord('q'): break

8/24/2019 A guide to Face Detection in Python - Towards Data Science
https://towardsdatascience.com/a-guide-to-face-detection-in-python-3eab0f6b9fc1 14/26
Finally, when everything is done, release the capture and destroy all windows. There
are some troubles killing windows on Mac which might require killing Python from the
Activity Manager later on.
video_capture.release()cv2.destroyAllWindows()
I.5. Wrapping it up
1
2
3
4
5
6
7
8
9
10
11
12
13
14
15
16
17
18
19
20
21
22
23
24
25
26
27
28
29
30
31
32
33
34
35
import cv2
cascPath = "/usr/local/lib/python3.7/site-packages/cv2/data/haarcascade_frontalface_default.xml
eyePath = "/usr/local/lib/python3.7/site-packages/cv2/data/haarcascade_eye.xml"
smilePath = "/usr/local/lib/python3.7/site-packages/cv2/data/haarcascade_smile.xml"
faceCascade = cv2.CascadeClassifier(cascPath)
eyeCascade = cv2.CascadeClassifier(eyePath)
smileCascade = cv2.CascadeClassifier(smilePath)
font = cv2.FONT_HERSHEY_SIMPLEX
video_capture = cv2.VideoCapture(0)
while True:
# Capture frame-by-frame
ret, frame = video_capture.read()
gray = cv2.cvtColor(frame, cv2.COLOR_BGR2GRAY)
faces = faceCascade.detectMultiScale(
gray,
scaleFactor=1.1,
minNeighbors=5,
minSize=(200, 200),
flags=cv2.CASCADE_SCALE_IMAGE
)
# Draw a rectangle around the faces
for (x, y, w, h) in faces:
cv2.rectangle(frame, (x, y), (x+w, y+h), (255, 0, 0), 3)
roi_gray = gray[y:y+h, x:x+w]
roi_color = frame[y:y+h, x:x+w]
cv2.putText(frame,'Face',(x, y), font, 2,(255,0,0),5)
il il C d d t tM ltiS l (

8/24/2019 A guide to Face Detection in Python - Towards Data Science
https://towardsdatascience.com/a-guide-to-face-detection-in-python-3eab0f6b9fc1 15/26
I.6. ResultsI’ve made a quick YouTube illustration of the face detection algorithm.
35
36
37
38
39
40
41
42
43
44
45
46
47
48
49
50
51
52
53
54
55
56
57
58
59
60
61
smile = smileCascade.detectMultiScale(
roi_gray,
scaleFactor= 1.16,
minNeighbors=35,
minSize=(25, 25),
flags=cv2.CASCADE_SCALE_IMAGE
)
for (sx, sy, sw, sh) in smile:
cv2.rectangle(roi_color, (sh, sy), (sx+sw, sy+sh), (255, 0, 0), 2)
cv2.putText(frame,'Smile',(x + sx,y + sy), 1, 1, (0, 255, 0), 1)
eyes = eyeCascade.detectMultiScale(roi_gray)
for (ex,ey,ew,eh) in eyes:
cv2.rectangle(roi_color,(ex,ey),(ex+ew,ey+eh),(0,255,0),2)
cv2.putText(frame,'Eye',(x + ex,y + ey), 1, 1, (0, 255, 0), 1)
cv2.putText(frame,'Number of Faces : ' + str(len(faces)),(40, 40), font, 1,(255,0,0),2)
# Display the resulting frame
cv2.imshow('Video', frame)
if cv2.waitKey(1) & 0xFF == ord('q'):
break
# When everything is done, release the capture
video_capture.release()
cv2.destroyAllWindows()
This embedded content is from a site that does not comply with theDo Not Track (DNT) setting now enabled on your browser.
Please note, if you click through and view it anyway, you may betracked by the website hosting the embed.
Learn More about Medium's DNT policy
8/24/2019 A guide to Face Detection in Python - Towards Data Science
https://towardsdatascience.com/a-guide-to-face-detection-in-python-3eab0f6b9fc1 16/26
II. Histogram of Oriented Gradients (HOG) in DlibThe second most popular implement for face detection is offered by Dlib and uses a
concept called Histogram of Oriented Gradients (HOG). This is an implementation of
the original paper by Dalal and Triggs.
II.1. TheoryThe idea behind HOG is to extract features into a vector, and feed it into a classification
algorithm like a Support Vector Machine for example that will assess whether a face (or
any object you train it to recognize actually) is present in a region or not.
The features extracted are the distribution (histograms) of directions of gradients
(oriented gradients) of the image. Gradients are typically large around edges and
corners and allow us to detect those regions.
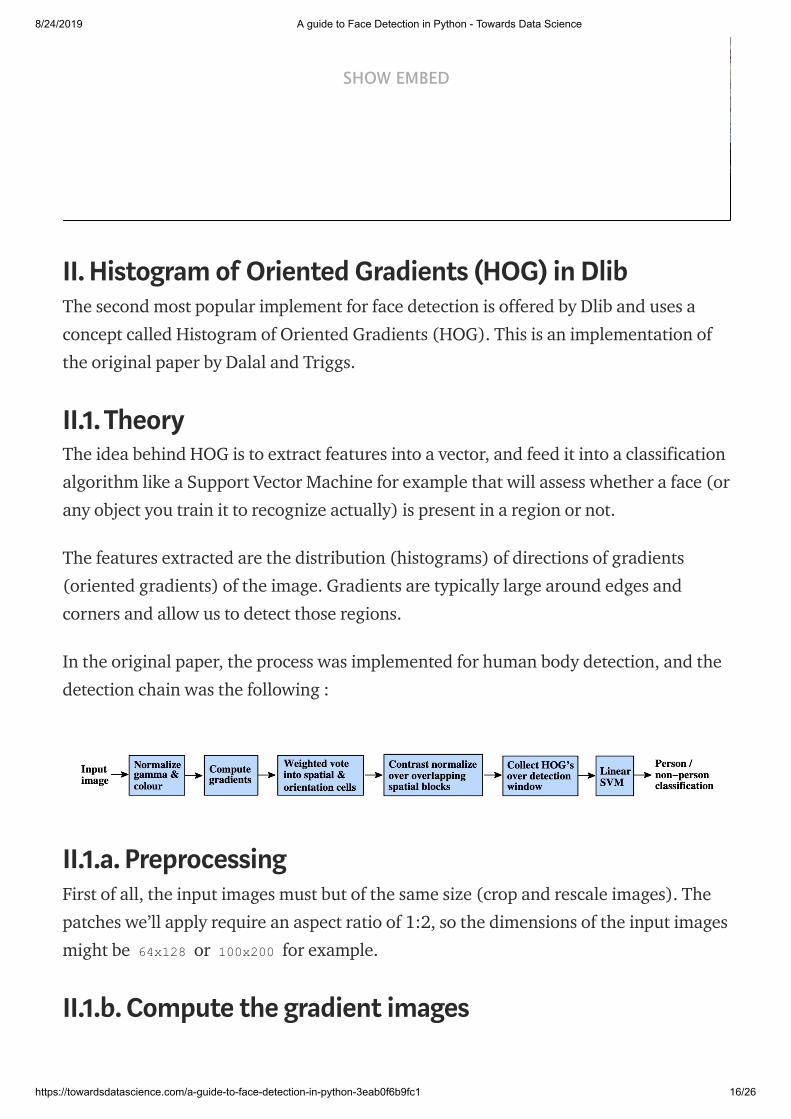
In the original paper, the process was implemented for human body detection, and the
detection chain was the following :
II.1.a. PreprocessingFirst of all, the input images must but of the same size (crop and rescale images). The
patches we’ll apply require an aspect ratio of 1:2, so the dimensions of the input images
might be 64x128 or 100x200 for example.
II.1.b. Compute the gradient images
SHOW EMBED

8/24/2019 A guide to Face Detection in Python - Towards Data Science
https://towardsdatascience.com/a-guide-to-face-detection-in-python-3eab0f6b9fc1 17/26
The first step is to compute the horizontal and vertical gradients of the image, by
applying the following kernels :
Kernels to compute the gradients
The gradient of an image typically removes non-essential information.
The gradient of the image we were considering above can be found this way in Python :
gray = cv2.imread('images/face_detect_test.jpeg', 0)
im = np.float32(gray) / 255.0
# Calculate gradient gx = cv2.Sobel(im, cv2.CV_32F, 1, 0, ksize=1)gy = cv2.Sobel(im, cv2.CV_32F, 0, 1, ksize=1)mag, angle = cv2.cartToPolar(gx, gy, angleInDegrees=True)
And plot the picture :
plt.figure(figsize=(12,8))plt.imshow(mag)plt.show()

8/24/2019 A guide to Face Detection in Python - Towards Data Science
https://towardsdatascience.com/a-guide-to-face-detection-in-python-3eab0f6b9fc1 18/26
We have not pre-processed the image before though.
II.1.c. Compute the HOGThe image is then divided into 8x8 cells to offer a compact representation and make
our HOG more robust to noise. Then, we compute a HOG for each of those cells.
To estimate the direction of a gradient inside a region, we simply build a histogram
among the 64 values of the gradient directions (8x8) and their magnitude (another 64
values) inside each region. The categories of the histogram correspond to angles of the
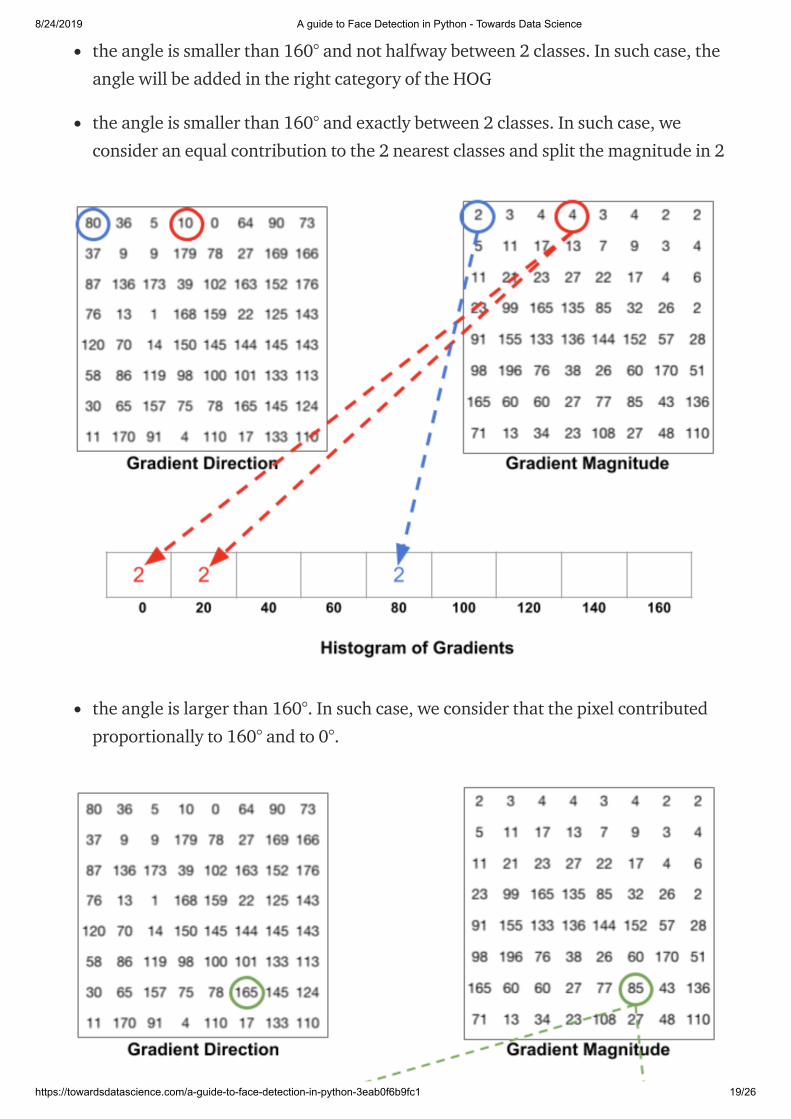
gradient, from 0 to 180°. Ther are 9 categories overall : 0°, 20°, 40°… 160°.
The code above gave us 2 information :
direction of the gradient
and magnitude of the gradient
When we build the HOG, there are 3 subcases :
8/24/2019 A guide to Face Detection in Python - Towards Data Science
https://towardsdatascience.com/a-guide-to-face-detection-in-python-3eab0f6b9fc1 19/26
the angle is smaller than 160° and not halfway between 2 classes. In such case, the
angle will be added in the right category of the HOG
the angle is smaller than 160° and exactly between 2 classes. In such case, we
consider an equal contribution to the 2 nearest classes and split the magnitude in 2
the angle is larger than 160°. In such case, we consider that the pixel contributed
proportionally to 160° and to 0°.

8/24/2019 A guide to Face Detection in Python - Towards Data Science
https://towardsdatascience.com/a-guide-to-face-detection-in-python-3eab0f6b9fc1 20/26
The HOG looks like this for each 8x8 cell :
HoG
II.1.d. Block normalizationFinally, a 16x16 block can be applied in order to normalize the image and make it
invariant to lighting for example. This is simply achieved by dividing each value of the
HOG of size 8x8 by the L2-norm of the HOG of the 16x16 block that contains it, which
is in fact a simple vector of length 9*4 = 36 .
II.1.e. Block normalizationFinally, all the 36x1 vectors are concatenated into a large vector. And we are done ! We
have our feature vector, on which we can train a soft SVM classifier (C=0.01).
8/24/2019 A guide to Face Detection in Python - Towards Data Science
https://towardsdatascience.com/a-guide-to-face-detection-in-python-3eab0f6b9fc1 21/26
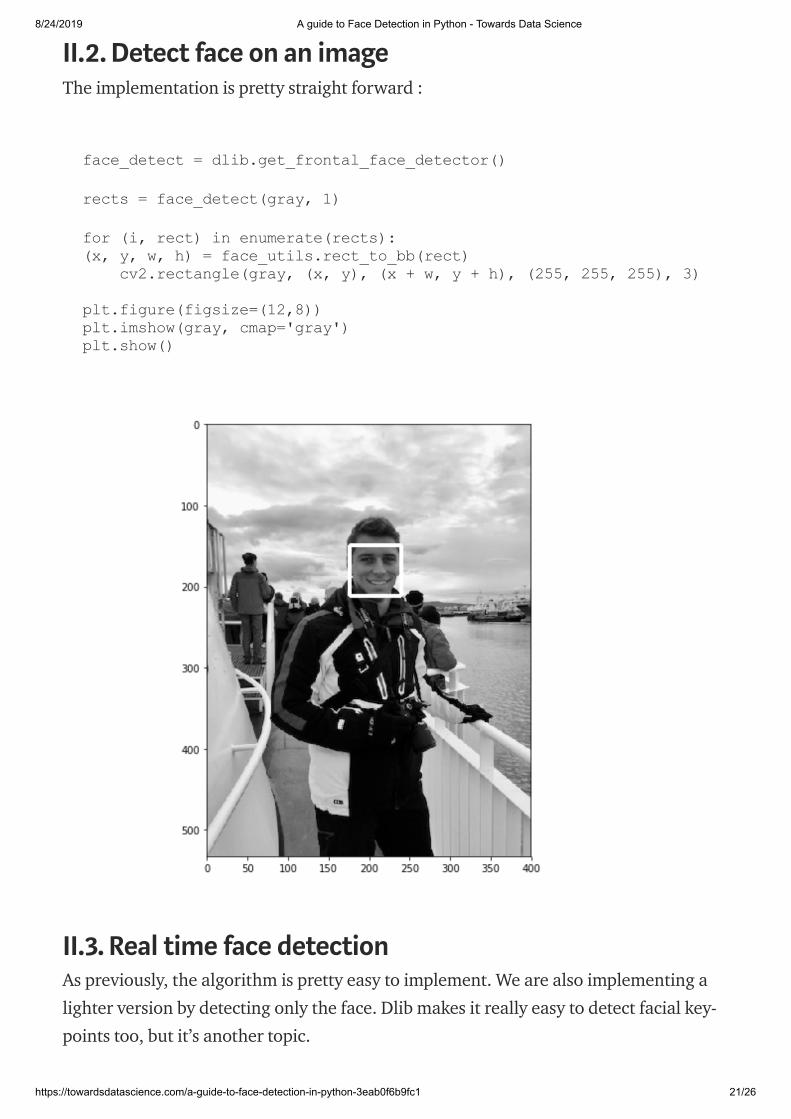
II.2. Detect face on an imageThe implementation is pretty straight forward :
face_detect = dlib.get_frontal_face_detector()
rects = face_detect(gray, 1)
for (i, rect) in enumerate(rects):(x, y, w, h) = face_utils.rect_to_bb(rect) cv2.rectangle(gray, (x, y), (x + w, y + h), (255, 255, 255), 3) plt.figure(figsize=(12,8))plt.imshow(gray, cmap='gray')plt.show()
II.3. Real time face detectionAs previously, the algorithm is pretty easy to implement. We are also implementing a
lighter version by detecting only the face. Dlib makes it really easy to detect facial key-
points too, but it’s another topic.

8/24/2019 A guide to Face Detection in Python - Towards Data Science
https://towardsdatascience.com/a-guide-to-face-detection-in-python-3eab0f6b9fc1 22/26
III. Convolutional Neural Network in DlibThis last method is based on Convolutional Neural Networks (CNN). It also implements
a paper on Max-Margin Object Detection (MMOD) for enhanced results.
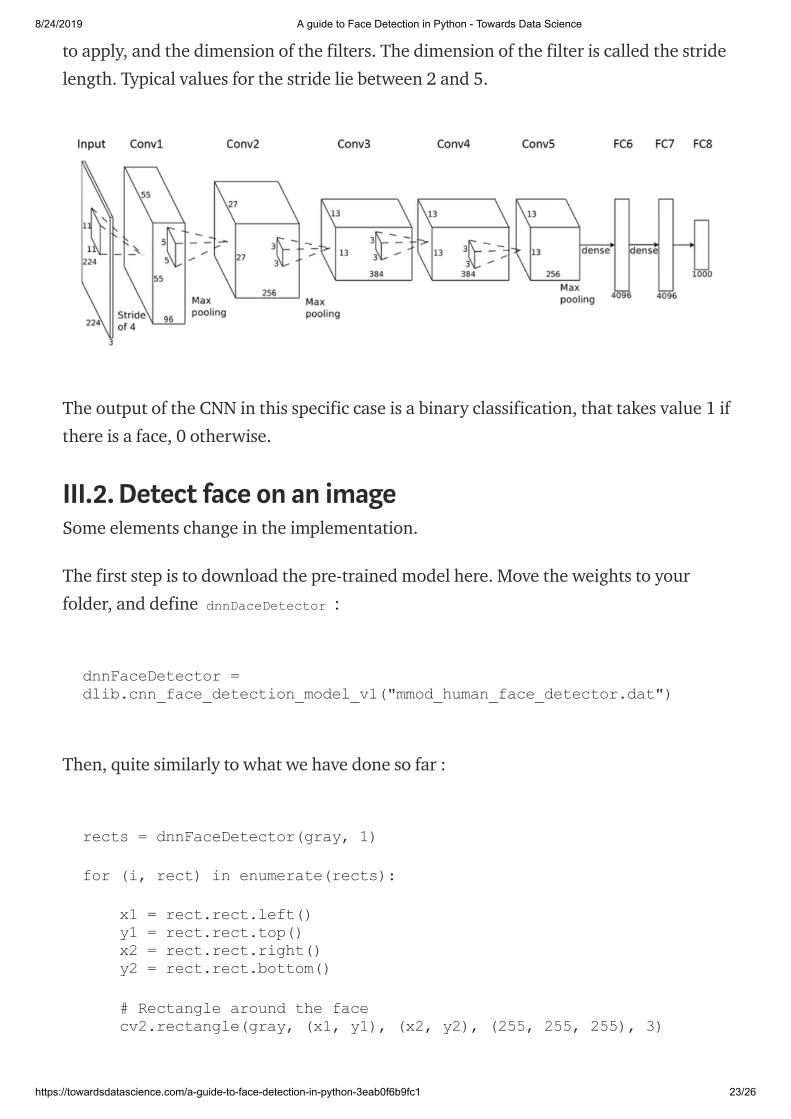
III.1. A bit of theoryConvolutional Neural Network (CNN) are feed-forward neural network that are mostly
used for computer vision. They offer an automated image pre-treatment as well as a
dense neural network part. CNNs are special types of neural networks for processing
datas with grid-like topology. The architecture of the CNN is inspired by the visual
cortex of animals.
In previous approaches, a great part of the work was to select the filters in order to
create the features in order to extract as much information from the image as possible.
With the rise of deep learning and greater computation capacities, this work can now
be automated. The name of the CNNs comes from the fact that we convolve the initial
image input with a set of filters. The parameter to choose remains the number of filters
view raw
1
2
3
4
5
6
7
8
9
10
11
12
13
14
15
16
17
18
19
20
21
22
23
Face detect dlib hosted with❤ by GitHub
video_capture = cv2.VideoCapture(0)
flag = 0
while True:
ret, frame = video_capture.read()
gray = cv2.cvtColor(frame, cv2.COLOR_BGR2GRAY)
rects = face_detect(gray, 1)
for (i, rect) in enumerate(rects):
(x, y, w, h) = face_utils.rect_to_bb(rect)
cv2.rectangle(frame, (x, y), (x + w, y + h), (0, 255, 0), 2)
cv2.imshow('Video', frame)
if cv2.waitKey(1) & 0xFF == ord('q'):
break
video_capture.release()
cv2.destroyAllWindows()
8/24/2019 A guide to Face Detection in Python - Towards Data Science
https://towardsdatascience.com/a-guide-to-face-detection-in-python-3eab0f6b9fc1 23/26
to apply, and the dimension of the filters. The dimension of the filter is called the stride
length. Typical values for the stride lie between 2 and 5.
The output of the CNN in this specific case is a binary classification, that takes value 1 if
there is a face, 0 otherwise.
III.2. Detect face on an imageSome elements change in the implementation.
The first step is to download the pre-trained model here. Move the weights to your
folder, and define dnnDaceDetector :
dnnFaceDetector = dlib.cnn_face_detection_model_v1("mmod_human_face_detector.dat")
Then, quite similarly to what we have done so far :
rects = dnnFaceDetector(gray, 1)
for (i, rect) in enumerate(rects):
x1 = rect.rect.left() y1 = rect.rect.top() x2 = rect.rect.right() y2 = rect.rect.bottom()
# Rectangle around the face cv2.rectangle(gray, (x1, y1), (x2, y2), (255, 255, 255), 3)
8/24/2019 A guide to Face Detection in Python - Towards Data Science
https://towardsdatascience.com/a-guide-to-face-detection-in-python-3eab0f6b9fc1 24/26
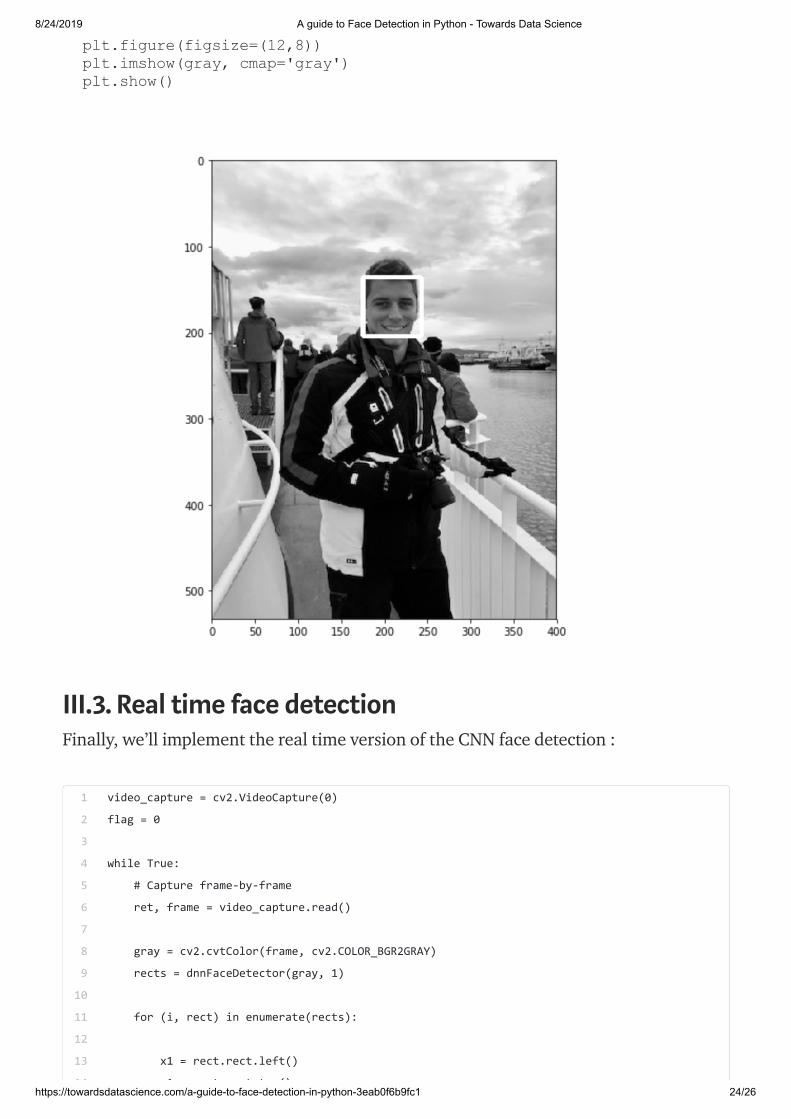
plt.figure(figsize=(12,8))plt.imshow(gray, cmap='gray')plt.show()
III.3. Real time face detectionFinally, we’ll implement the real time version of the CNN face detection :
1
2
3
4
5
6
7
8
9
10
11
12
13
14
video_capture = cv2.VideoCapture(0)
flag = 0
while True:
# Capture frame-by-frame
ret, frame = video_capture.read()
gray = cv2.cvtColor(frame, cv2.COLOR_BGR2GRAY)
rects = dnnFaceDetector(gray, 1)
for (i, rect) in enumerate(rects):
x1 = rect.rect.left()
1 t t t ()

8/24/2019 A guide to Face Detection in Python - Towards Data Science
https://towardsdatascience.com/a-guide-to-face-detection-in-python-3eab0f6b9fc1 25/26
IV. Which one to choose ?Tough question, but we’ll just go through 2 metrics that are important :
the computation time
the accuracy
In terms of speed, HoG seems to be the fastest algorithm, followed by Haar Cascade
classifier and CNNs.
However, CNNs in Dlib tend to be the most accurate algorithm. HoG perform pretty
well but have some issues identifying small faces. HaarCascade Classifiers perform
around as good as HoG overall.
I have personally used mainly HoG in my personal projects due to its speed for live face
detection.
Conclusion : I hope you enjoyed this quick tutorial on OpenCV and Dlib for face detection.
Don’t hesitate to drop a comment if you have any question/remark.
V. Sources :HOG
DLIB
i
14
15
16
17
18
19
20
21
22
23
24
25
26
27
28
29
f d h d i h❤ b Gi H b
y1 = rect.rect.top()
x2 = rect.rect.right()
y2 = rect.rect.bottom()
# Rectangle around the face
cv2.rectangle(frame, (x1, y1), (x2, y2), (0, 255, 0), 2)
# Display the video output
cv2.imshow('Video', frame)
# Quit video by typing Q
if cv2.waitKey(1) & 0xFF == ord('q'):
break
video_capture.release()
cv2.destroyAllWindows()

8/24/2019 A guide to Face Detection in Python - Towards Data Science
https://towardsdatascience.com/a-guide-to-face-detection-in-python-3eab0f6b9fc1 26/26
Viola-Jones Paper
Face Detection 1
Face Detection 2
Face Detection 3
DetectMultiScale
Viola-Jones
Machine Learning Towards Data Science Data Science Arti�cial Intelligence
Computer Vision
About Help Legal