a guide to ecg cloud for systmone users - … guide to ecg cloud for systmone users welcome to your...
TRANSCRIPT

A Guide to ECG Cloud for SystmOne Users
Welcome to your new ECG Cloud service. This equipment has been tested to work with your
Virtual Desktop supplied by your local IT Service and will allow a clinician to request the
following tests for a patient:
● 12‐lead ECG test
● 24 hour holter analysis
● 24hour ambulatory blood pressure test
The tests are performed within the practice however the clinician has the option to send the
data for expert analysis without the need for secondary care referral.
All test data is held within a centralised secure server environment with each test identified by
a unique ID. The unique ID allows the test data to be analysed by a cardiology service provider
without disclosing the identity of the patient.
ECG Cloud is fully integrated with SystmOne to save you time. Some initial setup work is
required and the purpose of this manual is to guide through the setup process and ongoing
operation of the service.
1 ECG Cloud Instructions
Revision date – May 2014 ©Technomed Telemedicine Ltd. and NHS West and South Yorkshire and Bassetlaw CSU, 2014

Index
Logging on to ECG Cloud
Creating the ECG Cloud referral button
Adding the ECG Cloud button to your SystmOne tool bar
Completing Integration with SystmOne
Requesting a test
Performing an ECG
Checking the quality of the ECG
Performing a 24 hour ambulatory BP – prepare the device
Performing a 24 hour ambulatory BP – download BP device data
Performing a 24 hour ambulatory BP – retrieve the study document
Performing a 24 hour Holter
Receiving a test
Finding a particular test
Forwarding a report
Importing test results into SystmOne
ECG Cloud System Administrator Guides
Access the Practice Manager tools
Update Practice Settings
Create a new user
Update an existing user
Delete existing user(s)
Reset a password
2 ECG Cloud Instructions
Revision date – May 2014 ©Technomed Telemedicine Ltd. and NHS West and South Yorkshire and Bassetlaw CSU, 2014

3 ECG Cloud Instructions
Revision date – May 2014 ©Technomed Telemedicine Ltd. and NHS West and South Yorkshire and Bassetlaw CSU, 2014

Logging on to ECG Cloud
This guide explains how to login to ECG Cloud. Your system administrator (your Practice Manager) will provide
you with your username and password.
Step Action Result and Note
1 Double click on the ECG Cloud icon on your
desktop
The ECG Cloud login screen will appear
2 Enter your username in the Username or
Email field. This is normally your NHS email
address
3 Enter your password in the Password field
and click Log In
The ECG Cloud home screen will appear
TIP: If you cannot remember your password, please click on the Forgotten your password link on the ECG Cloud home screen
4 ECG Cloud Instructions
Revision date – May 2014 ©Technomed Telemedicine Ltd. and NHS West and South Yorkshire and Bassetlaw CSU, 2014
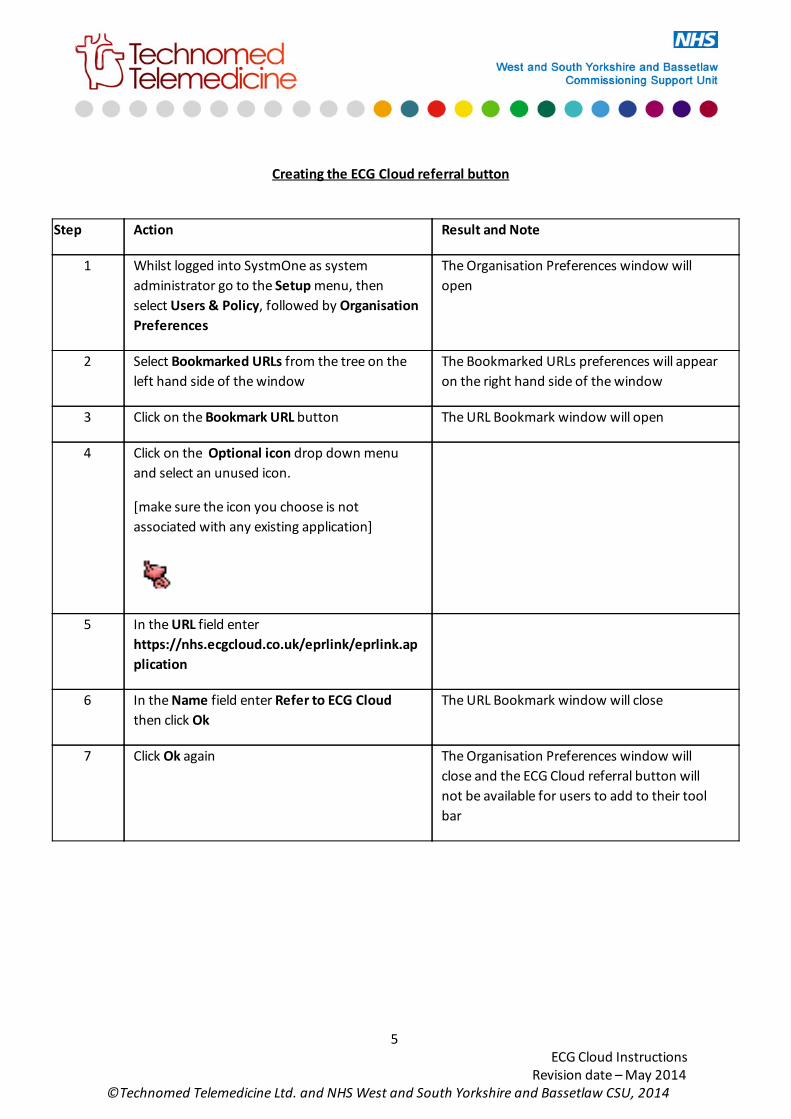
Creating the ECG Cloud referral button
Step Action Result and Note
1 Whilst logged into SystmOne as system
administrator go to the Setup menu, then
select Users & Policy, followed by Organisation
Preferences
The Organisation Preferences window will
open
2 Select Bookmarked URLs from the tree on the
left hand side of the window
The Bookmarked URLs preferences will appear
on the right hand side of the window
3 Click on the Bookmark URL button The URL Bookmark window will open
4 Click on the Optional icon drop down menu
and select an unused icon.
[make sure the icon you choose is not
associated with any existing application]
5 In the URL field enter
https://nhs.ecgcloud.co.uk/eprlink/eprlink.ap
plication
6 In the Name field enter Refer to ECG Cloud
then click Ok
The URL Bookmark window will close
7 Click Ok again The Organisation Preferences window will
close and the ECG Cloud referral button will
not be available for users to add to their tool
bar
5 ECG Cloud Instructions
Revision date – May 2014 ©Technomed Telemedicine Ltd. and NHS West and South Yorkshire and Bassetlaw CSU, 2014

Adding the ECG Cloud button to your SystmOne tool bar
Step Action Result and Note
1 Whilst logged into SystmOne right click on
the Quick Action tool bar, then select
Configure Tool Bar
The Tool Bar Configuration window will open
2 Left click on the tool bar you would like to
add the ECG Cloud button to, then click the
Amend Tool Bar button
The Configure Tool Bar window will open
3 Type ECG in the search field, then click Search Results matching your criteria will appear
4 Double click on the Refer to ECG Cloud
bookmark, then click Ok
The Configure Tool Bar window will close
5 Click Ok The Tool Bar Configuration window will close
and the ECG Cloud button will be appear on
your tool bar
INFO: Your system administrator will need to add the ‘Refer to ECG Cloud’ bookmark to you ‘Organisation Preferences’ before you can add it to your tool bar
6 ECG Cloud Instructions
Revision date – May 2014 ©Technomed Telemedicine Ltd. and NHS West and South Yorkshire and Bassetlaw CSU, 2014

Completing Integration with SystmOne
Step Action Result and Note
1 Whilst logged into SystmOne, click on the
System menu followed by PC Settings
The PC Settings window will open
2 Select Client Integration from the tree on the
left hand side of the screen
The Client Integration options will appear
3 Tick the Enable Client Integration box and
click Ok
The PC Settings window will close
4 Open the appropriate patient record, then
click the Refer to ECG Cloud button in the
Quick Action Toolbar
The Authenticate to complete installation
window will appear
5 Enter your NHS email address in the Email
address field, and your Password in the
password field, then click Login
The Select Location window will appear
6 Select your location from the dropdown box
and click OK
The ECG Cloud Referral window will appear
7 Select the test type from the dropdown box
then click Select
The Device Connected window will appear
8 Click Allow Connection A browser window will appear showing the
referral details
9 Complete the referral as you normally would
INFO: A demonstration video is available on the internet at http://www.technomedtm.co.uk/support/technical‐support/allow‐ecg‐cloud‐connect‐systemone/
7 ECG Cloud Instructions
Revision date – May 2014 ©Technomed Telemedicine Ltd. and NHS West and South Yorkshire and Bassetlaw CSU, 2014

Requesting a test
Step Action Result and Note
1 Whilst logged into SystmOne, open the
appropriate patient record, then click the ECG
Cloud referral button in the toolbar.
The ECG Cloud Referral window will open
2 Select the appropriate test type from the
drop down menu, then click Select
ECG Cloud will open in a new window with the
patients details automatically transferred
3 Complete the remainder of the form ensuring that you have included:
● Reason for test ● Relevant medical history ● Currently prescribed information
Then click Next
The Unique Job number is displayed
4 Click the View Patient Referral Form button The referral details will be displayed
5 Click Print to print the referral record and 2D
barcode (the 2D barcode is used for ECG
demographic data entry
INFO: A demonstration video is available on the internet at http://www.technomedtm.co.uk/support/operator‐support/register‐patient‐directly‐tpp‐systmone/
8 ECG Cloud Instructions
Revision date – May 2014 ©Technomed Telemedicine Ltd. and NHS West and South Yorkshire and Bassetlaw CSU, 2014

Performing an ECG
Step Action Result and Note
1 Firmly place the ECG machine in the docking
station and press the power button to switch
on
2 Press the F1 button (ID) A blank form will appear
3 Scan the 2D barcode at the top of the referral
form
[TIP: You can also enter the information
manually]
The patients details will appear on screen
4 Remove the ECG machine from the docking
station and connect it to the patient
5 Press the F6 button (Done)
6 Wait for four screens of clear ECG then press
Auto
The word Done will appear at the bottom of the
screen
7 Firmly replace the ECG machine in the
docking station
8 Press the XMT button to transmit the data The Transmission Status will appear on the
screen
INFO: A demonstration video is available on the internet at: http://www.technomedtm.co.uk/support/operator‐support/perform‐resting‐ecg/
9 ECG Cloud Instructions
Revision date – May 2014 ©Technomed Telemedicine Ltd. and NHS West and South Yorkshire and Bassetlaw CSU, 2014

Checking the quality of the ECG
Step Action Result and Note
1 Login into ECG Cloud (see the ‘Logging On’
guide for instructions on how to do this),
then select the Hub Port icon
The Hub Port screen will appear
2 If you have more than one ECG machine at
your practice, click View next to the
appropriate ECG machine to select the
machine that you are transmitting from
3 Perform and transmit the ECG (see
‘Performing an ECG’ guide for instructions on
how to do this)
After a few seconds the ECG will appear on
screen (the length of time this takes is
dependent on the internet connection)
4 Review the ECG quality and complete the
short form, clicking Accept if the ECG quality
is good, or Reject if the ECG quality is poor.
The Hub Port acceptance screen will appear
INFO: A demonstration video is available on the internet at http://www.technomedtm.co.uk/support/operator‐support/verify‐quality‐recorded‐ecg‐hub‐port/
10 ECG Cloud Instructions
Revision date – May 2014 ©Technomed Telemedicine Ltd. and NHS West and South Yorkshire and Bassetlaw CSU, 2014

Performing a 24 hour ambulatory BP – prepare the device
Step Action Result and Note
1 Connect the device to the PC using the USB
cable then login to ECG Cloud.
2 Click on the Prepare 24 Hr BP Device icon The Prepare 24 Hr BP Device screen will appear
3 Input the patient detail using the relevant
method below
With a Job Number Without a Job Number
A Under Option 1 enter the Job Number from
the ECG Cloud Referral Form
Under Option 2 select Blood Pressure from the
drop down menu
B Click Proceed Click Proceed
C Complete the patient referral Form where
required
D Click Next
4 Confirm the details are correct and click
Confirm
5 Click Prepare Device – if prompted with the
standard security warning click Run
6 Allow for Device Detection
7 Review and amend the schedule if necessary
8 Click Program Device The device will make a further beep sound
9 Click Ok You can now disconnect the device from the PC
11 ECG Cloud Instructions
Revision date – May 2014 ©Technomed Telemedicine Ltd. and NHS West and South Yorkshire and Bassetlaw CSU, 2014

Performing a 24 hour ambulatory BP – download BP device data
IMPORTANT – before you download any data from the Suntech Oscar2 Device you must end
the study. Without doing so the device will continue to take recordings and may cause
problems when preparing future studies.
Step Action Result and Note
1 Connect the device to the PC using the USB
cable then login to ECG Cloud.
2 Click on the Prepare 24 Hr BP Device icon
3 Click Launch BP Download Software – if
prompted with the standard security
warning click Run
4 Allow for device detection
5 Click the Download button in the bottom
right hand corner of the Device Manager
You will hear a series of bleeps from the device
6 After the bleeps have finished click Ok and
disconnect the device from the PC
12 ECG Cloud Instructions
Revision date – May 2014 ©Technomed Telemedicine Ltd. and NHS West and South Yorkshire and Bassetlaw CSU, 2014

Performing a 24 hour ambulatory BP – retrieve the study document
Step Action Result and Note
1 Whilst logged into ECG Cloud click on the
Home link at the top of the page to return to
the Home screen
The Home screen will appear
2 Click on the Reports View and Search icon The Reports View and Search screen will appear
3 Click on the Blood Pressure tab A list of tests/studies are listed in descending
date and time order
4 Find the patient study you are looking for in
the list and click on the View/Download
button
The patient study will now open
13 ECG Cloud Instructions
Revision date – May 2014 ©Technomed Telemedicine Ltd. and NHS West and South Yorkshire and Bassetlaw CSU, 2014

Performing a 24 hour Holter
Step Action Result and Note
1 Go to the ECG Cloud login screen (see the
‘Logging On’ guide for instructions on how to
do this), then click on the Refer Patient
option at the bottom of the screen
The Find Your Practice screen will appear
2 Enter your practice postcode in the Practice
Postcode field, then select your practice from
the dropdown list
The test Type selection field will appear
3 Select the appropriate test from the drop
down menu and click the Next button
The Patient Detail and Referral Details screen
will appear
4 Complete the form as required and click the
Next button
The Confirm Action message will appear
5 Click Yes to confirm that the details are
correct
A confirmation screen will appear with a unique
job number and a device will be sent out to you
within 3 working days
INFO: A demonstration video is available on the internet at http://www.technomedtm.co.uk/support/operator‐support/request‐ready‐use‐loan‐device/
14 ECG Cloud Instructions
Revision date – May 2014 ©Technomed Telemedicine Ltd. and NHS West and South Yorkshire and Bassetlaw CSU, 2014

Receiving a test
Step Action Result and Note
1 Login into ECG Cloud (see the ‘Logging On’
guide for instructions on how to do this), then
select the Report Viewer and Search icon
The Reports Viewer screen will appear
2 Locate the patient’s report from the list and
click on the View/Download icon
[INFO: Reports are listed in order of test date]
The report will appear on the screen with information including:
● Reason for test ● Report results ● Status traffic lights ● Cardiology comment ● Patient history ● The original trace
15 ECG Cloud Instructions
Revision date – May 2014 ©Technomed Telemedicine Ltd. and NHS West and South Yorkshire and Bassetlaw CSU, 2014

Finding a particular test
Step Action Result and Note
1 Whilst on the Report Viewer screen click on
the Find Reports icon
The Find Reports search screen will appear
2 Enter the patient’s name or unique patient
number and click the View Results button
All reports matching your criteria will be
displayed
16 ECG Cloud Instructions
Revision date – May 2014 ©Technomed Telemedicine Ltd. and NHS West and South Yorkshire and Bassetlaw CSU, 2014

Forwarding a report
The Report Viewer allows you to forward a link to any report. This is known as sharing a report since only a
link (valid for 14 days) is sent to the recipient and not a full copy of the document. The recipient will only have
access to the anonymised version of the report and the link can be disabled at any time.
Step Action Result and Note
1 Whilst viewing the relevant report click on
Share Report located at the top of the screen
The Share Report side bar will appear on the
right hand side of the screen
2 Enter the recipient email address and a short
message in the relevant fields then click
Share
The report will be forwarded
17 ECG Cloud Instructions
Revision date – May 2014 ©Technomed Telemedicine Ltd. and NHS West and South Yorkshire and Bassetlaw CSU, 2014
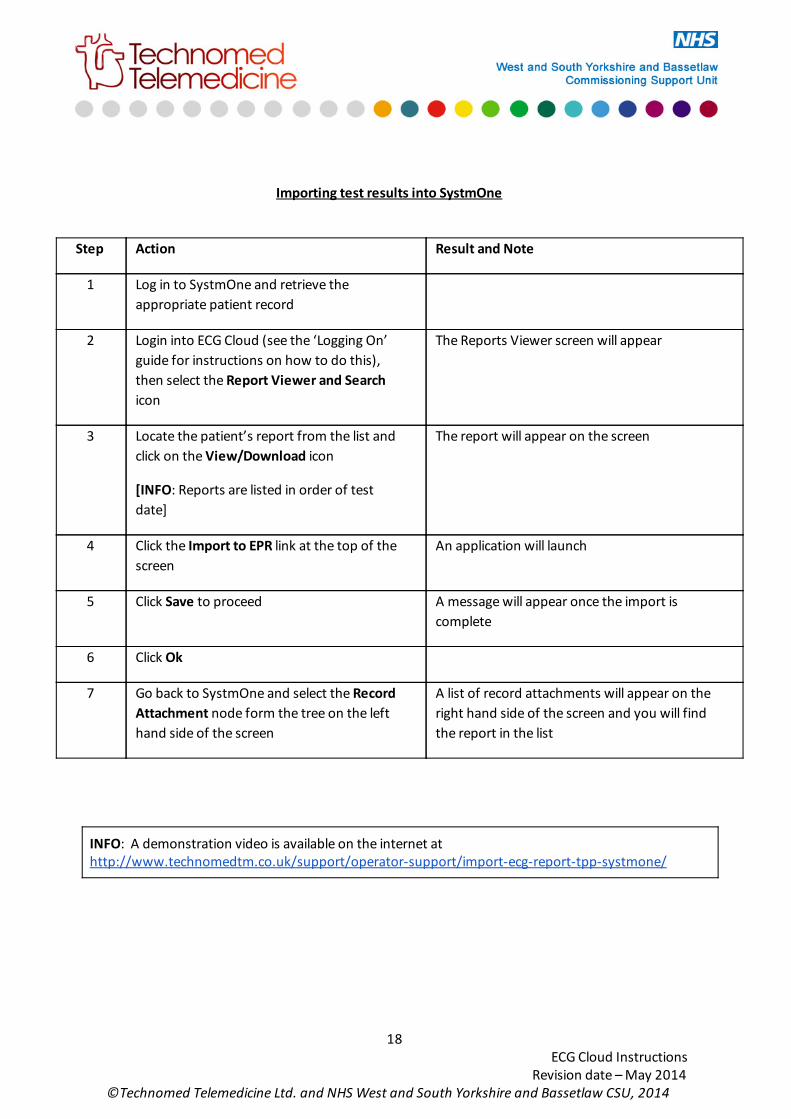
Importing test results into SystmOne
Step Action Result and Note
1 Log in to SystmOne and retrieve the
appropriate patient record
2 Login into ECG Cloud (see the ‘Logging On’
guide for instructions on how to do this),
then select the Report Viewer and Search
icon
The Reports Viewer screen will appear
3 Locate the patient’s report from the list and
click on the View/Download icon
[INFO: Reports are listed in order of test
date]
The report will appear on the screen
4 Click the Import to EPR link at the top of the
screen
An application will launch
5 Click Save to proceed A message will appear once the import is
complete
6 Click Ok
7 Go back to SystmOne and select the Record
Attachment node form the tree on the left
hand side of the screen
A list of record attachments will appear on the
right hand side of the screen and you will find
the report in the list
INFO: A demonstration video is available on the internet at http://www.technomedtm.co.uk/support/operator‐support/import‐ecg‐report‐tpp‐systmone/
18 ECG Cloud Instructions
Revision date – May 2014 ©Technomed Telemedicine Ltd. and NHS West and South Yorkshire and Bassetlaw CSU, 2014

ECG Cloud System Administrator Guides
Access the Practice Manager tools
ECG Cloud’s Practice Manager Tool offers a convenient way for nominated practice staff to add, update and
delete ECG Cloud users within their organisation. These users may include GPs, nurses, healthcare assistants
and more. The practice manager can also amend practice contact details and notification settings.
Step Action Result and Note
1 Double click on the ECG Cloud icon on your
desktop
The ECG Cloud login screen will appear
2 Enter your username in the Username or
Email field. This is normally your NHS email
address
3 Enter your password in the Password field
and click Log In
The ECG Cloud home screen will appear
4 Single click the icon labelled Practice
Manager
The Practice Manager Tool will open
TIP: If you do not see the Practice Manage icon but require it, please contact support.
19 ECG Cloud Instructions
Revision date – May 2014 ©Technomed Telemedicine Ltd. and NHS West and South Yorkshire and Bassetlaw CSU, 2014

Update Practice Settings
Step Action Result and Note
1 Whilst logged into the Practice Manager Tool
on ECG Cloud click on Practice Settings
The Amend Practice Settings form will appear
2 Review and amend the form where necessary
then click Save Changes
Your changes will now be saved
20 ECG Cloud Instructions
Revision date – May 2014 ©Technomed Telemedicine Ltd. and NHS West and South Yorkshire and Bassetlaw CSU, 2014

Create a new user
Step Action Result and Note
1 Whilst logged into the Practice Manager Tool
on ECG Cloud click on the Users tab
The Users screen will open
2 Click on the Create A New User link The Create New User form will appear
3 Complete the form under General Details
4 Pick a user type under Access Control.
TIP: You can fine‐tune a user’s tool sets by
changing the switches for each tool. A green
switch means the user can see the icon on
their main menu and blue means they
cannot.
5 Scroll to the bottom of the page and click
Submit
21 ECG Cloud Instructions
Revision date – May 2014 ©Technomed Telemedicine Ltd. and NHS West and South Yorkshire and Bassetlaw CSU, 2014

Update an existing user
Step Action Result and Note
1 Whilst logged into the Practice Manager Tool
on ECG Cloud click on the Users tab
The Users screen will open
2 Click on the Edit User button to the far right
of the user’s row
The user’s details will be displayed
3 Amend the details where necessary, then
scroll to the bottom of the page and click
Submit
Your changes will now be saved
22 ECG Cloud Instructions
Revision date – May 2014 ©Technomed Telemedicine Ltd. and NHS West and South Yorkshire and Bassetlaw CSU, 2014

Delete existing user(s)
Step Action Result and Note
1 Whilst logged into the Practice Manager Tool
on ECG Cloud click on the Users tab
The Users screen will open
2 Find the users that you wish to delete and
select them by clicking on the checkbox to
the left of their name
3 Click on the Remove Selected User(s) link A message will appear asking you to give a
reason for deletion
4 Optionally give a reason for deletion, then
click Confirm
The user(s) will be deleted
23 ECG Cloud Instructions
Revision date – May 2014 ©Technomed Telemedicine Ltd. and NHS West and South Yorkshire and Bassetlaw CSU, 2014

Reset a password
Every user can reset their own password using the ‘Forgotten your password?’ link from the login form;
however it requires the user to have a registered email address. For those that do not please follow the
instructions below to reset their password.
Step Action Result and Note
1 Whilst logged into the Practice Manager Tool
on ECG Cloud click on the Users tab
The Users screen will open
2 Find the user in the list and click on the Reset
Password button to the far right on the
user’s row
The Reset Password Form will appear
3 Complete the Reset Password Form then
click Submit
The password will now be reset
TIP: It is recommended that the user changes their password when they next log in.
24 ECG Cloud Instructions
Revision date – May 2014 ©Technomed Telemedicine Ltd. and NHS West and South Yorkshire and Bassetlaw CSU, 2014