6 teacher user guide 09102007 - rocky point union free ... · esp® maintenance - from this screen...
TRANSCRIPT

e S c h o o l D a t a U s e r G u i d e
CCSI® and eSD® are registered trademarks of Contemporary Computer Services, Inc.
Copyright © 2002-2007
Teacher Module
This chapter provides a summary of the functions that are most frequently used by classroom Teachers. As with all eSchoolData modules, options can be easily added (or removed) to meet building needs.
he eSchoolData (eSD®) system not only provides easy-to-use tools for classroom teachers, but more importantly, it extends instant access to information that was
traditionally not available to classroom teachers in any form. By providing classroom
teachers with access to concise, yet comprehensive academic profiles for all of their students, teachers are finally given an opportunity to use data in a meaningful way.
For the classroom teacher, the eSchoolData interface is centralized first around the class roster
and then subsequently centralized around the individual student.
This chapter assumes the user has basic familiarity with the eSD® system. For information on topics such as gaining access to the system and navigation, refer to Chapter 2 -Getting Started.
C H A P T E R C O N T E N T S
Accessing the Class Roster ......................................................................................................2 Class Roster............................................................................................................................3 Taking Attendance ..................................................................................................................4 How to Take Attendance .........................................................................................................4 Taking Attendance from the Central Office ...............................................................................6 Progress Reports (Interim Reports) ..........................................................................................7 Grade Entry for Report Card Grades .........................................................................................9 Entering Grades and Comments.............................................................................................10 Entering Assessments ...........................................................................................................12 Print Summary......................................................................................................................13 Staff Schedule View ..............................................................................................................14 Today’s Personal Schedule.....................................................................................................14 This Week’s Schedule............................................................................................................16 Semester View......................................................................................................................17 eSP™ Teacher’s Guide for eSchoolPortal.................................................................................18
Chapter
6.0
T
Rev 3.1.6 7-Sept 2007

e S c h o o l D a t a U s e r G u i d e
C h . 6 – T e a c h e r U s e r G u i d e
Chapter 6 Page 2 of 27 Rev 3.1.6
CCSI® and eSD® are registered trademarks of Contemporary Computer Services, Inc.
Copyright © 2002-2007
Gradebook Teacher Training Packet .......................................................................................20 Establish assignments ...........................................................................................................22 Reporting Features................................................................................................................25 Toolkit..................................................................................................................................26 Help .....................................................................................................................................27
Accessing the Class Roster
After signing in to eSD®, teachers’ homepages are usually set to Staff Schedule Views. The
Today’s Personal Schedule tab displays a list of courses assigned to the teacher including
information regarding period, days taught, room number, course number and name, class section and attendance information for the class. A sample of the screen is shown in Figure - 1.
Figure 1 - Today’s Personal Schedule
To access the roster for a particular class, click on the course name. Teachers assigned to teach more than one class per period should click the actual period (instead of the course name).
By clicking on the period instead of the course name, the rosters for all classes taught that period
will be combined to streamline the attendance taking process.

e S c h o o l D a t a U s e r G u i d e
C h . 6 – T e a c h e r U s e r G u i d e
Chapter 6 Page 3 of 27 Rev 3.1.6
CCSI® and eSD® are registered trademarks of Contemporary Computer Services, Inc.
Copyright © 2002-2007
Class Roster
From this screen teachers can access a wide array of information regarding all students in the
class. The screen below represents the complete array of information available. These tabs are permission driven from the security side of eSD® and therefore may not be available to all district
teachers all of the time.
Figure 2 – Class Roster
The tabs across the roster screen represent paths to that category of information.
Class Roster - generates names of students, their ID numbers, information on alerts, gender,
date entered the grade level, homeroom, and counselor.
Note: By clicking anywhere on the student’s name line, the teacher will be transported to screens with information regarding that specific student chosen. If this is the roster of an elementary
class, the clipboard indicates the Grade Entry screen for Elementary Report Cards
Today’s Date Tab - this is the screen from which attendance is taken for the class.
Progress Reports - this tab will bring the teacher to the screen designed to enter Progress Report grades and comments for that particular marking period only. This is permission driven in that teachers are not able to enter grades/comments unless the ‘window’ is open; nor are they
able to change grades for previous Progress Reports.
Seating Chart - teachers are able to create a matrix seating chart, complete with student
photos if the school has provided them. It is also possible for a teacher to take daily attendance
from the seating chart screen.
Grade Entry - from this screen, teachers input secondary report card grades and Regents test
scores.
Field Trip - will list field trips and all pertinent information about the trips taken by the class.
Buses - will generate the class roster as well as the bus each student is expected to take to and
from school
Attendance History - will dynamically provide a one screen synopsis of the attendance history
of each student in the class for the school year, the month, the day.

e S c h o o l D a t a U s e r G u i d e
C h . 6 – T e a c h e r U s e r G u i d e
Chapter 6 Page 4 of 27 Rev 3.1.6
CCSI® and eSD® are registered trademarks of Contemporary Computer Services, Inc.
Copyright © 2002-2007
Attendance Summary by Marking Period - this will generate attendance history for each
student by the calendar defined marking periods, this report includes daily attendance totals then breaks it down by Tardies and Absences.
eSP® Maintenance - from this screen teachers will be able to update their portion of the screen parents can view in the eSchoolPortal.
Grade Analysis - this extremely powerful feature allows each teacher the tools to analyze their students’ grades. The data is provided in raw data format, chart format and pivot table format.
Teachers can access and analyze the data from their own classes. Teachers can even compare
data from several classes via this feature.
Course Recommendations - if directed by their district, teachers may submit student course
requests for the coming scheduling school year. A teacher may recommend the majority of their students be assigned the next logical course in the sequence; however, a few students may be
recommended to an ‘Honors’ class or another higher level course.
Guardian/Emergency Contacts- this tab generates lists of all the guardian and/or emergency
contact information for each student in the roster. A simple click on the 5160 label button will
extract mailing labels for the students on that roster.
Gradebook- this comprehensive, on-line gradebook feature allows teachers to enter individual assignment/exam grades. The gradebook will calculate a suggested report card grade based
upon an algorithm established by the teacher. This calculated grade will automatically flow into the grade entry screen to be approved by the teacher at report card grade entry interval.
ERC Summary- elementary report card summary will print an elementary report card summary
for every student in the roster. This summary report will include grades submitted by Special Area teachers as well as mainstream teachers.
Taking Attendance
This section provides instruction on how to enter attendance information into the eSD system.
This process will usually be completed by school teachers or appropriate assistants, as dictated by school district policy. The system allows teachers to input and manage a variety of
attendance related information. Teachers are allowed to enter period-by-period as well as daily attendance in real time, and makes this information available to administrators immediately.
How to Take Attendance
Click on the class for which attendance is to be taken. Today’s attendance for the class will
appear.
A red exclamation indicates that attendance has not been taken for that class.

e S c h o o l D a t a U s e r G u i d e
C h . 6 – T e a c h e r U s e r G u i d e
Chapter 6 Page 5 of 27 Rev 3.1.6
CCSI® and eSD® are registered trademarks of Contemporary Computer Services, Inc.
Copyright © 2002-2007
Figure 3 – Attendance Roster
Click on the Attendance button next to the student’s name to change the attendance status. The
order is: Present --- Absent --- Tardy. By default, all the students will be marked present. If a student is already marked absent or tardy, this was done by the school attendance officer or
school nurse. After the attendance officer has updated a student’s attendance status, the classroom teacher will not be able to change the status.
When a student is Tardy or Absent, the boxes may checked for Note or Verification, or click on
the Click to enter a reason. When a student is marked tardy, the time will default to 15 minutes
after the beginning of the class. If this is not correct, enter the correct time.
When finished, be sure to click the Save button in the upper right part of the screen to store the attendance information which has been entered. Only click the Cancel button if the information
should not be saved.
Attendance information becomes immediately available to other system users, such as the
attendance office. The Attendance Office can begin acting on this information appropriately.
Tip – Partial Entry It is possible to return to the attendance entry screen at a later time to complete the class
attendance or make further updates. Click the Save button to save the information that has
already been entered on the screen.
NOTE: Even if the class has 100% attendance and no changes were made, the Save button
should be clicked. This will signal to the system that the teacher has taken attendance for the
class.

e S c h o o l D a t a U s e r G u i d e
C h . 6 – T e a c h e r U s e r G u i d e
Chapter 6 Page 6 of 27 Rev 3.1.6
CCSI® and eSD® are registered trademarks of Contemporary Computer Services, Inc.
Copyright © 2002-2007
Taking Attendance from the Central Office
Often a member of the central office will have to enter class attendance information. This situation may occur when an assigned teacher is not available to do it.
To locate the class, first select the Staff Schedules menu from the main menu, and then select
the Staff Schedule Report, as shown in Figure 3. If these options do not appear, contact your
System Administrator.
From the drop down boxes, select the school, scheduling year and teacher. Then, click on the course for which attendance is to be taken. When the course is selected, the class roster will
appear, as shown in Figure 7.
Figure 4 - Staff Schedule Report

e S c h o o l D a t a U s e r G u i d e
C h . 6 – T e a c h e r U s e r G u i d e
Chapter 6 Page 7 of 27 Rev 3.1.6
CCSI® and eSD® are registered trademarks of Contemporary Computer Services, Inc.
Copyright © 2002-2007
Figure 5 – Class Roster
From the roster, select the date for which to enter attendance, and then click on the date.
A screen should appear that is similar to the one shown in Figure 3, and it will have all the functionality that was already described earlier in this chapter.
Progress Reports (Interim Reports)
This section provides instruction on the process for entering Progress Report grades and comments in the eSD® system.
Click on the course for which Progress Reports grades are to be entered. Click on the Progress
Report tab at the top of the screen.
Select the calendar event (Progress Report) for the report period, and the progress report entry
screen will appear as shown in Figure 6.
Click to see attendance for this date.
Click to see calendar and select different date.

e S c h o o l D a t a U s e r G u i d e
C h . 6 – T e a c h e r U s e r G u i d e
Chapter 6 Page 8 of 27 Rev 3.1.6
CCSI® and eSD® are registered trademarks of Contemporary Computer Services, Inc.
Copyright © 2002-2007
Entering Comments
Figure 6 – Progress Report Entry Screen
Pre-numbered comments can be entered in two ways.
Option 1: Enter comment codes manually into the Selected Comments text box.
Separate comment codes with commas not spaces.
Option 2: Click on the journal icon to the right of the Comment Entry box to access the
comment popup listing. (When a comment is selected, it is highlighted in blue.) An example
of this is shown below.
Figure 7 – Comment Entry Screen
� Click the comments that are appropriate.
� Click Save
� Click the Print button located at the top of the page.

e S c h o o l D a t a U s e r G u i d e
C h . 6 – T e a c h e r U s e r G u i d e
Chapter 6 Page 9 of 27 Rev 3.1.6
CCSI® and eSD® are registered trademarks of Contemporary Computer Services, Inc.
Copyright © 2002-2007
A Typed Comment field (which includes a Spell Check) is also available if typed comments are
permissible. Some schools use the typed comments area to report absences and lateness to class. A second text box is available for schools choosing to use the “Typed Grades” option.
When all comments have been entered and saved for the class, it is recommended that a Print Class Summary be printed to verify what has been entered.
Grade Entry for Report Card Grades
The section provides instruction on the process for entering marking period grades in the
eSchoolData® system. The system provides a detailed view of the grades for each student in each marking period. The system will assist the teacher in awarding a final grade for the student on the
basis of the grades he/she obtained during previous Marking Periods. This feature is very helpful when using eSchoolData® for Grade Reporting.
Grade Entry is one step in a process that includes calculating final grades, calculating marking
period totals, identifying honor roll students, calculating class rank and producing transcripts. All marking period grades can be entered through the functionality described here. When a teacher
maintains an on-line grade book within eSchoolData, the grades from the grade book will automatically be transferred to the marking period grades.
� Click on the course for which grades are to be entered.
� When the class roster appears, click Grade Entry at the top of the screen.
The Grade Entry screen, as shown below, allows grades earned by the student to be entered in
the current marking period or current quarter, and also allows a view of grades earned by the student in previous marking periods. The column headings are set by the school district as
determined by calendar setup definitions, and so the screen may show different headings. The screen also allows the ability to enter a mid-term exam grade, final grade and student
assessment scores also defined in the course setup. (Regents, RCTs, etc.)

e S c h o o l D a t a U s e r G u i d e
C h . 6 – T e a c h e r U s e r G u i d e
Chapter 6 Page 10 of 27 Rev 3.1.6
CCSI® and eSD® are registered trademarks of Contemporary Computer Services, Inc.
Copyright © 2002-2007
Figure 8 - Grade Entry Screen
By clicking on the blue vertical bar for a specific marking period, the student’s grades for that
marking period can be entered. This screen will only allow grades for the current marking period
to be entered and not for previous or future marking periods.
Choosing Marking Periods, or any other column heading will expand the column and will allow
grade entry. In the above screen MP3 (Marking Period 3) has been expanded, however, it will not allow grade entry. Use the red triangle to collapse the Marking Period.
Note that attendance and tardy totals as well as period-by-period attendance is viewable on this screen. This data will flow automatically into the file used to create the final printed form of the
report card.
Entering Grades and Comments
Enter the numeric or letter grade in the box shown to the right of the student’s name in the appropriate column. Clicking on the ‘Grade’ button near the top of the screen will produce a
popup window displaying all available grades. The same is true of the ‘Comments’ button.
The icon will send a print summary to the printer.
As with entering comments in Progress Reports, multiple comments may be entered
simultaneously by entering the comment codes in the appropriate comment code area separated by commas. The number of comments allowed is determined by district policy.
If you wish to view previous Entries
clicking on this Blue button will display data in all of the columns.
Click on a specific marking period to expand for viewing or entering grades

e S c h o o l D a t a U s e r G u i d e
C h . 6 – T e a c h e r U s e r G u i d e
Chapter 6 Page 11 of 27 Rev 3.1.6
CCSI® and eSD® are registered trademarks of Contemporary Computer Services, Inc.
Copyright © 2002-2007
Figure 9 – Report Card Grade Entry Screen
Clicking on the will produce a screen listing all the comments available to be used. This screen is printable by clicking on the ‘Send to Printer’ button.
Figure 10 - Comment Code Table
Another option is available to teachers who prefer to enter comments by pointing-and-clicking.
Click on the icon, at the left of the Comment Code entry area, to get the same list of available comments. Select the appropriate comments for the student directly from this list. As an
example three comments have been chosen for a student (11, 14 and 18). When a comment is
clicked, it is highlighted in blue to show it has been selected.
Figure 11 - Comment Selection Screen

e S c h o o l D a t a U s e r G u i d e
C h . 6 – T e a c h e r U s e r G u i d e
Chapter 6 Page 12 of 27 Rev 3.1.6
CCSI® and eSD® are registered trademarks of Contemporary Computer Services, Inc.
Copyright © 2002-2007
After comments have been chosen, click on the Save button at the top of the Comment Codes
screen to transfer the comments to the Grade Entry screen. After the grade entry is complete, save it to the database using the Save button at the top of the page.
Print the Grade Table or the Comments Table for ready reference by clicking on the Send to Printer button at the top of each of these screens. Click the Print Summary icon to print a
summary of the entire class by student (more information on this feature below).
Repeat the process for each of the students in the class.
Entering Mid-Term and Final Exam Grades
To enter mid-term or final exam grades, expand the Mid-Term column or the Final Exam column. Choose Mid-Term and enter the appropriate grades.
Entering Final Grades
eSD® has a feature to calculate the final grade for the student based on the grades in each
marking period. The calculated final grade is a suggested grade, based on pre-defined course
weights. The algorithm for the weighting of marking periods, and associated exams is established in the Course Setup module. Teachers are still the final decision-makers when
assigning final grades. To support this scenario, the eSchoolData system provides teachers with an opportunity to accept a final grade based on the system calculations, or to override it and
award a different grade based on other influencing factors such as class participation or attendance. The grade calculator can also make allowances for missing grades.
To use the final grade calculator, click on the Grade Calculator Button, to get a suggested
grade.
Figure 12 – Calculation Confirmation
Entering Assessments
Assessment scores for State exams (Regents, RCTs, etc.) can also be entered using the grade
entry interface.
Assessments score for state exams are limited to the acceptable score types established by New York State. For instance, you cannot enter an “A” for a Regents exam.
���� It is important to ensure that the proper assessments are linked to the proper courses. The
school system administrator is responsible for linking courses to the associated assessments for each course. When teaching a Regents Course and Regents Exam grades are to be entered, ask
the system administrator to make the required associations to enable this process. The eSchoolData Help team may assist with this process as well.

e S c h o o l D a t a U s e r G u i d e
C h . 6 – T e a c h e r U s e r G u i d e
Chapter 6 Page 13 of 27 Rev 3.1.6
CCSI® and eSD® are registered trademarks of Contemporary Computer Services, Inc.
Copyright © 2002-2007
In Figure 14 below, Regents Comp English, which has been associated with this course can be
seen. By clicking on this heading, the scores obtained by the students can be entered.
Figure 13 - Entering Assessment Grades
Print Summary
After the entry of grades is completed, it is possible to look at all the data that has been entered
for a course by clicking on the Printer icon found at the top of each Marking Period (when
expanded). A screen with all the summary information for that class will be displayed. Click on the Send to Printer button in the upper right corner to print the information for paper records.
Note: If changes have been made on the grade entry screen, and the changes have not been saved, a prompt will appear to Save and to recalculate final grades.
Figure 14 - Print Summary
Assessment(s) associated to the class
e S c h o o l D a t a U s e r G u i d e
C h . 6 – T e a c h e r U s e r G u i d e
Chapter 6 Page 14 of 27 Rev 3.1.6
CCSI® and eSD® are registered trademarks of Contemporary Computer Services, Inc.
Copyright © 2002-2007
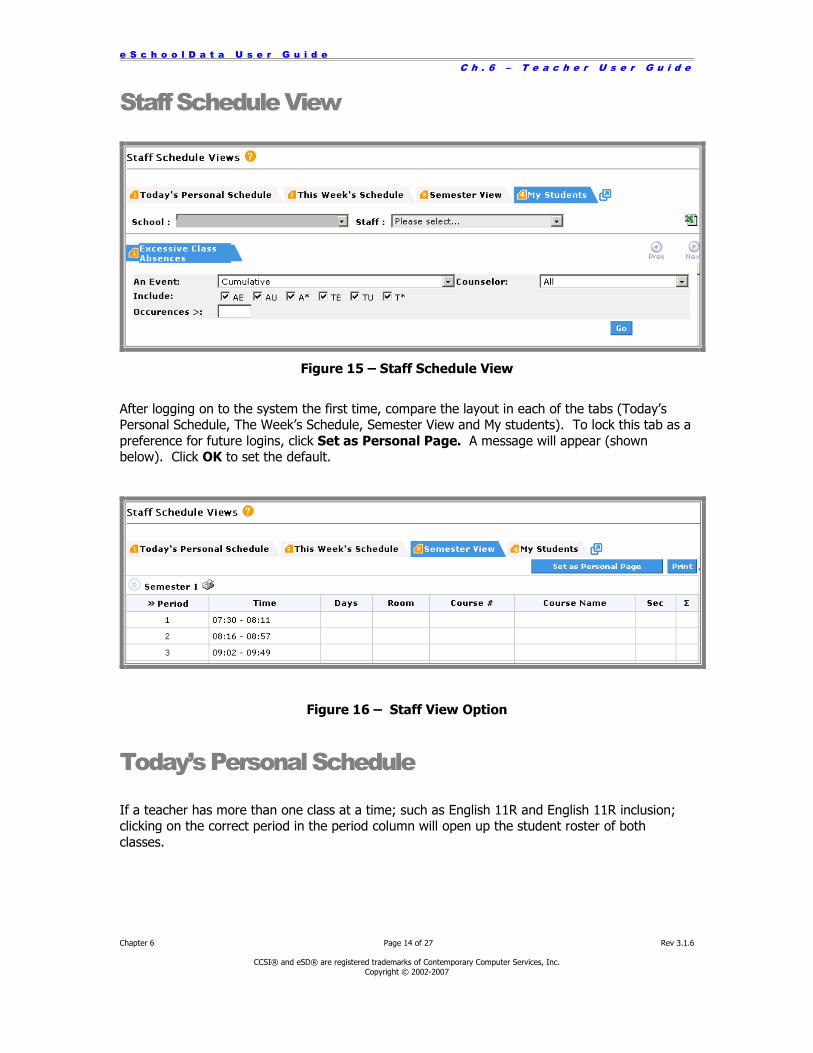
Staff Schedule View
Figure 15 – Staff Schedule View
After logging on to the system the first time, compare the layout in each of the tabs (Today’s Personal Schedule, The Week’s Schedule, Semester View and My students). To lock this tab as a
preference for future logins, click Set as Personal Page. A message will appear (shown below). Click OK to set the default.
Figure 16 – Staff View Option
Today’s Personal Schedule
If a teacher has more than one class at a time; such as English 11R and English 11R inclusion; clicking on the correct period in the period column will open up the student roster of both
classes.

e S c h o o l D a t a U s e r G u i d e
C h . 6 – T e a c h e r U s e r G u i d e
Chapter 6 Page 15 of 27 Rev 3.1.6
CCSI® and eSD® are registered trademarks of Contemporary Computer Services, Inc.
Copyright © 2002-2007
Figure 17 – Inclusion Class View
The resulting screen (see Figure 19) will indicate by the screen break the separate rosters of the two classes. Teachers are therefore enabled to take attendance for both classes from the same
screen.
Figure 18 – Combined Class Roster for Attendance
Click on the individual course and it will show the student attendance screen or roster of that class only.

e S c h o o l D a t a U s e r G u i d e
C h . 6 – T e a c h e r U s e r G u i d e
Chapter 6 Page 16 of 27 Rev 3.1.6
CCSI® and eSD® are registered trademarks of Contemporary Computer Services, Inc.
Copyright © 2002-2007
Figure 19 – Individual Class Attendance Screen
Figure 20 – Individual Class Attendance Roster
This view provides teachers with flexibility to quickly access rosters in multiple formats.
.
This Week’s Schedule
With this option, by hovering on a class, a drop down will appear giving a teacher the following
information: Course Name, Days, Semester and Attendance.
Note: ‘Today’s Personal Schedule’ view will accurately reflect the day schedule and semester
pattern of the school

e S c h o o l D a t a U s e r G u i d e
C h . 6 – T e a c h e r U s e r G u i d e
Chapter 6 Page 17 of 27 Rev 3.1.6
CCSI® and eSD® are registered trademarks of Contemporary Computer Services, Inc.
Copyright © 2002-2007
Figure 21 – Teacher’s Weekly Schedule View
In this view, clicking on a class will direct the teacher to the class attendance taking screen.
Once attendance is taken for the class for the day, the cell becomes white thereby confirming for the teacher that this function has been performed.
This view is further modifiable via the in the Period column. This will expand or collapse the
‘Time’ column on the screen.
Semester View
Click on the next to Semester 1 or Semester 2 and it will open user’s personal schedule showing the period, time, days, room, course #, course name and section.
Figure 21a –Semester View

e S c h o o l D a t a U s e r G u i d e
C h . 6 – T e a c h e r U s e r G u i d e
Chapter 6 Page 18 of 27 Rev 3.1.6
CCSI® and eSD® are registered trademarks of Contemporary Computer Services, Inc.
Copyright © 2002-2007
Figure 22 – Teacher’s Semester View
This view will only allow attendance for one class at a time. It will not combine rosters as the
other views will.
One advantage of this view is that teachers’ can easily access student and roster information for the entire school year. This view is often preferred by secondary teachers.
My Students
This view will allow individual teachers or any staff member to see “ALL” the student that have
been assigned. By selecting the student is will display the profile page for that student. In addition this screen has the option of displaying Full Class Lists (Figure 22a) and Excessive class
Absences (Figure 22b) for any student that staff member has been assigned.
Figure 22a – My Students – Class List

e S c h o o l D a t a U s e r G u i d e
C h . 6 – T e a c h e r U s e r G u i d e
Chapter 6 Page 19 of 27 Rev 3.1.6
CCSI® and eSD® are registered trademarks of Contemporary Computer Services, Inc.
Copyright © 2002-2007
Students with Excessive Absences Report – Allows the user to search for absences by the
number of occurrences within a specific date range. The report search can also filter by Student Status and by daily or period code or both. Student Names are listed alphabetically by the
number of absences in descending order. (Figure 22b)
This report is useful for identifying attendance patterns for groups of students, especially because it can limit its search to consecutive absences.
Use the status code Present to list students with exceptionally good attendance records. (i.e. for the first semester, request a list of the students who have been marked present more
than 88 times.)
Figure 22b – My Students – Excessive Class Absences
eSP™ Teacher’s Guide for eSchoolPortal
Teachers can update the eSchoolPortal through the eSP™ Maintenance option in each of their
class rosters. The maintenance screen will enable them to post new assignments and/or send e-mail.
e S c h o o l D a t a U s e r G u i d e
C h . 6 – T e a c h e r U s e r G u i d e
Chapter 6 Page 20 of 27 Rev 3.1.6
CCSI® and eSD® are registered trademarks of Contemporary Computer Services, Inc.
Copyright © 2002-2007
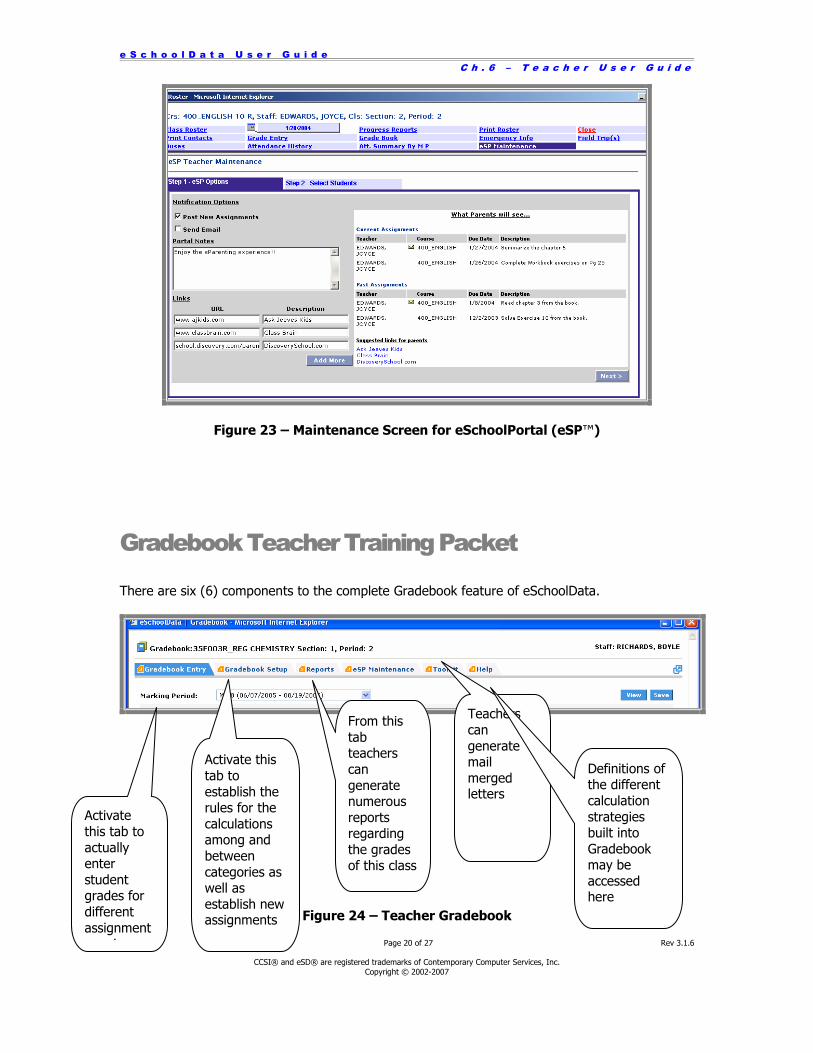
Figure 23 – Maintenance Screen for eSchoolPortal (eSP™)
Gradebook Teacher Training Packet
There are six (6) components to the complete Gradebook feature of eSchoolData.
Figure 24 – Teacher Gradebook
Activate
this tab to
actually enter
student grades for
different
assignments, quizzes,
Activate this
tab to
establish the rules for the
calculations among and
between
categories as well as
establish new assignments
From this
tab teachers
can
generate numerous
reports regarding
the grades of this class
Teachers
can
generate mail
merged letters
Definitions of the different
calculation
strategies built into
Gradebook may be
accessed here

e S c h o o l D a t a U s e r G u i d e
C h . 6 – T e a c h e r U s e r G u i d e
Chapter 6 Page 21 of 27 Rev 3.1.6
CCSI® and eSD® are registered trademarks of Contemporary Computer Services, Inc.
Copyright © 2002-2007
Step 1:
Always check that the gradebook is being setup for for the correct Marking Period.
Begin by setting up categories and assignments. A category is a collection of students’ work for which they will receive a grade. An assignment is a particular quiz, homework or test for which a
grade is given.
Figure 25 – Gradebook Setup Screen
The categories of Homework, Test, Quiz, and Projects are automatically established.
Note: a new Category can be added by clicking on the � Add a new category link.
The new category will appear beneath the previously established categories.
This button will copy the
complete set-up to other courses to which the teacher is assigned.
When a Category is established a grading
method must be selected
Teachers will name, identify
the weight, and grading
methods for the new category.

e S c h o o l D a t a U s e r G u i d e
C h . 6 – T e a c h e r U s e r G u i d e
Chapter 6 Page 22 of 27 Rev 3.1.6
CCSI® and eSD® are registered trademarks of Contemporary Computer Services, Inc.
Copyright © 2002-2007
Figure 26
Remember, the Weights cannot exceed 100% or the new category will not be accepted. The
number ‘0’ in the weight area of Mid-Term Exams or Final Exams if these tests are calculated separately from the categories.
Establish assignments
1. Click on the chevron ( ) to the right of the screen above the category to develop. There is a no limit to the number of assignments that can be setup.
Figure 27 – Establish Assignments
2. A subsequent line will appear on the screen asking teachers to identify eight (8)
components of the assignment.
3.
Figure 28 – Color Code Each Category
Components include: Assignment name; Max. Points achievable, Bonus (points may be
allowed here), Multiplier, Assign and Due Dates; additional Description is possible; and the assignment may automatically be posted on the eSP™ Parent Portal with a check in the box.
Clicking on the color box (the default is black) will bring up a screen from which colors may be
Click on the Add a new Assignment to this
category link
Color command box

e S c h o o l D a t a U s e r G u i d e
C h . 6 – T e a c h e r U s e r G u i d e
Chapter 6 Page 23 of 27 Rev 3.1.6
CCSI® and eSD® are registered trademarks of Contemporary Computer Services, Inc.
Copyright © 2002-2007
chosen. Different colors will help teachers visually differentiate the different categories and may
prove very beneficial when inputting grades for an assignment.
Step 2: Click on the Grade Entry Tab. A teacher will now see the assignments which have been
established.
Figure 29 – Student Name Mid-screen
Note that clicking on the blue triangles will open or close each particular column. The new assignment has as the column heading the name and due date of the assignment.
Hovering over a grade input box will generate the student’s name in the event too many columns
are opened and the roster is not viewable.
The Tab key will bring teachers to the grade input box for the next student in the same column.
Several new icons appear when teachers open the Marking Period Column.
Figure 30 This icon will cause the
system to calculate the
marking period grades based on the algorithms established
in the gradebook.
If approved by the district, this icon will
allow teachers to enter
free text as a report card comment.
Will provide running calculations
of Marking Period suggested
grades based on the algorithm established in the gradebook
setup

e S c h o o l D a t a U s e r G u i d e
C h . 6 – T e a c h e r U s e r G u i d e
Chapter 6 Page 24 of 27 Rev 3.1.6
CCSI® and eSD® are registered trademarks of Contemporary Computer Services, Inc.
Copyright © 2002-2007
Figure 31 – Grade Table
Remember to save work frequently!!
This will allow teachers
to input comment numbers which will appear on report cards.
This icon will bring up the Grade Table

e S c h o o l D a t a U s e r G u i d e
C h . 6 – T e a c h e r U s e r G u i d e
Chapter 6 Page 25 of 27 Rev 3.1.6
CCSI® and eSD® are registered trademarks of Contemporary Computer Services, Inc.
Copyright © 2002-2007
Reporting Features
Figure 33 – Teacher Report Screen
.
From this screen, teachers can identify if they require reports on all the children in the class or
only some of the children. They can also identify if they want reports which include all of the categories or only some of the categories; all of the assignments within a category or only some
of the assignments; or list missing grades only.
Figure 34 – Report Card Report
Clicking on this icon will
bring up a screen enabling
a user to determine which type of report will be generated.
Note: The class name, section and period always identify to a teacher their location within
their class load

e S c h o o l D a t a U s e r G u i d e
C h . 6 – T e a c h e r U s e r G u i d e
Chapter 6 Page 26 of 27 Rev 3.1.6
CCSI® and eSD® are registered trademarks of Contemporary Computer Services, Inc.
Copyright © 2002-2007
Toolkit
Figure 35 – New Template Setup
Here teachers may set up template letters which will mail merge with data from the gradebook
and produce letters to be sent to parents (following school policy procedures). Here the basic grid array of grades must also be established (Figure 36).
Figure 36 – Variables in Gradebook Template Design
Clicking on the deletes this variable in the letter. Clicking on the edit link allows this field to
be modified. The teacher has control over the font size and appearance throughout the document.
Clicking on the ‘Available Fields’ button will allow the selection of the fields available in the drop
down menu to be inserted in the merged letter. The selection includes student’s first/last names; grade; ID number; and school name.
The lowest text box allows for extensive free text on the part of teachers in their letters.
Remember to always save template letters!!

e S c h o o l D a t a U s e r G u i d e
C h . 6 – T e a c h e r U s e r G u i d e
Chapter 6 Page 27 of 27 Rev 3.1.6
CCSI® and eSD® are registered trademarks of Contemporary Computer Services, Inc.
Copyright © 2002-2007
Figure 37 – Assignment Screen Sort Preferences
The ‘Sort Preferences’ chevron will open a sub-screen allowing the user to select how the categories and the assignments will be ordered in the Gradebook Entry screen and thereby
facilitate grade entry for assignments.
Help
Use the Help screen for descriptions of the various grading methods embedded in the grade book.
Figure 38 – Gradebook Algorithms
On this page are explanations for the various grading method algorithms which are embedded in the eSD® Gradebook package.