5-day teacher jr/sr high school lesson plan
TRANSCRIPT

5-DAY TEACHER JR/SR
HIGH SCHOOL LESSON
PLAN
www.teamhandball.ab.ca
11759 Groat Road
Edmonton, Alberta T5M 3K6 Ph (780-415-266)
Developed by Michael Nahmiash

5 Day Lesson Plan
Lesson #1
Skills
Philosophy of the Game-See Booklet
Rules of Handball-See shortcut to the rules
Positions-See Manual
Warm-up-See Manual for Warm-up Games
Passing/Catching Drill-See Manual for many
drills
Mini Game- first day 4-4 with goalie
Individual positions on Offense
-Go over Position by Position
Passing/Catching
-Variety of different passes
-Fundamental of Passing
-Hand Position of passing
-Technique of absorbing the ball
Lesson #2
Skills
Warm-up- See manual for games
Dribbling/ball handling - See manual for
Drills
Passing/Catching- See manual for games
Shooting Technique- See manual for games
Mini Game- 2nd
day 5-5 with goalie
Dribbling
-Controlled Starting and Stopping, Changing of
Direction
Passing/Catching
-Variety of different passes
-Fundamental of Passing
-Hand Position of passing
-Technique of absorbing the ball
Shooting
-Jump Shots
-Stem Shots
-Sidearm shots
Lesson#3 Skills
Warm-up-See Manual for Warm-up Games
Defense - Positions on Defense
Individual Defensive- technique
Handball Game- full game
Defensive Positions
-go over each Defensive Position
Defensive Technique
-Fundamentals of Defensive movement (body
stance, arm, position)
Game Play
-play a game
Lesson#4 Skills
Warm-up- See Manual
Offensive Technique -(Team) See Manual
Handball Game- full game
Team Play Offensively
-Movement with-out the ball
-How and where to attack the defense
Game
-Play a game
Lesson#5 Skills
Review of All lessons
Game Play
Play a full game
B\\

Philosophy of the game
Handball is a team sport played by male or female teams. The players are allowed to
handle and throw the ball using their hands, but they must not touch the ball with their feet.
The objective of the game is to score and avoid getting goals. The team that scores more goals
in a given period of time wins the match. The game is played at a very high speed and body
contact is permitted. As a result, Fair Play has a central importance. Basic handball is either
played in a sports hall or outdoors on a 40x20 metre court or a School gym. The other
variations of the game, such as Mini handball, Beach Handball or Wheelchair Handball, are all
based on the fundamental rules of the game, although both facilities and rules shall be adapted
to their needs.
Who can play the game?
Handball is a team sport for two squads of 7 players (six court players and a goalkeeper)
up to 14 on a team. For competition handball 1-2 referees are also necessary
Basic Handball (The Traditional Game)
How to
Play?
Allowed Not Allowed Consequences
In Attack
(with The
Ball)
-Throw & catch the ball
using hands & arms
-Pass the ball to a team
mate
-Take a max. of 3 steps
with the ball
-Bounce the ball with one
hand & catch it again
-Play outside the goal area
-Touch the ball in the air
above the goal area
-Break through the defence
-Put the ball on the floor
when the referee takes ball
possession away
-Block or kick the ball using your
feet
-Hold the ball for more than 3
seconds
-Take more than 3 steps with the
ball
-Bounce the ball, catch it and
bounce it again
-Enter the goal area with the ball
-Touch the ball inside the goal
area
-Charge the opponent or run into
the defensive player
-Throw or push the ball away
after the referee takes ball
possession away
-Free throw for the opponent
-Free throw for the opponent
-Steps, free throw for the opponent
-Wrong dribble, free throw for the
opponent
--Goalkeeper throw
-Goalkeeper throw
-Offensive foul – free throw for the
opponent
-2-minute suspension
In Defense
(with-out the
ball)
-Use your hands to block the
ball and use your open palms
to take the ball away from the
opponent
-Make body contact with an
opponent (in face to face
position) in order to monitor
the opponent’s movement
-Fair play
- Stay outside the goal area
- Stay at least 3 metres away
from the free throw
-Pull or hit the ball out of the
hands of an opponent
-Hold (body or jersey) or push,
run, jump into an opponent
- Endanger the opponent
- Use the goal area as basic
defensive position
- Interfere with the execution of a
free throw
-Free throw / 7m throw
-Free throw / 7m throw & if movement
is directed at the opponent & not at the
ball
-personal progressive punishment
- Suspension (2 minutes) or
disqualification (red card)
- 7m throw
- Warning (once) & personal
progressive punishment
Goalkeeper -Touch the ball with any part
of his body inside the goal
area
- Leave the goal area without
the ball and play as a field
player
- Take the ball into the goal area
from outside
- Leave the goal area with the ball
- Endanger the opponent while
executing a save
- Free throw
- Free throw
- Personal progressive punishment

Handball Movement
While on offense there are some things to remember: players must create space by
spreading the court, and must also be a threat when attacking. Players can move the ball to
from one wing position through the backcourt players to the other wing player and then the
same back, which is called succession, to create holes within the defense. In order to create
holes, all the players must be in constant motion. Players should start from a point around 15 m
away from the goal, make two to three quick steps in the direction of the defending team.
Catch the ball on the move, take one to two more steps while holding the ball, and look for a
possible shot at the goal. If no shot option is there pass the ball to the next team member, who
is already in his forward movement. But always be aware of a situation where players can go
into a one-on-one, or if the defending players do not move, they can make a jump shot from 9 -
10 m to try and score.
Remember that passing the ball is faster than if being carried by a player. Through the
rules, players are allowed to take more than three steps if they are dribbling the ball, but this
also slows the player down. In tactical playing, only dribble the ball if there is no one on your
team in a position to throw the ball to.
On defense when attempting to stop the attacking team, the defenders try to foresee
their movements and have one defending player to each of the attacking players. In order to
make one-to-one-situations more difficult all six defending players should move a bit to the
ball side. To ensure that each defending player has one attacking player they should talk to
each other, communication is vital to team defense.
Positions
Players positions have been named from left to right as left wing (LW), left back (LB), center
back (CB), right back (RB), right wing (RW) and pivot (P).

I. Warm-up Drills
When doing warm-up or cool-down drills, use only the sidelines and end lines as
boundaries so that all players may play.
1) Over and Under (Figure 1)
1. Divide players into groups of two with one ball between them.
2. Have players face back to back, one foot away from each other.
3. Have players pass the ball over their heads, and then through their legs, keeping their
hands on the ball at all times.
4. After every successful pass one player takes one step forward, in order for the players
to be stretching their backs and abs.
5. Ensure players are passing the ball with both hands.
2) Feet Passing Stretch (Figure 2)
1. Divide players into groups of two with one ball.
2. Have players lie down on their backs, head to head, with the ball between one player’s
feet.
3. Players pass the ball to each other by lifting their legs, so the other player tries to grasp
the ball with their feet.
3) Torso Twist (Figure 3)
1. Divide players into groups of two again with one ball.
2. Players line up back to back, one foot away from each other.
3. One player turns their torso to the right with the ball, and the other left, keeping their
feet planted to the ground. Players must keep their hands on the ball at all times
4. Players pass the ball to each other stretching their backs keeping both hands on the ball.
Again after every successful pass one player move further ahead.
4) Crazy Ball Madness
1. Divide players into two teams, and have them line up on opposing end lines.
2. Place all balls at the centerline.
3. Players have 45 seconds to throw as many balls onto the opposing team side.

4. Players cannot cross over half.
5. After 45 sec count the balls on each side.
6. Players should realize that if they hold the balls until the last few seconds and throw
them all at once they could win.
7. Next time: Players can only hold onto the ball for 5 sec.
5) Touchdown
1. Divide players into two teams.
2. One team starts off with the ball at half. Teams try to score by placing the ball down
on
3. the opposing teams end line. They are allowed to take as many steps as they want and
as many passes, but are not allowed to dribble.
4. Opposing team tries to ‘tag’ or touch the player with the ball. If they ‘tag’ the player
holding the ball, the ball is turned over to the other team. Give the player 3 meters to
pass in the turned over ball.
5. After a few minutes progress to only 5 steps, then to 3 steps, then taking only one
dribble, then finally working towards taking more than 1dribble.
6) Timed Tag
1. Divide players into two teams, using half the court and one ball.
2. One team starts off with the ball, and must ‘tag’ the opposing players with the ball.
3. Players are not allowed to dribble, and must pass the ball in order to ‘tag’ the players
out of the game. Players may take their three steps. Players cannot throw the ball at
the other players. If players go outside the boundaries they are out.
4. Time to see how long it takes each team to ‘tag’ all the opposing players out.
7) Headball
1. Divide players into two teams.
2. One team starts with the ball at half, and tries to score by passing the ball down the
court and trying to head the ball into the opposing net.
3. Players are not allowed to dribble and can only take three steps. Defending team tries
to steal the ball.
4. There are no goalies in this game. Players should pass the ball around and move to
create space.
II. Footwork Drills
Offensive Footwork
1) Footwork (Figure 4)
1. Have players run around the gym, and meet with another player anywhere on the court.
Players stop and face each other, and take three steps, every player will fake to the left,
then step to the right, then jump off their left foot (Footwork: Left, Right, Left)
2. Players should try and meet with every team member and practice this.
3. Next switch to fake left, spin to right. Progress to right, left, right (jumping off of right
foot). Then fake right, spin to left.

Goal of Drill: Preparing players for proper footwork on offense. Have players
‘sell’ the fake, which will give them space when attacking.
2) Offensive Footwork Drill (Figure 5)
1. Have players line up in a row facing the net at around 12 meters.
2. Players pass to a player standing at the 9-meter line, and then receive a pass, land in
front of the net faking to one side (taking one step), and explode to the opposite side
(left or right) of the net, jumping off both feet.
3. Players then take their last step and jump and shoot the ball at the goal.
Goal of drill: To get players used to exploding away from the defender, instead of
attacking the defender straight on. When players land, they fake one way, and
jump the other around the net.
Defensive Footwork
1) The Great Pinnie Grab
1. Pick a few players (approx. 1/3) to grab pinnies and place them in the back of their
shorts.
2. Have other players try and remove the pinnies. The only way any player can move is
defensive slides. Players cannot run, only slide.
3. After all the pinnies have been removed, pick different players to have the pinnies in
their shorts.
Goal of Drill: Preparing players for proper movement on defense.
2) Defensive Footwork (Figure 6)
1. Have players line up in a row, one player on the six-meter line, and one player in front
standing on the 7-meter line.
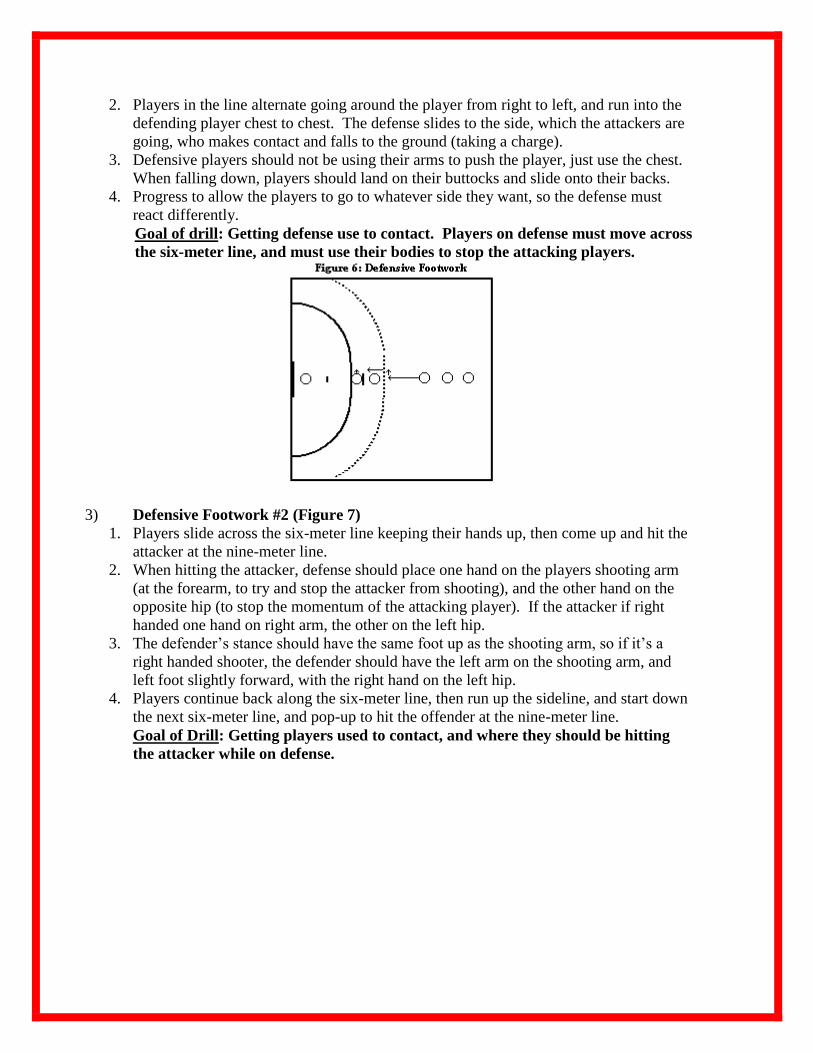
2. Players in the line alternate going around the player from right to left, and run into the
defending player chest to chest. The defense slides to the side, which the attackers are
going, who makes contact and falls to the ground (taking a charge).
3. Defensive players should not be using their arms to push the player, just use the chest.
When falling down, players should land on their buttocks and slide onto their backs.
4. Progress to allow the players to go to whatever side they want, so the defense must
react differently.
Goal of drill: Getting defense use to contact. Players on defense must move across
the six-meter line, and must use their bodies to stop the attacking players.
3) Defensive Footwork #2 (Figure 7)
1. Players slide across the six-meter line keeping their hands up, then come up and hit the
attacker at the nine-meter line.
2. When hitting the attacker, defense should place one hand on the players shooting arm
(at the forearm, to try and stop the attacker from shooting), and the other hand on the
opposite hip (to stop the momentum of the attacking player). If the attacker if right
handed one hand on right arm, the other on the left hip.
3. The defender’s stance should have the same foot up as the shooting arm, so if it’s a
right handed shooter, the defender should have the left arm on the shooting arm, and
left foot slightly forward, with the right hand on the left hip.
4. Players continue back along the six-meter line, then run up the sideline, and start down
the next six-meter line, and pop-up to hit the offender at the nine-meter line.
Goal of Drill: Getting players used to contact, and where they should be hitting
the attacker while on defense.

4) - Get players into groups of two.
1. Players bend at knees and attempt to swat each other’s knees, trying not to get hit by
the other player.
Goal of drill: Getting players used to swatting at the ball during defense.
III. Ball Handling Drills/Dribbling
After receiving the ball and before dribbling a player holds the ball with both hands. The ball is
being dribbled sideways at hip level. Bouncing on the ground is performed by the combined
action of the elbow and wrist joints. The angle of the bounced ball depends on the speed that
the player is moving at. The faster the run the more the angle becomes obtuse. If an opponent
comes closer, a player must lower his position as well as the dribbling, protecting the ball from
being taken by the opponent.
With An opponent With-out an opponent
Ball Handling (Figure 8)
2. Divide players in groups of two with one ball. Have players face the same direction
with one player holding the ball between them.

3. Both players explode from side to side dropping the ball between them (both hop to the
same side). Players keep the ball in the air, with their hand on top of the ball when
catching and dropping. The ball must not touch the ground.
4. Option 1- have players dribble the ball, one player dribbles once, then the next hops
and dribbles.
Goal of drill: Get players used to the ball, and preparing them for the side-to-
side movements required in playing. Make sure players are exploding when they
are jumping.
2) Grasping Strength
1. Have players divide into groups of two with two balls. Have both players grab the
balls (one in each hand), and try to push and pull the balls out of each other’s hands.
Player’s hands must be in front of the balls, not underneath or on the side
2. Do not twist the wrist in order to get the balls.
Goal of the drill: To ensure players are grasping the ball with their fingers as
hard as they can. This will help with shooting and passing.
Chasing Drills (still ball Handling)
1) Chasing Drills #1
a. 1 player lines up on the 6-meter line with a ball.
b. 1 player lines up on the end line.
c. Whistle is blown, player with ball dribbles as fast as they can and tries to score
on the goalie at the opposite end. The player on the end line tries to catch up to
the player and ‘tag’ or touch them. If the player with the ball is touched the
drill is over.
d. Option 1-players start drill sitting down, Option 2- players start drill lying on
stomach.
Goal of drill: Running on a fast break under pressure from the defense, while the
defense attempts to stop the fast break.
2) Chasing Drills #2
a. 1 player lines up on the 6-meter line with legs spread shoulder width apart
(defender).
b. 1 player with ball lines up a foot behind the player on the 6-meter line.
c. Player with ball bounces ball, then bounces ball between legs of the defender.
The player with the ball catches the ball and continues dribbling the ball and
tries to score on the goalie. The defender tries to ‘tag’ the dribbler.
Goal of drill: Running on a fast break under pressure from the defense, while the
defense attempts to stop the fast break.
3) Chasing Drills #3

a. 2 players line up on 6-meter line in line with goal post facing the
opposite net.
b. Ball is bounced (by coach or player) anywhere on court, usually
between the players.
c. Players move as soon as they hear the ball bounce. Whoever gets to the
ball first becomes the attacker and tries to score on the goalie, the other
tries to defend.
d. Option 1-start sitting down, Option 2- start lying on stomach.
Goal of drill: Court awareness and fast break movement.
4) Chasing Drills #4
a. 2 players line up on 6-meter line, one player lines up on the end line.
b. Players on 6-meter line have one ball; whistle is blown players run down
the court passing to each other. The player on the end line tries to ‘tag’
them.
c. Players cannot dribble the ball, and can only take 3-steps while holding
the ball.
Goal of drill: Passing the ball is faster than dribbling the ball. Players must move
together in order to get to the goal.
IV. Shooting Technique Drills
SHOOTING
Shots are one of the most important elements of handball. They are vital elements that decide
the scores. While shooting the muscles of the lower and upper limbs, pelvic region and trunk
are extremely engaged. One can assume that shooting is performed similarly to passing, but
with a stronger action of the trunk and upper limbs. The shot power is conditioned by the
distance and hand action time on a ball. The greater the distance that the hand on the ball
covers in the time unit the stronger the shot will be (a ball reaches a higher velocity)
performed. The names of shots have been derived from the way the players move on the court
and the position of his/her body to the ground. In handball there are the following shots:
i. Stem Shot
ii. Jump Shot
Stem Shot

Jump Shot
The analysis of a vertical jump shot from the bio-mechanics point of view, allows us to say
that...
i. For a jump shot (long jump) the best take-off angle is 45 degrees so that a player covers
the greatest distance.
ii. For a vertical jump shot the best take-off angle is 90 degrees, a player can then jump
the highest.
iii. The quality of a jump always depends on its initial velocity.
Pictures of Jump Shots
These drills should be repeated for the first few days of practice, as technique is one of
the most important parts of handball.
1) Skipping Drill

a. Each player has a ball, and starts skipping. Swinging their arms across their
bodies, turning their torso, and lifting their legs.
b. Players lift the same leg and arm, and try to jump as high as they can.
c. Players opposite arm should be held out in front of them.
2) Lying Down
a. With a partner and a ball, get players to lie down on their backs facing each
other 5-6 feet away.
b. Have players extend arm back above their head, with the ball touching the
ground, and their hand on top of the ball. Fingers should not touch the floor.
c. Have players roll forward into a sitting position, and have the players pass the
ball once up in the sitting position.
d. Have players turn torso, so their opposite arm is facing forward.
3) Progression from Lying Down.
a. Both players stand up approximately 6 feet away from each other.
b. One player passes the ball; the person receiving the ball catches and falls into
the sitting position. The players then rolls back into the lying position and then
continue rolling up into a standing position, and then passes the ball.
c. Players can only pass the ball once they are back in the standing position.
4) Shooting over Top
a. Get into groups of three. With two players six feet away, and one player on
their knees behind one of the players.
b. The player on their knees throws the ball over the shoulder of the player
standing in front of them.
c. Ensure players are throwing while extending their arm fully. Players should be
reaching and releasing the ball at the highest point. Have the standing player
crouch if shorter players are throwing over top.
d. Players behind catching the ball.
e. Have players throwing the ball at the standing persons chest and then at the feet
to ensure snapping of the wrist.
5) Shooting Technique
a. Each player has one ball and faces the wall, lying down on their shooting arms
side.
b. Have players throw the ball against the wall, leading with their elbow and
snapping their wrist. The shooting arm should finish at the opposite hip (arm is
going across the body).
c. Players should use abs to get more power.
Back Drills
3) Stem Shots (Figure 15)
a. Have players line up at LB, with one player at CB passing the ball.
b. Players pass to CB, run to the bench, catch the ball, (if right handed) jumps off
their right foot over the bench and lands on their left foot, and shoots the ball
and follows through on their right foot.

Goal of drill: After players jump over the bench and land, all their momentum should be
on that back foot, and then players should explode forward. Players should follow
through across their bodies.
1) Hoola Hoop Drill (Figure 16)
a. Have all players’ line up in one corner of the court, with each player holding a
ball. Set up 5 hoola hoops so that the players have enough room to run through
them.
b. One player jumps over the pylons on both feet, and practices their technique,
(lead with elbow, and snap their wrist), then runs up to the hoola hoops. The
player then begins running as fast as they can, stepping in the hoola hoops. On
their last step they players jump and shoot the ball at the net. Right-handed
players start off on their left foot, while left-handed players start off with their
right foot.
c. The next player begins once the player starts running through the hoola hoops.
d. Switch to the other side.
e. Progress down to only three hoola hoops.
a. To get players used to proper technique, start off with players
jumping off a bench, instead of the last hoola hoop so that they
have more time in the air to shoot the ball. Have other players
sit on the ends of the bench to create more stability.
Goal of drill: Players must get used to moving as fast as they can. Running
through the hoola hoops taking long strides, and shooting the ball.

4) Jump Shot (Figure 17)
a. Have players line up at left back at around 12 meters, with the other net on the
nine-meter line.
b. Have players pass the ball to the center back, run and catch the ball, take their
three steps and shoot before the net. Players should shoot the ball before the net
so that they don’t injure themselves.
c. Players should be jumping as high as they can making them drive there knee up,
releasing the ball over top of the net, using their wrist to snap the ball down.
d. To try and get players using proper technique, get them to jump off a bench
before shooting the ball. Again have players sit at the end of the bench to keep
it from tipping. Players should start further back so they have time to shoot the
ball.
Goal of drill: Proper technique, and shooting over top from back. It’s important
that players jump and reach as high as they can. Players must use their wrist to
snap the ball down over the net. Make sure the players drive there shooting arms
knee up, and follow through across their body.
2) 3-Line Drill (Figure 18)
a. Divide players into 3 lines around 12 meters back; left back (LB), center back
(CB), and right back (RB).

b. CB starts off with the ball, and passes to either the LB or the RB. The player
receiving the pass must be on the move catching the ball, then takes their 3
steps and shoots the ball from the 9-meter line.
c. Example: CB passes to LB, LB shoots, next LB passes to CB, CB shoots, next
CB passes to RB, RB shoots, next RB passes to CB, CB shoots…etc
Goal of drill: Movement of backs during offense.
Wing Drills
5) Rolling (Figure 19)
a. Have players line up at left wing.
b. Have players run through the hoola hoops, and jump off the bench. Have
players jump out as far as they can and land on their left foot and shoot the ball.
c. Once landed players should swing their hip and follow through with their
shooting arm, so that they are now facing the opposite direction from where
they started at wing.
d. Now facing the other way players should backpedal out of the shot, and land on
their buttocks, and roll over their shoulder out of the shot.
e. Progress to shooting the ball and rolling out on gymnastic mats, so they get
used to rolling.
f. Switch to the right wing.
Goal of drill: Proper technique of a wing shot. Player’s ability to roll out of a wing shot
will give them more time in the air to shoot. Players will be able to roll properly if they
can twist at the hips.
TEACHING OF CATCHING AND PASSING
1. General Remarks
Both elements are taught together. Start with the one hand half-upper catch and pass, then
teach the other more complicated movements. Thus at the beginning teach the easy elements
that are often used in game. Both right and left hand catching and passing must be practiced.

When teaching how to catch the ball, you must remember that players..
I. Should keep their eyes on the ball until they have caught it.
II. must spread their fingers, inner palms to the ball, and slightly bend
their elbows.
III. While catching the player must assume a posture required to pass.
IV. Should always move to the ball, without waiting.
V. Should not correct the catch.
Various Catching Methods - In handball there are the following methods of catching the ball:
a) upper
b) half-upper
c) lower
d) in midair
e) after bounce
f) from the ground
g) with the help of the other hand
h) putting down” a ball
Teaching how to pass, always remember...
i. To pass with the right and left hand.
ii. That passing should be as simple as possible, without additional moves.
iii. that the ball must be passed in front of a player, taking into account the
player’s speed.
iv. That the pass should be performed while running.
v. to practise short and long passing, taking into account the particular
vi. Situation on the playing field.
V. Passing /Catching Drills 1) Rectangle Drill (Figure 9 a & b)
a. Divide players into lines in form of a rectangle; as per Figure 1.
b. The ball starts at 2 opposing corners.
c. The ball is passed to the next player on the right, once the ball is passed the
players run to the other side. Corner players must run diagonally across.
d. Option 2- pass to the left, Option 3- after passing run half way, and backpedal
the other half.

e. Call the players name before passing the ball, players receiving the ball must be
aware that the ball is coming. Crisp passes and running…No jogging.
Goal of drill: Passing and catching. This drill develops awareness of oncoming
passes, communication between the players and movement without the
b
2) Rectangle Drill #2 (Figure 10)
a. Divide players into each corner and at half along the sidelines.
b. One player in the corner starts with the ball, runs half way along the end line or
sideline and passes to the next player on the move, who receives a pass
approximately half way between the lines. They stop and pass to the next player
on the move.
c. Have players stop when passing the ball to ensure better passes.
Goal of drill: Passing and catching on the move. Players must be able to catch
the ball while running, and be prepared to stop to make a pass to another player
on the move.
3) 4-Line Drill (Figure 11)

a. -Divide players into 4 lines along the end line, 2 players along the sideline and 2
middle players by the goal posts.
b. The middle lines have balls.
c. The middle players pass the ball to the outside players, and cross with the other
middle player, then receive the ball from the opposite side.
d. Outside players take 3 steps and pass, dribbling is not allowed from the outside
players. Always face forward, looking at the net.
Goal of drill: Passing and court awareness. The middle players must cross with
each other, while catching the ball on the move.
4) 2-Line Drill (Figure 12)
a. Divide players into 2 lines along the end line, around 1-2meters apart.
b. One ball for every two players.
c. Players run up the court passing the ball quickly between them, until they reach
the end line. Once they reach the end line, the players run to the sidelines and
make long passes to each other. Catch on the move, but stop to pass the ball.
d. Have players look at the net before passing the ball.
Goal of drill: Passing and catching. Players make short quick passes up the
court, while running. Then make long passes across the court to a player on the
move. Make sure players look at the net first when catching a ball.

5) 3-Man-Weave (Figure 13)
a. Divide players into 3 lines along the end line.
b. Middle line starts with ball, and then passes to either side.
c. Players follow their pass, and take over the empty line.
d. Keep players wide, crisp passes.
e. Option 2- reverse 3-man-weave, passing players must run in front of the players
instead of running behind them.
Goal of drill: Crossing with players, and catching the ball on the move. Again
make sure players are looking at the net before catching the ball.
6) Star Drill (Figure 14)
a. Have players divide into position, LW, LB, CB, RB, and RW.
b. Have one ball start at the wing position LW. The ball is passed to the LB (1),
across to the RB (2), down to the RW (3), and then to the CB (4), then passed
back to the LW (5).
c. Have players follow their passes. Players are on the move when catching the
ball; they take their three steps and then pass the ball.
d. Option 1- go in the opposite direction, starting from LW, LW to CB, CB to
RW, RW to RB, RB to LB, and LB to LW., Option 2- add another ball.
Goal of drill: Passing from positions, always face the net as to be an offensive
threat. Players attack and act as a threat and pass the ball.

Pivot Drills
6) Passing to the Pivot (Figure 20)
a. Have the pivot line up on the six meter line, with one defender about 1
meter in front of him. Have one player (the passer) stand on the 9–
meter line.
b. The pivot is restricted to move between the pylons, while the defender
tries to stop a pass from going to the pivot.
c. The passer tries to get a pass into the pivot, passing so the pivot is
moving to get the ball. No lob passes over the defender.
Goal of drill: Movement of pivot into the open space, allowing an open shot.
7) Jumping Over (Figure 21)
a. Have one player lie between the 6 and 9-meter lines.

b. Have another player hold the pivot by the waist as hard as they can. The pivot
tries to get free by pumping their legs and running.
c. Once free the pivot runs and jumps over the player lying down, receives a pass,
turns and faces the net, and then shoots the ball.
d. Pivot should jump towards the net.
Goal of drill: Pivot must fight for position.
8) Guessing Drill (Figure 22)
a. Have a pivot line up on the 6-meter line facing the goalie.
b. The coach blows the whistle, and a player bounce passes the ball to the pivot,
on either side on the pivot.
c. The pivot turns around on the sound of the whistle, and must find where the ball
is coming from.
d. Once the pivot catches the ball they turn and face the net and shoot the ball.
Goal of drill: Pivot must react to where the ball is played.