48m two-wire/decoder module owner’s manual and ... s manual and programming instructions for...
TRANSCRIPT

1
DUAL 48M Two-Wire/Decoder Module
Owner’s Manual and Programming InstructionsFor use with I-CORE® controller
DUAL®

2
For use with
I-CORE®

3
TABLE OF CONTENTS
SYSTEM COMPONENTS ................................................................................................................................................................................ 4OVERVIEW OF DUAL® DECODER OPERATION ............................................................................................................................................... 5SYSTEM OVERVIEW ...................................................................................................................................................................................... 6INSTALLATION OF DUAL DECODER MODULE .................................................................................................................................................7
Installation for Combined Decoder and ICM-600 Module.................................................................................................................................. 7WIRE SPECIFICATIONS AND INSTALLATION.................................................................................................................................................. 8
Using Pre-Existing Wire ..................................................................................................................................................................................... 8TYPICAL WIRE LAYOUT................................................................................................................................................................................. 9WIRE SPECIFICATION AND INSTALLATION ...................................................................................................................................................11
Connecting the Two-Wire Paths ........................................................................................................................................................................11OVERVIEW OF DECODER PROGRAMMING .................................................................................................................................................. 12
Programing Decoder Stations ........................................................................................................................................................................... 12TYPICAL DECODER CONNECTIONS ..............................................................................................................................................................14INSTALLING THE DECODERS AND SURGE ARRESTORS ................................................................................................................................ 15
Installing DUAL 1 and 2 ..................................................................................................................................................................................... 15Installing DUAL S .............................................................................................................................................................................................. 18
LIGHTNING PROTECTION AND GROUNDING ................................................................................................................................................ 19DIAGNOSTICS ............................................................................................................................................................................................. 20
Read Current Function .................................................................................................................................................................................... 20Find Solenoid Function .................................................................................................................................................................................... 20Operating Stations .......................................................................................................................................................................................... 20
TROUBLESHOOTING .................................................................................................................................................................................... 21Important tools ................................................................................................................................................................................................. 21ICD-HP Handheld Wireless Programmer .......................................................................................................................................................... 21Faults and Fault Messages ................................................................................................................................................................................ 21

4
SYSTEM COMPONENTS
DUAL 48M
ID WIRE (Example)
DUAL 1 DUAL 2 DUAL S

5
OVERVIEW OF DUAL® DECODER OPERATION
DUAL two-wire decoder technology permits control of irrigation systems over relatively long distances by attaching waterproof decoders as needed in a low voltage, direct burial two-wire path. The wire is cut wherever station control is needed, and the decoder wires are spliced into the path. The decoders are then connected to local standard 24 VAC solenoids for individual operation of valves and similar devices. Each decoder is uniquely addressed, and both the signal for their address and the power required for solenoid operation are sent over the single pair of wires. Up to 48 decoders can be individually operated by the I-CORE® controller over a single pair of wires in this manner.
TWO-WIRE PATH

6
SYSTEM OVERVIEW
I-CORE® CONTROLLER
DUAL® -1 (One-Station Decoder)
DUAL-S SURGE ARRESTOR (Recommended every 1000 feet, 300 m)
DUAL-2 (Two-Station Decoder)
DBR/Y-6 waterproof connectors in all two-wire path splices
DUAL-S (Placed at end of two-wire path)
MAX DISTANCE TO END OF TWO-WIRE PATH ID1 WIRE (14 AWG) 5000 feet (1500 m) or ID2 WIRE (12 AWG) 7500 feet (2300 m)
GROUND PLATE (Or ground rod)

7
INSTALLATION OF DUAL DECODER MODULE
The DUAL48M decoder output module is designed for use in all Hunter I-CORE® series controllers and provides two-wire decoder outputs for the Hunter DUAL® family of field decoders.
Installation for Combined Decoder and ICM-600 Module
The I-CORE will accept both the DUAL48M decoder module and standard ICM-600 expansion modules, providing the ability to attach both decoders and conventionally wired stations to the controller. The ICM-600 module(s) must be installed to the left of the DUAL Decoder Module with no gaps. The 48 station maximum does not change. The decoder module will automatically recognize the number of conventional stations (six per ICM-600). "The "Avail Station" display will change to show the range of available decoder stations (for example, 7-48, 13-48, etc).
1. Turn the dial to the Run position.
2. Open the facepack door, and locate the module slide lock. Slide the module lock to the unlocked “Power Off” position.
3. Install the DUAL48M in the first 3 slots to the right of the Power Module or to the right of any ICM600 modules if the installation includes both. Do not attempt to force the module into any other position.
4. Install the module by aligning it in the three slots, and slide it in, pushing until the module is fully seated.
5. Slide the module lock to the locked “Power On” position. The I-CORE will apply power to the module and recognize it for decoder use (controller maximum station size is now 48 stations).
NOTE: This module is not compatible with any other controller.
NOTE: The DUAL48M will display a line open message if the module is installed and no two-wire paths and decoders are wired to the controller.
Combined ICM-600 and DUAL48M
DUAL48M Installed (no ICM)

8
WIRE SPECIFICATIONS AND INSTALLATION
Wire and wire installation is a key factor in successful decoder installations. Substitution of recommended wire and wire splices is at the installer’s own risk and is a major cause of start-up service troubles. Hunter provides two types of wire for use with I-CORE DUAL™ decoder systems.
ID1 WIRE: Two-conductor, solid-core, twisted, color-coded red and blue, direct burial PE jacket 14 AWG/2.08 mm2 copper wires. Suitable up to 5000 feet/1500 m.
ID2 WIRE: Two-conductor, solid-core, twisted, color-coded red and blue, direct burial PE jacket 12 AWG/3.31 mm2 copper wires. Suitable up to 7500 feet/2300 m.
The twisted pairs are not shielded or armored. Conduit is not necessary unless local regulations require it (the two-wire path is low voltage).
• Each two-wire output run of wire is called a "path". The DUAL48M provides up to three output paths to the field, and decoders may be installed on any or all of them in any combination.
• It is not necessary to connect the paths to one another. Each path runs from the controller to the last decoder in the path, and simply stops there.
• Never connect a wire path from one controller to the wire paths from another controller.
Hunter requires twisted wire meeting the listed specifications on all paths. The twist in the wire is an essential part of surge suppression. The red/blue coding is a convenience for matching the wires to Hunter decoders. Color coding the two different conductors is mandatory.
Using Pre-Existing Wire
This is strongly discouraged by Hunter for the following reasons:
• It is unlikely that the pre-existing wire meets the specifications for gauge, twist, and solid copper.
• Pre-existing wire will not be color-coded correctly for the decoder wires.
• Pre-existing wire may have invisible problems (shorts, breaks, increased resistance, or damaged insulation) that will be inherited by the new installation.
ID WIRE TABLES
14 AWG/2 MM2 STANDARD DECODER CABLE (UP TO 5,000 FT./1,500 M)
12 AWG/3.3 MM2 LONG RANGE, HEAVY-DUTY DECODER CABLE
ID1GRY Gray jacket ID2GRY Gray jacket
ID1PUR Purple jacket ID2PUR Purple jacket
ID1YLW Yellow jacket ID2YLW Yellow jacket
ID1ORG Orange jacket ID2ORG Orange jacket
ID1BLU Blue jacket ID2BLU Blue jacket
ID1TAN Tan jacket ID2TAN Tan jacket

9
TYPICAL WIRE LAYOUT
TWO TWO-WIRE PATHS
SINGLE TWO-WIRE PATH
DUAL-S SURGE Suppression
NOTE: Do not loop the two-wire path back to the controller.

10
TYPICAL WIRE LAYOUT
DECODER CONTROLLER
SINGLE TWO-WIRE PATH WITH T-SPLICES
ID1: Up to 5000ft/ 1500 m from controller to each end of wire paths. ID2: Up to 7,500 ft/2300 m from controller to each end of wire paths
NOTE: Do not loop the two-wire path back to the controller.

11
WIRE SPECIFICATION AND INSTALLATION
Connecting the Two-Wire Paths
1. Turn Controller power OFF.
2. Route the red and blue wire paths from the field up through the wire openings or conduit into the controller wiring compartment.
3. Connect the red and blue two-wire paths to the decoder output screw terminals below the decoder module.
4. There are two rows of screw terminals in the controller that are accessed through an opening in the decoder module cover, one red and one blue, labeled 1-2-3. Each numbered pair represents a possible two-wire path to the field (some systems only use one pair, others may use all three).
5. Connect the red wire from a twisted pair to a numbered red terminal, and connect the blue wire to the blue terminal with the same number. Do not connect more than one wire to any of the terminals. Do not mix red from one pair with the blue from another pair. Keep each pair separate, red to red and blue to blue, until all pairs are connected to their numbered terminals.
6. Turn controller power back ON and test. The decoder output module display should show that it is ready for programming or operation.
NOTE: If decoder(s) have not been installed on the two-wire path(s), the decoder output module will display “Line Open”.
NOTE: Do not connect wires underneath the skirts with the red/blue arrows! Connect them to the exposed terminals in the middle.

12
OVERVIEW OF DECODER PROGRAMMING
Dual decoders must be programmed with station numbers before they can operate. They can be programmed from the DUAL48M module itself, before installation, or at any time with the ICD-HP wireless handheld programmer (sold separately).
Before programming any stations, you should have an exact plan on paper for the location of each decoder and station in the system. DUAL decoders are available in one- and two-station sizes, and they may be mixed in the same system. The numbered station assignments for each decoder can be programmed for any station by the decoder module depending on the size of the decoder.
The decoder output module has two holes to the right of the programming buttons called the Programming Port.
NOTE: Do not program the same station number into two different decoders!
Programing Decoder Stations
1. Turn controller power ON.
2. Insert the stripped end of the red wire from a DUAL decoder into one of the two Programming Ports to the right of the programming buttons on the decoder output module.
3. Insert the blue wire from the decoder into the other Programming Port hole.
4. Press the mode button (center button) once. An arrow will be displayed next to “Prog Decoder”.
5. Press the button again. The display will show “Reading” as the decoder module checks for a decoder.
NOTE: Do not let the wires touch each other.
NOTE: DUAL decoders cannot be programmed as Master Valves. Connect Master Valves directly to the controller PMV terminal.

13
OVERVIEW OF DECODER PROGRAMMING
6. If the decoder red/blue wires are not fully inserted into the module, or if the decoder is defective, a “Reading ERROR” message will be displayed.
7. Brackets [ ] indicate the station number for the decoder output. There will be two sets of brackets for a two-station decoder. (There may already be a number within the brackets indicating that the decoder has been previously programmed.) A new decoder will be set to station 00, and new DUAL-2 decoders will have both stations set to 00.
8. Use the buttons to select or change the station number(s) you would like to program into the decoder.
9. Press the button to program the decoder. If a two-station decoder is being programmed, use the button to navigate to the second set of brackets [ ] which indicate the station number for the #2 decoder output. Use the buttons to select the station number you would like to program.
10. The display will indicate when programming has been completed by showing “Programming DONE”. If the decoder has been accidentally disconnected or malfunctions, the display will show “Programming ERROR”. This means the decoder was not programmed (check connection, and try again).
11. When the decoder and stations have been programmed, the module display will return to the ready mode. Write the station numbers for each decoder output on the label provided on each decoder.

14
TYPICAL DECODER CONNECTIONS
If it is necessary to change the station numbers previously programmed into the decoder, the decoder may be reconnected to the Programming Port. The station number(s) will be displayed. Conduct the programming procedure outlined above to reprogram the decoder. The ICD-HP also provides the convenience of reprogramming decoders without having to remove them from the two-wire path.
NOTE: Decoders may be reprogrammed at any time.
15
INSTALLING THE DECODERS AND SURGE ARRESTORS
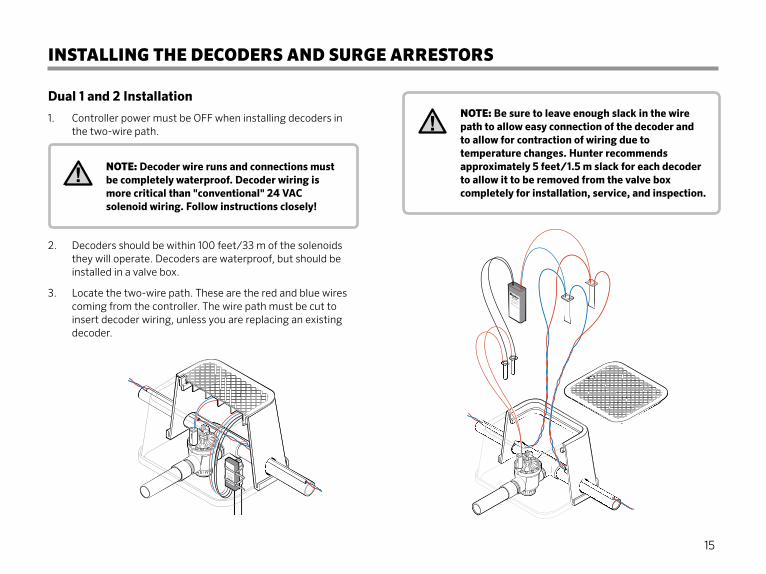
Dual 1 and 2 Installation
1. Controller power must be OFF when installing decoders in the two-wire path.
2. Decoders should be within 100 feet/33 m of the solenoids they will operate. Decoders are waterproof, but should be installed in a valve box.
3. Locate the two-wire path. These are the red and blue wires coming from the controller. The wire path must be cut to insert decoder wiring, unless you are replacing an existing decoder.
NOTE: Be sure to leave enough slack in the wire path to allow easy connection of the decoder and to allow for contraction of wiring due to temperature changes. Hunter recommends approximately 5 feet/1.5 m slack for each decoder to allow it to be removed from the valve box completely for installation, service, and inspection.
NOTE: Decoder wire runs and connections must be completely waterproof. Decoder wiring is more critical than "conventional" 24 VAC solenoid wiring. Follow instructions closely!

16
INSTALLING THE DECODERS AND SURGE ARRESTORS
1. At the decoder/valve box location, make sure there is approximately 5 feet/1.5 m of extra wire, half on either side of the splice. Cut the two-wire path for splicing at the midpoint of the slack loop
2. Strip the decoder wire for splicing. A section of protective outer jacket can be removed from each end to provide enough wire to work with comfortably. A minimum of 8"/20 cm is recommended.
Lightly score the outer jacket of the two-wire path at the desired length. Do not cut all the way through the jacket.
3. Snap the jacket at the cut.
4. Slide the extra piece of jacket off the twisted pair.
5. Cut and strip the red and blue wire ends 0.5"/12 mm.
30" (75 cm)
0.5" (12 mm)

17
INSTALLING THE DECODERS AND SURGE ARRESTORS
6. Join the red wire ends with the red decoder lead, and install in the supplied waterproof connector. Repeat for the blue wires.
7. Stake the decoder in the valve box if desired, with wires down. This picture shows a small pipe as a stake, with a larger piece of pipe tied to the decoder. The decoder can be removed for future service.
8. Connect solenoid wiring (100 ft/30 m max from decoder to solenoid). Use quality waterproof connectors (not supplied). • Black wires connect to the first station solenoid. • Yellow wires (DUAL-2 only) connect to the second station solenoid.
9. Apply power to the two-wire path and test
>100 � (30 m)

18
INSTALLING THE DECODERS AND SURGE ARRESTORS
Dual S Installation
1. The surge arrestor is installed in-line with the two-wire path, with a red and blue pair of wires on each side, for insertion in the path.
1a. Join one red wire path end with the red wire on one side of the surge arrester in a two-way splice, and install in the supplied waterproof connector. Repeat for the blue wire.
1b. Connect the red and blue wires on the other side of the surge arrester to the other side of the wire path.
2. Connect the earth ground hardware (plate or rod) with the bare copper lead. Use a quality waterproof connector or metal clamp. Use either 4"/100 mm x 36"/1 m copper plate, or 8'/2.5 m copper clad steel rod.
The earth ground hardware must be installed at least 8'/2.5 m away from the two-wire path, at right angles to the direction of the wire path.
Do not install a ground rod in the same valve box as the surge arrestor. See the Hunter Decoder System Design Guide for complete grounding specifications.
3. End-of-line installation: The end of each two-wire path should always be earth grounded. Connect both red wire leads from the Dual-S to the red wire path, and both blue wire leads to the blue wire path, to terminate the line.
Then connect the earth ground hardware (rod or plate) as with the inline specifications.
4. Apply power to the two-wire path and test.

19
DUAL-SSurge Protection
Module / Module de
protection contre
les surtensions
Solid bare coppershielding wire
LIGHTNING PROTECTION AND GROUNDING
In-Line Surge Arrestor Installation
Decoder ground wire
Solid bare copper shielding wire
Place ground plate in 6" (15 cm) wide trench, perpendicular to shielding wire, 8 feet (2.5 m) away, 36" (1 m) below ground level. Surround plate evenly with PowerSet material.
End-Line Surge Arrestor Installation
Decoder ground wireSolid bare copper shielding wire
Place ground plate in 6" (15 cm) wide trench, perpendicular to shielding wire, 8 feet (2.5 m) away, 36" (1 m) below ground level. Surround plate evenly with PowerSet material.

20
DIAGNOSTICS
The DUAL decoder module has two diagnostic modes to help you troubleshoot installation issues and check the status of solenoid operation.
Read Current Function
Allows for real time current readings of solenoids operating on the two-wire path.
1. Use the buttons to select the “Read Current” function. Press the button once and the display will show the current draw on the two-wire path.
2. The display will show current in milliamps (mA). The display shows typical current draw for a single solenoid.
Find Solenoid Function
The “Find Solenoid” function allows the users to activate the solenoid of a single station to produce a “chattering” sound. This function allows for quick identification of valves on the site.
1. Use the buttons to select the station you would like to operate in the "Find Solenoid" mode.
2. Press the button once to initiate. The module will "chatter" the solenoid for 60 seconds. Use the button at any time to stop the "Find Solenoid" function.
Operating Stations
The I-CORE controller can operate two programs simultaneously or up to five solenoids in the manual station operation model. At any time the controller is operating stations, the station numbers will be displayed.

21
TROUBLESHOOTING
Important tools
#2 Phillips screwdriver
ICD-HP Handheld Programmer
Known-good solenoid
Known-good decoder
Digital Multimeter
ICD-HP Handheld Wireless Programmer
This Hunter product allows wireless connection with DUAL decoders, even when they are wired into field installations. The ICD-HP allows direct diagnostics, operation, and programming of any DUAL decoder installed in a valve box. ICD-HP can also verify status of solenoids, read voltage, and test sensors. The ICD-HP is valuable for field troubleshooting and will pay for itself in greatly reduced setup, programming, and diagnostic time.
Faults and Fault Messages
Faults: Controller display shows “Fault”. This may be followed by a station number. If the display shows “2WP Fault”, it believes the fault is in the two-wire path.
The Station Status light on the I-Core System Status dashboard will also show a red LED when there has been a decoder fault.
If one or more station numbers are listed on the display, troubleshoot those stations. If there is no station number, troubleshoot the two-wire path connections.
1. Open the controller inner door to see additional diagnostic information on the DUAL48M display. The display may show Line Open or Line Fault.
The message may alternate with other screens. Allow a few seconds to see all displays.

22
TROUBLESHOOTING
2. Press the Mode (center) button on the DUAL48M control panel. Select “Diagnostics” with the arrows, and press Mode to select.
3. Press the Mode button to select “Read Current”. This will show the current draw in milliamps (ma). In standby (no stations running), the total should be approximately 3 mA multiplied by the number of decoders in the system. The number of decoders on the two-wire paths determines the correct current for the system.
When a station is turned on, the milliamps should increase by approximately 40mA, per solenoid attached to the active station.
• If a station is turned on, and the milliamps don’t increase enough, the controller will show a Station Fault followed by the station number.
• If a station is turned on, and the milliamps increase by more than the controller will allow, the controller will show a Station Fault followed by the station number.
• If the milliamps increase too much when no stations are supposed to be running, the controller will show a Line Fault with no station number.
4. Observe the current draw with no stations running. Divide the current draw by the number of decoder modules connected to the controller. It should be approximately 3 mA per decoder.
• Do not include DUAL-S surge suppression devices in current draw calculations- they do not increase the current.
5. If no problem is observed with the current draw reading in standby (no stations running), turn on a station listed in the Fault message with the Manual Single Station feature, or a wireless remote control.
6. Observe the Current Draw display. The current should increase by approximately 40 milliamps per solenoid connected to the decoder. Wait at least 30 seconds for the controller to complete its retry attempts and for the current to stabilize.

23
TROUBLESHOOTING
Line Fault: If the DUAL48M says “Line Fault” or “2WP Fault” when no stations are running, the most likely cause is a direct short between the two wires in the two wire path (red and blue). If the Line Fault message only appears when a station is turned on, the problem is most likely a short in the decoder-to-solenoid wiring for the affected stations.
I-Core® Display DUAL48M display in Standby
Cause Corrective Action
Fault, no station or 2WP Fault
Line Open: Current draw too low on standby
Two-wire path disconnected Check connections to two wire path. Line Open may appear during installation when 3 or fewer decoders are connected, due to the low current draw. This is normal.
Line Fault: Current draw too high on standby
Short in two-wire path
Too many decoders (more than 48) in two-wire path
Check two-wire path (red and blue must not touch)
Verify number of decoders in two-wire path
Fault with station numbers
DUAL48M display with Active Station
Cause Corrective Action
Current Draw for station too low (station number will blink slowly) *
Decoder not programmed
Decoder missing, damaged, or disconnected
Solenoid missing, damaged, or disconnected
Program decoder address
Repair/replace decoder or connections
Repair or replace solenoid or decoder-to-solenoid wiring
Current Draw for station too high (Line Fault will appear when station is running)
Shorted solenoid or solenoid wiring
Multiple decoders with same address
Too many solenoids connected
Repair/replace solenoid or decoder-to-solenoid wiring
Remove duplicate addresses
Remove excess solenoids

24
TROUBLESHOOTING
* Current Draw Too Low: In a low current situation, the controller will retry the command to the station up to 3 times.
The DUAL48M display will show the station number when it is sending the command to the decoder.
If the current does not increase, the station number will disappear for a few seconds. This indicates that the draw did not increase as expected.
After 4-5 more seconds, the station number will re-appear, during the retry attempt.
If low current draw continues, the number will disappear again.
After 3 unsuccessful attempts, the station number will disappear, and the Fault message will appear on the I-Core controller facepack display.
The slow blink of the station number is an indication that either the specified decoder, or its solenoids, are not connected or operational.
When a healthy decoder and solenoid are activated, there is no need for the retry attempts, and the station number will not appear to blink.
If No Stations Will Activate:
1. Verify that slide lock is in the Power On position and that power is on to the DUAL48M module (display appears).
2. Check DUAL48M for “Line Open” message. This means the two-wire path is disconnected from the controller.
3. Check between the controller and the first decoder to verify that the two-wire path is connected.
If No Stations Will Activate Beyond a Certain Station Number (followed by multiple station faults): Likely break in two-wire path beyond station 1.
1. Identify failing stations from Fault messages.
2. Identify decoder locations and layout on plan or in wiring path.
3. Begin with last working station, and look for break beyond that point.
4. If multiple two-wire paths are in use, disconnect other paths, and troubleshoot one path at a time.

25
TROUBLESHOOTING
Clear Fault Alarms:
Press the – button on the I-Core facepack to clear the Fault message and/or Alarm light.
Fault messages on the facepack do not prevent normal irrigation from occurring. The controller will continue to operate irrigation on stations that do not have faults.
Special Notes:
I-Core Decoders are not compatible with mechanical relays.
When combining DUAL48M with conventional I-Core station output modules, not all stations will be available for decoder addressing. The station numbers for slots with ICM-600 modules will not be available for decoder station programming.
Voltage measurement between an active decoder and the solenoid is not a reliable indicator of the output from a decoder.
• Decoder electrical power is not the same as 50/60 Hz power and normal voltmeters may show very low readings to active stations (may range from 5 to 14 Volts).
• It is more reliable to keep a known-good decoder, and a known-good solenoid, for troubleshooting purposes.
Controller may temporarily fault Open if less than three decoders are connected to the two-wire path, since standby current may fluctuate below the minimum. Correct by either waiting 5 minutes for line to stabilize, or connecting a second decoder.
Stations turned on in the field with ICD-HP may shut down prematurely, because the controller is unaware of the decoder activation. To prevent this, start another station via the controller or remote control anywhere in the system.
Checking the Two-Wire Path:
Disconnect the two-wire path from the controller. Use a quality multimeter to check the resistance on the two wires. Properly installed decoder paths should have a very high resistance (600,000 Ohm s or higher). Lower readings indicate shorts to earth (check connections).

RESIDENTIAL & COMMERCIAL | Built on Innovation®
1940 Diamond Street | San Marcos, California 92078 USALearn more. Visit hunterindustries.com
© 2015 Hunter Industries Incorporated LIT-533 RevA 7/15