45° miter sled instructions - rockler woodworking and...

1
45° Miter Sled Instructions 31593 Rev 08/14 © Rockler Companies Inc. 2014 Visit Rockler.com for the most current product information and videos or call 1-800-260-9663. Adjusting Miter Track Fit Use a 7/64" hex wrench (not included) to advance the nylon set screws in the sled’s miter bar until you achieve a smooth, no-slop fit in your saw’s miter track. Fig. 1. Cutting Longer Frames Without Extension Fences 1. Rip and cut all four frame workpieces to exact width and length. 2. Attach a short stop block to your table saw fence, a short distance ahead of the saw blade; make sure that the block does not extend as far as the blade. Fig. 2. 3. Using the trailing edge of the Miter Sled, set up to cut the workpieces to 45° at one end. The cut should be made so as to retain the full length of the workpiece; adjust your table saw fence with stop block accordingly. Fig. 3. Once set up, cut all four pieces. 4. Using the leading edge of the Miter Sled, clamp the workpiece with the square end toward the blade and adjust your table saw fence with stop block to the exact length of cut marked on the workpiece. Fig. 4. 5. With the workpiece against the stop block, proceed to cut all four pieces to exact length. 6. Glue and assemble the frame. Fig. 1 Fig. 2 Fig. 3 Fig. 4

Upload: lyhuong

Post on 14-Apr-2018

224 views

Category:

Documents


4 download

TRANSCRIPT

45° Miter Sled Instructions

31593Rev 08/14

© Rockler Companies Inc. 2014Visit Rockler.com for the most current product information and videos or call 1-800-260-9663.

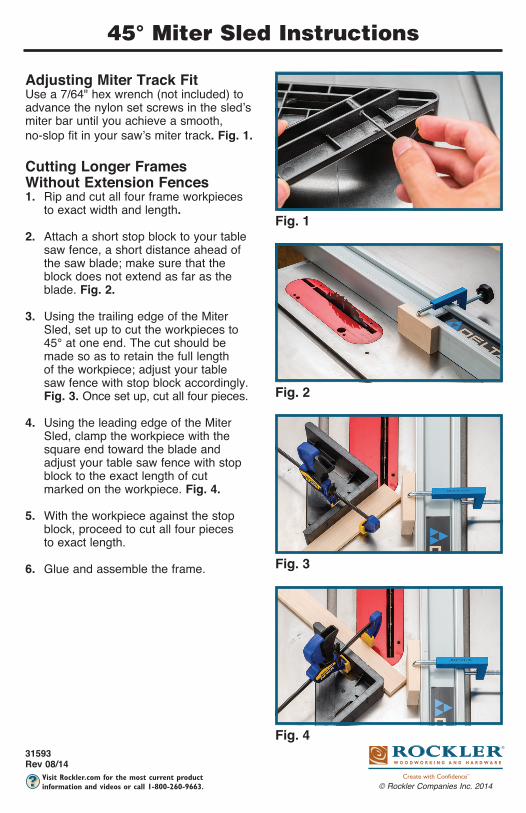
Adjusting Miter Track FitUse a 7/64" hex wrench (not included) to advance the nylon set screws in the sled’s miter bar until you achieve a smooth, no-slop fit in your saw’s miter track. Fig. 1.

Cutting Longer Frames Without Extension Fences1. Rip and cut all four frame workpieces to exact width and length.

2. Attach a short stop block to your table saw fence, a short distance ahead of the saw blade; make sure that the block does not extend as far as the blade. Fig. 2.

3. Using the trailing edge of the Miter Sled, set up to cut the workpieces to 45° at one end. The cut should be made so as to retain the full length of the workpiece; adjust your table saw fence with stop block accordingly. Fig. 3. Once set up, cut all four pieces.

4. Using the leading edge of the Miter Sled, clamp the workpiece with the square end toward the blade and adjust your table saw fence with stop block to the exact length of cut marked on the workpiece. Fig. 4.

5. With the workpiece against the stop block, proceed to cut all four pieces to exact length.

6. Glue and assemble the frame.

Fig. 1

Fig. 2

Fig. 3

Fig. 4