caed safety manual - amazon web servicescontent-calpoly-edu.s3.amazonaws.com/caed/1... · support...
TRANSCRIPT

Support Shop Safety ManualCollege of Architecture and Environmental DesignCal Poly San Luis Obispo

CAED Support Shop Safety ManualThis manual is provided to you to help you prepare for the safety test, the Support Shop introductory lecture and project demonstration. Please read through it before your first visit to the shop. Thorough understanding of the material in this manual will prepare you for the safety test. You will be required to pass this test before you can use the shop.The use of the Support Shop is a privilege, and that privilege can be revoked for any misuse of equipment or violation of any of the safety regulations.
Safety First — Dial 911If an emergency arises you must inform the Shop Manager or a Student Assistant.There are emergency telephones next to the tool room checkout window, at the front entrance to the metal shop and the sliding door in the wood-shop. Telephones are also available in the manager’s office and the technician’s office.Fire alarm switches are at the front entrance to the metal shop and the sliding door in the wood-shop. First Aid is available by the sink.
Shop Check InWhen you arrive you must check in at the tool room even if you do not need to check out tools.Please sign in with your name, major and time in. When you leave the shop, please sign out with the time.
Tool CheckoutYou must check out all tools at the tool room.Tools are checked out on a first come first serve basis.Tools are not to be removed from the Support Shop area.You are responsible for checking tools back in. Tools should be clean and in working condition when checked out and when returned.Tools left out or in the shop are not checked in.If you do not return tools, your school records will have a hold placed on them. Student Assistants cannot remove fines and holds. You must clear fines and holds with the Support Shop Manager.

Project storage space is extremely limited. There are a limited number of lockers under the
workbenches. These are available on a first come first served basis.Lockers with locks that do not have your name and CURRENT term clearly labeled will be cut and emptied. Do NOT use horizontal surfaces of tools as workspace or storage. i.e. Table saw runoff tables.Very limited storage is available in the Cathedral, outside, and in the storage bays.All materials must be clearly labeled with name, date and contact information.Check with the Support Shop Manager if you have questions. Improperly stored materials will become Shop property or disposed of.
General Rules for the Support Shop1.No Drugs or Alcohol.When working in the Shop you must be alert and well rested. If you are under the influence of ANY alcohol, drugs, or medications of any type that affect your mood and/or perception, or experiencing a lack of sleep you are not allowed to be in the shop.2. Eye protection must be worn at all times in the shops. Most prescription eyeglasses meet safety requirements, but do not provide complete protection and safety glasses can be worn over prescription frames. Sunglasses are not approved eye protection.3. Wear appropriate ear protection when needed. Ear protection is available in the Tool Room.4. Dress appropriately. Do not wear gloves in the wood shop. Loose clothing is dangerous as it may become entangled in moving parts and pull the operator into the machinery. Long hair must be securely tied back.Sturdy/closed toe shoes must always be worn in the Support Shops.5. No music headphones, such as iPods, are allowed in the Shop.6. Absolutely no horseplay, clowning around, or any other non- productive activity is allowed.7. Some areas/tools require special training, such as, welding and metal machining. You may not work in these areas without proper training. 8. Report all injuries, even if slight must be reported to the shop technician immediately.9. Clean Up. Always take the time to clean up your scraps and debris. Persons found leaving a mess will have Shop privileges suspended at the discretion of the Shop Manager.

10. Label All Chemicals. If you bring in any chemicals such as paint, adhesives, solvents, etc. they must either be in the original container or labeled clearly. All flammable liquids will be stored in a flammable cabinet only11. When in doubt, stop and ask
ToolsThe following is a brief list of tools and some of their uses in the Support Shop. This is intended as an introduction to some of the tools you will need to work on assigned projects. If you have little or no experience using the tools or are unclear how to accomplish the results wanted, please consult with the Shop Manager, Shop Technician or the Student Assistants. We are here for you.
Table SawsThe table saw is a very useful and versatile tool. It is designed to make very accurate STRAIGHT cuts. This machine can rip (cut along the material’s length) using the fence, or crosscut (cut across the material’s shorter dimension) using a miter guide or sled.You must ALWAYS use a guide to cut material on the table
saw. Freehand cuts may NEVER be performed on this tool.The blade can be raised or lowered by means of a hand wheel at the front of the cabinet. It can be tilted by means of a hand wheel on the left side. The degree to which it has been tilted is roughly indicated on a scale at the front of the base. For precise angles use an angle gauge.Near the blade are two safety features: a splitter or riving knife, which is behind the blade and in line with it; and a guard, which is the plastic hood over the blade. The splitter serves to prevent the material from coming away from the fence and it stops material from squeezing the blade helping prevent kickback. The blade guard prevents users from coming into contact with the spinning blade.The table saw can be fitted with a dado blade set that allows the width of the cut to be set from ?” to ?” to cut rabbits and dados in one pass.

Never try to cut wood that is warped. Material must ALWAYS have at least one straight edge to be cut on the table saw. Use only clean, untreated wood that is free of nails and staples. Do not use wood that has paint, foil or any type of coating. Ear protection is recommended.
Rip CutsRipping is the process of cutting in the longer dimension of the material. With solid wood and plywood it usually means cutting parallel to or along the grain. This is one of the most common uses of the table saw and the machine is fitted with a rip fence for this purpose. The fence can be locked into position parallel to the blade. The distance between the fence and the blade is read under the hairline window to the right of the fence. Gentle
downward pressure on the lever locks the blade in position. For any cut less than 6” wide a push stick should be used to push the material past the blade. For cuts less than about 1 1/2” wide the blade guard will need to be taken out of the way and the riving knife used.Check with the technician or student assistant if you have any questions.Procedure:1. Set fence to desired measurement.2. If needed ensure a push stick is sitting on the table near your right hand but not in the way of the cutting.3. Adjust the blade to 1/4” to 1/2” above the.4. Ensure exhaust system is running.5. Turn on table saw.6. Place material on the front of the table.7. Use your left hand to hold the material down and against the fence and your right hand to advance the material into the blade.8. Once cutting has begun, ensure that the material never comes away from the fence, and that it is running flat on the table. You must control the material all the way past the blade.
9. Never let go of the material once cutting is under way. If work binds or starts to jump or chatter, it is a sign that you are not controlling the material. Letting go may cause it to kick back and come flying toward you. In this case hold the work as securely as you can and use your left knee to press the “off” button of the switch. If this is not possible call for someone else to shut the machine off.10. For cuts more than 6” wide: Once the left hand comes into the vicinity of the table remove it and continue pushing with the right hand past the blade until the material is completely clear of the blade.11. For cuts less than 6” wide: Once the back end of the board has moved onto the table, hold material securely with the left hand while picking up push stick with the right hand. Use it to continue pushing the material through the blade. As the left hand approaches the insert remove it from the material and use the push stick to push the material until completely clear of the blade.12. For cuts less than 3/4” wide: The blade will cut through the push stick as the back of the board goes through it. This is normal. Make sure the blade extends only 1/4” above the material to reduce cutting into the push stick. If the push stick has been used several times before at different fence settings it can become quite “eaten” away. If this is the case throw it away and make a new push stick.13. In every case remove the cut piece by walking around to the side or back of the machine. Do not reach across the blade.14. When finished with a setting, turn off the machine before resetting.15. When finished with the machine, turn it off and clean off machine and surrounding floor.
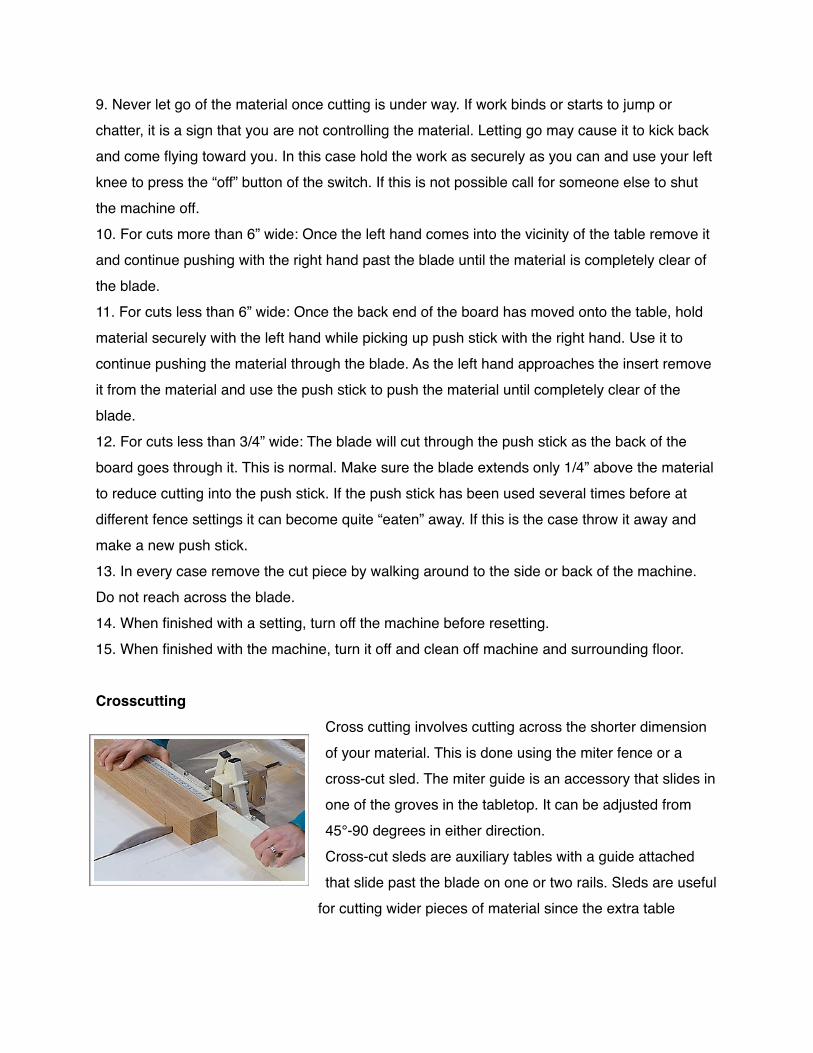
CrosscuttingCross cutting involves cutting across the shorter dimension of your material. This is done using the miter fence or a cross-cut sled. The miter guide is an accessory that slides in one of the groves in the tabletop. It can be adjusted from 45°-90 degrees in either direction. Cross-cut sleds are auxiliary tables with a guide attached that slide past the blade on one or two rails. Sleds are useful
for cutting wider pieces of material since the extra table

supports the material. We have a shop built sled that is usually confined to 90° cuts, although it can be altered to cut in a variety of ways.Procedure:1. Move rip fence to the side or remove from saw.2. If you are using a cross-cut sled, the blade guard will need to be removed.3. Place miter guide or sled on table and ensure that the rails slide freely in the grooves.4. Adjust blade height to 1/4” above material.5. Place material against rear guide of sled.6. Turn on machine7. Hold material securely against guide while pushing miter guide or sled past the blade. Make sure your hands are clear of the blade and be very aware of where the blade will exit the cut and rear of sled.8. Never let go of material once cutting is underway.9. When blade has cleared material, slide material sideways away from path of blade. If this is not practical turn machine off and walk around to remove material.10. Pull back miter fence or sled.11. Repeat as necessary. When finished, turn off saw, remove miter fence or sled,.12. Clean up area.
Panel SawThe Panel Saw is used primarily for cutting sheet material. It is usually much more convenient and easy to use than the tables for large sheet stock. It is able to make both horizontal and vertical cuts allowing you to either rip or crosscut plywood and other sheet goods such as MDF or similar materials.procedure.Vertical/Cross cuts1.Place material on edge resting on the bottom black rollers.2.With the saw in the OFF position and at the TOP of the
guide-rails, position material to desired location of cut.3. When material is positioned turn on circular saw using the foot pedal switch making sure the
saw has come fully up to speed before the blade contacts the material to be cut.
4. Slide the saw through the material at rate that feels smooth and not so fast as to bind or labor the saw.
5. When saw gets all the way to bottom of the rails and has cut completely through the material, release the foot pedal switch and let the blade come to a complete stop before raising the saw back to the top.
Horizontal/Rip cuts1. Make sure power is off/unplugged from the tool. Remove the saw mounting plate and
reinstall saw in horizontal position.2. With this cut, the saw remains stationary while the material is fed through the machine.3. Slide the saw to the desired location and secure the black plastic locking knobs.4. Turn saw on and allow blade to reach full speed before feeding material.5. Feed material through saw keep your hands well away from the saw and blade.6. When the cut is complete, turn saw off, wait for the blade to come to a complete stop and
then remove cut pieces.7. Thoroughly clean up the area around the saw including behind it.
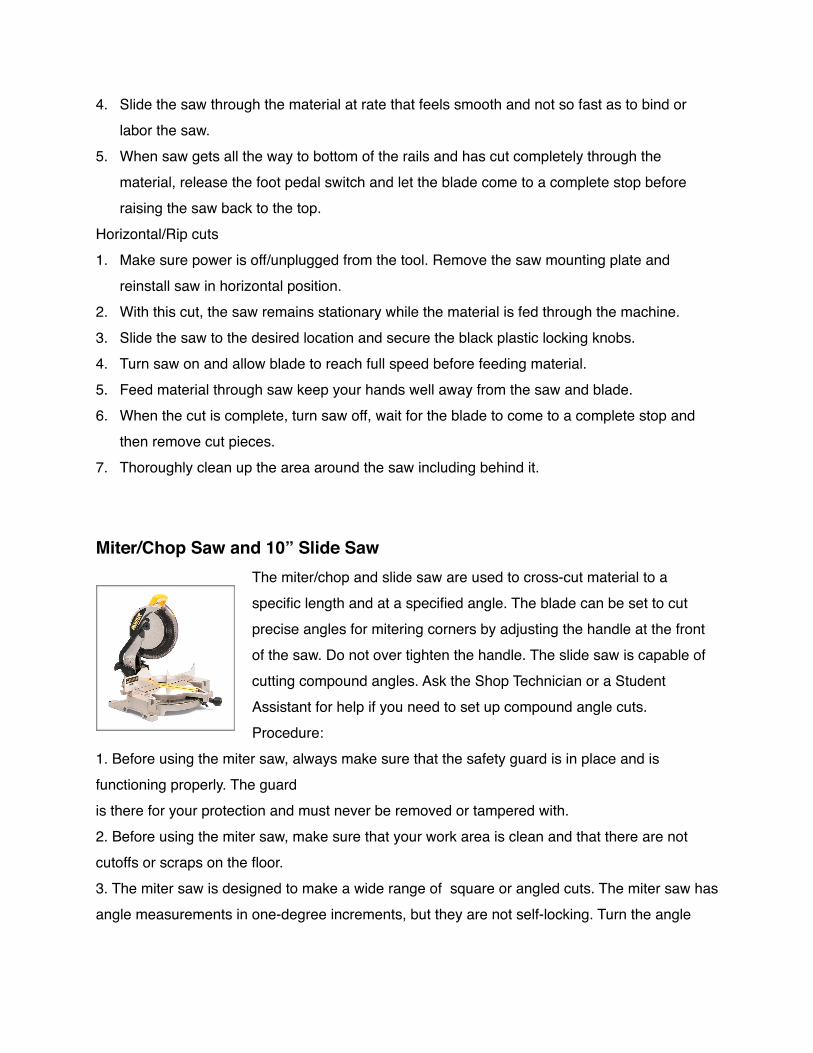
Miter/Chop Saw and 10” Slide SawThe miter/chop and slide saw are used to cross-cut material to a specific length and at a specified angle. The blade can be set to cut precise angles for mitering corners by adjusting the handle at the front of the saw. Do not over tighten the handle. The slide saw is capable of cutting compound angles. Ask the Shop Technician or a Student Assistant for help if you need to set up compound angle cuts.Procedure:
1. Before using the miter saw, always make sure that the safety guard is in place and is functioning properly. The guardis there for your protection and must never be removed or tampered with.2. Before using the miter saw, make sure that your work area is clean and that there are not cutoffs or scraps on the floor.3. The miter saw is designed to make a wide range of square or angled cuts. The miter saw has angle measurements in one-degree increments, but they are not self-locking. Turn the angle

adjustment handle to lock or unlock the angle position. Do not over tighten. Test cuts are recommended for precise work.4. If you need to cut small pieces, make sure you are cutting them from the end of a large/long piece5. If unsure of the proper saw for your stock size, ask a Student Assistant6. Before cutting any stock, always check the stock for nails or other hard materials that may damage the blade. 7. Hold your stock firmly against the back fence. Never attempt to cut material that does not rest against the fence. And NEVER cut small pieces or hold a piece freehand at an angle.8. Always make sure the blade is up to speed BEFORE making contact with the material that you are cutting.9. If the miter saw binds during a cut, immediately release the downward pressure being applied and turn off the power.10. When finished with a cut, release power switch and allow the blade to come to a complete stop before lifting the blade.11. When using the miter saw, your fingers must never be closer than 6 inches to the blade. 12. The Do not use the miter saw(s) in the wood shop to cut steel or other metals.13. Clean up after yourself.
6” and 8” JointerThe jointer is used to make wood material straight and square. The jointer removes material from the bottom portion of material in contact with the table. Varying the difference between the planes of 2 parallel tables – the in-feed and the out-feed controls how much material is removed. By keeping the cut surface pressed firmly down against the out-feed table as the wood is fed over the cutter, a straight, flat surface can be obtained. Once one surface is flat, the jointer
can then create an adjoining side at a precise angle (usually 90°) by means of the fence. The first flat surface is slid against the fence while the jointer planes the adjoining side flat. Safe, proper use and good technique are essential for accurate and consistent performance.Ear protection is recommended.

Considerations:1. Only new, untreated wood is to be used on the planers.2. For safety reasons material should be at least 12” long and at least 1/2” thick.3. Never attempt to cut end grain on this machine.4. Never reach down to pick up a board jammed on the out- feed bed.5. For best performance cuts should be limited to 1/32” maxi- mum in hardwoods and1/16” maximum in softwoods.6. Ask for shop attendant’s assistance for help changing depth of cut settings.7. When running the wider/flat dimension ALWAYS use a push tool(s) to safely hold and control material.Procedure for flattening a board:1. Seldom does a board come from a lumberyard or sawmill truly flat or square. More often than not, boards will have a warp, twist or bow or a combination of all of these things. A jointer can remove these undesirable qualities and leave the material in a more workable condition.2. Inspect material. It should be clean and free of dirt, nails, screws and loose knots.3. Check settings on machine. Depth of cut should be 1/32” or less for hardwoods and 1/16” or less for softwoods.4. Turn the machine on.5. If material is bowed or cupped place it on the in-feed table with the cup or bowed side down.6. Hold the board down with firm pressure but not enough pressure that bends the wood.7. If material gets caught on out-feed bed and you cannot back it out, do not reach down to free material. Hold material in place and turn off machine. Remove material after machine has stopped completely.8. Apply moderate downward pressure to the leading end of the board and a combination of downward and forward pressure on back end of board.9. BE SURE FINGER TIPS ARE ABOVE SURFACE OF MATERIAL AND ARE AWAY FROM CUTTER KNIVES.10. Begin feeding material through cutter knives. Material should pass over knives with relatively little vibration and with a moderate noise level. Noisy cuts or cuts that generate a lot of vibration indicate dull knives or improper operation. 11. Repeat until material is flat on one side.12. Clean up your shavings.Procedure for jointing the edge of a board:

This is how you obtain an edge that is straight and 90 degrees to the face.1. Inspect material. It should be clean and free of paint, dirt, nails, screws and loose knots.2. Check settings on machine. Depth of cut should be 1/16” or less for hardwoods and 1/8” or less for softwoods. Check the angle of the fence with a square.3. Turn the machine on.4. Place the flat face of the board against the fence. Apply pressure at the leading end of the board and press it against the fence. At the back end of the board use your other hand to begin pushing the board.5. As the material passes over the cutter head use one hand to keep the board tight against the fence and against the table. Allow the board to slide past as the other hand pushes the material. Ask for help if you don’t understand this procedure.6. Repeat until the edge is square to the face and straight along the length. Use a square to check.7. Clean up your shavings.
Thickness PlanerThe planer is used only on clean, solid wood to create a flat, parallel side. Avoid using wood with knots or severe grain structure, such as burl. The planers may cause damage to your wood. It cuts a thin, controlled layer of wood from the board by means of spinning cutters. In this machine the cutters are above the work, which slides under them on a bed that can be raised or lowered. Rollers in front and behind the cutters control the movement of the wood through the planer. Take light cuts of 1/16
MAXIMUM per pass It is better to remove a little at a time with multiple passes. Repeat to achieve desired thickness.Ear protection is highly recommended.Procedure:1. Inspect material. It should be clean and free of paint, dirt, nails, screws and loose knots.2. Carefully measure thickness of material to be planed and set machine to the SAME thickness as material for initial pass.3. Lay your wood on the feed table and push it forward until the rollers grab your material. If you need to push the materials use a push stick. Do not put your hands near the in feed area.

4. The material will come out the other side. The first pass may not remove any material. The hand wheel can be turned clockwise a Maximum if two full revolutions (1/16”) to raise the table.5. Repeat feeding your wood in and raising the table until the desired thickness is reached. Measure your progress and note the setting on the machine for reference.6. Lighter cuts may produce a better surface finish.
Drill pressThe drill presses are used to drill precise holes in a variety of materials. Using the correct bit for the material is important to achieve clean precise holes. For wood and plastic we have bradpoint, spade and Forstner bits. For metal, standard twist drills and for thin metal step drills are used. We also have hole saws that can be used with wood, plastic and metal. Drill presses have a depth control and can be used with various fixtures attached to the table to provide multiple precise results.procedure:
1. Before drilling any hole in metal, use a center punch to ensure accuracy.2. Before placing the proper cutting tool in the drill press chuck, check the speed by adjusting the position of the drive belts on the pulleys or the speed control lever. Generally, use low speeds for larger bits, medium speeds for medium bits, and faster speeds for smaller bits. Also, harder materials require slower speeds. Following these guidelines will result in a better hole drilled and less wear on the tools.3. Be sure that the cutting tool is correct for the material and sharp. Do not attempt to sharpen the cutting tool for any reason! If it needs sharpening, check with the Student Assistants. He or she may be able to sharpen it or provide a replacement.4. The cutting tool must be held tightly in the chuck. Secure it in the chuck using the chuck key. Before you turn on the drill press remove the chuck key to prevent it from being thrown out.5. When setting up the drill press, make certain that the cutting tool does not strike the steel table. Use a scrap piece of wood to back up the stock to be drilled. Always clamp small or irregular shaped pieces to the table before drilling.6. Always keep your hands, hair and clothing away from the rotating chuck or cutting tool.

7. Feed the cutting tool smoothly into the stock. When drilling a deep hole, withdraw the cutting tool frequently to reduce pressure and heat caused by the waste material being produced.8. If the drill bit jams and your piece spins, without endangering yourself, continue to apply downward pressure to the feed wheel. This keeps the stock close to the table. Immediately turn off the power.9. When a cutting tool starts to break through the stock reduce feed pressure being applied.10. Back the cutting tool out with the drill still running as soon as the hole has been drilled.11. Wait until the cutting tool stops before brushing off chips or removing your work.12. Long pieces should always extend beyond the tool on the left side of the drill press column in order to leave your right hand free to operate the feed wheel. 13. Clean up the tool and surrounding area.
Mortising MachineThe mortising machine is used to produce square holes. As the auger drills, the chisel corners square off the round hole. The machines are capable of ?” to ?” square holes with a depth determined by the chisel length, which varies. There is a depth stop on the left rear and a fence hold/down assembly adjusted by setscrews and levers.Procedure:1 Check the mortising chisel for damage and wear.2 Adjust the fence and the hold down. Lock securely in place.3 Adjust the depth. If a thru-hole is desired, use a clean sacrificial board
underneath stock to prevent chip-out. 4 Turn on machine and hold stock with your left hand against the fence. Use your right hand to slowly pull the lever and using steady pressure bore into stock. Do not force the cut- ting action.5 After depth has been reached push the lever up to free the cutter from the stock. Proper adjustment of the hold down facilitates this. Do not allow the stock to twist on the cutter.6 Make first hole at one end of mortise slot, second hole at opposite end of slot, and third hole in middle. Continue this pattern until the desire mortise length is achieved7 When finished turn machine off.8 Any problems are to be reported to Shop Personnel.9 Clean tool and surrounding area including floor.

Scroll SawThe Scroll Saw is used for cutting intricate shapes in relatively thin stock. The saw blade makes an up/down or reciprocal motion much like sawing by hand. The cutting action is slower than that of the band saw but has a finer selection of blade types and allows interior cuts to be made. The scroll saw should not be used to cut soft woods thicker than 1/2” and hard woods thicker than 3/8”. Thin plastic and metal can also be cut
using the scroll saw. Please get assistance before cutting any material other than wood. Procedure:1. Make sure the table is clean and free of debris.2. Inspect the blade to make sure that it is the proper blade for the material and type of cut you are making. If unsure check with Shop Personnel.3. To change the blade, use a hex key wrench to loosen the screws at the top and bottom blade holders. Insert the blade in the bottom holder and tighten the screw until blade is held firmly. Do not over tighten. To make an interior cut just loosen the top blade holder.4. For interior cuts, insert the blade into a predrilled hole. Pull the top holder to give about ?” clearance, tighten knob and ensure the blade moves freely.5. Adjust the spring hold down to rest on the stock. 6. With both hands, hold stock down on table and gently feed the stock into the blade. Do not force the cut. Keep a forward movement when cutting curves.7. Keep a firm grip and a firm downward pressure on your stock at all times!!! The action of the machine tends to lift the stock as it is cutting.8. If the blade catches on your stock, turn off the machine immediately, unplug the machine, and gently free the stock.9. Keep hands and fingers to each side of the blade, not in front, and come no closer than 2 inches from the blade.10. You may tilt the table by loosening the handle below the table. The table tilts both left and right to facilitate precision cutting.11. While using the scroll saw, do not talk to others or walk away from the machine while it is in operation12. Practice is the best way to master scroll cutting.13. Clean off the saw and surrounding floor.

Band SawsA band saw gets its name from its blade, consisting of a narrow band of toothed metal with the ends welded together to form a loop. Variations of this type of saw can be set up for woodworking, metalworking, and a variety of other materials. Band saws are particularly useful for cutting irregular shapes. The radius of a curve that can be cut on a particular saw is determined by the width of the blade. Bands saws are also capable of cutting thick wood, up to 12”, and can be used to cut boards thinner, called re-sawing. We have a special band
saw for re-sawing, but any band saw can be used for this purpose.procedure:1. Keep table clear of all material not being cut.2. Always keep the blade guard in place and upper and lower doors covering the blade pulleys closed at all times during operation.3. The blade guide should be set 1/4” above the stock to be cut. The blade guide is the only adjustment you should make on this tool.4. If the blade breaks, step away and turn of the power. Do not open the blade cover doors. Call a Student Assistant immediately.5. Hold cutting stock in such a way as to never have any of your fingers directly in line with the blade.6. The stock should be fed into the blade at a moderate rate of speed and pressure. There should be little resistance and no unusual noises made if you are using the correct feed rate.7. Use a push stick to clear material away from the blade when the band saw is in operation.8. Plan procedures so that there is the greatest amount of forward cuts and the least amount of backing out necessary.9. On long cuts (over 4”), if it becomes necessary to back out from a cut, stop the machine and allow it to come to acomplete stop before backing out the cutting stock from the blade.

10. For small or intricate curves, relief cuts should be used to avoid having the blade twist or bind excessively and possibly cause breakage of the blade.11. The wood cutting band saws are capable of cutting the following materials: solid wood, plywood, particleboard, Masonite, mdf, and most plastics. It is not suited for cutting metal, glass, plaster, cement or any other hard material.12. Clean the saw table and floor of scraps.
Disc and Belt SanderThe combination of a disc and a belt sander is a common woodworking tool that provides two useful sanding machines in one small package. The disc sander has a table that can be tilted and a miter fence slot to hold stock at the desired angle. The belt has a work stop across the belt to rest stock against. Never use the sander without resting stock on the table or work stop. The sander removes material rapidly so it is important to keep fingers clear of the moving surfaces.procedure:1. Make sure the belt and disc are properly attached and aligned before using the machine. If the belt is out of alignment, ask a Student Assistant
for assistance. Do not adjust anything except for the table tilt adjustment knobs.2. Only use the portion of the disc from the center to the edge that rotates down toward the table.3. Only one person is to use the sander at any one time.4. Keep fingers as far away from the sanding surfaces as possible.5. Keep a firm grip on the materials so that they are always in control.6. Very small or irregular shaped pieces should not be sanded on the sander.7. Too much pressure puts excessive load on the motor; you can hear it slow down. Do not excessively load the motor.8. Only large, flat surfaces and edges may be sanded on the belt sander.9. Move the work piece back and forth along the downward side of the disc; this prevents your work from burning or causing excessive build-up on the sanding surfaces.10. If sanding at an angle (not horizontal) tilt the sanding table down (never up) so that you avoid jamming the work piece (or your fingers) between the table and sanding disc.
11. The sander is for sanding “clean” wood only. Do not sand particleboard, rubber products, “bricks”, or any other material, which will clog the sanding surface or machine. 12. Clean sander and surrounding area.
Spindle SanderThe spindle sander consists of a cylindrical sanding drum that oscillates up and down as it spins. The spindle is at the center of the worktable. The spindle sander is used for sanding irregular curves and can be used to sand interior curves. Always use a spindle size that matches the curve you are sanding. The spindle sander is to be used for finishing work only. It is not meant to take off large amounts of material.Procedure:1. Only wood is to be used on the spindle sander.
2. Hold the stock firmly and flat against the table, as the spinning action may cause the stock to shoot away.3. Do not use excessive pressure.4. Clean up table and surrounding floor.
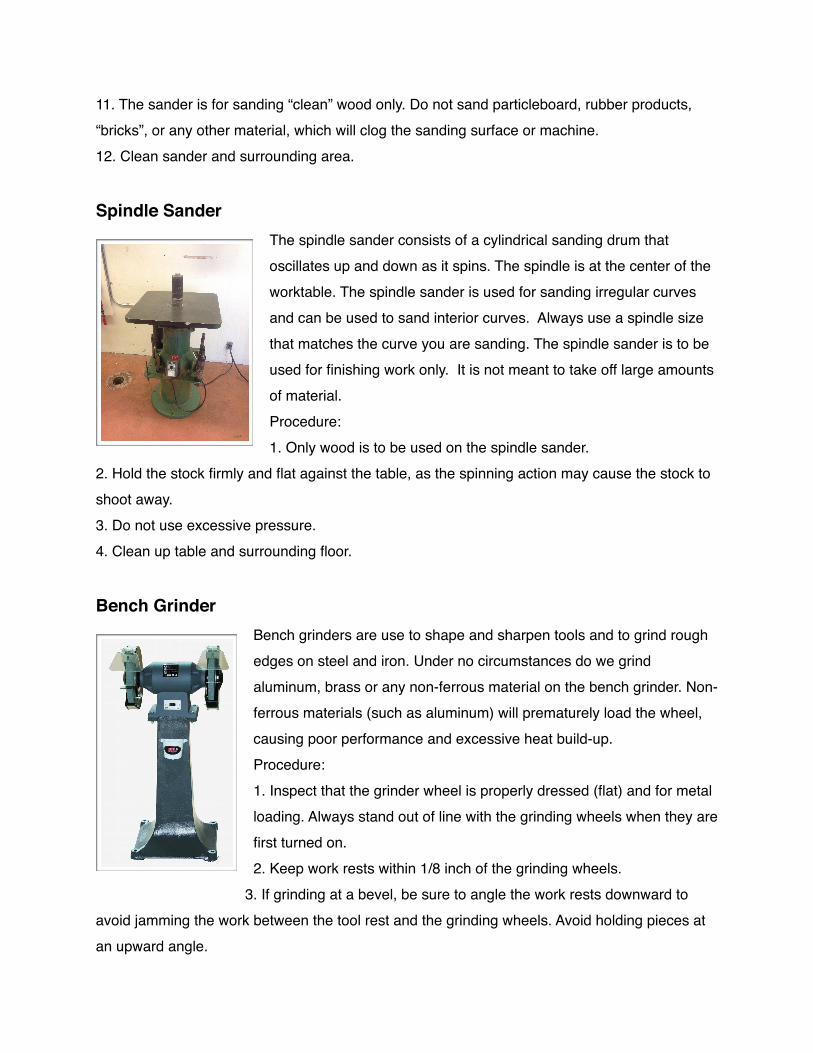
Bench GrinderBench grinders are use to shape and sharpen tools and to grind rough edges on steel and iron. Under no circumstances do we grind aluminum, brass or any non-ferrous material on the bench grinder. Non-ferrous materials (such as aluminum) will prematurely load the wheel, causing poor performance and excessive heat build-up.Procedure:1. Inspect that the grinder wheel is properly dressed (flat) and for metal loading. Always stand out of line with the grinding wheels when they are first turned on.2. Keep work rests within 1/8 inch of the grinding wheels.
3. If grinding at a bevel, be sure to angle the work rests downward to avoid jamming the work between the tool rest and the grinding wheels. Avoid holding pieces at an upward angle.

4. Feed work with moderate pressure and move back and forth across the grinding wheel in order to avoid burning your work or overheating the grinding wheel. If the wheel slows you are trying to grind too hard.5. Use the water cup or a larger vessel to quench metal as you grind.6. Clean up your mess.
Power Hand Tools
Circular SawThe hand circular saw, often called a Skil Saw, is a common construction tool. The circular saw is typically used for cutting dimensional lumber, such as that used in framing structures, or sheet goods.Equipped with the correct blade the circular saw can be used to cut a variety of materials including metals and masonry.procedure:1. Always check that the blade is securely mounted, clean and sharp. For fine cuts or certain material you may need to have
the blade changed. If in doubt- ask for assistance.2. Secure stock such that it will not move or shift and that the underside is clear in the blade path. Never try to cut holding stock on your lap or in the air.3. Be sure that the blade guard is able to move freely. Never defeat the guard by tying it up or jamming it in the up position.4. Power the saw only after you are in position to start cutting. Keep your eyes on the cut and as you push the saw forward the guard should move up. If you encounter any binding, sticking or resistance release the trigger to stop the saw and seek assistance. Never force the saw.5. Clean tool and your work area thoroughly.
Jig/Saber SawThe Jig or Saber Saw is a powered hand saw with a narrow saber like blade that moves in a reciprocating or up and down motion. The saber saw is often used for cutting curves and for

scrollwork. With the proper blade selection the saber saw can cut a wide range of materials from wood, plastics and metals.procedure:1. Check the blade for the material and type of cut. Be sure the blade is securely fastened in place and that the blade is sharp and undamaged.2. Plan your cuts. Make sure there is space under the stock that is clear for cutting. Be careful not to cut the electrical cord. 3. Give the tool your undivided attention. Keep a firm grip on the tool at all times and hold it firmly against the work. Al- ways clamp your stock to the table. Never cut while holding stock on your lap or in free air.4. Keep your eyes on the cutting blade as you follow the line.5. Keep a forward motion at all times. Do not bend or twist the blade while cutting.6. Never over-extend your reach when cutting large stock with the jigsaw.7. Always support the stock as you cut through to keep the wood from tearing or binding on the blade.8. Wait for the blade to stop before pulling out of stock.9. Clean tool and your work area thoroughly.
Power Hand DrillThe power hand drill is useful for boring holes and, if a variable speed, driving screws and bolts.The bit is held in a chuck that can be tightened either by hand or with a chuck key. Battery
operated drills are very portable but may lack the power or endurance needed for certain jobs/applicationprocedure:1. Make sure the chuck is free from all obstructions.2. Check to see if the directional switch is set correctly.3. Do not over-tighten the chuck.4. Disconnect the power when changing bits or cleaning the drill.5. When drilling holes on tables, use a scrap piece of wood to
back up the stock being drilled.6. Never leave the chuck key in the chuck at any time.7. Be sure the cutting tool is sharp.

8. Back the cutting tool out of the stock under power.9. Before drilling a hole, center punch the hole with a scratch awl (wood) or center punch (metal.)10. Always clamp the work to the table or in a vise.11. When drilling deep holes, withdraw the cutting bit frequently in order to reduce the pressure caused by the waste material being produced.12. Clean up tool and your shavings
RouterA router is a high-speed rotary tool used to remove material from an area in the face or edge of a piece of wood. The router is used to pro- duce decorative edges and designs in wood. They can also produce many types of wood joinery such as dados and dovetails. The uses are only limited by imagination and skill of the user.procedure:1. Make sure the depth adjusting locking nut is secure before making a cut. Otherwise, the bit may lower into the stock while
the cut is being made.2. The router should always be used pointing down into the stock.3. Never invert the router and try to use it as a makeshift shaper. It is extremely unsafe without the proper safety guards to provide the necessary stability.4. Do not make deep cuts that cause the bit to burn or smoke, or the router to bog down. Always pull the router evenly and moderately fast, not slow. This will avoid burning both your stock and our bits. 1/4 inch is the deepest cut you should ever make. Make multiple passes at different depths if necessary.5. Disconnect the power before changing bits or putting your fingers anywhere near the cutting bit.6. Keep both hands on the router while operating it at all times.7. Use bits designed for router use only. Drill bits, drum sanders, etc. are not designed to be operated at the high speeds of the router (20,000 rpm.)8. Keep all guards and shields in place when operating the router.

9. Do not over-extend the bits out of the collet chuck in order to make deep cuts. The bit shank should extend only 1/8 inch out of the chuck.10. Be careful not to drop the router bits. They are fragile and easily broken.11. If you’ve never used a router before, or are at all unsure, ask someone for an overview.12. Always clean the tool and work area.
Portable Belt SanderThe belt sander is an extremely powerful and fast sander. It is used to sand larger surfaces and can remove large amounts of material in a very short time. procedure:1. Always clamp your stock to the table before operating (bench stops work very well.)2. Check the sanding belt for correct grit and usability3. Never touch the sanding surface while the tool is running.4. Be sure the abrasive is correctly lined up on the base of the
sander.5. Grasp the tool very firmly, as it will want to run away from you.6. While sanding keep the sander moving. If you stop the sander may dig into your wood.7. Clean up the sander and surrounding area.
Sanding table and Palm SandersThe sanding table is located in the Cathedral and is a table with a pegboard top connected to a portable dust collector. Palm sanders come in two types electric and pneumatic. Either may be used for finish sanding. Use of the sanding table helps reduce the amount of sawdust in the air.procedure:1. The sanding table is to be used for sanding only!
2. Turn on the vacuum whenever you are sanding. Palm sanders can be plugged into the outlet strip at the left side of the table.

3. Always start with the coarser grit and move to finer grit sandpaper for desired finish. This will save you time and wear and tear on the sanders.4. Place the pad FLAT against the work piece and move the sander slowly and evenly over the work allowing the tool to do most of the work.5. Palm sanders are used for sanding only.6. Clean all tools before returning.
Pneumatic Nail GunsNail guns are a very fast and effective way of attaching wood materials together. These tools use compressed air as the power source. They can be used to create quick jigs and fixtures or to hold pieces together permanently when used in conjunction with wood glue.procedure:1.Never point the nail gun toward yourself or others even when it is disconnected from the air source2.Always use the appropriate and correct nails or brads for the job
and tool. These use specific special nails and must be loaded into the gun correctly.3. Press tip of tool directly on your workpiece. This will also disengage the spring loaded safety
mechanism allowing the tool to fire.4. Never place your support hand in line of or near where you will be nailing as the nail could
bend or go all the way through the material and into your hand.5. Never tamper with or alter the safety mechanism in any way.

Hand ToolsHands tools are those that require only human muscle to provide the force necessary to perform work. Common hand tools are hammers, screwdrivers, saws and chisels. The use of some tools is fairly intuitive and can be used with little or no training. Some tools, such as, the use of wood chisels require some instruction and training. Improper use of tools may cause damage to the work piece, the tool or the operator. Ask for assistance and learn how to safely and accurately use the tools provided for you.
NOTES: