4001824 operator’s manual - highland woodworking 70-220vsrm3 12-1/2” x 20” midi vsr lathe...
TRANSCRIPT

70-220VSR
www.rikontools.com70-220VSRM3
12-1/2” x 20” MIDI VSR Lathe
Operator’s ManualRecord the serial number and date of purchase in your manual for future reference.
Serial Number: _________________________ Date of purchase: _________________________
For technical support or parts questions, email [email protected] or call toll free at (877)884-5167
4001824

2
TABLE OF CONTENTS
SPECIFICATIONS
NOTE: The specifications, photographs, drawings and information in this manual represent the current model when the manual was prepared. Changes and improvements may be made at any time, with no obligation on the part of Rikon Power Tools, Inc. to modify previously delivered units. Reasonable care has been taken to ensure that the information in this manual is correct, to provide you with the guidelines for the proper safety, assembly and operation of this machine.
Motor ............................................................................................................. 1 HPMotor Speed (no load).......................................................................... 2,900 RPMVolts, Phase ........................................................................................ 120 V, 1 PhAmps, Hertz .......................................................................................... 6 A, 60 HzSwing Over Bed ......................................................................... 12-1/2” (318 mm)Swing Over Tool Rest Base.......................................................... 9-5/8” (244 mm)Distance Between Centers............................................................... 20” (508 mm)Electronic Variable Speeds ........................................................ 250 - 3,850 RPMSpeed Ranges (3) .................................. 250-750 / 550-1,650 / 1,300-3,850 RPMSpindle Rotation (2) ..................... Forward (C-Clockwise) & Reverse (Clockwise)Spindle Nose Threading.......................................................................... 1” x 8 TPIHeadstock Taper ............................................................................................ MT-2Tailstock Taper ............................................................................................... MT-2Hole Through Drive Spindle .............................................................. 3/8” (10 mm)Hole Through Tailstock ...................................................................... 3/8” (10 mm)Tailstock Ram Travel ................................................................... 2-1/2" (63.5 mm)Number of Indexing Positions............................................................................. 24Tool Rest Post Diameter ....................................................................1” (25.4 mm)Headstock Rotation ........................................................................................ 180°Overall Size (LxWxH)...................40-3/4” x 12" x 17-5/8" (1,035 x 305 x 449 mm)Cast Base Size (LxW) ...................................... 36-3/4” x 7-5/8” (195 x 933.5 mm)Net Weight .................................................................................. 115 lbs (52.2 kg)
Specifications.....................................................................................................................2 Safety Instructions ........................................................................................................3 - 6Contents of Package .....................................................................................................7Getting To Know Your Machine ..............................................................................................8Installation ......................................................................................................................8 Assembly ................................................................................................................................... 8Operation .................................................................................................................. 9 - 10Adjustments............................................................................................................... 11 - 13Maintenance .................................................................................................................... 14Electricals & Wiring Diagram .....................................................................................5 & 14Troubleshooting ....................................................................................................................... 15Parts Diagrams & Parts Lists .................................................................................. 16 - 17Accessories ........................................................................................................................ 18Notes ......................................................................................................................... 18Warranty .......................................................................................................................... 19

3
SAFETY SYMBOLS
IMPORTANT! Safety is the single most important consideration in the operation of this equipment. The following instructions must be followed at all times. Failure to follow all instructions listed below may result in electric shock,fire, and/or serious personal injury. There are certain applications for which this tool was designed. We strongly recommend that this tool not be modifiedand/or used for any other application other than that for which it was designed. If you have any questions about itsapplication, do not use the tool until you have contacted us and we have advised you.
SAFETY INSTRUCTIONS
GENERAL SAFETY
KNOW YOUR POWER TOOL. Read the owner’s manual carefully. Learn the tool’s applications, work capabilities, and its specific potential hazards.
BEFORE USING YOUR MACHINETo avoid serious injury and damage to the tool, read and follow all of the Safety and Operating Instructions before operating the machine.
1. Some dust created by using power tools contains chemicals known to the State of California to cause cancer, birth defects, or other reproductive harm.Some examples of these chemicals are:• Lead from lead-based paints.• Crystalline silica from bricks, cement, and other • masonry products.• Arsenic and chromium from chemically treated lumber.Your risk from these exposures varies, depending on how often you do this type of work. To reduce your exposure to these chemicals: work in a well ventilated area and work with approved safety equipment, such as those dust masks that are specially designed to filter out microscopic particles.
2. READ the entire Owner’s Manual. LEARN how to use the tool for its intended applications.
3. GROUND ALL TOOLS. If the tool is supplied with a 3 prong plug, it must be plugged into a 3-contact electrical receptacle. The 3rd prong is used to ground the tool and provide protection against accidental electric shock. DO NOT remove the 3rd prong. See Grounding Instructions on the following pages.
4. AVOID A DANGEROUS WORKING ENVIRONMENT. DO NOT use electrical tools in a damp environment or expose them to rain.
5. DO NOT use electrical tools in the presence of flammable liquids or gasses.
6. ALWAYS keep the work area clean, well lit, and organized. DO NOT work in an environment with floor surfaces that are slippery from debris, grease, and wax.
7. KEEP VISITORS AND CHILDREN AWAY. DO NOT permit people to be in the immediate work area, especially when the electrical tool is operating.
8. DO NOT FORCE THE TOOL to perform an operation for which it was not designed. It will do a safer and higher quality job by only performing operations for which the tool was intended.
9. WEAR PROPER CLOTHING. DO NOT wear loose clothing, gloves, neckties, or jewelry. These items can get caught in the machine during operations and pull the operator into the moving parts. The user must wear a protective cover on their hair, if the hair is long, to prevent it from contacting any moving parts.
10. CHILDPROOF THE WORKSHOP AREA by removing switch keys, unplugging tools from the electrical receptacles, and using padlocks.
11. ALWAYS UNPLUG THE TOOL FROM THE ELECTRICAL RECEPTACLE when making adjust-ments, changing parts or performing any maintenance.
SAFETY ALERT SYMBOL: Indicates DANGER, WARNING, or CAUTION. This symbol may be used in conjunction with other symbols or pictographs.
Indicates an imminently hazardous situation, which, if not avoided, could result in death or serious injury.
Indicates a potentially hazardous situation, which, if not avoided, could result in death or serious injury.
Indicates a potentially hazardous situation, which, if not avoided, could result in minor or moderate injury.
NOTICE: Shown without Safety Alert Symbol indicates a situation that may result in property damage.

4
SAFETY INSTRUCTIONS
16. NEVER LEAVE A RUNNING TOOL UNATTENDED. Turn the power switch to the “OFF” position. DO NOT leave the tool until it has come to a complete stop.
17. DO NOT STAND ON A TOOL. Serious injury could result if the tool tips over, or you accidentally contact the tool.
18. DO NOT store anything above or near the tool where anyone might try to stand on the tool to reach it.
19. MAINTAIN YOUR BALANCE. DO NOT extend yourself over the tool. Wear oil resistant rubber soled shoes. Keep floor clear of debris, grease, and wax.
20. MAINTAIN TOOLS WITH CARE. Always keep tools clean and in good working order. Keep all blades and tool bits sharp, dress grinding wheels and change other abrasive accessories when worn.
21. EACH AND EVERY TIME, CHECK FOR DAMAGED PARTS PRIOR TO USING THE TOOL. Carefully check all guards to see that they operate properly, are not dam-aged, and perform their intended functions. Check for alignment, binding or breaking of moving parts. A guard or other part that is damaged should be immediately repaired or replaced.
22. DO NOT OPERATE TOOL WHILE TIRED, OR UNDER THE INFLUENCE OF DRUGS, MEDICATION OR ALCOHOL.
23. SECURE ALL WORK. Use clamps or jigs to secure the workpiece. This is safer than attempting to hold the workpiece with your hands.
24. STAY ALERT, WATCH WHAT YOU ARE DOING, AND USE COMMON SENSE WHEN OPERATING A POWER TOOL. A moment of inattention while operating power tools may result in serious personal injury.
26. USE A PROPER EXTENSION CORD IN GOOD CONDITION. When using an extension cord, be sure to use one heavy enough to carry the current your product will draw. The table on the following page shows the cor-rect size to use depending on cord length and nameplate amperage rating. If in doubt, use the next heavier gauge. The smaller the gauge number, the larger diameter of the extension cord. If in doubt of the proper size of an exten-sion cord, use a shorter and thicker cord. An undersized cord will cause a drop in line voltage resulting in a loss of power and overheating. USE ONLY A 3-WIRE EXTENSION CORD THAT HAS A 3-PRONG GROUNDING PLUG AND A 3-POLE RECEPTACLE THAT ACCEPTS THE TOOL’S PLUG.
27. ADDITIONAL INFORMATION regarding the safe and proper operation of this product is available from:
• Power Tool Institute 1300 Summer Avenue Cleveland, OH 44115-2851 www.powertoolinstitute.org
• National Safety Council 1121 Spring Lake Drive Itasca, IL 60143-3201 www.nsc.org
• American National Standards Institute 25 West 43rd Street, 4th Floor New York, NY 10036 www.ansi.org
• ANSI 01.1 Safety Requirements for Woodworking Machines and the U.S. Department of Labor regulations www.osha.gov
28. SAVE THESE INSTRUCTIONS. Refer to them frequently and use them to instruct others.
25. ALWAYS WEAR A DUST MASK TO PREVENT INHALING DANGEROUS DUST OR AIRBORNE PARTICLES, including wood dust, crystalline silica dust and asbestos dust. Direct particles away from face and body. Always operate tool in well ventilated area and provide for proper dust removal. Use dust collection system wherever possible. Exposure to the dust may cause serious and permanent respiratory or other injury, including silicosis (a serious lung disease), cancer, and death. Avoid breathing the dust, and avoid prolonged contact with dust. Allowing dust to get into your mouth or eyes, or lay on your skin may promote absorption of harmful material. Always use properly fitting NIOSH/OSHA approved respiratory protection appropriate for the dust exposure, and wash exposed areas with soap and water.
12. KEEP PROTECTIVE GUARDS IN PLACE AND IN WORKING ORDER.
13. AVOID ACCIDENTAL STARTING. Make sure that the power switch is in the “OFF” position before plugging in the power cord to the electrical receptacle.
14. REMOVE ALL MAINTENANCE TOOLS from the immediate area prior to turning “ON” the machine.
15. USE ONLY RECOMMENDED ACCESSORIES. Use of incorrect or improper accessories could cause serious injury to the operator and cause damage to the tool. If in doubt, check the instruction manual that comes with that particular accessory.

5
SAFETY INSTRUCTIONS
THE USE OF AN EXTENSION CORD WITH THIS MACHINE IS NOT RECOMMENDED. For best power and safety, plug the machine directly into a dedicated, grounded electrical outlet that is within the supplied cord length of the machine.
If and extension cord needs to be used, it should only be for a limited operation of the machine. The exten-sion cord should be as short as possible in length, and have a minimum gauge size of 14AWG.
Check extension cords before each use. If damaged replace immediately. Never use a tool with a damaged cord, since touching the damaged area could cause electrical shock, resulting in serious injury.
Use a proper extension cord. Only use cords listed by Underwriters Laboratories (UL). Other extension cords can cause a drop in line voltage, resulting in a loss of power and overheating of tool. When operating a power tool out-doors, use an outdoor extension cord marked “W-A” or “W”. These cords are rated for outdoor use and reduce the risk of electric shock.
DO NOT MODIFY ANY PLUG. If it will not fit the electrical receptacle, have the proper electrical receptacle installed by a qualified electrician.
IMPROPER ELECTRICAL CONNECTION of the equipment grounding conductor can result in risk of electric shock. The conductor with the green insulation (with or without yellow stripes) is the equipment ground-ing conductor. DO NOT connect the equipment grounding conductor to a live terminal if repair or replacement of the electric cord or plug is necessary.
CHECK with a qualified electrician or service personnel if you do not completely understand the grounding instructions, or if you are not sure the tool is properly grounded when installing or replacing a plug.
USE ONLY A 3-WIRE EXTENSION CORD THAT HAS THE PROPER TYPE OF A 3-PRONG GROUNDING PLUG THAT MATCHES THE MACHINE’S 3-PRONG PLUG AND ALSO THE 3-POLE RECEPTACLE THAT ACCEPTS THE TOOL’S PLUG. *
REPLACE A DAMAGED OR WORN CORD IMMEDIATELY.
This tool is intended for use on a circuit that has an electrical receptacle as shown in FIGURE A. It shows a 3-wire electrical plug and electrical receptacle that has a grounding conductor. If a properly grounded electrcal receptacle is not available, an adapter as shown in FIGURE B can be used to temporarily connect this plug to a 2-contact ungrounded receptacle. The adapter has a rigid lug extending from it that MUST be connected to a permanent earth ground, such as a properly grounded receptacle box. THIS ADAPTER IS PROHIBITED IN CANADA.
IN THE EVENT OF A MALFUNCTION OR BREAKDOWN, grounding provides the path of least resistance for electric current and reduces the risk of electric shock. This tool is equipped with an electric cord that has an equipment grounding conductor and requires a grounding plug (not included). The plug MUST be plugged into a matching elec-trical receptacle that is properly installed and grounded in accordance with ALL local codes and ordinances.
THIS TOOL MUST BE GROUNDED WHILE IN USE TO PROTECT THE OPERATOR FROM ELECTRIC SHOCK.
EXTENSION CORDS
Keep the extension cord clear of the working area. Position the cord so that it will not get caught on lumber, tools or other obstructions while you are working with your power tool. * Canadian electrical codes require extension cords to be certified SJT type or better. ** The use of an adapter in Canada is not acceptable.
FIG. BFIG. A
ELECTRICAL SAFETY

6
SPECIFIC SAFETY INSTRUCTIONS FOR WOOD LATHES
1. Do not operate this machine until you have read all of the following instructions. 2. Do not attempt to operate this machine until it is completely assembled. 3. Do not turn ON this machine if any pieces are damaged or missing. 4. This machine must be properly grounded. 5. If you are not familiar with the operation of the machine, obtain assistance from a qualified person. 6. Always wear approved, safety protective eyewear and hearing protection when operating this machine. 7. Always wear a dust mask and use adequate dust collection and proper ventilation. 8. Do not wear loose clothing or jewelry when operating this machine. Keep long hair tied back. 9. Always make sure the power switch is in the OFF position prior to plugging in the machine.10. Always make sure the power switch is in the OFF position and the machine is unplugged when doing any cleaning,
assembly, setup operation, or when not in use.11. Use only sharp lathe tools. Dull tools can damage your work and are unsafe to use.12. When turning between centers, make sure the headstock and tailstock are snug against the workpiece.13. When face plate turning, rough-cut the workpiece close to the finished shape before screwing it to the face plate.14. Never jam tools into the workpiece or take too big of a cut.15. Make sure there are no loose knots, nails, staples, dirt or foreign objects in the workpiece to be turned. 16. Wood should not be warped, cracked or have improperly made or cured glue joints.17. Test spin the workpiece to ensure that it does not hit the lathe bed or tool rest before turning on the lathe.18. Start the lathe at slow speeds to check the settings, then increase the speed to your desired level for working.19. Low speeds are best for roughing stock, and for long or large diameter workpieces. 20. If excessive vibration occurs, stop the lathe to check the workpiece settings between centers or on face plates.21. For sanding or applying finishes, remove the tool rest from the machine. Use low speeds to avoid heat build-up.22. Do not engage the spindle lock when the lathe is turning, and be sure to disengage the spindle lock when done
working to avoid damage to the machine next time the lathe is turned on.23. Never stop the machine by grabbing the workpiece, faceplate or hand wheel. Let the machine stop on its own.24. The use of any accessories or attachments not recommended may cause injury to you and damage your machine.25. Remove material or debris from the work area. Keep the floor and work area neat and clean.26. Keep these instructions for future reference.
SAFETY INSTRUCTIONS
CALFORNIA PROPOSITION 65 WARNING: Some dust created by power sanding, sawing, grinding, drilling, and other construction activities contains chemicals known to the State of California to cause cancer and birth defects or other reproductive harm.Your risk from exposure to these chemicals varies, depending on how often you do this type of work. To reduce your exposure, work in a well-ventilated area and with approved safety equipment, such as dust masks that are specially designed to filter out microscopic particles. For more detailed information about California Proposition 65, log onto rikontools.com.
This machine is intended for the shaping, smoothing and finishing of natural, solid woods. The permissible workpiece dimensions must be observed (see Technical Specification). Any other use not as specified, including modification of the machine or use of parts not tested and approved by the equipment manufacturer can cause unforeseen damage.ATTENTION: Use of this lathe still presents risks that cannot be eliminated by the manufacturer. Therefore, the user must be aware that wood working machines are dangerous if not used with care and all safety precautions are adhered to.
This owner’s manual is not a teaching aid and is intended to show assembly, adjustments, and general use.

7
Model 70-220VSR Wood Lathe is shipped complete in one box.
Unpacking and Clean-up
1. Carefully remove all contents from the shipping carton. Compare the contents with the list of contents to make sure that all of the items are accounted for, before discarding any packing material. Place parts on a protected surface for easy identification and assembly. If any parts are missing or broken, please call RIKON Customer Service (877- 884-5167) as soon as possible for replacements. DO NOT turn your machine ON if any of these items are missing. You may cause injury to yourself or damage to the machine.
2. Report any shipping damage to your local distributor.
3. Clean all rust protected surfaces with ordinary household type grease or spot remover. Do not use flammables; gas- oline, paint thinner, mineral spirits, etc. These may damage painted surfaces. Clean thoroughly under the headstock, tailstock and tool rest body. Then coat with a light film of dry lubricant spray, or wax, to enhance passage of the tool rest and tailstock on/over the bed. Refrain from using any water-based solvents as they will promote metal rusting.
4. Apply a coat of paste wax to any machined surfaces to prevent rust. Wipe all parts thoroughly with a clean dry cloth.
5. Set packing material and shipping carton aside. Do not discard the packing material until the machine has been set up and is running properly, in case a return is necessary.
CONTENTS OF PACKAGE
A. Lathe BedB. Motor AssemblyC. Headstock AssemblyD. Tailstock AssemblyE. Electronic Controls
** Lathe shown on #70-920 Stand
CONTENTS OF PACKAGE
LIST OF LOOSE PARTS
F. Tool Rest BaseG. Spur CenterH. Live CenterI. 6” Tool RestJ. 3” Faceplate
K. Long Knockout BarL. Short Knockout BarM. Hex Wrenches (3, 4, 5 mm)N. Spanner Wrenches (2)O. Tool Holder, Screws & Washers (2)P. Manual & Warranty Card
A E
B
C
FG
D
H
I
J
LK
MN
O
TOOLS REQUIRED FOR ASSEMBLY & ADJUSTMENTS
#2 Phillips Screwdriver Adjustable Wrench
70-220VSR
www.rikontools.com70-220VSRM1
12-1/2” x 20” Midi VSR Lathe
Operator’s ManualRecord the serial number and date of purchase in your manual for future reference.
Serial Number: _________________________ Date of purchase: _________________________
For technical support or parts questions, email [email protected] or call toll free at (877)884-5167
4001824
P

8
INSTALLATION
1. When moving the lathe, DO NOT use the headstock assembly, motor, tool rest or tailstock as this may damage the machine. Hold under the lathe’s bed to lift and move the machine. Straps or battens placed under the lathe bed can also be used to move the machine.
2. Position the machine on a solid stand, or bench, that is located in an area that has ample space in front and in back of the lathe for working and moving around the lathe.
3. For best power and safety, the lathe should be plugged directly into a dedicated grounded electrical outlet that is
within the supplied cord length of the machine. The use of an extension cord is not recommended.
4. Align the machine so that during use, any turning debris or kickback will not face aisles, doorways, or other work areas that bystanders may be in. Do not locate or use the machine in damp or wet conditions.
5. Once in place in your shop, make sure that the machine is level. If possible, secure the machine, or stand to the floor, or bench, with lag screws (not supplied). This will reduce any possible vibration during use.
GETTING TO KNOW YOUR MACHINE
A
G
B
D
K
C
LH
I
A. Motor, Mounting Plate & Locking HandleB. Outboard Bed Cover Plate DoorC. HeadstockD. Spindle Lock Knob / Index PinE. Outboard Hand WheelF. Headstock CoverG. Spindle with Spur CenterH. Tool Rest & Base AssemblyI. Tool Rest Locking HandleJ. Tool Rest Base Locking LeverK. Live CenterL. Tailstock AssemblyM. Face PlateN. Electronic Controls - ON/OFF Switch - Forward / Reverse Switch - Speed Control Knob - Digital Speed ReadoutO. Lathe BedP. Power CordQ. Tailstock Locking LeverR. Tailstock Hand WheelS. Tailstock Locking HandleT. Tool Holder & Tools
EF
J
MOVING & INSTALLING THE LATHE
of the faceplate is needed. To remove the faceplate, loosen the two set screws in the rear hub of the faceplate, then unscrew the faceplate from the spindle (counter-clockwise rotation). Two wrenches are supplied to help loosen the faceplate from the spindle.
5. If spindle turning is to be done, remove the faceplate.Install the Spur Center into the headstock spindle and the Live Center into the tailstock spindle. Both Centers have #2 Morse Taper shanks.
6. Secure the lathe to a solid work surface or stand.
The 70-220VSR Lathe requires only minor assembly to become operational. See the photos above for reference.
1. Install the Tool Holder onto the back of the headstock with the two Phillips head screws and washers provided.
2. Install the Tool Rest Base onto the lathe bed. The Tail-stock will have to be removed to do this.
3. Install the 6” Tool Rest into the Tool Rest Base.
4. The Faceplate is shipped pre-installed on the headstock spindle. If plate or bowl turning is to be done, then the use
ASSEMBLY
** Midi Lathe shown on #70-920 Stand
M
N
PO
Q
R
E
S
R G
T
K
M

9
OPERATION
1. HEADSTOCK SPINDLE LOCK: The spring loaded Index Pin Assembly (#43, FIG. 1, A) is primarily used to po-sition the spindle for making accurate, spaced pattern work on projects such as straight fluting, grooving, drilling, detail carving, wood burning patterns and laying out designs. See page 13 for more information.The Index Pin will also keep the spindle from turning, so if necessary, faceplates, chucks or other accessories that have been mounted on the threaded spindle can be re-moved. NOTE: Do not put excessive pressure on the Index Pin when trying to remove accessories from the lathe, or damage to the pin, or spindle pulley, may result.
The Index Pin is spring loaded. Pull the Pin out, so that its Roll-Pin (#42) is removed from the ‘high’ grooves in the Locating Sleeve (#44). Rotate the pin 90° to position the roll-pin back into the Sleeve. The deeper groove locations will insert the Index Pin’s shaft into the Spindle pulley’s hole(s), locking the spindle in place. To unlock the spindle, reverse the process.
FIG. 1
FIG. 3
HEADSTOCK CONTROLS
2. HEADSTOCK INDEXING HOLES: (FIG. 1, B) The largest Spindle Pulley (#52, B) has 24 postioning holes located around its left side. Each index hole is 15° apart, and marked for reference around the perimeter of the pul-ley. Insert the Indexing Pin (A) into one of these holes, and the spindle will be locked so that work can be done on the workpiece. See page 13 for additional information.
Never start the lathe with the index pin en-gaged in the spindle, or damage to the machine will result.- Never engage the headstock spindle lock while the spindle is turning, or damage to the lathe will result. . 3. HEADSTOCK FACEPLATE: Faceplates (#58, FIG. 2, A) are used for turning bowls and plates. There are a number of screw holes on the plate for mounting the work-piece for turning. Thread the faceplate onto the spindle in a clockwise direction, and tighten it in place with the set screws that are located on the back hub of the faceplate. To remove the faceplate, loosen the set screws. Use one wrench on the flat portion of the spindle (X) and another wrench on flats of the faceplate’s rear hub, then loosen the faceplate from the spindle. Rotate the faceplate counter-clockwise to fully remove it from the spindle.
4. HEADSTOCK SPUR CENTER: The Spur Center (#59, FIG. 2, B) is used for turning between centers. It fits into the spindle. Both spindle and the spur center have match-ing MT-2 tapers. The spur center can be removed from the spindle with the Kockout Bar (#85), inserted through the outboard left end of the spindle. NOTE: Be careful and hold the spur center during this process so it does not fly out onto the floor. A short Knockout Bar (#86) is supplied to re-move the Spur Center’s Center Point, if it needs replacing.
FIG. 2
DIAMETEROF WORK
ROUGHINGRPM
GENERALCUTTING
RPMFINISHING
RPM
Under 2”
2 to 4”
4 to 6”
6 to 8”
8 to 10”
10 to 12”
12 to 14”
14 to 16”
1520
750
510
190
220
255
300
380
3200
1600
1080
400
460
540
650
3200
2480
1650
1240
1000
830
710
620
810
A
B
X
AB

10
OPERATION
FIG. 4
FIG. 5
FIG. 6
1. ON/OFF SWITCH: (FIG. 6, A) The safety, paddle ON/OFF switch is located on the right foot of the lathe for quick, easy and safe access. Lift the paddle to turn the lathe on. Push the paddle down to turn the lathe OFF. A safety lock insert (B) is included in the switch. This can be removed to disable the switch, so that the machine can not be turned on by accident, or by children.
2. SPEED RPM KNOB: (C) This knob controls the desired spindle revolutions per minute (RPM). The lathe has three speed ranges - 250-750, 550-1650, 1300-3850 RPM. See the Speed Chart (FIG. 3, page 9) for recommended speeds based on the diameter of the workpieces.
3. SPEED RPM DIGITAL READOUT: (D) Displays the spindle’s RPM as set by the RPM Knob (C).
4. FORWARD / REVERSE SWITCH: (E) This toggle switch will change the direction that the spindle turns - counter-clockwise (forward) or clockwise (reverse).
1. TOOL REST BODY LOCK HANDLE: (FIG. 4, A) This cam action lever handle locks the tool rest base (B) down in position on the lathe bed. Unlock handle to position the tool rest in any location along the lathe bed. Tighten the handle when the tool rest is properly located for safe turning of the workpiece.
2. TOOL REST LOCK HANDLE: (C) Locks the tool rest in position for supporting your tools during turning. Unlock the handle to adjust the tool rest at a specific angle, or height. Tighten handle when properly positioned.
1. TAILSTOCK LOCK HANDLE: (FIG. 5, D) Locks the tailstock in position along the length of the lathe bed. Unlock handle to position the tool rest to move the tail-stock. Tighten handle when properly positioned.
2. TAILSTOCK QUILL LOCK HANDLE: (E) Secures the tailstock quill in position. Unlock the handle to move the quill, with live center, forward or backwards. Tighten the locking handle when the quill is finally positioned.
3. TAILSTOCK QUILL HANDWHEEL: (F) The handwheel advances or retracts the quill 0 to 2-1/2”. The tailstock quill lock handle (E) must be loose to move the quill.
4. TAILSTOCK LIVE CENTER: (G) Used for turning between centers. The Live Center (#84) and the Quill (#83) have MT-2 tapers. Remove the live center by retracting the quill until the center loosens, or use the knockout bar.
TOOL REST CONTROLS
TAILSTOCK CONTROLS
ELECTRONIC CONTROLS
Only change rotation direction when the spindle has completely stopped. Should the switch be changed while the lathe is operating, the machine will auto-matically turn off in ‘protection’ mode. The Digital Readout will show an error reading. Turn off the lathe’s ON/OFF switch and the digital read-ing will go out, and the control box will reset. Then put the forward/reverse switch to the desired setting (FWD or REV) and the lathe can be turned back on to continue your work.
A
CB
D
E
FG
A
C
B
D
E

11
ADJUSTMENTS
1. Unplug the lathe from the power source.
2. Open the top Headstock Cover (#35, FIG. 7, A) and the left side, Bed Cover Plate Door (#8, B) to gain access to the belt and pulleys that are inside of the headstock.
3. Loosen the motor mount Locking Handle (#21, C).
4. Lift the Motor Connecting Plate Handle (#19, D) to loosen the tension on the Poly V-Belt (#16). The belt can now be re-positioned on the upper Spindle Pulley (#52) and lower Motor Pulley (#14, E) for the desired speed range setting. FIG. 8 shows the belt positions for the three speeds.NOTE: The ‘High’ speed range (1,300-3850 RPM) pro-vides maximum speed. The ‘Low’ speed range (250-750 RPM) will provide maximum torque. See the Speed Chart on page 9, FIG. 3, for recommended speeds based on the diameter of the workpieces being turned.
4. With the Poly V-Belt positioned on the pulleys, lower the Motor Connecting Plate so that the weight of the motor provides the needed tension on the belt. Then re-tighten the Locking Handle that was loosened in step 3, above.
5. Close the Headstock Cover and Bed Cover Plate Door to protect the belt, pulleys and internal working from dust.
FIG. 7
FIG. 8
CHANGING BELT SPEEDS
THE MACHINE MUST NOT BE PLUGGED IN AND THE POWER SWITCH MUST BE IN THE OFF POSITION UNTIL ALL ADJUSTMENTS ARE COMPLETE.
ADJUSTING THE LOCKING HANDLES
The locking handles on the tailstock and tool rest are pre-set at the factory to give ample holding pressure against the lathe bed to keep these lathe assemblies positioned, so that they will not move during use.
If adjustments are needed, the clamping pressure can be changed by turning the large Hex Nuts (#32 & 67) that are located under the lathe bed and below the assemblies. This can be done with an adjustable wrench (not included). FIG. 9 shows the tool rest removed from the lathe bed to view the locking mechanism and Hex Nut (A).
1. Loosen the Locking Handle (B) so that there is no clamping pressure being exerted on the lathe assembly.
2. With a wrench, slightly turn the Hex Nut to loosen or tighten it on its Threaded Shaft (#30 & 71).
3. Test the clamping pressure with the locking handle, and adjust the nut again, if needed, to set the right pressure. FIG. 9
A
C
AB
B
D
D
E

12
ADJUSTMENTS
To change the belt, the whole spindle shaft needs to be shifted right, out of the headstock, towards the tailstock. This will allow the new belt to be slipped over the spindle and onto the spindle pulley. Then the whole spindle shaft assembly can be re-installed so turning can be resumed.
1. Unplug the lathe from the power source.
2. Remove any accessories from the spindle - spur center, face plate, chuck, etc.
3. Open the top Headstock Cover (#35, FIG. 10, A) and the left side, Bed Cover Plate Door (#8, B) to gain access to the belt and pulleys that are inside of the headstock.
4. Loosen the motor mount Locking Handle (#21, C).
5. Lift the Motor Connecting Plate Handle (#19, D) to loosen the tension on the Poly V-Belt (#16). The belt can now be removed from the lower Motor Pulley (#14, E).
6. Loosen the Set Screw (#40) that attaches the Hand Wheel (#41, E) to the spindle, and remove the Hand Wheel.
7. Remove the two countersunk Phillips Screws (#33B) that hold the RPM Reader and Support Bracket assem-blies (#49, 48, 48A-F), which are located under the Spindle Pulley’s Segmented Plate (#53, G). This will drop the RPM Reader inside of the headstock and safely away from the spindle pulley. FIG. 11.
8. Remove the Set Screws (#51, H) that attach the Spindle Pulley to the spindle. The pulley should now be loose on the spindle. NOTE: There are two (2) set screws in the threaded hole, one on top of the other. This stacking pre-vents the set screws from loosening during use.
9. Remove the Retaining C-Clip (#39) that is on the out-side, left end of the spindle where the hand wheel was.
10. Carefully knock the spindle, towards the tailstock. Use a block of wood against the spindle end to prevent any damage when it is hit with a mallet/hammer. The spindle pulley, now loose, will slide along the spindle.
11. Remove the old belt, if present, and install the new belt over the spindle pulley. Return the pulley back onto the spindle, and re-install the spindle back into the headstock casting. As in step 10, carefully knock the spindle and bear-ings into place with a block of wood and mallet.
12. Secure the spindle pulley in place on the spindle with the set screws. Make sure that the set screws engage back onto the flat section on the spindle to eliminate slippage.
CHANGING THE BELT
FIG. 10
FIG. 11
13. Re-install the RPM Reader & Support Bracket that were unscrewed in step 7. The Reader’s elements are ‘U’ shaped and must be positioned so that the Segmented Plate is in the middle of the two Reader’s elements. You will have to reach up inside the headstock to position the bracket to take the two screws. HINT: Use an awl, stiff wire or toothpick to help align the bracket’s threaded holes with the countersunk holes in the headstock. This will make re-fastening the screws easier.
14. Re-assemble the remaining headstock parts by revers-ing the procedure previously described.
A
C
B
D
D
E
E
H
F
G
REMOVESPINDLE
HANDWHEEL REMOVEDFROM SPINDLE

ADJUSTMENTS
13
CHANGING THE BEARINGS
To change the b earings, the whole spindle shaft needs to be shifted right, out of the headstock, towards the tailstock. Then the bearings can be removed from the headstock casting. With the new bearings in place, the spindle shaft assembly can be re-installed, so turning can be resumed.
1. Follow the steps 1-10 described in CHANGING THE BELT on page 12 to remove the spindle assembly from the headstock.
2. Carefully knock out the old bearings. Use a block of wood against the bearings to prevent any damage to the machine, if it is mistakenly hit with a mallet/hammer. Do not remove the large Retaining C-Clips (#55) from the castings. These clips properly position the bearings when in place.
THE MACHINE MUST NOT BE PLUGGED IN AND THE POWER SWITCH MUST BE IN THE OFF POSITION UNTIL ALL ADJUSTMENTS ARE COMPLETE.
3. Install the two new Bearings (#38 & 56) in the head-stock, by carefully knocking them into position.
4. Re-assemble the lathe parts by reversing the procedure described in steps 11 - 14 as described in the CHANGING THE BELT instructions on page 12. NOTE: The lathe’s ball bearings are lifetime lubricated, sealed, and do not need any further care. To prevent slip-ping, keep the drive belt free of oil and grease.
SPINDLE INDEXING ADJUSTMENTS
The Headstock Spindle has 24 indexing holes, each 15° apart, which allows accurate pattern work on projects such as straight fluting, grooving, drilling, detail carving, wood burning patterns, laying out designs and more.
The Indexing Chart, FIG. 12, shows how to rotate the spindle to access any of the 24 indexing holes. The 8 pri-mary settings are listed in FIG. 13, however, other indexing/design settings are possible. Vary the index combinations to make non-equal, spaced patterns. Also, by rotating/re-postioning your work while it is being held between centers, in a chuck or on a faceplate, new orientation points for the index holes will be set for your work.
To Use: Insert the Indexing Pin (#43) into one of the 24 spindle’s positioning holes according to the chart, and the number of setting you need for your workpiece. Make sure that the pin locates and securely enters into one of the indexing holes so that there is no accidental slipping.
FIG. 12
NUMBER OF INDEX
POSITIONS
ANGLE BETWEEN POSITIONS
HEADSTOCK INDEX
LETTER 1
2
34
6
8
12
24
360°
180°
120°90°
60°
45°
40°
30°
A
A
A A
A
A
A
A
NEVER START THE LATHE WITH THE INDEX PIN ENGAGED IN THE SPINDLE, OR DAMAGE TO THE MACHINE WILL RESULT.
With the Indexing Pin in the first spindle hole setting, do your work (drilling /marking/etc.), then rotate the spindle to the next index setting noted on the chart. Work through all of the designated index setting numbered positions and complete the remaining markings, or work, on your work-piece.
SPINDLE INDEX
NUMBER
1
1,131,9,17
1,7,13,19
1 to 24
1,4,7,10,13,16,19,22
1,5,9,13,17,21
1,3,5,7,9,11,13,15,17,19,21,23
FIG. 13See page 9 for additional information on the lathe’s head-stock and indexing.
14
MAINTENANCE
1. Before each use:
- Check the power cord and plug for any wear or damage.
- Check for any loose screws, hardware, locking handles, jigs or various lathe accessories.
- Check the area to make sure it is clear of any misplaced tools, lumber, cleaning supplies, etc. that could hamper the safe operation of the machine.
2. Avoid a build-up of wood shavings and dust. Regularly clean all parts of the machine using a soft cloth, brush or compressed air. A general cleaning should be done after every use to avoid future problems and ensure that the machine is in ready condition for its next use.
Turn the power switch “OFF” and disconnect the plug from the outlet prior to adjusting or maintaining the machine. DO NOT attempt to repair or maintain the electrical components of the motor. Contact a qualified service technician for this type of maintenance.
3. Keep the lathe bed free of resin and rust. Clean it regu-larly with a non-flammable solvent, then coat with a light film of dry lubricant spray, or wax, to enhance passage of the tool rest and tailstock on/over the bed.
4. Keep the lathe tools sharp, and make sure the steel is not loose in the handles so that no accidents might occur. Making sure that tools are in proper operating condition will ensure that the quality of your turning will be the best possible.
5. Check all lathe accessories (spur centers, live centers, chucks, tool rests, etc) to ensure that they are in perfect working condition.
6. The lathe’s ball bearings are lifetime lubricated, sealed, and do not need any further care. Keep the drive belt free of oil and grease to prevent slipping on the pulleys.
WARNING: If blowing sawdust, wear a proper dust mask and eye protection to prevent debris from being inhaled and blowing into your eyes.
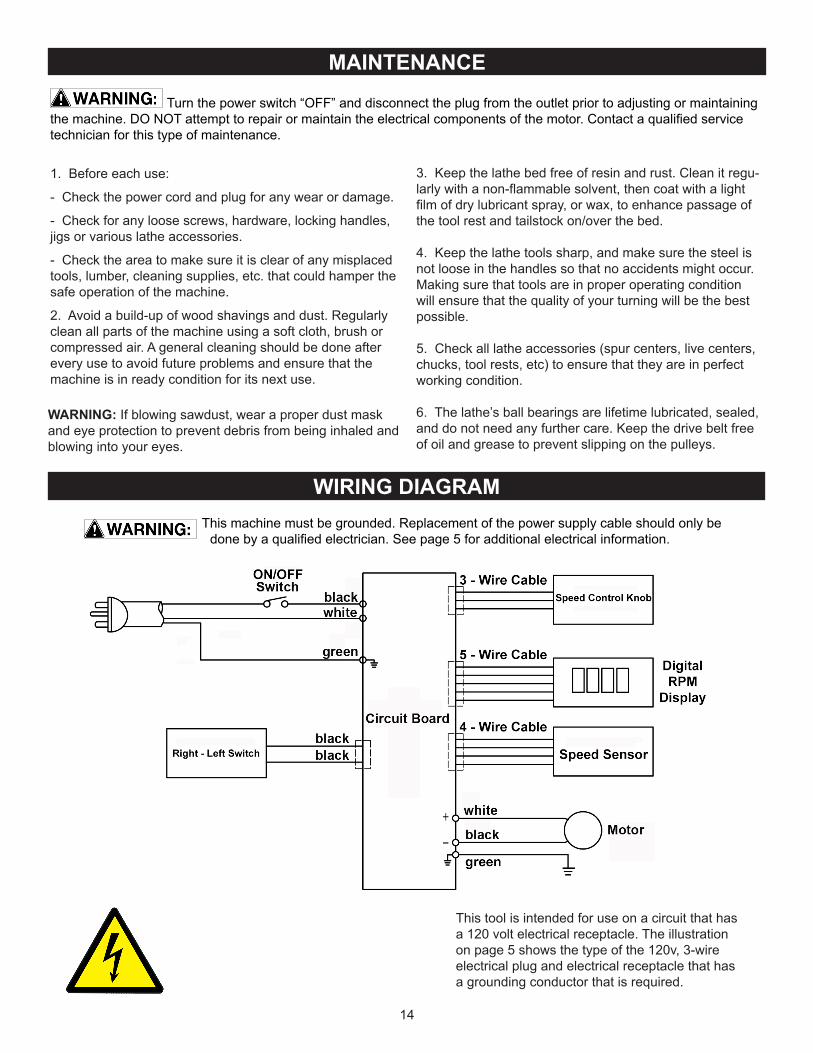
This tool is intended for use on a circuit that has a 120 volt electrical receptacle. The illustration on page 5 shows the type of the 120v, 3-wire electrical plug and electrical receptacle that has a grounding conductor that is required.
WIRING DIAGRAM This machine must be grounded. Replacement of the power supply cable should only be done by a qualified electrician. See page 5 for additional electrical information.

For parts or technical questions contact: [email protected] or 877-884-5167.
15
TROUBLESHOOTINGPROBLEM PROBABLE CAUSE REMEDY
1. Workpiece is warped, out of round, has major flaw, or was improperly prepared or centered for turning 2. Worn spindle bearings 3. Worn belt 4. Motor mount bolt or handles are loose 5. Lathe is on an uneven surface
1. Correct problem by planing, band sawing, or discard the workpiece 2. Replace the bearings 3. Replace the belt 4. Tighten all bolts or handles 5. Shim the lathe stand, or adjust the feet on the stand for stability
Excessive Vibration.
1. Excessive depth of cut 2. Loose or broken belt 3. Worn spindle bearings 4. Improper cooling of motor 5. Worn motor
1. Reduce cutting depth 2. Check tension or replace drive belt 3. Replace bearings 4. Clean motor to increase air flow, or reduce motor running time 5. Replace Motor
Motor or Spindle Stalls or will not start
1. Correct the overload condition 2. Increase supply wire size or elimi- nate extension cord if one is used 3. Adjust belt tension 4. Have voltage checked by an electri cian and corrected, if necessary 5. Replace the motor
1. Power line is overloaded 2. Undersize wires in supply system 3. Drive belt tension is too high 4. Low voltage 5. Worn motor
Motor fails to develop full power.
1. Dull turning tools 2. Tool rest is set too low 3. Tool rest is set too far from the workpiece 4. Improper turning tool is being used
1. Sharpen the tools 2. Reposition the tool rest height 3. Set the tool rest closer to the workpiece 4. Use the correct tool for operation
1. Excessive pressure being applied by the tailstock onto the workpiece 2. Tailstock is not secured in place 3. Lathe bed and tailstock mating surfaces are greasy or oily.
1. Apply only sufficient force with the tailstock to hold the workpiece securely between centers. 2. Tighten tailstock locking lever 3. Remove tailstock and clean bed surfaces with a cleaner degreaser
Tailstock Moves when applying pressure
Digital readout does not work 1. Digital readout sensor out of position 1. Contact Technical Support at 877-884-5167 or email [email protected]
Motor will not start 1. Machine is not plugged in 2. Low voltage 3. Loose connection
1. Plug in machine 2. Check fuses 3. Check plug and all connections
Tools tend to grab or dig in.
Machine bogs down during cutting 1. Excessive depth of cut is taken 2. Turning tools are dull
1. Decrease the depth of cut 2. Sharpen the turning tools
Tailstock or Tool Rest Base do not lock in place
1. Incorrect adjustment on locking lever mechanism
1. Adjust the nut under the clamping plate to increase (or decrease) the clamping pressure of the lock levers
Motor overheats 1. Motor is overloaded 2. Air flow restricted on the motor
1. Reduce load on the motor 2. Clean motor to increase air flow

PARTS DIAGRAM
16
NO
TE: P
leas
e re
fere
nce
the
Man
ufac
ture
r’s P
art N
umbe
r whe
n ca
lling
for R
epla
cem
ent P
arts
.Fo
r Par
ts u
nder
War
rant
y, th
e S
eria
l Num
ber o
f you
r mac
hine
is re
quire
d.

PARTS LIST
17
MFG
. PA
RT
NO
.
Tapp
ing
scre
wSu
ppor
t bra
cket
Thre
aded
pla
teH
ex s
ocke
t bol
t M
5x8
Cab
le p
late
Cro
ss p
an h
ead
scre
w M
4x8
Flat
was
her
Plat
eR
PM re
ader
ass
embl
yH
eads
tock
Sock
et h
ead
cap
scre
w M
6x10
Spin
dle
pulle
ySe
gmen
ted
RPM
pla
teH
ex s
ocke
t cap
scr
ew
M4x
10R
etai
ning
ring
C-c
lipBe
arin
gSp
indl
e3”
Fac
e pl
ate
Spur
cen
ter
Tapp
ing
scre
wEl
ectri
c bo
x co
ver
Larg
e co
rd s
train
relie
f M20
Smal
l cor
d st
rain
relie
f M16
Plas
tic e
lect
ric b
oxC
ontro
l box
ass
embl
yFr
ont c
ontro
l pan
elSw
itch
Self-
lock
ing
nut
M10
Cla
mpi
ng p
late
Com
pres
sion
spr
ing
Nut
M
5Se
t scr
ew
M5x
25Th
read
ed s
haft
Tails
tock
Set s
crew
M
5x12
Ret
aini
ng ri
ngTa
ilsto
ck s
haft
Han
d w
heel
Sock
et h
ead
cap
scre
w M
6x8
Rot
atio
n ha
ndle
Sprin
g co
ilSc
rew
Lock
ing
hand
leTa
ilsto
ck lo
ckin
g le
ver
Tails
tock
lock
ing
shaf
tLi
ve c
ente
rLo
ng K
nock
out B
ar (n
ot s
how
n)Sh
ort K
nock
out B
ar (n
ot s
how
n)W
renc
h - 3
2 m
m (n
ot s
how
n)W
renc
h - 4
6 m
m (n
ot s
how
n)
P1-S
T2D
9X6D
5GB8
45Z
P1-J
MW
L120
3020
012
P1-J
L270
1001
7P1
-M5X
8GB7
0D1B
P1-1
5020
14-0
2P1
-M4X
8GB8
18Z
P1-W
SH4G
B97D
1ZP1
-JM
WL1
2030
2001
4P1
-JM
WL1
2030
9100
1P1
-JM
WL1
2030
2000
5-11
7LP1
-M6X
10G
B80B
P1-J
MW
L120
3020
006
P1-J
MW
L120
3020
007
P1-M
4X10
GB7
0ZP1
-CLP
47G
B893
D1B
P1-B
RG
6005
-2R
SV2G
B276
P1-J
MW
L120
3020
004
P1-J
MW
L120
3020
010
P1-J
L930
1110
0P1
-ST4
D2X
13G
B845
BP1
-JM
WL1
2030
9000
3-00
1SP1
-DJJ
H71
20P1
-JL9
1046
300
P1-J
MW
L120
3090
002-
001S
P1-J
MW
L120
3091
000
P1-J
MW
L120
3090
001-
001S
P1-H
Y18-
32A
P1-M
10G
B889
BP1
-JL9
3030
012
P1-J
MW
L120
3040
004
P1-M
5GB6
170B
P1-M
5X25
GB7
7BP1
-JM
WL1
2030
4000
2P1
-JM
WL1
2030
4000
3-11
7LP1
-M5X
12G
B79B
P1-C
LP12
GB8
96B
P1-J
L930
3000
3P1
-JM
WL1
2030
4000
5P1
-M6X
8GB8
0BP1
-JL9
3030
007
P1-J
MW
L120
3040
007
P1-J
L930
3000
8P1
-JM
WL1
2030
4100
0P1
-JM
WL1
2030
4000
1P1
-JL9
3030
001
P1-J
L930
3100
0AP1
-JL9
3070
002
P1-J
L930
7000
1P1
-JL9
3070
003
P1-J
L930
7000
3A
MFG
. PA
RT
NO
.D
ESC
RIP
TIO
N
K
EY N
O.
47 48 48A
48B
48C
48D
48E
48F
49 50 51 52 53 54 55 56 57 58 59 60 61 62B
62C
63 63A
64 65 67 68 69 70A
70B
71 72 73 74 75 76 77 78 79 80 81 82 83 84 85 86 87 88
P1-J
MW
L120
3010
002-
076L
P1-M
6X30
GB7
0BP1
-WSH
6GB9
7D1B
P1-W
SH6G
B93B
P1-J
L930
1001
7-00
1SP1
-M6X
12G
B818
BP1
-M4X
10G
B819
BP1
-JM
WL1
2030
1100
0-07
6UP1
-M4X
12G
B819
ZP1
-JM
WL1
2030
1000
6P1
-M4G
B617
0BP1
-M4X
10G
B818
BP1
-JM
WL1
2030
1000
5P1
-JM
WL1
2030
1000
7P1
-M6X
5GB8
0BP1
-JM
WL1
2030
1000
1P1
-M6X
16G
B70D
2ZP1
-WSH
6GB9
3ZP1
-M8G
B889
ZP1
-M5X
10G
B818
BP1
-JM
WL1
2030
1000
4P1
-WSH
8GB9
6ZP1
-KTS
B-1-
B-M
8X63
X25
P1-Z
3612
020
P1-M
6X16
GB7
0D2B
P1-C
LP21
GB8
94D
1BP1
-JM
WL1
2030
5000
4P1
-KTS
B-1-
B-M
8X63
X32
P1-J
MW
L120
3050
001-
001G
P1-J
MW
L120
3050
003-
117L
P1-C
LP15
GB8
94D
1BP1
-JM
WL1
2030
5000
2P1
-JL9
3030
012
P1-M
10G
B889
BP1
-M4X
10G
B819
BP1
-M4X
10G
B823
BP1
-M4X
16G
B819
BP1
-JM
WL1
2030
2000
2BP1
-WSH
4GB9
7D1B
P1-J
MW
L120
3020
001-
001S
P1-J
MW
L120
3020
003
P1-J
L930
1000
8P1
-BR
G62
04-2
RS-
P5G
B276
P1-C
LP20
GB8
94D
1BP1
-M6X
8GB8
0BP1
-JM
WL1
2030
2001
3P1
-PIN
3X14
GB8
79B
P1-J
MW
L120
3020
008
P1-J
MW
L120
3020
011
P1-J
MW
L120
3020
009
P1-C
LP9G
B896
B
Bed
Hex
soc
ket c
ap s
crew
M6x
30Fl
at w
ashe
rLo
ck w
ashe
rTo
ol h
olde
rC
ross
pan
hea
d sc
rew
M6x
12C
ount
ersu
nk h
ead
scre
w M
4x10
Bed
cove
r pla
te d
oor
Cou
nter
sunk
hea
d sc
rew
M4x
12M
agne
tN
utH
alf-C
nter
sk h
ead
scre
w M
4x10
Plat
eM
otor
pul
ley
Sock
et h
ead
cap
scre
w M
6x5
Poly
V-b
elt
Hex
soc
ket c
ap s
crew
M
6x16
Lock
was
her
Self-
lock
ing
nut
M8
Cro
ss p
an h
ead
scre
w
M5x
10M
otor
con
nect
ing
plat
eBi
g w
ashe
rLo
ckin
g ha
ndle
Mot
orH
ex s
ocke
t cap
scr
ew M
6x16
Ret
aini
ng ri
ngLo
ckin
g le
ver
Lock
ing
hand
leTo
ol re
stTo
ol re
st b
ase
Ret
aini
ng ri
ngTh
read
ed s
haft
& sl
eeve
Cla
mpi
ng p
late
Self-
lock
ing
nut
Cnt
ersu
nk P
hillip
s sc
rew
M4x
10Sc
rew
M4x
10C
ross
pan
hea
d sc
rew
M
4x16
Hin
geFl
at w
ashe
rH
eads
tock
cov
erH
inge
sha
ftW
ave
was
her
Bear
ing
Ret
aini
ng ri
ngSo
cket
hea
d ca
p sc
rew
M6x
8H
and
whe
elR
oll p
inIn
dex
pin
knob
& s
haft
Loca
ting
slee
veSp
ring
Split
was
her
DES
CR
IPTI
ON
KEY
NO
.
1 2 3 4 5 6 7 8 9 10 11 12 13 14 15 16 17 18 18A
18B
19 20 21 22 23 24 25 26 27 28 29 30 31 32 33 33A
33B
34A
34B
35 36 37 38 39 40 41 42 43 44 45 46

18
ACCESSORIES70-901 24” LATHE BED EXTENSION
Made of heavy cast iron, it bolts to the right end of the 70-220VSR Midi Lathe to extend the lathe’s working spindle length capacity to 44”.
Universal, all-steel Stand Extension bolts onto the 70-910 and 70-920 stands to sup-port lathes with Bed Extensions. The stand extension adjusts from 18-3/4” to 32-1/4” long, and 24-1/2” to 34-1/2” working height.
ADDITIONAL LATHE ACCESSORIES For addional lathe accessories or replacement parts, contact your local RIKON distributor, or visit the RIKON website at www.rikontools.com.
Tool rests, Face Plates, Drive Centers, Spur & Live Centers, Drill Chuck & Arbor, Drive Belts, etc.
NOTESUse this section to record Maintenance, Service and any calls to Technical Support:
70-913 LATHE STAND EXTENSION
Universal, all-steel Stand adjusts from 23-1/4” to 37-1/4” long, and 24-1/2” to 34-1/2” working height.
70-920 LATHE STAND

19
WARRANTY
19

www.rikontools.com70-220VSRM3
70-220VSR
For more information:16 Progress RoadBillerica, MA 01821
877-884-5167 / [email protected]