300-005-166-a09 powerpath hp-ux install and admin … emc powerpath for hp-ux version 5.1...
TRANSCRIPT
EMC® PowerPath® for HP-UXVersion 5.1
Installation andAdministration Guide
P/N 300-005-166REV A09
EMC CorporationCorporate Headquarters:
Hopkinton, MA 01748-9103
1-508-435-1000www.EMC.com

2
Copyright © 1997 - 2011 EMC Corporation. All rights reserved.
Published May 2011
EMC believes the information in this publication is accurate as of its publication date. The information issubject to change without notice.
THE INFORMATION IN THIS PUBLICATION IS PROVIDED “AS IS.” EMC CORPORATION MAKES NOREPRESENTATIONS OR WARRANTIES OF ANY KIND WITH RESPECT TO THE INFORMATION IN THISPUBLICATION, AND SPECIFICALLY DISCLAIMS IMPLIED WARRANTIES OF MERCHANTABILITY ORFITNESS FOR A PARTICULAR PURPOSE.
Use, copying, and distribution of any EMC software described in this publication requires an applicablesoftware license.
For the most up-to-date listing of EMC product names, see EMC Corporation Trademarks on EMC.com.
All other trademarks used herein are the property of their respective owners.
EMC PowerPath for HP-UX Version 5.1 Installation and Administration Guide
Contents
Preface ..................................................................................................... 7
Chapter 1 Installing PowerPath on an HP-UX HostBefore you install .............................................................................. 12
Obtain up-to-date information ................................................ 12Choose a convenient time..........................................................13Locate your license key..............................................................13Prepare the host and storage system .......................................14Prepare for a clustered environment .......................................14
Installing PowerPath ........................................................................ 15Installing from the CD .............................................................. 16Installing from the tar file..........................................................18Installing a major release and a service pack..........................20Installing a PowerPath service pack ........................................22
After you install................................................................................. 25Registering PowerPath on the host ..........................................25Verify the PowerPath Installation ............................................26
Upgrading PowerPath ..................................................................... 28Supporting Veritas Volume Manager............................................ 29PowerPath coexistence with HP-UX native multipath ............... 31Coexistence with third-party path management software ......... 32
Behavior with third-party multipathing software.................32
Chapter 2 Configuring a PowerPath Boot Device on HP-UXConfiguring a PowerPath device as the boot device ................... 36Considerations for VNX OE and CLARiiON storage ................. 37Configuring a PowerPath boot device with LVM........................ 38Configuring a PowerPath boot device with VxVM ..................... 44
EMC PowerPath for HP-UX Version 5.1 Installation and Administration Guide 3
Chapter 3 PowerPath in a ClusterPowerPath in an MC/ServiceGuard cluster................................. 46
Installing PowerPath in a new MC/ServiceGuard cluster... 46Integrating PowerPath into an MC/ServiceGuard cluster .. 48Integrating MC/ServiceGuard in a PowerPath environment .49
PowerPath in a Veritas Cluster Server cluster.............................. 51Installing PowerPath in a new VCS cluster ............................ 51Integrating PowerPath into a VCS cluster .............................. 52
Chapter 4 Migrating to PowerPathMigrating from HP StorageWorks Secure Path ........................... 54
Secure Path operation on HP-UX............................................ 54Migration procedure ................................................................. 54
Migrating From HP StorageWorks AutoPath XP Virtual Array 56AutoPath operation on HP-UX................................................ 56
Migrating from IBM Subsystem Device Driver (SDD) ............... 57SDD operation on HP-UX ........................................................ 57Migration procedure ................................................................. 57
Chapter 5 Removing PowerPath From an HP-UX HostBefore removing PowerPath ........................................................... 60Removing PowerPath ...................................................................... 61
HP console with X-Windows graphics display .................... 61HP console with terminal access ............................................. 62
Chapter 6 PowerPath Administration on HP-UXDevice naming .................................................................................. 64Reconfiguring PowerPath devices online ..................................... 64Agile device support ........................................................................ 65iSCSI devices ..................................................................................... 66Removing devices............................................................................. 69Removing a single logical device ................................................... 69LVM alternate links (PVLinks) ....................................................... 69
Considerations for VNXOE and CLARiiON storage ............ 70Using powermt config when a path is lost ................................... 70PowerPath and the HORCM command device ........................... 70Replacing Secure Path with PowerPath ........................................ 71PowerPath and VxVM best practice .............................................. 72Upgrading HP-UX............................................................................ 73
EMC PowerPath for HP-UX Version 5.1 Installation and Administration Guide4

Error messages................................................................................... 73
Appendix A Files Changed by PowerPath InstallationFiles added by PowerPath installation........................................... 76
HP-UX 11i v1 (PA-RISC)........................................................... 76HP-UX 11i v2 and 11i v3 (PA-RISC)........................................ 79HP-UX 11i v2 or 11i v3 (IA64) .................................................. 82
Files modified by PowerPath installation...................................... 87
Index ...................................................................................................... 89
5EMC PowerPath for HP-UX Version 5.1 Installation and Administration Guide

EMC PowerPath for HP-UX Version 5.1 Installation and Administration Guide6
Preface
As part of an effort to improve and enhance the performance and capabilitiesof its product line, EMC from time to time releases revisions of its hardwareand software. Therefore, some functions described in this guide may not besupported by all revisions of the software or hardware currently in use. Forthe most up-to-date information on product features, refer to your productrelease notes.
If a product does not function properly or does not function as described inthis guide, please contact your EMC representative.
Audience This guide is part of the PowerPath documentation set, and isintended for use by system or storage administrators duringinstallation, configuration, and administration of the product.
Readers of this guide are expected to be familiar with:
◆ Storage systems in their environment
◆ HP-UX operating system
◆ Applications (for example, clustering software) used withPowerPath
Relateddocumentation
The complete set of EMC enterprise storage documentation forPowerPath, all available from EMC Corporation, includes:
◆ EMC PowerPath Product Guide◆ EMC PowerPath for AIX Installation and Administration Guide◆ EMC PowerPath for HP-UX Installation and Administration Guide◆ EMC PowerPath for Linux Installation and Administration Guide◆ EMC PowerPath for Solaris Installation and Administration Guide◆ EMC PowerPath for Windows Installation and Administration Guide
EMC PowerPath for HP-UX Version 5.1 Installation and Administration Guide 7
8
Preface
◆ EMC PowerPath for HP-UX Release Notes◆ EMC PowerPath for AIX Release Notes◆ EMC PowerPath for Solaris Release Notes◆ EMC PowerPath for Linux Release Notes◆ EMC PowerPath for Windows Release Notes
These documents are updated periodically. Electronic versions of theupdated manuals are available on the Powerlink website:http://Powerlink.EMC.com
If your environment includes EMC Symmetrix storage systems, referalso to the EMC Host Connectivity Guide for HP-UX, which is availableon the Powerlink website.
If your environment includes EMC VNX™ Operating Environment(OE) and CLARiiON storage systems, refer also to the followingmanuals:
◆ EMC Host Connectivity Guide for HP-UX
◆ VNX OE Storage System Support website(www.emc.com/vnxsupport)
◆ CLARiiON Storage-System Support website(http://www.emc.com/clariionsupport)
◆ EMC Navisphere Manager Version 6.X Administrator’s Guide
If your environment includes other vendors’ storage systems, refer tothe appropriate documentation from your vendor. Refer also to theEMC E-Lab Interoperability Navigator, available on the Powerlinkwebsite.
Conventions used inthis guide
This manual uses the following conventions for notes and cautions:
Note: A note presents information that is important, but not hazard-related.
CAUTION!A caution contains information essential to avoid data loss ordamage to the system or equipment.
EMC PowerPath for HP-UX Version 5.1 Installation and Administration Guide

Preface
Typographical ConventionsThis manual uses the following type style conventions:
Where to get help EMC support, product, and licensing information can be obtained asfollows.
Product information — For documentation, release notes, softwareupdates, or for information about EMC products, licensing, andservice, go to the EMC Powerlink website (registration required) at:
http://Powerlink.EMC.com
Technical support — For technical support, go to EMC CustomerService on Powerlink. To open a service request through Powerlink,you must have a valid support agreement. Contact your EMC salesrepresentative for details about obtaining a valid support agreementor to answer any questions about your account.
Your comments Your suggestions will help us continue to improve the accuracy,organization, and overall quality of the user publications. Please sendyour opinion of this guide to:
AVANT
GARDEKeystrokes
Palatino,bold
◆ Dialog box, button, icon, and menu items in text◆ Selections you can make from the user interface,
including buttons, icons, options, and fieldnames
Palatino,italic
◆ New terms or unique word usage in text◆ Command line arguments when used in text◆ Book titles
Courier,italic
Arguments used in examples of command linesyntax.
Courier System prompts and displays and specificfilenames or complete paths. For example:
working root directory [/usr/emc]:c:\Program Files\EMC\Symapi\db
Courier,bold
◆ User entry. For example:symmpoll -p
◆ Options in command line syntax
EMC PowerPath for HP-UX Version 5.1 Installation and Administration Guide 9
10
Preface
If you have issues, comments, or questions about specific informationor procedures, please include the title and, if available, the partnumber, the revision (for example, A01), the page numbers, and anyother details that will help us locate the subject you are addressing.
EMC PowerPath for HP-UX Version 5.1 Installation and Administration Guide
1Invisible Body Tag
This chapter includes the following sections:
◆ Before you install................................................................................ 12◆ Installing PowerPath ......................................................................... 15◆ After you install.................................................................................. 25◆ Upgrading PowerPath....................................................................... 28◆ Supporting Veritas Volume Manager ............................................. 29◆ PowerPath coexistence with HP-UX native multipath ............... 31◆ Coexistence with third-party path management software .......... 32
Installing PowerPath onan HP-UX Host
Installing PowerPath on an HP-UX Host 11
12
Installing PowerPath on an HP-UX Host
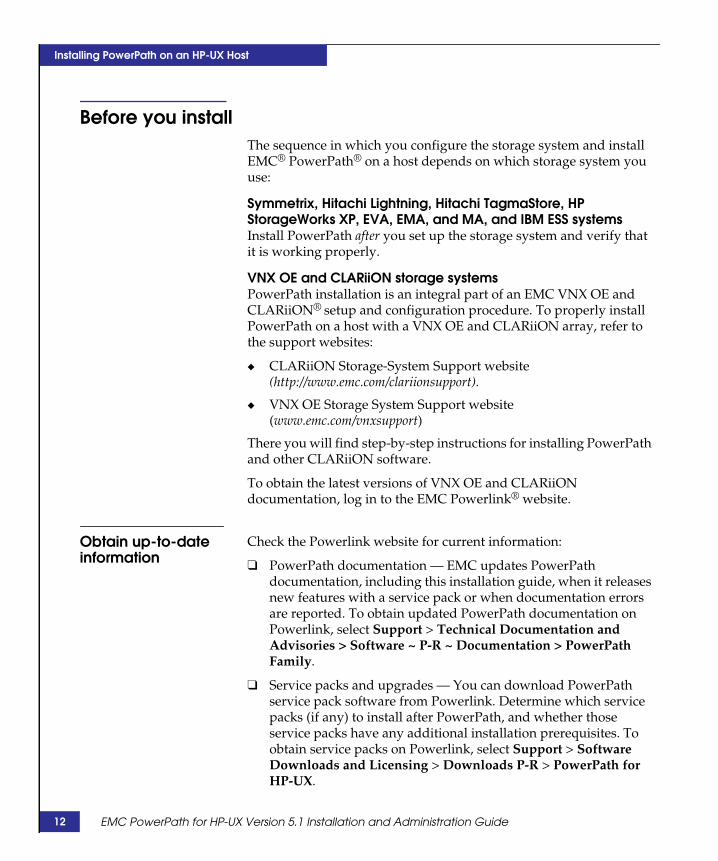
Before you installThe sequence in which you configure the storage system and installEMC® PowerPath® on a host depends on which storage system youuse:
Symmetrix, Hitachi Lightning, Hitachi TagmaStore, HPStorageWorks XP, EVA, EMA, and MA, and IBM ESS systemsInstall PowerPath after you set up the storage system and verify thatit is working properly.
VNX OE and CLARiiON storage systemsPowerPath installation is an integral part of an EMC VNX OE andCLARiiON® setup and configuration procedure. To properly installPowerPath on a host with a VNX OE and CLARiiON array, refer tothe support websites:
◆ CLARiiON Storage-System Support website(http://www.emc.com/clariionsupport).
◆ VNX OE Storage System Support website(www.emc.com/vnxsupport)
There you will find step-by-step instructions for installing PowerPathand other CLARiiON software.
To obtain the latest versions of VNX OE and CLARiiONdocumentation, log in to the EMC Powerlink® website.
Obtain up-to-dateinformation
Check the Powerlink website for current information:
❑ PowerPath documentation — EMC updates PowerPathdocumentation, including this installation guide, when it releasesnew features with a service pack or when documentation errorsare reported. To obtain updated PowerPath documentation onPowerlink, select Support > Technical Documentation andAdvisories > Software ~ P-R ~ Documentation > PowerPathFamily.
❑ Service packs and upgrades — You can download PowerPathservice pack software from Powerlink. Determine which servicepacks (if any) to install after PowerPath, and whether thoseservice packs have any additional installation prerequisites. Toobtain service packs on Powerlink, select Support > SoftwareDownloads and Licensing > Downloads P-R > PowerPath forHP-UX.
EMC PowerPath for HP-UX Version 5.1 Installation and Administration Guide
Installing PowerPath on an HP-UX Host
❑ EMC Issue Tracker— EMC Issue Tracker is an application onPowerlink that allows you to search for known problems anddefects in EMC software. To access Issue Tracker, on Powerlinkselect Support > Interoperability and Product LifecycleInformation > E-Lab Issue Tracker Information > E-Lab IssueTracker.
You can use the Issue Tracker to find:
• Descriptions of PowerPath bugs existing on any host platformthat is supported by PowerPath.
• Workarounds for existing bugs
EMC updates this database regularly between scheduled releasesand service pack releases.
Choose a convenient timeInstalling PowerPath entails restarting the host. Plan to install orupgrade PowerPath when a restart will cause minimal disruption.
Locate your license keyThe PowerPath license registration key is on the License Key Cardthat you received from EMC.
Effective February 15, 2011, instead of the physical Right To Use(RTU), the default delivery method for PowerPath licenses iselectronic. An electronic License Authorization Code (LAC) is sent byemail in order to redeem the license key on the Powerlink Licensingportal. This does not affect upgrades because PowerPath retainsexisting license information.
Physical RTU cards are still available as an option. EMC GlobalSupport, at 1-800-svc4emc (or 1-800-782-4362), can provide moreinformation. The EMC PowerPath Family Electronic LicenseOrdering Process Technical Notes, available on Powerlink, providesmore information about the PowerPath license electronic orderingprocess.
Note: If you are upgrading from an earlier version of PowerPath, you do notneed to reregister. PowerPath will use your existing key.
Before you install 13
14
Installing PowerPath on an HP-UX Host
Prepare the host and storage system❑ Install the required HP-UX service packs. Refer to the HP website
and to the EMC E-Lab™ Interoperability Navigator for the mostup-to-date service pack requirements.
❑ Ensure that the c-bit (common serial number bit) is set on theEMC Symmetrix® interface. Failure to set the c-bit can cause datacorruption.
❑ Configure the HP-UX host so storage-system disk devices areincorporated into HP-UX. The storage-system devices must beaddressed on the Fibre Channel by using SCSI target IDs andSCSI LUNs. Ensure the Symmetrix storage system ports areonline.
The EMC Host Connectivity Guide for HP-UX provides moreinformation on both Symmetrix and VNX OE and CLARiiONsystems. The VNX OE and CLARiiON systems support websitesprovide additional information on VNX OE and CLARiiONsystems:
• CLARiiON Storage-System Support website(http://www.emc.com/clariionsupport).
• VNX OE Storage System Support website(www.emc.com/vnxsupport)
For other arrays, refer to the vendor’s documentation.
❑ Configure the HBA drivers if you have not already done so.
CAUTION!Be sure to follow HBA driver configuration guidelines in theproduct documentation and E-Lab Navigator (available onPowerlink). Improper settings can cause erratic failoverbehavior, such as greatly increased I/O delays.
Prepare for a clustered environmentIf you are installing PowerPath in a clustered environment, preparethe cluster environment. Chapter 3, ”PowerPath in a Cluster,” onpage 45 contains information on installing PowerPath in a new orexisting cluster.
EMC PowerPath for HP-UX Version 5.1 Installation and Administration Guide
Installing PowerPath on an HP-UX Host
Installing PowerPathThis section describes:
◆ “Installing from the CD” on page 16.
◆ “Installing from the tar file” on page 18.
◆ “Installing a major release and a service pack” on page 20.
Note: If you are upgrading from an earlier release of PowerPath, see“Upgrading PowerPath” on page 28 before you begin the installation.
Table 1 on page 15 shows the operating system names used in thisdocument.
Notes on 11i v3support
Note the following if you are installing PowerPath on an HP-UX11i v3 host:
◆ PowerPath 5.1 disables at the device level the native multipathingfor legacy addressed devices. When devices are configured forPowerPath (for example, when you run powermt config),PowerPath disables native multipathing on the devices itmanages by setting to false the leg_mpath_enable attribute.
Do not change this setting to enable native multipathing forlegacy addressed devices while PowerPath is installed. Removalof devices from PowerPath management reenables multipathingfor legacy addressed devices (default HP-UX setting).
The HP-UX 11i v3 documentation provides more information onlegacy addressing in HP-UX 11i v3.
◆ In earlier releases of HP-UX, failed file system I/Os were retriedindefinitely. HP-UX 11i v3 by default no longer retries failed I/Osindefinitely, but instead returns I/O errors to the file system aftera finite number of retries. This results in file system error
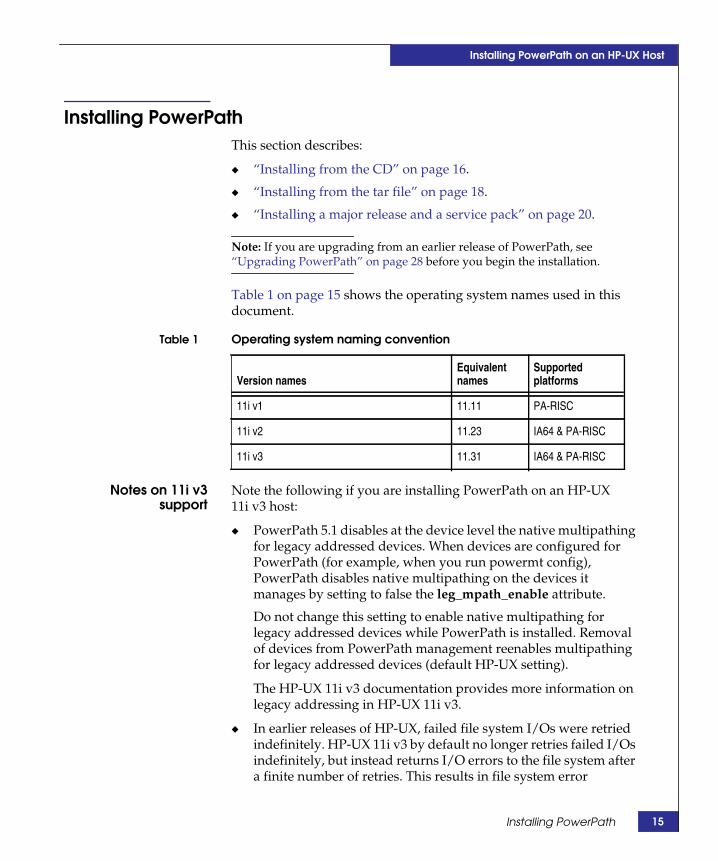
Table 1 Operating system naming convention
Version namesEquivalentnames
Supportedplatforms
11i v1 11.11 PA-RISC
11i v2 11.23 IA64 & PA-RISC
11i v3 11.31 IA64 & PA-RISC
Installing PowerPath 15
16
Installing PowerPath on an HP-UX Host
messages if all paths to a LUN are disabled manually, or fail dueto hardware problems. PowerPath does not alter this behavior onHP-UX 11i v3. You can restore the infinite retry on a per devicebasis by using the HP-UX scsimgr command, as follows:
scsimgr set_attr -D /dev/rdisk/diskX -a infinite_retries_enable=true
The HP website and documentation contains more information.
Installing from theCD
To install PowerPath from the CD:
1. Log in as root.
2. Insert the CD into the CD-ROM drive.
3. Mount the CD on your file system. For example, to mount the CDon /mnt, enter:
mount /dev/dsk/c#t#d# /mnt
Note: If the EMC SYMCLI inq utility is installed, you can use it todetermine the c#t#d# device for the CD-ROM drive.
4. Install the software:
◆ If you are performing a fresh PowerPath installation, using the–x ask=true option allows you to register PowerPath during theinstallation process. The following examples use /mnt as themount point.
• To install and register PowerPath on HP-UX 11i v1 using the -xask=true option, type:
swinstall -x autoreboot=true -x mount_all_filesystems=false –x ask=true \-s /mnt/UNIX/HPUX/EMCPower.HPUX.5.1.x/EMCPower.HPUX.5.1.x.GA.bxxx EMCpower.tar
• To install and register PowerPath on HP-UX 11i v2 and 11i v3using the -x ask=true option, type:
swinstall -x autoreboot=true -x mount_all_filesystems=false -x ask=true \-s /mnt/UNIX/HPUX/EMCPower.HPUX.PI.5.1.x/EMCPower.HPUX.PI.5.1.x.GA.bxxxEMCpower.tar
where SPx is the service pack number and bxxx represents thebuild number for the release. For example, for PowerPath 5.1 SP2for HP-UX, the package and build number would beEMCPower.HPUX.5.1.2.GA.b113.
Table 2 on page 17 provides prompts you will need to registerPowerPath on the host.
EMC PowerPath for HP-UX Version 5.1 Installation and Administration Guide
Installing PowerPath on an HP-UX Host
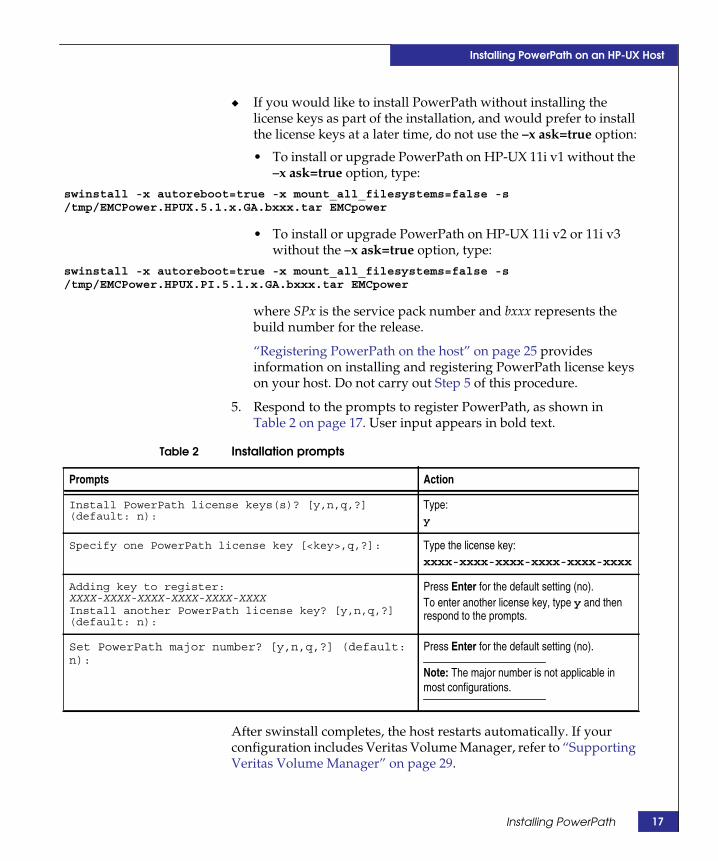
◆ If you would like to install PowerPath without installing thelicense keys as part of the installation, and would prefer to installthe license keys at a later time, do not use the –x ask=true option:
• To install or upgrade PowerPath on HP-UX 11i v1 without the–x ask=true option, type:
swinstall -x autoreboot=true -x mount_all_filesystems=false -s/tmp/EMCPower.HPUX.5.1.x.GA.bxxx.tar EMCpower
• To install or upgrade PowerPath on HP-UX 11i v2 or 11i v3without the –x ask=true option, type:
swinstall -x autoreboot=true -x mount_all_filesystems=false -s/tmp/EMCPower.HPUX.PI.5.1.x.GA.bxxx.tar EMCpower
where SPx is the service pack number and bxxx represents thebuild number for the release.
“Registering PowerPath on the host” on page 25 providesinformation on installing and registering PowerPath license keyson your host. Do not carry out Step 5 of this procedure.
5. Respond to the prompts to register PowerPath, as shown inTable 2 on page 17. User input appears in bold text.
After swinstall completes, the host restarts automatically. If yourconfiguration includes Veritas Volume Manager, refer to “SupportingVeritas Volume Manager” on page 29.
Table 2 Installation prompts
Prompts Action
Install PowerPath license keys(s)? [y,n,q,?](default: n):
Type:y
Specify one PowerPath license key [<key>,q,?]: Type the license key:xxxx-xxxx-xxxx-xxxx-xxxx-xxxx
Adding key to register:XXXX-XXXX-XXXX-XXXX-XXXX-XXXXInstall another PowerPath license key? [y,n,q,?](default: n):
Press Enter for the default setting (no).To enter another license key, type y and thenrespond to the prompts.
Set PowerPath major number? [y,n,q,?] (default:n):
Press Enter for the default setting (no).
Note: The major number is not applicable inmost configurations.
Installing PowerPath 17
18
Installing PowerPath on an HP-UX Host
Installing from the tar fileUse this procedure to install or upgrade to standalone packages. Thefollowing PowerPath for HP-UX packages can be installed orupgraded as standalone packages:
◆ PowerPath 5.1
◆ PowerPath 5.1 SP2—both fresh installation and upgrade fromearlier PowerPath versions
“Installing a major release and a service pack” on page 20 providesinformation on installing PowerPath 5.1 SP1 for HP-UX.
To download from Powerlink and unzip the compressed tar file:
1. On Powerlink, select Support > Software Downloads andLicensing > Downloads P-R > PowerPath for HP-UX.
2. Save the compressed tar file locally. This procedure uses the /tmpdirectory as the file location.
If you save the file to another directory and want to copy it tothe/tmp directory, use one of the following commands.
• For HP-UX 11i v1, type:
cp <file_location>/EMCPower.HPUX.5.1.x.GA.bxxx.tar.gz /tmp
• For HP-UX 11i v2 or 11i v3, type:
cp <file_location>/EMCPower.HPUX.PI.5.1.x.GA.bxxx.tar.gz /tmp
where SPx is the service pack number and bxxx represents the buildnumber for the release. For example, for PowerPath 5.1 SP2 forHP-UX, the package and build number would beEMCPower.HPUX.5.1.2.GA.b113.
3. Unzip the installation package.
• For HP-UX 11i v1, type:
gunzip /tmp/EMCPower.HPUX.5.1.x.GA.bxxx.tar.gz
• For HP-UX 11i v2 or 11i v3, type:
gunzip /tmp/EMCPower.HPUX.PI.5.1.x.GA.bxxx.tar.gz
where SPx is the service pack number and bxxx represents thebuild number for the release.
4. Install the software:
EMC PowerPath for HP-UX Version 5.1 Installation and Administration Guide
Installing PowerPath on an HP-UX Host
◆ If you are performing a fresh installation, include the –x ask=trueoption, which initiates the license key registration process asshown in steps 4 on page 16 and 5 on page 17.
Note: If you are upgrading from PowerPath 5.0.x or 4.5.x, the PowerPathsoftware preserves the license key from the previous version.
• To install or upgrade PowerPath on HP-UX 11i v1 using the–x ask=true option, type:
swinstall -x autoreboot=true -x mount_all_filesystems=false -s/tmp/EMCPower.HPUX.5.1.x.GA.bxxx.tar EMCpower
• To install or upgrade PowerPath on HP-UX 11i v2 or 11i v3using the –x ask=true option, type:
swinstall -x autoreboot=true -x mount_all_filesystems=false -s/tmp/EMCPower.HPUX.PI.5.1.x.GA.bxxx.tar EMCpower
where SPx is the service pack number and bxxx represents thebuild number for the release.
Table 2 on page 17 provides prompts you will need to registerPowerPath on the host
The host restarts automatically after swinstall completes. If yourconfiguration includes Veritas Volume Manager, refer to “SupportingVeritas Volume Manager” on page 29.
◆ If you would like to install PowerPath without installing thelicense keys, and install the license keys at a later time, do not usethe –x ask=true option:
• To install or upgrade PowerPath on HP-UX 11i v1, type:
swinstall -x autoreboot=true -x mount_all_filesystems=false -s/tmp/EMCPower.HPUX.5.1.x.GA.bxxx.tar EMCpower
• To install or upgrade PowerPath on HP-UX 11i v2 or 11i v3,type:
swinstall -x autoreboot=true -x mount_all_filesystems=false -s/tmp/EMCPower.HPUX.PI.5.1.x.GA.bxxx.tar EMCpower
where SPx is the service pack number and bxxx represents thebuild number for the release.
“Registering PowerPath on the host” on page 25 providesinformation on installing and registering PowerPath license keyson your host.
Installing PowerPath 19
20
Installing PowerPath on an HP-UX Host
If your configuration includes Veritas Volume Manager, refer to“Supporting Veritas Volume Manager” on page 29
Installing a major release and a service packThis procedure describes how to install PowerPath 5.1 and 5.1 SP1 forHP-UX at the same time with one host reboot. Use this procedure if:
◆ A host uses an ALUA mode or a single-SP CLARiiON AX4-5device as an external boot device, and you want to installPowerPath. This is because PowerPath 5.1 does not supportALUA or single-SP CLARiiON AX4-5 arrays, so following thenormal installation procedure with the reboot after installation ofPowerPath 5.1 causes the host to hang during reboot.
◆ You want to install PowerPath 5.1 SP1 for HP-UX and do not havePowerPath 5.1 installed on the host. PowerPath 5.1 SP1 cannot beinstalled as a standalone package.
To install the PowerPath 5.1 and 5.1 SP1:
Note: PowerPath 5.1 SP2,shouldbe installed as a standalone package. Followthe procedure provided in “Installing from the tar file” on page 18.
1. Clear out the temporary depot. Type:
swremove -x mount_all_filesystems=false -d \* @ /var/spool/sw
2. Unzip the installation packages.
For HP-UX 11i v1, type:
gunzip /EMCPower.HPUX.5.1.0.GA.b160.tar.gzgunzip /EMCPower.HPUX.5.1.SP1.b019.tar
For HP-UX 11i v2 or 11i v3, type:
gunzip /EMCPower.HPUX.PI.5.1.0.GA.b160.tar.gzgunzip /EMCPower.HPUX.PI.5.1.SP1.b019.tar
3. Copy PowerPath 5.1 to the temporary depot. Type:
• For HP-UX 11i v1, type:
swcopy -x mount_all_filesystems=false -s/EMCPower.HPUX.5.1.0.GA.b160.tar EMCpower @ /var/spool/sw
• For HP-UX 11i v2 or 11i v3, type:
EMC PowerPath for HP-UX Version 5.1 Installation and Administration Guide
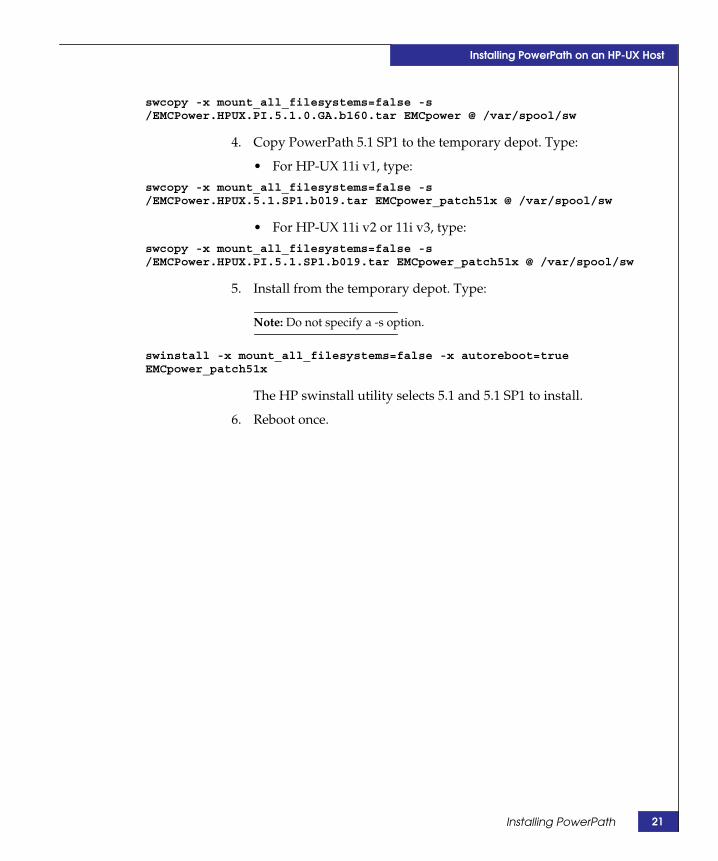
Installing PowerPath on an HP-UX Host
swcopy -x mount_all_filesystems=false -s/EMCPower.HPUX.PI.5.1.0.GA.b160.tar EMCpower @ /var/spool/sw
4. Copy PowerPath 5.1 SP1 to the temporary depot. Type:
• For HP-UX 11i v1, type:
swcopy -x mount_all_filesystems=false -s/EMCPower.HPUX.5.1.SP1.b019.tar EMCpower_patch51x @ /var/spool/sw
• For HP-UX 11i v2 or 11i v3, type:
swcopy -x mount_all_filesystems=false -s/EMCPower.HPUX.PI.5.1.SP1.b019.tar EMCpower_patch51x @ /var/spool/sw
5. Install from the temporary depot. Type:
Note: Do not specify a -s option.
swinstall -x mount_all_filesystems=false -x autoreboot=trueEMCpower_patch51x
The HP swinstall utility selects 5.1 and 5.1 SP1 to install.
6. Reboot once.
Installing PowerPath 21
22
Installing PowerPath on an HP-UX Host
Installing a PowerPath service packTake note of the following:
◆ The procedure provided in “Installing a PowerPath service pack”on page 22 does not apply to PowerPath 5.1 SP2. The procedureprovided in “Installing from the tar file” on page 18 applies toboth fresh installations of and upgrades to PowerPath 5.1 SP2from earlier PowerPath versions.
◆ The procedure provided in “Installing a PowerPath service pack”on page 22 does not apply to a fresh installation of PowerPath 5.1SP1., The procedure provided in “Installing a major release and aservice pack” on page 20 applies to fresh installations ofPowerPath 5.1 SP1.
◆ The procedure provided in “Installing a PowerPath service pack”on page 22 applies to installing PowerPath 5.1 SP1 on a hostwhere PowerPath 5.1 is already installed.
◆ If you are running an earlier release of PowerPath, do one of thefollowing:
• Upgrade to PowerPath 5.1 SP2 directly following theprocedure in “Installing from the tar file” on page 18.
• Upgrade to PowerPath 5.1 and then upgrade to PowerPath 5.1SP1 following the procedure provided in “Installing aPowerPath service pack” on page 22f.
• Remove the earlier release of PowerPath, and then installPowerPath 5.1 and PowerPath 5.1 SP1 simultaneouslyfollowing the procedure provided in “Installing a majorrelease and a service pack” on page 20.
◆ All installed hot fixes must be removed before you upgrade toPowerPath 5.1 SP1. Step 2 on page 24 describes how to uninstallhot fixes.
◆ PowerPath service packs are distributed as tar files on Powerlink.
Installing a PowerPath service packTo install a PowerPath service pack if you are running PowerPath 5.1:
Note: This procedure does not apply to PowerPath 5.1 SP2. PowerPath 5.1 forHP-UX must be installed on the host.
EMC PowerPath for HP-UX Version 5.1 Installation and Administration Guide
Installing PowerPath on an HP-UX Host
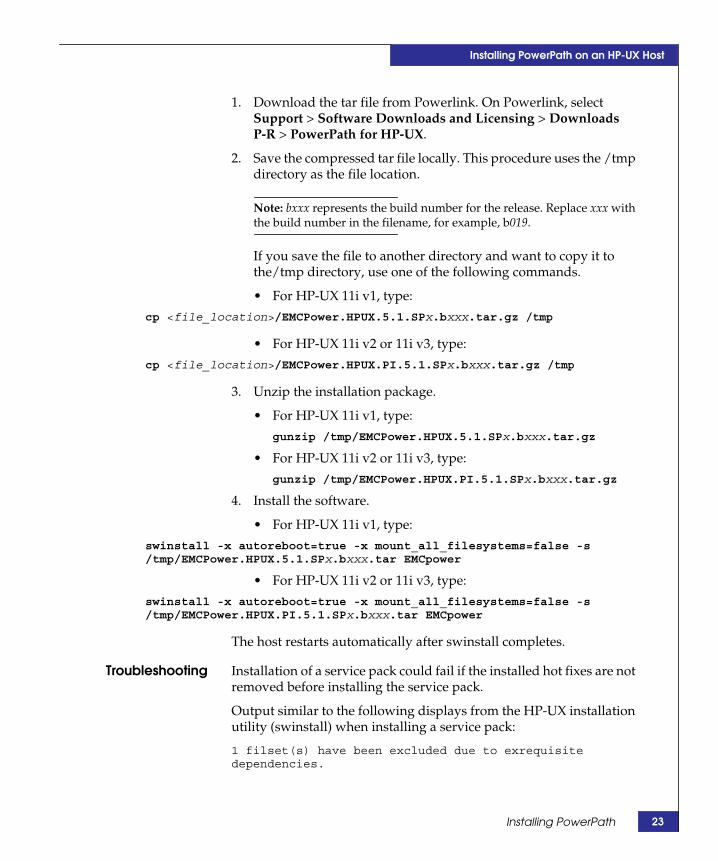
1. Download the tar file from Powerlink. On Powerlink, selectSupport > Software Downloads and Licensing > DownloadsP-R > PowerPath for HP-UX.
2. Save the compressed tar file locally. This procedure uses the /tmpdirectory as the file location.
Note: bxxx represents the build number for the release. Replace xxx withthe build number in the filename, for example, b019.
If you save the file to another directory and want to copy it tothe/tmp directory, use one of the following commands.
• For HP-UX 11i v1, type:
cp <file_location>/EMCPower.HPUX.5.1.SPx.bxxx.tar.gz /tmp
• For HP-UX 11i v2 or 11i v3, type:
cp <file_location>/EMCPower.HPUX.PI.5.1.SPx.bxxx.tar.gz /tmp
3. Unzip the installation package.
• For HP-UX 11i v1, type:
gunzip /tmp/EMCPower.HPUX.5.1.SPx.bxxx.tar.gz
• For HP-UX 11i v2 or 11i v3, type:
gunzip /tmp/EMCPower.HPUX.PI.5.1.SPx.bxxx.tar.gz
4. Install the software.
• For HP-UX 11i v1, type:
swinstall -x autoreboot=true -x mount_all_filesystems=false -s/tmp/EMCPower.HPUX.5.1.SPx.bxxx.tar EMCpower
• For HP-UX 11i v2 or 11i v3, type:
swinstall -x autoreboot=true -x mount_all_filesystems=false -s/tmp/EMCPower.HPUX.PI.5.1.SPx.bxxx.tar EMCpower
The host restarts automatically after swinstall completes.
Troubleshooting Installation of a service pack could fail if the installed hot fixes are notremoved before installing the service pack.
Output similar to the following displays from the HP-UX installationutility (swinstall) when installing a service pack:
1 filset(s) have been excluded due to exrequisitedependencies.
Installing PowerPath 23
24
Installing PowerPath on an HP-UX Host
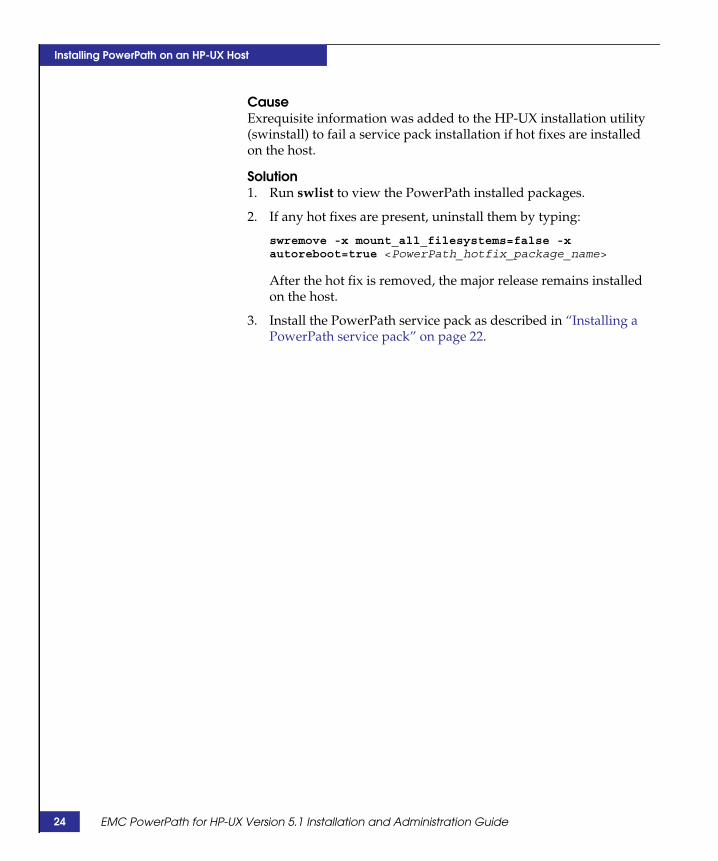
CauseExrequisite information was added to the HP-UX installation utility(swinstall) to fail a service pack installation if hot fixes are installedon the host.
Solution1. Run swlist to view the PowerPath installed packages.
2. If any hot fixes are present, uninstall them by typing:
swremove -x mount_all_filesystems=false -xautoreboot=true <PowerPath_hotfix_package_name>
After the hot fix is removed, the major release remains installedon the host.
3. Install the PowerPath service pack as described in “Installing aPowerPath service pack” on page 22.
EMC PowerPath for HP-UX Version 5.1 Installation and Administration Guide

Installing PowerPath on an HP-UX Host
After you installThis section describes:
❑ “Registering PowerPath on the host” on page 25 (first-timeinstallation only).
❑ “Verify the PowerPath Installation” on page 26
Registering PowerPath on the hostPowerPath 5.1 for HP-UX allows you to register PowerPath licensekeys during the installation process, as described in Step 4 of“Installing from the CD” on page 16 and Step 4 of “Installing fromthe tar file” on page 18. If you installed PowerPath for the first time,but did not register the software during the installation process,follow this procedure to register PowerPath.
To register the PowerPath software:
1. Log in as root.
2. Type emcpreg -install.
Output similar to the following appears:
=========== EMC PowerPath Registration ===========Do you have a new registration key or keys to enter? [n]
3. Type y and press Enter.
Output similar to the following appears:
Enter the registration key(s) for your product(s),one per line, pressing Enter after each key.After typing all keys, press Enter again.
Key (Enter if done):
4. Type the PowerPath registration key, and press Enter.
If you enter a valid registration key, output similar to thefollowing appears:
1 key(s) successfully added.Key successfully installed.Key (Enter if done):
After you install 25
26
Installing PowerPath on an HP-UX Host
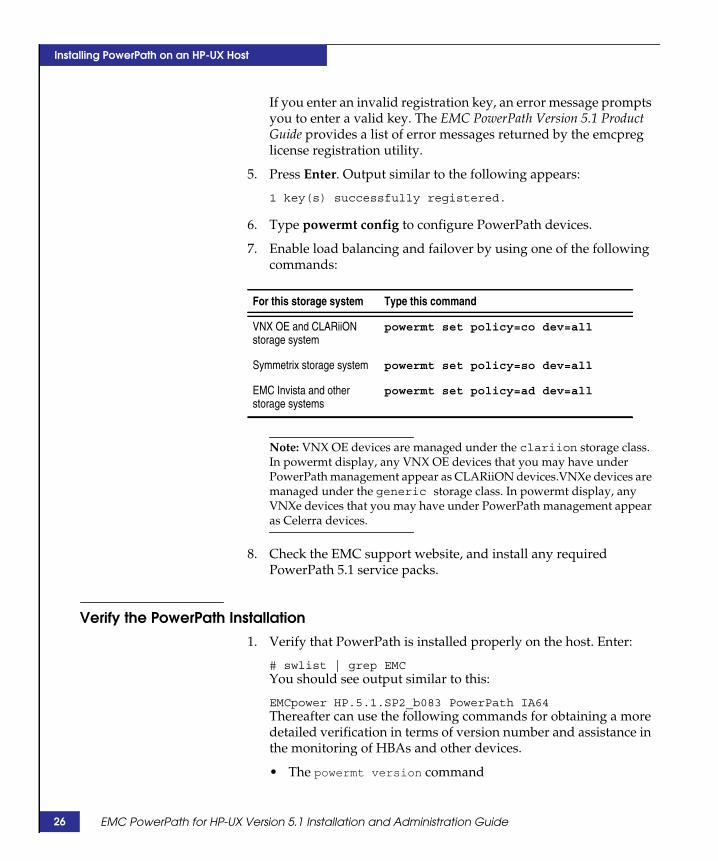
If you enter an invalid registration key, an error message promptsyou to enter a valid key. The EMC PowerPath Version 5.1 ProductGuide provides a list of error messages returned by the emcpreglicense registration utility.
5. Press Enter. Output similar to the following appears:
1 key(s) successfully registered.
6. Type powermt config to configure PowerPath devices.
7. Enable load balancing and failover by using one of the followingcommands:
Note: VNX OE devices are managed under the clariion storage class.In powermt display, any VNX OE devices that you may have underPowerPath management appear as CLARiiON devices.VNXe devices aremanaged under the generic storage class. In powermt display, anyVNXe devices that you may have under PowerPath management appearas Celerra devices.
8. Check the EMC support website, and install any requiredPowerPath 5.1 service packs.
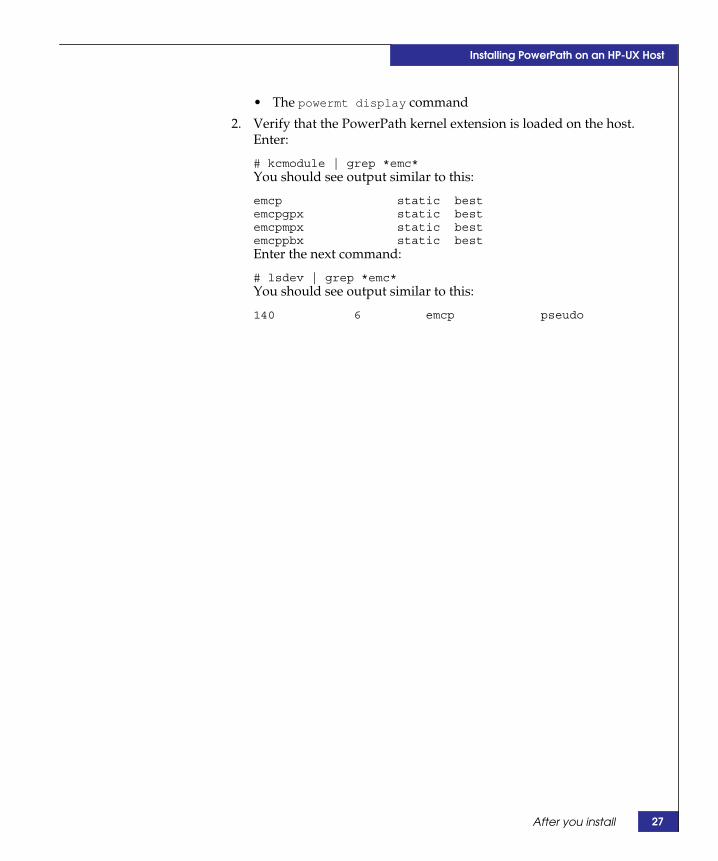
Verify the PowerPath Installation1. Verify that PowerPath is installed properly on the host. Enter:
# swlist | grep EMCYou should see output similar to this:
EMCpower HP.5.1.SP2_b083 PowerPath IA64Thereafter can use the following commands for obtaining a moredetailed verification in terms of version number and assistance inthe monitoring of HBAs and other devices.
• The powermt version command
For this storage system Type this command
VNX OE and CLARiiONstorage system
powermt set policy=co dev=all
Symmetrix storage system powermt set policy=so dev=all
EMC Invista and otherstorage systems
powermt set policy=ad dev=all
EMC PowerPath for HP-UX Version 5.1 Installation and Administration Guide
Installing PowerPath on an HP-UX Host
• The powermt display command
2. Verify that the PowerPath kernel extension is loaded on the host.Enter:
# kcmodule | grep *emc*You should see output similar to this:
emcp static bestemcpgpx static bestemcpmpx static bestemcppbx static bestEnter the next command:
# lsdev | grep *emc*You should see output similar to this:
140 6 emcp pseudo
After you install 27
28
Installing PowerPath on an HP-UX Host
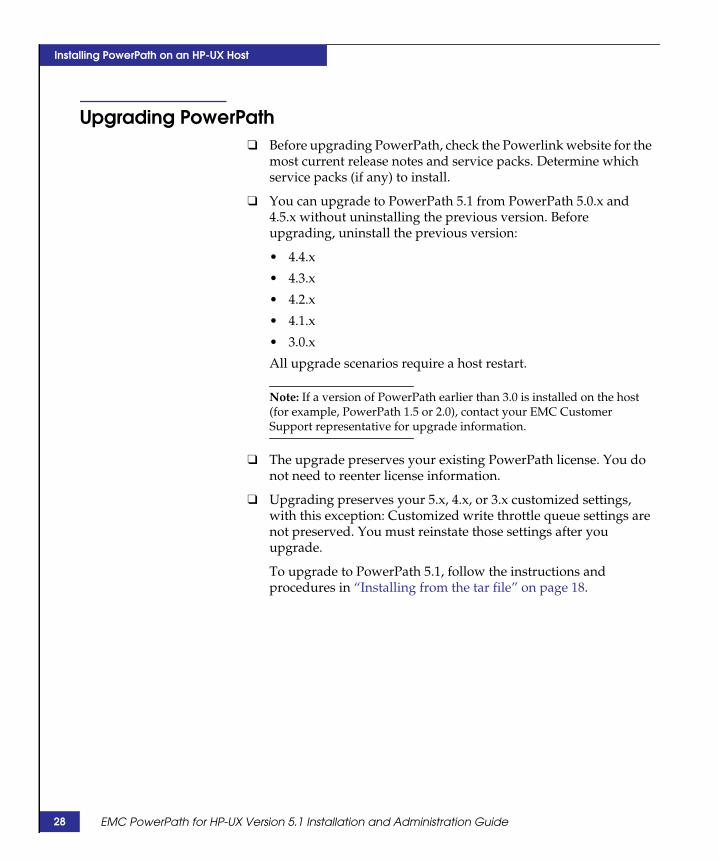
Upgrading PowerPath❑ Before upgrading PowerPath, check the Powerlink website for the
most current release notes and service packs. Determine whichservice packs (if any) to install.
❑ You can upgrade to PowerPath 5.1 from PowerPath 5.0.x and4.5.x without uninstalling the previous version. Beforeupgrading, uninstall the previous version:
• 4.4.x
• 4.3.x
• 4.2.x
• 4.1.x
• 3.0.x
All upgrade scenarios require a host restart.
Note: If a version of PowerPath earlier than 3.0 is installed on the host(for example, PowerPath 1.5 or 2.0), contact your EMC CustomerSupport representative for upgrade information.
❑ The upgrade preserves your existing PowerPath license. You donot need to reenter license information.
❑ Upgrading preserves your 5.x, 4.x, or 3.x customized settings,with this exception: Customized write throttle queue settings arenot preserved. You must reinstate those settings after youupgrade.
To upgrade to PowerPath 5.1, follow the instructions andprocedures in “Installing from the tar file” on page 18.
EMC PowerPath for HP-UX Version 5.1 Installation and Administration Guide
Installing PowerPath on an HP-UX Host
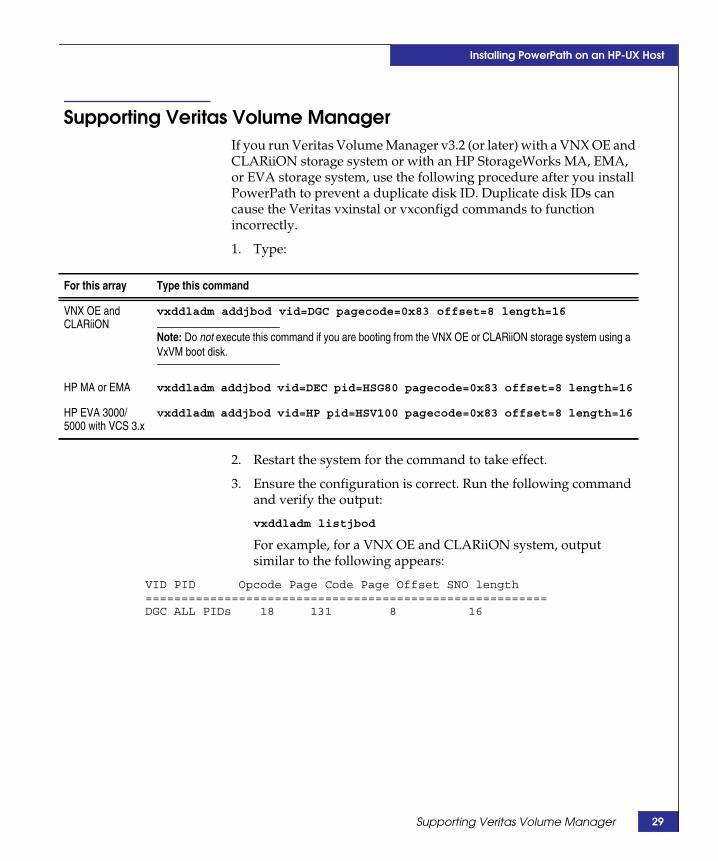
Supporting Veritas Volume ManagerIf you run Veritas Volume Manager v3.2 (or later) with a VNX OE andCLARiiON storage system or with an HP StorageWorks MA, EMA,or EVA storage system, use the following procedure after you installPowerPath to prevent a duplicate disk ID. Duplicate disk IDs cancause the Veritas vxinstal or vxconfigd commands to functionincorrectly.
1. Type:
2. Restart the system for the command to take effect.
3. Ensure the configuration is correct. Run the following commandand verify the output:
vxddladm listjbod
For example, for a VNX OE and CLARiiON system, outputsimilar to the following appears:
VID PID Opcode Page Code Page Offset SNO length========================================================DGC ALL PIDs 18 131 8 16
For this array Type this command
VNX OE andCLARiiON
vxddladm addjbod vid=DGC pagecode=0x83 offset=8 length=16
Note: Do not execute this command if you are booting from the VNX OE or CLARiiON storage system using aVxVM boot disk.
HP MA or EMA vxddladm addjbod vid=DEC pid=HSG80 pagecode=0x83 offset=8 length=16
HP EVA 3000/5000 with VCS 3.x
vxddladm addjbod vid=HP pid=HSV100 pagecode=0x83 offset=8 length=16
Supporting Veritas Volume Manager 29

30
Installing PowerPath on an HP-UX Host
If you subsequently remove PowerPath from the host, return VeritasDMP to its default state for VNX OE and CLARiiON or HPStorageWorks MA, EMA, or EVA devices as follows:
1. Type:
2. Restart the host.
For this array Type this command
VNX OE and CLARiiON vxddladm rmjbod vid=DGC
HP MA or EMA vxddladm rmjbod vid=DEC
HP EVA 3000 or 5000 arrayswith VCS 3.x firmware
vxddladm rmjbod vid=HP
EMC PowerPath for HP-UX Version 5.1 Installation and Administration Guide
Installing PowerPath on an HP-UX Host
PowerPath coexistence with HP-UX native multipathHP-UX native multi-path (nMP) is a new feature with HP-UX 11.31.When PowerPath is installed on a system running HP-UX 11.31,PowerPath is inserted in the IO stack above nMP. By default,PowerPath will assume management of all PowerPath supportedstorage classes and thus provide IO path selection on those devices.
To prevent PowerPath from managing a storage class or specificdevice and return control to HP-UX nMP, use the powermtunmanage command.
PowerPath coexistence with HP-UX native multipath 31
32
Installing PowerPath on an HP-UX Host
Coexistence with third-party path management software
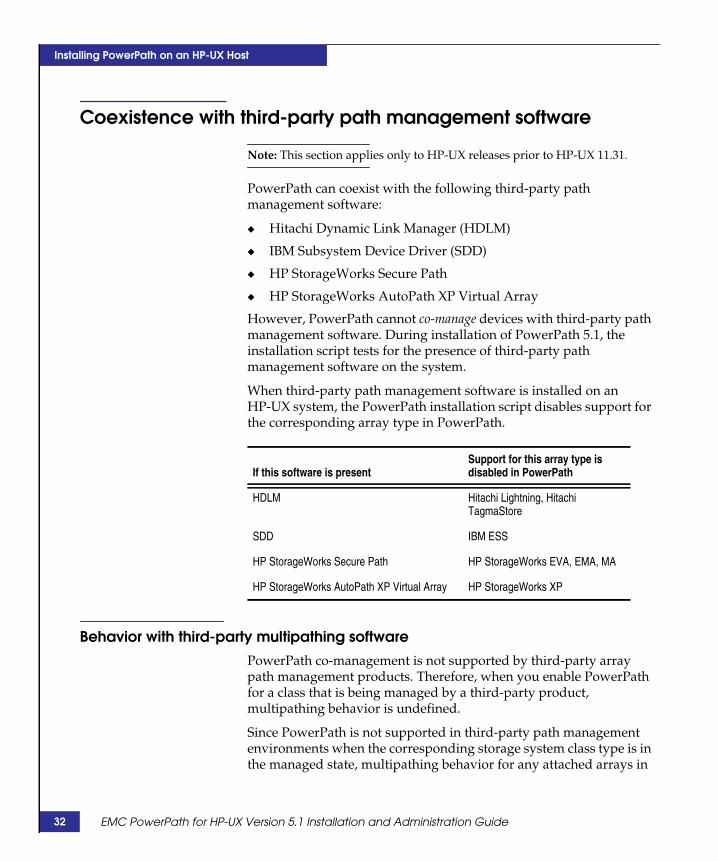
Note: This section applies only to HP-UX releases prior to HP-UX 11.31.
PowerPath can coexist with the following third-party pathmanagement software:
◆ Hitachi Dynamic Link Manager (HDLM)
◆ IBM Subsystem Device Driver (SDD)
◆ HP StorageWorks Secure Path
◆ HP StorageWorks AutoPath XP Virtual Array
However, PowerPath cannot co-manage devices with third-party pathmanagement software. During installation of PowerPath 5.1, theinstallation script tests for the presence of third-party pathmanagement software on the system.
When third-party path management software is installed on anHP-UX system, the PowerPath installation script disables support forthe corresponding array type in PowerPath.
Behavior with third-party multipathing softwarePowerPath co-management is not supported by third-party arraypath management products. Therefore, when you enable PowerPathfor a class that is being managed by a third-party product,multipathing behavior is undefined.
Since PowerPath is not supported in third-party path managementenvironments when the corresponding storage system class type is inthe managed state, multipathing behavior for any attached arrays in
If this software is presentSupport for this array type isdisabled in PowerPath
HDLM Hitachi Lightning, HitachiTagmaStore
SDD IBM ESS
HP StorageWorks Secure Path HP StorageWorks EVA, EMA, MA
HP StorageWorks AutoPath XP Virtual Array HP StorageWorks XP
EMC PowerPath for HP-UX Version 5.1 Installation and Administration Guide
Installing PowerPath on an HP-UX Host
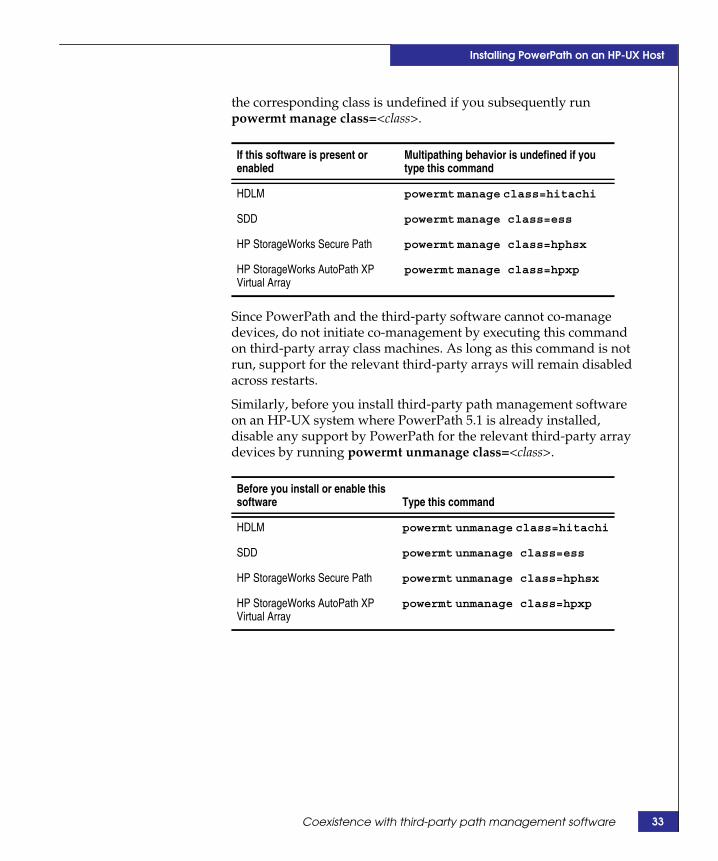
the corresponding class is undefined if you subsequently runpowermt manage class=<class>.
Since PowerPath and the third-party software cannot co-managedevices, do not initiate co-management by executing this commandon third-party array class machines. As long as this command is notrun, support for the relevant third-party arrays will remain disabledacross restarts.
Similarly, before you install third-party path management softwareon an HP-UX system where PowerPath 5.1 is already installed,disable any support by PowerPath for the relevant third-party arraydevices by running powermt unmanage class=<class>.
If this software is present orenabled
Multipathing behavior is undefined if youtype this command
HDLM powermt manage class=hitachi
SDD powermt manage class=ess
HP StorageWorks Secure Path powermt manage class=hphsx
HP StorageWorks AutoPath XPVirtual Array
powermt manage class=hpxp
Before you install or enable thissoftware Type this command
HDLM powermt unmanage class=hitachi
SDD powermt unmanage class=ess
HP StorageWorks Secure Path powermt unmanage class=hphsx
HP StorageWorks AutoPath XPVirtual Array
powermt unmanage class=hpxp
Coexistence with third-party path management software 33
34
Installing PowerPath on an HP-UX Host
EMC PowerPath for HP-UX Version 5.1 Installation and Administration Guide
2Invisible Body Tag
This chapter includes the following sections:
◆ Configuring a PowerPath device as the boot device .................... 36◆ Considerations for VNX OE and CLARiiON storage................... 37◆ Configuring a PowerPath boot device with LVM......................... 38◆ Configuring a PowerPath boot device with VxVM ...................... 44
Configuring aPowerPath Boot Device
on HP-UX
Configuring a PowerPath Boot Device on HP-UX 35
36
Configuring a PowerPath Boot Device on HP-UX
Configuring a PowerPath device as the boot deviceOn some storage systems, you can use a PowerPath device as theboot device (device that contains the startup image). Consult thePowerPath release notes to find out if your storage system supportsPowerPath boot devices. Use of a PowerPath device as the bootdevice provides load balancing and path failover.
EMC PowerPath for HP-UX Version 5.1 Installation and Administration Guide
Configuring a PowerPath Boot Device on HP-UX
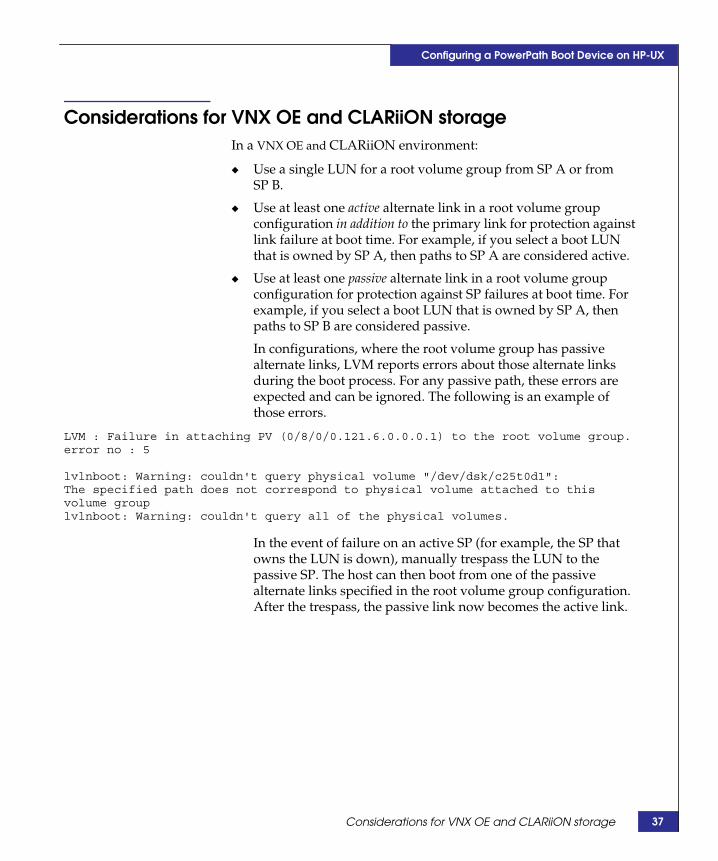
Considerations for VNX OE and CLARiiON storageIn a VNX OE and CLARiiON environment:
◆ Use a single LUN for a root volume group from SP A or fromSP B.
◆ Use at least one active alternate link in a root volume groupconfiguration in addition to the primary link for protection againstlink failure at boot time. For example, if you select a boot LUNthat is owned by SP A, then paths to SP A are considered active.
◆ Use at least one passive alternate link in a root volume groupconfiguration for protection against SP failures at boot time. Forexample, if you select a boot LUN that is owned by SP A, thenpaths to SP B are considered passive.
In configurations, where the root volume group has passivealternate links, LVM reports errors about those alternate linksduring the boot process. For any passive path, these errors areexpected and can be ignored. The following is an example ofthose errors.
LVM : Failure in attaching PV (0/8/0/0.121.6.0.0.0.1) to the root volume group.error no : 5
lvlnboot: Warning: couldn't query physical volume "/dev/dsk/c25t0d1":The specified path does not correspond to physical volume attached to thisvolume grouplvlnboot: Warning: couldn't query all of the physical volumes.
In the event of failure on an active SP (for example, the SP thatowns the LUN is down), manually trespass the LUN to thepassive SP. The host can then boot from one of the passivealternate links specified in the root volume group configuration.After the trespass, the passive link now becomes the active link.
Considerations for VNX OE and CLARiiON storage 37
38
Configuring a PowerPath Boot Device on HP-UX
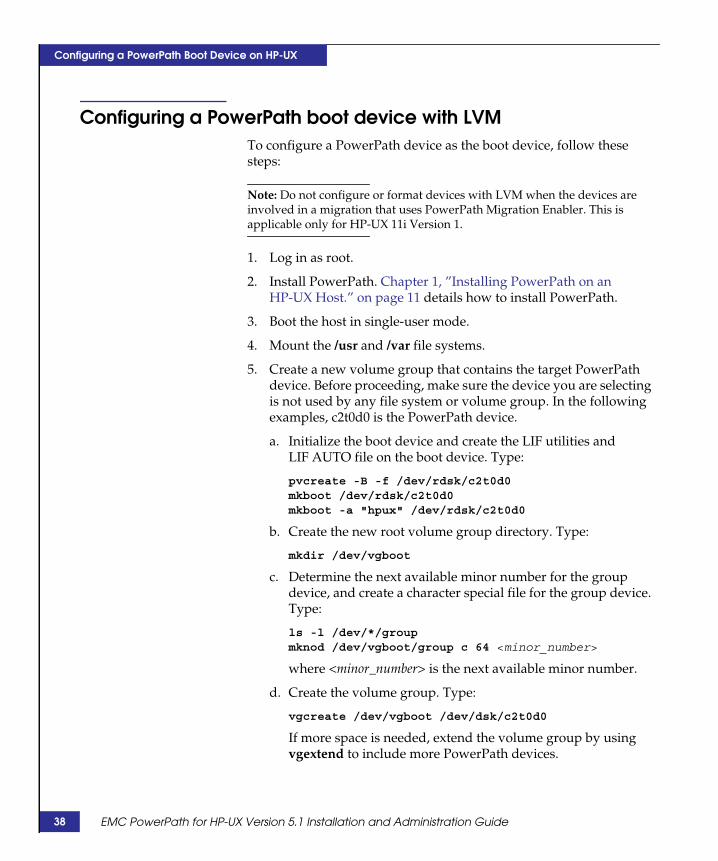
Configuring a PowerPath boot device with LVMTo configure a PowerPath device as the boot device, follow thesesteps:
Note: Do not configure or format devices with LVM when the devices areinvolved in a migration that uses PowerPath Migration Enabler. This isapplicable only for HP-UX 11i Version 1.
1. Log in as root.
2. Install PowerPath. Chapter 1, ”Installing PowerPath on anHP-UX Host.” on page 11 details how to install PowerPath.
3. Boot the host in single-user mode.
4. Mount the /usr and /var file systems.
5. Create a new volume group that contains the target PowerPathdevice. Before proceeding, make sure the device you are selectingis not used by any file system or volume group. In the followingexamples, c2t0d0 is the PowerPath device.
a. Initialize the boot device and create the LIF utilities andLIF AUTO file on the boot device. Type:
pvcreate -B -f /dev/rdsk/c2t0d0mkboot /dev/rdsk/c2t0d0mkboot -a "hpux" /dev/rdsk/c2t0d0
b. Create the new root volume group directory. Type:
mkdir /dev/vgboot
c. Determine the next available minor number for the groupdevice, and create a character special file for the group device.Type:
ls -l /dev/*/groupmknod /dev/vgboot/group c 64 <minor_number>
where <minor_number> is the next available minor number.
d. Create the volume group. Type:
vgcreate /dev/vgboot /dev/dsk/c2t0d0
If more space is needed, extend the volume group by usingvgextend to include more PowerPath devices.
EMC PowerPath for HP-UX Version 5.1 Installation and Administration Guide
Configuring a PowerPath Boot Device on HP-UX
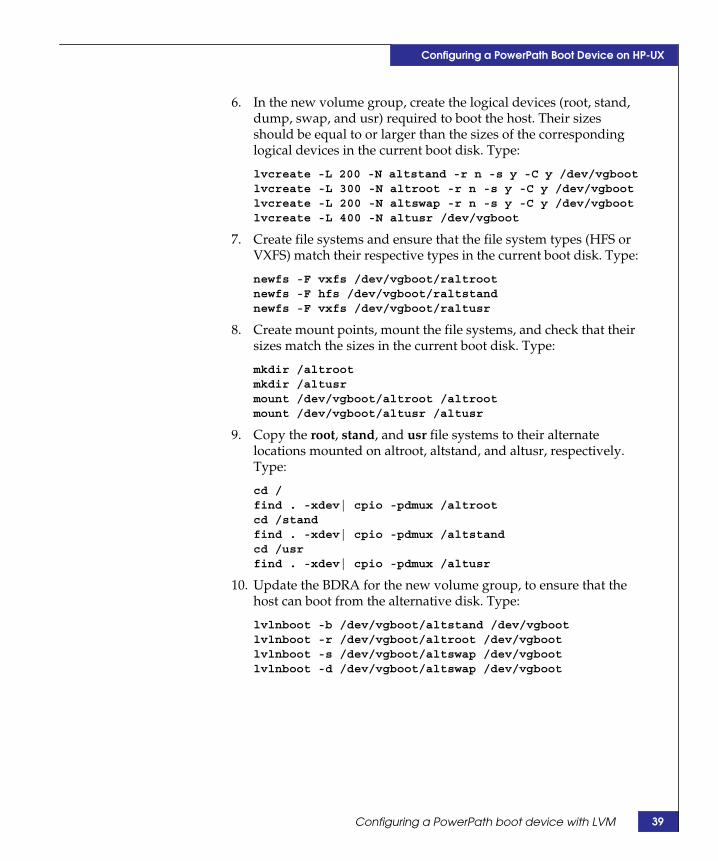
6. In the new volume group, create the logical devices (root, stand,dump, swap, and usr) required to boot the host. Their sizesshould be equal to or larger than the sizes of the correspondinglogical devices in the current boot disk. Type:
lvcreate -L 200 -N altstand -r n -s y -C y /dev/vgbootlvcreate -L 300 -N altroot -r n -s y -C y /dev/vgbootlvcreate -L 200 -N altswap -r n -s y -C y /dev/vgbootlvcreate -L 400 -N altusr /dev/vgboot
7. Create file systems and ensure that the file system types (HFS orVXFS) match their respective types in the current boot disk. Type:
newfs -F vxfs /dev/vgboot/raltrootnewfs -F hfs /dev/vgboot/raltstandnewfs -F vxfs /dev/vgboot/raltusr
8. Create mount points, mount the file systems, and check that theirsizes match the sizes in the current boot disk. Type:
mkdir /altrootmkdir /altusrmount /dev/vgboot/altroot /altrootmount /dev/vgboot/altusr /altusr
9. Copy the root, stand, and usr file systems to their alternatelocations mounted on altroot, altstand, and altusr, respectively.Type:
cd /find . -xdev| cpio -pdmux /altrootcd /standfind . -xdev| cpio -pdmux /altstandcd /usrfind . -xdev| cpio -pdmux /altusr
10. Update the BDRA for the new volume group, to ensure that thehost can boot from the alternative disk. Type:
lvlnboot -b /dev/vgboot/altstand /dev/vgbootlvlnboot -r /dev/vgboot/altroot /dev/vgbootlvlnboot -s /dev/vgboot/altswap /dev/vgbootlvlnboot -d /dev/vgboot/altswap /dev/vgboot
Configuring a PowerPath boot device with LVM 39
40
Configuring a PowerPath Boot Device on HP-UX
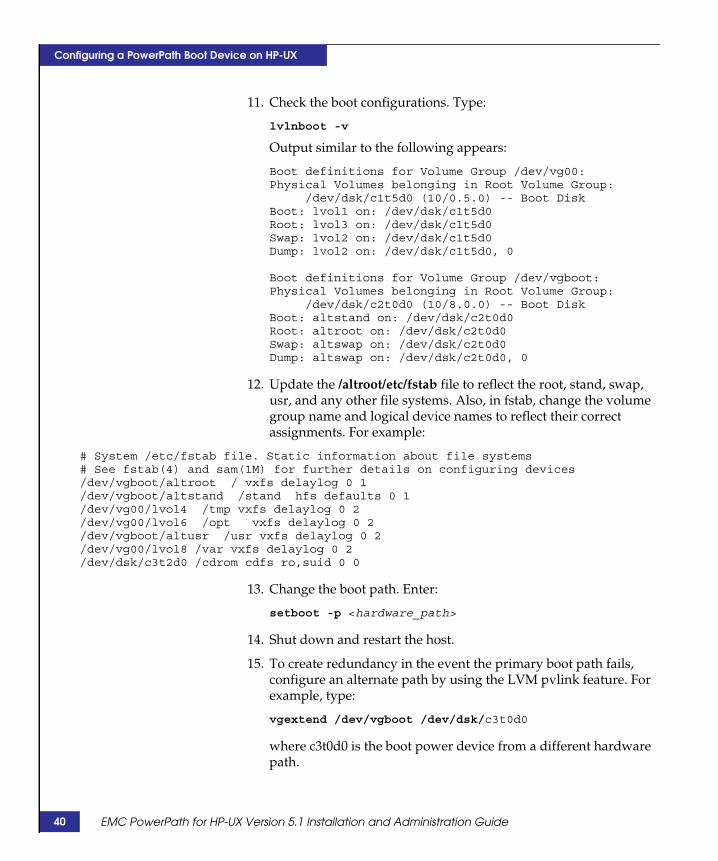
11. Check the boot configurations. Type:
lvlnboot -v
Output similar to the following appears:
Boot definitions for Volume Group /dev/vg00:Physical Volumes belonging in Root Volume Group:
/dev/dsk/c1t5d0 (10/0.5.0) -- Boot DiskBoot: lvol1 on: /dev/dsk/c1t5d0Root: lvol3 on: /dev/dsk/c1t5d0Swap: lvol2 on: /dev/dsk/c1t5d0Dump: lvol2 on: /dev/dsk/c1t5d0, 0
Boot definitions for Volume Group /dev/vgboot:Physical Volumes belonging in Root Volume Group:
/dev/dsk/c2t0d0 (10/8.0.0) -- Boot DiskBoot: altstand on: /dev/dsk/c2t0d0Root: altroot on: /dev/dsk/c2t0d0Swap: altswap on: /dev/dsk/c2t0d0Dump: altswap on: /dev/dsk/c2t0d0, 0
12. Update the /altroot/etc/fstab file to reflect the root, stand, swap,usr, and any other file systems. Also, in fstab, change the volumegroup name and logical device names to reflect their correctassignments. For example:
# System /etc/fstab file. Static information about file systems# See fstab(4) and sam(1M) for further details on configuring devices/dev/vgboot/altroot / vxfs delaylog 0 1/dev/vgboot/altstand /stand hfs defaults 0 1/dev/vg00/lvol4 /tmp vxfs delaylog 0 2/dev/vg00/lvol6 /opt vxfs delaylog 0 2/dev/vgboot/altusr /usr vxfs delaylog 0 2/dev/vg00/lvol8 /var vxfs delaylog 0 2/dev/dsk/c3t2d0 /cdrom cdfs ro,suid 0 0
13. Change the boot path. Enter:
setboot -p <hardware_path>
14. Shut down and restart the host.
15. To create redundancy in the event the primary boot path fails,configure an alternate path by using the LVM pvlink feature. Forexample, type:
vgextend /dev/vgboot /dev/dsk/c3t0d0
where c3t0d0 is the boot power device from a different hardwarepath.
EMC PowerPath for HP-UX Version 5.1 Installation and Administration Guide
Configuring a PowerPath Boot Device on HP-UX
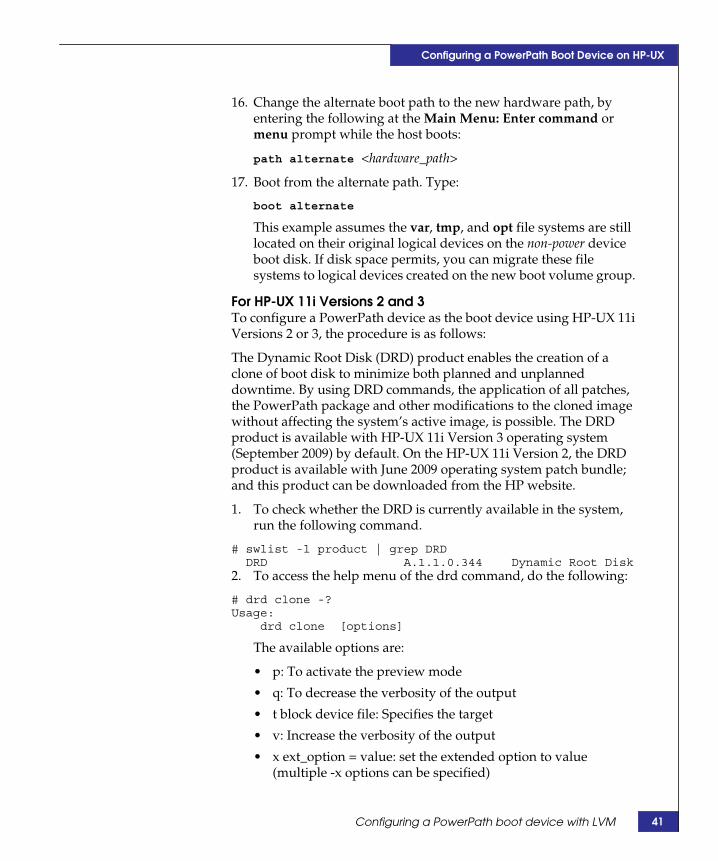
16. Change the alternate boot path to the new hardware path, byentering the following at the Main Menu: Enter command ormenu prompt while the host boots:
path alternate <hardware_path>
17. Boot from the alternate path. Type:
boot alternate
This example assumes the var, tmp, and opt file systems are stilllocated on their original logical devices on the non-power deviceboot disk. If disk space permits, you can migrate these filesystems to logical devices created on the new boot volume group.
For HP-UX 11i Versions 2 and 3To configure a PowerPath device as the boot device using HP-UX 11iVersions 2 or 3, the procedure is as follows:
The Dynamic Root Disk (DRD) product enables the creation of aclone of boot disk to minimize both planned and unplanneddowntime. By using DRD commands, the application of all patches,the PowerPath package and other modifications to the cloned imagewithout affecting the system’s active image, is possible. The DRDproduct is available with HP-UX 11i Version 3 operating system(September 2009) by default. On the HP-UX 11i Version 2, the DRDproduct is available with June 2009 operating system patch bundle;and this product can be downloaded from the HP website.
1. To check whether the DRD is currently available in the system,run the following command.
# swlist -l product | grep DRDDRD A.1.1.0.344 Dynamic Root Disk
2. To access the help menu of the drd command, do the following:
# drd clone -?Usage:
drd clone [options]
The available options are:
• p: To activate the preview mode
• q: To decrease the verbosity of the output
• t block device file: Specifies the target
• v: Increase the verbosity of the output
• x ext_option = value: set the extended option to value(multiple -x options can be specified)
Configuring a PowerPath boot device with LVM 41
42
Configuring a PowerPath Boot Device on HP-UX
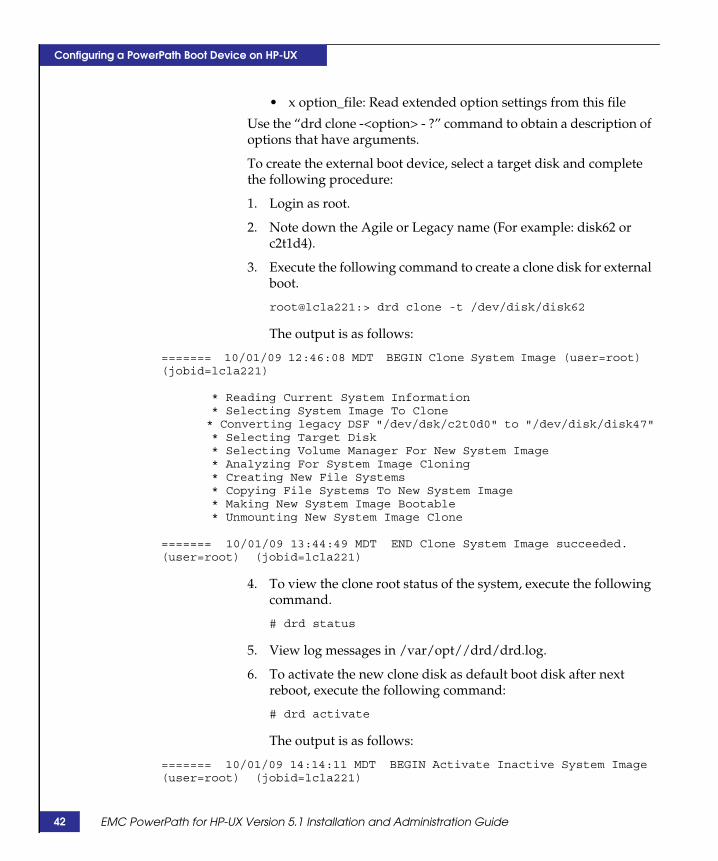
• x option_file: Read extended option settings from this file
Use the “drd clone -<option> - ?” command to obtain a description ofoptions that have arguments.
To create the external boot device, select a target disk and completethe following procedure:
1. Login as root.
2. Note down the Agile or Legacy name (For example: disk62 orc2t1d4).
3. Execute the following command to create a clone disk for externalboot.
root@lcla221:> drd clone -t /dev/disk/disk62
The output is as follows:
======= 10/01/09 12:46:08 MDT BEGIN Clone System Image (user=root)(jobid=lcla221)
* Reading Current System Information* Selecting System Image To Clone* Converting legacy DSF "/dev/dsk/c2t0d0" to "/dev/disk/disk47"* Selecting Target Disk* Selecting Volume Manager For New System Image* Analyzing For System Image Cloning* Creating New File Systems* Copying File Systems To New System Image* Making New System Image Bootable* Unmounting New System Image Clone
======= 10/01/09 13:44:49 MDT END Clone System Image succeeded.(user=root) (jobid=lcla221)
4. To view the clone root status of the system, execute the followingcommand.
# drd status
5. View log messages in /var/opt//drd/drd.log.
6. To activate the new clone disk as default boot disk after nextreboot, execute the following command:
# drd activate
The output is as follows:
======= 10/01/09 14:14:11 MDT BEGIN Activate Inactive System Image(user=root) (jobid=lcla221)
EMC PowerPath for HP-UX Version 5.1 Installation and Administration Guide
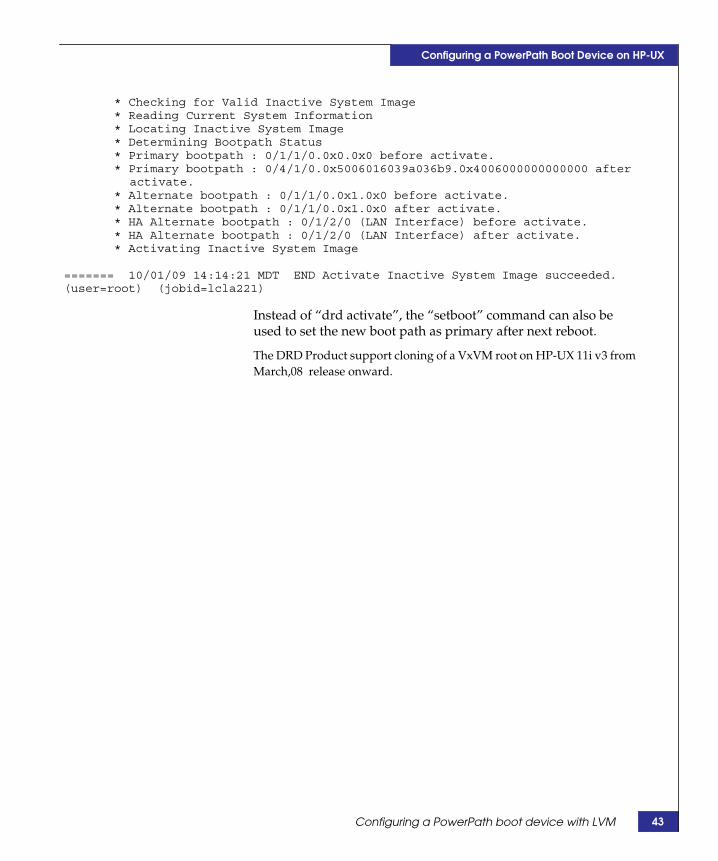
Configuring a PowerPath Boot Device on HP-UX
* Checking for Valid Inactive System Image* Reading Current System Information* Locating Inactive System Image* Determining Bootpath Status* Primary bootpath : 0/1/1/0.0x0.0x0 before activate.* Primary bootpath : 0/4/1/0.0x5006016039a036b9.0x4006000000000000 after
activate.* Alternate bootpath : 0/1/1/0.0x1.0x0 before activate.* Alternate bootpath : 0/1/1/0.0x1.0x0 after activate.* HA Alternate bootpath : 0/1/2/0 (LAN Interface) before activate.* HA Alternate bootpath : 0/1/2/0 (LAN Interface) after activate.* Activating Inactive System Image
======= 10/01/09 14:14:21 MDT END Activate Inactive System Image succeeded.(user=root) (jobid=lcla221)
Instead of “drd activate”, the “setboot” command can also beused to set the new boot path as primary after next reboot.
The DRD Product support cloning of a VxVM root on HP-UX 11i v3 fromMarch,08 release onward.
Configuring a PowerPath boot device with LVM 43
44
Configuring a PowerPath Boot Device on HP-UX
Configuring a PowerPath boot device with VxVMThe process described here assumes that the host is runningHP-UX 11i v1.0 (September 2002 or later) and Veritas VolumeManager (VxVM).To configure a PowerPath device as the boot device:
Note: Do not configure or format devices with VxVM while the devices areinvolved in a migration that uses PowerPath Migration Enabler. For thePowerPath 5.1 SP2 release, EMC recommends using VxVM 5.0 MP1 RP3.
1. Ensure that VxVM is configured.
2. Select a storage system device as the new VxVM rootable bootdisk. The device you choose must have a capacity approximatelyequal to that of the current LVM boot disk volume.
For example, select c10t0d0.3. If there is more than one path to the selected storage system
device, use the vxdiskadm command to select a path that isknown to VxVM.
For example, the storage system device has two paths, c10t0d0and c12t0d0, but only c10t0d0 is known to VxVM.
4. Type:
/etc/vx/bin/vxcp_lvmroot -v -b <device>
Where <device> is the storage system device you selected instep 2.
For example, type:
/etc/vx/bin/vxcp_lvmroot -v -b c10t0d0
This command incudes the storage system device c10t0d0 in therootdg, creates all the file systems on this device, and runs thesetboot command to set the boot path to this device.
Note: If the selected storage system device is slightly smaller than thelocal LVM disk, use the -R option in the vxcp_lvmroot command tocompress file systems that are not full. For example, if the selected deviceis 20% smaller than the local LVM disk, use the following command:/etc/vx/bin/vxcp_lvmroot -v -R 20 -b c10t0d0For more information, refer to the vxcp_lvmroot man page.
5. Restart the host.
EMC PowerPath for HP-UX Version 5.1 Installation and Administration Guide
3Invisible Body Tag
This chapter includes the following sections:
◆ PowerPath in an MC/ServiceGuard cluster .................................. 46◆ PowerPath in a Veritas Cluster Server cluster ............................... 51
PowerPath in a Cluster
PowerPath in a Cluster 45
46
PowerPath in a Cluster
PowerPath in an MC/ServiceGuard clusterThis section describes how to:
◆ Install PowerPath and MC/ServiceGuard in a new cluster, that is,where neither PowerPath nor MC/ServiceGuard software isinstalled on any host to be included in the cluster.
◆ Integrate PowerPath into an existing MC/ServiceGuard cluster.
◆ Integrate MC/ServiceGuard into a PowerPath environment.
Note: If you are running PowerPath on an HP-UX 11i v3.0 host, do not useany new command options designed for new-style device special files.PowerPath 5.1 does not support the new style of devices
Installing PowerPath in a new MC/ServiceGuard clusterTo install and configure PowerPath and MC/ServiceGuard whenneither PowerPath nor the MC/ServiceGuard software is installed:
1. On all hosts, prepare the cluster hardware. Make the necessarynetworking and disk connections among the hosts and thestorage system. Refer to the relevant HP documentation. InSymmetrix or VNX OE and CLARiiON environments, refer alsoto the support system websites:
• VNX OE Storage System Support website(www.emc.com/vnxsupport)
• CLARiiON Storage-System Support website(http://www.emc.com/clariionsupport).
2. Complete the following steps on one host:
a. Install PowerPath. Follow the instructions in “InstallingPowerPath” on page 15.
b. Run vgdisplay -v to identify the volume group to which eachPowerPath device belongs.
c. Run vgchange -a n <volume_group> to deactivate the volumegroup to share with the other hosts in the cluster.
d. Install the MC/ServiceGuard software by following theinstructions in the relevant HP documentation. ConfigureMC/ServiceGuard to use the shared volume group identifiedin step 2b.
EMC PowerPath for HP-UX Version 5.1 Installation and Administration Guide
PowerPath in a Cluster
e. Run vgexport -p -s -v -m <map_file volume_group> to exportthe volume group.
f. Use rcp or ftp to copy the map file to the other hosts in thecluster.
3. Complete the following steps on each remaining host in thecluster:
a. Install PowerPath. Follow the instructions in “InstallingPowerPath” on page 15. Do not create any volume groups;instead, you will import the shared volume group from thehost on which you installed PowerPath in step 2a.
b. Run vgimport -s -v -m <map_file volume_group> to import theshared volume group.
c. Run vgchange -a n <volume_group> to deactivate the sharedvolume group.
d. Install MC/ServiceGuard following the instructions in therelevant HP documentation. Configure MC/ServiceGuard touse the shared volume group identified in step 2b.
4. On all hosts in the cluster:
a. To prevent package volume groups from being activated atsystem boot time, set the AUTO_VG_ACTIVATE flag to 0 inthe /etc/lvmrc file.
b. Include all the volume groups that are not cluster-bound in thecustom_vg_activation function. Volume groups that will beused by packages should not be included anywhere in the file,since they will be activated and deactivated by packagecontrol scripts.
The root volume group does not need to be included incustom_vg_activation, since it is activated automaticallybefore /etc/lvmrc is used at boot time.
c. Start cluster services by using the cmrunnode command.Alternatively, enable automatic cluster startup by setting theAUTOSTART_CMCLD flag to 1 in the/etc/rc.config.d/cmcluster file. With automatic cluster startup,the host joins the cluster at boot time.
Note: Automatic cluster startup is the preferred way to start a cluster.
PowerPath in an MC/ServiceGuard cluster 47
48
PowerPath in a Cluster
Once cluster services are started, the shared volume group and itsunderlying PowerPath devices are under the control ofMC/ServiceGuard for failure monitoring and detection, and forautomated shutdown and failover of critical data services.
Integrating PowerPath into an MC/ServiceGuard clusterIntegrating PowerPath into an existing MC/ServiceGuard clusterrequires that you coordinate actions among hosts, so you do notdisrupt cluster services. On a host-by-host basis, you must shut downthe packages that are running on the host, start them on other hosts,halt the cluster services on the host, install PowerPath, and restartwith clustering enabled. Ideally, you should schedule this for a timewhen cluster activity is at a minimum.
To integrate PowerPath into an existing MC/ServiceGuard cluster, oneach host in the cluster, one host at a time:
1. Run cmhaltpkg <package_name> (or use SMH or SAM) to stopeach package running on the current host.
2. Run cmrunpkg -n <host_name package_name> (or use SMH orSAM) to start each package on an adoptive (takeover) host.
3. Run cmhaltnode (or use SMH or SAM) to stop the cluster serviceson the current host.
4. Install PowerPath. Follow the instructions in “InstallingPowerPath” on page 15.
5. Run cmrunnode to start cluster services on the current host.
Once cluster services are started, the shared volume group and itsunderlying PowerPath devices are under the control ofMC/ServiceGuard for failure monitoring and detection and forautomated shutdown and failover of critical data services.
EMC PowerPath for HP-UX Version 5.1 Installation and Administration Guide
PowerPath in a Cluster
Integrating MC/ServiceGuard in a PowerPath environmentWhen one or more of the hosts that will be part of the cluster havePowerPath installed, but none has MC/ServiceGuard installed,follow this procedure:
1. On all hosts, prepare the cluster hardware. Make the necessarynetworking and disk connections among the hosts and thestorage system. Refer to the relevant HP documentation. InSymmetrix or VNX OE and CLARiiON environments, refer alsoto the EMC Host Connectivity Guide for HP-UX or to the supportsystem websites:
• VNX OE Storage System Support website(www.emc.com/vnxsupport)
• CLARiiON Storage-System Support website(http://www.emc.com/clariionsupport).
2. On every host on which PowerPath is already installed:
a. Run vgdisplay -v to identify the volume group to which eachPowerPath device belongs.
b. Run vgchange -a n <volume_group> to deactivate the volumegroup you want to share with the other cluster hosts.
c. Install MC/ServiceGuard, following the instructions in therelevant HP documentation. Configure MC/ServiceGuard touse the shared volume group identified in step 2a.
d. Run vgexport -p -s -v -m <map_file volume_group> to exportthe volume group.
3. On a single host on which PowerPath is already installed:
Use rcp or ftp to copy the map file to the hosts in the cluster thatdo not have PowerPath installed.
4. On every host on which PowerPath is not installed:
a. Install PowerPath. Follow the instructions in “InstallingPowerPath” on page 15. Do not create any volume groups.Instead, you will import the shared volume group from a hoston which PowerPath is already installed.
b. Run vgimport -s -v -m <map_file volume_group> to import theshared volume group.
PowerPath in an MC/ServiceGuard cluster 49

50
PowerPath in a Cluster
c. Run vgchange -a n <volume_group> to deactivate the sharedvolume group.
d. Install MC/ServiceGuard, following the instructions in therelevant HP documentation. Configure MC/ServiceGuard touse the shared volume group identified in step 2a.
5. On all hosts in the cluster:
a. To prevent package volume groups from being activated atsystem boot time, set the AUTO_VG_ACTIVATE flag to 0 inthe /etc/lvmrc file.
b. Then include all volume groups that are not cluster-bound inthe custom_vg_activation function. Volume groups that willbe used by packages should not be included anywhere in thefile, since they will be activated and deactivated by packagecontrol scripts.
The root volume group does not need to be included incustom_vg_activation, since it is activated automaticallybefore /etc/lvmrc is used at boot time.
c. Start cluster services using the cmrunnode command.Alternatively, enable automatic cluster startup by setting theAUTOSTART_CMCLD flag to 1 in the/etc/rc.config.d/cmcluster file. With automatic clusterstartup, the host joins the cluster at boot time.
Note: Automatic cluster startup is the preferred way to start a cluster.
Once cluster services are started, the shared volume group and itsunderlying PowerPath devices are under the control ofMC/ServiceGuard for failure monitoring and detection and forautomated shutdown and failover of critical data services.
EMC PowerPath for HP-UX Version 5.1 Installation and Administration Guide
PowerPath in a Cluster
PowerPath in a Veritas Cluster Server clusterThis section describes how to:
◆ Install PowerPath and VCS in a new cluster, that is, where neitherPowerPath nor VCS software is installed on any host to beincluded in the cluster.
◆ Integrate PowerPath into an existing VCS cluster.
Installing PowerPath in a new VCS clusterTo install PowerPath and VCS when neither is installed on any host:
1. On each host to be included in the cluster:
a. Prepare the cluster hardware. Make the necessary networkingand disk connections among the hosts and the storage system.Refer to the relevant VCS documentation. In Symmetrix orVNX OE and CLARiiON environments, refer also to the EMCHost Connectivity Guide for HP-UX or the storage systemwebsites:
– VNX OE Storage System Support website(www.emc.com/vnxsupport)
– CLARiiON Storage-System Support website(http://www.emc.com/clariionsupport).
b. Use the HP ioscan -fnC disk or EMC inq utility to verify thatall storage system devices are seen by each host.
c. Install PowerPath. Follow the instructions in “InstallingPowerPath” on page 15. Verify that PowerPath can see all thedevices.
d. Install any applications.
e. Install the VCS software. Follow the installation proceduredescribed in the relevant Veritas Cluster Serverdocumentation. Initially configure VCS to run without aservice group. Start cluster services on all hosts.
2. On each node in the cluster, define the resources (for example,VxVM volumes) that make up the service group. (You willconfigure the service group in step 3.)
PowerPath in a Veritas Cluster Server cluster 51
52
PowerPath in a Cluster
3. On one node in the cluster:
a. Configure the service group by adding the resources youdefined in step 2 to the /etc/VRTSvcs/conf/config/main.cf file.The disk or logical device resources should use native c#t#d#devices. In addition, if you use service group heartbeat disks,they too should use native c#t#d# devices.
Note: Using a disk for service group heartbeat instead of a network issubject to restrictions. Not all disks can be used. Consult the Veritasdocumentation.
b. Start cluster services on the host.
4. Start cluster services on each remaining node in the cluster. Thesehosts rebuild their local configuration files from the main.cf fileyou edited in step 3a.
5. On each node in the cluster:
a. Verify that the service group is up and running, and use eitherthe VCS GUI (hagui) or the hagrp -list command to verify thatthe service group can successfully fail over to all hosts in thecluster.
b. Add other service groups as needed.
Integrating PowerPath into a VCS clusterTo integrate PowerPath into an existing VCS cluster:
1. Type hastop -local -evacuate on each node in the cluster to stopcluster services on the node.
2. On each node in the cluster, install or upgrade PowerPath. Followthe instructions in “Installing PowerPath” on page 15.
3. Run hastart to start cluster services on the node where youchanged the main.cf file, and wait for the node to be fullyreintegrated into the cluster.
4. Run hastart to start the remaining nodes in the cluster, waiting foreach node to be fully integrated into the cluster before runninghastart on the next node.
EMC PowerPath for HP-UX Version 5.1 Installation and Administration Guide
4Invisible Body Tag
This chapter includes the following sections:
◆ Migrating from HP StorageWorks Secure Path............................. 54◆ Migrating From HP StorageWorks AutoPath XP Virtual Array 56◆ Migrating from IBM Subsystem Device Driver (SDD)................. 57
Migrating to PowerPath
Migrating to PowerPath 53
54
Migrating to PowerPath
Migrating from HP StorageWorks Secure PathThis section describes how to migrate to PowerPath from SecurePath.
Secure Pathoperation on HP-UX
Secure Path replaces all native cXtYdZ devices that belong to aparticular EVA or HSG80 LUN (there is one such native device foreach path) with one unique cPt0dZ device. The original nativedevices are not usable as long as Secure Path is installed. The pseudodevices can be initialized and added to Veritas disk groups. Volumescan be built on them.
Migrationprocedure
Note: This procedure applies only to migrating data that resides directly onraw Secure Path pseudo devices, or file systems that are built directly on rawSecure Path pseudo devices. If Veritas volumes are built by using Secure Pathpseudo devices and Secure Path is then uninstalled, the Veritas recoverymanager subsequently fails to detect the volumes on the underlying cXtYdZdevices. You must back up such volumes before you uninstall Secure Path andthen restore them to freshly built PowerPath-based volumes.
To migrate from Secure Path to PowerPath:
1. Stop I/O activity from the host to the Secure Path pseudo devices:
a. Unmount any layered file systems.
b. In /etc/fstab, comment out any file system entries that directlyuse Secure Path pseudo names.
2. Install PowerPath.
PowerPath detects an existing Secure Path installation and appearunmanaged on the HP hsx devices.
3. Uninstall Secure Path.
This forces a host restart.
EMC PowerPath for HP-UX Version 5.1 Installation and Administration Guide
Migrating to PowerPath
4. After the host boots, restore all devices that are managed by thehsx driver back to the native sdisk driver. To accomplish this forall EVA and HSG80 LUNs:
a. Identify any HSG or HSV devices currently owned by the hsxdriver, and transfer ownership of these devices to the sdiskdriver. Type the following commands:
ioscan -fn | grep HSG | grep hsx | awk '{print "ioscan -H ", $3, " -M sdisk"}' \> /tmp/fix_hsx.txt
ioscan -fn | grep HSV | grep hsx | awk '{print "ioscan -H ", $3, " -M sdisk"}' \>> /tmp/fix_hsx.txt
ksh < /tmp/fix_hsx.txtb. Rebuild cXtYdZ devices as needed for EVA or HSG LUNs.
Type the following commands:
ioscan -fnC diskinsf -eioscan -fnC disk
The last ioscan command should show one cXtYdZ device forevery logical path to every EVA or HSG LUN allocated to thehost.
5. Type the following command:
powermt manage class=hphsx
6. Verify that all paths to all StorageWorks LUNs are visible toPowerPath. Type the following command:
powermt display dev=all class=hphsx
7. If, for performance, LUNs were originally distributed preferredacross both EVA or HSG80 controllers, run the powermt restorecommand.
8. Edit /etc/fstab for those file systems that formerly used SecurePath pseudo devices directly (that is, with no volume manager):
a. Add the corresponding cXtYdZ device names.
b. Type mount -a.
Migrating from HP StorageWorks Secure Path 55
56
Migrating to PowerPath
Migrating From HP StorageWorks AutoPath XP Virtual ArrayThis section describes how to migrate to PowerPath from AutoPath.
AutoPath operationon HP-UX
Structurally, AutoPath is very similar to PowerPath on HP-UX: Itdoes not create pseudo-devices. AutoPath provides multipathing andload balancing whenever any one of the underlying native cXtYdZdevices is used for a LUN. There is one such device per path.
Veritas volumes can be built by using these native cXtYdZ devicenames. Such volumes remain accessible across removal of AutoPathand installation of PowerPath.
Migration is straightforward, since any device names originally usedunder AutoPath remain usable after PowerPath installation.
Migration procedure To migrate from AutoPath to PowerPath:
1. Install PowerPath. This forces a restart.
PowerPath detects an existing AutoPath installation and appearunmanaged on the HP XP devices.
2. Uninstall AutoPath. This forces a restart.
3. Ensure that PowerPath will henceforth handle multipathing forall HP XP devices:
a. Run vxdiskadm, select option 17, and suppress all but onepath to every HP XP device from the VxVM point of view.
b. Run the command powermt manage class=hpxp.
c. Verify that PowerPath can now see all paths to every HP XPLUN. Type the command:
powermt display dev=all class=hpxp.
EMC PowerPath for HP-UX Version 5.1 Installation and Administration Guide

Migrating to PowerPath
Migrating from IBM Subsystem Device Driver (SDD)This section describes how to migrate to PowerPath from SDD.
SDD operation onHP-UX
For each ESS LUN on HP-UX, there are typically several nativecXtYdZ devices in /dev/dsk and /dev/rdsk, that is, one nativedevice per path to the LUN. SDD adds one extra pseudo device,vdiskN, for each unique ESS LUN. Note that all these device entriesare usable for any given LUN:
◆ For I/O issued directly to the native cXtYdZ device, SDD doesnot multipath.
◆ For I/O issued to the vdiskN device, SDD does multipath over allavailable native paths to the LUN.
Veritas can recognize only the native cXtYdZ devices. SDD does notprovide any install-time utilities to make its pseudo devices visible toVeritas. Thus, an ESS LUN is typically configured within Veritas byusing one native cXtYdZ path. Since Veritas /DMP does support ESSarrays, DMP can provide multipathing for ESS LUNs.
Migrationprocedure
To migrate from SDD to PowerPath:
1. Stop I/O activity from the host to the sdd pseudo devices:
• Unmount any layered file systems.
• In /etc/fstab, comment out any file system entries that directlyuse the pseudo names.
2. Install PowerPath.
PowerPath detects an existing IBMsdd installation and appearunmanaged on the ESS devices.
3. Uninstall sdd, which may require a reboot.
4. Ensure that PowerPath will now handle multipathing:
a. Run vxdiskadm, select option 17, and suppress all but onepath to every ESS device from the VxVM point of view.
b. Run powermt manage class=ess.
c. Run powermt display dev=all class=ess to verify thatPowerPath can now see all paths to every ESS LUN.
Migrating from IBM Subsystem Device Driver (SDD) 57
58
Migrating to PowerPath
5. Edit /etc/fstab for those file systems that formerly used sddpseudo devices directly. Add the equivalent cXtYdZ devicenames, then mount -a.
EMC PowerPath for HP-UX Version 5.1 Installation and Administration Guide
5Invisible Body Tag
This chapter includes the following sections:
◆ Before removing PowerPath ............................................................ 60◆ Removing PowerPath........................................................................ 61
Removing PowerPathFrom an HP-UX Host
Removing PowerPath From an HP-UX Host 59
60
Removing PowerPath From an HP-UX Host
Before removing PowerPathBefore you remove PowerPath, check the Powerlink website for themost current information. EMC updates the PowerPath release notesperiodically and posts them on the Powerlink website.
IMPORTANT!Before PowerPath is uninstalled in a Symmetrix or VNX OE andCLARiiON environment, ensure that no devices are being used byLVM (Logical Volume Manager), or by any other application, andthat I/O to the device is not active. This requirement is alsodocumented in OPT 214468.
EMC PowerPath for HP-UX Version 5.1 Installation and Administration Guide
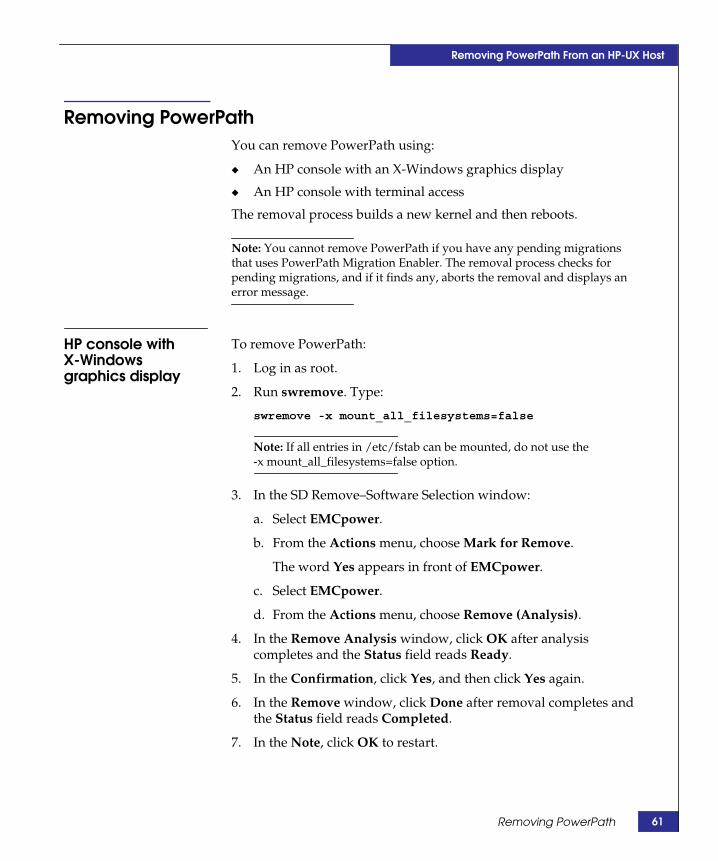
Removing PowerPath From an HP-UX Host
Removing PowerPathYou can remove PowerPath using:
◆ An HP console with an X-Windows graphics display
◆ An HP console with terminal access
The removal process builds a new kernel and then reboots.
Note: You cannot remove PowerPath if you have any pending migrationsthat uses PowerPath Migration Enabler. The removal process checks forpending migrations, and if it finds any, aborts the removal and displays anerror message.
HP console withX-Windowsgraphics display
To remove PowerPath:
1. Log in as root.
2. Run swremove. Type:
swremove -x mount_all_filesystems=false
Note: If all entries in /etc/fstab can be mounted, do not use the-x mount_all_filesystems=false option.
3. In the SD Remove–Software Selection window:
a. Select EMCpower.
b. From the Actions menu, choose Mark for Remove.
The word Yes appears in front of EMCpower.
c. Select EMCpower.
d. From the Actions menu, choose Remove (Analysis).
4. In the Remove Analysis window, click OK after analysiscompletes and the Status field reads Ready.
5. In the Confirmation, click Yes, and then click Yes again.
6. In the Remove window, click Done after removal completes andthe Status field reads Completed.
7. In the Note, click OK to restart.
Removing PowerPath 61

62
Removing PowerPath From an HP-UX Host
HP console withterminal access
To remove PowerPath:
1. Log in as root.
2. Run swremove. Type:
swremove -x mount_all_filesystems=false
Note: If all entries in /etc/fstab can be mounted, do not use the-x mount_all_filesystems=false option.
The screen displays an explanation of the menus and navigationaltools.
3. Select RETURN and press Enter.
4. At the SD Remove–Software Selection screen:
a. Use the down/up arrow key and the space bar to selectEMCpower.
b. Use the Tab key to select File.
c. Use the right arrow key to select Actions, and press Enter.
d. Use the down arrow key to select Mark for Remove, and pressEnter.
The word Yes appears in front of EMCpower.
e. Use the spacebar to select EMCpower.
f. Use the Tab key to select File.
g. Use the right arrow key to select Actions, and press Enter.
h. Use the down arrow key to highlight Remove (analysis), andpress Enter.
5. At the Remove Analysis screen, when analysis completes and thestatus is Ready, use the Tab key to select OK, and press Enter.
6. At the Confirmation screen, select Yes, and then select Yes again.
7. At the Remove window, select Done after removal completes andthe status is Ready.
8. At the Note window, select OK to restart the system.
EMC PowerPath for HP-UX Version 5.1 Installation and Administration Guide
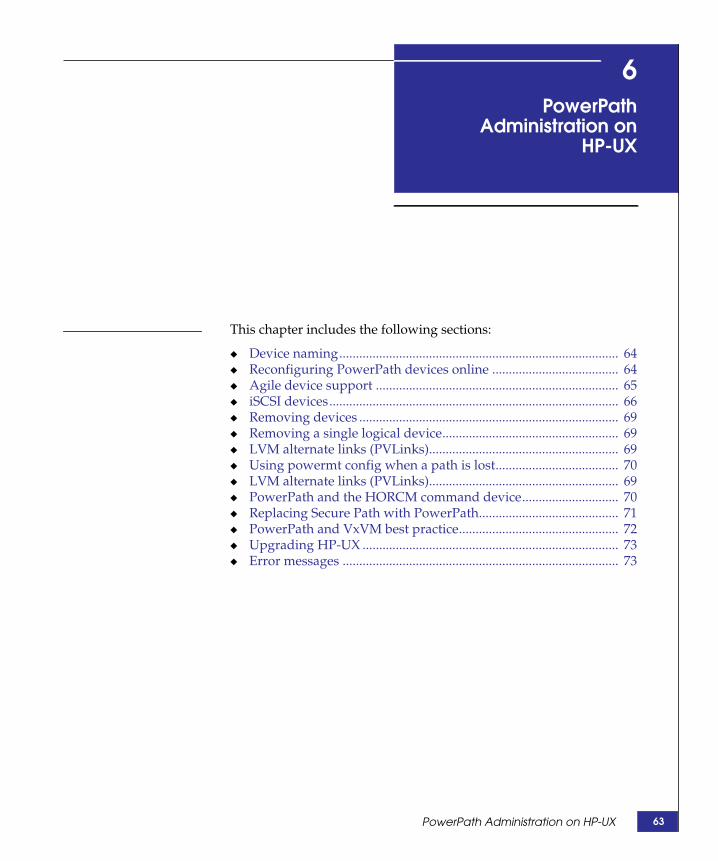
6
visible Body Tag
This chapter includes the following sections:
◆ Device naming.................................................................................... 64◆ Reconfiguring PowerPath devices online ...................................... 64◆ Agile device support ......................................................................... 65◆ iSCSI devices....................................................................................... 66◆ Removing devices .............................................................................. 69◆ Removing a single logical device..................................................... 69◆ LVM alternate links (PVLinks)......................................................... 69◆ Using powermt config when a path is lost..................................... 70◆ LVM alternate links (PVLinks)......................................................... 69◆ PowerPath and the HORCM command device............................. 70◆ Replacing Secure Path with PowerPath.......................................... 71◆ PowerPath and VxVM best practice................................................ 72◆ Upgrading HP-UX ............................................................................. 73◆ Error messages ................................................................................... 73
PowerPathAdministration on
HP-UX
PowerPath Administration on HP-UX 63
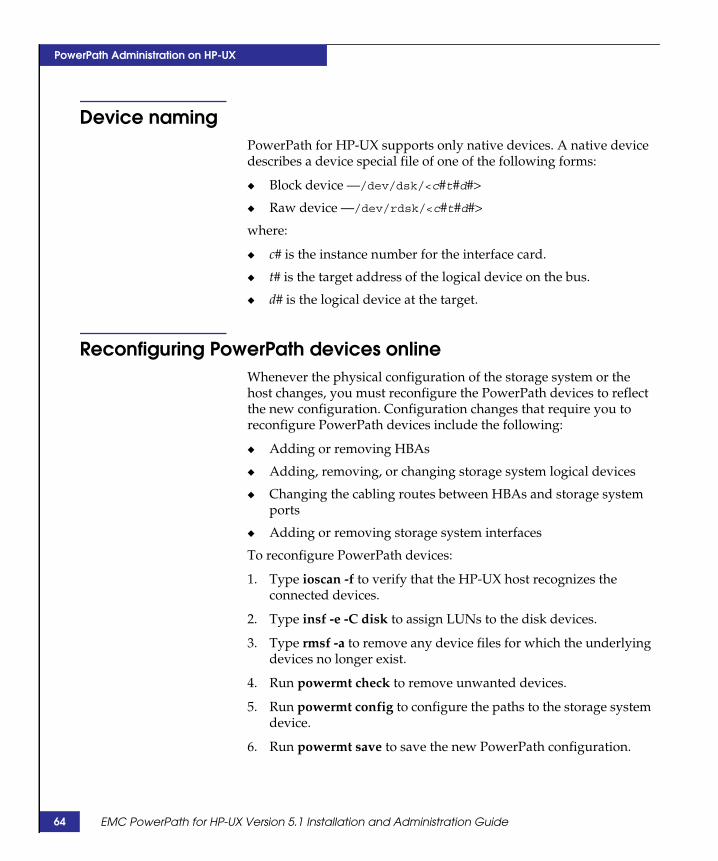
64
PowerPath Administration on HP-UX
Device namingPowerPath for HP-UX supports only native devices. A native devicedescribes a device special file of one of the following forms:
◆ Block device —/dev/dsk/<c#t#d#>
◆ Raw device —/dev/rdsk/<c#t#d#>
where:
◆ c# is the instance number for the interface card.
◆ t# is the target address of the logical device on the bus.
◆ d# is the logical device at the target.
Reconfiguring PowerPath devices onlineWhenever the physical configuration of the storage system or thehost changes, you must reconfigure the PowerPath devices to reflectthe new configuration. Configuration changes that require you toreconfigure PowerPath devices include the following:
◆ Adding or removing HBAs
◆ Adding, removing, or changing storage system logical devices
◆ Changing the cabling routes between HBAs and storage systemports
◆ Adding or removing storage system interfaces
To reconfigure PowerPath devices:
1. Type ioscan -f to verify that the HP-UX host recognizes theconnected devices.
2. Type insf -e -C disk to assign LUNs to the disk devices.
3. Type rmsf -a to remove any device files for which the underlyingdevices no longer exist.
4. Run powermt check to remove unwanted devices.
5. Run powermt config to configure the paths to the storage systemdevice.
6. Run powermt save to save the new PowerPath configuration.
EMC PowerPath for HP-UX Version 5.1 Installation and Administration Guide
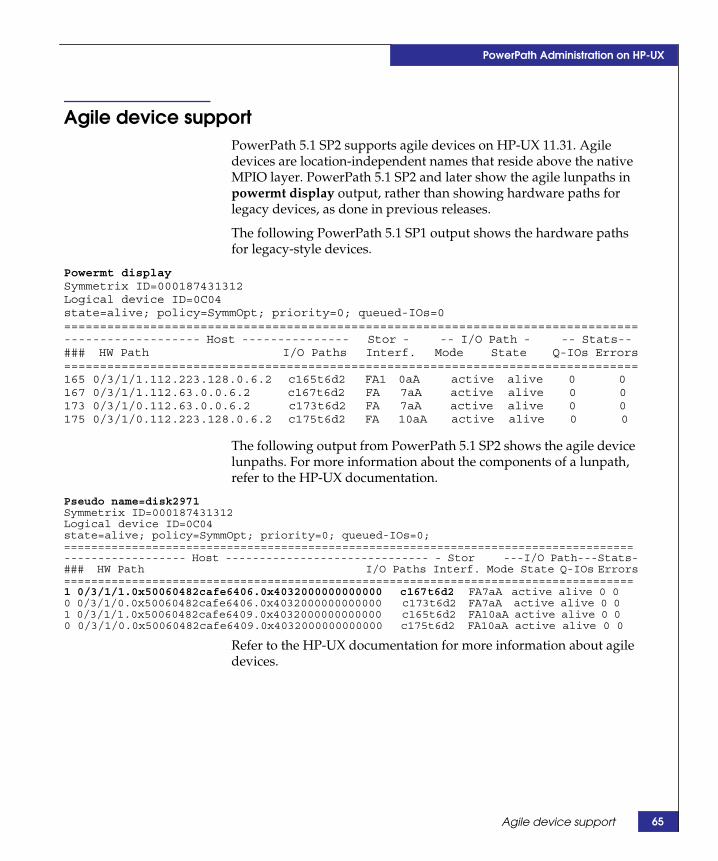
PowerPath Administration on HP-UX
Agile device supportPowerPath 5.1 SP2 supports agile devices on HP-UX 11.31. Agiledevices are location-independent names that reside above the nativeMPIO layer. PowerPath 5.1 SP2 and later show the agile lunpaths inpowermt display output, rather than showing hardware paths forlegacy devices, as done in previous releases.
The following PowerPath 5.1 SP1 output shows the hardware pathsfor legacy-style devices.
Powermt displaySymmetrix ID=000187431312Logical device ID=0C04state=alive; policy=SymmOpt; priority=0; queued-IOs=0================================================================================------------------- Host --------------- Stor - -- I/O Path - -- Stats--### HW Path I/O Paths Interf. Mode State Q-IOs Errors================================================================================165 0/3/1/1.112.223.128.0.6.2 c165t6d2 FA1 0aA active alive 0 0167 0/3/1/1.112.63.0.0.6.2 c167t6d2 FA 7aA active alive 0 0173 0/3/1/0.112.63.0.0.6.2 c173t6d2 FA 7aA active alive 0 0175 0/3/1/0.112.223.128.0.6.2 c175t6d2 FA 10aA active alive 0 0
The following output from PowerPath 5.1 SP2 shows the agile devicelunpaths. For more information about the components of a lunpath,refer to the HP-UX documentation.
Pseudo name=disk2971Symmetrix ID=000187431312Logical device ID=0C04state=alive; policy=SymmOpt; priority=0; queued-IOs=0;====================================================================================------------------ Host ------------------------------ - Stor ---I/O Path---Stats-### HW Path I/O Paths Interf. Mode State Q-IOs Errors====================================================================================1 0/3/1/1.0x50060482cafe6406.0x4032000000000000 c167t6d2 FA7aA active alive 0 00 0/3/1/0.0x50060482cafe6406.0x4032000000000000 c173t6d2 FA7aA active alive 0 01 0/3/1/1.0x50060482cafe6409.0x4032000000000000 c165t6d2 FA10aA active alive 0 00 0/3/1/0.0x50060482cafe6409.0x4032000000000000 c175t6d2 FA10aA active alive 0 0
Refer to the HP-UX documentation for more information about agiledevices.
Agile device support 65
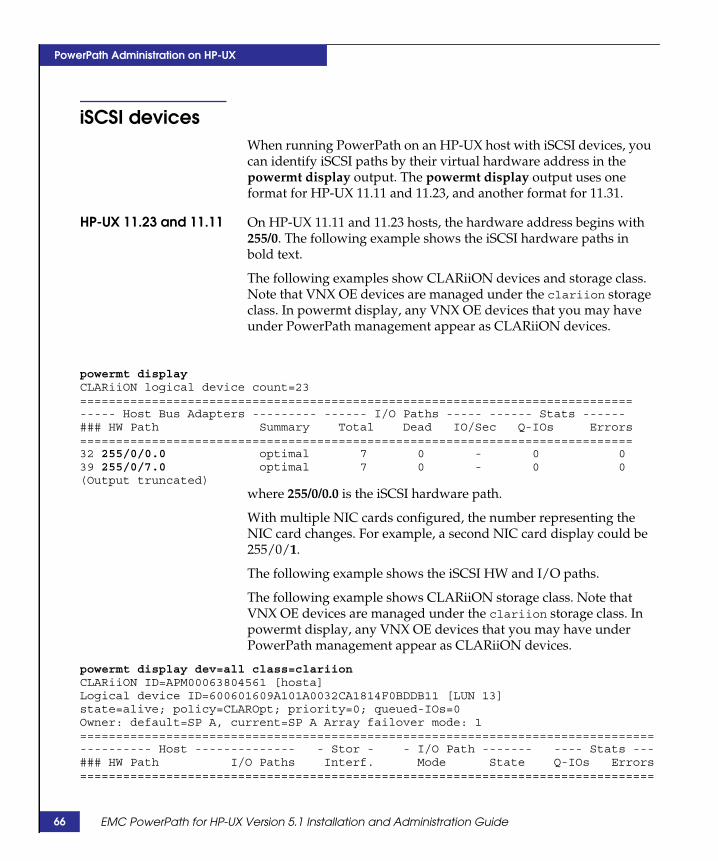
66
PowerPath Administration on HP-UX
iSCSI devicesWhen running PowerPath on an HP-UX host with iSCSI devices, youcan identify iSCSI paths by their virtual hardware address in thepowermt display output. The powermt display output uses oneformat for HP-UX 11.11 and 11.23, and another format for 11.31.
HP-UX 11.23 and 11.11 On HP-UX 11.11 and 11.23 hosts, the hardware address begins with255/0. The following example shows the iSCSI hardware paths inbold text.
The following examples show CLARiiON devices and storage class.Note that VNX OE devices are managed under the clariion storageclass. In powermt display, any VNX OE devices that you may haveunder PowerPath management appear as CLARiiON devices.
powermt displayCLARiiON logical device count=23=============================================================================----- Host Bus Adapters --------- ------ I/O Paths ----- ------ Stats ------### HW Path Summary Total Dead IO/Sec Q-IOs Errors=============================================================================32 255/0/0.0 optimal 7 0 - 0 039 255/0/7.0 optimal 7 0 - 0 0(Output truncated)
where 255/0/0.0 is the iSCSI hardware path.
With multiple NIC cards configured, the number representing theNIC card changes. For example, a second NIC card display could be255/0/1.
The following example shows the iSCSI HW and I/O paths.
The following example shows CLARiiON storage class. Note thatVNX OE devices are managed under the clariion storage class. Inpowermt display, any VNX OE devices that you may have underPowerPath management appear as CLARiiON devices.
powermt display dev=all class=clariionCLARiiON ID=APM00063804561 [hosta]Logical device ID=600601609A101A0032CA1814F0BDDB11 [LUN 13]state=alive; policy=CLAROpt; priority=0; queued-IOs=0Owner: default=SP A, current=SP A Array failover mode: 1================================================================================---------- Host -------------- - Stor - - I/O Path ------- ---- Stats ---### HW Path I/O Paths Interf. Mode State Q-IOs Errors================================================================================
EMC PowerPath for HP-UX Version 5.1 Installation and Administration Guide
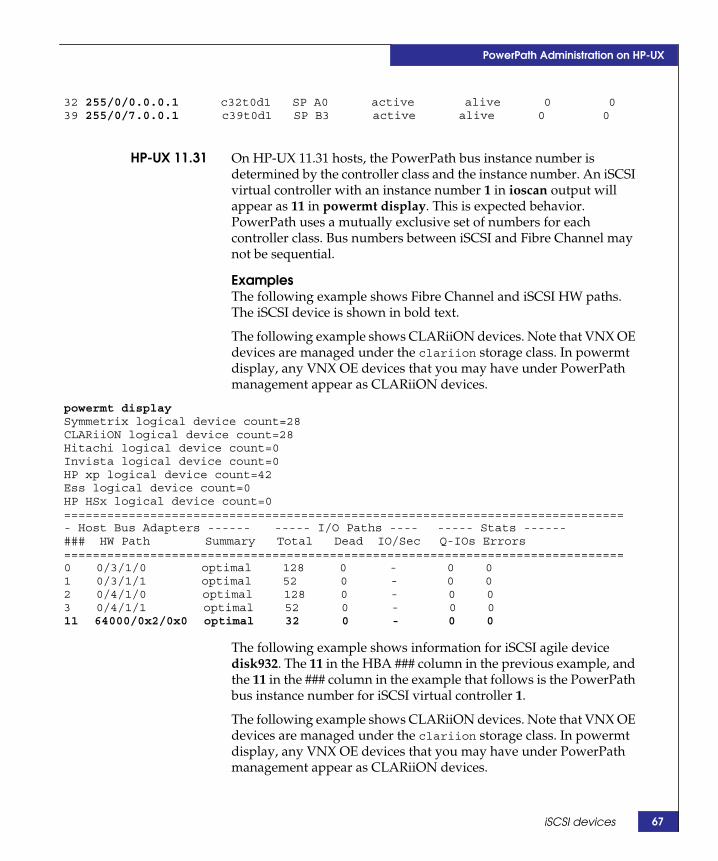
PowerPath Administration on HP-UX
32 255/0/0.0.0.1 c32t0d1 SP A0 active alive 0 039 255/0/7.0.0.1 c39t0d1 SP B3 active alive 0 0
HP-UX 11.31 On HP-UX 11.31 hosts, the PowerPath bus instance number isdetermined by the controller class and the instance number. An iSCSIvirtual controller with an instance number 1 in ioscan output willappear as 11 in powermt display. This is expected behavior.PowerPath uses a mutually exclusive set of numbers for eachcontroller class. Bus numbers between iSCSI and Fibre Channel maynot be sequential.
ExamplesThe following example shows Fibre Channel and iSCSI HW paths.The iSCSI device is shown in bold text.
The following example shows CLARiiON devices. Note that VNX OEdevices are managed under the clariion storage class. In powermtdisplay, any VNX OE devices that you may have under PowerPathmanagement appear as CLARiiON devices.
powermt displaySymmetrix logical device count=28CLARiiON logical device count=28Hitachi logical device count=0Invista logical device count=0HP xp logical device count=42Ess logical device count=0HP HSx logical device count=0==============================================================================- Host Bus Adapters ------ ----- I/O Paths ---- ----- Stats ------### HW Path Summary Total Dead IO/Sec Q-IOs Errors==============================================================================0 0/3/1/0 optimal 128 0 - 0 01 0/3/1/1 optimal 52 0 - 0 02 0/4/1/0 optimal 128 0 - 0 03 0/4/1/1 optimal 52 0 - 0 011 64000/0x2/0x0 optimal 32 0 - 0 0
The following example shows information for iSCSI agile devicedisk932. The 11 in the HBA ### column in the previous example, andthe 11 in the ### column in the example that follows is the PowerPathbus instance number for iSCSI virtual controller 1.
The following example shows CLARiiON devices. Note that VNX OEdevices are managed under the clariion storage class. In powermtdisplay, any VNX OE devices that you may have under PowerPathmanagement appear as CLARiiON devices.
iSCSI devices 67
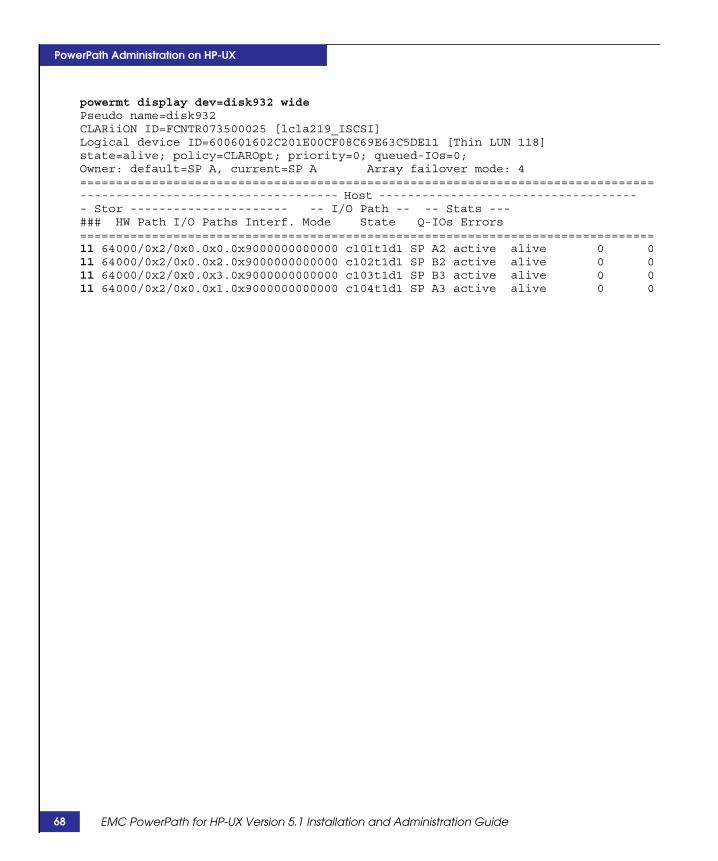
68
PowerPath Administration on HP-UX
powermt display dev=disk932 widePseudo name=disk932CLARiiON ID=FCNTR073500025 [lcla219_ISCSI]Logical device ID=600601602C201E00CF08C69E63C5DE11 [Thin LUN 118]state=alive; policy=CLAROpt; priority=0; queued-IOs=0;Owner: default=SP A, current=SP A Array failover mode: 4================================================================================------------------------------------ Host ------------------------------------- Stor ---------------------- -- I/O Path -- -- Stats ---### HW Path I/O Paths Interf. Mode State Q-IOs Errors================================================================================11 64000/0x2/0x0.0x0.0x9000000000000 c101t1d1 SP A2 active alive 0 011 64000/0x2/0x0.0x2.0x9000000000000 c102t1d1 SP B2 active alive 0 011 64000/0x2/0x0.0x3.0x9000000000000 c103t1d1 SP B3 active alive 0 011 64000/0x2/0x0.0x1.0x9000000000000 c104t1d1 SP A3 active alive 0 0
EMC PowerPath for HP-UX Version 5.1 Installation and Administration Guide
PowerPath Administration on HP-UX
Removing devicesRemoval of VNXOE and CLARiiON devices directly from the arrayStorage group causes all paths to other devices, from the samestorage group, to go dead momentarily. This is caused by notremoving the devices from the host correctly.
To remove devices:
1. Identify the devices to remove.
2. Note the hardware path.
3. Run powermt remove to remove the devices from PowerPathcontrol.
4. Take the devices from the storage group using Navisphere.
5. Run rmsf on the hardware path to completely remove from thesystem.
Removing a single logical deviceIf you manually disable or remove a single logical device from astorage group, and then return the same device to the storage group,PowerPath takes an unusually long time (up to 24 hours) to recognizeand restore the device.
Use powermt restore to restore the logical device immediately.
Note that autorestore of entire paths occurs in the normal time frame.
LVM alternate links (PVLinks)The HP-UX LVM can be configured to support multiple hardwarepaths to the same storage system logical device.
◆ HP-UX LVM supports up to eight paths (one primary and sevenalternate links) to the same logical device.
◆ PowerPath supports up to 32 paths to the same logical device.
EMC recommends the use of LVM alternate links (PVLinks) whenyou boot from a storage system. If the primary path fails, anautomatic switch to the alternate path occurs. If PowerPath is notinstalled, use of alternate links increases availability in the event ofhardware problems.
Removing devices 69

70
PowerPath Administration on HP-UX
PowerPath uses alternate links as part of its boot/root failoverstrategy, but not for load balancing, path prioritization, or for otherreasons associated with PowerPath. Thus, use LVM alternate linkswhen booting from a storage system. Otherwise, EMC recommendsthat you disable PVLinks when using PowerPath.
Considerations for VNXOE and CLARiiON storageIn a VNXOE and CLARiiON environment:
◆ An LVM volume group should use an active path as the primarypath to the storage device.
◆ One passive path should also be specified as an alternate link toprotect against SP failures at boot time.
Using powermt config when a path is lostIf a physical path is lost, run ioscan -fn before you runpowermt config. Otherwise, powermt config may take a very longtime.
PowerPath and the HORCM command deviceNote that for Hitachi Lightning and HP XP HORCM operations,PowerPath does not provide redundancy to the HORCM commanddevice, leaving a failure point for HORCM operations should thepath to the command device fail. To avoid this, place both paths tothe command device in the HORCM instance configuration fileunder the HORCM_CMD section on the host. The paths must be onthe same line. For example:
HORCM_CMD#Path 1 to command device #Path 2 to command device/dev/rdsk/c2t16d250s2 /dev/rdsk/c3t17d250s2
EMC PowerPath for HP-UX Version 5.1 Installation and Administration Guide
PowerPath Administration on HP-UX
Replacing Secure Path with PowerPathTo replace HP StorageWorks Secure Path with PowerPath:
1. Uninstall Secure Path.
Secure Path does not seem to uninstall properly: All devices arestill registered with the hsx driver installed by Secure Path, evenafter removal of the package.
2. Reregister the StorageWorks devices as sdisk devices:
a. Enter the following command:
ioscan -fn | grep {DEC | HSV} | grep hsx
For example:
ioscan -fn | grep HSV | grep hsx
disk 122 0/7/0/0.98.20.19.0.0.1 hsx UNCLAIMED DEVICE HP HSV100disk 154 0/7/0/0.98.20.19.0.0.4 hsx UNCLAIMED DEVICE HP HSV100
b. For each entry reported in step 2a, enter the followingcommand:
ioscan -H <hardware_path> -M sdisk
For example:
ioscan -H 0/7/0/0.98.20.19.0.0.1 -M sdiskioscan -H 0/7/0/0.98.20.19.0.0.4 -M sdisk
3. Install PowerPath as described in “Installing PowerPath” onpage 15.
4. Restart the host.
Replacing Secure Path with PowerPath 71
72
PowerPath Administration on HP-UX
PowerPath and VxVM best practiceOn HP-UX 11i v2 (11.23) hosts, when PowerPath and VxVM (VeritasVolume Manager) coexist, EMC recommends suppressing all but onepath to VxVM and letting PowerPath handle the multipathingfunctionalities. Not doing so may cause the boot sequence to takemany times longer to complete.
To suppress VxVM paths, perform one of the following:
◆ Suppress all paths from the view of VxVM.
1. Run vxdiskadm.
2. Choose option 17 Prevent multipathing/Suppress devicesfrom VxVM’s view.
3. Choose option 1 Suppress all paths through a controller fromVxVM’s view.
◆ Edit /etc/vx/vxvm.exclude and include the paths you intend tosuppress.
1. Run /usr/lib/vxvm/diag.d/vxdmpdbprint and determinewhich paths to suppress.
For example, output similar to the following appears:
Devlist with enclosure name = EMC1, da_type = EMC DMPNODES :1> name=c15t3d2, ap=4, fp=0, tp=4, state=ENABLED1> subpath=c15t3d2 state=ENABLED2> subpath=c16t3d2 state=ENABLED3> subpath=c23t3d2 state=ENABLED4> subpath=c26t3d2 state=ENABLED
2. Edit /etc/vx/vxvm.exclude to suppress all paths but one.Include the c# of the controllers you want to suppress in thecontrollers section.
For example, suppress c16, c23, and c26, but not c15.
exclude_all 0pathscontrollersc16 2/0/14/1/0.111.0.20c23 0/0/14/1/0.110.0.9.1c26 0/0/14/1/0.110.0.10.1productpathgroups
3. Save /etc/vx/vxvm.exclude and then reboot.
EMC PowerPath for HP-UX Version 5.1 Installation and Administration Guide
PowerPath Administration on HP-UX
4. Run /usr/lib/vxvm/diag.d/vxdmpdbprint.
For example, output similar to the following appears:
Devlist with enclosure name = EMC1, da_type = EMC DMPNODES :1> name=c15t3d2, ap=1, fp=0, tp=1, state=ENABLED1> subpath=c15t3d2 state=ENABLED
For more information on Veritas DMP, refer to the Veritasdocumentation.
Upgrading HP-UXBefore upgrading HP-UX, you must uninstall PowerPath. Aftercompleting the operating system upgrade, reinstall PowerPath. Thisapplies only when you upgrade between major operating systemrevisions. When you install operating system patches or updates, youdo not need to uninstall PowerPath.
Error messagesThe EMC PowerPath Product Guide contains a complete list ofPowerPath error messages.
PowerPath reports errors to the /var/adm/syslog/syslog.log file. Thepowermt utility reports errors to standard error (stderr). You can usethe HP-UX syslogd command to control where the messages arereported. Refer to the HP-UX syslogd (1M) manual page for moreinformation.
Upgrading HP-UX 73

74
PowerPath Administration on HP-UX
EMC PowerPath for HP-UX Version 5.1 Installation and Administration Guide
Anvisible Body Tag
This chapter includes the following sections:
◆ Files added by PowerPath installation ........................................... 76◆ Files modified by PowerPath installation ...................................... 87
Files Changed byPowerPath Installation
Files Changed by PowerPath Installation 75
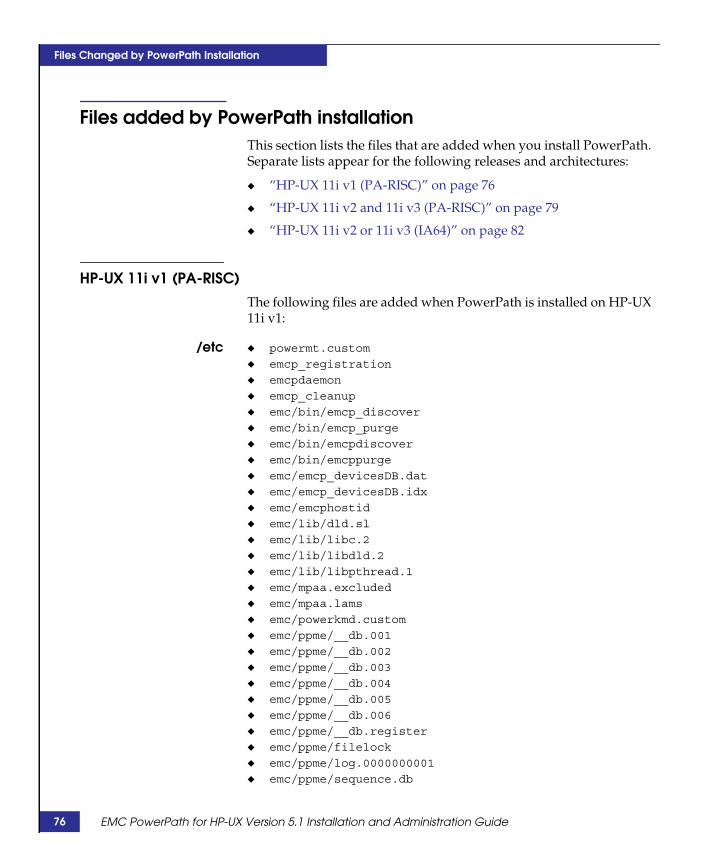
76
Files Changed by PowerPath Installation
Files added by PowerPath installationThis section lists the files that are added when you install PowerPath.Separate lists appear for the following releases and architectures:
◆ “HP-UX 11i v1 (PA-RISC)” on page 76
◆ “HP-UX 11i v2 and 11i v3 (PA-RISC)” on page 79
◆ “HP-UX 11i v2 or 11i v3 (IA64)” on page 82
HP-UX 11i v1 (PA-RISC)The following files are added when PowerPath is installed on HP-UX11i v1:
/etc ◆ powermt.custom
◆ emcp_registration
◆ emcpdaemon
◆ emcp_cleanup
◆ emc/bin/emcp_discover
◆ emc/bin/emcp_purge
◆ emc/bin/emcpdiscover
◆ emc/bin/emcppurge
◆ emc/emcp_devicesDB.dat
◆ emc/emcp_devicesDB.idx
◆ emc/emcphostid
◆ emc/lib/dld.sl
◆ emc/lib/libc.2
◆ emc/lib/libdld.2
◆ emc/lib/libpthread.1
◆ emc/mpaa.excluded
◆ emc/mpaa.lams
◆ emc/powerkmd.custom
◆ emc/ppme/__db.001
◆ emc/ppme/__db.002
◆ emc/ppme/__db.003
◆ emc/ppme/__db.004
◆ emc/ppme/__db.005
◆ emc/ppme/__db.006
◆ emc/ppme/__db.register
◆ emc/ppme/filelock
◆ emc/ppme/log.0000000001
◆ emc/ppme/sequence.db
EMC PowerPath for HP-UX Version 5.1 Installation and Administration Guide
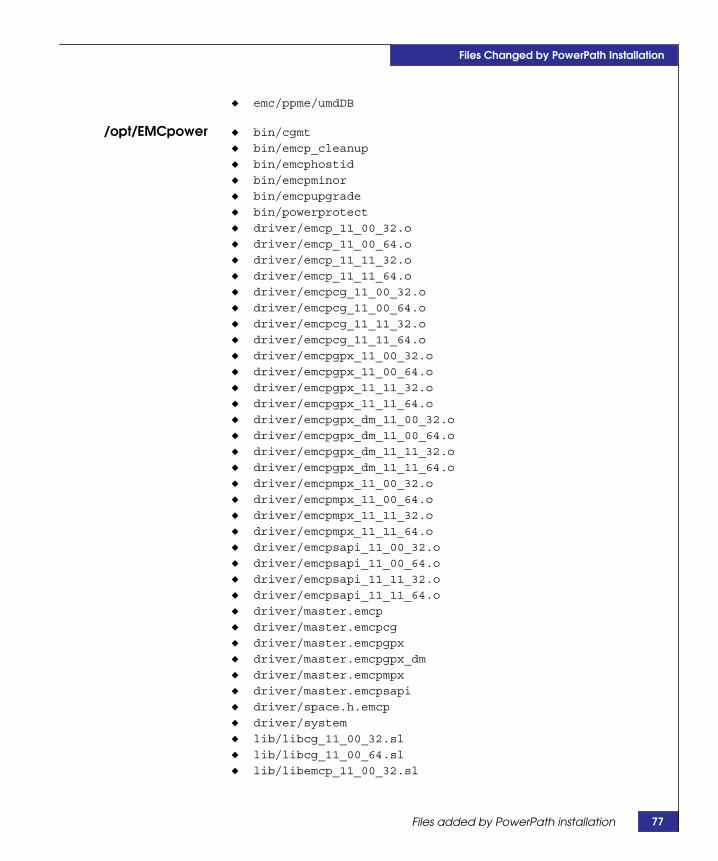
Files Changed by PowerPath Installation
◆ emc/ppme/umdDB
/opt/EMCpower ◆ bin/cgmt
◆ bin/emcp_cleanup
◆ bin/emcphostid
◆ bin/emcpminor
◆ bin/emcpupgrade
◆ bin/powerprotect
◆ driver/emcp_11_00_32.o
◆ driver/emcp_11_00_64.o
◆ driver/emcp_11_11_32.o
◆ driver/emcp_11_11_64.o
◆ driver/emcpcg_11_00_32.o
◆ driver/emcpcg_11_00_64.o
◆ driver/emcpcg_11_11_32.o
◆ driver/emcpcg_11_11_64.o
◆ driver/emcpgpx_11_00_32.o
◆ driver/emcpgpx_11_00_64.o
◆ driver/emcpgpx_11_11_32.o
◆ driver/emcpgpx_11_11_64.o
◆ driver/emcpgpx_dm_11_00_32.o
◆ driver/emcpgpx_dm_11_00_64.o
◆ driver/emcpgpx_dm_11_11_32.o
◆ driver/emcpgpx_dm_11_11_64.o
◆ driver/emcpmpx_11_00_32.o
◆ driver/emcpmpx_11_00_64.o
◆ driver/emcpmpx_11_11_32.o
◆ driver/emcpmpx_11_11_64.o
◆ driver/emcpsapi_11_00_32.o
◆ driver/emcpsapi_11_00_64.o
◆ driver/emcpsapi_11_11_32.o
◆ driver/emcpsapi_11_11_64.o
◆ driver/master.emcp
◆ driver/master.emcpcg
◆ driver/master.emcpgpx
◆ driver/master.emcpgpx_dm
◆ driver/master.emcpmpx
◆ driver/master.emcpsapi
◆ driver/space.h.emcp
◆ driver/system
◆ lib/libcg_11_00_32.sl
◆ lib/libcg_11_00_64.sl
◆ lib/libemcp_11_00_32.sl
Files added by PowerPath installation 77
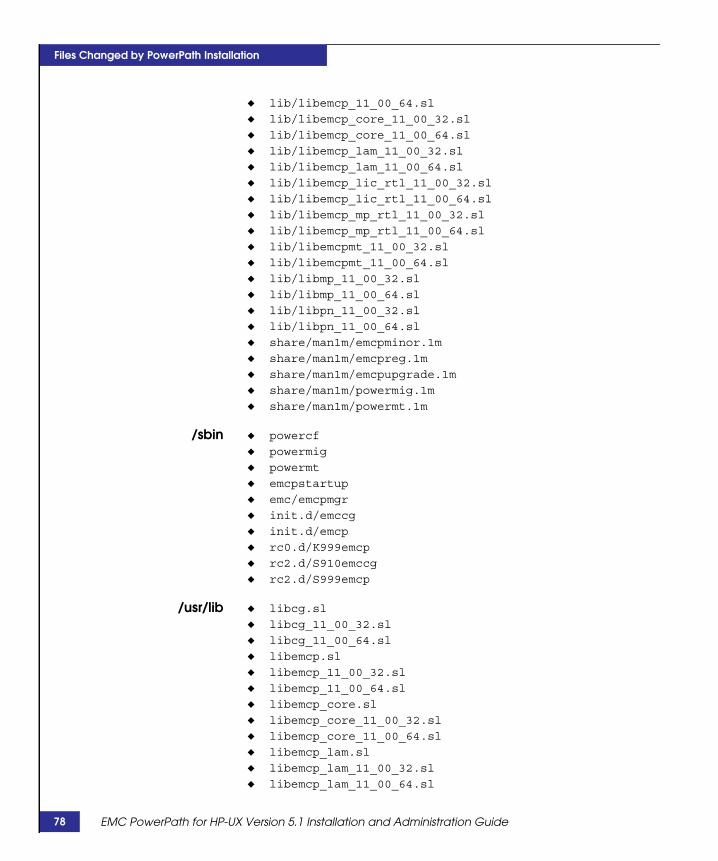
78
Files Changed by PowerPath Installation
◆ lib/libemcp_11_00_64.sl
◆ lib/libemcp_core_11_00_32.sl
◆ lib/libemcp_core_11_00_64.sl
◆ lib/libemcp_lam_11_00_32.sl
◆ lib/libemcp_lam_11_00_64.sl
◆ lib/libemcp_lic_rtl_11_00_32.sl
◆ lib/libemcp_lic_rtl_11_00_64.sl
◆ lib/libemcp_mp_rtl_11_00_32.sl
◆ lib/libemcp_mp_rtl_11_00_64.sl
◆ lib/libemcpmt_11_00_32.sl
◆ lib/libemcpmt_11_00_64.sl
◆ lib/libmp_11_00_32.sl
◆ lib/libmp_11_00_64.sl
◆ lib/libpn_11_00_32.sl
◆ lib/libpn_11_00_64.sl
◆ share/man1m/emcpminor.1m
◆ share/man1m/emcpreg.1m
◆ share/man1m/emcpupgrade.1m
◆ share/man1m/powermig.1m
◆ share/man1m/powermt.1m
/sbin ◆ powercf
◆ powermig
◆ powermt
◆ emcpstartup
◆ emc/emcpmgr
◆ init.d/emccg
◆ init.d/emcp
◆ rc0.d/K999emcp
◆ rc2.d/S910emccg
◆ rc2.d/S999emcp
/usr/lib ◆ libcg.sl
◆ libcg_11_00_32.sl
◆ libcg_11_00_64.sl
◆ libemcp.sl
◆ libemcp_11_00_32.sl
◆ libemcp_11_00_64.sl
◆ libemcp_core.sl
◆ libemcp_core_11_00_32.sl
◆ libemcp_core_11_00_64.sl
◆ libemcp_lam.sl
◆ libemcp_lam_11_00_32.sl
◆ libemcp_lam_11_00_64.sl
EMC PowerPath for HP-UX Version 5.1 Installation and Administration Guide
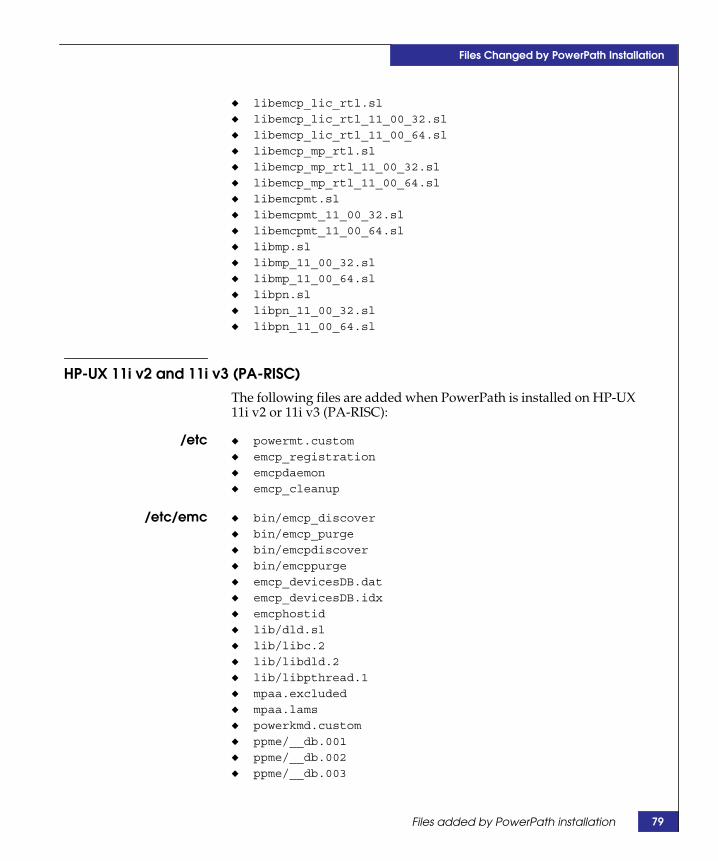
Files Changed by PowerPath Installation
◆ libemcp_lic_rtl.sl
◆ libemcp_lic_rtl_11_00_32.sl
◆ libemcp_lic_rtl_11_00_64.sl
◆ libemcp_mp_rtl.sl
◆ libemcp_mp_rtl_11_00_32.sl
◆ libemcp_mp_rtl_11_00_64.sl
◆ libemcpmt.sl
◆ libemcpmt_11_00_32.sl
◆ libemcpmt_11_00_64.sl
◆ libmp.sl
◆ libmp_11_00_32.sl
◆ libmp_11_00_64.sl
◆ libpn.sl
◆ libpn_11_00_32.sl
◆ libpn_11_00_64.sl
HP-UX 11i v2 and 11i v3 (PA-RISC)The following files are added when PowerPath is installed on HP-UX11i v2 or 11i v3 (PA-RISC):
/etc ◆ powermt.custom
◆ emcp_registration
◆ emcpdaemon
◆ emcp_cleanup
/etc/emc ◆ bin/emcp_discover
◆ bin/emcp_purge
◆ bin/emcpdiscover
◆ bin/emcppurge
◆ emcp_devicesDB.dat
◆ emcp_devicesDB.idx
◆ emcphostid
◆ lib/dld.sl
◆ lib/libc.2
◆ lib/libdld.2
◆ lib/libpthread.1
◆ mpaa.excluded
◆ mpaa.lams
◆ powerkmd.custom
◆ ppme/__db.001
◆ ppme/__db.002
◆ ppme/__db.003
Files added by PowerPath installation 79
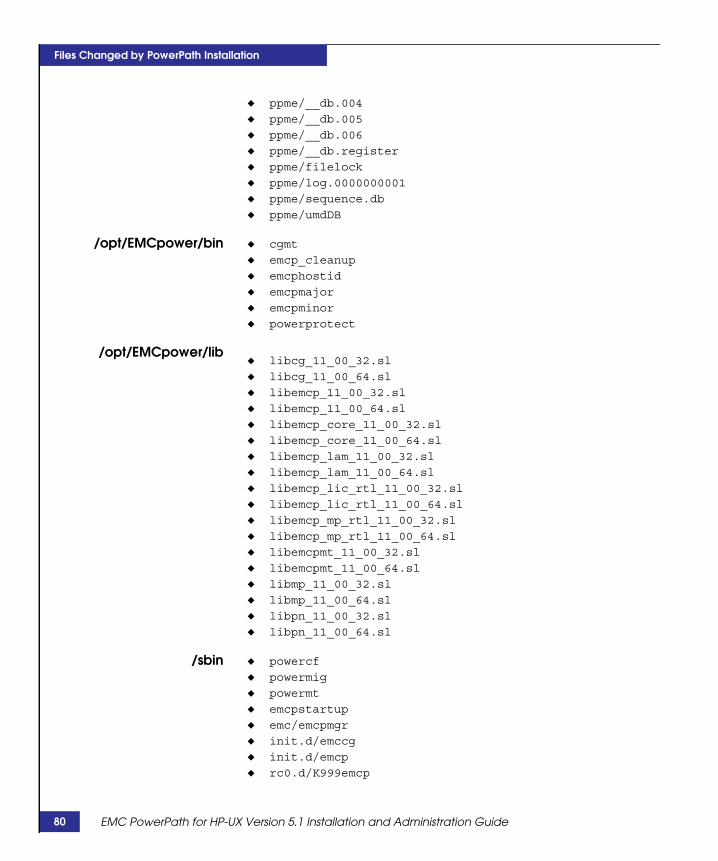
80
Files Changed by PowerPath Installation
◆ ppme/__db.004
◆ ppme/__db.005
◆ ppme/__db.006
◆ ppme/__db.register
◆ ppme/filelock
◆ ppme/log.0000000001
◆ ppme/sequence.db
◆ ppme/umdDB
/opt/EMCpower/bin ◆ cgmt
◆ emcp_cleanup
◆ emcphostid
◆ emcpmajor
◆ emcpminor
◆ powerprotect
/opt/EMCpower/lib◆ libcg_11_00_32.sl
◆ libcg_11_00_64.sl
◆ libemcp_11_00_32.sl
◆ libemcp_11_00_64.sl
◆ libemcp_core_11_00_32.sl
◆ libemcp_core_11_00_64.sl
◆ libemcp_lam_11_00_32.sl
◆ libemcp_lam_11_00_64.sl
◆ libemcp_lic_rtl_11_00_32.sl
◆ libemcp_lic_rtl_11_00_64.sl
◆ libemcp_mp_rtl_11_00_32.sl
◆ libemcp_mp_rtl_11_00_64.sl
◆ libemcpmt_11_00_32.sl
◆ libemcpmt_11_00_64.sl
◆ libmp_11_00_32.sl
◆ libmp_11_00_64.sl
◆ libpn_11_00_32.sl
◆ libpn_11_00_64.sl
/sbin ◆ powercf
◆ powermig
◆ powermt
◆ emcpstartup
◆ emc/emcpmgr
◆ init.d/emccg
◆ init.d/emcp
◆ rc0.d/K999emcp
EMC PowerPath for HP-UX Version 5.1 Installation and Administration Guide
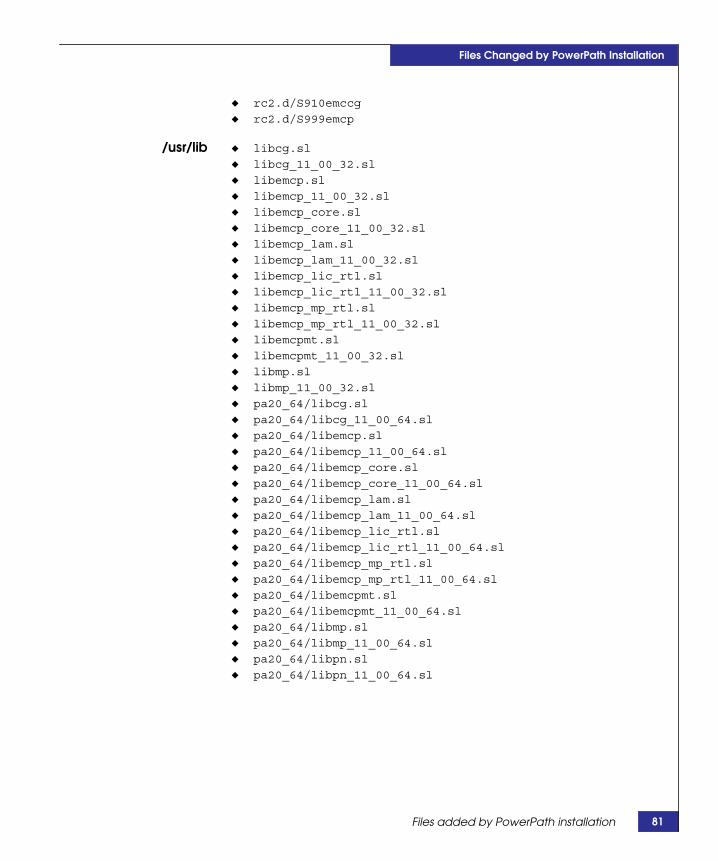
Files Changed by PowerPath Installation
◆ rc2.d/S910emccg
◆ rc2.d/S999emcp
/usr/lib ◆ libcg.sl
◆ libcg_11_00_32.sl
◆ libemcp.sl
◆ libemcp_11_00_32.sl
◆ libemcp_core.sl
◆ libemcp_core_11_00_32.sl
◆ libemcp_lam.sl
◆ libemcp_lam_11_00_32.sl
◆ libemcp_lic_rtl.sl
◆ libemcp_lic_rtl_11_00_32.sl
◆ libemcp_mp_rtl.sl
◆ libemcp_mp_rtl_11_00_32.sl
◆ libemcpmt.sl
◆ libemcpmt_11_00_32.sl
◆ libmp.sl
◆ libmp_11_00_32.sl
◆ pa20_64/libcg.sl
◆ pa20_64/libcg_11_00_64.sl
◆ pa20_64/libemcp.sl
◆ pa20_64/libemcp_11_00_64.sl
◆ pa20_64/libemcp_core.sl
◆ pa20_64/libemcp_core_11_00_64.sl
◆ pa20_64/libemcp_lam.sl
◆ pa20_64/libemcp_lam_11_00_64.sl
◆ pa20_64/libemcp_lic_rtl.sl
◆ pa20_64/libemcp_lic_rtl_11_00_64.sl
◆ pa20_64/libemcp_mp_rtl.sl
◆ pa20_64/libemcp_mp_rtl_11_00_64.sl
◆ pa20_64/libemcpmt.sl
◆ pa20_64/libemcpmt_11_00_64.sl
◆ pa20_64/libmp.sl
◆ pa20_64/libmp_11_00_64.sl
◆ pa20_64/libpn.sl
◆ pa20_64/libpn_11_00_64.sl
Files added by PowerPath installation 81
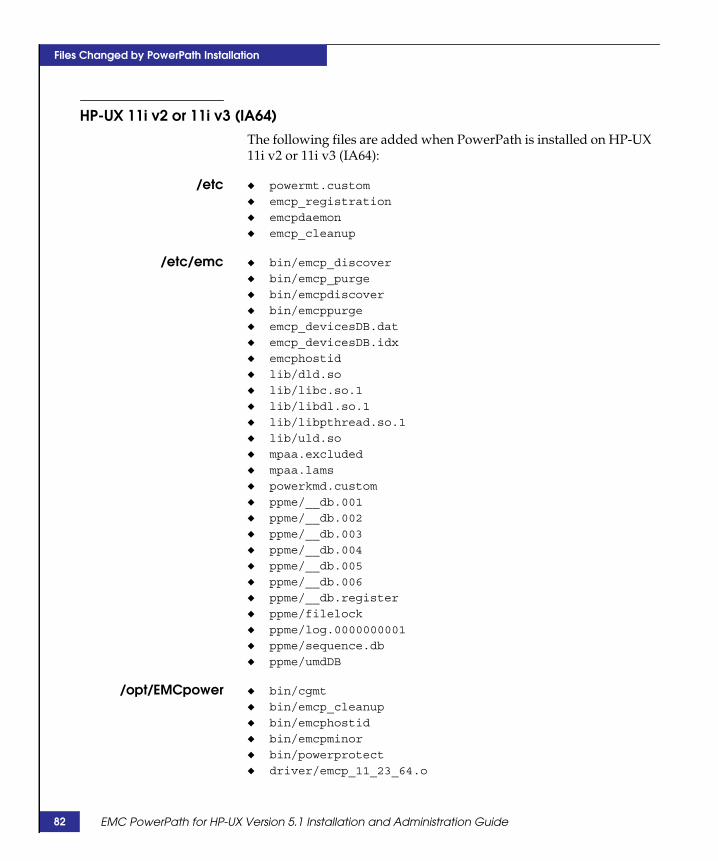
82
Files Changed by PowerPath Installation
HP-UX 11i v2 or 11i v3 (IA64)The following files are added when PowerPath is installed on HP-UX11i v2 or 11i v3 (IA64):
/etc ◆ powermt.custom
◆ emcp_registration
◆ emcpdaemon
◆ emcp_cleanup
/etc/emc ◆ bin/emcp_discover
◆ bin/emcp_purge
◆ bin/emcpdiscover
◆ bin/emcppurge
◆ emcp_devicesDB.dat
◆ emcp_devicesDB.idx
◆ emcphostid
◆ lib/dld.so
◆ lib/libc.so.1
◆ lib/libdl.so.1
◆ lib/libpthread.so.1
◆ lib/uld.so
◆ mpaa.excluded
◆ mpaa.lams
◆ powerkmd.custom
◆ ppme/__db.001
◆ ppme/__db.002
◆ ppme/__db.003
◆ ppme/__db.004
◆ ppme/__db.005
◆ ppme/__db.006
◆ ppme/__db.register
◆ ppme/filelock
◆ ppme/log.0000000001
◆ ppme/sequence.db
◆ ppme/umdDB
/opt/EMCpower ◆ bin/cgmt
◆ bin/emcp_cleanup
◆ bin/emcphostid
◆ bin/emcpminor
◆ bin/powerprotect
◆ driver/emcp_11_23_64.o
EMC PowerPath for HP-UX Version 5.1 Installation and Administration Guide
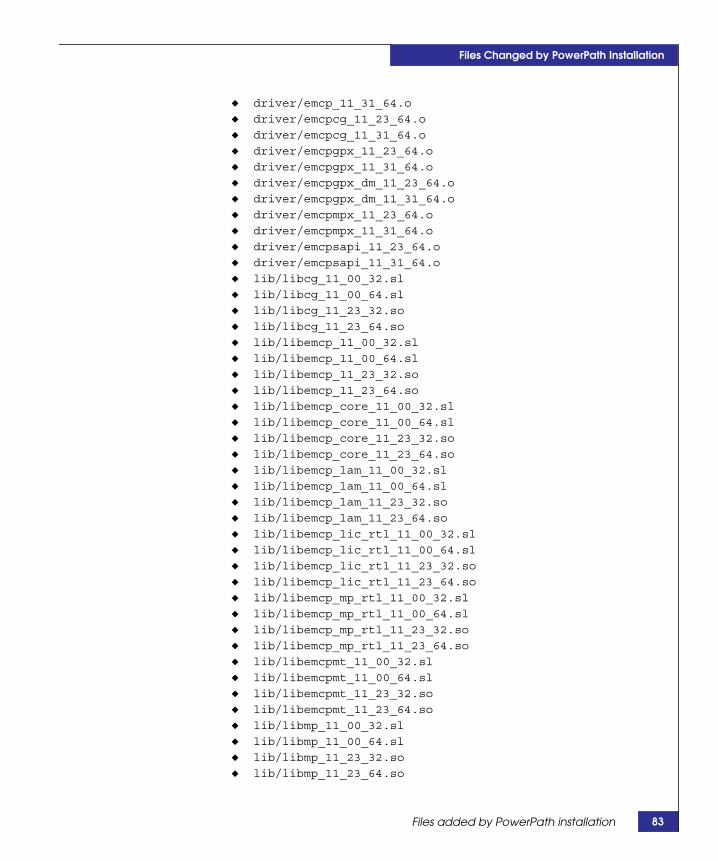
Files Changed by PowerPath Installation
◆ driver/emcp_11_31_64.o
◆ driver/emcpcg_11_23_64.o
◆ driver/emcpcg_11_31_64.o
◆ driver/emcpgpx_11_23_64.o
◆ driver/emcpgpx_11_31_64.o
◆ driver/emcpgpx_dm_11_23_64.o
◆ driver/emcpgpx_dm_11_31_64.o
◆ driver/emcpmpx_11_23_64.o
◆ driver/emcpmpx_11_31_64.o
◆ driver/emcpsapi_11_23_64.o
◆ driver/emcpsapi_11_31_64.o
◆ lib/libcg_11_00_32.sl
◆ lib/libcg_11_00_64.sl
◆ lib/libcg_11_23_32.so
◆ lib/libcg_11_23_64.so
◆ lib/libemcp_11_00_32.sl
◆ lib/libemcp_11_00_64.sl
◆ lib/libemcp_11_23_32.so
◆ lib/libemcp_11_23_64.so
◆ lib/libemcp_core_11_00_32.sl
◆ lib/libemcp_core_11_00_64.sl
◆ lib/libemcp_core_11_23_32.so
◆ lib/libemcp_core_11_23_64.so
◆ lib/libemcp_lam_11_00_32.sl
◆ lib/libemcp_lam_11_00_64.sl
◆ lib/libemcp_lam_11_23_32.so
◆ lib/libemcp_lam_11_23_64.so
◆ lib/libemcp_lic_rtl_11_00_32.sl
◆ lib/libemcp_lic_rtl_11_00_64.sl
◆ lib/libemcp_lic_rtl_11_23_32.so
◆ lib/libemcp_lic_rtl_11_23_64.so
◆ lib/libemcp_mp_rtl_11_00_32.sl
◆ lib/libemcp_mp_rtl_11_00_64.sl
◆ lib/libemcp_mp_rtl_11_23_32.so
◆ lib/libemcp_mp_rtl_11_23_64.so
◆ lib/libemcpmt_11_00_32.sl
◆ lib/libemcpmt_11_00_64.sl
◆ lib/libemcpmt_11_23_32.so
◆ lib/libemcpmt_11_23_64.so
◆ lib/libmp_11_00_32.sl
◆ lib/libmp_11_00_64.sl
◆ lib/libmp_11_23_32.so
◆ lib/libmp_11_23_64.so
Files added by PowerPath installation 83
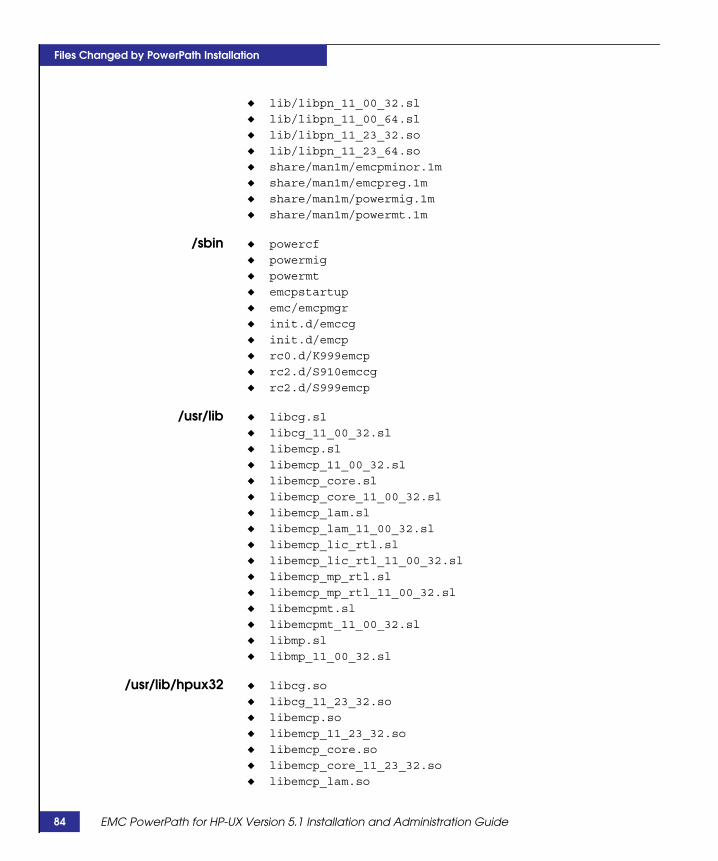
84
Files Changed by PowerPath Installation
◆ lib/libpn_11_00_32.sl
◆ lib/libpn_11_00_64.sl
◆ lib/libpn_11_23_32.so
◆ lib/libpn_11_23_64.so
◆ share/man1m/emcpminor.1m
◆ share/man1m/emcpreg.1m
◆ share/man1m/powermig.1m
◆ share/man1m/powermt.1m
/sbin ◆ powercf
◆ powermig
◆ powermt
◆ emcpstartup
◆ emc/emcpmgr
◆ init.d/emccg
◆ init.d/emcp
◆ rc0.d/K999emcp
◆ rc2.d/S910emccg
◆ rc2.d/S999emcp
/usr/lib ◆ libcg.sl
◆ libcg_11_00_32.sl
◆ libemcp.sl
◆ libemcp_11_00_32.sl
◆ libemcp_core.sl
◆ libemcp_core_11_00_32.sl
◆ libemcp_lam.sl
◆ libemcp_lam_11_00_32.sl
◆ libemcp_lic_rtl.sl
◆ libemcp_lic_rtl_11_00_32.sl
◆ libemcp_mp_rtl.sl
◆ libemcp_mp_rtl_11_00_32.sl
◆ libemcpmt.sl
◆ libemcpmt_11_00_32.sl
◆ libmp.sl
◆ libmp_11_00_32.sl
/usr/lib/hpux32 ◆ libcg.so
◆ libcg_11_23_32.so
◆ libemcp.so
◆ libemcp_11_23_32.so
◆ libemcp_core.so
◆ libemcp_core_11_23_32.so
◆ libemcp_lam.so
EMC PowerPath for HP-UX Version 5.1 Installation and Administration Guide
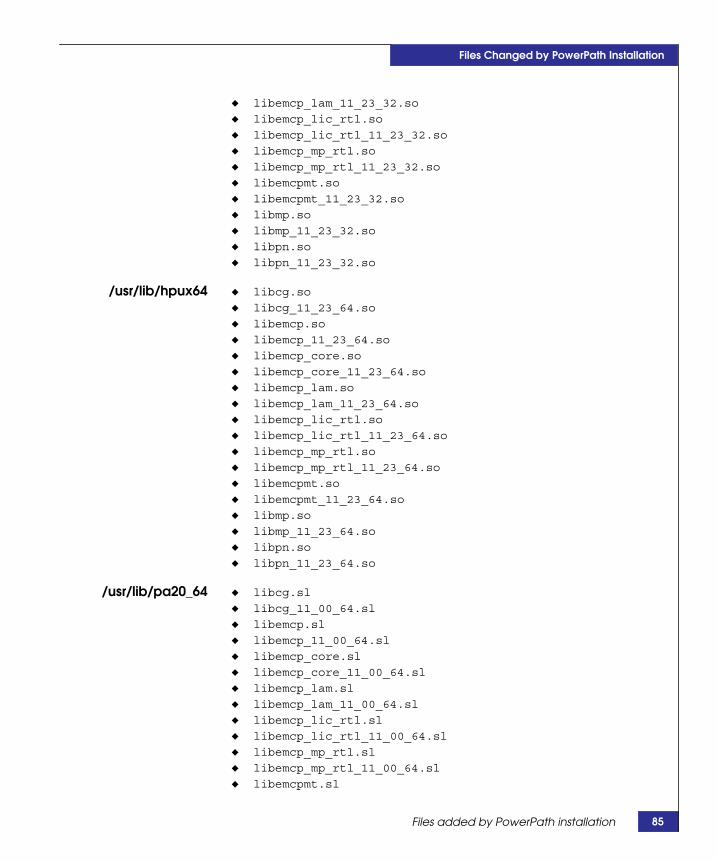
Files Changed by PowerPath Installation
◆ libemcp_lam_11_23_32.so
◆ libemcp_lic_rtl.so
◆ libemcp_lic_rtl_11_23_32.so
◆ libemcp_mp_rtl.so
◆ libemcp_mp_rtl_11_23_32.so
◆ libemcpmt.so
◆ libemcpmt_11_23_32.so
◆ libmp.so
◆ libmp_11_23_32.so
◆ libpn.so
◆ libpn_11_23_32.so
/usr/lib/hpux64 ◆ libcg.so
◆ libcg_11_23_64.so
◆ libemcp.so
◆ libemcp_11_23_64.so
◆ libemcp_core.so
◆ libemcp_core_11_23_64.so
◆ libemcp_lam.so
◆ libemcp_lam_11_23_64.so
◆ libemcp_lic_rtl.so
◆ libemcp_lic_rtl_11_23_64.so
◆ libemcp_mp_rtl.so
◆ libemcp_mp_rtl_11_23_64.so
◆ libemcpmt.so
◆ libemcpmt_11_23_64.so
◆ libmp.so
◆ libmp_11_23_64.so
◆ libpn.so
◆ libpn_11_23_64.so
/usr/lib/pa20_64 ◆ libcg.sl
◆ libcg_11_00_64.sl
◆ libemcp.sl
◆ libemcp_11_00_64.sl
◆ libemcp_core.sl
◆ libemcp_core_11_00_64.sl
◆ libemcp_lam.sl
◆ libemcp_lam_11_00_64.sl
◆ libemcp_lic_rtl.sl
◆ libemcp_lic_rtl_11_00_64.sl
◆ libemcp_mp_rtl.sl
◆ libemcp_mp_rtl_11_00_64.sl
◆ libemcpmt.sl
Files added by PowerPath installation 85
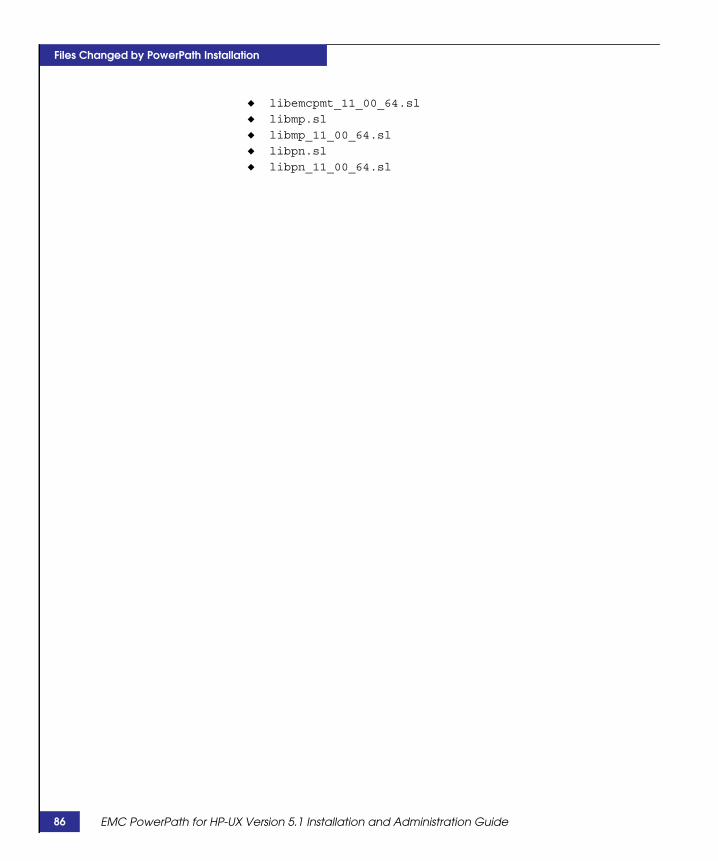
86
Files Changed by PowerPath Installation
◆ libemcpmt_11_00_64.sl
◆ libmp.sl
◆ libmp_11_00_64.sl
◆ libpn.sl
◆ libpn_11_00_64.sl
EMC PowerPath for HP-UX Version 5.1 Installation and Administration Guide
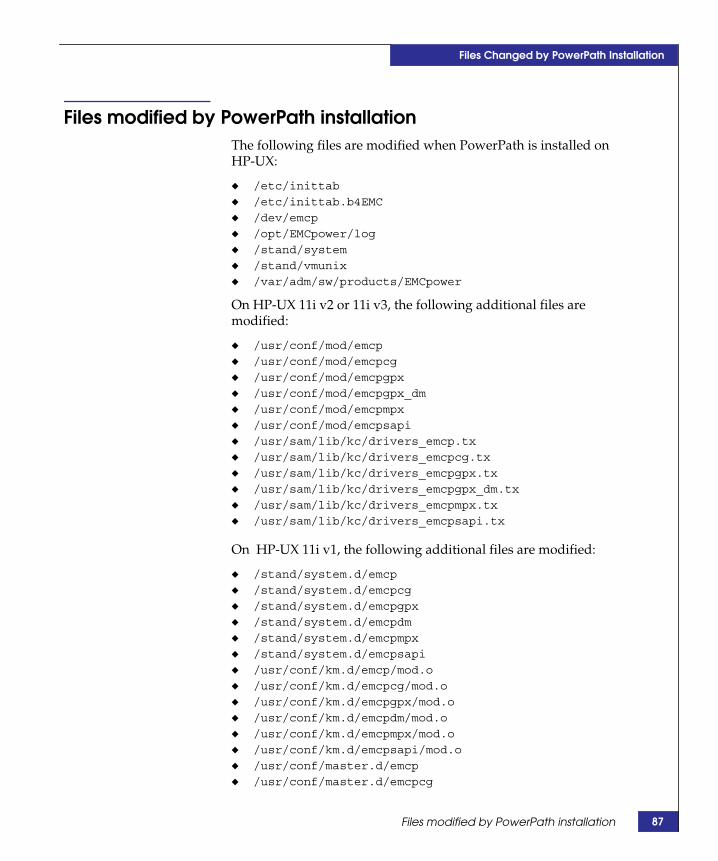
Files Changed by PowerPath Installation
Files modified by PowerPath installationThe following files are modified when PowerPath is installed onHP-UX:
◆ /etc/inittab
◆ /etc/inittab.b4EMC
◆ /dev/emcp
◆ /opt/EMCpower/log
◆ /stand/system
◆ /stand/vmunix
◆ /var/adm/sw/products/EMCpower
On HP-UX 11i v2 or 11i v3, the following additional files aremodified:
◆ /usr/conf/mod/emcp
◆ /usr/conf/mod/emcpcg
◆ /usr/conf/mod/emcpgpx
◆ /usr/conf/mod/emcpgpx_dm
◆ /usr/conf/mod/emcpmpx
◆ /usr/conf/mod/emcpsapi
◆ /usr/sam/lib/kc/drivers_emcp.tx
◆ /usr/sam/lib/kc/drivers_emcpcg.tx
◆ /usr/sam/lib/kc/drivers_emcpgpx.tx
◆ /usr/sam/lib/kc/drivers_emcpgpx_dm.tx
◆ /usr/sam/lib/kc/drivers_emcpmpx.tx
◆ /usr/sam/lib/kc/drivers_emcpsapi.tx
On HP-UX 11i v1, the following additional files are modified:
◆ /stand/system.d/emcp
◆ /stand/system.d/emcpcg
◆ /stand/system.d/emcpgpx
◆ /stand/system.d/emcpdm
◆ /stand/system.d/emcpmpx
◆ /stand/system.d/emcpsapi
◆ /usr/conf/km.d/emcp/mod.o
◆ /usr/conf/km.d/emcpcg/mod.o
◆ /usr/conf/km.d/emcpgpx/mod.o
◆ /usr/conf/km.d/emcpdm/mod.o
◆ /usr/conf/km.d/emcpmpx/mod.o
◆ /usr/conf/km.d/emcpsapi/mod.o
◆ /usr/conf/master.d/emcp
◆ /usr/conf/master.d/emcpcg
Files modified by PowerPath installation 87
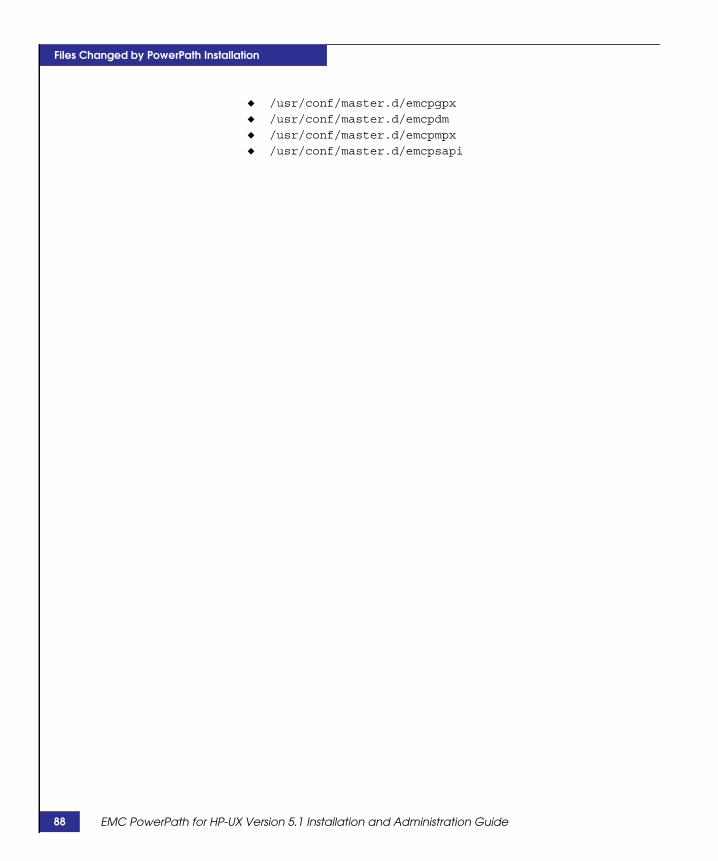
88
Files Changed by PowerPath Installation
◆ /usr/conf/master.d/emcpgpx
◆ /usr/conf/master.d/emcpdm
◆ /usr/conf/master.d/emcpmpx
◆ /usr/conf/master.d/emcpsapi
EMC PowerPath for HP-UX Version 5.1 Installation and Administration Guide
Index
Symbols/etc/vx/vxvm.exclude 72/var/adm/syslog/syslog.log 73
Aadding devices online 64alternate links 69
Bboot device, PowerPath device as 36
CCLARiiON storage systems
considerations for 37setting up 12
cluster, installing PowerPath in 14coexisting with HP-UX native multipath 31coexisting with third-party management software
32
Ddevice naming conventions 64device removal 69devices, adding online 64documentation, related 7
Eerror messages 73
HHORCM command device 70HP StorageWorks AutoPath, migrating from 56HP StorageWorks Secure Path, migrating from 54HP-UX, upgrading 73
IIBM Subsystem Device Driver (SDD), migrating
from 57installing PowerPath
in a cluster 14preinstallation instructions 12service pack installation 22
Llogical device, removing 69LVM alternate links 69
MMC/ServiceGuard cluster
installing with PowerPath 46integrating PowerPath into 48integrating with PowerPath 49
migrating fromHP StorageWorks AutoPath 56HP StorageWorks Secure Path 54IBM Subsystem Device Driver (SDD) 57
Nnaming conventions 64native devices 64
EMC PowerPath for HP-UX Version 5.1 Installation and Administration Guide 89
90
Index
Ooperating system, upgrading 73
PPowerPath boot device
configuring 36configuring with LVM 38configuring with VxVM 44LVM alternate links 69
PowerPath device, native 64PowerPath devices, reconfiguring online 64PowerPath error messages 73PowerPath registration 25PowerPath, upgrading 28preinstallation instructions 12PVLinks 69
Rreconfiguring PowerPath devices online 64registering PowerPath 25removing devices 69removing PowerPath 61
SSecure Path, replacing with PowerPath 71service pack installation 22suppressing VxVM paths 72
Ttroubleshooting, physical path is lost 70troubleshooting, service pack installation 23
Uuninstalling PowerPath 61upgrading HP-UX 73upgrading PowerPath 28
VVCS (Veritas Cluster Server) cluster
installing with PowerPath 51integrating PowerPath into 52
Veritas Volume Manager (VxVM) 29VxVM best practice, suppressing paths 72
EMC PowerPath for HP-UX Version 5.1 Installation and Administration Guide