hp-ux hp 9000 transition strategies for db2
TRANSCRIPT
HP-UX HP 9000 Transition Strategies for DB2
Introduction ......................................................................................................................................................2 HP-UX transition plan ......................................................................................................................................5
Review your business situation....................................................................................................................5 Assess infrastructure stack and availability..................................................................................................5 Identify transition components .....................................................................................................................7 Define technical requirements .....................................................................................................................8 Define transition strategy .............................................................................................................................9
DB2 migration ................................................................................................................................................10 DB2 transition implementation steps .............................................................................................................11
Source system (HP 9000) production environment ...................................................................................11 Transfer method ........................................................................................................................................13 Target system (HP Integrity) environment .................................................................................................13
Laboratory transition test setup......................................................................................................................17 Appendix A: DB2 database backup/restore (redirected) ................................................................................19
HP-UX 11.11 (running on the HP 9000 server)..........................................................................................20 Transferring data to the HP Integrity server ...............................................................................................21 HP-UX 11i v2 (running on the HP Integrity server) ....................................................................................22
Appendix B: Retaining (detach/attach) external database storage ................................................................26 HP-UX 11.11 (running on the HP 9000 server)..........................................................................................28 Transferring data to HP Integrity server .....................................................................................................33 HP-UX 11i v2 (running on the HP Integrity server) ....................................................................................33 Alternative links..........................................................................................................................................36
Further information ........................................................................................................................................37
Introduction As more robust market-leading solutions become available, it is becoming increasingly compelling for you to consider higher performing, lower cost options, such as HP Integrity servers running HP-UX 11i v2 on the Intel® Itanium® 2 processor architecture. This new architecture has achieved better price performance and record breaking performance results than any other processor architecture.
A major goal of the Itanium architecture was to maintain a high degree of compatibility with the PA-RISC processor architecture that the HP 9000 platform is based on. One result is that a database created on an HP 9000 server running HP-UX 11i will not require data conversion for use on an HP Integrity server running HP-UX 11i v2. Transitioning a DB2 database from an HP 9000 to an HP Integrity simply calls for moving the database between servers within the same operating system. The only restrictions are that both environments must satisfy the following conditions:
• The minimum DB2 version for both environments is V8.1 * • Any storage hardware (external disk storage arrays) to be transitioned must be supported on
HP Integrity servers • Both environments must be at the same DB2 version level when using the retaining external
database storage method described in Appendix B, and it is recommended that both be at the same FixPak level
* Note: If your current operating environment uses DB2 V7.2 or below, migration to DB2 V8.1 or above is required on your HP 9000 system.
A migration of DB2 to a higher version, FixPak level, 64-bit word size, or acquisition of new storage hardware may be needed if any of the above conditions are not satisfied. HP strongly encourages you to move to a 64-bit instance word size. DB2 for the HP Integrity server only supports the 64-bit word size.
This technical document can assist you in planning and implementing your transition. Its purpose is to present the transition strategy and details involved with moving DB2 databases to the HP Integrity server platform running HP-UX 11i v2. It draws upon DB2 transition methodology combined with a focus on the HP 9000 to HP-UX Integrity server environment and on testing done in HP laboratories. A DB2 transition involves many implementation steps, including gathering data, setting up the target HP Integrity database server, moving the original database, testing, tuning, and turning the target environment over to production. This document discusses these steps and illustrates them for two different methods of moving DB2 databases from one platform to the other.
For convenience, this document uses the following terminology: Source environment/source system/source server – your present
HP 9000 server running HP-UX 11i. Target environment/target system/target server – your new HP
Integrity server running HP-UX 11i v2. This document assumes:
Working knowledge of DB2 installation and database administration
Working knowledge of HP-UX system and network administration
tuning Working knowledge of HP-UX and DB2 performance Familiarity with project management methodologies
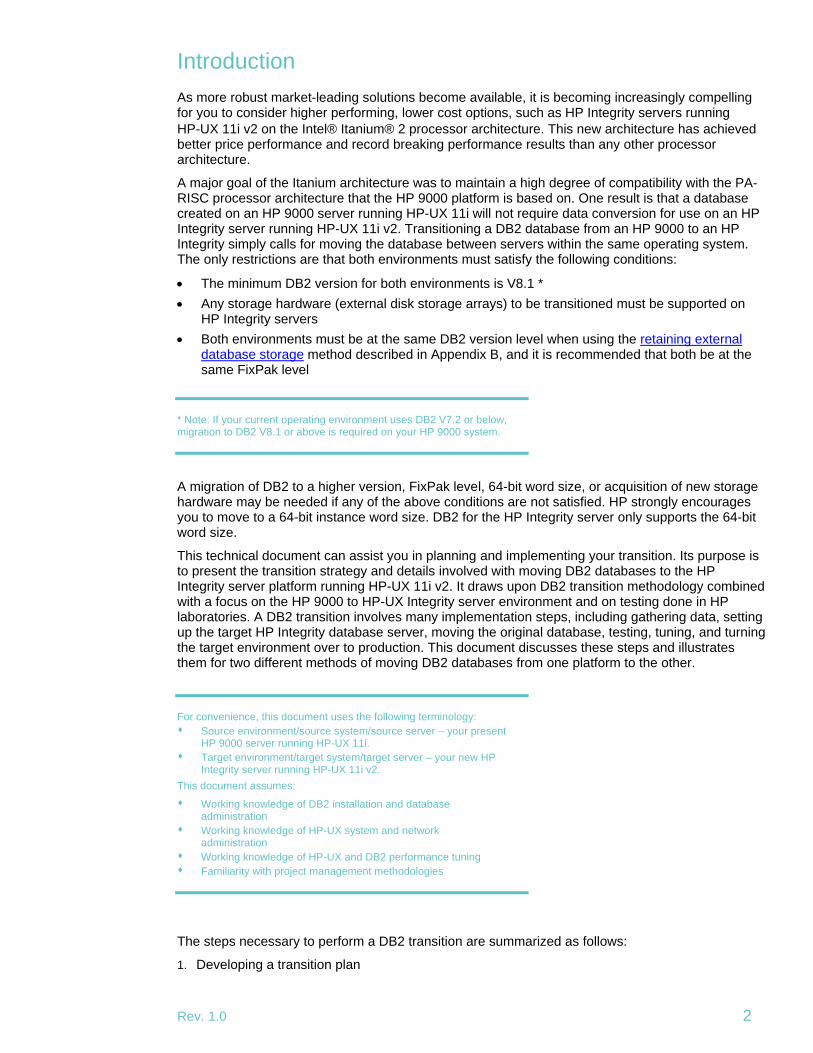
The ste DB2 transition are summarized as follows: ps necessary to perform a
Developing a transition plan 1.
Rev. 1.0 2

2. Performing a DB2 migration (if necessary) 3. Implementing the DB2 transition
In Figure 1, the above steps are represented in shaded boxes. The implementation steps and other activities are represented by bulleted text items and are discussed in detail through this document.
Rev. 1.0 3
Figure 1. Overall DB2 transition steps example
•Review business situations •Assess infrastructure stack & availability •Identify transition components •Define technical requirements •Define transition strategy
����� �� ���� ���������� �����������
����� ��� �� �� ��������� ���������� �����������
DB2 Backup
DB2 Restore (Redirect)
Retaining (Detach/Attach) database external storage
Storag
Transfer backup data via network (FTP,NFS) ��
Backup Database Storage
Backup Storag
athered mizations
ps
tion
•Gather information & customizations •DB2 backup •Transfer method Select database moving method •Install DB2, FixPak, patches, and other products •Apply information g and custo•Implement database moving method •Post transition ste•Test and tune •Move to produc
Database Storage
���
������� ��� ��������� (if
necessary)
•Check if current DB2 version is supported on HP Integrity
�������
���� ����������
HP-UX transition plan Developing and documenting a plan is critical to a successful transition. Planning can help identify crucial decisions that are needed before beginning the transition process. Some of the steps that are essential in developing a DB2 HP-UX transition plan are:
1. Review your business situation 2. Assess infrastructure stack and application availability 3. Identify transition components 4. Define technical requirements 5. Define transition strategy:
a. Transition process b. Test plan and acceptance criteria c. Allowable production downtime and selecting a database moving method d. Testing and tuning
6. General project plan activities
Review your business situation You should conduct a transition to HP-UX 11i v2 on HP Integrity servers with due consideration for factors that drive your business, and for resulting demands on your IT environment. Among the elements to be considered:
• Business needs may require you to implement additional DB2 functionality, some of which may be offered only with DB2 V8.1 or above.
• Business demands on your IT environment may currently or potentially exceed its capacity, driving a need for additional computer resources.
• Server consolidation, to reduce cost while implementing the latest Adaptive Enterprise technology, may be combined with your transition.
• End-of-service dates on older versions of DB2, the operating system, or other infrastructure components may force the transition.
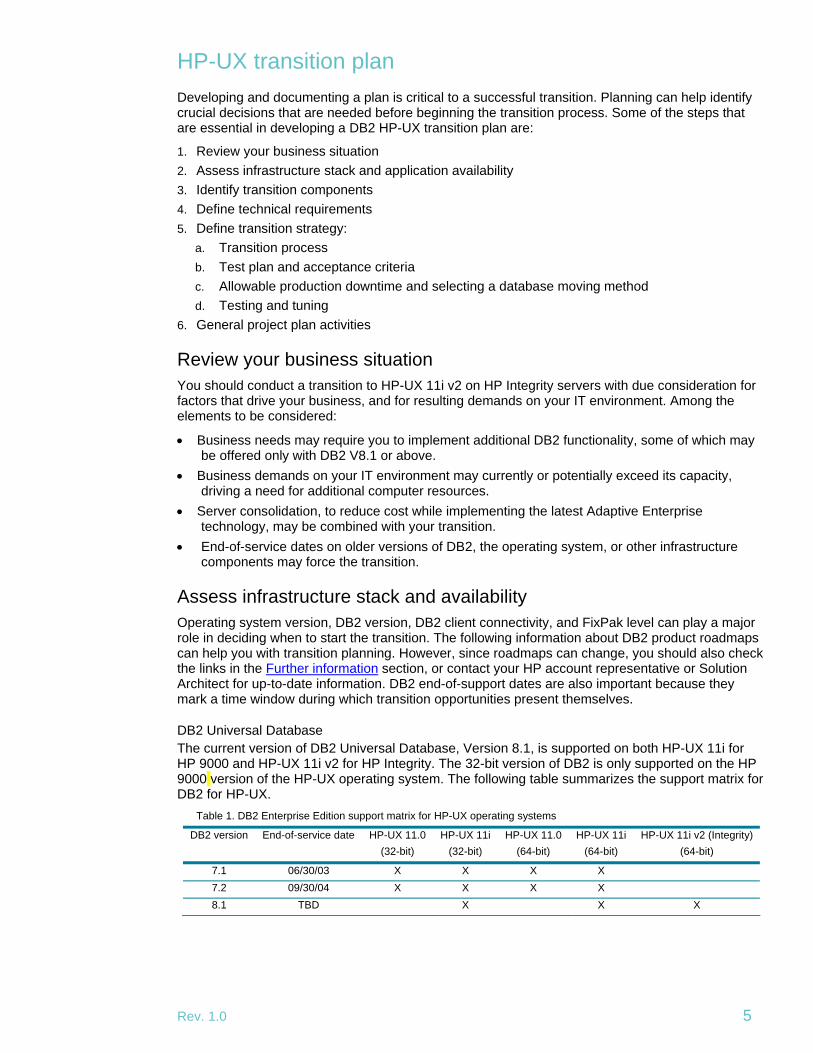
Assess infrastructure stack and availability Operating system version, DB2 version, DB2 client connectivity, and FixPak level can play a major role in deciding when to start the transition. The following information about DB2 product roadmaps can help you with transition planning. However, since roadmaps can change, you should also check the links in the Further information section, or contact your HP account representative or Solution Architect for up-to-date information. DB2 end-of-support dates are also important because they mark a time window during which transition opportunities present themselves.
DB2 Universal Database The current version of DB2 Universal Database, Version 8.1, is supported on both HP-UX 11i for HP 9000 and HP-UX 11i v2 for HP Integrity. The 32-bit version of DB2 is only supported on the HP 9000 version of the HP-UX operating system. The following table summarizes the support matrix for DB2 for HP-UX.
Table 1. DB2 Enterprise Edition support matrix for HP-UX operating systems
DB2 version End-of-service date HP-UX 11.0 (32-bit)
HP-UX 11i (32-bit)
HP-UX 11.0 (64-bit)
HP-UX 11i (64-bit)
HP-UX 11i v2 (Integrity) (64-bit)
7.1 06/30/03 X X X X 7.2 09/30/04 X X X X 8.1 TBD X X X
Rev. 1.0 5
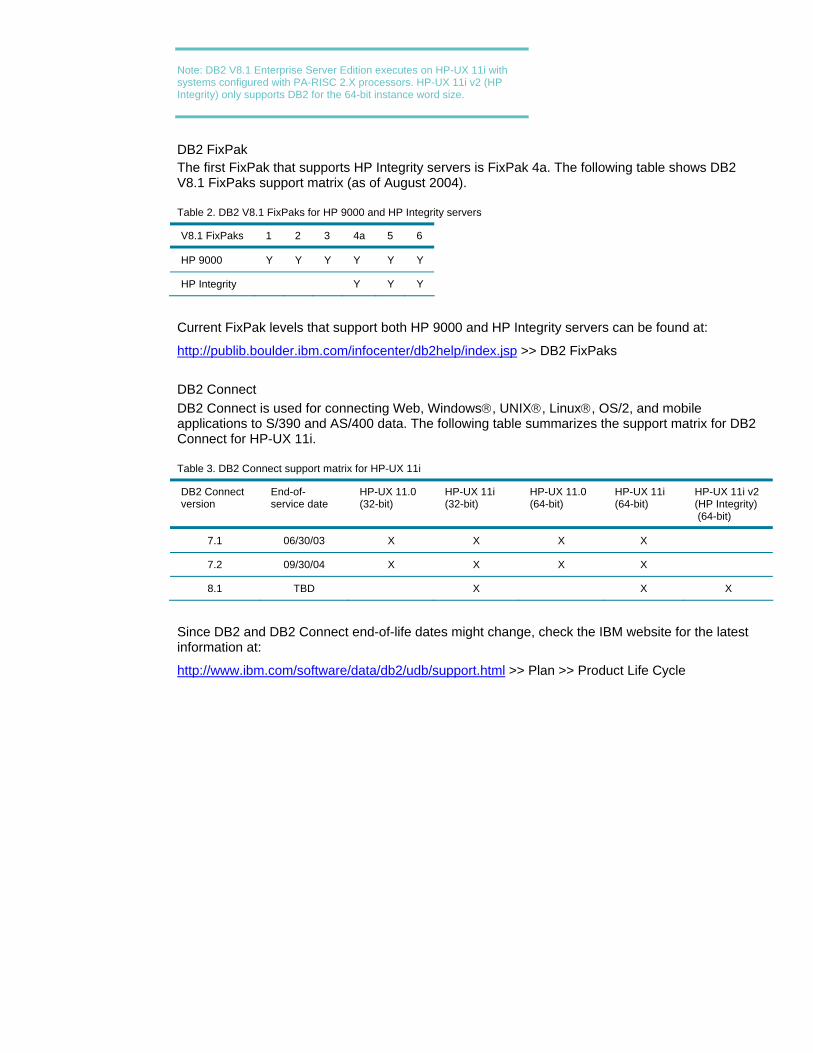
Note: DB2 V8.1 Enterprise Server Edition executes on HP-UX 11i with systems configured with PA-RISC 2.X processors. HP-UX 11i v2 (HP Integrity) only supports DB2 for the 64-bit instance word size.
DB2 FixPak The first FixPak that supports HP Integrity servers is FixPak 4a. The following table shows DB2 V8.1 FixPaks support matrix (as of August 2004).
Table 2. DB2 V8.1 FixPaks for HP 9000 and HP Integrity servers
V8.1 FixPaks 1 2 3 4a 5 6
HP 9000 Y Y Y Y Y Y
HP Integrity Y Y Y
Current FixPak levels that support both HP 9000 and HP Integrity servers can be found at:
http://publib.boulder.ibm.com/infocenter/db2help/index.jsp >> DB2 FixPaks
DB2 Connect DB2 Connect is used for connecting Web, Windows®, UNIX®, Linux®, OS/2, and mobile applications to S/390 and AS/400 data. The following table summarizes the support matrix for DB2 Connect for HP-UX 11i.
Table 3. DB2 Connect support matrix for HP-UX 11i
DB2 Connect version
End-of-service date
HP-UX 11.0 (32-bit)
HP-UX 11i (32-bit)
HP-UX 11.0 (64-bit)
HP-UX 11i (64-bit)
HP-UX 11i v2 (HP Integrity) (64-bit)
7.1 06/30/03 X X X X
7.2 09/30/04 X X X X
8.1 TBD X X X
Since DB2 and DB2 Connect end-of-life dates might change, check the IBM website for the latest information at:
http://www.ibm.com/software/data/db2/udb/support.html >> Plan >> Product Life Cycle
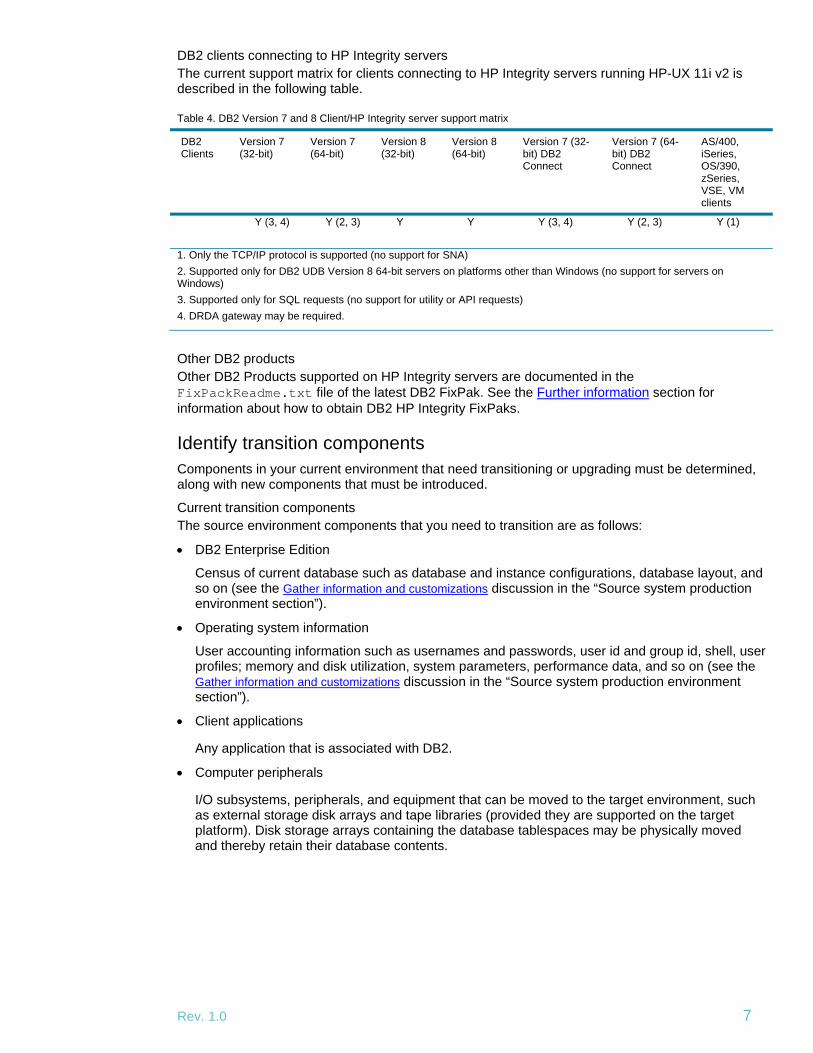
DB2 clients connecting to HP Integrity servers The current support matrix for clients connecting to HP Integrity servers running HP-UX 11i v2 is described in the following table.
Table 4. DB2 Version 7 and 8 Client/HP Integrity server support matrix
DB2 Clients
Version 7 (32-bit)
Version 7 (64-bit)
Version 8 (32-bit)
Version 8 (64-bit)
Version 7 (32-bit) DB2 Connect
Version 7 (64-bit) DB2 Connect
AS/400, iSeries, OS/390, zSeries, VSE, VM clients
Y (3, 4) Y (2, 3) Y Y Y (3, 4) Y (2, 3) Y (1)
1. Only the TCP/IP protocol is supported (no support for SNA) 2. Supported only for DB2 UDB Version 8 64-bit servers on platforms other than Windows (no support for servers on Windows) 3. Supported only for SQL requests (no support for utility or API requests) 4. DRDA gateway may be required.
Other DB2 products Other DB2 Products supported on HP Integrity servers are documented in the FixPackReadme.txt file of the latest DB2 FixPak. See the Further information section for information about how to obtain DB2 HP Integrity FixPaks.
Identify transition components Components in your current environment that need transitioning or upgrading must be determined, along with new components that must be introduced.
Current transition components The source environment components that you need to transition are as follows:
• DB2 Enterprise Edition
Census of current database such as database and instance configurations, database layout, and so on (see the Gather information and customizations discussion in the “Source system production environment section”).
• Operating system information
User accounting information such as usernames and passwords, user id and group id, shell, user profiles; memory and disk utilization, system parameters, performance data, and so on (see the Gather information and customizations discussion in the “Source system production environment section”).
• Client applications
Any application that is associated with DB2.
• Computer peripherals
I/O subsystems, peripherals, and equipment that can be moved to the target environment, such as external storage disk arrays and tape libraries (provided they are supported on the target platform). Disk storage arrays containing the database tablespaces may be physically moved and thereby retain their database contents.
Rev. 1.0 7
• Additional products
Other IBM or third-party products executing on the source system database server that need to be transitioned.
• Technical skills
Technical skills need to be updated to include HP-UX 11i training for HP Integrity servers.
New transition components New hardware, software, and environmental components introduced with the transition are:
• HP Integrity server hardware and peripherals • Computer (amount of memory, disks, and CPUs) • New external storage (SAN, RAID) • Network (routers, adapters, switches) • Environment • Power requirements • Air conditioning • Computer room • Software • Operating system (HP-UX 11i v2 or above) • Operating system patches • DB2 Universal database • Other HP Integrity servers supported products (IBM, HP, third-party)
Define technical requirements The technical requirements for both hardware and software must be reviewed. This includes not only the production environment, but also testing, development, and application upgrading environments. Although each will have its own hardware and software requirements, this paper only focuses on the requirements for the new database server. Hardware and software references which may help define the technical requirements follow.
Hardware requirements Environmental requirements for HP Integrity servers are available at:
http://www.hp.com » Servers
Information on operating system support for different data storage equipment can be found on:
http://www.hp.com >> Storage or the Storage Vendor’s website
Depending on the transition method, temporary storage for database backup and restore may be required on both servers. The network between servers must have sufficient bandwidth to move the database in a reasonable timeframe if its contents are to be transferred by networking, and not by physically moving storage equipment to the target environment.
Software requirements Reference sources for DB2 software follow.
DB2 support http://www.ibm.com/software/data/db2/udb/support.html
DB2 Information Center http://publib.boulder.ibm.com/infocenter/db2help/index.jsp
DB2 operating system requirements, including required operating system patches, can be found at the DB2 Information Center. DB2 release notes and documentation can be found at the DB2 support web page, but product installation notes are only found on the product CD-ROM. Alternatively, the FixPackReadme.text file for DB2 FixPaks contains the required operating system patch level and also a DB2 product list for HP Integrity servers. See the Other DB2 products section in this document.
HP patches can be found at: http://www.itrc.hp.com
HP-UX 11i documents can be found at: http://www.docs.hp.com
Note: The release notes for DB2 V8.1 FixPak 4+ state the following: Database migration for HP-UX on IA64 Database migration is not supported for DB2 for HP-UX on IA64 throughout the Version 8.x releases. Restoring a Version 7 DB2 backup image to a Version 8 instance is not supported on DB2 for HP-UX on IA64.
The term Database migration, as used by IBM, refers to migration of the database to a newer version (as distinct from a different platform). It does not mean that DB2 database transition to HP Integrity servers is not supported throughout the Version 8.x releases.
Define transition strategy Your plan should include a step-by-step transition process description, along with plans for in-process testing and acceptance testing of the new environment in your transition strategy. Moving the database itself will probably require the most time, possibly imposing some planned production downtime. How much downtime you will need and how much is allowable will influence your selection of a database moving method.
Defining the transition process Defining the overall transition process, deciding whether to implement a DB2 migration, and selecting the method for moving the database are very important technical requirements. The implementation section of this document outlines the transition process and should be part of your transition strategy. Your transition process may also include prototyping this transition process with a test environment before actually using the production environment.
Rev. 1.0 9
Test plan and acceptance criteria The objective of a test plan is to prescribe tests that ensure that your production environment performs properly following the transition. You may want to check the performance of your target system and conduct scalability tests to ensure that it can grow along with your business. Make sure that the functionality of all your critical business processes is tested and do not forget to test any customizations that may have been implemented.
Allowable production downtime and selecting a database moving method Downtime usually begins when you start your data transfer from your current production system to your target production system. In most cases, the database cannot be used during that time. You can manage when the downtime ends by using one or more tactics. With good planning and testing, you can reduce the amount of production downtime.
General project plan activities Your transition should also include general project plan activities such as: • Identify and schedule staff and equipment resources • Identify and schedule other resources that you may use for the transition • Prepare a contingency plan for unanticipated problems or a plan to back out of the transition
DB2 migration A DB2 migration is necessary only if your current DB2 version is below DB2 v8.1. DB2 migration from V7.2 or below must be performed on your current operating system and may also involve an operating system upgrade to HP-UX 11i.
Note: DB2 V8.1 Enterprise Server Edition executes on HP-UX 11i running on HP 9000 systems configured with PA-RISC 2.X (PA-8x00) processors. You cannot perform a migration to DB2 V8.1 without this CPU version type. The CPU version type can be found using the following command:
root#sam >> Performance Monitor >> System Properties CPU Version: PA 8500 CPU Module 3.0
If your CPU version type is not a PA-RISC 2.X (PA-8x00) type processor, contact your HP account representative or Solution Architect.
The list of steps for migrating to DB2 Version 8 on UNIX is documented at:
http://publib.boulder.ibm.com/infocenter/db2help/index.jsp >> DB2 Universal Database >> Installing a DB2 server on HP-UX >> Migrating DB2 (UNIX)
The migration tool will be invoked by the restore utility when backup images are produced by the previous two versions of DB2. It can also change the 32-bit word size to 64-bit word size on the target system by restoring to an instance with 64-bit word size. The version 8.1 DB2 database instance with 32-bit word size can be backed up on your source system and then restored to your target system with a 64-bit instance word size. Restoring a Version 7 DB2 backup image to a Version 8 instance is not supported on DB2 for HP Integrity servers.
A good reference for the restore command can be found at:
http://publib.boulder.ibm.com/infocenter/db2help/index.jsp >> DB2 Universal Database >> Installing a DB2 server on HP-UX >> index >> RESTORE DATABASE command
DB2 transition implementation steps The DB2 transition implementation steps described in this paper apply to a single partition transition; they must be repeated for multiple partitions.
You can start the DB2 transition to your target environment only when:
• Your source environment DB2 database is at V8.1 or above • The same DB2 version exists on both source and target systems if the transition method involves
moving storage media or hardware to the target system with the database intact. It is highly recommended that the same FixPak level exist on both source and target systems.
The db2level utility can report this information (see step 2d in Appendix B for an example of how to use this command).
A DB2 transition to HP Integrity is a multistep process performed on both the source and target environments. Figure 1 shows the overall steps, including the DB2 implementation transition steps. Steps performed on the source system for reviewing and saving current environment information should be done before making any attempt to move the database. This is followed by selecting a method for moving the database that best suits your environment. Steps that initiate and finalize the transition are then performed on the target system.
Source system (HP 9000) production environment Gather information and customizations You need to collect the following items of information from your source system DB2 database server and transfer them to your HP Integrity server using a UNIX utility such as ftp:
• Database parameters configuration Database configuration, database manager configuration, and DB2 instance registry variables should be reviewed and saved to files. The same database parameters should be used on the target system, with some minor modifications for performance optimization. Step 2 in Appendix A shows examples of how to save these database parameter configurations.
• Database tablespace information The database layout of your current configuration should be saved and analyzed. The configuration should include information about all the tablespaces and their details, including container information. This information is necessary for restoring a database to the HP Integrity server and for identifying tablespaces on data storage that may be moved to the HP Integrity server. Step 3 in Appendix A shows examples of how to obtain this information.
• UNIX accounting information Information such as login name, user id, group name, group id, user profile, and so on, including a list of environmental variables and shell information should be saved for all DB2 instances, fenced, and das users that are being transitioned. These are useful information that must be applied to the HP-UX Integrity server. Step 2c in Appendix B shows how to obtain this information.
Rev. 1.0 11
• DB2 database checks The current database version, FixPak level, and number of bits in the instance must be verified to see if it is supported on the HP Integrity server. Step 2d in Appendix B shows how to obtain this information.
The logs in the instance home directory under /sqllib/db2dump and /sqllib/log should also be examined for errors. Transitioning a corrupted database can cause unforeseen problems.
$cd /home/db2udb8/sqllib/db2dump $cat db2diag.log $cd /home/db2udb8/sqllib/log $ls
• Device information Device information for storage devices that are planned to be moved must be saved to file. This information is essential for the HP-UX operating system to recognize and associate it with the appropriate file systems or raw devices that the database uses. Appendix B lists the commands necessary to move a storage array to the target system.
If new storage is purchased for the target environment, a file system layout (for example, /etc/fstab) can help you create file systems similar to those of your source system. If new storage is to be used for raw devices, the characteristics of the raw device must be determined (use lvdisplay –v or diskinfo –b).
• Performance metrics
Consider collecting performance data on both the source and target databases so that you can compare them. You can accomplish using db2 get snapshot or db2expln utilities. Also, consider running test queries on highly used transactions and record the db2expln output for each query.
Note: IBM has many DB2 tools that you can use to monitor performance. These tools can be found on the IBM website:
http://www.ibm.com/software/data/db2imstools/
You can monitor HP-UX performance by using the glance or gpm utilities. You should record CPU, I/O, and memory metrics while the database is in operation. If any of the observed metrics indicate performance problems, they can be addressed by tuning on the HP Integrity server.
Reviewing and saving the above information is essential for creating a target environment with appropriately similar functionality and characteristics.
DB2 backup No matter which moving method you decide to use, a full offline backup is highly recommended to ensure consistency of the data.
Transfer method The usual way to transfer DB2 database contents between different operating systems is to use utilities that export and import the database in an endian-neutral and internal data type-neutral manner.
Endianism refers to the way in which data is stored and bytes are addressed for multi-byte data types (floating point numbers, for example). Different operating systems may have different endianism along with different internal byte representation for a data type. HP-UX 11i for both HP 9000 and HP Integrity servers stores data as most significant byte first (big-endian) and its internal byte representations are the same.
Therefore, you can use utilities like backup/restore, which stores data in internal format, for the transition. Moving storage media is also an acceptable solution since the internal file storage formats between operating systems are the same.
Information regarding the different DB2 moving methods can be found in the following DB2 Product Manuals:
• Data Recovery and High Availability Guide and Reference • Data Movement Utilities Guide and Reference
For the laboratory test, HP chose the following two methods for ease-of-use:
• Backup/restore – This is the recommended method if new external storage devices are to be used with the HP Integrity server. DB2 backup is very fast. HP recommends that you perform the prudent step of taking a backup before starting any method of database transitioning. DB2 restore will allow you to change the disk layouts of your database for better performance. The main drawback to this method is the loss of production time while moving the data across the network and restoring the database. This may be a problem for moving large databases. This method is described in Appendix A: DB2 database backup/restore (redirected).
• Moving storage media – This method is of great advantage for ease of transition and for minimal downtime. The database is transitioned by simply moving the storage hardware on which the database resides to the HP Integrity server. Of course, storage that is to be moved must be supported on the target HP Integrity server. The path to the data must be preserved. This could be file path for file systems or device path for raw devices. A full offline backup is recommended before using this method. This method is described in Appendix B: Retaining (detach/attach) external database storage.
Target system (HP Integrity) environment Once your target server is up and running with proper versions of HP-UX 11i and DB2, you need to do the following:
1. Install DB2 FixPak, patches, and other products 2. Apply the information and customizations gathered from the HP 9000 server 3. Implement the database moving method that was selected 4. Perform necessary post-transition steps 5. Test and tune 6. Move the database server to production
Rev. 1.0 13
Install DB2, FixPak, patches, and other products On its website, IBM has documented the steps to install DB2 on servers running HP-UX 11i. These steps are found by navigating to:
http://publib.boulder.ibm.com/infocenter/db2help/index.jsp >> DB2 Universal Database >> Installing a DB2 server on HP-UX
On this website there are links to:
• Modify kernel parameters for DB2 • Mount the DB2 installation CD-ROM • Start the DB2 Setup wizard to install DB2 • Apply the latest FixPak • Verify the installation using the command line processor (CLP) • Install the DB2 online documentation • Memory requirements for servers (UNIX) • Disk requirements for DB2 servers (UNIX) • Installation requirements for DB2 servers (HP-UX)
See the Software requirements section of this document for required version, bundles, and patches for HP Integrity server, DB2 FixPaks, and information on how to obtain them.
The DB2 Setup wizard allows you to view installation prerequisites (minimum hardware and software requirements which include installation notes which are only available on the CD-ROM) and the release notes.
Apply gathered information and customizations After you have installed DB2, you can apply the information collected from your DB2 source server to the newly created target server.
• Device information – file systems and raw devices If you physically move the storage system to the target server, carry out steps 11 through 18 in Appendix B so that the database can recognize the data on the moved storage system.
If you used a file system for your database, you can use the /etc/fstab from your source server to generate a file system on the target server.
If you plan to use files larger than 2GB, you must enable large file support. Check /etc/fstab or use a utility like sam to see if you are currently using this option. The fsadm and fsadm_hfs man pages show you how to enable large file support. HP recommends that you do enable large file support.
• UNIX accounting information The account information for all DB2 users on the target system should be the same as its source system counterpart. Step 11d in Appendix B shows an example for performing this task.
Implement database move method Once you have chosen a database moving method, you can begin moving the database from the source system to the target system. Steps for the two methods HP tested (using a laboratory test setup described later in this document) are documented in Appendix A and Appendix B.
The database backup/resto e method does not need an existing empty database to be created before data is restored to the target server. It only needs adequate storage space for the backup image, and either a file, device, or path for each tablespace. The retaining external database storage method only needs cable redirection between computer storage interfaces (most likely PCI fibre adapters) and the external storage disk array. The external storage disk array must be a type supported by the HP Integrity server. A full offline database backup is highly recommended before attempting a transition of the storage disk array to the HP Integrity server.
r
For other moving methods see the Transfer method section for further information.
Post-transition steps HP recommends the following steps on the target database server after you have completed moving the database from the source server:
1. Indexes, triggers, constraints –- the two moving methods mentioned in this paper do not need any manually performed indexes, triggers, or constraints intervention. Other moving methods may require you to perform these tasks manually.
2. Database and instance configurations – you must evaluate and update all DB2 instance registry variables, database, and database manager parameters. Copies of these variables and parameters for the source server are saved to files in the Gather information and customizations step. Evaluate, compare, and change these variables as needed for the target server. Also, modify UNIX service and registry service, and make sure that the dbm svcename has been updated. An example of this step is shown in step 7 in Appendix A.
3. Execute the DB2 runstats utility to update the database statistics; this ensures that the best access plan will be used in your HP Integrity database environment. You must update the statistics for all tables in the database. Before performing this task, HP also recommends that you re-compute the database manager cpuspeed by setting it to -1 before executing runstats.
db2 update dbm cfg using cpuspeed -1;
Note: A recycle of the DB2 instance is necessary for this step to become effective
The following script, called mk_runstat.sql, generates a new script that updates all table statistics: $vi mk_runstats.sql select 'runstats on table ' || tabschema || '.' || tabname || ' with distribution and indexes all;' from syscat.tables where type = 'T' and tabschema <> 'SYSIBM';$ $db2 –tvf mk_runstats.sql > runstat_all_tables.sql
An example implementation of this step is shown in step 8 in Appendix A.
4. Check the database logs for errors for each database instance. The logs can be found in the home directory under /sqllib/db2dump.
$cd /home/db2udb8/sqllib/db2dump $cat db2diag.log $cd ../log $ls
5. Verify that the amount of used pages per tablespace is consistent with the amount of used pages before the transition. Perform db2 list tablespace show detail and compare it to the information collected in Gather information and customizations section.
Rev. 1.0 15
6. Catalog a new TCPIP node with the IP address of your HP Integrity database server for all clients using the source database server, as illustrated by the following example commands executed on a client: $db2 catalog tcpip node nova208 remote 192.140.12.10 server 50000 $db2 terminate $db2 catalog db om88 at node nova208
Note: Refer to Table 4 of this document for a list of supported clients that can communicate with the HP Integrity server.
7. Using the backup/restore method will automatically rebind all of the DB2 packages. DB2 packages must be rebound manually (using the BIND command, REBIND command, or the db2rbind utility) when using the moving storage media method.
8. SQL procedures must be dropped and recreated:
a. Un-catalog any native language stored procedures/UDFs (C or C++):
$db2 drop procedure <procedure name> # drop the procedure
b. Rebuild all native language DB2 applications and native language stored procedures/UDFs compiled to Itanium format (the DB2 Application Development Guide Building and Running Applications contains examples for this step).
c. Re-catalog any native language stored procedures/UDFs(C or C++) by recreating the procedure:
$db2 create procedure <procedure name>
9. All external libraries referencing DB2 must be rebuilt on HP Integrity server.
Test and tune Test and tune your newly created DB2 database server before moving it to production. It is important to determine that your critical business processes are working properly and that your DB2 database server is delivering optimal performance.
• Test plan and acceptance criteria Test your new database server by executing the test plan you prepared (see the Test plan and acceptance criteria section).
• Tune HP recommends that you tune the new HP Integrity database as described in BM DB2 Universal Database Administration Guide: Perfo mance Version 8. The new environment is different and may require different operating system and database parameters.
Ir
As part of this process, you can run, on the target system, the same test queries you ran on the source system before the transition (see the performance metrics discussion). Compare the results. If they are not favorable, look at the output of db2expln command for the query for indications as to the cause. Another source of information is a comparison to the performance data collected on the HP 9000 source server.
Performance monitoring is necessary for tuning. Monitor memory, CPU, and I/O performance of your new configuration. Tune the system, application, and database as necessary. Use the statistics and transaction and query response times obtained earlier from the source database server to judge whether there is a performance problem with the new server (see the Gather information and customizations section).
Insufficient memory, CPU, and I/O resources can create performance bottlenecks and degradation. Monitor these resources with utilities such as GPM, glance, sar, vmstat, and iostat. Differences in disk layouts, memory, and kernel design can also affect performance. Both operating system configuration and database configuration parameters may need tuning.
HP-UX 11i tuning documentation can be found on the HP documentation website: http://www.docs.hp.com
Both HP and IBM offer training that can assist you in tuning both HP-UX 11i and IBM DB2.
Move to production When you have completed all tests and are satisfied with the system’s performance, you can move your new DB2 HP Integrity database server to production use.
Laboratory transition test setup An application benchmark performance kit for a well-known supply chain management software application was used to simulate and check the two selected transition moving methods. This application stores its application objects within the database, along with the application data. It uses a four-tier architecture (client, web, application, and database tiers). The size of the DB2 V8.1 FixPak 6 database used for the benchmark is approximately 20GB of raw data.
The benchmark simulates 300 online users using Mercury LoadRunner software with a level of business process validation. A Mercury Quick Test Professional client is used to simulate a user that records benchmark timings and web page validation of the business process.
To test and validate the transition, HP executed the benchmark, validated the benchmark row counts, and executed the application’s integrity check of its application database objects. The tests only involved moving a single instance with tablespaces of type file and path. Tablespaces of type device (raw device) were not tested, even though the appendices include information regarding that use.
The test environment is shown in Figure 2. For the method of DB2 database backup/restore (redirected), both VA74xx storage arrays were used. For the method of retaining (detach/attach) external database storage, the VA74xx attached to the HP 9000 database server was moved to the HP Integrity database server as a step of the transition, replacing the original VA74xx.
Appendix A and Appendix B show the steps and logic used to migrate DB2 V8.1 FixPak 6 from HP 9000 to HP Integrity server running HP-UX 11i v2. The actual shell commands used are shown in boldface. The command line prompt for the DB2 instance owner user is shown as $, while that of the root user is shown as root#.
Rev. 1.0 17
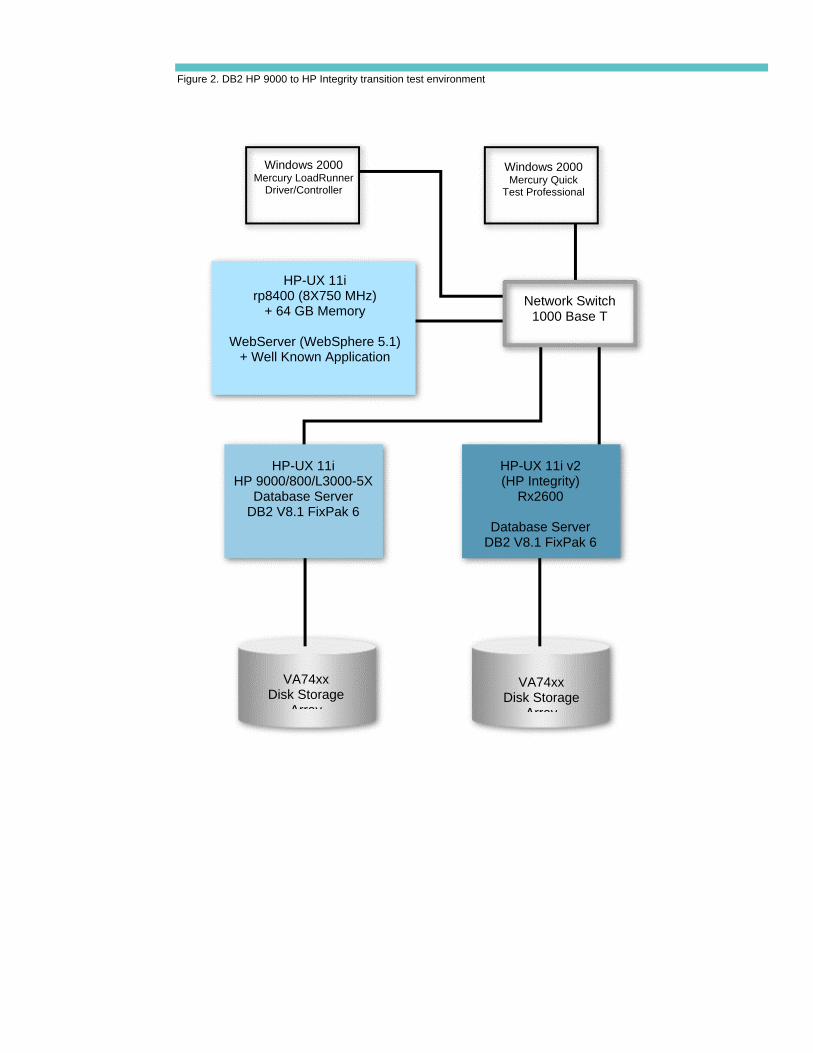
Figure 2. DB2 HP 9000 to HP Integrity transition test environment
Network Switch 1000 Base T
VA74xx Disk Storage
Array
VA74xx Disk Storage
Array
HP-UX 11i v2 (HP Integrity)
Rx2600
Database Server DB2 V8.1 FixPak 6
HP-UX 11i HP 9000/800/L3000-5X
Database Server DB2 V8.1 FixPak 6
HP-UX 11i rp8400 (8X750 MHz)
+ 64 GB Memory
WebServer (WebSphere 5.1) + Well Known Application
Windows 2000 Mercury Quick
Test Professional
Windows 2000 Mercury LoadRunner
Driver/Controller
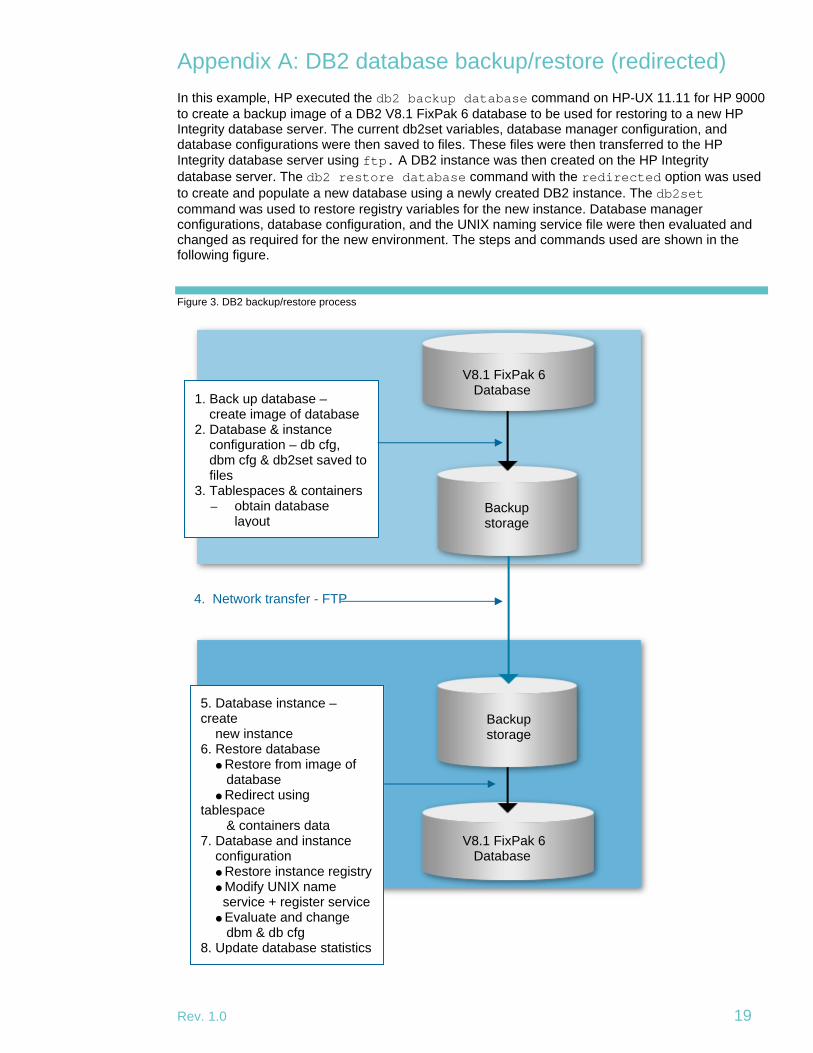
Appendix A: DB2 database backup/restore (redirected) In this example, HP executed the db2 backup database command on HP-UX 11.11 for HP 9000 to create a backup image of a DB2 V8.1 FixPak 6 database to be used for restoring to a new HP Integrity database server. The current db2set variables, database manager configuration, and database configurations were then saved to files. These files were then transferred to the HP Integrity database server using ftp. A DB2 instance was then created on the HP Integrity database server. The db2 restore database command with the redirected option was used to create and populate a new database using a newly created DB2 instance. The db2setcommand was used to restore registry variables for the new instance. Database manager configurations, database configuration, and the UNIX naming service file were then evaluated and changed as required for the new environment. The steps and commands used are shown in the following figure.
Figure 3. DB2 backup/restore process
V8.1 FixPak 6 Database
����� ��� ��� �����
1. Back up database – create image of database 2. Database & instance configuration – db cfg, dbm cfg & db2set saved to files 3. Tablespaces & containers
– obtain database layout
4. Network transfer - FTP
����� ��� �� ���
���������� 5. Database instance – create new instance 6. Restore database Restore from image of database Redirect using tablespace & containers data 7. Database and instance configuration Restore instance registry Modify UNIX name service + register service Evaluate and change dbm & db cfg 8. Update database statistics
Backup storage
Backup storage
V8.1 FixPak 6 Database
Rev. 1.0 19
DB2 database backup/restore is a viable option for the transition because endianism1 is identical for HP-UX on HP 9000 servers and HP-UX 11i v2 on HP Integrity servers. DB2 Data Recovery and High Availability Guide and Reference V8 documents the backup/restore procedure. It also shows how to optimize DB2 backup/restore. Several IBM white papers relate to this method and may assist you in the transition. See the Further information section for specific references.
HP-UX 11.11 (running on the HP 9000 server) The DB2 database was backed up to a local drive using db2 backup database. Selected database information for the transition was saved to files.
1. Make a full offline backup image of the DB2 database: $db2 backup database om88 to /internal/backup
Note: A full offline database backup is highly recommended.
2. Save database & instance configuration to files: $cd /internal/backup $db2 connect to om88
Database Connection Information Database server = DB2/HP64 8.1.6 SQL authorization ID = DB2UDB8 Local database alias = OM88 $db2set –all > db2set_all.txt $db2 get dbm cfg > db2_get_dbm_cfg.txt $db2 get db cfg > db2_get_db_cfg.txt
3. Obtain database layout (tablespaces & containers).
a) List the tablespace information:
$db2 list tablespaces show detail > db2_list_tablespaces.txt $cat db2_list_tablespaces.txt Tablespaces for Current Database Tablespace ID = 0 Name = SYSCATSPACE Type = System managed space Contents = Any data State = 0x0000 Detailed explanation: Normal Total pages = 579131 Useable pages = 579131 Used pages = 579131 Free pages = Not applicable High water mark (pages) = Not applicable Page size (bytes) = 4096 Extent size (pages) = 8 Prefetch size (pages) = 32 Number of containers = 1 Tablespace ID = 1 Name = TEMPSPACE1 Type = System managed space Contents = System Temporary data State = 0x0000 Detailed explanation: Normal Total pages = 251 Useable pages = 251
1 Endianism refers to the way in which data is stored and defines how bytes are addressed in multi-byte data types.
Used pages = 251 Free pages = Not applicable High water mark (pages) = Not applicable Page size (bytes) = 4096 Extent size (pages) = 8 Prefetch size (pages) = 32 Number of containers = 3 Tablespace ID = 2 Name = USERSPACE1 Type = Database managed space Contents = Any data State = 0x0000 Detailed explanation: Normal Total pages = 4200000 Useable pages = 4199952 Used pages = 2586184 Free pages = 1613768 High water mark (pages) = 2586184 Page size (bytes) = 4096 Extent size (pages) = 8 Prefetch size (pages) = 32 Number of containers = 6 Tablespace ID = 3 Name = USERSPACE1IDX Type = Database managed space Contents = Any data State = 0x0000 Detailed explanation: Normal Total pages = 2100000 Useable pages = 2099952 Used pages = 1086760 Free pages = 1013192 High water mark (pages) = 1086760 Page size (bytes) = 4096 Extent size (pages) = 8 Prefetch size (pages) = 32 Number of containers = 6
b) List the tablespace container information for each Tablespace ID in the above listing:
$db2 list tablespace containers for 0 show detail > table0.txt $db2 list tablespace containers for 1 show detail > table1.txt $db2 list tablespace containers for 2 show detail > table2.txt $db2 list tablespace containers for 3 show detail > table3.txt
Transferring data to the HP Integrity server The ftp utility was used to transfer the backed up data and select database information. You can use other data transferring method, such as rcp or NFS. (NFS does not require additional storage for another copy of the database backup image.)
4. ftp all files that were collected in the previous steps to the HP Integrity server:
$ FTP nova208
Rev. 1.0 21
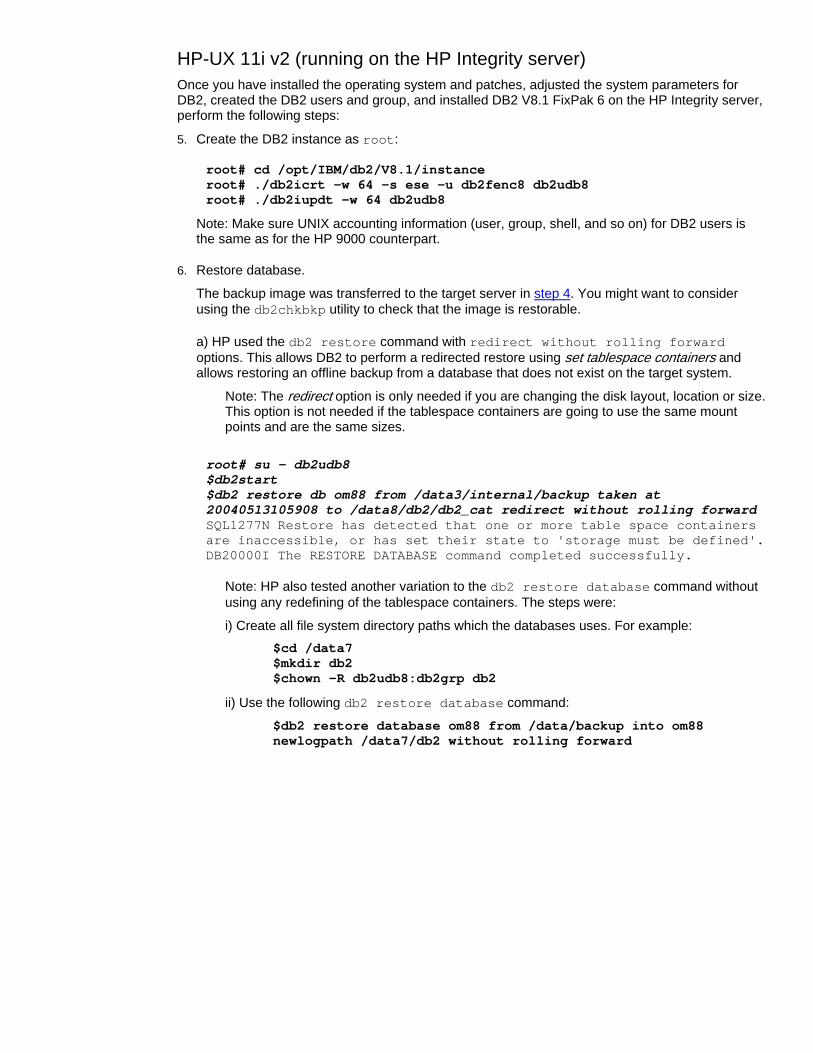
HP-UX 11i v2 (running on the HP Integrity server) Once you have installed the operating system and patches, adjusted the system parameters for DB2, created the DB2 users and group, and installed DB2 V8.1 FixPak 6 on the HP Integrity server, perform the following steps:
5. Create the DB2 instance as root:
root# cd /opt/IBM/db2/V8.1/instance root# ./db2icrt –w 64 –s ese –u db2fenc8 db2udb8 root# ./db2iupdt -w 64 db2udb8
Note: Make sure UNIX accounting information (user, group, shell, and so on) for DB2 users is the same as for the HP 9000 counterpart.
6. Restore database.
The backup image was transferred to the target server in step 4. You might want to consider using the db2chkbkp utility to check that the image is restorable.
a) HP used the db2 restore command with redirect without rolling forward options. This allows DB2 to perform a redirected restore using set tablespace containers and allows restoring an offline backup from a database that does not exist on the target system.
Note: The redirect option is only needed if you are changing the disk layout, location or size. This option is not needed if the tablespace containers are going to use the same mount points and are the same sizes.
root# su – db2udb8 $db2start $db2 restore db om88 from /data3/internal/backup taken at 20040513105908 to /data8/db2/db2_cat redirect without rolling forward SQL1277N Restore has detected that one or more table space containers are inaccessible, or has set their state to 'storage must be defined'. DB20000I The RESTORE DATABASE command completed successfully.
Note: HP also tested another variation to the db2 restore database command without using any redefining of the tablespace containers. The steps were:
i) Create all file system directory paths which the databases uses. For example: $cd /data7 $mkdir db2 $chown –R db2udb8:db2grp db2
ii) Use the following db2 restore database command:
$db2 restore database om88 from /data/backup into om88 newlogpath /data7/db2 without rolling forward
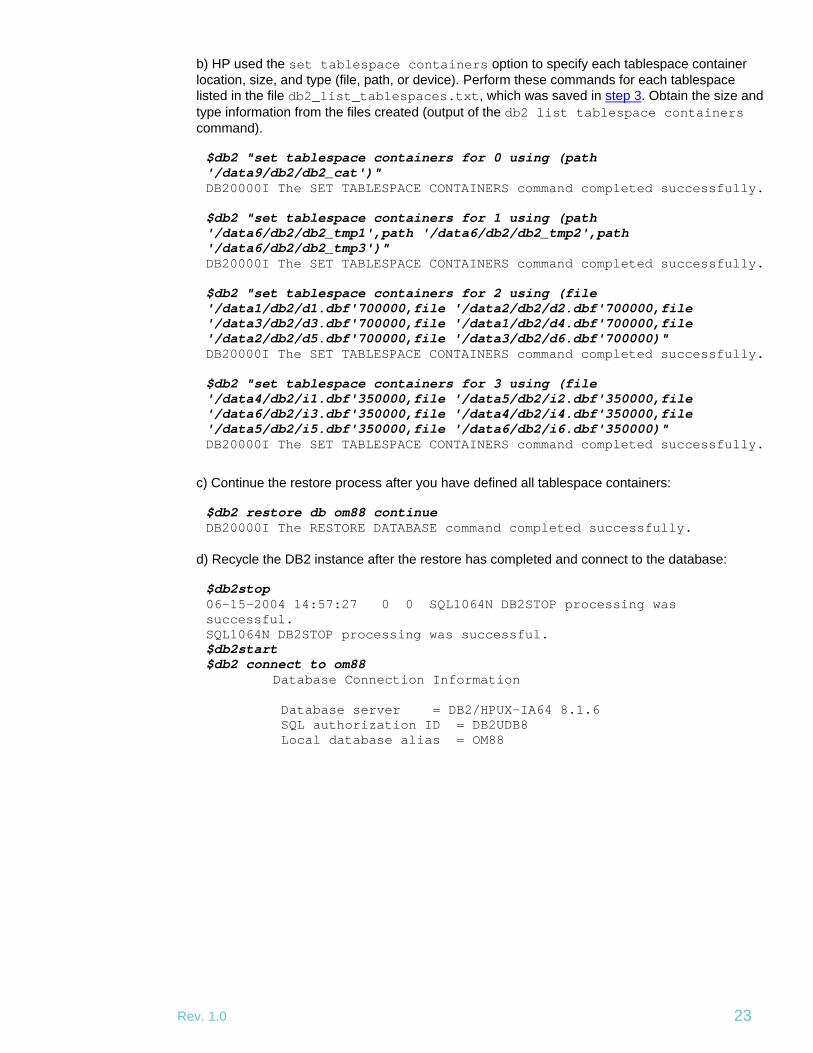
b) HP used the set tablespace containers option to specify each tablespace container location, size, and type (file, path, or device). Perform these commands for each tablespace listed in the file db2_list_tablespaces.txt, which was saved in step 3. Obtain the size and type information from the files created (output of the db2 list tablespace containers command). $db2 "set tablespace containers for 0 using (path '/data9/db2/db2_cat')" DB20000I The SET TABLESPACE CONTAINERS command completed successfully. $db2 "set tablespace containers for 1 using (path '/data6/db2/db2_tmp1',path '/data6/db2/db2_tmp2',path '/data6/db2/db2_tmp3')" DB20000I The SET TABLESPACE CONTAINERS command completed successfully. $db2 "set tablespace containers for 2 using (file '/data1/db2/d1.dbf'700000,file '/data2/db2/d2.dbf'700000,file '/data3/db2/d3.dbf'700000,file '/data1/db2/d4.dbf'700000,file '/data2/db2/d5.dbf'700000,file '/data3/db2/d6.dbf'700000)" DB20000I The SET TABLESPACE CONTAINERS command completed successfully. $db2 "set tablespace containers for 3 using (file '/data4/db2/i1.dbf'350000,file '/data5/db2/i2.dbf'350000,file '/data6/db2/i3.dbf'350000,file '/data4/db2/i4.dbf'350000,file '/data5/db2/i5.dbf'350000,file '/data6/db2/i6.dbf'350000)" DB20000I The SET TABLESPACE CONTAINERS command completed successfully.
c) Continue the restore process after you have defined all tablespace containers: $db2 restore db om88 continue DB20000I The RESTORE DATABASE command completed successfully.
d) Recycle the DB2 instance after the restore has completed and connect to the database: $db2stop 06-15-2004 14:57:27 0 0 SQL1064N DB2STOP processing was successful. SQL1064N DB2STOP processing was successful. $db2start $db2 connect to om88 Database Connection Information Database server = DB2/HPUX-IA64 8.1.6 SQL authorization ID = DB2UDB8 Local database alias = OM88
Rev. 1.0 23
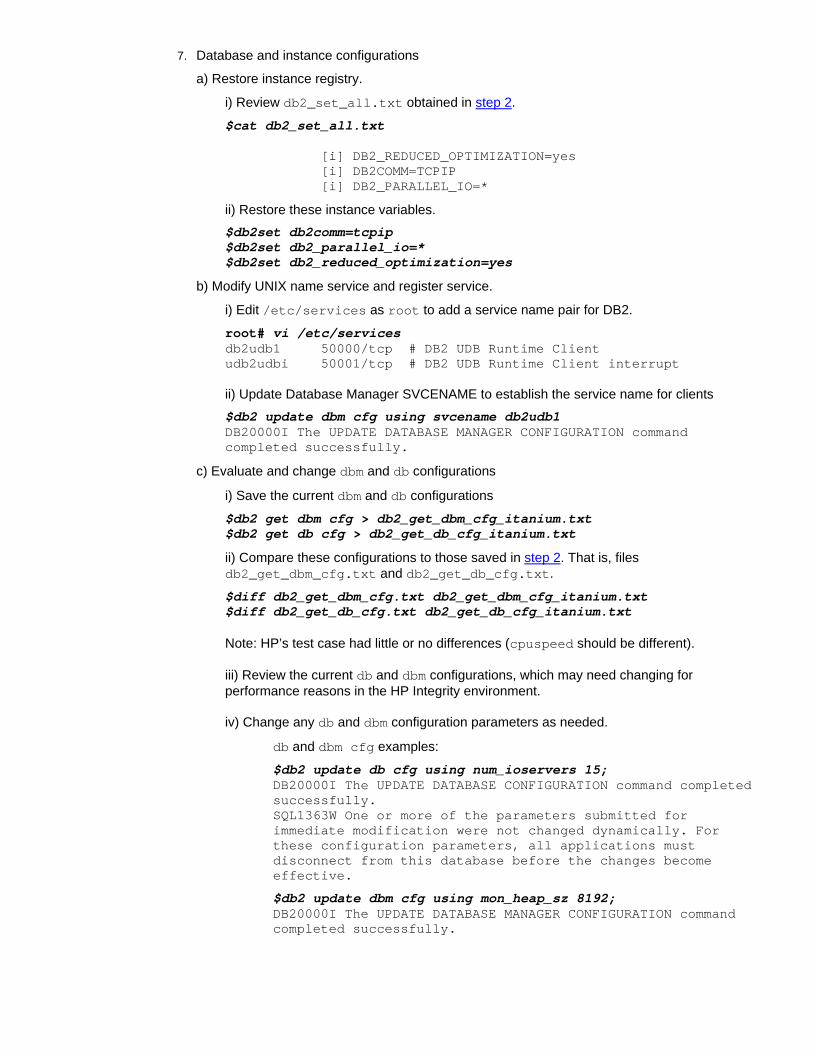
7. Database and instance configurations
a) Restore instance registry.
i) Review db2_set_all.txt obtained in step 2.
$cat db2_set_all.txt [i] DB2_REDUCED_OPTIMIZATION=yes [i] DB2COMM=TCPIP [i] DB2_PARALLEL_IO=*
ii) Restore these instance variables. $db2set db2comm=tcpip $db2set db2_parallel_io=* $db2set db2_reduced_optimization=yes
b) Modify UNIX name service and register service.
i) Edit /etc/services as root to add a service name pair for DB2.
root# vi /etc/services db2udb1 50000/tcp # DB2 UDB Runtime Client udb2udbi 50001/tcp # DB2 UDB Runtime Client interrupt
ii) Update Database Manager SVCENAME to establish the service name for clients $db2 update dbm cfg using svcename db2udb1
DB20000I The UPDATE DATABASE MANAGER CONFIGURATION command completed successfully.
c) Evaluate and change dbm and db configurations
i) Save the current dbm and db configurations
$db2 get dbm cfg > db2_get_dbm_cfg_itanium.txt $db2 get db cfg > db2_get_db_cfg_itanium.txt
ii) Compare these configurations to those saved in step 2. That is, files db2_get_dbm_cfg.txt and db2_get_db_cfg.txt.
$diff db2_get_dbm_cfg.txt db2_get_dbm_cfg_itanium.txt $diff db2_get_db_cfg.txt db2_get_db_cfg_itanium.txt Note: HP’s test case had little or no differences (cpuspeed should be different). iii) Review the current db and dbm configurations, which may need changing for
performance reasons in the HP Integrity environment. iv) Change any db and dbm configuration parameters as needed.
db and dbm cfg examples:
$db2 update db cfg using num_ioservers 15; DB20000I The UPDATE DATABASE CONFIGURATION command completed successfully. SQL1363W One or more of the parameters submitted for immediate modification were not changed dynamically. For these configuration parameters, all applications must disconnect from this database before the changes become effective.
$db2 update dbm cfg using mon_heap_sz 8192; DB20000I The UPDATE DATABASE MANAGER CONFIGURATION command completed successfully.
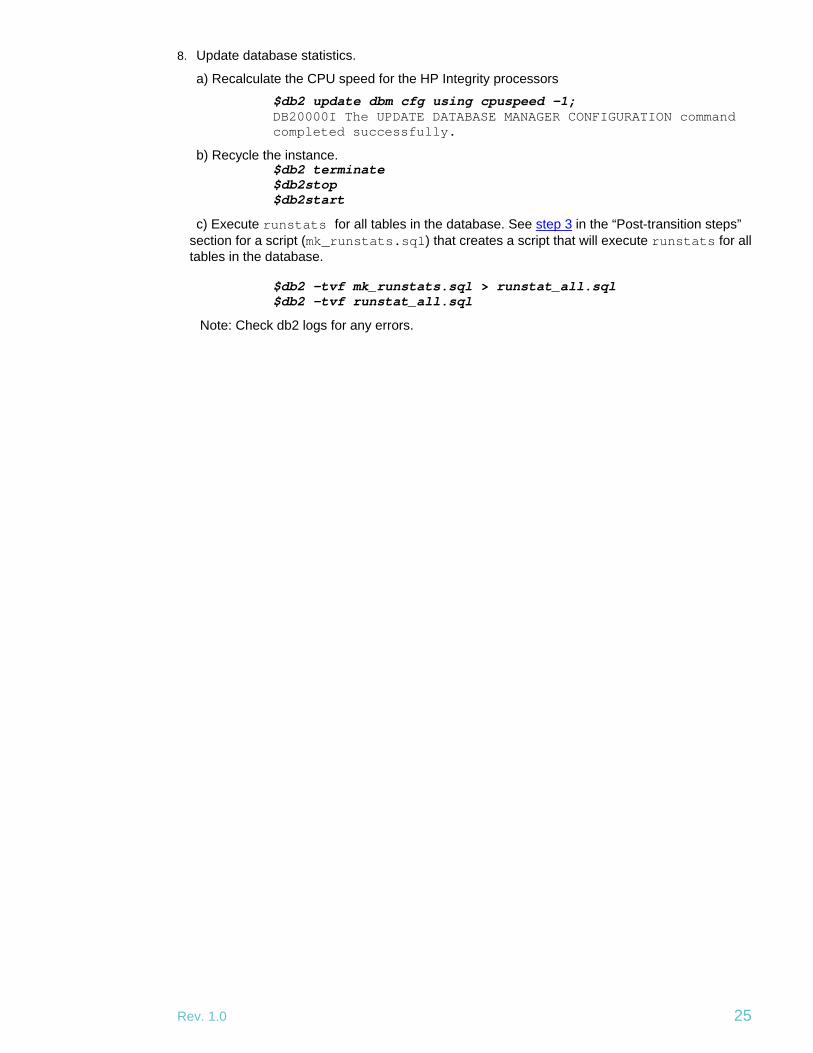
8. Update database statistics.
a) Recalculate the CPU speed for the HP Integrity processors $db2 update dbm cfg using cpuspeed -1;
DB20000I The UPDATE DATABASE MANAGER CONFIGURATION command completed successfully.
b) Recycle the instance. $db2 terminate $db2stop $db2start
c) Execute runstats for all tables in the database. See step 3 in the “Post-transition steps” section for a script (mk_runstats.sql) that creates a script that will execute runstats for all tables in the database.
$db2 –tvf mk_runstats.sql > runstat_all.sql $db2 –tvf runstat_all.sql
Note: Check db2 logs for any errors.
Rev. 1.0 25
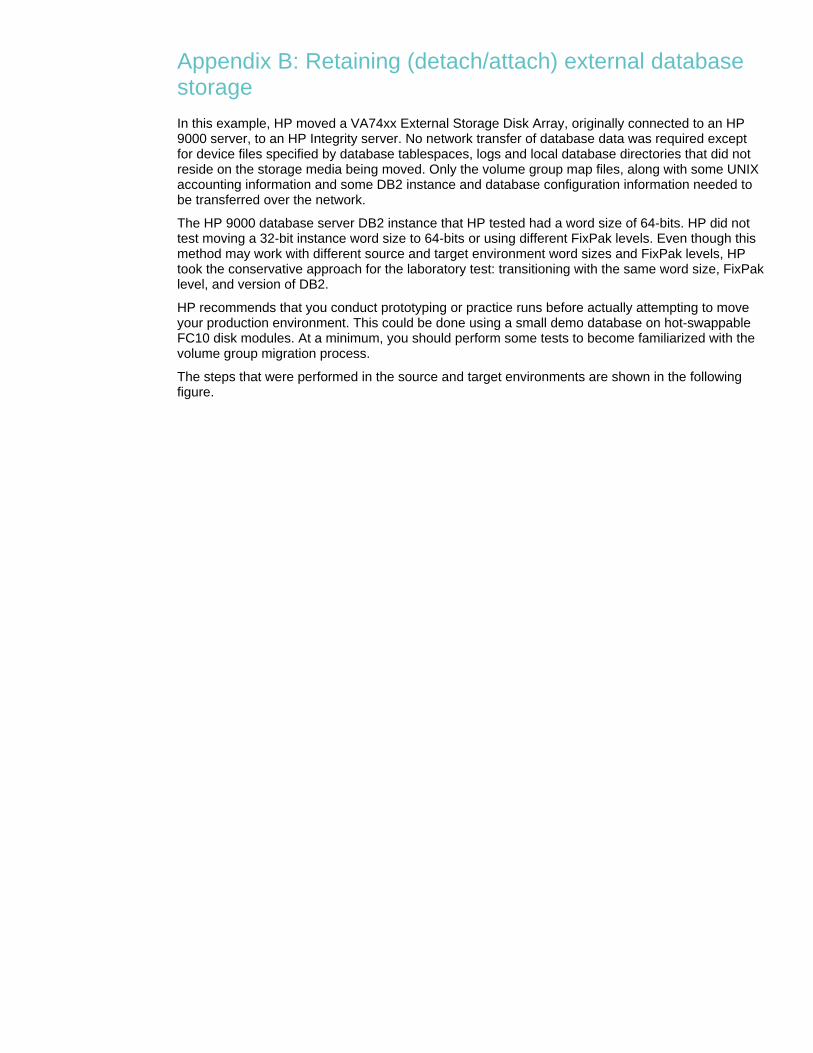
Appendix B: Retaining (detach/attach) external database storage In this example, HP moved a VA74xx External Storage Disk Array, originally connected to an HP 9000 server, to an HP Integrity server. No network transfer of database data was required except for device files specified by database tablespaces, logs and local database directories that did not reside on the storage media being moved. Only the volume group map files, along with some UNIX accounting information and some DB2 instance and database configuration information needed to be transferred over the network.
The HP 9000 database server DB2 instance that HP tested had a word size of 64-bits. HP did not test moving a 32-bit instance word size to 64-bits or using different FixPak levels. Even though this method may work with different source and target environment word sizes and FixPak levels, HP took the conservative approach for the laboratory test: transitioning with the same word size, FixPak level, and version of DB2.
HP recommends that you conduct prototyping or practice runs before actually attempting to move your production environment. This could be done using a small demo database on hot-swappable FC10 disk modules. At a minimum, you should perform some tests to become familiarized with the volume group migration process.
The steps that were performed in the source and target environments are shown in the following figure.
Figure 4. Retaining (detach/attach) external database storage process
R
�������� �������� 8. Detach H/W cables 9. Shut down and attach H/W cables
�
D
DB2 V8.1 Fixpak 6
����� ���
�� �����
2. Gather & save information db & dbm configurations Tablespaces information UNIX account information DB2 and device checks File system information Save owner + group info List database directory
3. Move database contents to external storage 4. Shut down the database and move local database directory to HP Integrity server (if applicable)
�� ���� �����������
ev. 1.0
�
�B2 V8.FixPak 6
�������� ��
���� �
�
FTP
�
�
1
������
VA74xx External Storage Disk Array
FTP
�
��� �����������
�� �10. Boot server
� �����
11. DB
12. C13. C im a14. M15. R16. Da co17. U
5. Drop instance 6. Export volume group to HP Integrity server 7. Shut down computer
1. Back up database
2 consistency check Device files System parameters DB2 version and FixPak UNIX accounting
information Raw devices
reate instance reate device and group,
port volume groups, and ctivate ount file systems e-catalog database tabase and instance nfiguration
pdate database statistics
27
HP-UX 11.11 (running on the HP 9000 server) The DB2 database was backed up to a local drive using db2 backup database command. Selected database and operating system information for the transition was then saved to files.
1. Back up the DB2 database using the db2 backup database command shown in step 1 in Appendix A.
Note: Don’t back up your database to the storage media you plan to move. Perform a full offline backup.
2. Gather and save information.
a) Save the database and instance configuration (as shown in step 2 in Appendix A).
b) Save tablespaces and containers information (as shown in step 3 in Appendix A).
c) UNIX accounting information – use the sam utility or examine the contents of /etc/group and /etc/passwd.
i) Record the group names and group ids for the DB2 instance, fenced, and das users. Group Name: db2grp Group Id: 103
ii) Record the Login name and User ID for the DB2 instance, fenced, and das users Login Name: db2udb8 User ID: 103 Login Name: db2as8 User ID: 104 Login Name: db2fenc8 User ID: 105
d) DB2 and device checks
i) Check the DB2 version by issuing the following command, then record the DB2 version and FixPak level:
$db2level DB21085I Instance "db2udb8" uses "64" bits and DB2 code release "SQL08016" with level identifier "02070106". Informational tokens are "DB2 v8.1.0.56", "s040616", "U497646", and FixPak "6". Product is installed at "/opt/IBM/db2/V8.1".
ii) Check whether all device files used by the database reside on the storage media that is to be moved to the HP Integrity server.
A) List the device files for all disks and determine which device files are associated with the storage media that is moving as user root.
root# ioscan -funC disk > ioscan_pa_risc.txt root# cat ioscan_pa_risc.txt Class I H/W Path Driver S/W State H/W Type Description ========================================================================= disk 0 0/0/2/0.6.0 sdisk CLAIMED DEVICE SEAGATE ST318404LC /dev/dsk/c1t6d0 /dev/rdsk/c1t6d0 disk 1 0/0/2/1.6.0 sdisk CLAIMED DEVICE SEAGATE ST318404LC /dev/dsk/c2t6d0 /dev/rdsk/c2t6d0 disk 54 0/2/0/0.8.0.101.0.0.0 sdisk CLAIMED DEVICE HP A6189A /dev/dsk/c12t0d0 /dev/rdsk/c12t0d0 disk 76 0/2/0/0.8.0.101.0.0.1 sdisk CLAIMED DEVICE HP A6189A /dev/dsk/c12t0d1 /dev/rdsk/c12t0d1 Note: If the device files are not present, try performing an ioscan follow by insf –v.
B) Check the db and dbm configurations (step 2a) and tablespace and container information (step 2b) and record the paths, lvm device files, or file system mounting points which the database uses.
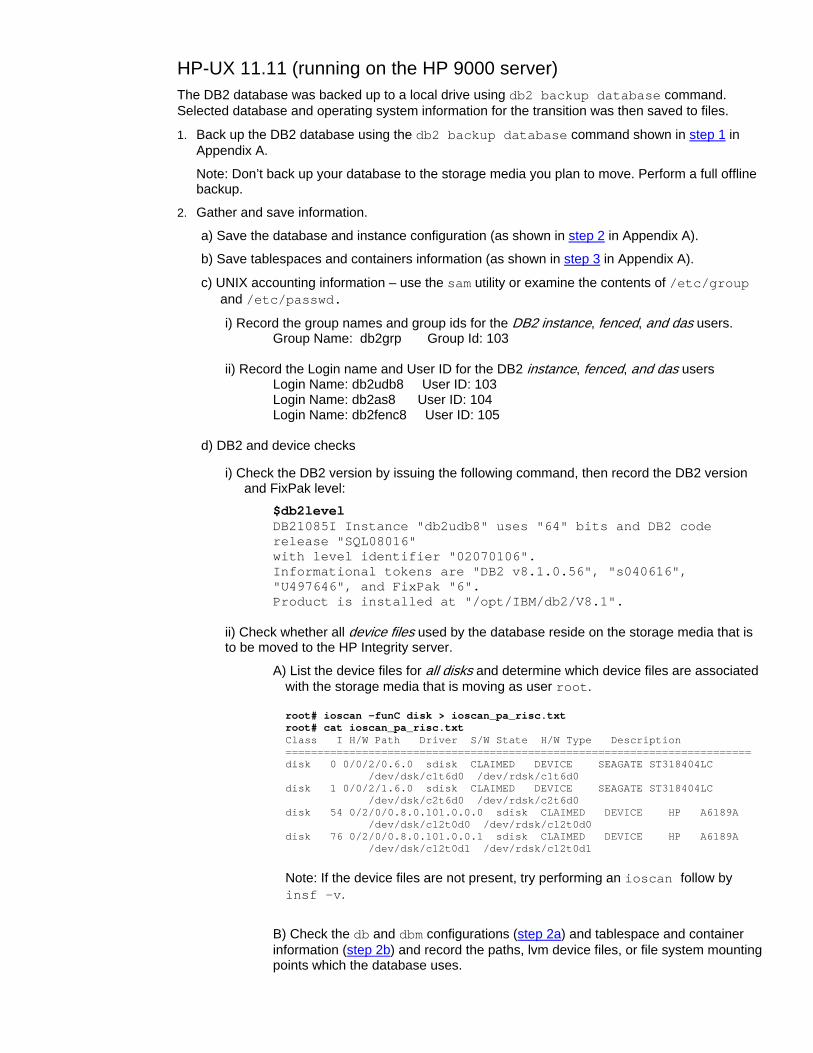
$vi db2_get_db_cfg.txt # contents of file saved in step 2a Path to log files = /data8/db2/db2_cat/db2udb8/NODE0000/SQL00001/SQLOGDIR/ $vi db2_get_dbm_cfg.txt #contents of file saved in step2a Diagnostic data directory path (DIAGPATH) = /home/db2udb8/sqllib/ db2dump Default database path (DFTDBPATH) = /home/db2udb8 $vi table0.txt #check the contents of all the containers files saved in step 2b Tablespace Containers for Tablespace 0 Container ID = 0 Name = /data9/db2/db2_cat Type = Path Total pages = 579131 Useable pages = 579131 Accessible = Yes
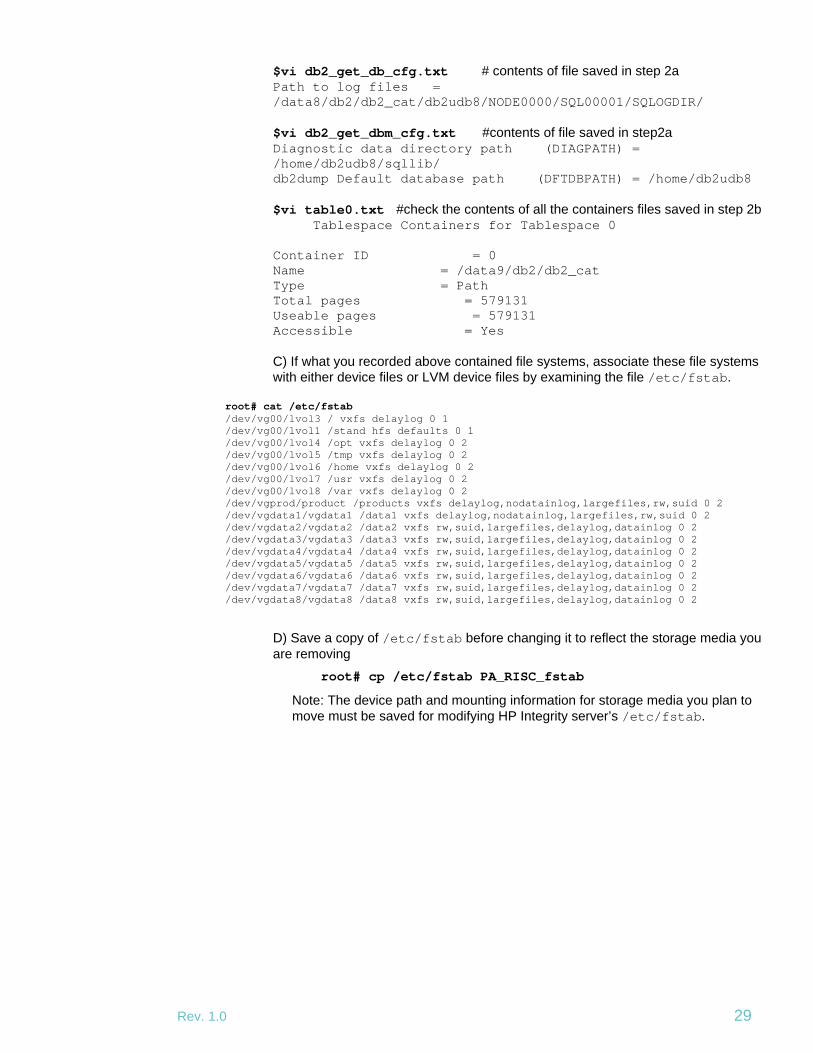
C) If what you recorded above contained file systems, associate these file systems with either device files or LVM device files by examining the file /etc/fstab.
root# cat /etc/fstab /dev/vg00/lvol3 / vxfs delaylog 0 1 /dev/vg00/lvol1 /stand hfs defaults 0 1 /dev/vg00/lvol4 /opt vxfs delaylog 0 2 /dev/vg00/lvol5 /tmp vxfs delaylog 0 2 /dev/vg00/lvol6 /home vxfs delaylog 0 2 /dev/vg00/lvol7 /usr vxfs delaylog 0 2 /dev/vg00/lvol8 /var vxfs delaylog 0 2 /dev/vgprod/product /products vxfs delaylog,nodatainlog,largefiles,rw,suid 0 2 /dev/vgdata1/vgdata1 /data1 vxfs delaylog,nodatainlog,largefiles,rw,suid 0 2 /dev/vgdata2/vgdata2 /data2 vxfs rw,suid,largefiles,delaylog,datainlog 0 2 /dev/vgdata3/vgdata3 /data3 vxfs rw,suid,largefiles,delaylog,datainlog 0 2 /dev/vgdata4/vgdata4 /data4 vxfs rw,suid,largefiles,delaylog,datainlog 0 2 /dev/vgdata5/vgdata5 /data5 vxfs rw,suid,largefiles,delaylog,datainlog 0 2 /dev/vgdata6/vgdata6 /data6 vxfs rw,suid,largefiles,delaylog,datainlog 0 2 /dev/vgdata7/vgdata7 /data7 vxfs rw,suid,largefiles,delaylog,datainlog 0 2 /dev/vgdata8/vgdata8 /data8 vxfs rw,suid,largefiles,delaylog,datainlog 0 2
D) Save a copy of /etc/fstab before changing it to reflect the storage media you are removing
root# cp /etc/fstab PA_RISC_fstab
Note: The device path and mounting information for storage media you plan to move must be saved for modifying HP Integrity server’s /etc/fstab.
Rev. 1.0 29
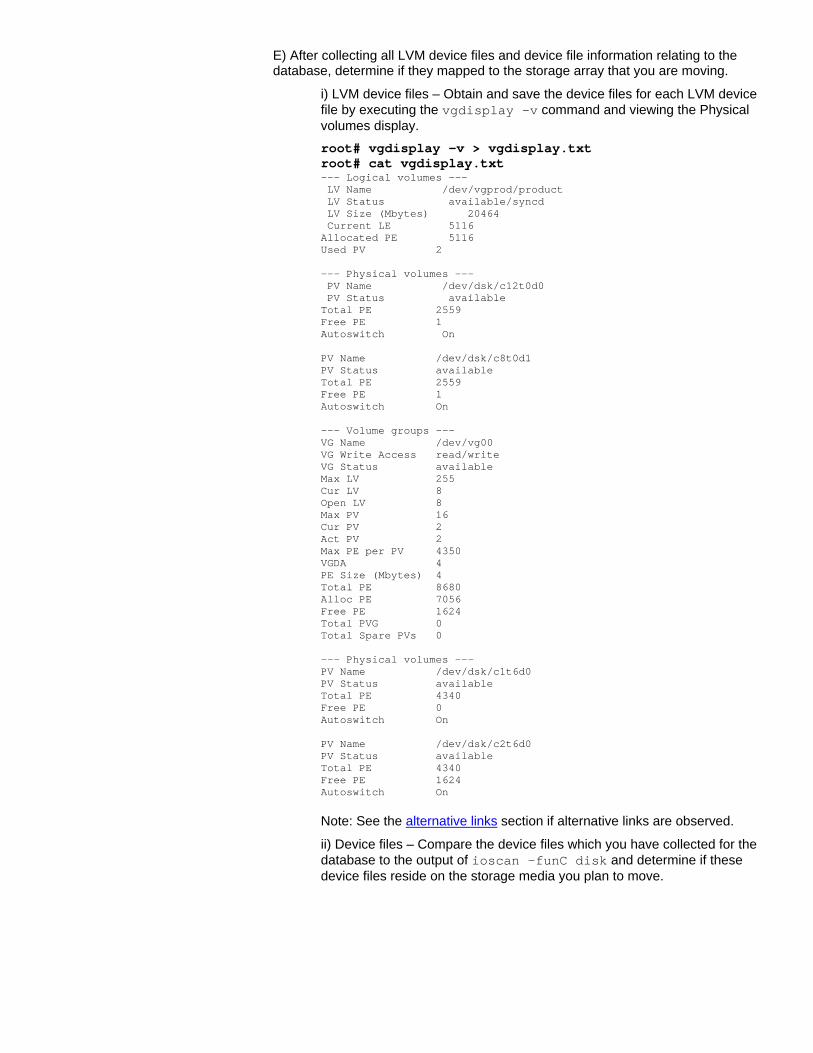
E) After collecting all LVM device files and device file information relating to the database, determine if they mapped to the storage array that you are moving.
i) LVM device files – Obtain and save the device files for each LVM device file by executing the vgdisplay –v command and viewing the Physical volumes display.
root# vgdisplay –v > vgdisplay.txt root# cat vgdisplay.txt --- Logical volumes --- LV Name /dev/vgprod/product LV Status available/syncd LV Size (Mbytes) 20464 Current LE 5116 Allocated PE 5116 Used PV 2 --- Physical volumes --- PV Name /dev/dsk/c12t0d0 PV Status available Total PE 2559 Free PE 1 Autoswitch On PV Name /dev/dsk/c8t0d1 PV Status available Total PE 2559 Free PE 1 Autoswitch On --- Volume groups --- VG Name /dev/vg00 VG Write Access read/write VG Status available Max LV 255 Cur LV 8 Open LV 8 Max PV 16 Cur PV 2 Act PV 2 Max PE per PV 4350 VGDA 4 PE Size (Mbytes) 4 Total PE 8680 Alloc PE 7056 Free PE 1624 Total PVG 0 Total Spare PVs 0 --- Physical volumes --- PV Name /dev/dsk/c1t6d0 PV Status available Total PE 4340 Free PE 0 Autoswitch On PV Name /dev/dsk/c2t6d0 PV Status available Total PE 4340 Free PE 1624 Autoswitch On
Note: See the alternative links section if alternative links are observed.
ii) Device files – Compare the device files which you have collected for the database to the output of ioscan –funC disk and determine if these device files reside on the storage media you plan to move.
Note: In our example above, the database DIAGPATH and DFTDBPATH reside on the file system /home/db2udb8 which is part of the LVM device file /dev/vg00. The LVM device file physical volumes are /dev/dsk/c1t6d0 and /dev/dsk/c2t6d0, which are identified with the description of SEAGATE ST318404LC or internal disks that are not part of the storage media that is plan to be moved.
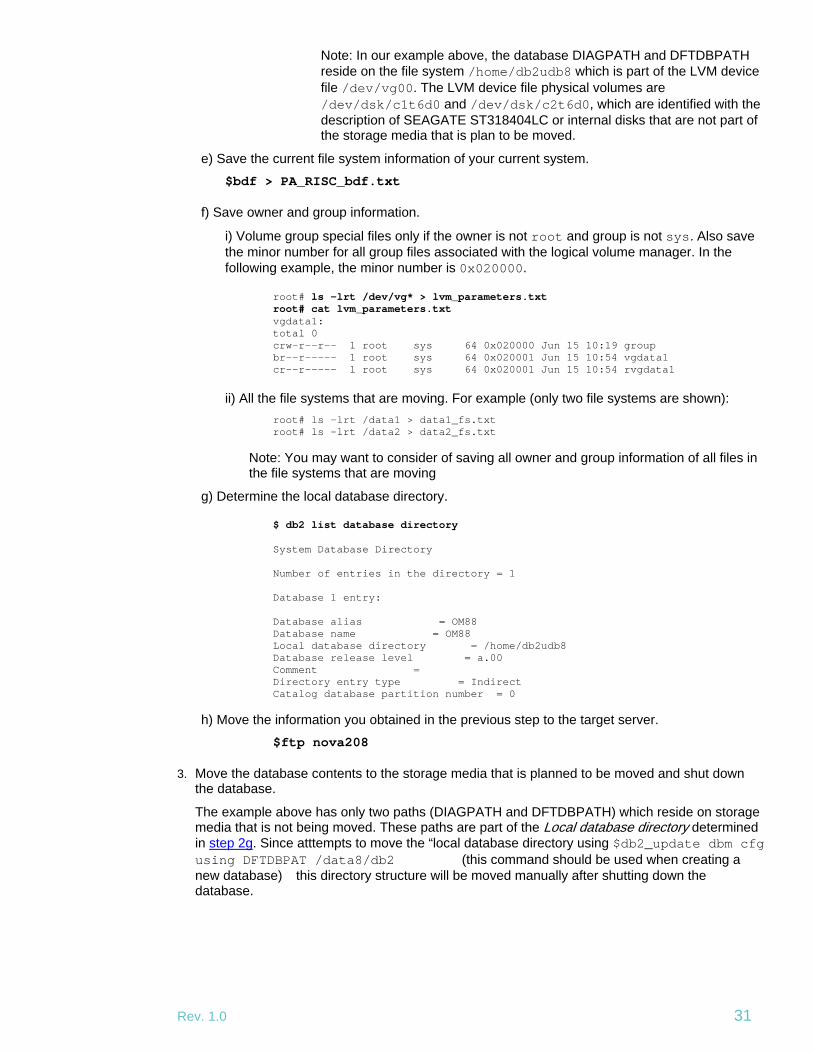
e) Save the current file system information of your current system. $bdf > PA_RISC_bdf.txt
f) Save owner and group information.
i) Volume group special files only if the owner is not root and group is not sys. Also save the minor number for all group files associated with the logical volume manager. In the following example, the minor number is 0x020000.
root# ls -lrt /dev/vg* > lvm_parameters.txt root# cat lvm_parameters.txt vgdata1: total 0 crw-r--r-- 1 root sys 64 0x020000 Jun 15 10:19 group br--r----- 1 root sys 64 0x020001 Jun 15 10:54 vgdata1 cr--r----- 1 root sys 64 0x020001 Jun 15 10:54 rvgdata1
ii) All the file systems that are moving. For example (only two file systems are shown):
root# ls –lrt /data1 > data1_fs.txt root# ls –lrt /data2 > data2_fs.txt
Note: You may want to consider of saving all owner and group information of all files in the file systems that are moving
g) Determine the local database directory.
$ db2 list database directory System Database Directory Number of entries in the directory = 1 Database 1 entry: Database alias = OM88 Database name = OM88 Local database directory = /home/db2udb8 Database release level = a.00 Comment = Directory entry type = Indirect Catalog database partition number = 0
h) Move the information you obtained in the previous step to the target server. $ftp nova208
3. Move the database contents to the storage media that is planned to be moved and shut down
the database.
The example above has only two paths (DIAGPATH and DFTDBPATH) which reside on storage media that is not being moved. These paths are part of the Local database directory determined in step 2g. Since atttempts to move the “local database directory using $db2_update dbm cfg using DFTDBPAT /data8/db2 ������ (this command should be used when creating a new database)� this directory structure will be moved manually after shutting down the database.
Rev. 1.0 31
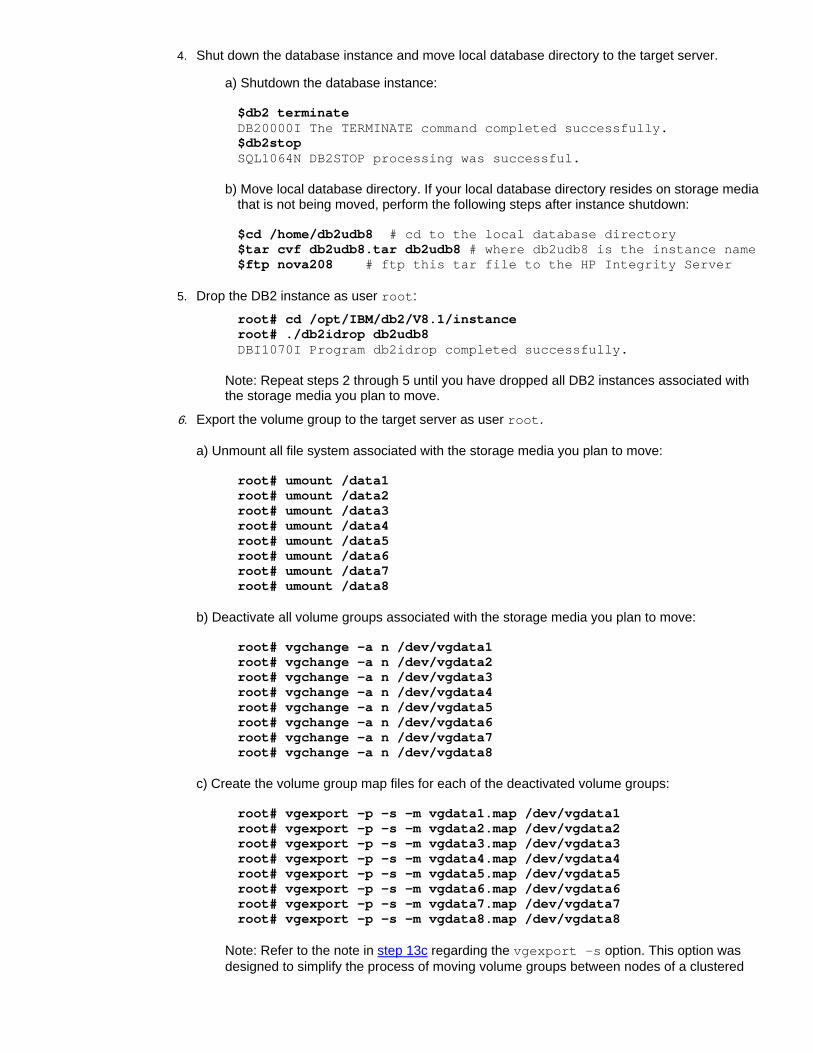
4. Shut down the database instance and move local database directory to the target server.
a) Shutdown the database instance:
$db2 terminate DB20000I The TERMINATE command completed successfully. $db2stop SQL1064N DB2STOP processing was successful.
b) Move local database directory. If your local database directory resides on storage media
that is not being moved, perform the following steps after instance shutdown:
$cd /home/db2udb8 # cd to the local database directory $tar cvf db2udb8.tar db2udb8 # where db2udb8 is the instance name $ftp nova208 # ftp this tar file to the HP Integrity Server
5. Drop the DB2 instance as user root:
root# cd /opt/IBM/db2/V8.1/instance root# ./db2idrop db2udb8 DBI1070I Program db2idrop completed successfully.
Note: Repeat steps 2 through 5 until you have dropped all DB2 instances associated with the storage media you plan to move.
6. Export the volume group to the target server as user root.
a) Unmount all file system associated with the storage media you plan to move:
root# umount /data1 root# umount /data2 root# umount /data3 root# umount /data4 root# umount /data5 root# umount /data6 root# umount /data7 root# umount /data8
b) Deactivate all volume groups associated with the storage media you plan to move:
root# vgchange –a n /dev/vgdata1 root# vgchange –a n /dev/vgdata2 root# vgchange –a n /dev/vgdata3 root# vgchange –a n /dev/vgdata4 root# vgchange –a n /dev/vgdata5 root# vgchange –a n /dev/vgdata6 root# vgchange –a n /dev/vgdata7 root# vgchange –a n /dev/vgdata8
c) Create the volume group map files for each of the deactivated volume groups:
root# vgexport –p –s –m vgdata1.map /dev/vgdata1 root# vgexport –p –s –m vgdata2.map /dev/vgdata2 root# vgexport –p –s –m vgdata3.map /dev/vgdata3 root# vgexport –p –s –m vgdata4.map /dev/vgdata4 root# vgexport –p –s –m vgdata5.map /dev/vgdata5 root# vgexport –p –s –m vgdata6.map /dev/vgdata6 root# vgexport –p –s –m vgdata7.map /dev/vgdata7 root# vgexport –p –s –m vgdata8.map /dev/vgdata8
Note: Refer to the note in step 13c regarding the vgexport –s option. This option was designed to simplify the process of moving volume groups between nodes of a clustered

system, but which is also available for non-clustered systems. The –p option avoids expunging the volume group from the HP 9000 system to allow for backtracking if necessary. Refer to the alternative links section if multiple fibre controllers are configured.
d) Copy these volume group map files to the HP Integrity server:
root# ftp nova208
7. Shutdown the HP 9000 server:
root# shutdown –h 0
Transferring data to HP Integrity server HP transferred the database data by physically moving the two fibre channel disk array cables hooked up to the VA74xx to the HP Integrity server
8. Detach the cables associated with the storage media to be moved from the HP 9000 server. 9. Shut down the HP Integrity server and attach the cables associated with the storage media to be
moved to the HP Integrity server.
root# shutdown –h 0
HP-UX 11i v2 (running on the HP Integrity server) Once you have installed the operating system and patches, adjusted the system parameters for DB2, created the DB2 users and group, and installed DB2 V8.1 FixPak 6 on the HP Integrity server, perform the following steps:
10. Boot the HP Integrity server by powering on the server. 11. Perform the DB2 consistency check to validate the success of the storage media transition.
a) Check to see if the new storage media device files are recognized by the HP Integrity server. root# ioscan –funC disk
Note: Compare the output to that obtained in step 2d. In the example with the VA74xx, there were two device paths for each LUN configured on the VA74xx.
b) Check to see if DB2 operating system parameters are set properly.
System parameters root# cd /opt/IBM/db2/V8.1/bin64 root#./db2osconf
Operating System patches/bundles for DB2
root# swlist
c) Using DB2level, make sure that the DB2 version and Fixpak are the same as in step 2. The DB2 version must be the same.
d) Using sam, make sure that the UNIX account information is the same as in step 2c. Also, verify the owner and group privileges for the file system directories residing on the moved storage media.
root# ls -lrt /data2/db2 total 11200064 drwxr-xr-x 2 db2udb8 db2grp 96 Apr 15 14:16 om88 -rw------- 1 db2udb8 db2grp 2867200000 May 20 13:35 d5.dbf -rw------- 1 db2udb8 db2grp 2867200000 May 25 13:07 d2.dbf
12. Follow the instructions shown in step 5 in Appendix A to create the DB2 instance.
Rev. 1.0 33

13. Create device and group file, import the volume groups, and activate it as described below.
a) Create the device for the volume group root# mkdir /dev/vgdata1 root# mkdir /dev/vgdata2 root# mkdir /dev/vgdata3 root# mkdir /dev/vgdata4 root# mkdir /dev/vgdata5 root# mkdir /dev/vgdata6 root# mkdir /dev/vgdata7 root# mkdir /dev/vgdata8
b) Create the group file for the volume group.
root# mknod /dev/vgdata1/group c 64 0x020000 root# mknod /dev/vgdata2/group c 64 0x030000 root# mknod /dev/vgdata3/group c 64 0x040000 root# mknod /dev/vgdata4/group c 64 0x050000 root# mknod /dev/vgdata5/group c 64 0x060000 root# mknod /dev/vgdata6/group c 64 0x070000 root# mknod /dev/vgdata7/group c 64 0x080000 root# mknod /dev/vgdata8/group c 64 0x090000
Note: The group file major number is always 64. The minor number is hexadecimal and always ending in 0000. You might consider using the same minor number for each group on the HP 9000 server (see step 2f) that was saved. These minor numbers must not already exist on the HP Integrity server; if they do exist, create a unique minor number.
c) Import all volume groups that you vgexport by using the map files that you created in step 6c. The number of maximum volume groups a system may have depends on the system parameter maxvgs. The default is 10.
root# vgimport –s –m vgdata1.map /dev/vgdata1 root# vgimport –s –m vgdata2.map /dev/vgdata2 root# vgimport –s –m vgdata3.map /dev/vgdata3 root# vgimport –s –m vgdata4.map /dev/vgdata4 root# vgimport –s –m vgdata5.map /dev/vgdata5 root# vgimport –s –m vgdata6.map /dev/vgdata6 root# vgimport –s –m vgdata7.map /dev/vgdata7 root# vgimport –s –m vgdata8.map /dev/vgdata8
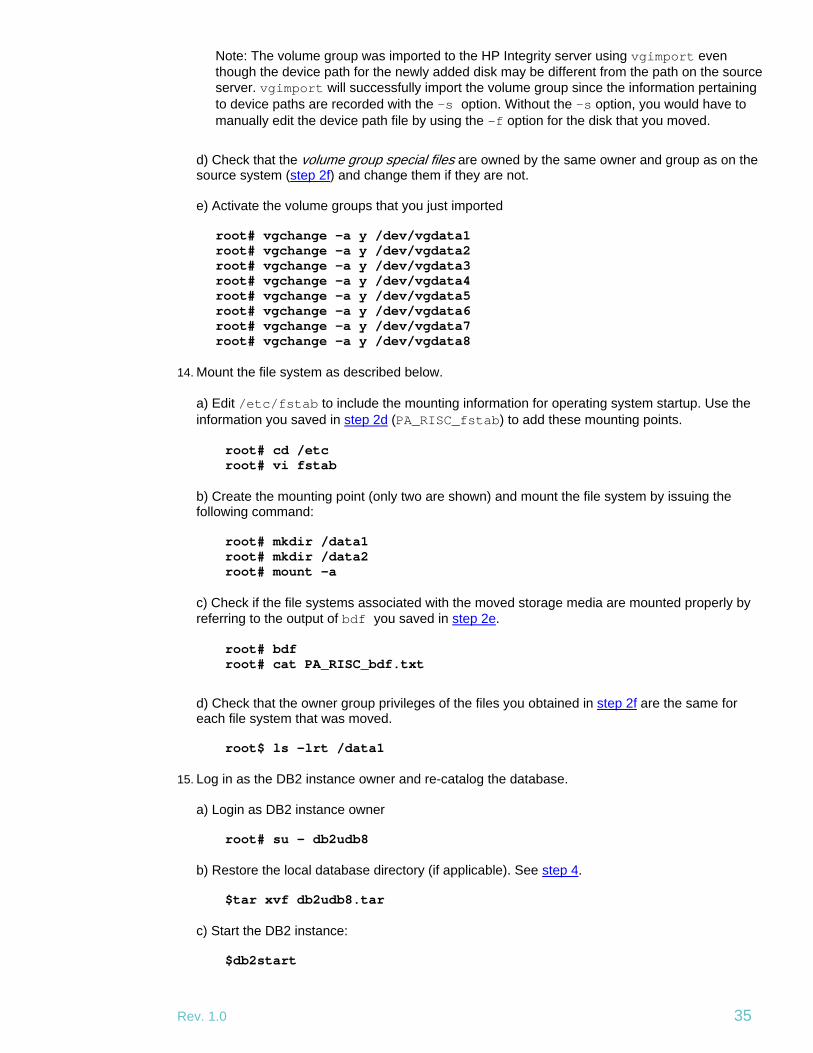
Note: The volume group was imported to the HP Integrity server using vgimport even though the device path for the newly added disk may be different from the path on the source server. vgimport will successfully import the volume group since the information pertaining to device paths are recorded with the –s option. Without the –s option, you would have to manually edit the device path file by using the –f option for the disk that you moved.
d) Check that the volume group special files are owned by the same owner and group as on the source system (step 2f) and change them if they are not.
e) Activate the volume groups that you just imported
root# vgchange –a y /dev/vgdata1 root# vgchange –a y /dev/vgdata2 root# vgchange –a y /dev/vgdata3 root# vgchange –a y /dev/vgdata4 root# vgchange –a y /dev/vgdata5 root# vgchange –a y /dev/vgdata6 root# vgchange –a y /dev/vgdata7 root# vgchange –a y /dev/vgdata8
14. Mount the file system as described below.
a) Edit /etc/fstab to include the mounting information for operating system startup. Use the information you saved in step 2d (PA_RISC_fstab) to add these mounting points.
root# cd /etc root# vi fstab
b) Create the mounting point (only two are shown) and mount the file system by issuing the following command:
root# mkdir /data1 root# mkdir /data2 root# mount -a
c) Check if the file systems associated with the moved storage media are mounted properly by referring to the output of bdf you saved in step 2e.
root# bdf root# cat PA_RISC_bdf.txt
d) Check that the owner group privileges of the files you obtained in step 2f are the same for each file system that was moved.
root$ ls –lrt /data1
15. Log in as the DB2 instance owner and re-catalog the database.
a) Login as DB2 instance owner
root# su – db2udb8 b) Restore the local database directory (if applicable). See step 4.
$tar xvf db2udb8.tar c) Start the DB2 instance:
$db2start
Rev. 1.0 35
d) Catalog the database:
$db2 catalog database om88 on /home/db2udb8
Note: /home/db2udb8 is the local database directory which was determined in step 2g.
16. Rebind the DB2 packages:
$db2rbind om88 -l /home/db2udb8/bind.log all
17. Follow step 7 in Appendix A to update database and instance configurations.
18. Follow step 8 in Appendix A to update database statistics information.
Note: Repeat steps 12 through18 for all DB2 instances associated with the moved storage media. Check DB2 logs for any errors.
Alternative links Multiple device files (paths) to a logical unit (LUN) are usually observed when multiple fibre controllers are attached to a fibre disk storage array. Volume groups can be created with a primary path and alternative paths. These paths can be selected when creating volume groups (vgcreate) manually. The sam utility will automatically select the first available path when it creates a volume group. The vgimport utility with the –s option will find its path similar to the sam utility. Use the –f option with vgexport and vgimport to manually select primary and alternative paths. The file created with the –f option may need to be edited (device file c # may change; t # and d # should not change) before it is applied with vgimport.
Further information For additional information and assistance, contact:
[email protected] For technical and planning information about transition subjects, go to:
http://www.hp.com/go/transition-modules/ For information regarding the DB2 product, go to:
http://www.software.ibm.com/data/db2 For information regarding DB2 support, go to:
http://www.ibm.com/software/data/db2/udb/support.html For information regarding DB2 technical help, go to:
http://publib.boulder.ibm.com/infocenter/db2help/index.jsp For information regarding DB2 with HP-UX, go to:
http://publib.boulder.ibm.com/infocenter/db2help/index.jsp >> DB2 Universal Database >> Installing a DB2 server on HP-UX For DB2 and DB2 Connect end-of-service dates, go to:
http://www.ibm.com/software/data/db2/udb/support.html >> Plan >> Product Life Cycle For information regarding DB2 migration, go to:
http://publib.boulder.ibm.com/infocenter/db2help/index.jsp >> DB2 Universal Database >> Installing a DB2 server on HP-UX >> DB2 migrating For HP and IBM manuals that can assist you throughout the transition for both HP-UX and DB2, go to the following websites:
HP-UX – http://www.docs.hp.com DB2 – http://www.ibm.com/software/data/db2/udb/support.html
For HP operating system patches, go to: http://www.itrc.hp.com For the latest FixPak from the IBM anonymous FTP server, go to:
ftp://ftp.software.ibm.com >> ps/products/db2/fixed/English/db2hpIA64v8/FixPak
Rev. 1.0 37

For information regarding the following backup/restore white paper topics, go to:
DB2 Redirected Restore Scripts – http://www.ibm.com/developerworks/db2/library/techarticle/0212mulligan/0212mulligan.html Database Recovery Using Redirected Incremental Restore – http://www.ibm.com/developerworks/db2/library/techarticle/0212melnyk/0212melnyk.html Using DB2 Incremental Backup – http://www.ibm.com/developerworks/db2/library/techarticle/0205adamache/0205adamache.html Production to Development: Moving Databases – http://www.ibm.com/developerworks/db2/library/techarticle/0207kline/0207kline.html Cloning DB2 Databases Using Redirected Restore – http://www.ibm.com/developerworks/db2/library/techarticle/0211melnyk/0211melnyk.html Using DB2 utilities to clone databases across different platforms – http://www.ibm.com/developerworks/db2/library/techarticle/dm-0403melnyk/
© 2004 Hewlett-Packard Development Company, L.P. The information contained herein is subject to change without notice. The only warranties for HP products and services are set forth in the express warranty statements accompanying such products and services. Nothing herein should be construed as constituting an additional warranty. HP shall not be liable for technical or editorial errors or omissions contained herein. Itanium and Intel are registered trademarks of Intel Corporation in the U.S. and other countries and are used under license. Linux is a U.S. registered trademark of Linus Torvalds. UNIX is a trademark of The Open Group in the U.S. and/or other countries. Windows is a U.S. registered trademark of Microsoft Corporation. 5982-7502EN, 08/2004