2.3.02 barcode scanning
TRANSCRIPT

iOS Introduction2.3.02 Barcode Scanning
Purpose
Liquid UI for iOS supports barcode scanning using a built-in camera or a third partydevice like Linea Pro. It enables you to populate the data on any SAP input field witha single click. It supports both: 1D and 2D barcode scanning. Furthermore, edit thescanned data or program an action after scanning to trigger events like auto-populate, auto-enter or auto-tabbing.
For instance, auto PO Number, Line Item and Quantity fields for your PO Receiptsprocess with a single barcode scan – removing data entry errors and enablingautomated data capture.
It is a rule-based barcode integration where you can configure barcode scannerbased on the selected barcode type in your App.
Rule 1: You can add or remove prefixes and suffixes from the scannedvalue based on a barcode type.Rule 2: You can program scanned data to trigger actions like auto-populateor auto-enter after scanning data.Rule 3: The default configuration is applied to all the barcode scan, if rulebased on barcode type is not defined.Rule 4: You can also determine action like scan, done, tab, or return later,at the time of barcode scanning.
Note: The app provides advanced rule-based barcode integration where you caneither pre-configure barcode scanner from the Main Menu or determine action aftereach barcode scan.
Minimum RequirementsSupporting barcode formatsPre-configuring barcode scannerScanning 1D barcodeScanning 2D barcode
Minimum Requirements
This feature requires an active Liquid UI for iOS license. (Click here to knowmore about Liquid UI for iOS licensing.)
Supporting barcode formats
1. Using the built-in camera: Liquid UI supports the following barcode typeswhen you use the built-in camera;
Code 39, Code 93, Code 128, DataBar, DataBar Expanded, EAN-8,EAN-13, Interleaved 2 of 5, QR Code, UPC-A, and UPC-E
Page 1 / 23(c) 2022 Liquid UI | Synactive | GuiXT <[email protected]> | 2022-03-24 22:19URL: https://www.guixt.com/knowledge_base/content/35/409/en/2302-barcode-scanning.html
iOS Introduction
2. Using a third-party scanner: Liquid UI supports the following barcodetypes when you use a third party scanner like;
Linea Pro 4, Aztec code, Code 11, Code 39, Code 93, Code 128,Codebar, Data Matrix, EAN 8, EAN 13, UCC/EAN 128, UPC A, UPC E,UPC E1, GS1, IATA, ISBN, ISMN, ISSN, Industrial 2 of 5, Interleaved 2of 5, Matrix 2 to 5, Maxi code, MicroPDF417, Micro QR code,MSI/Plessey, UK/Plessey, PDF417, QR code, RSS 14, RSS Limited, RSS-Expanded, S-code, and Telepen
Pre-configuring barcode scanner
Liquid UI supports full native scanner configuration capability. You can edit the Default Barcode Type or add a new Barcode Type to perform auto-tab or auto-enter and can also add prefix and suffixes under Barcode Types to remove themfrom barcode scanned value based on your requirement.
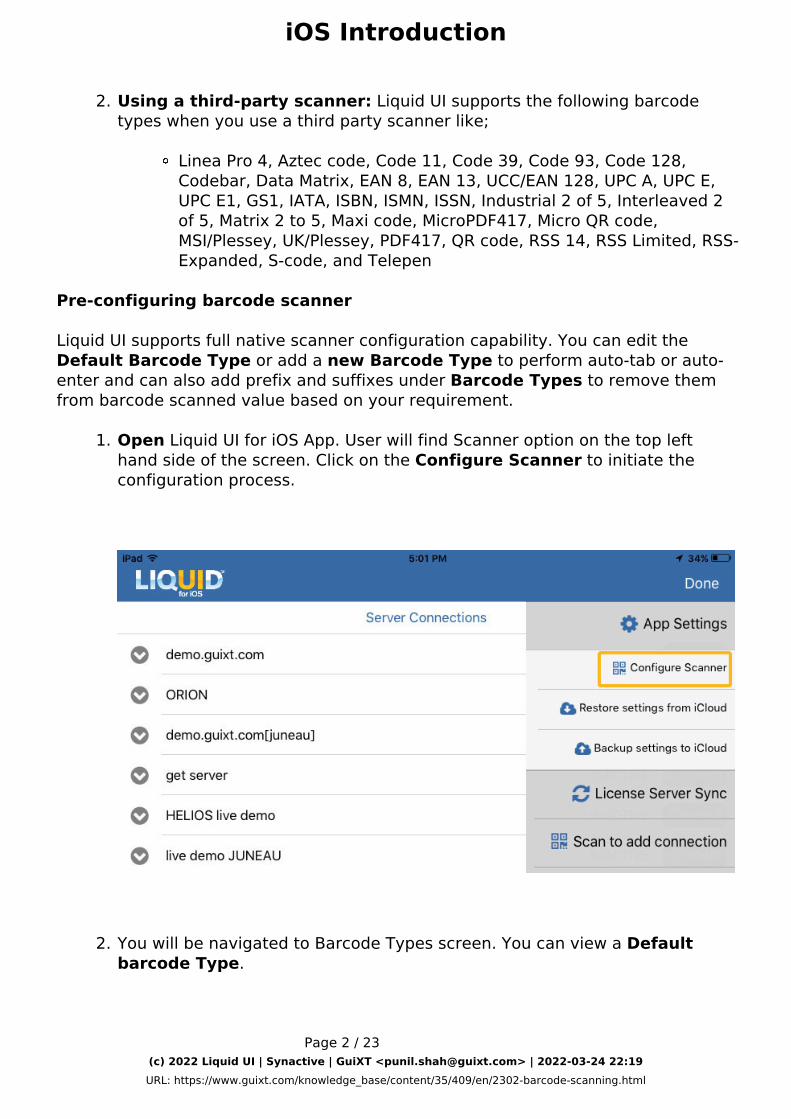
1. Open Liquid UI for iOS App. User will find Scanner option on the top lefthand side of the screen. Click on the Configure Scanner to initiate theconfiguration process.
2. You will be navigated to Barcode Types screen. You can view a Defaultbarcode Type.
Page 2 / 23(c) 2022 Liquid UI | Synactive | GuiXT <[email protected]> | 2022-03-24 22:19URL: https://www.guixt.com/knowledge_base/content/35/409/en/2302-barcode-scanning.html

iOS Introduction
3. Select the default Barcode Type to navigate to Scanner Prefixes screen.You can view default scanner element.
Note: You cannot delete the default Barcode type.
4. Under Default scanner element, you can view default settings with AUTOENTER, AUTO TAB and OFF options only. Select the required option and clickSave.
Page 3 / 23
(c) 2022 Liquid UI | Synactive | GuiXT <[email protected]> | 2022-03-24 22:19URL: https://www.guixt.com/knowledge_base/content/35/409/en/2302-barcode-scanning.html

iOS Introduction
AUTO ENTER: This option automatically perform enter afterpopulating the scanned value into the scanned field.AUTO TAB: This option automatically places the cursor in the nextfield after populating the scanned value into the scanned field.OFF: Performs neither AUTO ENTER nor AUTO TAB.
5. You will be navigated to Barcode Types screen. Click + symbol to add thebarcode type.
Page 4 / 23(c) 2022 Liquid UI | Synactive | GuiXT <[email protected]> | 2022-03-24 22:19URL: https://www.guixt.com/knowledge_base/content/35/409/en/2302-barcode-scanning.html

iOS Introduction6. Add Barcode Type screen has following fields,
1. Type: This field indicates the class of barcode, which can be addedin two ways;
Manually enter barcode typeScan barcode with the camera to retrieve type.
2. Comment: Provide description about the barcode type for furtherreference.
3. Enabled: To activate or deactivate barcode type4. Click Save. On success, user will be taken back to the Barcode
Types screen with an updated list.
7. The naming of the added barcode would be combination of comment andtype. The comment will be highlighted in bold, whereas the barcode type innormal font as in following screen.
Page 5 / 23(c) 2022 Liquid UI | Synactive | GuiXT <[email protected]> | 2022-03-24 22:19URL: https://www.guixt.com/knowledge_base/content/35/409/en/2302-barcode-scanning.html

iOS Introduction
8. Select any field from the listed barcode type. User will be navigated to theScanner Prefixes screen.
Page 6 / 23(c) 2022 Liquid UI | Synactive | GuiXT <[email protected]> | 2022-03-24 22:19URL: https://www.guixt.com/knowledge_base/content/35/409/en/2302-barcode-scanning.html
iOS Introduction
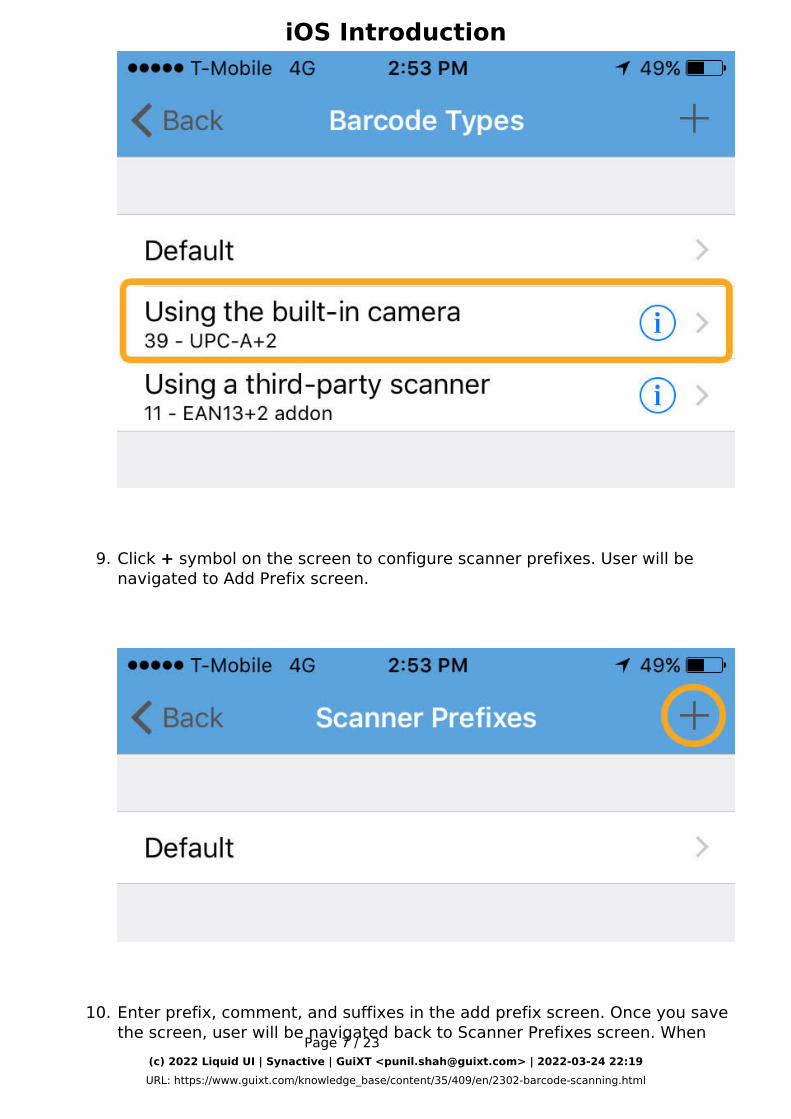
9. Click + symbol on the screen to configure scanner prefixes. User will benavigated to Add Prefix screen.
10. Enter prefix, comment, and suffixes in the add prefix screen. Once you savethe screen, user will be navigated back to Scanner Prefixes screen. WhenPage 7 / 23
(c) 2022 Liquid UI | Synactive | GuiXT <[email protected]> | 2022-03-24 22:19URL: https://www.guixt.com/knowledge_base/content/35/409/en/2302-barcode-scanning.html

iOS Introductionthe user tapped on H190 entry. Top toolbar title changes accordingly, andpopulates with the prefix on this screen, as H190 title. If user hits Cancelbutton, no changes would be taking place to that screen.
Note: Prefix and Suffixes fields are case-sensitive.
11. Enter the required field on Add Prefix screen and click Save. If user doesn’tenter prefix field, they will receive an alert message as following screen.
Page 8 / 23(c) 2022 Liquid UI | Synactive | GuiXT <[email protected]> | 2022-03-24 22:19URL: https://www.guixt.com/knowledge_base/content/35/409/en/2302-barcode-scanning.html

iOS Introduction
12. Click save after entering the necessary inputs. On successful, user will findthe updated field in Scanner Prefixes screen.
Page 9 / 23(c) 2022 Liquid UI | Synactive | GuiXT <[email protected]> | 2022-03-24 22:19URL: https://www.guixt.com/knowledge_base/content/35/409/en/2302-barcode-scanning.html

iOS Introduction
13. Swipe to the left on the selected list item to delete. Default element will notbe deleted from the screen. Select Delete option and the listed item wouldbe removed from the screen.
Scanning 1D barcode
The barcode scan enables iOS users to select SCAN option on any SAP input fieldwith just a tap.
1. Liquid UI SCAN feature eliminates manual data entries by populating thePage 10 / 23
(c) 2022 Liquid UI | Synactive | GuiXT <[email protected]> | 2022-03-24 22:19URL: https://www.guixt.com/knowledge_base/content/35/409/en/2302-barcode-scanning.html

iOS Introductiondetail through barcode. The user can also edit the scanned field by placingthe cursor on the input field.
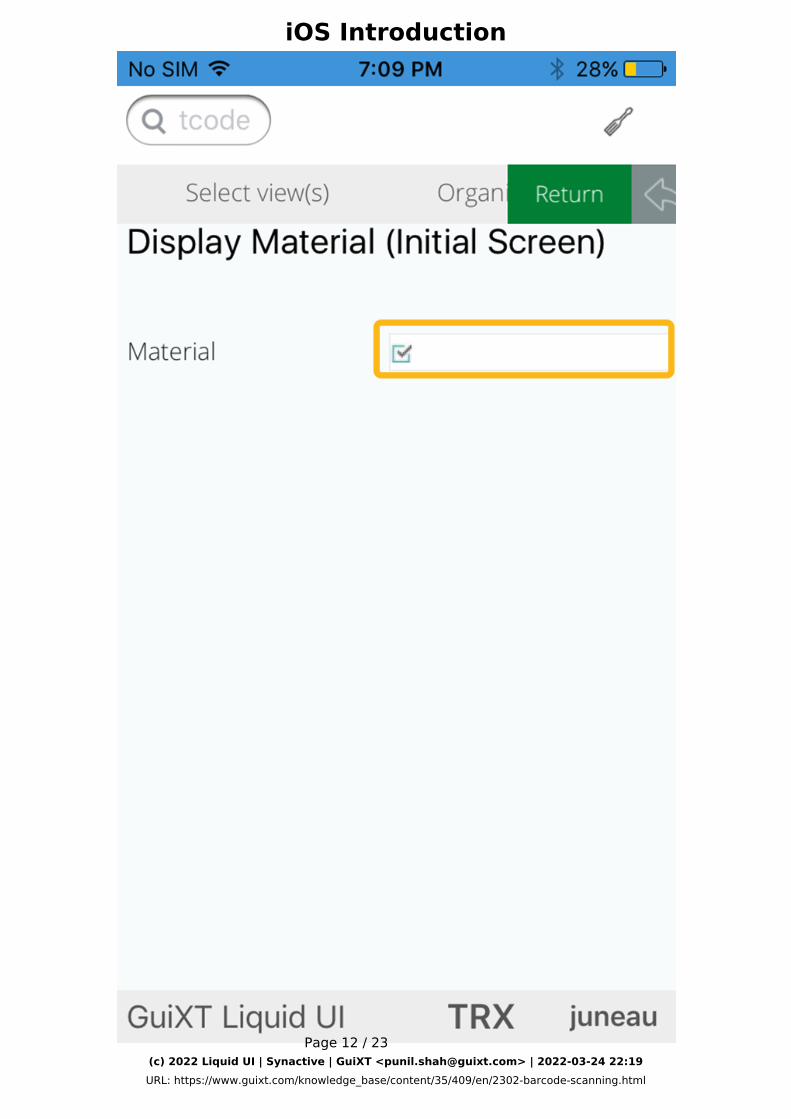
Open Liquid UI for iOS App. Navigate to any SAP transaction. For ExampleMM03 transaction.
Page 11 / 23(c) 2022 Liquid UI | Synactive | GuiXT <[email protected]> | 2022-03-24 22:19URL: https://www.guixt.com/knowledge_base/content/35/409/en/2302-barcode-scanning.html
iOS Introduction
Page 12 / 23(c) 2022 Liquid UI | Synactive | GuiXT <[email protected]> | 2022-03-24 22:19URL: https://www.guixt.com/knowledge_base/content/35/409/en/2302-barcode-scanning.html

iOS Introduction
2. Double tap on the input field to select all the available options for input field.Select Scan Barcode to scan the barcode and read the value into the inputfield.
3. Click Done to finish the scanning.
Page 13 / 23(c) 2022 Liquid UI | Synactive | GuiXT <[email protected]> | 2022-03-24 22:19URL: https://www.guixt.com/knowledge_base/content/35/409/en/2302-barcode-scanning.html

iOS Introduction
4. The scanned value will be read into the input field as shown below:
5. To edit the scanned field, place the cursor on the input field. The user canmanually edit the field with the device keyboard.
Page 14 / 23(c) 2022 Liquid UI | Synactive | GuiXT <[email protected]> | 2022-03-24 22:19URL: https://www.guixt.com/knowledge_base/content/35/409/en/2302-barcode-scanning.html

iOS Introduction
Scanning 2D barcode
The 2D barcode can contain multiple rows of data, i.e. a block of data, that if usedthe user would need to generate a rule to extract the data for a field from the blockof data scanned. The 2D data input would normally be used in a single field like 1Dscan. Open Liquid UI for iOS App. Navigate to any SAP transaction. For ExampleXK02 transaction.
1. Navigate to XK02 transaction and enter Vendor details, and select the Address checkbox from General data and click Return.
Page 15 / 23(c) 2022 Liquid UI | Synactive | GuiXT <[email protected]> | 2022-03-24 22:19URL: https://www.guixt.com/knowledge_base/content/35/409/en/2302-barcode-scanning.html

iOS Introduction
Page 16 / 23(c) 2022 Liquid UI | Synactive | GuiXT <[email protected]> | 2022-03-24 22:19URL: https://www.guixt.com/knowledge_base/content/35/409/en/2302-barcode-scanning.html

iOS Introduction
2. You will be navigated to the Change Vendor Address screen. Place thecursor on the input field and then do a single tap on the field to view theSCAN option. Click Scan Barcode to scan either 1D or 2D barcode.
Page 17 / 23(c) 2022 Liquid UI | Synactive | GuiXT <[email protected]> | 2022-03-24 22:19URL: https://www.guixt.com/knowledge_base/content/35/409/en/2302-barcode-scanning.html

iOS Introduction
Page 18 / 23(c) 2022 Liquid UI | Synactive | GuiXT <[email protected]> | 2022-03-24 22:19URL: https://www.guixt.com/knowledge_base/content/35/409/en/2302-barcode-scanning.html

iOS Introduction
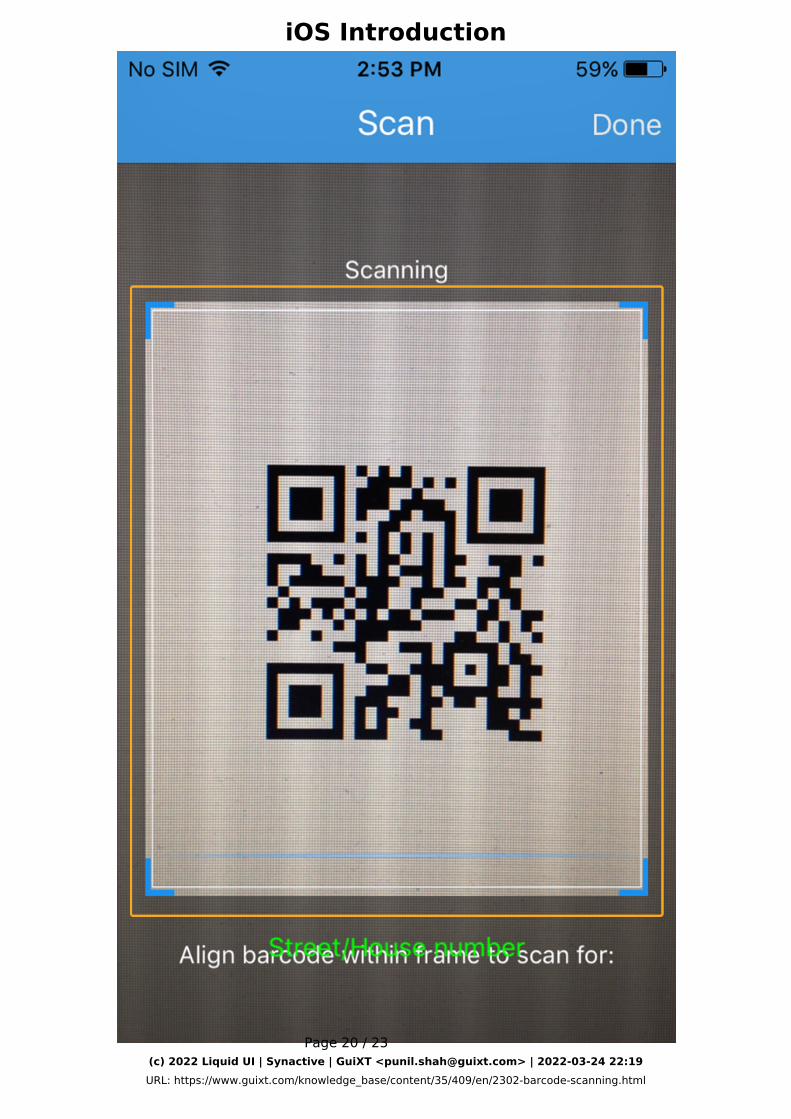
3. To retrieve the Vendor address, let us scan a 2D barcode as following:
Page 19 / 23(c) 2022 Liquid UI | Synactive | GuiXT <[email protected]> | 2022-03-24 22:19URL: https://www.guixt.com/knowledge_base/content/35/409/en/2302-barcode-scanning.html
iOS Introduction
Page 20 / 23(c) 2022 Liquid UI | Synactive | GuiXT <[email protected]> | 2022-03-24 22:19URL: https://www.guixt.com/knowledge_base/content/35/409/en/2302-barcode-scanning.html

iOS Introduction
4. Once the scan is performed, the scanned value will be read directly into theinput field as shown below:
5. To edit the scanned field, place the cursor on the input field. The user canmanually edit the field with the device keyboard.
Page 21 / 23(c) 2022 Liquid UI | Synactive | GuiXT <[email protected]> | 2022-03-24 22:19URL: https://www.guixt.com/knowledge_base/content/35/409/en/2302-barcode-scanning.html

iOS Introduction
Page 22 / 23(c) 2022 Liquid UI | Synactive | GuiXT <[email protected]> | 2022-03-24 22:19URL: https://www.guixt.com/knowledge_base/content/35/409/en/2302-barcode-scanning.html

iOS Introduction
Unique solution ID: #1409Author: [email protected] update: 2019-07-04 12:30
Powered by TCPDF (www.tcpdf.org)
Page 23 / 23(c) 2022 Liquid UI | Synactive | GuiXT <[email protected]> | 2022-03-24 22:19URL: https://www.guixt.com/knowledge_base/content/35/409/en/2302-barcode-scanning.html