user’s manual - bilkur€¦ · barcode symbol set up-1 ... macro/spacial key set up...
TRANSCRIPT

V8.0.2
User’s
Manual
CONTENTS
Introduction ………………………………………………… 1
Auto-Inroduction Barcode Scanner Operating Instruction 2
Appearance………………………………………………… 4
Installing and Removing…………………………………… 4
Installing the interface cable………………………… 4
Removing the interface cable………………………… 5
Installing Keyboard Wedge Scanner ……………………… 5
Installing RS-232C Interface Scanner………………………6
Installing USB interface scanner…………………………… 7
Come Back Manufacture Setting…………………………… 8
Display the Firmware Version……………………………… 8
USB Mode…………………………………………………… 8
KBW Mode…………………………………………………… 8
RS-232 Mode………………………………………………… 8
Multiscan Function ……………………………………………9
Scan Mode……………………………………………… 9
Add Barcode ID………………………………………… 9
Buzzer…………………………………………………… 9
Interface-KBW……………………………………………… 10
Transmit Speed………………………………………… 10
KBW language…………………………………………… 10
Capital Key on and of…………………………………… 10
Interface-Serial-1…………………………………………… 11
Baud Rate…………………………………………………11
Interface-Serial-2…………………………………………… 12
handshake Protocol………………………………………12
Data Bit…………………………………………………… 12
Interface-Serial-3………………………………………………13
Parity Check……………………………………………… 13
Barcode Enable and Disable-1…………………………… 14
CODE 11………………………………………………… 14
CODE 39………………………………………………… 14

CODE 39 FULL ASCII ………………………………… 14
CODE 93…………………………………………………14
CODE 128……………………………………………… 14
Barcode Enable and Disable-2…………………………… 15
MSI/Plessey…………………………………………… 15
INTERLEAVE 2 OF 5………………………………… 15
INDUSTRIAL 2 OF 5………………………………… 15
CODABAR……………………………………………… 15
CHINA POSTAL CODE…………………………………15
Barcode Enable and Disable-3…………………………… 16
UPC/EAN……………………………………………… 16
Barcode Symbol Set Up-1……………………………………17
CODE 11…………………………………………………17
CODE 39…………………………………………………17
Barcode Symbol Set Up-2……………………………………18
CODE 93…………………………………………………18
CODE 128……………………………………………… 18
MSI/Plessey…………………………………………… 18
Barcode Symbol Set Up-3……………………………………19
INTERLEAVE 2 OF 5………………………………… 19
INDUSTRIAL 2 OF 5………………………………… 19
CODABAR……………………………………………… 19
Barcode Symbol Set Up-4……………………………………20
CODABAR……………………………………………… 20
UPC/EAN……………………………………………… 20
Barcode Symbol Set Up-5……………………………………21
UPC/EAN……………………………………………… 21
Barcode Symbol Set Up-6……………………………………22
UPC/EAN……………………………………………… 22
Edit and Set Up Brcode -1………………………………… 23
Edit and Set Up Brcode -2………………………………… 24
Macro/Spacial Key Set Up Barcode……………………… 25
Termination String Setup Barcode………………………… 26
Advanced Setting Mode -1………………………………… 27

Prefix…………………………………………………… 27
………………………………… 28
Suffix…………………………………………………… 28
………………………………… 29
Truncate Header Character…………………………… 29
…………………………………
Truncate Trailer Character…………………………… 30
Appendix……………………………………………………… 31
Appendix A: Full ASCII Table………………………… 31
Appendix B: Troubleshooting and Error Beeps………45
Advanced Setting Mode -2
Advanced Setting Mode -3
Advanced Setting Mode -4 30
1
Introduction
Barcode devices provide an accurate, easy, and fast method of data entry and data storage for computerized information system.
The products we offer have another technology of infrared automatic sensor. User only need to put the barcode into sensing area which in front of window, 650nm laser will be automatic activated. Then aimed at the barcode which need to scan, the scanner scan automatically, the information will transmit to the host computer system.
There are two mode for this produce: handheld and automatic sensing laser barcode scanner. That means user can use it by handheld mode or can use as the fixation with the bracket-held.
The products we are offering now can be integrated into any host computer system by the following ways:
Keyboard
Wand
RS-232
Dual RS-232
USB
OTHERS
All the operating parameters are programmed by barcode programming menu and stored in non-volatile RAM which can retain the settings after power is turned off.
For the function which are not listed in this menu, please consult your supplier for more details.
*All rights reserved, including those to reprint this manual.

2
Auto-introduction Barcode ScannerOperating Instructions
1.The default scan mode of this scanner is auto induction scan mode. It start to scan in 2 seconds, when the object is close to the scanner. (Figure 1)
(Figure 1)
(Figure 2)
2.Press the button for 8 seconds, the user can switch the scanner mode between auto induction mode and manual trigger mode. (Figure 2)

3
3.The auto induction distance is 15-20CM. (Figure 3)
4.Make sure there is no baulk on the induction zone in front of the windows of scanner. If reading successful or can not reading in certain time, the scanner will auto-off laser.
5.When the laser close, Pls. Move the object from the induction zone, then the user can start to scan for next time.
(Figure 3)

4
Appearance
Beeper
LED
Trigger Exit window
Cable interfaceport
Installing and Removing
Installing the interface cable
1.Plug the cable’s Rj45 port into the bottom of the scanner. (Figure 2)
2.Connect the other end of the interface cable to the host.
(Figure 1)
(Figure 2)

5
Removing the interface cable
1.Unplug the installing cable’s modular connector by depressing the connector clip with the tip of a screwdriver.
2.Carefully slide out the cable.
3.Follow the step for installing the interface cable on page 5-7 to connect a new cable.
(Figure 3)
Installing keyboard wedge scanner
1.Make sure that the scanner has the correct cable for your system.
2.Turn off the power of the system.
3.Unplug the keyboard from the system.
4.Connect Y cable to the system and keyboard.
5.Turn on the power of the system.
6.If the indicator LED light up, buzzer sounds, the scanner is ready for reading.
(Figure 4)

6
Installing RS-232C interface scanner
1.Make sure there is power supply for the scanner.
2.Connect the cable to the RS-232C port of the device.
(Figure 5)
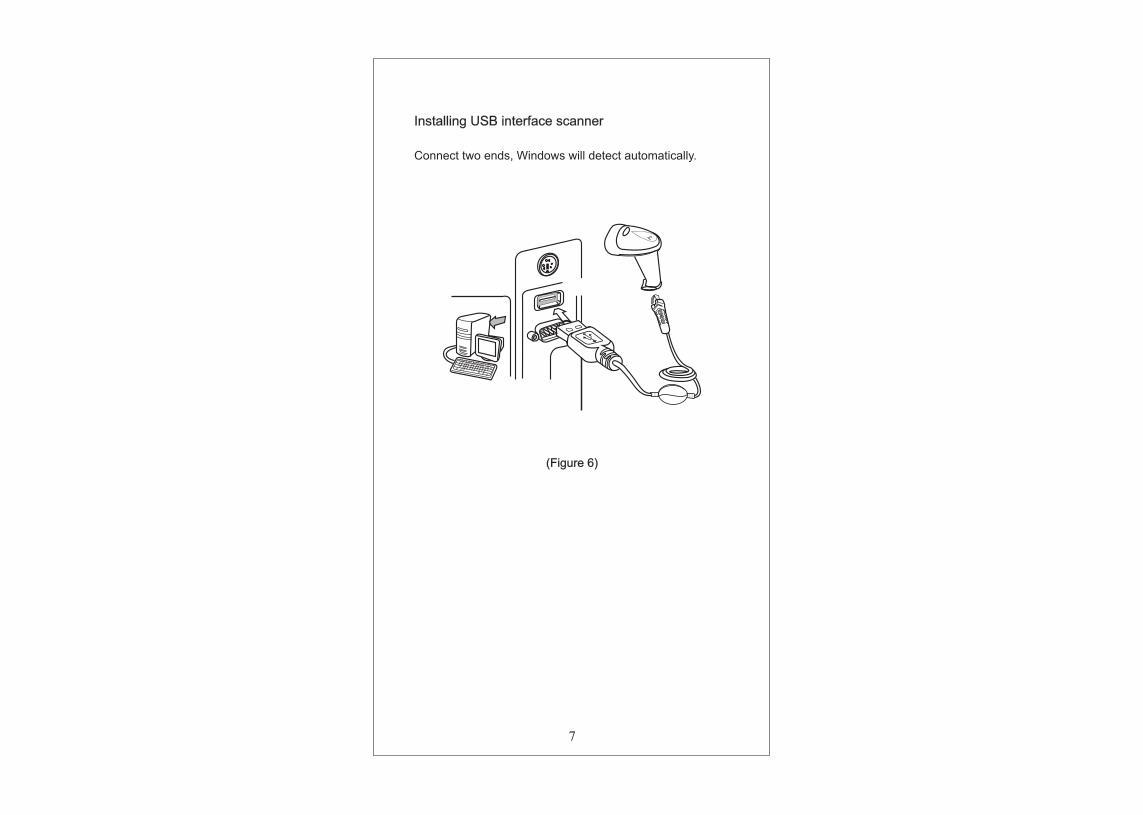
Installing USB interface scanner
Connect two ends, Windows will detect automatically.
(Figure 6)
7

USB mode
KBW mode*
8
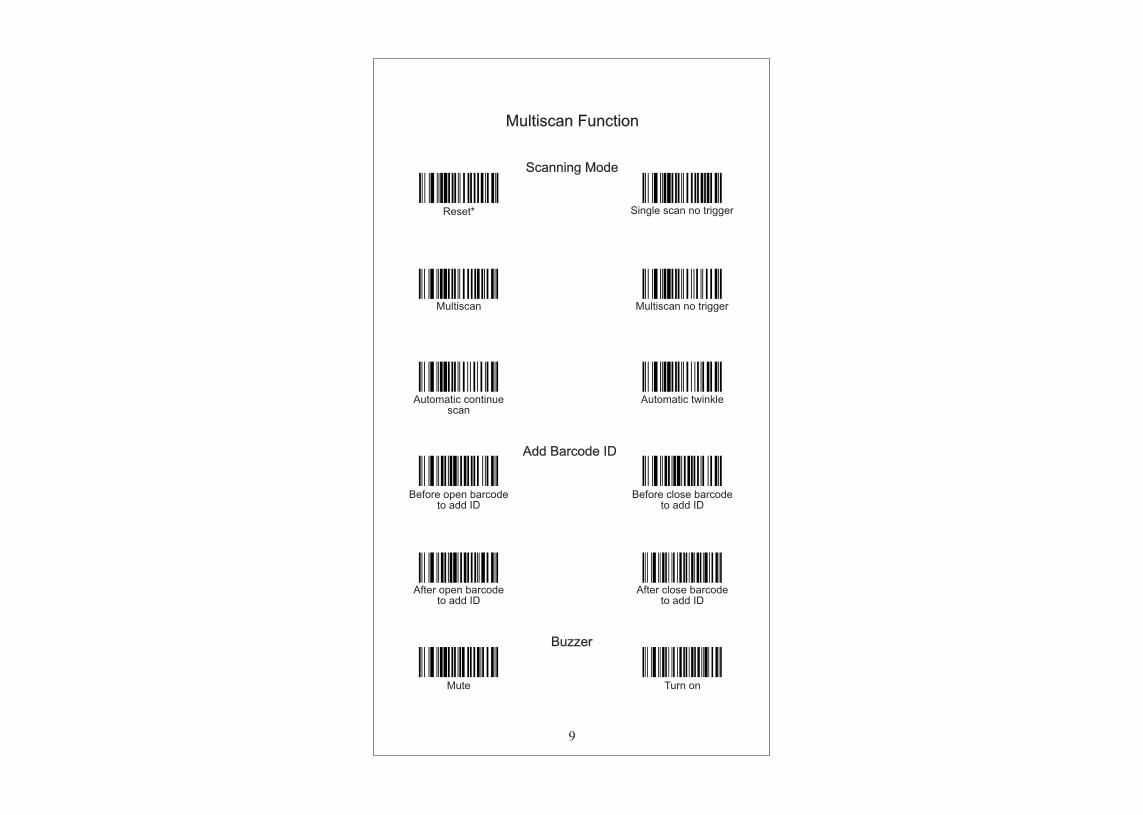
Reset* Single scan no trigger
Multiscan Multiscan no trigger
Automatic continuescan
Automatic twinkle
Add Barcode ID
Multiscan Function
Scanning Mode
Before open barcodeto add ID
Before close barcodeto add ID
After open barcodeto add ID
After close barcodeto add ID
Mute Turn on
Buzzer
9

Interface - KBW
Language
Capital Key On and Off
USA* German
Reset France
Capital key on Reset*
Capital key off
10

Interface - Serial - 1
Baud Rate
600
2400 4800
9600* 19200
57600 38400
115200 None
11

Interface - Serial - 2
Handshake Protocol
None* Xon / Xoff
ACK / NAK RTS / CTS
Handshake timeout2 seconds
Handshake timeout5 seconds
Data Bit
7 data bits 8 data bits*
Stop Bit
1 stop bit* 2 stop bits
12
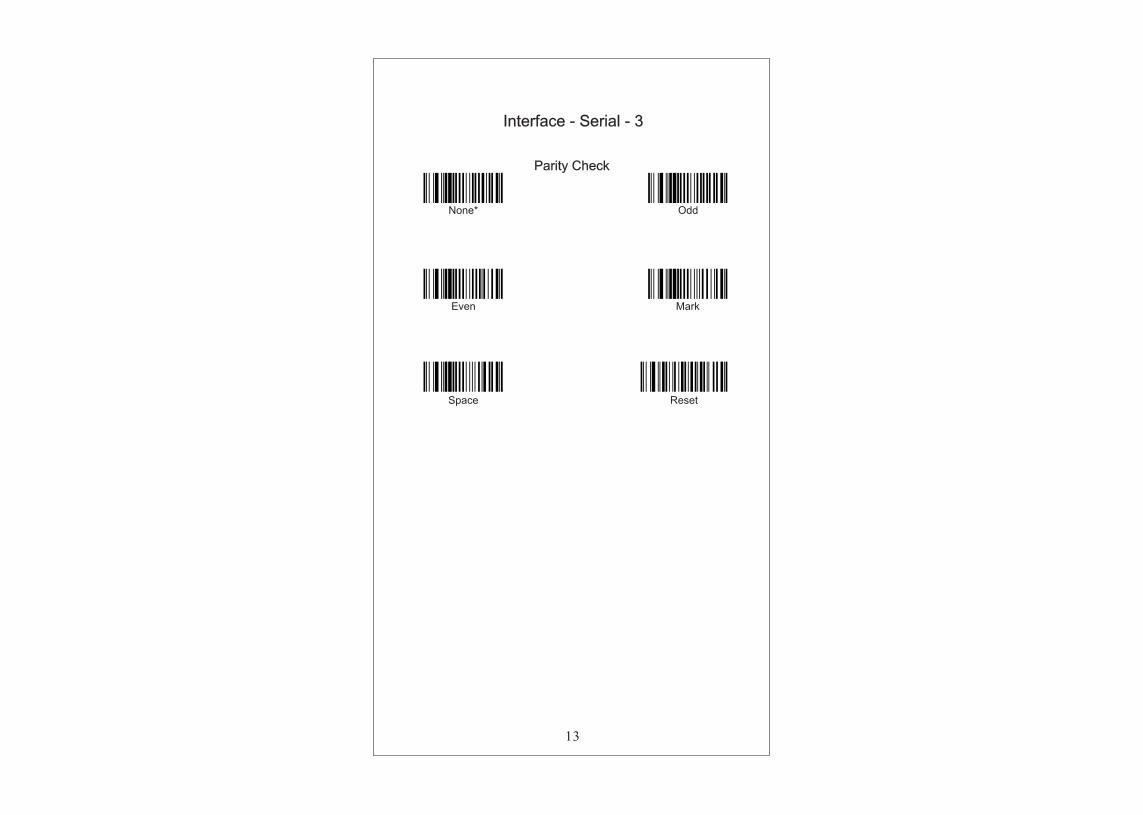
Interface - Serial - 3
Parity Check
None* Odd
Even Mark
Reset Space
13
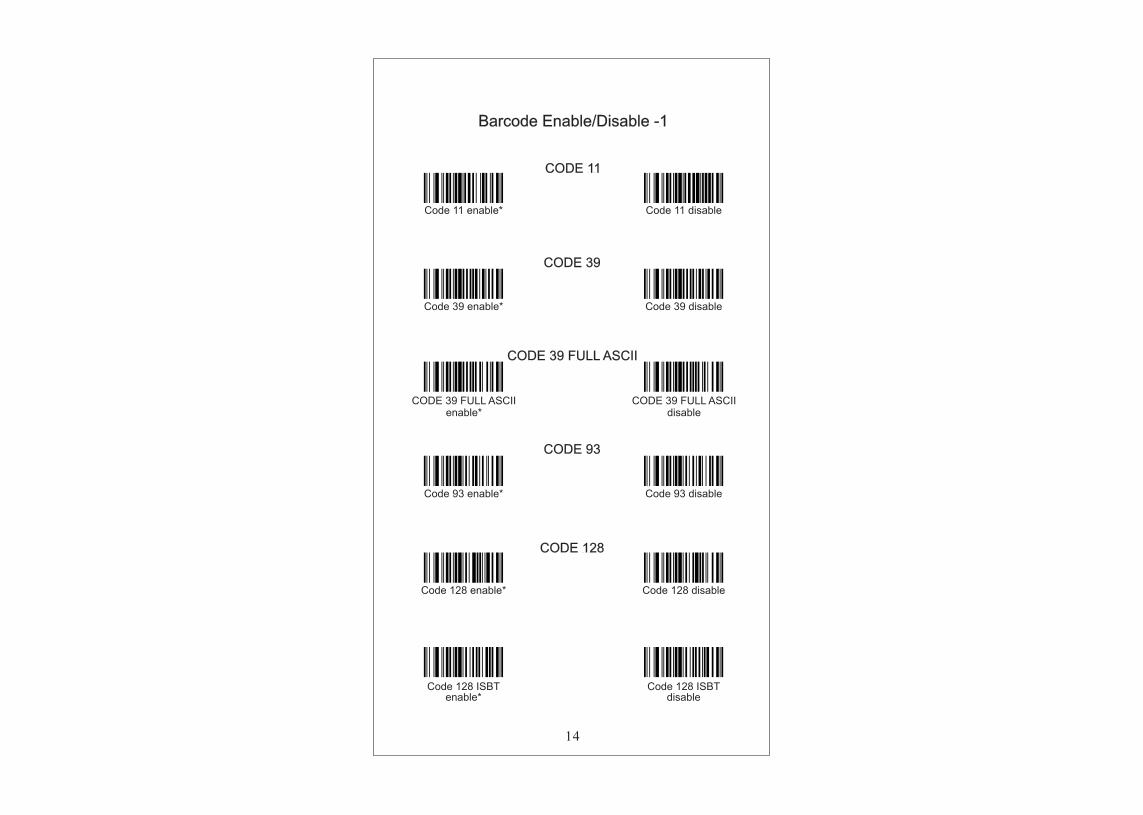
Barcode Enable/Disable -1
CODE 11
CODE 39
CODE 39 FULL ASCII
CODE 93
CODE 128
Code 11 enable* Code 11 disable
Code 39 enable* Code 39 disable
CODE 39 FULL ASCIIenable*
CODE 39 FULL ASCIIdisable
Code 93 enable* Code 93 disable
Code 128 disable Code 128 enable*
Code 128 ISBTenable*
Code 128 ISBTdisable
14
15
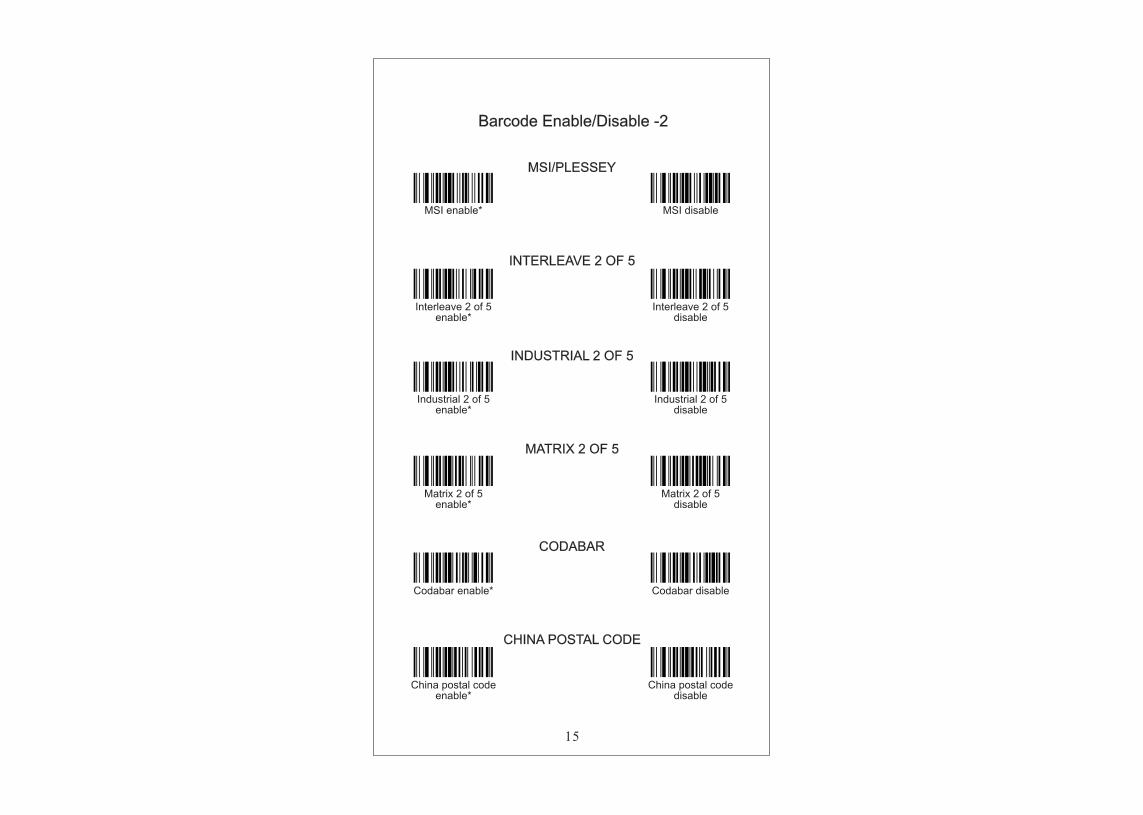
Barcode Enable/Disable -2
MSI/PLESSEY
INTERLEAVE 2 OF 5
INDUSTRIAL 2 OF 5
MATRIX 2 OF 5
CODABAR
CHINA POSTAL CODE
MSI enable* MSI disable
Interleave 2 of 5disable
Interleave 2 of 5enable*
Industrial 2 of 5enable*
Industrial 2 of 5disable
Matrix 2 of 5enable*
Matrix 2 of 5disable
Codabar enable* Codabar disable
China postal codeenable*
China postal codedisable

16
Barcode Enable/Disable -3
UPC/EAN
UPC-A enable* UPC-A disable
UPC-E enable* UPC-E disable
EAN-13 enable* EAN-13 disable
EAN-8 disable EAN-8 enable*

17
Barcode Symbol Set Up -1
CODE 11
Code 11 ID chars - ‘m’ Code 11 ID chars - ‘z’
Code 11 redundancyenable
Code 11 redundancydisable
CODE 39
Code 39 SS chars - none Code 39 SS chars - ‘+’
Code 39 start/end charsenable
Code 39 start/end charsdisable*
Code 39 ID chars - ‘a’ Code 39 ID chars - ‘z’
Code 39 redundancyenable
Code 39 redundancydisable

18
Barcode Symbol Set Up -2
CODE 93
Code 93 ID chars - ‘h’ Code 93 ID chars - ‘z’
Code 93 redundancyenable
Code 93 redundancydisable
CODE 128
Code 93 ID chars - ‘g’ Code 93 ID chars - ‘z’
Code 128 redundancyenable
Code 128 redundancydisable
MSI/PLESSEY
MSI ISBN ID chars - ‘f’ MSI ISBN ID chars - ‘z’
MSI redundancyenable
MSI redundancydisable

19
Barcode Symbol Set Up -3
INTERLEAVE 2 OF 5
INDUSTRIAL 2 OF 5
CODABAR
Interleave 2 of 5ID chars - ‘i’
Interleave 2 of 5ID chars - ‘z’
Interleave 2 of 5redundancy enable
Interleave 2 of 5redundancy disable
Industrial 2 of 5ID chars - ‘j’
Industrial 2 of 5ID chars - ‘z’
Industrial 2 of 5redundancy enable
Industrial 2 of 5redundancy disable
Codabar ID chars - ‘k’ Codabar ID chars - ‘z’
Codabar start/end charsenable
Codabar start/end charsdisable*

20
Barcode Symbol Set Up -4
Codabar space enable Codabar space disable
UPC-E convert to UPC-Aenable
Codabar redundancydisable
CODABAR
UPC/EAN
CODABAR
Codabar redundancyenable
UPC-E convert to UPC-Adisable*
UPC-A convert to EAN-13enable
UPC-A convert to EAN-13disable*
EAN-13 convert to ISBN enable
EAN-13 convert to ISBN disable*
UPC-A ID chars - ‘b’ UPC-A ID chars - ‘z’

21
Barcode Symbol Set Up -5
UPC/EAN
EAN-13 ID chars - ‘c’ EAN-13 ID chars - ‘z’
EAN-13 ID chars - ‘e’ EAN-13 ID chars - ‘z’
EAN-8 ID chars - ‘d’ EAN-8 ID chars - ‘z’
ISBN ID chars - ‘f’ ISBN ID chars - ‘z’
UPC/EAN redundancydisable
UPC/EANenable
redundancy
UPC/EAN- 2 digits
supplements UPC/EAN- 5 digits
supplements

22
Barcode Symbol Set Up -6
UPC/EAN- 2 & 5 digits
supplements UPC/EANdisable*
supplements
UPC/EAN
23
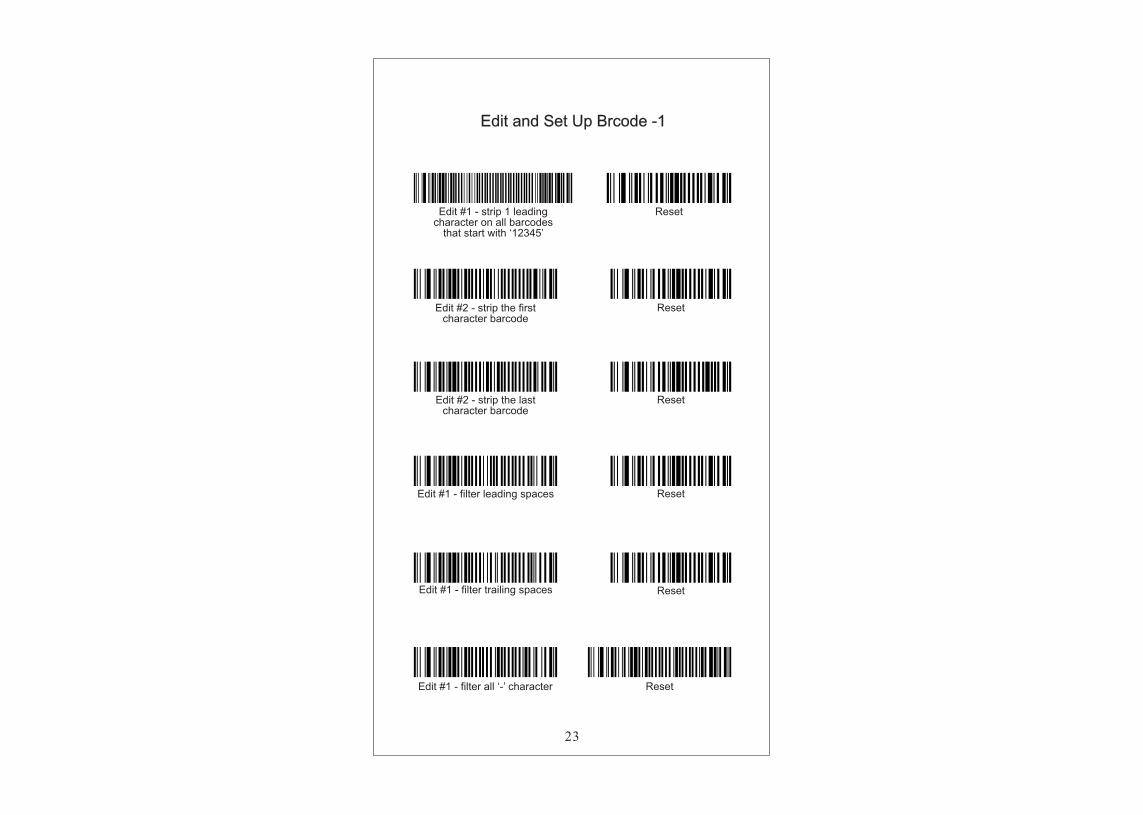
Edit and Set Up Brcode -1
Edit #1 - strip 1 leadingcharacter on all barcodes
that start with ‘12345’
Reset
Reset
Edit #1 - filter leading spaces
Reset Edit #2 - strip the lastcharacter barcode
Reset
Reset Edit #1 - filter trailing spaces
Edit #1 - filter all ‘-’ character Reset
Edit #2 - strip the firstcharacter barcode

24
Edit and Set Up Brcode -2
Edit - insert leading ‘0’ Reset

25
Macro/Spacial Key Set Up Barcode
Macro #1 - find ‘1’ andreplace with ‘ONE’
Reset
Reset
Reset
Reset
Reset
Macro #1 - find ‘2’ andreplace with ‘TWO’ for code 39
Macro #1 - find ‘0’ andreplace with ‘A’
Macro #1 - find ‘F3’ andreplace with ‘0’
Macro #1 - find ‘ENTER’ andreplace with ‘2’

26
Termination String Setup Barcode
String #1 -termination char -CR String #1 -termination char -LF
String #1 -termination char-CR+LF
String #1 disable
String #2 -Code 128termination -CR
String #2 -Code 128termination -LF
String #2 -Code 128termination -CR+LF
String #2 -Code 128termination removed
String -Code 39 termination-TAB
String -Code 39 termination-TAB removed
String -all codes preamble- ‘STX’
String -all codes postamble- ‘ETX’
27
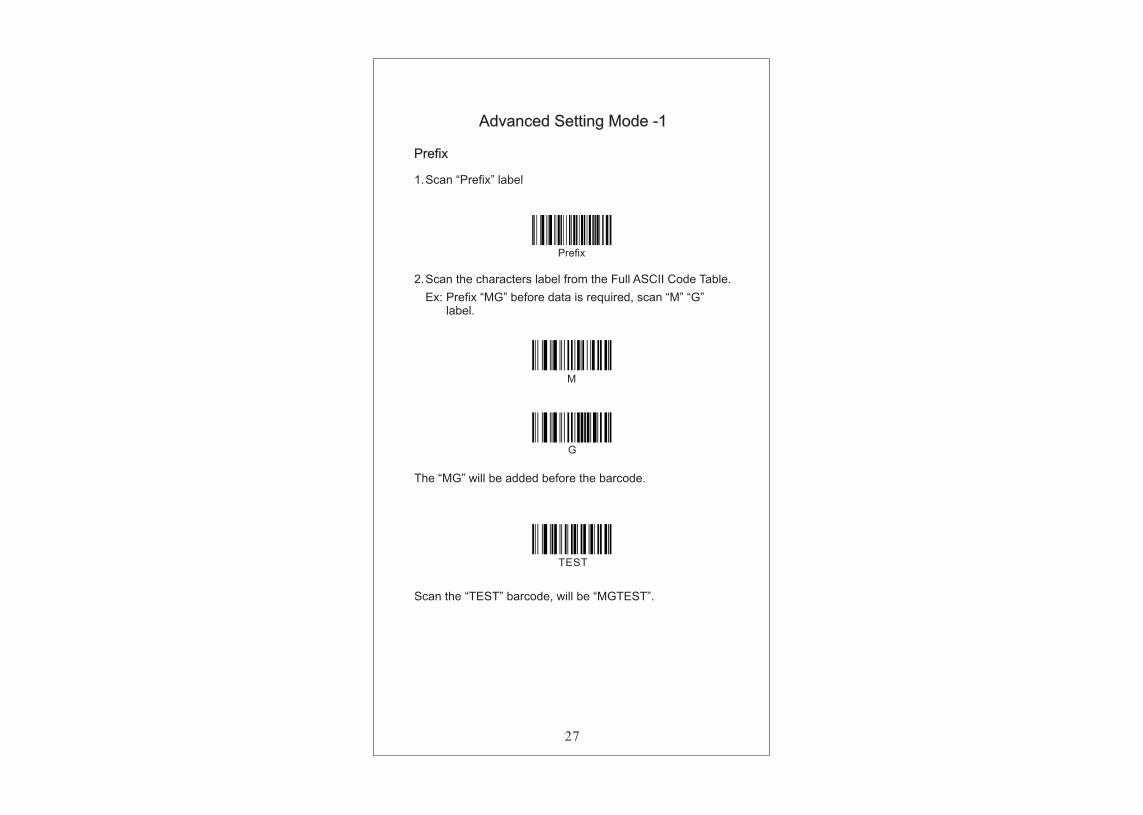
Advanced Setting Mode -1
M
G
TEST
Prefix
1.Scan “Prefix” label
2.Scan the characters label from the Full ASCII Code Table.
Ex: Prefix “MG” before data is required, scan “M” “G” label.
Prefix
The “MG” will be added before the barcode.
Scan the “TEST” barcode, will be “MGTEST”.

28
O
K
TEST
Advanced Setting Mode -2
Suffix
1.Scan “Suffix” label
Suffix
2.Scan the characters label from the Full ASCII Code Table.
Ex: Suffix “OK” before data is required, scan “O” “K” label.
The “OK” will be added after the barcode.
Scan the “TEST” barcode, will be “TESTOK”.

29
$02STX
123456789
Advanced Setting Mode -3
Truncate Header Character
Truncate header character
1.Scan “Truncate header character” label.
2.Scan the number that you want to truncate from the Full ASCII Table.
Ex: Truncate 2 header characters, scan “$02” label .
There will 2 header character be truncated.
Scan the above, there will be “3456789”.
30
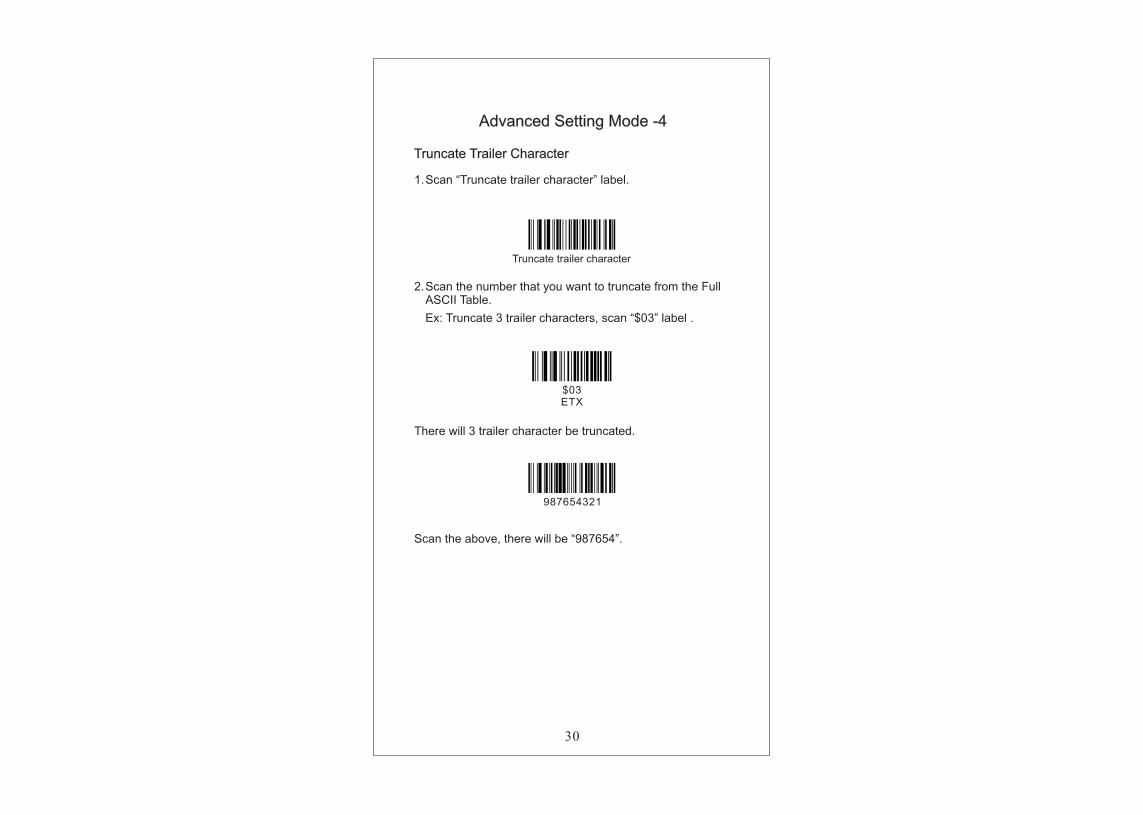
Truncate Trailer Character
Advanced Setting Mode -4
$03ETX
987654321
Truncate trailer character
1.Scan “Truncate trailer character” label.
2.Scan the number that you want to truncate from the Full ASCII Table.
Ex: Truncate 3 trailer characters, scan “$03” label .
There will 3 trailer character be truncated.
Scan the above, there will be “987654”.

OC001Prefix
OC002Suffix
OC003Truncate header character
OC004Truncate trailer character
$00NUL/SP
$01SOH
$02STX
$03ETX
$04EOT
$05ENQ
$06ACK
$07BEL
$08BS/Back Space
$09HT/TAB
31
Appendix
Appendix A: Full ASCII Table

$0ALF
$0CFF
$0DCR/ENTER
$0ESO
$10DLE
$12DC2
$13DC3
$14DC4
$15NAK
$16SYN
$17ETB
$0BVT
$0FSI
$11DC1
32

$18CAN
$19EM
$1ASUB
$1BESC/ESC
$1CFS
$1DGS
$1ERS
$1FUS
$20SP
$21!
$22
"$23
#
$24$
$25%
33

$26&
$322
$27'
$28(
$29)
$2A*
$2B+
$2C,
$2D-
$2E.
$2F/
$300
$311
$333
34

$344
$355
$366
$377
$388
$399
$3A:
$3B;
$3C<
$3D=
$3E>
$3F?
$40@
$41A
35

$42B
$43C
$44D
$45E
$46F
$47G
$48H
$49I
$4AJ
$4BK
$4CL
$4DM
$4EN
$4FO
36

$50P
$51Q
$52R
$53S
$54T
$55U
$56V
$57W
$58X
$59Y
$5AZ
$5B[
$5C\
$5D]
37

$5E^
$5F_
$60、
$61a
$62b
$63c
$64d
$65e
$66f
$67g
$68h
$69i
$6Aj
$6Bk
38
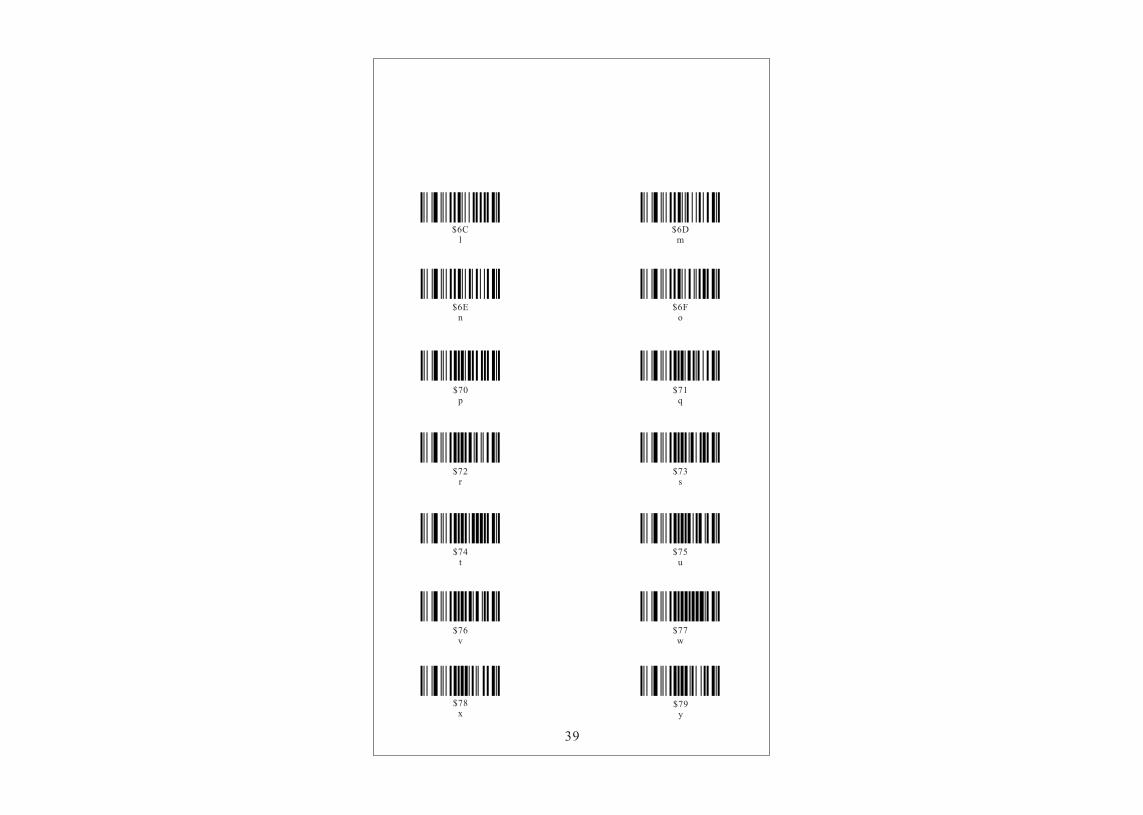
$6Cl
$6Dm
$6En
$6Fo
$70p
$71q
$72r
$73s
$74t
$75u
$76v
$77w
$78x
$79y
39
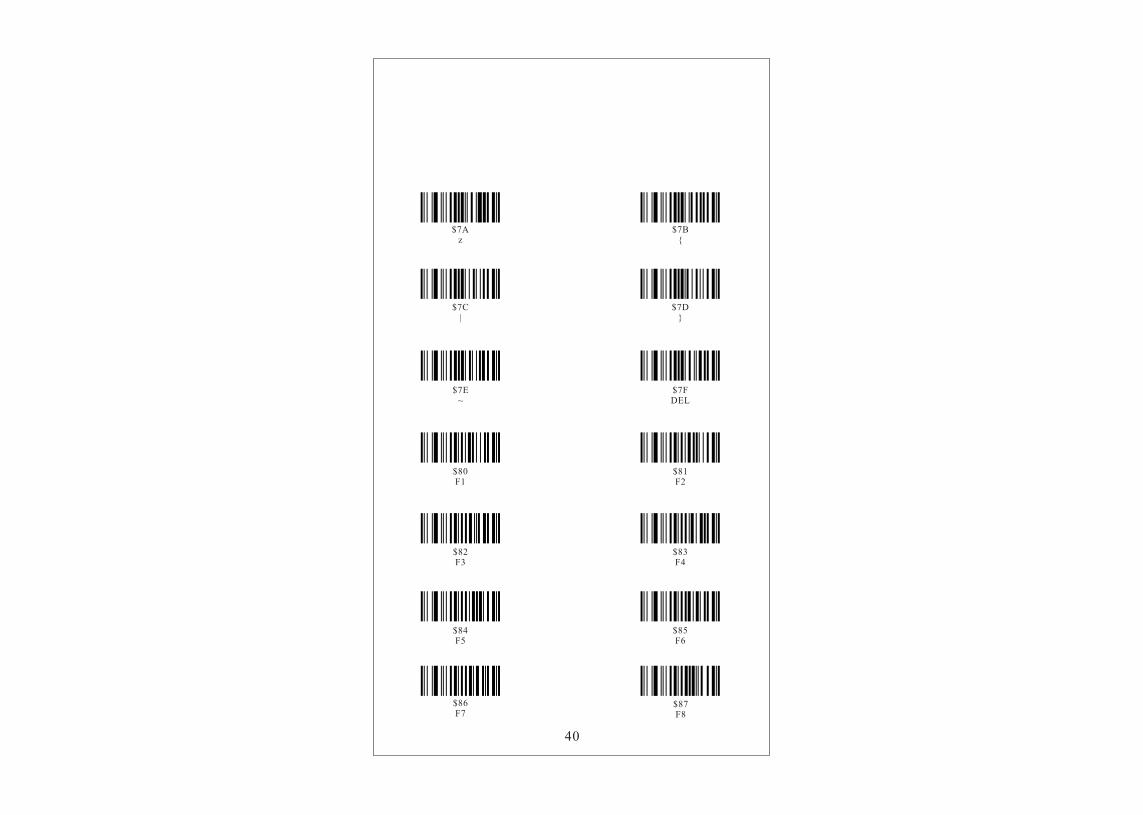
$7Az
$7B{
$7C|
$7D}
$7E~
$7FDEL
$80F1
$81F2
$82F3
$83F4
$84F5
$85F6
$86F7
$87F8
40
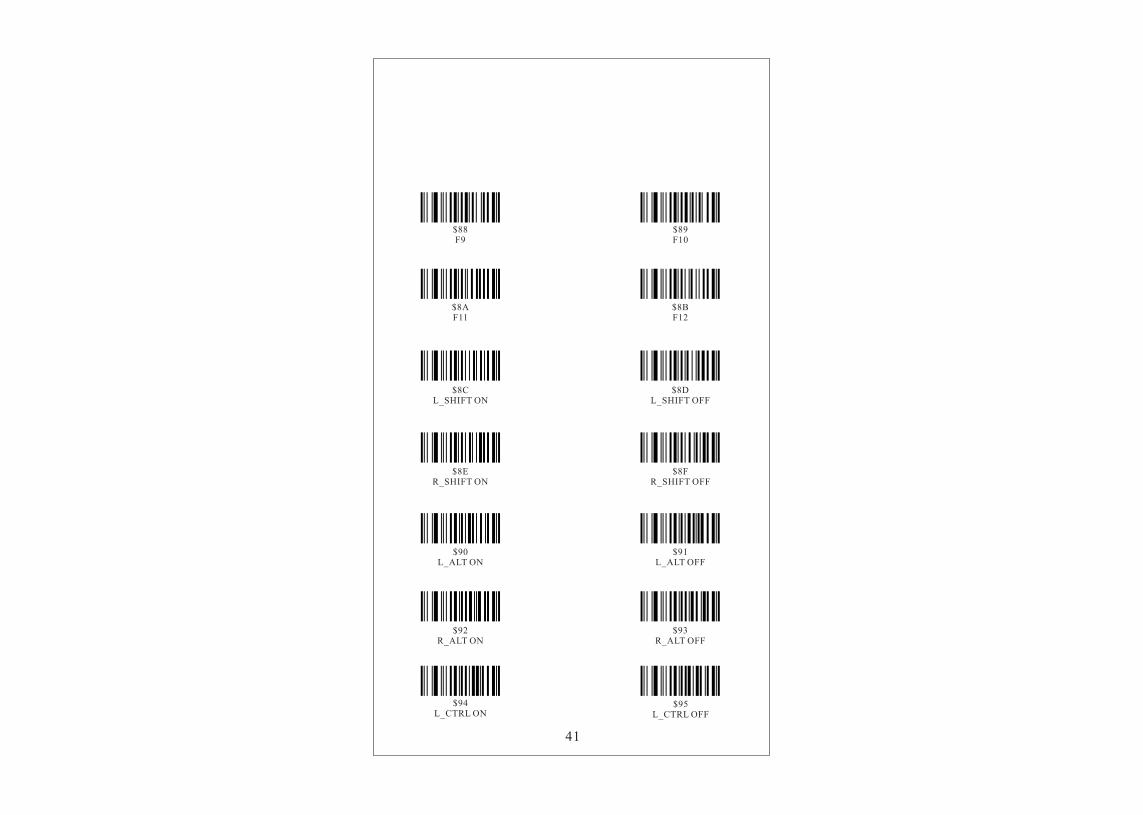
$88F9
$89F10
$8AF11
$8BF12
$8CL_SHIFT ON
$8DL_SHIFT OFF
$8ER_SHIFT ON
$8FR_SHIFT OFF
$90L_ALT ON
$91L_ALT OFF
$92R_ALT ON
$93R_ALT OFF
$94L_CTRL ON
$95L_CTRL OFF
41
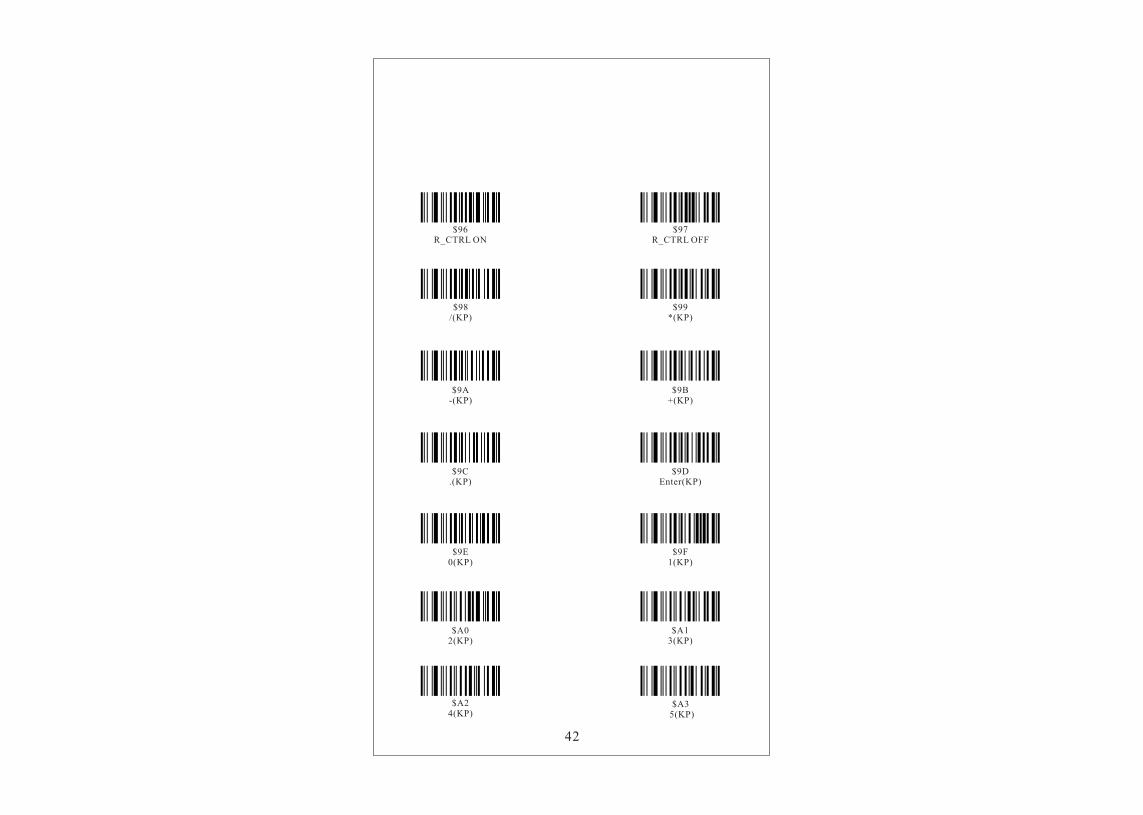
$96R_CTRL ON
$97R_CTRL OFF
$99*(KP)
$9A-(KP)
$9B+(KP)
$9C.(KP)
$9DEnter(KP)
$9E0(KP)
$9F1(KP)
$A02(KP)
$A13(KP)
$A24(KP)
$A3 5(KP)
$98/(KP)
42

$A46(KP)
$A57(KP)
$A79(KP)
$A8Inert
$A9Delete
$AAHome
$ABEnd
$ACPage Up
$ADPage Down
$AEUp
$AFDown
$B0Left
$B1 Right
$A68(KP)
43
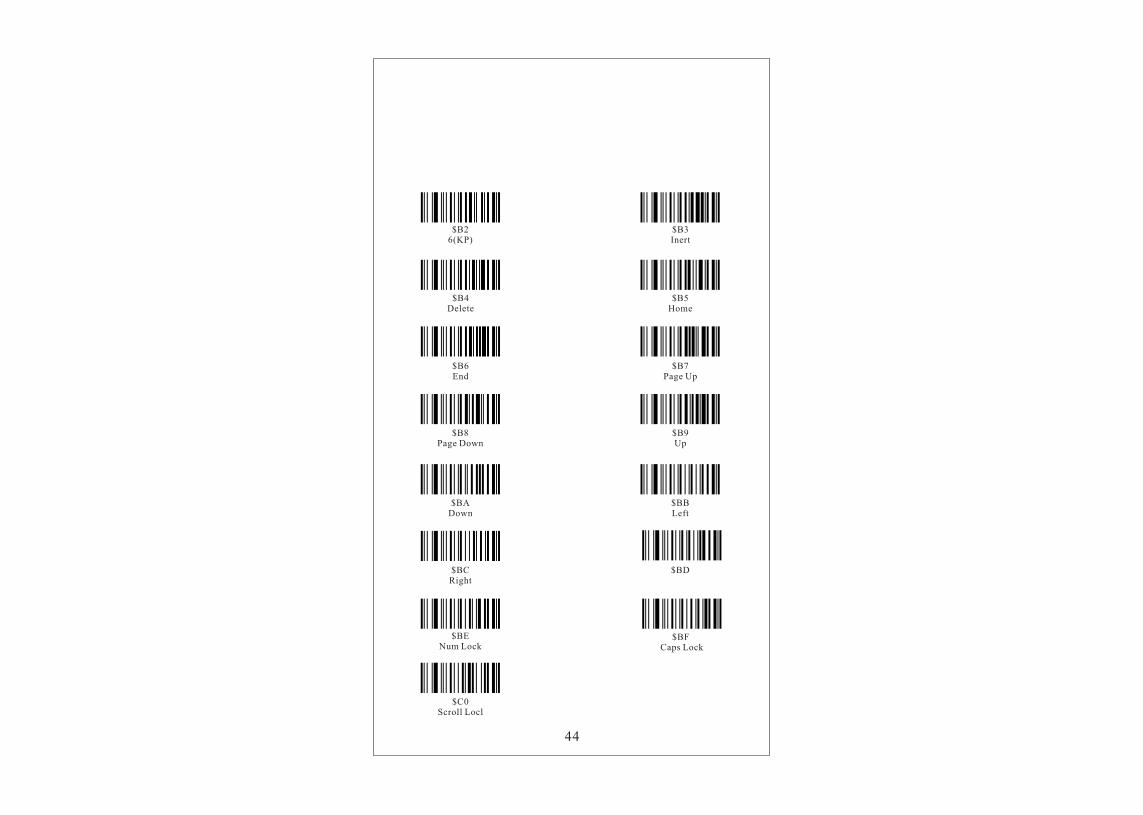
$B26(KP)
$B3Inert
$B5Home
$B6End
$B7Page Up
$B8Page Down
$B9Up
$BADown
$BBLeft
$BCRight
$BD
$BENum Lock
$BF Caps Lock
$B4Delete
$C0Scroll Locl
44

45
Appendix B: Troubleshooting and Error Beeps
Problem: The LED without light, without buzz, without laser.
Cause: The power supply for scanner off, or the wire interface become flexible.
Solution: Check the power supply, make sure the power supply on work. Reconnect the scanner and the computer again by wire.
Problem: After scan, no data to be transmitted.
Cause: The scanners setup is incorrect.
Solution: Make sure the scanners setup is in the correct mode.
Problem: No power supply startup buzz when the interface reader connect to the computer.
Cause: The interface reader won’t offer the power supply.
Solution: Use a direct with 5V to connect up.
Problem: After connect the interface scanner, no data transmit when reading the barcode.
Cause: Haven’t setup the interface mode or communication agreement incorrect.
Solution: Setup the interface mode. Or reset the correct communication agreement.
Problem: The scanner reader is normal, but with buzz.
Cause: The incorrect setup, which setup in aphonia.
Solution: Scan the barcode of the startup voice.
Problem: Scan some of the barcode with buzz, but without the buzz when scan other barcode which in the same mode system.
Cause: The barcode be damage or there some problems with the barcode printing.
Solution: Check the barcode whether be damaged with carefulness. And check other barcode to find whether there are different to the same barcode system. Check the printer mode. Changed the setup of printer.
Problem: Other complexion or can’t read the barcode.
Solution: Close the computer, re-connect the barcode scanner with the computer and keyboard, then turn on the computer power supply and check it; if still couldn’t solve the problem, please contact with the dealer of the company.