20a43...20a43 3m90101a-e cover 1 14/08/2003, 11:40 2 child safety it makes a difference where your...
TRANSCRIPT

20A43
3M90101A-E COVER 14/08/2003, 11:401

2
Child SafetyIt Makes A DifferenceWhere Your TV StandsCongratulations on your purchase! As you enjoyyour new TV, keep these safety tips in mind:
The Issue¾ If you are like most consumers, you have a TV in your home.
Many homes, in fact, have more than one TV.The home theater entertainment experience is a growingtrend, and larger TVs are popular purchases; however, theyare not always supported on the proper TV stands.Sometimes TVs are improperly secured or inappropriatelysituated on dressers, bookcases, shelves, desks, audiospeakers, chests, or carts. As a result, TVs may fall over,causing unnecessary injury.
¾
¾
Toshiba Cares!¾ The consumer electronics industry
is committed to making homeentertainment enjoyable and safe.¾ The Consumer ElectronicsAssociation formed the HomeEntertainment Support SafetyCommittee, comprised of TV andconsumer electronics furnituremanufacturers, to advocatechildren’s safety and educate
consumers and their families abouttelevision safety.
Tune Into Safety¾ One size does NOT fit all! Use appropriate
furniture large enough to support the weight of yourTV (and other electronic components).
¾ Use appropriate angle braces, straps, and anchors to secureyour furniture to the wall (but never screw anything directlyinto the TV).Carefully read and understand the other enclosedinstructions for proper use of this product.Do not allow children to climb on or play with furnitureand TVs.Avoid placing any item on top of your TV (such as a VCR,remote control, or toy) that a curious child may reach for.Remember that children can become excited while watchinga program and can potentially push or pull a TV over.Share our safety message about this hidden hazard of thehome with your family and friends. Thank you!
¾
¾
¾
¾
¾
2500 Wilson Blvd.Arlington, VA 22201 U.S.A.Tel. 703-907-7600 Fax 703-907-7690www.CE.org
CEA is the Sponsor, Producer andManager of the International CES®
Safety PrecautionsWARNINGTO REDUCE THE RISK OF FIRE OR ELECTRIC SHOCK,DO NOT EXPOSE THIS APPLIANCE TO RAIN ORMOISTURE.
Dear Customer,Thank you for purchasing this Toshiba TV. This manual willhelp you use the many exciting features of your new TV.Before operating the TV, please read this manualcompletely, and keep it nearby for future reference.
NOTE TO CATV INSTALLERS IN THE USAThis is a reminder to call the CATV system installer’sattention to Article 820-40 of the NEC, which providesguidelines for proper grounding and, in particular, specifiesthat the cable ground shall be connected to the groundingsystem of the building, as close to the point of cable entryas practical. For additional antenna grounding information,see items 25 and 26 on page 4.
The lightning symbol in the triangle tells you that thevoltage inside this product may be strong enough tocause an electric shock. DO NOT TRY TO SERVICETHIS PRODUCT YOURSELF.
The exclamation mark in the triangle tells you thatimportant operating and maintenance instructionsfollow this symbol.
WARNING: TO REDUCE THE RISK OF ELECTRICSHOCK, DO NOT REMOVE COVER (OR BACK).NO USER-SERVICEABLE PARTS INSIDE. REFERSERVICING TO QUALIFIED SERVICE PERSONNEL.
NOTICE OF POSSIBLE TV STAND INSTABILITYDANGER: RISK OF SERIOUS PERSONALINJURY OR DEATH! Use this TV withthe TOSHIBA TV stand recommended in the
“Specifications” section only. Use with other stands mayresult in instability, causing possible injury or death.
NOTICE OF POSSIBLE ADVERSE EFFECTSON TV PICTURE TUBE
If a fixed (non-moving) pattern remains on the TVscreen for long periods of time, the image can becomepermanently engrained in the picture tube. This type ofdamage is NOT COVERED BY YOUR WARRANTY.See item 33 on page 4.
0303
WARNING
3M90101A-E P02-07 14/08/2003, 11:402

3
Installation, Care, and ServiceInstallationFollow these recommendations and precautions and heed allwarnings when installing your TV:
16) Never modify this equipment. Changes or modificationsmay void: a) the warranty, and b) the user’s authority tooperate this equipment under the rules of the FederalCommunications Commission.
17) DANGER: RISK OF SERIOUS PERSONALINJURY, DEATH, OR EQUIPMENTDAMAGE! Never place the TV on
an unstable cart, stand, or table. The TVmay fall, causing serious personal injury,death, or serious damage to the TV.
18) Never place or store the TV in directsunlight; hot, humid areas; areassubject to excessive dust or vibration;or locations with temperatures at orbelow 41˚F (5˚C).
19) Always place the TV on the flooror a sturdy, level, stable surface thatcan support the weight of the unit.
20) Never place items such as vases,aquariums, or candles on top of the TV.
21) Never block or cover the slots oropenings in the TV cabinet back,bottom, and sides. Never placethe TV:• on a bed, sofa, rug, or similar
surface;• too close to drapes, curtains,
or walls; or• in a confined space such as a
bookcase, built-in cabinet, or anyother place with poor ventilation.
The slots and openings are providedto protect the TV from overheatingand to help maintain reliableoperation of the TV.
22) Never allow anything to rest on or roll over the powercord, and never place the TV where the power cord issubject to wear or abuse.
23) Never overload wall outlets andextension cords.
Important Safety Instructions1) Read these instructions.
Keep these instructions.Heed all warnings.Follow all instructions.
2)3)4)
5) Do not use this apparatus nearwater.
6) Clean only with a dry cloth.
7) Do not block any ventilationopenings. Install in accordance withthe manufacturer’s instructions.
8) Do not install near any heatsources such as radiators,heat registers, stoves, or otherapparatus (including amplifiers)that produce heat.
9) Do not defeat the safety purpose of the polarized orgrounding type plug. A polarized plug has two bladeswith one wider than the other. A grounding type plug hastwo blades and a third groundingprong. The wide blade or the thirdprong are provided for your safety.If the provided plug does not fit intoyour outlet, consult an electricianfor replacement of the obsolete outlet.
10) Protect the power cord from beingwalked on or pinched, particularly atplugs, convenience receptacles, andthe point where it exits the apparatus.
11) Only use attachments/accessories specified by themanufacturer.
12) Use only with the cart, stand, tripod,bracket, or table specified by themanufacturer, or sold with theapparatus. When a cart is used, usecaution when moving the cart/apparatuscombination to avoid injury from tip-over.
13) Unplug this apparatus duringlightning storms or whenunused for long periods of time.
14) Refer all servicing to qualified service personnel.Servicing is required when the apparatus has beendamaged in any way, such as power supplycord or plug is damaged, liquid hasbeen spilled or objects have fallen intothe apparatus, the apparatus has beenexposed to rain ormoisture, does notoperate normally, or has been dropped.
15) CAUTION: To reduce the risk of electric shock, do notuse the polarized plug with an extension cord, receptacle,or other outlet unless the blades can be insertedcompletely to prevent blade exposure.
Wide plug
QUALIFIEDSERVICE
TECHNICIAN
0303
3M90101A-E P02-07 14/08/2003, 11:403

4
Ground clamp
Antenna discharge unit(NEC Section 810-20)
Grounding conductors(NEC Section 810-21)
Power service groundingelectrode system (NEC Art 250 Part H)Ground clamps
Antenna lead-in wire
Electric service equipment
QUALIFIEDSERVICE
TECHNICIAN
24) Always operate this equipment froma 120 VAC, 60 Hz power source only.
25) Always make sure the antenna system is properlygrounded to provide adequate protection against voltagesurges and built-up static charges (see Section 810 of theNational Electric Code).
26) DANGER: RISK OF SERIOUS PERSONALINJURY OR DEATH!• Use extreme care to make sure you are never in
a position where your body (or any item you are in contactwith, such as a ladder or screwdriver) can accidentallytouch overhead power lines. Never locate the antennanear overhead power lines or other electrical circuits.• Never attempt to install any of the following duringlightning activity:a) an antenna system; or b) cables, wires, or any hometheater component connected to an antenna or phonesystem.
CareFor better performance and safer operation of your TOSHIBATV, follow these recommendations and precautions:
27) Always sit approximately 10–25 feet away from the TV andas directly in front of it as possible. The picture can appeardull if you sit too far to the left or right of the TV, or ifsunlight or room lights reflect on the screen. Turn the TVoff to check for reflections on the screen, and then removethe source of reflections while viewing the TV.
28) Always unplug the TV beforecleaning. Never use liquid oraerosol cleaners.
29) WARNING: RISK OF ELECTRIC SHOCK!Never spill liquids or push objects of any kindinto the TV cabinet slots.
30) [This item applies to projection TVs only.] If the airtemperature rises suddenly (for example, when the TV isfirst delivered), condensation may form on the lenses. Thiscan make the picture appear distorted or the color appearfaded. If this happens, turn off the TV for 6 to 7 hours toallow the condensation to evaporate.
31) For added protection of your TV from lightning and powersurges, always unplug the power cord and disconnect theantenna from the TV if you leave the TV unattended orunused for long periods of time.
32) During normal use, the TV may makeoccasional snapping or poppingsounds. This is normal, especiallywhen the unit is being turned on oroff. If these sounds become frequentor continuous, unplug the power cordand contact a Toshiba Authorized Service Center.
33) Possible Adverse Effects on TV Picture Tube: If a fixed(non-moving) pattern remains on the TV screen for longperiods of time, the image can become permanentlyengrained in the picture tube and cause subtle butpermanent ghost images. This type of damage is NOTCOVERED BY YOUR WARRANTY. Never leave your TVon for long periods of time while it is displaying thefollowing formats or images:• Fixed Images, such as PIP/POP windows, stock tickers,
video game patterns, TV station logos, and websites.Special Formats that do not use the entire screen. Forexample, viewing letterbox style (16:9) media on anormal (4:3) display (gray bars at top and bottom ofscreen); or viewing normal style (4:3) media on awidescreen (16:9) display (gray bars on left and rightsides of screen).
•
Service34) WARNING: RISK OF ELECTRIC
SHOCK! Never attempt to service theTV yourself. Opening and
removing the covers may exposeyou to dangerous voltage or otherhazards. Refer all servicing to aToshiba Authorized Service Center.
35) If you have the TV serviced:
• Ask the service technician to use only replacement partsspecified by the manufacturer.
• Upon completion of service, askthe service technician to performroutine safety checks to determinethat the TV is in safe operatingcondition.
36) When the TV reaches the end of its useful life, ask aqualified service technician to properly dispose of the TV.Improper disposal may result in a picture tube implosionand possible personal injury.
0303
3M90101A-E P02-07 14/08/2003, 11:404

5
ANT IN
VIDEO
AUDIOL
R
FEATURES
LOCATION OF CONTROLS
• 181 Channel Tuner - The tuning system is capable of receiving all 68 VHF/UHF standard broadcast channels thatare available in your area. When operating on a cable system, it can tune to the standard VHF channel frequenciesplus up to 113 cable channel frequencies. The actual number of channels received depends upon channelreception in your area or your cable system.
• On-screen 3 Language Display - This TV can display the on-screen language in English, Spanish or French.• Sleep Timer - Operable from the remote control, the TV can be programmed to turn off automatically (from 10 to
120 minutes, in 10-minute increments).• Memory Back Up - This system prevents loss of memorized channel selections in case a power interruption to the
TV should occur.• V-Chip - The V-Chip function can read the rating of a TV program or movie content if the program is encoded with
this information. V-Chip will allow you to set a restriction level. (designed to work with the U. S. V-Chip system only)• Picture Control Adjustments - The on-screen display allows precise remote control adjustment of BRIGHTNESS,
COLOR, CONTRAST, SHARPNESS and TINT.• Closed Captioned Decoder - Displays closed captions or text on-screen (when available).• Stereo/SAP Reception - This TV is designed to receive stereo and second audio program (SAP) broadcasts
where available.• Lock feature - This feature has three functions, LOCKING CHANNELS, LOCKING VIDEO INPUT and SETTING
THE GAME TIMER.• Programmable ON Timer - Allows you to automatically turn on the TV at a set time.
FRONT BACK
1 3 4 6
8
5
10
1. POWER Button - Press to turn the TV on or off.2. Remote Sensor - Signals from the Remote Control
unit are received here.3. POWER indicator - Lights up when the power is
turned on.4. CHANNEL ▲/▼ Buttons - Press to select a higher or
lower numbered channel set into memory.(ENTER Button) - Press to enter or select informationfor on-Screen operations.(RESET Button) - Press, while in the on-screenmenu mode, to reset the on-screen picture adjust-ments to their factory preset positions.
5. VOLUME ▲/▼ Buttons - Press to raise or lower thelevel of the sound.(MENU Buttons) - Press both VOLUME ▲/▼ buttonsat the same time to display the on-screen menu func-tions.(SET + / – Buttons) - Press to select the desired set-ting during on-screen operations.
6. AUDIO/VIDEO IN (VIDEO 2) Jacks - Audio and videosignal cables from an external source can be con-nected here.
7. PHONE (Earphone) Jack - Plug an earphone ormonaural headphones with a 1/8 miniplug into thisjack for private listening.
8. VHF/UHF IN (ANT) Jack - Connect a VHF/UHFantenna or CATV cable to this jack.
9. AUDIO/VIDEO IN (VIDEO 1) Jacks - Audio andvideo signal cables from an external source can beconnected here.
10. AC Power Cord - Plug into an outlet with 120V,60 Hz AC power only.
9
72
3M90101A-E P02-07 14/08/2003, 11:405
6
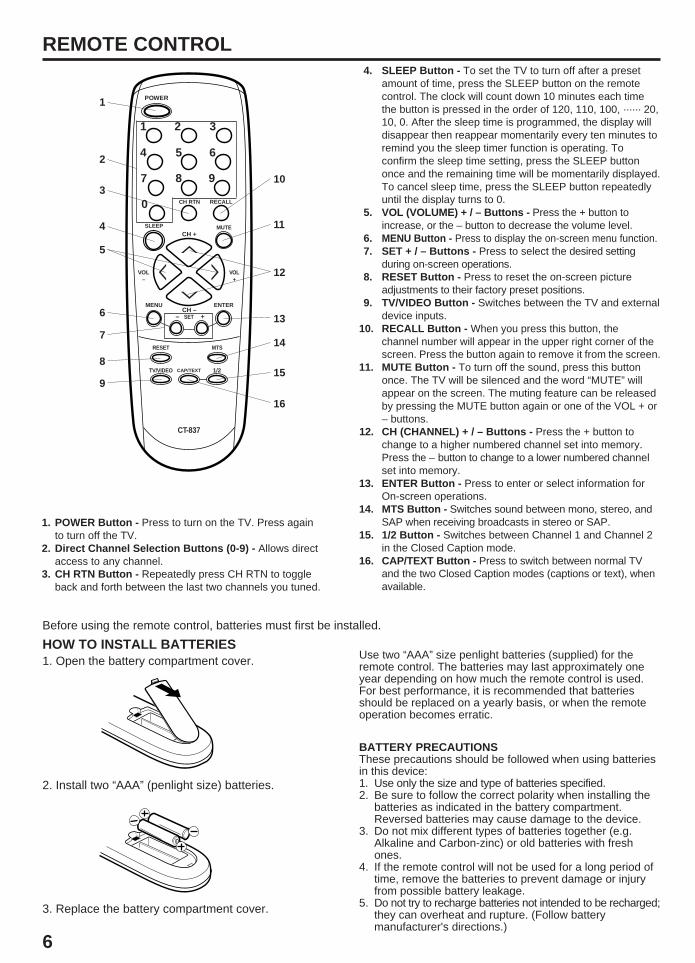
4. SLEEP Button - To set the TV to turn off after a presetamount of time, press the SLEEP button on the remotecontrol. The clock will count down 10 minutes each timethe button is pressed in the order of 120, 110, 100, ······ 20,10, 0. After the sleep time is programmed, the display willdisappear then reappear momentarily every ten minutes toremind you the sleep timer function is operating. Toconfirm the sleep time setting, press the SLEEP buttononce and the remaining time will be momentarily displayed.To cancel sleep time, press the SLEEP button repeatedlyuntil the display turns to 0.
5. VOL (VOLUME) + / – Buttons - Press the + button toincrease, or the – button to decrease the volume level.
6. MENU Button - Press to display the on-screen menu function.7. SET + / – Buttons - Press to select the desired setting
during on-screen operations.8. RESET Button - Press to reset the on-screen picture
adjustments to their factory preset positions.9. TV/VIDEO Button - Switches between the TV and external
device inputs.10. RECALL Button - When you press this button, the
channel number will appear in the upper right corner of thescreen. Press the button again to remove it from the screen.
11. MUTE Button - To turn off the sound, press this buttononce. The TV will be silenced and the word “MUTE” willappear on the screen. The muting feature can be releasedby pressing the MUTE button again or one of the VOL + or– buttons.
12. CH (CHANNEL) + / – Buttons - Press the + button tochange to a higher numbered channel set into memory.Press the – button to change to a lower numbered channelset into memory.
13. ENTER Button - Press to enter or select information forOn-screen operations.
14. MTS Button - Switches sound between mono, stereo, andSAP when receiving broadcasts in stereo or SAP.
15. 1/2 Button - Switches between Channel 1 and Channel 2in the Closed Caption mode.
16. CAP/TEXT Button - Press to switch between normal TVand the two Closed Caption modes (captions or text), whenavailable.
REMOTE CONTROL
1. Open the battery compartment cover.
2. Install two “AAA” (penlight size) batteries.
HOW TO INSTALL BATTERIESBefore using the remote control, batteries must first be installed.
3. Replace the battery compartment cover.
1. POWER Button - Press to turn on the TV. Press againto turn off the TV.
2. Direct Channel Selection Buttons (0-9) - Allows directaccess to any channel.
3. CH RTN Button - Repeatedly press CH RTN to toggleback and forth between the last two channels you tuned.
Use two “AAA” size penlight batteries (supplied) for theremote control. The batteries may last approximately oneyear depending on how much the remote control is used.For best performance, it is recommended that batteriesshould be replaced on a yearly basis, or when the remoteoperation becomes erratic.
BATTERY PRECAUTIONSThese precautions should be followed when using batteriesin this device:1. Use only the size and type of batteries specified.2. Be sure to follow the correct polarity when installing the
batteries as indicated in the battery compartment.Reversed batteries may cause damage to the device.
3. Do not mix different types of batteries together (e.g.Alkaline and Carbon-zinc) or old batteries with freshones.
4. If the remote control will not be used for a long period oftime, remove the batteries to prevent damage or injuryfrom possible battery leakage.
5. Do not try to recharge batteries not intended to be recharged;they can overheat and rupture. (Follow batterymanufacturer's directions.)
MENU
VOL–
SLEEP MUTE
CH RTN RECALL
VOL+
ENTERCH –
CH +
1 2 3
4 5 6
7
0
8 9
– SET +
1/2CAP/TEXT
RESET MTS
TV/VIDEO
POWER
CT-837
1
2
3
5
6
7
8
9
10
11
12
13
16
4
15
14
3M90101A-E P02-07 14/08/2003, 11:406

7
A B
Combination VHF/UHF antennaSingle 75 ohm cable
(or)Single 300 ohm twin-lead wire*
TRANSFORMER(not supplied)
*For best performance, if you have a splitter connected, remove the splitter and connect the single wire to the transformer, and then to the TV’s antenna input (as illustrated here).
Separate VHF and UHF antennas or Combination VHF/UHF antenna with separate cables/wires
300 ohm twin-lead wire
COMBINER(not supplied)
UHF Antenna
VHF Antenna
75 ohm cable
300 ohm twin-lead wire
COMBINER(not supplied)
UHF Antenna
VHF Antenna300 ohm twin-lead wire*
TRANSFORMER(not supplied)
Cable TV service
(or)
(or)
To ANT inputon back of TV
To ANT inputon back of TV
To ANT inputon back of TV
To ANT inputon back of TV
To ANT inputon back of TV
To ANT inputon back of TV
To ANT inputon back of TV
(or)
From cableTV service
From cableTV service
From cableTV service A / B SWITCHSPLITTER
CONVERTER/ DESCRAMBLER
CONVERTER/ DESCRAMBLER
ANTENNA/CATV CONNECTIONSCombination VHF/UHF Antenna (Single 75 ohm cable or 300ohm twin-lead wire)Connect the 75 ohm cable from a combination VHF/UHFantenna to the antenna jack.If your combination antenna has a 300 ohm twin-lead wire, usethe 300-75 ohm matching transformer (not supplied).Combination VHF/UHF Antenna (Separate VHF and UHF 300ohm twin-leads)Connect the UHF twin-lead wire to a combiner (not supplied).Connect the VHF twin-lead to the 300-75 ohm matchingtransformer (not supplied). Attach the transformer to thecombiner. Attach the combiner to the antenna jack.Separate VHF/UHF AntennasConnect the 75 ohm cable from the VHF antenna and the UHFantenna twin-lead to a combiner (not supplied). Attach thecombiner to the antenna jack.NOTE: If your VHF antenna has a twin-lead wire, use the 300-75ohm matching transformer (not supplied), then connect the trans-former to the combiner.For Subscribers to Basic Cable TV ServiceFor basic cable service not requiring a converter/descramblerbox, connect the CATV 75 ohm coaxial cable directly to theantenna jack on the back of the television.For Subscribers to Scrambled Cable TV ServiceIf you subscribe to a cable service which requires the use of aconverter/descrambler box, connect the incoming cable to theconverter/descrambler box and connect the output of the box tothe antenna jack on the back of the television. Follow theconnections shown left. Set the television to the output of theconverter/descrambler box (usually channel 3 or 4) and use theconverter/descrambler box to select channels.For Subscribers to Unscrambled Basic Cable withScrambled Premium ChannelsIf you subscribe to a cable service in which basic cable channelsare unscrambled and premium channels require the use of aconverter/descrambler box, you may wish to use a two-set signalsplitter (sometimes called a “two-set coupler”) and an A/B switchbox from the cable installer or an electronics supply store. Followthe connections shown left. With the switch in the “B” position, youcan directly tune any nonscrambled channels on your TV. Withthe switch in the “A” position, tune your TV to the output of theconverter/descrambler box (usually channel 3 or 4) and use thebox to tune scrambled channels.This television has an extended tuning range and can tune mostcable channels without using a cable company suppliedconverter box. Some cable companies offer “premium paychannels” in which the signal is scrambled. Descrambling thesesignals for normal viewing requires the use of a descramblerdevice which is generally provided by the cable company.
CONNECTION TO OTHER EQUIPMENTThe exact arrangement you use to interconnect various video and audio components to the TV is dependent on the model and featuresof each component. Check the Owner’s Manual provided with each component for the location of video and audio inputs and outputs.The following connection diagrams are offered as suggestions. You may need to modify them to accommodate your particularassortment of components.
To view the picture from a VCR, camcorder, or TV game, youmust put the TV in VIDEO mode first. Press TV/VIDEO toselect VIDEO mode. The word “VIDEO1” or “VIDEO2”displays briefly on-screen. Press TV/VIDEO again to return toTV mode.
TV/VIDEO SELECTION
1. To connect the TV to a VCR
The TV also can be used as a display device for many videogames. However, due to the wide variety of different types ofsignal generated by these devices and subsequent hook-upvariations required, they have not all been included in thesuggested connection diagrams. You will need to consult eachcomponent's Owner's Manual for additional information.
2. To connect the TV to a TV Game
To playback from the camcorder, connect the camcorder tothe TV as shown.
3. To connect the TV to a camcorder
Choose one of the following seven connections, based on yourequipment and service:
VIDEO 1 TV VIDEO 1 VIDEO 2
ANT IN
VIDEO
AUDIOL
R
Rear of TVVCR
(not supplied)
To Audio/Video OUT
AUDIO (L)
VIDEO
AUDIO (R)
Front of TV
To AV OUT jack
TV GAME
To Audio/Video OUT
Front of TV
(not supplied)
(not supplied)
3M90101A-E P02-07 14/08/2003, 11:407

8
SETTING THE LANGUAGEThis TV can display the on-screen displays and adjustment menus in English, Spanish, or French.On-screen language selection (step 3) will automatically appear on the screen when you press the MENU button initially.Select the language you prefer first, then proceed with the other menu options.
NOTE:If Spanish or French is chosen, the Closed Caption indicators will be in the selected language, but the Closed Caption text will notbe affected by the language selection.
Press SET + or – until the “ A ” indi-cator points to the desiredlanguage: English (ENGLISH),Spanish (ESPAÑOL) or French(FRANCAIS), then press ENTER.
1
2
3
4
Press MENU.
Press SET + or – to select theLANGUAGE mode, then pressENTER. Press MENU repeatedly until the
MENU screen is cleared.
CH SETUPPICTURE
LANGUAGEV-CHIP SETLOCKON TIMER
AUDIO
MENU
⟨ + / – / ENTER / MENU ⟩ ⟨ + / – / ENTER / MENU ⟩
FRANCAIS
ENGLISH
ESPAÑOL
LANGUAGE / IDIOMA / LANGUE
TO MEMORIZE CHANNELSThis TV is equipped with a channel memory feature that allows theTV to skip up or down to the next channel set into memory, skip-ping over unwanted channels.Before selecting channels, they must be programmed into the TV’smemory. In addition to normal VHF and UHF channels, this TV canreceive up to 113 Cable TV channels. To use this TV with anantenna, set the TV/CABLE menu option to the TV setting. Whenshipped from the factory, this menu option is in the CABLE setting.
TV/CABLE SELECTION
Press MENU.
Press SET + or – until the indicator next to“CH SETUP” begins to flash, then pressENTER.
Press SET + or – until the indicator nextto “TV/CABLE” begins to flash.
Press ENTER to select the TV orCABLE mode. The arrow indicates theselected mode.
Press MENU repeatedly until theMENU screen is cleared.
NOTE:Contact your cable company to determine the type of cablesystem used in your area.
Press MENU repeatedly until the MENU screen iscleared.
TO ADD/DELETE CHANNELS
Press MENU.
Press SET + or – until the indicator next to“CH SETUP” begins to flash, then pressENTER.
Press SET + or – until the indicatornext to “ADD/DELETE” begins to flash,then press ENTER.
Select the desired channels to beadded or deleted using the DirectChannel Selection buttons (0-9), CH +or – or SET + or –.
1
2
3
4
5
4
1
2
3
4
5 Press ENTER to select ADD or DELETE.If an unmemorized channel was selected (step 4), thechannel indication will be red. Press ENTER if you wishto ADD the unmemorized channel. The channel indica-tor will change from red to green when a channel isadded and the channel will be memorized.
If a memorized channel was selected (step 4), the chan-nel indication will be green. To delete the channel from
Press MENU repeatedly until the MENU screen iscleared.
6
memory, press ENTER repeatedly until“DEL” appears on-screen. The channelindicator will change from green to redwhen a channel is deleted. RepeatSteps 4 and 5 for each channel to beadded or deleted.
MENUCH SETUPPICTURE
LANGUAGEV-CHIP SETLOCKON TIMER
AUDIO
⟨ + / – / ENTER / MENU ⟩
ADD CH 012
⟨ 0 – 9 / + / – / ENTER / MENU ⟩
MENUCH SETUPPICTURE
LANGUAGEV-CHIP SETLOCKON TIMER
AUDIO
⟨ + / – / ENTER / MENU ⟩
AUTOMATIC CHANNEL MEMORY
Press MENU.
Press SET + or – until the indicator nextto “CH SETUP” begins to flash, thenpress ENTER.
1
2MENU
CH SETUPPICTURE
LANGUAGEV-CHIP SETLOCKON TIMER
AUDIO
⟨ + / – / ENTER / MENU ⟩
Press SET + or – until the indicator nextto “AUTO CH MEMORY” begins to flash,then press ENTER. The TV will beginmemorizing all the channels available inyour area. Channel numbers will remainred until auto memorizing is complete.
3
AUTO CH MEMORY
TV
ADD / DELETE
CABLE
⟨ + / — / ENTER / MENU ⟩
AUTO CH MEMORY
TV
ADD / DELETE
CABLE
⟨ + / — / ENTER / MENU ⟩
AUTO CH MEMORY
TV
ADD / DELETE
CABLE
⟨ + / — / ENTER / MENU ⟩
3M90101A-E P08-11 14/08/2003, 11:408

9
DIRECT CHANNEL SELECTION buttons (0-9) - Press thesebuttons to select a channel. The channel number will appear onthe upper right corner of the TV screen. If an invalid channelnumber is selected, the display will revert to the previouschannel.
TV MODE DIRECT CHANNEL SELECTION - When the TV/CABLE menu option is in the TV position, all channels can beinstantly selected by using two buttons (For example, to selectchannel 2, press “0,” then “2.” If you press only “2,” channelselection will be delayed for a few seconds). For channels 10and above, press the two digits in order.
TV - VHF/UHF channelsCABLE - CABLE TV channels
To turn on the TV, press POWER.
The VOLUME can be adjusted to a desired level bypressing VOL (VOLUME) + or –.
The sound level will be indicated on the TV screen byGREEN BARS AND A NUMBER. As the sound levelincreases, so do the number of BARS AND THE NUMBERon the screen. The same is true for decreasing the level.
Set the TV/CABLE menu option to the appropriateposition. When shipped from the factory, this menu optionis in the CATV setting. See “TO MEMORIZE CHANNELS”on page 8.
TV OPERATION
CABLE mode direct channel selectionWhen the TV/CABLE menu option is in the CABLE position,channels can be selected as follows:
1-9
10-12
13-99
100-125
Press “0” twice, then 1-9 as needed.Example, to select channel 2, press “002.”Press “0”, then remaining 2 digits.Example, to select channel 12, press “012.”Press the 2 digits in order.Example, to select channel 36, press “36.”Press the 3 digits in order.Example, to select channel 120, press“120.”
1
2
3
4 CH (CHANNEL) + and – buttonsPress and release CH (CHANNEL) + or –. The channelautomatically stops at the next channel set into memory.Press and hold the button down to change channels morequickly.
For proper operation, before selecting channels, theyshould be set into the TV's memory.See “TO MEMORIZE CHANNELS” on page 8. NOTE: If the station being viewed stops broadcasting, the TV
will automatically shut off after 15 minutes.
CLOSED CAPTIONWHAT IS CLOSED CAPTIONING?This television has the capability to decode and display ClosedCaptioned television programs. When available, ClosedCaptioning will display text on the screen for hearing impairedviewers or it will translate and display text in another language.
TO VIEW CLOSED CAPTIONSPress CAP/TEXT on the remote control to switch between nor-mal TV and the two Closed Caption Modes (Captions and 1/2 ofFull Screen Text).
Captions: This Closed Caption Mode will display text on thescreen in English or another language (depending on the settingof Closed Captions 1/2 .) Generally, Closed Captions in Englishare transmitted on Captions Channel 1 and Closed Captions inother languages are transmitted on Captions Channel 2.
• When activating the Closed Captioned Decoder, there will be a short delay before the Closed Captioned text appears on the screen.• Closed Captioned text is only displayed in locations where it is available.• If no caption signal is received, no captions will appear, but the television will remain in the Caption Mode.• Misspellings or unusual characters may occasionally appear during Closed Captioning. This is normal with Closed Captioning,
especially with live programs. This is because during live programs, captions are also entered live. These transmissions do not allowtime for editing.
• When Captions are being displayed, on-screen displays, such as volume and mute may not be seen or may interfere with ClosedCaptions.
• Some cable systems and copy protection systems may interfere with the Closed Captioned signal.• If using an indoor antenna or if TV reception is very poor, the Closed Caption Decoder may not appear or may appear with strange
characters or misspelled words. In this case, adjust the antenna for better reception or use an outdoor antenna.
The Captions will appear in places on the screen wherethey will least interfere with the picture, usually on thebottom of the screen. News programs will usually showthree-line Closed Captions which scroll onto the screen.Most other shows provide two or three lined Captionsplaced near the character who is speaking so the viewercan follow the dialogue. Words in italics or underlineddescribe titles, words in foreign languages or wordsrequiring emphasis. Words that are sung usually appearenclosed by musical notes.
Text: When available, the Text mode will fill part of thescreen with a programming schedule or other information.After selecting a Closed Caption Mode, it will stay in effectuntil it is changed, even if the channel is changed. If theCaptions signal is lost due to a commercial or a break in thesignal, the Captions will reappear when the signal isreceived again. If the channels are changed, the Captionswill be delayed approximately 10 seconds.For television programs broadcasting with ClosedCaptions, look in your TV guide for the Closed Captionssymbol (CC).
3M90101A-E P08-11 14/08/2003, 11:409

10
You can adjust the setting for bass, treble, balance, surroundand stable sound.
Press MENU.
Press SET + or – button until theindicator next to “AUDIO” begins toflash, then press ENTER.
Press ENTER repeatedly to select the item you want toadjust.
1
2
3
STABLE SOUND
TREBLE BALANCEBASS
SURROUND
SOUND ADJUSTMENTS
STABLE SOUND FEATUREWhen the loud sound is made, the stable sound featureautomatically lower the sound.
NOTE:The on-screen display will disappear 6 seconds after finishing anadjustment. The settings can only be adjusted when they aredisplayed on the TV screen.4 Press SET + or – button to adjust the setting.
SURROUND FEATUREThe SURROUND feature expands the audio listening fieldwider and deeper to create exceptional sound quality from theTV’s speakers. The feature uses stereo signals from a TVbroadcast or video input.
CH SETUPPICTURE
LANGUAGEV-CHIP SETLOCKON TIMER
AUDIO
MENU
⟨ + / – / ENTER / MENU ⟩
ADJUSTING THE PICTUREYou can adjust the settings for color, sharpness, contrast,brightness and tint.
1
2
4 Press SET + or – to adjust the setting.
CONTRAST COLORBRIGHTNESS TINT SHARPNESS
3
Press MENU.
Press SET + or – until theindicator next to “PICTURE”begins to flash, then pressENTER.
Press ENTER repeatedly to select the item you want toadjust.
TO RETURN TO INITIAL SETTING:Press RESET while the picture adjusting mode appearson-screen.
BRIGHTNESS
CONTRAST
COLOR
TINT
SHARPNESS
+
lighter
higher
deeper
greenish
darker
lower
paler
reddish
softersharper
–
TO RETURN TO INITIAL SETTINGPress RESET while the sound adjusting mode appears on thescreen.
CH SETUPPICTURE
LANGUAGEV-CHIP SETLOCKON TIMER
AUDIO
MENU
⟨ + / — / ENTER / MENU ⟩
BASS
TREBLE
BALANCE
SURROUND
STABLE SOUND
+
stronger
stronger
right speaker stronger
ON
weaker
weaker
left speaker stronger
OFF
OFFON
–
3M90101A-E P08-11 14/08/2003, 11:4010

11
NOTES:• V-Chip function is based on specifications for the United States and therefore may not work properly in Canada.• If you want to change your password, follow steps 1 and 2 and select “CHANGE PASSWORD” option. Then enter your new
password.• The V-Chip function is activated only on programs and tapes that have the rating signal.• Once you block a program using the V-Chip function, the blocked program cannot be watched based on the content of the
show. When the program starts, the “INPUT PASSWORD” will appear on the screen. When you want to release the V-Chiptemporarily, enter the password.If you change the channel or turn off the TV while the V-Chip function was temporarily released, the original setting will beresumed. If you return to the channel you were watching you must re-enter your password to temporarily release your V-Chipfunction again.
• When you watch the TV using a cable box or a VCR and the TV is tuned to channel 3 or 4, you must release the V-Chiptemporarily. The V-Chip setting will not be resumed until you turn off the TV. The TV channel is not used in this case.
• When changing the channel with the cable box or the VCR, approximately 10 seconds will pass until the program appears.• If you forget or lose your password, you can reset it using the following procedure:
- While holding down the VOLUME D button on the TV, press “0” on the remote control for a few seconds.
SETTING THE V-CHIPThe V-Chip function is available only for the U. S. V-Chip system. The Canadian V-Chip system is not supported.This TV is fitted with a V-CHIP controller that provides you with channel viewing access controls and restrictions. This function is toprevent your children from watching violent or sexual scenes that you may choose to exclude.
Press MENU and then SET + or – until the indicator nextto “V-CHIP SET” begins to flash, then press ENTER.
Enter your password (4 digits) using the Direct channelselection buttons (0-9).In the event of entering an incorrect password pressRESET. Then press ENTER.
Enter the password again, and then press ENTER.
Press SET + or – until the indicator next to “V-CHIP”begins to flash.Press ENTER to select ON.
Press SET + or – until the indicator next to “TV RATING” or“MPAA RATING” begins to flash. Press ENTER.
Press SET + or – to select the desired rating for theapplicable video or TV channel. Press ENTER.
Press MENU repeatedly until the MENU screen is cleared.
1
34
5
6
7
2
When you select TV-Y7, TV-PG, TV-14 or TV-MA, press RECALL toexplain the rating.Press SET + or – to select the desired rating you want. Press ENTER toselect the setting ON or OFF.
TV RATING
MPAA RATING
OFF PG PG-13 R NC-17
SET – SET +
XG
OFF TV-Y7 TV-G TV-14 TV-MA
SET – SET +
TV-Y TV-PG
TV-PG: Parental guidanceTV-14: 14 years old and aboveTV-MA: 17 years old and above
TV-Y: All childrenTV-Y7: 7 years old and aboveTV-G: Children's program
R: Under 17 years old parentalguidance suggested
NC-17: 17 years old and aboveX: Adult only
G: All agesPG: Parental guidancePG-13: Parental guidance less
than 13 years old
You can listen to high-fidelity stereo sound with the Multi-channelTV Sound (MTS) feature. MTS can also transmit a second audioprogram (SAP) containing a second language or other audioinformation.
When the TV receives a stereo or SAP broadcast, the wordSTEREO or SAP appears on-screen every time the TV is turnedon, the channel is changed, or RECALL is pressed.The MTS feature is not available in the VIDEO mode.
You can leave your TV in STEREO mode because it willautomatically output stereo or monaural sound, depending onthe broadcast type. If the stereo sound is noisy, select MONO toreduce the noise. The word STEREO or SAP is displayed inlight blue when the TV receives the signal.
TO SELECT THE DESIRED MTS SETTING:Repeatedly press MTS to select either STEREO, SAP,MONO+SAP, or MONO. If the current program is not availablein stereo or SAP, the setting will not be available when youpress MTS.
SELECTING STEREO/SAP BROADCASTS
STEREO
MONO + SAPMONO
SAP
If the current program is not broadcasting either stereo or SAP,those settings will not be available when you press MTS.
3M90101A-E P08-11 14/08/2003, 11:4011

12
VIDEO LOCK
⟨ + / – / ENTER / MENU ⟩
OFFVIDEOVIDEO+
LOCKING VIDEO INPUTWith the VIDEO LOCK feature, you can lock out the inputsource and (VIDEO1, VIDEO2) channel 3 and 4.You will not be able to select the input sources with the TV/VIDEO button or Channel buttons unless you clear the setting.
1
2
3
4
5
GAME TIMER
⟨ + / Ð / ENTER / MENU⟩
OFF
30
60
90
120
Press MENU, then press SET + or – until the indicatornext to “LOCK” begins to flash, then press ENTER.
Use the Channel Number buttons (0-9) to enter yourpassword, then press ENTER. The LOCK menu appears.
Press SET + or – until the indicatornext to “VIDEO LOCK” begins to flash,then press ENTER.
Press SET + or – to select:• OFF: Unlocks all video input sources.• VIDEO: Locks VIDEO1,VIDEO2• VIDEO +: Locks VIDEO1,VIDEO2 channel 3 and channel 4. This option should be used if you use the antenna to play a video tape.
Press MENU repeatedly until the MENU screen is cleared.
1
2
3
4
5
USING THE LOCK MENU
LOCK
⟨ + / – / ENTER / MENU ⟩
GAME TIMER
CH LOCKVIDEO LOCK
CHANGE PASSWORD
1
2
3
4
6
The LOCK menu includes the CH LOCK, VIDEO LOCK, GAME TIMER and CHANGE PASSWORD functions.You can use these functions after entering the correct PASSWORD. (This password is the same one selected under “SETTING THEV-CHIP” on page 11.)
5
LOCKING CHANNELSWith the CH LOCK feature, you can lock specific channels. You will not be able to tune locked channels unless you clear thesetting. You can choose to lock up to nine TV channels and nine cable channels.
Use the Channel Number Buttons (0-9) to display thetelevision channel you wish to lock.
Press MENU, then press SET + or – until the indicatornext to “LOCK” begins to flash. Then press ENTER.
Use the Channel Number buttons (0-9) to enter yourpassword, then press ENTER.The LOCK menu appears.
Press SET + or – until the indicator nextto “CH LOCK” begins to flash, thenpress ENTER.
Press SET + or – to select:• INPUT to select the channel as one to be locked. Then press ENTER.• ALL CLEAR to clear all channels from the list of locked channels. Then press ENTER.
Repeat steps 1 through 5 to lock other channels. When youare finished locking channels, press MENU repeatedly untilthe MENU screen is cleared.
NOTES:• If you are accessing the LOCK menus or V-chip menus for the
first time, choose a four-digit number to be your password.• After programming CH LOCK, change channels before turning
off the television.• If you want to unlock channels, select ALL CLEAR in step 5,
then press ENTER.CH LOCK
⟨ + / – / ENTER / MENU ⟩
CABLEINPUT
ALL CLEAR
--- --- ------ --- ------ --- ---
If you try to tune a locked channel, the TV will not display it, butwill display the nearest unlocked channel.
NOTE:After programming VIDEO LOCK, change channels or activatethe TV/VIDEO key before turning off the television.
TO SET THE ON TIMER
1
2
3
4
5
This feature allows you to program the TV to turn on automatically at a set time and channel.NOTE: After a power failure or disconnection of the power, the timer setting will be lost.
Press MENU, then press SET + or – untilthe indicator next to “ON TIMER” beginsto flash. Then press ENTER.The ON TIMER menu appears.
Press SET + or – to set the desired hour (0-12), thenpress ENTER.
Press SET + or – to set the desired minute(00, 05, 10, ...55), then press ENTER.
NOTE:To cancel the ON TIMER, select CANCEL in step 4 above.Press MENU repeatedly until the MENU screen is cleared.
Press SET + or – to set the desiredchannel, then press ENTER.
Press SET + or – to select the SET mode, then press ENTER.
ON TIMER
á+ / – / ENTER / MENU ñ
HOURMINUTECH 002
00h00mCANCEL
ON TIMER
á+ / – / ENTER / MENU ñ
HOURMINUTECH 125
08h15mSET
Press MENU repeatedly until the MENU screen is cleared.6
SETTING THE GAME TIMERWith the GAME TIMER feature, you can automatically activatethe VIDEO LOCK feature (VIDEO setting) to set a time limit forplaying a TV game (30, 60, 90, or 120 minutes).
Press MENU, then press SET + or – until the indicator next to“LOCK” begins to flash, then press ENTER.
Use the Channel Number buttons (0-9) to enter your password, then press ENTER. The LOCK menu appears.
Press SET + or – until the indicator next to “GAME TIMER”begins to flash, then press ENTER.
Press SET + or – to select a time limit(30 minutes, 60 minutes, 90 minutes,120 minutes or OFF).
Press MENU repeatedly until the MENU screen is cleared.After the GAME TIMER is programmed, the display will ap-pear briefly every ten minutes to remind you that the GAMETIMER is operating. When the programmed end time isreached, the display will change the channel automatically.
3M90101A-E P12-BACK 14/08/2003, 11:4012

13
TROUBLESHOOTING GUIDEBefore requesting service, please refer to the following chart for the symptom and possible solution.
SYMPTOMS POSSIBLE SOLUTIONS SYMPTOMS POSSIBLE SOLUTIONS
TV does notoperate
Poor soundor no sound
Poor pictureor no picture
Picturewobbles ordrifts
Poor color orno color
Poorreception onsomechannels
• Make sure the power cord is plugged in.• Try another AC outlet.• Power is off; check fuse or circuit breaker.• Unplug unit for an hour, then plug it back in.
• Station or CATV experiencing problems;tune to another station.
• Check sound adjustments (VOLUME andMUTE).
• Check for sources of possible interference.
• Station or CATV experiencing problems; tuneto another station.
• Make sure channels are set into memory.• Check antenna or CATV connections; adjustantenna.
• Check for sources of possible interference.• Check picture control adjustments.• Press CAP/TEXT to turn off the ClosedCaption mode.
• Station or CATV experiencing problems; tuneto another station.
• Make sure channels are set into memory.• Station is weak; adjust antenna to receivedesired station.
• Check for sources of possible interference.
• Station or CATV experiencing problems; tuneto another station.
• Make sure channels are set into memory.• Check picture control adjustments.• Check antenna or CATV connection. Adjustantenna.
• Station or CATV experiencing problems; tuneto another station.
• Make sure channels are set into memory.• CATV company is scrambling signal.• Adjust antenna.
• Check all CATV connections.• Set TV/CABLE menu option to the CABLEmode.
• Station or CATV system problems; tryanother station.
• Check antenna connections; reorient antenna.• Check for sources of possible interference.
Horizontal ordiagonal barson screen
No receptionabovechannel 13
No CATVreception
• Batteries are weak, dead or insertedincorrectly.
• Remote is out of range; move closer to TV(within 15 feet).
• Make sure Remote is aimed at sensor.• Confirm there are no obstructions betweenthe Remote and the TV.
• Make sure the power cord is plugged in.
• Make sure TV/CABLE menu option is in theappropriate mode.
• If using antenna, check UHF antennaconnections.
No Remoteoperation
• No broadcast on station tuned.• Sleep Timer is set.• Power interrupted.
• TV station experiencing problems or programtuned is not closed captioned. Try anotherchannel.
• Check CATV connection or VHF/UHFantenna, reposition or rotate antenna.
• Press CAP/TEXT to turn on the closed captiondecoder.
Closed -Caption is notactivated
TV shuts off
• Press CAP/TEXT to turn off the ClosedCaption mode.
Black box onscreen
SPECIFICATIONSAC Power Input:AC Power Consumption:Picture Tube:Audio Power Output Rating:Speaker:Tuner Type:Remote Control:Receiving Channels:
Antenna Input Impedance:Input:
Dimensions:
Weight:
120V, 60Hz90 WattsType 20 (508mm diagonal)2.5 + 2.5 Watts2 inches (51mm) x 4-11/16 inches (119 mm) Full Range, 8 ohm x 2181 Channel, Quartz PLL Frequency SynthesizedInfrared, Direct Access, 2 x AAA batteries (supplied)VHF 2-13UHF 14-69CATV 01-97 (5A)-(A-3)
98-99 (A-2)-(A-1)14-22 (A)-(I)23-36 (J)-(W)37-65 (AA)-(FFF)66-125 (GGG)-(125)
75 Ohm (VHF/UHF) Coaxial InputVideo: 1.0 Vp-p 75 ohmAudio: 300 mV, 47k ohmWidth: 23-1/4 inches (590mm)Height: 17-9/16 inches (446.5mm)Depth: 19-3/8 inches (492mm)46.3 Ibs (21.0 kg)
Remote Control with two size “AAA” batteriesACCESSORY
Design and specifications are subject to change without notice.
• Select proper language in the menu options.Display is notshown inyour language
3M90101A-E P12-BACK 14/08/2003, 11:4013

14
Limited United States WarrantyFor 24” FST PURE ® and All Smaller Television Models
Toshiba America Consumer Products, Inc. (“TACP”) and Toshiba Hawaii, Inc. (“THI”) make the following limited warrantiesto original consumers in the United States. THESE LIMITED WARRANTIES EXTEND TO THE ORIGINAL CONSUMERPURCHASER OR ANY PERSON RECEIVING THIS TELEVISION AS A GIFT FROM THE ORIGINAL CONSUMERPURCHASER AND TO NO OTHER PURCHASER OR TRANSFEREE.
PRODUCTS PURCHASED IN THE U.S.A. AND USED IN CANADA ARE NOT COVERED BY THESE WARRANTIES.
PRODUCTS PURCHASED IN CANADA AND USED IN THE U.S.A. ARE NOT COVERED BY THESE WARRANTIES.
Limited Ninety (90) Day Warranty on Labor*TACP/THI warrant this television and its parts against defects in materials or workmanship for a period of ninety (90)days after the date of original retail purchase. DURING THIS PERIOD, TACP/THI WILL, AT TACP/THI’S OPTION,REPAIR OR REPLACE A DEFECTIVE PART WITH A NEW OR REFURBISHED PART WITHOUT CHARGE TO YOUFOR PARTS OR LABOR. YOU MUST DELIVER THE ENTIRE TELEVISION TO AN AUTHORIZED TACP/THI SERVICESTATION. YOU MUST PAY FOR ALL TRANSPORTATION AND INSURANCE CHARGES FOR THE TELEVISION TOAND FROM THE SERVICE STATION.
Limited One (1) Year Warranty on Parts*TACP/THI further warrant the parts in this television against defects in materials or workmanship for a period of one (1)year after the date of original retail purchase. DURING THIS PERIOD, TACP/THI WILL, AT TACP/THI’S OPTION,REPAIR OR REPLACE A DEFECTIVE PART WITH A NEW OR REFURBISHED PART WITHOUT CHARGE TO YOUFOR THE PART, PROVIDED THAT IF A DEFECTIVE PART IS REPAIRED OR REPLACED AFTER NINETY (90) DAYSFROM THE DATE OF ORIGINAL RETAIL PURCHASE, YOU MUST PAY ALL LABOR CHARGES INVOLVED IN THEREPAIR OR REPLACEMENT. YOU MUST DELIVER THE ENTIRE TELEVISION TO AN AUTHORIZED TACP/THISERVICE STATION. YOU MUST PAY FOR ALL TRANSPORTATION AND INSURANCE CHARGES FOR THETELEVISION TO AND FROM THE SERVICE STATION.
Limited Two (2) Year Warranty on Picture Tube*TACP/THI further warrant the picture tube in this television against defects in materials or workmanship for a period oftwo (2) years after the date of original retail purchase. DURING THIS PERIOD, TACP/THI WILL, AT TACP/THI’SOPTION, REPAIR OR REPLACE A DEFECTIVE PICTURE TUBE WITH A NEW OR REFURBISHED PICTURE TUBEWITHOUT CHARGE TO YOU, EXCEPT THAT IF A DEFECTIVE PICTURE TUBE IS REPAIRED OR REPLACEDAFTER NINETY (90) DAYS FROM THE DATE OF THE ORIGINAL RETAIL PURCHASE, YOU MUST PAY ALL LABORCHARGES INVOLVED IN THE REPAIR OR REPLACEMENT. YOU MUST DELIVER THE ENTIRE TELEVISION TO ANAUTHORIZED TACP/THI SERVICE STATION. YOU MUST PAY FOR ALL TRANSPORTATION AND INSURANCECHARGES FOR THE TELEVISION TO AND FROM THE SERVICE STATION.
Rental UnitsThe warranty for rental units begins with the first rental or thirty (30) days from the date of shipment to the rental firm,whichever comes first.
*Commercial UnitsTelevisions sold and used for commercial purposes have a limited ninety (90) day warranty for all parts, labor andpicture tube.
Owner’s Manual and Demographic CardYou should read this owner’s manual thoroughly before operating this television. You should complete and mail theenclosed Demographic card within ten days after you, or the person who has given you this product as a gift, purchasedthis television. This is one way to enable TACP/THI to provide you with better customer service and improved product.Failure to return the Demographic card will not affect your rights under this warranty.
3M90101A-E P12-BACK 14/08/2003, 11:4014

15
Your ResponsibilityTHE ABOVE WARRANTIES ARE SUBJECT TO THE FOLLOWING CONDITIONS:
(1) You must provide your bill of sale or other proof of purchase.
(2) All warranty servicing of this television must be made by an Authorized TACP/THI Service Station.
(3) The warranties from TACP and THI are effective only if the television is purchased and operated in the U.S.A. orPuerto Rico.
(4) Labor service charges for set installation, set up, adjustment of customer controls and installation or repair ofantenna systems are not covered by these warranties. Reception problems caused by inadequate antenna systems are yourresponsibility.
(5) Warranties extend only to defects in materials or workmanship as limited above and do not extend to any televisionor parts which have been lost or discarded by you or to damage to television or parts caused by misuse, accident,Acts of God, such as lightning or fluctuations in electric power, improper installation, improper maintenance or usein violation of instructions furnished by TACP/THI; or to units which have been modified or had the serial numberremoved, altered, defaced or rendered illegible.
How to Obtain Warranty ServicesIf, after following all of the operating instructions in this manual and checking the section “Troubleshooting”, you find thatservice is needed:
(1) To find the nearest TACP/THI Authorized Service Station:For televisions purchased in the United States, except Hawaii, visit TACP’s web site at www.toshiba.com/tacp orcall toll free 1-800-631-3811.For televisions purchased in Hawaii, contact Toshiba Hawaii, Inc., 327 Kamakee Street, Honolulu, HI 96814, (808) 591-9281.
(2) Present your bill of sale or other proof of purchase to the Authorized Service Station. You must deliver the entiretelevision to an Authorized TACP/THI Service Station. You must pay for all transportation and insurance chargesfor the television to and from the Service Station.
ALL WARRANTIES IMPLIED BY THE LAW OF ANY STATE OF THE U.S.A., INCLUDING THE IMPLIED WARRANTIESOF MERCHANTABILITY AND FITNESS FOR A PARTICULAR PURPOSE, ARE EXPRESSLY LIMITED TO THE DU-RATION OF THE LIMITED WARRANTIES SET FORTH ABOVE. WITH THE EXCEPTION OF ANY WARRANTIESIMPLIED BY THE LAW OF ANY STATE OF THE U.S.A. AS HEREBY LIMITED, THE FOREGOING WARRANTY ISEXCLUSIVE AND IN LIEU OF ALL OTHER WARRANTIES, GUARANTEES, AGREEMENTS AND SIMILAROBLIGATIONS OF TACP OR THI WITH RESPECT TO THE REPAIR OR REPLACEMENT OF ANY PARTS. IN NOEVENT SHALL TACP OR THI BE LIABLE FOR CONSEQUENTIAL OR INCIDENTAL DAMAGES.
No person, agent, distributor, dealer or company is authorized to change, modify or extend the terms of these warrantiesin any manner whatsoever. The time within which action must be commenced to enforce any obligation of TACP or THIarising under this warranty or under any law of the United States or of any state thereof is hereby limited to 90 days fromthe date you discover or should have discovered, the defect. This limitation does not apply to implied warranties arisingunder the law of any state of the U.S.A.
THIS WARRANTY GIVES YOU SPECIFIC LEGAL RIGHTS, AND YOU MAY ALSO HAVE OTHER RIGHTS WHICHMAY VARY FROM STATE TO STATE IN THE U.S.A. SOME STATES OF THE U.S.A. DO NOT ALLOW LIMITATIONSON HOW LONG AN IMPLIED WARRANTY LASTS, WHEN AN ACTION MAY BE BROUGHT, OR THE EXCLUSIONOR LIMITATION OF INCIDENTAL OR CONSEQUENTIAL DAMAGES, SO THE ABOVE LIMITATIONS OR EXCLUSIONSMAY NOT APPLY TO YOU UNDER SUCH CIRCUMSTANCES.
FST PURE® is a registered trademark of Toshiba America Consumer Products, Inc.
For additional information,visit TACP’s web site:www.toshiba.com/tacp.
3M90101A-E P12-BACK 14/08/2003, 11:4015

16
Limited Canada WarrantyFor 24” FST PURE ® and All Smaller Television Models
Toshiba of Canada Limited (“TCL”) makes the following limited warranties to original consumers in Canada. THESELIMITED WARRANTIES EXTEND TO THE ORIGINAL CONSUMER PURCHASER OR ANY PERSON RECEIVINGTHIS TELEVISION AS A GIFT FROM THE ORIGINAL CONSUMER PURCHASER AND TO NO OTHER PURCHASEROR TRANSFEREE.
PRODUCTS PURCHASED IN THE U.S.A. AND USED IN CANADA ARE NOT COVERED BY THESE WARRANTIES.
PRODUCTS PURCHASED IN CANADA AND USED IN THE U.S.A. ARE NOT COVERED BY THESE WARRANTIES.
Limited Ninety (90) Day Warranty on Labor*TCL warrants this television and its parts against defects in materials or workmanship for a period of ninety (90) daysafter the date of original retail purchase. DURING THIS PERIOD, TCL WILL, AT TCL’S OPTION, REPAIR OR REPLACEA DEFECTIVE PART WITH A NEW OR REFURBISHED PART WITHOUT CHARGE TO YOU FOR PARTS OR LABOR.YOU MUST DELIVER THE ENTIRE TELEVISION TO AN AUTHORIZED TCL SERVICE STATION. YOU MUST PAYFOR ALL TRANSPORTATION AND INSURANCE CHARGES FOR THE TELEVISION TO AND FROM THE SERVICESTATION.
Limited One (1) Year Warranty on Parts*TCL further warrants the parts in this television against defects in materials or workmanship for a period of one (1) yearafter the date of original retail purchase. DURING THIS PERIOD, TCL WILL, AT TCL’S OPTION, REPAIR OR REPLACEA DEFECTIVE PART WITH A NEW OR REFURBISHED PART WITHOUT CHARGE TO YOU FOR THE PART,PROVIDED THAT IF A DEFECTIVE PART IS REPAIRED OR REPLACED AFTER NINETY (90) DAYS FROM THEDATE OF ORIGINAL RETAIL PURCHASE, YOU MUST PAY ALL LABOR CHARGES INVOLVED IN THE REPAIR ORREPLACEMENT. YOU MUST DELIVER THE ENTIRE TELEVISION TO AN AUTHORIZED TCL SERVICE STATION.YOU MUST PAY FOR ALL TRANSPORTATION AND INSURANCE CHARGES FOR THE TELEVISION TO AND FROMTHE SERVICE STATION.
Limited Two (2) Year Warranty on Picture Tube*TCL further warrants the picture tube in this television against defects in materials or workmanship for a period of two(2) years after the date of original retail purchase. DURING THIS PERIOD, TCL WILL, AT TCL’S OPTION, REPAIR ORREPLACE A DEFECTIVE PICTURE TUBE WITH A NEW OR REFURBISHED PICTURE TUBE WITHOUT CHARGETO YOU, EXCEPT THAT IF A DEFECTIVE PICTURE TUBE IS REPAIRED OR REPLACED AFTER NINETY (90)DAYS FROM THE DATE OF THE ORIGINAL RETAIL PURCHASE, YOU PAY ALL LABOR CHARGES INVOLVED INTHE REPAIR OR REPLACEMENT. YOU MUST DELIVER THE ENTIRE TELEVISION TO AN AUTHORIZED TCLSERVICE STATION. YOU MUST PAY FOR ALL TRANSPORTATION AND INSURANCE CHARGES FOR THETELEVISION TO AND FROM THE SERVICE STATION.
Rental UnitsThe warranty for rental units begins with the first rental or thirty (30) days from the date of shipment to the rental firm,whichever comes first.
*Commercial UnitsTelevisions sold and used for commercial purposes have a limited ninety (90) day warranty for all parts, labor andpicture tube.
Owner’s ManualYou should read this owner’s manual thoroughly before operating this television.
Your ResponsibilityTHE ABOVE WARRANTIES ARE SUBJECT TO THE FOLLOWING CONDITIONS:
(1) You must provide your bill of sale or other proof of purchase.
(2) All warranty servicing of this television must be made by an Authorized TCL Service Station.
3M90101A-E P12-BACK 14/08/2003, 11:4016

17
(3) The warranties from TCL are effective only if the television is purchased in Canada from an authorized TCL dealerandoperated in Canada.
(4) Labor service charges for set installation, set up, adjustment of customer controls and installation or repair ofantenna systems are not covered by these warranties. Reception problems caused by inadequate antenna systemsare your responsibility.
(5) Warranties extend only to defects in materials or workmanship as limited above and do not extend to any televisionor parts which have been lost or discarded by you or to damage to television or parts caused by misuse, accident,Acts of God, such as lightning or fluctuations in electric power, improper installation, improper maintenance or usein violation of instructions furnished by TCL; or to units which have been modified or had the serial numberremoved, altered, defaced or rendered illegible.
How to Obtain Warranty ServicesIf, after following all of the operating instructions in this manual and checking the section “Troubleshooting,” you findthat service is needed:
(1) To find the nearest TCL Authorized Service Station visit TCL’s web site at www.toshiba.ca
(2) Present your bill of sale or other proof of purchase to the Authorized Service Station. You must deliver the entiretelevision to an Authorized TCL Service Station. You must pay for all transportation and insurance charges for thetelevision to and from the Service Station.
ALL WARRANTIES IMPLIED BY THE LAW OF ANY PROVINCE OF CANADA, INCLUDING THE IMPLIED WARRAN-TIES OF MERCHANTABILITY AND FITNESS FOR A PARTICULAR PURPOSE, ARE EXPRESSLY LIMITED TO THEDURATION OF THE LIMITED WARRANTIES SET FORTH ABOVE. WITH THE EXCEPTION OF ANY WARRANTIESIMPLIED BY THE LAW OF ANY PROVINCE OF CANADA AS HEREBY LIMITED, THE FOREGOING WARRANTY ISEXCLUSIVE AND IN LIEU OF ALL OTHER WARRANTIES, GUARANTEES, AGREEMENTS AND SIMILAR OBLIGA-TIONS OF TCL WITH RESPECT TO THE REPAIR OR REPLACEMENT OF ANY PARTS. IN NO EVENT SHALL TCLBE LIABLE FOR CONSEQUENTIAL OR INCIDENTAL DAMAGES.
No person, agent, distributor, dealer or company is authorized to change, modify or extend the terms of these warrantiesin any manner whatsoever. The time within which action must be commenced to enforce any obligation of TCL arisingunder this warranty or under any law of Canada or of any province thereof, is hereby limited to 90 days from the dateyou discover or should have discovered, the defect. This limitation does not apply to implied warranties arising underthe law of any province of Canada.
THIS WARRANTY GIVES YOU SPECIFIC LEGAL RIGHTS, AND YOU MAY ALSO HAVE OTHER RIGHTS WHICHMAY VARY FROM PROVINCE TO PROVINCE IN CANADA. SOME PROVINCES OF CANADA DO NOT ALLOWLIMITATIONS ON HOW LONG AN IMPLIED WARRANTY LASTS, WHEN AN ACTION MAY BE BROUGHT, OR THEEXCLUSION OR LIMITATION OF INCIDENTAL OR CONSEQUENTIAL DAMAGES, SO THE ABOVE LIMITATIONSOR EXCLUSIONS MAY NOT APPLY TO YOU UNDER SUCH CIRCUMSTANCES.
FST PURE® is a registered trademark of Toshiba America Consumer Products, Inc.
For additional information,visit TCL’s web site:www .toshiba.ca
3M90101A-E P12-BACK 14/08/2003, 11:4017

J3M90101A03/04
PRINTED IN THAILAND
U
3M90101A-E P12-BACK 14/08/2003, 11:4018