©2021 revolution games
TRANSCRIPT

©2021 Revolution Games
1 The Deadly Woods – Rules of Play
©2021 Revolution Games
1.0 INTRODUCTION ...........................................................2
1.1 THE GAME ................................................................. 2 1.2 GAME SCALE............................................................... 2 1.3 CONTACTING REVOLUTION GAMES .................................. 2
2.0 COMPONENTS ......................................................2
2.1 GAME COMPONENTS ................................................... 2 2.2 MAP ......................................................................... 2 2.3 COUNTERS .................................................................. 3 2.4 ASSETS ...................................................................... 3 2.5 ACTION ROUND CHITS .................................................. 3 2.6 MARKERS ................................................................... 3 2.7 PLAYER AID CARDS ....................................................... 4 2.8 RULES ........................................................................ 4
3.0 SETUP AND VICTORY ............................................4
3.1 IN GENERAL ................................................................ 4 3.2 SETUP ....................................................................... 4 3.3 GAME LENGTH ............................................................ 5 3.4 VICTORY CONDITIONS ................................................... 5 3.5 HEX CONTROL ............................................................. 5
4.0 SEQUENCE OF PLAY ..............................................5
4.1 ASSET AVAILABILITY/SPECIAL REINFORCEMENT PHASE ........ 5 4.2 REPLACEMENT PHASE ................................................... 5 4.3 ACTION ROUND PHASE ................................................. 5 4.4 VICTORY CHECK/CLEAN-UP PHASE.................................. 6
5.0 INITIATIVE ............................................................6
5.1 IN GENERAL ................................................................ 6 5.2 DETERMINING INITIATIVE ............................................... 6
6.0 STACKING .............................................................6
6.1 SPECIAL STACKING RESTRICTIONS .................................... 6 6.2 APPLYING STACKING LIMITS............................................ 6 6.3 STACKING LIMITS FOR ASSETS AND MARKERS .................... 6
7.0 ZONES OF CONTROL (ZOC) ...................................7
7.1 IN GENERAL ................................................................ 7 7.2 ZOC AND TERRAIN ....................................................... 7 7.3 ZOC EFFECTS .............................................................. 7
8.0 SUPPLY .................................................................7
8.1 IN GENERAL ................................................................ 7 8.2 SUPPLY TRACE ............................................................. 8 8.3 SUPPLY EFFECTS........................................................... 8 8.4 ALWAYS SUPPLIED UNITS ............................................... 8 8.5 PEIPER FUEL DUMP CAPTURE ......................................... 8 8.6 US AIR SUPPLY ............................................................ 8
9.0 ARMY BOUNDARIES .............................................8
9.1 IN GENERAL ................................................................ 8 9.2 GERMAN ARMY AREA RESTRICTIONS ............................... 9
9.3 BRITISH ARMY AREA RESTRICTIONS................................. 9 9.4 5TH FJ DIVISIONS 14TH REGIMENT ................................. 9
10.0 MOVEMENT ......................................................... 9
10.1 IN GENERAL ........................................................... 9 10.2 MOVEMENT PROCEDURE ......................................... 9 10.3 EMERGENCY WITHDRAWAL .................................... 10 10.4 ROAD MOVEMENT................................................ 10 10.5 INFANTRY USING MOTORIZED MOVEMENT ................ 10 10.6 BRIDGES ............................................................. 10
11.0 COMBAT ............................................................ 11
11.1 IN GENERAL ......................................................... 11 11.2 SPECIFIC RULES .................................................... 12 11.3 COMBAT PROCEDURE ............................................ 12 11.4 RETREAT ............................................................. 13 11.5 ADVANCE ............................................................ 14
12.0 ASSETS ............................................................... 14
12.1 IN GENERAL ......................................................... 14 12.2 GERMAN ARTILLERY AND NEBELWERFER ................... 14 12.3 ALLIED ARTILLERY ................................................. 14 12.4 US ENGINEER ASSETS ............................................ 15 12.5 GERMAN OPERATION GREIF ASSET COUNTER............. 15 12.6 GERMAN MOTORIZED ASSET MARKER ...................... 16 12.7 VON DER HEYDTE PARACHUTE UNIT ......................... 16 12.8 ALLIED TRAFFIC ASSET MARKER .............................. 16 12.9 SPECIAL REINFORCEMENTS ..................................... 16 12.10 SS WITHDRAWAL ................................................. 16
13.0 REPLACEMENTS ................................................. 17
13.1 IN GENERAL ......................................................... 17 13.2 REPLACEMENT PROCEDURES ................................... 17
14.0 THE ACTION ROUND PHASE ............................... 17
14.1 IN GENERAL ......................................................... 17 14.2 ACTION ROUND LIMITS .......................................... 17 14.3 TURN 1 STARTING SEQUENCE .................................. 18 14.4 MOVE OR COMBAT (M/C) CHITS ............................ 18 14.5 5TH AND 6TH PANZER ARMY CHIT ........................... 18 14.6 ALL GERMAN/ONE ARMY ...................................... 19 14.7 3 FORMATIONS CHIT ............................................. 19 14.8 REINFORCEMENT CHITS ......................................... 19 14.9 PATTON/MONTY ACTION ROUND CHIT .................... 20
15.0 VICTORY CHECK/CLEAN-UP ................................ 20
16.0 OPTIONAL RULE ................................................. 20
16.1 GERMAN +2 COMBAT ASSET .................................. 20
17.0 ACTION CHIT AVAILABILITY ................................ 23
The Deadly Woods – Rules of Play 2
©2021 Revolution Games
1.0 INTRODUCTION
1.1 The Game
The Deadly Woods (hereafter TDW) covers the Battle of the Bulge from December 16, 1944 to January 15, 1945. Designed as a two-player game, it is also suitable for solitaire play.
1.2 Game Scale
Hexes are approximately 3 miles across.
Each Turn represents 2 to 4 days. Units are typically regiments, brigades, or regiment-sized Combat Commands (CC) or Kampfgruppen (KG).
1.3 Contacting Revolution Games
To see our latest releases visit us at www.revolutiongames.us. If any game components are missing or damaged, contact us by email at [email protected].
2.0 COMPONENTS
2.1 Game Components
• one play map (22x34”) • one and a half counter-sheets
(264 5/8-inch counters) • one setup map • one six-sided die (boxed games) • one game box or Ziploc bag • one rulebook • three player aid cards
Players will need to supply an opaque container from which to draw action chits for each Action Round.
2.2 Map
The game map represents the areas of the Ardennes Forest over which the campaign was fought, divided into hexagons (hexes) which are used to regulate movement and unit positioning. Each hex has a number assigned to it for reference. Hex terrain is explained on the map’s Terrain key. When the rules refer to a river, it applies to both major and minor rivers.
2.2.1 Entry Areas
The yellow circles with black letters A through J are Allied entry areas. The blue circles with black letters K, L, and M are German entry areas. Reinforcements are placed in these hexes as listed on the Turn Record Track. Entry hexes are also considered supply sources for each side, blue for German and yellow for Allied.
2.2.2 Map Charts and Tables
The map sheet contains several boxes, charts and tracks used to facilitate play. The boxes, charts, and tracks on the map are:
Turn Record Track: The map contains the Turn Record Track (known as the TRT) used to track the game turn. Each turn represents 2 to 4 days. See player aid 1 for an explanation of how to read the TRT. Action Round Track: This track is used to show which Action Round Chits have been pulled from the cup. Each time a player draws a chit, the chit is placed on the track in the order pulled. German Victory Point Track: This track is used to record the number of German victory points. German Assets Box: This area is used to house the various German asset counters. German Eliminated Units Box: This box is an area to place the German units that have been eliminated. German Bridge Repair Box: This box is used to track each German Army’s bridge repair status. Allied Assets Box: This box is used to house the various Allied asset counters.
3 The Deadly Woods – Rules of Play
©2021 Revolution Games
Allied Eliminated Units Box: This box is an area to place the Allied units that have been eliminated. Terrain Key: This box displays each of the terrain types on the map.
2.3 Counters
There are four basic types of counters:
2.3.1 Combat Units
Military forces representing Infantry, including Paratroop and Glider Infantry, Mechanized, Mechanized Cavalry, and Armor units. The US Delay asset (12.9.1) and German VdH (Von der Heydte, 12.7) act as Infantry Combat units. See player aid 1 for a description of how to read the counters.
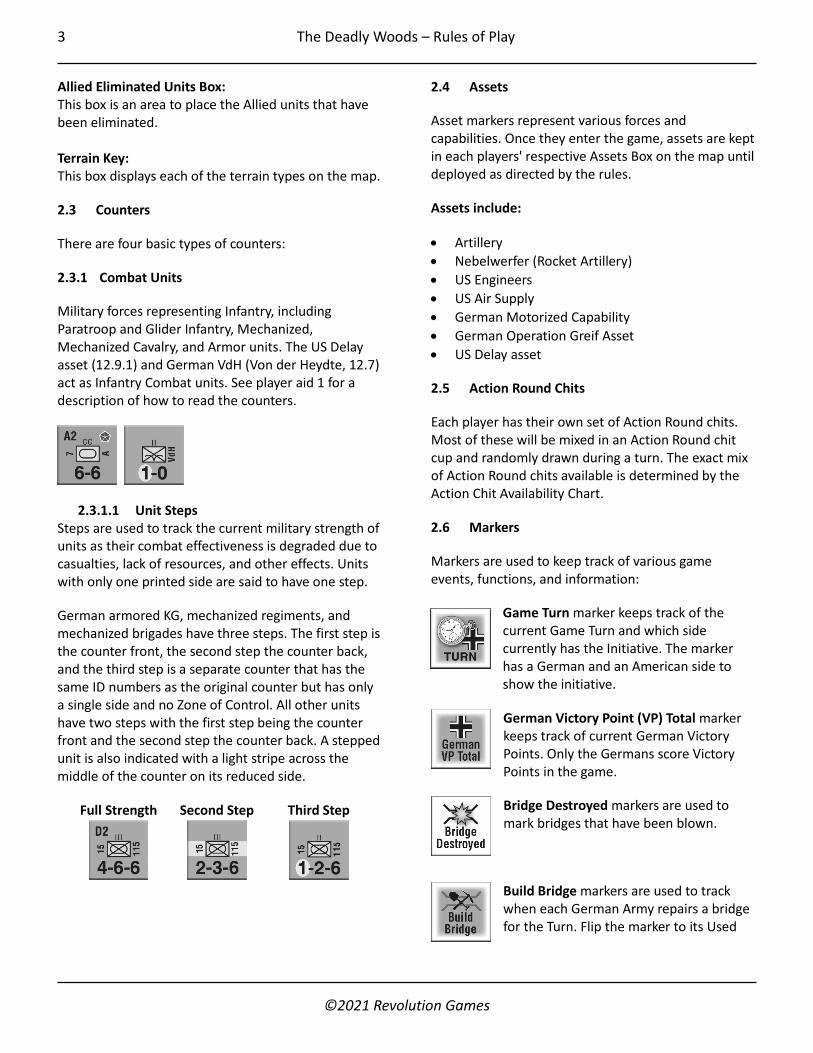
2.3.1.1 Unit Steps Steps are used to track the current military strength of units as their combat effectiveness is degraded due to casualties, lack of resources, and other effects. Units with only one printed side are said to have one step.
German armored KG, mechanized regiments, and mechanized brigades have three steps. The first step is the counter front, the second step the counter back, and the third step is a separate counter that has the same ID numbers as the original counter but has only a single side and no Zone of Control. All other units have two steps with the first step being the counter front and the second step the counter back. A stepped unit is also indicated with a light stripe across the middle of the counter on its reduced side.
Full Strength Second Step Third Step
2.4 Assets
Asset markers represent various forces and capabilities. Once they enter the game, assets are kept in each players' respective Assets Box on the map until deployed as directed by the rules.
Assets include:
• Artillery • Nebelwerfer (Rocket Artillery) • US Engineers • US Air Supply • German Motorized Capability • German Operation Greif Asset • US Delay asset
2.5 Action Round Chits
Each player has their own set of Action Round chits. Most of these will be mixed in an Action Round chit cup and randomly drawn during a turn. The exact mix of Action Round chits available is determined by the Action Chit Availability Chart.
2.6 Markers
Markers are used to keep track of various game events, functions, and information:
Game Turn marker keeps track of the current Game Turn and which side currently has the Initiative. The marker has a German and an American side to show the initiative.
German Victory Point (VP) Total marker keeps track of current German Victory Points. Only the Germans score Victory Points in the game.
Bridge Destroyed markers are used to mark bridges that have been blown.
Build Bridge markers are used to track when each German Army repairs a bridge for the Turn. Flip the marker to its Used

The Deadly Woods – Rules of Play 4
©2021 Revolution Games
side when a German Army repairs a bridge in its area.
VP Control markers are used to mark VP hexes currently under German control in instances where the presence of German units does not make that clear.
Peiper Fuel marker indicates the location and possible capture of the US fuel dump at Bullingen.
No Supply markers are used to mark units out of supply.
2.7 Player Aid Cards
The game contains a total of 3 player aid cards:
Player aid 1 on the back of the cover, consists of the unit descriptions, types, assets, and how to read the turn record track.
Player aids 2 and 3 are front and back of a separate card and two copies of this card are provided in the game. Player aid 2 consist of the CRT and TEC and player aid 3 consists of the Action Chit Summary Chart. The Action Chit Summary Chart does not contain all the rules for the action chits, these are covered in detail in the rule book.
2.8 Rules
These rules are organized in a case format, generally in the order you use them in the Sequence of Play (see 4.0). Rules and their subrules are numbered for easy reference.
NOTE: When a rule is called out in the text, you will see it in parentheses within the text like “… when blowing bridges (10.6.1), …” which indicates that case 10.6.1 contains further information on that topic.
3.0 SETUP AND VICTORY
3.1 In General
TDW contains both a six-turn scenario depicting the German attack and a 12-turn campaign scenario which continues the conflict to include the Allied counterattack. One player controls the German forces and the other player controls the Allies (US and British forces).
3.2 Setup
The initial German and Allied forces are placed on the play map and Turn Record Track in starting locations indicated by a number in the upper left corner of the counter. These numbers correspond to information on the setup map.
TIP: The easiest way to do this is to sort all units with only a number into numerical order and group all units with a letter together alphabetically.
EXAMPLE: The 2 Panzer’s KG a has an 11 in the upper left corner indicating it sets up in the hex with a black 11 on the setup map or hex number 3317.
NOTE: Every hex on the play map that is a starting location has a small dot - green for Americans and gray for the Germans - to help make sure you have units in the right locations.
The counters with a letter-number combination in the upper left corner are reinforcements (4.1, 4.2, and 14.8). Place reinforcement units in the corresponding boxes on the TRT. Some units are Special Reinforcements, have just a letter on them and are placed in the center column on the TRT and enter at the start of each turn during the Special Reinforcement Phase (12.9).
Place the Game Turn marker on the Turn 1 box of the Turn Record Track, German side up. Place the German VP Total marker on the 0 space of the Victory Point Track. Put all Assets with a square in the upper left corner in each player's Assets Box.

5 The Deadly Woods – Rules of Play
©2021 Revolution Games
Place Bridge Destroyed markers to indicate the following bridges begin the game blown: 4025/3926, 3923/3823, 3622/3623, 3419/3320.
3.3 Game Length
Six turns for the German Attack scenario or 12 turns for the Campaign scenario; however, the game may end sooner if the Germans meet certain Victory Conditions outlined below.
3.4 Victory Conditions
The Germans (only) score 1 VP for each VP hex (marked on the map with an orange hexagon) they control if it is in supply at the end of the turn.
The Germans win by Sudden Death if they end a turn:
• with nine or more supplied Motorized steps across the Meuse in the British Area; or
• controlling five or more VP hexes that can trace a line of supply to a German supply source.
If Sudden Death Victory does not apply, the winner of the game is determined at the end of Turn 6 (German Attack scenario) or at the end of Turn 12 (Campaign Scenario).
Attack scenario: The Germans win by controlling four or more VP hexes that can trace a line of supply to a German supply source at the end of turn 6.
Campaign scenario: The Germans win if, at the end of Turn 12, they control a number of VP hexes that can trace a line of supply to a German supply source:
• At least 3 VP hexes if the German player cancelled the Turn 11 Withdrawal of SS formations: or
• At least 2 VP hexes if the Withdrawal was not cancelled.
The Allies win either scenario if the Germans have failed to meet any of these Victory Conditions.
3.5 Hex Control
The Allied Player controls all VP hexes, Towns and Villages on the west side of the Westwall at the start
of the game. Hex control changes the instant an opposing unit enters a friendly-controlled hex.
4.0 SEQUENCE OF PLAY
4.1 Asset Availability/Special Reinforcement Phase
• Allies may deploy the US Delay asset onto the map if available.
• Allies may remove or deploy US Engineer assets if available. (Not on Turn 1)
• Germans may deploy the German Operation Greif asset to the map if available. (Turns 2-4)
• Germans may deploy the German Motorized marker to the map if available. (Not on Turn 1)
• Allies may place Allied Traffic asset if available (Turns 1-3; on Turn 1, this is done after the German Move round).
• Move Special Reinforcements from the current turn on the TRT to the Allied Asset Box on their front (available) side.
See rule 12.0 for specific details regarding Assets.
4.2 Replacement Phase
Each player may replace steps lost in combat. The number of steps that may be replaced by each side is printed on the Turn Record Track.
See rule 13.0 for specific details regarding Replacements.
4.3 Action Round Phase
The Initiative Player must choose one of their chits to play first (Exception: Not on Turn 1). The remaining available chits for both sides are placed in the Action Cup for random drawing or held in hand per the Action Chit Availability chart.
The Initiative Player conducts the 1st Action Round, and then players conduct all Action Rounds as they are drawn from the cup. (See Turn 1 Exceptions, 14.3.1.)
See rule 14.0 for specific details regarding the Action Round.

The Deadly Woods – Rules of Play 6
©2021 Revolution Games
4.4 Victory Check/Clean-Up Phase
At the end of the turn, players will check victory conditions to determine if the game has ended depending on the scenario conditions.
If the game continues, players conduct a few clean-up steps to reset markers for the following turn.
See rule 15.0 for specific details regarding the Victory Check and Clean-Up.
5.0 INITIATIVE
5.1 In General
The Initiative player must choose an available Action Round chit as the first chit played during the Turn's Action Round Phase. (Exception: Not on Turn 1).
EXAMPLE: It is Turn 2 and the Germans have the initiative. The German player looks at all the available German Action Round chits for Turn 2 and selects the “All German” chit and places it in the 1 box on the Action Chit Track on the map. The remaining Action Round chits for both sides are placed in an opaque cup.
5.2 Determining Initiative
The German Player has the Initiative on Turns 1 to 5.
The German Player has the initiative on Turn 6 if, at the start of Turn 6, the Germans controls three VP hexes in supply.
The Allies have the Initiative on Turns 7 through 13.
6.0 STACKING
Stacking is the placement of one or more units in a single hex. A “stack” refers to all Combat units placed in a hex.
The maximum allowed in a stack is one division (consisting of one to four units) plus one unit not of that division.
EXAMPLE: The Allies could stack one unit of the 106th Division plus all units of the 99th Division. The Germans could stack the 12th Division plus one unit of the 12SS Panzer Division.
6.1 Special Stacking Restrictions
British and US units may not stack together. Units of different US Corps may not stack together, including Engineer assets. Units with no Corps designation may stack with any Corps.
Units using the Mechanized Road Movement rate (10.4.1) may not enter a hex with another friendly unit.
6.2 Applying Stacking Limits
All units must move individually, never by stack.
Stacking limits are enforced as follows:
• Stacking limits apply at the end of each Movement Round.
• Stacking limits apply after advance after combat. • Stacking limits apply at the end of Retreat. A unit
forced to retreat into an over-stacked hex may continue to retreat until it enters a hex that isn't over-stacked if the retreat rules would otherwise allow it. Restrictions against British-US stacking and US Corps stacking still apply during a retreat.
• If a hex is over-stacked after any of the above conditions, the owning player immediately eliminates sufficient units to bring the hex within stacking limits.
• Otherwise, any number of units may enter or pass through a hex during a turn.
6.3 Stacking Limits for Assets and Markers
Game markers and other assets do not count toward stacking limits, but there may never be more than one US Engineer asset in a hex.
6.3.1 Combat Unit Assets
The US Delay asset may never stack. If an Allied unit enters its hex in movement or retreat, the US Delay

7 The Deadly Woods – Rules of Play
©2021 Revolution Games
asset is immediately returned to the Asset Box for deployment in the following turn.
7.0 ZONES OF CONTROL (ZOC)
7.1 In General
All Combat units, except those with circled Attack or Defense Strength, have a Zone of Control (ZOC) which extends into all adjacent hexes and affects the movement and actions of enemy units.
If at least one unit in a hex has a ZOC, the entire stack is assumed to have a ZOC. ZOC only affect enemy units.
7.2 ZOC and Terrain
ZOC do not extend across unbridged river hexsides. Armor unit’s ZOC do not extend into Woods or Forest hexes except on Roads. Allied non-Infantry ZOC do not extend into German Westwall hexes.
7.3 ZOC Effects
Units must stop on entering an enemy ZOC (EZOC).
Units may not move from one EZOC to another, except as a result of advance after combat.
EXCEPTION: The German 150th Panzer Brigade may once, during the first three turns, do one of the following:
A) Start a move in one EZOC and move directly to another and then stop moving; or
B) Enter an EZOC and keep moving as long as the next hex entered does not contain an EZOC.
Units that retreat through an EZOC lose 1 step per stack (not per unit).
Units may not trace supply through an EZOC (but see below).
For both sides, friendly combat units negate EZOC for retreat purposes and for tracing supply. For the Germans, the Westwall hexes also negate EZOC for retreat purposes and tracing supply. For the Allies, the US Engineer assets do not negate EZOC for retreat or supply, but the US Delay asset does.
An EZOC does not force combat to take place.
8.0 SUPPLY
8.1 In General
Allied units check for supply at start of any movement, at the instant of combat (attack or defense), when taking replacements, and for units of the US 106th Infantry Division during Clean-Up Phase of Turn 2.
German units check for supply when the German Supply Check action chit is drawn and when taking replacements. German Supply Check chits are added to the cup every turn starting with Turn 2.
A unit that is out of supply and then checks supply at one of the above times is then in supply if they can successfully trace supply (8.2).
TIP: Markers labeled “No Supply” are provided to mark units that are out of supply. Since Allied units check supply every time they try to move or have combat it is not required to mark them but is often handy to do so. NOTE: This rule means that the two sides have different supply concerns. The Germans are forced to consider when the next supply check chit is drawn. If both have been drawn this turn, they know they do not have a worry about supply the rest of the turn. The Allies can be put out of supply by the Germans instantly and restored to supply just as quickly.

The Deadly Woods – Rules of Play 8
©2021 Revolution Games
For example, an Allied unit only checks for supply for movement at the instant of its movement. So an Allied unit that is out of supply could have other Allied units create a supply path for it during movement by building bridges or negating enemy ZOC and the unit that was out of supply is now in supply when it moves.
Units may intentionally move or advance into a hex where they would be Out of Supply (OOS).
8.2 Supply Trace
A unit is Supplied if it can trace a line no more than 5 hexes to a road and then along the road to a friendly entry area hex, yellow for the Allies and blue for the Germans. Any number of units can trace supply to a single entry area hex.
At no point in this trace may the line pass through a Forest hex except along a Road, through a hex occupied by an enemy unit or non-negated enemy ZOC, or across a blown bridge or unbridged River hexside.
8.3 Supply Effects
OOS Allied Armored and Mechanized Cavalry units have their Movement Allowance (MA) reduced to 3, lose the Defensive Armor Combat bonus, may not move at the Motorized Road Movement Rate, and may not attack.
OOS Allied Infantry units may not be treated as Motorized for Movement and may not attack.
OOS German Armor units may only move by being replaced by their third-step Mech unit. (The tanks have been abandoned and the personnel are escaping with armored cars, halftracks, etc.) OOS German Armor units lose the Defensive Armor Combat bonus and may not attack.
OOS German Mechanized units have their MA reduced to 3 while OOS, may not use the Motorized Road Movement Rate, and may not attack.
OOS German infantry units may not be Motorized or attack. (If currently Motorized, return the Motorized marker to the Asset Box.)
Surrender: At the end of Turn 2, any OOS units of the US 106th Infantry Division surrenders and are removed from play.
OOS German defending units may not receive Artillery support. OOS Allied defending units may not receive Artillery support unless there is a supplied combat unit (not an Engineer asset) of the correct corps for the Allies within 3 hexes.
8.4 Always Supplied Units
The US Delay asset never requires supply. Allied Engineer assets do not require supply and may give Engineer support shifts to OOS units.
8.5 Peiper Fuel Dump Capture
If the German KG Peiper unit occupies Bullingen (hex 5407) during the first German Movement Round of Turn 1, Peiper is considered in supply for all purposes on Turn 2. Place the Peiper Fuel marker on the unit as a reminder. If Peiper does not enter hex 5407 during the 1st German Movement Round, remove the Peiper Fuel Dump marker from play.
8.6 US Air Supply
Once per game on the second Allied Reinforcement chit of Turn 5, the Allies may place the US Air Supply marker. It may be placed in any Allied-controlled Town or Village in clear terrain. US units may trace supply path of up to 5 hexes to the Air Supply marker thereafter for any purpose apart from Replacements and Artillery Support. The trace of supply has the normal terrain and ZOC restrictions laid out in section 8.2. If the Germans take the Town or Village, the Air Supply marker is removed from the game.
9.0 ARMY BOUNDARIES
9.1 In General
German Army boundaries are the borders marked on the map with a yellow dotted line that delineate each

9 The Deadly Woods – Rules of Play
©2021 Revolution Games
of the German Army operational areas. From north to south on the map, the areas are: 6th Panzer Army area, 5th Panzer Army area, and 7th Army area. The British Army area boundary is the border with the brown dotted line that delineates the British area on the northwest corner of the map.
German Army areas are used to identify which German units will be activated using the 5th Panzer Army, 6th Panzer Army, and “One Army” Action Round chits. When one of these Action Round chits is drawn, all units located inside that army area are activated.
9.2 German Army Area Restrictions
On Turns 1 through 3, no German unit located in an army area may move, advance after combat, or retreat across an Army boundary line, and Artillery/Nebelwerfer assets may only be used to support combat in hexes in their respective army's area. Units may attack a hex adjacent to the army boundary lines. A German unit or stack that would be forced to retreat across an army boundary line may not retreat and takes an additional loss for each hex not retreated instead.
9.2.1 Area Restrictions and St. Vith
The Army boundary between the 5th Panzer Army area and the 6th Panzer Army area is permanently removed for movement and combat one turn after a German unit enters St. Vith.
EXAMPLE: If a German unit moves through St. Vith on Turn 1, the boundary restrictions would be lifted on Turn 2.
Starting on Turn 4, Army boundary restrictions no longer apply anywhere on map and regardless of who holds St Vith.
9.2.2 German Artillery and Nebelwerfer Activation
6th Panzer Army Artillery and Nebelwerfer assets may never be used in the 7th Army area and vice versa.
9.3 British Army Area Restrictions
British units may not enter as a reinforcement, move, retreat, advance after combat, or provide artillery
support beyond the British Army area. They may attack and provide artillery support adjacent to the boundary line.
9.4 5th FJ Divisions 14th Regiment
The 14th Regiment of the 5th FJ Division starts in the 5th Panzer Army area and may cross into the 7th Army area from the start of the game in either direction as often as the German player wishes. During the first three turn, while in the 5th Panzer Army Area the unit must remain within 2 hexes of the 7th Army boundary line. While in the 5th Panzer Army area, it would be activated by the 5th Panzer Army Chit. While in the 7th Army area, the 5th Panzer Army chit would not activate the unit.
10.0 MOVEMENT
10.1 In General
All units with a Movement Allowance (MA) higher than 0 may move when allowed by an Action Round chit that allows movement. Movement is affected by Supply and Zones of Control, as well as by the terrain on the map.
Infantry and Motorized units (Armor, Mechanized, Mechanized Cavalry) pay different terrain costs as shown on the TEC.
10.2 Movement Procedure
Units are moved individually from hex to adjacent hex, paying varying Movement Point costs depending upon the terrain in the hex being entered and/or hexside crossed. These costs are detailed on the TEC.
10.2.1 Movement Restrictions
Movement is restricted by the following:
• Units do not accumulate Movement Points from Movement Round to Movement Round nor lend them from one unit to another.
• Moving units need not expend all available Movement Points before stopping.
• Complete the movement of each unit before beginning that of another.

The Deadly Woods – Rules of Play 10
©2021 Revolution Games
• A unit may not move more than once per round.
• Supply affects movement (8.3). • ZOC affects movement (7.3).
10.3 Emergency Withdrawal
A unit unable to move because of EZOC may move two hexes provided:
• the first hex entered contains a friendly supplied combat unit (not Engineers), and
• the second hex entered is in supply and not adjacent to an enemy unit.
The hexes moved through must contain terrain the unit could normally move through. The supplied unit “holding open the door” may not move this round.
EXCEPTION: This move may not be made by armor units moving their one hex allowed during a combat round.
10.4 Road Movement
Infantry units moving from one contiguous road hex to another ignore other terrain in the hex and pay 1 movement point to enter each hex.
Motorized units and Infantry units moving as Motorized pay ½ MP for moving from one contiguous road hex to another.
NOTE: Roads do not connect across Destroyed Bridge hexsides for either infantry road movement or motorized road movement.
10.4.1 Road Movement Restrictions
Motorized units and Infantry units moving as motorized that pay the road movement rate of ½ MP may not stack with any other friendly unit while moving at the motorized road movement rate (including in their starting and ending hexes).
EXCEPTION: Entering reinforcements may stack - indeed may overstack - in their hex of entry including with units that were already in the hex.
Motorized units using the road movement rate that leave a road hex at any point in their movement, including crossing a destroyed bridge hexside or stacking with another unit, pay the full movement cost for that hex and all subsequent hexes moved that round, ignoring all road movement benefits.
NOTE: They pay the cost of the other terrain in the hex. That means they may not enter a Forest hex after leaving the road and must cross Bridged hexsides as if they had no road.
10.5 Infantry using Motorized Movement
All entering German infantry reinforcements, German infantry under the Motorized asset marker, and all Allied infantry units may be treated as motorized if they start on a road. In addition, those units double their Movement Allowance to 6 and may only move along roads for the entirety of their movement.
The German infantry entering as a reinforcement may only be motorized during the initial reinforcement round of entry. After that they are only motorized if using the Motorized asset marker.
EXAMPLE: A German infantry unit with an MA of 3 under the Motorized asset marker doubles its movement allowance to 6 and can move 12 hexes along roads.
10.6 Bridges
All bridges are marked on the map. A bridge may be either intact or destroyed (blown), and four bridges are marked as blown at the start of the game. Most, but not all, bridges are where a road crosses the river.
A bridge with a road across it costs no additional MP for infantry units or motorized units that are using road movement. If a motorized unit is moving off road then the bridge would cost an additional 2 MP.
A bridge with no road crossing it costs an infantry unit no extra MP to cross it. A motorized unit crossing at such a bridge pays 2 additional MP.

11 The Deadly Woods – Rules of Play
©2021 Revolution Games
10.6.1 Blowing Bridges
Each Allied Move round (not Reaction, Combat, Patton, Monty, or Reinforcement rounds), each Engineer unit may destroy any one bridge within 3 hexes if the Allies have a combat unit on at least one side of the bridge.
Either side may blow a bridge when a friendly unit suffers a DR/DR* result in combat and retreats across the bridge. After the retreat is complete, that player rolls the die: on a 1-3 the bridge is blown.
NOTE: This is the only time a die roll is required for bridge destruction. All other methods are automatic.
A player may also destroy a bridge if an enemy unit attacks across a bridged hexside. If the defender still holds the hex at the end of combat, the bridge is considered blown unless the defender chooses otherwise.
A destroyed bridge may be crossed by infantry for a cost of 1 additional MP or by motorized units for a cost of 3 additional MP. A destroyed bridge cannot be crossed using road movement.
Mark blown bridges with a Bridge Destroyed marker.
10.6.2 Rebuilding Blown Bridges
A blown bridge may be rebuilt by either side simply by have a unit cross over the blown bridge hexside. The bridge is considered immediately rebuilt. Remove the Bridge Destroyed marker.
The German player may only rebuild one bridge in each Army Area per turn. On the map next to the TRT, there is a display with boxes for each German Army area and three markers are provided that say bridge build on them and used on the back. When a bridge is built in an army area, flip its marker to the used side as a reminder that no more bridges may be built that turn in that army area. At the end of the turn, all markers are flipped back to their front side.
10.6.3 Ouren Bridge
The bridge between hex 3315 and 3215 (near Lutzkampen) historically was too weak to support
tanks without substantial rebuilding. When the Germans discovered this, they redirected the 116 Pz to cross at Dasburg instead of crossing where originally intended. On Turn 1, no armor may cross the Ouren bridge.
10.6.4 Allied Movement Restrictions
British units, and the American 17th Airborne Division and 11th Armored Division must remain west of the Meuse River until either released as listed below or until any German unit moves or attacks across the Meuse River.
Turn 5: 29rd Armored Brigade
Turn 8: 43rd Infantry Division, 6th Airborne Divisions, 11th Armored Division
Turn 9: 51st Infantry Division, 53rd Infantry Divisions, 33rd Armored Brigade, 17th Airborne Division.
The American 5th Armored Division enters at entry area “J” and may not move, retreat or advance after combat more than 3 hexes from there. If “J” is blocked and the division has to enter at another entry area, then it has no restrictions on its use. These counters are marked with an asterisk next to their movement allowance as a reminder of this restriction.
11.0 COMBAT
11.1 In General
Combat occurs during each Player’s Combat round and, for a limited number of units, in other types of rounds as indicated for that Action Round chit. The active player is “the attacker,” and the other player is “the defender,” no matter the overall situation on the map.
Each combat consists of the attacking player’s units in one or more hexes attacking all units in one defending hex. Attacks may be conducted from multiple hexes. Each attack must always target one defending hex.
During combat, units may attack adjacent enemy units across non-prohibited hexsides. All eligible friendly combat units may engage in combat. Attacking is voluntary. Units in the same hex may attack different
The Deadly Woods – Rules of Play 12
©2021 Revolution Games
hexes, or not attack at all. Only attacking units and all defending units are affected by the Combat Result.
Designate and resolve each individual combat one at a time. The attacker need not declare all combats beforehand and may designate and resolve them in any order. The resolution of one must be completed before the next begins.
11.2 Specific Rules
The following rules apply to all combats:
• Units with an attack strength of zero may not attack.
• A unit may attack or be attacked only once per round.
• A unit’s attack or defense strength may not be divided to attack or defend (respectively) in more than one combat.
• OOS units may not attack.
11.2.1 Divisional Integrity
Almost all units in the game are part of a division with its number shown to the left of the unit symbol.
A defending Allied unit must be within 3 hexes of another unit of its division at the instant of combat or the attacker gets a one column shift to the right. Maximum of one shift for this to the attacker per combat.
NOTE: German units do not have to be near other parts of their division while on the defense.
An attacking Allied or German unit that is part of a division must be within 3 hexes of another unit of its division at the instant of combat or the attacker gets a one column shift to the left. Maximum of one shift for this to the attacker per combat.
NOTE: The following units are not part of any division:
Germans: two heavy tank battalions (301, 506), the VdH airborne battalion, and three brigades (150, FG, FB).
Allies: the two British armor Brigades (29, 33), the American 517 Airborne, four American mechanized cavalry regiments (4, 6, 14, 102) and the US Delay asset.
These units do not suffer the one-column shift penalty for not being part of a division.
11.3 Combat Procedure
Each combat uses the following procedure:
11.3.1 Determine Attacking Units and Defending Hex
The attacker first declares the defending hex and all attacking units. The attacker then announces which Artillery or Nebelwerfer assets (if any) will support the attack. The defender must then announce which Artillery or Engineer assets (if any) are supporting the defense.
11.3.2 Determine Combat Odds or Differential
Add separately all attacking and defending strengths, taking into account all assets and terrain effects to determine the combat odds, attacker to defender. All terrain effects are cumulative. Round off odds in favor of the defender.
EXAMPLE: 33 attacking factors to 10 defending factors would be 3-1 odds.
Any attack which does not generate at least a 1-3 ratio is automatically treated as AL1. Any attack beyond 6-1 is resolved on the 6-1 column.
Add 1 Defense Factor (total) to any unit or stack defending in a Village hex.
Westwall hexes double the defense strength of any German infantry unit occupying them. The German player or Allied player would still get any shifts from the terrain as well.
Terrain also affects the strength of Nebelwerfer assets for the attacker. The terrain effects on Nebelwerfers are not cumulative. Choose the one least favorable to the attacker. See the Terrain Effects Chart.
13 The Deadly Woods – Rules of Play
©2021 Revolution Games
Infantry units defending in Town, Woods and Forest hexes, or all units defending in a Rough hex or across a Minor or Major River hexside (including at bridges) get a one column shift to the left on the final odds. River shifts only apply if all attackers are attacking across the river.
Armored units get a one column shift to the left defending in Clear terrain (which may contain a Village but not a Town) against attacks containing no Armored units, and get a one-column shift to the right if attacking a Clear hex (which may contain a Village but not a Town) not across any River hexside, that has no defending Armored units.
The attacker gets a one column shift to the right when attacking OOS defending units.
On Turn 1 when the KG Peiper unit is part of an attack, add 1 to the die roll.
All column shifts are cumulative and combined to form a final modifier before applying it to the CRT. If the final modifier shifts the combat to below the 1-3 column, the result is AL1. If the final modifier shifts the combat beyond the 6-1 column, the combat is resolved on the 6-1 column.
11.3.3 Determine Results
Roll a single die on the Combat Results Table (CRT) to get the combat results. Cross-index the final odds column and the die roll result (adding any die roll modifiers) for the combat results.
Apply the results immediately (including Retreats and Advances) before conducting the next combat. Losses are always applied by the player controlling those units. Players should note that different units have different amounts of steps to take combat losses (2.5.2). See the CRT for an explanation of combat results.
On the first Combat round of Turn 1, the German player may convert any DR or DR* results to a BL1 instead. (The German player may wish to do this to eliminate a unit or prevent a retreat.)
11.4 Retreat
Only defending units may suffer a Retreat result. Units must retreat 2 hexes and may not retreat into or across terrain they could not legally move through or off the map edge.
Retreating units may not retreat through enemy units and must avoid EZOC if possible. Units that retreat through any number of EZOC suffer a total of one additional step loss for the entire stack of retreating units.
German units may not retreat towards the west map edge unless there is no other path free of enemy units, EZOC, and prohibited terrain.
Allied units may not retreat towards the east map edge unless there is no other path free of enemy units, EZOC, and prohibited terrain.
Units may not end their retreat adjacent to an enemy unit. They may retreat additional hexes to not end up adjacent to an enemy unit.
Units unable to retreat 2 hexes or finish their retreat not adjacent to an enemy unit must remain in their original hex and take additional losses: all one step units are eliminated, then all two-step units are reduced to one step, and then all three step units are reduced to two steps.
11.4.1 Allied Airborne
All Allied Airborne units may choose to cancel the Retreat portion (only) of any Combat Result when defending by taking an additional loss of 1 step if they occupy a Town, Village, Forest, or Woods. This cancels the retreat portion for all units in the defending hex. The Airborne unit may be eliminated while doing this and it still cancels the retreat result.
EXAMPLE: A Town hex with a full-strength Airborne unit and a full-strength armored unit suffers a DR*. The hex must take the * result of one step with either unit. The Allied player chooses to lose it from the Airborne unit. He then decides to not retreat and removes the Airborne unit as it has now taken its
The Deadly Woods – Rules of Play 14
©2021 Revolution Games
second loss. The armored unit holds the defending hex at full-strength.
11.4.2 Units with no Movement Allowance
The US Delay asset and units that have no movement allowance that receive a Retreat result are eliminated.
11.5 Advance
Attacking units may advance into a vacated enemy hex. Units ignore any ZOCs when advancing but may not advance into or across terrain they could not legally enter or cross. Stacking limits must be observed.
12.0 ASSETS
12.1 In General
Assets are generally placed in each side’s Asset Box at the start of the turn they enter and thereafter remain in play.
EXCEPTIONS: The German 6th Panzer Artillery and Nebelwerfer are removed on Turn 11. The Operation Greif asset is removed at the end of Turn 4. The Allied Traffic asset is removed at the end of Turn 3. The Allied Delay asset marker is available only on turns the Germans have the Initiative.
Assets placed on map at the start of a turn, in this order, include the US Engineers, German Operation Greif Unit, German motorized unit, Allied Traffic asset, and the US Delay asset.
12.2 German Artillery and Nebelwerfer
On Turns 1 through 3, these German assets may only be used in combats in which the defending unit is within the army area listed.
Starting on Turn 4, this restriction no longer applies but 6th Panzer assets may never be used in the 7th Army Area and vice versa.
German Artillery and Nebelwerfer assets add their Combat Strength to any combats they are assigned to support. Each German Nebelwerfer (Rocket Artillery) may be used once per turn but may only be used
when attacking. Each German Artillery may be used once per turn on either attack or defense.
A maximum of one Artillery and one Nebelwerfer asset may be assigned to any one combat. They may not be used to support unsupplied units.
Attacking Nebelwerfer are affected by terrain. When attacking clear terrain, add one to their combat strength. When attacking Villages or Forest, they subtract one. When attacking Rough or Town terrain, they subtract 2. These effects are not cumulative. If a hex has more than one terrain type, use the one that is the greatest benefit to the defender.
A German Nebelwerfer may double its modified combat strength in any combat and be placed on the TRT as a reinforcement entering two turns later.
EXAMPLE: A Nebelwerfer unit doubled on Turn 1 would be placed on the TRT for Turn 3, when it will be available again for use.
Once used, flip the Nebelwerfer or Artillery unit to its Used side and return it to the Asset box.
12.3 Allied Artillery
Allied Artillery works the same as German Artillery with the following exceptions:
• A maximum of two Allied artillery may be used in any combat.
• Allied Artillery may be used in combats involving units of their Corps only.
EXCEPTION: Allied Artillery may be used to support any hexes containing American Airborne units within 3 hexes of a supplied unit of the Artillery's Corps.
EXAMPLE: An Airborne unit is in a hex with a 7th Corps unit, in supply, and within 3 hexes of a unit of the 5th Corps, also in supply. The hex could get artillery support from the 7th Corps, the 5th Corps, or from both Corps.
Allied Artillery may be used to support an unsupplied unit on defense (only) if a supplied unit of that Corps is within 3 hexes. Unsupplied Airborne units may get

15 The Deadly Woods – Rules of Play
©2021 Revolution Games
artillery support from the artillery of any Corps unit in supply within 3 hexes up to the maximum of two Allied artillery per combat.
Allied Artillery is used once per round. (It may be used on attack in one round and defense in the following round and many more times in the same turn.) Flip Allied artillery to its Used side to show it may not be used for the rest of this round. At the end of the round, flip Allied artillery back to its unused side.
On Turn 1 of the game, Allied Artillery may not support the 313th and 314th Regiments of the 99th Division.
12.4 US Engineer Assets
12.4.1 Deployment
US Engineers are initially placed in the Allied Asset Box. They are then deployed from the Asset Box to the map at the start of the Asset/Special Reinforcement Phase.
EXCEPTION: The US V Corps asset begins the game on the map at Elsenborn and may not be removed on Turn 1.
Engineer assets may be deployed in any friendly-controlled and currently supplied Village or Town hex within 3 hexes of a supplied unit of its Corps.
Once placed on the map, they remain until an enemy unit enters their hex (12.4.4) or the Allied player chooses to remove it in any subsequent turn. Eliminated US Engineer assets are placed on the TRT two turns ahead. When removed by the Allied player, they are placed on the TRT one turn ahead.
Engineer assets are not combat units, and they may be moved through freely by friendly units, do not count as a unit for stacking, do not hinder road movement, do not block EZOC for supply or retreat, nor can they be used as the unmoving unit for Emergency Withdrawal.
12.4.2 Defense
When deployed on the map, Engineers provide a combat shift of one column to the left to any
defending Allied unit of the same Corps as the Engineer, US Delay asset, or any Airborne unit, that is within 3 hexes of the Engineer. An Engineer may not be used to aid Allied attacks. An Engineer Asset alone in a hex may not be attacked.
12.4.3 Blowing Bridges
Each Allied Move round (not Reaction, Combat, Patton, Monty, or Reinforcement rounds), each Engineer asset may destroy any one bridge within 3 hexes if the Allies have a combat unit (this includes the US Delay asset) on at least one side of the bridge.
12.4.4 Engineer Forced Removal
During German movement, it costs a German unit their entire MA to enter a hex with an Allied Engineer asset. The asset is then removed to the TRT and placed two turns ahead where it will then enter as a reinforcement available to be deployed in that turn. This movement can be in any type of action round, including the one-hex movement of armor units in a combat round.
An Engineer is also removed and placed on the TRT two turns ahead if a German unit enters its hex during an advance after combat.
EXAMPLE: If the German player enters a hex with an US Engineer Asset on Turn 3, the Engineer is placed on the TRT on Turn 5.
12.5 German Operation Greif Asset Counter
This counter represents German detachments in American uniforms, rumors of such units, and traffic jams. It may be placed on the map during the Asset Special Reinforcement phase on Turns 2-4 in any hex on the map not occupied or adjacent to an Allied unit or Engineer marker.
EXCEPTION: On Turn 2, it must be placed in the 6th Panzer Army Area.
It costs Allied units using road movement +2 additional MP to enter its hex.

The Deadly Woods – Rules of Play 16
©2021 Revolution Games
12.6 German Motorized Asset Marker
The German player may Motorize one supplied infantry unit on the map per turn during the Asset phase. Place the Motorized asset marker on a supplied German infantry unit that is on a road hex and that hex must be able to trace supply. The marker may not be placed on a unit adjacent to an Allied unit and is removed the instant the unit is adjacent to an Allied unit. The German unit will behave in the same manner as Allied infantry units (10.4.1, 10.5). It can move as an infantry unit normally but if it starts on a road it may declare itself motorized, have its movement allowance doubled and it stays on the road for the full movement.
12.7 Von der Heydte Parachute Unit
This unit is deployed on the map following the First Allied Reaction round on Turn 1. It may be placed in any Clear/Light Woods hex that does not contain a Village or Town in the 6th Panzer Army Area that is not occupied or in the ZOC of an Allied unit.
When placed, a die is rolled. On a result of 1-2, the unit is placed face up in the hex and it is a normal German unit with no movement allowance or ZOC and a single step. It is subject to normal supply rules starting on Turn 2, may never be motorized, and never receive Artillery support. On a die roll of 3-6, the unit is placed face down and the marker exerts a penalty of 2 MP to any Allied unit that enters the hex. The marker is removed at the end of Turn 2.
12.8 Allied Traffic Asset Marker
This marker may be placed during the Asset Availability phase of Turns 1-3 in any road hex and costs German units entering the hex by road movement 2 additional MP. It may be removed and relocated in the Asset Availability phase of each turn during this period.
EXCEPTION: On Turn 1, this marker is placed after the German Move round.
12.9 Special Reinforcements
Several Allied units begin the game on the Turn Record
Track as Special Reinforcements. These are the US Delay asset, some US Artillery (12.3), some US Engineers (12.4), and all British Artillery (12.3).
These are placed on the play map at the beginning of the turn during the Asset Availability/Special Reinforcements phase instead of waiting for a Reinforcements chit to be pulled during the Action Rounds.
12.9.1 US Delay Asset
The US Delay asset (a 0-1-0 combat unit with no Zone of Control) represents US combat forces below the scale of the design (company or battalion) fighting rear-guard actions against the Germans. Starting on Turn 2, it is available on any turn the Germans have the Initiative.
It may be deployed at the start of the Asset Availability/Special Reinforcement phase in any Allied-controlled supplied Village or Town hex not occupied by an Allied unit. It is treated as a normal unit with no ZOC but may neither move nor attack. If located in a Village, it does get the additional strength point that units in such terrain normally receive.
It may receive Engineer Asset Support from a single engineer of any Corps. It may not receive artillery support.
The US Delay asset itself requires no supply. It is removed if it is forced to retreat or takes a step loss in combat and placed in the Asset box for deployment in the following turn.
The Allied player may remove the US Delay asset at the start of any Asset phase and deploy it in a new hex in that same Asset phase.
12.10 SS Withdrawal
On Turn 11 during the Asset phase, determine the number of steps among the German 6th Panzer Army Artillery and Nebelwerfer units, along with any remaining units of the 1st SS, 2nd SS, 9th SS, 12th SS Panzer Divisions, and the FB brigade. (These units are marked with the number 11 in a black circle on the top right corner of the unit.)

17 The Deadly Woods – Rules of Play
©2021 Revolution Games
If there are fewer than 12 steps, then the German player must have 3 VP or more or he immediately loses the game.
If fewer than 12 steps and the Germans have 3 VP or more, the units remain in play and the German player can only win at the end of Turn 12 if they have 3 VP or more.
If there are more than 12 steps among the named units and they are in supply, they are now withdrawn from the game. If OOS, they remain in the game.
If the German player has 3 or more VP, the Germans may cancel the withdrawal. If they do, the Allies win the game unless the German player has 3 VP or more at the end of Turn 12.
13.0 REPLACEMENTS
13.1 In General
Replacements are used to rebuild some units which have been reduced to their stepped side or rebuild certain units that have been eliminated. Note that not all units have a reduced side.
13.2 Replacement Procedures
Each player may receive replacements in a turn. The number of points and type for each side is printed on the TRT. The top number is infantry and the bottom number is armor. At the start of each turn, the non-initiative player spends replacements by flipping one reduced unit to its full-strength side for each replacement point. The unit must be able to trace supply (not Air or Special Peiper supply) at that instant. Then the initiative player does the same.
13.2.1 German Replacements
For the German side, replacements are used to rebuild reduced units on their stepped side. German units with 3 steps can rebuild the 3rd step to the 2nd step. German units that have been eliminated may not be rebuilt. German armor replacements are used to replace German armor units and mechanized units.
13.2.2 Allied Replacements
For the Allied side, replacements are used to rebuild reduced American units on their stepped side or rebuild American units that have been eliminated. Allied armor replacements are used to replace Allied armor units and mechanized cavalry units.
British units and American airborne units may never receive replacements or be rebuilt from eliminated using replacements. Units of the 106th division that surrendered may not be rebuilt.
The Allied player may also bring back an eliminated unit on its reduced side. The unit must be placed in a Town that is in supply (not Air supply) and not adjacent to an enemy unit. Luxembourg City may only have units of the 8th and 3rd Corps placed in it and Eupen may only have units of the 5th and 7th Corps. All other Towns may have units of any American Corps placed in them. The Allied player may not bring back a unit from eliminated and then spend a second replacement point to flip it from reduced to full strength in a single turn.
14.0 THE ACTION ROUND PHASE
14.1 In General
The Action Round phase is where most of the action in the game takes place. Each turn, a certain set of Action Round chits listed on the Action Chit Availability Chart is available to each player. The initiative player must choose one of their side’s chits to begin the Action Round phase, the remainder of both sides’ chits are mixed in the Action Chit cup and randomly drawn after the first Action Round.
As chits are played, they are placed on the Action Round Track on the map as a reminder.
How each chit functions and exceptions to these general rules are noted below.
14.2 Action Round Limits
A side may not have more than two consecutive Action Round chits in a row, unless only their side’s chits remain in the Action Chit Cup. If an illegal third chit is drawn, keep drawing until a legal chit is drawn,

The Deadly Woods – Rules of Play 18
©2021 Revolution Games
then return the unused chits to the cup. German Supply Check Action Round chits do not count for this restriction; they do not count as an Action Round chit for either side.
EXAMPLE: The German player draws a German Supply Check Action Round chit and then a German Movement Action Round chit followed by a 5th Panzer Army Action Round chit. This would be legal as the German Supply Check does not count as a chit for the Germans for the purposes of the two consecutive activations limit. The next chit drawn is Allied Reinforcements followed by another German Supply Check and then an Allied Movement. The Allies have now had two consecutive chits in a row and the next chit must be German as again the German Supply Check Acton Round chit does not count for either side.
14.3 Turn 1 Starting Sequence
Turn 1 has a specific starting sequence to simulate the German surprise attack. Follow the sequence below:
1. German Combat Action Round 2. German Move Action Round 3. Allied Traffic Asset Placement 4. Allied “Reaction 3” Action Round 5. German VdH FJ Unit Placement
After the above sequence is complete, the Action Round phase continues as normal. The Turn 1 Action Round chits listed on the Action Chit Availability Chart are placed in the Action Chit cup. The Allied player will have the second “Reaction 3” Action Round chit off to the side, ready to play.
NOTE: The Allied player will have had the last Action Round in the sequence list above. This means that if another Allied chit is drawn it will be the 2nd Action chit in a row and the following chit pull must be German.
14.3.1 Turn 1 Allied Reaction Rounds
The Allied player gets two “Reaction 3” Action Round chits. The first “Reaction 3” chit played as the third Action Round of Turn 1 allows three Allied units to
move. Units of the 2nd and 99th Infantry Divisions may not be moved with the first “Reaction 3” chit.
The second “Reaction 3” chit, which is held by the Allied player, can be played after either the 5th or 6th Panzer Army chits or as the last chit of the turn, at the Allied player’s discretion, and allows three Allied units to perform a move round. Activated Allied Armored units that do not move may perform combat. The activated units may include units who were moved with the first “Reaction 3” chit. Units of the 2nd and 99th Infantry Divisions can be activated with the second “Reaction 3” chit.
At the end of Turn 1, remove both Reaction 3 Action Round chits from the game.
14.4 Move or Combat (M/C) Chits
Action Round chits marked “Move” on one side and “Combat” on the other may be used for either a move round or a combat round. The Allied player (only) may choose two move or two combat rounds per turn or a combination of one move and one combat round. The German player may only play one move round and one combat round per turn in either order.
REMINDER: On Turn 1, the German player must play a combat round first and then a move round (11.3).
When played as a move round, all that player's units may move, subject to the Supply and Movement rules. In addition, Armor units (only) that do not move may perform combat (Exception: Not on Turn 1).
When played as a combat round, all friendly units adjacent to enemy units may attack, subject to the Supply and Combat rules. In addition, in-supply Armor units not adjacent to an enemy unit may move 1 hex before combat, all normal movement restrictions apply, and thus position themselves to attack or just gain a hex of movement (Exception: Not on Turn 1).
14.5 5th and 6th Panzer Army Chit
When played, these chits allow all German units located in the chit’s army area to perform a move round. (When German Army boundary restrictions are lifted, they may finish movement in any army area.) All

19 The Deadly Woods – Rules of Play
©2021 Revolution Games
Armor units starting in the chit’s army area may attack at the end of movement. The infantry and mechanized units may move but not attack.
EXAMPLE: It is Turn 4 and the German breakthrough is going well in the 5th Panzer Army area. The German player decides to shift several Panzer divisions from the 6th Panzer Army area where progress is weak to the 5th Panzer Army area. When the 5th Panzer Action Round chit is drawn, all of these units will be activated because they are in the 5th Panzer Army area.
14.6 All German/One Army
The Turn 2 “All German” chit allows German units anywhere on the map to move. After movement, all German units may attack. Remove this chit from the game at the end of Turn 2.
The Turn 3 “One Army” chit allows all German units in one army area to move. After movement, all activated German units may attack. Remove this chit from the game at the end of Turn 3.
REMINDER: When German Army boundary restrictions are lifted, German units may finish movement in any army area.
14.7 3 Formations Chit
The German player may move one armored formation, one mechanized formation and one infantry formation. After movement, the activated units may attack. A formation can be of divisional size or smaller and includes all the regiments, KG, and battalions of that formation.
14.8 Reinforcement Chits
Reinforcement units placed in the boxes on either side of the TRT are brought into play when the Reinforcement chits for those forces are drawn from the cup during the Action Rounds. The letters in the yellow circles on the TRT are the entry areas on the map.
The first Reinforcement chit played during a turn for that side will allow all reinforcements for that side located in the “First” box on the TRT to enter play. The
second Reinforcement Chit played for that side will allow all reinforcements for that side located in the “Second” box on the TRT to enter play.
Place all reinforcement units on the indicated entry hex or hexes of the map. Stacking limits do not apply when initially placed but must be met at the end of the Round.
If all listed Allied entry hexes are currently occupied by German units or in an EZOC, those units enter at the nearest available Allied entry area farthest from the east map edge.
EXAMPLE: On turn 4, units of the American III Corps are due to enter at areas B and C. All these hexes are occupied by German units or in an EZOC, so the American units would enter on any hex of area “D”.
If all listed German entry hexes are enemy occupied or in an EZOC, the units do not enter the game.
After placement, units may move and armor units (only) may perform combat after all movement is completed. German infantry entering play this turn may be treated as motorized for movement during their Reinforcement round only. Units may use road movement (10.4) from this hex regardless of starting stacked, including being stacked with units that were not part of the reinforcement group.
14.8.1 US III Corps Reinforcements
Units of the US III Corps may enter at entry area “D” instead of their scheduled entry area at the Allied player’s option at a penalty of a one-round delay.
EXAMPLE: A unit of the US III Corps that was due to enter on the second Reinforcement chit of Turn 3 at entry area “C” would instead enter on the first Reinforcement chit of Turn 4 at “D”.
A unit of the US III Corps that was due to enter on the first Reinforcement chit of a Turn would instead enter on the second Reinforcement chit.
The Deadly Woods – Rules of Play 20
©2021 Revolution Games
14.8.2 Allied Reinforcements Turns 2-7
On Turns 2 through 7, the Allied player starts each turn with one Reinforcement chit to hold and may replace any Allied chit drawn during the turn with the held Reinforcement chit. The drawn chit is put back in the cup. If the last Allied chit is pulled from the cup and the Allied player still holds the Reinforcement chit, the Reinforcement chit must be placed in the cup at that time.
NOTE: Normally the Allied player uses this rule when the Allied Move/Combat chit is drawn and replaces it with the Reinforcement chit. This allows the reinforcements to enter first and then take advantage of the Move/Combat chit in a later round.
Another strategy is for the Allied player to replace a drawn Reinforcement chit with the held Reinforcement chit. The Allies might do this to increase the chance of getting the next chit drawn. The reinforcing units that enter the game are from the “First” box on the TRT in this case.
14.8.3 Conditional German Reinforcements
The German Turn 3 Reinforcements are conditional. The 10th SS Panzer units only enter if the Germans currently control St. Vith. The German 11th Panzer units only enter if the Germans currently control Bastogne. The check is performed when the second German Reinforcement chit is drawn for the turn. If these units do not enter on Turn 3, they do not enter the game at all.
14.8.4 101st and 82nd Airborne Divisions
When the 101st and 82nd Airborne Division units enter with the first Allied Reinforcement chit of Turn 2, they have a movement allowance of 12 as long as they stay on the roads.
EXAMPLE: A unit of the 82nd Airborne coming in at entry area E can move 24 road hexes and end up just outside Bastogne.
14.9 Patton/Monty Action Round Chit
When this chit is drawn, the Allied player decides whether to play it as either Patton or Monty.
If played as Patton, all US III Corps units may move after which all III Corps units may attack.
If played as Monty, British units and US VII Corps units may move or attack (Monty's choice).
15.0 VICTORY CHECK/CLEAN-UP
At the end of the turn, the German player scores 1 VP for each VP hex he controls that is in supply.
Check to see if the German Player has won a Sudden Death Victory (3.4).
If ending Turn 2, check to see if units of the US 106th Division surrender (8.3).
If ending Turn 6 of the German Attack scenario, check victory conditions (3.4).
If ending Turn 12 of the Campaign scenario, check victory conditions (3.4).
If the game has not ended, return all asset units except the US Engineers to their respective Asset Box.
Turn all assets in the Asset Boxes to their front (available) side. Turn all German Bridge Build markers to their front side.
Advance the Turn Marker to indicate the start of the next turn. Flip the Marker to its German or Allied side to indicate who has the Initiative for the new Turn (5.2).
16.0 OPTIONAL RULE 16.1 German +2 Combat Asset
Some players may wish to play a game with the Germans having a little more offensive power. We have included an additional +2 Combat asset that the German player can use on Turns 1-2 to assist one combat in each turn with a +2 die roll modifier. If this
21 The Deadly Woods – Rules of Play
©2021 Revolution Games
rule is used, do not give Peiper the +1 combat modifier on Turn 1. Designers Notes Since you are reading this, I probably don't have to justify Why Another Bulge Game? (and hopefully the play will do that) but okay, Why Another Bulge Game? The Battle of the Bulge, along with Gettysburg and Waterloo, is one of the most covered topics in our hobby. In the classic chicken and egg scenario, I think the egg of public interest in these topics has produced the chicken of many designs on each. And part of that is each of us has our own “ideal” game on these topics, so both customers and designers are motivated (switching metaphors) to keep scratching that itch. (As an aside, having now done games on Gettysburg and the Bulge, I feel I shall have to do my take on Waterloo at some point.) In my case, I have played many, though by no means all, the games on the Bulge, starting with the first Avalon Hill design from the 60s, which I got around 1971, to GMT's Ardennes 44 and the latest Compass edition of Bitter Woods, with more than a couple of Danny Parker designs along the way. None of them were bad (a testament perhaps to the inherent drama of the topic) and some of them were great, but none of them were EXACTLY what I was looking for. Which is generally when it is time for me to do it myself. So, what was I looking for that The Deadly Woods provides the others didn't? Smaller footprint for one thing; some of the best games on the topic are two-mappers and while I enjoy a small monster game myself (see The Dark Valley) in general my preference is for one map. I also wanted a game covering the entire campaign, including the Allied counteroffensive to eliminate the Bulge. This is included in some-but not all-previous Bulge games, but generally as an option. I wanted a design where the Allied attacks were an intrinsic part of the game, where the German player has to think about what happens after his attacks stall, rather than just calling it a game at that point. Finally, the Igo-Hugo sequence of most of them tends to result in somewhat stylized play, where surprises are more a matter of unlucky die rolls than uncertainty
over who can get where when. (I exclude John Butterfield's Enemy Action Ardennes, which is however both a pretty big footprint and a considerably more complex game.) The chit system in The Deadly Woods removes some of the chess-like maneuvers of other Bulge designs, introducing more of the chance and chaos that so-marked the course of this battle. (I'll add that Revolution's Celles makes a different but also excellent use of chit-pulls, but it covers only part of the battle.) Who will get to a key crossroads “first with the most” is no longer built into arrival times and movement allowances. As in my other chit pull designs, you will have to hope for the best and plan for the worst. This also makes the game a very good solo experience. (I hope.) I mentioned The Dark Valley above, and The Deadly Woods is indeed part of my ongoing “Dark” series of chit-pull operational designs which includes the East Front, Rommel in North Africa, and Normandy. So why not The Dark Woods? Simple-GMT requested I keep “Dark” for the designs in this series published by them, which seemed a fair request. So if I do more of these designs for Revolution, you may see more Deadly places to fight. Speaking of Revolution, my thanks to Roger and everyone involved. They did a first-class job, and any problems with the resulting design are of course, their responsibility and not mine. On the other hand, if you love the game, it's entirely on me. Ted Raicer
The Deadly Woods – Rules of Play 22
©2021 Revolution Games
101st and 82nd Airborne 14.8.4
3 Formations chits 14.7
5th and 6th Panzer Army 9.1, 14.5
Action Chit Availability 17.0
Action Round 2.5, 4.3, 14.0
Advance 6.2, 7.3, 8.3, 9.2, 9.3, 10.6.4, 11.5, 12.4.4
All German/One Army 14.6
Allied Movement restrictions 10.6.4
Allied reinforcements 14.8.2
Allied Traffic asset 12.8
Armor, combat shifts 11.3.2
Armor, Move/Combat 14.4
Armor, movement 10.1, 10.3
Armor, Ouren Bridge 10.6.3
Armor, replacements 13.2.1, 13.2.2
Armor, supply 8.3
Armor, ZOC 7.2
Army Boundaries 9.0
Artillery, Allied 9.3, 12.3, 12.9
Artillery, combat 11.3.1
Artillery, German 8.3, 9.2, 12.2, 12.7, 12.10
Assets 2.4, 6.3, 12.0
Bridge, Ouren 10.6.3
Bridges 10.6, 11.3.2
Bridges, blown 3.2, 8.2, 10.4, 10.6.1, 12.4.3
Bridges, rebuilding 10.6.2
Combat procedure 11.3
Combat 11.0
Divisional Integrity 11.2.1
Emergency withdrawal 10.3
Entry Areas 2.2.1, 8.2, 10.6.4, 14.8
Glider Infantry 2.3.1
Initiative Player 4.3, 5.1, 13.2, 14.1
Mech. Cavalry 2.3.1, 8.3, 10.1, 13.2.2
Mechanized 2.3.1, 6.1, 8.3, 10.1, 13.2.1, 13.2.2, 14.5, 14.7
Motorized movement 3.4, 8.3, 10.1, 10.4, 10.5, 10.6, 12.6, 14.8
Move/Combat chits 14.4
Movement restrictions 9.2, 9.2.1,9.3, 10.2.1, 10.4.1, 10.6.4, 12.2, 14.4, 14.5, 14.6
Movement 10.0
Nebelwerfer 9.2, 9.2.2, 11.3.1, 11.3.2, 12.1, 12.2, 12.10
Operation Greif 4.1, 12.1, 12.5
Paratroop Infantry 2.3.1
Patton/Monty 10.6.1, 14.9
Peiper Fuel Dump 2.6, 8.5, 13.2
Reinforcements 2.2.1, 3.2, 4.1, 8.6, 9.3, 10.4.1, 10.5, 10.6.1, 12.5, 12.9, 12.9.1, 14.8
Reinforcements, Conditional German 14.8.3
Replacement 4.2, 13.0
Replacement, Allies 13.2.2
Replacements, German 13.2.1
Retreat 6.2, 6.3.1, 7.3, 9.2, 9.3, 10.6.1, 10.6.4, 11.3.3, 11.4, 11.4.1, 11.4.2, 12.4.1, 12.9.1
Retreat, Allied Airborne 11.4.1
Road movement 10.4, 10.4.1, 10.6.1, 12.4.1, 12.5, 12.8, 14.8
Special Reinforcements 3.2, 4.1, 12.4.1, 12.5, 12.9, 12.9.1
SS Withdrawal 3.4, 12.4.1, 12.10
Stacking 6.0, 11.5, 12.4.1, 14.8
Supply 2.2.1, 3.4, 8.0, 14.2
Unit Steps 2.3.1.1, 3.4
US Air Supply 2.4, 8.6
US Delay asset 2.3.1, 4.1, 6.3.1, 7.3, 8.4, 11.4.2, 12.1, 12.4.3, 12.9, 12.9.1
US Engineer asset 4.1, 6.1, 6.3, 7.3, 8.4, 10.6.1, 11.3.1, 12.1, 12.4, 12.5, 12.9
US Engineers, defending 12.4.2
US Engineers, removal 12.4.4
US III Corps reinforcements 14.8.1, 14.9
Victory Check 4.4, 15.0
Victory conditions 3.4
Von der Heyde unit 2.3.1, 12.7, 14.3
Zones of Controls 7.0
INDEX

23 The Deadly Woods – Rules of Play
©2021 Revolution Games
17.0 ACTION CHIT AVAILABILITY Turn 1 December 16-17 Turn 7 December 28-29 German* In Cup (5th Pz, 6th Pz). German In Cup (3 Formation, 2xM/C,
2xSupply Ck.) Allied In Cup (2 Reinf),
In Player hand (1 React). Allied* In Cup (Patton/Monty, 2xM/C)
In Player hand (1 Reinf) Turn 2 December 18-19 Turn 8 December 30-31 German* In Cup (All German, 3 Formation,
2xReinf, 2xM/C, 2xSupply Ck., 5th Pz, 6th Pz).
German In Cup (3 Formation, 2xM/C, 2xSupply Ck.)
Allied In Cup (2xM/C, 1 Reinf) In Player hand (1 Reinf)
Allied* In Cup (Patton/Monty, 2xM/C).
Turn 3 December 20-21 Turn 9 January 1-3 German* In Cup (One Army, 3 Formation,
2xReinf, 2xM/C, 2xSupply Ck., 5th Pz, 6th Pz)
German In Cup (3 Formation, 2xM/C, 2xSupply Ck.)
Allied In Cup (2xM/C, 1 Reinf) In Player hand (1 Reinf)
Allied* In Cup (Patton/Monty, 2xM/C)
Turn 4 December 22-23 Turn 10 January 4-7 German* In Cup (3 Formation, 2xReinf,
2xM/C, 2xSupply Ck., (5th Pz or 6th Pz)**) **If Germans control St. Vith and Bastogne, they receive both formations.
German Allied*
In Cup ((2xM/C, 2xSupply Ck.) In Cup (Patton/Monty, 2xM/C, 1 Reinf)
Allied In Cup (2xM/C, 1 Reinf) In Player hand (1 Reinf)
Turn 5 December 24-25 Turn 11 January 8-11 German* In Cup (3 Formation, 2xReinf,
2xM/C, 2xSupply Ck., (5th Pz or 6th Pz)**) **If Germans control St. Vith and Bastogne, they receive one of the formations.
German Allied*
In Cup ((2xM/C, 2xSupply Ck.) In Cup (Patton/Monty, 2xM/C)
Allied In Cup (2xM/C, 1 Reinf) In Player hand (1 Reinf)
Turn 6 December 26-27 Turn 12 January 12-15 German* In Cup (3 Formation, 2xReinf,
2xM/C, 2xSupply Ck., (5th Pz or 6th Pz)**) **If Germans control St. Vith and Bastogne, they receive one of the formations.
German Allied*
In Cup ((2xM/C, 2xSupply Ck.) In Cup (Patton/Monty, 2xM/C).
Allied* In Cup (Patton/Monty, 2xM/C, 1 Reinf) In Player hand (1 Reinf)
*On turns 2 to 5, the German player chooses the first chit to be played. On Turn 6, the German player chooses the first chit if they have 3+ VP, otherwise the Allied player chooses. On turns 7 to 13 the Allied player chooses the first chit.