2012 summer conditioning (baseball) - huskers · nebraska baseball warm-up drills 2—10 lifting...
TRANSCRIPT
Confidential Property of the University of Nebraska
2012 SUMMER WORKOUT
JOBA CHAMBERLAIN 2006 ALL-AMERICAN
MIKE NESSETH 2008 LIFTER OF THE YEAR
JOHNNY DORN 2006 LIFTER OF THE YEAR
ALEX GORDON 2005 ALL-AMERICAN
Confidential Property of the University of Nebraska
Table of Contents
Josh Scheffert
2012
Lifter of the Year
poundage's that don’t allow good technique. Technique comes first.
Our expectations as a team are high next year, but I am sure they are no higher than the expectations you have for yourself. The program will make you a better player, but you must do it. We are all depending on you.
If you have questions at all, don’t hesitate to call collect at:
402-472-3333.
Sincerely,
Mike Arthur
Strength & Conditioning Coach
Now is the time. This is your official lifting program to prepare you for the upcoming season. Without a doubt, if you follow the program as outlined, you will be better prepared when the off season program starts during the first week of September.
You face a bold challenge. Because you are not here in Lincoln for the summer, the personal responsibility and accountability fall solely on your shoulders. The players who stay in town have a distinct advantage in that they will have the constant supervision to make sure they are working at the level we expect. It takes great motivation and self-discipline to do the lifting program on your own, but I am confident you are up to the task.
The first section of your book outlines all warm-up drills and lifting exercises. Included is a poundage chart to help select your poundage's and then your progress chart on the inside back cover.
There are two workouts to be done each week. Select any two days you want to fit your schedule. If possible allow at least two days rest in between workouts. If you allow only one day rest make sure the second workout is a little bit lighter.
The first week will start off with two sets of ten repetitions. The following five weeks will be three sets of ten repetitions. The first set starts light and following two sets get progressively heavier. The primary focus is to use good lifting form. Don’t use
Summer Workout 2012
NEBRASKA BASEBALL
Warm-up Drills 2—10
Lifting Exercises 11—18
Poundage Chart 19
Progress Chart 20
Beep Test 21

Confidential Property of the University of Nebraska
FORWARD LUNGE Figure 3
1. Begin by stepping forward with your right leg (exaggerate normal stride length).
2. When your right foot is planted, lower your right elbow to the ground.
3. Use right leg to pull your left leg off the ground so that you can then step forward with the left foot.
4. Repeat the procedure for 10 yards alternating right and left.
Figure 3: Forward Lunge
Figure 1: Walking Knee Ups
Figure 2: Walking Heel Ups
Page 2
1. When you lift one leg, the other leg should be fully extended.
2. Get up on your toes.
3. Repeat the procedure for 10 yards alternating right and left.
WALKING KNEE UPS (Ham) Figure 1
WALKING HEEL UPS (Quad) Figure 2 1. Maintain good forward lean.
2. Keep knees pointed down towards the ground.
3. Heels should come in contact with the hips.
4. Get up on your toes and extend.
5. Repeat the procedure for 10 yards alternating right and left.

Confidential Property of the University of Nebraska
1. Step laterally as far as possible and lower hips. 2. Keep toes pointed forward and feet flat on the
ground. 3. Repeat the procedure for 5 yards and then step
with opposite foot in opposite direction for 5 yards.
SIDE LUNGE Figure 5
1. Start in pushup position. 2. Keep knees straight and take small steps
rotating around the ankle joint toward the hands.
3. Walk forward as far as possible. 4. Go up on fingertips. 5. Do for five yards.
INCH WORM Figures 6-7
Figure 6: Inch Worm Start
Figure 5: Side Lunge
Figure 7: Inch Worm Finish
BACKWARD LUNGE Figure 4
1. Step back with left leg. 2. Twist to the right as you lower your hips. 3. Repeat the procedure for 10 yards alternating
right and left.
Page 3
Figure 4: Backward Lunge

Confidential Property of the University of Nebraska
Page 4
SINGLE LEG RDL Figures 8-9 1. Balance on right foot and lean forward. 2. Return to start position while keeping balance. 3. Do not let left foot touch ground if possible. 4. Do not cross left leg behind right leg. 5. Keep left toes pointed straight down. 6. Do ten repetitions on each leg.
Figures 8-9: Single Leg RDL
LEG OVER Figure 10
1. Lay flat on back with arms straight out to the side.
2. Bring right leg over to left hand. 3. Keep right leg straight. 4. Keep shoulders flat on ground. 5. Alternate five repetitions to each side.
Figure 10: Leg Over

Confidential Property of the University of Nebraska
Page 5
Figure 11: Tripod
1. Sit on ground with knees bent about 90 degrees. 2. Position hands by the hips with fingers pointed
forward. 3. Lift hips off ground. 4. Lower the shoulders down as far as possible
and extend neck up. 5. Lift the right foot off ground and balance with the
left foot with toes pointed up. 6. Move the hips forward and back by bending at
the left knee. 7. Do for 15 to 30 seconds and repeat with right
foot down and lift the left foot off. 8. Should feel the hamstrings work. 9. Keep shoulders down by pressing hard into the
ground with hands.
TRIPOD Figure 11

Confidential Property of the University of Nebraska
Page 6
ARM SWINGS Figure 12 1. Start small circles moving hands forward. 2. Gradually increase size of circles. 3. Do for ten repetitions and repeat with backward
circle.
Figure 12: Arm Swings
CROSS IN FRONT Figures 13-14
1. Keep hands at shoulder level and cross in front. 2. Do for ten reps alternating arms coming across.
Figure 14: Cross in Front
Figure 13: Cross in Front
O O

Confidential Property of the University of Nebraska
Page 7
WING STRETCH Figures 15-16 1. Hold arms at shoulder level with
arms bent at the elbows. 2. Pull elbows back by squeezing
shoulder blades together for a two count.
3. Then straighten arms and pull back for a two count.
4. Repeat the procedure for 5 repetitions.
GOAL POSTS Figures 17-18
1. Hold arms at shoulder level with arms bent at the elbows.
2. Externally rotate arms and internally rotate forward for five repetitions.
Figures 15-16: Wing Stretch
Figures 17-18: Goal Posts
Confidential Property of the University of Nebraska
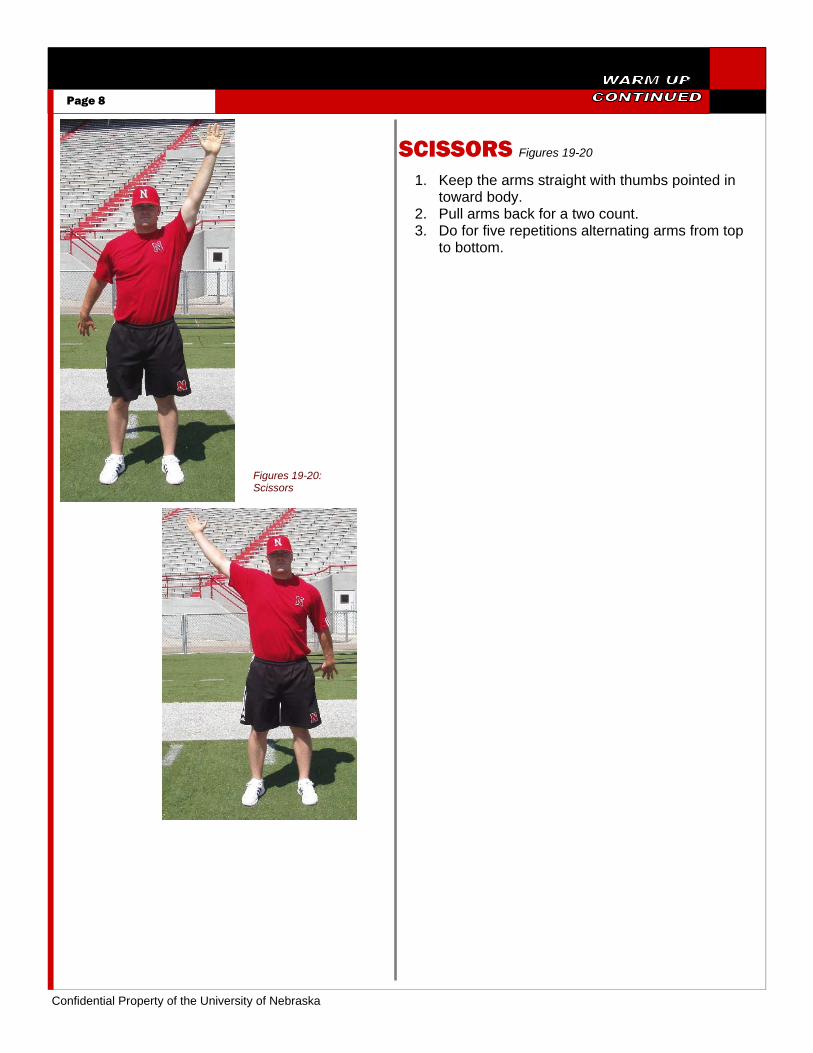
SCISSORS Figures 19-20 1. Keep the arms straight with thumbs pointed in
toward body. 2. Pull arms back for a two count. 3. Do for five repetitions alternating arms from top
to bottom.
Page 8
Figures 19-20: Scissors
Confidential Property of the University of Nebraska
Page 9
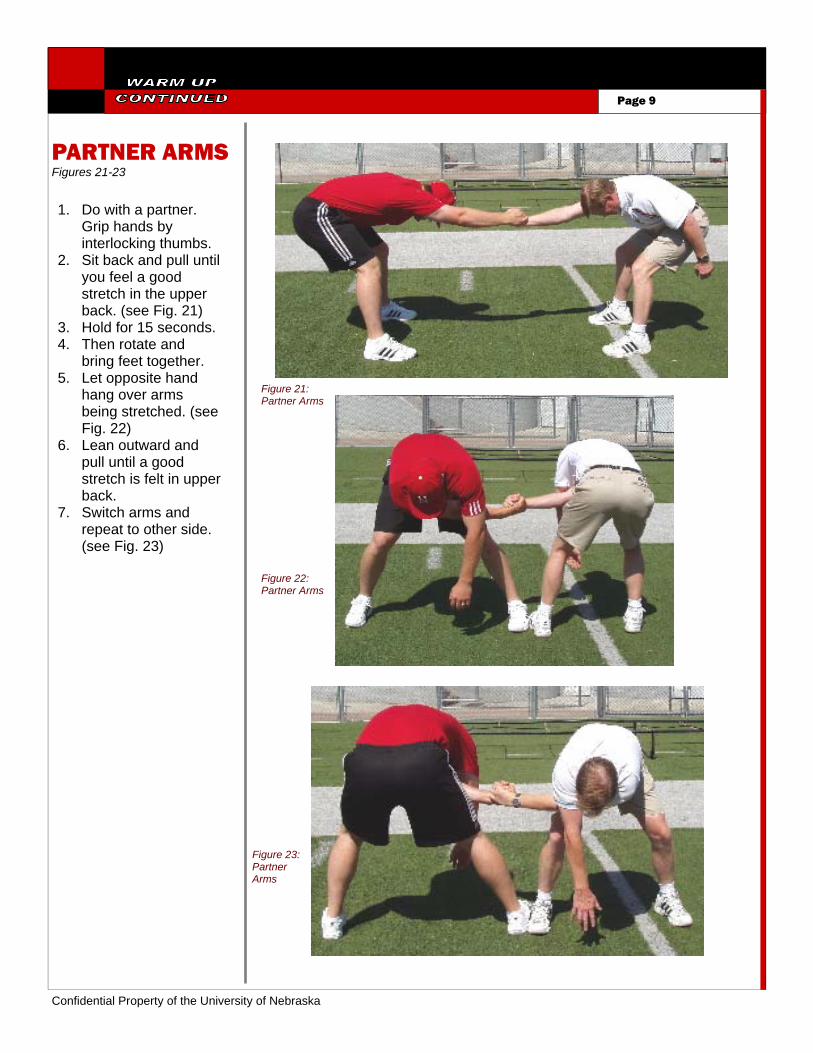
PARTNER ARMS Figures 21-23
1. Do with a partner. Grip hands by interlocking thumbs.
2. Sit back and pull until you feel a good stretch in the upper back. (see Fig. 21)
3. Hold for 15 seconds. 4. Then rotate and
bring feet together. 5. Let opposite hand
hang over arms being stretched. (see Fig. 22)
6. Lean outward and pull until a good stretch is felt in upper back.
7. Switch arms and repeat to other side. (see Fig. 23)
Figure 17: High Knees
Figure 22: Partner Arms
Figure 23: Partner Arms
Figure 21: Partner Arms

Confidential Property of the University of Nebraska
Page 10
LIFTING GUIDELINES
Every strength training program is made up of resistance exercises. Strength training exercises are also skills that utilize specific techniques. All strength training books give explanations of how to execute exercise techniques with drawings or pictures visually showing the movement patterns. Seldom are the exercise explanations read. The pictures or drawings are often times all that is necessary to teach the exercise. Techniques are usually taught by demonstrating the exercise (skill) with very little verbal explanation. The coach does it this way because the athlete receives more information in less time. Verbal explanations are usually kept to a minimum of a few cue words when demonstrating an exercise. The most used cue words should be: tighten your abs or flex your abs.
For example, when an athlete is told to do a pushup no explanation is necessary. As long as the athlete lowers the body to the ground until the chest touches the ground, then push themselves up to the starting position, not much coaching is necessary. That is, if they are tightening their abs as they do the pushups. A more technical exercise, such as the squat, a few more commands are given on how to place the bar on the shoulders, foot spacing etc., with the main goal of bending the knees and hips to lower the body and standing back up. The cues are to keep the back straight, chest up and don’t round the back. While the intentions may be good, the outcomes from using such cues are counter productive and lead to injury. Yes, the goal to developing muscular strength has been accomplished, but proper biomechanics has been sacrificed. Tighten the abs to keep the back straight.
Control of human movement patterns are gov-erned by the mechanical laws of neural, mus-cular and skeletal systems. In most cases, ex-ercise techniques are taught without considera-tion of basic biomechanics. Biomechanics is the use of mechanics to study a biological sys-tem. Many of the mechanical principles used for an operation of an automobile apply to the human body. If your car is not in alignment your tires will wear out quickly, besides getting poor gas mileage. If you don’t get the problem corrected poor alignment will lead to a host of other problems. The same with your body, if you lift with bad biomechanics it will break down.
WARMING-UP
When a muscle is cold, a sudden contraction can result in muscle damage. Therefore, before lifting, always warm up your muscles properly by performing the same lifting movements with a lighter weight. Thus, you cannot warm up properly for squats by performing bench presses. Rather, if you are squatting, warm up by performing a few sets of squatting with a resistance well below the weight you intend to use for the workout poundage.
When performing exercises involving free weights, it is best to have two spotters, espe-cially with the squat. Spotters should keep their hands under the bar without touching it and should be alert at all times. Since it takes two spotters and one to lift, it is best to work in groups of three. The spotters can also load the weights for the lifter, which greatly reduces the workout time. Moreover, when three athletes are working together the time it takes to rotate athletes and change the weights provides about the right amount of rest between each set. It is best to squat using a power rack that has safety catches.
HAVING SPOTTERS

Confidential Property of the University of Nebraska
Page 11
LIFTING THROUGH A FULL RANGE OF MOTION Execute all exercises through their full range of motion if you want to receive the full benefits of strength training. Partial movements are unwise because after a period of time partial movement reduces the joint’s range of motion making you less flexible and increasing your chances of pulling or straining a muscle. Perform each exercise exactly as described.
BREATHING PROPERLY Correct breathing helps you get the most benefit from exercises. Holding the breath stabilizes the muscles of the torso, allowing you to exert greater force on the weight. Always inhale at the starting position of the exercise. Hold your breath until the repetition is nearly complete, at which point you should forcibly exhale.
ABDOMINAL FLEXING After taking a deep breath, tighten the abdominal muscles to an extreme degree. This can be done by forcing a small amount air out of the lungs. Notice how the abs tightens when you cough. The lower torso expands outward; pressure should be felt as the abs, lower back, diaphragm, muscles of the pelvic floor, and other respiratory muscles develop tension. This is similar to what boxers do when taking a punch to the mid-section. It should feel like a basketball inside the lower torso being filled with air expanding outward in all directions. The spine will flex slightly, as when you do abdominal crunches. Do not attempt to tighten the low back by extending the spine with a slight arch. Jet pilots tighten their abs to prevent blacking out when encountering tremendous acceleration forces.
CONTROL THE RESISTANCE
When lowering the weight, during slow movement exercises, the bar should be controlled to keep the tension on the muscle groups being used. This will lengthen the muscle fibers (similar to the stretching of a rubber band). If the weight is allowed to drop so that the bar can be bounced at the bottom of the movement, no tension is built up in the muscle. When reversing the direction of the bar, you want to take advantage of this elastic energy by lifting the bar as explosively as possible. This takes advantage of the stretch-shortening cycle. When using exercise machines do not allow the resistance to bang the machine.
STABILIZATION Anything that substitutes as a stabilizer, other than the muscles of the body, limits effective stabilization. Belts and wraps are also counter productive to maximum stability development within the body because they act as stabilizers in place of the appropriate muscle groups. Belts and wraps limit the synergetic muscles ability to regulate and coordinate the movement pattern of the resistance. If the muscles surrounding the joints don’t play the role as stabilizers and synergist, the joint structure becomes the weak link. Then you aren’t effectively preventing potential joint injuries. Therefore, never use belts and wraps, unless absolutely necessary, because of a current injury or to prevent injury when going for a maximum attempt on a lift.
Confidential Property of the University of Nebraska
Page 12
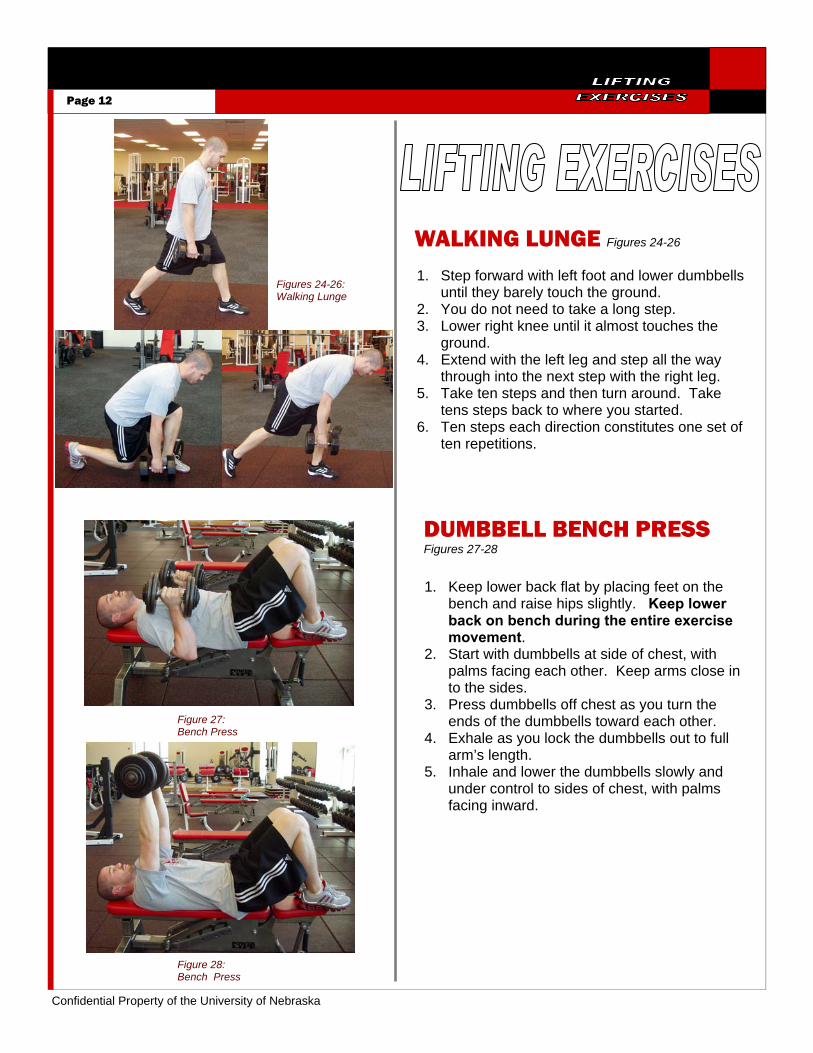
DUMBBELL BENCH PRESS Figures 27-28
1. Step forward with left foot and lower dumbbells until they barely touch the ground.
2. You do not need to take a long step. 3. Lower right knee until it almost touches the
ground. 4. Extend with the left leg and step all the way
through into the next step with the right leg. 5. Take ten steps and then turn around. Take
tens steps back to where you started. 6. Ten steps each direction constitutes one set of
ten repetitions.
Figures 24-26: Walking Lunge
Figure 27: Bench Press
Figure 28: Bench Press
WALKING LUNGE Figures 24-26
1. Keep lower back flat by placing feet on the bench and raise hips slightly. Keep lower back on bench during the entire exercise movement.
2. Start with dumbbells at side of chest, with palms facing each other. Keep arms close in to the sides.
3. Press dumbbells off chest as you turn the ends of the dumbbells toward each other.
4. Exhale as you lock the dumbbells out to full arm’s length.
5. Inhale and lower the dumbbells slowly and under control to sides of chest, with palms facing inward.
Confidential Property of the University of Nebraska
Page 13
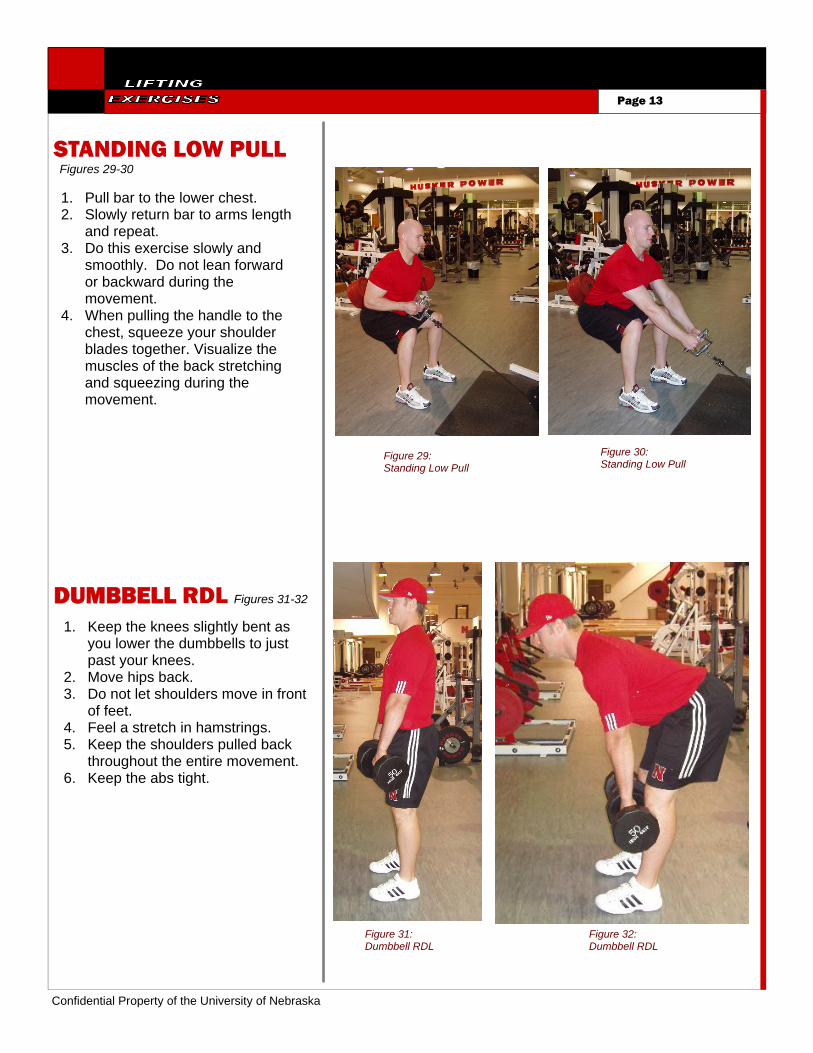
DUMBBELL RDL Figures 31-32 1. Keep the knees slightly bent as
you lower the dumbbells to just past your knees.
2. Move hips back. 3. Do not let shoulders move in front
of feet. 4. Feel a stretch in hamstrings. 5. Keep the shoulders pulled back
throughout the entire movement. 6. Keep the abs tight.
STANDING LOW PULL Figures 29-30 1. Pull bar to the lower chest. 2. Slowly return bar to arms length
and repeat. 3. Do this exercise slowly and
smoothly. Do not lean forward or backward during the movement.
4. When pulling the handle to the chest, squeeze your shoulder blades together. Visualize the muscles of the back stretching and squeezing during the movement.
Figure 29: Standing Low Pull
Figure 30: Standing Low Pull
Figure 31: Dumbbell RDL
Figure 32: Dumbbell RDL
Confidential Property of the University of Nebraska
Page 14
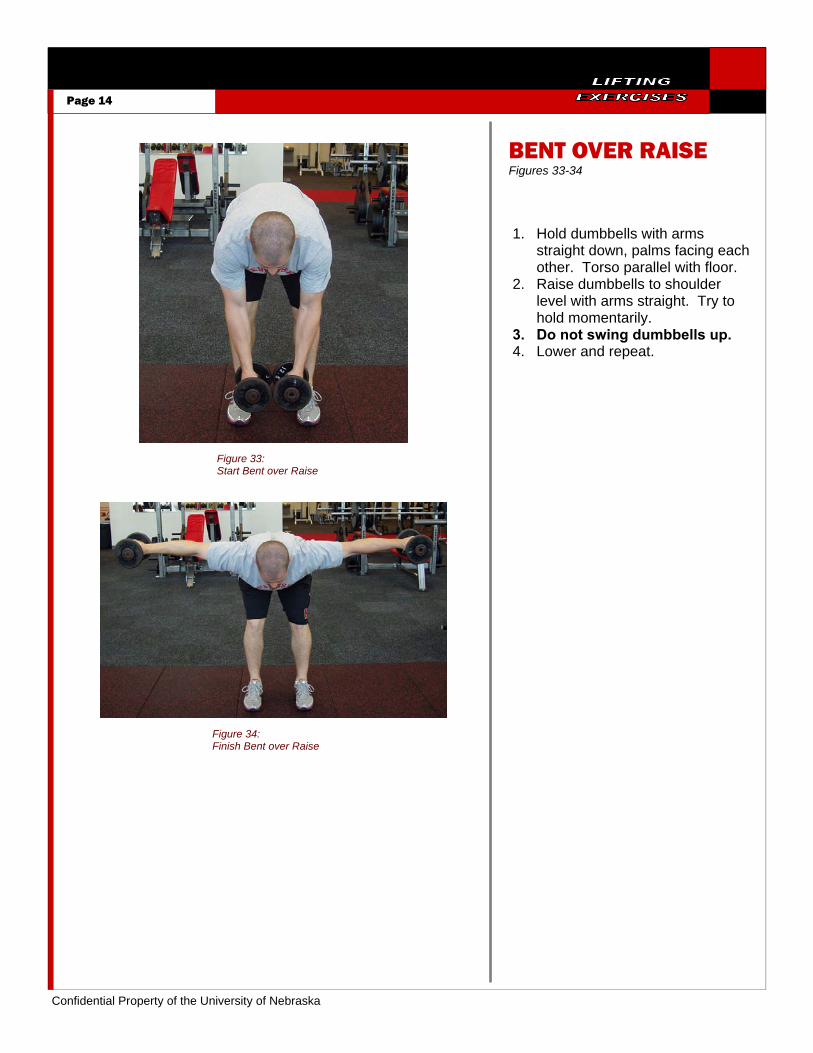
BENT OVER RAISE Figures 33-34
1. Hold dumbbells with arms straight down, palms facing each other. Torso parallel with floor.
2. Raise dumbbells to shoulder level with arms straight. Try to hold momentarily.
3. Do not swing dumbbells up. 4. Lower and repeat.
Figure 33: Start Bent over Raise
Figure 34: Finish Bent over Raise

Confidential Property of the University of Nebraska
Page 15
BARBELL ROW Figures 35-36
1. Place barbell on floor in front of you.
2. Keep feet hip width apart. 3. Use overhand grip about
shoulder width apart. 4. Unlock the knees, torso parallel
with floor. 5. Pull barbell to lower part of
chest. Feel the shoulder blades pulling together.
6. Lower and repeat. Do not jerk barbell up, do slowly and under control.
Figure 35: Barbell Row Start
Figure 36: Barbell Row Finish
Figure 37: Leg Curl
Figure 38: Leg Curl
LEG CURL Figures 37-38
1. Keep abs tight, do not let back arch.
2. Pull pads up to hips and lower slowly.

Confidential Property of the University of Nebraska
Page 17 Page 16
Figure 39: Tricep Pushdown
Figure 40: Tricep Pushdown
Figure 41: Dumbbell Hammer Curl
Figure 42: Dumbbell Hammer Curl
TRICEP PUSH DOWN Figures 39-40
1. Keep abs tight. 2. Do not let the shoulders come
up, keep down. 3. Keep elbows at side. 4. Let hands come up until the arms
are parallel with ground and extend downward.
DUMBBELL HAMMER CURL Figures 41-42
1. Keep abs tight. 2. Do not let the shoulders come
up, keep down. 3. Keep elbows at side. 4. Keep thumbs pointed up.

Confidential Property of the University of Nebraska
Page 17
Figure 45: Static Abs Top Backward
Figure 44: Static Abs Front
Figure 43: Static Abs Top Forward
STATIC ABS Figures 43-45 1. Place right elbow on ground with
left hand behind the head and left elbow pointed up. (see Fig. 43)
2. Place top leg forward and raise the hips as high as possible.
3. Hold for 15 to 30 seconds. 4. Then place both elbows on
ground. (see Fig. 44) 5. Keep abs tight and hips up. 6. Hold for 30 to 60 seconds. 7. Place right elbow on ground with
left hand behind the head and left elbow pointed up. (see Fig. 45)
8. Place top leg back and raise the hips as high as possible.
9. Hold for 15 to 30 seconds. 10. Repeat sequence with left elbow
on ground.

Confidential Property of the University of Nebraska
Page 18
1R
M
10
10
10
10
10
10
45
30
30
35
220
145
155
165
50
30
35
35
225
145
155
170
55
35
40
40
230
150
160
170
60
40
40
45
235
150
165
175
65
40
45
50
240
155
170
180
70
45
50
50
245
160
170
185
75
50
50
55
250
160
175
185
80
50
55
60
255
165
180
190
85
55
60
65
260
170
180
195
90
60
65
65
265
170
185
200
95
60
65
70
270
175
190
200
100
65
70
75
275
180
190
205
105
70
75
80
280
180
195
210
110
70
75
80
285
185
200
215
115
75
80
85
290
190
205
215
120
80
85
90
295
190
205
220
125
80
85
95
300
195
210
225
130
85
90
95
305
200
215
230
135
85
95
100
310
200
215
230
140
90
100
105
315
205
220
235
145
95
100
110
320
210
225
240
150
95
105
110
325
210
225
245
155
100
110
115
330
215
230
245
160
105
110
120
335
215
235
250
165
105
115
125
340
220
240
255
170
110
120
125
345
225
240
260
175
115
120
130
350
225
245
260
180
115
125
135
355
230
250
265
185
120
130
140
360
235
250
270
190
125
135
140
365
235
255
275
195
125
135
145
370
240
260
275
200
130
140
150
375
245
260
280
205
135
145
155
380
245
265
285
210
135
145
155
385
250
270
290
215
140
150
160
390
255
275
290
1RM
1010
1045
3030
3550
3035
3555
3540
4060
4040
4565
4045
50
260
170
180
195
265
170
185
200
270
175
190
200
275
180
190
205
280
180
195
210
For
exam
ple,
to
use
the
poun
dage
ch
art,
on
Mon
day
whe
n yo
u do
the
Ben
ch P
ress
, it
calls
for
2
sets
x 1
0 re
ps.
Go
to
the
poun
dage
ch
art.
Fi
nd
colu
mns
on
e an
d tw
o un
der
the
3x10
co
lum
n.
Look
dow
n th
e co
lum
ns
until
yo
u fin
d th
e po
unda
ges
you
thin
k yo
u ca
n ac
com
plis
h (e
xam
ple,
17
0 &
18
0).
The
first
set
you
wou
ld
do 1
70 f
or t
en r
eps
and
on t
he s
econ
d se
t yo
u w
ould
do
180
for
10 r
eps.
O
n W
eek
2 an
d af
ter
do
3x10
. Th
is
wou
ld
give
yo
u a
pred
icte
d 1R
M
of
260
poun
ds.
Rec
ord
the
1RM
in
the
spa
ce t
o th
e rig
ht
of D
umbb
ell B
ench
Pre
ss
and
unde
r W
eek
1. I
f the
po
unda
ges
are
easy
, in
-cr
ease
you
r 1R
M th
e ne
xt
wor
kout
. If
the
poun
dag-
es w
ere
diffi
cult
and
did
not
allo
w
good
te
ch-
niqu
e,
redu
ce
the
1RM
th
e ne
xt w
orko
ut.
An
ar-
row
can
be
put
in t
hat
sam
e co
lum
n ne
xt t
o th
e
poun
dage
to
in
dica
te
whe
ther
to
in
crea
se
or
decr
ease
th
e 1R
M
the
next
wor
kout
.
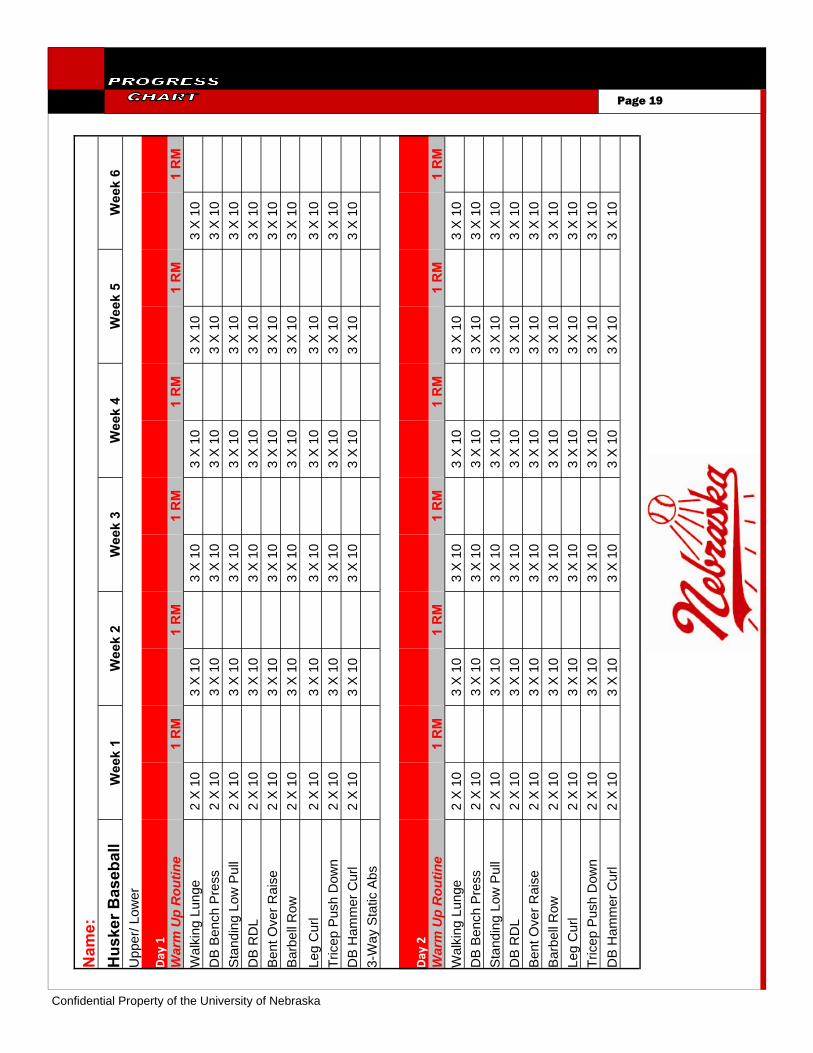
Nam
e:
Husker B
aseb
all
Week 1
Upp
er/ L
ower
Day 1
War
m U
p R
outin
e
1 R
M
Wal
king
Lun
ge
2 X
10
DB
Ben
ch P
ress
2
X 1
0
260↑
Sta
ndin
g Lo
w P
ull
2 X
10
DB
RD
L 2
X 1
0 B
ent O
ver R
aise
2
X 1
0 B
arbe
ll R
ow
2 X
10
Leg
Cur
l 2
X 1
0 Tr
icep
Pus
h D
own
2 X
10
DB
Ham
mer
Cur
l 2
X 1
0 3-
Way
Sta
tic A
bs
Confidential Property of the University of Nebraska
Page 19
N
ame:
Hus
ker B
aseb
all
Wee
k 1
Wee
k 2
Wee
k 3
Wee
k 4
Wee
k 5
Wee
k 6
Upp
er/ L
ower
Day 1
War
m U
p R
outin
e
1 R
M
1
RM
1 R
M
1
RM
1 R
M
1
RM
W
alki
ng L
unge
2
X 1
0
3 X
10
3
X 1
0
3 X
10
3
X 1
0
3 X
10
D
B B
ench
Pre
ss
2 X
10
3
X 1
0
3 X
10
3
X 1
0
3 X
10
3
X 1
0
Sta
ndin
g Lo
w P
ull
2 X
10
3
X 1
0
3 X
10
3
X 1
0
3 X
10
3
X 1
0
DB
RD
L 2
X 1
0
3 X
10
3
X 1
0
3 X
10
3
X 1
0
3 X
10
B
ent O
ver R
aise
2
X 1
0
3 X
10
3
X 1
0
3 X
10
3
X 1
0
3 X
10
B
arbe
ll R
ow
2 X
10
3
X 1
0
3 X
10
3
X 1
0
3 X
10
3
X 1
0
Leg
Cur
l 2
X 1
0
3 X
10
3
X 1
0
3 X
10
3
X 1
0
3 X
10
Tr
icep
Pus
h D
own
2 X
10
3
X 1
0
3 X
10
3
X 1
0
3 X
10
3
X 1
0
DB
Ham
mer
Cur
l 2
X 1
0
3 X
10
3
X 1
0
3 X
10
3
X 1
0
3 X
10
3-
Way
Sta
tic A
bs
Day 2
War
m U
p R
outin
e
1 R
M
1
RM
1 R
M
1
RM
1 R
M
1
RM
W
alki
ng L
unge
2
X 1
0
3 X
10
3
X 1
0
3 X
10
3
X 1
0
3 X
10
D
B B
ench
Pre
ss
2 X
10
3
X 1
0
3 X
10
3
X 1
0
3 X
10
3
X 1
0
Sta
ndin
g Lo
w P
ull
2 X
10
3
X 1
0
3 X
10
3
X 1
0
3 X
10
3
X 1
0
DB
RD
L 2
X 1
0
3 X
10
3
X 1
0
3 X
10
3
X 1
0
3 X
10
B
ent O
ver R
aise
2
X 1
0
3 X
10
3
X 1
0
3 X
10
3
X 1
0
3 X
10
B
arbe
ll R
ow
2 X
10
3
X 1
0
3 X
10
3
X 1
0
3 X
10
3
X 1
0
Leg
Cur
l 2
X 1
0
3 X
10
3
X 1
0
3 X
10
3
X 1
0
3 X
10
Tr
icep
Pus
h D
own
2 X
10
3
X 1
0
3 X
10
3
X 1
0
3 X
10
3
X 1
0
DB
Ham
mer
Cur
l 2
X 1
0
3 X
10
3
X 1
0
3 X
10
3
X 1
0
3 X
10

Confidential Property of the University of Nebraska
Page 21
Page 21
All new incoming student athletes must take the beep test before participating in any condi-tioning or practice session. The objective is to determine any unknown heart problems that would prevent a new student athlete from participating in any conditioning program and/or sport practice. Each athlete must attain a minimum VO2 level, based on their bodyweight.
The beep test consists of running a twenty meter (21.5 yards) shuttle down and back. It is progressive in nature, where it starts off at a slow pace and each minute gets a little faster. The first minute seven intervals are run (140 meters). During the ninth minute eleven inter-vals are run (220 meters). A CD player is used and beeps to pace you for each twenty me-ter interval.
I suggest running the twenty yard shuttle run (twenty yards down and back). This will get you used to making the turns. Run this for 10 minutes at a time keeping track of how many 20 yard intervals you can run. Do this twice a week. Running 80 to 100 twenty yard inter-vals in ten minutes is a good goal that is if you can keep count. Always start off slow and try to gradually pick up the pace over the 10 minute time span. Always touch one line with the right foot and the other line with the left foot. This is so you don’t run in a circle by pushing off the same leg each time you turn.
Page 20
Confidential Property of the University of Nebraska