1997 - #2 (summer) diy marine maintenance · installing genoa tracks q:i removed the self-tending...
TRANSCRIPT
forheads
Fear and Loathing in the Vanity
boat
owne
r
DIY1997 - #2 (SUMMER)
Talkback Installing genoa tracks; Low-down on bottom removal; Aftermarket parts, freeing windows; Restoring metal-flake; Building with PT wood; Oil ratings; Engine Diagnostics; Windlass info wanted; Calling all American Marine owners.
Tech Tips Original tips and tricks
MARINEMAINTENANCEM A G A Z I N E
the
Departments
It’s possible to solve most marine sanitationproblems with repairs and upgrades. Here’show.
Shop TalkHolding Things Together: Follow these guidelines to pick the best adhesive for joining wood.
By Wayne Redditt
Powerboat RiggingGood Vibrations: Synchronize your twins and eliminate engine vibration and save fuel with a Glendinning Automatic Synchronizer.
Engine TroubleshootingPreventing Outboard Theft: an outboard lock will deter thieves, but it takes boron to stop them.
DIY ProjectsMake a wood-epoxy holding tank; Add a speaker and switch for three-way VHF reception; Stay put with this custom captain’s chair.
Sailboat RiggingRunning Rigging: A quick and easy toggle-and-cinch fastener for attaching jib sheets.
Features
Columns
Knotty Know-HowUse the buntline hitch to attach braided lines to a bail, becket, post or a rope eye. It’s nearly as strong as an eye splice.
ElectronicsReducing Your Electrical Demand: Tips to conserve battery power without sacrificing comfort or safety.
By Kevin Jeffery
Good BoatkeepingQuick patch for hose; Purge head odors at the source; In-a-pinch hose clamps; Boarding ramp for dogs.
By David & Zora Aiken

Installing Genoa TracksQ: I removed the self-tending staysail boom and want toinstall two tracks to accommodate the staysail. What isthe angle the track has to make with the inner forestay? Michael A. Laaper, Tamawind, Merritt Island, Fla.
A: When placing genoa tracks, the controlling factoris the shrouds, not the forestay, as you cannot sheet thesail farther inboard than the shrouds. Assuming yourboat has a modern rig with the uppers fastened toinboard chainplates (not mounted on the topsides),position the tracks parallel to the centerline, straightback from the upper shrouds. — JM
Low-down on Bottom RemovalQ: I have a 6m (20’) Bayliner Capri. I need to removeseveral coats of antifouling paint without damagingthe gelcoat. How should I do it? Claude Ladouceur, Coqu, Brome Lake, Granby, Que.
A: Removing antifouling paint is a task most of usloathe. You do this by either grinding, scraping, apply-ing a specially-formulated bottom paint stripper or blast-ing. The former three are the most arduous and hardestphysically; the latter the most expensive. We don’t rec-ommend using chemical paint strippers, which maydamage gelcoat or the polyester resin in the laminate.
Start with a clean hull, removing all surface growthsuch as algae, barnacles and sea grass. An acid-basedcleaner (see our review on page 30) quickly dissolvesany growth and grime. To grind off bottom paint use a24- to 36-grit abrasive. This should remove about 70%of the bottom paint. Use a finer grit (60 to 100) toremove the remaining paint. Make sure you wear pro-tective clothing, gloves and use a respirator. Grinding ismessy, so some boaters opt to scrape the paint with ablade scraper. It works best if the blade is slightly dull,so file the supplied blade to a more obtuse angle.Repeat as required to maintain a good edge. Oncemost of the paint is removed, sand the hull with 60- to100-grit paper. It’s a painstakingly slow process — alesson in endurance and patience.
Another option is to use Peel-Away, a non-methyl-ene-chloride stripper that removes multiple bottom paintcoatings. It’s available in two formulations: Peel-AwayMarine Safety Strip for most applications, and Peel-Away II for boats coated with an epoxy primer or barri-er coat. Applying Peel-Away is similar to wallpapering.
A non-sagging paste with the consistency of mayon-naise coats the bottom paint and then is covered withstrips of plastic-coated paper. The paper seals the pasteand prevents evaporation. Peel-Away’s only drawbackis the time it requires — it takes 24 to 48 hours beforeyou can remove the paper and scrape the surface,depending on the thickness of paint and outside tem-perature. Optimum working temperature is 15.5°C(60°F); below 7°C (45°F), the product becomes dor-mant. Peel-Away is more expensive than sandpaper,the effort required is a lot less strenuous. The cost tostrip a 7.5m (25’) boat using the standard Peel-Awayproduct averages $250. It covers 40 to 50 square feetper 3.785L (1gal).
Sandblasting with sand, baking soda or othermediums will remove the paint but must be done by aqualified operator. In unskilled hands, sandblasting canembed particles in the laminate and leave a bumpy fin-ish that may have to be recoated with an epoxy. TheArmex Accustrip System, which uses a baking soda-based abrasive, is a more passive process and doesless damage to the gelcoat. — JM
Aftermarket Parts, Freeing WindowsQ: I have an ‘83 Mirage 33 sailboat equipped with aVolvo Penta 2003 diesel engine. Could you tell me ifaftermarket manufacturers offer equivalent fuel and oilfilter replacements for Volvo parts. The Volvo part num-ber for the fuel filter is 829913-5; the oil filter is834337-8.
On a different subject, in your issue that coveredretrofitting windows (SPRING ‘96), I tried to follow thesuggestions for removing a window frame. After remov-ing the screws from the aluminum frame I couldn’tbreak it loose from the fiberglass. It appears that asealant/adhesive was used. Is there an easy way tobreak the aluminum frame free? I made no attempt topry the frame loose as it bends very easily and I didn’twant to destroy the window.Hugh Baxter, West Vancouver, B.C.
A: To answer your question on aftermarket parts, origi-nal equipment manufacturers (OEMs) generally don’tencourage the use of aftermarket parts. With someparts you can save money, but occasionally, you actual-ly pay less for original equipment. It’s best to compari-
TALKBACK

son-shop first. According to a local supplier, your filter isactually made by Bosch — it’s the same part number ason the canister. As for the oil filter, AC Delco part num-ber PF952 should fit, but be careful. We’re told that thispart fits a wide range of models and on some installa-tions it may interfere with the belt which will put a holein the side of the oil filter.
Window frames are often difficult to remove,depending on the type of sealant used. Use a sharp util-ity knife inserted between the frame and the fiberglassand carefully cut the sealant. Go slowly. It’s a painstak-ing process but it’s the only solution. Don’t pry with ascrewdriver or you risk puncturing the fiberglass ordamaging the frame. — JM
Restoring MetalflakeQ: I was particularly interested in your article onrestoring gelcoat with acrylics (SPRING ‘96 issue). Ihave a 15-year-old Baja with a metalflake finish that issun faded; normal waxing doesn’t bring out a shine. Amarina wet-sanded a test patch and it looks good, butthe cost is US$1,300 and it won’t guarantee theresults. I would like to try Vertglas (an acrylic gelcoatrestorer). How do I know how much wet-sanding to dobefore applying and what paper grits do I use? Is thisa good product for metalflake? I have never attemptedthis before and want very much to make my boat shineagain. Doug Kershner, Journey, Allentown, Pa.
A: Metalflake is tricky stuff when compounding orsanding, so I’d definitely recommend a clear finish tobring up the gelcoat. Sanding is not necessary whenapplying Vertglas, which offers a three-step system: youfirst apply the Oxidation Remover to remove all chalk-ing, followed by a thorough cleaning with the BoatWash and then apply the Color Restorer/Sealer.Acrylics are not difficult to apply, but their fast dryingtimes leave little room for error. Read the instructionscarefully and don’t overwork the product or you’ll havea streaky, hazy finish. You’ll want to apply at least sixcoats to ensure sufficient UV-protection. Plan on an after-noon to do the entire job. Acrylic finishes are not a per-manent fix. You must recoat annually, applying one ormore coats as desired — the more coats, the higher thegloss. Neglect an acrylic coating and it turns cloudy,peels and must be completely stripped. Damaged areasare easily touched up using the same application tech-niques. — JM
Building With PT WoodQ: I’m wondering if you have any information onusing pressure-treated wood to upgrade a transom ina fiberglass boat. I’m fitting my boat with a
Need help with a problem? Unableto find information on products ordo-it-yourself projects?
DIY TALKBACK is a special reader servicethat makes available to you the resourcesof marine industry experts on topics suchas boat repair, engines, trailers, electricity,plumbing, electronics, sails, maintenanceand more.
Cost is FREE to DIY subscribers.
Send your questions to:TALKBACK via mail, or E-mail. Includeyour name, subscriber ID number (if known),boat name and home port in all correspon-dence. MAIL:P.O. Box 22473Alexandria, VA 22304 E-MAIL: [email protected]
TECHN
ICAL H
ELPLIN
E

MerCruiser drive that requires aheavier transom so I figured Iwould put in two 19mm (3/4”)layers of pressure-treated plywood.Is this a good idea?Randy A. Perry, Dances WithWaves, Kentville, N.S.
A: The use of pressure-treated ply-wood and lumber in boat construc-tion has received a lot of press late-ly. Plywood transoms in fiberglassboats are normally set in a puttysealant to seal any voids, thenencapsulated on both sides in glassand resin. The main concern forusing pressure-treated or any exteri-or-grade plywood are the voids thatare present in the wood. Thesevoids must be filled around thestern-drive cut-out, and the openingmust be well-sealed with epoxy onthe end grain as well as all edgesto prevent water migrating alongthe ply laminates. Pressure-treatedplywood is not inherently strongerthan other plywoods and probablywon’t last any longer if water infil-trates the laminates. — WR
Oil RatingsQ: I just purchased a ‘87MerCruiser 470 (3.7L 165hp) with200 hours and am in the processof spring recommissioning. Myconcern is this: MerCruiser’s manu-al states that I should use 40W SFoil or 20W40 as a substitute, oras a second but less-preferablechoice, 20W50. I am consideringusing Mobil 1 20W50 syntheticoil. What is your opinion on theuse of synthetics in these engines?Gary Wortz, Terri L, New Castle,Del.
A: According to Larry Watson,consumer affairs manager for
Mercury Marine, your owner’smanual was written 10 years agoand for many years MerCruiser rec-ommended single-grade 30W or40W SF-rated oil. Today, the rec-ommended oil for use in allMerCruisers is Quicksilver 25W40CD or CF certified multigrade oil(Quicksilver part number 92-832112A12). The use of otherbrands with the same certified vis-cosity and service ratings are prob-ably satisfactory. Synthetic oils areexcellent products and well-accept-ed in automotive use with noadverse effects, however, they havenot been qualified by MerCruiserfor use at this time.
Engine DiagnosticsQ: We purchased a ‘77 Ontario32 sailboat last summer that has aYanmar 2QM20 diesel inboard.The engine runs perfectly but tendsto vibrate a lot when runningbetween idle (1,000 rpm) and thenormal cruising speed of 6 knots.There is also a strange thumpingnoise when running at this speed.The cutlass bearing seems wornand will be replaced this spring,the engine has a flexible prop-shaftcoupling and I doubt the enginehas been aligned for some time.Are these symptoms normal for thistype of engine? Dan Duchesne, Coorie Doon,Ottawa, Ont.
A: From Dan Fong Of Total Power,Mississauga, Ont., comes this reply:All engines vibrate more at idlespeed, which on your engine ideal-ly is around 800 rpm, then shouldsmooth out at 1,000 rpm. Checkthe engine alignment. Even a slightvariation will increase vibration. Ata cruising speed of 6 knots, theengine should not make any unusu-al thumping as you described. Youneed to determine where the thump-ing is coming from. A worn cutlassbearing can cause such noise andshould be replaced. You should
also check the engine mounts andflexible coupling. Also, take a mea-surement of your propeller tip clear-ance, which should be 15% of yourpropeller diameter. Recheck theengine alignment two weeks afterlaunching. If the noise persists, youshould have the engine serviced bya reputable marine mechanic.
Windlass Info WantedPeter Lazenby of Duncan, B.C. islooking for operation and mainte-nance information for his ‘79-vin-tage Monica Marine windlassmodel 1500. Send written replies to6145 Genoa Bay Rd., RR 1,Duncan, BC V9L 1M3 or fax to(250) 746-6775.
Calling All AmericanMarine OwnersDanny Covington sails a ‘74 7.5m(25’) step-down fixed-keel sailboatbuilt by American Marine Industriesin Charleston, S.C. He and severalother owners are interested in locat-ing original owners’ manuals. Sende-mail replies to him [email protected].
TALKBACK

STAINLESS OR NOT If the plat-ing on a so-called stainless-steel fit-ting should peel, the fitting is zincand should be replaced with oneof bronze or stainless steel.
LUBE JOB Keep your head’s rub-ber valves, seals and piston o-ringsflexible by pouring a half-ounce ofmineral or baby oil dissolved in ahalf a toilet bowl of warm water.Close the manual lever to flushand pump the bowl just until themixture disappears. Let stand foran hour or more.
STAY FRESH Fruits and vegeta-bles stay fresh longer in Evert-Freshreusable storage bags, whichabsorb and remove the ethylenegas released by the produce. Bagsare sold in packages of 10, inmedium and large sizes, and areavailable from health food stores,chandleries, West Marine (US$6for large) and Boat/U.S.
TENSION BLOCK Should youstrip the bolt in your alternator ten-sioning arm and the belt is tooloose to produce any charging orproperly drive the engine’s coolingwater pump, wedge a wooden orother non-conductive block (orblocks) between the alternatorbody and a nearby non-movingpart of the engine block. Run slow-ly back to port for repairs.Phil Friedman, Port Royal Marine,Pompano Beach, FL
GALLEY DISINFECTANTAccording to a study conducted bythe Hospitality Institute ofTechnology and Management inSt. Paul, Minn., the most effectiveway to wash and remove poten-tially harmful bacteria on cutting
TECH TIPSboards and galley countertops isto mix a solution of one part 5%white vinegar with four parts waterapplied from a squirt bottle.
CABLE CORROSION Rustappearing through the plastic cov-ering of a lifeline cable indicatescrevice corrosion and the safestcourse is to replace the cable.
QUICK PATCH To patch pinholesin an inflatable dinghy or fender,first partially deflate it to relievethe pressure, then apply a poly-urethane sealant, such as 3M520O. Use a toothpick to force thesealant into the hole and let it cure(up to seven days depending onthe sealant used) before reinflat-ing.
HOW MUCH DOES IT HOLD?To determine the capacity in U.S.gallons of a tank, a close estimatecan be made by measuring thetank and dividing the volume ofthe tank in cubic inches by 231.Multiply the result by 3.785 toobtain litres.
SAW GUARD When storinghandsaws, knives or other sharpobjects, protect the blade with apiece of old, small diameter hoseslit down the middle.
SPIKE ALERT To avoid voltagespikes that can damage sensitiveelectronic equipment, turn on elec-tronics after you start the engineand switch them off before turningoff the engine.
SPLASH PROOF To preventsplashing when emptying screw-ontype metal canisters or plastic jugscontaining liguids, hold the con-
tainer with the spout facing up (onthe top) so air gets in above theliquid level.
MAGNET TEST When trying todetermine if fittings are platedsteel, bronze, brass or stainlesssteel, check them with a magnet.Any attraction means the fitting isprobably plated steel.
SEAL IT WITH PLASTICDischarge and, sometimes, intakehead hoses can be a major sourceof offensive odors. Tightly wrap-ping the hose with kitchen plasticwrap will seal smells in the hoseuntil you are able to replace it.
RIGHT OF ENTRY To gain easyaccess to fasteners mounted underthe cabin headliner without remov-ing it, cut a hole in the liner underthe fasteners and install plasticinspection ports.
SHADES OF REMNANTS Whenapplying adhesives and sealants,clean up with a rag that is of acontrasting color. You’ll be able tosee the residue on the rag and canavoid wiping it back onto your fin-ished work or your hands, cloth-ing, hair, etc.
Tech Tips welcomes contributionsfrom readers. If you have a boat-tested tip you’d like to share, sendcomplete information along withyour name, boat name and homeport to: DIY Tech Tips,
P.O. Box 22473, Alexandria, VA,22304 or E-mail to

HOLDING THINGSTOGETHER Joining two pieces ofwood requires anadhesive of somenature. Follow theseguidelines to pick thebest one for the job.
By Wayne Redditt
Since the beginning of time, boatbuilders have been applying vari-ous formulations of gooey stuff inan attempt to keep the sea out ofthe boat.
Nowadays, this “stuff” is gener-ally referred to as an adhesive-sealant. In the real world of boatrepair, the distinction is moot. Inorder for a sealant to function wellit should have good adhesive prop-erties. The real difference is thatsealants are elastic when comparedto pure adhesives. This flexibilityallows for more versatility than youcould expect of a straight glue.
Knowing which of the multitudeof products to use for the task athand involves determining howmuch flexibility is required. Someproducts cure harder than othersand have less elasticity. Some hard-en with age until they become brit-tle and fail. Silicones, for example,are so elastic they can contribute lit-tle if anything to the structural rigidi-ty of the boat, while polyurethaneswill stiffen the structure.
The number of sealants avail-able in home renovation stores farexceed those available at marinestores — and prices are significant-ly cheaper. But this doesn’t meanthat specialty marine adhesives andsealants are merely repackagedhouse renovation products.
The added cost of marine adhe-
sives is well justified. Hardwarestore products that are designed forthe housing industry, don’t have theperformance-enhancing compo-nents in their chemistry that themarine environment requires.
Choosing the right material forthe job may be more difficult thanactually doing the job. Most marinestores stock at least three types ofpolysulfide, polyurethane and sili-cone products, including oil-basedproducts traditionally used for hullseams.
Polyurethanes (3M 5200,Sikaflex 241 and others) are mostcommonly used for adhesive-sealantapplications. These can be appliedwith complete confidence for useunder water and, being ever soslightly elastic, they allow somewood movement. 3M Marinewarns that the 5200 must be usedwithin 24 hours of breaking theseal, so make sure you haveenough jobs to warrant opening acartridge. You’ll also need Scotch-Grip #4 for clean up; nothing elsewill remove the stuff. When han-dling polyurethanes wear protectivegloves. Don’t use your bare fingerto spread adhesives onto wood sur-faces. To smooth adhesives or makean attractive fillet, here’s a goodtrick: Dip your gloved finger inwater before running it along abead of polyurethane. The waterprevents the adhesive from stickingto your glove and allows you to cre-ate a concave edge.
Polyurethane bonds are moreor less permanent; it requires greatpatience to remove a plank that isfastened to its neighbor withpolyurethane. The strategy for suc-cess involves cutting the seam witha sharp, thin blade. If the plank canbe sacrificed, set your circular saw
to the depth of the plank thicknessand saw through the seam. Be sureto stay on the replacement plank assaw cuts in the adjacent goodplank will require further repairs.Sawing into frames is poor formtoo, so double-check the depth set-ting before cutting.
When I was making mahoganylaunches as part of a professionalboatbuilding team, we used epoxyfor everything. Using epoxy forbedding is not so strange when youconsider the permanence ofpolyurethane adhesive-sealants. It’sactually easier to remove a piece ofhardware bedded in epoxy than toremove one bedded inpolyurethane. There are two meth-ods to remove hardware set inepoxy. One is to strike it sharplywith a dead-blow hammer, in afashion that will cause shear failure.There is a certain risk in this, as thewood below may fail first. The sec-ond is to heat the part gently untilthe epoxy softens. This happens ata surprisingly low temperature, usu-ally just a little too hot to touch com-fortably.
Neither of these techniques willwork with polyurethane. I havebeen told that using a guitar string(high E) stretched taut and heatedvia a model train transformer, willcut through it. I would like to hearfrom someone else who has triedthis approach.When not messing about in his workshop,Wayne Redditt shares his expertise in boat-building, repair and restoration with thesenior students of Georgian College’sMarine Technology-Recreation course.Subsequent columns will discuss construc-tion methods, restoration techniques, mod-ern repair materials and other topics forbuilders and tinkerers of boats. Inquiriesdirected towards this column are welcome.Send your comments or questions via mail,fax or e-mail, attention ShopTalk.

forheads
By Nick Bailey
In the last issue (1997-#1) we cov-ered all plumbing systems otherthan the head, otherwise known asthe marine toilet or as commonlyreferred to as a marine sanitationdevice (MSD).
Of all of the onboard plumbingsystems, the head has a redundantreputation as a real troublemaker.This notoriety is exaggerated,although not entirely undeserved.MSDs are seldom well-maintainedand even less well-understood.Beware, neglect will lead to nastysurprises. If you thought the devicewas a bit disgusting even when itwas working well, then just waituntil it screws up!
HEADS: The FrontEnd of the SanitationSystemThere are basically four kinds ofmarine toilets, classified by how thesewage is moved: manual pump,electric pump, vacuum and gravity.
The manual-pump toilet is the
most common type. Well-knownexamples are made by Blake,Groco, PAR (made by Jabsco),Raritan and Wilcox Crittendon.Flush water is pumped in at thesame time the sewage is pumpedout, usually by a double-actingmanual pump. The down stroke ofthe pump handle forces a pistondown, pushing sewage out of thepump chamber through a one-wayvalve to the holding tank (or over-board to a thru-hull) while at thesame time drawing in seawater forflushing from a thru-hull into theupper half of the pump chamber.
On the upstroke, the one-wayinlet valve is pushed closed and theflush water is forced out along thetoilet’s rim. As the piston rises,sewage and used flush water aredrawn into the pump chamberready for the down stroke thatagain forces everything out the dis-charge hose. The head inlet valveusually has a small manual controllabeled “Flush or Dry Bowl” so thatyou can control the amount of flushwater — a bare minimum if youwant to preserve your holding tank
capacity, or lots of flush water ifyou want to purge the dischargehoses before leaving the boat at theend of the weekend. Regardless,the pumping and flushing proce-dure should end with the valveclosed to leave a relatively drybowl.
These traditional heads rangewidely in price from about $200 tomore than $1,000 and vary incomplexity. Most have a multitudeof seals, gaskets, O-rings and valvesurfaces that can foul, stick, clog,jam, wear out and otherwise causeaggravation. Most heads havecomplete rebuild kits available. Theability to field-strip, clean andrebuild a head is considered anessential life skill for any seriouslong-distance cruiser.
A unique alternative to the con-ventional manual head is the LaVachead by Blake. This remarkablysimple head does away with thecomplicated pump assembly at thehead itself and uses a pump similarto a diaphragm bilge pump butinstalled on the discharge hosefrom the head. The most unusualfeature is the toilet bowl lid thatforms an airtight seal on the bowlitself. When the bowl contents arepumped out, the suction draws sea-water for flushing into the head viathe usual inlet seacock and hosestraight to the rim of the bowl. Topump dry, simply open the lid,which breaks the suction. This headhas far fewer moving parts thanothers, which means less mainte-nance and trouble. However, largepeople are advised not to flushwhile seated on this head!
The electric toilet may simply bea powered version of the manualtoilet with a hefty DC motor drivinga reciprocating crank, which in turnactuates the same basic pumpmechanism described above.
boat
owne
r
DIY
Add a stock of latex rubber gloves to your toolkit and read on because it’s possible to solvemost marine sanitation problems with repairsand upgrades.
Fear and Loathing in the Vanity

Alternatively, it may have a macerator pump. The macerator-pump toilet is quite different in that it
uses a rubber impeller pump to pull in flush water and,usually driven on the same shaft, a centrifugal orimpeller discharge pump with a chopper or maceratorblade (not unlike a garbage disposal unit) that pureesthe sewage so that it won’t choke the pump. Theseheads have the convenience of push-button flushing, butbecause the rubber pump impeller will disintegrate ifit’s run dry, you don’t have the option of controlling theamount of water used, which can be at least 7.5L (2gal) per flush. This type of head could prove impracti-cal if connected to a small holding tank system. PARand Raritan make the most common macerator units.
Popular on larger powerboats, the Vacu-Flush headby Sealand (formerly Mansfield) is unique in the mar-ketplace. It uses a vacuum pump — a powerful bellowspump with extra one-way “duck-bill” valves — in linewith a vacuum accumulator tank that draws flush waterfrom the potable water system. The vacuum systembehaves like a pressure water system in reverse. Whenthe “flush” foot pedal is pushed, a small amount ofwater is let into the bowl, the discharge valve in the toi-let opens and the sewage promptly disappears with a“whoosh” down the discharge hose towards the vacu-um tank. Simultaneously, somewhere down in the ves-sel’s machinery spaces, an automatic pressure switchsenses the sudden change in vacuum and engages thevacuum pump. The pump chugs away until it reachesfull pressure then the pressure switch shuts it down. Inthe meantime, it has scavenged the sewage from thevacuum side of the system and delivered it down to thenon-vacuum holding tank (or waste-treatment system oroverboard).
This is a nice system. It has relatively low powerconsumption and it uses less flush water than any other.It is, however, costly to install, and although more reli-able and less finicky than any other electric and mostmanual head systems, if things do go wrong, it can be
expensive to fix. Vacuum leaks are particularly sneakythings to track.
The last category of heads is gravity powered. Inthese systems the sewage drops straight into the stor-age tank below. The most common variety is theportable-style (commonly referred to as porta-potties),which stores the waste in a small, removable tank sec-tion of the head. Some models have deck pump out fit-tings (mandatory in Canada), some have recirculatingflush capability in which the sewage in the tank mixedwith deodorizing additives gets pumped around forflushing. Some have a fairly large capacity and provi-sion for pressure-water flushing. Unfortunately, somehave a bad reputation as cheap, flimsy, prone to leak-age, smelly and generally obnoxious. Many boatersprefer to use a bucket (which may or may not be legalin your jurisdiction) rather than carry around sewage insuch a dubious container.
If your boat operates in waters designated as “NoDischarge Zones” it must be fitted with what the U.S.Coast Guard (USCG) calls a Type III MSD. In theseareas, it’s not legal to pump any sewage overboardeven if you have a treatment system on board. In mostU.S. coastal waters (inside the three-mile limit), it’s legalto discharge sewage only after it’s treated by a USGC-certified Type I MSD (i.e. Raritan Lectra/San, Sealand
GATE-FREE
If your boat has gate valves, replacethem before they seize or break. Many
seized gate valves are irrevocably seized to thethru-hull; be prepared to remove and replace thewhole thru-hull. To do this, sever the thru-hull stemand free the valve with a mini-grinder or hack-saw. If the thru-hull nut is also seized, grind off themushroom head on the outside of the hull, knock-ing the remnants through to the inside. Be carefulnot to gouge the hull.
TIPS
DIY ONLINEFREE Email Newsletters
Receive valuable tips and troubleshooting information
with DIY boat owner's bimonthly email newsletter.
It's FREE!
To sign up, just log onto www.diy-boat.com
and click on" F R E E N E W S L E T T E R "

sewage. Rigid Schedule 80 PVCpipe or household ABS (DWV ser-vice) offer a non-permeable alterna-tive and are useful if you want toeliminate any low spots that tend tohold sewage. Be careful not to uselight-gauge Schedule 40 pipe — itcan crack, especially when verycold.
can be a major contributor to headodor. Head hose should be flexibleand smooth-walled, preferablyheavy-gauge PVC sanitation-gradehose or top-quality reinforced neo-prene. The spiral-ribbed thin wallhose often used is okay for bilgepumps but is too thin for an odor-free head hose and the ribs trap
SanX and others), or Type II MSDfor boats over 9.8m (66’). Thesecostly units (about US$2,000 com-plete with the head) are small on-board sewage treatment plants thatmacerate and disinfect the sewageuntil it meets very specific bacteriacounts and standards for turbidity(suspended solids) prior to dis-charge.
DISPOSAL: The BackEnd of the System
Discharge HoseMuch has been written by variousauthorities on head hose. The con-sensus is that if you install thewrong kind of discharge hose it
Head Rebuild
Preparation Pump out the holding tank and flush the
system well. Shut off any sea-cocks, disconnect dischargeand intake lines, unscrew themount bolts and remove thehead from the boat in order towork on it in less cramped quar-ters (or remove the pump assem-bly only). Remove pump assem-bly from base. Open the headrepair kit and carefully checkthe parts and the enlarged dia-gram provided.
Inlet Valves Remove thevalve cover (typically six screws)and remove the flapper valve.Clean all mating surfaces care-fully, replace all valve parts withnew ones and replace any O-rings and seals on the inletvalve lever. Lightly smear seal-ing surfaces with siliconesealant.
Piston Rings and ShaftSeal Wrap the piston rod andcarefully secure with vise grips.Unscrew the pump handle andrelease the piston to drop orknock out the bottom of thepump housing. Clean and lubri-cate the pump cylinder. Replacethe piston rings or piston assem-bly, and remove and replacethe piston rod seal. With anexternal seal, unscrew orremove the retaining ring; aninternal rod seal must be priedout from the inside.
Discharge ValvesRemove, clean sealing surfacesand replace the flapper valve atthe pump base. Dismantle thedischarge elbow, clean out andreplace the duck bill or “joker”valve.
Seals Replace any sealing gaskets and O-rings, clean
all mating surfaces and checkcarefully for cracks in all hous-ings.
Assembly Reassemble carefully. Don’t over-torque the
plastic housings, which crackvery easily. If cracked, they mustbe replaced.
Clean up Reinstall, hookup, open the seacocks and testfor leaks.
A rebuild kit includes replacementparts for all the perishable items anda parts list helps you identify otherproblem areas.
1
2
3
4
5
6
7

When shopping for hose, thestandard head discharge size is 1-1/2” inside diameter (ID) hose;some macerator-type heads will dis-charge via a 1” ID. Inlet suctionhose is usually 3/4” ID and shouldbe firm and non-collapsible.
Vented LoopsRegardless of how well or poorly amarine sanitation system goesabout its business, there is one thingit must never do and that is sink theboat. This happens more often thanyou might suspect simply becausemost heads in sailboats and somein powerboats are installed belowthe waterline and connected to aseawater inlet. Seawater siphoninginto the head bowl results when oneof the flapper valves on the head(“Flush or Dry Bowl”) fails.
Sailboats spend a lot of timeheeled over at angles up to 30° ormore, which radically changeswhat fittings are below the “heeled”waterline. One solution is to alwaysturn off the head inlet seacock whenit’s not in use, but this may not bepractical if the seacock is inaccessi-ble. Some boats even comeequipped with a secondary (acces-sible) shut-off valve on the intakeline. These security measures alldepend on the operator to do theright thing, but to err is human.Besides, there are always guestsand children and they might notalways remember or understandinstructions.
The proper head installationwill incorporate an automaticmethod of disrupting any siphoningaction. To accomplish this, config-ure the inlet hose with a tall loopabove the waterline and close tothe underside of the deck betweenthe head pump and the bowl. Thismay require the removal andreplacement of the standard hosefitted on the toilet. At the top of theloop, install a special U-shaped fit-ting known as a vented loop or anti-
siphon vent. The vented loop incor-porates a small one-way air valvethat opens if any suction is presentin the hose, allowing air to enterthe line and break the siphoningaction. A similar siphon break isrequired on the discharge hose ifit’s connected to a thru-hull.
There are a few problems withvented loops. The anti-siphon ventfitting can clog with debris, calciumor salt crystals and quit working. Toprevent this, clean periodically. Aswell, sewage odors in the dis-charge line vent sometimes filterinto the boat. To eliminate this,attach a small diameter hose to thenipple on top of the vented loopand lead it to an overboard vent fit-ting mounted well above the water-line or connect it to an existingholding tank vent. Alternatively,feed the hose into a cockpit scup-per provided that it’s above thewaterline at all times.
Thru-hullsThe head inlet and discharge thru-hulls should have reliable, quick-act-ing valves. Seacocks with integralquarter-turn valves or thru-hulls com-bined with a ball valve of stainlesssteel, bronze or Marelon are muchpreferred over gate valves.
Holding TanksMany boating areas in NorthAmerica, in particular most freshwa-ter lakes and rivers, don’t allowmarine sanitation systems to dis-charge any sewage overboardwhether it’s treated or not. The boatmust be without an installed toileton board or the head must have aholding tank.
Holding tanks come in all types.On boats built for saltwater mar-kets, the holding tank may be anafterthought, either too small, inac-cessible for maintenance or general-ly substandard. The most common

capacity of 45L (12 gal). For twocouples, 91L (24 gal) is the mini-mum. The other consideration ishow big a tank you can fit into theboat. Stock polyethylene tanks areavailable in many shapes andsizes and custom stainless-steeltanks can be built to suit youravailable space. (Refer toFigures 1, 2 and 3 for typicalholding tank installations.)
It’s also possible to build afiberglass or wood-epoxy tank orglass in an existing seat lockerand convert it into a tank. In orderto resist stress cracking and avoidpinhole leaks, it should be heavilybuilt and thoroughly epoxy-barriercoated on the inside to prevent
tanks are molded polyethylene,available in shapes to fit most loca-tions. If made of linear (notcrosslinked) heavy-gauge 6mm to9mm (1/4” to 3/8”) seamless poly-ethylene, they will give excellentservice. Lighter gauge tanks areflimsy and prone to odor penetra-tion. Heavy-gauge (2mm (3/32”)or thicker) stainless-steel tanks arestrongest and the least odor perme-able. However, in the long-term(five-plus years) such tanks corrodefrom sewage acids. Corrosionattacks the seams first, leading toleakage and the need to removeand repair them. (Aluminum andother metals are unsuitable holdingtank materials because they areless corrosion-resistant than stain-less steel.)
Bladders or flexible-rubbertanks are sometimes used. They aredifficult to secure and, as a result,they are subject to chafe, particular-ly in a sailboat. Flexible tanks arealso tough on the fittings connectedto them. These tanks must beinspected requently, so should beinstalled in an easy-to-access spot.Also, some head chemicals may“devour” the rubber, creating a
repulsive smell more intense thanany known head odor.
Remember, sewage weighs3.6kg per 3.8L (8lb per gal), whichis a lot of mass sloshing about.When choosing a tank it makessense to spend the extra money fora good one.
Add a Holding TankIf you need to fit a tank, decidefirst what size you need. Do youuse the boat for day trips, week-ends, or extended cruises? Theminimum average flush volumeper person per day is about 11.3L(3 gal). Therefore, a couple on aweekend cruise will need a tank
VENT LINE
INTAKETHROUGH HULL P-TRAP
DIPTUBEHOLDING
TANK
DECK PUMPOUTFITTING
Figure 1
“No discharge” deck pumpout only.AM
ERIC
AN B
OAT
& Y
ACHT
CO
UNCI
L

If your existing water tank ispolyethylene with the usual 1-1/2”fill fitting and 1/2” vent and out-lets, you will have some difficultyreplacing the 1/2” outlet with a 1-1/2” pumpout discharge fitting. Ifthe tank is heavily reinforced, thewater outlet can be enlarged with aholesaw to accept a 1- 1/2” hosebarb mushroom-style thru-hull(preferably reinforced plastic) withbacking nut. Caulk the thru-hull wellwith a polyurethane sealant (3M5200, Sikaflex or other). This modi-fication has been done successfullybut because polyethylene does notbond well to most sealants, the sealmay fail. I recommend replacingthe tank with another the same sizebut equipped with the correct fit-tings.
All hose connections should bedouble-clamped with stainless-steelclamps, and any head installationsbelow the waterline should havevented loops on the intake and dis-
nections and either cracks the tankat the fitting or the fitting itselfcracks. When space is tight, con-vert your water tank to a sewageholding tank and then squeeze abladder tank into some nook anduse it for water. At least if the blad-der tank leaks you won’t be subject-ed to a horrifying stench.
moisture penetration. (See DIYProjects on page 27 for instructionson building a wood-epoxy tank.)
Any installed tank must bestrong enough to carry the fullsewage load and it must be secure-ly blocked or clamped in place.Any movement or flex puts stress onthe inlet, discharge and vent con-
INTAKETHROUGH
HULL
HOLDINGTANK
"Y" VALVE
VENT LINE
OVERBOARDDISCHARGE
PUMP
DECK PUMPOUTFITTING
VENT LINE
SIPHONBREAK
DISCHARGETHROUGH-HULL
Figure 2
Overboard discharge option after the holding tank.
AMER
ICAN
BO
AT &
YAC
HT C
OUN
CIL
What can you do @DIY ONLINE? www.diy-boat.com
Free NewsletterSign up for a bi-monthly dose of more maintenance tips and projects
Shop OnlineThe place to purchase the current issue, back issues, MRT CD-ROMs, Hands-On Boater CD-ROM, and renew your DIY Subscription
Subscriber ServicesClick here to notify DIY of an address change, a missing copy, or for a subscription expire inquiry
Technical HelplineWhen you need help with a problem, click here to reach our Technical Helpline. For subscribers only!
ArchivesAn editorial index of all DIY articles from 1995 to the current issue!
DIY EZINEThe 7 most recent issues of DIY - All Online! No more storage, searchable, and accessable from any port.

charge lines. To prevent noxiousodors emitting from a vented loop,attach a hose from the valve to anoverboard vent mounted above thewaterline (Figure 4) or tie it into the holding tank vent or cockpit
scupper. It’s also worthwhileinstalling the largest practical ventdiameter or two vents on the tank toassist with the oxygenation of thesewage (see “Odor Control”below). Note: On boats withoptional overboard discharge, theY-valve must be secured with a pad-lock, cable tie or the valve handleremoved when operating within thethree-mile limit.
Odor ControlThere are several sources of headodor of which leaks are the worstcause — find them and fix them.Discharge hoses, even top-qualityones, eventually become saturatedand odor penetrates the walls. Tocheck your head hose for odor per-meability, try the rag test. Wipe theouter surface of the hose with adamp cloth. If the cloth smells, thehose is permeable. Replace immedi-ately. To eliminate hose odor, avoidsewage remaining in the line forlong periods. Flush well or evenrevise your hose routing to minimizelow spots or traps. Consider replac-ing hoses with straight-through plas-tic pipe but keep in mind that theproper size head-to-pipe or hose-to-
pipe adapters may be hard to find.The inlet hose can be another
cause of odor, particularly in salt-water. Marine growth decompos-ing in the stagnant water of anintake line can mean the first flushof the weekend will reek. A straineron the inlet line can help solve this.Periodic purging of the entire inletline with a 30% solution of vinegarand fresh water will also help.Never use bleach or other commer-cial cleaners in a marine toilet; itcan attack the rubber and metalparts.
Low-cost in-line head chemicaldispensers, such as the Head-O-Matic Tank-ette (Figure 5), treat allwater pumped to the head to elimi-nate intake odor. Easy to install, theTank-ette (CDN$59.95/US$39.95) clamps onto a 3/4”intake line (use adapters for otherhose sizes) mounted above thewaterline. A bullet of blue solidchemical drops into the unit and isreplaced after one month or whenthe water runs clear. Replacementbullets cost $9 or less. An optionalE-Z Flush cap facilitates winterizingor flushing of the head.
The discharge joker valve canleak allowing sewage to back upinto the head. Or if the piston ringsare worn, sewage can leak past
HEELEDWATERLINE
WATERLINE
Figure 4
To prevent water from siphoning backinto the head, install a vented loop inthe inlet hose (and the discharge hoseif connected to a thru-hull) locatedabove the maximum-heeled waterline.
Figure 5
The Head-O-Matic Tank-ette installsin the intake line and auto-feeds headchemicals to treat water pumped tothe head.
AMER
ICAN
BO
AT &
YAC
HT C
OUN
CIL
"Y" VALVE
INTAKETHROUGH-HULL
SIPHONEBREAK
VENT LINE
DISCHARGETHROUGH-HULL
TYPE1
DECK PUMPOUT FITTING
HOLDINGTANK
Figure 3
Overboard discharge option before the holding tank.
AMER
ICAN
BO
AT &
YAC
HT C
OUN
CIL

They realize theyneed a last minutepump out, blissful-ly unaware that a6m (20’) geyser ofraw sewagewould erupt whenthe deck fittingwas opened.
The oppositehappens when the vent is clogged during a pump out.The large diaphragm pumps will easily suck a heavystainless-steel tank flat into a crumpled pancake. Socheck the vents periodically for blockages and spiderwebs. A ruptured holding tank is the smelliest one of all.
More Routine MaintenanceMaintenance Rule #1 is to make sure that everyone whouses the head understands that it’s not connected to thetown drain and that it is by nature a finicky, cantanker-ous, spiteful device. All instructions must be strictlyobeyed, such as “Don’t put anything in the head unlessyou have eaten it first.” It’s claimed that the legendaryWilcox Crittenden Skipper head can flush an overcoat,but for the rest the only exception to the “eat first” rule is
into the flush-water side, contaminating it. Then it’s timefor head repairs. Another source of odor is generallyhead area cleanliness and, although unpopular (andprobably unenforceable), a “guys sit to pee” rule willreduce splash, odor and cleaning.
Cheap, lightweight, polyethylene tanks are odorpermeable; heavy-gauge tanks are much less so butodors may eventually seep through. Septic-tanksewage odor is a by-product of the anaerobic bacteriathat thrive in the oxygen-deprived, carbon-dioxide-richenvironment of most holding tanks. This is why munici-pal sewage treatment plants aerate sewage to pro-mote the growth of aerobic oxygen-loving bacteria,which give off much less odor as they naturally breakdown the sewage. The same is true of backyard com-posters.
Peggie Hall of Peal Products, a company specializ-ing in marine sanitation systems in Atlanta, Georgia,advocates a simple, innovative approach to naturallyeliminate sewage smells in the tank. The key is to fit thelargest practical cross-flow vent system to the tank —usually two independent vent lines of 2.54m (1”) diam-eter hose to each side of the boat (Figure 6). This setsup true cross-flow ventilation of the tank, clears out thecarbon dioxide and prevents oxygen starvation, whichallows the aerobic bacteria to gain the upper handover the smelly anaerobic types while breaking downthe sewage by natural fermentation. Although it mightseem counter-intuitive, this enlarged vent system isreported to eliminate most holding tank odors. For theidea to work, the vent hoses must be as short as possi-ble and free of low spots that can trap air. It’s alsoimportant that the hoses aren’t restricted by filters ortiny screened fittings on the outboard end. With sail-boat installations, care must be taken that the ventscome straight up from the tank top to avoid fillingwhile the boat is heeled. They should exit at locationsabove the waterline at all times (i.e. the bow or thetransom). According to Hall, the rule is: The less freshair a holding tank gets, the more it will stink.
Vent maintenance is also important in odor con-trol. Vent lines are easily blocked by spider webs or bysewage if the tank has been overfilled and “ram fed”by the head pump — especially if the outside hull ventfitting is tiny and screened. This can lead to a danger-ous situation since the fermenting sewage producesgases and pressure builds. It doesn’t help if your guestsstand on the pump handle to pump the head due tothe back pressure. I have seen heavy-gauge rectangu-lar polyethylene tanks blow up like balloons and breakthe joinery meant to contain them. There’s also theurban legend of the couple in fancy dress whites tak-ing their friends by boat to the Commodore’s Ball.
DRIP PAN
A plastic pan orcut-off jug bottom placed
underneath the lowest point inthe system will prevent anyunpleasant extract from spillinginto the bilge when you drain itfor maintenance.
TIPS

In saltwater, calcium can buildup in the toilet and lines and almostbecomes like a hard coral growthdue possibly to microscopicdiatoms. Periodic flushing with vine-gar will help dissolve thesedeposits, but if they are severe andthe head becomes difficult to pump,you may have to replace the hosesor carefully flush the system at leastonce with diluted hydrochloric acid(muriatic acid). This must be donecarefully as the acid can slowlyattack metal parts in the head sys-tem.
Regularly check all hose con-nections for new signs of leakage.To check the operation of the anti-siphon valve, blow through a pieceof hose fitted over the nipple.
Simple maintenance habitsalso help to minimize odor; thelast flush of the cruise, especiallyat the end of the weekend, shouldalways be a thorough one to elim-inate sewage standing in the dis-
charge line.Nick Bailey has been in the marineservice profession for more than 20years and currently is service man-ager of Bristol Marine inMississauga, Ont. He and his wifeown and race a woodenThunderbird on Lake Ontario.
marine or ultra-cheap one-ply toiletpaper.
If Rule #1 is followed, headsdon’t need much maintenance.Check that the vents are clear — beaware of any sudden resistance inpumping effort and never force thepump. Experts recommend occa-sionally flushing half a toilet bowl ofwarm water with biodegradablelaundry detergent through the sys-tem followed by two ounces of min-eral or baby oil (not vegetable oil,which slimes up the lines and tank).Periodic greasing of the piston rodis also recommended. The oil willhelp the head and the detergentwill emulsify the oil in the tank topreserve good bacteria. If the boatis equipped with a Type I or Type IIMSD, do not flush cleaner or treat-ment into the system unless it wasspecifically designed and sold forthat purpose.
Many pros recommend a com-plete head rebuild every two yearsas the best preventative mainte-nance program. (Add this task toyour spring recommissioning list.)This ensures the head is always intop shape and it also guaranteesthat you will be familiar with theunit when repairs are needed.
HEADFILL-IN
What do you do whenthe head is not working? Carrya supply of Flush-Me-Nots. Linethe head bowl (or a bucket orwhatever else fits) with theplastic bag then add somehigh-tech powdered absorbent(it’s part of the package). Afteruse, seal the bag with a twist-tie and dispose of it as youwould a diaper.
TIPS
Figure 6
Eliminate most holding tank odorscaused by oxygen-starved bacteria byfitting the largest practical cross-flowvent system to the tank.
Anne
-Mar
ie H
endr
y
Pump works freely buthead won’t draw in
flushwater
Pump pistonrings not sealing or
piston broken
Remove hose and check for blockage or
loss of prime
Headleaks
Carefullytighten Still leaks
Pump works freely butbowl fills faster than it
drains
Pumpharder
Checkintake
seacockis open
Pumpout tank and check vents are clear
Check level inholding tank
Pump doesn’twork freely
Temporary stickingone-way discharge valve
Dischargevalve may be
clogged
Check andclear vent
Check inletvalve is open
Check overboard discharge seacock for calcium build-up
Inlet or discharge valve
leaking
Pump and closeseacocks one at a
time
If sewage, clear orreplace discharge
valveBowl fills back upwhen unattended
Treat withacid
CLOSED
OKAY
NO
NO
NOT FULL
FULL
Open and tryagain
OKAY
YES
OPEN
NO
YES
REBUILDHEAD

GOOD VIBRATIONS
Install an automaticengine synchronizer toeliminate engine vibrationand save fuel in a twin-engine boat.
Tools &Materials
Drill and bitsPliersAssorted screwdriversSocket setWrenchesWire cutters and
crimping toolWire ring terminals 19mm (3/4”)
marine-grade plywood (optional)
1 33C or 43C control cable
2 .187”-diameter drive cables
Switch kit2 tach senders
(optional if required)12-gauge two-
conductor wire4 5/16” lag bolts
Owners of twin-engine boats knowthe importance of having bothengines synchronized so they oper-ate at exactly the same rpm.Inboard and sterndrive engines thatare out of sync by as little as 15rpm can cause excessive vibrationthat radiates through the hull anddeck, creating extra noise and pro-
ducing an uncomfortableride. Vibration can alsocause wearing of the stuff-ing box, propeller andbearings, loosening ofengine mounts and fit-tings, and make steeringdifficult. Engines that arenot synchronized alsoburn more fuel becausethey are not sharing theload equally.
Twin engines can besynchronized manuallywith the help of tachome-ters or indicator lights. Asfew tachometers are per-fectly calibrated — some units differas much as 100 rpm or more —many experienced operators relyon their ears, listening for the famil-iar “purring” when engines are syn-chronized. On a boat with twindiesels, this sound is heard whenthe operating difference is within10 to 15 rpm, which is adequatewhen running in optimum condi-tions. Operating a boat with loudmufflers or from a flybridge, espe-cially in strong winds and roughseas, puts the driver out of earshotof the engines and beyond the“sound” of synchronization.Blinking indictor lights help deter-mine when the engines are in sync,but they can be a distraction.
Manually synchronizingengines requires constant adjust-ment of the throttles. A change inboat speed or a slight movement inthe throttle springs will cause theengines to go out of sync and it’sback to fiddling with the throttles.(High-end digital tachs can comewithin a 1 or 2 rpm difference butstill require nursing the throttles.)
The only way to accurately and
continuously synchronize twinengines is by using an automaticsynchronizer. The automatic syn-chronizer made by GlendinningMarine Products eliminates atedious chore by making throttleadjustments automatically. Just pulla switch at the bridge to engagethe synchronizer. Set the throttle ofone engine (known as the lead ormaster), and the synchronizer willadjust the other engine (known asthe slave) to the identical rpm.When conditions demand manualcontrol of the engines (when dock-ing, for example), the unit can beswitched off at any speed. And, ifsomething happens that the syn-chronizer is unable to match therpm of the slave engine to the lead,it shuts off automatically.
This is a very simple electro-mechanical device. Two drivecables lead from the tachometertake-offs on the engines to the endsof two geared shafts on the syn-chronizer. As these shafts spin, athird gear equalizes the speeds(rpm) of both shafts, moving thebridge throttle control of the slave
RIGGINGP O W E R B O A T
PORT ENGINE
SLAVE
SLAVE ENGINETACHOMETER CABLE
NOTE 1
CONTROLCABLE
TO SLAVEENGINE
STBD ENGINE
LEAD BRIDGECONTROLSTATION
LEAD ENGINETACHOMETER CABLE
NOTE 2
Figure 1
A typical synchronizer installation on twin engineswith pull-to-open throttle cables and counter-clockwise rotation. The bridge control cable forthe slave engine (shown as a dotted line) and tachsenders are removed from the engine andattached to the synchronizer.

engine to a position identical tothat of the lead engine.
Glendinning’s synchronizercan be installed on any diesel orgasoline engine and is easilyadapted to any type of control sys-tem: push-pull cables, hydraulic, airor electronic controls.
Installation The system consists of the synchro-nizer control box, mounted in theengine compartment, and a switchand pilot light at the bridge. Alsorequired but not included is a 12-or 14-gauge duplex wire, cableties, wire terminals, a Morse 33Cor 44C or equivalent engine con-trol cable and two .187”-diameterdrive cables. Installation is not diffi-cult but does require some mechan-ical ability: a professional installertakes five to 10 hours, so you maywant to reserve a weekend to com-plete the job.
The synchronizer is mounted inthe engine compartment on itsbase, on a bulkhead or inverted onthe ceiling. Select a location thataligns the synchronizer with thethrottle control cable that runs fromthe bridge to the slave engine.(Usually the port engine is theslave.) The cable (two cables on
dual-station boats) from the syn-chronizer to the engine must notexceed 2.4m (8’); the drive cablefrom the engine’s tachometer take-off must be less than 4.2m (14’).Care must be given to cable rout-ing — avoid sharp bends or “S”curves. Mount the synchronizerusing 5/16” lag bolts (not sup-plied) to a flat surface; if necessary,use 19mm (3/4”) marine-gradeplywood.
There are different take-offs onthe synchronizer for attaching con-trol cables. Determine which oneto use depends on whetherincreasing speed is a push-to-openor pull-to-open action and on therotation of the engines — eitherclockwise or counter-clockwise onboth engines or different on eachone. (Most diesel engines haveclockwise rotation, while the rota-tion of most gasoline engines isone clockwise and the othercounter-clockwise.) The followinginstructions offer general guide-lines to install a single-station con-trol with pull-to-open throttle cablesand engines that both rotate clock-wise. Instructions for other engineset-ups are well-described in themanual supplied with the unit. Tohelp with the explanation, some
components are numbered andidentified in Figure 2.
Remove the throttle controlcable from the slave engine.Connect the short new 33C cable(referred to as the engine controlcable) to the slave engine, thenattach it to the solenoid side of thesynchronizer (1). Route the cable sothere are no sharp bends. Securethe cable under the clamp on thehousing, then attach the terminaleye (provided) to the cable end.Slip the terminal eye over the pivotpin (2) on the end of the governorcontrol rod (3) and adjust the eyeso the governor lever is not restrict-ed by the cable in either idle orwide-open-throttle positions. Installthe cotter pin to hold the terminaleye in place.
Boats equipped with Hynautichydraulic controls need an adapterkit (US$45) mounted to the synchro-nizer. Kits are also available forpneumatic controls made by Kobelt,Rexroth and others (US$120).
Red stop collars (4) on the unit’sgovernor control rod limit its traveland activate micro-switches that shutdown the synchronizer before therod can exceed the preset high- andlow-speed positions. These collarsmust be adjusted in both idle andwide-open positions — the installa-tion manual tells you how to do this.
Now take the throttle controlcable (or cables for dual stations)that was removed from the slaveengine and attach it to the oppositeside of the synchronizer (5) andplace it in the clamp (6). Refer tothe instructions to check and adjustthe cable overtravel before connect-ing the terminal eye (7) to the pivotpin (8).
The next step is to install thedrive cable connections. These aretwo heavy cables (not supplied),less than 4.2m (14’) long, that runfrom the synchronizer to thetachometer connection on eachengine. Remove the existing tach
Figure 2
Cut-away of the Glendinning Automatic Synchronizer showing setup for a pull-to-open operation.
1
23
11 12
8
7
10
6
5
4
9

EQUIPMENT LISTcable from each engine andreplace them with the new drivecables of the proper length.Connect the other end to the correcttake-off on the synchronizer. On aboat with both engines havingclockwise rotation and pull-to-opencables, the slave cable attaches to9 and the lead to 10, as shown inFigure 2. If the engines have elec-tric tach senders, these are removedand mounted to the ends of the gov-ernor control rods (not shown) usingextensions (US$18 each). Engineswithout electric tach senders (includ-ing Volvo diesel, Ford Lehman,Cummins B, C and D Series, DetroitDiesel 8.2L, Perkins 6/354 andV8/540, Caterpillar 3116 and allgasoline inboards) also needmechanical drive adapters. Theseinstall on each engine using theexisting crankshaft bolt, and thedrive cable from the synchronizerscrews onto each adapter.
The last step involves installingand wiring the on/off switch andpilot light. Mount both in a visiblelocation on the dash near the throt-tle controls. Run a two-conductorwire (12-gauge for 12-volt system,14-gauge for a 24 volt system)from the synchronizer (11) to theswitch and light, following thewiring diagram in the manual. A10-amp in-line fuse (included) isinstalled between the synchronizerand the ignition switch of the slaveengine.
MaintenanceThe synchronizer is prelubricatedat the factory and requires only alight spray of moisture-displacinglubricant once a year. After 100 to200 hours of operation, the clutchthat keeps tension on the synchro-nizer rods may need adjusting,which is easily done by an adjust-ment screw (12). The drive cables,like all mechanical cables, willeventually wear out over time andneed replacing.
The following shows the typical cost to install a single-station synchro-nizer. Prices listed are in U.S. dollars.
1 12-volt Synchronizer $7251 Morse control cable, 2.1m/7’ $32.492 Drive cables, 2.7m/9’ and 3.3m/11’ $86.3812-Gauge wire, terminals, cable ties $401 Single-station switch with fuse $12.502 Tach sender extensions $36Total $932.37
Options2 Mechanical drive adapters $160
(credit of $36 for tach sender extensions)1 Dual-station switch kit $34.50
For further information contact:Glendinning Marine Products, 740Century Circle, Conway, SC29526; Tel: (800) 500-2381, (803)399-6146, Fax: (803) 399-5005.

padlock through the motor’s clampscrews, the outboard seemedinvincible. An insurance claim wasfiled, we paid the $500deductible, and within a fewweeks received a new, current-model replacement engine. Thistime we were taking no chancesand mounted the engine on thebracket with heavy, galvanizedanchor chain, securing it to theclamp bracket and transom eyebolts with hardened steel pad-locks. Just one week out of the boxand the engine disappearedagain, only this time the boat rest-ed on a trailer within 30m (100’)of a friend’s house. Needless tosay, we were mad as hell anddecided it was time to take con-trol.
Fighting Back Thousands of outboards are stolenevery summer. Our engine was justone of 41 outboards stolen in ourarea that weekend alone. A thiefequipped with bolt cutters, a hack-saw, sledge hammer, torquewrench, drill, even an ax canremove an outboard in short order.The clamp screws are gray metaland snap off easily with a fewgood whacks with a hammer.Outboards mounted to the transomare slightly more secure, unless thethieves have bolt cutters or a torquewrench, and a drill is all that’srequired to remove bracket-mount-ed motors.
Just like a car, outboards can-not be made totally theft-free, butyou can create enough of a deter-rent that the thieves will, hopefully,go elsewhere.
There are several different lock-ing devices owners can buy for less
than $40 to thwart outboardthieves. These attach to the clampscrews or mounting bolts of out-boards up to about 40 hp.
The Fulton Outboard Motor Lok(CDN$29.83/US$23.31) is a bar-type lock that mounts over the twinclamp screws of most small out-boards. It consists of two pieces:the screws are wedged betweenthe two halves, one which has afoam insert to reduce vibration, anda key lock is tightened to compresseverything together. When installedon a bracket-mounted outboard,there must be sufficient clearance toenable raising of the bracket.
Moor-Aid (CDN$14/US$10),made by Douglas R. Hughes, fitsany single or double clamp-on out-board. Made of heavy-duty steel, aslotted bracket slides under thebase of one clamp screw and asteel cap covers the screw handle.This cap mounts into a captive slotin the bracket and is secured witha hardened-steel padlock (includ-ed). A series of holes allows foradjustment of the cap and the pad-lock to ensure a tight fit. The brack-et base has four slots that dig intothe transom when the device isforced by turning it.
McGard’s outboard lock(US$26) fits outboards that arebolted to the transom bracket with8mm- (5/16”) or 12mm- (1/2”)diameter bolts. A collar replacesone of the nuts holding the out-board motor, then is tightened withthe special key tool provided ineach set. The collar spins freely ifit’s not first loosened with the key.
The Stern Safe (CDN$40.50 /US$27.95) installs on outboardsthat are thru-bolted to the transom.The original locking nut is removed
ENGINE••• — — — •••
TROUBLESHOOTING
Preventing Outboard Theft
Theft-deterrentoptions are expensivebut you can probablypurchase everythingyou need for less thanyour insurancedeductible.
The times they are a changing. Tenyears ago, we never locked any-thing. Now there are chains withpadlocks on cockpit hatches, thestern locker, downriggers — eventhe boat is chained to the dock.Our investment seemed theft-proof,or so we believed.
Our naiveté was shatteredwhen the six-year-old, 5-hp out-board on our test boat was liftedfrom the kicker bracket while theboat was docked. Secured with a
Heavy, galvanized chain didn’t stopthieves from lifting our one-week-oldoutboard, and without a trace — theblack residue on the transom is finger-print powder.

and replaced with a hardened steel housing. The nut isreinstalled and tightened, special washers slide over thestud and the housing is secured with a stainless-steellock.
Two’s BetterAll these devices help resist motor theft, but given theright equipment and enough time, a determined thiefstill can walk away with your engine. Locks that securethe clamp screws prevent the turning of the screws but
rely on the strength of them and they aren’t very strong.And, devices that cover the transom bolt can surely beremoved by a skilled thief sporting some heavy-dutyhardware. So, how do you stop outboard theft?
One solution is to add more locking devices. Ontransom-mounted motors, add a second bolt lock. Orinstall one of the outboard locks mentioned above andchain the outboard to the boat. But not any chain orlock will do. You’ll need a chain and padlock with ashackle made of hardened boron alloy — there’s noth-ing stronger. It can’t be cut or sawed-off — the onlyway to remove boron alloy is with an acetylene torch orhigh-speed grinder, which, hopefully, the thieves didn’tpack with them.
Stuff made of boron is expensive. A 7mm (9/32”)chain sells for about $14 per foot. Padlocks with boron-alloy shackles, available from Master Lock (Pro Series)and Medeco, cost $30 to $150, depending on the sizeand thickness of the shackle. These locks provide up to6,750kg (15,000lb) of resistance to bolt cutter attacksand are not easily drilled or picked.
The ultimate crime fighter: A construction-grade padlockwith a shackle and chain made of hardened boron-alloy steelcan only be cut with an acetylene torch or high-speedgrinder.

ENGINE••• — — — •••
TROUBLESHOOTING
Our new outboard sports anoutboard lock and a boron-alloychain that runs through the carry-ing handle to a transom eye and issecured with a Pro Series padlock.The total investment is CDN$166(about US$130), which is one-thirdof our insurance deductible. When
you consider that every insuranceclaim increases your rate by asmuch as 15%, the expense ofinstalling theft-deterrent devices iswell worth the money.
One way to deter thieves is with an outboard motor lock: (left to right) Moor-Aid, McGard, Stern Safe and Fulton.
DIY EZINE www.diy-boat.com
Now you can access DIY Boat Owner Magazines anytime, anywhere.
You can read, print or search the current issue plus 7 most recent back issues of DIY, then receive 3 more issues for a total of 11 issues per year! Subscribers to the EZINE also qualify for DIY's FREE Technical Assistance.
Try Before you Buy - Log onto www.diy-boat.com and click on "Free Trial" to view 1 issue.
To subscribe to DIY EZINE, follow the instructions online or call 1-888-658-BOAT.
No more storage • Searchable • Instant access anywhere
11Issues
The Portable Solution

MADE-TO-MEASURETANKSWhen you need extra tankageconsider making your own.Potable water and holdingtanks made of
plywood coated with epoxy resinare inexpensive, simple to buildand are easily custom-made to fitany tank shape or hull contour.Epoxy is the ideal tank material. Itwaterproofs the plywood yetwon’t contaminate drinking waterand is resistant to head chemicals.I’ve used wood-epoxy water tankson Nutcracker for 12 years with-out any bad tastes or odors. Thetanks were constructed with WestSystem brand epoxy, but I’m sureother resins would net similarresults.
Carefully measure the spacefor the tank, then make a card-board template. Assemble thepieces using masking tape to holdit all together. Dry-fit the template,then trace the patterns onto the
plywood. Building a rectangulartank is straightforward: cut theends, sides, bottom, top and baf-fles out of 1/4” marine-grade ply-wood for tanks up to 151L (40
gal); use 8mm or 9mm (5/16”or 3/8”) ply for larger tanks.
Because the bottom and topoverlap the sides and
ends, you’ll need todeduct double the
thickness of theplywood from
your heightmeasure-ments.Decrease thewidth of thesides by thesame amountto allow forthe overlapof the ends.To build atank that con-forms to the
contour of the hull, laminate multi-ple sheets of thin veneer to therequired thickness over a woodform (mold), then join as describedbelow.
Tanks larger than19L (5 gal) shouldhave inter-nal bafflesto preventthe liquidfrom surg-ing insidethe tank. Thenumber ofbafflesdepends onthe size of thetank. A 151L(40 gal) watertank, for
example, requires two or three baf-fles spaced 30cm (12”) or lessapart to ensure sufficient support.Cut deep scallops in the lower andupper corners of each baffle (seeFigure 1) so the contents flowfreely between compartments.
Assemble the tank in two sec-tions: the main tank with the baf-fles, then the top. Both are assem-bled separately and completelyfinished, then the top is glued inplace. Join the sides, ends andbottom panels using cleats(2.5cm/1”) triangular pieces ofwood) attached with thickenedresin. Use staples, small coppernails or pipe clamps to hold thepanels in place until the glue sets.Alternatively, bond the panelstogether using fillets: epoxy thick-ened with colloidal silica to apeanut-butter consistency that,when applied to an inside corner,forms a cove-shape bead over thejoin (Figure 2). For addedstrength on larger tanks, cover thefillet with fiberglass tape and resin.The goal isto
Figure 1
A tank constructed of plywood and “waterproofed” with multiple coats of epoxy resin. Baffles prevent the contents fromsurging in the tank and scallop-shaped cutouts in the corners venteach compartment.
PROJECTSDIY
To form a fillet, apply a bead of thickened epoxy (use a syringeor a heavy-duty plastic bag with a small hole cut in one corner),then pass a tongue depressor held at a 45° angle over the mix-ture to remove excess and form a smooth fillet. Use a putty knifeto scrape the excess epoxy on either side of the fillet for asmooth concave edge (A).
Figure 2
Anne
-Mar
ie H
endr
y
Anne-Marie Hendry

marked. When cured, drill theholes. A typical potable water tankhas a 16mm (5/8”) vent, 3cm (1-1/2”) fill and 12mm (1/2”) outlet;a holding tank has one or two16mm (5/8”) vents and 3cm (1-1/2”) inlet and pumpout.
Glue the top to the tank, andhold in place with staples or clampsuntil set. Apply three coats of resinto the exterior of the tank, followedby two coats of anenamel orpolyurethanepaint. Install thehose fittings withsealant, then securelymount the tank in the boat.
A word of caution: wood-epoxy tanks are not recommend-ed for fuel storage due to therisk of fire.
Remote Speaker SwitchMany VHF transceivers have aninternal speaker and an audio jack,which permits connection for a
have rounded, smooth corners.With either method, apply thick-ened epoxy to all plywood matingsurfaces. Scrape or sand off anyexcess epoxy, then sand the wood(and fillets) with 120-grit paper.Coat the interior of the box and theunderside of the top with a mini-mum of four coats of unthickenedresin. Apply three coats “green ongreen” — recoat when the resin isjust slightly tacky and before itreaches its final cure stage (about 2-1/2 to 3 hours at room tempera-ture). After the third coat let it curethoroughly, then sand to a glass-smooth finish with 120-grit paper.This ensures an easy-to-clean sur-face. Because epoxy is transparent,add a white pigment (paste or pow-der) to the last coat at the rate of5% by weight so you can easily seethe scum when cleaning the tank.
Cut holes in the top for largeclean-out ports: install 10cm or15cm (4” or 6”) screw-in plasticinspection ports, positioned so theyprovide access to the entire tank forcleaning. On tanks with multiplebaffles, locate the ports betweeneach baffled section. Mark theplacement for the vent, fill and dis-charge hose fittings, then glue back-ing blocks made of 12mm (1/2”)stock to the top exterior where
remote speaker. When the remotespeaker is plugged in, the internalspeaker doesn’t operate. The jackand plug connections are usuallybehind the transceiver in an inac-cessible location. Changing fromlocal to remote is a nuisance. Toimprove this situation on board ourMorgan 32, I added a switch andanother speaker. The new localspeaker takes the place of the inter-nal speaker when connecting the
remote. Changing from localto remote requires a simple
flick of a switch.You’ll need to
ensure that the newspeaker has thesame
impedance as your other speakers(usually 8 ohms); this information isin your VHF specifications sheet.Kevin Dean, Via Sophia, NorthVancouver, B.C.
A removable wood-epoxy water tankfits snugly in the vee-berth and has twoinspection ports for cleaning. A stain-less-steel cable with adjustable turn-buckle attaches to the bulkhead andleads around the tank to a floor-mounted pad eye to hold the tanksecurely in place. A rubber gasketunder the wire on the forward edgeprotects the tank from chafe.
Add a double-pole switch and a sec-ond auxiliary speaker for surroundVHF reception.
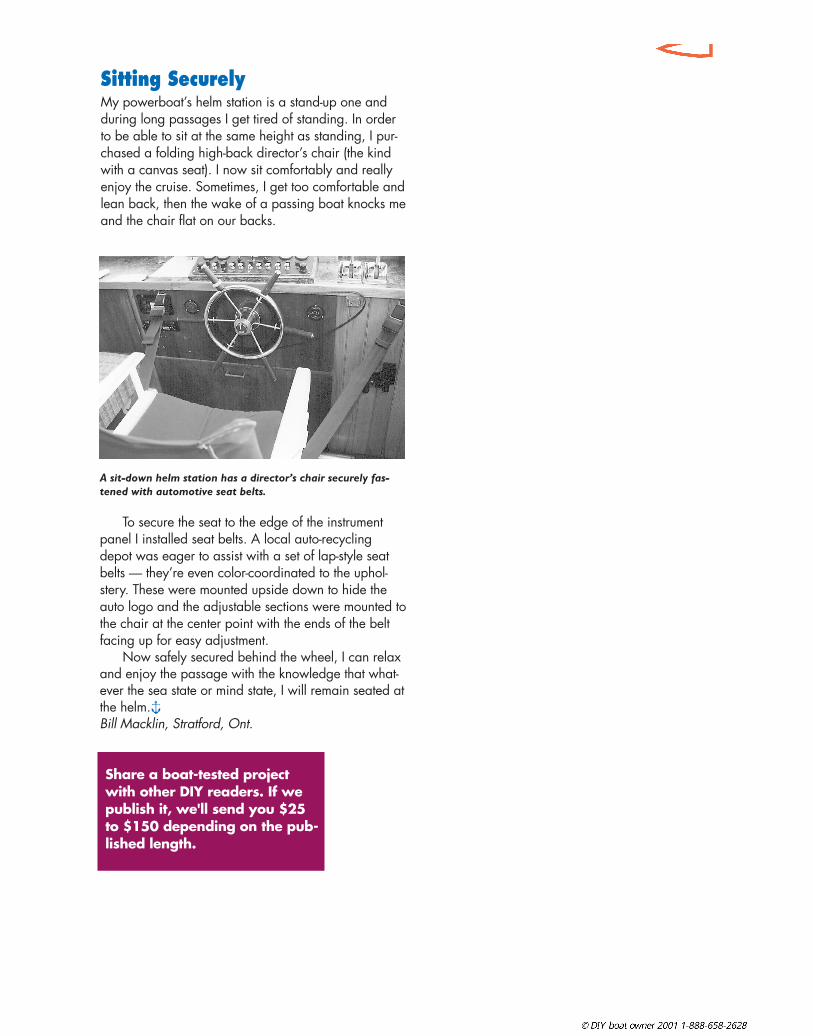
To secure the seat to the edge of the instrumentpanel I installed seat belts. A local auto-recyclingdepot was eager to assist with a set of lap-style seatbelts — they’re even color-coordinated to the uphol-stery. These were mounted upside down to hide theauto logo and the adjustable sections were mounted tothe chair at the center point with the ends of the beltfacing up for easy adjustment.
Now safely secured behind the wheel, I can relaxand enjoy the passage with the knowledge that what-ever the sea state or mind state, I will remain seated atthe helm.Bill Macklin, Stratford, Ont.
Sitting SecurelyMy powerboat’s helm station is a stand-up one andduring long passages I get tired of standing. In orderto be able to sit at the same height as standing, I pur-chased a folding high-back director’s chair (the kindwith a canvas seat). I now sit comfortably and reallyenjoy the cruise. Sometimes, I get too comfortable andlean back, then the wake of a passing boat knocks meand the chair flat on our backs.
A sit-down helm station has a director’s chair securely fas-tened with automotive seat belts.
Share a boat-tested projectwith other DIY readers. If wepublish it, we'll send you $25to $150 depending on the pub-lished length.

through the grommet, then passthe knotted end through the loop.Yank back hard and the doubledloop will jam; the knotted end actsas a toggle to prevent the loop eyefrom pulling out of the grommet.Haul the toggle cord back hardthrough the grommet against therope toggle. Mark where the mid-point is. Remove the toggle cord.
Double the jib sheet, if usingone continuous jib sheet (it must belong enough to pass down eachside of the boat) and lay the bightof the doubled end back ontoitself, to form a sliding doubledeye. Pass the loop eye of the tog-gle cord through the doubled-backjib sheet loops and cinch the sheettight at the marked midpoint. Toattach two separate sheets, tieeach to the toggle cord at its mid-point with a buntline hitch (seeKnotty Know-How on the nextpage). Now, pass the eye of thecinch loop through the clew grom-met, lock it on the other side withthe knotted end and set it with atug.
The harder the pull on thesheets, the tighter the toggle cordlocks. When the sail flogs, the
ATTACHING JIBSHEETS
There are many different ways ofattaching jib sheets. Some boaterssplice sheets to a snap shackle ortie bowlines. The former methodallows for quick sail changes but isthe least preferred — a floggingshackle makes a dan-gerous projectile on aheaving foredeck.Bowlines are moresecure but take time torelease when changingsails — assuming youdon’t have a set ofsheets for every foresail.
The following is amodified application ofthe toggle cord forattaching jib sheets.There are other similiarmethods — a singlecord with an eye splice in one endand a big figure eight or stevedoreknot in the other, for example —but I prefer this quick-and-dirtyone. I’ve used it for many years ontwo small cruisers and it has neverfailed.
Use a short piece of braidedpolyester line of a diameter that,when doubled to form an eye, willjust pass snugly through the clewgrommet of the jib(s). This is impor-tant; the fit should be snug, but nottight.
Fold the line in half and tie asimple overhand or figure-eightknot in the matched bitter ends.The doubled length should be justlong enough to freely clear the cor-ner of the jib by a few incheswhen the knotted end is passedthrough the loop. Thread the loop
RIGGINGS A I L B O A T
loop stays locked. (The limp qualityof double-braid line prevents theeye from opening and releasingthe knotted end.)
Only one set of jib sheets isrequired with the toggle-and-cinchattachment. To change headsails,“unlock” the toggle loop, pull it outof the clew grommet and insert itinto another sail.
This is one “fastener” Idon’t much mind beingflogged in the headwith and it’s muchfaster than attaching jibsheets to the clew withbowlines. It’s also muchhandier than havingseparate jib sheets foreach sail, as I don’thave to run new sheetsaft with each headsailchange. (I almostalways sail single-hand-ed, so I appreciate
labor-saving methods.) This gadget has never come
loose in use, despite hard headsailfloggings while reefing the main.Wear hasn’t been a problem; thegrommets don’t seem to chafe thedouble braid. Even so, replace-ment is easy and cheap.
Allen Parks is former owner and pub-lisher of a weekly newspaper in cen-tral Idaho. He prefers small trailercruisers outfitted for “water camp-ing” and over the past 27 years, hassailed mountain waters in Utah,Idaho, Oregon and Washington’sPuget Sound and the San JuanIslands. From his home port of OakHarbor in Whidbey Island, Wash.,Parks and his wife cruise the PacificNorthwest in Rigel, a self-restored‘60s vintage JOG/MORC classEnglish-built Signet 20 and Poteet, aWest Wight Potter 15.
Make the toggle cord just long enough so it fits snug against theclew. It’s shown larger than it needs to be for clarity.

KNOTTY KNOW-HOWBuntline hitchKnot
When you don’t havethe time or the skillto do an eyesplice, a goodknot to dead-end braidedlines to abail, beck-et, post or arope eye isthe bunt-linehitch. It’snearly as strong as asplice and gives a very fairlead. This knot can also beused to bend two linestogether, such as tyingsheets to the clew of a jibor a toggle cord (seeSailboat Rigging).Properly tied, this knotgives a secure holdthat’s easy to untieafter loading.
It looks compli-cated to tie, but it’ssimply two half-hitches tied back-wards. To make it,lead the bitterend through theeye (metal orrope) oraround thepost, then tiea figure-eightknot aroundthe stand-ing part.Pull hard onthe standingpart to seatthe knotagainst theeye. If the line is real slippery, tuck in anotherturn or two, or seize the bitter end down.
ANN
E-M
ARIE
HEN
DRY

REDUCING YOUR ELECTRICALDEMAND
Conserve batterypower without sacrificing comfort orsafety. Here’s how.
By Kevin Jeffery
One of the best ways to makesure there’s always enough bat-tery power onboard is to reduceyour electrical demand. This does-n’t mean giving up conveniencesor safety gear you’ve come toenjoy and rely on. Most boaterscan reduce their electrical loadsignificantly simply by choosingefficient appliances and operatingthem wisely.
The first step is tohave a good estimateof your current electri-cal load, since yourload and your ability toreplace this load (either with12-volt charging gear or otherpower sources) must be evenlymatched. This approachallows you to view your totalenergy budget and targetproblem areas effectively. Theresults may surprise you. (For aquick review of how to estimateyour electrical load see Figure 1on page 34.) Now, go throughyour appliance list and chooseloads that can be reduced. Startwith the most universal and easiestto alter, lighting.
Cabin & Deck LightingKerosene lanterns are hard to beatfor atmosphere and low battery
draw, but electric lighting is oneof the simple luxuries of our times.Cabin lighting typically accountsfor a large portion of a boater’selectric load, but you can reduceconsumption by up to 75% withenergy-efficient fluorescent lightsor up to 20% with halogen lamps.Lighting efficiency is measured inlumens per watt, or the light out-put in relation to the energy con-sumed. Incandescent bulbs arenotorious energy wasters, operat-ing in similar fashion to heatingelements — only about 10% ofthe electricity consumed is turnedinto light, while 90% dissipates asheat. A typical 8-watt fluorescentlamp delivering 60 lumens-per-watt gives the same light output(lumen level) as a 40-watt incan-descent bulb yielding 12 lumens-per-watt.
On one boat I owned therewere 11 8-watt fluorescent cabinfixtures, and if all were on at oncethe total draw was still less than asingle 100-watt incandescentbulb. On a typical evening wewould operate the equivalent offour cabin lights for about fourhours, so our average cabin light-ing load was 0.67 amps per lightx four lights x four hours per night
or just over 10 amp-hours pernight, about the same as usingone 30- to 35-watt incandescentbulb.
Most anchor lights, includingthose incorporated into a sail-boat’s masthead tricolor light,have a large electrical load. Theyconsume between 10 amp-hours(if a 12-watt bulb is used) and 20amp-hours (with a 25-watt bulb) inone night. A good alternative is toget a low-drain anchor light.Battery-powered versions thathang in the rigging, some withphotoelectric switches that shut theunit off at dawn, are readily avail-able or can be easily made. Imade one out of a fractured glasspreserve jar, two 100-milliamperehigh-intensity DC lamps fromRadio Shack, an automatic light-sensitive “eye,” and some exterior-grade wire that doubled as the
hanging lanyard. It pro-duced as much ormore light than akerosene lantern, con-sumed only 2 amp-hours per night, andcost around $10.(Plans for an automaticbattery-powered anchorlight will appear in afuture issue.)
Sailors can greatlyreduce the total electrical draw oftheir boat’s running lights byswitching to a masthead tricolor fix-ture. It uses only one 25-watt incan-descent bulb instead of three sepa-rate deck-mounted lights for port,starboard and stern, which togeth-er can consume 60 amp-hours ofelectricity if on for 10 hours. Usinga tricolor reduces the load to 20amp-hours. (Keep your deck-
ELECTRONICS
Energy-efficient transistorized lights with fluorescent bulbs(these are from Hella) consume only one-fifth of the powerof incandescent bulbs.

mounted running lights for usewhen under power or in areas ofheavy traffic.) Make sure that yourenergy system is sized so that youalways have enough energy forrunning lights.
Refrigeration & Water MakingOn-board refrigeration places youin a fairly high energy category,
especially when cruisingin warm climates.Powerboaters can reducetheir electrical load bychoosing modest-sized,efficient marine or RVrefrigerators (check theenergy-use rating on thelabel). Or they can cuttheir electrical load signifi-cantly by converting to abuilt-in system with asuper-insulated, top-load-ing box with multiple lid
seals (similar to those used on sail-boats as described below), asopposed to an upright box withmodest insulation where the cold isreleased every time you open thedoor.
Sailors have several types ofrefrigeration systems from which tochoose. Engine-driven refrigerationusing holding plates (plates that“store” cold and keep box temper-atures low for 24 hours or more) is
perhaps the most complete methodto reducing electrical consumption,since it eliminates it altogether. Infact, the boat’s main engine, orone of the many small dieselchargers on the market, can bepowering a refrigeration compres-sor as well as a water-maker pumpand a high-output alternator forcharging batteries. The downsideof this type of system is that youmust run an engine every day andyou’ll get no contribution to yourrefrigeration or water-makingloads from renewable energysources, such as solar or windpower. An alternative is to havean efficient 12-volt holding platerefrigeration system, such as thoseoffered by Glacier Bay, Grunert,Nova Kool, Sea Frost, Technauticsand others. With a 12-volt holdingplate system, if renewable charg-ing sources can’t keep up with theload, you simply run an engine-dri-ven high-output alternator to sup-
An efficient 12-volt watermaker such as theVillage Marine Little Wonder (CDN$3,900/US$2,899) produces 22.7L (6 gal) of water in anhour using only 15 amp-hours of electricity.

ply electricity for refrigeration,water-making and storing surpluselectricity.
Other EquipmentSTOVES Eliminate applianceswith heating elements where possi-ble by cooking with propane. Ifyou like to use a coffee-maker,despite its 100-amp draw whenbrewing, drip the coffee into athermal carafe and turn off themachine. If your model has a built-in clock or timer, disconnect itwhen it’s not being used to elimi-nate the “phantom” load (seebelow). Microwave ovens are fair-
ly efficient, especially when usedfor warming food quickly, but theycan drain batteries rapidly if usedindiscriminately.
RECHARGEABLESRechargeable communicationdevices and cordless appliancesuse an AC plug-in transformer or“power cube” — a small devicethat transforms standard AC powerinto low-voltage AC or DC power.These appliances draw modestamounts of power when chargingor running, but they never com-pletely shut off. If the power is sup-plied by a large inverter, this phan-tom load — drawing power evenwhen appliances are turned off —means the inverter may never gointo its standby mode, thereforewasting a lot of power. Since mostgear can be recharged quickly, it’sbest to recharge the battery pack,
ELECTRONICS
FIGURE 1: Calculating Electrical Loads
To estimate your electrical load, setup an appliance load chart similar tothe one to the right. List all electricalappliances you would like to have onboard. If you plan to upgrade yourboat soon, this is a good time to thinkabout future electrical demand. Listyour DC loads first, followed by yourAC loads as this allows you to assessyour DC charging sources as well asvarious methods of providing ACpower.
Next to each appliance, note theaverage current draw. Average cur-rent draw takes into account the factthat, for some appliances such asautopilots, the current draw varieswith how hard the appliance is work-ing when operating. Average drawalso accounts for appliances withmultiple speed or other operation set-tings.
In the next column, bring timeinto the equation by noting howmany hours on average each appli-
ance is used. Take into account thatsome appliances are used every daywhile others are used occasionally,and that some appliances are operat-ed mostly in port and some are usedexclusively at sea. To find the aver-age daily hours of use for occasionalloads, calculate average hours of useper week and divide by seven days.
Now multiply the average cur-rent draw in column two by the aver-age daily hours of use in columnthree to get your average daily elec-trical energy consumption in amp-hours. You’ll find that some appli-ances with high power draws con-sume a modest amount of energy ifoperated only for short periods oftime, whereas a relatively low-drawappliance like an anchor light con-sumes a surprising amount of electric-ity when operated nightly for 10 ormore hours. Add the values in col-umn 4 to determine your total aver-age daily load.

then disconnect the power cube from the circuit. Youcan do this by placing all your rechargeable gear onone power strip that can be manually turned on for anhour or two when needed. (Caution: Never use an elec-tric timer for the charging cycles — it also has a con-stant power draw.)
INVERTERS Today’s inverters are very efficient atconverting battery power to household AC power, butthey still consume about 10% of the available electricityin the process. Use 12-volt appliances where possibleand disconnect all rechargeable AC gear when not inuse so that the inverter can revert to its standby mode(see above).
COMPUTERS Laptop computers use only a fractionof the power of desktop models, especially once the lap-top’s internal battery is charged. Use a direct DC charg-er if possible. If an AC power cube is used, disconnectit from the power source whenever you can.
ENTERTAINMENT TVs, VCRs, stereos and otherentertainment appliances vary widely in the amount ofpower they draw. In general, DC equipment for theautomotive and marine markets is much more energy-efficient. Electricity use is proportional to a stereo’s
Sample Appliance Load Chart
APPLIANCE AVERAGE AVERAGE AVERAGECURRENT USE CONSUMPTION
DRAW (hours/ (amp-hours(amps) day) /day)
DC LOADSCabin lights 3 4 12Running lights 2 2 4Standard anchor light 1 10 10VHF receive 0.5 4 2
transmit 5 0.4 2GPS 0.5 3 1.5Instruments 0.5 3 1.5Stereo/tape deck 2 2 4.0Bilge pump 4 0.1 0.4Marine refrigeration 5 12 60Autopilot 2 2 4
AC LOADSTV/VCR 6 0.5 3Laptop computer 1 2 2Microwave oven 80 0.17 13.6Coffee mill 8 0.01 0.08Coffee-maker (brewing) 100 0.13 13
Total Average Daily Load = 133 amp-hours per day

wattage ratings, so be selectivewhen buying. Phantom loads inthe entertainment arena includetimers, lights and the instant-onfeature on most TVs. To conserveenergy, simply disconnect theseappliances when not in use.
COMMUNICATIONS Here’sa time when it’s not better to givethan receive. Communicationdevices such as VHF and SSBradios draw 10 times more powerwhen transmitting as when receiv-ing. Keep your communicationtransmissions to a minimum.
VACUUM-LESS Keepingyour boat clean is important, butdon’t sacrifice your batteries forthe sake of convenience. Non-elec-tric sweepers and small broomshave lost favor over the years, butthey can be almost as convenient,less noisy and certainly more ener-gy-efficient than high-draw electricvacuums.
WATER PUMPS Most on-board water pumps draw between3 and 5 amps when running, butthey are only on for short periodsof time. Using hand- or foot-operat-ed pumps helps conserve electrici-ty while regulating freshwater use.For seawater electric pumps, keepintake strainers and waterlinesclear of debris and marinegrowth. A seawater pump candraw many times more electricalpower than normal, if restrictionsare present.
As you can see, reducingyour electrical demand has a lotto do with making intelligentchoices about appliances andhow you use them. If, after mak-ing those choices, your batteriesare still feeling down, you mayhave to alter your lifestyle a bit or
ELECTRONICS

upgrade your charging ability.Only you can decide when conser-vation measures become dracon-ian and rob you of simple plea-
sures on board.Kevin Jeffrey is an independent energydesigner and consultant, author andpublisher of The Independent EnergyGuide, and co-author and publisher of
The Sailor’s Multihull Guide andAdventuring With Children. He liveson Prince Edward Island and has sailedextensively with his family on severalcruising catamarans.
FINDING CURRENT
DRAW
A digital system monitor pro-vides a convenient method forfinding the current draw of allappliances already on board.Begin by making sure allcharging sources andappliance loads areoff, then turn offappliances one at atime. The Link 10,available from HeartInterface, or CruisingEquipment’s E-Meterare a good single-
bank system monitor that dis-plays charging or load amps,battery voltage, and amp-hours. For more sophisticatedmonitoring, the SALT SystemsMonitor, available
from SeaAir LandTechnologies, is an accurate,simple-to-use device that canmonitor up to four batterybanks or charging sources,has programmable alarm func-tions and can even connect toa PC.
TIPS

ten to the stern pulpit. When in the“down” position, the water end ofthe ramp is supported by a smallfender underneath. The ramp floatsup and down to accommodatewave action and the dog’sweight.
In-a-Pinch HoldersHose clamps are high on
the list of sparesto carry but some-times you run outof the size youneed. If that hap-pens to you, takea short length ofwire and use pli-ers to twist and tie.Another temporary
clamp is created bywrapping old line or twine aroundthe hose a few times. Slide a cotter
pin over the wrapsand twist it until tight,then tie or tape the pinto hold it in place.Before using either ofthese substitutes,
wrap tape
(electric orduct) aroundthe hose so themetal or linetwists don’tdamage it.
Hose Patchers
Carry spare lengths of hose forfuel and water applications or atleast note the diameters of allhoses and carry appropriate-sizedpieces of plastic adapters. If youdiscover a damaged hose, youcan cut away the bad section andrejoin the two cut ends with a cen-ter “patch” and hose clamps.
Head LinesNobody really wants to acknowl-edge, much less deal with, theproblem of odor wafting fromthe head, but here’s one prac-tical solution.
Incoming water is often a bigsource of smell. The Head-O-MaticTank-ette is a treatment-dispensinggadget that attacks that initial sourceof odor. Install the Tank-ette (thedevice) in the head’s water-intakehose, then pop in a Head-O-Maticblue bullet (thetreatment). Aswater flows in,some of thebullet’s ingre-
dient flows with it to control odor,break down waste, lubricate thepumping mechanism and keep theholding tank fresh. The Tank-ette dif-fers from other similar-looking units
because you can adjust theamount of treatment
feedingthrough the
system. Contact:AlexMilne
Associates, 3700 Weston Rd.,North York, ON M9L 2Z4; Tel:(800) 563-5947, (416) 742-4911 Fax: (416) 742-6005.
Mutt RampNot all dogs likeboating, butmany dolove
the water.If yours is one ofthe latter, save yourself a lot of on-off hoisting by rigging a doggieplatform.
Actual dimensions and attach-ment methods vary will with eachboat and the dog’s size, so ingenu-ity is required. Make the ramp of
plywood or fiberglass,and cover it withindoor/outdoor car-peting. A few interim
wood strips,also carpeted,offer addedtraction.
The boat end of the ramp isloosely hinged around the top rungof a transom boarding ladder.Attach a length of line to the waterend of the ramp to hoist the ramp toa vertical, stowing position and fas-
Good Boatkeeping