16103 ek res x4 navodila 02 - ekwb the holder using the 2 (two) m4x10 din 7984 screws, pvc washers...
TRANSCRIPT

2nd revision, Dec 15th 2016
EK-RES X4
USER GUIDE
GENERAL INFORMATIONS
/ 1 /
CONTENT: - EK-RES X4 series reservoir- Reservoir holders (universal and bottom)- LED light strip- Pair of pre-cut solid Acrylic tubes- Mounting mechanism
/ 2 /
INSTALLING THE RESERVOIR HOLDERS
EK-RES X4 series reservoirs comes with two special holders. These hold-ers are meant to be installed directly on the computer chassis or alterna-tively fan holes. User may need to drill up to 4 (four) Ø5mm holes through chassis metal using electric power drill if there are no appropriate mounting holes available.
TOP
OR 4x271x2,5 gasket
Glass tube (200mm)
Anticyclon
Rod
M3x8 INOX screw
71x2,5 gasket
Bottom
Screw
The RES X4 UNI holder is intended to be mounted anywhere in the chassis and in any possible direction. The gap between the mounting holes is 105mm, therefore it can also be mounted on 120mm fan holes. Se-cure the holder using the 2 (two) M4x10 DIN 7984 screws, PVC washers and M4 nuts.
The RES X4 120mm fan holder is intended to be mounted on the bottom of the chassis . The gap between the mounting holes is 105mm, therefore it can also be mounted on 120mm fan holes. If you want to mount the holder on the fan, you should use 4 (four) self-tapping screw, otherwise you must use the enclosed 4 (four) M4x10 DIN 7984 screws, secured with nuts and washers.
ATTACHING THE RESERVOIR ON THE HOLDERS
/ 3 /
In order to mount the RES X4 onto the RES X4 UNI holder you should follow the steps below:
STEP 1: Take the RES X4 reser-voir and guide the RES X4 Bot-tom into the bottom circular jaws of the holder.
STEP 2: Gently push the reser-voir into the bottom jaws so that they bend a little. When pushing down guide the upper jaws of the holder into the TOP groove.
STEP 3: Push the upper part of the reservoir into the upper jaws. It should slide in smoothly.
The RES X4 120mm fan hold-er should be mounted before this step. Take the reservoir and guide the bottom part through the circular part of the holder. The holder has a seat on the bottom manifold of the RES X4. Make sure that holder grabs the whole circumference of the reservoir bottom firmly.
UNIVERSAL HOLDER BOTTOM HOLDER
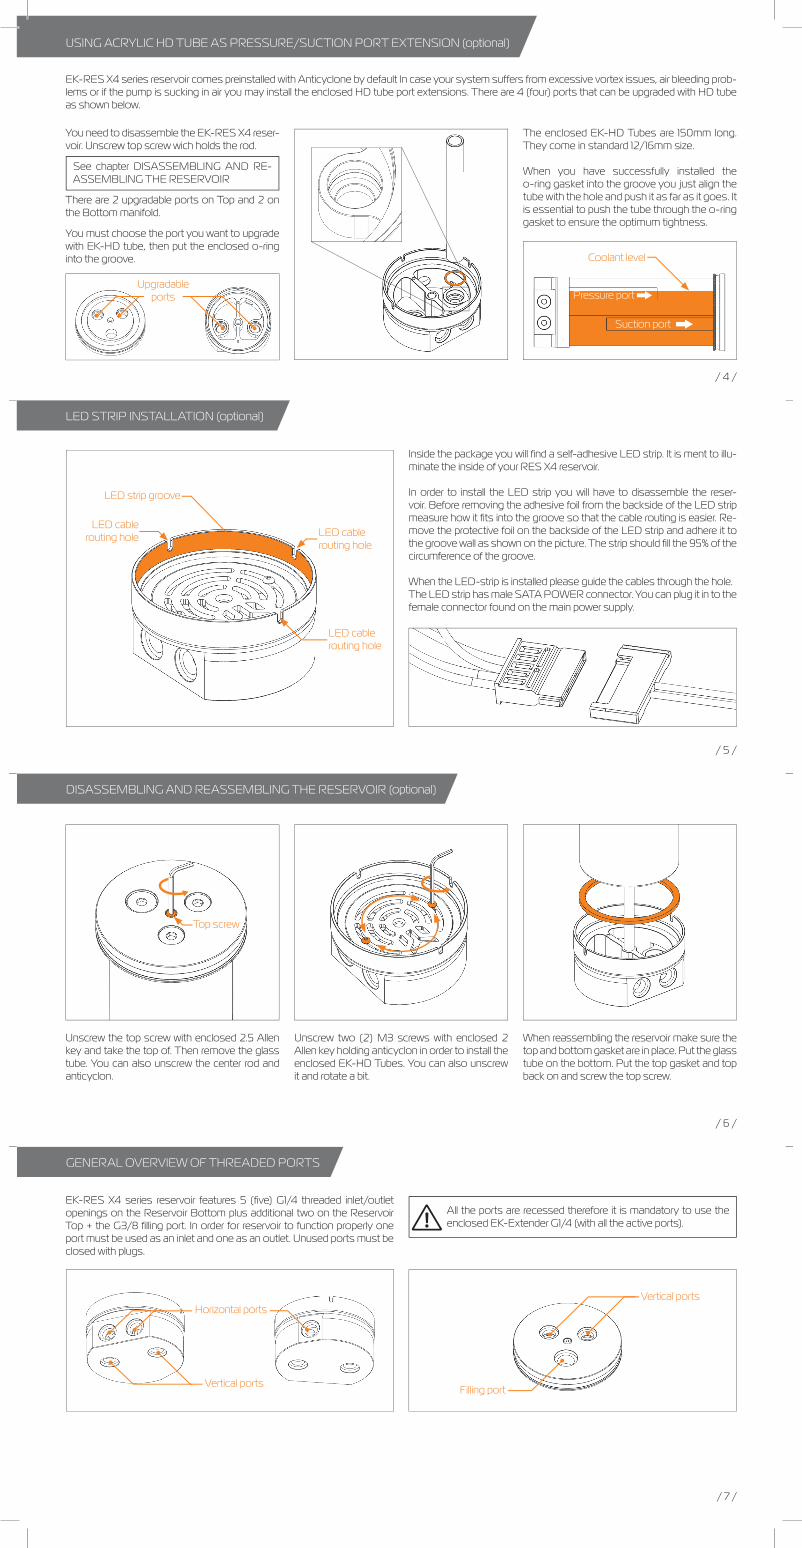
LED STRIP INSTALLATION (optional)
Inside the package you will fi nd a self-adhesive LED strip. It is ment to illu-minate the inside of your RES X4 reservoir.
In order to install the LED strip you will have to disassemble the reser-voir. Before removing the adhesive foil from the backside of the LED strip measure how it fi ts into the groove so that the cable routing is easier. Re-move the protective foil on the backside of the LED strip and adhere it to the groove wall as shown on the picture. The strip should fi ll the 95% of the circumference of the groove.
When the LED-strip is installed please guide the cables through the hole. The LED strip has male SATA POWER connector. You can plug it in to the female connector found on the main power supply.
DISASSEMBLING AND REASSEMBLING THE RESERVOIR (optional)
Unscrew the top screw with enclosed 2.5 Allen key and take the top of. Then remove the glass tube. You can also unscrew the center rod and anticyclon.
/ 5 /
/ 6 /
USING ACRYLIC HD TUBE AS PRESSURE/SUCTION PORT EXTENSION (optional)
EK-RES X4 series reservoir comes preinstalled with Anticyclone by default In case your system suffers from excessive vortex issues, air bleeding prob-lems or if the pump is sucking in air you may install the enclosed HD tube port extensions. There are 4 (four) ports that can be upgraded with HD tube as shown below.
/ 4 /
GENERAL OVERVIEW OF THREADED PORTS
EK-RES X4 series reservoir features 5 (fi ve) G1/4 threaded inlet/outlet openings on the Reservoir Bottom plus additional two on the Reservoir Top + the G3/8 fi lling port. In order for reservoir to function properly one port must be used as an inlet and one as an outlet. Unused ports must be closed with plugs.
You need to disassemble the EK-RES X4 reser-voir. Unscrew top screw wich holds the rod.
See chapter DISASSEMBLING AND RE-ASSEMBLING THE RESERVOIR
There are 2 upgradable ports on Top and 2 on the Bottom manifold.
You must choose the port you want to upgrade with EK-HD tube, then put the enclosed o-ring into the groove.
The enclosed EK-HD Tubes are 150mm long. They come in standard 12/16mm size.
When you have successfully installed the o-ring gasket into the groove you just align the tube with the hole and push it as far as it goes. It is essential to push the tube through the o-ring gasket to ensure the optimum tightness.
Unscrew two (2) M3 screws with enclosed 2 Allen key holding anticyclon in order to install the enclosed EK-HD Tubes. You can also unscrew it and rotate a bit.
When reassembling the reservoir make sure the top and bottom gasket are in place. Put the glass tube on the bottom. Put the top gasket and top back on and screw the top screw.
All the ports are recessed therefore it is mandatory to use the enclosed EK-Extender G1/4 (with all the active ports).
Upgradable ports
Suction port
Pressure port
Coolant level
LED strip groove
LED cable routing hole LED cable
routing hole
LED cable routing hole
Horizontal ports
Vertical ports
Vertical ports
Filling port
/ 7 /
Top screw