#12 & #24 shear manual
TRANSCRIPT
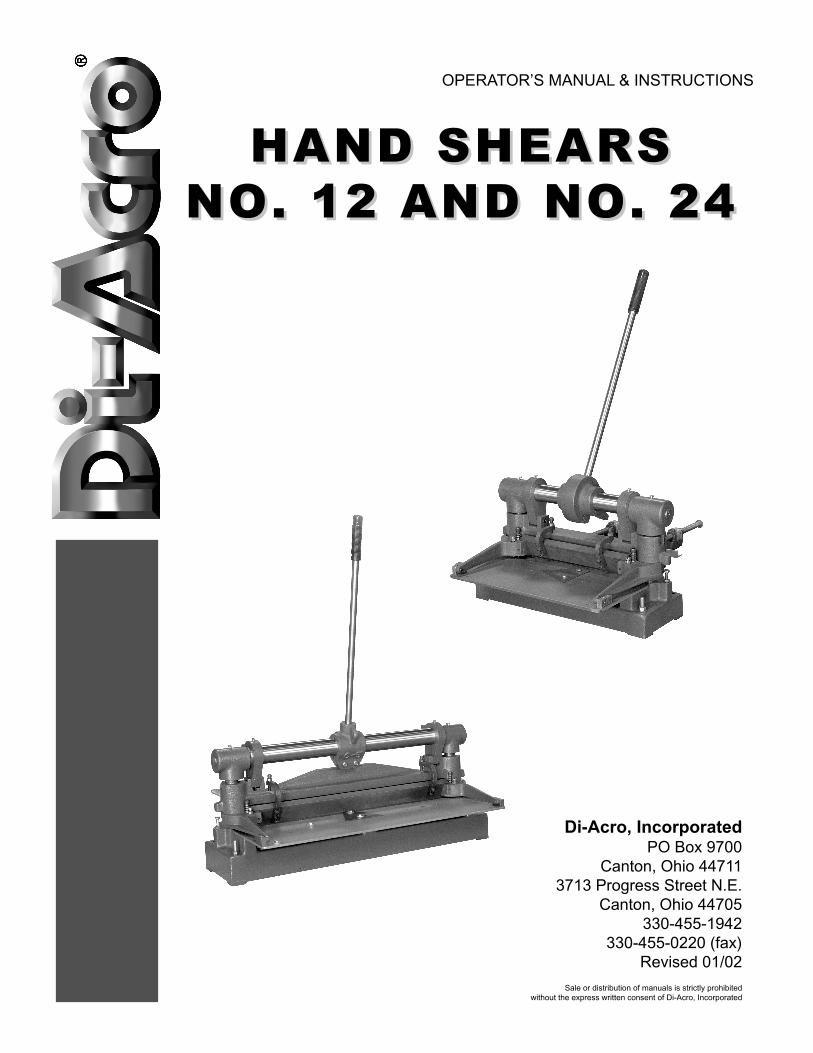
OPERATOR’S MANUAL & INSTRUCTIONS
HAND SHEARSHAND SHEARS
NO. 12 AND NO. 24NO. 12 AND NO. 24
Di-Acro, IncorporatedPO Box 9700
Canton, Ohio 44711
3713 Progress Street N.E.
Canton, Ohio 44705
330-455-1942
330-455-0220 (fax)
Revised 01/02
Sale or distribution of manuals is strictly prohibited
without the express written consent of Di-Acro, Incorporated
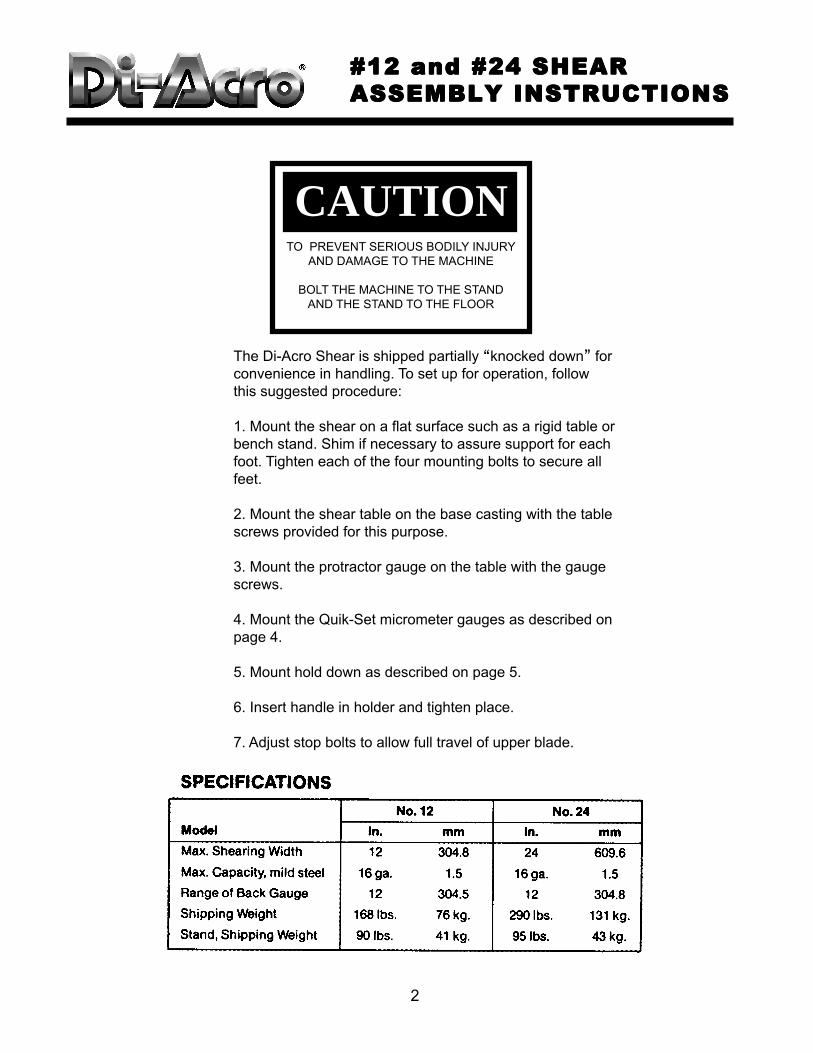
CAUTIONTO PREVENT SERIOUS BODILY INJURY
AND DAMAGE TO THE MACHINE
BOLT THE MACHINE TO THE STAND
AND THE STAND TO THE FLOOR
#12 and #24 SHEAR#12 and #24 SHEAR#12 and #24 SHEAR#12 and #24 SHEAR#12 and #24 SHEAR
ASSEMBLY INSTRUCTIONSASSEMBLY INSTRUCTIONSASSEMBLY INSTRUCTIONSASSEMBLY INSTRUCTIONSASSEMBLY INSTRUCTIONS
The Di-Acro Shear is shipped partially “knocked down” for
convenience in handling. To set up for operation, follow
this suggested procedure:
1. Mount the shear on a flat surface such as a rigid table or
bench stand. Shim if necessary to assure support for each
foot. Tighten each of the four mounting bolts to secure all
feet.
2. Mount the shear table on the base casting with the table
screws provided for this purpose.
3. Mount the protractor gauge on the table with the gauge
screws.
4. Mount the Quik-Set micrometer gauges as described on
page 4.
5. Mount hold down as described on page 5.
6. Insert handle in holder and tighten place.
7. Adjust stop bolts to allow full travel of upper blade.
2

#12 and #24 SHEAR#12 and #24 SHEAR#12 and #24 SHEAR#12 and #24 SHEAR#12 and #24 SHEAR
OPERATING PROCEDURESOPERATING PROCEDURESOPERATING PROCEDURESOPERATING PROCEDURESOPERATING PROCEDURES
Operating Procedures for all Di-Acro Shears are
the same.
When setting up for a production run:
Mount the Ruled Squaring Gauge or the Protractor
Gauge in the most practical position on the work table
and adjust it to the desired angle. (See illustration A)
Mount and position Material Gauge as described on
the following page.
ADJUSTING AND GRINDING BLADES —
The precision standards to which Di-Acro Shears are
built eliminate the necessity of adjusting the shear
blades after they have been bolted into position
against the base and top blade casting.
When shipped from the factory, these machines are
adjusted to accurately shear 16 gauge steel and the
thinnest of sheet materials.
The bottom shear blade should at all times be located
so that its upper edge is flush with the top of the base
casting and shear table.
Vertical adjustment of the bottom shear blade is
obtained by use of Blade Support Bolts which are
located in the base casting directly below the bottom
blade ( see illustration B).
Di-Acro Shear blades are made from high quality oil
hardened tool steel properly heat treated and preci-
sion ground. They are easily resharpened on an
ordinary surface grinder by grinding the narrow edge
of the blade which measures .470” (see illustration
C).
NOTE: Grinding wide edge of the blades reduces its
size and necessitates shimming to obtain proper
adjustment.
3

#12 and #24 SHEAR#12 and #24 SHEAR#12 and #24 SHEAR#12 and #24 SHEAR#12 and #24 SHEAR
MICROMETER GAUGEMICROMETER GAUGEMICROMETER GAUGEMICROMETER GAUGEMICROMETER GAUGE
4
To install “Quik-Set” Micrometer Gauges on Hand
Models follow the procedures listed below:
INSTALLATION:
1. Mount Material Stop C on Micrometer Gauges D and
E
2. Screw in Threaded Rods A & B by hand until they
stop. Make sure lock nuts are loose.
3. Synchronize gauges.
TO SYNCHRONIZE GAUGES:
A. Set Micrometer Gauges D and E on Zero
B. Push down or depress spring loaded Micrometer
Gauges to release them from Threaded Rods and slide
Material stop Assembly forward until it touches lower
shear blade.
C. Turn Micrometer Gauges D and E to engage
Threaded Rods.
D. Turn Threaded Rods A and B counter clockwise and
Micrometer Gauges D and E clockwise until Material
Stop C touches lower shear blade and Micrometer
Gauges read zero.
E. Tighten lock nut on each Threaded Rod.
ADJUSTING “““““QUIK-SET””””” MICROMETER GAUGES
Operator can easily and quickly adjust Gauges while
standing either in front or back of Shear.
To adjust:
1. Set both Micrometer Gauges on zero and push down
or depress. This releases the Material Stop Assembly
from the threaded rods.
2. Move Material Stop to approximate desired location
(complete assembly can be freely moved back and forth
on threaded rods when Micrometer Gauges are de-
pressed) and adjust micrometer Gauges to accurately
position Material Stop.
INSTRUCTIONS “QUIK-SET” MICROMETER GAUGES

#12 and #24 SHEAR#12 and #24 SHEAR#12 and #24 SHEAR#12 and #24 SHEAR#12 and #24 SHEAR
HOLD DOWN BARHOLD DOWN BARHOLD DOWN BARHOLD DOWN BARHOLD DOWN BAR
5
MOUNT Shear Table C on Casting with Screws H.
TO MOUNT Basic Hold Down Bar Assembly, screw
Hold Down Bar M to Hold Down Arms B using Socket
HD Cap Screws.
PLACE Hold Down Bar Assembly on Shear Table
centering Bolts D in oversize holes.
MOUNT hold Down Bar Assembly on Shear Table
locating Springs E on screws F and starting them into
tapped holes in Base Casting.
LOCATE front edge of Hold Down Bar M at edge of
lower shear blade so it may be used as gauge when
shearing to a scribed line. Horizontal adjustment of
the Hold Down Bar is provided for by the oversize
mounting holes for Hold Down Trunnions A.
ADJUST vertical clearance of Hold Down Bar on
Screws K. For accuracy, when shearing to a scribed
line, it is important that both vertical and horizontal
adjustments of the bar be made so that the bar is
very close to the material being sheared.
REGULATE tension of Hold Down Bar by adjusting
Hold Down Spring Screws F. Adjust to minimum
tension required to securely hold material while
shearing. When shearing narrow strips of material on
one end of the shear, two ways assuring even hold
down pressure across the material are:
1. Place a piece of the material between
the Hold Down Bar and the table on the
opposite end.
2. Adjust Screw L on the opposite end to
a point where a material thickness is the
distance between the Hold Down Bar and
the Table.

#12 and #24 HAND SHEAR#12 and #24 HAND SHEAR#12 and #24 HAND SHEAR#12 and #24 HAND SHEAR#12 and #24 HAND SHEAR
6
12
11
10
9
7
6
5
4
3
2
1
24
25
26
23
27
28
29
30
13
14
15
16
17
18
20
21
19
22
31
32
33

7
#12 and #24 HAND SHEAR#12 and #24 HAND SHEAR#12 and #24 HAND SHEAR#12 and #24 HAND SHEAR#12 and #24 HAND SHEAR
PART
NUMBER SHEAR NO. 12 SHEAR NO. 24 DESCRIPTION QTY
1.
2.
3.
4.
5.
6.
7.
9.
10.
11.
12.
13.
14.
15.
16.
17.
18.
19.
20.
21.
22.
23.
24.
25.
26.
27.
28.
29.
29A.
29B.
30.
31.
32.
33.
21A0516C1304
8230121-300
21A0516C1104
31X0516C
8230120-900
8150650-110
8030650-310
31X1000F
8230110-100
21A0516C1304
8030650-300
22C0104C0304
8250110-501
8230143-502
21A0104C0102H
8250160-108
61X0104
21A0104C0308
20A0516C1000
8000120-871
8230120-300
21A0102C2000
8230120-801
23A0104C0304
8230121-100
8230121-200
8690100-100
8230110-371
8903000-000
8230110-300
8230143-179
21A0104C0708
31X100F
8251121-971
21A0516C1104
8240121-300
21A0516C1104
31X0516C
8240120-900
8150650-110
8030650-310
31X1000F
8240110-100
21A0516C1304
8030650-400
22C0104C0304
8240110-501
8230143-502
21A0104C0102H
8250160-108
61X0104
21A0104C0308
20A0516C1102
8000120-871
8230120-300
21A0102C2000
8240120-801
23A0104C0304
8240121-100
8240121-200
8690100-100
8240110-371
8903000-000
8230110-300
8240143-179
21A0104C0708
31X1000F
8271121-971
Screw
Upper Casting
Screw
Nut
Blade
Name Plate
Instr. Plate
Nut
Base
Screw
Caution Plate
Screw
Table
Protractor Gauge
Screw
Squaring Gauge
Washer
Screw
Screw
Long Handle Arm Assy
Pin
Scewr
Handle Holder
Screw
Shaft
Shaft Link
Oil Hole Cover
Shaft Bearing Assy
Shaft Bearing
Shaft
Quikset Back Gauge
Screw
Nut
Holddown Assy
10
1
2
2
2
1
1
2
1
10
1
2
1
1
2
1
4
2
2
1
2
1
1
1
1
2
4
2
2
2
1
5
5
8231800-080 8241800-080
12 24
10
1
2
2
2
1
1
2
1
10
1
3
1
1
2
1
4
2
2
1
2
2
1
1
1
2
4
2
2
2
1
8
8

#12 and #24 SHEAR#12 and #24 SHEAR#12 and #24 SHEAR#12 and #24 SHEAR#12 and #24 SHEAR
HOLD DOWN ASSEMBLYHOLD DOWN ASSEMBLYHOLD DOWN ASSEMBLYHOLD DOWN ASSEMBLYHOLD DOWN ASSEMBLY
8
7
6
5
8
4
3
2
1
10
11
12
9

9
#12 and #24 SHEAR#12 and #24 SHEAR#12 and #24 SHEAR#12 and #24 SHEAR#12 and #24 SHEAR
HOLD DOWN ASSEMBLYHOLD DOWN ASSEMBLYHOLD DOWN ASSEMBLYHOLD DOWN ASSEMBLYHOLD DOWN ASSEMBLY
PART
NUMBERSHEAR NO. 12 SHEAR NO. 24 DESCRIPTION QTY
1.
2.
3.
4.
5.
6.
7.
8.
9.
10.
11.
12.
20A0516C1104
8051121-901
20A0516C1104
8251470-101
8510211-700
8051121-900
8251121-900
19A0104X1000
31X0516C
8251121-901
8000121-901
21A0104F0708
20A0516C1104
8271121-701
20A0516C1104
8251470-101
8510211-700
8240121-900
8251121-900
19A0104X1000
31X0516C
8251121-901
8000121-901
21A0104F0708
Screw
Hold Down Bracket
Screw
Arm Adj Bolt
Spring
Hold Down Bar
Hold Down Arm “R”
Pin
Nut
Hold Down Arm “L”
Hold Down Trunnion
Screw
2
2
4
2
2
1
1
2
4
1
2
8

#12 and #24 SHEAR#12 and #24 SHEAR#12 and #24 SHEAR#12 and #24 SHEAR#12 and #24 SHEAR
GAUGE ASSEMBLYGAUGE ASSEMBLYGAUGE ASSEMBLYGAUGE ASSEMBLYGAUGE ASSEMBLY
10
PART
NUMBER SHEAR NO. 12 SHEAR NO. 24 DESCRIPTION QTY
1.
2.
3.
4.
5.
7.
8.
9.
10.
11.
12.
13.
13 A.
13 B.
14.
15.
16.
8030143-103
21A0104C0102H
8000143-103
22B0104C0708
22AXX10F0102
8230143-103
22D-0516C0102
8690470-404
8220143-104
21A0104C0308
8100143-104
8210143-172
8120510-204
8000143-104
8200143-104
8010143-104
8240143-103
21A0104C0102H
8000143-103
22B0104C0708
22AXX10F0102
8230143-103
22D-0516C0102
8690470-404
8220143-104
21A0104C0308
8100143-104
8210143-172
8120510-204
8000143-104
8200143-104
8010143-104
8240143-105
Quik Set Stop
Screw
Quik Set Bracket
Screw
Screw
Quik Set Rod
Screw
Nut
Quik Set Arm Long
Screw
Quik Set Arm Short
Dial Nut Assy
Spring
Dial Shoe
Pivot Sleeve
Spacer Sleeve
Quik Set Tie Bar
1
1
2
2
2
2
2
2
1
2
1
2
2
2
1
2
1
4
16
12
5
6
13
8
3
7
10
14
2
9
15
11
11

#12 and #24 SHEAR#12 and #24 SHEAR#12 and #24 SHEAR#12 and #24 SHEAR#12 and #24 SHEAR
GAUGE ASSEMBLYGAUGE ASSEMBLYGAUGE ASSEMBLYGAUGE ASSEMBLYGAUGE ASSEMBLY
1 23
7
4
5
6
PART
NUMBER SHEAR NO. 12 SHEAR NO. 24 DESCRIPTION QTY
1.
2.
3.
4.
5.
6.
7.
8240140-800
8040140-700
8230142-000
21A0516C1000H
61X0104
21A0104C0102H
8240140-700
8240140-800
8040140-700
8230142-000
21A0516C1000H
61X0104
21A0104C0102H
8240140-700
Stop Rod
Stop Clamp
Material Stop
Screw
Washer
Screw
Stop Clamp
12 24
2
2
1
2
2
2
0
2
1
1
2
2
2
1
11