100215 getting started with condor soaring · pdf filegetting started with condor soaring...
TRANSCRIPT
Getting Started with Condor Soaring Simulator
This article is intended to help soaring pilots get started in the wonderful world of on-line glider racing. The Condor simulator is by far the best and most realistic soaring simulator on the planet. Not only are the flight physics very high fidelity, but the package was designed from the ground up to support online multi-player soaring competitions. If you are an experienced glider racing pilot, you will easily recognize how good Condor is, and maybe wonder why you need that hugely expensive glider that you can only fly for a few months every year. If you have never raced gliders or flown much cross-country, you can get a taste of the heart-pounding adrenaline rush as you blast through the finish gate at 50 feet and 140kts, dumping water. Although I have no firm statistics, I believe there are now more active Condor glider pilots than there are active ‘Real Life’ (RL) glider pilots, and the Condor pilots fly 24/7, year round, world-wide. The ‘Monday Night Soaring’ contest, started to give Condor pilots a race to fly in U.S. time zones, has now run continuously for over five years and attracts as many international pilots as it does American ones. The main Condor community website has more than 6000 registered users, who have posted over 107,000 posts in a little over three years. This article attempts to cover some of the highlights of getting started with Condor, but doesn’t even scratch the surface of the full capabilities of this wonderful package. For more information, feel free to contact the author at [email protected], or visit the Condor website at http://www.condorsoaring.com
Hardware and Software Requirements:
Computer: You will need a decent computer with a good display and graphics card. It doesn’t have to be a ‘gaming’ machine – just decent. I use a Dell Precision M6300 laptop with 2GB RAM and the built-in NVIDIA graphics card. Condor will also run on Macintosh computers equipped with Intel processors. Condor only runs under a Microsoft Windows operating system. I use Windows XP Pro, but I understand that (gag, puke) Vista will work as well. On a Macintosh, the more recent operating systems use a feature called “Boot-Camp”, with which you create a separate disk partition for Windows and install the Windows operating system natively. You then have option to boot the hardware into Windows or Macintosh. Condor will not run under Windows emulation. You will also need a separate mouse – more on this later.
Joystick/Rudder Pedals: You need a decent joystick with a twist-grip for rudder control, or you need rudder pedals. Condor has an ‘auto-coordination’ setting that allows realistic flight without
rudder pedals, but you still need some additional rudder control for cross-wind takeoffs (trust me on this).
Internet Connection: You will, of course, need an internet connection if you want to fly in any of the on-line races. You can fly Condor by yourself off-line, and you can hook multiple computers together in a LAN arrangement for ‘local’ races with other friends, but the real draw of Condor is real-time racing against other pilots across the world. You don’t need super bandwidth. A DSL or cable connection will probably work fine. However, it must be a terrestrial connection – a satellite link won’t work at all due to the high latency caused by the very large distances involved with geosynchronous satellites. There are rumors to the effect that recent cellphone modems are fast enough to run Condor OK, but of course then you have to pay for the 180-240 minutes needed to fly a race!
Condor, Sceneries, Plane Pack 1: The Condor simulator can be purchased on-line from the main Condor website at http://condorsoaring.com/ for about 40 Euros. You’ll also need Plane Pack 1 for another 10 Euros. If you want to buy locally, both Condor and Plane Pack 1 are available from Paul Remde’s Cumulus Soaring Inc. (http://www.cumulus-soaring.com/). Sceneries. Condor comes with one scenery (Slovenia) installed, but you’ll need to acquire a number of others to be able to fly in online competitions. The good news is – they are almost all free, and even the non-free ones are very cheap. The bad news is, they are all very large downloads, with some of the more photo-realistic ones topping 1GB. Be prepared for multi-hour downloads. Sceneries for almost all of Europe are available, and sceneries from all over the world are becoming available, including many for the continental U.S.
Installation and Initial Setup:
Installation: Installation is extremely simple – run the setup file, and accept all the defaults. I haven’t heard of anyone having problems with initial install.
Initial Setup:
Pilot Info Launch Condor, and click on the ‘Pilot’ button. This will bring up the following screen.

Enter your name, country, tail number and Competition Number. If you don’t have a Comp Number, it’s OK to make one up. However, later on if you register for one of the big races you may have to change to one that isn’t already taken. Leave the ‘RN and CN Color’ and ‘Competition ID’ fields alone. This is a bit confusing, because Condor uses the ‘Competition Number’ for what we think of as the Competition ID, and the ‘Competition ID’ field is an internally generated unique ID that can’t be edited (this may be used in future races as a unique pilot identifier). The ‘Logbook’ button takes you to an internal spreadsheet that records all your flying experiences since installing Condor on this machine. Click OK to save the Pilot data and exit the dialog.
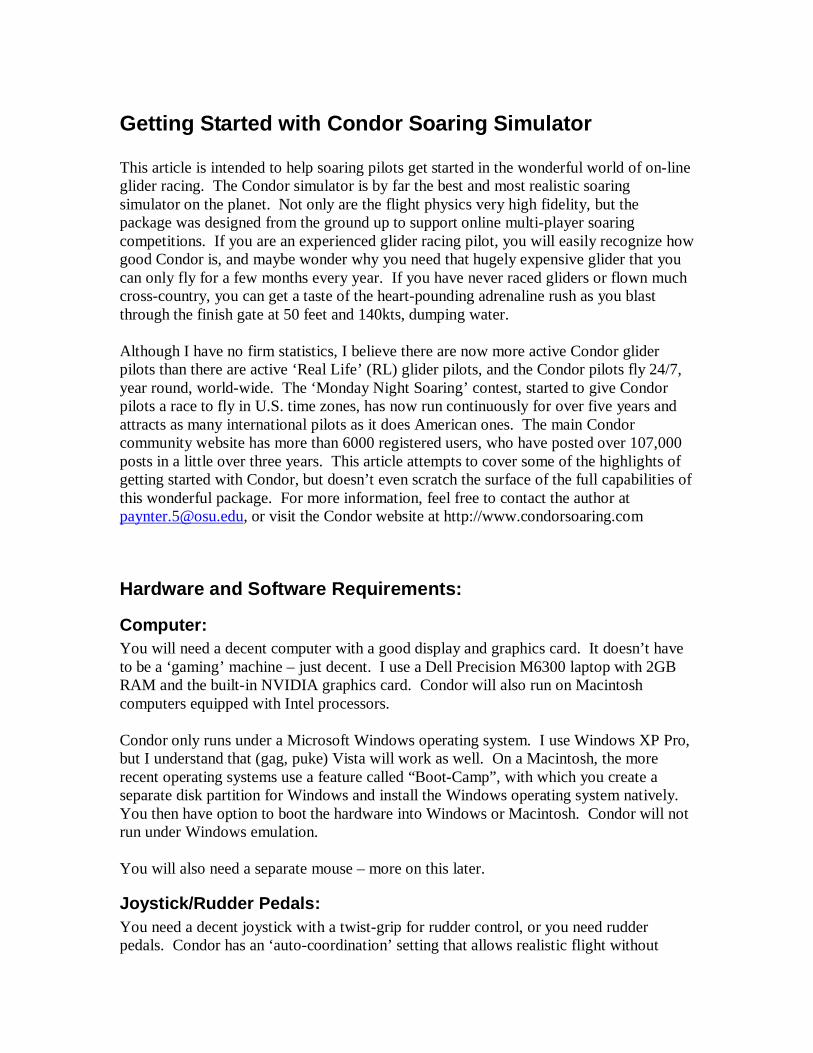
Setup Pages: Click on ‘Setup’ to launch the initial setup pages. These pages allow you to specify speed, distance, and lift units, assign control functions to joystick buttons, and other useful information. Here are some screen shots of my configuration, showing the settings that I have evolved over the two years or so that I have been flying condor.
Graphics Tab: The settings on this page affect view realism and graphics loading. The graphics card is automatically detected and displayed at the upper right. You may need to experiment with these options to find the combination that gives you the most realism without significantly affecting frame rate. My Dell Precision M6300 laptop is fairly fast, so I have most realism options maxed out. If you have an older PC, you might have to uncheck some or all of the realism options, and back off on the terrain & visibility options to get a reasonable frame rate, especially in gaggles where there is a lot going on.
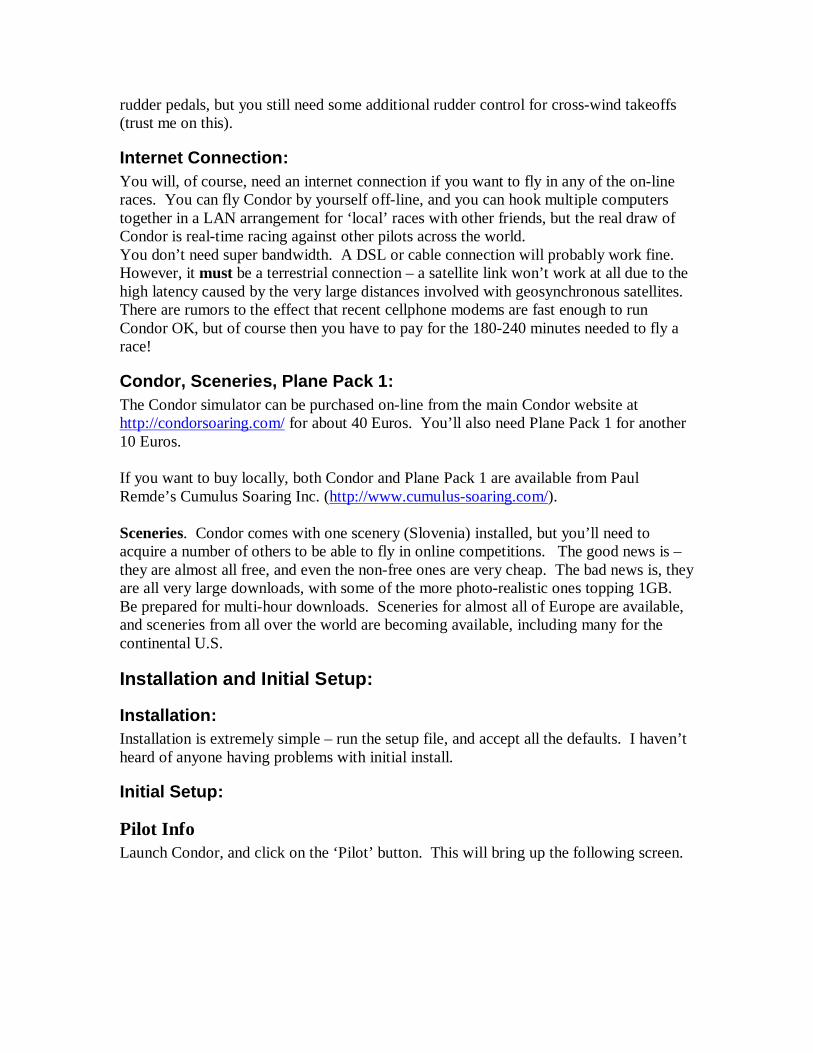
Sound Tab: Nothing unusual here. You’ll note that I have the ‘Vario off when negative’ option checked, just as I do in my RL (Real Life) cockpit.
Input Tab: The left side of this page defines the relationship between stick movement and control movement. Leave all these settings at the original defaults, *except* make sure the ‘stick trim where available’, ‘stick centers with hands off’, and ‘Auto Rudder’ checkboxes are what you want for your configuration.

The right side of this screen allows assignment of Condor functions to joystick buttons/controls, via the ‘Assign Controls’ button (see later screenshots). I strongly recommend checking the ‘Mouse look’ checkbox, which allows you to move the outside point-of-view (POV) around with the mouse, and unchecking ‘Left button for mouselook’. Controlling the POV with the mouse is very fast and very intuitive, and rapid POV adjustment is an absolute necessity in contest flying. The Force Feedback options are only relevant for a force feedback joystick. I happen to have a vintage Microsoft Sidewinder Force Feedback II joystick, so I have these options enabled.
Joystick Control Assignments: The next two screenshots show my joystick control assignments. Other than the normal roll, pitch, and yaw controls, the only other assignments I make are for the elevator trim, Zoom In, Zoom Out, and Zoom Reset (View Reset) functions. Zoom In and View Reset are very handy in competition flying, as it allows you to look ahead to catch those wing flashes in the next thermal.

Network Tab: Nothing to do here – leave as default.
Options Tab: Here’s where you can define your preferred units for altitude, vario time constants, etc. In the Miscellaneous column all I did was change the screenshot (S-keyboard key) from BMP to JPG. The NMEA output section is very useful for connecting an external PDA. If this is enabled, Condor will output NMEA sentences to the selected output port (COM6 in my case) just like the GPS in RL. This is a wonderful tool for keeping your PDA skills sharp in the off-season, or evaluating a new PDA and soaring software combination in the comfort and safety of your den instead of trying to figure it out in flight. I highly recommend this feature.

Online Racing: This section assumes you have successfully installed Condor and done the initial setup, you have flown in the offline ‘Free Flight’ mode long enough to be able to stay upright and aloft, and now you want to try your luck in an online competition. Online competitions require that someone, somewhere acts as a race ‘server’, and then competitors connect to that server over the internet. Anyone with a Condor program can act as the server, and can fly in the competition as well. So, for instance, I could email my buddy in East Uagadugu and tell him that I was going to start up Condor on my PC and set up a race at such and such an IP address. My buddy would then start Condor on his PC, type in my IP address, and tell Condor to connect to that ‘server’. Assuming we did everything correctly, my glider and my buddy’s glider would now appear on the runway at the takeoff airport in the selected scenery, get towed up, and released just like in RL. I would see his glider through my canopy, and he would see mine through his. Any changes in my plane’s state (altitude, speed, attitude, etc) are instantly visible to my buddy, and vice versa. To make this process easier, a list of ‘public’ servers is maintained by the Condor folks at http://www.soaringsim.com/serverlist.php. Race organizers ‘publish’ their server address on this list, and race entrants simply click on that line in the list to join the race. There are three basic steps in joining an online race; Connect to the server, select and configure a glider, and join the race. The screenshots and discussion below take you through each step. To initially connect to a server via the Condor Server List (by far the most common way of joining), you must first make sure that Condor IS NOT running on your PC. This is a bit counter-intuitive at first, but you get used to it pretty quickly (if you forget, Condor will remind you). Launch your favorite web browser, and navigate to the Condor Server List at http://www.soaringsim.com/serverlist.php (shown below).

Click on the desired server name, and Condor automatically launches and displays a screen like the following:
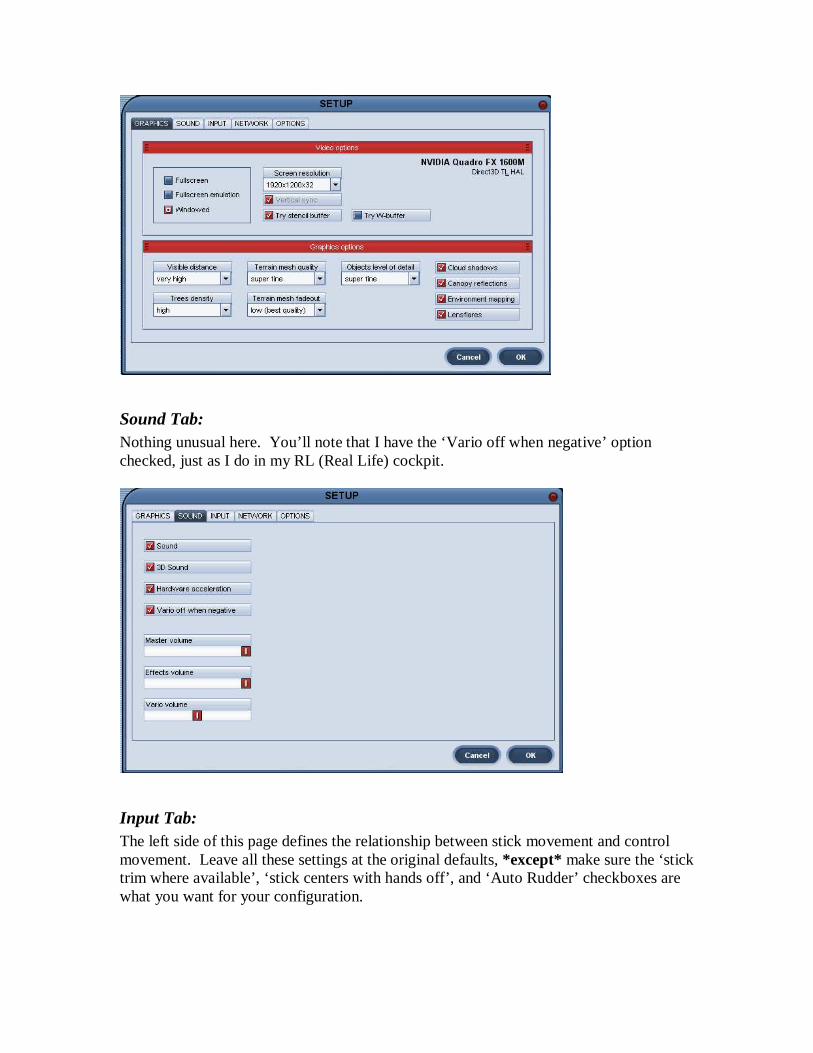
Note the ‘Connect information’ section at the lower right has the server host address already filled in. If this particular race requires a password, you would enter it in the ‘Password’ field. Otherwise, leave it blank and click on ‘Join’. Once you have connected to a race server, a dialog showing all the relevant task and plane information will be presented, as shown in the following screenshots.
Task Tab: The task tab shows the task layout on a map of the scenery. Right-click options allow you to change the map scale and/or change the map display. Changing from ‘photo-realistic’ to a pseudo-colored height map type can be important for races in mountainous terrain, like Provence or New Zealand. The right side shows race details like the scenery being used, the task waypoints, and task timing details. The ‘Time (hours, minutes)’ field shows the time of day in the race scenery at the time the server started (often, but not always, a little after noon). The ‘Race in’ field shows the number of minutes between when the join time ends and the

race start window opens. The ‘Time window’ field shows the number of minutes that the start gate is open. Note that in Condor races, the start window is often fairly short to keep the entire race time within bounds. Important! If the ‘Time window’ field shows 0, then the race will have a regatta start, and all pilots’ elapsed time starts at the end of the ‘Race in’ period, whether or not a pilot has actually crossed the start line!
Plane Tab: This screen has two sub-tabs: The 3D view shows a rotating view of the selected glider, and the ‘Settings tab allows you to set the water ballast level (if enabled), and the CG setting for the race. The ‘Plane class’ field can be fixed to a particular class by the race organizer, or it can be a handicapped race where you can fly anything. The ‘Plane type’ field shows the models available for the selected class. Note that unless you have purchased and installed Plane Pack 1, some of the more modern 18-meter gliders won’t be available. The ‘skin’ field allows the use of custom paint schemes for your glider (note – your whizzo custom paint job won’t be visible to other pilots unless they also have your paint scheme installed on their PC, which makes this feature almost useless).


Weather Tab: This tab shows the relevant weather parameters set by the race organizer for the flight. This is mostly self-explanatory. Watch out for situations where the weather parameters have ‘high’ variation!
NOTAM Tab: Take some time to look over the information on this tab, as there are a few very important items. The Realism section shows how far away you can see glider ‘tags’, how far away you can see thermals (almost always set to zero for a real race), and how far away a turnpoint ‘pole’ can be seen (also generally set to zero for real races). The ‘Monday Night Soaring’ (MNS) race organizers generally set this to 1nm (very realistic), while other races tend to use larger values. Even without the tags, you can still see other gliders, just not quite as far away. The checkboxes in the realism section enable/disable various realism options. The ones that are most often used for races are ‘Allow PDA’, ‘Allow External view’ (handy to check that you really did load up with ballast), and ‘Allow mid-air collision recovery’ (the Q key on the keyboard). This last option is very necessary in Condor due to the
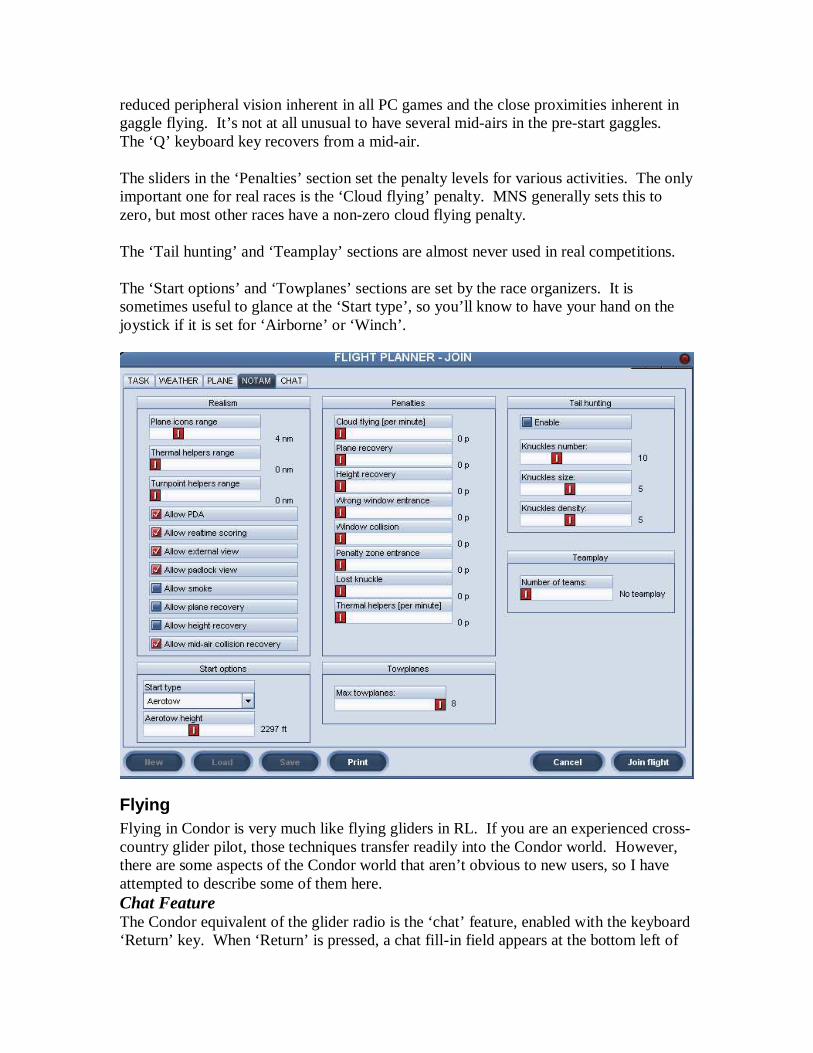
reduced peripheral vision inherent in all PC games and the close proximities inherent in gaggle flying. It’s not at all unusual to have several mid-airs in the pre-start gaggles. The ‘Q’ keyboard key recovers from a mid-air. The sliders in the ‘Penalties’ section set the penalty levels for various activities. The only important one for real races is the ‘Cloud flying’ penalty. MNS generally sets this to zero, but most other races have a non-zero cloud flying penalty. The ‘Tail hunting’ and ‘Teamplay’ sections are almost never used in real competitions. The ‘Start options’ and ‘Towplanes’ sections are set by the race organizers. It is sometimes useful to glance at the ‘Start type’, so you’ll know to have your hand on the joystick if it is set for ‘Airborne’ or ‘Winch’.
Flying Flying in Condor is very much like flying gliders in RL. If you are an experienced cross-country glider pilot, those techniques transfer readily into the Condor world. However, there are some aspects of the Condor world that aren’t obvious to new users, so I have attempted to describe some of them here. Chat Feature The Condor equivalent of the glider radio is the ‘chat’ feature, enabled with the keyboard ‘Return’ key. When ‘Return’ is pressed, a chat fill-in field appears at the bottom left of

the screen, as shown in the following screenshot. Pressing ‘Enter’ again transmits whatever you typed to everyone else on the server. Note the default frequency for this fill-in field is 123.5, BUT it can be (and sometimes is, inadvertently) changed! The backslash (\) and single-quote (‘) keys step the frequency up and down in 0.25MHz steps, respectively. If you change the frequency (inadvertently or otherwise), only those on the same frequency will ‘hear’ you. Fortunately, non-default freqs are shown in RED so its easy to see when you’ve screwed up. PDA Basics The PDA that comes with Condor is actually pretty good, although it does have some significant limitations. The worst problem with the PDA is that it is limited to north-up orientation, which means that when the task line happens to be oriented more east-west than north-south, it is much harder to look ahead for potential problem areas. There are 4 separate pages available in the PDA, accessible via the 1,2,3,4 number keys, but the ‘4’ page actually has two different sub-screens.
Screen 1: Map View: This shows the traditional map view of the task, using whatever map type was initially selected when first entering the race. The PageUp/Down keys change the scale, and the ‘Cockpit Zoom’ (Y) keyboard key zooms in on the PDA (very helpful in bridging between map zoom scales).
Screen 2: Next Waypoint View: Shows the next and subsequent waypoints. Useless.
Screen 3: Final Glide View: Shows the final glide situation for the next and subsequent waypoints at the selected MC value. Here ‘DH’ means your current height above the target waypoint, and ‘DDH’ means your calculated arrival height above the target waypoint. PageUp/Down moves up & down through waypoints (+1 means the 1st waypoint after the next one, etc). Very helpful.
Screen 4a: Wind View: Shows the current wind at the current altitude. Extremely useful for ridge tasks.
Screen 4b: Bread-crumb View: Shows the last few minutes of lift/sink activity. Extremely useful for centering thermals. PageUp/Down changes the scale.
The ‘Tilde’(~) key: If you read the manual very closely, you will find that the Tilde (~) keyboard key toggles main screen readouts on and off, including the chat text and flap/trim position readouts. I’ve never had the occasion to deliberately disable readouts, but I have inadvertently done so on a number of occasions while going after the ‘1’ (map) key. So, when this happens

to you and you can’t figure out why readouts don’t work anymore, try hitting the tilde key and see if it all comes back.

This document was created with Win2PDF available at http://www.win2pdf.com.The unregistered version of Win2PDF is for evaluation or non-commercial use only.This page will not be added after purchasing Win2PDF.