10 unconventional ceramic techniques you haven’t...
TRANSCRIPT

to
10 Unconventional Ceramic Techniques
You Haven’t Tried Yet
Learn the Unconventional Ceramic Techniques Used by Your Favorite Artists.
Brought to you by

www.CeramicAr4stsNow.com
Laser Decals
ONE
1
Ar4st: Jus4n Rothshank

DIY Laser Decals
Add photo-quality images and text to ceramic. Ceramic decals are a great way to add photo-‐quality images and text to your ceramic art, but they can be expensive or require a mass quan4ty order. A liEle known trick is that some home laser printers have iron in the ink (similar to Spanish iron-‐oxide) and with the right paper, you can print your own for just a few dollars per sheet. Unlike commercial ceramic decals, laser decals do not have adhering glass and instead rely on the surface of the piece’s glaze mel4ng to s4ck. To start using your decals, apply them to a finished glazed work that has been fired up to its final temperature. Let the decals dry overnight before firing the piece again up to the temperature when the glaze just begins to melt. If you don’t fire hot enough, the image will rub off and if you fire to high, it will be absorbed into the glaze. There is a sweet spot where you can get consistent custom ceramic decal results from your average laser printer. A common printer you can buy for this process is the P1109w HP LaserJet Pro Laser Printer available for about $60 at Officemax and waterslide decal paper is available for just a couple dollars per sheet. Related Links: hEp://rothshank.com/jus4ns-‐work/decal-‐resources/ hEp://www.andrewgilliaE.com/home.html hEp://lindaarbuckle.com/handouts/laser-‐decals-‐for-‐ceramics.pdf hEp://www.decalpaper.com/Default.asp
www.CeramicAr4stsNow.com

Artist: Andrew Gilliatt
“Iron Decals are like custom printed stickers that can be permanently fired onto ceramic.” POTTERYDECALS.COM “
www.CeramicAr4stsNow.com

Glow-in-the-dark Glaze
TWO
2
Ar4st: Jay Jenson

Glow-in-the-dark Glaze
Learn the story of “Gloze.”
While in grad school at Edinboro University of Pennsylvania, Brian Jensen was challenged to develop cutting-edge ceramic technology as a part of his education. This lead Jensen down and long and complex path of talking with various companies around the world who were experimenting and dealing in glow-in-the-dark materials. Jensen overcame some massive hurdles (many of which were legal and bureaucratic) and developed the first glow-in-the-dark glaze for the consumer market - he called it Gloze. Jensen introduced Gloze to the market in early 2003, launching it at the National Council on Education for the Ceramic Arts (NCECA) conference in San Diego, California. You can see an example of Gloze in the images below. Although we couldn't find anyone still producing the original Gloze, you can buy glowing ceramic pigment for $140/ kilogram from the Singaporean-based Glo-Net. “Brian Jensen’s quest for glowing glaze began in the town of Edinboro, Pennsylvania, with professor Steve Kemenyffy’s challenge to graduate students to develop cutting-edge ceramics technology.” Read More on Ceramic Arts Daily. Related Links: http://ceramicartsdaily.org/wp-content/uploads/2009/02cmjja04glowingglaze.pdf http://www.glo-net.com/ceramic.html
www.CeramicAr4stsNow.com

Artist: Jay Jenson
“I decided I wanted to make the product available to the public so others could find new and interesting uses for the glaze.” JAY JENSEN
“www.CeramicAr4stsNow.com

Paper Clay
THREE
3
Ar4st: Shannon Goff

Paper Clay
A super-clay that fixes everything you hate about ceramics.
Adding paper to clay transforms the material you think you know into something with strange, seeming contradictory, properties. There are 3 major benefits to paperclay: strength, uniform drying, and great bonding properties.
Working with a material with fiber running though it makes your finished greenware incredibly durable. This means that you can create typically impossibly thin or fragile forms and have the ability to get it into the kiln without breaking. The fibers also act as capillaries that disperse the moisture evenly inside of the clay. There is no need to cover paperclay sculptures for slow drying, the even moisture and added strength keeps even the biggest changes in thickness from cracking apart. The last, and possibly most amazing, property of paperclay is that you don’t need to slip and score when you attach paperclay-to-paperclay using paperclay slip. You can also attach wet clay to dry clay using paperclay slip and sometimes even wet clay to already fired ceramic without cracking! Whoa!
To make paperclay, blend 3 rolls of toilet paper into a bucket of warm water with a drill. Then, clump the fiber together and wring out the water so you are left with damp clumps of fiber. Add these clumps to a 5 gallon bucket filled ¾ with clay slurry and blend until it is consistent all the way through. For an amazing sculpting material you can dry the slurry until it’s the consistency of your typical clay.
Related Links: http://ceramicartsdaily.org/wp-content/uploads/2015/06/Paperclay.pdf http://www.shannongoff.info/ - /new-gallery-2/ http://www.angelamellor.com/
www.CeramicAr4stsNow.com

Artist: Angela Mellor
“This addition makes the clay more forgiving… It can dry more easily, yet also be rehydrated. It can be fired and then added on to and fired again.” SHANNON GOFF
“www.CeramicAr4stsNow.com

Fabric Clay
FOUR
4

Fabric Clay
Cut, fold, and wrinkle clay just like fabric.
Fabric Clay is another way of working with paperclay as a sculpting material. When enough fiber is added to a clay slip, the fibrous slip can be thinly spread on a smooth plaster slab and compressed with a metal rib. Once the slip dries (1-2 minutes), you can peel the fabric-thin sheet off of the slab for unique building properties. The sheet acts like fabric - it needs to be cut with scissors, it can be folded, it can be draped or wrinkled, and it can be incredibly translucent when working with porcelain. Additionally, it has the unique properties of paperclay: no cracking, no slipping and scoring, and the ability to rehydrate bone-dry work to a workable consistency. Of course, the final work is incredibly fragile, but it creates a truly unexpected look for the ceramic material. Related Links: http://www.jeremiahbutters.com/
www.CeramicAr4stsNow.com
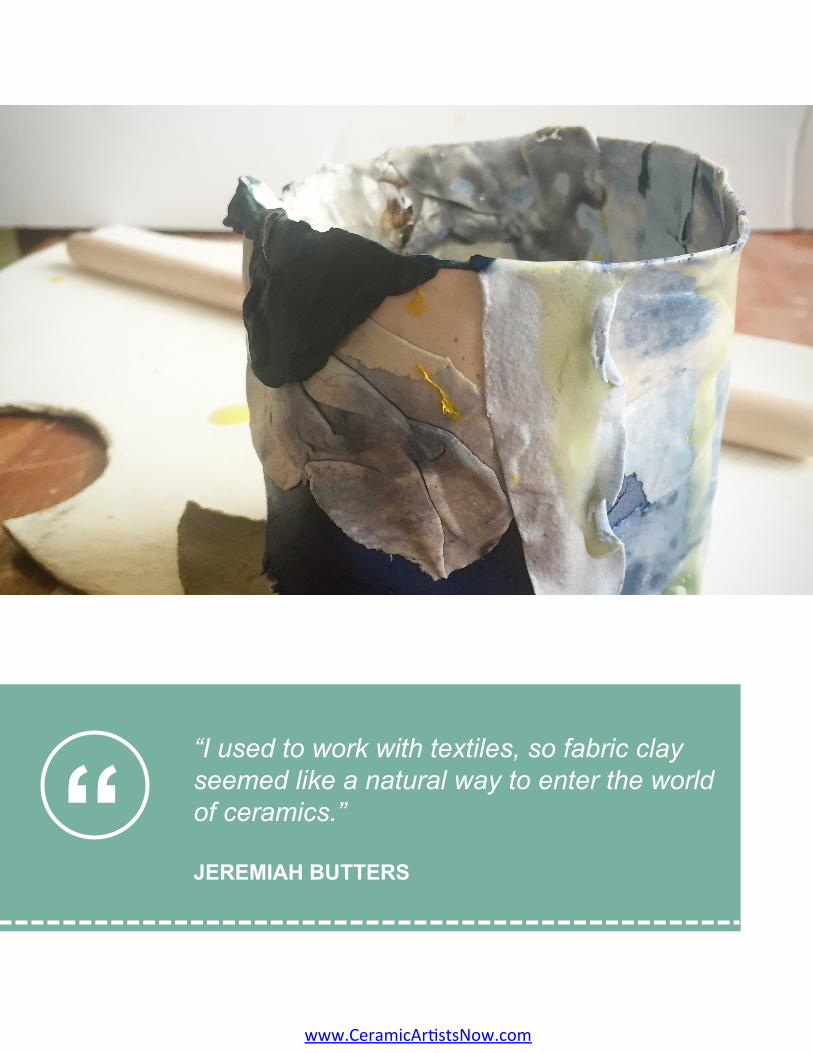
“I used to work with textiles, so fabric clay seemed like a natural way to enter the world of ceramics.” JEREMIAH BUTTERS
“www.CeramicAr4stsNow.com

Drawing In Plaster Molds
FIVE
5
Ar4st: Peter Pincus

Drawing in Plaster Molds
Paint on the surface of your slip-cast art.
For those artists who are slip casting, you know that there are limits to the clay surfaces you can achieve. A fun way to make your slipcast surfaces interesting and beautiful is to do some drawing on the inside of the mold. This is a process used by artists like Peter Pincus, Babs Haenen, and Tomoko Sakumoto. To do this, first add color to a small amount of your casting slip using mason stains. Then, roughly paint your first color on the inside of the plaster mold. Take an exact-o knife and cut shapes or lines in the layer of colored slip and proceed to remove the slip scraps from around the shapes you drew. Repeat these steps with each additional colored clip. When you are finished adding your cut shapes, put your mold together and proceed with the slip-casting process as usual. When you remove the piece from your mold, all of your paintings will exist in the same surface plane, achieving a beautifully clean design. Related Links: http://bit.ly/1PXA5CR http://peterpincus.com/ http://tezukayama-g.com/en/tomoko-sakumoto/
www.CeramicAr4stsNow.com
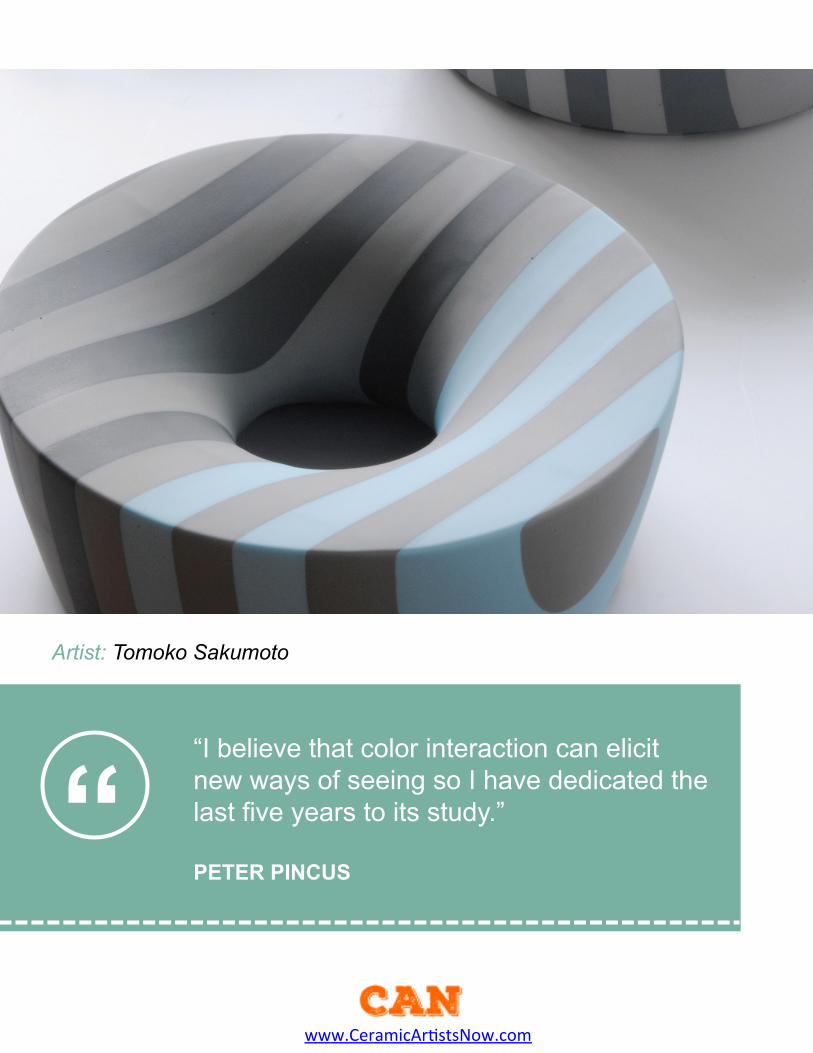
Artist: Tomoko Sakumoto
“I believe that color interaction can elicit new ways of seeing so I have dedicated the last five years to its study.” PETER PINCUS
“www.CeramicAr4stsNow.com

Inflating Clay
SIX
6

Inflating Clay
Make clay balloons for better forms!
Ever wonder how potters can make those huge bulbous forms without the whole from collapsing in on itself? They may be utilizing trapped air to keep the shape! In order to allow a large bulbous form to hold its shape, a potter will pull the walls of the pot until it has just a tiny opening at the top. If they stop there, the form might begin to collapse and fall inward due a combination of moisture, center weight, and centrifugal force. To allow the shape to maintain its form, the potter will hold the pot with their hands and seal the tiny opening at the top using their tongue. This traps the air inside, creating a giant clay balloon, held up by the interior air pressure. The piece is left on the wheel to dry to a point when it can support itself - the leather hard stage. Then, a small hole is cut on top, coil is applied, centered, and a bottle top is thrown into place. Related Links: https://www.instagram.com/p/9nB_XrnIfP/
www.CeramicAr4stsNow.com

“We shape clay into a pot, but it is the emptiness inside that holds whatever we want. - LAO TZU
“www.CeramicAr4stsNow.com

Screen Printing
SEVEN
7

Screen Printing.
Use layering screen printing techniques on your clay.
Screen printing is a great way to add precise patterns and repeated layers to the surface of your work. Unlike typical screen printing where the screen is secured taught inside of a frame, you can use the loose screen to rub colored slips and glaze onto your work. You can screen print on tiles or on round surfaces at almost any point in the ceramic process with slips or glazes. After you decide on a pattern, you can purchase an EZ Screen Print kit and burn your image into a screen using the power of the sun. Press the screen onto your leather hard clay surface and smooth it with your finger until it is sealed. Then, using your fingers or a rib, rub your slip or colored underglaze through the screen. Peel the screen up to reveal your pattern and repeat as many times as you want. You can use a variety of colors and build on top of existing patters for incredibly complex surface decoration. Related Links: https://www.youtube.com/watch?v=CvmsnOBTG94 http://ezscreenprint.com/ http://meredithhost.com/home.html
www.CeramicAr4stsNow.com

Artist: Meredith Host
“I layer these designs and decals to make an intricate, complex surface that would not be possible with only a single layer of pattern.” MEREDITH HOST
“www.CeramicAr4stsNow.com

Multiple Firings
EIGHT
8
Ar4st: Ron Nagle

Multiple Firings
How many times can you fire?
There is a strange myth in the ceramic community that you shouldn’t/can’t refire work. This idea is baseless and completely false. Firing repeatedly can be a great way to get the perfect surface. Did the red not come out red enough? Add More! Fire Again! Contemporary ceramic artist Ron Nagle famously fires his work up to 25+ times to get the PERFECT surface on his sculptures. Nagle uses enamels, fired at cone 018 to get high-gloss and high-control surfaces. The enamels lend themselves to repeated firings, and since they are fires at such a low temperature there is less chance of the piece cracking in the refire. The result of Nagle’s obsessive firing process is work with a perfect product-like finish. Related Links: http://www.ronnagle.net/ http://www.franklloyd.com/dynamic/artist.asp?ArtistID=1 http://ceramicartsdaily.org/ceramic-supplies/ceramic-glaze/johanna-de-maine-creating-bright-textured-surfaces-with-raised-enamels-lusters-and-a-sandblaster/
www.CeramicAr4stsNow.com

Artist: Ralph Bacerra
“My intention is to make images as ambiguous as possible so that viewers can create their own story.” RON NAGLE
“www.CeramicAr4stsNow.com

Water Carving
NINE
9
Ar4st: Jus4n Crowe

Water Carving Clay
A technique that mimics the natural erosion process.
Water carving clay is a reduc4ve process that mimics erosion. It is typically done on porcelain, for its smooth surface, but can also be done with grieer clays resul4ng in texture. It is done by sec4oning off parts of bone-‐dry clay and slowly removing material resul4ng in smooth insets with precise boundaries. To begin water carving, you need to sec4on off a part of your clay surface with a water resistant material. Commonly used materials are paraffin, wood shellac, painters tape, and other waxes. Once a moisture-‐free paEern or sec4on is determined, take a wet sponge dipped in warm-‐hot water and scrub the exposed clay. The material will begin to remove slowly with each new scrubbing, crea4ng smooth canyons and crevices. Related Links: hEp://ceramicartsdaily.org/poEery-‐making-‐techniques/ceramic-‐decora4ng-‐techniques/etched-‐in-‐clay-‐how-‐to-‐make-‐beau4ful-‐relief-‐surfaces-‐with-‐shellac-‐resist/ hEp://ryanmckerley.com/ hEps://www.youtube.com/watch?v=iVcQlbYPVuk
www.CeramicAr4stsNow.com

Artist: Ryan McKerley.
“Process is the main influence on my work. I didn’t envision a style to seek out but was led to my current body of work by following this technique.” RYAN MCKERLEY
“www.CeramicAr4stsNow.com

3D Printing Clay
TEN
10
Ar4st: Olivier Van Herpt, Explora4ons in func4onal 3D Prin4ng Ceramics

3D Printing Clay
The Future of Studio Pottery?
You may have noticed that 3D printing is changing the world we live in and we are just in the experimental stages of the technology. We now have machines 3D printing houses, creating clothing, jewelry, and prototyping concept designs out of every material you can imagine including metal, plastic, concrete, glass, pancake batter, and… clay. The technology for 3D printing clay is far from perfected, but there are kits available online that you can build your own. The basic process (which is far from basic), is that you design your form using a rapid prototyping program like CAD or Rhino, and export that file to your 3D printer, which then extrudes a thin, wet string of clay. When layered one on top of another, you end up with essentially a big pot made with tiny coils. The manufacturing practicality has not been confirmed, but the final products are incredibly beautiful and brilliant objects pairing the ancient history of ceramics with contemporary technology. Related Links: http://matterfactory.com/ http://oliviervanherpt.com/functional-3d-printed-ceramics/ http://iaac.net/research-projects/large-scale-3d-printing/pylos/ https://vimeo.com/142682057
www.CeramicAr4stsNow.com

Designer: Pylos Project. Researcher : Sofoklis Giannakopoulos, Research advisor : Areti Markopoulou, pylos.iaac.net
“The project focuses on the natural properties of soil. Earth, or Soil, as a construction material has been used since Neolithic times.” PYLOS PROJECT
“www.CeramicAr4stsNow.com! Learn More at