$10 smartphone to digital microscope conversion.pdf
DESCRIPTION
Filename: $10 Smartphone to digital microscope conversionTRANSCRIPT

http://www.instructables.com/id/10-Smartphone-to-digital-microscope-conversion/
Food Living Outside Play Technology Workshop
$10 Smartphone to digital microscope conversion!by Yoshinok on October 15, 2013
Table of Contents
$10 Smartphone to digital microscope conversion! . . . . . . . . . . . . . . . . . . . . . . . . . . . . . . . . . . . . . . . . . . . . . . . . . . . . . . . . . . . . . . . . . . . . . . . . . . . . . . . . . . . . . 1
Intro: $10 Smartphone to digital microscope conversion! . . . . . . . . . . . . . . . . . . . . . . . . . . . . . . . . . . . . . . . . . . . . . . . . . . . . . . . . . . . . . . . . . . . . . . . . . . . . . 2
Step 1: Materials and Tools . . . . . . . . . . . . . . . . . . . . . . . . . . . . . . . . . . . . . . . . . . . . . . . . . . . . . . . . . . . . . . . . . . . . . . . . . . . . . . . . . . . . . . . . . . . . . . . . . . . 3
Step 2: Getting the lens from a laser pointer . . . . . . . . . . . . . . . . . . . . . . . . . . . . . . . . . . . . . . . . . . . . . . . . . . . . . . . . . . . . . . . . . . . . . . . . . . . . . . . . . . . . . . 4
Step 3: A few notes on the lens... . . . . . . . . . . . . . . . . . . . . . . . . . . . . . . . . . . . . . . . . . . . . . . . . . . . . . . . . . . . . . . . . . . . . . . . . . . . . . . . . . . . . . . . . . . . . . . 5
Step 4: Drilling the bolt holes . . . . . . . . . . . . . . . . . . . . . . . . . . . . . . . . . . . . . . . . . . . . . . . . . . . . . . . . . . . . . . . . . . . . . . . . . . . . . . . . . . . . . . . . . . . . . . . . . . 5
Step 5: Embedding the lens . . . . . . . . . . . . . . . . . . . . . . . . . . . . . . . . . . . . . . . . . . . . . . . . . . . . . . . . . . . . . . . . . . . . . . . . . . . . . . . . . . . . . . . . . . . . . . . . . . . 6
Step 6: Drilling the hole for the light source . . . . . . . . . . . . . . . . . . . . . . . . . . . . . . . . . . . . . . . . . . . . . . . . . . . . . . . . . . . . . . . . . . . . . . . . . . . . . . . . . . . . . . . 7
Step 7: Assembly . . . . . . . . . . . . . . . . . . . . . . . . . . . . . . . . . . . . . . . . . . . . . . . . . . . . . . . . . . . . . . . . . . . . . . . . . . . . . . . . . . . . . . . . . . . . . . . . . . . . . . . . . . 7
Step 8: Explore! . . . . . . . . . . . . . . . . . . . . . . . . . . . . . . . . . . . . . . . . . . . . . . . . . . . . . . . . . . . . . . . . . . . . . . . . . . . . . . . . . . . . . . . . . . . . . . . . . . . . . . . . . . . 9
Related Instructables . . . . . . . . . . . . . . . . . . . . . . . . . . . . . . . . . . . . . . . . . . . . . . . . . . . . . . . . . . . . . . . . . . . . . . . . . . . . . . . . . . . . . . . . . . . . . . . . . . . . . . . . 12
Advertisements . . . . . . . . . . . . . . . . . . . . . . . . . . . . . . . . . . . . . . . . . . . . . . . . . . . . . . . . . . . . . . . . . . . . . . . . . . . . . . . . . . . . . . . . . . . . . . . . . . . . . . . . . . . . . . . 12

http://www.instructables.com/id/10-Smartphone-to-digital-microscope-conversion/
Intro: $10 Smartphone to digital microscope conversion!
The world is an interesting place, but its fascinating up close. Through the lens of a microscope you can find details that you would otherwise never notice. But now youcan.
This instructable will show you how to build a stand for about $10 that will transform your smartphone into a powerful digital microscope. This DIY conversion stand ismore than capable of functioning in an actual laboratory setting. With magnification levels as high as 175x, plant cells and their nuclei are easily observed! In addition toallowing the observation of cells, this setup also produces stunning macro photography.
The photos in this instructable were taken with an iPhone 4S.
Watch the video below for a quick overview of the project!
Image Notes1. Onion epithelial cells (175x)
Image Notes1. Salt (40x)
http://www.instructables.com/id/10-Smartphone-to-digital-microscope-conversion/
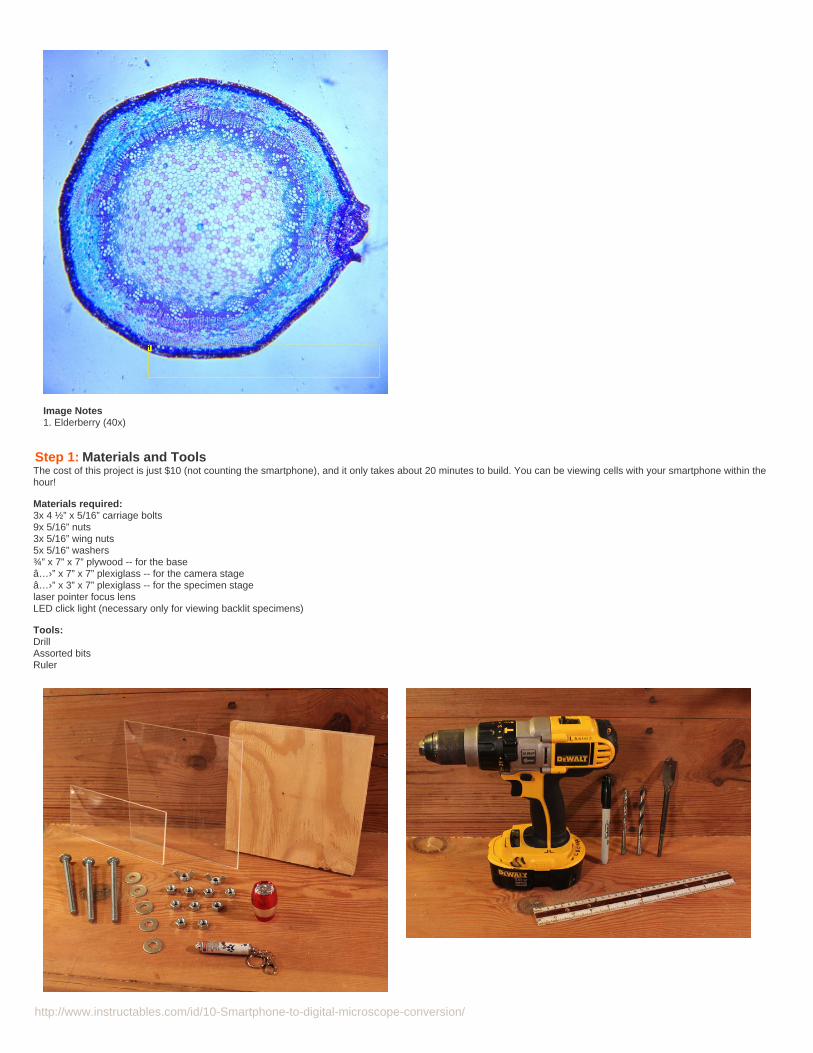
Image Notes1. Elderberry (40x)
Step 1: Materials and ToolsThe cost of this project is just $10 (not counting the smartphone), and it only takes about 20 minutes to build. You can be viewing cells with your smartphone within thehour!
Materials required:3x 4 ½” x 5/16” carriage bolts9x 5/16” nuts3x 5/16” wing nuts5x 5/16” washers¾” x 7” x 7” plywood -- for the baseâ…›” x 7” x 7” plexiglass -- for the camera stageâ…›” x 3” x 7” plexiglass -- for the specimen stagelaser pointer focus lensLED click light (necessary only for viewing backlit specimens)
Tools:DrillAssorted bitsRuler
http://www.instructables.com/id/10-Smartphone-to-digital-microscope-conversion/
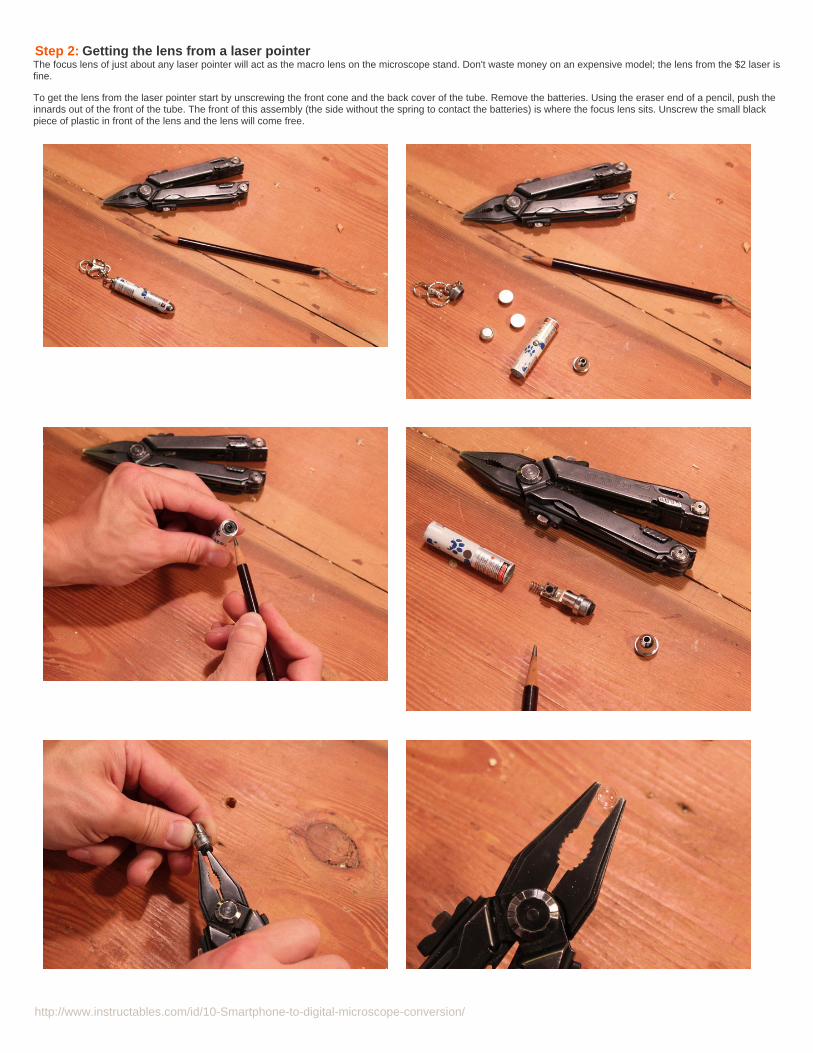
Step 2: Getting the lens from a laser pointerThe focus lens of just about any laser pointer will act as the macro lens on the microscope stand. Don't waste money on an expensive model; the lens from the $2 laser isfine.
To get the lens from the laser pointer start by unscrewing the front cone and the back cover of the tube. Remove the batteries. Using the eraser end of a pencil, push theinnards out of the front of the tube. The front of this assembly (the side without the spring to contact the batteries) is where the focus lens sits. Unscrew the small blackpiece of plastic in front of the lens and the lens will come free.

http://www.instructables.com/id/10-Smartphone-to-digital-microscope-conversion/
Step 3: A few notes on the lens...The lens, when viewed from the side is not symmetrical. You’ll see a thin translucent strip (~1mm) on one side of the lens. That side must not be adjacent to the camera.You can determine the correct orientation by sticking the lens between the prongs of a hairpin and taping the rig to the back of a smartphone. The correct orientation willprovide you with a larger field of view.
As it is, you can take reasonably good macro photos with this lens and smartphone. This simple rig is limited; not to mention, it’s extremely hard to keep the phonesteady when taking zoomed in photos. That’s why we need to build a stand!
Step 4: Drilling the bolt holesMake a mark with a Sharpie on the front two corners of the plywood base ¾” from both the sides and the front edges.Put a sacrificial piece of wood beneath the plywood base before drilling. You don’t want to damage surface of the bench! Stack the plexiglass camera stage (7” x 7”piece) on top of the base. Then stack the specimen stage (3” x 7”) on top of the camera stage with ¾” of the stage extending off the front of the base.Drill through the entire assembly. The bolts that stick up through the base must be countersunk in order for the stand to sit flat. Flip the base over and counter sink theholes with a spade bit.
http://www.instructables.com/id/10-Smartphone-to-digital-microscope-conversion/
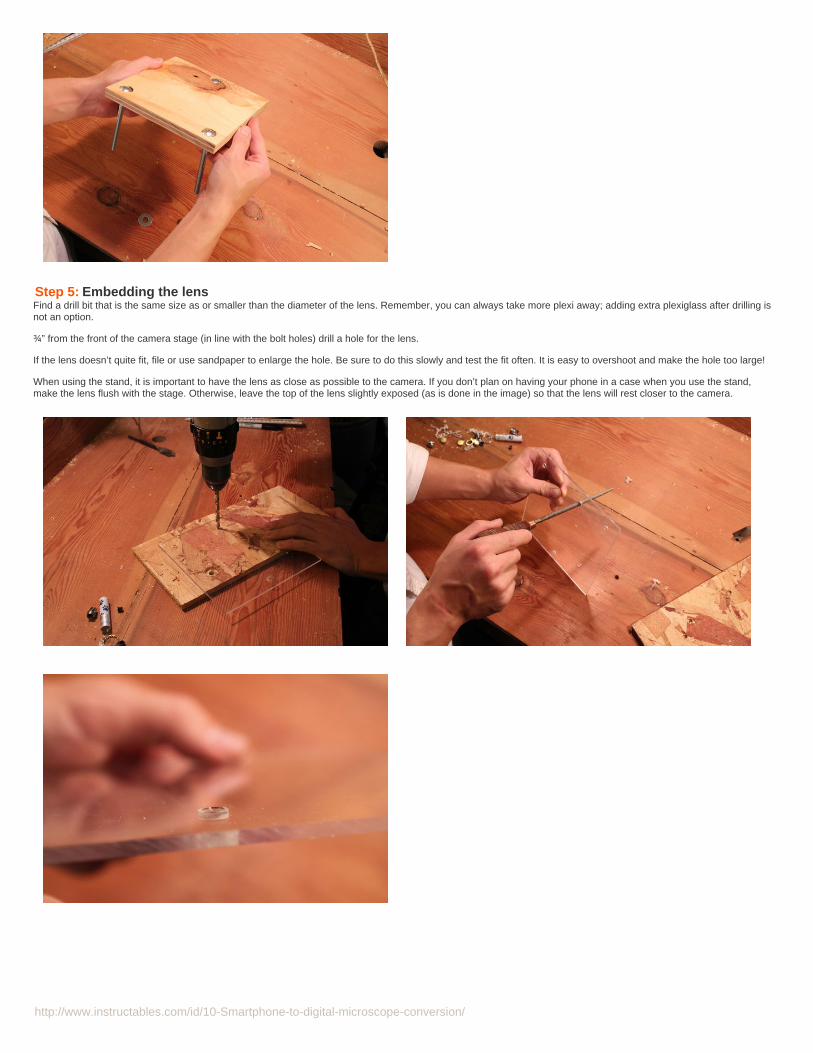
Step 5: Embedding the lensFind a drill bit that is the same size as or smaller than the diameter of the lens. Remember, you can always take more plexi away; adding extra plexiglass after drilling isnot an option.
¾” from the front of the camera stage (in line with the bolt holes) drill a hole for the lens.
If the lens doesn’t quite fit, file or use sandpaper to enlarge the hole. Be sure to do this slowly and test the fit often. It is easy to overshoot and make the hole too large!
When using the stand, it is important to have the lens as close as possible to the camera. If you don’t plan on having your phone in a case when you use the stand,make the lens flush with the stage. Otherwise, leave the top of the lens slightly exposed (as is done in the image) so that the lens will rest closer to the camera.

http://www.instructables.com/id/10-Smartphone-to-digital-microscope-conversion/
Step 6: Drilling the hole for the light sourceIt is important that a hole for your light source is directly below the focus lens. The best way to mark the placement of the light is to slide the camera stage (without thelens) down to the base, mark with a pencil where the hole is to be drilled, and drill a shallow hole to rest the light in.
Image Notes1. Use the lens hole as a guide to mark the hole for the the light source.
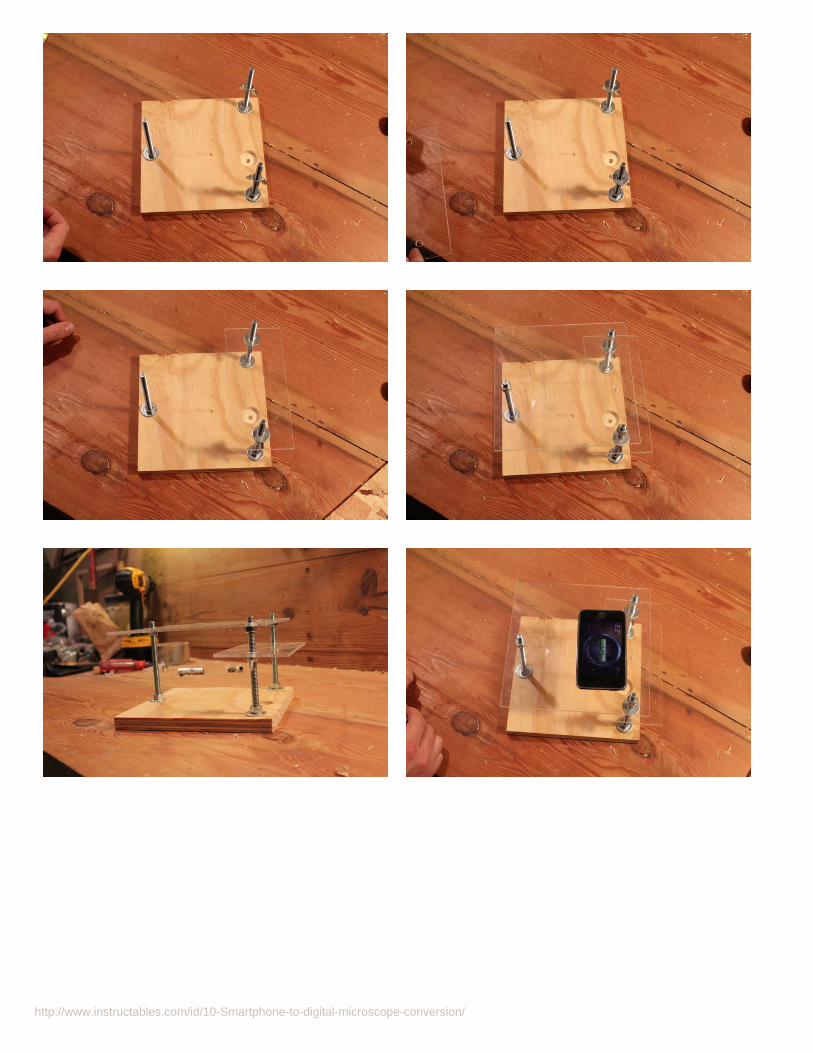
Step 7: AssemblyWe are ready to assemble! Start with washers and nuts to hold the bolts tight to the base. Then add some upside down wing nuts and then washers to the two front bolts.Place the specimen stage on top of the washers and add a nut to each bolt. Lower them about 1/2” and rest the camera stage on top of these nuts. A level is handy hereto make sure that the stage is actually flat. If you don’t own a level there are plenty of free level apps for a phone! When the stage is level both front to back and left toright, tighten down the final nuts.
http://www.instructables.com/id/10-Smartphone-to-digital-microscope-conversion/
http://www.instructables.com/id/10-Smartphone-to-digital-microscope-conversion/
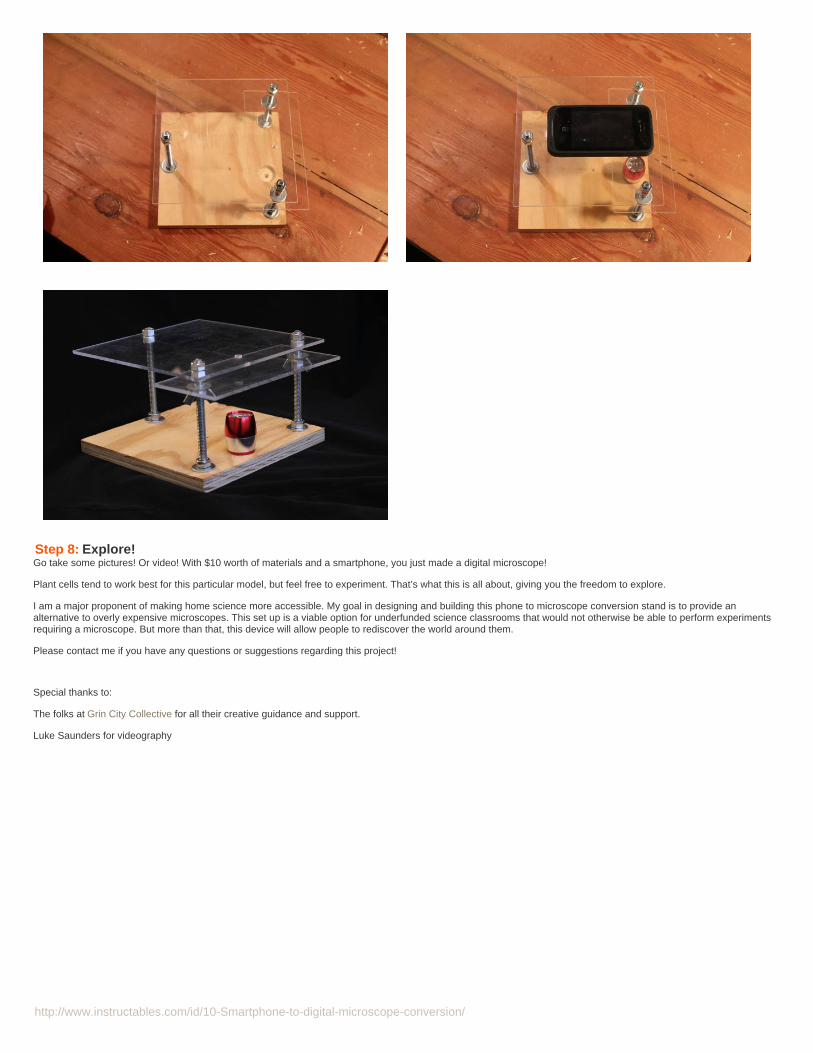
Step 8: Explore!Go take some pictures! Or video! With $10 worth of materials and a smartphone, you just made a digital microscope!
Plant cells tend to work best for this particular model, but feel free to experiment. That’s what this is all about, giving you the freedom to explore.
I am a major proponent of making home science more accessible. My goal in designing and building this phone to microscope conversion stand is to provide analternative to overly expensive microscopes. This set up is a viable option for underfunded science classrooms that would not otherwise be able to perform experimentsrequiring a microscope. But more than that, this device will allow people to rediscover the world around them.
Please contact me if you have any questions or suggestions regarding this project!
Special thanks to:
The folks at Grin City Collective for all their creative guidance and support.
Luke Saunders for videography

http://www.instructables.com/id/10-Smartphone-to-digital-microscope-conversion/
Image Notes1. Plasmolysis of red onion epithelial cells (175x)
Image Notes1. Maple seed pod (80x)
Image Notes1. Diatoms (175x)

http://www.instructables.com/id/10-Smartphone-to-digital-microscope-conversion/
Image Notes1. Nematode (175x)
Image Notes1. Apocynum cannabinum root cross section (80x)
Image Notes

http://www.instructables.com/id/10-Smartphone-to-digital-microscope-conversion/
1. Pepper (80x)
Image Notes1. Pollen (175x)
Related Instructables
Slide RingingTable by kymyst
MacroPhotography:An EssentialSkill for GoodInstructables by1up
How to turnyour iPhoneinto aMicroscope orSpotting ScopeEyepiece(Photos) byandymill
Macrophotographystand (revolvingwith lights) byUKKM
Simple Super-Macro/MicroscopeWebcamConversion byZephyris
Homemademacro lens forcamera phones(video) bymanualdomundo
Advertisements