#1 virtual care delivery software & hardware company … · 2018-04-09 · video card: ati 59xx...
TRANSCRIPT
CapSure® 2 Manual - SUM-50025 REV1
User Manual
CapSure 2

© 2002-2013 GlobalMedia Group, LLC. All Rights Reserved. GMR16020067 SUM-500030 Rev 1
CapSure 2
1
Contents:
About GlobalMed
About Capsure®
Technical Overview of DICOM and Capsure®
Registration and Support
What Does Capsure® Do?
System Requirements
Installing Capsure®
Interface
Tabs Region
Frequently Asked Questions
Software License Agreement
Notes
Warranty Information
1
3
4
5
6
7
8
9
11
21
23
25
26
Page:
1
2
3
4
5
6
7
8
9
10
11
12
13
Section:
GMR16020067 SUM-500030 Rev 1© 2002-2013 GlobalMedia Group, LLC. All Rights Reserved.
CapSure 2
1
About GlobalMed
Scottsdale, Arizona-based GlobalMed, designs, manufactures and markets telemedicine solutions and medical image automation systems that provide superior image quality, unmatched versatility, and unsurpassed simplicity for the healthcare industry. GlobalMed’s camera, image management, store and forward, video conferencing and video streaming technologies enable multiple specialists and other caregivers to be more effective in providing patient care, and more productive and efficient in managing patient information. Products include the TotalExam™ Camera, the most versatile and easy-to-use exam camera on the market, CapSure® store and forward imaging and image management software with DICOM output, which provides automated workflow capabilities for seamless integration into a provider’s network, and fully integrated mobile video cart systems for primary care applications.
Contact Info
GlobalMed Help Desk: www.globalmed.com/helpdeskGlobalMed Help Desk: 1.800.886.3692 International: 480.922.0044
Technical SupportNational Telehealth Help Desk # 1.866.651.3180

© 2002-2013 GlobalMedia Group, LLC. All Rights Reserved. GMR16020067 SUM-500030 Rev 1
CapSure 2
2
Dear Valued Customer,
GlobalMed sincerely appreciates your investment and the opportunity to service your telemedicine needs. We are committed to providing the very best products and support in the telemedicine industry.
Your feedback is important to our continued success and we welcome your suggestions, comments and concerns. GlobalMed offices are open Monday through Friday from 8 a.m. to 5 p.m. (Arizona time). To reach Sales, Technical Support or Customer Service please call our toll free number at 1.800.886.3692. We can also be contacted via email at [email protected].
We look forward to our continued partnership for years to come. Thank you for your business.
Sincerely,
Joel E. BarthelemyManaging Director
GMR16020067 SUM-500030 Rev 1© 2002-2013 GlobalMedia Group, LLC. All Rights Reserved.
CapSure 2
3
About CapSure®
CapSure® is a store and forward, and collaboration software designed specifically for the medical professional. Capturing and sharing medical images could be a time-consuming task, but CapSure®
simplifies the process of acquiring, sharing, storing and forwarding medical images. In addition, it reduces operator’s time and data entry errors by receiving details of the patient electronically via a modality worklist query. The modality worklist query reduces orphan studies by associating images with the proper patient. Whether your need is to store and forward or share images in real-time, CapSure®
provides the flexibility to conduct synchronous or asynchronous teleconsultation.
CapSure® allows users to annotate, and measure on the images while facilitating a HIPAA compliance environment. It protects patient privacy by automatically removing data and images from the originating computer at the end of a patient session, and forwarding images into a DICOM PACS server. Being a DICOM-compliant software, CapSure® connects easily to CONi™ cloud-based services or other third-party DICOM PACS servers.
Indication for Use
CapSure® is intended for use by trained professionals (physicians, clinicians and technicians) and receives digital images from medical video cameras. The images can be viewed, manipulated, and annotated with drawing tools.
Images can then be stored or shared, including video conferencing, across computer networks. Standard .jpeg compression is utilized.
CapSure® is not intended for use in mammography.
Caution: Federal law restricts the use and sale of this device to licensed medical professionals.
Safety, Security and Privacy
CapSure® software executes on the Microsoft Windows operating system and as such complies with all Microsoft Windows security. CapSure® does not act as a server or respond to messages therefore, availability is not required. CapSure® receives worklist information via the network and sends DICOM payloads via the network. Network security and encryption are the responsibility of the facility or organization utilizing CapSure®.
© 2002-2013 GlobalMedia Group, LLC. All Rights Reserved. GMR16020067 SUM-500030 Rev 1
CapSure 2
4
Technical Overview of DICOM and CapSure®
DICOM (Digital Imaging and Communication in Medicine) is a message standard and a comprehensive specification of information content, structure, encoding, and communications protocols for electronic interchange of diagnostic and therapeutic images and image-related information. DICOM is a complete specification of the elements required to achieve a practical level of automatic interpretation. It ensures HIPAA compliancy when transmitting encoded medical data.
The fundamental concepts of the DICOM message protocol, services, and information objects are reviewed as background for a detailed discussion of the functionality of DICOM; the innovations and limitations of the Standard; and the impact of various DICOM features on information system users.
DICOM addresses five general application areas: • Network image management • Network image interpretation management• Network print management• Imaging procedure management • Off-line storage media management
DICOM is a complete specification of the elements required to achieve a practical level of automatic interoperability between biomedical imaging computer systems–from application layer to bit-stream encoding. The Standard is being extended and expanded in modular fashion to support new applications and incorporate new technology.
An interface to other Information Systems provides for shared management of patient, procedure, and results information related to images. A Conformance Statement template enables a knowledgeable user to determine if interoperability between two implementations is possible. Knowledge of DICOM’s benefits and realistic understanding of its limitations enable one to use the Standard effectively as the basis for a long term implementation strategy for image management and communications systems.
When an image is saved, CapSure® creates different types of files: Image, Text, Audio, and a DICOM Payload (if DICOM Image Capture feature is enabled).
Image: JPEG (Joint Photography Experts Group file), BMP (Bitmap file), or PNG (Portable Network Graphics file) Text: TXT file (Unicode) Audio: WAV file (Waveform Audio File) DICOM Payload: DCM (Image and Information file)
In order for a session to see a stored image, CapSure® must save a JPEG2000, Bitmap or PNG formatted file. To be compliant with DICOM, a .dcm DICOM payload file is saved. The DICOM payload has a JPEG and “nested” tags or fields for data storage. These fields are dynamic in nature and once opened by a DICOM application or DICOM PACS viewer, these fields are completely editable.
GMR16020067 SUM-500030 Rev 1© 2002-2013 GlobalMedia Group, LLC. All Rights Reserved.
CapSure 2
5
Registration, Upgrades and Support
WARNING - DO NOT REGISTER CAPSURE® ON YOUR COMPUTER IF IT IS NOT THE COMPUTER YOU PLAN ON USING PERMANENTLY. THE SOFTWARE ACTIVATION KEY CANNOT BE USED ON MORE THAN ONE COMPUTER.
CapSure® comes with a ten day trial period for you to test out its features. At anytime during the trial period you may register the product. If you have reached the end of your trial period, then you must complete the registration process to continue using CapSure®. Registration can be done using the Registration Wizard during installation. Registration is required to activate the software. When you register, you will be provided with a code to unlock the version of software you have purchased.
If any updates are made to CapSure®, these will be available through the GlobalMed website. To keep this application current, we encourage you to check online for the latest upgrades, offers and product revisions. They can be found at: www.GlobalMed.com.
© 2002-2013 GlobalMedia Group, LLC. All Rights Reserved. GMR16020067 SUM-500030 Rev 1
CapSure 2
6
What does CapSure® 2.0 do?
CapSure® is designed to work in synergy with the Windows 7® Operating System. The software takes full advantage of the latest updates available from Microsoft and works together as an extension of your iREZ and TotalExam camera lines. Some of the features of version 2.0 are:
New Features:
• Support for 1080p HD resolution at 60 frames per second. • One main window. CapSure®2 combines the session window with the viewing window found in previous versions. The workspace or viewing panel can be increased to maximize the image viewing size. • Customizable Top buttons that fade away when not in use. • Customizable Tabs that the users can show and/or hide as they wish. • Ability to add up to four video sources at the same time.
Other CapSure® Features:
• Picture-on-Picture (POP)• Annotate and measure features directly on the image• Ability to save images in multiple formats (.bmp, .jpg or .png) • DICOM compliant• Digital Zoom (25% - 600%)• Connectivity with DICOM PACS • Date, Time and Name Frame label stamp
GMR16020067 SUM-500030 Rev 1© 2002-2013 GlobalMedia Group, LLC. All Rights Reserved.
CapSure 2
7
System Requirements
ATTENTION: This is a high-performance product. Best results are achieved with the minimum requirements (or greater) for CapSure®. CapSure® is designed for the iREZ and TotalExam camera lines. It may not properly function with other manufacturer digital cameras. Consult with GlobalMed Technical Support for questions.
Software:
Windows 7 64-bit Operating System (SP1) or higherVisual C++ Redistributable (2010) x64.Net Framework 4.0DirectX9c
Minimum Hardware:
Processor: 2.3 GHz Core i5 or fasterInterface: Two USB 2.0 port (Built-in USB port is recommended)Memory: 4 GB DDR DRAM CD ROM/DVD: Compact Disc or DVD combo drive is recommendedHard Disk: 10 GB of free space for image library. (Average bit map size is 3-12 MB)Video Card: Intel Graphics Media Accelerator X3000 (or greater) Camera support: iREZ i1300c, iREZ i2100c, iREZ KD, iREZ K2, iREZ K2r, TotalExam1, TotalExam2, TotalExam HD.
NOTE: These are the minimum requirements for the CapSure2 software. Other requirements will be needed for high definition devices, such as the TotalExamHD.
Additional Minimum Hardware Requirements for use with TotalExamHD:Video Card: ATI 59xx or higher (faster is recommended, 1 GB on-board memory recommended) (Must support Direct 3D version 11)
NOTE: If you are unsure whether or not your system meets these requirements, or if you have any questions regarding the use of this software, please contact our technical support staff before installing.
Technical Support: 480.922.0044 x option 2
E-mail us at: [email protected]

© 2002-2013 GlobalMedia Group, LLC. All Rights Reserved. GMR16020067 SUM-500030 Rev 1
CapSure 2
8
Installing CapSure®
CapSure® software is a professional application, and it is assumed that the professional user has experience in the Windows environment. If you are a novice user, we recommend you spend some time becoming familiar with the Windows Operating System before installing and using this product. Windows has a help and support area and can be found by pressing the Start button at the lower left of your monitor and choosing Help and Support.
To install CapSure®, perform the following steps:• Place the CD into your computer’s CD ROM drive and let the auto-run installer start up.• Follow the basic installation instructions.• The Installer will place a “shortcut” on your desktop for you.
If you have disabled the auto-run feature on your computer or the CD does not automatically start up after a minute or so, right-click on the CD icon and “explore” the CD. Double click on the file labeled setup.exe, and follow the installation process above
Running the Application
• Select “Activate Later” to continue running in trial mode.• Select “Activate Now” to complete your registration now.• Please review the registration procedure on the inside of the CD cover flap.
You are welcome to download CapSure® for a free demonstration trial. Once the demonstration period ends, CapSure® will not launch, run, or re-install on your computer. You must register your software to receive a key that will allow you to continue using it. Contact a GlobalMed Sales Associate to download and purchase the software.
GMR16020067 SUM-500030 Rev 1© 2002-2013 GlobalMedia Group, LLC. All Rights Reserved.
CapSure 2
9
Interface
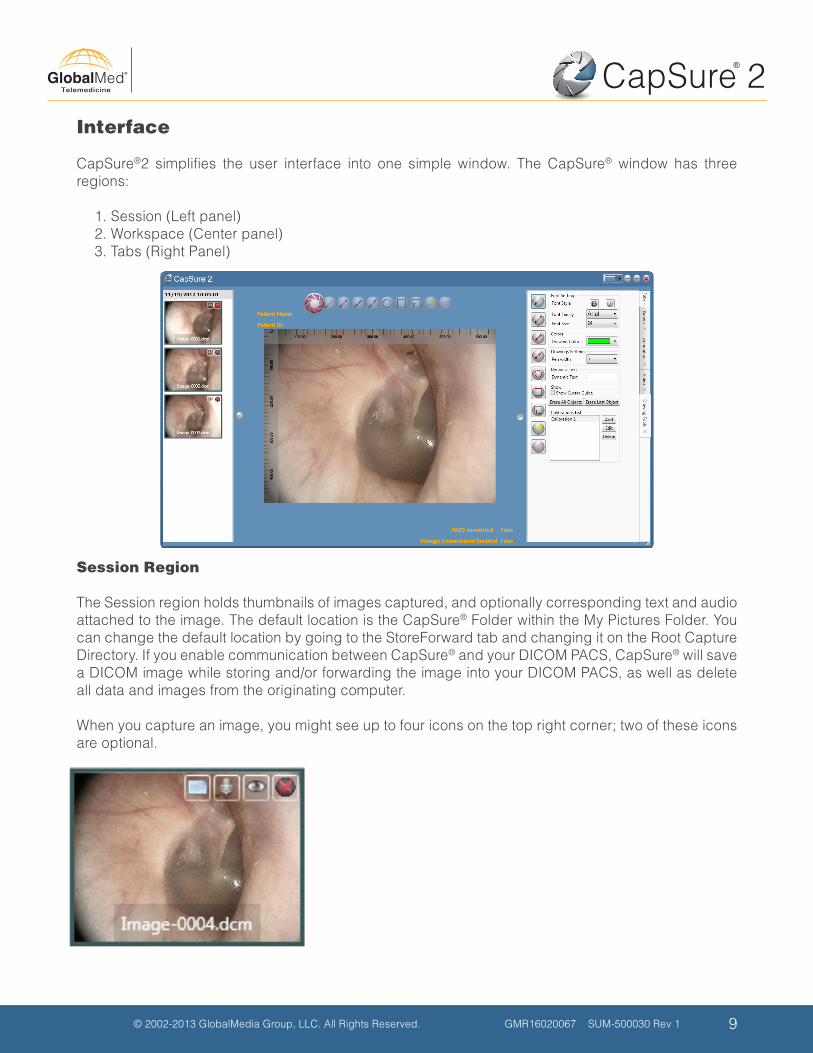
CapSure®2 simplifies the user interface into one simple window. The CapSure® window has three regions:
1. Session (Left panel)2. Workspace (Center panel)3. Tabs (Right Panel)
Session Region
The Session region holds thumbnails of images captured, and optionally corresponding text and audio attached to the image. The default location is the CapSure® Folder within the My Pictures Folder. You can change the default location by going to the StoreForward tab and changing it on the Root Capture Directory. If you enable communication between CapSure® and your DICOM PACS, CapSure® will save a DICOM image while storing and/or forwarding the image into your DICOM PACS, as well as delete all data and images from the originating computer.
When you capture an image, you might see up to four icons on the top right corner; two of these icons are optional.
© 2002-2013 GlobalMedia Group, LLC. All Rights Reserved. GMR16020067 SUM-500030 Rev 1
CapSure 2
10
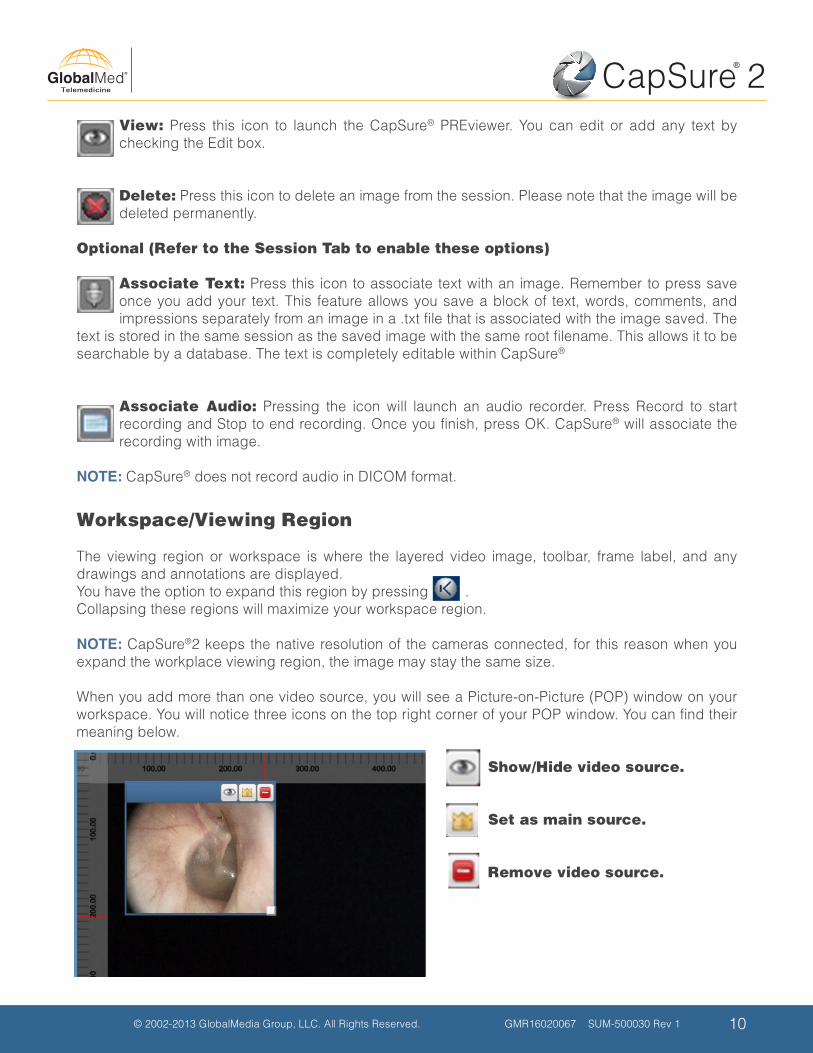
View: Press this icon to launch the CapSure® PREviewer. You can edit or add any text by checking the Edit box.
Delete: Press this icon to delete an image from the session. Please note that the image will be deleted permanently.
Optional (Refer to the Session Tab to enable these options) Associate Text: Press this icon to associate text with an image. Remember to press save once you add your text. This feature allows you save a block of text, words, comments, and impressions separately from an image in a .txt file that is associated with the image saved. The
text is stored in the same session as the saved image with the same root filename. This allows it to be searchable by a database. The text is completely editable within CapSure®
Associate Audio: Pressing the icon will launch an audio recorder. Press Record to start recording and Stop to end recording. Once you finish, press OK. CapSure® will associate the recording with image.
NOTE: CapSure® does not record audio in DICOM format.
Workspace/Viewing Region
The viewing region or workspace is where the layered video image, toolbar, frame label, and any drawings and annotations are displayed. You have the option to expand this region by pressing . Collapsing these regions will maximize your workspace region.
NOTE: CapSure®2 keeps the native resolution of the cameras connected, for this reason when you expand the workplace viewing region, the image may stay the same size.
When you add more than one video source, you will see a Picture-on-Picture (POP) window on your workspace. You will notice three icons on the top right corner of your POP window. You can find their meaning below.
Show/Hide video source.
Set as main source.
Remove video source.
GMR16020067 SUM-500030 Rev 1© 2002-2013 GlobalMedia Group, LLC. All Rights Reserved.
CapSure 2
11
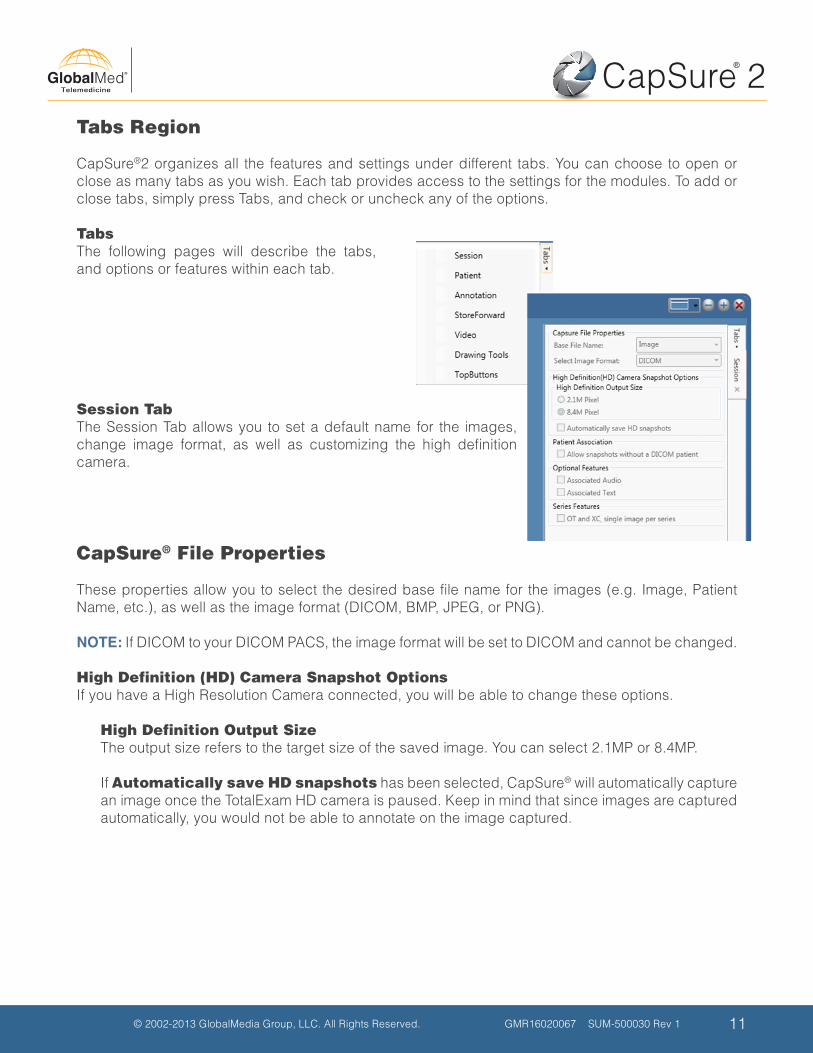
Tabs Region
CapSure®2 organizes all the features and settings under different tabs. You can choose to open or close as many tabs as you wish. Each tab provides access to the settings for the modules. To add or close tabs, simply press Tabs, and check or uncheck any of the options.
TabsThe following pages will describe the tabs, and options or features within each tab.
Session Tab The Session Tab allows you to set a default name for the images, change image format, as well as customizing the high definition camera.
CapSure® File Properties
These properties allow you to select the desired base file name for the images (e.g. Image, Patient Name, etc.), as well as the image format (DICOM, BMP, JPEG, or PNG).
NOTE: If DICOM to your DICOM PACS, the image format will be set to DICOM and cannot be changed.
High Definition (HD) Camera Snapshot OptionsIf you have a High Resolution Camera connected, you will be able to change these options.
High Definition Output SizeThe output size refers to the target size of the saved image. You can select 2.1MP or 8.4MP.
If Automatically save HD snapshots has been selected, CapSure® will automatically capture an image once the TotalExam HD camera is paused. Keep in mind that since images are captured automatically, you would not be able to annotate on the image captured.

© 2002-2013 GlobalMedia Group, LLC. All Rights Reserved. GMR16020067 SUM-500030 Rev 1
CapSure 2
12
Patient Association If CapSure® is connected to your DICOM PACS, you should uncheck this option to prevent the user from capturing images without selecting a patient. If the user tries to capture an image, CapSure® will prompt the user to select a patient in the Patient Tab. If CapSure® is not connected to your DICOM PACS, leave this option checked to store images locally.
Optional Features
Check these options if you want to allow users to associate audio or text file with an image. The audio and text fie will not be in DICOM format.
Series Features
Check this option to save a single image per series in the OT (Other Type) and XC (External Camera Type) modality. If you want to see multiple images in one series or study, do not select this option.
GMR16020067 SUM-500030 Rev 1© 2002-2013 GlobalMedia Group, LLC. All Rights Reserved.
CapSure 2
13
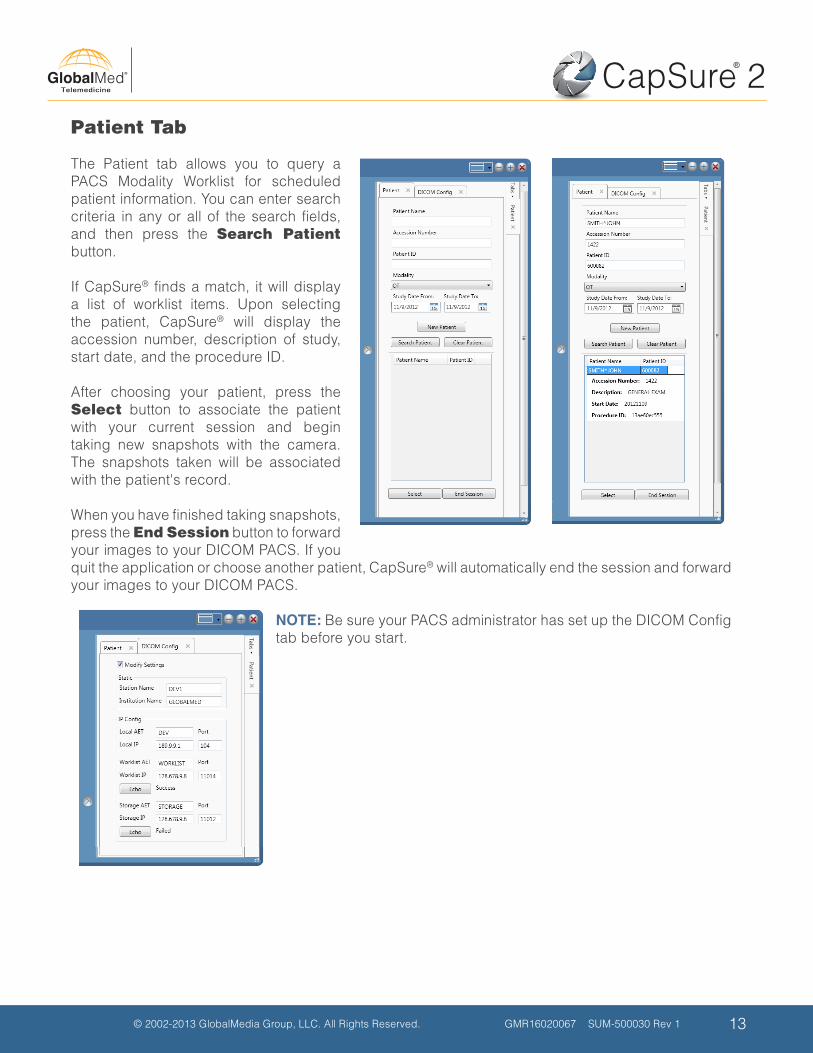
Patient Tab
The Patient tab allows you to query a PACS Modality Worklist for scheduled patient information. You can enter search criteria in any or all of the search fields, and then press the Search Patient button.
If CapSure® finds a match, it will display a list of worklist items. Upon selecting the patient, CapSure® will display the accession number, description of study, start date, and the procedure ID.
After choosing your patient, press the Select button to associate the patient with your current session and begin taking new snapshots with the camera. The snapshots taken will be associated with the patient's record.
When you have finished taking snapshots, press the End Session button to forward your images to your DICOM PACS. If you quit the application or choose another patient, CapSure® will automatically end the session and forward your images to your DICOM PACS.
NOTE: Be sure your PACS administrator has set up the DICOM Config tab before you start.
© 2002-2013 GlobalMedia Group, LLC. All Rights Reserved. GMR16020067 SUM-500030 Rev 1
CapSure 2
14
The DICOM Config tab enables you to configure the connection between CapSure® and your DICOM PACS in order to store images. This tab requires administrator rights, and should be configured by your PACS administrator.
AET refers to an Application Entity Title (a DICOM name), IP refers to an IP address, and Port refers to a port number. Your PACS administrator should assign you the appropriate IPs and ports.
The station name and institution name are values you may wish to specify to help you identify the workstation in captured images.
The Local fields correspond to the CapSure® software itself. The port number is 104 by default and it is recommended that you DO NOT change this value. Consult with your PACS administrator to determine these values. Worklist AET fields correspond to the modality worklist service with which CapSure® communicates to find patient studies to associate with. Consult with your PACS administrator to determine these values. You can test the connection by pressing Echo; if your test failed, check your configuration, and try again.
Storage AET fields correspond to the storage service with which CapSure® communicates to store images remotely. Consult with your PACS administrator to determine these values. You can test the connection by pressing Echo; if your test failed, check your configuration, and try again.
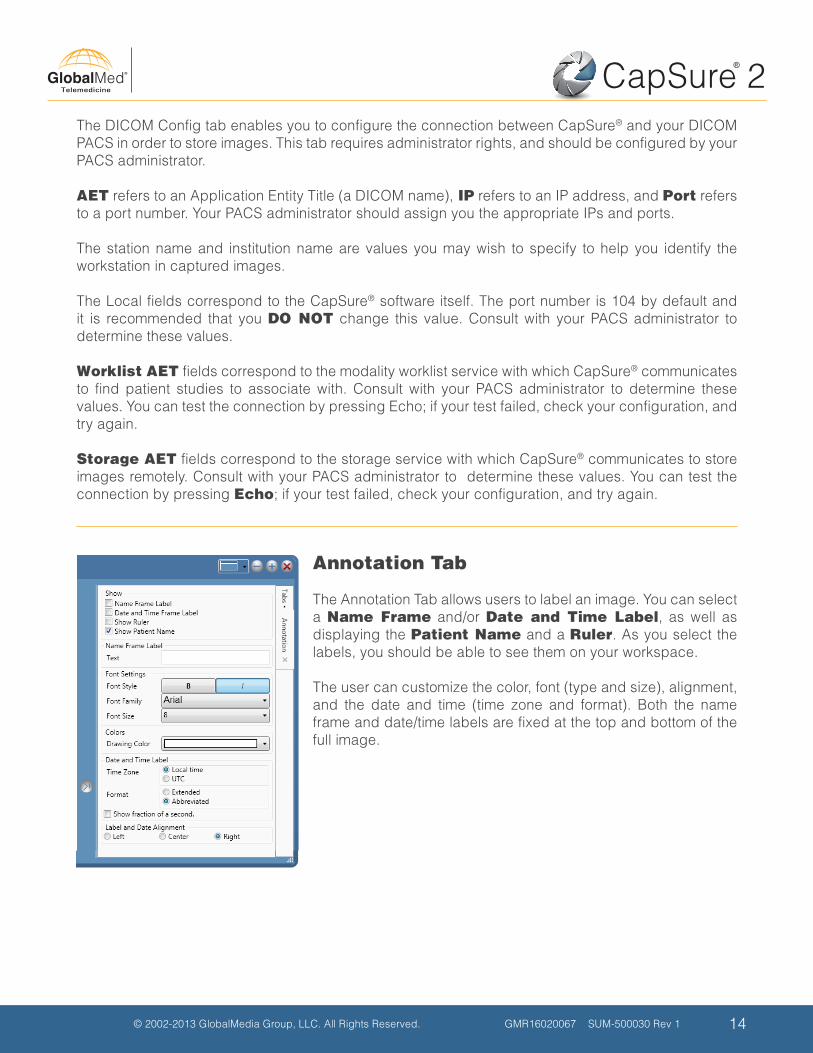
Annotation Tab
The Annotation Tab allows users to label an image. You can select a Name Frame and/or Date and Time Label, as well as displaying the Patient Name and a Ruler. As you select the labels, you should be able to see them on your workspace.
The user can customize the color, font (type and size), alignment, and the date and time (time zone and format). Both the name frame and date/time labels are fixed at the top and bottom of the full image.
GMR16020067 SUM-500030 Rev 1© 2002-2013 GlobalMedia Group, LLC. All Rights Reserved.
CapSure 2
15
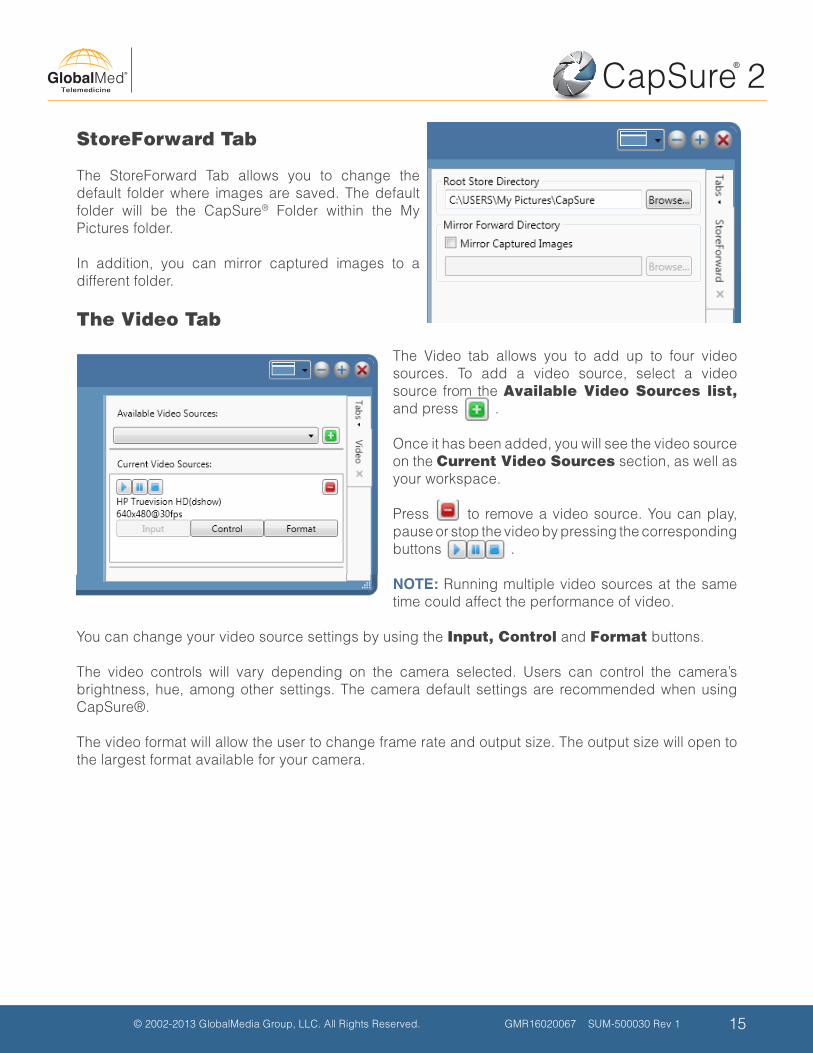
StoreForward Tab
The StoreForward Tab allows you to change the default folder where images are saved. The default folder will be the CapSure® Folder within the My Pictures folder.
In addition, you can mirror captured images to a different folder.
The Video Tab The Video tab allows you to add up to four video sources. To add a video source, select a video source from the Available Video Sources list, and press .
Once it has been added, you will see the video source on the Current Video Sources section, as well as your workspace.
Press to remove a video source. You can play, pause or stop the video by pressing the corresponding buttons .
NOTE: Running multiple video sources at the same time could affect the performance of video.
You can change your video source settings by using the Input, Control and Format buttons.
The video controls will vary depending on the camera selected. Users can control the camera’s brightness, hue, among other settings. The camera default settings are recommended when using CapSure®.
The video format will allow the user to change frame rate and output size. The output size will open to the largest format available for your camera.

© 2002-2013 GlobalMedia Group, LLC. All Rights Reserved. GMR16020067 SUM-500030 Rev 1
CapSure 2
16
Drawing Tools Tab
The Drawing Tools tab allows the user to customize the drawing properties. All the drawing tools on this tab will be explained in the Top Buttons Tab.
Font SettingSelect the font style (bold, italics), the font Family and Size.
ColorsSelect from the 9 different colors available.
Drawing SettingsDetermines the width of lines.
Dynamic TextAny pre-defined text. It can be edited on the workspace.
Show Cursor GuideSelect this option to show the cursor guide on the workspace.
Calibration ListThe calibration list will display all your calibration. You have the option to add, edit and delete any calibration from your list. CapSure® will auto save your calibration.
Vital Signs
The Vital Signs tab allows user to annotate patient vitals onto the captured images. User can either enter the data in manually or pull it automatically from supported vital signs devices. Users can display Blood Pressure, Temperature, SpO2 and Pulse Rate.
Use the dropdown menu under Select Vital Signs Device to select either No Device or a supported vital Signs device.
To display the vitals check the box next to the vital or click Select All to select all the vitals. To pull the values from the connected supported vital signs device click on From Device or select Manual Entry to enter the values manually.
GMR16020067 SUM-500030 Rev 1© 2002-2013 GlobalMedia Group, LLC. All Rights Reserved.
CapSure 2
17
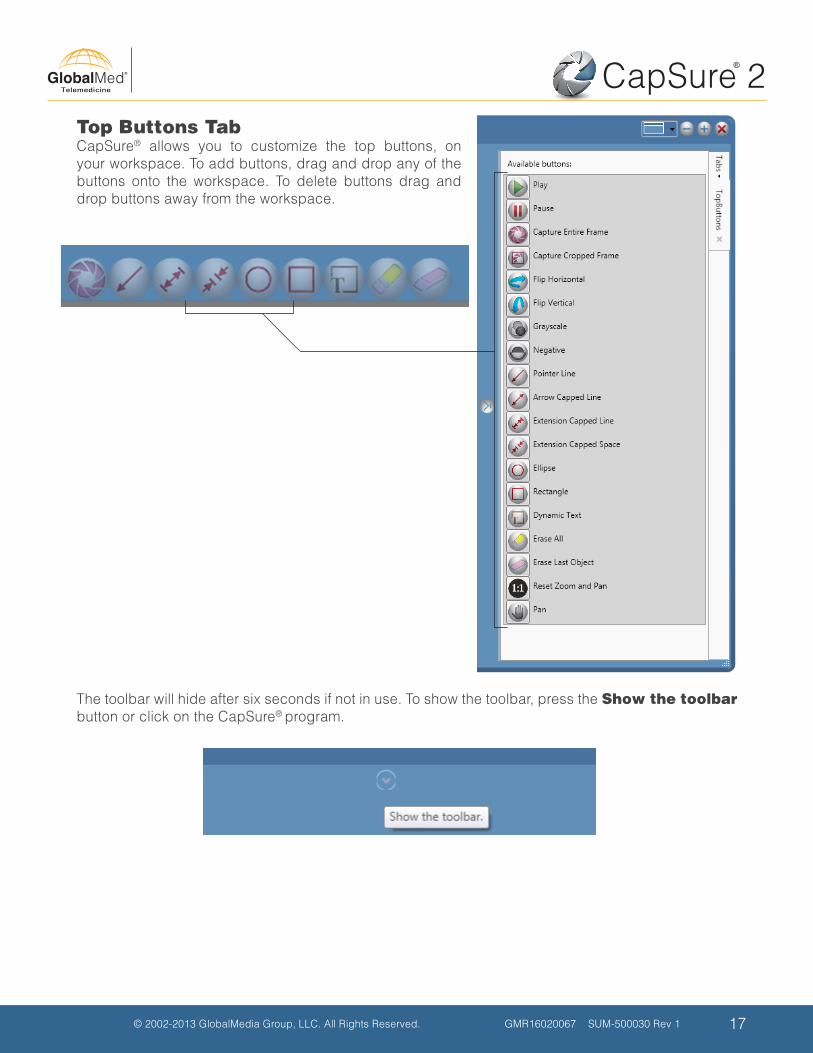
Top Buttons TabCapSure® allows you to customize the top buttons, on your workspace. To add buttons, drag and drop any of the buttons onto the workspace. To delete buttons drag and drop buttons away from the workspace.
The toolbar will hide after six seconds if not in use. To show the toolbar, press the Show the toolbar button or click on the CapSure® program.
© 2002-2013 GlobalMedia Group, LLC. All Rights Reserved. GMR16020067 SUM-500030 Rev 1
CapSure 2
18
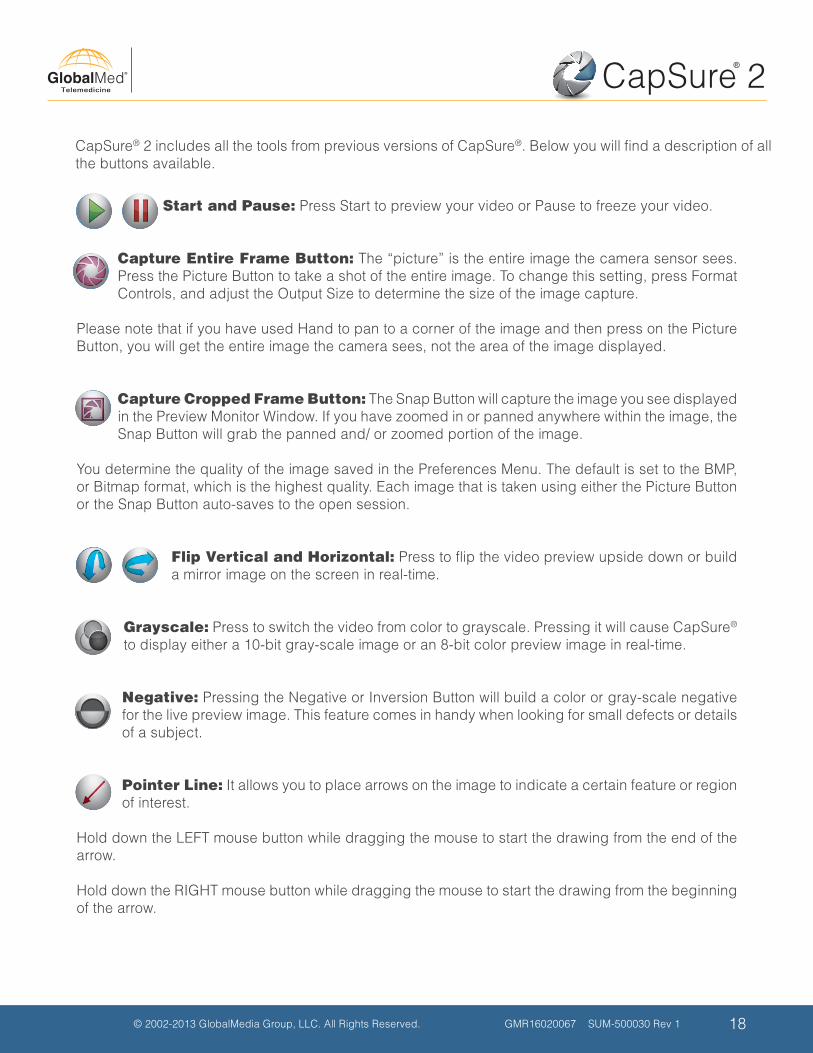
Start and Pause: Press Start to preview your video or Pause to freeze your video.
Capture Entire Frame Button: The “picture” is the entire image the camera sensor sees. Press the Picture Button to take a shot of the entire image. To change this setting, press Format Controls, and adjust the Output Size to determine the size of the image capture.
Please note that if you have used Hand to pan to a corner of the image and then press on the Picture Button, you will get the entire image the camera sees, not the area of the image displayed.
Capture Cropped Frame Button: The Snap Button will capture the image you see displayed in the Preview Monitor Window. If you have zoomed in or panned anywhere within the image, the Snap Button will grab the panned and/ or zoomed portion of the image.
You determine the quality of the image saved in the Preferences Menu. The default is set to the BMP, or Bitmap format, which is the highest quality. Each image that is taken using either the Picture Button or the Snap Button auto-saves to the open session.
Flip Vertical and Horizontal: Press to flip the video preview upside down or build a mirror image on the screen in real-time.
Grayscale: Press to switch the video from color to grayscale. Pressing it will cause CapSure®
to display either a 10-bit gray-scale image or an 8-bit color preview image in real-time.
Negative: Pressing the Negative or Inversion Button will build a color or gray-scale negative for the live preview image. This feature comes in handy when looking for small defects or details of a subject.
Pointer Line: It allows you to place arrows on the image to indicate a certain feature or region of interest.
Hold down the LEFT mouse button while dragging the mouse to start the drawing from the end of the arrow.
Hold down the RIGHT mouse button while dragging the mouse to start the drawing from the beginning of the arrow.
CapSure® 2 includes all the tools from previous versions of CapSure®. Below you will find a description of all the buttons available.
GMR16020067 SUM-500030 Rev 1© 2002-2013 GlobalMedia Group, LLC. All Rights Reserved.
CapSure 2
19
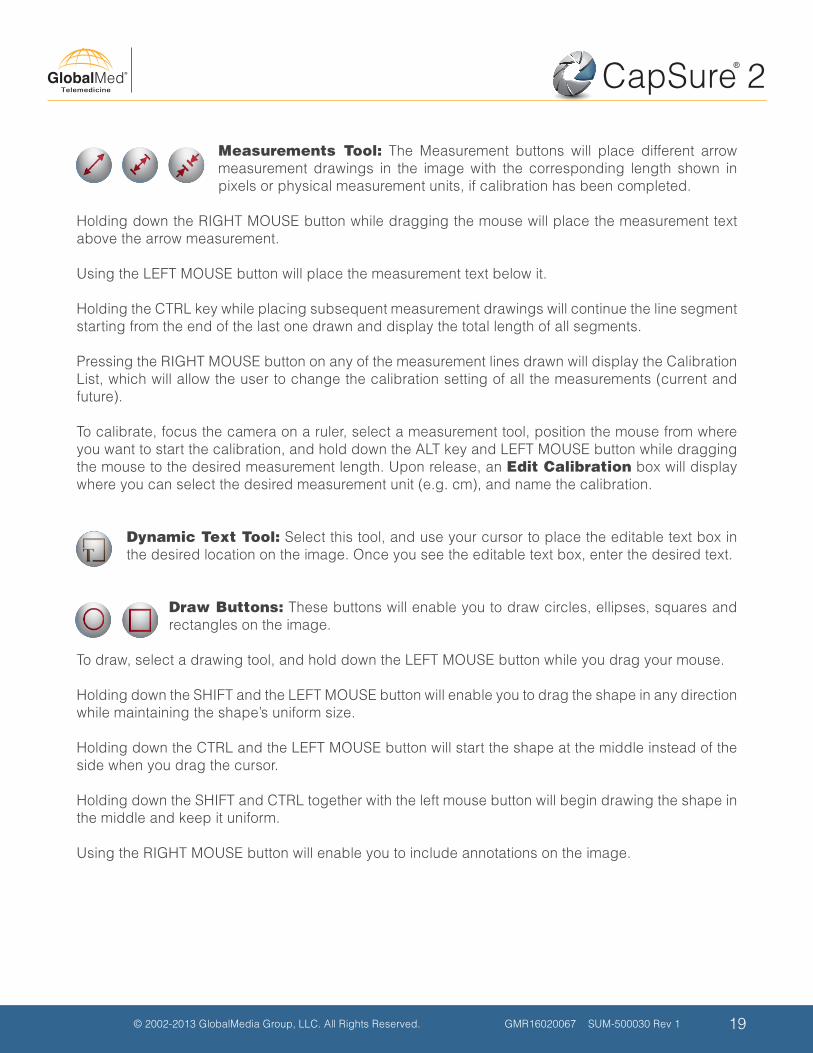
Measurements Tool: The Measurement buttons will place different arrow measurement drawings in the image with the corresponding length shown in pixels or physical measurement units, if calibration has been completed.
Holding down the RIGHT MOUSE button while dragging the mouse will place the measurement text above the arrow measurement. Using the LEFT MOUSE button will place the measurement text below it. Holding the CTRL key while placing subsequent measurement drawings will continue the line segment starting from the end of the last one drawn and display the total length of all segments. Pressing the RIGHT MOUSE button on any of the measurement lines drawn will display the Calibration List, which will allow the user to change the calibration setting of all the measurements (current and future).
To calibrate, focus the camera on a ruler, select a measurement tool, position the mouse from where you want to start the calibration, and hold down the ALT key and LEFT MOUSE button while dragging the mouse to the desired measurement length. Upon release, an Edit Calibration box will display where you can select the desired measurement unit (e.g. cm), and name the calibration.
Dynamic Text Tool: Select this tool, and use your cursor to place the editable text box in the desired location on the image. Once you see the editable text box, enter the desired text.
Draw Buttons: These buttons will enable you to draw circles, ellipses, squares and rectangles on the image.
To draw, select a drawing tool, and hold down the LEFT MOUSE button while you drag your mouse.
Holding down the SHIFT and the LEFT MOUSE button will enable you to drag the shape in any direction while maintaining the shape’s uniform size.
Holding down the CTRL and the LEFT MOUSE button will start the shape at the middle instead of the side when you drag the cursor.
Holding down the SHIFT and CTRL together with the left mouse button will begin drawing the shape in the middle and keep it uniform.
Using the RIGHT MOUSE button will enable you to include annotations on the image.

© 2002-2013 GlobalMedia Group, LLC. All Rights Reserved. GMR16020067 SUM-500030 Rev 1
CapSure 2
20
Eraser Button: Press once on the Erase All Button to erase everything drawn on the image. Press Erase Last Object to erase the last drawing placed or measurement made on the image.
Reset: Press once to reset the zoom and pan.
Pan: Once selected, the cursor becomes a Hand. Left-Click using your mouse button and the Hand changes into a “grabbing hand” icon, allowing you to pan the image. You need to zoom in before panning the image. If you want to unselect this feature, press on the icon again.
GMR16020067 SUM-500030 Rev 1© 2002-2013 GlobalMedia Group, LLC. All Rights Reserved.
CapSure 2
21
Frequently Asked Questions (FAQs)
1. I have a No signal message on the workspace region.A no signal message indicates that no video source has been selected. Go to the Video Tab, and select a source from the available video sources list.
2. My camera is connected, but I cannot see it on the Available Video Sources list. First, check that the camera is properly powered. If you connected your camera after opening CapSure®, close and then reopen the software. Second, check that the necessary drivers for the camera have been installed on the computer. If the problem persists, check that no other applications are currently using the video source. These applications will commonly be video conferencing software.
3. How do I know if my camera drivers are installed?Open the Device Manager in Windows and look under Imaging devices. If the drivers have been installed, you should see your camera as one of the options.
4. Why is my video window tinted green, pink, or another color?If you are using an S-Video camera, check that the S-Video is correctly connected between the camera and the interface to the computer.
5. I am experiencing slow video performance or video lag.If you are experiencing video lag or poor performance, stop any additional video source. If the problem continues, stop all additional video sources by pressing Stop on the Video Tab. Flipping the image orientation can cause a video lag on the TotalExam HD.
6. How can I reboot my TotalExam camera? The camera will reboot after deactivating the skin tone balance feature. Press and hold the Pause button for seven seconds to activate skin tone balance, and repeat the same process to deactivate the feature.
7. I tried to search for a patient, and got a Connection failed message.Check your Patient Config tab. Test your connection by pressing Echo. If your connection failed, revise your IP/Port, and try again.
8. How do I save my settings?The last used settings for CapSure® software should save upon exiting the application. To ensure the settings are saved, configure the software as you desire and close the application.
9. What is the Admin password?By default, the Admin password is “admin”. It is possible to change this value for more security. Please consult GlobalMed technical support for instructions.

© 2002-2013 GlobalMedia Group, LLC. All Rights Reserved. GMR16020067 SUM-500030 Rev 1
CapSure 2
22
Frequently Asked Questions (FAQs) cont.
10. I cannot use or apply the Grayscale, Negative, and Flip tool when the image is paused.You cannot use these tools when you pause an image using the Pause tool. To apply these tools, press Play and apply the tools before you pause the image. These tools would not be affected if you are pausing the image from the camera (e.g. pause button on TotalExam).
11. I am not able to select any of my measurement tools; I just see a hand instead of my mouse cursor.When the Pan tool is selected your mouse cursor change to a hand. While this tool is selected, you can use the Negative, Grayscale and Flip tool, but you need to unselect the Pan tool before selecting any of the measurement or pointer tools.
12. How do I calibrate CapSure®?CapSure® can be calibrated to any pre-defined length. To calibrate, focus the camera on a ruler, select a measurement tool, position the mouse where you want to start the calibration from, and hold down the ALT key and LEFT mouse button while dragging the mouse to the desired measurement length. Upon release, a Create Calibration File box will displayed where you can select the desired measurement unit (e.g. cm), and name the calibration. Press Save to save the calibration.
GMR16020067 SUM-500030 Rev 1© 2002-2013 GlobalMedia Group, LLC. All Rights Reserved.
CapSure 2
23
Software License Agreement
Legal AgreementGlobalMed / iREZ PRODUCTSTHIS IS A LEGAL AGREEMENT BETWEEN YOU, THE CUSTOMER, AND GLOBALMEDIA GROUP, L.L.C. (GLOBALMED) CONCERNING THE ENCLOSED COMPUTER PROGRAMS (THE “PROGRAM”). YOU SHOULD REVIEW THE FOLLOWING TERMS AND CONDITIONS OF THIS AGREEMENT CAREFULLY BEFORE INSTALLING THIS SOFTWARE. BY INSTALLING THIS SOFTWARE, YOU INDICATE YOUR ACCEPTANCE OF ALL TERMS AND CONDITIONS CONTAINED HEREIN. IF YOU DO NOT AGREE WITH EACH OF SAID TERMS, YOU SHOULD PROMPTLY RETURN THE PACKAGE UNOPENED TO THE PLACE OF PURCHASE FOR A REFUND OF THE PURCHASE PRICE (LESS ANY APPLICABLE RESTOCKING CHARGES.)
LicensePursuant to the license granted to you by this Agreement, you may install the Program on any computer only in conjunction with GlobalMed or iREZ products and copy the Program into any computer readable or printed form for back-up or modification purposes only.
If you transfer the license, you must, at the same time, either transfer all copies of the Program, whether in printed or computer readable form, to the same party or destroy any copies not transferred.
YOU MAY NOT USE, COPY, OR TRANSFER THE PROGRAM OR ANY COPY IN WHOLE OR IN PART, EXCEPT AS EXPRESSLY PROVIDED FOR IN THIS AGREEMENT. If you transfer possession of any copy of the program to another party, your license is automatically terminated.
By installing any of these drivers, software, or hardware devices you acknowledge that GlobalMed and its subsidiaries or its successors in interest are not responsible for any problems that may exist due to the installation or operation. This is completely the choice of the end user. Use of these products is solely at the risk of the end user.
TermThe license is effective until terminated. You may terminate it at any other time by destroying the Program together with all copies in any form. It shall also terminate upon conditions set forth elsewhere in this Agreement, or if you fail to comply with any term or condition of this Agreement. Upon such termination, you must destroy the Program together with all copies in any form.
© 2002-2013 GlobalMedia Group, LLC. All Rights Reserved. GMR16020067 SUM-500030 Rev 1
CapSure 2
24
General
You may not sublicense, assign, or transfer the license or the program except as expressly provided in this Agreement. Any attempt to otherwise sublicense, assign or transfer any of the rights, duties, or obligations hereunder is null and void and not merely void-able.
If you have any questions concerning this Agreement, including warranty service, you should contact GlobalMedia Group, L.L.C. through the Technical Support Desk at www.GlobalMed.com.
The laws of the State of Arizona shall govern this Agreement.BY INSTALLING ANY GlobalMed PRODUCT YOU ACKNOWLEDGE THAT YOU HAVE READ THIS AGREEMENT, UNDERSTAND IT, AND AGREE TO BE BOUND BY ITS TERMS AND CONDITIONS. YOU FURTHER AGREE THAT IT IS THE COMPLETE AND EXCLUSIVE STATEMENT OF THE AGREEMENT BETWEEN US, WHICH SUPERSEDES ANY PROPOSAL OR PRIOR AGREEMENT, ORAL OR WRITTEN, AND ANY OTHER COMMUNICATIONS BETWEEN US RELATING TO THE SUBJECT MATTER OF THIS AGREEMENT.
GMR16020067 SUM-500030 Rev 1© 2002-2013 GlobalMedia Group, LLC. All Rights Reserved.
CapSure 2
25
Warranty Information
GlobalMed’s hardware and software products come with a standard, one-year limited warranty.
Products that become defective during the first year (365 days) after the order is shipped (“Original Warranty Period”) will be repaired or replaced by GlobalMed free of charge. This limited warranty is contingent upon proper use of the product and does not cover products that have been damaged (scratches, bent metal, broken components), misused, modified, or subjected to unusual physical or electrical stress. Customer must obtain an official Return Merchandise Authorization (“RMA”) from GlobalMed prior to shipping any products to GlobalMed for repair or replacement. Customer must include all original components, literature, and packaging in the same salable condition received to avoid any additional charges. All returns for any other reason must be made within the first 30 days from time of shipment and will be subject to a 25 percent restocking charge.

GMR16020067 SUM-500030 Rev 1© 2002-2013 GlobalMedia Group, LLC. All Rights Reserved.
CapSure 2
26
Copyright © 2012, GlobalMedia Group, LLC. All Rights Reserved. GlobalMed and all the product and service names contained in the Company’s product and services Company literature are trademarks of GlobalMedia Group, LLC. All other trademarks are the property of their respective holders. GlobalMed products do not diagnose, cure or prevent any disease. In no event will GlobalMed products be used in life support applications.
SUM-500030 REV1
15020 North 74th Street Scottsdale, Arizona 85260 USA
1.800.886.3692
+1.480.922.0044 phone
+1.480.922.1090 fax
www.globalmed.com