1 server maintenance workshop part two: database server brian bauer, software support specialist
TRANSCRIPT

1
Server Maintenance Workshop
Part Two: Database ServerBrian Bauer, Software Support Specialist

2
Passageways Database Naming Convention Entitlement Name used in all Database Names (Production_Portal, Test_Portal, Board_Portal, Community_Portal)
_PortalFx - Framework and all Standard Components (Alerts, Framework Islands, Conversations)
_PortalFx_Documents – all Database Documents
_(modulename) – Each module is stored in its own database
Note: For older portals the naming conventions will be different and will not include the entitlement name. The PortalFx database will be named Passageways.

3
Employee / Board Portal Suite• Portal Framework (PortalFx or Passageways)• Portal Documents (PortalFx_Documents or Documents)• Announcements• Calendar• Discussions (Only for Pre 4.11.0 Installations)• Photos• Polls • Read Receipt• Reservations
Passageways Database List: Included in Standard Suite

4
Passageways Database List: Modules and Featured Apps
Modules• Assigned Tasks• Dashboards• Expense Reports• Forms• Help Desk• Meeting Packets• Products & Services (Products)• Vendor Management
Featured Applications• Apparel Cart• Employee Directory • Employee Recognition• Invoice• Lobby• LMS• Management Blog • Purchase Order• Supply Order • Test Creator
Note: The naming convention for Featured Applications varies. Sometimes they are included in Passageways_PS or have _PS or CS_ in the database name.

5
Database Components
TablesData Storage, Table RelationshipsData Indexes, Default values.
ViewsReferenceable queries across multiple tables, usually with functions.
Programmability Stored procedures for portal use and functions for queries. – Datediff, Len
Storage Index Full Text Catalogs.
SecurityWho has access to the database.

6
Things To Remember
Do NOT change anything in your database.
(Expressway Validation)
Backup Databases Regularly Daily!
Delete Old Backups / Don’t run out of server space.

7
On Demand Database Backup
http://msdn.microsoft.com/en-us/library/ms175477.aspxBackup Overview (SQL Server) - MSDN - Microsoft

8
SQL Data and Logs on Separate Drives
When managing disk space, it can be useful to have SQL database data files and log files on separate drives. This can be managed under the SQL Server properties.
After connecting to your SQL server, right-click on the server name in the Object Explorer, and select Properties.

9
SQL Data and Logs on Separate Drives
Under Database Settings, you can set the default location of the data (.mdb) and log (.ldb) files. Any new databases created will have their files go to these locations.
The Passageways portal will only be impacted if the location of the Data or Log file runs out of disk space.

10
Simple Maintenance Plan Example
11
What are they?SQL Maintenance Plans are workflows of tasks required to make sure that your databases are optimized, backed up, and free of inconsistencies!
A maintenance plan wizard is available to assist in the creation of maintenance plans, though, often creating plans manually offers more flexibility.
SQL Maintenance Plans are also useful for keeping our data tables small. They allow us to identify large tables, clear out old data, clean out maintenance records and transaction logs and many other things that help keep both our Passageways tables and our master tables in check!
Why do we need them?
SQL Maintenance Plans:

12
From here we will be able to utilize the maintenance plan wizard or manually create a maintenance plan.
SQL Maintenance Plans: Simple Maintenance Example

13
In order to send notifications we must first add Operators and configure the necessary information pertaining to each.
SQL Maintenance Plans: Simple Maintenance Example
Before we begin, make sure the SQL Server Agent Service is running and set to Startup Automatically

14
SQL Maintenance Plans: Simple Maintenance Example
Name the New Maintenance Plan “Simple Maintenance Plan”
Right click Maintenance Plan and select New Maintenance Plan.

15
SQL Maintenance Plans: Toolbox & Designer
The Designer will be used to customize the maintenance plan.
The Toolbox lists the various tasks that can be added to maintenance plans.
The Designer Surface (aka Work Area) is used to organize and define the maintenance plan tasks.

16
SQL Maintenance Plans: Simple Maintenance Example
Define the subplan properties including a name, description and schedule. We’ll call this one Portal Framework Database Backup.
This sub-plan will be used to backup our framework database every day at 3:00 AM.
Double click to modify the default Subplan_1

17
SQL Maintenance Plans: Simple Maintenance Example
Drag and drop the Back Up Database Task from the Toolbox into the designer surface.
Double click Task to get Properties
18
SQL Maintenance Plans:Simple Maintenance Example
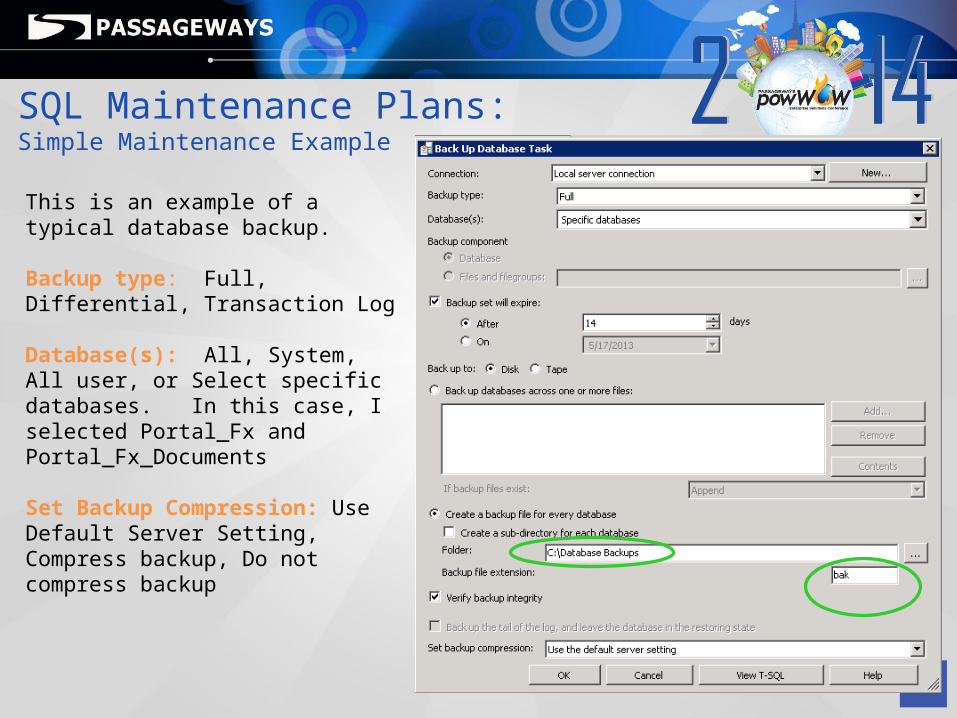
This is an example of a typical database backup.
Backup type: Full, Differential, Transaction Log
Database(s): All, System, All user, or Select specific databases. In this case, I selected Portal_Fx and Portal_Fx_Documents
Set Backup Compression: Use Default Server Setting, Compress backup, Do not compress backup

19
SQL Maintenance Plans: Simple Maintenance Example
Drag and drop the Check Database Integrity Task from the Toolbox into the designer surface.
Double-Click the Task Icon to set the properties

20
SQL Maintenance Plans: Simple Maintenance Example
Select the Check DB Integrity Task. Drag the green arrow to the Back Up Database Task.
You have now created Dependant Tasks by establishing a simple Connection so the tasks will complete in subsequent order.

21
SQL Maintenance Plans: Simple Maintenance Example
The type of connections between tasks can be configured as well. Go ahead and double click on the green arrow to get the constraint editor.
A typical connection will use the evaluation operation of “Constraint” with a few preset values which include success, failure, and completion.
Success – This means that the return value of the operation was successful.
Failure – This means that the operation failed to complete or was not successful.
Completion – This means that the operation fully completed either with a success or failure.

22
SQL Maintenance Plans: Simple Maintenance Example
In addition to checking a simple value based on a constraint, more advanced expressions and operations can be selected, including combinations of constraints and expressions.
Generally Expressions are used for validating very specific information such as ensuring that when the previous task completes it is offering up some information that may be validated. The available return values outside of Success, Failure, and Completed are available per task type on MSDN.

23
SQL Maintenance Plans: Simple Maintenance Example
Save your new maintenance plan! Ctrl-S or click the Save Document Icon.
The maintenance plan will now show under your management folder in the SQL object explorer.
There you have it! A simplistic maintenance plan! Just Right-Click and Select Execute to see it in action!

24
SQL Maintenance Plans: Using the Wizard
If the previous manual way of doing this is intimidating, a wizard exists that guides you through the process of creating a maintenance plan. From the object explorer, right click Maintenance Plans and select Maintenance Plan Wizard.

25
Plan Properties Maintenance Tasks Task Order
Task Configuration Report & Log Options Completion Review
SQL Maintenance Plans: Using the Wizard

26
Let’s Add Reporting, Logging and Notifications

27
In order to send notifications we must first add Operators and configure the necessary information pertaining to each.
Expand the SQL Server Agent nodeRight click the Operators node and select “New Operator…”Complete the information and click OK.
SQL Maintenance Plans: Reporting, Logging and Notifications

28
Now that we have set up an Operator to receive notifications, let’s go back and add some reporting and notifications to our “Simple Maintenance Plan”
In your Object Explorer go back to expand Management then Maintenance Plans
Double-click, or Right-click the “Simple Maintenance Plan” and select Modify.
SQL Maintenance Plans: Reporting, Logging and Notifications

29
SQL Maintenance Plans: Reporting, Logging and NotificationsSelect the Reporting and Logging icon which is kind of hidden between Manage Connections and Servers…
You will be presented with the Reporting and Logging dialog.

30
For my Simple Maintenance Plan I have chosen to…
-Create a new text file in folder C:\Database Maintenance Reports
-Send report to Anne Wertz
-Log extended information.
Extended logging will provide additional details when looking back at logs at the cost of additional disk space.
SQL Maintenance Plans: Reporting, Logging and Notifications

31
Now you have added simple Reporting and Notifications!
Just Right-Click and select Execute to see it in action!
If you do not receive an email you may need to configure SQL Server Agent Mail to use Database Mail.
Resource:http://msdn.microsoft.com/en-us/library/ms186358.aspx
Browse to your reports folder to see the results!!
SQL Maintenance Plans: Reporting, Logging and Notifications
Ctrl-S! Save Frequently!

32
SQL Maintenance Plans: Putting It All Together Combining all of the skills demonstrated in the previous slides we can add additional tasks to create a more comprehensive workflow that iterates through a daily clean up pattern.

33
SQL Maintenance Plans: Putting It All Together

34
SQL Maintenance Plans: Putting It All Together

35
Questions?

36
Historical Data Clean-up

37
Historical Data Clean-up: Why is it needed?
There are several tables in the Passageways database that keep historical information that may only be pertinent to your organization for a period of time.
If the data is never deleted from these tables, they will continue to grow which will increase the size of your database as well as the size of your backups!

38
Historical Data Clean-up: Using Simple Queries
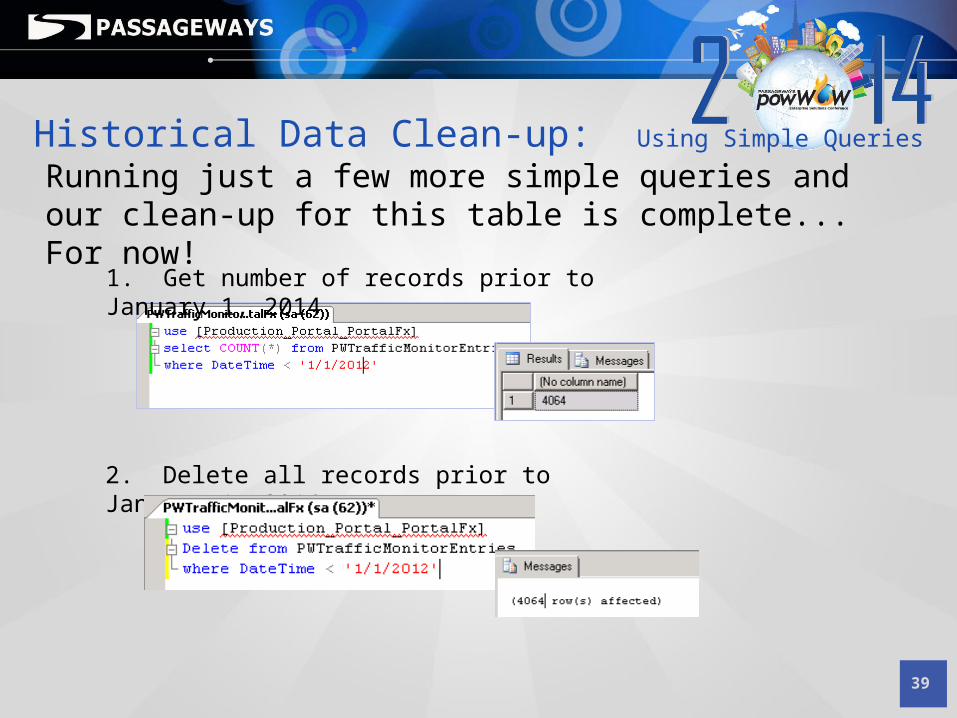
Let’s take a look at the PWTrafficMonitorEntries table which logs daily every page click made by your users. Using a simple select statement we can view all records sorted by DateTime.
39
Historical Data Clean-up: Using Simple Queries
Running just a few more simple queries and our clean-up for this table is complete... For now!
1. Get number of records prior to January 1, 2014
2. Delete all records prior to January 1, 2014

40
Historical Data Clean-up: Using Simple Queries
Use DateDiff in your query to find records older than 60 days.DateDiff(Unit of Measurement, Date A, Date B) = Date B – Date A
1. Get the number of records that are older than 60 days
2. Delete all records that are older than 60 days

41
SQL Maintenance Plans: Tables with Historical Data
Framework Database
PWTrafficMonitorEntriesPWAlertItems *legacy
PWNotificationPWSearchTermHistoryPWUserWallPWUserWallComment PWUserWallLikePost
Announcements
PWAnnouncementReadReceiptsPWGroupAnnouncements
Calendars
PWGroupEventsPWGroupEventSignUps
ReservationsReservations

42
Data Clean-up AutomationUsing SSIS Packages

43
Checks if record count > 500
Checks if record count <= 500
Removes records that are older than 60 days.
Data Clean-up Automation: Sample Traffic History Cleanup
Backs up the Traffic History Table
Gets the record count for the Traffic History Table

44
Data Clean-up Automation: SSIS Packages Overview
SQL Server Integration Services (SSIS) is a project type allow you to create more advanced workflows that can include Maintenance Plan Tasks, Variables, Conditional Connections, SQL Queries and more
SSIS Packages can then be scheduled to run regularly in SQL Management Studio
SQL Server Business Intelligence Development Studio is a component of SQL Server 2008 R2 that can be included when SQL is installed.
45
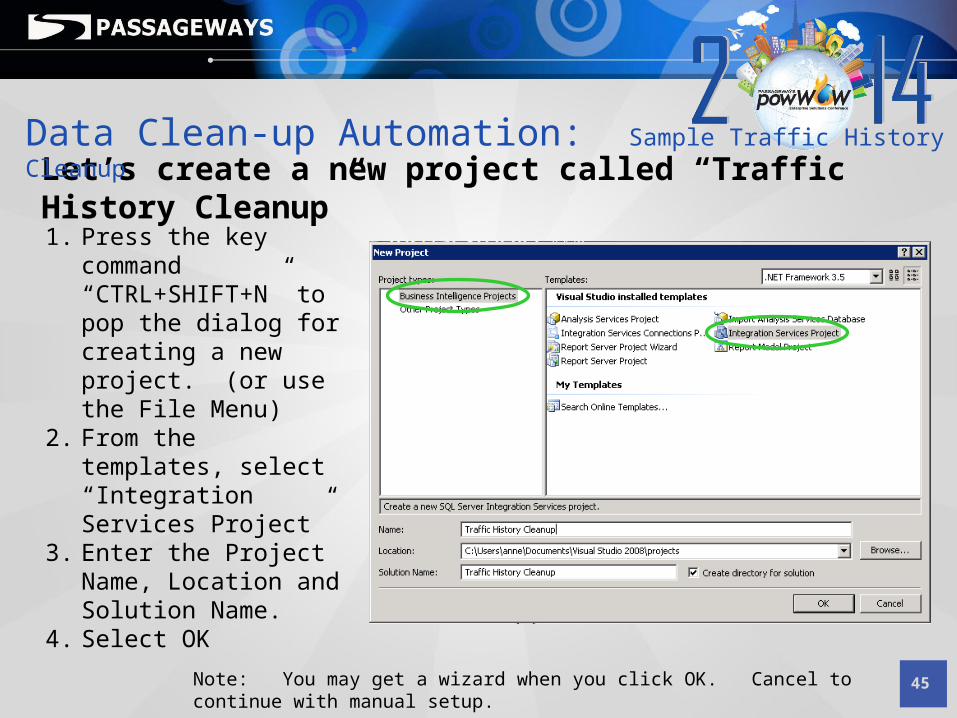
Let’s create a new project called “Traffic History Cleanup”
1. Press the key command “CTRL+SHIFT+N” to pop the dialog for creating a new project. (or use the File Menu)
2. From the templates, select “Integration Services Project”
3. Enter the Project Name, Location and Solution Name.
4. Select OK
Data Clean-up Automation: Sample Traffic History Cleanup
Note: You may get a wizard when you click OK. Cancel to continue with manual setup.

46
Data Clean-up Automation: Sample Traffic History Cleanup

47
On the right is the Solution Explorer where you can see the details about the current solution. The default package name is Package.dtsx which is not very descriptive. Let’s rename it to something more easily identifiable.
1. Right click the file “Package.dtsx” and choose rename. 2. Change the name to “TrafficCleanUpPackage.dtsx”. Be sure NOT to lose the
extension!3. When prompted to rename the package object as well, click “Yes”.
Data Clean-up Automation: Sample Traffic History Cleanup
Ctrl-S! Save Frequently!

48
Now, in order for this package to interact with our SQL Server Instance, we need to create a connection. At the bottom of the screen is a section called “Connection Managers”. manager
1. Right click this and select “New OLE DB Connection”
2. You will be presented with the Configure Connection Manager. Click the button “New…” now.
Data Clean-up Automation: Sample Traffic History Cleanup

49
Another dialog will pop that allows you to identify server information and provider information. The provider will be dependant on the version of your SQL Instance. Since I am using a SQL 2008 R2 instance, my provider will be Native OLE DB\SQL Server Native Client 10.0.
1. Configure your SQL connection. I have chosen to use Windows Authentication and to connect directly the PortalFX database.
2. Test your connection to ensure that you have selected the right options. Once finished, click “OK”.
3. Select the New Connection, click “OK” again. Your connection should now be in the Connection Manager List.
Data Clean-up Automation: Sample Traffic History Cleanup

50
For this example we need to be able to perform an action based on how many records are in the Traffic History Table. We will get this information from a SQL query later in this exercise. In order to use this information in our SSIS package we will need to have a way to store it. We will define a Variable for this so the data can be used and passed between tasks and connections.
1. Be sure to select the ‘Control Flow’ tab in the designer.
2. Right click in the work area and select “Variables”. The Variables Panel will open to the top, left of the designer
Data Clean-up Automation: Sample Traffic History Cleanup

51
3. Click the Add Variable button
4. Change the default value to “RowCount” .
This variable will be created and will be useable throughout the package. You can have an unlimited number of variables for tracking data throughout your workflows.
Data Clean-up Automation: Sample Traffic History Cleanup
Ctrl-S! Save Frequently!

52
Now that we have defined a variable named “RowCount”, we need to run a query to get the number of records in the Traffic History Table, PWTrafficMonitorEntries. Let’s check our Toolbox to see what tasks are available.
The Toolbox Button is located all of the way on the left, next to the Variables Panel. Once selected the Variables Panel will be replaced with the Toolbox Panel.
Data Clean-up Automation: Sample Traffic History Cleanup

53
Let’s find the Execute SQL Task and drag it onto the Control Flow work area. Note: If the Execute SQL Task is not available then Right-Click in the Maintenance Plan Task section and ‘Choose Items’ from the menu. Check the Execute SQL Task Item on the SSIS Control Flow Items Tab.
Data Clean-up Automation: Sample Traffic History Cleanup
Ctrl-S! Save Frequently!
1. Drag and Drop the Execute SQL Task into the work area
2. Double click the Execute SQL Task object to configure

54
We are able to set a large number of properties for the task but we’re going to cover just the relevant ones at this time.
•Name / Description
•ResultSet Property
•ResultSet Page
•Connection
•SQL Statement
Data Clean-up Automation: Sample Traffic History Cleanup

55
1. Change the Name to “Traffic History Count” so it easily identifies the task.
2. Change the Description to “Return the number of rows in the PWTrafficMonitorEntries table”.
3. Change the Result Set to “Single Row”. Since we are looking to get just the count of records, we are expecting just a single return value from our query.
4. From the connection drop down, select the connection that we created previously.
Data Clean-up Automation: Sample Traffic History Cleanup

56
Now let’s define our SQL Statement. The most important thing about writing this SQL statement is to remember that we will be executing transact SQL. This means that often times it is better to declare variables to pass data throughout the statement. It’s also important to specify the schema object level when interacting with SQL objects.
Data Clean-up Automation: Sample Traffic History Cleanup
-- Select the number of records in the PWTrafficMonitorEntries table -- and assign it to a local variable.
Declare @Num INT -- Local variable of type integer SET @Num = (Select COUNT(*) from [Production _Portal_PortalFx].[dbo].[PWTrafficMonitorEntries]) -- Sets the Local variable @Num to the number of rows in this table -- Best practice is to use the dbo schema for defining the object
-- Select the value of our local variable and return it in a Column named "TrafficCount"Select @Num as TrafficCount
Tip: Use SQL Management Studio to create and test your SQL Scripts!

57
Let’s enter the SQL statement from the previous screen into the SQL Query dialog that pops up for our SQL Statement property.
Data Clean-up Automation: Sample Traffic History Cleanup
1. Click the Ellipsis on the SQL Statement Property`
2. Copy the SQL Statement in the Enter SQL Query Dialog, Click “OK”
Declare @Num INT SET @Num = (Select COUNT(*) from [Production_PortalFx].[dbo].[PWTrafficMonitorEntries])Select @Num as TrafficCount

58
Finally we have a SSIS Variable, RowCount, that we want to associate with the return value of column, Traffic Count, in our SQL Query.
This will assign the returned value in the column, TrafficCount, to our SSIS variable, RowCount. After setting this, click the OK button on the dialog to save our task.
Data Clean-up Automation: Sample Traffic History Cleanup
1. Click on the Result Set page on the left of the screen and click the add button.
2. Click the Add Button. The SSIS Variable, RowCount, will automatically be added
3. Change Result Name from ‘NewResultName’ to ‘TrafficCount’

59
Before proceeding, we should check to see if our task will execute successfully. To do so, right click the task and “Execute Task”. The task will fire and indicate its success by turning green. If it is red, you have more work to do!
Select the progress tab to see the validation output.
Hit the Stop button to return to edit mode!
Ctrl-S! Save Frequently!Data Clean-up Automation: Sample Traffic History Cleanup

60
Questions?
Data Clean-up Automation: Sample Traffic History Cleanup

61
Checks if record count > 500
Checks if record count <= 500
Removes records that are older than 60 days.
Data Clean-up Automation: Sample Traffic History Cleanup
Backs up the Traffic History Table
Gets the record count for the Traffic History Table

62
We have four more tasks to add. Let’s go ahead and move those to our work area and then create our connections.
Data Clean-up Automation: Sample Traffic History Cleanup
1. Drag and Drop these tasks to your Work AreaBack Up Database Task, Maintenance Cleanup Task, History Cleanup Task,Execute SQL Task
2. Organize the Tasks in Sequential order by moving them around in the work area. (Refer to next slide)
3. Create Connections between each task by dragging the green arrows to connect

63
Data Clean-up Automation: Sample Traffic History Cleanup
Ctrl-S! Save Frequently!
Now let’s set the task properties for each task.

64
Data Clean-up Automation: Sample Traffic History Cleanup
1. Double-click the Back Up Database Task
2. Set the Backup Task Properties as we did when creating SQL Maintenance Plans. Click OK
3. Right-Click Back Up Database Task and “Execute Task”
4. Hit Stop button to return to designer

65
Data Clean-up Automation: Sample Traffic History Cleanup
1. Double-click the History Cleanup Task
2. Set the History Cleanup Task Properties as we did when creating SQL Maintenance Plans. Click OK
3. Right-Click Back Up Database Task and “Execute Task”
4. Hit Stop button to return to designer

66
Data Clean-up Automation: Sample Traffic History Cleanup
1. Double-click the Maintenance Cleanup Task
2. Set the Maintenance Cleanup Task Properties as we did when creating SQL Maintenance Plans. Click OK
3. Right-Click Maintenance Cleanup Task and “Execute Task”
4. Hit Stop button to return to designer

67
Now let’s finish up the Table Cleanup Task!
Double-Click the “Execute SQL Task” to get started.
Data Clean-up Automation: Sample Traffic History Cleanup

68
1. Change the Name to “Delete Traffic History” so it clearly identifies the task.
2. Change the Description to “This task will delete all rows from the PWTrafficMonitorEntries table that are older than 60 days”.
3. Leave the Result Set to “None”. Since we are deleting records, we are not expecting a return value from our query.
4. From the connection drop down, select the connection that we created previously.
Data Clean-up Automation: Sample Traffic History Cleanup

69
Now lets define a SQL Statement that will delete the records from the PWTrafficMonitorEntries table older than 60 days.
Data Clean-up Automation: Sample Traffic History Cleanup
-- Delete records from the table that are older than 60 days using the DateDiff function-- The number of days can easily be modified based on your organizations needs
Delete from [Production_Portal_PortalFx].[dbo].[PWTrafficMonitorEntries]where DATEDIFF (day, DateTime, getdate()) > 60

70
Let’s enter the SQL statement from the previous screen into the SQL Query dialog that pops up for our SQL Statement property.
Data Clean-up Automation: Sample Traffic History Cleanup
1. Click the Ellipsis on the SQL Statement Property`
2. Copy the SQL Statement in the Enter SQL Query Dialog, Click “OK”Delete from [Production_Portal_PortalFx].[dbo].[PWTrafficMonitorEntries]where DATEDIFF (day, DateTime, getdate()) > 60

71
Data Clean-up Automation: Sample Traffic History Cleanup
We now have a linear workflow but we haven’t yet used the RowCount Variable to set a Condition.
We only want to run the clean up task if there are more than 500 rows.
To do this we can add conditional connections.

72
1. Select the “Traffic History Count” Task
2. Drag the unlinked green line from the Traffic History Count to our History Cleanup Task
Data Clean-up Automation: Sample Traffic History Cleanup
Now you should see two connections from the Traffic History Count task. We want the Delete Traffic History task to happen if there are more than 500 records so let’s work on that connection first.

73
Double-Click the connection pointing to the Delete Traffic History task.Data Clean-up Automation: Sample Traffic History Cleanup

74
1. Switch the evaluation operation to Expression and Constraint. For this we want to both evaluate the data and make sure that the operation succeeded.
2. Leave Value as “Success”.
3. Add an expression using the SSIS variable, RowCount, we created.@[User::RowCount] > 500
4. Click the test button to evaluate our expression. It should give us a success message.
Data Clean-up Automation: Sample Traffic History Cleanup

75
Click OK to accept these constraints. This will ensure that the returned value from our SQL Query must be over the integer 500 before proceeding to the next task.
A little fx icon indicates that we are evaluating a variable on this connection.
Data Clean-up Automation: Sample Traffic History Cleanup
Ctrl-S! Save Frequently!

76
Now we are ready to add a condition to the other connection.
Double-Click the connection pointing to the History Cleanup Task.
Data Clean-up Automation: Sample Traffic History Cleanup

77
1. Switch the evaluation operation to Expression and Constraint. For this we want to both evaluate the data and make sure that the operation succeeded.
2. Leave Value as “Success”.
3. Add an expression using the SSIS variable, RowCount, we created.@[User::RowCount] <= 500
4. Click the test button to evaluate our expression. It should give us a success message.
Data Clean-up Automation: Sample Traffic History Cleanup
Ctrl-S! Save Frequently!

78
Checks if record count <= 500
Checks if record count > 500
Data Clean-up Automation: Sample Traffic History Cleanup
Removes records that are older than 60 days.
Voila! It’s Done!

79
Now we can check the whole workflow to make sure it works all together.
Hit the Play Button to Start!
Check out the Execution Results!
Data Clean-up Automation: Sample Traffic History Cleanup

80
Questions?

81
Data Clean-up Automation: Schedule and Run!
It is now time to schedule our SSIS Package!
1. Load SQL Server Management Studio Note: It’s OK to leave Business Intelligence Studio Open
2. Navigate to the SQL Server Agent3. Expand the SQL Server Agent 4. Right Click Jobs and click “New Job…”.
A dialog will be displayed that will allow us to start configuring our SSIS package for scheduling. Complete the General properties.

82
Click the “Steps” page from the left menu and select the “New…” button at the bottom of this page. Provide a Step Name. From the type drop down select “SQL Server Integration Services Package”.
Data Clean-up Automation: Schedule and Run!

83
On the General tab change the Package source to “File system”. The Server information should be grayed out. Click the “…” button below “Package” and navigate to the package we created and select it.
Data Clean-up Automation: Schedule and Run!
If you did not take note of the package location, you can go back into your SSIS project and look in the Solution Explorer.

84
After confirming the job by clicking OK, it is time to create a schedule for the job. Click on the schedule page on the left. Click “New…” at the bottom of the dialog. The schedule dialog should be identical to the SQL Maintenance Plan above.
Like before, I have scheduled this to run daily at 3:00 AM.
Data Clean-up Automation: Schedule and Run!

85
Finally, let’s create an alert in case something goes wrong with our backup. Click the Alerts page on the left and click the “Add…” button at the bottom of the page.
Set the database target to the database defined in our SSIS package and change the severity to 021 – Fatal Error in the Database Processes. This will trigger whenever the database backup fails.
Data Clean-up Automation: Schedule and Run!

86
Click the Response page on the left navigation. Here we can choose to notify the operator that we created during the SQL Maintenance Tutorial.
That’s it! Go ahead and save your Job.
Success!
Data Clean-up Automation: Schedule and Run!

87
Questions?
Data Clean-up Automation: Schedule and Run!

88
SSIS Packages can utilize a huge range of control flow items. Below are some items that you should look at utilizing in your workflows.Send mail task – The send mail task is great for notifying an individual or group of individuals that your workflow has completed. You will be required to create a new connection manager, like we did for SQL, to your SMTP server for this. This connection can be created from within the task configuration.
This task is also great for notifying individuals when tasks failed. Simply trigger an email task with a constraint with the constraint value set to “Failure”.
Advanced SSIS Package: Archiving and Renaming Backups

89
A really important thing to do with SSIS packages is to automate the renaming and movement of backups from a backup server to a storage server. In this part we will look at using 3 tasks together: foreach loop container, empty data flow task and file system task. Start by adding the Foreach Loop Container to your Control Flow.
Advanced SSIS Package: Archiving and Renaming Backups

90
The next few steps are a bit tricky, but we’ll break down each one. Open up the Foreach Loop Container’s properties by double clicking on it. Click on the Collection menu to the left. We’re going to add an Foreach File Enumerator Expression.
In the Enumerator Configuration section, point the folder to your storage server location and for the Files specify *.bak. Finally switch the “Retrieve file name” option to “Name and extension” and select “Traverse subfolders”.
Advanced SSIS Package: Archiving and Renaming Backups

91
Now we need to create some variables that our foreach loop container will use. All of these variables will be at the scope of the foreach loop container as our other actions will be children of this container.
These variables will be named:1. Archive Path2. FullArchivePathFileName3. FullSourcePathFileName4. MyFileValue5. SourcePath
I’ve placed a temp variable in some of these, however at run time, when iterating many of these filenames will automatically be updated in the loop. Go ahead and create these variables now.
Advanced SSIS Package: Archiving and Renaming Backups

92
In order for these variables to be useful, we need to add some expressions to them so that they don’t explicitly look for abc or 11111. Select the FullSourcePathFileName variable. You should notice that the properties window in the bottom right changes.
Select the Expression box and click the “…” button.
Advanced SSIS Package: Archiving and Renaming Backups

93
A dialog will pop allowing us to write an expression. Enter the following into the Expression box and click evaluate expression: @[User::SourcePath] + @[User::MyFileValue]
The output should look like this.
Click OK to save this. Now before proceeding, make to change the “EvaluateAsExpression” value to true from false. This will make this variable use the expression instead of the value that we manually entered.
Advanced SSIS Package: Archiving and Renaming Backups

94
Now we will do the same for FullArchivePathFileName. Follow the preceding steps and this time use the expression:
@[User::ArchivePath] + SUBSTRING( @[User::MyFileValue] , 1 , FINDSTRING( @[User::MyFileValue],".",1) - 1 ) + "-" + (DT_STR, 2, 1252) Month( @[System::StartTime] )+ (DT_STR, 4, 1252) Year( @[System::StartTime] )+ SUBSTRING( @[User::MyFileValue] , FINDSTRING( @[User::MyFileValue],".",1) , LEN( @[User::MyFileValue] ) )
This may look a bit confusing, but this takes some basic T-SQL and combines it with our variables. Taking a look at the output makes it make a bit more sense.
The real power of this expression is that it names your archive uniquely based on the systems time and date!
Advanced SSIS Package: Archiving and Renaming Backups

95
Next, open up the properties for the Foreach Loop Container again and this time select the Variable Mappings page. Select the MyFileValue variables for a mapping.
This will allow the Foreach Loop Container to own the MyFileValue so that when our rename operation happens later on, it will have a variable to use for the name of the backup.
Advanced SSIS Package: Archiving and Renaming Backups

96
At this point our Foreach Loop Container is pretty well defined, but it doesn’t have any tasks to loop! Drag a Data Flow Task and a File System Task into the Foreach Loop Container. Then connect the Data Flow Task to the File System Task. Your control flow should look like this:
I have renamed the Data Flow Task to “Empty Data Flow Task” to indicate that in this scenario we won’t be using it. In other ETL (extract, transform, load) scenarios, this is where our more complex work would go such as validation, splitting, or compression.
Advanced SSIS Package: Archiving and Renaming Backups

97
The last part of creating this package is to define the file system task. This task will perform the grunt work.
Here we are defining a “Rename file” operation with both destination and source variables. This will result in the Rename file operation also moving our file to the source file path all in one task!
Advanced SSIS Package: Archiving and Renaming Backups

98
At this point, by putting all these steps together we can now place this task into our existing workflow or create a different package all together to contain this loop. If you have done this correct, you can execute at this time. For this example, this is my source folder.
Advanced SSIS Packages Information

99
Now, right click foreach loop container and click “Execute Container”. Our container should light up green, our source folder should be empty and our target folder full with renamed backups!
Advanced SSIS Package: Archiving and Renaming Backups

100
Last, but not least, take a look at the Progress tab to see what the pipeline looks like when executed.
After taking a look at this and saving your SSIS package. You can now schedule it and add reporting / logging.
Advanced SSIS Package: Archiving and Renaming Backups

101
Here is it all put together!
Advanced SSIS Package: Archiving and Renaming Backups

102
Questions?
Advanced SSIS Package: Archiving and Renaming Backups