1. install and setup adt - peter-lo.com · 1. install and setup adt ... 2.1 creating an android...
TRANSCRIPT

Android Apps Development for Mobile and Tablet Device (Level I) Lesson 1
4T025-1-A @ Peter Lo 2014 1
1. Install and Setup ADT
1.1 Installation of Java SE Development Kit (JDK) 1. Download the latest version of Java SE Development Kit (JDK) from the Oracle’s Java webpage:
http://www.oracle.com/technetwork/java/javase/downloads/index.html. Then click “Accept
License Agreement” and then select the correct version to download.
2. Double click the file to start the installation of JDK. Select the component that you want to
install (Recommend select all). Select Change to modify the path for installing JDK, and then
press Next to continue.
3. Select Change to modify the path for installing JRE, and then press Next to continue. After the
install process finish, click [Close] to end.

Android Apps Development for Mobile and Tablet Device (Level I) Lesson 1
4T025-1-A @ Peter Lo 2014 2
1.2 Installation of Android SDK 1. Download the latest version of Android SDK from the Android Developer webpage:
http://developer.android.com/sdk/index.html. Then click “I have read and agree with the
above terms and conditions” and then select the correct version to download.
2. Unpack the ZIP file (named adt-bundle-<os_platform>.zip) and save it to an appropriate
location, such as a "Development" directory in your home directory. Open the directory
(adt-bundle-<os_platform>/eclipse/) and launch Eclipse. Select the workspace when start
Eclipse in first time.
3. The Android Developer Tool is launch.
Android Apps Development for Mobile and Tablet Device (Level I) Lesson 1
4T025-1-A @ Peter Lo 2014 3
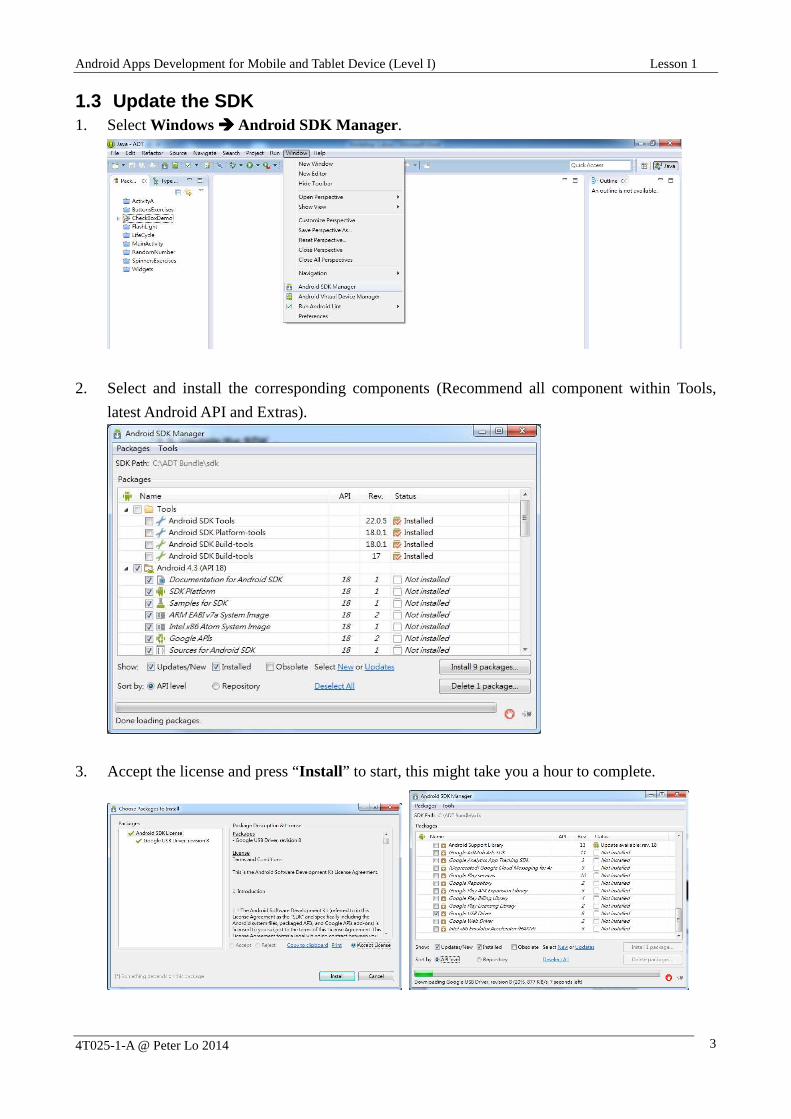
1.3 Update the SDK 1. Select Windows ���� Android SDK Manager.
2. Select and install the corresponding components (Recommend all component within Tools,
latest Android API and Extras).
3. Accept the license and press “Install ” to start, this might take you a hour to complete.

Android Apps Development for Mobile and Tablet Device (Level I) Lesson 1
4T025-1-A @ Peter Lo 2014 4
1.4 Update the Eclipse 1. Sometime, you are required to update the Eclipse by selecting Windows ���� Preferences.
2. Press the [Add] button from the Install/Update ���� Available Software Sites section in
Preferences dialog.
3. Set the location as https://dl-ssl.google.com/android/eclipse/, and press [OK] to confirm. Then
execute Help ���� Check for Update again.

Android Apps Development for Mobile and Tablet Device (Level I) Lesson 1
4T025-1-A @ Peter Lo 2014 5
1.5 Create an Android Virtual Device (AVD) 1. To run your app on the emulator you need to first create an Android Virtual Device which is a
device configuration for the Android emulator that allows you to model different devices. First
you need to create a virtual SD card for your AVD. Go to the SDK Windows tools folder (C:\
[adt-bundle]\ sdk \tools) and execute the following command.
mksdcard 512M mysdcard.iso
2. After execute the command is DOS Prompt, you can use “DIR” to verify the file.
3. Start ADT Bundle, and select Windows ���� Android Virtual Device Manager to launch the
Android Virtual Device Manager.
4. Click New in the Android Virtual Device Manager panel.

Android Apps Development for Mobile and Tablet Device (Level I) Lesson 1
4T025-1-A @ Peter Lo 2014 6
5. Fill in the details for the AVD. Give it a name, device, platform target, an SD card size, and a skin
and then press OK.
6. The new AVD is listed in the Android Virtual Device Manager, close the device manager

Android Apps Development for Mobile and Tablet Device (Level I) Lesson 1
4T025-1-A @ Peter Lo 2014 7
2. Building your First Android App
2.1 Creating an Android Project 1. Start Eclipse and click File ���� New ���� Android Application Project
2. Fill in the application and project name (recommend select Android 4.0 or above) and then press
“Next”. Leave the default selections on the next screen and click “Next”.
3. You can customize an icon in several ways and the tool generates an icon for all screen densities.
Before you publish your app, you should be sure your icon meets the specifications defined in
the Iconography design guide. Click Next.

Android Apps Development for Mobile and Tablet Device (Level I) Lesson 1
4T025-1-A @ Peter Lo 2014 8
4. Now you can select an activity template from which to begin building your app. Select
“BlankActivity ” and click Next. Then leave all the details for the activity in their default state
and click Finish.
5. A default set of template source files are created in the Android project

Android Apps Development for Mobile and Tablet Device (Level I) Lesson 1
4T025-1-A @ Peter Lo 2014 9
2.2 Executing the Android App 2.2.1 Execute the Android App in AVD 1. Select Run ���� Run As ���� Android Application to install the app on your AVD and start it.
2. Your first app will be launched.

Android Apps Development for Mobile and Tablet Device (Level I) Lesson 1
4T025-1-A @ Peter Lo 2014 10
2.2.2 Running the Android App on Mobile Phone 1. Power on your device, then select Settings ���� Developer Option, to enter developer mode.
․ USB debugging (Required)
․ Stay awake (Optional)
․ Allow mock locations (Optional)
․ Power menu bug reports (Optional)
2. Close all AVD, and connect your mobile to PC through USB. Then select Run ���� Run As ����
Run Configuration in Eclipse.

Android Apps Development for Mobile and Tablet Device (Level I) Lesson 1
4T025-1-A @ Peter Lo 2014 11
3. Select “Always prompt to pick device” in “ Deployment Target Selection Mode” under
"Target" tab, and then press “OK ” button to confirm.
4. Select Run ���� Run As ���� Android Application in Eclipse again.
5. Select your mobile device and press “OK ” to deploy and execute the app in your mobile.

Android Apps Development for Mobile and Tablet Device (Level I) Lesson 1
4T025-1-A @ Peter Lo 2014 12
3. Localization
3.1 Supporting Different Languages 1. To add support for more languages, you can create additional values directories inside res/ that
include a hyphen and the ISO country code at the end of the directory name. Or using “Add New
Translation” to define.
2. Select the language and input the value for New Translation, then press [OK] to continue.

Android Apps Development for Mobile and Tablet Device (Level I) Lesson 1
4T025-1-A @ Peter Lo 2014 13
3. Change the language of your mobile to Chinese, and then execute the app again. Can you see the
different?

Android Apps Development for Mobile and Tablet Device (Level I) Lesson 1
4T025-1-A @ Peter Lo 2014 14
4. Project Management
4.1 Close Project 4. In order to close the project completely, select File ���� Close All to close all opened files. Then
right click the project and select “Close Project” to close the project completely
4.2 Open Existing Project 1. Select the project and double click (or right click and select Open Project). Then double click the
layout file (activity_main.xml) to edit the screen layout or double to source file to edit the code.

Android Apps Development for Mobile and Tablet Device (Level I) Lesson 1
4T025-1-A @ Peter Lo 2014 15
4.3 Remove Project 1. If you need to remove a project, right click and then select “Delete”.
2. Click “Delete project contents on disk (cannot be undone) if you want to delete the file
permanently. Then press “OK ” to confirm and start deletion.
4.4 Import External Project 1. In order to import a project, do not copy it into workspace directly. Please it somewhere, and then
let ADT copy it into workspace by menu. Select File ���� New ���� Project …
2. Select Android ���� Android Project from Existing Code, and then press “Next”. Then use the
“Browse” button to select the project folder. You can select Copy projects into Workspace if
you want to import into workspace. Then click “Finish” to start import.
Android Apps Development for Mobile and Tablet Device (Level I) Lesson 1
4T025-1-A @ Peter Lo 2014 16
5. Debugging
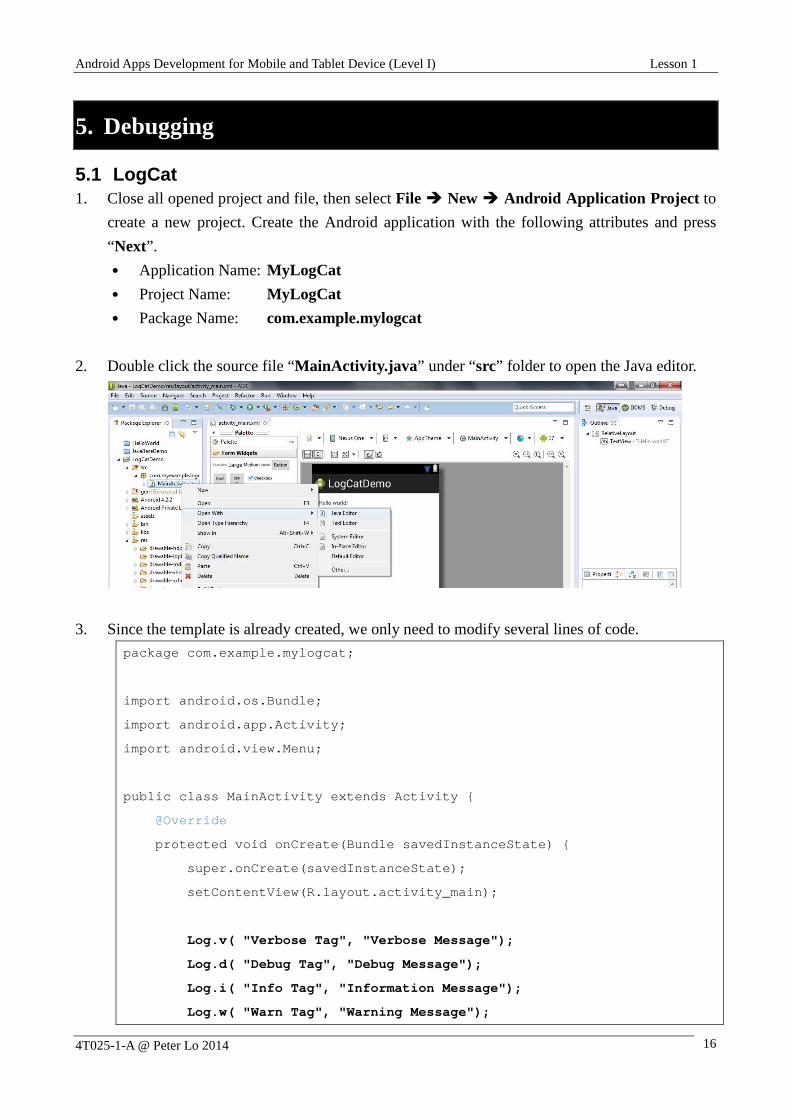
5.1 LogCat 1. Close all opened project and file, then select File � New � Android Application Project to
create a new project. Create the Android application with the following attributes and press
“Next”.
․ Application Name: MyLogCat
․ Project Name: MyLogCat
․ Package Name: com.example.mylogcat
2. Double click the source file “MainActivity.java ” under “src” folder to open the Java editor.
3. Since the template is already created, we only need to modify several lines of code.
package com.example.mylogcat;
import android.os.Bundle;
import android.app.Activity;
import android.view.Menu;
public class MainActivity extends Activity {
@Override
protected void onCreate(Bundle savedInstanceState) {
super.onCreate(savedInstanceState);
setContentView(R.layout.activity_main);
Log.v( "Verbose Tag", "Verbose Message");
Log.d( "Debug Tag", "Debug Message");
Log.i( "Info Tag", "Information Message");
Log.w( "Warn Tag", "Warning Message");

Android Apps Development for Mobile and Tablet Device (Level I) Lesson 1
4T025-1-A @ Peter Lo 2014 17
Log.e( "Error Tag", "Error Message");
}
@Override
public boolean onCreateOptionsMenu(Menu menu) {
// Inflate the menu; this adds items to the action bar if it is present.
getMenuInflater().inflate(R.menu.main, menu);
return true;
}
}
4. Since the Log utility library is not imported into the program, error will be occurred. Click on the
statement “Log.”, and then press “Import Log (android.util) ”.
5. Right click the project, select Run ���� Run As ���� Android Application to execute the apps.

Android Apps Development for Mobile and Tablet Device (Level I) Lesson 1
4T025-1-A @ Peter Lo 2014 18
6. In order to open the LogCat windows, select Windows ���� Show View ���� Others.
7. Select Android ���� LogCat in the “Show View” dialog box.
8. The messages are shown in the LogCat windows.

Android Apps Development for Mobile and Tablet Device (Level I) Lesson 1
4T025-1-A @ Peter Lo 2014 19
5.2 Debugging Process with Breakpoint 1. Close all opened project and file, then select File � New � Android Application Project to
create a new project. Create the Android application with the following attributes and press
“Next”.
․ Application Name: MyBreakPoint
․ Project Name: MyBreakPoint
․ Package Name: com.example.mybreakpoint
2. Double click the source file “MainActivity.java ” under “src” folder to open the Java editor.
Since the template is already created, we only need to modify several lines of code.
package com.example.mybreakpoint;
import android.os.Bundle;
import android.app.Activity;
import android.view.Menu;
public class MainActivity extends Activity {
@Override
protected void onCreate(Bundle savedInstanceState) {
super.onCreate(savedInstanceState);
setContentView(R.layout.activity_main);
String a, b, c;
a = "Debug ";
b = "Demo";
c = a + b;
setTitle (c);
}
@Override
public boolean onCreateOptionsMenu(Menu menu) {
// Inflate the menu; this adds items to the action bar if it is present.
getMenuInflater().inflate(R.menu.main, menu);
return true;
}
}

Android Apps Development for Mobile and Tablet Device (Level I) Lesson 1
4T025-1-A @ Peter Lo 2014 20
3. Double click the left vertical line to create a breakpoint (a blue dot will be appeared).
4. Right click the project, select Debug ���� Debug As ���� Android Application to execute the apps
in debug mode.
Android Apps Development for Mobile and Tablet Device (Level I) Lesson 1
4T025-1-A @ Peter Lo 2014 21
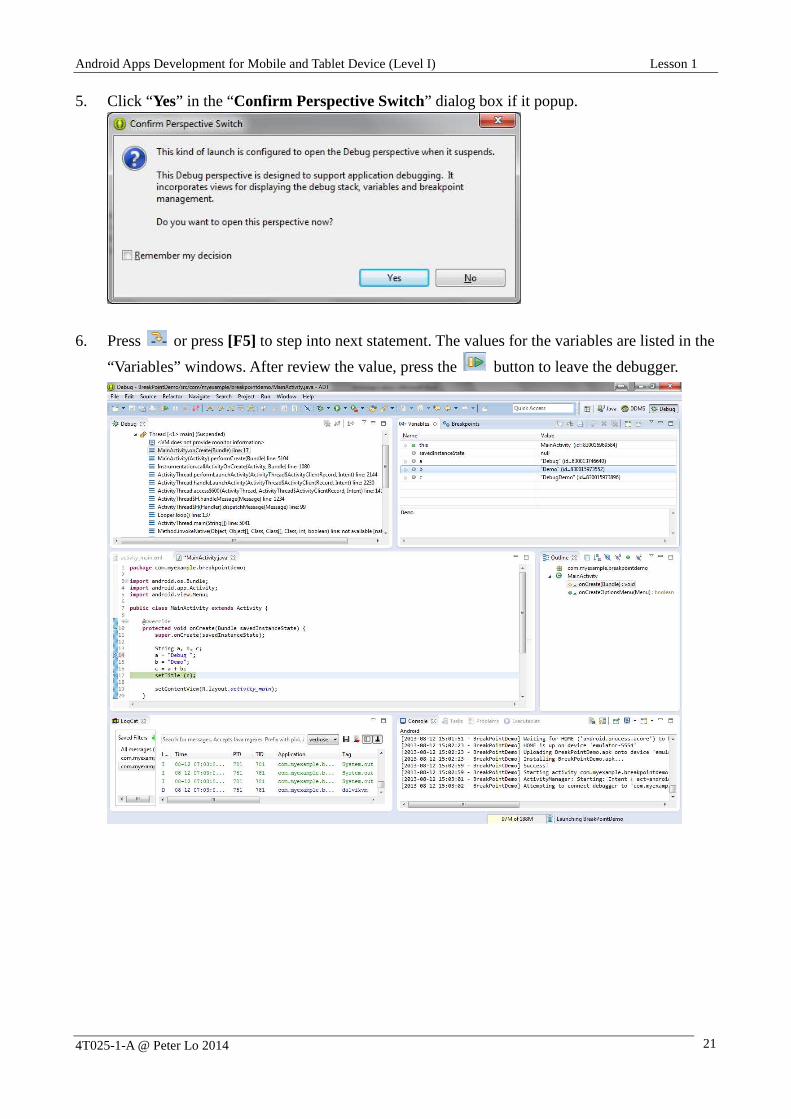
5. Click “Yes” in the “Confirm Perspective Switch” dialog box if it popup.
6. Press or press [F5] to step into next statement. The values for the variables are listed in the
“Variables” windows. After review the value, press the button to leave the debugger.