android apps adt
DESCRIPTION
ANDROID APPS DEVELOPMENT GUIDE!!!TRANSCRIPT
User's Guide
Last update : 2014.06.12 Copyright: © 2012, 2013, 2014 Anywhere Software Edition 1.4
Table of contents 2 Basic4Android User's Guide
1 General information.................................................................................................................5 2 Conditional compilation ..........................................................................................................6
2.1 Build configurations ........................................................................................................6 2.1.1 Built-in symbols...........................................................................................................6
2.2 Code Exclusion................................................................................................................7 2.2.1 Example from the forum ..............................................................................................7
2.3 Unsupported structure.................................................................................................... 10 3 Libraries ................................................................................................................................ 11
3.1 IME Input Methods Editor ........................................................................................... 11 3.1.1 Handling the screen size changed event...................................................................... 13 3.1.2 Showing and hiding the keyboard .............................................................................. 14 3.1.3 Handle the action button ............................................................................................ 14 3.1.4 Custom filters ............................................................................................................ 15
3.2 #AdditionalJar attribute.................................................................................................. 16 4 SQLite Database.................................................................................................................... 20
4.1 SQLite Database basics.................................................................................................. 20 4.2 First steps ...................................................................................................................... 24 4.3 SQLite Viewer............................................................................................................... 25 4.4 SQLite Database first simple example program.............................................................. 26 4.5 SQLite Database second simple example program......................................................... 32 4.6 SQLite Database third simple example program............................................................. 37 4.7 SQLite Database fourth example program...................................................................... 38
4.7.1 Editing ....................................................................................................................... 40 4.7.2 Filtering ..................................................................................................................... 41 4.7.3 Code .......................................................................................................................... 42
4.7.3.1 Main Activity..................................................................................................... 43 4.7.3.2 Edit activity........................................................................................................ 45 4.7.3.3 Filter Activity..................................................................................................... 46
5 DBUtils ................................................................................................................................. 47 5.1 DBUtils functions .......................................................................................................... 48 5.2 Examples ....................................................................................................................... 50
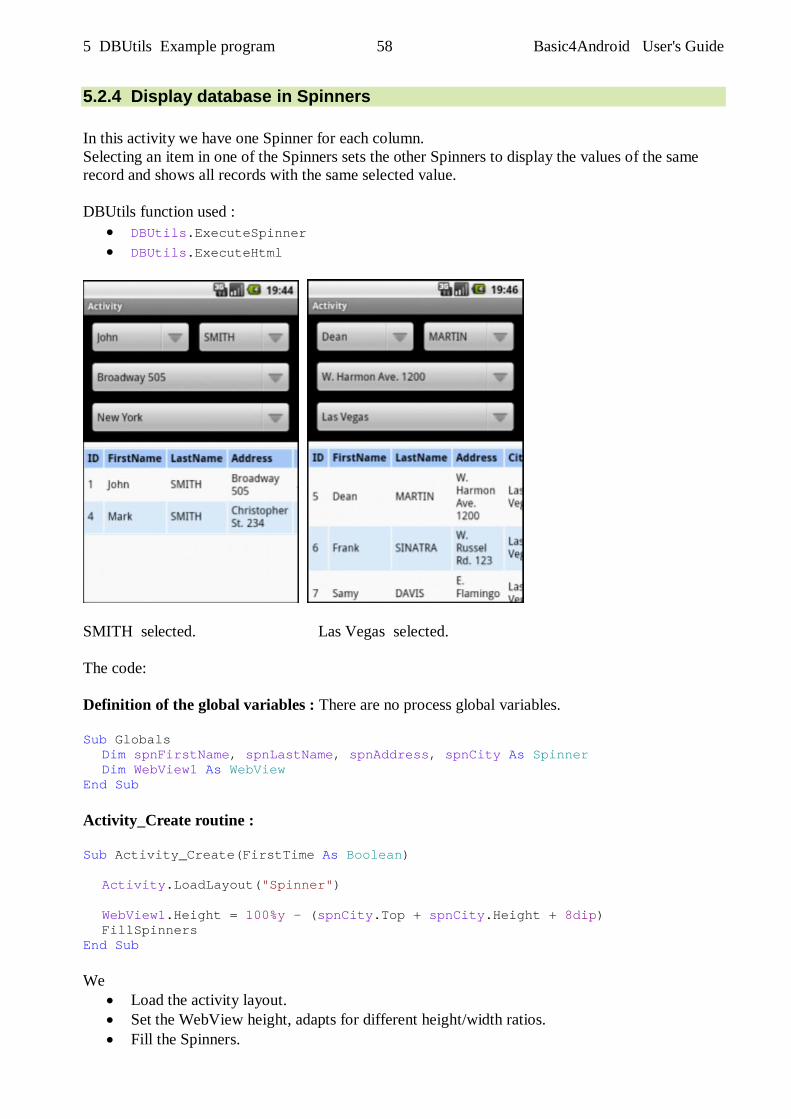
5.2.1 Example program Main module ................................................................................ 50 5.2.2 Show the table in a WebView .................................................................................... 52 5.2.3 Show FirstName and LastName in a ListView ........................................................... 56 5.2.4 Display database in Spinners...................................................................................... 58 5.2.5 Edit database.............................................................................................................. 60
6 GPS....................................................................................................................................... 68 6.1 GPS Library................................................................................................................... 68
6.1.1 GPS Object ................................................................................................................ 68 6.1.2 GPS Satellite.............................................................................................................. 69 6.1.3 GPS Location............................................................................................................. 69
6.2 GPS Program................................................................................................................. 70 6.2.1 General explanations.................................................................................................. 73 6.2.2 Setup.......................................................................................................................... 74 6.2.3 GPS display ............................................................................................................... 76 6.2.4 Satellites .................................................................................................................... 77 6.2.5 Map display ............................................................................................................... 78 6.2.6 GPS path.................................................................................................................... 80 6.2.7 Save GPS path file / KML file.................................................................................... 83
6.3 GPS Program Code........................................................................................................ 84 6.3.1 Initialization of the GPS............................................................................................. 85 6.3.2 Button with tooltip ..................................................................................................... 86
Table of contents 3 Basic4Android User's Guide
6.3.3 Button with tooltip and additional buttons.................................................................. 89 6.3.4 GPS Calculate distance scales .................................................................................... 92 6.3.5 Drawing GPS position ............................................................................................... 93
7 Widgets, home screen widgets............................................................................................... 96 7.1 Widgets Part I ............................................................................................................... 96 7.2 Widgets Part II.............................................................................................................. 99
8 Http / HttpUtils2.................................................................................................................. 102 8.1 HttpUtils2 Objects ...................................................................................................... 102 8.2 HttpUtils2 Functions................................................................................................... 102 8.3 HttpUtils Example1 .................................................................................................... 104 8.4 HttpUtils Example2 .................................................................................................... 105 8.5 The Flickr Viewer example.......................................................................................... 106
9 Network / AsyncStreams ..................................................................................................... 107 10 Advanced drawings ............................................................................................................. 111
10.1 View Drawables .......................................................................................................... 111 10.1.1 ColorDrawable..................................................................................................... 111 10.1.2 GradientDrawable ................................................................................................ 112 10.1.3 BitmapDrawable .................................................................................................. 113 10.1.4 StateListDrawable................................................................................................ 114 10.1.5 NinePatchDrawable ............................................................................................. 117
10.2 Layers with Panels / ImageViews / Images .................................................................. 119 10.2.1 Source code.......................................................................................................... 120
10.3 Diagrams / Charts ........................................................................................................ 124 10.3.1 Diagrams / Graph example program................................................................... 124 10.3.2 Second Graph program......................................................................................... 133 10.3.3 Charts Framework................................................................................................ 134
10.3.3.1 Pie Chart ...................................................................................................... 135 10.3.3.2 Bar Chart...................................................................................................... 138 10.3.3.3 Stacked Bar Chart......................................................................................... 141 10.3.3.4 Lines Chart................................................................................................... 143
10.4 Antialiasing filter ......................................................................................................... 148 11 Class modules...................................................................................................................... 149
11.1 Getting started ............................................................................................................. 149 11.1.1 Adding a class module ......................................................................................... 150 11.1.2 Classes structures ................................................................................................. 150 11.1.3 Polymorphism...................................................................................................... 151 11.1.4 Self reference ....................................................................................................... 152 11.1.5 Activity object...................................................................................................... 153
11.2 Classes from the forum ................................................................................................ 154 11.3 First example Wheel selection..................................................................................... 155
11.3.1 Simple example.................................................................................................... 155 11.3.2 Show the selected entry centred in the middle window......................................... 159 11.3.3 Return the selected value...................................................................................... 161 11.3.4 Color properties ................................................................................................... 163 11.3.5 A more advanced example ................................................................................... 167
11.4 Second example LimitBar........................................................................................... 168 11.5 Add properties to a class .............................................................................................. 173 11.6 Display a custom view in the Designer......................................................................... 174
11.6.1 Example with the LimitBar .................................................................................. 177 11.7 Compile a class into a Library...................................................................................... 179
11.7.1 Example with the LimitBar class example............................................................ 181 11.7.2 Using the library in a program.............................................................................. 182

Table of contents 4 Basic4Android User's Guide
Main contributors : Erel Uziel (Erel), Klaus Christl (klaus)
1 General information 5 Basic4Android User's Guide
1 General information This guide is dedicated for more advanced users and treats more specific topics. It covers Basic4Android version 3.80. All the source code and files needed (layouts, images etc) of the example projects in this guide are included in the SourceCode folder. Beginners should first read the Beginner's Guide.
2 Conditional Compilation 6 Basic4Android User's Guide
2 Conditional compilation In computer programming, conditional compilation is compilation implementing methods which allow the compiler to produce differences in the executable produced controlled by parameters that are provided during compilation.
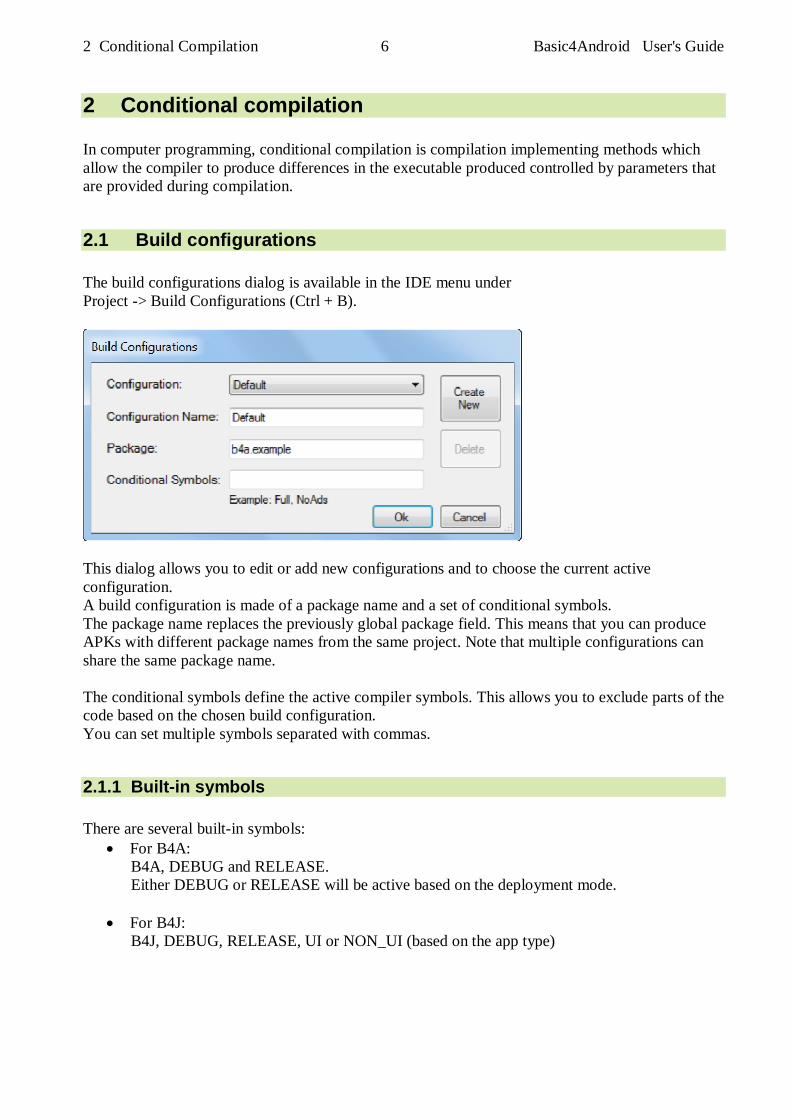
2.1 Build configurations The build configurations dialog is available in the IDE menu under Project -> Build Configurations (Ctrl + B).
This dialog allows you to edit or add new configurations and to choose the current active configuration. A build configuration is made of a package name and a set of conditional symbols. The package name replaces the previously global package field. This means that you can produce APKs with different package names from the same project. Note that multiple configurations can share the same package name. The conditional symbols define the active compiler symbols. This allows you to exclude parts of the code based on the chosen build configuration. You can set multiple symbols separated with commas.
2.1.1 Built-in symbols There are several built-in symbols:
For B4A: B4A, DEBUG and RELEASE. Either DEBUG or RELEASE will be active based on the deployment mode.
For B4J: B4J, DEBUG, RELEASE, UI or NON_UI (based on the app type)
2 Conditional Compilation 7 Basic4Android User's Guide
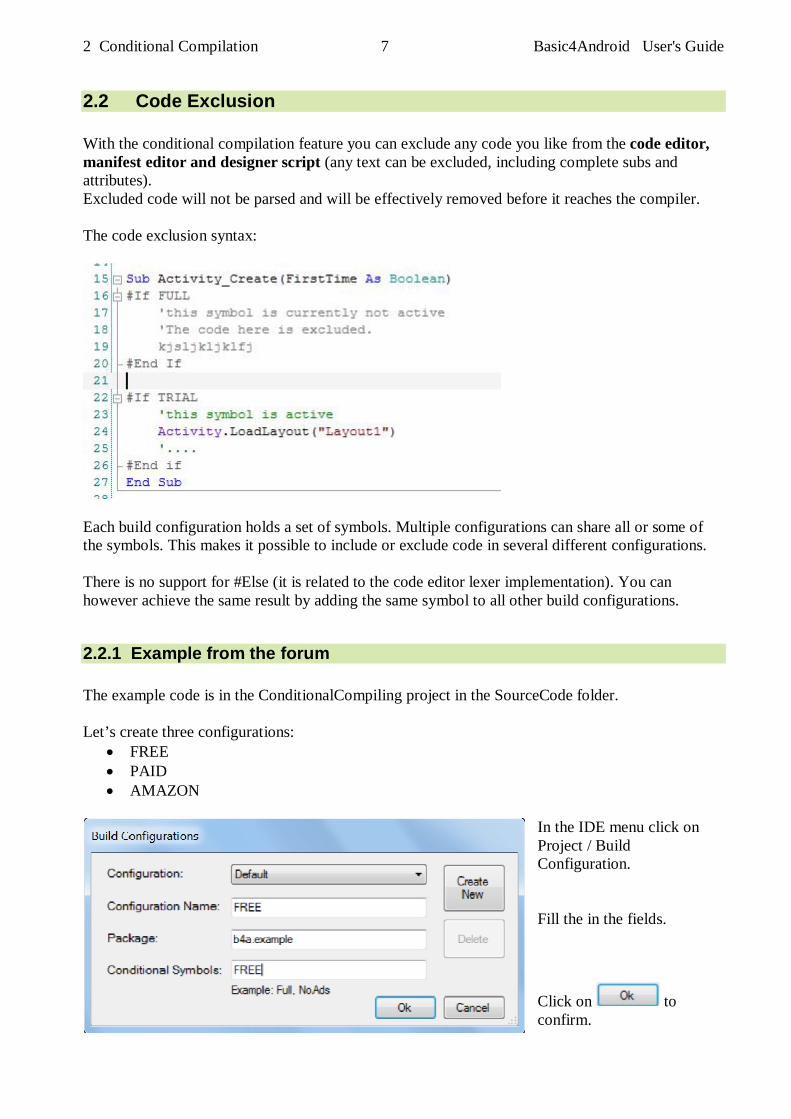
2.2 Code Exclusion With the conditional compilation feature you can exclude any code you like from the code editor, manifest editor and designer script (any text can be excluded, including complete subs and attributes). Excluded code will not be parsed and will be effectively removed before it reaches the compiler. The code exclusion syntax:
Each build configuration holds a set of symbols. Multiple configurations can share all or some of the symbols. This makes it possible to include or exclude code in several different configurations. There is no support for #Else (it is related to the code editor lexer implementation). You can however achieve the same result by adding the same symbol to all other build configurations.
2.2.1 Example from the forum The example code is in the ConditionalCompiling project in the SourceCode folder. Let’s create three configurations:
FREE PAID AMAZON
In the IDE menu click on Project / Build Configuration. Fill the in the fields.
Click on to confirm.

2 Conditional Compilation 8 Basic4Android User's Guide
Select Project / Build Configuration again you’ll see this. In the drop down list Default is replaced by FREE.
Click on to create a new configuration.
Fill in the new values.
Click on to create the third configuration.
Replace PAID by AMAZON and click to finish.
2 Conditional Compilation 9 Basic4Android User's Guide
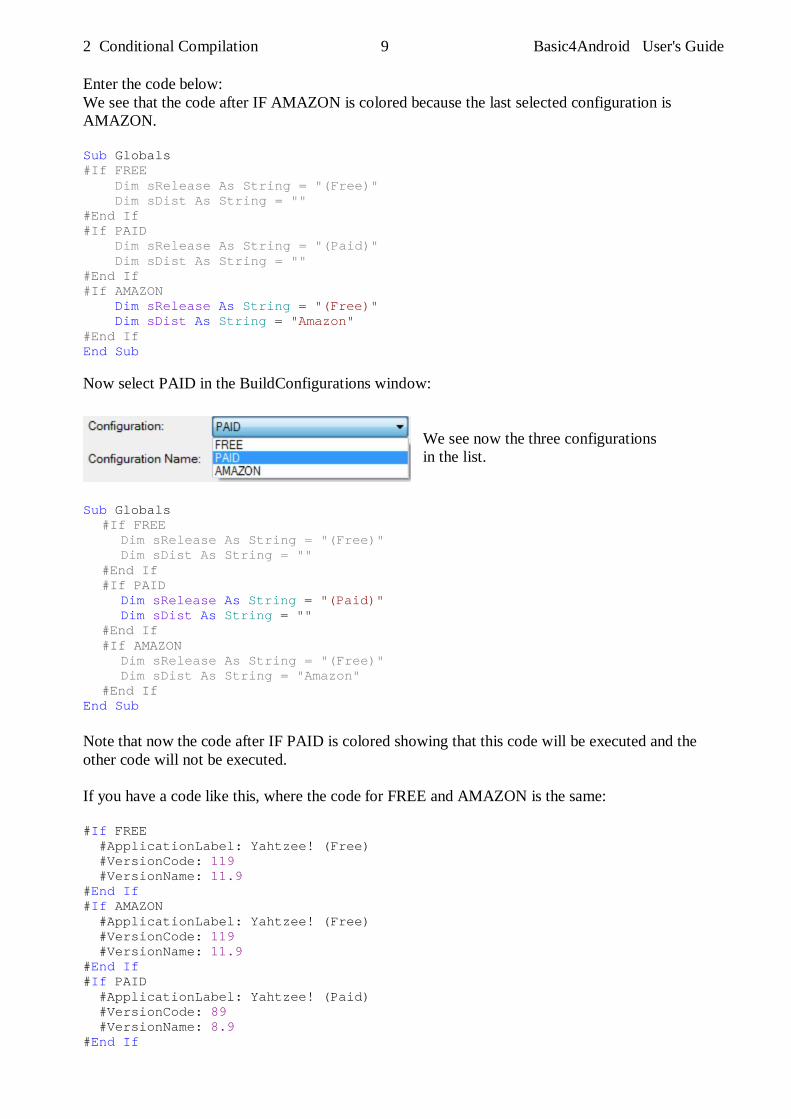
Enter the code below: We see that the code after IF AMAZON is colored because the last selected configuration is AMAZON. Sub Globals #If FREE Dim sRelease As String = "(Free)" Dim sDist As String = "" #End If #If PAID Dim sRelease As String = "(Paid)" Dim sDist As String = "" #End If #If AMAZON Dim sRelease As String = "(Free)" Dim sDist As String = "Amazon" #End If End Sub Now select PAID in the BuildConfigurations window:
We see now the three configurations in the list.
Sub Globals #If FREE Dim sRelease As String = "(Free)" Dim sDist As String = "" #End If #If PAID Dim sRelease As String = "(Paid)" Dim sDist As String = "" #End If #If AMAZON Dim sRelease As String = "(Free)" Dim sDist As String = "Amazon" #End If End Sub Note that now the code after IF PAID is colored showing that this code will be executed and the other code will not be executed. If you have a code like this, where the code for FREE and AMAZON is the same: #If FREE #ApplicationLabel: Yahtzee! (Free) #VersionCode: 119 #VersionName: 11.9 #End If #If AMAZON #ApplicationLabel: Yahtzee! (Free) #VersionCode: 119 #VersionName: 11.9 #End If #If PAID #ApplicationLabel: Yahtzee! (Paid) #VersionCode: 89 #VersionName: 8.9 #End If
2 Conditional Compilation 10 Basic4Android User's Guide
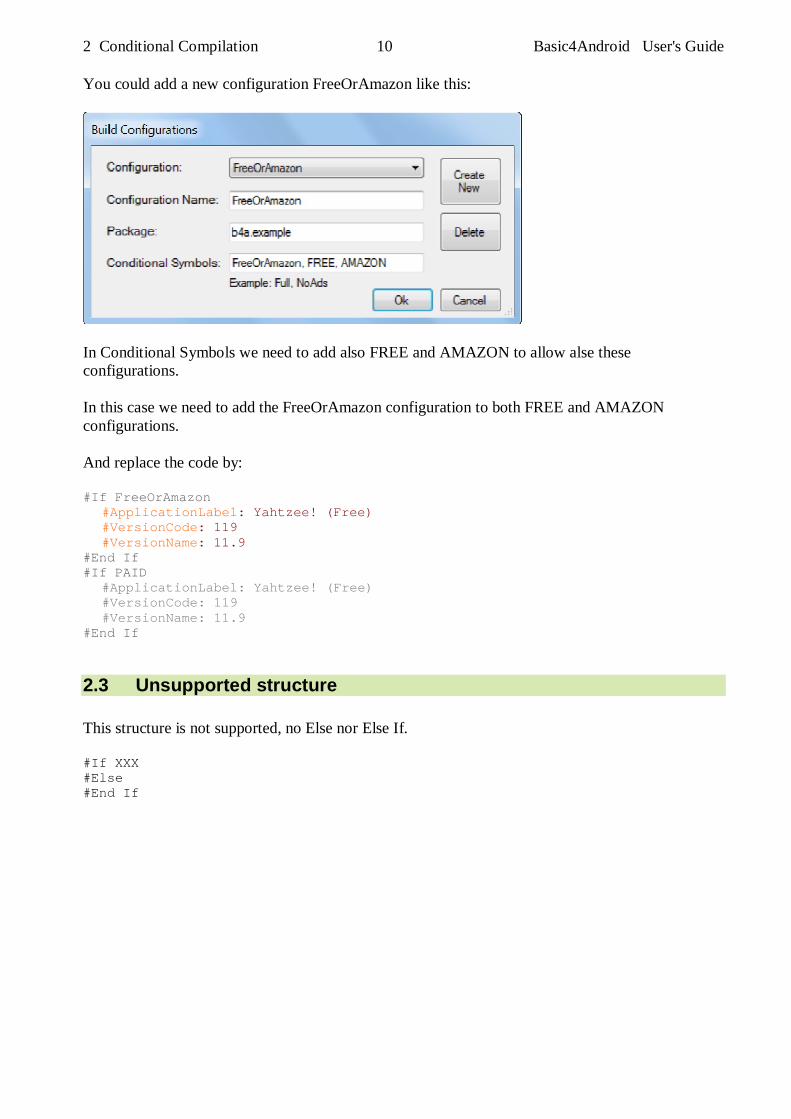
You could add a new configuration FreeOrAmazon like this:
In Conditional Symbols we need to add also FREE and AMAZON to allow alse these configurations. In this case we need to add the FreeOrAmazon configuration to both FREE and AMAZON configurations. And replace the code by: #If FreeOrAmazon #ApplicationLabel: Yahtzee! (Free) #VersionCode: 119 #VersionName: 11.9 #End If #If PAID #ApplicationLabel: Yahtzee! (Free) #VersionCode: 119 #VersionName: 11.9 #End If
2.3 Unsupported structure This structure is not supported, no Else nor Else If. #If XXX #Else #End If
3 Libraries 11 Basic4Android User's Guide
3 Libraries In this chapter we will study some specific libraries.
3.1 IME Input Methods Editor The IME library allows to modify the soft keyboard behaviour. The library can be found here IME library. The most part of this chapter has been taken over from Erels' IME Tutorial. The example code has been changed a little bit. Android has very good support for custom input method editors (IMEs). The downside for this powerful feature is that interacting with the soft keyboard can be sometimes quite complicated. This library includes several utilities that will help you better handle the soft keyboard. The methods are :
AddHandleActionEvent (EditText As EditText) Adds the HandleAction event to the given EditText.
AddHeightChangedEvent Enables the HeightChanged event. This event is raised when the soft keyboard state changes. You can use this event to resize other views to fit the new screen size. Note that this event will not be raised in full screen activities (an Android limitation
HideKeyboard Hides the soft keyboard if it is visible.
Initialize (EventName As String) Initializes the object and sets the subs that will handle the events.
SetCustomFilter (EditText As EditText, DefaultInputType As Int, AcceptedCharacters As String) Sets a custom filter. EditText - The target EditText. DefaultInputType - Sets the keyboard mode. AcceptedCharacters - The accepted characters. Example: Create a filter that will accept IP addresses (numbers with multiple dots) IME.SetCustomFilter(EditText1, EditText1.INPUT_TYPE_NUMBERS, "0123456789.")
ShowKeyboard (View As View) Sets the focus to the given view and opens the soft keyboard. The keyboard will only show if the view has received the focus.
3 Libraries 12 Basic4Android User's Guide
The events are : HandleAction As Boolean
HeightChanged (NewHeight As Int, OldHeight As Int)
Raised when the keyboard has changed, but only if the event has been activated with the AddHeightChangedEvent method
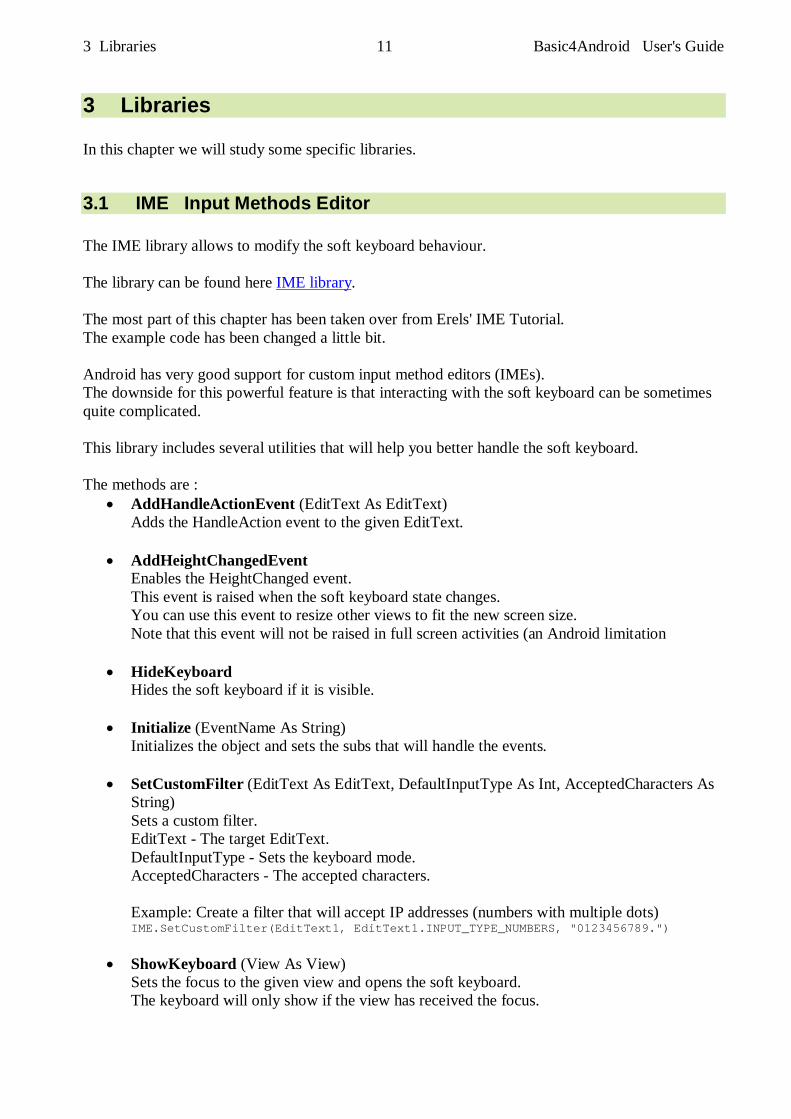
The attached example demonstrates the available methods. The example is an extended example of Erels' project from the IME library. Note that the IME object should be initialized before it can be used. IME.Initialize(EventName As String) IME1.Initialize("IME1")
Shows the keyboard Must start with 'a' limited to an IP address limited to an hex number limited to an octal number hides the keyboard
3 Libraries 13 Basic4Android User's Guide
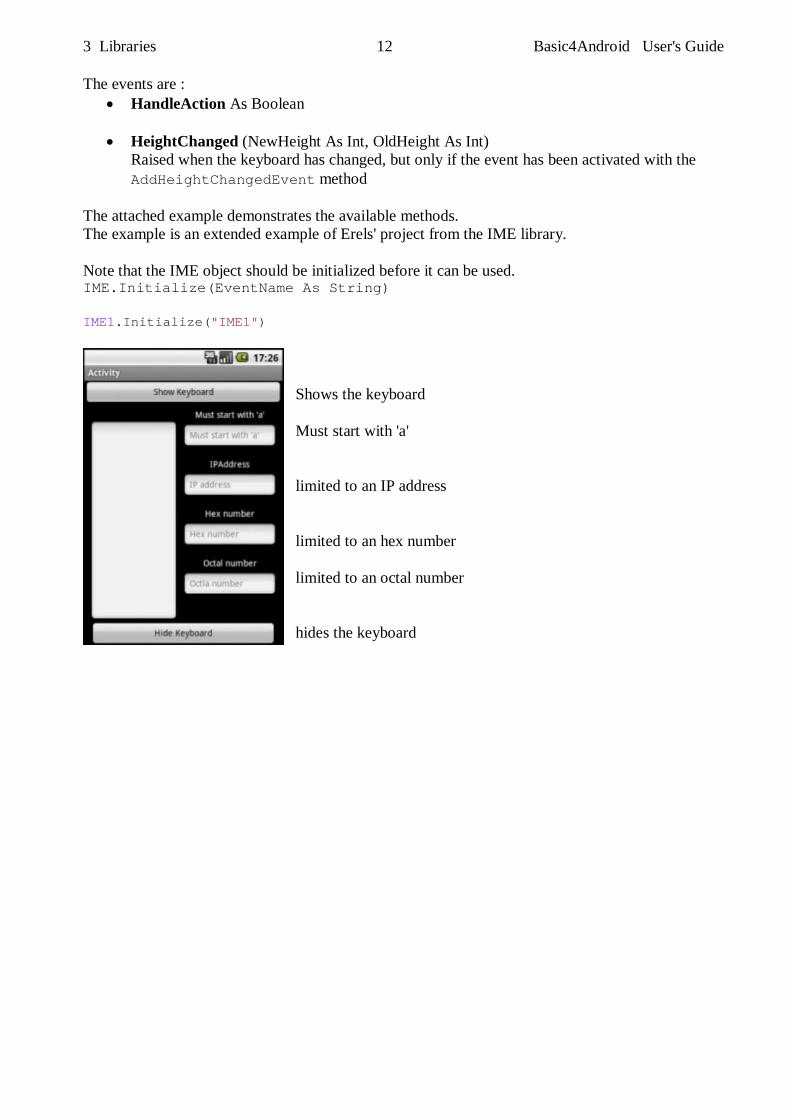
3.1.1 Handling the screen size changed event When the keyboard opens the available screen size becomes much shorter. By default if the EditText is located near the bottom of the screen, Android will "push" the whole activity and make the EditText visible. This mode is named "adjustPan" mode. By calling IME1.AddHeightChangedEvent you are changing the activity to "adjustSize" mode. In this mode the activity will not be pushed automatically. Instead the HeightChanged event will be raised when the keyboard is shown or hidden. For example the following code makes sure that the button at the bottom is always visible and sets the large EditText height to match the available height:
When the keyboard is displayed the left EditText views height is adapted according to the keyboard size. The Hide keyboard button is moved above the keyboard.
The code: Sub IME1_HeightChanged(NewHeight As Int, OldHeight As Int) btnHideKeyboard.Top = NewHeight - btnHideKeyboard.Height edtTest.Height = btnHideKeyboard.Top - edtTest.Top End Sub Note that this method will not work if the activity is in full screen mode (Issue 5497 - android - adjustResize windowSoftInputMode breaks when activity is fullscreen - Android).

3 Libraries 14 Basic4Android User's Guide
3.1.2 Showing and hiding the keyboard IME1.ShowKeyboard(EditText) - Sets the focus to the given view and opens the soft keyboard. Sub btnShowKeyboard_Click IME1.ShowKeyboard(edtStartWithA) End Sub IME1.HideKeyboard - Hides the keyboard (this method is the same as Phone.HideKeyboard). Sub btnHideKeyboard_Click IME1.HideKeyboard End Sub
3.1.3 Handle the action button By calling IME1.AddHandleActionEvent you can override the default behaviour of the action button (the button that shows Next or Done). This event is similar to EditText_EnterPressed event. However it is more powerful. It also allows you to handle the Next button and also to consume the message (and keep the keyboard opened and the focus on the current EditText). This can be useful in several cases. For example in a chat application you can send the message when the user presses on the done button and keep the keyboard open by consuming the message. You can also use it to validate the input before jumping to the next view by pressing on the Next button (note that the user will still be able to manually move to the next field). You can use the Sender keyword to get the EditText that raised the event. Sub IME1_HandleAction As Boolean Dim edt As EditText edt = Sender Select edt.Tag Case "edtStartWithA" If edt.Text.StartsWith("a") = False Then ToastMessageShow("Text must start with 'a'.", True) 'Consume the event. 'The keyboard will not be closed Return True Else Return False 'will close the keyboard End If End Select End Sub
3 Libraries 15 Basic4Android User's Guide
3.1.4 Custom filters EditText.InputType allows you to set the keyboard mode and the allowed input. However there are situations where you need to use a custom filter. For example if you want to accept IP addresses (ex: 192.168.0.1). In this case none of the built-in types will work. Setting the input type to INPUT_TYPE_DECIMAL_NUMBERS will get you close but it will not allow the user to write more than a single dot. IME1.SetCustomFilter allows you to both set the keyboard mode and also to set the accepted characters. In this case we will need a code such as: IP address : IME1.SetCustomFilter(edtIPAddress, edtIPAddress.INPUT_TYPE_NUMBERS, "0123456789.")
edtIPAddress is the given EditText view edtIPAddress.INPUT_TYPE_NUMBERS is the keyboard type "0123456789." are the allowed characters, in our case we accept not only numbers as
with INPUT_TYPE_NUMBERS but we accept also dots. Note that this is only a simple filter. It will accept the following input ...999 (which is not a valid IP address): Hex number input : ' 0x0080000 is the flag of NO_SUGGESTIONS. IME1.SetCustomFilter(edtHexNumber, Bit.Or(edtHexNumber.INPUT_TYPE_TEXT, _ 0x00080000), "01234567890abcdef") 0x00080000 is the flag for NO_SUGGESTION Bit.Or(edtHexNumber.INPUT_TYPE_TEXT, 0x00080000) combines the INPUT_TYPE_TEXT flag with the _SUGGESTION flag Octal number input : IME1.SetCustomFilter(edtOctalNumber, Bit.Or(edtOctalNumber.INPUT_TYPE_NUMBERS, _ 0x00080000), "01234567") Note: With these filters the default keyboards is displayed but only the defined characters are authorized all the other keys are disabled but still visible.

3 Libraries 16 Basic4Android User's Guide
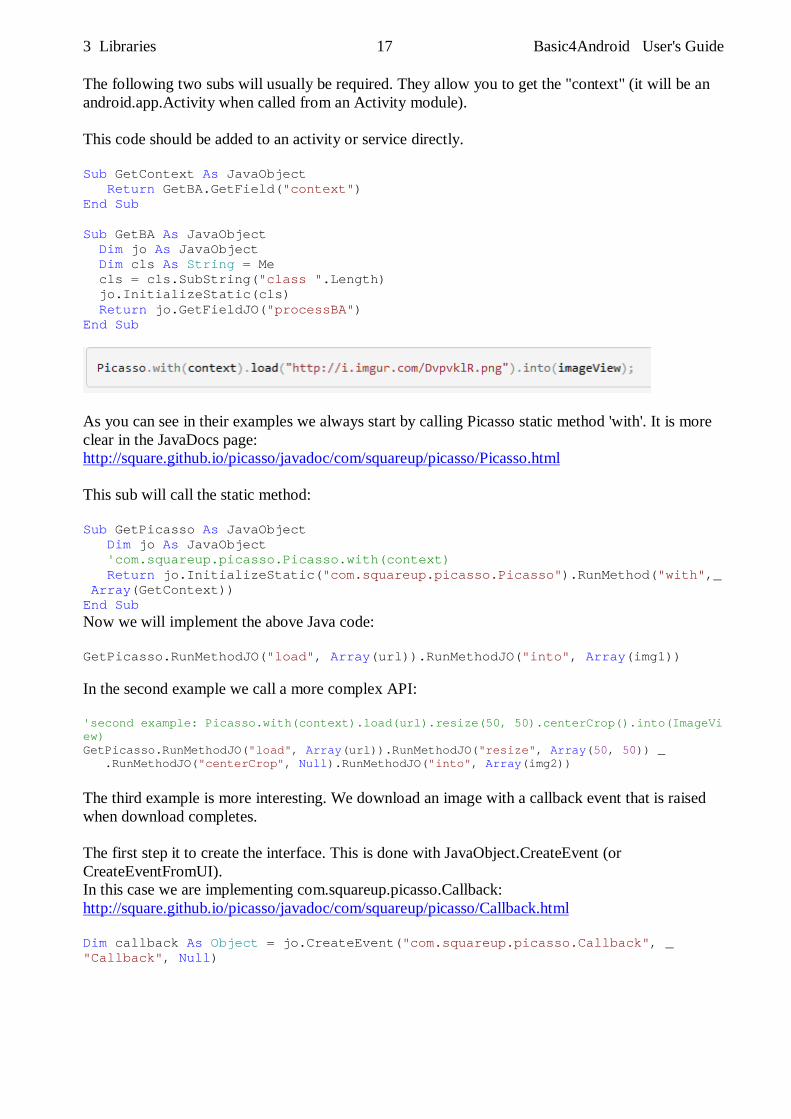
3.2 #AdditionalJar attribute This is a copy of Erels tutorial in the forum. The #AdditionalJar module attribute (introduced in B4A v3.80) allows us to reference external jars. With the help of JavaObject it is now possible to integrate third party jars without a wrapper. This solution is good for "simple" libraries. If the API is complicated with many interfaces then it will be easier to create a wrapper. As an example we will use Picasso image downloader to download images: http://square.github.io/picasso/
The first step is to download the third party jar and put it in the additional libraries folder. We then use #AdditionalJar to tell the compiler to add a reference to this jar: #AdditionalJar: picasso-2.2.0 Note that the jar extension is omitted. You can call #AdditionalJar multiple times if multiple jars are required.
3 Libraries 17 Basic4Android User's Guide
The following two subs will usually be required. They allow you to get the "context" (it will be an android.app.Activity when called from an Activity module). This code should be added to an activity or service directly. Sub GetContext As JavaObject Return GetBA.GetField("context") End Sub Sub GetBA As JavaObject Dim jo As JavaObject Dim cls As String = Me cls = cls.SubString("class ".Length) jo.InitializeStatic(cls) Return jo.GetFieldJO("processBA") End Sub
As you can see in their examples we always start by calling Picasso static method 'with'. It is more clear in the JavaDocs page: http://square.github.io/picasso/javadoc/com/squareup/picasso/Picasso.html This sub will call the static method: Sub GetPicasso As JavaObject Dim jo As JavaObject 'com.squareup.picasso.Picasso.with(context) Return jo.InitializeStatic("com.squareup.picasso.Picasso").RunMethod("with",_ Array(GetContext)) End Sub Now we will implement the above Java code: GetPicasso.RunMethodJO("load", Array(url)).RunMethodJO("into", Array(img1)) In the second example we call a more complex API: 'second example: Picasso.with(context).load(url).resize(50, 50).centerCrop().into(ImageView) GetPicasso.RunMethodJO("load", Array(url)).RunMethodJO("resize", Array(50, 50)) _ .RunMethodJO("centerCrop", Null).RunMethodJO("into", Array(img2))
The third example is more interesting. We download an image with a callback event that is raised when download completes. The first step it to create the interface. This is done with JavaObject.CreateEvent (or CreateEventFromUI). In this case we are implementing com.squareup.picasso.Callback: http://square.github.io/picasso/javadoc/com/squareup/picasso/Callback.html Dim callback As Object = jo.CreateEvent("com.squareup.picasso.Callback", _ "Callback", Null)
3 Libraries 18 Basic4Android User's Guide
The last parameter is the default return value. This value will be used if the event cannot be raised (activity is paused for example). In this case we return Null. The event sub: Sub Callback_Event (MethodName As String, Args() As Object) As Object If MethodName = "onSuccess" Then ToastMessageShow("Success!!!", True) Else If MethodName = "onError" Then ToastMessageShow("Error downloading image.", True) End If Return Null End Sub MethodName - The interface method name (onSuccess or onError in this case). Args - An array of parameters passed to this method. In this case there are no parameters. All this information is from Picasso JavaDocs: http://square.github.io/picasso/javadoc/index.html?com/squareup/picasso/Callback.html The last step is to call the method that expects the callback: GetPicasso.RunMethodJO("load", Array(url)).RunMethodJO("into", Array(img1, _ callback)) As this library requires the INTERNET permission we need to manually add it to the manifest editor: AddPermission(android.permission.INTERNET) The complete code: #Region Project Attributes #ApplicationLabel: B4A Example #VersionCode: 1 #VersionName: 'SupportedOrientations possible values: unspecified, landscape or portrait. #SupportedOrientations: unspecified #CanInstallToExternalStorage: False #End Region #Region Activity Attributes #FullScreen: False #IncludeTitle: True #End Region #AdditionalJar: picasso-2.2.0 Sub Process_Globals End Sub Sub Globals Dim img1, img2 As ImageView End Sub
3 Libraries 19 Basic4Android User's Guide
Sub Activity_Create(FirstTime As Boolean) img1.Initialize("") Activity.AddView(img1, 0, 0, 100%x, 50%y) img2.Initialize("") Activity.AddView(img2, 0, 50%y, 100%x, 50%y) Dim url As String = "http://i.imgur.com/DvpvklR.png" 'first example: Picasso.with(context).load(url).into(imageView); GetPicasso.RunMethodJO("load", Array(url)).RunMethodJO("into", Array(img1)) 'second example: Picasso.with(context).load(url).resize(50, 50).centerCrop().into(ImageView) GetPicasso.RunMethodJO("load", Array(url)).RunMethodJO("resize", Array(50, 50)) _ .RunMethodJO("centerCrop", Null).RunMethodJO("into", Array(img2)) 'third example: download image with callback Dim jo As JavaObject = GetPicasso Dim callback As Object = jo.CreateEvent("com.squareup.picasso.Callback", "Callback", Null) GetPicasso.RunMethodJO("load", Array(url)).RunMethodJO("into", Array(img1, callback)) End Sub Sub Callback_Event (MethodName As String, Args() As Object) As Object If MethodName = "onSuccess" Then ToastMessageShow("Success!!!", True) Else If MethodName = "onError" Then ToastMessageShow("Error downloading image.", True) End If Return Null End Sub Sub GetPicasso As JavaObject Dim jo As JavaObject 'com.squareup.picasso.Picasso.with(context) Return jo.InitializeStatic("com.squareup.picasso.Picasso").RunMethod("with", Array(GetContext)) End Sub Sub GetContext As JavaObject Return GetBA.GetField("context") End Sub Sub GetBA As JavaObject Dim jo As JavaObject Dim cls As String = Me cls = cls.SubString("class ".Length) jo.InitializeStatic(cls) Return jo.GetFieldJO("processBA") End Sub Sub Activity_Resume End Sub Sub Activity_Pause (UserClosed As Boolean) End Sub
4 SQLite Database 20 Basic4Android User's Guide
4 SQLite Database What is a database (source Wikipedia Database): A database is an organized collection of data for one or more purposes, usually in digital form. The data are typically organized to model relevant aspects of reality (for example, the availability of rooms in hotels), in a way that supports processes requiring this information (for example, finding a hotel with vacancies). The term "database" refers both to the way its users view it, and to the logical and physical materialization of its data, content, in files, computer memory, and computer data storage. This definition is very general, and is independent of the technology used. However, not every collection of data is a database; the term database implies that the data is managed to some level of quality (measured in terms of accuracy, availability, usability, and resilience) and this in turn often implies the use of a general-purpose Database management system (DBMS). A general-purpose DBMS is typically a complex software system that meets many usage requirements, and the databases that it maintains are often large and complex. The standard database system in Android is SQLite. The interface between your program and the database is a the SQL language. The data is stored in tables, each table has a certain number of columns and rows. Each row contains a data set and the different data of a given set are stored in the columns. If you add a default database to your project in the files Tab it is located in the DirAssets folder. Databases cannot be accessed in DirAssets even if it's only for reading. Therefore you must copy it to another folder for example DirInternal or DirRootExternal. With DirRootExternal you can also add a subdirectory. For example: DirRootExternal & "/MyDatabase" Don't forget to create the subdirectory : File.MakeDir(File.DirRootExternal, "MyDatabase") Example code in Activity_Create : If FirstTime Then If File.Exists(File.DirRootExternal, "Database.db") = False Then File.Copy(File.DirAssets, "Database", File.DirRootExternal, "Database.db") End If SQL1.Initialize(File.DirRootExternal, "Database.db", True) End If
4.1 SQLite Database basics Some simple SQL instructions. Here you find the SQLite site : SQLite Here you find the SQLite syntax : SQLite syntax A very intersting website to learn SQL is this one : W3Schools SQL. Database initialisation: SQL1.Initialize(DBDirName, DBFileName, True) DBDirName = Directory name of the database. DBFileName = Database file name. True = Create if necessary False don't create

4 SQLite Database 21 Basic4Android User's Guide
Table creation: CREATE TABLE TableName ( ID INTEGER PRIMARY KEY, Col1 TEXT, Col2 REAL ) Creates a table with the name 'TableName' and three columns: Column Index Name Variable Type 1 ID INTEGER PRIMARY KEY
2 Col1 TEXT 3 Col2 REAL Different available data types: INTEGER PRIMARY KEY is a special variable type used for identifiers ID's. It is a long integer value beginning with 1 and it is incremented by one each time a new data set, with a NULL parameter for this column, is added to the database. INTEGER is a 64-bit signed integer number. REAL is a 64-bit IEEE floating point number. TEXT is a string. BLOB Binary Large OBject, the value is stored exactly as it was input. NULL SQL1.ExecNonQuery("CREATE TABLE TableName(ID INTEGER PRIMARY KEY, Col1 TEXT, Col2 REAL") Adding data: INSERT INTO TableName VALUES ( NULL, 'Val1', Val2 ) SQL1.ExecNonQuery("INSERT INTO TableName VALUES (NULL, 'Val1', Val2") Text variable must be between two quotes 'Val1', numbers not Val2. Updating data: UPDATE TableName Set Col1 = 'Val1', Col2 = Val2 WHERE ID = idVal SQL1.ExecNonQuery("UPDATE TableName Set Col1 = 'Val1', Col2 = Val2 WHERE ID = idVal") Reading data:
The whole database: SELECT * FROM TableName Cursor1 = SQL1.ExecQuery("SELECT * FROM TableName")
The whole database and ordering according to a given column: SELECT * FROM TableName ORDER BY Col1 ASC ascending Cursor1 = SQL1.ExecQuery("SELECT * FROM TableName ORDER BY Col1 ASC") SELECT * FROM TableName ORDER BY 2 DESC descending Cursor1 = SQL1.ExecQuery("SELECT * FROM TableName ORDER BY 2 DESC") The column to order can be given either by its name Col1 or its number 2. The column numbering begins with 1.
4 SQLite Database 22 Basic4Android User's Guide
Filtering SELECT * FROM TableName WHERE Col1 LIKE 'abc' AND Col2 LIKE 123 Cursor1 = SQL1.ExecQuery("SELECT * FROM TableName" WHERE Col1 LIKE 'abc%' AND Col2 LIKE 123 ") The % character can be used as a wildcard: abc means the exact sequence %abc means beginning with any characters and ending with abc abc% means beginning with abc and ending with any characters %abc% means abc anywhere in the string
A single column SELECT Col1 FROM TableName Cursor1 = SQL1.ExecQuery("SELECT Col1 FROM TableName")
Distinct values from a column, no duplicate values SELECT DISTINCT Col1 FROM TableName Cursor1 = SQL1.ExecQuery("SELECT DISTINCT Col1 FROM TableName")
Single entry (value) SELECT Col1 FROM TableName WHERE ID = idVal Value = SQL1.ExecQuerySingleResult("SELECT Col1 FROM TableName WHERE ID = idVal")
Single row, where the ID has a given value SELECT * FROM TableName WHERE ID = idVal Cursor1 = SQL1.ExecQuery("SELECT * FROM TableName WHERE ID = idVal")
Max / min value in a column, in the examples the max and min values of the given column. SELECT max(Col1) FROM TableName SELECT min(Col1) FROM TableName Max = SQL1.ExecQuerySingleResult("SELECT max(Col1) FROM TableName") Min = SQL1.ExecQuerySingleResult("SELECT min(Col1) FROM TableName")
Get the max length of the data in a column For a string, the returned value is the number of characters. For a number, the returned value is the number of characters of its string representation. For a blob, the returned value is the number of bytes. SELECT max(length(Col1)) FROM TableName MaxChars = SQL1.ExecQuerySingleResult("SELECT max(length(Col1)) FROM TableName")
Get the total number of rows SELECT count() FROM TableName NumberOfRows = SQL1.ExecQuerySingleResult("SELECT count() FROM TableName")
Get the tables in the database SELECT name FROM sqlite_master WHERE Type='table' Cursor1 = SQL1.ExecQuery("SELECT name FROM sqlite_master Where Type='table'")
4 SQLite Database 23 Basic4Android User's Guide
Get the column names of a table. SELECT * FROM TableName Cursor1 = SQL1.ExecQuery("SELECT * FROM TableName") For i = 0 to Cursor1.ColumnCount - 1 ColumnName(i) = Cursor1.GetColumnName(i) Next
Get the number of database rows that were changed or inserted or deleted by the most recently completed INSERT, DELETE, or UPDATE. SELECT changes() FROM TableName NbChanges = SQL1.ExecQuerySingleResult("SELECT changes() FROM TableName")
Get the PRIMARY KEYs from a table and save them in a List, rowid is a reserved column name. This is valid even if there is no column defined with PRIMARY KEY. SELECT rowid FROM TableName Dim IDList As List IDList.Initialize Cursor1 = SQL1.ExecQuery("SELECT rowid FROM TableName") For i = 0 To Cursor1.RowCount - 1 Cursor1.Position = i IDList.Add(Cursor1.GetLong2(0)) Next
Get Table information It uses a special query PRAGMA. This query returns one row per column with following data : Column index name Explanation
0 cid column index 1 name column name 2 type data type 3 dflt_value default value 4 notnull null if the database acccepts null values 5 pk primary key = 1 if the column is a PRIMARY KEY otherwise = 0
This is valid only if a column with a primary key was created. Cursor1 = SQL1.ExecQuery("PRAGMA table_info (TableName)") For i = 0 To Cursor1.RowCount - 1 Cursor1.Position = i For j = 0 To Cursor1.ColumnCount - 1 Log(i & " / " & j & " : " & Cursor1.GetString2(j)) Next Log(" ") Next Or this code: Cursor1 = SQL1.ExecQuery("PRAGMA table_info (TableName)") For i = 0 To Cursor1.RowCount - 1 Cursor1.Position = i Log("ID : " & Cursor1.GetString("cid")) Log("Name : " & Cursor1.GetString("name")) Log("Type : " & Cursor1.GetString("type")) Log("Default value : " & Cursor1.GetString("dflt_value")) Log("Not null : " & Cursor1.GetString("notnull")) Log("Primaty key : " & Cursor1.GetString("pk")) Log(" ") Next
4 SQLite Database 24 Basic4Android User's Guide
Deleting data: DELETE FROM TableName WHERE ID = idVal SQL1.ExecNonQuery("DELETE FROM TableName WHERE ID = idVal") Rename a table: Renames a given table. ALTER TABLE TableName RENAME TO NewTableName) SQL1.ExecNonQuery("ALTER TABLE TableName RENAME TO NewTableName") Add a column: Add a new column to the database. ALTER TABLE TableName ADD COLUMN Colname ColType) SQL1.ExecNonQuery("ALTER TABLE TableName ADD COLUMN ColN TEXT") Update the database: Update the database after having added a new column.
Sets the values of all rows in the new column to an empty string. UPDATE TableName SET ColName = '' SQL1.ExecNonQuery("UPDATE TableName SET ColN = ''")
Sets the values of the rows in a column to a given new value where the value is another old value. UPDATE TableName SET ColName = 'ValueNew' WHERE ColName = 'ValueOld' SQL1.ExecNonQuery("UPDATE TableName SET ColN = 'ValueNew' WHERE ColN = 'ValueOld'")
4.2 First steps To use a database, we must : - First reference the SQL library in the Libs Tab in the lower right corner in the IDE.
- Declare it with a Dim in the Process_Global routine. Sub Process_Globals Dim SQL1 As SQL
4 SQLite Database 25 Basic4Android User's Guide
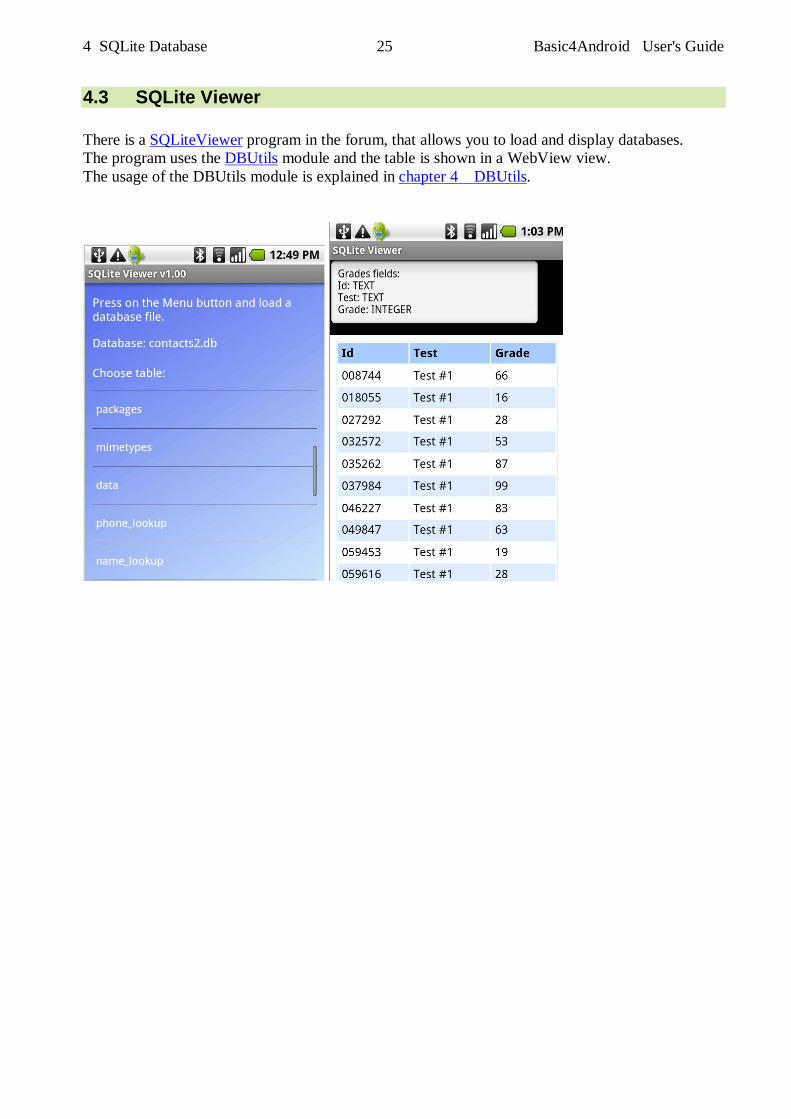
4.3 SQLite Viewer There is a SQLiteViewer program in the forum, that allows you to load and display databases. The program uses the DBUtils module and the table is shown in a WebView view. The usage of the DBUtils module is explained in chapter 4 DBUtils.
4 SQLite Database 26 Basic4Android User's Guide
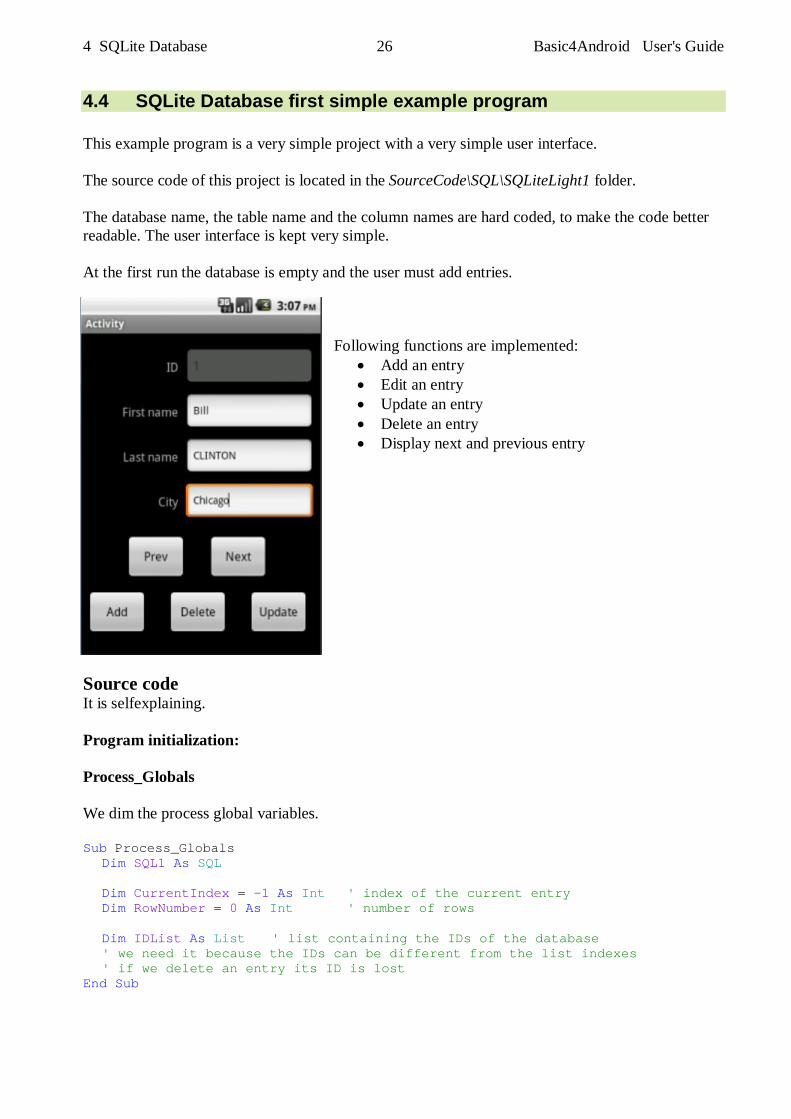
4.4 SQLite Database first simple example program This example program is a very simple project with a very simple user interface. The source code of this project is located in the SourceCode\SQL\SQLiteLight1 folder. The database name, the table name and the column names are hard coded, to make the code better readable. The user interface is kept very simple. At the first run the database is empty and the user must add entries.
Following functions are implemented:
Add an entry Edit an entry Update an entry Delete an entry Display next and previous entry
Source code It is selfexplaining. Program initialization: Process_Globals We dim the process global variables. Sub Process_Globals Dim SQL1 As SQL Dim CurrentIndex = -1 As Int ' index of the current entry Dim RowNumber = 0 As Int ' number of rows Dim IDList As List ' list containing the IDs of the database ' we need it because the IDs can be different from the list indexes ' if we delete an entry its ID is lost End Sub
4 SQLite Database 27 Basic4Android User's Guide
Globals We dim all the views of the layout. Sub Globals Dim edtID, edtFirstName, edtLastName, edtCity As EditText Dim btnAdd, btnDelete, btnUpdate, btnPrevious, btnNext As Button End Sub Activity_Create We check if the database already exists, initialize it, load it and show the first entry. Sub Activity_Create(FirstTime As Boolean) If FirstTime Then ' File.Delete(File.DirInternal, "persons.db") ' only for testing, removes the database 'check if the database already exists If File.Exists(File.DirInternal, "persons.db") = False Then 'if not, initialize it SQL1.Initialize(File.DirInternal, "persons.db", True) 'and create it CreateDataBase End If End If Activity.LoadLayout("Main") End Sub Activity_Resume If the database is not initialized we initialize it, initialize the IDList list, read the database and show the first entry. Sub Activity_Resume ' If the database is not initialized we initialize it If SQL1.IsInitialized = False Then SQL1.Initialize(File.DirInternal, "persons.db", True) End If IDList.Initialize 'initialize the ID list ReadDataBase 'read the database ShowEntry(0) 'show the first entry End Sub Program closing : Activity_Pause If the program is closed by the user we close the database. Sub Activity_Pause (UserClosed As Boolean) If UserClosed Then SQL1.Close 'if the user closes the program we close the database End If End Sub
4 SQLite Database 28 Basic4Android User's Guide
Database handling : Create the database We create the database with the four following columns :
ID INTEGER PRIMARY KEY the ID of the entry. We use the INTEGER PRIMARY KEY data type, which is automatically invremented when we add a new entry.
FirstName the persons first name with TEXT data type. LastName the persons last name with TEXT data type. City the city where the person is living with TEXT data type.
Sub CreateDataBase Dim Query As String Query = "CREATE TABLE persons (ID INTEGER PRIMARY KEY, FirstName TEXT, LastName TEXT, City TEXT)" SQL1.ExecNonQuery(Query) End Sub ReadDataBase We
- Define a Cursor and read IDs from the databse. - Check if there database is not empty. - Fill IDList with the IDs of all entries. - Set the current index to 0 - Close the cursor
Why do we use a List with the IDs ? We use for the ID the INTEGER PRIMARY KEY data type which is unique. If we delete an entry its ID is lost, which means that the ID numbers are not simply the row indexes but there can be ‘holes’ in the list. Sub ReadDataBase Dim Row As Int Dim Cursor1 As Cursor 'We read only the ID column and put them in a List Cursor1 = SQL1.ExecQuery("SELECT ID FROM persons") If Cursor1.RowCount > 0 Then 'check if entries exist RowNumber = Cursor1.RowCount 'set the row count variable IDList.Initialize 'initialize the ID list For Row = 0 To RowNumber - 1 Cursor1.Position = Row 'set the Cursor to each row IDList.Add(Cursor1.GetInt("ID")) 'add the ID's to the ID list Next CurrentIndex = 0 'set the current index to 0 End If Cursor1.Close 'close the cursor, we don't need it anymore End Sub
4 SQLite Database 29 Basic4Android User's Guide
ShowEntry We get the selected entrys ID from IDList, read the entry from the database, fill the EditText views and close the Cursor. Sub ShowEntry(EntryIndex As Int) Dim Cursor1 As Cursor Dim ID As Int If IDList.Size = 0 Then 'check if the database is empty Return 'if yes leave the routine End If ID = IDList.Get(EntryIndex) 'get the ID for the given entry index 'read the entry with the given ID Cursor1 = SQL1.ExecQuery("SELECT * FROM persons WHERE ID = " & ID) edtID.Text = ID 'display the ID Cursor1.Position = 0 'set the cursor edtFirstName.Text = Cursor1.GetString("FirstName") 'read the FirstName column edtLastName.Text = Cursor1.GetString("LastName") 'read the LasstName column edtCity.Text = Cursor1.GetString("City") 'read the value of the City column Cursor1.Close 'close the cursor, we don't it anymore End Sub
4 SQLite Database 30 Basic4Android User's Guide
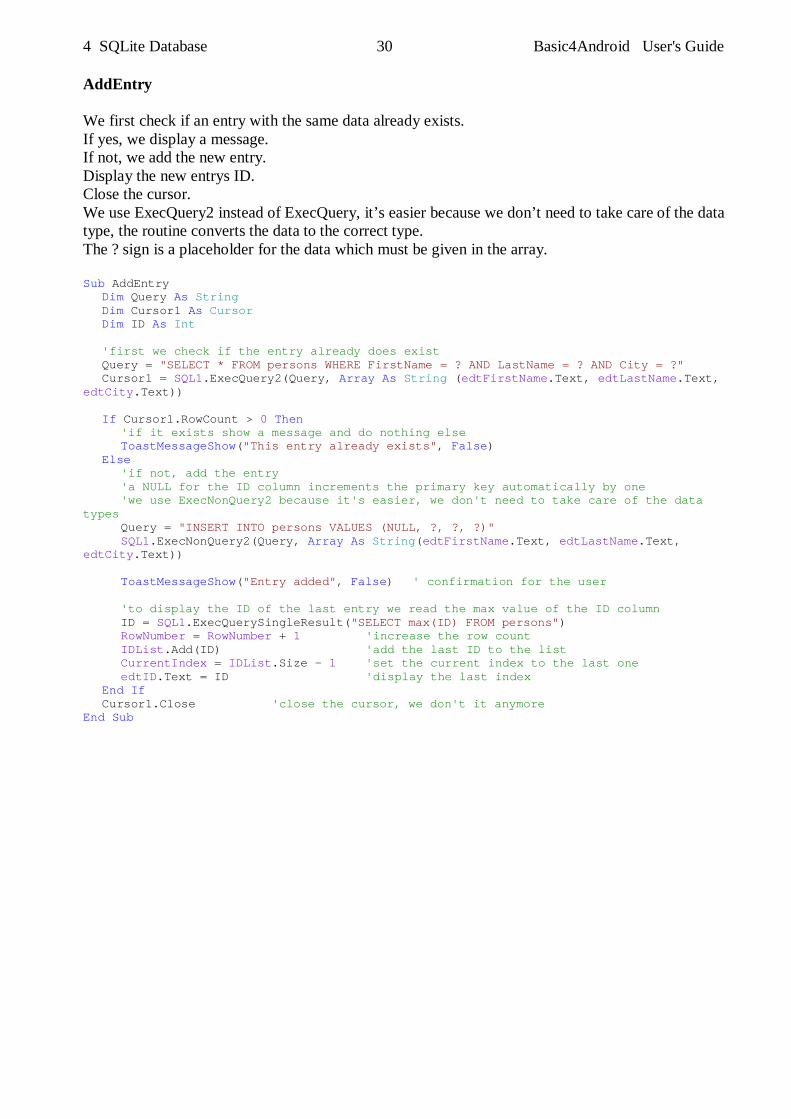
AddEntry We first check if an entry with the same data already exists. If yes, we display a message. If not, we add the new entry. Display the new entrys ID. Close the cursor. We use ExecQuery2 instead of ExecQuery, it’s easier because we don’t need to take care of the data type, the routine converts the data to the correct type. The ? sign is a placeholder for the data which must be given in the array. Sub AddEntry Dim Query As String Dim Cursor1 As Cursor Dim ID As Int 'first we check if the entry already does exist Query = "SELECT * FROM persons WHERE FirstName = ? AND LastName = ? AND City = ?" Cursor1 = SQL1.ExecQuery2(Query, Array As String (edtFirstName.Text, edtLastName.Text, edtCity.Text)) If Cursor1.RowCount > 0 Then 'if it exists show a message and do nothing else ToastMessageShow("This entry already exists", False) Else 'if not, add the entry 'a NULL for the ID column increments the primary key automatically by one 'we use ExecNonQuery2 because it's easier, we don't need to take care of the data types Query = "INSERT INTO persons VALUES (NULL, ?, ?, ?)" SQL1.ExecNonQuery2(Query, Array As String(edtFirstName.Text, edtLastName.Text, edtCity.Text)) ToastMessageShow("Entry added", False) ' confirmation for the user 'to display the ID of the last entry we read the max value of the ID column ID = SQL1.ExecQuerySingleResult("SELECT max(ID) FROM persons") RowNumber = RowNumber + 1 'increase the row count IDList.Add(ID) 'add the last ID to the list CurrentIndex = IDList.Size - 1 'set the current index to the last one edtID.Text = ID 'display the last index End If Cursor1.Close 'close the cursor, we don't it anymore End Sub
4 SQLite Database 31 Basic4Android User's Guide
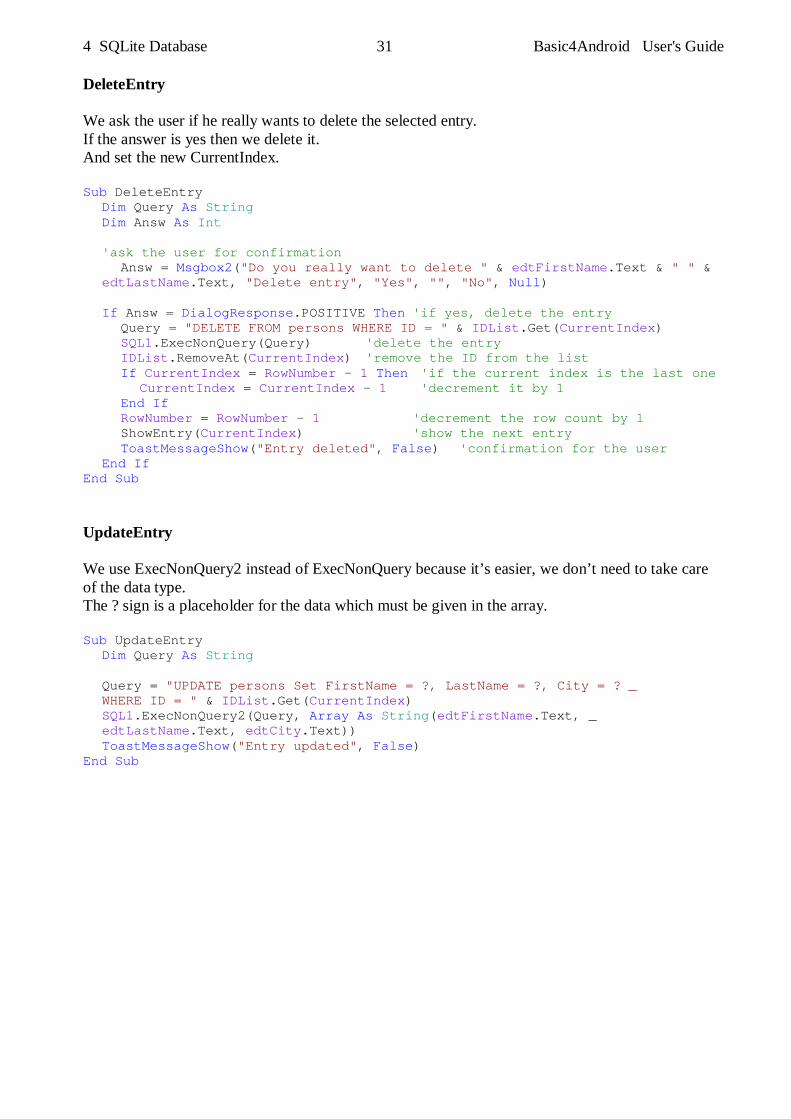
DeleteEntry We ask the user if he really wants to delete the selected entry. If the answer is yes then we delete it. And set the new CurrentIndex. Sub DeleteEntry Dim Query As String Dim Answ As Int 'ask the user for confirmation
Answ = Msgbox2("Do you really want to delete " & edtFirstName.Text & " " & edtLastName.Text, "Delete entry", "Yes", "", "No", Null)
If Answ = DialogResponse.POSITIVE Then 'if yes, delete the entry Query = "DELETE FROM persons WHERE ID = " & IDList.Get(CurrentIndex) SQL1.ExecNonQuery(Query) 'delete the entry IDList.RemoveAt(CurrentIndex) 'remove the ID from the list If CurrentIndex = RowNumber - 1 Then 'if the current index is the last one CurrentIndex = CurrentIndex - 1 'decrement it by 1 End If RowNumber = RowNumber - 1 'decrement the row count by 1 ShowEntry(CurrentIndex) 'show the next entry ToastMessageShow("Entry deleted", False) 'confirmation for the user End If End Sub UpdateEntry We use ExecNonQuery2 instead of ExecNonQuery because it’s easier, we don’t need to take care of the data type. The ? sign is a placeholder for the data which must be given in the array. Sub UpdateEntry Dim Query As String
Query = "UPDATE persons Set FirstName = ?, LastName = ?, City = ? _ WHERE ID = " & IDList.Get(CurrentIndex)
SQL1.ExecNonQuery2(Query, Array As String(edtFirstName.Text, _ edtLastName.Text, edtCity.Text)) ToastMessageShow("Entry updated", False) End Sub
4 SQLite Database 32 Basic4Android User's Guide
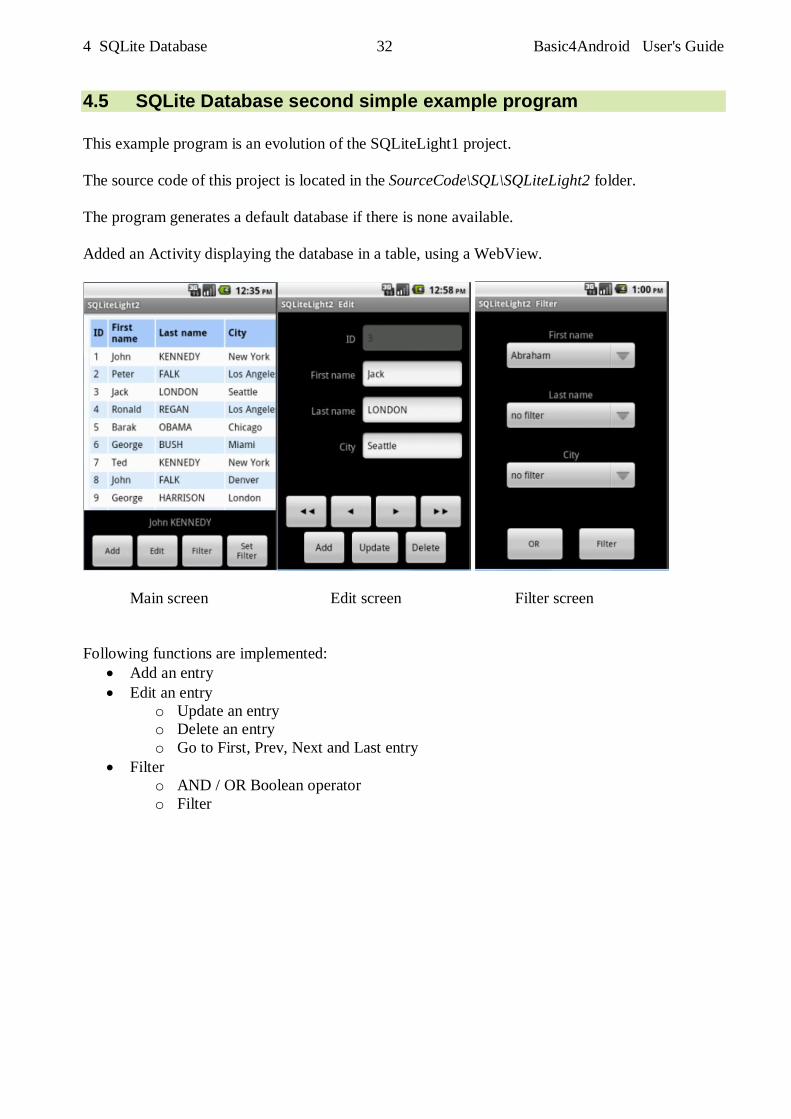
4.5 SQLite Database second simple example program This example program is an evolution of the SQLiteLight1 project. The source code of this project is located in the SourceCode\SQL\SQLiteLight2 folder. The program generates a default database if there is none available. Added an Activity displaying the database in a table, using a WebView.
Main screen Edit screen Filter screen Following functions are implemented:
Add an entry Edit an entry
o Update an entry o Delete an entry o Go to First, Prev, Next and Last entry
Filter o AND / OR Boolean operator o Filter
4 SQLite Database 33 Basic4Android User's Guide
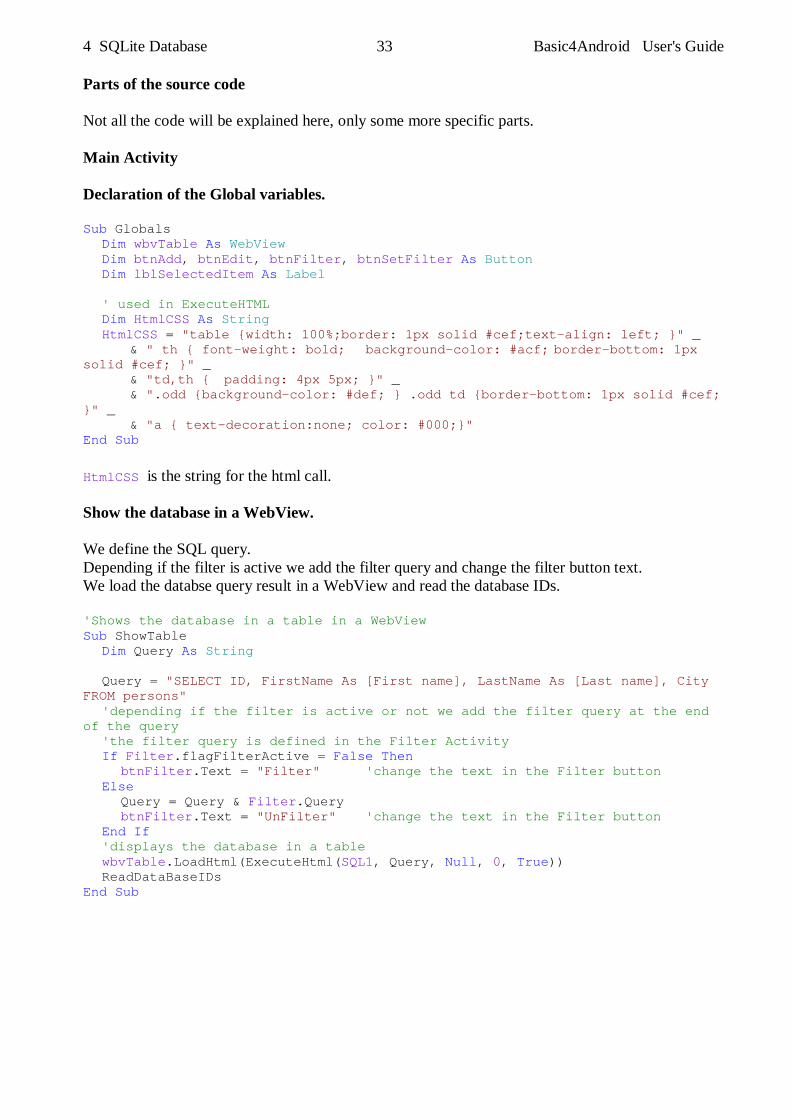
Parts of the source code Not all the code will be explained here, only some more specific parts. Main Activity Declaration of the Global variables. Sub Globals Dim wbvTable As WebView Dim btnAdd, btnEdit, btnFilter, btnSetFilter As Button Dim lblSelectedItem As Label ' used in ExecuteHTML Dim HtmlCSS As String HtmlCSS = "table {width: 100%;border: 1px solid #cef;text-align: left; }" _ & " th { font-weight: bold; background-color: #acf; border-bottom: 1px solid #cef; }" _ & "td,th { padding: 4px 5px; }" _ & ".odd {background-color: #def; } .odd td {border-bottom: 1px solid #cef; }" _ & "a { text-decoration:none; color: #000;}" End Sub HtmlCSS is the string for the html call. Show the database in a WebView. We define the SQL query. Depending if the filter is active we add the filter query and change the filter button text. We load the databse query result in a WebView and read the database IDs. 'Shows the database in a table in a WebView Sub ShowTable Dim Query As String Query = "SELECT ID, FirstName As [First name], LastName As [Last name], City FROM persons" 'depending if the filter is active or not we add the filter query at the end of the query 'the filter query is defined in the Filter Activity If Filter.flagFilterActive = False Then btnFilter.Text = "Filter" 'change the text in the Filter button Else Query = Query & Filter.Query btnFilter.Text = "UnFilter" 'change the text in the Filter button End If 'displays the database in a table wbvTable.LoadHtml(ExecuteHtml(SQL1, Query, Null, 0, True)) ReadDataBaseIDs End Sub
4 SQLite Database 34 Basic4Android User's Guide
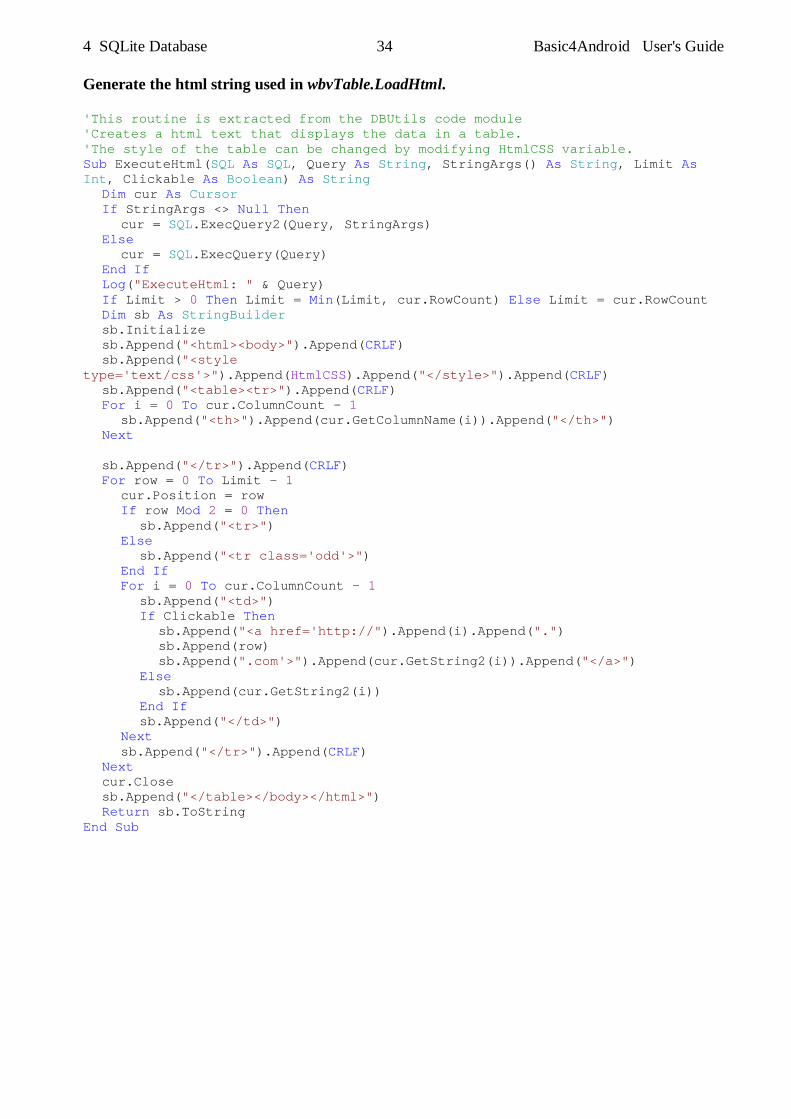
Generate the html string used in wbvTable.LoadHtml. 'This routine is extracted from the DBUtils code module 'Creates a html text that displays the data in a table. 'The style of the table can be changed by modifying HtmlCSS variable. Sub ExecuteHtml(SQL As SQL, Query As String, StringArgs() As String, Limit As Int, Clickable As Boolean) As String Dim cur As Cursor If StringArgs <> Null Then cur = SQL.ExecQuery2(Query, StringArgs) Else cur = SQL.ExecQuery(Query) End If Log("ExecuteHtml: " & Query) If Limit > 0 Then Limit = Min(Limit, cur.RowCount) Else Limit = cur.RowCount Dim sb As StringBuilder sb.Initialize sb.Append("<html><body>").Append(CRLF) sb.Append("<style type='text/css'>").Append(HtmlCSS).Append("</style>").Append(CRLF) sb.Append("<table><tr>").Append(CRLF) For i = 0 To cur.ColumnCount - 1 sb.Append("<th>").Append(cur.GetColumnName(i)).Append("</th>") Next sb.Append("</tr>").Append(CRLF) For row = 0 To Limit - 1 cur.Position = row If row Mod 2 = 0 Then sb.Append("<tr>") Else sb.Append("<tr class='odd'>") End If For i = 0 To cur.ColumnCount - 1 sb.Append("<td>") If Clickable Then sb.Append("<a href='http://").Append(i).Append(".") sb.Append(row) sb.Append(".com'>").Append(cur.GetString2(i)).Append("</a>") Else sb.Append(cur.GetString2(i)) End If sb.Append("</td>") Next sb.Append("</tr>").Append(CRLF) Next cur.Close sb.Append("</table></body></html>") Return sb.ToString End Sub
4 SQLite Database 35 Basic4Android User's Guide
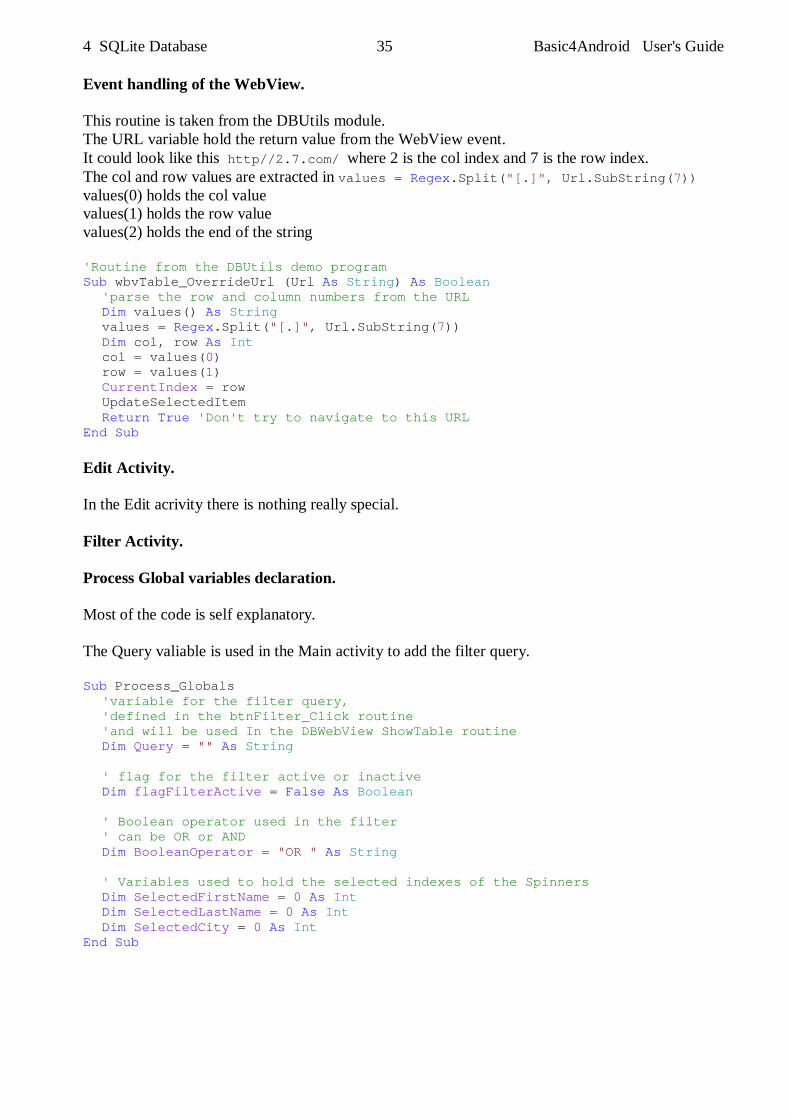
Event handling of the WebView. This routine is taken from the DBUtils module. The URL variable hold the return value from the WebView event. It could look like this http//2.7.com/ where 2 is the col index and 7 is the row index. The col and row values are extracted in values = Regex.Split("[.]", Url.SubString(7)) values(0) holds the col value values(1) holds the row value values(2) holds the end of the string 'Routine from the DBUtils demo program Sub wbvTable_OverrideUrl (Url As String) As Boolean 'parse the row and column numbers from the URL Dim values() As String values = Regex.Split("[.]", Url.SubString(7)) Dim col, row As Int col = values(0) row = values(1) CurrentIndex = row UpdateSelectedItem Return True 'Don't try to navigate to this URL End Sub Edit Activity. In the Edit acrivity there is nothing really special. Filter Activity. Process Global variables declaration. Most of the code is self explanatory. The Query valiable is used in the Main activity to add the filter query. Sub Process_Globals 'variable for the filter query, 'defined in the btnFilter_Click routine 'and will be used In the DBWebView ShowTable routine Dim Query = "" As String ' flag for the filter active or inactive Dim flagFilterActive = False As Boolean ' Boolean operator used in the filter ' can be OR or AND Dim BooleanOperator = "OR " As String ' Variables used to hold the selected indexes of the Spinners Dim SelectedFirstName = 0 As Int Dim SelectedLastName = 0 As Int Dim SelectedCity = 0 As Int End Sub
4 SQLite Database 36 Basic4Android User's Guide
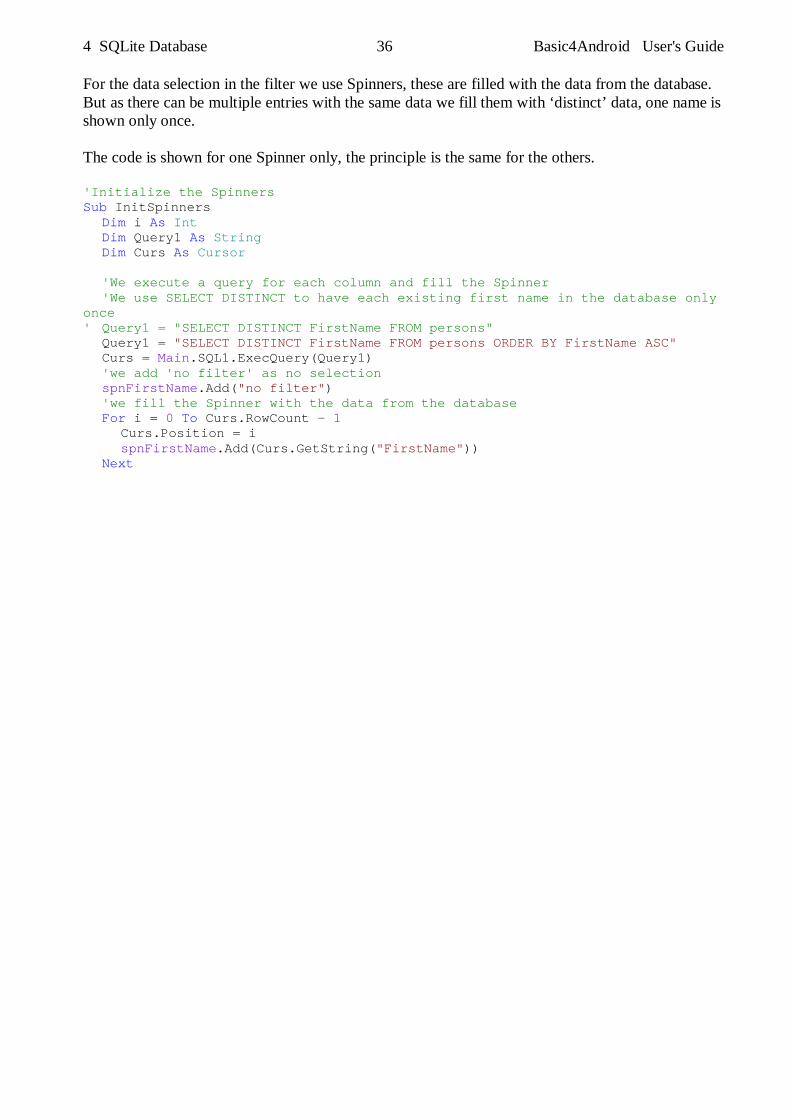
For the data selection in the filter we use Spinners, these are filled with the data from the database. But as there can be multiple entries with the same data we fill them with ‘distinct’ data, one name is shown only once. The code is shown for one Spinner only, the principle is the same for the others. 'Initialize the Spinners Sub InitSpinners Dim i As Int Dim Query1 As String Dim Curs As Cursor 'We execute a query for each column and fill the Spinner 'We use SELECT DISTINCT to have each existing first name in the database only once ' Query1 = "SELECT DISTINCT FirstName FROM persons" Query1 = "SELECT DISTINCT FirstName FROM persons ORDER BY FirstName ASC" Curs = Main.SQL1.ExecQuery(Query1) 'we add 'no filter' as no selection spnFirstName.Add("no filter") 'we fill the Spinner with the data from the database For i = 0 To Curs.RowCount - 1 Curs.Position = i spnFirstName.Add(Curs.GetString("FirstName")) Next
4 SQLite Database 37 Basic4Android User's Guide
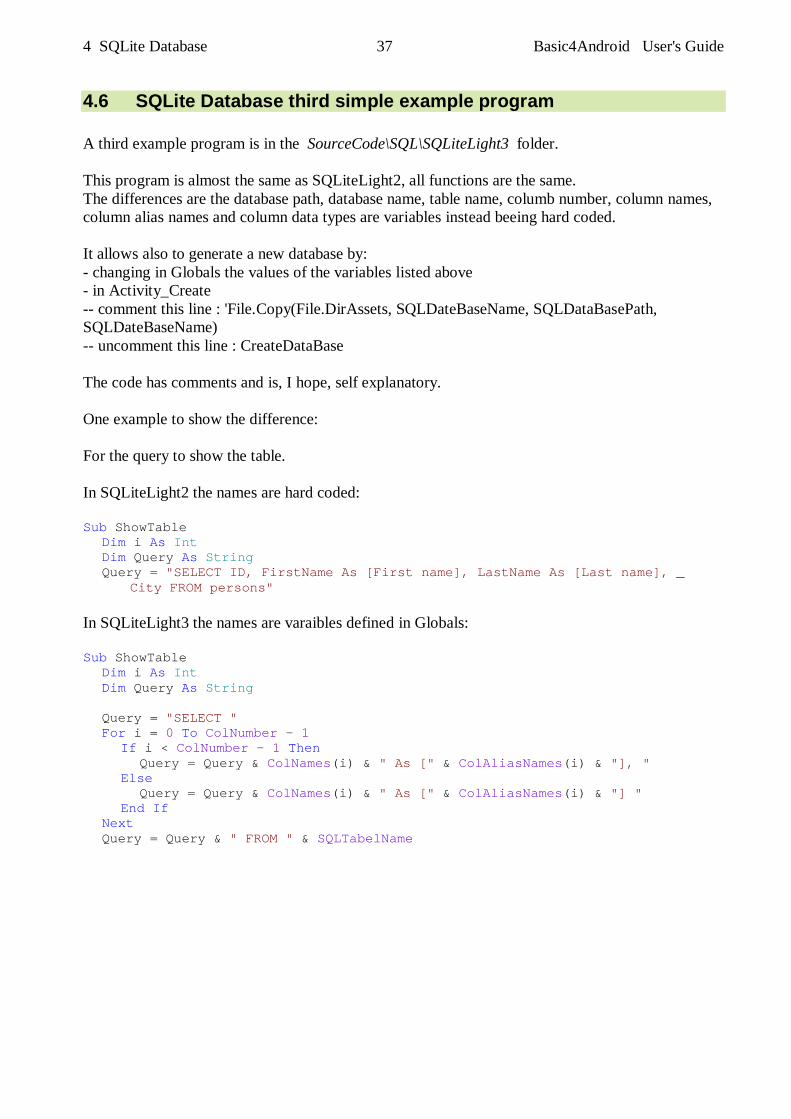
4.6 SQLite Database third simple example program A third example program is in the SourceCode\SQL\SQLiteLight3 folder. This program is almost the same as SQLiteLight2, all functions are the same. The differences are the database path, database name, table name, columb number, column names, column alias names and column data types are variables instead beeing hard coded. It allows also to generate a new database by: - changing in Globals the values of the variables listed above - in Activity_Create -- comment this line : 'File.Copy(File.DirAssets, SQLDateBaseName, SQLDataBasePath, SQLDateBaseName) -- uncomment this line : CreateDataBase The code has comments and is, I hope, self explanatory. One example to show the difference: For the query to show the table. In SQLiteLight2 the names are hard coded: Sub ShowTable Dim i As Int Dim Query As String Query = "SELECT ID, FirstName As [First name], LastName As [Last name], _
City FROM persons" In SQLiteLight3 the names are varaibles defined in Globals: Sub ShowTable Dim i As Int Dim Query As String Query = "SELECT " For i = 0 To ColNumber - 1 If i < ColNumber - 1 Then Query = Query & ColNames(i) & " As [" & ColAliasNames(i) & "], " Else Query = Query & ColNames(i) & " As [" & ColAliasNames(i) & "] " End If Next Query = Query & " FROM " & SQLTabelName
4 SQLite Database 38 Basic4Android User's Guide
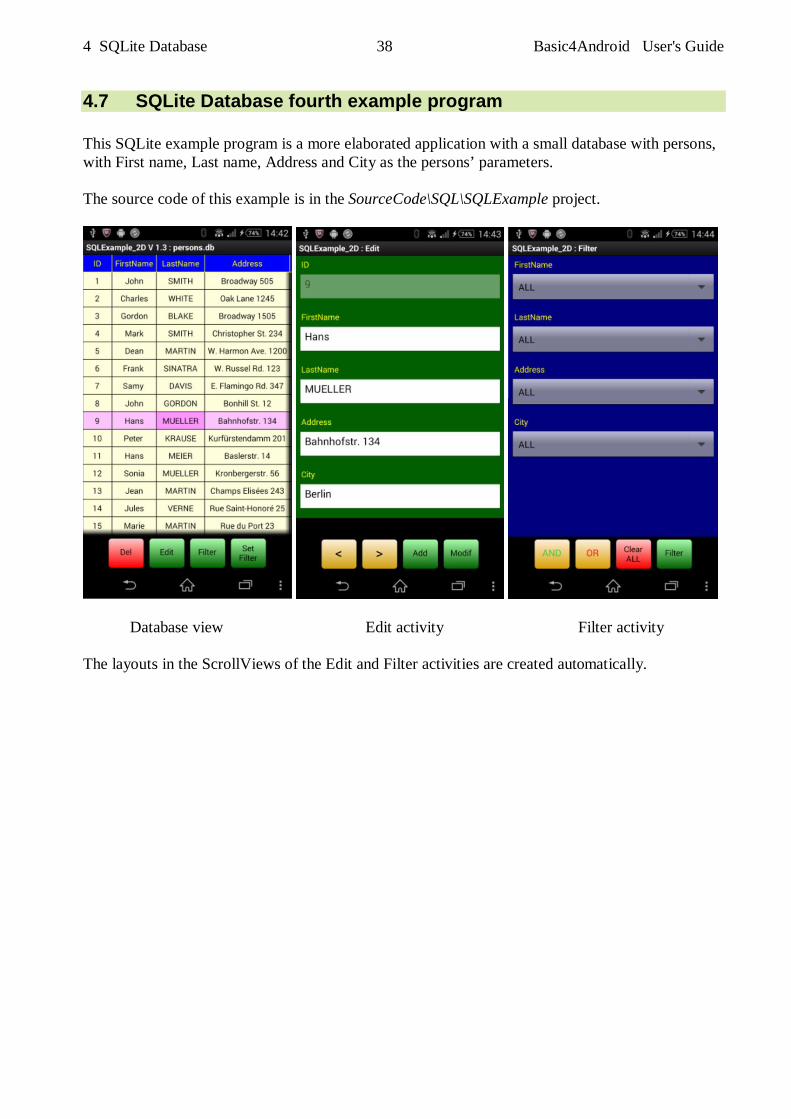
4.7 SQLite Database fourth example program This SQLite example program is a more elaborated application with a small database with persons, with First name, Last name, Address and City as the persons’ parameters. The source code of this example is in the SourceCode\SQL\SQLExample project.
Database view Edit activity Filter activity The layouts in the ScrollViews of the Edit and Filter activities are created automatically.
4 SQLite Database 39 Basic4Android User's Guide
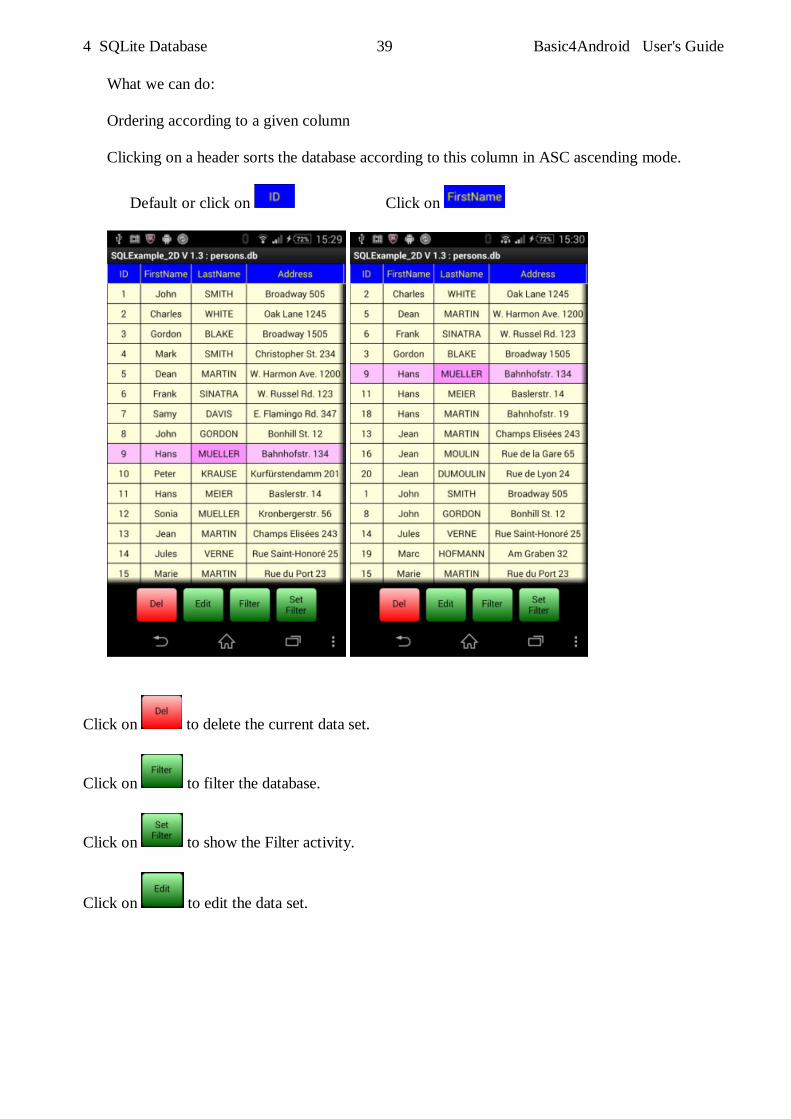
What we can do: Ordering according to a given column Clicking on a header sorts the database according to this column in ASC ascending mode.
Default or click on Click on
Click on to delete the current data set.
Click on to filter the database.
Click on to show the Filter activity.
Click on to edit the data set.
4 SQLite Database 40 Basic4Android User's Guide
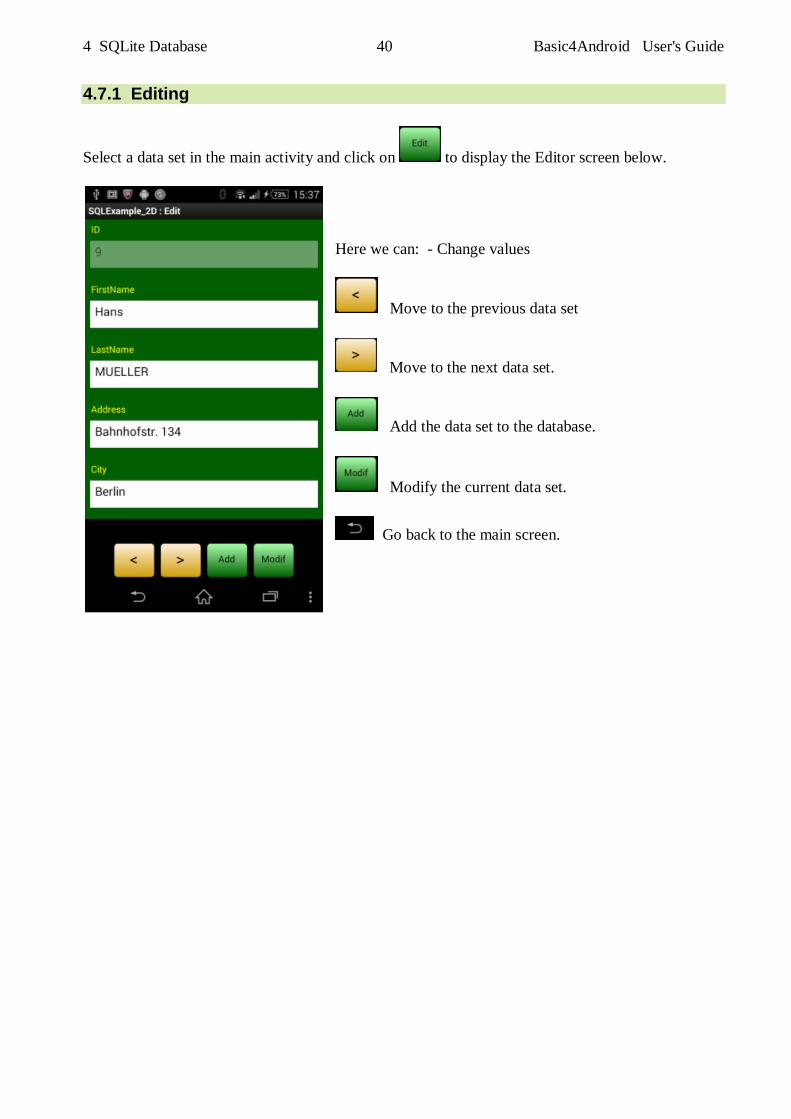
4.7.1 Editing
Select a data set in the main activity and click on to display the Editor screen below.
Here we can: - Change values
Move to the previous data set
Move to the next data set.
Add the data set to the database.
Modify the current data set.
Go back to the main screen.
4 SQLite Database 41 Basic4Android User's Guide
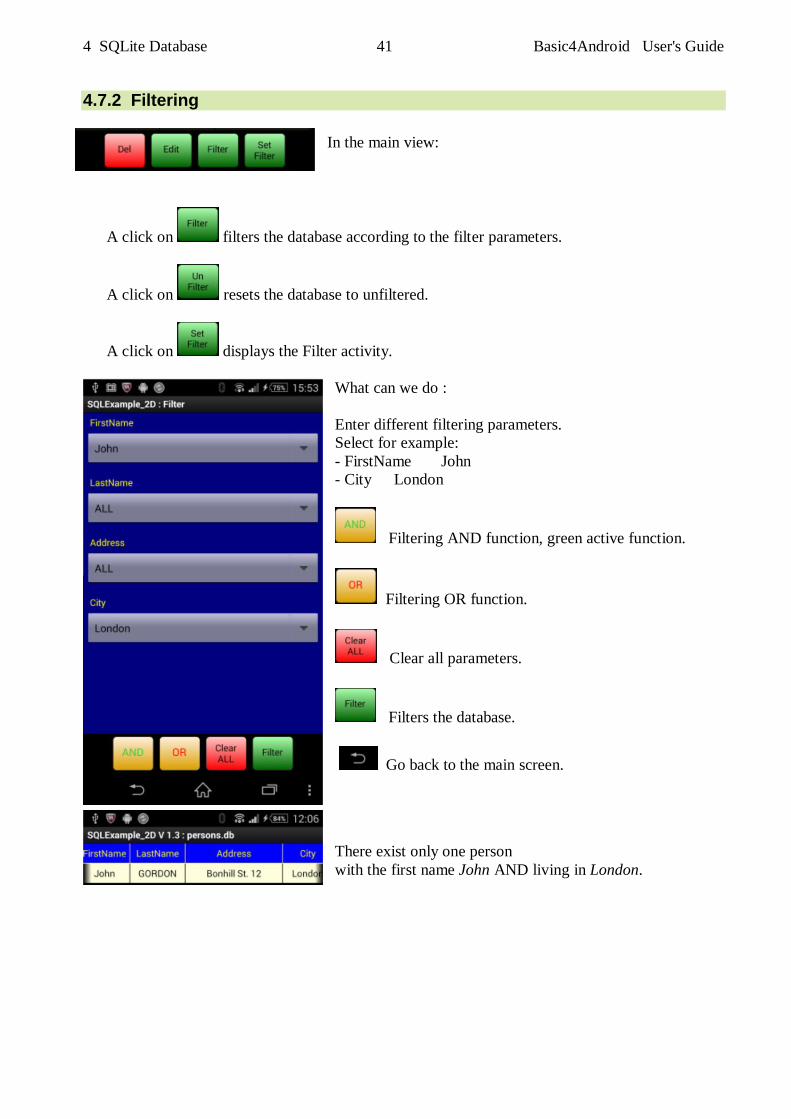
4.7.2 Filtering In the main view:
A click on filters the database according to the filter parameters.
A click on resets the database to unfiltered.
A click on displays the Filter activity.
What can we do : Enter different filtering parameters. Select for example: - FirstName John - City London
Filtering AND function, green active function.
Filtering OR function.
Clear all parameters.
Filters the database.
Go back to the main screen.
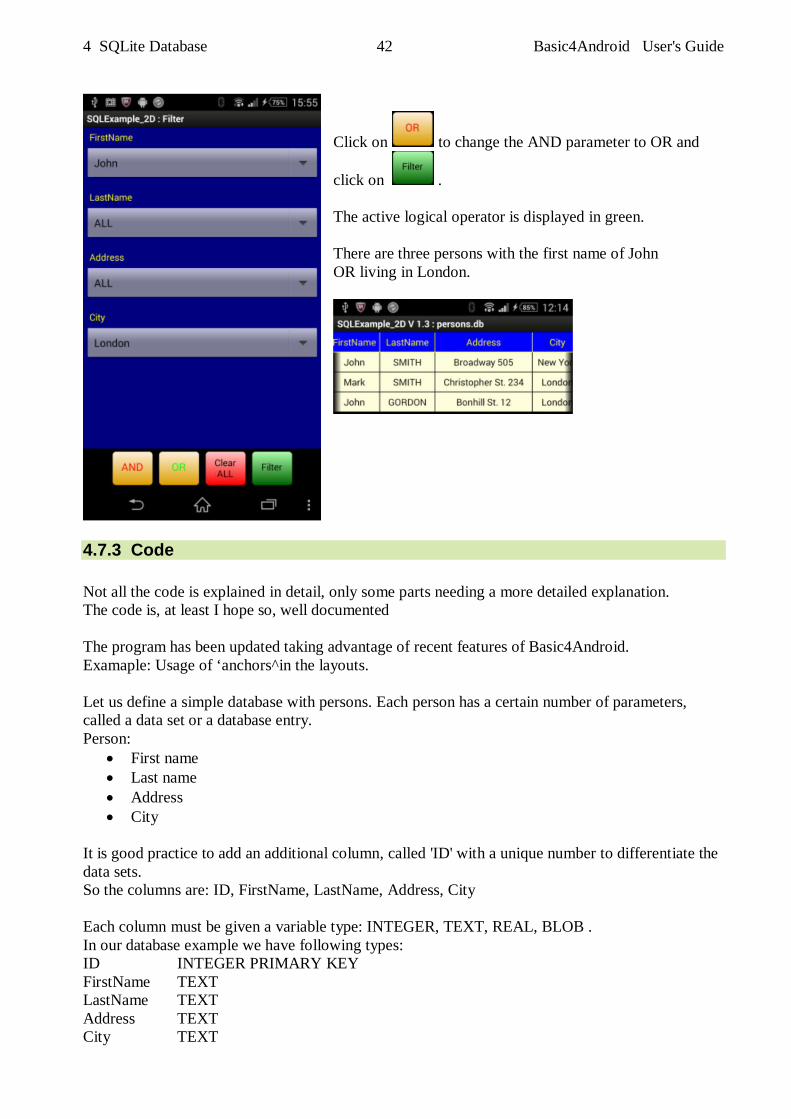
There exist only one person with the first name John AND living in London.
4 SQLite Database 42 Basic4Android User's Guide
Click on to change the AND parameter to OR and
click on . The active logical operator is displayed in green. There are three persons with the first name of John OR living in London.
4.7.3 Code Not all the code is explained in detail, only some parts needing a more detailed explanation. The code is, at least I hope so, well documented The program has been updated taking advantage of recent features of Basic4Android. Examaple: Usage of ‘anchors^in the layouts. Let us define a simple database with persons. Each person has a certain number of parameters, called a data set or a database entry. Person:
First name Last name Address City
It is good practice to add an additional column, called 'ID' with a unique number to differentiate the data sets. So the columns are: ID, FirstName, LastName, Address, City Each column must be given a variable type: INTEGER, TEXT, REAL, BLOB . In our database example we have following types: ID INTEGER PRIMARY KEY FirstName TEXT LastName TEXT Address TEXT City TEXT
4 SQLite Database 43 Basic4Android User's Guide
4.7.3.1 Main Activity In Process_Globals We define the variables below: Dim ColumnName(NumberOfColumns) As String ' names of the columns ColumnName(0) = "ID" ColumnName(1) = "FirstName" ColumnName(2) = "LastName" ColumnName(3) = "Address" ColumnName(4) = "City" Dim ColumnAliasName(NumberOfColumns) As String ' alias names of the columns ColumnAliasName(0) = "ID" ColumnAliasName(1) = "First name" ColumnAliasName(2) = "Last name" ColumnAliasName(3) = "Address" ColumnAliasName(4) = "City" ColumName is obvious, the ColumnAliasNames ase used to display the table headers, this is useful to give more meaningful names or to chage the name in multilangage programs. In Activity_Create We initialize the RowID List which holds the IDs of the datasets of each row. ' initialize the RowID If RowID.IsInitialized = False Then RowID.Initialize End If In Activity_Resume This code reads the table name of the database. ' gets the table name of the database Dim curs As Cursor curs = SQL1.ExecQuery("SELECT name FROM sqlite_master WHERE Type='table'") curs.Position = 0 DBTableName = curs.GetString("name") curs.Close
4 SQLite Database 44 Basic4Android User's Guide
The column widths are calculated in this routine: 'Calculates the width of the given column Sub CalculateColumnWidth(HeaderName As String, ColumName As String) As Int Dim Curs As Cursor Dim row, MaxNumberOfChars As Int ' reads the max number of characters in the column MaxNumberOfChars = SQL1.ExecQuerySingleResult("SELECT max(length(" & _ ColumName & ")) FROM " & DBTableName) ' gets all rows with the max number of characters Curs = SQL1.ExecQuery("SELECT " & ColumName & " FROM " & DBTableName & " _ WHERE length(" & ColumName & ") = " & MaxNumberOfChars) Curs.Position = 0 Dim TextMaxWidth As Int ' measures the text width in pixels of the header name TextMaxWidth = cvs.MeasureStringWidth(HeaderName, Typeface.DEFAULT, FontSize) For row = 0 To Curs.RowCount - 1 Curs.Position = row ' gets the max text width of the text TextMaxWidth = Max(TextMaxWidth, _ cvs.MeasureStringWidth(Curs.GetString(ColumName), Typeface.DEFAULT, FontSize)) Next Curs.Close 'returns the max text width + 10dip as margin Return TextMaxWidth + 10dip End Sub We :
Read the maximum character of the data in each column. Read the rows with the longest content for each column. Calculate the width of header text. Calculate the width of the long column texts. Keep the maximum width value. Add a margin of 10dip.
4 SQLite Database 45 Basic4Android User's Guide
4.7.3.2 Edit activity Almost all the code is explained in the source file. In the EditDispItem We have this code: ' sets the Text properties For col = 0 To Main.NumberOfColumns - 1 Dim edt As EditText edt = scvEdit.Panel.GetView(col * 2 + 1) edt.Text = Cursor1.GetString(Main.ColumnName(edt.Tag)) Next What does this edt = scvEdit.Panel.GetView(col * 2 + 1) mean ? We want to get the view with the given index (col * 2 + 1) from the ScrollView.Panel scvEdit.Panel In the ScrollView.Panel we have a Label and an EditText view per column. The view index begins with 0 and is incremented by one each time we add a view. So : View Column Index Label0 0 0 EditText0 0 1 Label1 1 2 EditText1 1 3 Label2 2 4 EditText2 2 5 Label3 3 6 EditText3 3 7 If we want to get the EditText view for column 3. We calculate col * 2 + 1 = 3 * 2 + 1 = 7 which is the index of the EditText view for column 3. Therefore : edt = scvEdit.Panel.GetView(col * 2 + 1)
4 SQLite Database 46 Basic4Android User's Guide
4.7.3.3 Filter Activity Almost all the code is explained in the source file. For the Filter we use a Spinner for each column except for the first one, the ID column. The Spinners are filled with all DISTICT values from each column. The query looks like this: SELECT DISTINCT ColumnName FROM TableName ORDER BY ColumnName ASC And the code filling the Spinners: ' We get all DISTINCT values for each column ' and fill the Spinners with these values Dim txt As String txt = "SELECT DISTINCT " & Main.ColumnName(col) & " FROM " & _ Main.DBTableName & " ORDER BY " & Main.ColumnName(col) & " ASC" Curs = Main.SQL1.ExecQuery(txt) spn.Clear spn.Add("ALL") For row = 0 To Curs.RowCount - 1 Curs.Position = row spn.Add(Curs.GetString(Main.ColumnName(col))) Next Another approach could have been to use EditText views, instead of the Spinners, to enter texts and check if there exist data with the given text or containing the given text in the given column.
5 DBUtils 47 Basic4Android User's Guide
5 DBUtils For those who are not familiar with SQLite, Erel has written the DBUtils code module that should make things easier. Note: DBUtils is a code module and not a library! To use it, you must load the file DBUtils .bas to your project in the IDE menu Project / Add Existing Module. This will add the module to your project.
5 DBUtils 48 Basic4Android User's Guide
5.1 DBUtils functions
CopyDBFromAssets(FileName As String) As String Copies a database file that was added in the Files tab. The database must be copied to a writable location because it is not possible to access a database located in File.DirAssets. This method copies the database to the storage card File.DirDefaultExternal. If the storage card is not available the file is copied to the internal folder File.DirInternal. The target folder is returned. If the database file already exists then no copying is done.
CreateTable(SQL As SQL, TableName As String, FieldsAndTypes As Map, PrimaryKey As String) Creates a new table with the given name. FieldsAndTypes - A map with the fields names as keys and the types as values. You can use the DB_... constants for the types. PrimaryKey - The column that will be the primary key. Pass empty string if not needed.
DropTable(SQL As SQL, TableName As String) Deletes the given table.
InsertMaps(SQL As SQL, TableName As String, ListOfMaps As List) Inserts the data to the table. ListOfMaps - A list with maps as items. Each map represents a record where the map keys are the columns names and the maps values are the values. Note that you should create a new map for each record (this can be done by calling Dim to redim the map).
UpdateRecord(SQL As SQL, TableName As String, Field As String, NewValue As Object, WhereFieldEquals As Map) Updates a record in the database. Field - Column name NewValue - new value WhereFieldEquals - Map where the map keys are the column names and the map values the values to look for.
ExecuteMemoryTable(SQL As SQL, Query As String, StringArgs() As String, Limit As Int) As List Executes the query and returns the result as a list of arrays. Each item in the list is a strings array. StringArgs() - Values to replace question marks in the query. Pass Null if not needed. Limit - Limits the results. Pass 0 for all results.
5 DBUtils 49 Basic4Android User's Guide
ExecuteMap(SQL As SQL, Query As String, StringArgs() As String) As Map Executes the query and returns a Map with the column names as the keys and the first record values As the entries values. StringArgs() - Values to replace question marks in the query. Pass Null if not needed. The keys are lower cased. Returns Null if no results found.
ExecuteSpinner(SQL As SQL, Query As String, StringArgs() As String, Limit As Int, Spinner1 As Spinner) Executes the query and fills the Spinner with the values in the first column. StringArgs() - Values to replace question marks in the query. Pass Null if not needed. Limit - Limits the results. Pass 0 for all results.
ExecuteListView(SQL As SQL, Query As String, StringArgs() As String, Limit As Int, ListView1 As ListView, TwoLines As Boolean) Executes the query and fills the ListView with the value. StringArgs()- Values to replace question marks in the query. Pass Null if not needed. Limit - Limits the results. Pass 0 for all results. If TwoLines is true then the first column is mapped to the first line and the second column is mapped to the second line. In both cases the value set to the row is the array with all the records values.
ExecuteJSON(SQL As SQL, Query As String, StringArgs() As String, Limit As Int, DBTypes As List) As Map Executes the given query and creates a Map that you can pass to JSONGenerator and generate JSON text. StringArgs()- Values to replace question marks in the query. Pass Null if not needed. Limit - Limits the results. Pass 0 for all results. DBTypes - Lists the type of each column in the result set. Usage example: (don't forget to add a reference to the JSON library) Dim gen As JSONGenerator gen.Initialize(DBUtils.ExecuteJSON(SQL, "SELECT Id, Birthday FROM Students", Null, 0, Array As String(DBUtils.DB_TEXT, DBUtils.DB_INTEGER))) Dim JSONString As String JSONString = gen.ToPrettyString(4) Msgbox(JSONString, "")
ExecuteHtml(SQL As SQL, Query As String, StringArgs() As String, Limit As Int, Clickable As Boolean) As String Creates a html text that displays the data in a table. The style of the table can be changed by modifying HtmlCSS variable. StringArgs() - Values to replace question marks in the query. Pass Null if not needed. Limit - Limits the results. Pass 0 for all results.
GetDBVersion(SQL As SQL) As Int Gets the current version of the database. If the DBVersion table does not exist it is created and the current version is set to version 1.
SetDBVersion(SQL As SQL, Version As Int) Sets the database version to the given version number.
5 DBUtils Example program 50 Basic4Android User's Guide
5.2 Examples You find Erels' example in the Forum under DBUtils - Android databases are now simple. This example will not be explained in this chapter.
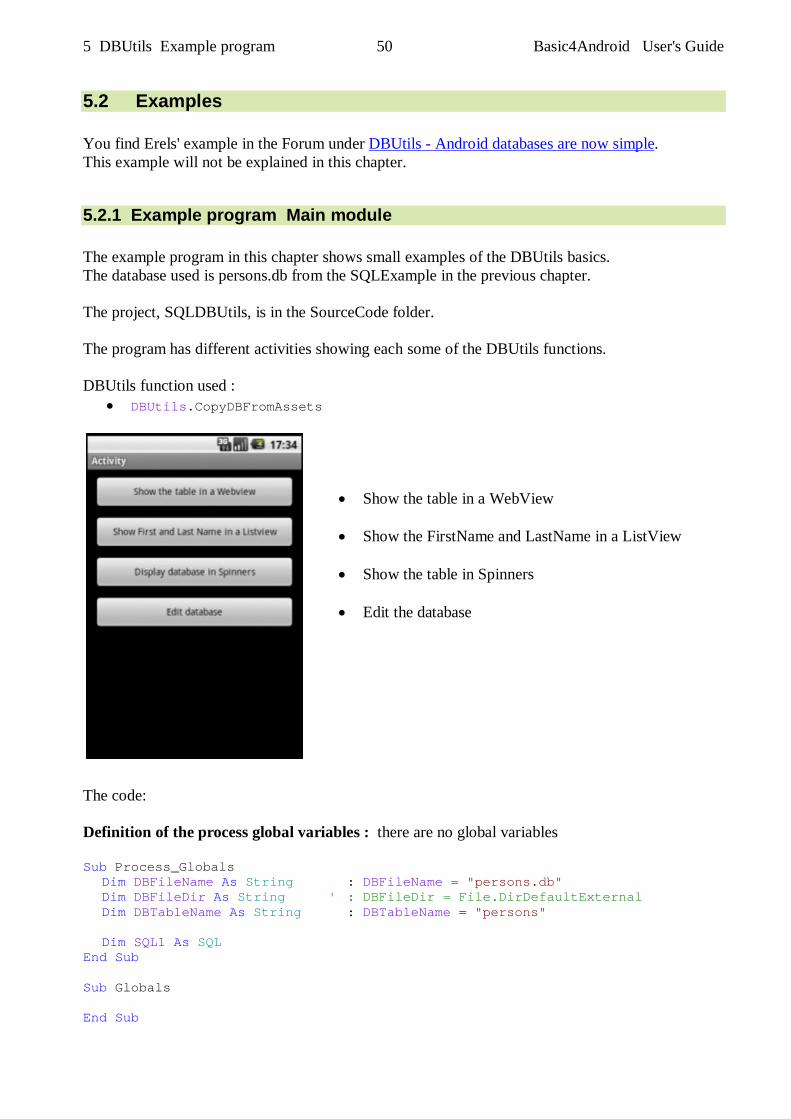
5.2.1 Example program Main module The example program in this chapter shows small examples of the DBUtils basics. The database used is persons.db from the SQLExample in the previous chapter. The project, SQLDBUtils, is in the SourceCode folder. The program has different activities showing each some of the DBUtils functions. DBUtils function used :
DBUtils.CopyDBFromAssets
Show the table in a WebView
Show the FirstName and LastName in a ListView
Show the table in Spinners
Edit the database
The code: Definition of the process global variables : there are no global variables Sub Process_Globals Dim DBFileName As String : DBFileName = "persons.db" Dim DBFileDir As String ' : DBFileDir = File.DirDefaultExternal Dim DBTableName As String : DBTableName = "persons" Dim SQL1 As SQL End Sub Sub Globals End Sub
5 DBUtils Example program 51 Basic4Android User's Guide
Activity_Create routine : Sub Activity_Create(FirstTime As Boolean) If FirstTime Then ' File.Delete(File.DirDefaultExternal, DBFileName) ' for testing If File.Exists(File.DirDefaultExternal, DBFileName) = False Then DBFileDir = DBUtils.CopyDBFromAssets(DBFileName) End If SQL1.Initialize(DBFileDir, DBFileName, True) End If Activity.LoadLayout("main") End Sub
If FirstTime = True, then we copy the database from the File.DirAssets directory to another folder if it doesn't already exist. For testing you could uncomment the line File.Delete... to delete the current database and replace it by the original one. By default, DBUtils tries to copy the database to File.DirDefaultExternal if this one is writable, if not then the database is copied to File.DirInternal. If the database already exists in the other folder nothing happens.
Initialize the database. Load the main layout file for the main Activity.
btnSelect routine : Sub btnSelect_Click Dim btn As Button btn = Sender StartActivity(btn.Tag) End Sub All the Buttons have the same EventName btnSelect defined in the Designer. The Button.Tag property, btn.Tag in the example, is the name of the Activity we want to start, also defined in the Designer. The advantage is that we can add a new button to call a new Activity without the need to modify the code of the main module.
5 DBUtils Example program 52 Basic4Android User's Guide
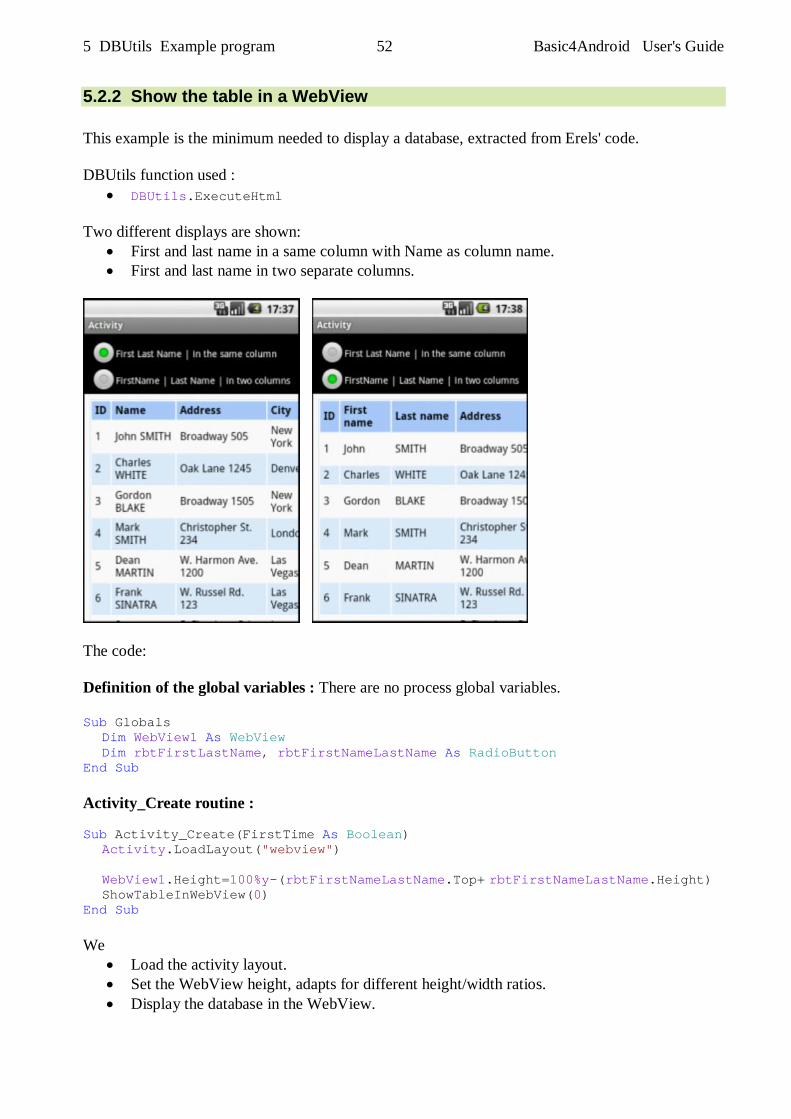
5.2.2 Show the table in a WebView This example is the minimum needed to display a database, extracted from Erels' code. DBUtils function used :
DBUtils.ExecuteHtml Two different displays are shown:
First and last name in a same column with Name as column name. First and last name in two separate columns.
The code: Definition of the global variables : There are no process global variables. Sub Globals Dim WebView1 As WebView Dim rbtFirstLastName, rbtFirstNameLastName As RadioButton End Sub Activity_Create routine : Sub Activity_Create(FirstTime As Boolean) Activity.LoadLayout("webview") WebView1.Height=100%y-(rbtFirstNameLastName.Top+ rbtFirstNameLastName.Height) ShowTableInWebView(0) End Sub We
Load the activity layout. Set the WebView height, adapts for different height/width ratios. Display the database in the WebView.
5 DBUtils Example program 53 Basic4Android User's Guide
ShowTableInWebView routine : Sub ShowTableInWebView(Mode As Int) Dim Query As String If Mode = 0 Then Query = "SELECT ID, [FirstName] || ' ' || [LastName] As Name, Address, City FROM " & Main.DBTableName Else Query = "SELECT ID, FirstName As [First name], LastName As [Last name], Address, City FROM " & Main.DBTableName End If WebView1.LoadHtml(DBUtils.ExecuteHtml(Main.SQL1, Query, Null, 0, True)) End Sub This routine shows the database in a table in a WebView.
Mode defines the display mode, 0 = FirstName and LastName in one column. 1 = FirstName and LastName in two separate columns.
The query texts need some explanations (second Query):
SELECT SQL query keyword ID is the DB column name and the same column name is used in the header FirstName As [First name] FirstName is the DB column name As for alias, header name different from the column name [First name] is the header name, the [ ] are needed because of the space between
First and name LastName As [Last name] LastName DB column name As for alias, header name different from the column name [Last name] header name
Address DB column name and header name City DB column name and header name FROM SQL query keyword DBTableName table name, in this case a variable
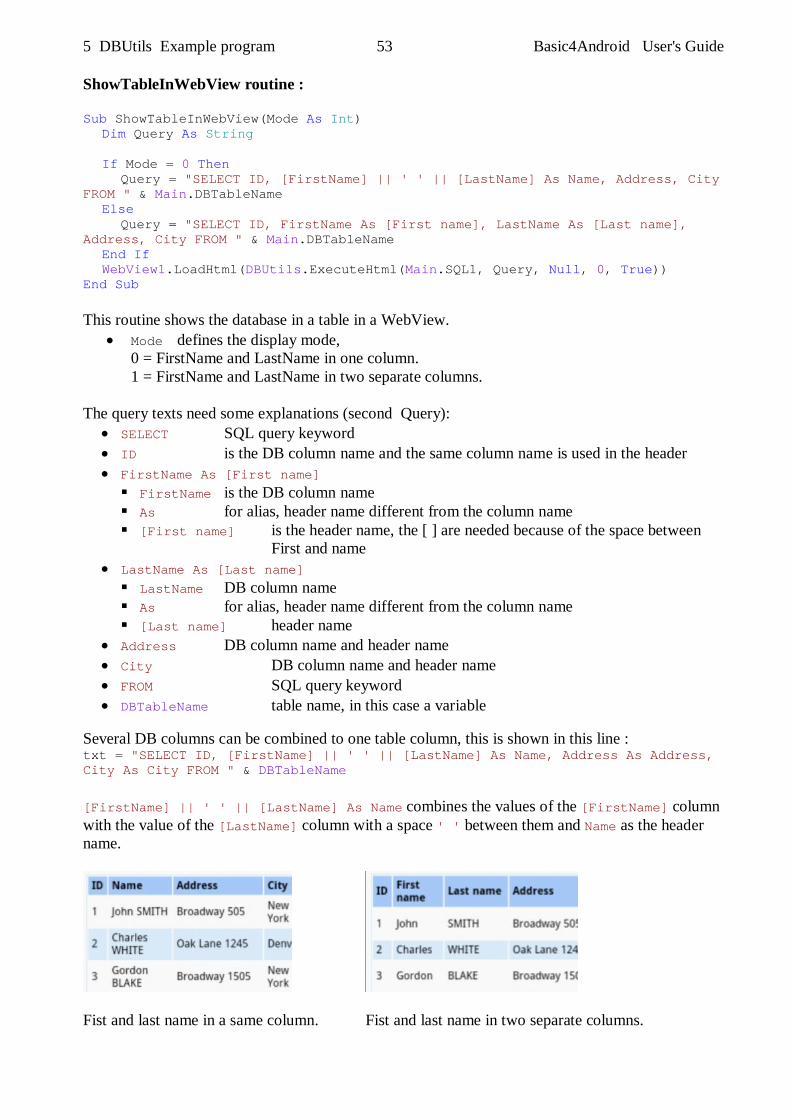
Several DB columns can be combined to one table column, this is shown in this line : txt = "SELECT ID, [FirstName] || ' ' || [LastName] As Name, Address As Address, City As City FROM " & DBTableName [FirstName] || ' ' || [LastName] As Name combines the values of the [FirstName] column with the value of the [LastName] column with a space ' ' between them and Name as the header name.
Fist and last name in a same column. Fist and last name in two separate columns.
5 DBUtils Example program 54 Basic4Android User's Guide
The call of the WebView : WebView1.LoadHtml(DBUtils.ExecuteHtml(SQL1, Query, Null, 0, True)) Where we call DBUtils.ExecuteHtml with :
SQL1 SQL object Query the SQL query Null no array 0 no limit True WebView clickable, if True the WebView1_OverrideUrl event will be raised.
The WebView event routine : This routine is called when a cell in the table is selected and returns a ToastMessage with the row and column index. Sub WebView1_OverrideUrl (Url As String) As Boolean 'parse the row and column numbers from the URL Dim values() As String values = Regex.Split("[.]", Url.SubString(7)) Dim col, row As Int col = values(0) row = values(1) ToastMessageShow("User pressed on column: " & col & " and row: " & row, False) Return True 'Don't try to navigate to this URL End Sub The returned value of Utl = http://col.row.com/ Example : http://1.3.com/ We :
Dim a string array values Split the Url string with values = Regex.Split("[.]", Url.SubString(7))
Url.SubString(7) = 1.3.com/ substring beginning with the 7th character till the end. Dim col and row as Integers col = values(0) and row = values(1) Display a ToastMessage with the two values. Return True to consume the event, to not transmit it to the operating system.
5 DBUtils Example program 55 Basic4Android User's Guide
RadioButton CheckedChange event routine : Sub rbtSelectMode_CheckedChange(Checked As Boolean) Dim rbt As RadioButton If Checked Then rbt = Sender ShowTableInWebView(rbt.Tag) End If End Sub The two RadioButtons have the same EventName rbtSelectMode defined in the Designer. The Tag properties are :
0 for First and last name in the same column. 1 for First and last name in two separate columns.
We :
Dim rbt as a local RadioButton. If Checked = True then we : Set rbt = Sender , the RadioButton that raised the event. Display the table according the selected display mode.
5 DBUtils Example program 56 Basic4Android User's Guide
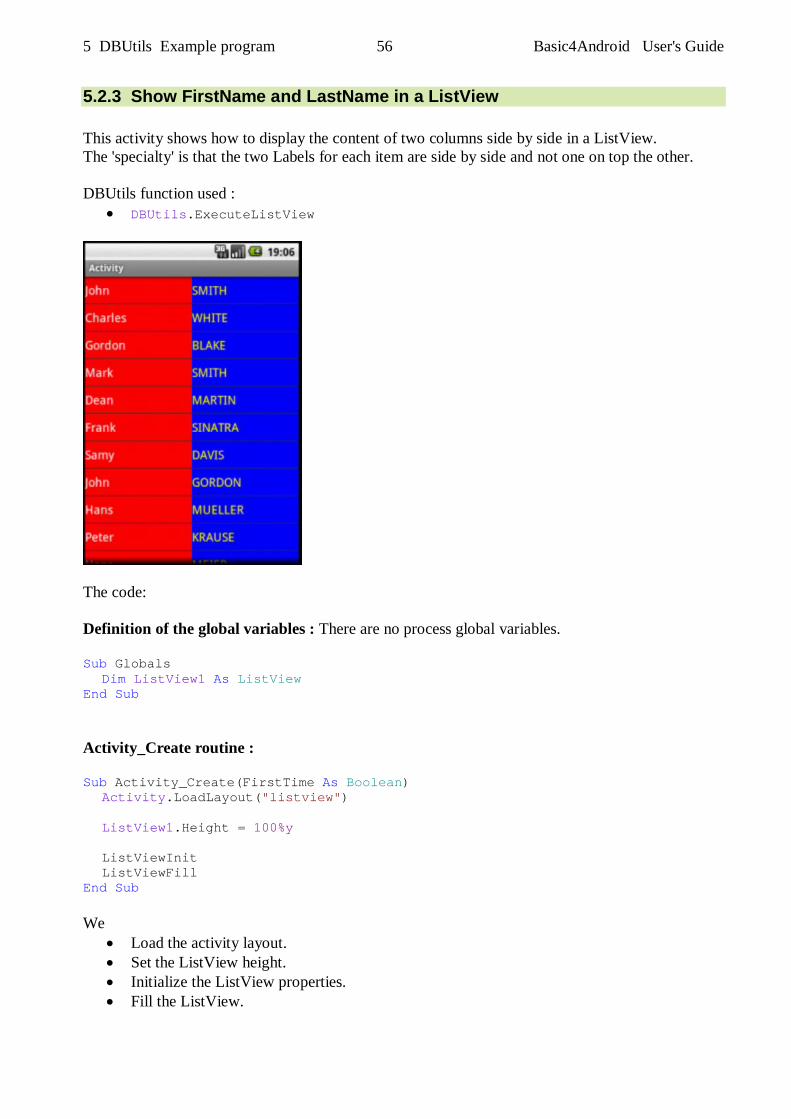
5.2.3 Show FirstName and LastName in a ListView This activity shows how to display the content of two columns side by side in a ListView. The 'specialty' is that the two Labels for each item are side by side and not one on top the other. DBUtils function used :
DBUtils.ExecuteListView
The code: Definition of the global variables : There are no process global variables. Sub Globals Dim ListView1 As ListView End Sub Activity_Create routine : Sub Activity_Create(FirstTime As Boolean) Activity.LoadLayout("listview") ListView1.Height = 100%y ListViewInit ListViewFill End Sub We
Load the activity layout. Set the ListView height. Initialize the ListView properties. Fill the ListView.
5 DBUtils Example program 57 Basic4Android User's Guide
The ListViewInit routine : Sub ListViewInit ListView1.TwoLinesLayout.ItemHeight = 40dip ListView1.TwoLinesLayout.Label.Left = 0 ListView1.TwoLinesLayout.Label.Width = 50%x ListView1.TwoLinesLayout.Label.Height = 40dip ListView1.TwoLinesLayout.Label.Gravity = Gravity.CENTER_VERTICAL ListView1.TwoLinesLayout.Label.Color = Colors.Red ListView1.TwoLinesLayout.Label.TextSize = 18 ListView1.TwoLinesLayout.SecondLabel.Top = 0 ListView1.TwoLinesLayout.SecondLabel.Left = 50%x ListView1.TwoLinesLayout.SecondLabel.Width = 50%x ListView1.TwoLinesLayout.SecondLabel.Height = 40dip ListView1.TwoLinesLayout.SecondLabel.Gravity = Gravity.CENTER_VERTICAL ListView1.TwoLinesLayout.SecondLabel.Color = Colors.Blue ListView1.TwoLinesLayout.SecondLabel.TextColor = Colors.Yellow ListView1.TwoLinesLayout.SecondLabel.TextSize = 18 End Sub We :
Set the ItemHeight = 40dip Set the Left, Width, Height, Gravity, Color and TextSize
properties for the first Label. Set the Top, Left, Width, Height, Gravity, Color, TextColor and TextSize
properties for the second Label. The ListViewFill routine : Sub ListViewFill Dim Query As String Query = "SELECT FirstName, LastName FROM " & Main.DBTableName DBUtils.ExecuteListView(Main.SQL1, Query, Null, 0, ListView1, True) End Sub The Query :
SELECT SQL keyword. FirstName LastName the two selected column names. FROM SQL keyword. Main.DBTableName the table name, in this case a process global variable
We call DBUtils.ExecuteListView with
Main.SQL1 the database Query the SQL query Null no string array 0 no limit ListView1 the ListView view True for two lines ListView (False = one line ListView)
5 DBUtils Example program 58 Basic4Android User's Guide
5.2.4 Display database in Spinners In this activity we have one Spinner for each column. Selecting an item in one of the Spinners sets the other Spinners to display the values of the same record and shows all records with the same selected value. DBUtils function used :
DBUtils.ExecuteSpinner DBUtils.ExecuteHtml
SMITH selected. Las Vegas selected. The code: Definition of the global variables : There are no process global variables. Sub Globals Dim spnFirstName, spnLastName, spnAddress, spnCity As Spinner Dim WebView1 As WebView End Sub Activity_Create routine : Sub Activity_Create(FirstTime As Boolean) Activity.LoadLayout("Spinner") WebView1.Height = 100%y - (spnCity.Top + spnCity.Height + 8dip) FillSpinners End Sub We
Load the activity layout. Set the WebView height, adapts for different height/width ratios. Fill the Spinners.

5 DBUtils Example program 59 Basic4Android User's Guide
The FillSpinners routine : Sub FillSpinners Dim Query As String Query = "SELECT FirstName FROM " & Main.DBTableName spnFirstName.Clear DBUtils.ExecuteSpinner(Main.SQL1, Query, Null, 0, spnFirstName) Query = "SELECT LastName FROM " & Main.DBTableName spnLastName.Clear DBUtils.ExecuteSpinner(Main.SQL1, Query, Null, 0, spnLastName) Query = "SELECT Address FROM " & Main.DBTableName spnAddress.Clear DBUtils.ExecuteSpinner(Main.SQL1, Query, Null, 0, spnAddress) Query = "SELECT City FROM " & Main.DBTableName spnCity.Clear DBUtils.ExecuteSpinner(Main.SQL1, Query, Null, 0, spnCity) End Sub We :
Dim the Query variable. Define the Query for the spnFirstName Spinner. Call the DBUtils.ExecuteSpinner routine. Main.SQL1 the SQL database Query the SQL query Null no string array 0 no limit spnFirstName the Spinner name
The Query for the FirstName Spinner :
SELECT SQL keyword. FirstName the column name to read. FROM SQL keyword. Main.DBTableName the table name, in this case a process global variable.
The same principle is used for the other Spinners, the only differences are the column names and the Spinners.
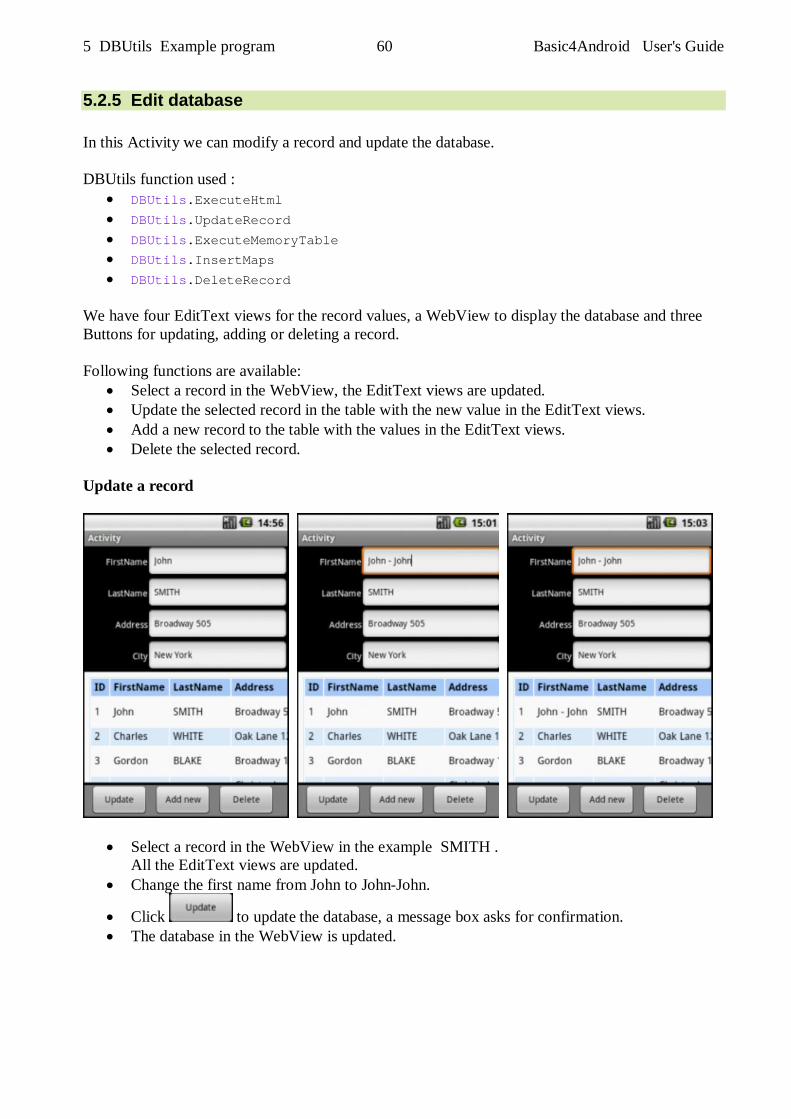
5 DBUtils Example program 60 Basic4Android User's Guide
5.2.5 Edit database In this Activity we can modify a record and update the database. DBUtils function used :
DBUtils.ExecuteHtml DBUtils.UpdateRecord DBUtils.ExecuteMemoryTable DBUtils.InsertMaps DBUtils.DeleteRecord
We have four EditText views for the record values, a WebView to display the database and three Buttons for updating, adding or deleting a record. Following functions are available:
Select a record in the WebView, the EditText views are updated. Update the selected record in the table with the new value in the EditText views. Add a new record to the table with the values in the EditText views. Delete the selected record.
Update a record
Select a record in the WebView in the example SMITH . All the EditText views are updated.
Change the first name from John to John-John.
Click to update the database, a message box asks for confirmation. The database in the WebView is updated.
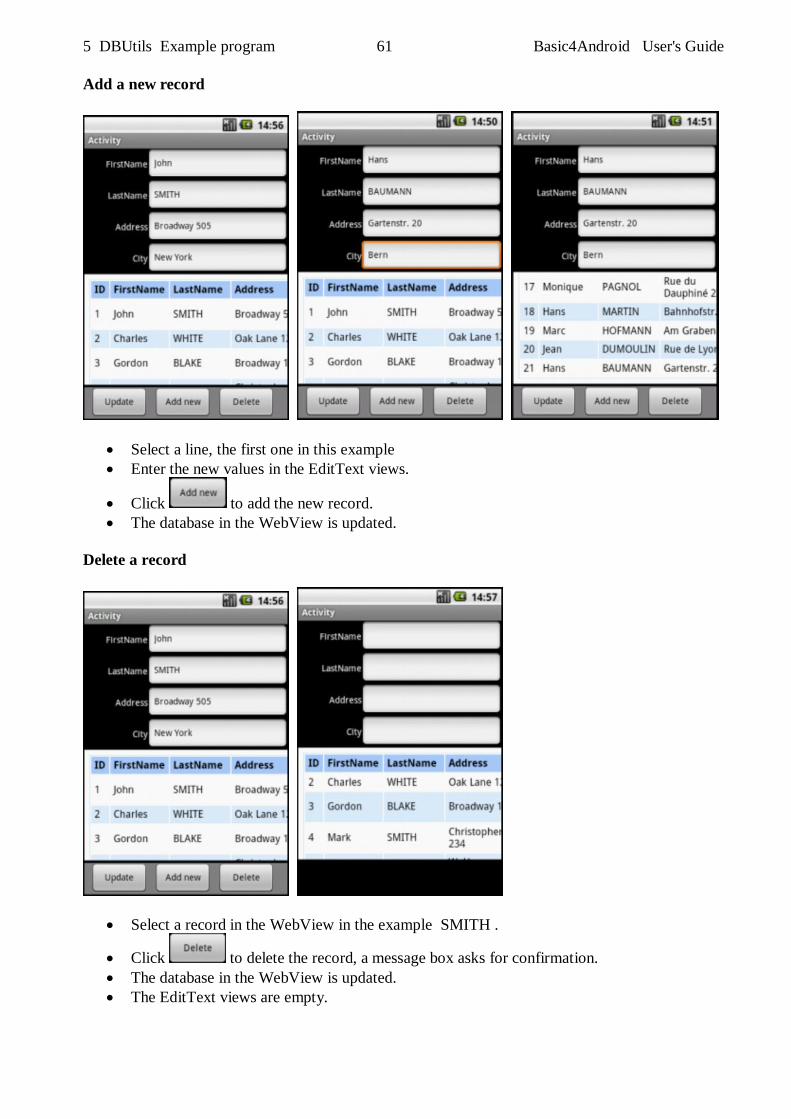
5 DBUtils Example program 61 Basic4Android User's Guide
Add a new record
Select a line, the first one in this example Enter the new values in the EditText views.
Click to add the new record. The database in the WebView is updated.
Delete a record
Select a record in the WebView in the example SMITH .
Click to delete the record, a message box asks for confirmation. The database in the WebView is updated. The EditText views are empty.
5 DBUtils Example program 62 Basic4Android User's Guide
The code: Definition of the global variables : There are no process global variables. Sub Globals Dim edtFirstName, edtLastName, edtAddress, edtCity As EditText Dim btnUpdate As Button Dim WebView1 As WebView Dim lstTable As List Dim pnlToolBox As Panel Dim col, row, ID As Int End Sub Activity_Create routine : Sub Activity_Create(FirstTime As Boolean) Activity.LoadLayout("edit") pnlToolBox.Top = 100%y - pnlToolBox.Height WebView1.Height = pnlToolBox.Top - (edtCity.Top + edtCity.Height + 4dip) FillWebView pnlToolBox.Visible = False End Sub We
Load the activity layout. Set the btnUpdate Button Top property. Set the WebView height, adapts for different height/width ratios. Fill the WebView. Hide the buttons, ToolBox.
The FillWebView routine : Sub FillWebView Dim Query As String Query = "SELECT * FROM " & Main.DBTableName ' the line above does the same as the line below ' in bothe cases the WebView column names are the same as the DB column names ' Query = "SELECT ID, FirstName, LastName, Address, City FROM " & Main.DBTableName WebView1.LoadHtml(DBUtils.ExecuteHtml(Main.SQL1, Query, Null, 0, True)) lstTable = DBUtils.ExecuteMemoryTable(Main.SQL1, Query, Null, 0) End Sub It's similar to the routine in chapter 4.2.2 Show the table in a WebView.
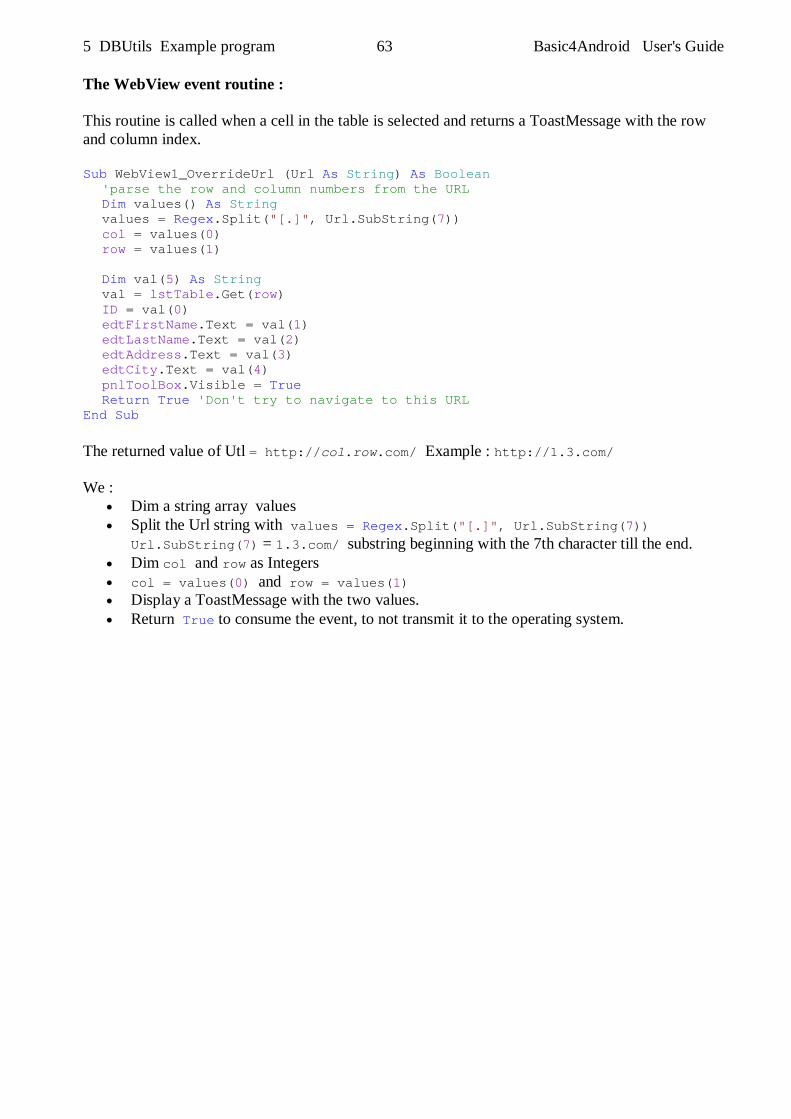
5 DBUtils Example program 63 Basic4Android User's Guide
The WebView event routine : This routine is called when a cell in the table is selected and returns a ToastMessage with the row and column index. Sub WebView1_OverrideUrl (Url As String) As Boolean 'parse the row and column numbers from the URL Dim values() As String values = Regex.Split("[.]", Url.SubString(7)) col = values(0) row = values(1) Dim val(5) As String val = lstTable.Get(row) ID = val(0) edtFirstName.Text = val(1) edtLastName.Text = val(2) edtAddress.Text = val(3) edtCity.Text = val(4) pnlToolBox.Visible = True Return True 'Don't try to navigate to this URL End Sub The returned value of Utl = http://col.row.com/ Example : http://1.3.com/ We :
Dim a string array values Split the Url string with values = Regex.Split("[.]", Url.SubString(7))
Url.SubString(7) = 1.3.com/ substring beginning with the 7th character till the end. Dim col and row as Integers col = values(0) and row = values(1) Display a ToastMessage with the two values. Return True to consume the event, to not transmit it to the operating system.
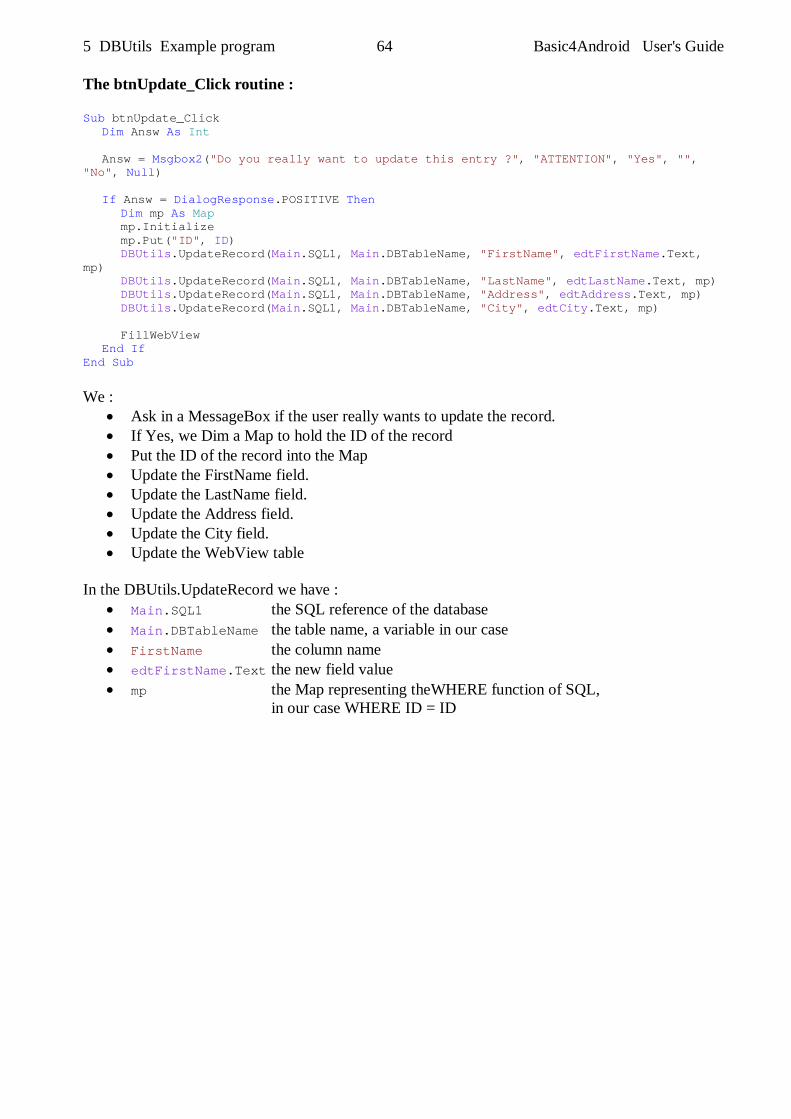
5 DBUtils Example program 64 Basic4Android User's Guide
The btnUpdate_Click routine : Sub btnUpdate_Click Dim Answ As Int Answ = Msgbox2("Do you really want to update this entry ?", "ATTENTION", "Yes", "", "No", Null) If Answ = DialogResponse.POSITIVE Then Dim mp As Map mp.Initialize mp.Put("ID", ID) DBUtils.UpdateRecord(Main.SQL1, Main.DBTableName, "FirstName", edtFirstName.Text, mp) DBUtils.UpdateRecord(Main.SQL1, Main.DBTableName, "LastName", edtLastName.Text, mp) DBUtils.UpdateRecord(Main.SQL1, Main.DBTableName, "Address", edtAddress.Text, mp) DBUtils.UpdateRecord(Main.SQL1, Main.DBTableName, "City", edtCity.Text, mp) FillWebView End If End Sub We :
Ask in a MessageBox if the user really wants to update the record. If Yes, we Dim a Map to hold the ID of the record Put the ID of the record into the Map Update the FirstName field. Update the LastName field. Update the Address field. Update the City field. Update the WebView table
In the DBUtils.UpdateRecord we have :
Main.SQL1 the SQL reference of the database Main.DBTableName the table name, a variable in our case FirstName the column name edtFirstName.Text the new field value mp the Map representing theWHERE function of SQL,
in our case WHERE ID = ID
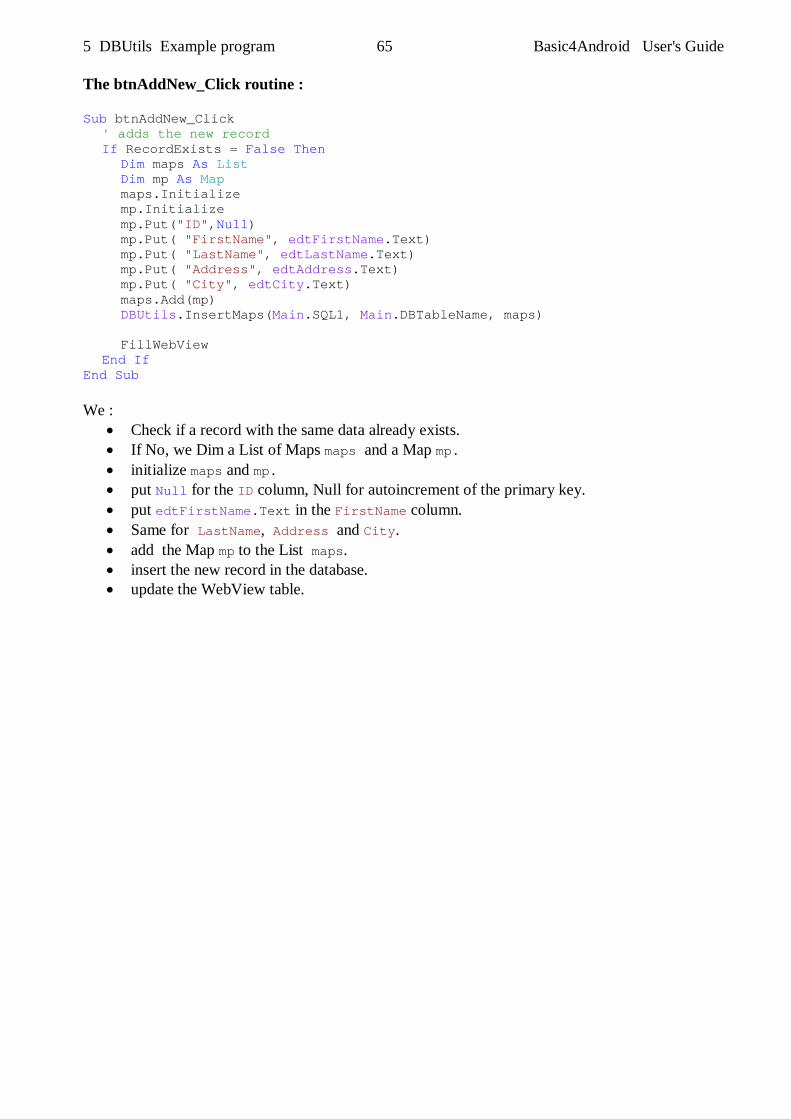
5 DBUtils Example program 65 Basic4Android User's Guide
The btnAddNew_Click routine : Sub btnAddNew_Click ' adds the new record If RecordExists = False Then Dim maps As List Dim mp As Map maps.Initialize mp.Initialize mp.Put("ID",Null) mp.Put( "FirstName", edtFirstName.Text) mp.Put( "LastName", edtLastName.Text) mp.Put( "Address", edtAddress.Text) mp.Put( "City", edtCity.Text) maps.Add(mp) DBUtils.InsertMaps(Main.SQL1, Main.DBTableName, maps) FillWebView End If End Sub We :
Check if a record with the same data already exists. If No, we Dim a List of Maps maps and a Map mp. initialize maps and mp. put Null for the ID column, Null for autoincrement of the primary key. put edtFirstName.Text in the FirstName column. Same for LastName, Address and City. add the Map mp to the List maps. insert the new record in the database. update the WebView table.
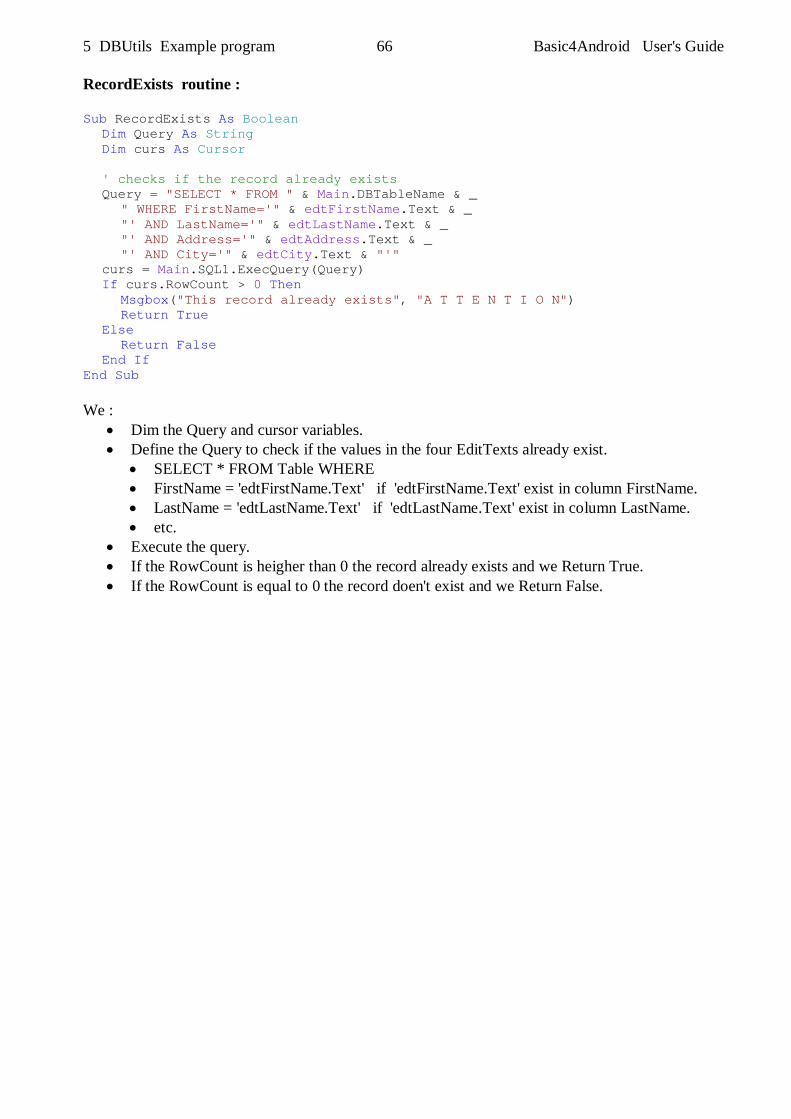
5 DBUtils Example program 66 Basic4Android User's Guide
RecordExists routine : Sub RecordExists As Boolean Dim Query As String Dim curs As Cursor ' checks if the record already exists Query = "SELECT * FROM " & Main.DBTableName & _ " WHERE FirstName='" & edtFirstName.Text & _ "' AND LastName='" & edtLastName.Text & _ "' AND Address='" & edtAddress.Text & _ "' AND City='" & edtCity.Text & "'" curs = Main.SQL1.ExecQuery(Query) If curs.RowCount > 0 Then Msgbox("This record already exists", "A T T E N T I O N") Return True Else Return False End If End Sub We :
Dim the Query and cursor variables. Define the Query to check if the values in the four EditTexts already exist.
SELECT * FROM Table WHERE FirstName = 'edtFirstName.Text' if 'edtFirstName.Text' exist in column FirstName. LastName = 'edtLastName.Text' if 'edtLastName.Text' exist in column LastName. etc.
Execute the query. If the RowCount is heigher than 0 the record already exists and we Return True. If the RowCount is equal to 0 the record doen't exist and we Return False.

5 DBUtils Example program 67 Basic4Android User's Guide
The btnDelete_Click routine : Sub btnDelete_Click Dim Answ As Int Answ = Msgbox2("Do you really want to delete this record ?", "DELETE record", "Yes", "", "No", Null) If Answ = DialogResponse.POSITIVE Then Dim mp As Map Dim val(5) As String mp.Initialize mp.Put("ID", ID) val = lstTable.Get(row) mp.Put("FirstName", val(1)) mp.Put("LastName", val(2)) mp.Put("Address", val(3)) mp.Put("City", val(4)) DBUtils.DeleteRecord(Main.SQL1, Main.DBTableName, mp) FillWebView edtFirstName.Text = "" edtLastName.Text = "" edtAddress.Text = "" edtCity.Text = "" row = -1 col = -1 pnlToolBox.Visible = False End If End Sub We :
Dim the Answ variable Ask the user if he really wants to delete the record. If the answer is yes (DialogResponse.POSITIVE) then : Dim mp as a Map and val(5)as String. Initialize the Map mp . Put the ID value to the Map. Set the values of the current row lstTable.Get(row) to val.
The content of the current row is the string array lstTable.Get(row). Put the values of the columns to the Map. Execute the Query DBUtils.DeleteRecord(Main.SQL1, Main.DBTableName, mp). Run the FillWebView routine to update the table. Set the content of the EditText views to empty. Set row and col to -1 no row nor column selected. Hide the button toolbox, no function available.
6 GPS 68 Basic4Android User's Guide
6 GPS The GPS library has three objects:
GPS GPSSatellite Location
The example program will show several functions of the GPS library and has following functions.
Connecting the GPS Getting and displaying GPS information Saving a GPS path Display the available satellites Showing Google maps Show a GPS path on the map
6.1 GPS Library The GPS LIbrary is part of the basic Basic4Android language.
6.1.1 GPS Object The GPS object has:
Members o GPSEnabled as Boolean [read only]
Tests whether the user has enabled the GPS or not o Initialize (EventName As String)
Initializes the GPS with its EventName o LoacationSettingsIntent As android.contend.Intent [read only]
Returns the intent that is used to show the global location settings.
o Start(MinimumTime As Long, MinimumDistance As Float) Starts listening for events. MinimumTime The shortest period (in milliseconds) between events. Pass 0 for highest frequency MinimumDistance The shortest change in distance (in meters) for which to raise events. Pass 0 for highest frequency.
o Stop Stops listening to the GPS. You will usually want to call Stop inside Sub Activity_Pause.
Events o LocationChanged (Location1 As Location)
Raised when a new 'fix' is ready. o UserEnabled (Enabled As Boolean) o GpsStatus (Satellites As List)
6 GPS 69 Basic4Android User's Guide
6.1.2 GPS Satellite The GPSSatellite object holds various information about a GPS satellite. A List with the available satellites is passed to the GpsSatus event. Satellite data:
Azimuth 0 - 360 degrees Elevation 0 - 90 degrees Prn (Pseudo random number) Snr (Signal / noise ratio) UsedInFix True if the satellite is used to determine the current fix.
6.1.3 GPS Location A Location object holds various information about a specific GPS fix (position). In most cases you will work with locations that are passed to the GPS LocationChanged event. The location object can also be used to calculate distance and bearing to other locations. The most useful properties.
Location1.Latitude latitude of the fix in [°] Location1.Longitude longitude of the fix in [°] Location1.Altitude altitude of the fix in [m] Location1.Bearing bearing of the fix in [°] Location1.Speed speed of the fix in [m/s] Location1.Time time of the fix in in [ticks]
The most useful methods.
Location1.Initialize Initializes an empty location.
Location1.Initialize2 (Latitude As String, Longitude As String) Initializes a location with the two given values, all the other properties are 0.
Location1.DistanceTo (TargetLocation As Location) in [m] Location1.DistanceTo(Location2) calculates the distance between Location1 and Location2.
Location1.BearingTo (TargetLocation As Location) in [°] Location1.BearingTo(Location2) calculates the bearing from Location1 to Location2.
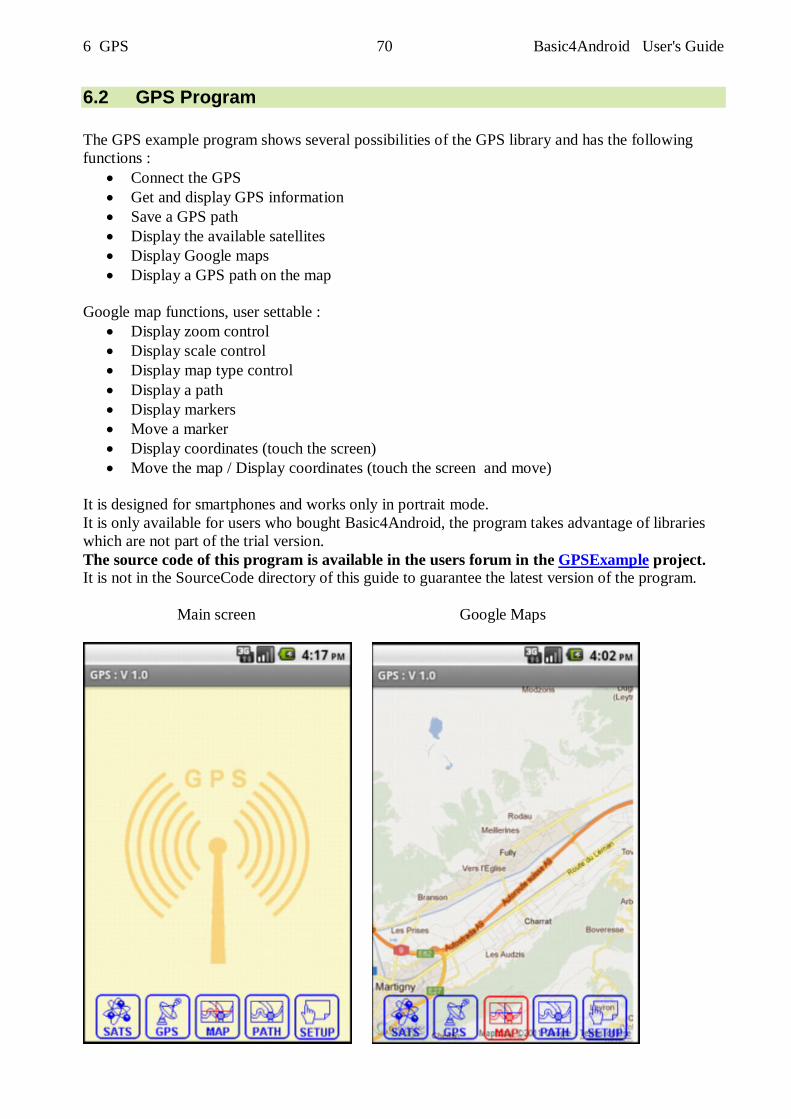
6 GPS 70 Basic4Android User's Guide
6.2 GPS Program The GPS example program shows several possibilities of the GPS library and has the following functions :
Connect the GPS Get and display GPS information Save a GPS path Display the available satellites Display Google maps Display a GPS path on the map
Google map functions, user settable : Display zoom control Display scale control Display map type control Display a path Display markers Move a marker Display coordinates (touch the screen) Move the map / Display coordinates (touch the screen and move)
It is designed for smartphones and works only in portrait mode. It is only available for users who bought Basic4Android, the program takes advantage of libraries which are not part of the trial version. The source code of this program is available in the users forum in the GPSExample project. It is not in the SourceCode directory of this guide to guarantee the latest version of the program. Main screen Google Maps
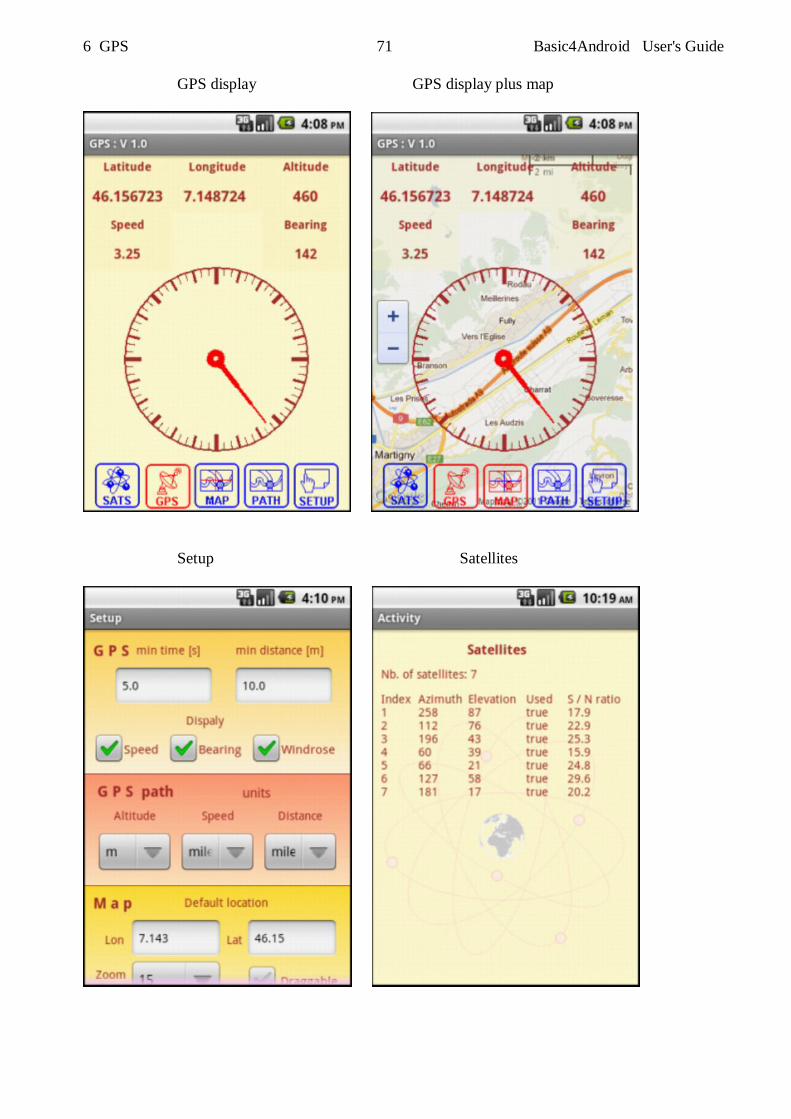
6 GPS 71 Basic4Android User's Guide
GPS display GPS display plus map
Setup Satellites
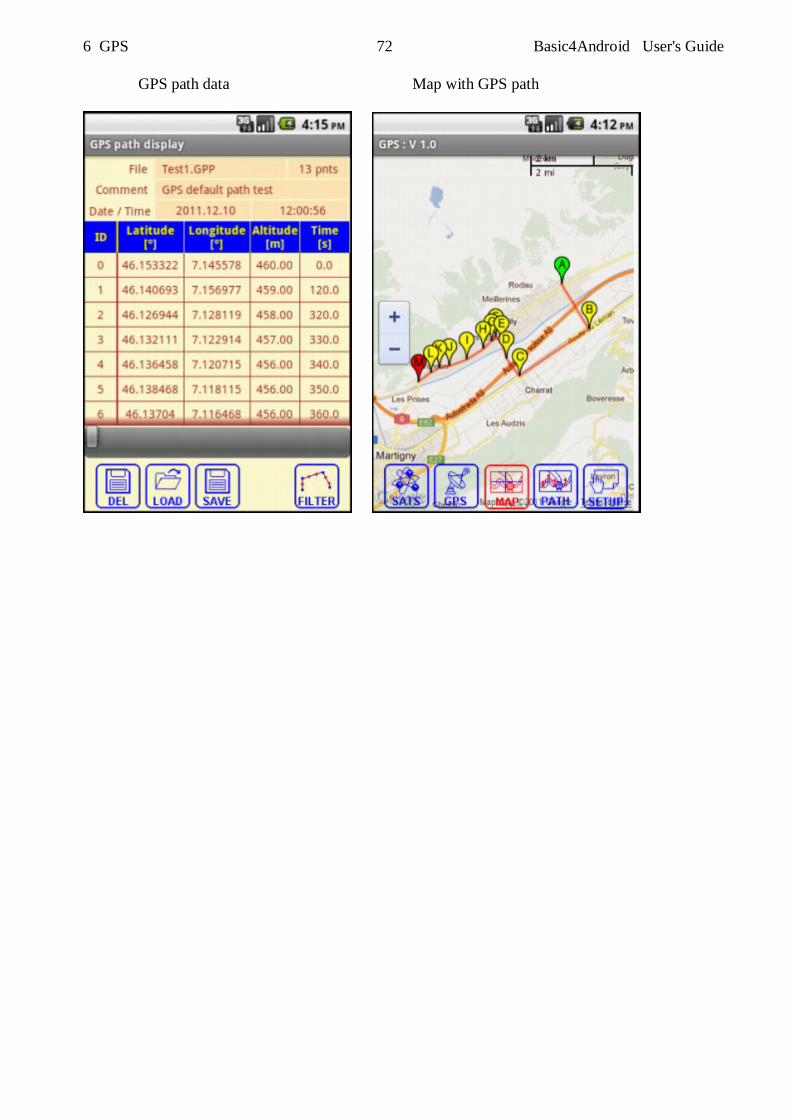
6 GPS 72 Basic4Android User's Guide
GPS path data Map with GPS path
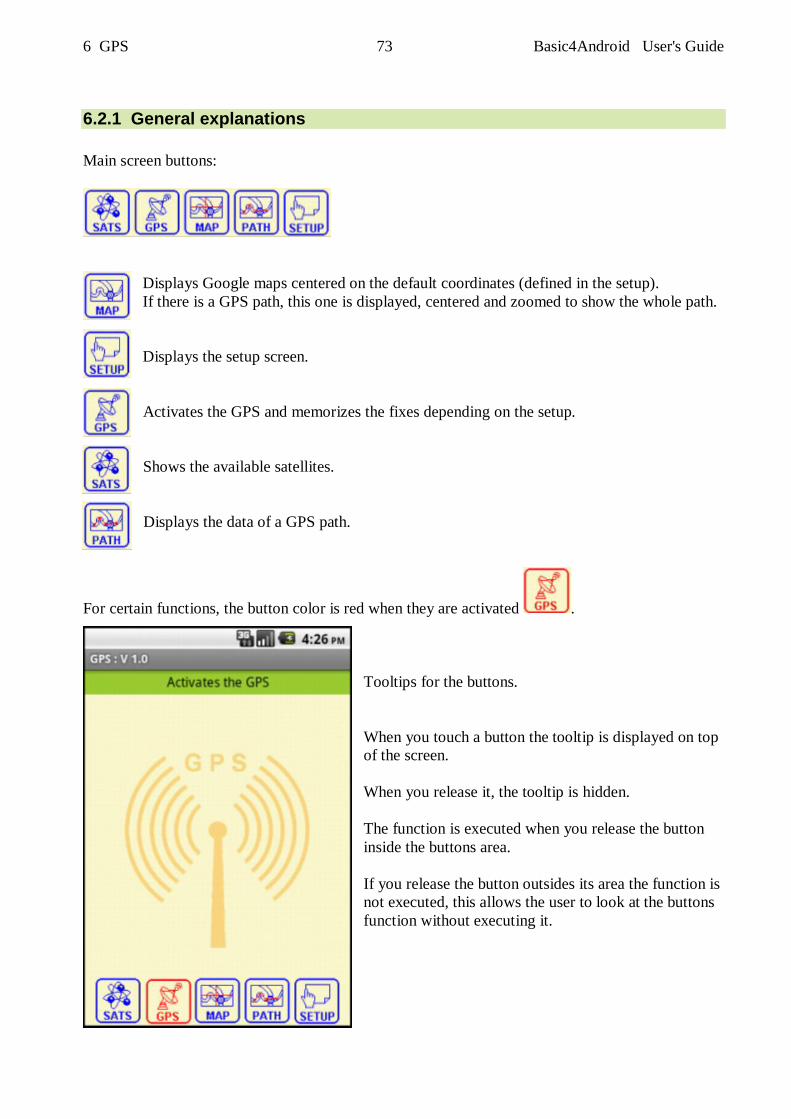
6 GPS 73 Basic4Android User's Guide
6.2.1 General explanations Main screen buttons:
Displays Google maps centered on the default coordinates (defined in the setup). If there is a GPS path, this one is displayed, centered and zoomed to show the whole path. Displays the setup screen. Activates the GPS and memorizes the fixes depending on the setup. Shows the available satellites. Displays the data of a GPS path.
For certain functions, the button color is red when they are activated . Tooltips for the buttons. When you touch a button the tooltip is displayed on top of the screen. When you release it, the tooltip is hidden. The function is executed when you release the button inside the buttons area. If you release the button outsides its area the function is not executed, this allows the user to look at the buttons function without executing it.
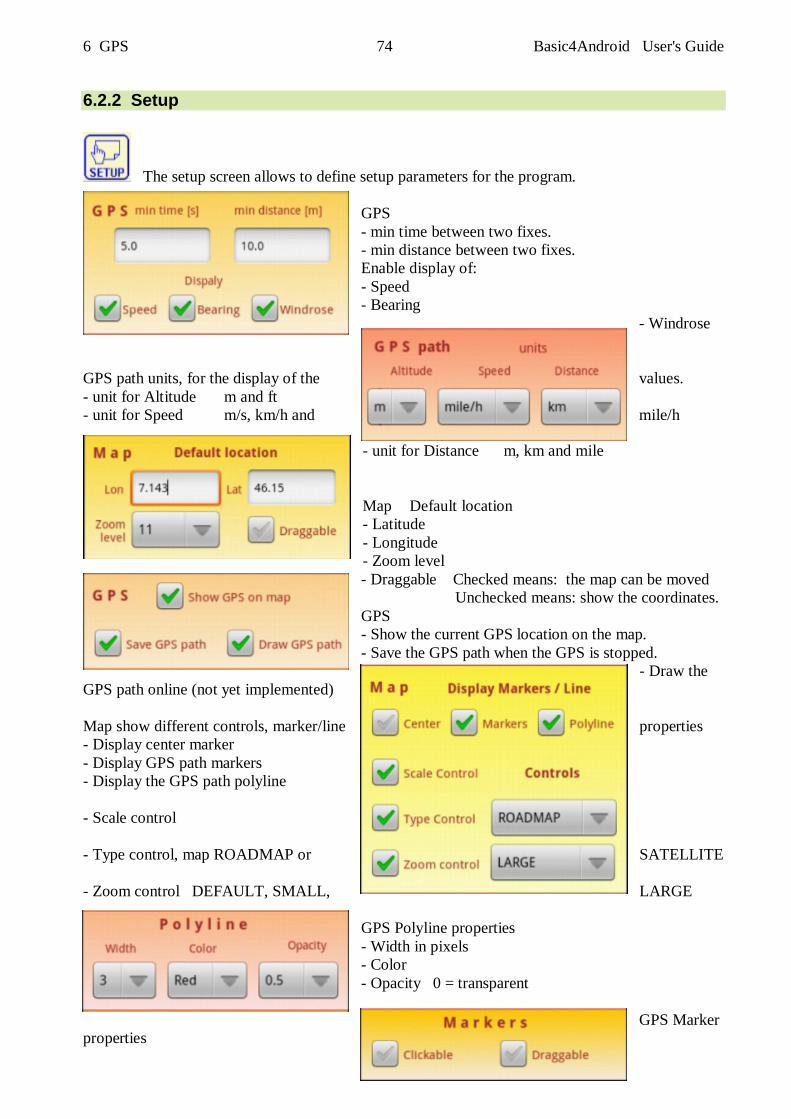
6 GPS 74 Basic4Android User's Guide
6.2.2 Setup
The setup screen allows to define setup parameters for the program. GPS - min time between two fixes. - min distance between two fixes. Enable display of: - Speed - Bearing
- Windrose
GPS path units, for the display of the values. - unit for Altitude m and ft - unit for Speed m/s, km/h and mile/h
- unit for Distance m, km and mile Map Default location - Latitude - Longitude - Zoom level - Draggable Checked means: the map can be moved Unchecked means: show the coordinates. GPS - Show the current GPS location on the map. - Save the GPS path when the GPS is stopped.
- Draw the GPS path online (not yet implemented) Map show different controls, marker/line properties - Display center marker - Display GPS path markers - Display the GPS path polyline - Scale control - Type control, map ROADMAP or SATELLITE - Zoom control DEFAULT, SMALL, LARGE
GPS Polyline properties - Width in pixels - Color - Opacity 0 = transparent
GPS Marker
properties

5 GPS 75 Basic4Android User's Guide
- Marker clickable (not yet implemented) - Marker draggable
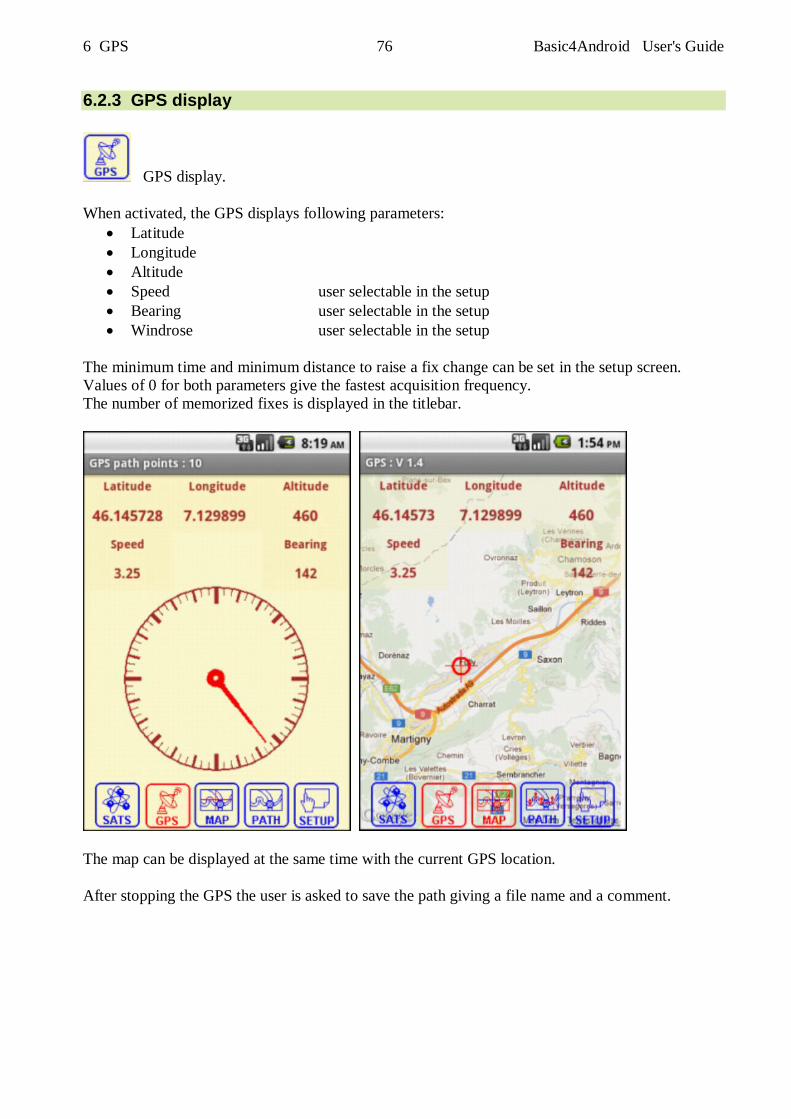
6 GPS 76 Basic4Android User's Guide
6.2.3 GPS display
GPS display. When activated, the GPS displays following parameters:
Latitude Longitude Altitude Speed user selectable in the setup Bearing user selectable in the setup Windrose user selectable in the setup
The minimum time and minimum distance to raise a fix change can be set in the setup screen. Values of 0 for both parameters give the fastest acquisition frequency. The number of memorized fixes is displayed in the titlebar.
The map can be displayed at the same time with the current GPS location. After stopping the GPS the user is asked to save the path giving a file name and a comment.
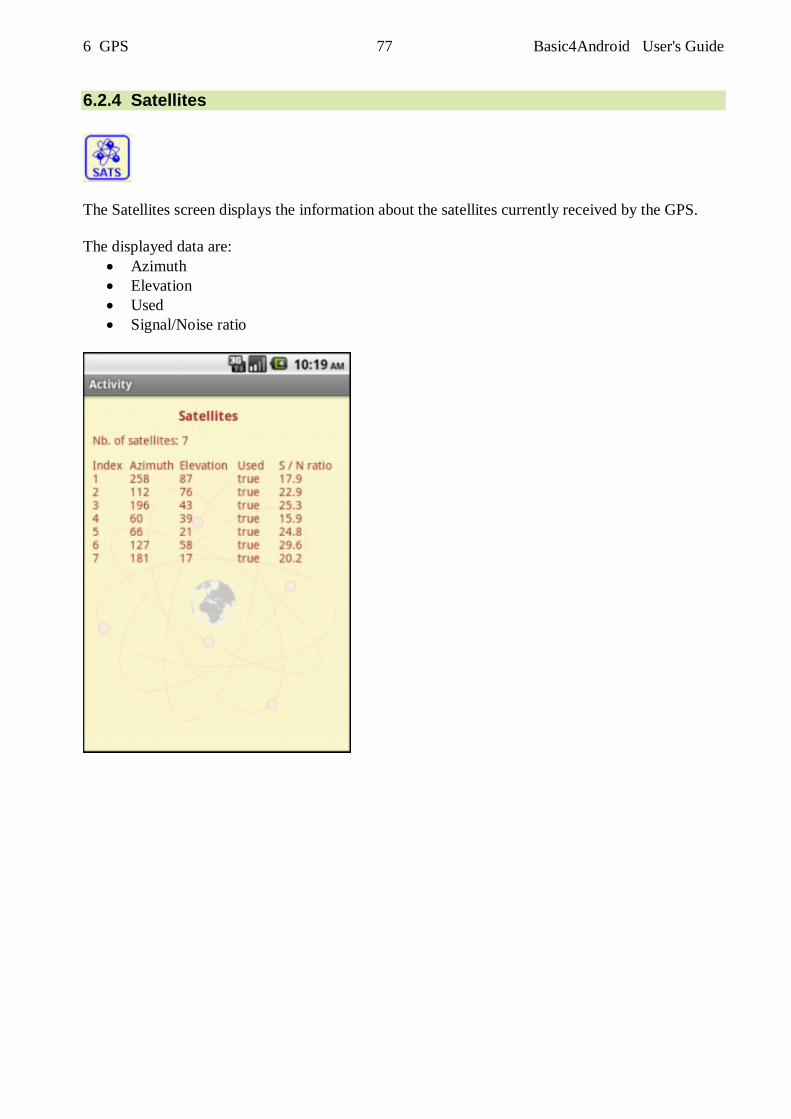
6 GPS 77 Basic4Android User's Guide
6.2.4 Satellites
The Satellites screen displays the information about the satellites currently received by the GPS. The displayed data are:
Azimuth Elevation Used Signal/Noise ratio
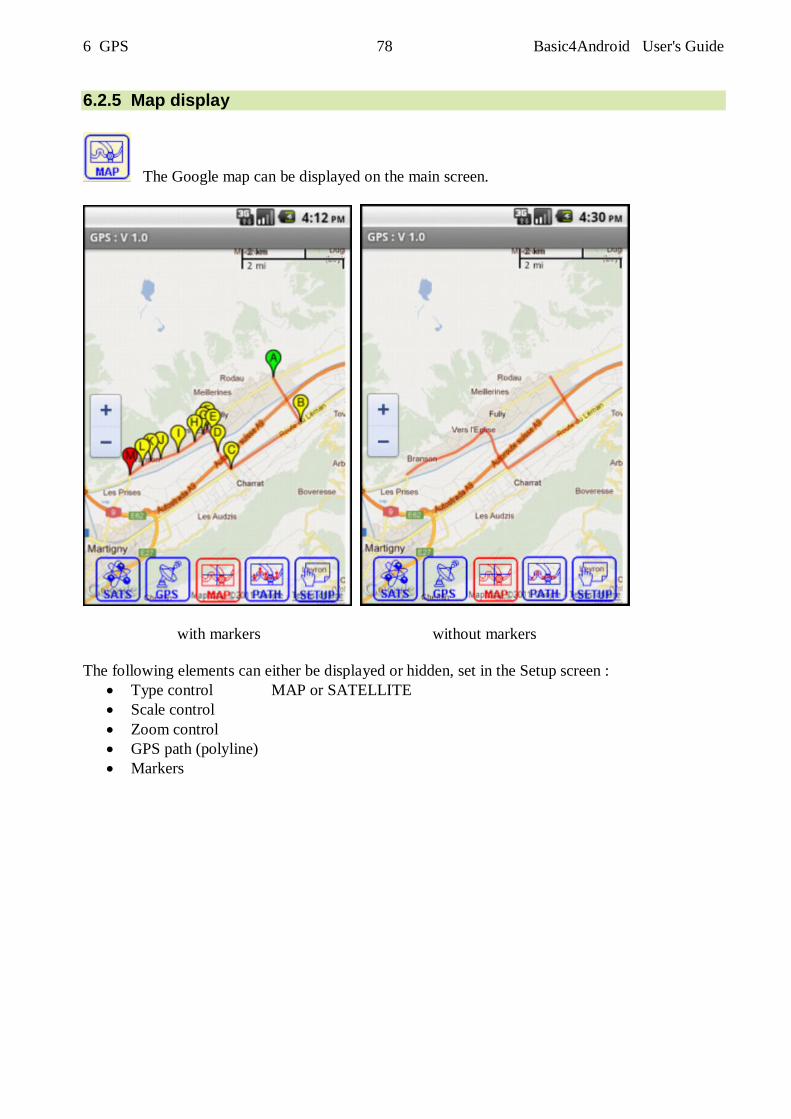
6 GPS 78 Basic4Android User's Guide
6.2.5 Map display
The Google map can be displayed on the main screen.
with markers without markers The following elements can either be displayed or hidden, set in the Setup screen :
Type control MAP or SATELLITE Scale control Zoom control GPS path (polyline) Markers
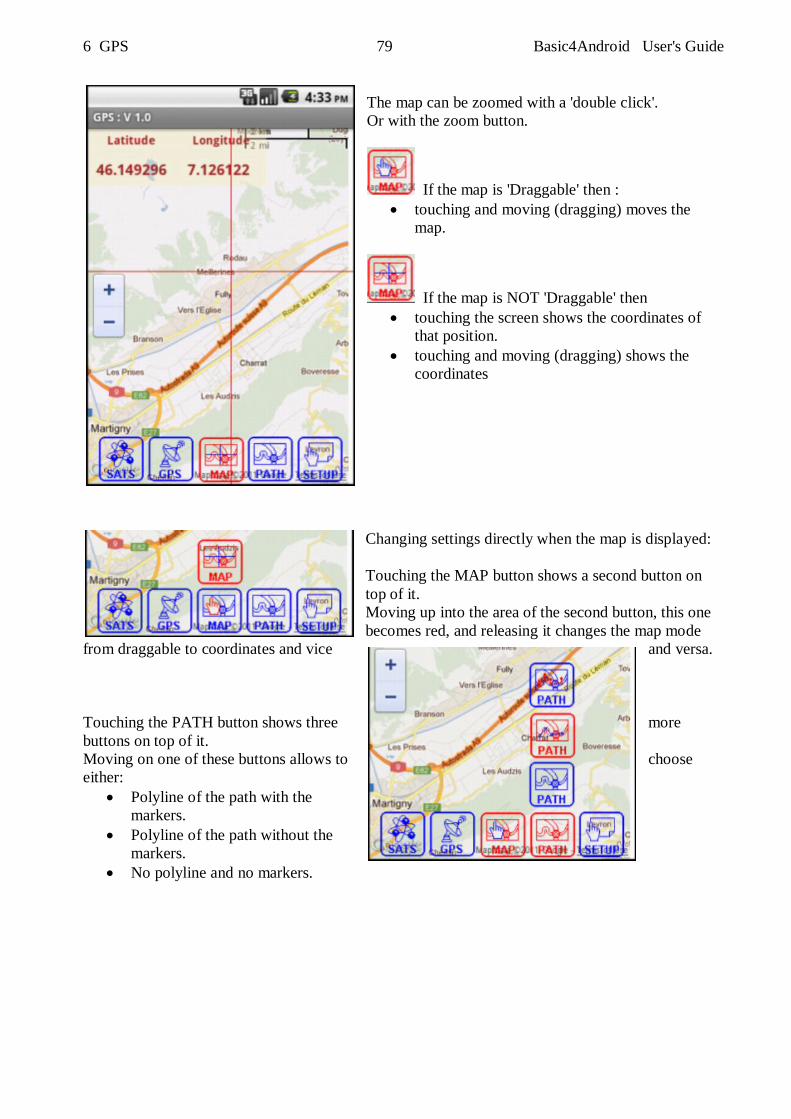
6 GPS 79 Basic4Android User's Guide
The map can be zoomed with a 'double click'. Or with the zoom button.
If the map is 'Draggable' then : touching and moving (dragging) moves the
map.
If the map is NOT 'Draggable' then touching the screen shows the coordinates of
that position. touching and moving (dragging) shows the
coordinates
Changing settings directly when the map is displayed: Touching the MAP button shows a second button on top of it. Moving up into the area of the second button, this one becomes red, and releasing it changes the map mode
from draggable to coordinates and vice and versa. Touching the PATH button shows three more buttons on top of it. Moving on one of these buttons allows to choose either:
Polyline of the path with the markers.
Polyline of the path without the markers.
No polyline and no markers.
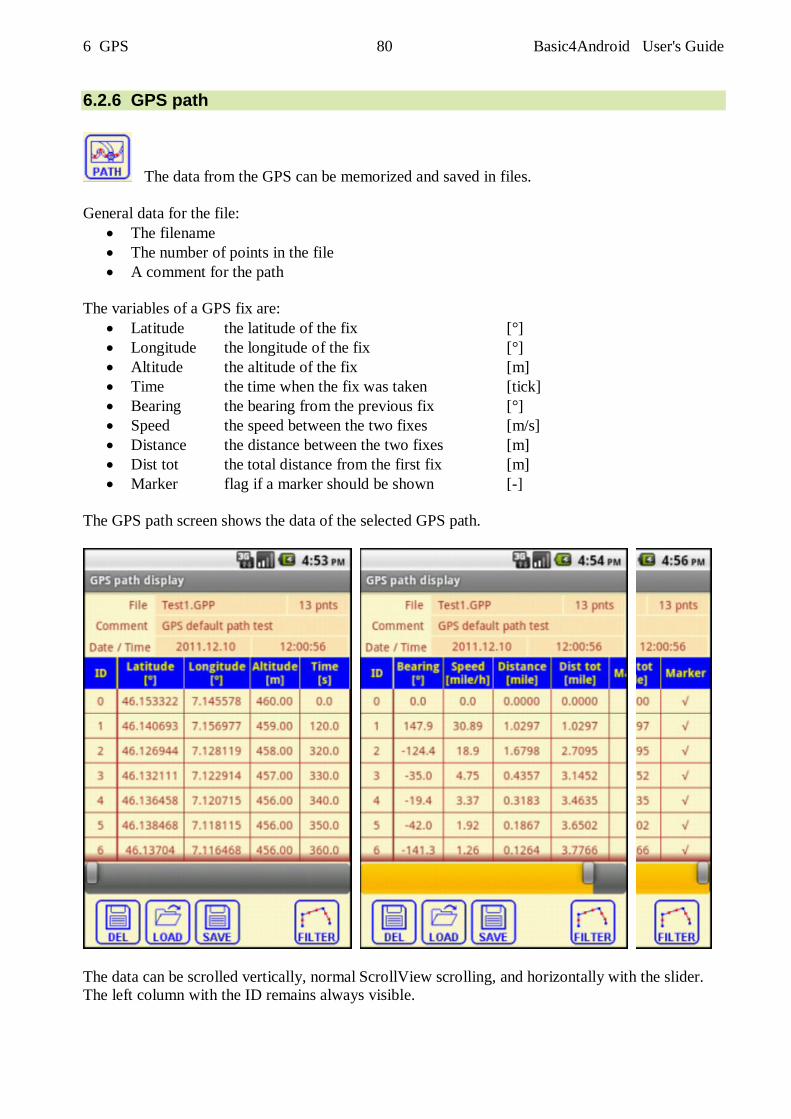
6 GPS 80 Basic4Android User's Guide
6.2.6 GPS path
The data from the GPS can be memorized and saved in files. General data for the file:
The filename The number of points in the file A comment for the path
The variables of a GPS fix are:
Latitude the latitude of the fix [°] Longitude the longitude of the fix [°] Altitude the altitude of the fix [m] Time the time when the fix was taken [tick] Bearing the bearing from the previous fix [°] Speed the speed between the two fixes [m/s] Distance the distance between the two fixes [m] Dist tot the total distance from the first fix [m] Marker flag if a marker should be shown [-]
The GPS path screen shows the data of the selected GPS path.
The data can be scrolled vertically, normal ScrollView scrolling, and horizontally with the slider. The left column with the ID remains always visible.

6 GPS 81 Basic4Android User's Guide
You can:
Delete the selected file. Load a GPS path file. Save the GPS path file. Delete the selected row. Filter a path
Clicking on a row selects it or unselects it. When a row is selected :
it is highlighted in red. a Delete button is displayed allowing to delete this fix.
When a fix is deleted the Speed, Bearing, Distance and Dist Tot values are updated. Clicking on one of the headers below changes the unit of the displayed values. Altitude Speed Distance / Dist tot m ft m/s km/h mile/h m km mile
check / uncheck Clicking on a marker cell changes between checked and unchecked. Marker
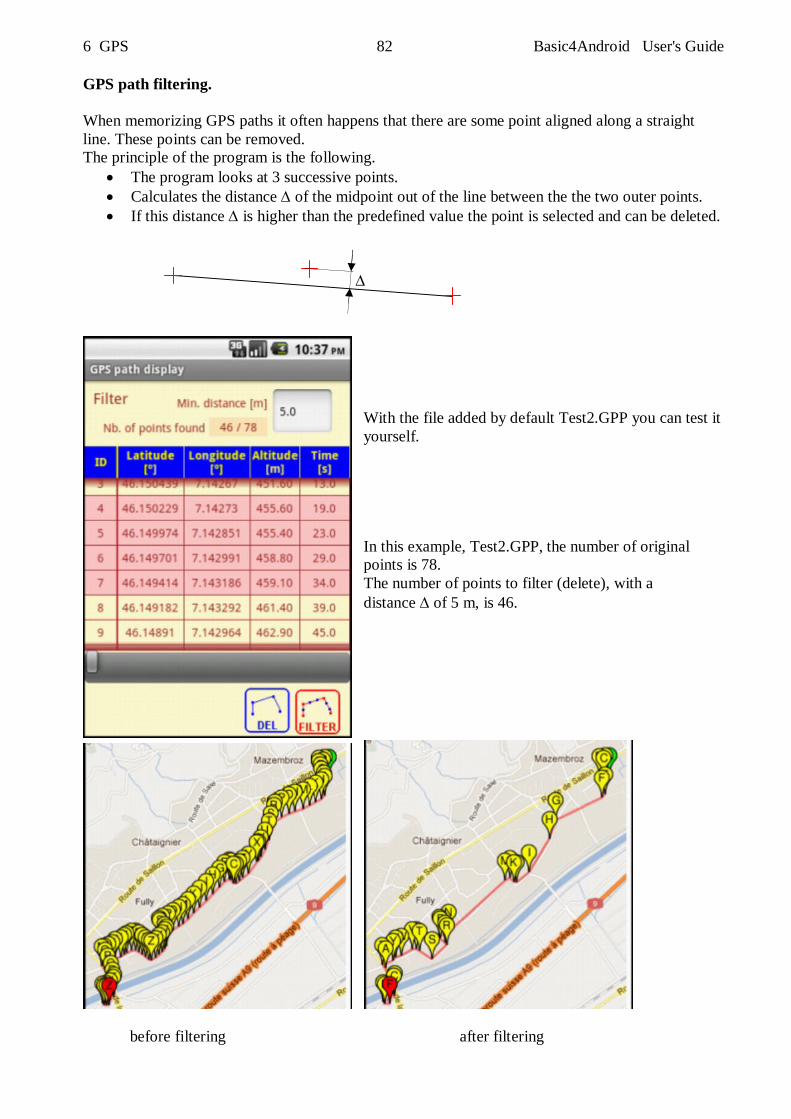
6 GPS 82 Basic4Android User's Guide
GPS path filtering. When memorizing GPS paths it often happens that there are some point aligned along a straight line. These points can be removed. The principle of the program is the following.
The program looks at 3 successive points. Calculates the distance of the midpoint out of the line between the the two outer points. If this distance is higher than the predefined value the point is selected and can be deleted.
With the file added by default Test2.GPP you can test it yourself. In this example, Test2.GPP, the number of original points is 78. The number of points to filter (delete), with a distance of 5 m, is 46.
before filtering after filtering

6 GPS 83 Basic4Android User's Guide
6.2.7 Save GPS path file / KML file A GPS path can be save either :
in the program specific GPP format (GPS Path)
in the Google Earth KML format.
Enter the filename. The program adds automatically the correct suffix. Enter a comment. Reminder of the number of points. The drawback of the kml format is that you loose the time and speed information for each fix. The advantage is, you can display the path in Google Earth.
KML documentation.
6 GPS 84 Basic4Android User's Guide
6.3 GPS Program Code Not all the code of the program will be explained in this chapter but only some more special features. Many functions are almost the same as explained in other examples. The line numbers in the code snippets in this chapter can be somewhat different from the latest project. The program has following modules:
Main activity module main screen, GPS screen and GoogleMaps screen.
Satellites activity module display of the satellites data.
Setup activity module setup screen using a ScrollView with a panel higher than the screen.
GPSPaths activity module displays the GPS path data plus loading, saving and editing.
GPSSave activity module screen for saving a GPS path file with file name and comment entry.
GPSModule code module GPS code used in several activity modules
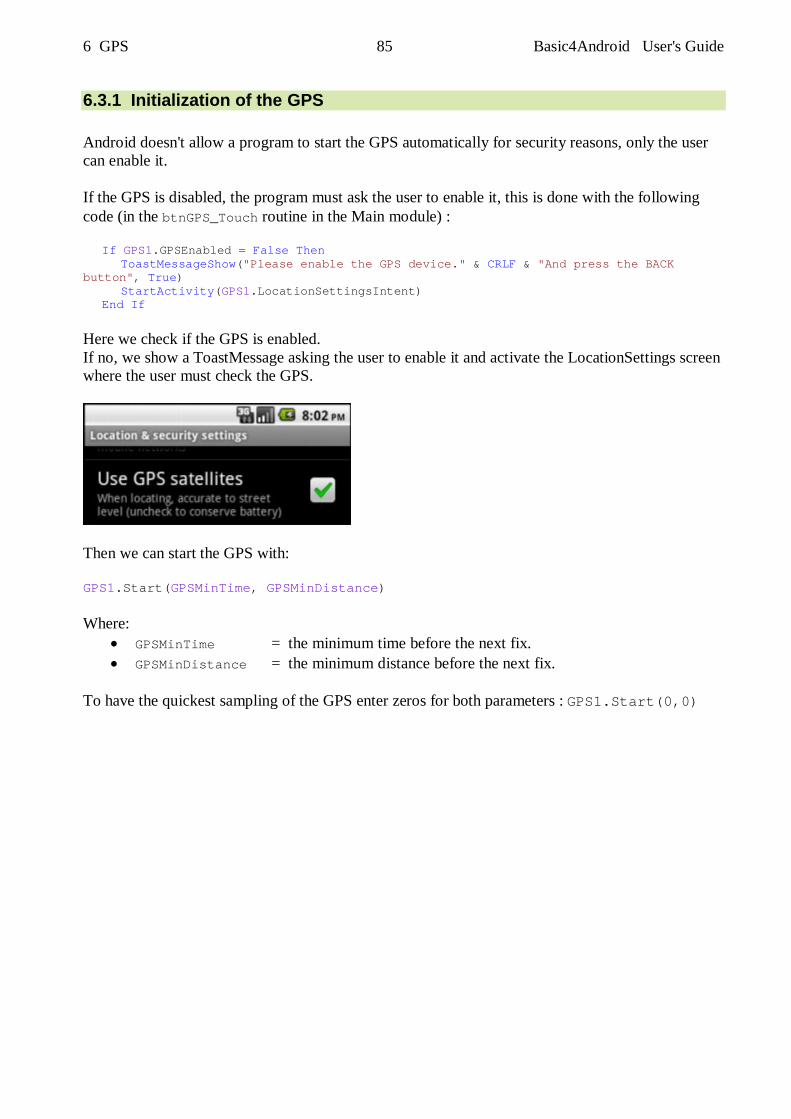
6 GPS 85 Basic4Android User's Guide
6.3.1 Initialization of the GPS Android doesn't allow a program to start the GPS automatically for security reasons, only the user can enable it. If the GPS is disabled, the program must ask the user to enable it, this is done with the following code (in the btnGPS_Touch routine in the Main module) : If GPS1.GPSEnabled = False Then ToastMessageShow("Please enable the GPS device." & CRLF & "And press the BACK button", True) StartActivity(GPS1.LocationSettingsIntent) End If
Here we check if the GPS is enabled. If no, we show a ToastMessage asking the user to enable it and activate the LocationSettings screen where the user must check the GPS.
Then we can start the GPS with: GPS1.Start(GPSMinTime, GPSMinDistance) Where:
GPSMinTime = the minimum time before the next fix. GPSMinDistance = the minimum distance before the next fix.
To have the quickest sampling of the GPS enter zeros for both parameters : GPS1.Start(0,0)

6 GPS 86 Basic4Android User's Guide
6.3.2 Button with tooltip The buttons of the program show a tooltip on top of the screen when they are touched. The views used for this are not Buttons but Panels, because Button don't have the Touch event and Panels have it. btnGPS button (panel), in the Main module: This button acts as a toggle button, GPS ON or OFF with a color change. Sub btnGPS_Touch(Action As Int, x As Float, y As Float) Dim bmd As BitmapDrawable Select Action Case Activity.ACTION_DOWN If GPS_On = False Then ToolTip("Activates the GPS") bmd.Initialize(LoadBitmap(File.DirAssets, "btngps1.png")) Else ToolTip("Stops the GPS") bmd.Initialize(LoadBitmap(File.DirAssets, "btngps0.png")) End If btnGPS.Background = bmd - First we dim a BitmapDrawable object that will contain the bitmap to display in the button. - Select ACTION_DOWN, - Check if GPS is OFF (GPS_On = False) or ON (GPS_On = True) - Load the corresponding bitmap and set it to the buttons background. Case Activity.ACTION_UP If x > 0 AND x < btnGPS.Width AND y > 0 AND y < btnGPS.Height Then GPS_On = Not(GPS_On) If GPS_On = False Then bmd.Initialize(LoadBitmap(File.DirAssets, "btngps0.png")) GPS1.Stop PhoneAwake.ReleaseKeepAlive If GPSPath.Size > 0 Then cvsMap.DrawRect(rectMapPos, Colors.Transparent, True, 1) pnlMap.Invalidate2(rectMapPos) If SaveGPSPath = True Then StartActivity(GPSSave) End If Else Msgbox("There are no waypoints", "GPS path saving") GPSModule.LoadPath MapZoomLevel = MapZoomLevelOld MapCenter = MapOldCenter MapShow End If - Select ACTION_UP - Check if the touch coordinates are within the button area. If yes we execute the function. - Change the GPS_On variable - Check if GPS_On = False (GPS disabled) we - Load the corresponding bitmap (blue image) - Stop the GPS - Release the phone keep alive function
5 GPS 87 Basic4Android User's Guide
- Check if there are GPS path data GPSPath.Size > 0 - Check if saving GPS pata data is selected - Start the GPS path data saving Activity - If not - Display a MessageBox - Load the previous GPS path - Show the GoogleMap Else bmd.Initialize(LoadBitmap(File.DirAssets, "btngps1.png")) If GPS1.GPSEnabled = False Then ToastMessageShow("Please enable the GPS device." & CRLF & "And press the BACK button", True) StartActivity(GPS1.LocationSettingsIntent) End If GPSPath.Initialize If Map_On Then MapZoomLevelOld = MapZoomLevel MapOldCenter = MapCenter MapZoomLevel = MapDefaultZoomLevel MapCenter.Latitude = MapDefaultLat MapCenter.Longitude = MapDefaultLng MapShow End If PhoneAwake.KeepAlive(False) lblLatitude.Text = "- - -" lblLongitude.Text = "- - -" lblAltitude.Text = "- - -" lblBearing.Text = "- - -" lblSpeed.Text = "- - -" GPS1.Start(GPSMinTime, GPSMinDistance) End If - If GPS_On = True (GPS enabled) we - Load the corresponding bitmap (red image) - Check if the GPS is not enabled on the phone - Display a ToastMessage inviting the user to enable the GPS - Call the phone setup to let the user enable the GPS - Initialize the GPSPath data list - Check if the Map_On = True, map displayed - Set the Zoom level, centre lat and long to the default values - Update the map the new parameters - Set the PhoneAwake function, the False parameter indicates no bright screen - set the different display labels to "- - -", no value - Start the GPS, GPSMinTime and GPSMinDistance are defined in the setup screen.
6 GPS 88 Basic4Android User's Guide
pnlDispGPSLatLng.Visible = GPS_On pnlDispGPSAltitude.Visible = GPS_On pnlDispGPSSpeed.Visible = GPS_On AND GPSDispSpeed pnlDispGPSBearing.Visible = GPS_On AND GPSDispBearing pnlDispGPSWindrose.Visible = GPS_On AND GPSDispWindrose pnlMainBackgound.Visible = Not(pnlDispGPSWindrose.Visible) btnGPS.Background = bmd End If ToolTip("") End Select End Sub - Then show the different display labels according to setup settings. - Set the background image - Hide the tooltip.
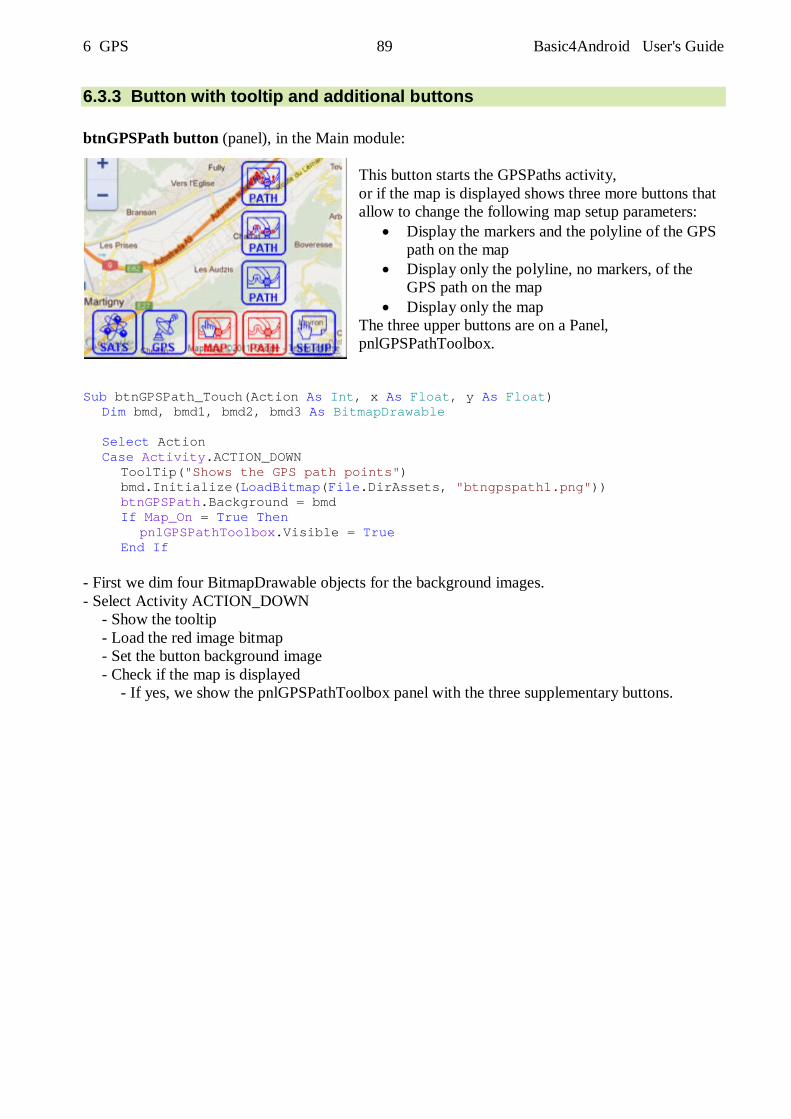
6 GPS 89 Basic4Android User's Guide
6.3.3 Button with tooltip and additional buttons btnGPSPath button (panel), in the Main module:
This button starts the GPSPaths activity, or if the map is displayed shows three more buttons that allow to change the following map setup parameters:
Display the markers and the polyline of the GPS path on the map
Display only the polyline, no markers, of the GPS path on the map
Display only the map The three upper buttons are on a Panel, pnlGPSPathToolbox.
Sub btnGPSPath_Touch(Action As Int, x As Float, y As Float) Dim bmd, bmd1, bmd2, bmd3 As BitmapDrawable Select Action Case Activity.ACTION_DOWN ToolTip("Shows the GPS path points") bmd.Initialize(LoadBitmap(File.DirAssets, "btngpspath1.png")) btnGPSPath.Background = bmd If Map_On = True Then pnlGPSPathToolbox.Visible = True End If - First we dim four BitmapDrawable objects for the background images. - Select Activity ACTION_DOWN - Show the tooltip - Load the red image bitmap - Set the button background image - Check if the map is displayed - If yes, we show the pnlGPSPathToolbox panel with the three supplementary buttons.
6 GPS 90 Basic4Android User's Guide
Case Activity.ACTION_MOVE If x > 0 AND x < btnGPSPath.Width AND y > -3 * btnGPSPath.Height AND y < -2 * btnGPSPath.Height Then bmd3.Initialize(LoadBitmap(File.DirAssets, "btngpspathmarker1.png")) bmd2.Initialize(LoadBitmap(File.DirAssets, "btngpspathline0.png")) bmd1.Initialize(LoadBitmap(File.DirAssets, "btngpspath0.png")) ToolTip("Shows the polyline and the markers") Else If x > 0 AND x < btnGPSPath.Width AND y > -2 * btnGPSPath.Height AND y < - btnGPSPath.Height Then bmd3.Initialize(LoadBitmap(File.DirAssets, "btngpspathmarker0.png")) bmd2.Initialize(LoadBitmap(File.DirAssets, "btngpspathline1.png")) bmd1.Initialize(LoadBitmap(File.DirAssets, "btngpspath0.png")) ToolTip("Shows the polyline without the markers") Else If x > 0 AND x < btnGPSPath.Width AND y > -btnGPSPath.Height AND y < 0 Then bmd3.Initialize(LoadBitmap(File.DirAssets, "btngpspathmarker0.png")) bmd2.Initialize(LoadBitmap(File.DirAssets, "btngpspathline0.png")) bmd1.Initialize(LoadBitmap(File.DirAssets, "btngpspath1.png")) ToolTip("Doesn't shows the polyline nor the markers") Else bmd3.Initialize(LoadBitmap(File.DirAssets, "btngpspathmarker0.png")) bmd2.Initialize(LoadBitmap(File.DirAssets, "btngpspathline0.png")) bmd1.Initialize(LoadBitmap(File.DirAssets, "btngpspath0.png")) ToolTip("Shows the GPS path points") End If btnGPSPath3.Background = bmd3 btnGPSPath2.Background = bmd2 btnGPSPath1.Background = bmd1 In this part we check if the move coordinates are in the area of a button and change the button images, red in in the area and blue outsides. - Select Activity ACTION_MOVE - Check if the move coordinates are in the area of the top most button, if yes - Load the corresponding images for the four buttons. - Check if the move coordinates are in the area of the second button from top, if yes - Load the corresponding images for the four buttons. - Check if the move coordinates are in the area of the third button from top, if yes - Load the corresponding images for the four buttons. - Check if the move coordinates are in the area of the lower button, if yes - Load the corresponding images for the four buttons. - Set the images for the three top buttons
6 GPS 91 Basic4Android User's Guide
Case Activity.ACTION_UP If x > 0 AND x < btnGPSPath.Width Then If y > -3 * btnGPSPath.Height AND y < -2 * btnGPSPath.Height Then DispMapMarkers = True DispMapPolylne = True MapShow Else If y > -2 * btnGPSPath.Height AND y < -btnGPSPath.Height Then DispMapMarkers = False DispMapPolylne = True MapShow Else If y > -btnGPSPath.Height AND y < 0 Then DispMapMarkers = False DispMapPolylne = False MapShow Else If y > 0 AND y < btnGPSPath.Height Then StartActivity("GPSPaths") End If End If If DispMapMarkers = True Then bmd.Initialize(LoadBitmap(File.DirAssets, "btngpspathmarker0.png")) Else If DispMapPolylne = True Then bmd.Initialize(LoadBitmap(File.DirAssets, "btngpspathline0.png")) Else bmd.Initialize(LoadBitmap(File.DirAssets, "btngpspath0.png")) End If ToolTip("") pnlGPSPathToolbox.Visible = False btnGPSPath.Background = bmd End Select End Sub In this part we check in what button area the UP coordinates are in and execute, or not, the corresponding functions. - Select Activity ACTION_UP - Check if the move coordinates are in the area of the top most button, if yes - Set the setup variables the given values, DispMapMarkers = True DispMapPolyline = True. - Update the map. - Check if the move coordinates are in the area of the second button from top, if yes - Set DispMapMarkers = False DispMapPolyline = True. - Update the map. - Check if the move coordinates are in the area of the third button from top, if yes - Set DispMapMarkers = False DispMapPolyline = False. - Update the map. - Check if the move coordinates are in the area of the lower button, if yes - Start the GPSPaths activity. - Depending on the setup variables we load the correct bitmap for the btnGPSPath button. - Hide the tooltip. - Hide the toolbox of the three upper buttons. - Set the correct bitmap to btnGPSPath.
6 GPS 92 Basic4Android User's Guide
6.3.4 GPS Calculate distance scales The two routines below calculate the latitude X and longitude Y coordinates, in km, from coordinate 0, 0 (equator and Greenwich meridian) to the given lat and lng coordinates.
lat and lng are in degrees, we need to transform them to radians with lng / 180 * cPI and lat / 180 * cPI.
for Y (lat) we multiply the angle (in radians) by the earth radius (6371 km) for X (lng) we multiply the angle (in radians) by the earth radius (6371 km)
and multiply by CosD(lat).
The EarthRadius variable is defined in the Process_Globals routine in the GPSPaths module. The EarthRadius value used, 6371 km, is a mean value. In reality, the EarthRadius varies with the latitude but for our calculations the assumption of a mean radius is enough accurate. Sub GPSCalcX(lat As Double) As Double ' calculates the longitude distance in km from coordinates 0, 0 Return lat * EarthRadius / 180 * cPI End Sub It's 'simply' the Earthradius multiplied by the angle lat , but the angle is in degrees so we need to transform it into radians. Sub GPSCalcY(lat As Double, lng As Double) As Double ' calculates the latitude distance in km from coordinates 0, 0 Return lng * EarthRadius / 180 * cPI * CosD(lat) End Sub The calculation for the lng coordinate is similar to the lat calculation. But, the radius of a circle of latitude depends on the latitude, so we need to multiply the result by the cosine of lat CosD(lat). We use CosD because the angle is in degrees.
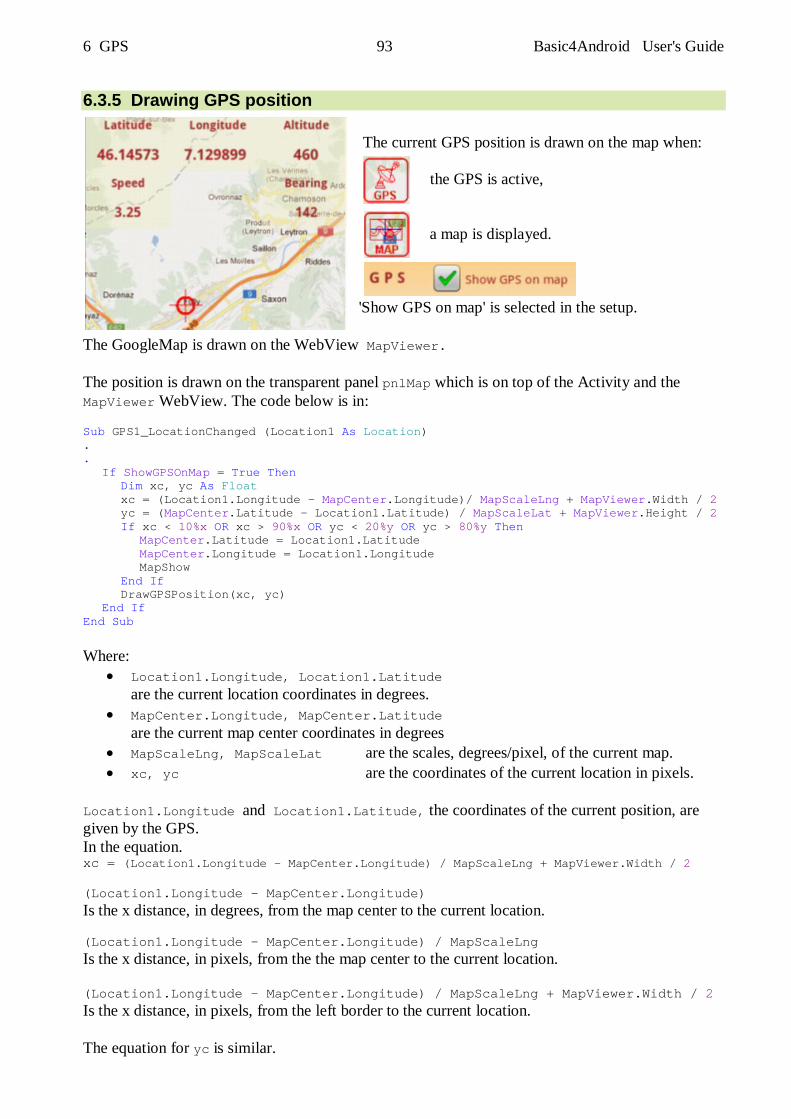
6 GPS 93 Basic4Android User's Guide
6.3.5 Drawing GPS position The current GPS position is drawn on the map when:
the GPS is active, a map is displayed.
'Show GPS on map' is selected in the setup.
The GoogleMap is drawn on the WebView MapViewer. The position is drawn on the transparent panel pnlMap which is on top of the Activity and the MapViewer WebView. The code below is in: Sub GPS1_LocationChanged (Location1 As Location) . . If ShowGPSOnMap = True Then Dim xc, yc As Float xc = (Location1.Longitude - MapCenter.Longitude)/ MapScaleLng + MapViewer.Width / 2 yc = (MapCenter.Latitude - Location1.Latitude) / MapScaleLat + MapViewer.Height / 2 If xc < 10%x OR xc > 90%x OR yc < 20%y OR yc > 80%y Then MapCenter.Latitude = Location1.Latitude MapCenter.Longitude = Location1.Longitude MapShow End If DrawGPSPosition(xc, yc) End If End Sub Where:
Location1.Longitude, Location1.Latitude are the current location coordinates in degrees.
MapCenter.Longitude, MapCenter.Latitude are the current map center coordinates in degrees
MapScaleLng, MapScaleLat are the scales, degrees/pixel, of the current map. xc, yc are the coordinates of the current location in pixels.
Location1.Longitude and Location1.Latitude, the coordinates of the current position, are given by the GPS. In the equation. xc = (Location1.Longitude - MapCenter.Longitude) / MapScaleLng + MapViewer.Width / 2 (Location1.Longitude - MapCenter.Longitude) Is the x distance, in degrees, from the map center to the current location. (Location1.Longitude - MapCenter.Longitude) / MapScaleLng Is the x distance, in pixels, from the the map center to the current location. (Location1.Longitude - MapCenter.Longitude) / MapScaleLng + MapViewer.Width / 2 Is the x distance, in pixels, from the left border to the current location. The equation for yc is similar.
6 GPS 94 Basic4Android User's Guide
If xc < 10%x OR xc > 90%x OR yc < 20%y OR yc > 80%y Then MapCenter.Latitude = Location1.Latitude MapCenter.Longitude = Location1.Longitude MapShow End If Here we check if the current location reaches one of the maps borders, and if true, we set the map centre coordinates to the current location coordinates and redraw the map. DrawGPSPosition(xc, yc) Draws the location on the map. Complementary calculation routines: CalcMapScales: calculates the map pixel scales Sub CalcMapScales ' Calculates the map scales MapScaleLng = 360 / Power(2, MapZoomLevel) / TileSize MapScaleLat = MapScaleLng * CosD(MapCenter.Latitude) End Sub Where:
MapScaleLng = Longitude scale in degrees/pixel MapZoomLevel = Current map zoom level TileSize = Map tile size in pixels MapScaleLat = Latitude scale in degrees/pixel MapCenter.Latitude = Centre lat coordinate of the current map in degrees.
360 is the earth circumference in degrees. Power(2, MapZoomLevel) is the number of tiles for the given zoom level. The default map tile size is 256 pixels defined in the Main module. Dim TileSize As Int : TileSize = 256 But this tile size must be changed according to the device's density, because on different devices with almost the same physical dimensions, but different densities, the size of the map is the same. That means that the tile size is proportional to the device density. Dim lv As LayoutValues lv = GetDeviceLayoutValues TileSize = TileSize * lv.Scale
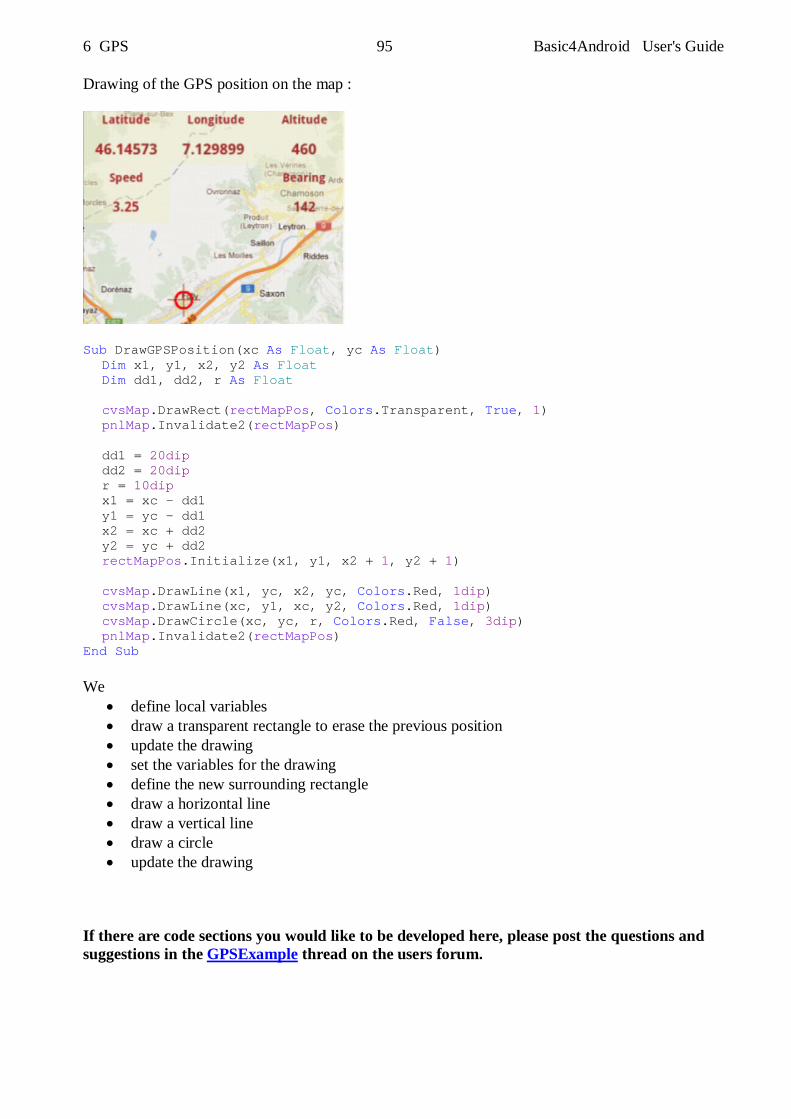
6 GPS 95 Basic4Android User's Guide
Drawing of the GPS position on the map :
Sub DrawGPSPosition(xc As Float, yc As Float) Dim x1, y1, x2, y2 As Float Dim dd1, dd2, r As Float cvsMap.DrawRect(rectMapPos, Colors.Transparent, True, 1) pnlMap.Invalidate2(rectMapPos) dd1 = 20dip dd2 = 20dip r = 10dip x1 = xc - dd1 y1 = yc - dd1 x2 = xc + dd2 y2 = yc + dd2 rectMapPos.Initialize(x1, y1, x2 + 1, y2 + 1) cvsMap.DrawLine(x1, yc, x2, yc, Colors.Red, 1dip) cvsMap.DrawLine(xc, y1, xc, y2, Colors.Red, 1dip) cvsMap.DrawCircle(xc, yc, r, Colors.Red, False, 3dip) pnlMap.Invalidate2(rectMapPos) End Sub We
define local variables draw a transparent rectangle to erase the previous position update the drawing set the variables for the drawing define the new surrounding rectangle draw a horizontal line draw a vertical line draw a circle update the drawing
If there are code sections you would like to be developed here, please post the questions and suggestions in the GPSExample thread on the users forum.
7 Widgets 96 Basic4Android User's Guide
7 Widgets, home screen widgets This chapter is a copy of Erels' two tutorials in the users forum. Android home screen widgets tutorial - part I Android home screen widgets tutorial - part II
7.1 Widgets Part I Basic4android v1.6 adds support for home screen widgets. This tutorial will explain how to implement your own home screen widgets (also named App Widgets). It is important to understand that the widgets are created and managed in another process, different than the process that your application is running in. The home screen application is hosting your widgets. This means that it is not possible to directly access the widgets views. Instead we are using a special object named RemoteViews which gives us indirect access to the widget views. Widgets do not support all views types. The following views are supported:
Button (default drawable) Label (ColorDrawable or GradientDrawable) Panel (ColorDrawable or GradientDrawable) ImageView ProgressBar (both modes)
All views support the Click event and no other event. The widget layout and configuration must be defined with XML files. During compilation Basic4android reads the layout file created with the designer and generates the required XML files. Each widget is tied to a Service module. The widget is created and updated through this module. Creating a widget - step by step guide
Add a Service module. Note that the service module handling the widget is a standard service.
Design the widget layout with the designer. First add a Panel and then add the other views to this Panel.
The widget layout will be made from this panel. Add code similar to the following code the service module:
7 Widgets 97 Basic4Android User's Guide
Sub Process_Globals Dim rv As RemoteViews End Sub Sub Service_Create rv = ConfigureHomeWidget("LayoutFile", "rv", 0, "Widget Name") End Sub Sub Service_Start (StartingIntent As Intent) If rv.HandleWidgetEvents(StartingIntent) Then Return End Sub Sub rv_RequestUpdate rv.UpdateWidget End Sub Sub rv_Disabled StopService("") End Sub Sub Service_Destroy End Sub
Compile and run your application. Go to the home screen, long press on the screen and you will see your widget listed on the widgets list.
ConfigureHomeWidget is a special keyword. At runtime it creates the RemoteViews object from the layout and sets the events. At compile time the compiler generates the required files based on the arguments of this keyword. The four parameters are: layout file, event name, update interval and the widget name. Event name sets the subs that will handle the RequestUpdate and Disabled events. The widget can be configured to update itself automatically. The interval, measured in minutes, defines how often will the widget request to update itself. Set to 0 to disable automatic updates. Updating the widget too often will have a bad impact on the battery. The minimum value is 30 minutes. Widget name - the name that will appear in the widgets list. As these arguments are read by the compiler, only strings or numbers are accepted. Events: Sub Service_Start (StartingIntent As Intent) If rv.HandleWidgetEvents(StartingIntent) Then Return End Sub The above code checks the Intent message that caused this service to start and is responsible for raising the events related to the widget. It returns true if an event was raised. The widget raises two events. RequestUpdate is raised when the widget needs to update itself. It will fire after adding the widget to the screen, after the device has booted, based on the scheduled updating interval (if set) or after the application was updated. The Disabled event is raised when the last instance of our widget is removed from the screen.
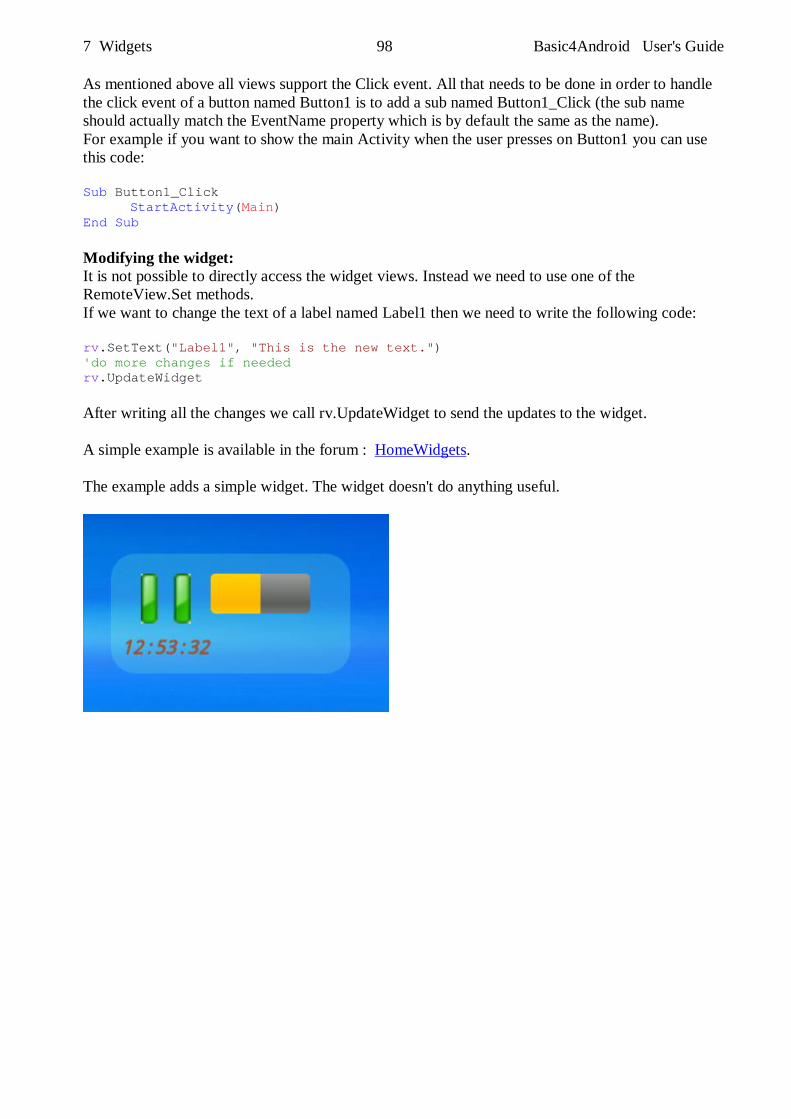
7 Widgets 98 Basic4Android User's Guide
As mentioned above all views support the Click event. All that needs to be done in order to handle the click event of a button named Button1 is to add a sub named Button1_Click (the sub name should actually match the EventName property which is by default the same as the name). For example if you want to show the main Activity when the user presses on Button1 you can use this code: Sub Button1_Click StartActivity(Main) End Sub Modifying the widget: It is not possible to directly access the widget views. Instead we need to use one of the RemoteView.Set methods. If we want to change the text of a label named Label1 then we need to write the following code: rv.SetText("Label1", "This is the new text.") 'do more changes if needed rv.UpdateWidget After writing all the changes we call rv.UpdateWidget to send the updates to the widget. A simple example is available in the forum : HomeWidgets. The example adds a simple widget. The widget doesn't do anything useful.
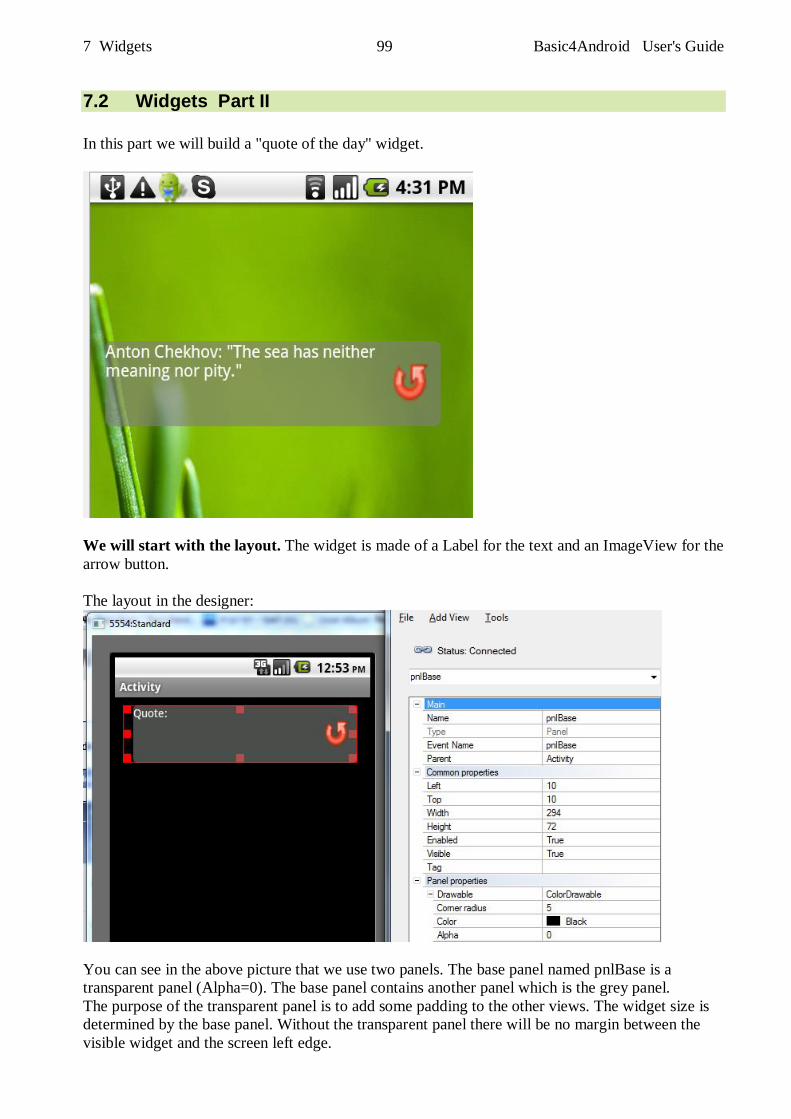
7 Widgets 99 Basic4Android User's Guide
7.2 Widgets Part II In this part we will build a "quote of the day" widget.
We will start with the layout. The widget is made of a Label for the text and an ImageView for the arrow button. The layout in the designer:
You can see in the above picture that we use two panels. The base panel named pnlBase is a transparent panel (Alpha=0). The base panel contains another panel which is the grey panel. The purpose of the transparent panel is to add some padding to the other views. The widget size is determined by the base panel. Without the transparent panel there will be no margin between the visible widget and the screen left edge.
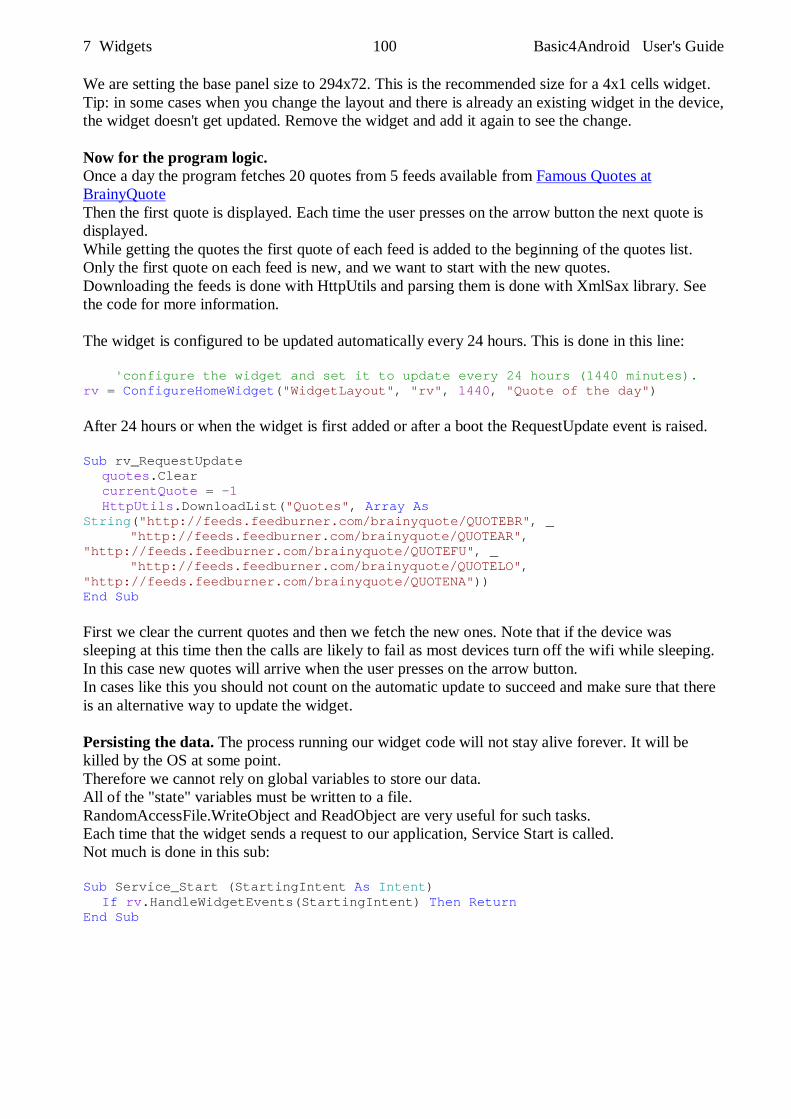
7 Widgets 100 Basic4Android User's Guide
We are setting the base panel size to 294x72. This is the recommended size for a 4x1 cells widget. Tip: in some cases when you change the layout and there is already an existing widget in the device, the widget doesn't get updated. Remove the widget and add it again to see the change. Now for the program logic. Once a day the program fetches 20 quotes from 5 feeds available from Famous Quotes at BrainyQuote Then the first quote is displayed. Each time the user presses on the arrow button the next quote is displayed. While getting the quotes the first quote of each feed is added to the beginning of the quotes list. Only the first quote on each feed is new, and we want to start with the new quotes. Downloading the feeds is done with HttpUtils and parsing them is done with XmlSax library. See the code for more information. The widget is configured to be updated automatically every 24 hours. This is done in this line: 'configure the widget and set it to update every 24 hours (1440 minutes). rv = ConfigureHomeWidget("WidgetLayout", "rv", 1440, "Quote of the day") After 24 hours or when the widget is first added or after a boot the RequestUpdate event is raised. Sub rv_RequestUpdate quotes.Clear currentQuote = -1 HttpUtils.DownloadList("Quotes", Array As String("http://feeds.feedburner.com/brainyquote/QUOTEBR", _ "http://feeds.feedburner.com/brainyquote/QUOTEAR", "http://feeds.feedburner.com/brainyquote/QUOTEFU", _ "http://feeds.feedburner.com/brainyquote/QUOTELO", "http://feeds.feedburner.com/brainyquote/QUOTENA")) End Sub First we clear the current quotes and then we fetch the new ones. Note that if the device was sleeping at this time then the calls are likely to fail as most devices turn off the wifi while sleeping. In this case new quotes will arrive when the user presses on the arrow button. In cases like this you should not count on the automatic update to succeed and make sure that there is an alternative way to update the widget. Persisting the data. The process running our widget code will not stay alive forever. It will be killed by the OS at some point. Therefore we cannot rely on global variables to store our data. All of the "state" variables must be written to a file. RandomAccessFile.WriteObject and ReadObject are very useful for such tasks. Each time that the widget sends a request to our application, Service Start is called. Not much is done in this sub: Sub Service_Start (StartingIntent As Intent) If rv.HandleWidgetEvents(StartingIntent) Then Return End Sub
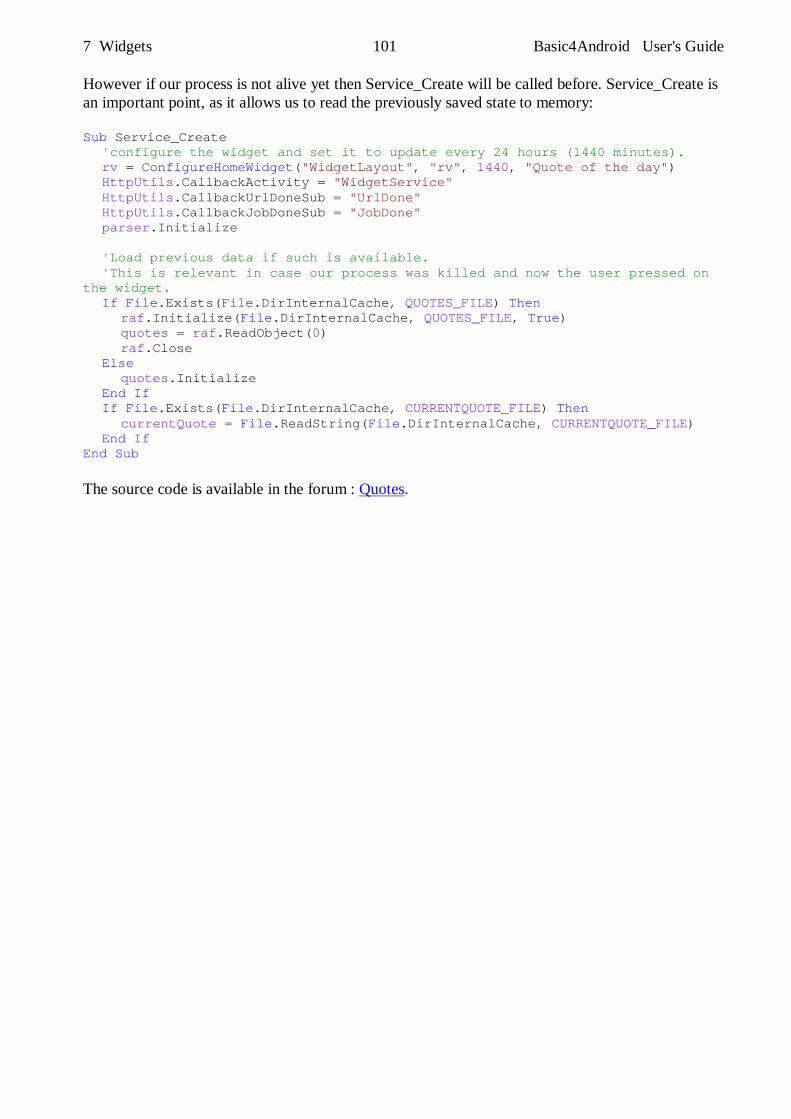
7 Widgets 101 Basic4Android User's Guide
However if our process is not alive yet then Service_Create will be called before. Service_Create is an important point, as it allows us to read the previously saved state to memory: Sub Service_Create 'configure the widget and set it to update every 24 hours (1440 minutes). rv = ConfigureHomeWidget("WidgetLayout", "rv", 1440, "Quote of the day") HttpUtils.CallbackActivity = "WidgetService" HttpUtils.CallbackUrlDoneSub = "UrlDone" HttpUtils.CallbackJobDoneSub = "JobDone" parser.Initialize 'Load previous data if such is available. 'This is relevant in case our process was killed and now the user pressed on the widget. If File.Exists(File.DirInternalCache, QUOTES_FILE) Then raf.Initialize(File.DirInternalCache, QUOTES_FILE, True) quotes = raf.ReadObject(0) raf.Close Else quotes.Initialize End If If File.Exists(File.DirInternalCache, CURRENTQUOTE_FILE) Then currentQuote = File.ReadString(File.DirInternalCache, CURRENTQUOTE_FILE) End If End Sub The source code is available in the forum : Quotes.
7 Http / HttpUtils2 102 Basic4Android User's Guide
8 Http / HttpUtils2 HttpUtils2 is a standard library (since Basic4Android version 2.70) that helps with communicating with web services (Http servers), before it was a HttpUtils2 Class.
8.1 HttpUtils2 Objects The HttpUtils2 contains one object : HttpJob. How to define a job. Example : Dim Job1 As HttpJob Job1.Initialize("Job1", Me) Job1.Download(b4a)
8.2 HttpUtils2 Functions HttpUtils2 has following functions :
Complete(id As SInt) Called by the service when job completes.
Download(Link As String) Submits a HTTP GET request. Consider using Download2 if the parameters should be escaped.
Download2(JobName As String, URLs As List) Submits a HTTP GET request. Encodes illegal parameter characters. Example: job.Download2("http://www.example.com", Array As String("key1", _ "value1", "key2", "value2"))
GetBitmap As Bitmap Returns the response as a bitmap
GetInputStream As InputStream Returns an InputStream
GetRequest As InputStream Returns a HttpUriRequest
GetString As String Returns the response as a string encoded with UTF8.
GetString2 (Encoding As String) As String Returns the response as a string with the specified encoded.
Initialize (Name As String, TargetModule As Object) Initializes the Job. Name - The job's name. Note that the name doesn't need to be unique. TargetModule - The activity or service that will handle the JobDone event.
7 Http / HttpUtils2 103 Basic4Android User's Guide
IsInitialized As Boolean Tests whether the object has been initialized.
JobName Field containing the job name. Example : If job1.JobName = "Job1") Then
Password Field containing a string with the job password. Example : If job1.Password = "PassWord") Then
PostBytes(Link As String, Data As Bytes()) Sends a POST request with the given string as the post data.
PostFile(Link As String, Dir As String, FileName As String) Sends a POST request with the given file as the post data. This method doesn't work with assets files.
PostString(Link As String, Text As String) Sends a POST request with the given string as the post data.
Release Should be called to free resources held by this job.
Success Field containing a Boolean. Example : If job1.Password = "PassWord") Then
Tag Field containing the job Tag. Example : If job1.Tag = "something") Then
UserName Field containing a string with the job username. Example : If job1.UserName = "UserName") Then
The calling module must contain a JobDone routine where you handle the results of the different jobs. Example : Sub JobDone(Job As HttpJob) If Job.Success = True Then Dim s As String s = Job.GetString Log(s) End If End Sub Look at Example2 for more than one job.

7 Http / HttpUtils2 104 Basic4Android User's Guide
8.3 HttpUtils Example1 A simple example of downloading a page and returning the page as string: Source code : HttpUtilsExample1.b4a Sub Globals Dim b4a As String b4a = "http://www.basic4ppc.com" End Sub Sub Activity_Create(FirstTime As Boolean) Dim Job1 As HttpJob Job1.Initialize("Job1", Me) Job1.Download(b4a) End Sub Sub JobDone(Job As HttpJob) If Job.Success = True Then Dim s As String s = Job.GetString Log(s) End If End Sub First we initialize the job. "Job1" = job name Me = current calling module Then we call Job1.Download. This call submits a job request to HttpUtils. HttpUtils raises an event Sub JobDone(Job As HttpJob) when the job is finished. We have four ways to access a downloaded resource:
HttpJob.GetString - Returns the resource as string HttpJob.GetString2(Encoding As String) - Returns the resource as string with a specific
encoding. HttpJob.GetBitmap - Returns the resource as bitmap HttpJob.GetInputStream - Returns an InputStream which allows you to manually read the
downloaded resource.
These four methods should only be called in the JobDone routine. Inside the JobDone event sub you should check Job.Success = True to ensure that the job request was successful.
7 Http / HttpUtils2 105 Basic4Android User's Guide
8.4 HttpUtils Example2 Source code : HttpUtilsExamples\HttpUtilsExample2.b4a In this example we first download an image and set it as the activity background. Then we download another two Urls and print them as string. Sub Activity_Create(FirstTime As Boolean) Dim job1, job2, job3 As HttpJob job1.Initialize("Job1", Me) 'Send a GET request job1.Download2("http://www.basic4ppc.com/print.php", _ Array As String("first key", "first value :)", "second key", "value 2")) 'Send a POST request job2.Initialize("Job2", Me) job2.PostString("http://www.basic4ppc.com/print.php", "first key=first value&key2=value2") 'Send a GET request job3.Initialize("Job3", Me) job3.Download("http://www.basic4ppc.com/forum/images/categories/android.png") End Sub Sub JobDone (Job As HttpJob) Log("JobName = " & Job.JobName & ", Success = " & Job.Success) If Job.Success = True Then Select Job.JobName Case "Job1", "Job2" 'print the result to the logs Log(Job.GetString) Case "Job3" 'show the downloaded image Activity.SetBackgroundImage(Job.GetBitmap) End Select Else Log("Error: " & Job.ErrorMessage) ToastMessageShow("Error: " & Job.ErrorMessage, True) End If Job.Release End Sub In Activity_Create we :
Dim the three jobs. send a Get request in job1 send a Post request in job2 send a Get request in job3
In JobDone we :
Test if the current job was sucessful If yes, check the current job name and execute its code. If no, display a ToastMessage
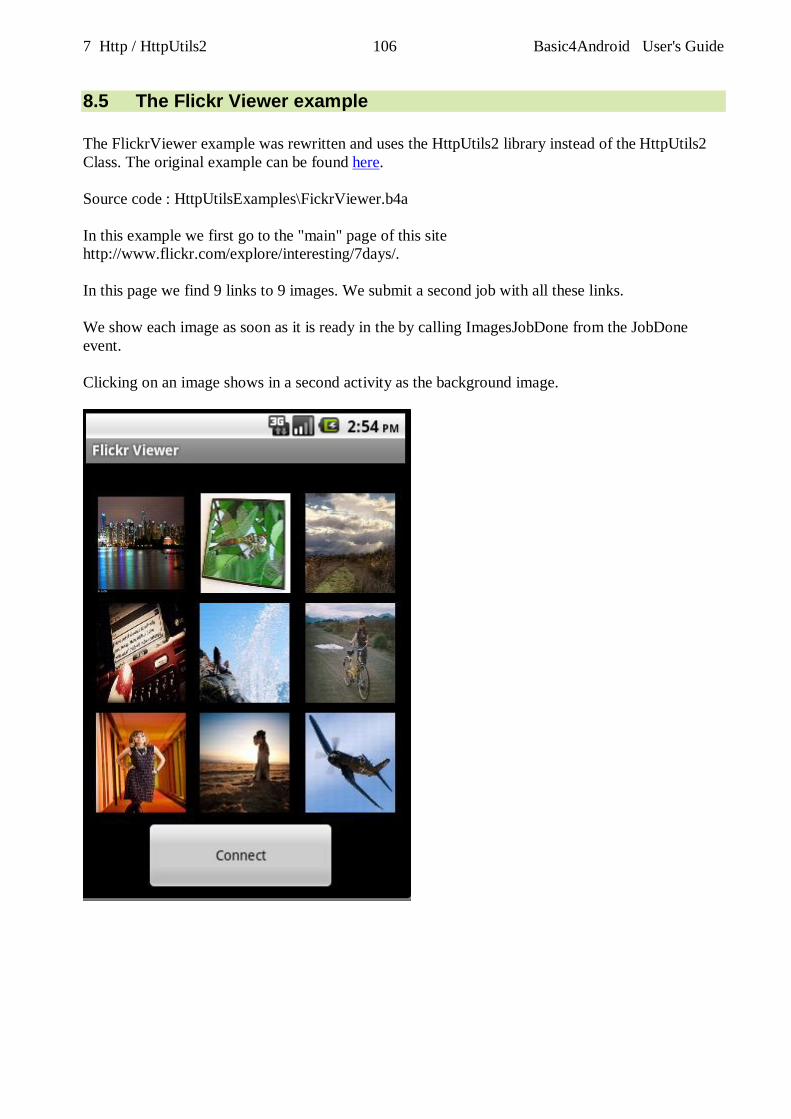
7 Http / HttpUtils2 106 Basic4Android User's Guide
8.5 The Flickr Viewer example The FlickrViewer example was rewritten and uses the HttpUtils2 library instead of the HttpUtils2 Class. The original example can be found here. Source code : HttpUtilsExamples\FickrViewer.b4a In this example we first go to the "main" page of this site http://www.flickr.com/explore/interesting/7days/. In this page we find 9 links to 9 images. We submit a second job with all these links. We show each image as soon as it is ready in the by calling ImagesJobDone from the JobDone event. Clicking on an image shows in a second activity as the background image.
9 Network / AsyncStreams 107 Basic4Android User's Guide
9 Network / AsyncStreams The Network library allows you to communicate over TCP/IP with other computers or devices. The Network library contains two objects. Socket and ServerSocket. The Socket object is the communication endpoint. Reading and writing are done with Socket.InputStream and Socket.OutputStream. ServerSocket is an object that listens for incoming connections. Once a connection is established an event is raised and a socket object is passed to the event sub. This socket will be used to handle the new client. Client application Steps required: - Create and initialize a Socket object. - Call Socket.Connect with the server address. - Connection is done in the background. The Connected event is raised when the connection is ready or if it failed. - Communicate with the other machine using Socket.InputStream to read data and Socket.OutputStream to write data. Server application Steps required: - Create and initialize a ServerSocket object. - Call ServerSocket.Listen to listen for incoming connections. This happens in the background. - Once a connection is established the NewConnection event is raised and a Socket object is passes. - Call ServerSocket.Listen if you want to accept more connections. - Using the Socket object received, communicate with the client.
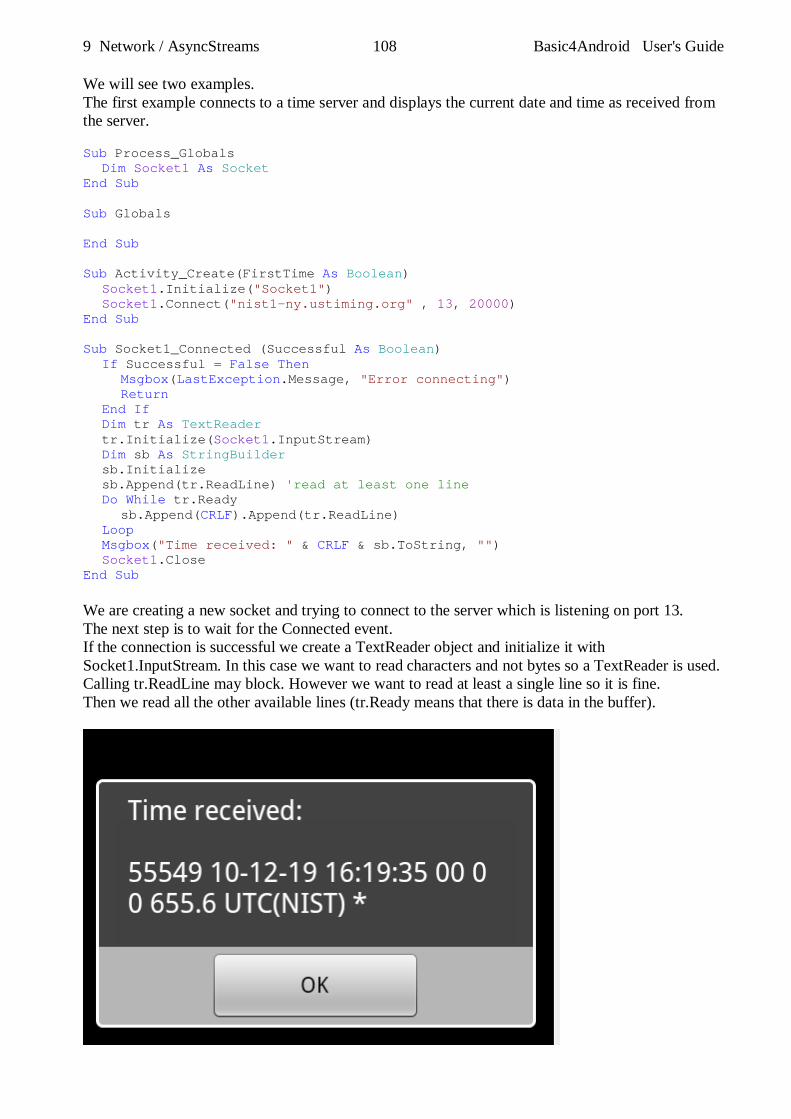
9 Network / AsyncStreams 108 Basic4Android User's Guide
We will see two examples. The first example connects to a time server and displays the current date and time as received from the server.
Sub Process_Globals Dim Socket1 As Socket End Sub Sub Globals End Sub Sub Activity_Create(FirstTime As Boolean) Socket1.Initialize("Socket1") Socket1.Connect("nist1-ny.ustiming.org" , 13, 20000) End Sub Sub Socket1_Connected (Successful As Boolean) If Successful = False Then Msgbox(LastException.Message, "Error connecting") Return End If Dim tr As TextReader tr.Initialize(Socket1.InputStream) Dim sb As StringBuilder sb.Initialize sb.Append(tr.ReadLine) 'read at least one line Do While tr.Ready sb.Append(CRLF).Append(tr.ReadLine) Loop Msgbox("Time received: " & CRLF & sb.ToString, "") Socket1.Close End Sub We are creating a new socket and trying to connect to the server which is listening on port 13. The next step is to wait for the Connected event. If the connection is successful we create a TextReader object and initialize it with Socket1.InputStream. In this case we want to read characters and not bytes so a TextReader is used. Calling tr.ReadLine may block. However we want to read at least a single line so it is fine. Then we read all the other available lines (tr.Ready means that there is data in the buffer).
9 Network / AsyncStreams 109 Basic4Android User's Guide
In the second application we will create a file transfer application, that will copy files from the desktop to the device. The device will use a ServerSocket to listen to incoming connections. Once a connection has been made, we will enable a timer. This timer checks every 200ms whether there is any data waiting to be read. The file is sent in a specific protocol. First the file name is sent and then the actual file. We are using a RandomAccessFile object to convert the bytes read to numeric values. RandomAccessFile can work with files or arrays of bytes, we are using the later in this case. RandomAccessFile can be set to use little endian byte order. This is important here as the desktop uses this byte order as well. The desktop example application was written with Basic4ppc. Once connected the user selects a file and the file is sent to the device which saves it under /sdcard/android. Both applications are attached. Some notes about the code: - The server is set to listen on port 2222. The server displays its IP when it starts. The desktop client should use this IP address when connecting to a real device (this IP will not work with the emulator). However if you work with the emulator or if your device is connected to the computer in debug mode you can use 'adb' to forward a desktop localhost port to the device. This is done by issuing "adb forward tcp:5007 tcp:2222" Now in the client code we should connect to the localhost ip with port 5007. Client.Connect("127.0.0.1", 5007) Again if you are testing this application in the emulator you must first run this adb command. Adb is part of the Android SDK. - Listening to connections : Sub Activity_Resume ServerSocket1.Listen End Sub Sub Activity_Pause (UserClosed As Boolean) If UserClosed Then Timer1.Enabled = False Socket1.Close ServerSocket1.Close 'stop listening End If End Sub Sub ServerSocket1_NewConnection (Successful As Boolean, NewSocket As Socket) Dim InputStream1, OutputStream1 As AsyncStreams If Successful Then Socket1 = NewSocket Timer1.Enabled = True InputStream1 = Socket1.InputStream OutputStream1 = Socket1.OutputStream ToastMessageShow("Connected", True) Else Msgbox(LastException.Message, "Error connecting") End If ServerSocket1.Listen 'Continue listening to new incoming connections End Sub

9 Network / AsyncStreams 110 Basic4Android User's Guide
In Sub Activity_Resume (which also called right after Activity_Create) we call ServerSocket.Listen and start listening to connections. Note that you can call this method multiple times safely. In Sub Activity_Pause we close the active connection (if there is such a connection) and also stop listening. This only happens if the user pressed on the back key (UserClosed = True). The ServerSocket will later be initialized in Activity_Create. The server side application can handle new connections. It will just replace the previous connection with the new one. The desktop client example application doesn't handle broken connections. You will need to restart it to reconnect.
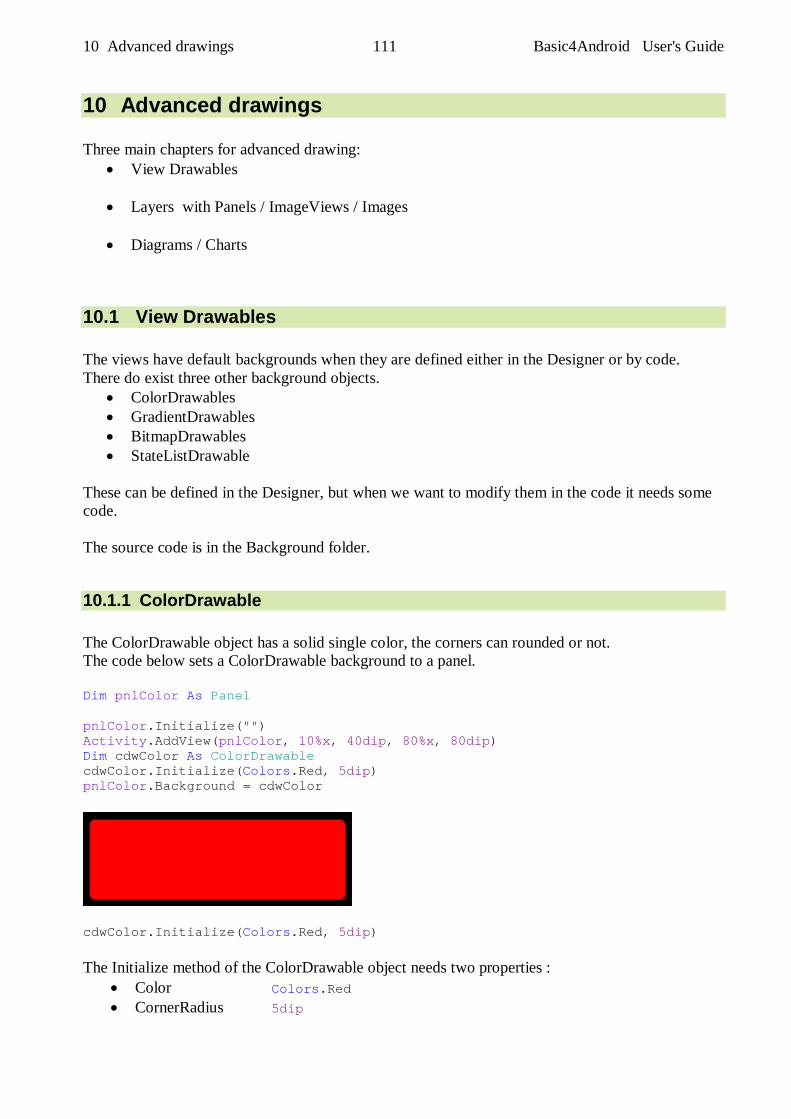
10 Advanced drawings 111 Basic4Android User's Guide
10 Advanced drawings Three main chapters for advanced drawing:
View Drawables
Layers with Panels / ImageViews / Images
Diagrams / Charts
10.1 View Drawables The views have default backgrounds when they are defined either in the Designer or by code. There do exist three other background objects.
ColorDrawables GradientDrawables BitmapDrawables StateListDrawable
These can be defined in the Designer, but when we want to modify them in the code it needs some code. The source code is in the Background folder.
10.1.1 ColorDrawable The ColorDrawable object has a solid single color, the corners can rounded or not. The code below sets a ColorDrawable background to a panel. Dim pnlColor As Panel pnlColor.Initialize("") Activity.AddView(pnlColor, 10%x, 40dip, 80%x, 80dip) Dim cdwColor As ColorDrawable cdwColor.Initialize(Colors.Red, 5dip) pnlColor.Background = cdwColor
cdwColor.Initialize(Colors.Red, 5dip) The Initialize method of the ColorDrawable object needs two properties :
Color Colors.Red CornerRadius 5dip
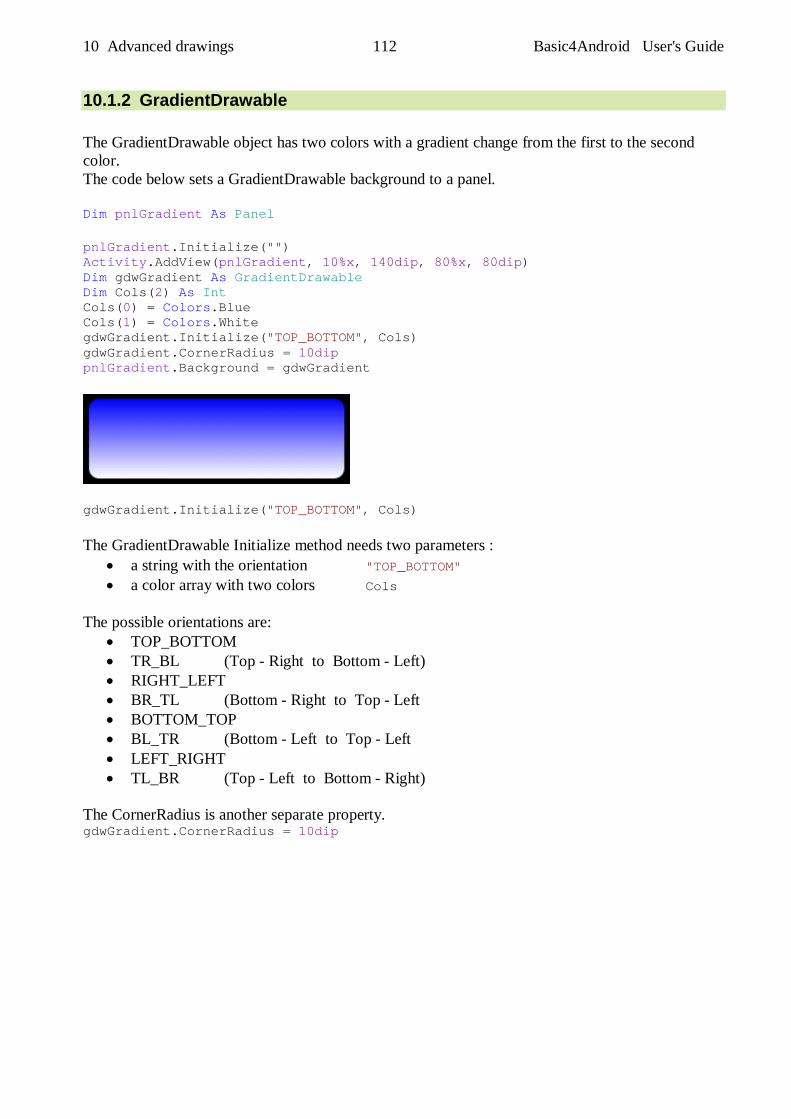
10 Advanced drawings 112 Basic4Android User's Guide
10.1.2 GradientDrawable The GradientDrawable object has two colors with a gradient change from the first to the second color. The code below sets a GradientDrawable background to a panel. Dim pnlGradient As Panel pnlGradient.Initialize("") Activity.AddView(pnlGradient, 10%x, 140dip, 80%x, 80dip) Dim gdwGradient As GradientDrawable Dim Cols(2) As Int Cols(0) = Colors.Blue Cols(1) = Colors.White gdwGradient.Initialize("TOP_BOTTOM", Cols) gdwGradient.CornerRadius = 10dip pnlGradient.Background = gdwGradient
gdwGradient.Initialize("TOP_BOTTOM", Cols) The GradientDrawable Initialize method needs two parameters :
a string with the orientation "TOP_BOTTOM" a color array with two colors Cols
The possible orientations are:
TOP_BOTTOM TR_BL (Top - Right to Bottom - Left) RIGHT_LEFT BR_TL (Bottom - Right to Top - Left BOTTOM_TOP BL_TR (Bottom - Left to Top - Left LEFT_RIGHT TL_BR (Top - Left to Bottom - Right)
The CornerRadius is another separate property. gdwGradient.CornerRadius = 10dip
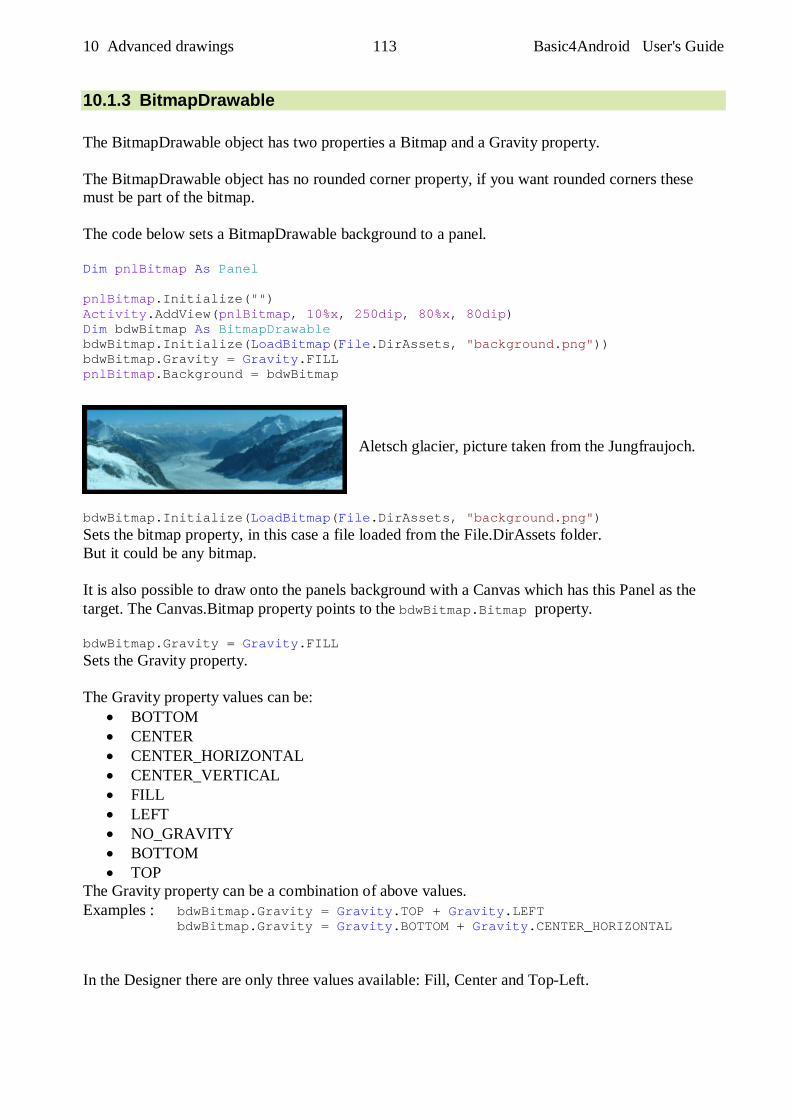
10 Advanced drawings 113 Basic4Android User's Guide
10.1.3 BitmapDrawable The BitmapDrawable object has two properties a Bitmap and a Gravity property. The BitmapDrawable object has no rounded corner property, if you want rounded corners these must be part of the bitmap. The code below sets a BitmapDrawable background to a panel. Dim pnlBitmap As Panel pnlBitmap.Initialize("") Activity.AddView(pnlBitmap, 10%x, 250dip, 80%x, 80dip) Dim bdwBitmap As BitmapDrawable bdwBitmap.Initialize(LoadBitmap(File.DirAssets, "background.png")) bdwBitmap.Gravity = Gravity.FILL pnlBitmap.Background = bdwBitmap
Aletsch glacier, picture taken from the Jungfraujoch.
bdwBitmap.Initialize(LoadBitmap(File.DirAssets, "background.png") Sets the bitmap property, in this case a file loaded from the File.DirAssets folder. But it could be any bitmap. It is also possible to draw onto the panels background with a Canvas which has this Panel as the target. The Canvas.Bitmap property points to the bdwBitmap.Bitmap property. bdwBitmap.Gravity = Gravity.FILL Sets the Gravity property. The Gravity property values can be:
BOTTOM CENTER CENTER_HORIZONTAL CENTER_VERTICAL FILL LEFT NO_GRAVITY BOTTOM TOP
The Gravity property can be a combination of above values. Examples : bdwBitmap.Gravity = Gravity.TOP + Gravity.LEFT bdwBitmap.Gravity = Gravity.BOTTOM + Gravity.CENTER_HORIZONTAL In the Designer there are only three values available: Fill, Center and Top-Left.
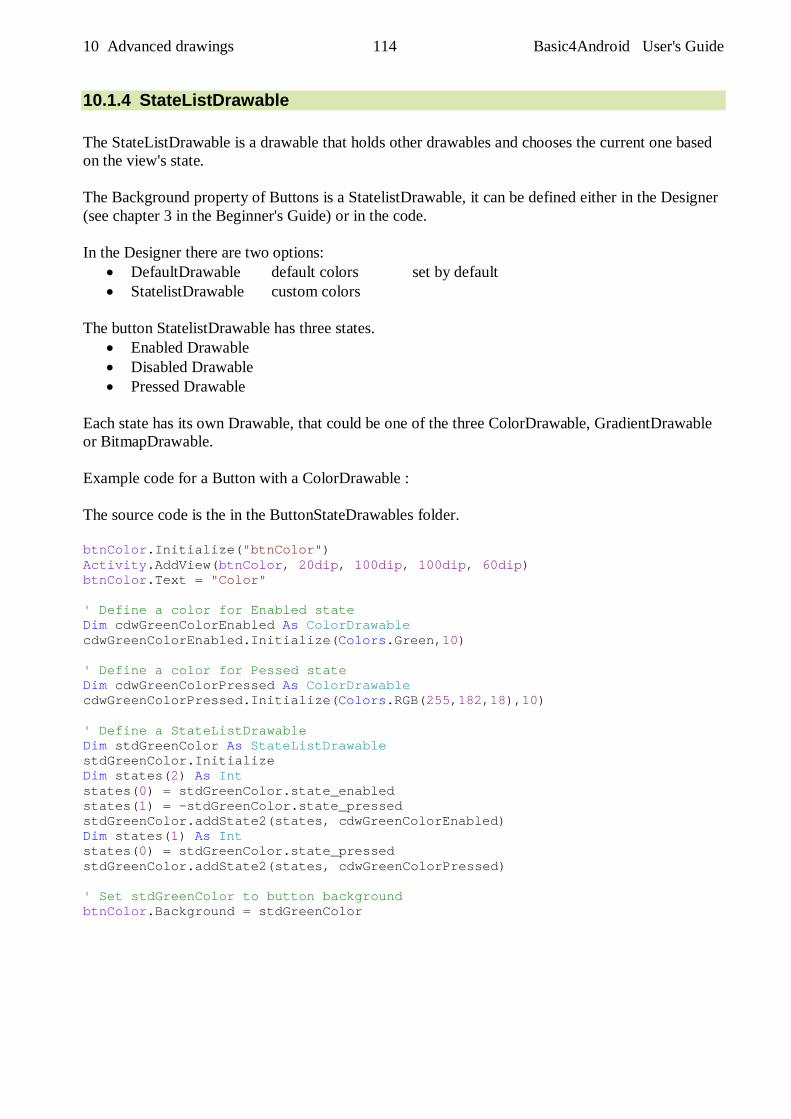
10 Advanced drawings 114 Basic4Android User's Guide
10.1.4 StateListDrawable The StateListDrawable is a drawable that holds other drawables and chooses the current one based on the view's state. The Background property of Buttons is a StatelistDrawable, it can be defined either in the Designer (see chapter 3 in the Beginner's Guide) or in the code. In the Designer there are two options:
DefaultDrawable default colors set by default StatelistDrawable custom colors
The button StatelistDrawable has three states.
Enabled Drawable Disabled Drawable Pressed Drawable
Each state has its own Drawable, that could be one of the three ColorDrawable, GradientDrawable or BitmapDrawable. Example code for a Button with a ColorDrawable : The source code is the in the ButtonStateDrawables folder. btnColor.Initialize("btnColor") Activity.AddView(btnColor, 20dip, 100dip, 100dip, 60dip) btnColor.Text = "Color" ' Define a color for Enabled state Dim cdwGreenColorEnabled As ColorDrawable cdwGreenColorEnabled.Initialize(Colors.Green,10) ' Define a color for Pessed state Dim cdwGreenColorPressed As ColorDrawable cdwGreenColorPressed.Initialize(Colors.RGB(255,182,18),10) ' Define a StateListDrawable Dim stdGreenColor As StateListDrawable stdGreenColor.Initialize Dim states(2) As Int states(0) = stdGreenColor.state_enabled states(1) = -stdGreenColor.state_pressed stdGreenColor.addState2(states, cdwGreenColorEnabled) Dim states(1) As Int states(0) = stdGreenColor.state_pressed stdGreenColor.addState2(states, cdwGreenColorPressed) ' Set stdGreenColor to button background btnColor.Background = stdGreenColor
10 Advanced drawings 115 Basic4Android User's Guide
Example code for a Button with a GradientDrawable : btnGradient.Initialize("btnGradient") Activity.AddView(btnGradient, 20dip, 180dip, 100dip, 60dip) btnGradient.Text = "Gradient" ' Define two gradient colors for Enabled state Dim colsEnabled(2) As Int colsEnabled(0) = Colors.RGB(255,196,196) colsEnabled(1) = Colors.RGB(255,25,25) ' Define a GradientDrawable for Enabled state Dim gdwEnabled As GradientDrawable gdwEnabled.Initialize("TOP_BOTTOM",colsEnabled) gdwEnabled.CornerRadius = 5 ' Define two gradient colors for Pressed state Dim colsPressed(2) As Int colsPressed(0) = Colors.RGB(25,255,25) colsPressed(1) = Colors.RGB(255,255,255) ' Define a GradientDrawable for Pressed state Dim gdwPressed As GradientDrawable gdwPressed.Initialize("TOP_BOTTOM",colsPressed) gdwPressed.CornerRadius = 5 ' Define a StateListDrawable Dim stdGradient As StateListDrawable stdGradient.Initialize Dim states(2) As Int states(0) = stdGradient.state_enabled states(1) = -stdGradient.state_pressed stdGradient.addState2(states, gdwEnabled) Dim states(1) As Int states(0) = stdGradient.state_pressed stdGradient.addState2(states, gdwPressed) ' Set stdRedGradient to button background btnGradient.Background = stdGradient
10 Advanced drawings 116 Basic4Android User's Guide
Example code for a Button with a BitmapDrawable : btnBitmap.Initialize("btnBitmap") Activity.AddView(btnBitmap, 40dip, 260dip, 60dip, 60dip) ' Define a bitmap for Enabled state Dim bdwEnabled As BitmapDrawable bdwEnabled.Initialize(LoadBitmap(File.DirAssets, "btnArrowDown0.png")) ' Define a bitmap for Pressed state Dim bdwPressed As BitmapDrawable bdwPressed.Initialize(LoadBitmap(File.DirAssets, "btnArrowDown1.png")) ' Define a StateListDrawable Dim stdBitmap As StateListDrawable stdBitmap.Initialize Dim states(2) As Int states(0) = stdBitmap.state_enabled states(1) = -stdBitmap.state_pressed stdBitmap.addState2(states, bdwEnabled) Dim states(1) As Int states(0) = stdBitmap.state_enabled stdBitmap.addState2(states, bdwPressed) ' Set stdBitmap to button btnBitmap btnBitmap.Background = stdBitmap
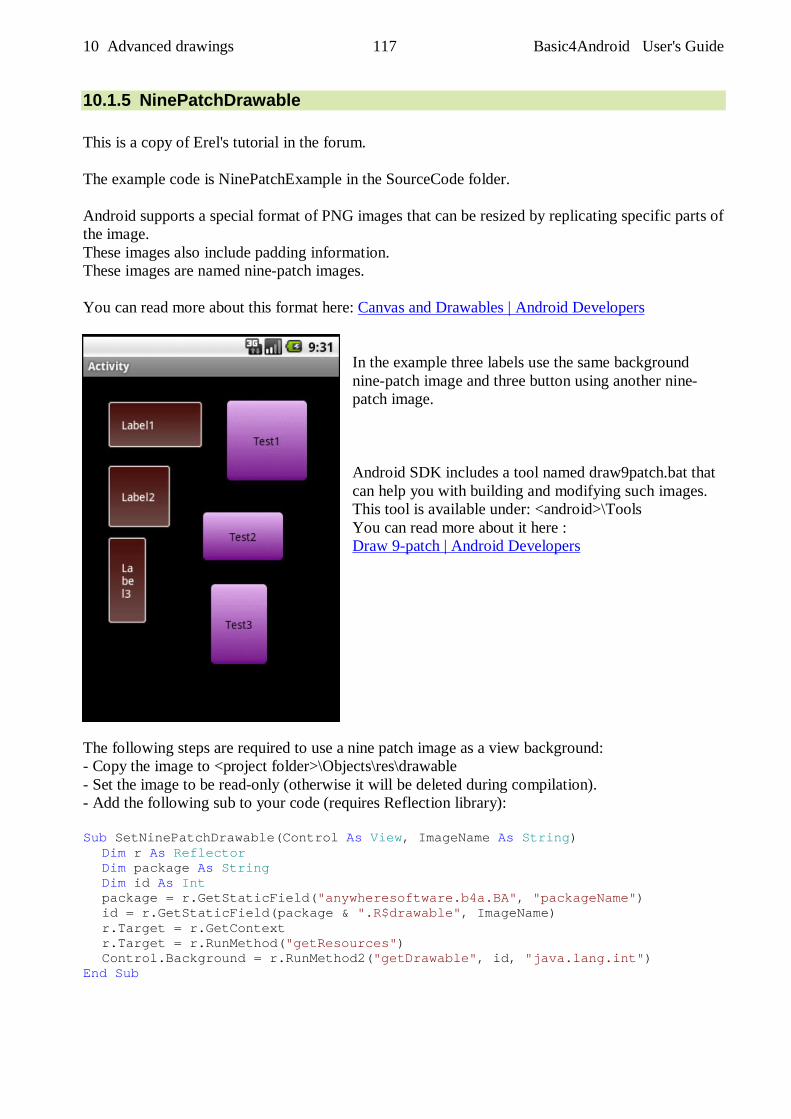
10 Advanced drawings 117 Basic4Android User's Guide
10.1.5 NinePatchDrawable This is a copy of Erel's tutorial in the forum. The example code is NinePatchExample in the SourceCode folder. Android supports a special format of PNG images that can be resized by replicating specific parts of the image. These images also include padding information. These images are named nine-patch images. You can read more about this format here: Canvas and Drawables | Android Developers
In the example three labels use the same background nine-patch image and three button using another nine-patch image. Android SDK includes a tool named draw9patch.bat that can help you with building and modifying such images. This tool is available under: <android>\Tools You can read more about it here : Draw 9-patch | Android Developers
The following steps are required to use a nine patch image as a view background: - Copy the image to <project folder>\Objects\res\drawable - Set the image to be read-only (otherwise it will be deleted during compilation). - Add the following sub to your code (requires Reflection library): Sub SetNinePatchDrawable(Control As View, ImageName As String) Dim r As Reflector Dim package As String Dim id As Int package = r.GetStaticField("anywheresoftware.b4a.BA", "packageName") id = r.GetStaticField(package & ".R$drawable", ImageName) r.Target = r.GetContext r.Target = r.RunMethod("getResources") Control.Background = r.RunMethod2("getDrawable", id, "java.lang.int") End Sub
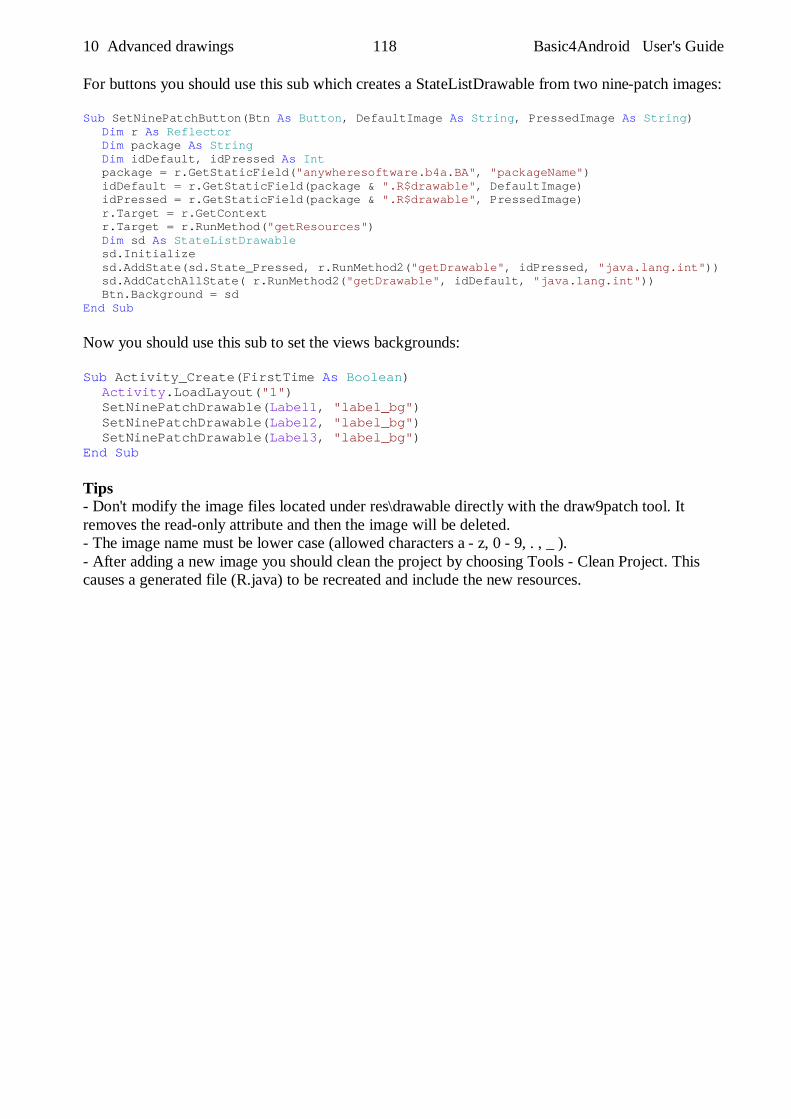
10 Advanced drawings 118 Basic4Android User's Guide
For buttons you should use this sub which creates a StateListDrawable from two nine-patch images: Sub SetNinePatchButton(Btn As Button, DefaultImage As String, PressedImage As String) Dim r As Reflector Dim package As String Dim idDefault, idPressed As Int package = r.GetStaticField("anywheresoftware.b4a.BA", "packageName") idDefault = r.GetStaticField(package & ".R$drawable", DefaultImage) idPressed = r.GetStaticField(package & ".R$drawable", PressedImage) r.Target = r.GetContext r.Target = r.RunMethod("getResources") Dim sd As StateListDrawable sd.Initialize sd.AddState(sd.State_Pressed, r.RunMethod2("getDrawable", idPressed, "java.lang.int")) sd.AddCatchAllState( r.RunMethod2("getDrawable", idDefault, "java.lang.int")) Btn.Background = sd End Sub Now you should use this sub to set the views backgrounds: Sub Activity_Create(FirstTime As Boolean) Activity.LoadLayout("1") SetNinePatchDrawable(Label1, "label_bg") SetNinePatchDrawable(Label2, "label_bg") SetNinePatchDrawable(Label3, "label_bg") End Sub Tips - Don't modify the image files located under res\drawable directly with the draw9patch tool. It removes the read-only attribute and then the image will be deleted. - The image name must be lower case (allowed characters a - z, 0 - 9, . , _ ). - After adding a new image you should clean the project by choosing Tools - Clean Project. This causes a generated file (R.java) to be recreated and include the new resources.
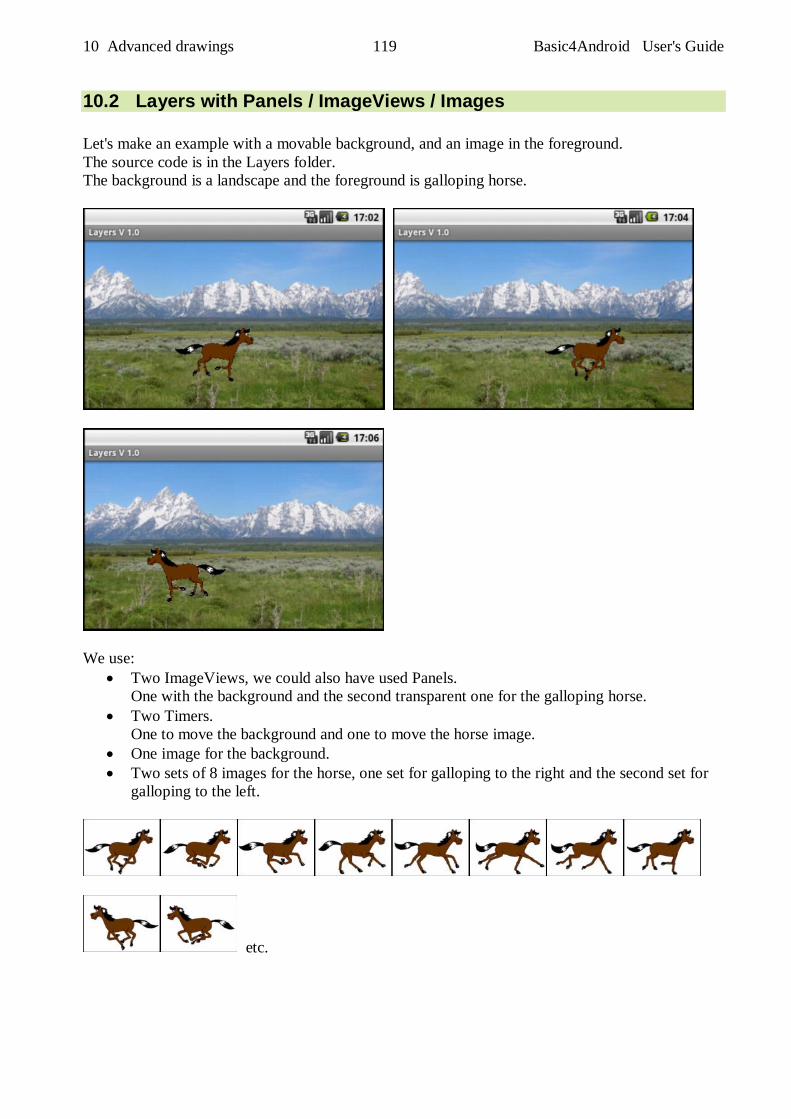
10 Advanced drawings 119 Basic4Android User's Guide
10.2 Layers with Panels / ImageViews / Images Let's make an example with a movable background, and an image in the foreground. The source code is in the Layers folder. The background is a landscape and the foreground is galloping horse.
We use:
Two ImageViews, we could also have used Panels. One with the background and the second transparent one for the galloping horse.
Two Timers. One to move the background and one to move the horse image.
One image for the background. Two sets of 8 images for the horse, one set for galloping to the right and the second set for
galloping to the left.
etc.
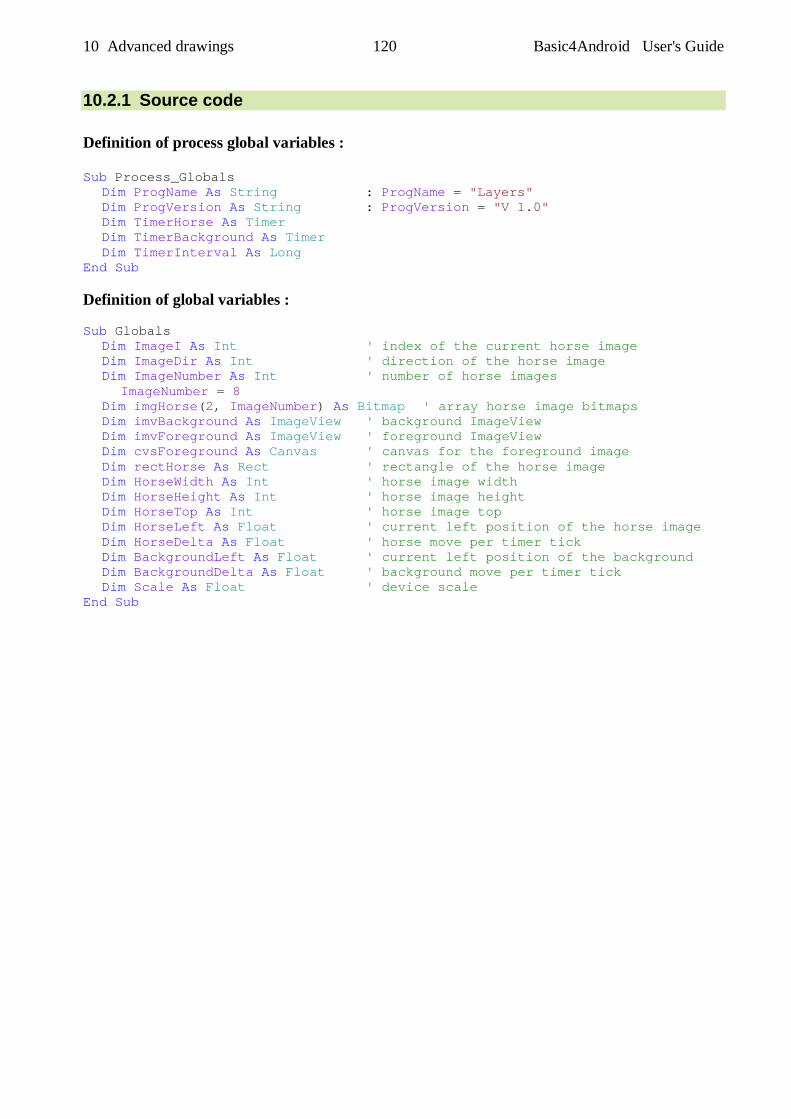
10 Advanced drawings 120 Basic4Android User's Guide
10.2.1 Source code Definition of process global variables : Sub Process_Globals Dim ProgName As String : ProgName = "Layers" Dim ProgVersion As String : ProgVersion = "V 1.0" Dim TimerHorse As Timer Dim TimerBackground As Timer Dim TimerInterval As Long End Sub Definition of global variables : Sub Globals Dim ImageI As Int ' index of the current horse image Dim ImageDir As Int ' direction of the horse image Dim ImageNumber As Int ' number of horse images ImageNumber = 8 Dim imgHorse(2, ImageNumber) As Bitmap ' array horse image bitmaps Dim imvBackground As ImageView ' background ImageView Dim imvForeground As ImageView ' foreground ImageView Dim cvsForeground As Canvas ' canvas for the foreground image Dim rectHorse As Rect ' rectangle of the horse image Dim HorseWidth As Int ' horse image width Dim HorseHeight As Int ' horse image height Dim HorseTop As Int ' horse image top Dim HorseLeft As Float ' current left position of the horse image Dim HorseDelta As Float ' horse move per timer tick Dim BackgroundLeft As Float ' current left position of the background Dim BackgroundDelta As Float ' background move per timer tick Dim Scale As Float ' device scale End Sub
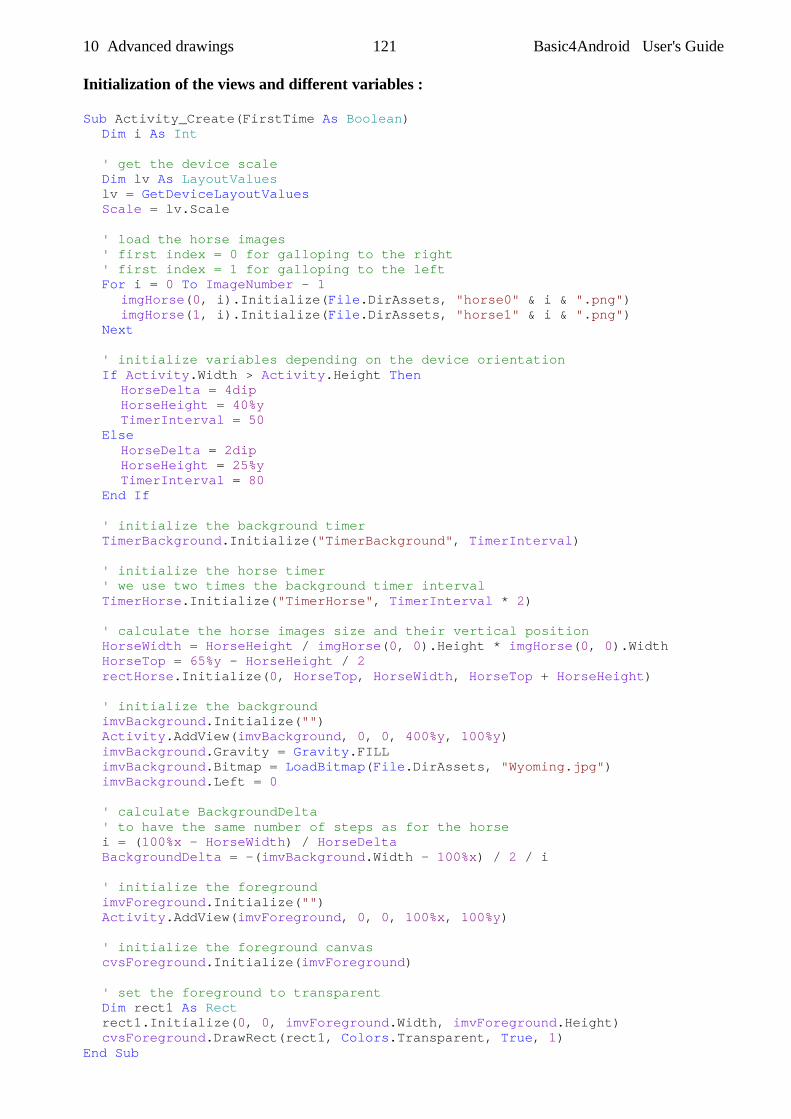
10 Advanced drawings 121 Basic4Android User's Guide
Initialization of the views and different variables : Sub Activity_Create(FirstTime As Boolean) Dim i As Int ' get the device scale Dim lv As LayoutValues lv = GetDeviceLayoutValues Scale = lv.Scale ' load the horse images ' first index = 0 for galloping to the right ' first index = 1 for galloping to the left For i = 0 To ImageNumber - 1 imgHorse(0, i).Initialize(File.DirAssets, "horse0" & i & ".png") imgHorse(1, i).Initialize(File.DirAssets, "horse1" & i & ".png") Next ' initialize variables depending on the device orientation If Activity.Width > Activity.Height Then HorseDelta = 4dip HorseHeight = 40%y TimerInterval = 50 Else HorseDelta = 2dip HorseHeight = 25%y TimerInterval = 80 End If ' initialize the background timer TimerBackground.Initialize("TimerBackground", TimerInterval) ' initialize the horse timer ' we use two times the background timer interval TimerHorse.Initialize("TimerHorse", TimerInterval * 2) ' calculate the horse images size and their vertical position HorseWidth = HorseHeight / imgHorse(0, 0).Height * imgHorse(0, 0).Width HorseTop = 65%y - HorseHeight / 2 rectHorse.Initialize(0, HorseTop, HorseWidth, HorseTop + HorseHeight) ' initialize the background imvBackground.Initialize("") Activity.AddView(imvBackground, 0, 0, 400%y, 100%y) imvBackground.Gravity = Gravity.FILL imvBackground.Bitmap = LoadBitmap(File.DirAssets, "Wyoming.jpg") imvBackground.Left = 0 ' calculate BackgroundDelta ' to have the same number of steps as for the horse i = (100%x - HorseWidth) / HorseDelta BackgroundDelta = -(imvBackground.Width - 100%x) / 2 / i ' initialize the foreground imvForeground.Initialize("") Activity.AddView(imvForeground, 0, 0, 100%x, 100%y) ' initialize the foreground canvas cvsForeground.Initialize(imvForeground) ' set the foreground to transparent Dim rect1 As Rect rect1.Initialize(0, 0, imvForeground.Width, imvForeground.Height) cvsForeground.DrawRect(rect1, Colors.Transparent, True, 1) End Sub
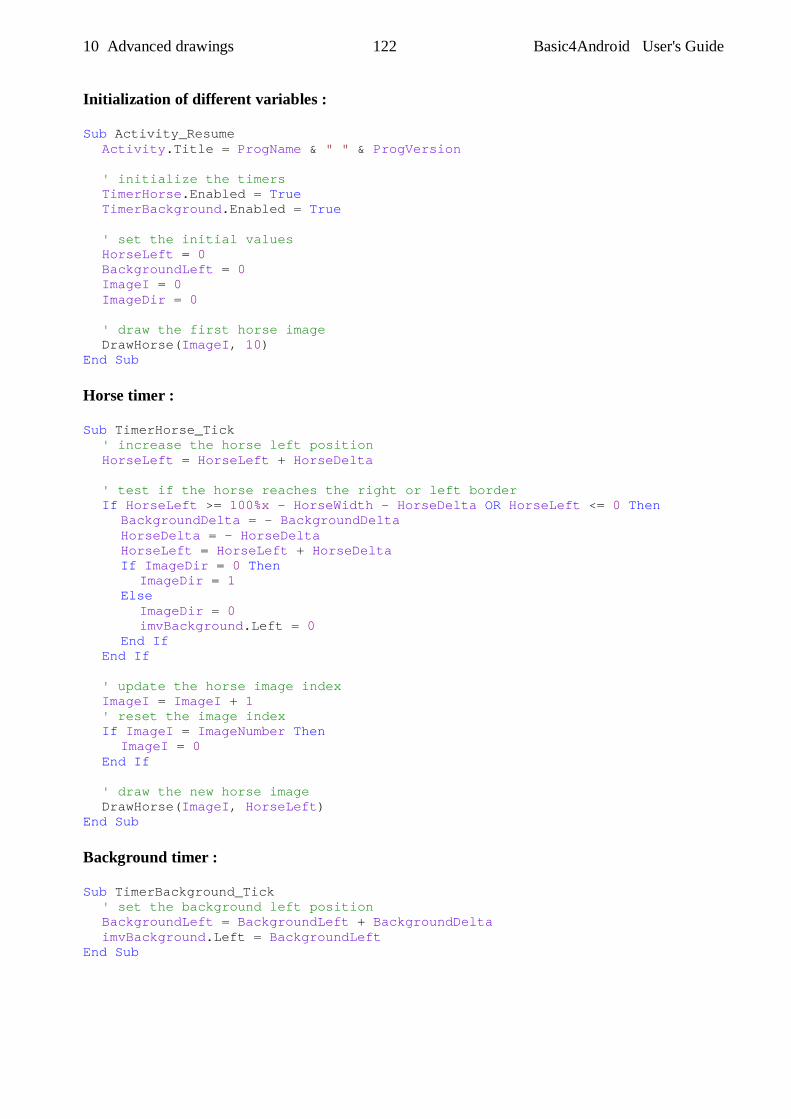
10 Advanced drawings 122 Basic4Android User's Guide
Initialization of different variables : Sub Activity_Resume Activity.Title = ProgName & " " & ProgVersion ' initialize the timers TimerHorse.Enabled = True TimerBackground.Enabled = True ' set the initial values HorseLeft = 0 BackgroundLeft = 0 ImageI = 0 ImageDir = 0 ' draw the first horse image DrawHorse(ImageI, 10) End Sub Horse timer : Sub TimerHorse_Tick ' increase the horse left position HorseLeft = HorseLeft + HorseDelta ' test if the horse reaches the right or left border If HorseLeft >= 100%x - HorseWidth - HorseDelta OR HorseLeft <= 0 Then BackgroundDelta = - BackgroundDelta HorseDelta = - HorseDelta HorseLeft = HorseLeft + HorseDelta If ImageDir = 0 Then ImageDir = 1 Else ImageDir = 0 imvBackground.Left = 0 End If End If ' update the horse image index ImageI = ImageI + 1 ' reset the image index If ImageI = ImageNumber Then ImageI = 0 End If ' draw the new horse image DrawHorse(ImageI, HorseLeft) End Sub Background timer : Sub TimerBackground_Tick ' set the background left position BackgroundLeft = BackgroundLeft + BackgroundDelta imvBackground.Left = BackgroundLeft End Sub
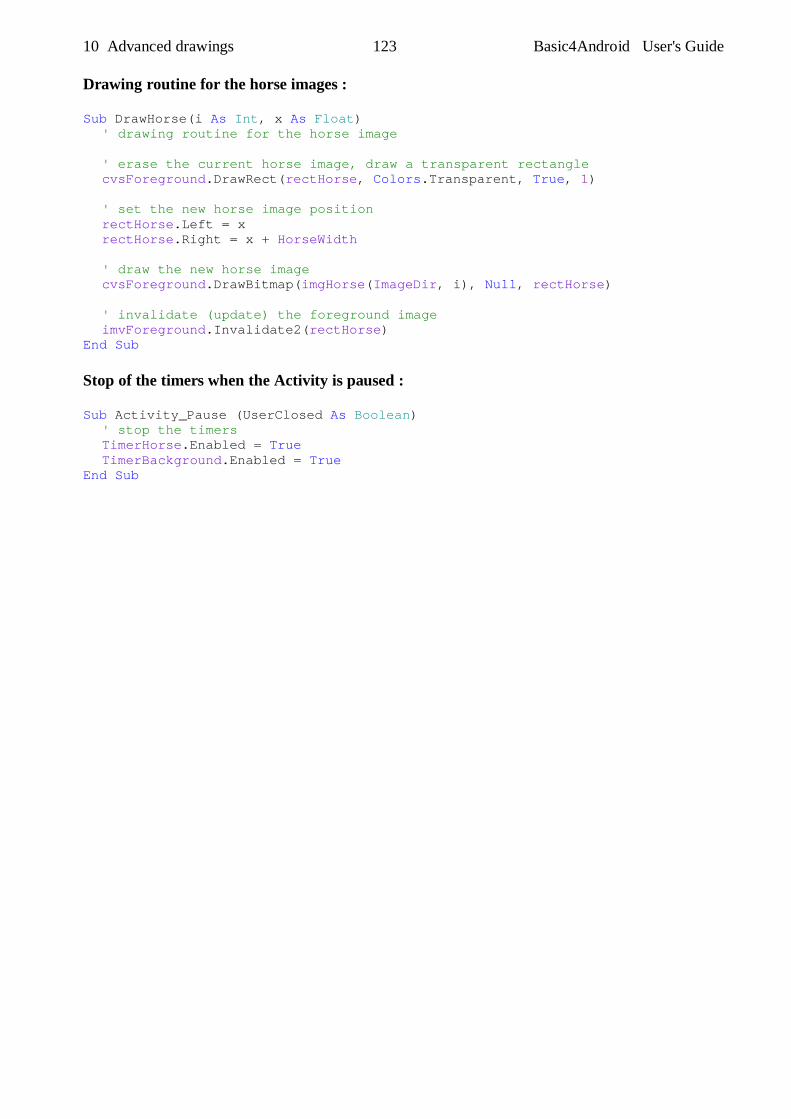
10 Advanced drawings 123 Basic4Android User's Guide
Drawing routine for the horse images : Sub DrawHorse(i As Int, x As Float) ' drawing routine for the horse image ' erase the current horse image, draw a transparent rectangle cvsForeground.DrawRect(rectHorse, Colors.Transparent, True, 1) ' set the new horse image position rectHorse.Left = x rectHorse.Right = x + HorseWidth ' draw the new horse image cvsForeground.DrawBitmap(imgHorse(ImageDir, i), Null, rectHorse) ' invalidate (update) the foreground image imvForeground.Invalidate2(rectHorse) End Sub Stop of the timers when the Activity is paused : Sub Activity_Pause (UserClosed As Boolean) ' stop the timers TimerHorse.Enabled = True TimerBackground.Enabled = True End Sub
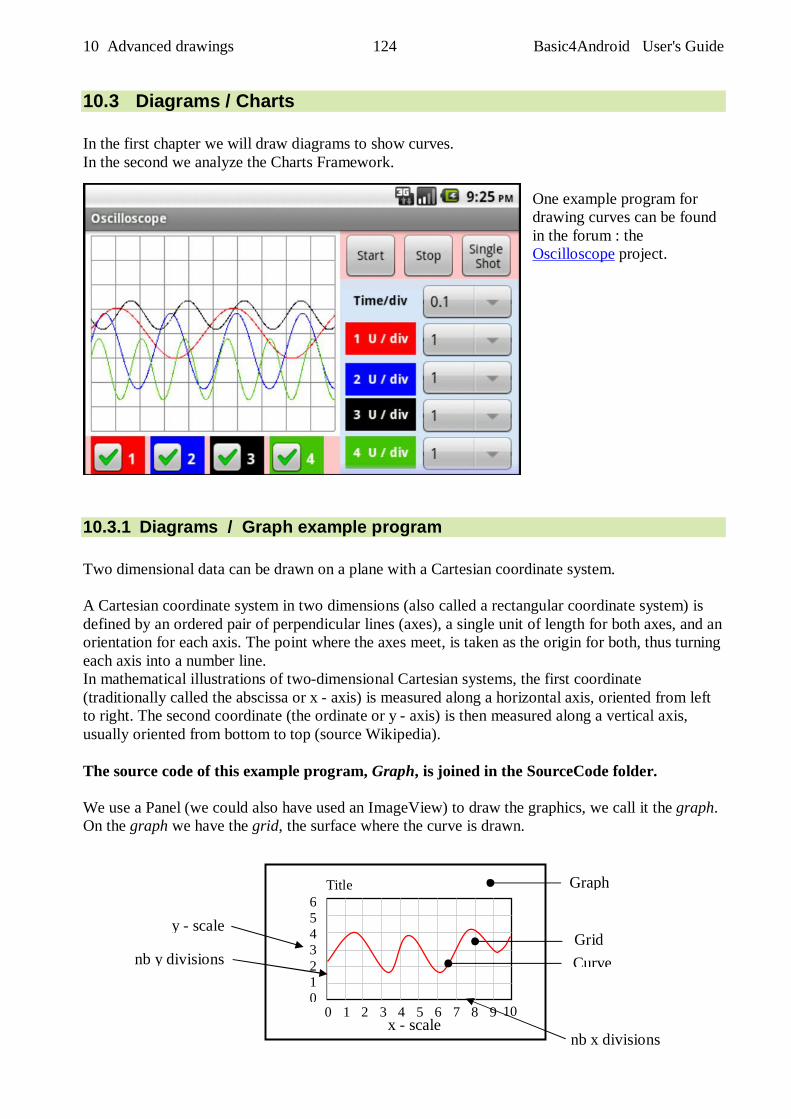
10 Advanced drawings 124 Basic4Android User's Guide
10.3 Diagrams / Charts In the first chapter we will draw diagrams to show curves. In the second we analyze the Charts Framework.
One example program for drawing curves can be found in the forum : the Oscilloscope project.
10.3.1 Diagrams / Graph example program Two dimensional data can be drawn on a plane with a Cartesian coordinate system. A Cartesian coordinate system in two dimensions (also called a rectangular coordinate system) is defined by an ordered pair of perpendicular lines (axes), a single unit of length for both axes, and an orientation for each axis. The point where the axes meet, is taken as the origin for both, thus turning each axis into a number line. In mathematical illustrations of two-dimensional Cartesian systems, the first coordinate (traditionally called the abscissa or x - axis) is measured along a horizontal axis, oriented from left to right. The second coordinate (the ordinate or y - axis) is then measured along a vertical axis, usually oriented from bottom to top (source Wikipedia). The source code of this example program, Graph, is joined in the SourceCode folder. We use a Panel (we could also have used an ImageView) to draw the graphics, we call it the graph. On the graph we have the grid, the surface where the curve is drawn.
6 5 4 3 2 1 0
0 1 2 3 4 5 6 7 8 9 10
Title
y - scale
x - scale
Grid
Graph
Curve nb y divisions
nb x divisions
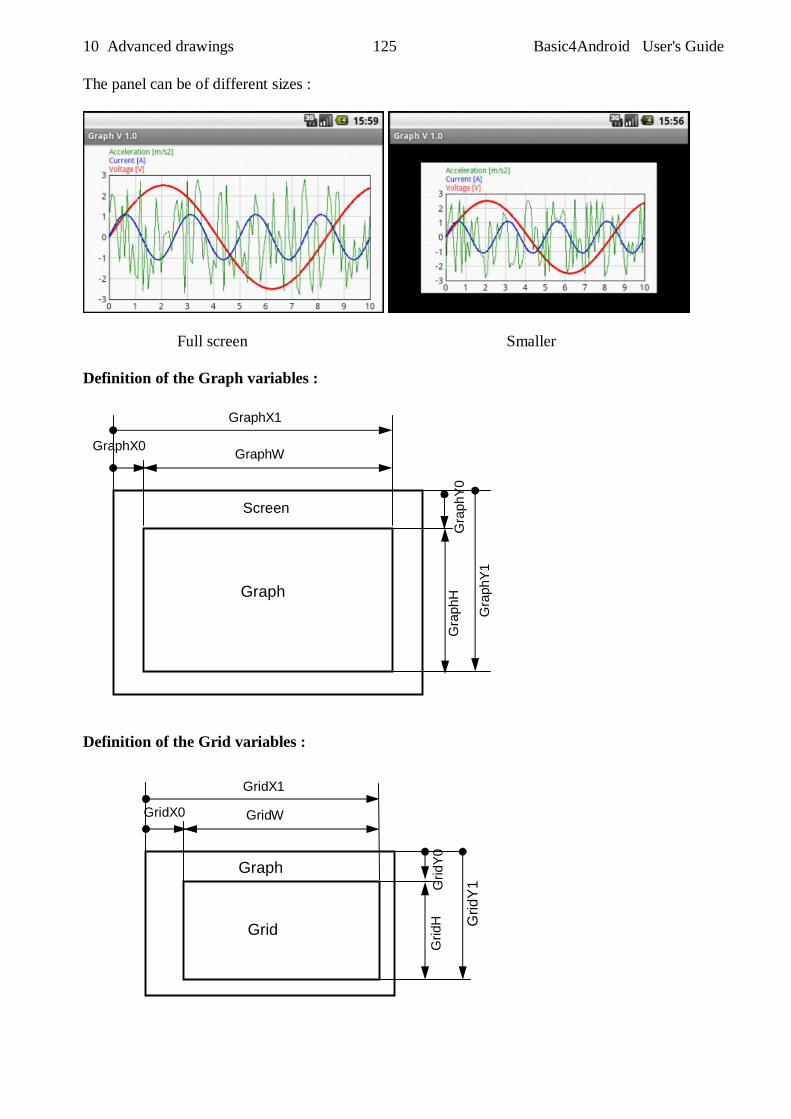
10 Advanced drawings 125 Basic4Android User's Guide
The panel can be of different sizes :
Full screen Smaller Definition of the Graph variables :
Definition of the Grid variables :
GridX1
GridW GridX0
Grid
Y1
Grid
Graph
Grid
Y0
Grid
H
GraphX1
GraphW GraphX0
Gra
phY
1
Screen
Graph
Gra
phY
0 G
raph
H

10 Advanced drawings 126 Basic4Android User's Guide
Source code. The code is commented and I think (hope) enough self explanatory. It should not be considered as a project for itself but more as a demonstrator. The code could seem complicated but it really is not. You'll probably notice a lot of variables, but I prefer working with variables rather than directly with numeric values. It's much easier to maintain or modify a code. Activity create. Sub Activity_Create(FirstTime As Boolean) GraphInit CheckDeviceType pnlGraph.Initialize("pnlGraph") Activity.AddView(pnlGraph, GraphX0, GraphY0, GraphW, GraphH) cvsGraph.Initialize(pnlGraph) CurveInit GridInit If FirstTime Then CurveValInit End If ScaleInit End Sub Activity resume. Sub Activity_Resume Dim i As Int Activity.Title = ProgName & " " & ProgVersion GraphClear GridDraw For i = 0 To CurveNb - 1 CurveDraw(i) Next End Sub The different dimensions for the graph are all expressed in percentage of the Activity height d%y , to fit the different device sizes. Initialization of the Graph panel dimensions. (called from Activity_Create) Sub GraphInit ' initialize the Graph variables ' all dimensions are expressed in % of height GraphX0 = 3%y GraphW = 100%x - 2 * GraphX0 GraphX1 = GraphX0 + GraphW GraphY0 = 3%y GraphH = 100%y - 2 * GraphY0 GraphY1 = GraphY0 + GraphH rectGraph.Initialize(0, 0, GraphW, GraphH) GraphColor = Colors.White End Sub
10 Advanced drawings 127 Basic4Android User's Guide
The text sizes are also adapted to the device sizes. I have considered four different device sizes :
Smartphone 3.5 smartphone with a 3.5 inch screen size Smartphone 5 smartphone with a 5 inch screen size Tablet 7 tablet with a 7 inch screen size Tablet 10 tablet with a 10 inch screen size
Code to check the device type. (called from Activity_Create) Sub CheckDeviceType ' check device type, used to define text sizes ' should be completed if necessary Dim lv As LayoutValues lv = GetDeviceLayoutValues Select lv.Scale Case 2 DeviceType = "Smartphone 5" Case 1.5 If lv.Width > 1100 Then DeviceType = "Tablet 7" Else DeviceType = "Smartphone 3.5" End If Case 1 If lv.Width > 1100 Then DeviceType = "Tablet 10" Else If lv.Width < 600 Then DeviceType = "Smartphone 3.5" Else DeviceType = "Tablet 7" End If End Select End Sub
10 Advanced drawings 128 Basic4Android User's Guide
Initialization of the curves parameters. (called from Activity_Create) Sub CurveInit ' set curve line color CurveLineColor(0) = Colors.Red CurveLineColor(1) = Colors.Blue CurveLineColor(2) = Colors.RGB(10, 140, 0) ' set curve line wisth (stroke) CurveLineStroke(0) = 3dip CurveLineStroke(1) = 2dip CurveLineStroke(2) = 1dip ' set curve text size according to the device type CurveTextSize = 14 Select DeviceType Case "Smarphone 3.5" CurveTextSize = 14 Case "Smarphone 5" CurveTextSize = 22 Case "Tablet 7" CurveTextSize = 28 Case "Tablet 10" CurveTextSize = 42 End Select ' get the text height CurveTextHeight = cvsGraph.MeasureStringHeight("Ag", Typeface.DEFAULT, CurveTextSize) + 2dip End Sub
10 Advanced drawings 129 Basic4Android User's Guide
Initilization of the grid. (called from Activity_Create) Sub GridInit ' initialize the Grid variables ' all dimensions are expressed proportional to the curves text height ' horzontal dimensions GridX0 = 2 * CurveTextHeight GridW = GraphW - GridX0 - 1.2 * CurveTextHeight GridX1 = GridX0 + GridW ' verical dimensions GridY0 = 3.2 * CurveTextHeight GridH = GraphH - GridY0 - 1.2 * CurveTextHeight GridY1 = GridY0 + GridH ' define the number of divisions for each axis If lv.Width > lv.Height Then GridNbDivX = 10 GridNbDivY = 6 Else GridNbDivX = 5 GridNbDivY = 12 End If ' calculate the division dimensions in pixels GridDeltaX = GridW / GridNbDivX GridDeltaY = GridH / GridNbDivY ' assign the grid rectangle rectGrid.Initialize(GridX0, GridY0, GridX1, GridY1) ' set the different colors GridColor = Colors.White GridLineColor = Colors.LightGray GridFrameColor = Colors.Black ScaleTextColor = Colors.Black ' set scale text size according to the device type ScaleTextSize = 12 Select DeviceType Case "Smartphone 3.5" ScaleTextSize = 12 Case "Smartphone 5" ScaleTextSize = 18 Case "Tablet 7" ScaleTextSize = 24 Case "Tablet 10" ScaleTextSize = 36 End Select ScaleTextHeight = cvsGraph.MeasureStringHeight("Ag", Typeface.DEFAULT, ScaleTextSize) + 2dip End Sub
10 Advanced drawings 130 Basic4Android User's Guide
Initialization of the curve values. (called from Activity_Create) These are sample curves, this routine can be adapted to each application. This routine is called only when FirstTime = True. Sub CurveValInit Dim i, n As Int Dim t As Double Dim Amplitude(CurveNb) As Double Dim Offset(CurveNb) As Double Dim Omega(CurveNb) As Double ' set curve amplitude Amplitude(0) = 2.5 Amplitude(1) = 1.5 Amplitude(2) = .02 ' set curve offset Offset(0) = 0 Offset(1) = 1 Offset(2) = -1 ' set curve omega Omega(0)= 2.4 * cPI Omega(1)= 8 * cPI ' calculate curve point values For i = 0 To CurveNb - 1 For n = 0 To CurveNbPoints t = n / 100 If i = 2 Then Curve(i, n) = Offset(i) + Amplitude(i) * Rnd(-100, 100) Else Curve(i, n) = Offset(i) + Amplitude(i) * Sin(Omega(i) * t) End If Next Next ' set curve names and units CurveName(0) = "Voltage" CurveUnit(0) = "[V]" CurveName(1) = "Current" CurveUnit(1) = "[A]" CurveName(2) = "Acceleration" CurveUnit(2) = "[m/s2]" ' set scale values ScaleXMax = CurveNbPoints / 10 ScaleXMin = 0 ScaleYMax = 3 ScaleYMin = -3 End Sub Initialization of the scales according to the device orientation. (called from Activity_Create) Sub ScaleInit ' initilize the scales according to the grid dimensions. ScaleXDelta = ScaleXMax / GridNbDivX ScaleX = GridW / (ScaleXMax - ScaleXMin) ScaleYDelta = (ScaleYMax - ScaleYMin) / GridNbDivY ScaleY = GridH / (ScaleYMax - ScaleYMin) End Sub
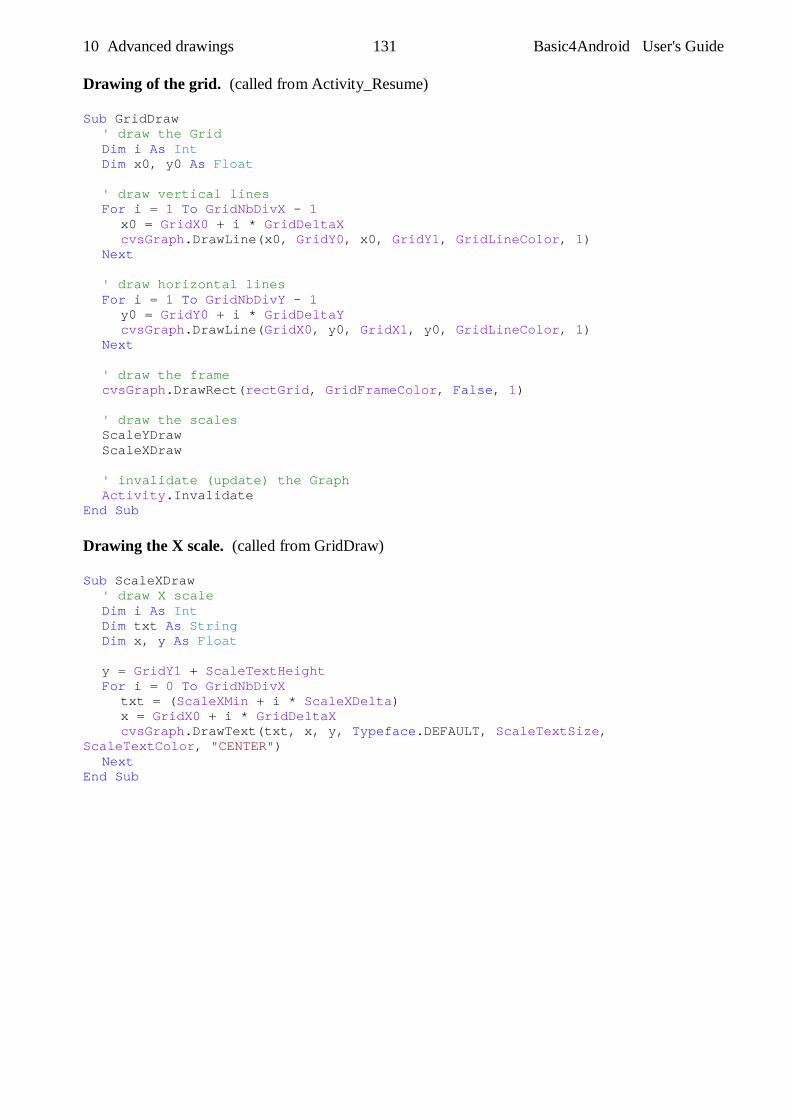
10 Advanced drawings 131 Basic4Android User's Guide
Drawing of the grid. (called from Activity_Resume) Sub GridDraw ' draw the Grid Dim i As Int Dim x0, y0 As Float ' draw vertical lines For i = 1 To GridNbDivX - 1 x0 = GridX0 + i * GridDeltaX cvsGraph.DrawLine(x0, GridY0, x0, GridY1, GridLineColor, 1) Next ' draw horizontal lines For i = 1 To GridNbDivY - 1 y0 = GridY0 + i * GridDeltaY cvsGraph.DrawLine(GridX0, y0, GridX1, y0, GridLineColor, 1) Next ' draw the frame cvsGraph.DrawRect(rectGrid, GridFrameColor, False, 1) ' draw the scales ScaleYDraw ScaleXDraw ' invalidate (update) the Graph Activity.Invalidate End Sub Drawing the X scale. (called from GridDraw) Sub ScaleXDraw ' draw X scale Dim i As Int Dim txt As String Dim x, y As Float y = GridY1 + ScaleTextHeight For i = 0 To GridNbDivX txt = (ScaleXMin + i * ScaleXDelta) x = GridX0 + i * GridDeltaX cvsGraph.DrawText(txt, x, y, Typeface.DEFAULT, ScaleTextSize, ScaleTextColor, "CENTER") Next End Sub
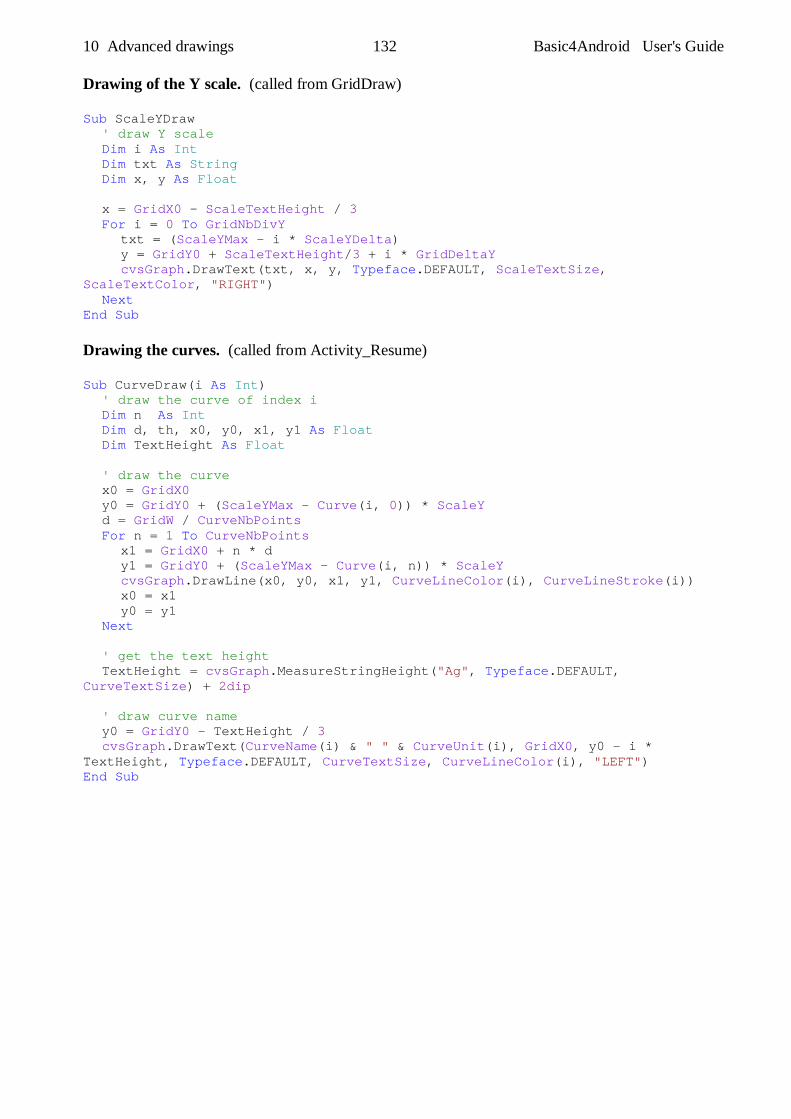
10 Advanced drawings 132 Basic4Android User's Guide
Drawing of the Y scale. (called from GridDraw) Sub ScaleYDraw ' draw Y scale Dim i As Int Dim txt As String Dim x, y As Float x = GridX0 - ScaleTextHeight / 3 For i = 0 To GridNbDivY txt = (ScaleYMax - i * ScaleYDelta) y = GridY0 + ScaleTextHeight/3 + i * GridDeltaY cvsGraph.DrawText(txt, x, y, Typeface.DEFAULT, ScaleTextSize, ScaleTextColor, "RIGHT") Next End Sub Drawing the curves. (called from Activity_Resume) Sub CurveDraw(i As Int) ' draw the curve of index i Dim n As Int Dim d, th, x0, y0, x1, y1 As Float Dim TextHeight As Float ' draw the curve x0 = GridX0 y0 = GridY0 + (ScaleYMax - Curve(i, 0)) * ScaleY d = GridW / CurveNbPoints For n = 1 To CurveNbPoints x1 = GridX0 + n * d y1 = GridY0 + (ScaleYMax - Curve(i, n)) * ScaleY cvsGraph.DrawLine(x0, y0, x1, y1, CurveLineColor(i), CurveLineStroke(i)) x0 = x1 y0 = y1 Next ' get the text height TextHeight = cvsGraph.MeasureStringHeight("Ag", Typeface.DEFAULT, CurveTextSize) + 2dip ' draw curve name y0 = GridY0 - TextHeight / 3 cvsGraph.DrawText(CurveName(i) & " " & CurveUnit(i), GridX0, y0 - i * TextHeight, Typeface.DEFAULT, CurveTextSize, CurveLineColor(i), "LEFT") End Sub
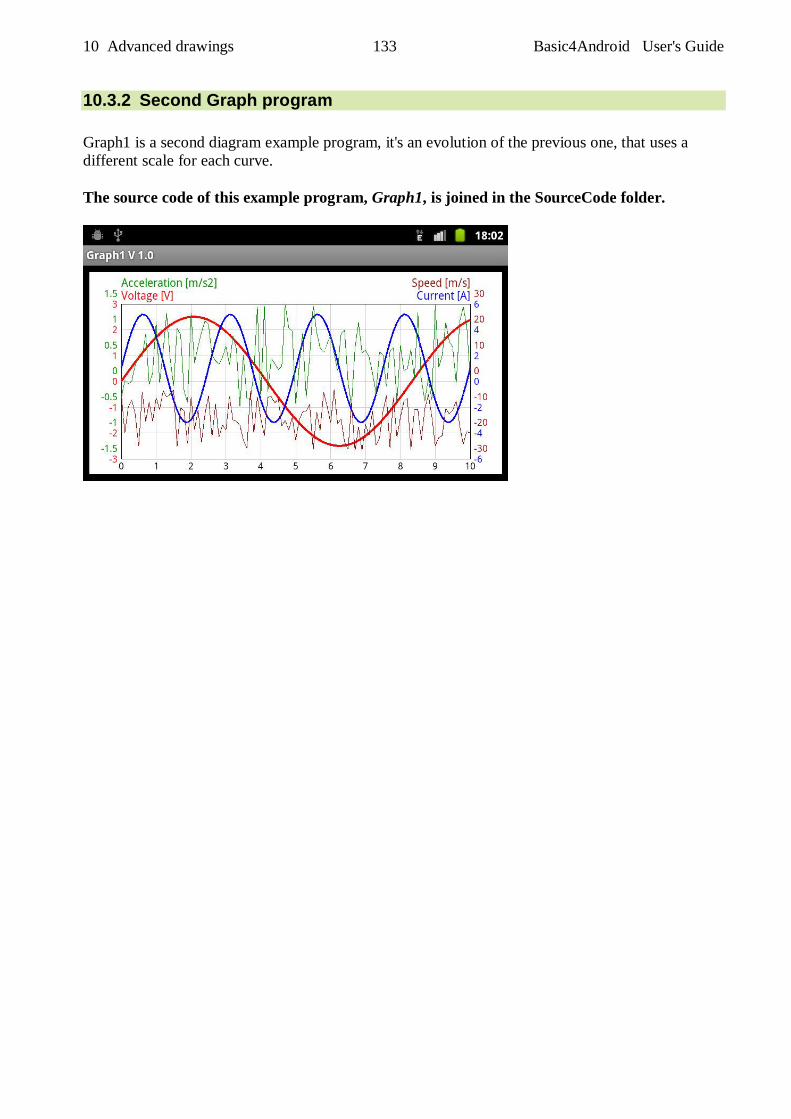
10 Advanced drawings 133 Basic4Android User's Guide
10.3.2 Second Graph program Graph1 is a second diagram example program, it's an evolution of the previous one, that uses a different scale for each curve. The source code of this example program, Graph1, is joined in the SourceCode folder.

10 Advanced drawings 134 Basic4Android User's Guide
10.3.3 Charts Framework The Charts Framework module allows to draw several types of diagrams:
Pie charts Bar charts Stacked Bar charts Curves
It can be downloaded here : Charts Framework Attention : The Charts Framework is a code module and not a library.
The goal of this chapter is to show how to use the Charts Framework and not to explain how its code is build. The joined source codes allows to play with each kind of chart type.
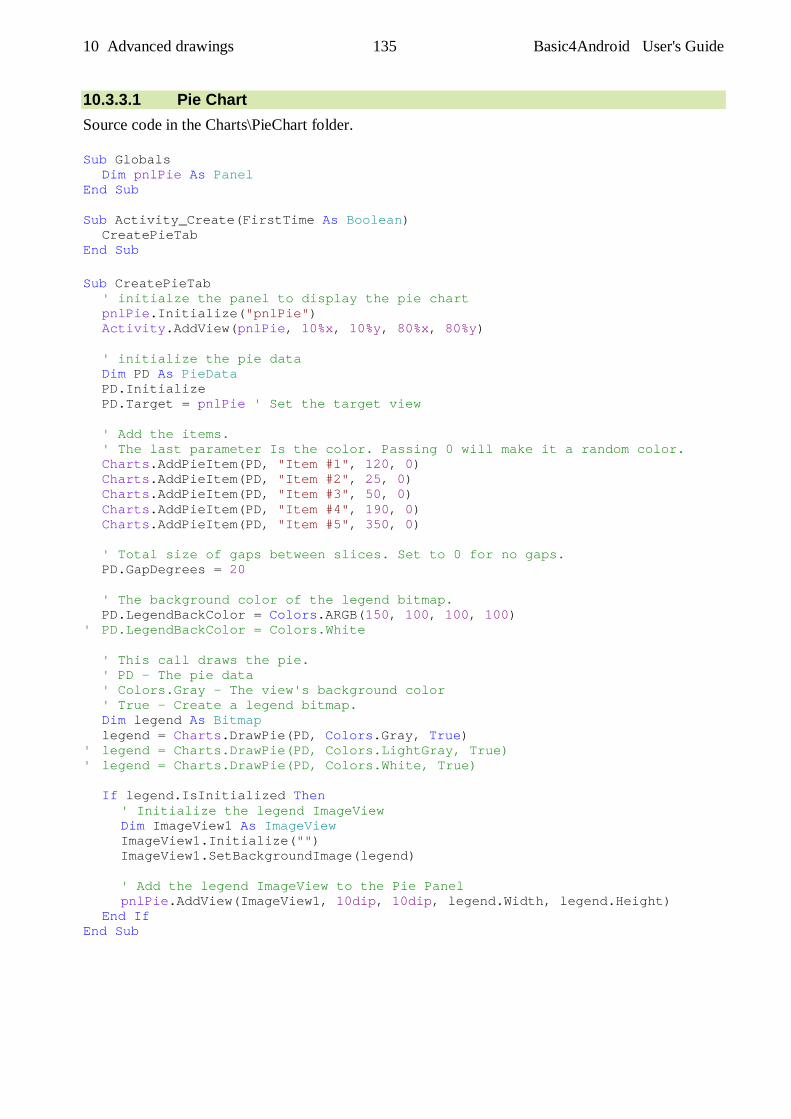
10 Advanced drawings 135 Basic4Android User's Guide
10.3.3.1 Pie Chart Source code in the Charts\PieChart folder. Sub Globals Dim pnlPie As Panel End Sub Sub Activity_Create(FirstTime As Boolean) CreatePieTab End Sub Sub CreatePieTab ' initialze the panel to display the pie chart pnlPie.Initialize("pnlPie") Activity.AddView(pnlPie, 10%x, 10%y, 80%x, 80%y) ' initialize the pie data Dim PD As PieData PD.Initialize PD.Target = pnlPie ' Set the target view ' Add the items. ' The last parameter Is the color. Passing 0 will make it a random color. Charts.AddPieItem(PD, "Item #1", 120, 0) Charts.AddPieItem(PD, "Item #2", 25, 0) Charts.AddPieItem(PD, "Item #3", 50, 0) Charts.AddPieItem(PD, "Item #4", 190, 0) Charts.AddPieItem(PD, "Item #5", 350, 0) ' Total size of gaps between slices. Set to 0 for no gaps. PD.GapDegrees = 20 ' The background color of the legend bitmap. PD.LegendBackColor = Colors.ARGB(150, 100, 100, 100) ' PD.LegendBackColor = Colors.White ' This call draws the pie. ' PD - The pie data ' Colors.Gray - The view's background color ' True - Create a legend bitmap. Dim legend As Bitmap legend = Charts.DrawPie(PD, Colors.Gray, True) ' legend = Charts.DrawPie(PD, Colors.LightGray, True) ' legend = Charts.DrawPie(PD, Colors.White, True) If legend.IsInitialized Then ' Initialize the legend ImageView Dim ImageView1 As ImageView ImageView1.Initialize("") ImageView1.SetBackgroundImage(legend) ' Add the legend ImageView to the Pie Panel pnlPie.AddView(ImageView1, 10dip, 10dip, legend.Width, legend.Height) End If End Sub
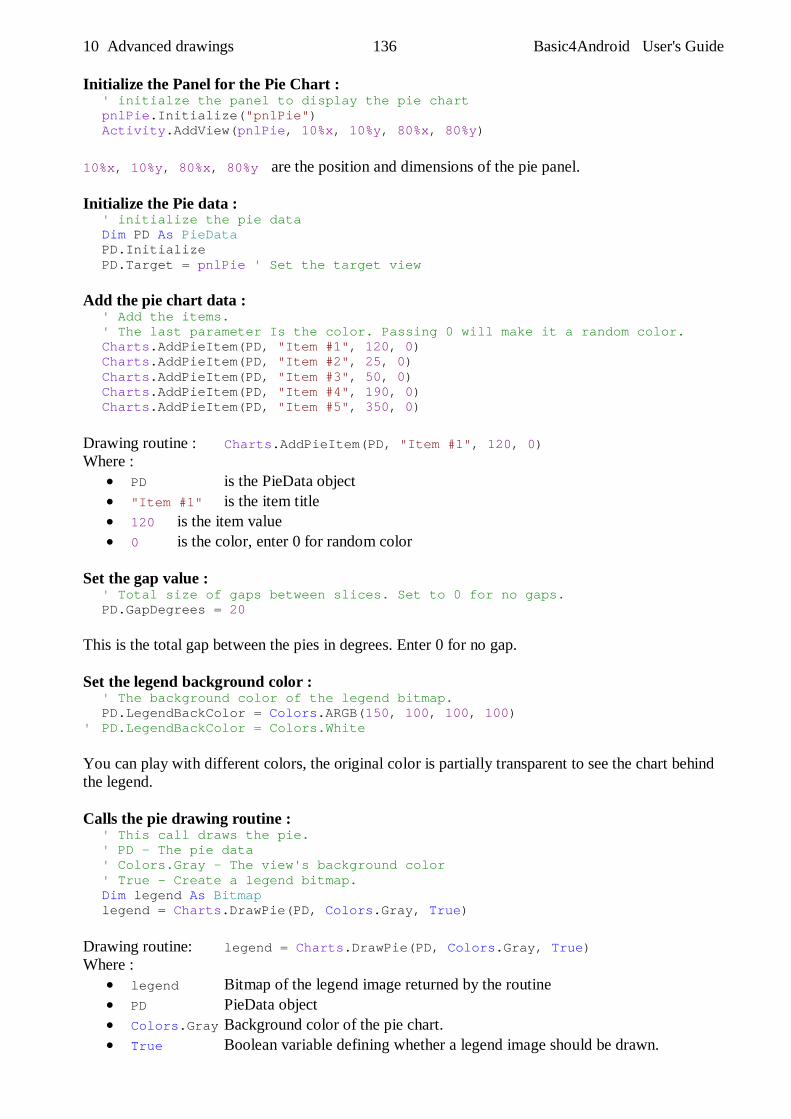
10 Advanced drawings 136 Basic4Android User's Guide
Initialize the Panel for the Pie Chart : ' initialze the panel to display the pie chart pnlPie.Initialize("pnlPie") Activity.AddView(pnlPie, 10%x, 10%y, 80%x, 80%y) 10%x, 10%y, 80%x, 80%y are the position and dimensions of the pie panel. Initialize the Pie data : ' initialize the pie data Dim PD As PieData PD.Initialize PD.Target = pnlPie ' Set the target view Add the pie chart data : ' Add the items. ' The last parameter Is the color. Passing 0 will make it a random color. Charts.AddPieItem(PD, "Item #1", 120, 0) Charts.AddPieItem(PD, "Item #2", 25, 0) Charts.AddPieItem(PD, "Item #3", 50, 0) Charts.AddPieItem(PD, "Item #4", 190, 0) Charts.AddPieItem(PD, "Item #5", 350, 0) Drawing routine : Charts.AddPieItem(PD, "Item #1", 120, 0) Where :
PD is the PieData object "Item #1" is the item title 120 is the item value 0 is the color, enter 0 for random color
Set the gap value : ' Total size of gaps between slices. Set to 0 for no gaps. PD.GapDegrees = 20 This is the total gap between the pies in degrees. Enter 0 for no gap. Set the legend background color : ' The background color of the legend bitmap. PD.LegendBackColor = Colors.ARGB(150, 100, 100, 100) ' PD.LegendBackColor = Colors.White You can play with different colors, the original color is partially transparent to see the chart behind the legend. Calls the pie drawing routine : ' This call draws the pie. ' PD - The pie data ' Colors.Gray - The view's background color ' True - Create a legend bitmap. Dim legend As Bitmap legend = Charts.DrawPie(PD, Colors.Gray, True) Drawing routine: legend = Charts.DrawPie(PD, Colors.Gray, True) Where :
legend Bitmap of the legend image returned by the routine PD PieData object Colors.Gray Background color of the pie chart. True Boolean variable defining whether a legend image should be drawn.
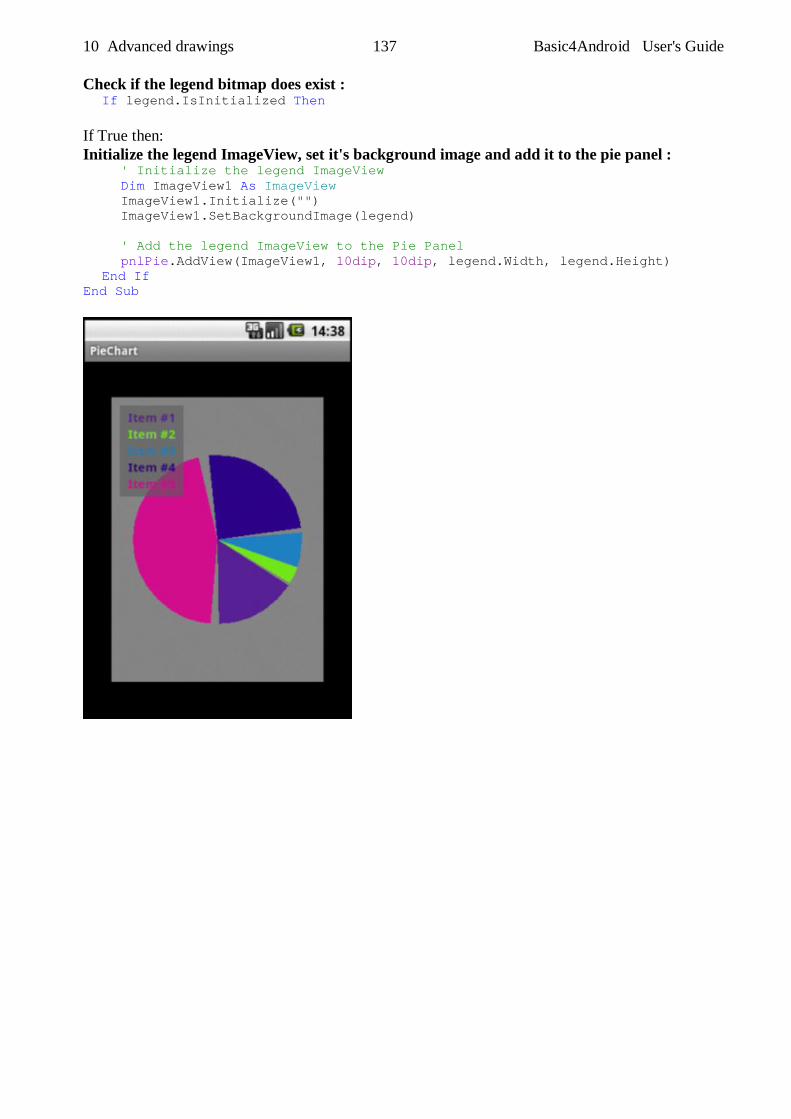
10 Advanced drawings 137 Basic4Android User's Guide
Check if the legend bitmap does exist : If legend.IsInitialized Then If True then: Initialize the legend ImageView, set it's background image and add it to the pie panel : ' Initialize the legend ImageView Dim ImageView1 As ImageView ImageView1.Initialize("") ImageView1.SetBackgroundImage(legend) ' Add the legend ImageView to the Pie Panel pnlPie.AddView(ImageView1, 10dip, 10dip, legend.Width, legend.Height) End If End Sub
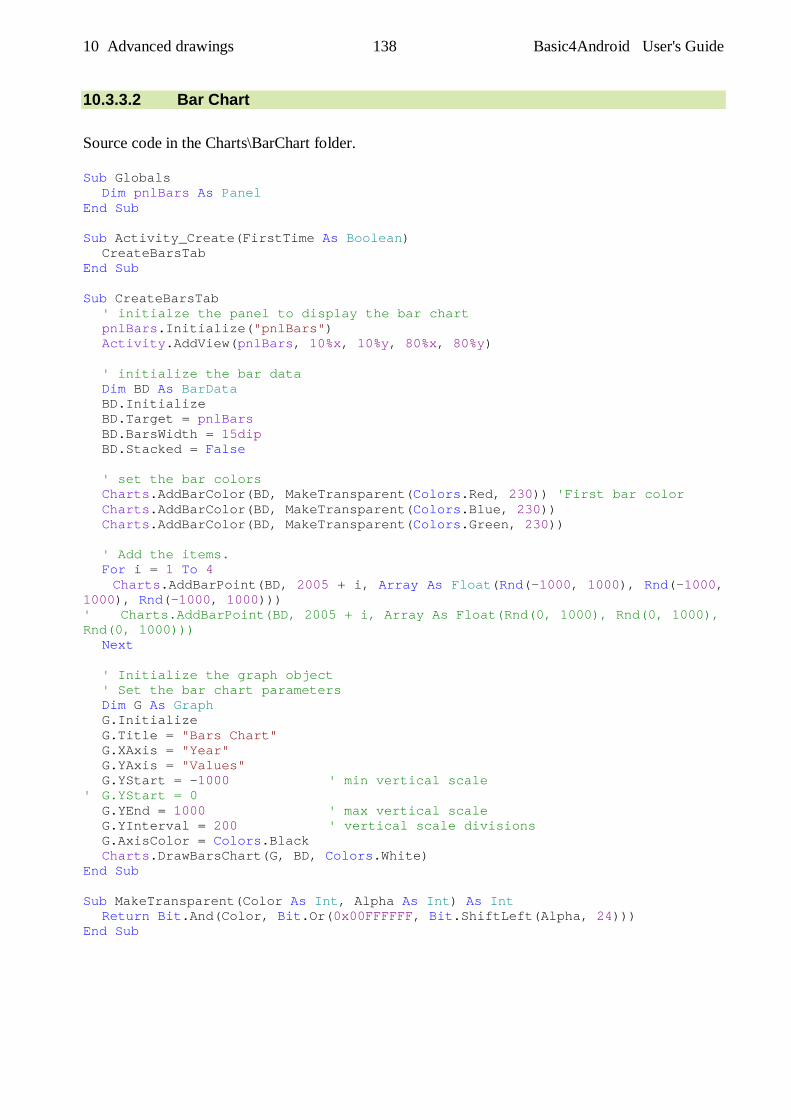
10 Advanced drawings 138 Basic4Android User's Guide
10.3.3.2 Bar Chart Source code in the Charts\BarChart folder. Sub Globals Dim pnlBars As Panel End Sub Sub Activity_Create(FirstTime As Boolean) CreateBarsTab End Sub Sub CreateBarsTab ' initialze the panel to display the bar chart pnlBars.Initialize("pnlBars") Activity.AddView(pnlBars, 10%x, 10%y, 80%x, 80%y) ' initialize the bar data Dim BD As BarData BD.Initialize BD.Target = pnlBars BD.BarsWidth = 15dip BD.Stacked = False ' set the bar colors Charts.AddBarColor(BD, MakeTransparent(Colors.Red, 230)) 'First bar color Charts.AddBarColor(BD, MakeTransparent(Colors.Blue, 230)) Charts.AddBarColor(BD, MakeTransparent(Colors.Green, 230)) ' Add the items. For i = 1 To 4 Charts.AddBarPoint(BD, 2005 + i, Array As Float(Rnd(-1000, 1000), Rnd(-1000, 1000), Rnd(-1000, 1000))) ' Charts.AddBarPoint(BD, 2005 + i, Array As Float(Rnd(0, 1000), Rnd(0, 1000), Rnd(0, 1000))) Next ' Initialize the graph object ' Set the bar chart parameters Dim G As Graph G.Initialize G.Title = "Bars Chart" G.XAxis = "Year" G.YAxis = "Values" G.YStart = -1000 ' min vertical scale ' G.YStart = 0 G.YEnd = 1000 ' max vertical scale G.YInterval = 200 ' vertical scale divisions G.AxisColor = Colors.Black Charts.DrawBarsChart(G, BD, Colors.White) End Sub Sub MakeTransparent(Color As Int, Alpha As Int) As Int Return Bit.And(Color, Bit.Or(0x00FFFFFF, Bit.ShiftLeft(Alpha, 24))) End Sub
10 Advanced drawings 139 Basic4Android User's Guide
Initialize the Panel for the Bar Chart : ' initialze the panel to display the bar chart pnlBars.Initialize("pnlBars") Activity.AddView(pnlBars, 10%x, 10%y, 80%x, 80%y) 10%x, 10%y, 80%x, 80%y are the position and dimensions of the bar panel. Initialize the Bar data : ' initialize the bar data Dim BD As BarData BD.Initialize BD.Target = pnlBars BD.BarsWidth = 15dip BD.Stacked = False BD.Stacked = False indicates that it is a BarChart and not a StackedBarChart. Set the bar colors : ' set the bar colors Charts.AddBarColor(BD, MakeTransparent(Colors.Red, 230)) 'First bar color Charts.AddBarColor(BD, MakeTransparent(Colors.Blue, 230)) Charts.AddBarColor(BD, MakeTransparent(Colors.Green, 230)) Add the bar data : ' Add the items. For i = 1 To 4 Charts.AddBarPoint(BD, 2005 + i, Array As Float(Rnd(-1000, 1000), Rnd(-1000, 1000), Rnd(-1000, 1000))) ' Charts.AddBarPoint(BD, 2005 + i, Array As Float(Rnd(0, 1000), Rnd(0, 1000), Rnd(0, 1000))) Next A bar chart can have n sets of m values. Loop to add the sets, in the example n = 4. For i = 1 To 4 Routine adding the bar values, in the example m = 3 : Charts.AddBarPoint(BD, 2005 + i, Array As Float(Rnd(-1000, 1000), Rnd(-1000, 1000), Rnd(-1000, 1000))) Where :
BD BarData object 2005 + i Horizontal axis tag Array As Float Array of values the m values per set.
The bar chart can draw negative and positive values. This is not the case for stacked bar charts.
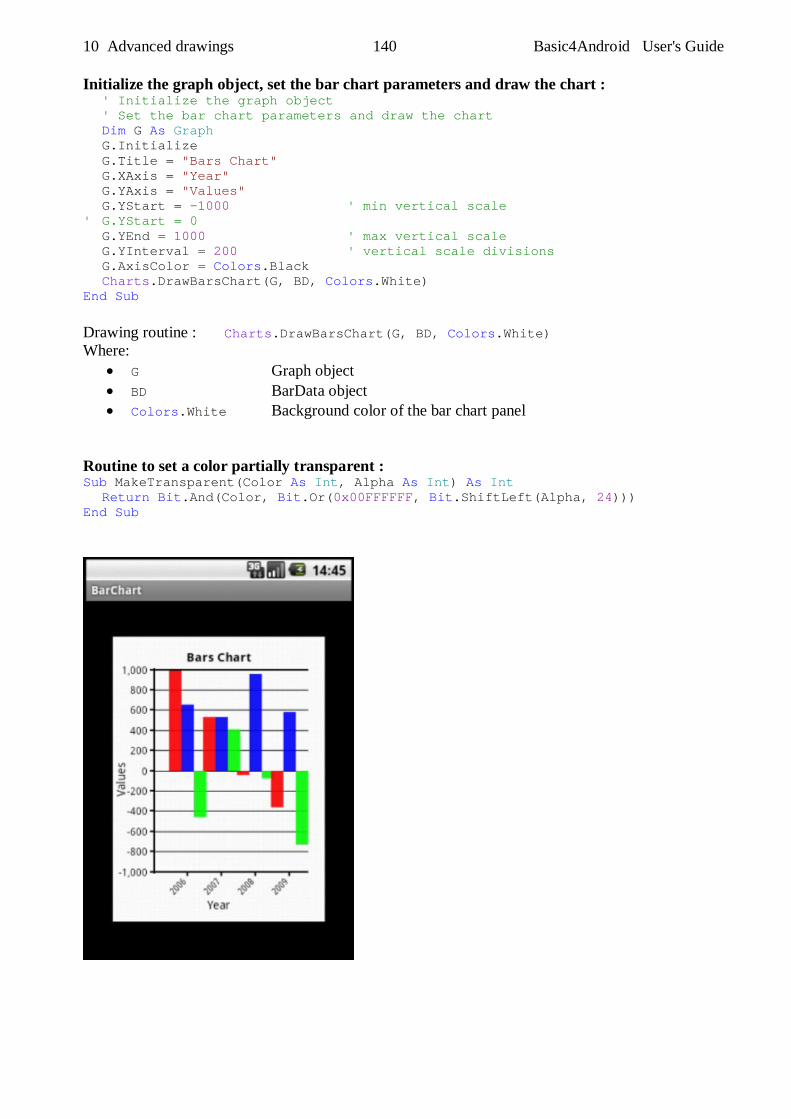
10 Advanced drawings 140 Basic4Android User's Guide
Initialize the graph object, set the bar chart parameters and draw the chart : ' Initialize the graph object ' Set the bar chart parameters and draw the chart Dim G As Graph G.Initialize G.Title = "Bars Chart" G.XAxis = "Year" G.YAxis = "Values" G.YStart = -1000 ' min vertical scale ' G.YStart = 0 G.YEnd = 1000 ' max vertical scale G.YInterval = 200 ' vertical scale divisions G.AxisColor = Colors.Black Charts.DrawBarsChart(G, BD, Colors.White) End Sub Drawing routine : Charts.DrawBarsChart(G, BD, Colors.White) Where:
G Graph object BD BarData object Colors.White Background color of the bar chart panel
Routine to set a color partially transparent : Sub MakeTransparent(Color As Int, Alpha As Int) As Int Return Bit.And(Color, Bit.Or(0x00FFFFFF, Bit.ShiftLeft(Alpha, 24))) End Sub
10 Advanced drawings 141 Basic4Android User's Guide
10.3.3.3 Stacked Bar Chart Source code in the Charts\StackedBarChart folder. For details, look at the Bar Chart chapter. Sub Globals Dim pnlStackedBars As Panel End Sub Sub Activity_Create(FirstTime As Boolean) CreateStackedBarsTab End Sub Sub CreateStackedBarsTab ' initialze the panel to display the stacked bar chart pnlStackedBars.Initialize("pnlStackedBars") Activity.AddView(pnlStackedBars, 10%x, 10%y, 80%x, 80%y) ' initialize the bar data Dim BD As BarData BD.Initialize BD.Target = pnlStackedBars BD.BarsWidth = 40dip BD.Stacked = True 'Makes it a stacked bars chart ' set the bar colors Charts.AddBarColor(BD, MakeTransparent(Colors.Red, 230)) 'First bar color Charts.AddBarColor(BD, MakeTransparent(Colors.Blue, 230)) Charts.AddBarColor(BD, MakeTransparent(Colors.Green, 230)) ' Add the items. For i = 1 To 4 Charts.AddBarPoint(BD, 2005 + i, Array As Float(Rnd(0, 400), Rnd(0, 400), Rnd(0, 400))) Next ' Initialize the graph object ' Set the bar chart parameters Dim G As Graph G.Initialize G.Title = "Stacked Bars Chart" G.XAxis = "Year" G.YAxis = "Values" G.YStart = 0 G.YEnd = 1000 G.YInterval = 100 G.AxisColor = Colors.Black Charts.DrawBarsChart(G, BD, Colors.White) End Sub Sub MakeTransparent(Color As Int, Alpha As Int) As Int Return Bit.And(Color, Bit.Or(0x00FFFFFF, Bit.ShiftLeft(Alpha, 24))) End Sub The routine is exactly the same as for Bar Charts. The only difference is the bar with that is wider and the BD.Stacked parameter is True. BD.BarsWidth = 40dip BD.Stacked = True 'Makes it a stacked bars chart
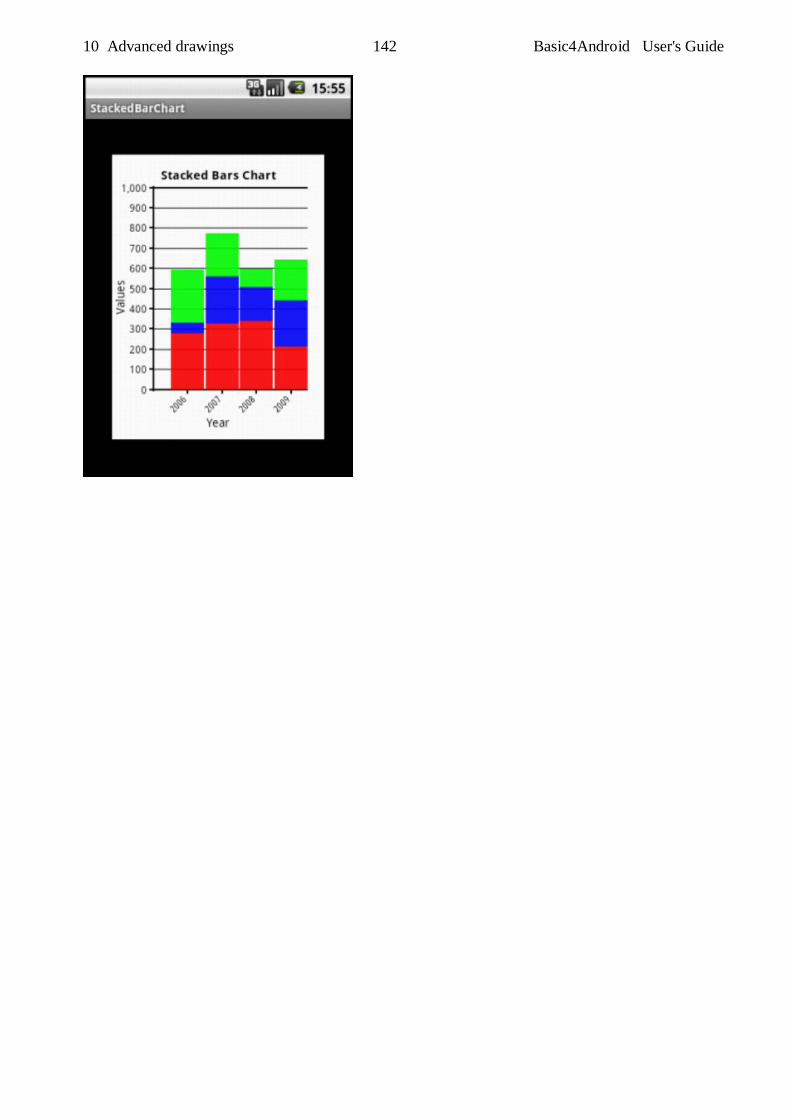
10 Advanced drawings 142 Basic4Android User's Guide
10 Advanced drawings 143 Basic4Android User's Guide
10.3.3.4 Lines Chart Source code in the Charts\LinesChart folder. The routine can draw one or more lines, the difference is explained below. Sub Globals Dim pnlLines As Panel End Sub Sub Activity_Create(FirstTime As Boolean) CreateLinesTab End Sub Sub CreateLinesTab ' Initialze the panel to display the lines chart pnlLines.Initialize("pnlLines") Activity.AddView(pnlLines, 10%x, 10%y, 80%x, 80%y) ' Initialize the line data Dim LD As LineData LD.Initialize LD.Target = pnlLines ' Set the line colors Charts.AddLineColor(LD, Colors.Red) 'First line color Charts.AddLineColor(LD, Colors.Blue) 'Second line color ' Add the line points. For i = 0 To 360 Step 10 ' In the case of 2 lines or more we are adding an array of values. ' One for each line. ' Make sure to create an array for each point. ' You cannot reuse a single array for all points. Charts.AddLineMultiplePoints(LD, i, Array As Float(SinD(i), CosD(i)), i Mod 90 = 0) Next ' Initialize the graph object ' Set the line chart parameters and draw the line chart Dim G As Graph G.Initialize G.Title = "2 Lines Chart (Sine & Cosine)" G.XAxis = "Degrees" G.YAxis = "Values" G.YStart = -1 G.YEnd = 1 G.YInterval = 0.2 G.AxisColor = Colors.Black Charts.DrawLineChart(G, LD, Colors.White) End Sub
10 Advanced drawings 144 Basic4Android User's Guide
Initialize the Panel for the Lines Chart : ' Initialze the panel to display the lines chart pnlLines.Initialize("pnlLines") Activity.AddView(pnlLines, 10%x, 10%y, 80%x, 80%y) 10%x, 10%y, 80%x, 80%y are the position and dimensions of the lines panel. Initialize the Lines data : ' Initialize the line data Dim LD As LineData LD.Initialize LD.Target = pnlLines Set the line colors : ' Set the line colors Charts.AddLineColor(LD, Colors.Red) 'First line color Charts.AddLineColor(LD, Colors.Blue) 'Second line color Add the lines data : ' Add the line points. For i = 0 To 360 Step 10 ' In this case we are adding an array of two values. One for each line. ' Make sure to create an array for each point. ' You cannot reuse a single Array For all points. Charts.AddLineMultiplePoints(LD, i, Array As Float(SinD(i), CosD(i)), i Mod 90 = 0) Next In this part of the routine we generate the values for each line at each point. Routine adding the line values : Charts.AddLineMultiplePoints(LD, i, Array As Float(SinD(i), CosD(i)), i Mod 90 = 0) Where :
LD LineData object i X value of the horizontal axis, can be different than i. Array As Float(SinD(i), CosD(i))
Array of Y values for index i In the example there are 2 lines : SinD(i) and CosD(i) For a single line chart we could have this statement : Charts.AddLineMultiplePoints(LD, i, SinD(i), i Mod 90 = 0) For a three line chart we could have this statement : Charts.AddLineMultiplePoints(LD, i, Array As Float(Val1, Val2, Val3), i Mod 90 = 0)
i Mod 90 = 0 When true then a horizontal tag, with the value of i, is displayed on the horizontal axis. i Mod 90 = 0 is equal to the reminder of i / 90, the reminder is true only when i = 0, 90, 180, 270 or 360.
The general routine would look like this: Charts.AddLineMultiplePoints(LD, x, Array As Float(Val1, Val2, ... , ValN), TagFunction) TagFunction is a function that is true when we want to have a tag on the horizontal axis.
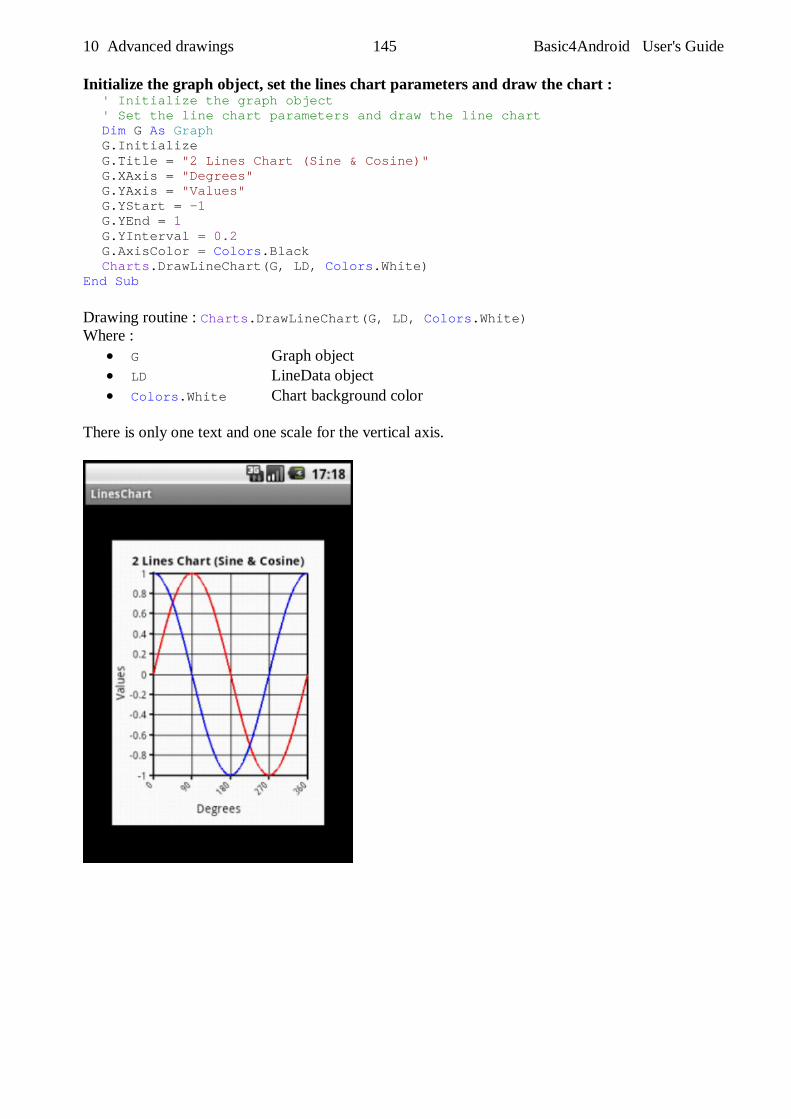
10 Advanced drawings 145 Basic4Android User's Guide
Initialize the graph object, set the lines chart parameters and draw the chart : ' Initialize the graph object ' Set the line chart parameters and draw the line chart Dim G As Graph G.Initialize G.Title = "2 Lines Chart (Sine & Cosine)" G.XAxis = "Degrees" G.YAxis = "Values" G.YStart = -1 G.YEnd = 1 G.YInterval = 0.2 G.AxisColor = Colors.Black Charts.DrawLineChart(G, LD, Colors.White) End Sub Drawing routine : Charts.DrawLineChart(G, LD, Colors.White) Where :
G Graph object LD LineData object Colors.White Chart background color
There is only one text and one scale for the vertical axis.
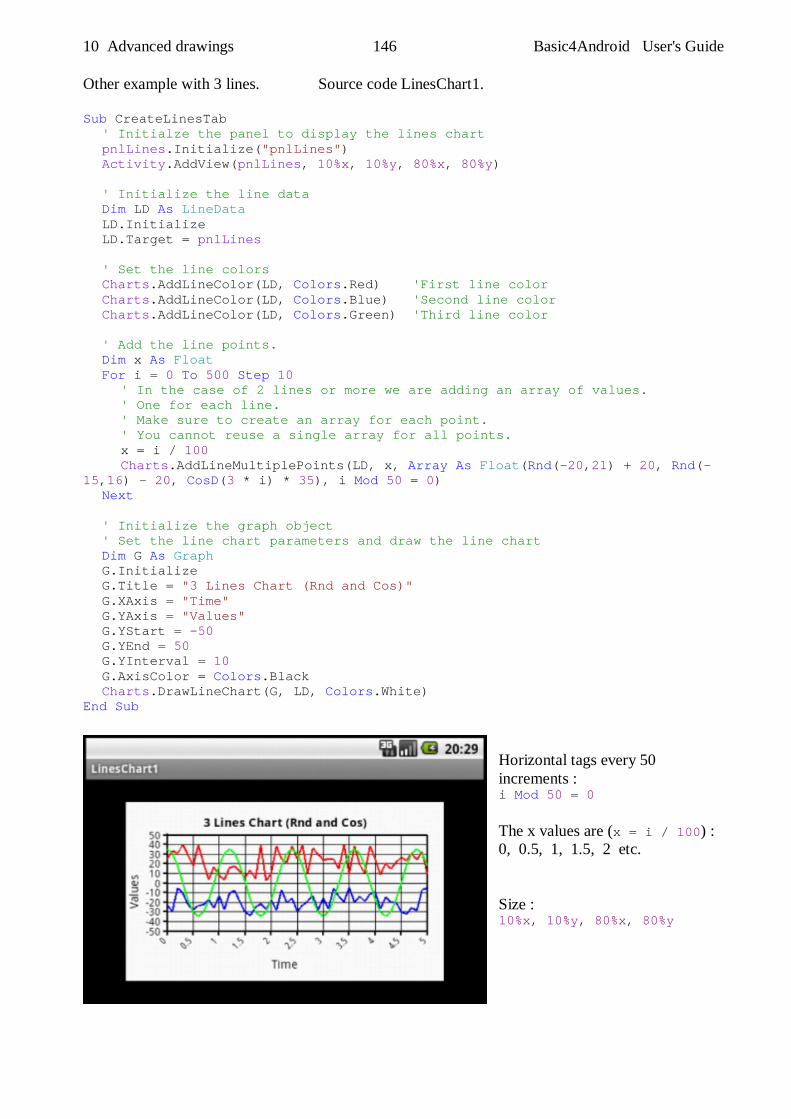
10 Advanced drawings 146 Basic4Android User's Guide
Other example with 3 lines. Source code LinesChart1. Sub CreateLinesTab ' Initialze the panel to display the lines chart pnlLines.Initialize("pnlLines") Activity.AddView(pnlLines, 10%x, 10%y, 80%x, 80%y) ' Initialize the line data Dim LD As LineData LD.Initialize LD.Target = pnlLines ' Set the line colors Charts.AddLineColor(LD, Colors.Red) 'First line color Charts.AddLineColor(LD, Colors.Blue) 'Second line color Charts.AddLineColor(LD, Colors.Green) 'Third line color ' Add the line points. Dim x As Float For i = 0 To 500 Step 10 ' In the case of 2 lines or more we are adding an array of values. ' One for each line. ' Make sure to create an array for each point. ' You cannot reuse a single array for all points. x = i / 100 Charts.AddLineMultiplePoints(LD, x, Array As Float(Rnd(-20,21) + 20, Rnd(-15,16) - 20, CosD(3 * i) * 35), i Mod 50 = 0) Next ' Initialize the graph object ' Set the line chart parameters and draw the line chart Dim G As Graph G.Initialize G.Title = "3 Lines Chart (Rnd and Cos)" G.XAxis = "Time" G.YAxis = "Values" G.YStart = -50 G.YEnd = 50 G.YInterval = 10 G.AxisColor = Colors.Black Charts.DrawLineChart(G, LD, Colors.White) End Sub
Horizontal tags every 50 increments : i Mod 50 = 0 The x values are (x = i / 100) : 0, 0.5, 1, 1.5, 2 etc. Size : 10%x, 10%y, 80%x, 80%y
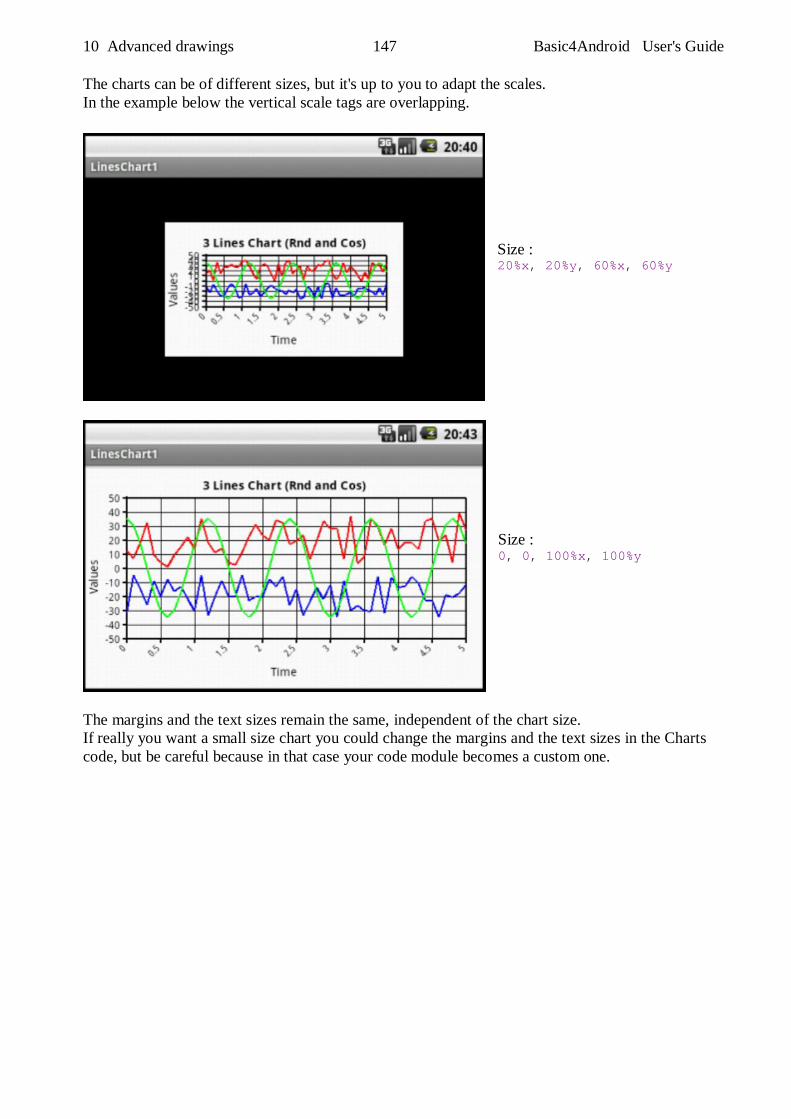
10 Advanced drawings 147 Basic4Android User's Guide
The charts can be of different sizes, but it's up to you to adapt the scales. In the example below the vertical scale tags are overlapping.
Size : 20%x, 20%y, 60%x, 60%y Size : 0, 0, 100%x, 100%y
The margins and the text sizes remain the same, independent of the chart size. If really you want a small size chart you could change the margins and the text sizes in the Charts code, but be careful because in that case your code module becomes a custom one.
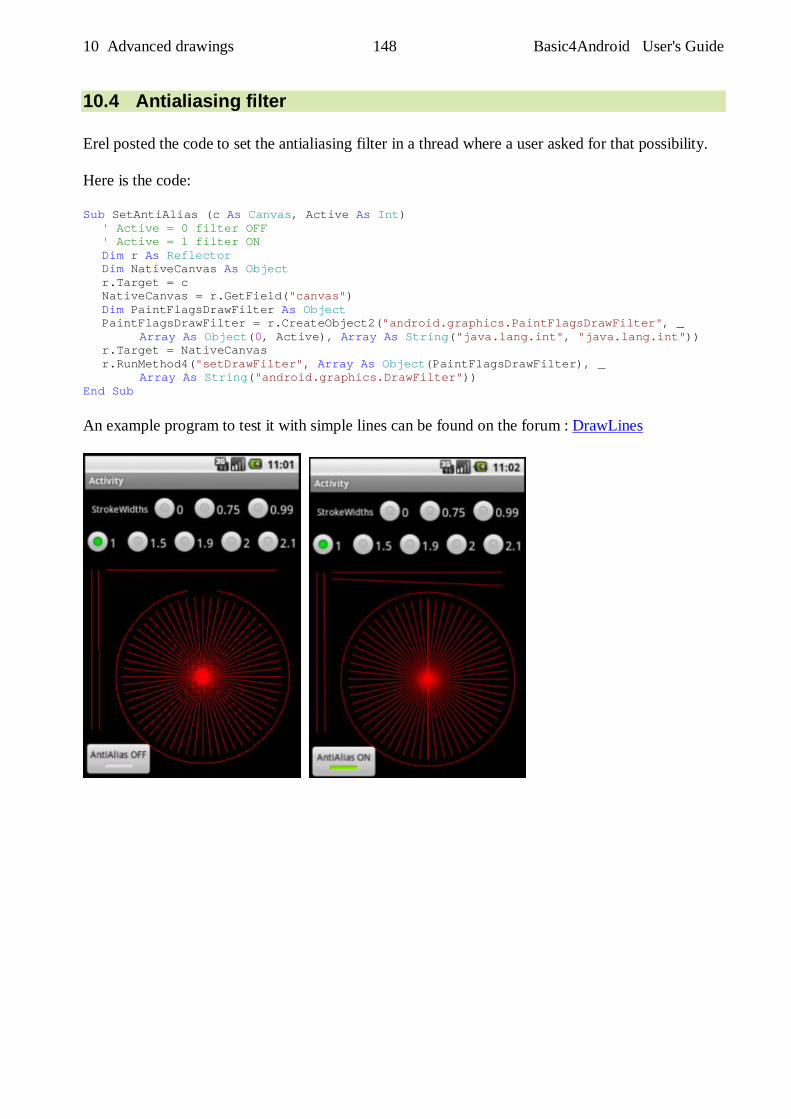
10 Advanced drawings 148 Basic4Android User's Guide
10.4 Antialiasing filter Erel posted the code to set the antialiasing filter in a thread where a user asked for that possibility. Here is the code: Sub SetAntiAlias (c As Canvas, Active As Int) ' Active = 0 filter OFF ' Active = 1 filter ON Dim r As Reflector Dim NativeCanvas As Object r.Target = c NativeCanvas = r.GetField("canvas") Dim PaintFlagsDrawFilter As Object PaintFlagsDrawFilter = r.CreateObject2("android.graphics.PaintFlagsDrawFilter", _ Array As Object(0, Active), Array As String("java.lang.int", "java.lang.int")) r.Target = NativeCanvas r.RunMethod4("setDrawFilter", Array As Object(PaintFlagsDrawFilter), _ Array As String("android.graphics.DrawFilter")) End Sub An example program to test it with simple lines can be found on the forum : DrawLines
11 Class modules 149 Basic4Android User's Guide
11 Class modules Basic4android v2.00 adds support for classes modules.
11.1 Getting started Classes definition from Wikipedia: In object-oriented programming, a class is a construct that is used to create instances of itself – referred to as class instances, class objects, instance objects or simply objects. A class defines constituent members which enable its instances to have state and behavior. Data field members (member variables or instance variables) enable a class instance to maintain state. Other kinds of members, especially methods, enable the behavior of a class instances. Classes define the type of their instances. A class usually represents a noun, such as a person, place or thing, or something nominalized. For example, a "Banana" class would represent the properties and functionality of bananas in general. A single, particular banana would be an instance of the "Banana" class, an object of the type "Banana". Example: Source code Persons in the Classes/ Persons folder. In the Person module 'Class Person module Sub Class_Globals Private FirstName, LastName As String Private BirthDate As Long End Sub Sub Initialize (aFirstName As String, aLastName As String, aBirthDate As Long) FirstName = aFirstName LastName = aLastName BirthDate = aBirthDate End Sub Public Sub GetName As String Return FirstName & " " & LastName End Sub Public Sub GetCurrentAge As Int Return GetAgeAt(DateTime.Now) End Sub Public Sub GetAgeAt(Date As Long) As Int Dim diff As Long diff = Date - BirthDate Return Floor(diff / DateTime.TicksPerDay / 365) End Sub Main module. Sub Activity_Create(FirstTime As Boolean) Dim p As Person p.Initialize("John", "Doe", DateTime.DateParse("05/12/1970")) Log(p.GetCurrentAge) End Sub
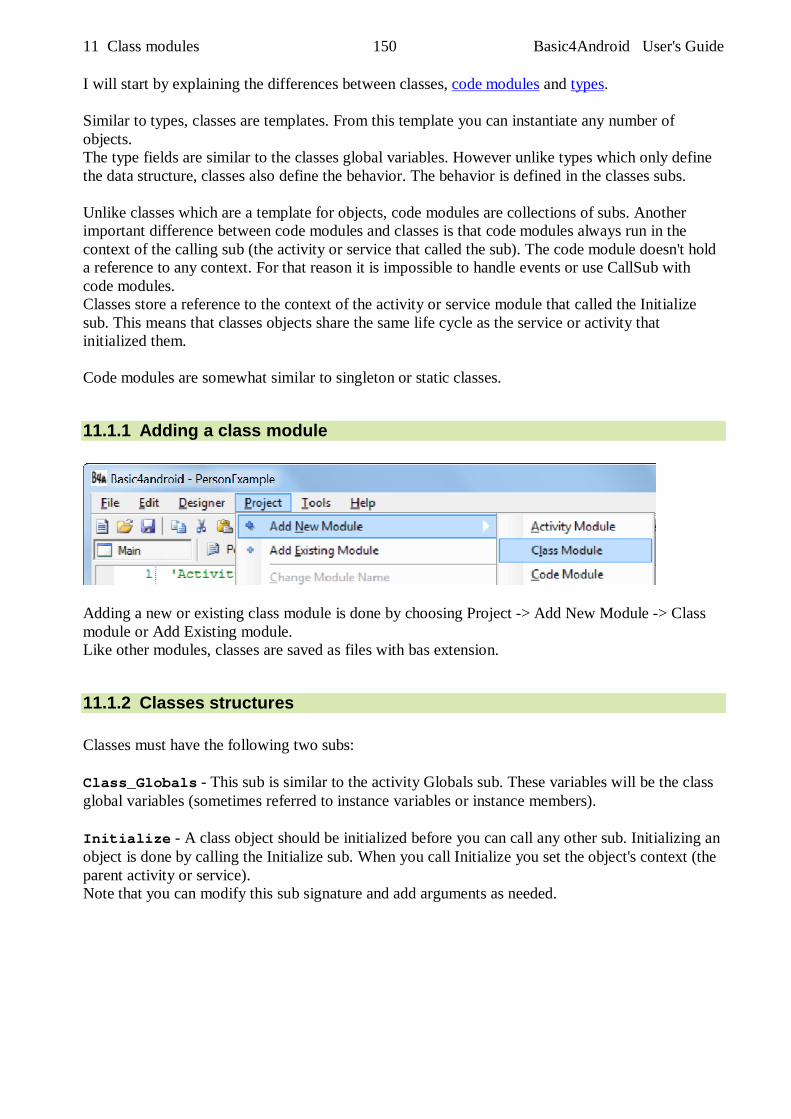
11 Class modules 150 Basic4Android User's Guide
I will start by explaining the differences between classes, code modules and types. Similar to types, classes are templates. From this template you can instantiate any number of objects. The type fields are similar to the classes global variables. However unlike types which only define the data structure, classes also define the behavior. The behavior is defined in the classes subs. Unlike classes which are a template for objects, code modules are collections of subs. Another important difference between code modules and classes is that code modules always run in the context of the calling sub (the activity or service that called the sub). The code module doesn't hold a reference to any context. For that reason it is impossible to handle events or use CallSub with code modules. Classes store a reference to the context of the activity or service module that called the Initialize sub. This means that classes objects share the same life cycle as the service or activity that initialized them. Code modules are somewhat similar to singleton or static classes.
11.1.1 Adding a class module
Adding a new or existing class module is done by choosing Project -> Add New Module -> Class module or Add Existing module. Like other modules, classes are saved as files with bas extension.
11.1.2 Classes structures Classes must have the following two subs: Class_Globals - This sub is similar to the activity Globals sub. These variables will be the class global variables (sometimes referred to instance variables or instance members). Initialize - A class object should be initialized before you can call any other sub. Initializing an object is done by calling the Initialize sub. When you call Initialize you set the object's context (the parent activity or service). Note that you can modify this sub signature and add arguments as needed.
11 Class modules 151 Basic4Android User's Guide
In the above code we created a class named Person and later instantiate an object of this type: Dim p As Person p.Initialize("John", "Doe", DateTime.DateParse("05/12/1970")) Log(p.GetCurrentAge) Calling initialize is not required if the object itself was already initialized: Dim p2 As Person p2 = p 'both variables now point to the same Person object. Log(p2.GetCurrentAge)
11.1.3 Polymorphism Polymorphism allows you to treat different types of objects that adhere to the same interface in the same way. Basic4android polymorphism is similar to the Duck typing concept. As an example we will create two classes named: Square and Circle. Each class has a sub named Draw that draws the object to a canvas: Source code Draw in the Classes/Draw folder. 'Class Square module Sub Class_Globals Private mx, my, mLength As Int End Sub 'Initializes the object. You can add parameters to this method if needed. Sub Initialize (x As Int, y As Int, length As Int) mx = x my = y mLength = length End Sub Sub Draw(c As Canvas) Dim r As Rect r.Initialize(mx, my, mx + mLength, my + mLength) c.DrawRect(r, Colors.White, False, 1dip) End Sub 'Class Circle module Sub Class_Globals Private mx, my, mRadius As Int End Sub 'Initializes the object. You can add parameters to this method if needed. Sub Initialize (x As Int, y As Int, radius As Int) mx = x my = y mRadius = radius End Sub Sub Draw(cvs As Canvas) cvs.DrawCircle(mx, my, mRadius, Colors.Yellow, False, 1dip) End Sub
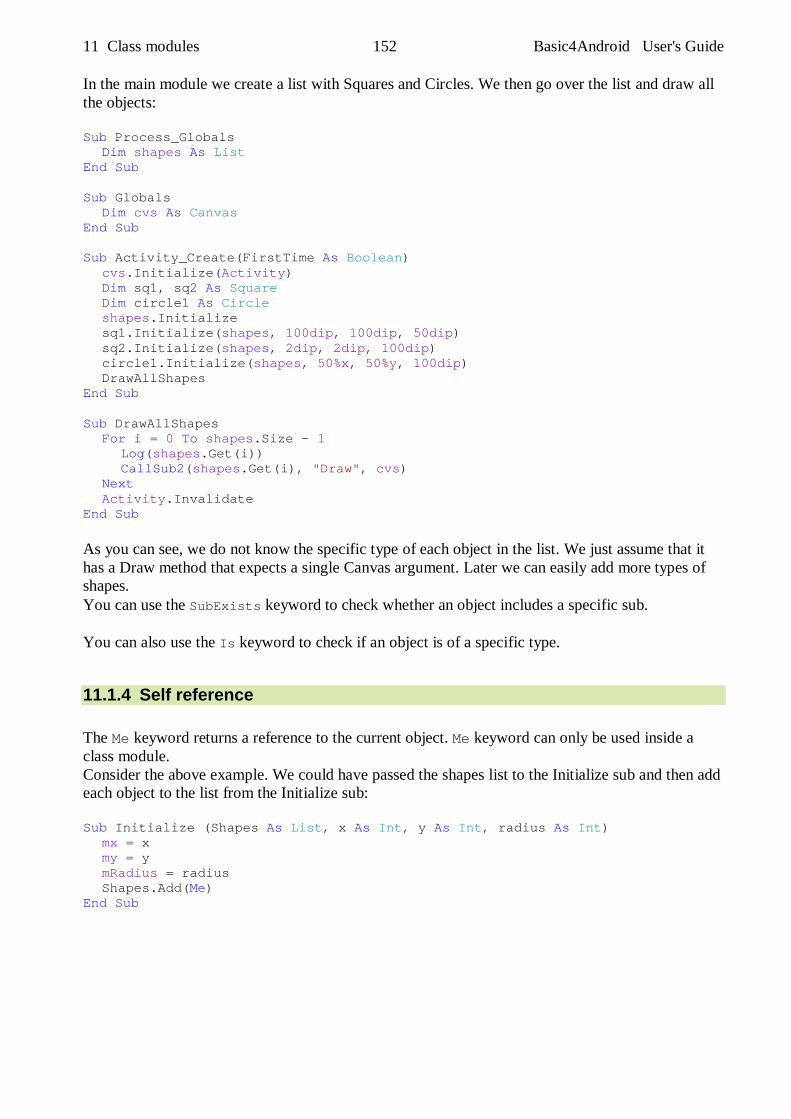
11 Class modules 152 Basic4Android User's Guide
In the main module we create a list with Squares and Circles. We then go over the list and draw all the objects: Sub Process_Globals Dim shapes As List End Sub Sub Globals Dim cvs As Canvas End Sub Sub Activity_Create(FirstTime As Boolean) cvs.Initialize(Activity) Dim sq1, sq2 As Square Dim circle1 As Circle shapes.Initialize sq1.Initialize(shapes, 100dip, 100dip, 50dip) sq2.Initialize(shapes, 2dip, 2dip, 100dip) circle1.Initialize(shapes, 50%x, 50%y, 100dip) DrawAllShapes End Sub Sub DrawAllShapes For i = 0 To shapes.Size - 1 Log(shapes.Get(i)) CallSub2(shapes.Get(i), "Draw", cvs) Next Activity.Invalidate End Sub As you can see, we do not know the specific type of each object in the list. We just assume that it has a Draw method that expects a single Canvas argument. Later we can easily add more types of shapes. You can use the SubExists keyword to check whether an object includes a specific sub. You can also use the Is keyword to check if an object is of a specific type.
11.1.4 Self reference The Me keyword returns a reference to the current object. Me keyword can only be used inside a class module. Consider the above example. We could have passed the shapes list to the Initialize sub and then add each object to the list from the Initialize sub: Sub Initialize (Shapes As List, x As Int, y As Int, radius As Int) mx = x my = y mRadius = radius Shapes.Add(Me) End Sub
11 Class modules 153 Basic4Android User's Guide
11.1.5 Activity object This point is related to the activities special life cycle. Make sure to first read the activities and processes life-cycle tutorial. Android UI elements hold a reference to the parent activity. As the OS is allowed to kill background activities in order to free memory, UI elements cannot be declared as process global variables (these variables live as long as the process lives). Such elements are named Activity objects. The same is true for custom classes. If one or more of the class global variables is of a UI type (or any activity object type) then the class will be treated as an "activity object". The meaning is that instances of this class cannot be declared as process global variables.
11 Class modules 154 Basic4Android User's Guide
11.2 Classes from the forum A certain number of examples exist in the forum. Below a non exhaustive list with comments from the develppers.
TableView - Supports tables of any size Erel This class is a much improved version of the ScrollView based Table.
CustomListView Erel A flexible list based on ScrollView
CameraEx Erel CameraEx class wraps the Camera object and using reflection and other code it extends its functionality.
CheckList Informatix I created a class to manage a list with checkboxes (but not only, you can use it for any kind of list with rows). The layout is highly customizable and you can even extend a clicked item with extra content. You can rearrange the items programmatically or manually (drag & drop).
SlideMenu corwin42 This is a class that implements a sliding menu as seen in many apps like Google+, Evernote, Facebook etc.
ScrollPanel Informatix This class displays a small panel beside the vertical scrollbar in a scrollview. You can display what you want in its label and drag it to quickly scroll.
Floating Windows Informatix With this class, you can create floating windows, move them with the finger, dock them, stick them to an edge, maximize them, customize their action bar... You fill them as you fill a panel.
ActionBar Informatix This class allows to create Action Bars. There was already a good library to do that (AHActionBar) but I needed more features and more flexibility.
Animated Sliding Menu NJDude This class will allow you to create animated sliding menus.
ICS Like Horizontal and Vertical Seekbars mabool This class implements ICS Like SeekBars.
ClsWheel klaus It allows to display different data input screens with wheels. What can be done ? You can define five different types of Wheel input screens.
If you want to develop your own classes you should have a look at the classes above to see and understand what has been done and how.
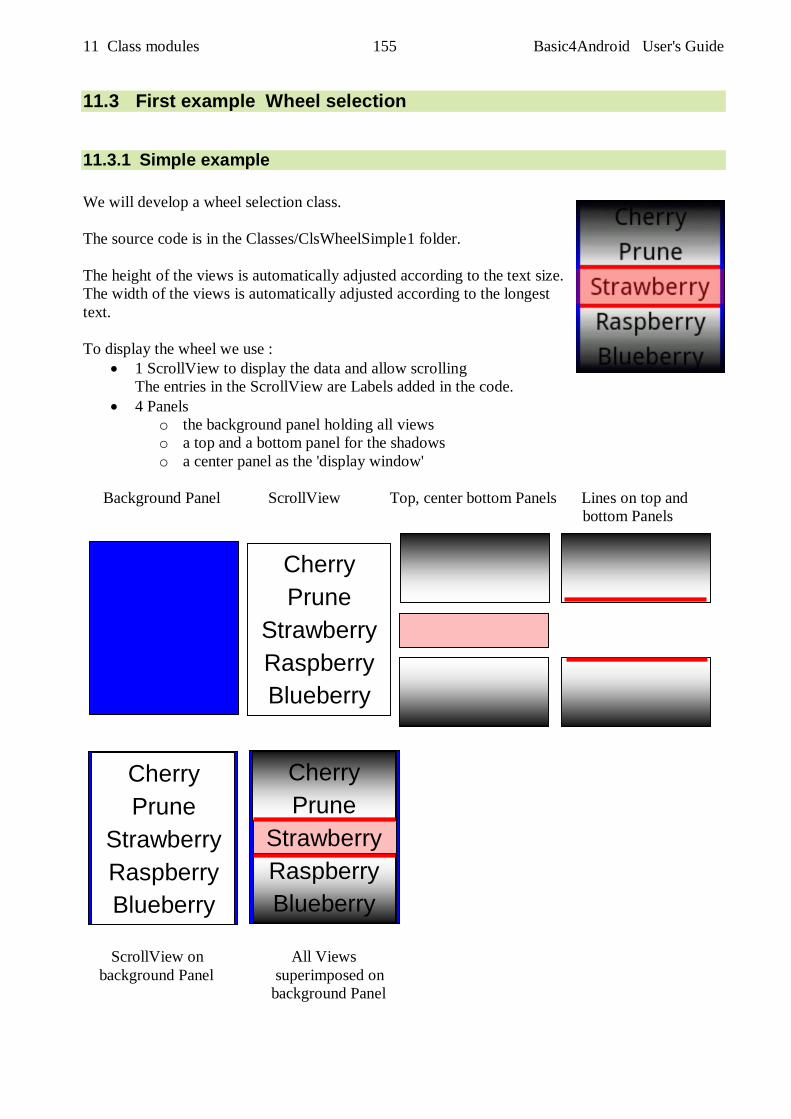
11 Class modules 155 Basic4Android User's Guide
11.3 First example Wheel selection
11.3.1 Simple example We will develop a wheel selection class. The source code is in the Classes/ClsWheelSimple1 folder. The height of the views is automatically adjusted according to the text size. The width of the views is automatically adjusted according to the longest text. To display the wheel we use :
1 ScrollView to display the data and allow scrolling The entries in the ScrollView are Labels added in the code.
4 Panels o the background panel holding all views o a top and a bottom panel for the shadows o a center panel as the 'display window'
Background Panel ScrollView Top, center bottom Panels Lines on top and bottom Panels ScrollView on All Views background Panel superimposed on background Panel
Cherry Prune
Strawberry Raspberry Blueberry
Cherry Prune
Strawberry Raspberry Blueberry
Cherry Prune
Strawberry Raspberry Blueberry
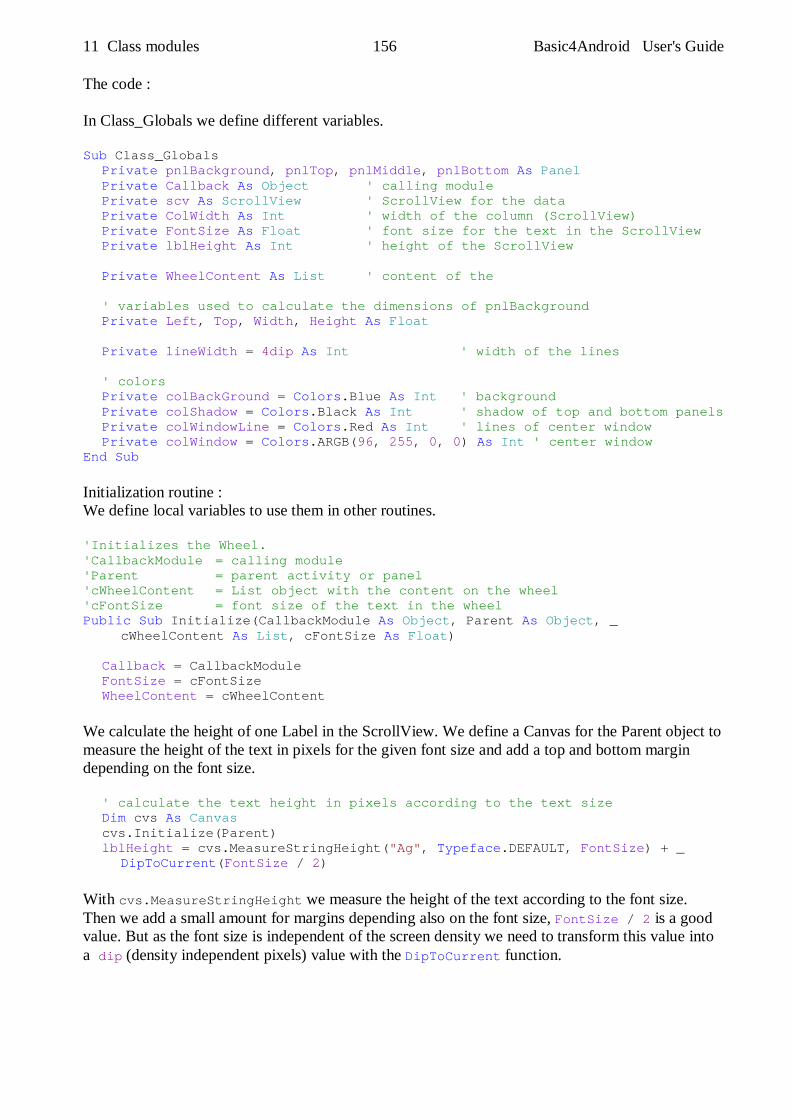
11 Class modules 156 Basic4Android User's Guide
The code : In Class_Globals we define different variables. Sub Class_Globals Private pnlBackground, pnlTop, pnlMiddle, pnlBottom As Panel Private Callback As Object ' calling module Private scv As ScrollView ' ScrollView for the data Private ColWidth As Int ' width of the column (ScrollView) Private FontSize As Float ' font size for the text in the ScrollView Private lblHeight As Int ' height of the ScrollView Private WheelContent As List ' content of the ' variables used to calculate the dimensions of pnlBackground Private Left, Top, Width, Height As Float Private lineWidth = 4dip As Int ' width of the lines ' colors Private colBackGround = Colors.Blue As Int ' background Private colShadow = Colors.Black As Int ' shadow of top and bottom panels Private colWindowLine = Colors.Red As Int ' lines of center window Private colWindow = Colors.ARGB(96, 255, 0, 0) As Int ' center window End Sub Initialization routine : We define local variables to use them in other routines. 'Initializes the Wheel. 'CallbackModule = calling module 'Parent = parent activity or panel 'cWheelContent = List object with the content on the wheel 'cFontSize = font size of the text in the wheel Public Sub Initialize(CallbackModule As Object, Parent As Object, _ cWheelContent As List, cFontSize As Float) Callback = CallbackModule FontSize = cFontSize WheelContent = cWheelContent We calculate the height of one Label in the ScrollView. We define a Canvas for the Parent object to measure the height of the text in pixels for the given font size and add a top and bottom margin depending on the font size. ' calculate the text height in pixels according to the text size Dim cvs As Canvas cvs.Initialize(Parent) lblHeight = cvs.MeasureStringHeight("Ag", Typeface.DEFAULT, FontSize) + _ DipToCurrent(FontSize / 2) With cvs.MeasureStringHeight we measure the height of the text according to the font size. Then we add a small amount for margins depending also on the font size, FontSize / 2 is a good value. But as the font size is independent of the screen density we need to transform this value into a dip (density independent pixels) value with the DipToCurrent function.
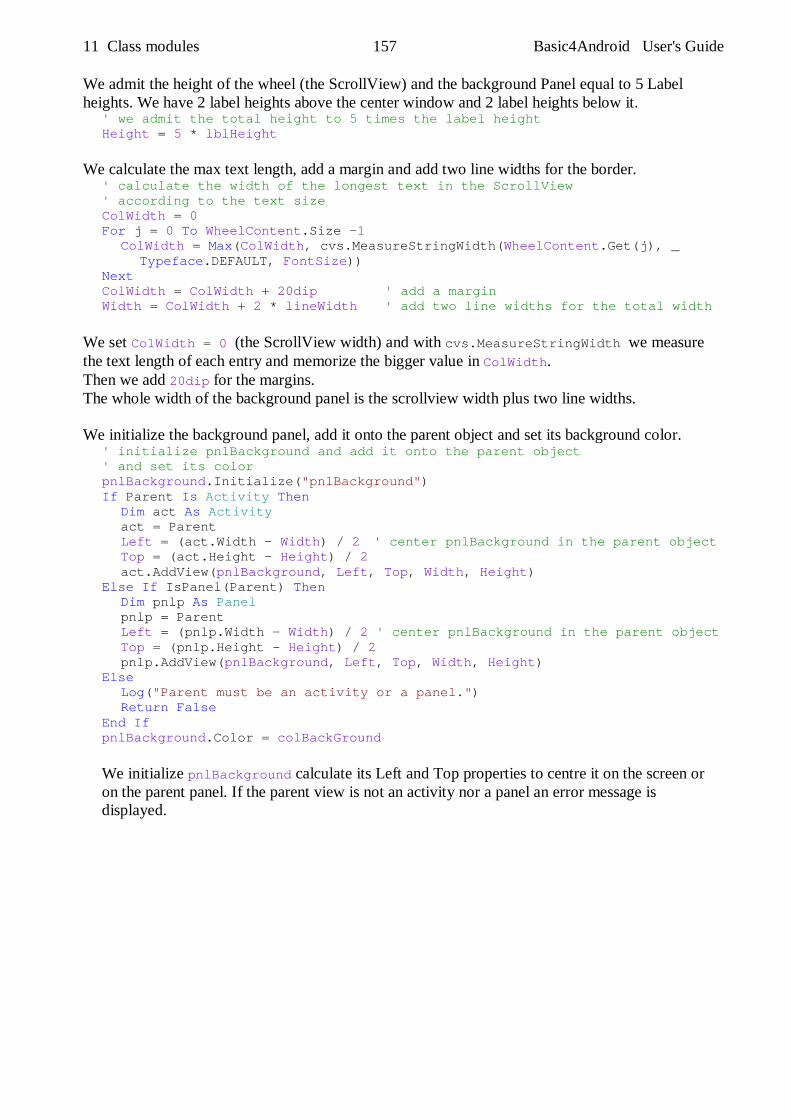
11 Class modules 157 Basic4Android User's Guide
We admit the height of the wheel (the ScrollView) and the background Panel equal to 5 Label heights. We have 2 label heights above the center window and 2 label heights below it. ' we admit the total height to 5 times the label height Height = 5 * lblHeight We calculate the max text length, add a margin and add two line widths for the border. ' calculate the width of the longest text in the ScrollView ' according to the text size ColWidth = 0 For j = 0 To WheelContent.Size -1 ColWidth = Max(ColWidth, cvs.MeasureStringWidth(WheelContent.Get(j), _ Typeface.DEFAULT, FontSize)) Next ColWidth = ColWidth + 20dip ' add a margin Width = ColWidth + 2 * lineWidth ' add two line widths for the total width We set ColWidth = 0 (the ScrollView width) and with cvs.MeasureStringWidth we measure the text length of each entry and memorize the bigger value in ColWidth. Then we add 20dip for the margins. The whole width of the background panel is the scrollview width plus two line widths. We initialize the background panel, add it onto the parent object and set its background color. ' initialize pnlBackground and add it onto the parent object ' and set its color pnlBackground.Initialize("pnlBackground") If Parent Is Activity Then Dim act As Activity act = Parent Left = (act.Width - Width) / 2 ' center pnlBackground in the parent object Top = (act.Height - Height) / 2 act.AddView(pnlBackground, Left, Top, Width, Height) Else If IsPanel(Parent) Then Dim pnlp As Panel pnlp = Parent Left = (pnlp.Width - Width) / 2 ' center pnlBackground in the parent object Top = (pnlp.Height - Height) / 2 pnlp.AddView(pnlBackground, Left, Top, Width, Height) Else Log("Parent must be an activity or a panel.") Return False End If pnlBackground.Color = colBackGround
We initialize pnlBackground calculate its Left and Top properties to centre it on the screen or on the parent panel. If the parent view is not an activity nor a panel an error message is displayed.
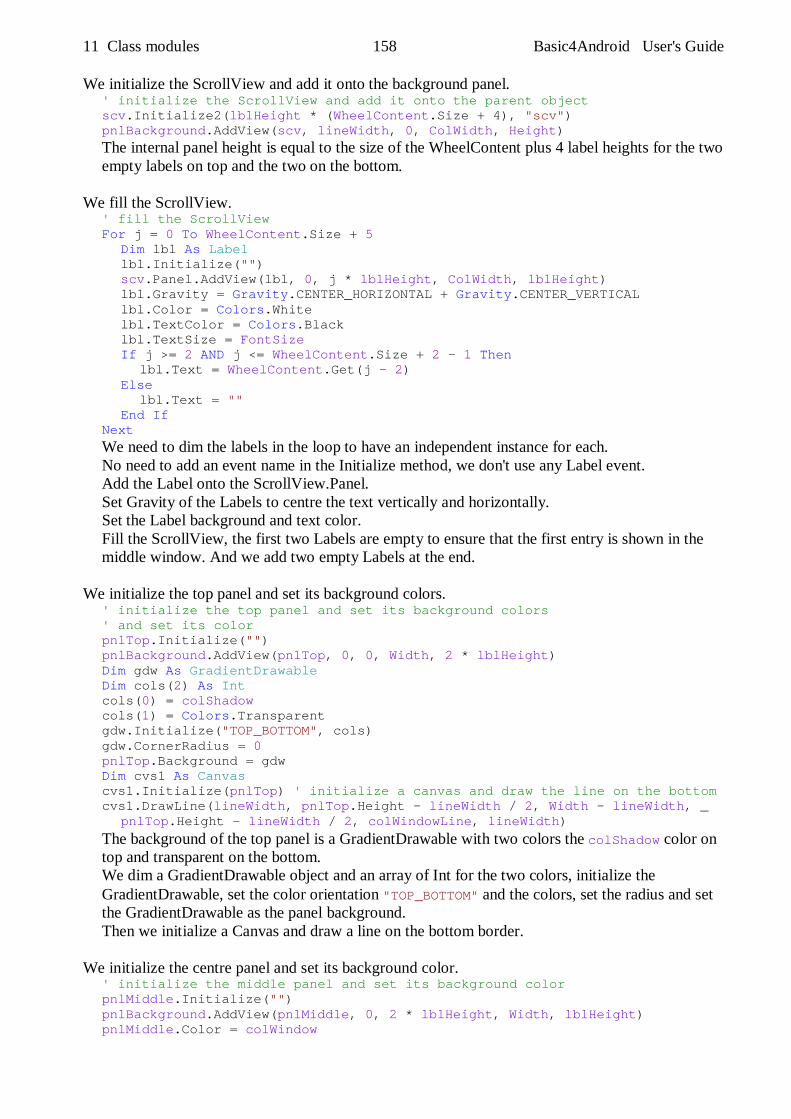
11 Class modules 158 Basic4Android User's Guide
We initialize the ScrollView and add it onto the background panel. ' initialize the ScrollView and add it onto the parent object scv.Initialize2(lblHeight * (WheelContent.Size + 4), "scv") pnlBackground.AddView(scv, lineWidth, 0, ColWidth, Height)
The internal panel height is equal to the size of the WheelContent plus 4 label heights for the two empty labels on top and the two on the bottom.
We fill the ScrollView. ' fill the ScrollView For j = 0 To WheelContent.Size + 5 Dim lbl As Label lbl.Initialize("") scv.Panel.AddView(lbl, 0, j * lblHeight, ColWidth, lblHeight) lbl.Gravity = Gravity.CENTER_HORIZONTAL + Gravity.CENTER_VERTICAL lbl.Color = Colors.White lbl.TextColor = Colors.Black lbl.TextSize = FontSize If j >= 2 AND j <= WheelContent.Size + 2 - 1 Then lbl.Text = WheelContent.Get(j - 2) Else lbl.Text = "" End If Next
We need to dim the labels in the loop to have an independent instance for each. No need to add an event name in the Initialize method, we don't use any Label event. Add the Label onto the ScrollView.Panel. Set Gravity of the Labels to centre the text vertically and horizontally. Set the Label background and text color. Fill the ScrollView, the first two Labels are empty to ensure that the first entry is shown in the middle window. And we add two empty Labels at the end.
We initialize the top panel and set its background colors. ' initialize the top panel and set its background colors ' and set its color pnlTop.Initialize("") pnlBackground.AddView(pnlTop, 0, 0, Width, 2 * lblHeight) Dim gdw As GradientDrawable Dim cols(2) As Int cols(0) = colShadow cols(1) = Colors.Transparent gdw.Initialize("TOP_BOTTOM", cols) gdw.CornerRadius = 0 pnlTop.Background = gdw Dim cvs1 As Canvas cvs1.Initialize(pnlTop) ' initialize a canvas and draw the line on the bottom cvs1.DrawLine(lineWidth, pnlTop.Height - lineWidth / 2, Width - lineWidth, _ pnlTop.Height - lineWidth / 2, colWindowLine, lineWidth)
The background of the top panel is a GradientDrawable with two colors the colShadow color on top and transparent on the bottom. We dim a GradientDrawable object and an array of Int for the two colors, initialize the GradientDrawable, set the color orientation "TOP_BOTTOM" and the colors, set the radius and set the GradientDrawable as the panel background. Then we initialize a Canvas and draw a line on the bottom border.
We initialize the centre panel and set its background color. ' initialize the middle panel and set its background color pnlMiddle.Initialize("") pnlBackground.AddView(pnlMiddle, 0, 2 * lblHeight, Width, lblHeight) pnlMiddle.Color = colWindow
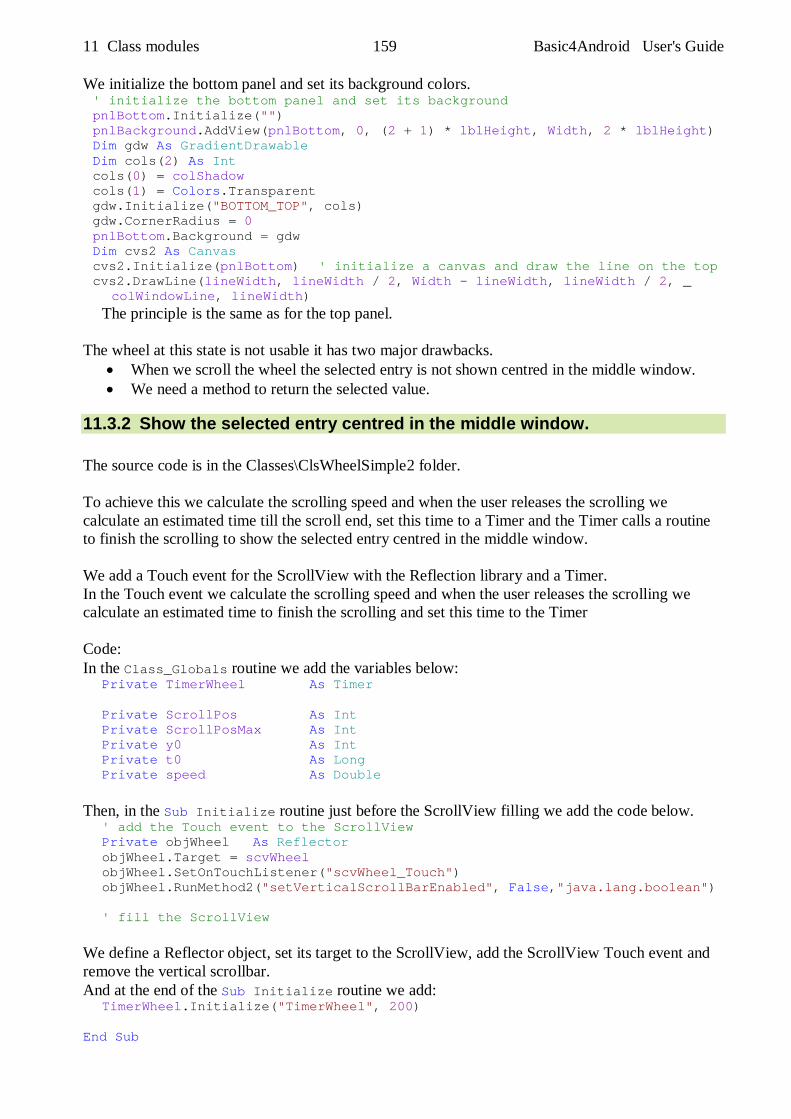
11 Class modules 159 Basic4Android User's Guide
We initialize the bottom panel and set its background colors. ' initialize the bottom panel and set its background pnlBottom.Initialize("") pnlBackground.AddView(pnlBottom, 0, (2 + 1) * lblHeight, Width, 2 * lblHeight) Dim gdw As GradientDrawable Dim cols(2) As Int cols(0) = colShadow cols(1) = Colors.Transparent gdw.Initialize("BOTTOM_TOP", cols) gdw.CornerRadius = 0 pnlBottom.Background = gdw Dim cvs2 As Canvas cvs2.Initialize(pnlBottom) ' initialize a canvas and draw the line on the top cvs2.DrawLine(lineWidth, lineWidth / 2, Width - lineWidth, lineWidth / 2, _ colWindowLine, lineWidth)
The principle is the same as for the top panel. The wheel at this state is not usable it has two major drawbacks.
When we scroll the wheel the selected entry is not shown centred in the middle window. We need a method to return the selected value.
11.3.2 Show the selected entry centred in the middle window. The source code is in the Classes\ClsWheelSimple2 folder. To achieve this we calculate the scrolling speed and when the user releases the scrolling we calculate an estimated time till the scroll end, set this time to a Timer and the Timer calls a routine to finish the scrolling to show the selected entry centred in the middle window. We add a Touch event for the ScrollView with the Reflection library and a Timer. In the Touch event we calculate the scrolling speed and when the user releases the scrolling we calculate an estimated time to finish the scrolling and set this time to the Timer Code: In the Class_Globals routine we add the variables below: Private TimerWheel As Timer Private ScrollPos As Int Private ScrollPosMax As Int Private y0 As Int Private t0 As Long Private speed As Double Then, in the Sub Initialize routine just before the ScrollView filling we add the code below. ' add the Touch event to the ScrollView Private objWheel As Reflector objWheel.Target = scvWheel objWheel.SetOnTouchListener("scvWheel_Touch") objWheel.RunMethod2("setVerticalScrollBarEnabled", False,"java.lang.boolean") ' fill the ScrollView We define a Reflector object, set its target to the ScrollView, add the ScrollView Touch event and remove the vertical scrollbar. And at the end of the Sub Initialize routine we add: TimerWheel.Initialize("TimerWheel", 200) End Sub
11 Class modules 160 Basic4Android User's Guide
Then we add the Sub scvWheel_Touch routine : Private Sub scvWheel_Touch(ViewTag As Object, Action As Int, X As Float, _ Y As Float, MotionEvent As Object) As Boolean Dim dt As Long Dim tt As Int Select Action Case 0 ' ACTION_DOWN t0 = DateTime.Now y0 = Y Case 1 ' ACTION_UP tt = Max(10, -Logarithm(1 / speed, cE) * 110) TimerWheel.Interval = tt TimerWheel.Enabled = True Case 2 ' ACTION_MOVE dt = (DateTime.Now - t0) speed = Abs((Y - y0) / dt * 250) t0 = DateTime.Now y0 = Y End Select Return False End Sub In ACTION_DOWN we set the variables t0 to the current time and y0 to the current y position. In ACTION_MOVE we calculate the time difference dt between the current time and the previous move. Then we calculate the moving speed, the value of 250 was determined by trials. And we set the variables t0 to the current time and y0 to the current y position. In ACTION_UP we calculate the estimated time tt till scroll end. The equation is based on a logarithmic decay and the value of 110 was determined by trials. Then we set this time to the Timer.Interval and enable the Timer. The TimerWheel_Tick routine: Private Sub TimerWheel_Tick TimerWheel.Enabled = False scvWheel.ScrollPosition = Floor(scvWheel.ScrollPosition / lblHeight + .5) * _ lblHeight End Sub We disable the Timer and calculate the final ScrollPosition as a multiple of the lblHeight with the current scroll position and set it to the scvWheel.ScrollPosition.
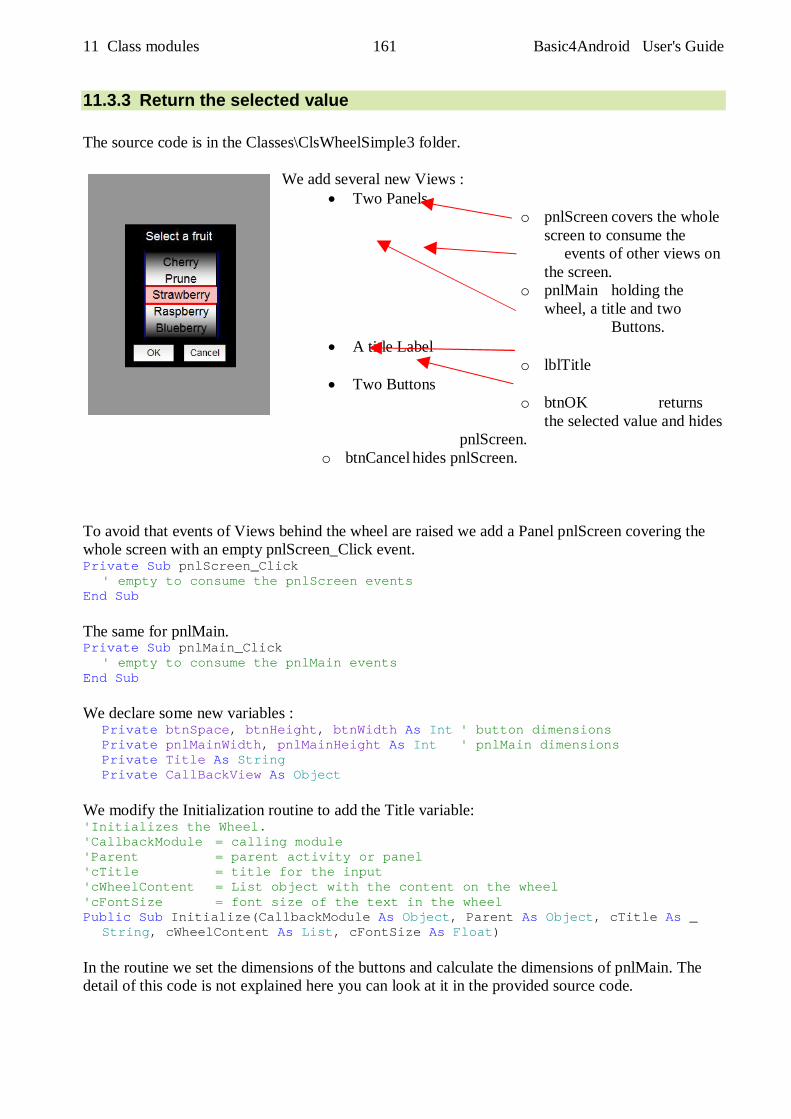
11 Class modules 161 Basic4Android User's Guide
11.3.3 Return the selected value The source code is in the Classes\ClsWheelSimple3 folder.
We add several new Views : Two Panels
o pnlScreen covers the whole screen to consume the events of other views on the screen.
o pnlMain holding the wheel, a title and two Buttons.
A title Label o lblTitle
Two Buttons o btnOK returns
the selected value and hides pnlScreen.
o btnCancel hides pnlScreen. To avoid that events of Views behind the wheel are raised we add a Panel pnlScreen covering the whole screen with an empty pnlScreen_Click event. Private Sub pnlScreen_Click ' empty to consume the pnlScreen events End Sub The same for pnlMain. Private Sub pnlMain_Click ' empty to consume the pnlMain events End Sub We declare some new variables : Private btnSpace, btnHeight, btnWidth As Int ' button dimensions Private pnlMainWidth, pnlMainHeight As Int ' pnlMain dimensions Private Title As String Private CallBackView As Object We modify the Initialization routine to add the Title variable: 'Initializes the Wheel. 'CallbackModule = calling module 'Parent = parent activity or panel 'cTitle = title for the input 'cWheelContent = List object with the content on the wheel 'cFontSize = font size of the text in the wheel Public Sub Initialize(CallbackModule As Object, Parent As Object, cTitle As _ String, cWheelContent As List, cFontSize As Float) In the routine we set the dimensions of the buttons and calculate the dimensions of pnlMain. The detail of this code is not explained here you can look at it in the provided source code.
11 Class modules 162 Basic4Android User's Guide
We need to modify the Show routine and add an object for the returned value. The return object can be a Label, an EditText, a Button or a String. 'show the wheel 'cCallBackView = view or string variable that gets the returned value 'Value = value to preset Public Sub Show(cCallBackView As Object, Value As Object) Dim index As Int CallBackView = cCallBackView pnlScreen.Visible = True index = WheelContent.IndexOf(Value) scvWheel.ScrollPosition = index * lblHeight DoEvents scvWheel.ScrollPosition = index * lblHeight DoEvents End Sub We get the selected value in this routine : Private Sub GetSelection As String Dim i As Int i = (Floor(scvWheel.ScrollPosition / lblHeight)) Return WheelContent.Get(i) End Sub We return the selected value to the Text property of the given view in the Show routine or to the given String variable. Private Sub btnOK_Click If CallBackView Is Label Then Dim lbl As Label lbl = CallBackView lbl.Text = GetSelection Else If CallBackView Is String Then CallBackView = GetSelection End If pnlScreen.Visible = False End Sub
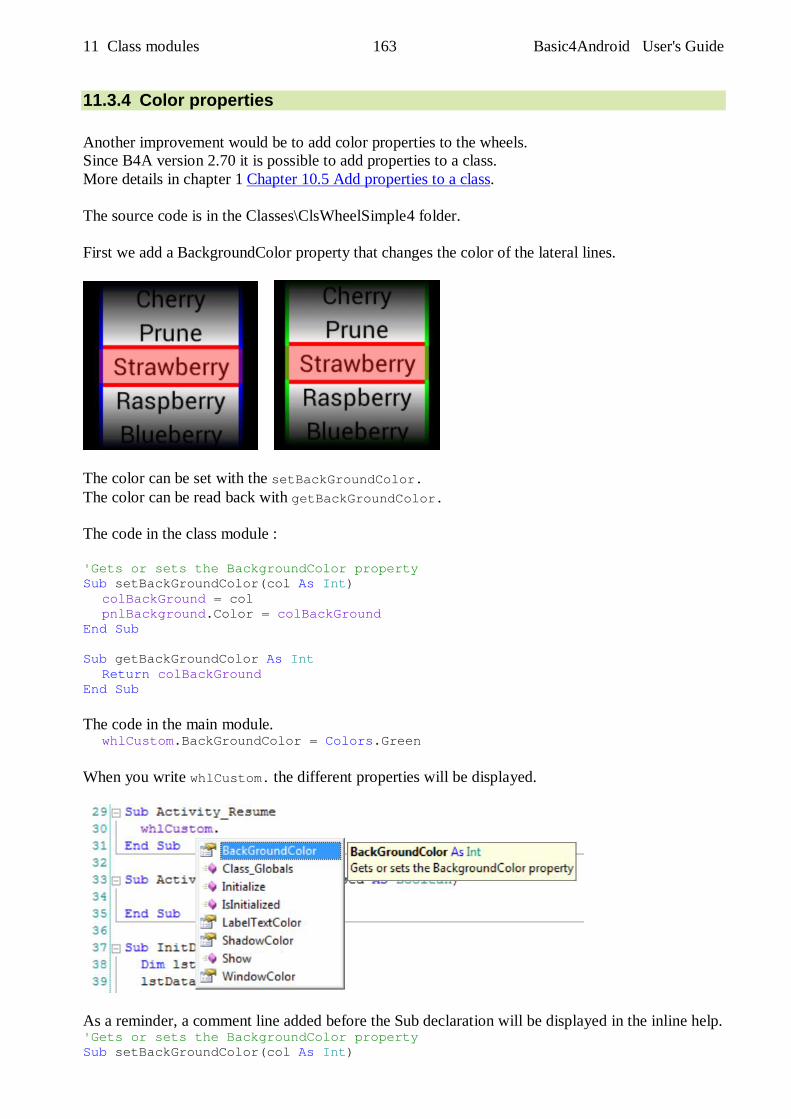
11 Class modules 163 Basic4Android User's Guide
11.3.4 Color properties Another improvement would be to add color properties to the wheels. Since B4A version 2.70 it is possible to add properties to a class. More details in chapter 1 Chapter 10.5 Add properties to a class. The source code is in the Classes\ClsWheelSimple4 folder. First we add a BackgroundColor property that changes the color of the lateral lines.
The color can be set with the setBackGroundColor. The color can be read back with getBackGroundColor. The code in the class module : 'Gets or sets the BackgroundColor property Sub setBackGroundColor(col As Int) colBackGround = col pnlBackground.Color = colBackGround End Sub Sub getBackGroundColor As Int Return colBackGround End Sub The code in the main module. whlCustom.BackGroundColor = Colors.Green When you write whlCustom. the different properties will be displayed.
As a reminder, a comment line added before the Sub declaration will be displayed in the inline help. 'Gets or sets the BackgroundColor property Sub setBackGroundColor(col As Int)
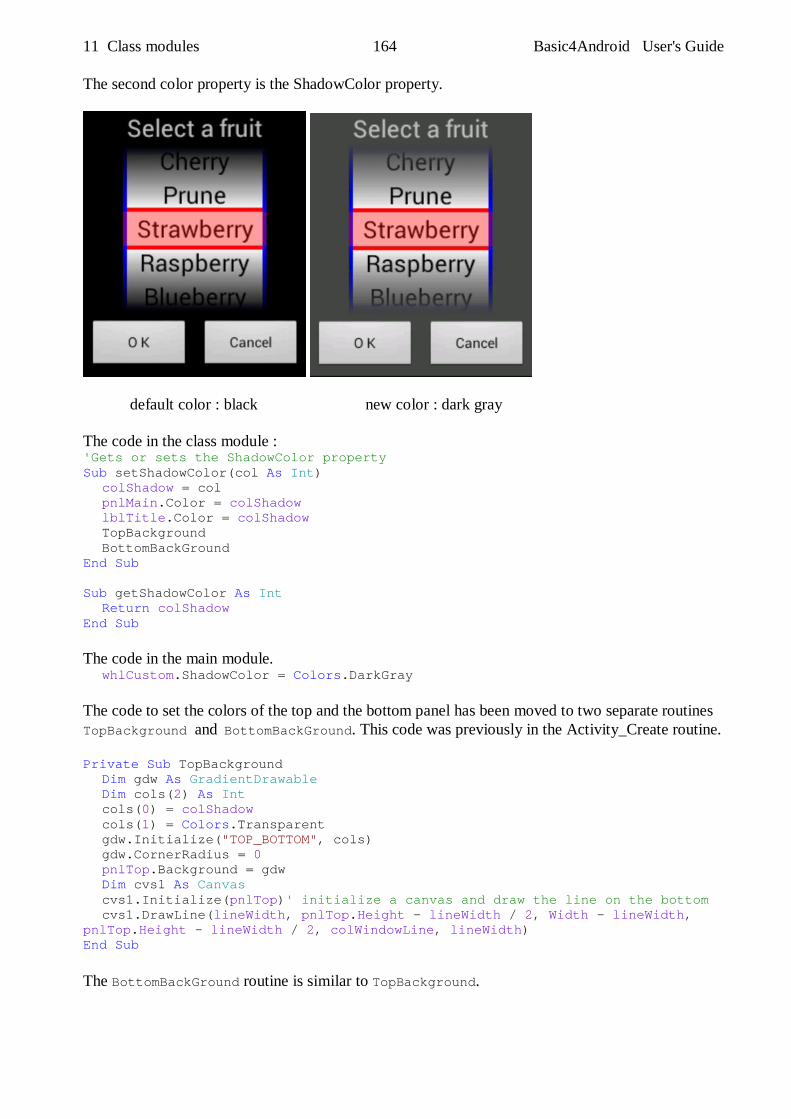
11 Class modules 164 Basic4Android User's Guide
The second color property is the ShadowColor property.
default color : black new color : dark gray The code in the class module : 'Gets or sets the ShadowColor property Sub setShadowColor(col As Int) colShadow = col pnlMain.Color = colShadow lblTitle.Color = colShadow TopBackground BottomBackGround End Sub Sub getShadowColor As Int Return colShadow End Sub The code in the main module. whlCustom.ShadowColor = Colors.DarkGray The code to set the colors of the top and the bottom panel has been moved to two separate routines TopBackground and BottomBackGround. This code was previously in the Activity_Create routine. Private Sub TopBackground Dim gdw As GradientDrawable Dim cols(2) As Int cols(0) = colShadow cols(1) = Colors.Transparent gdw.Initialize("TOP_BOTTOM", cols) gdw.CornerRadius = 0 pnlTop.Background = gdw Dim cvs1 As Canvas cvs1.Initialize(pnlTop)' initialize a canvas and draw the line on the bottom cvs1.DrawLine(lineWidth, pnlTop.Height - lineWidth / 2, Width - lineWidth, pnlTop.Height - lineWidth / 2, colWindowLine, lineWidth) End Sub The BottomBackGround routine is similar to TopBackground.
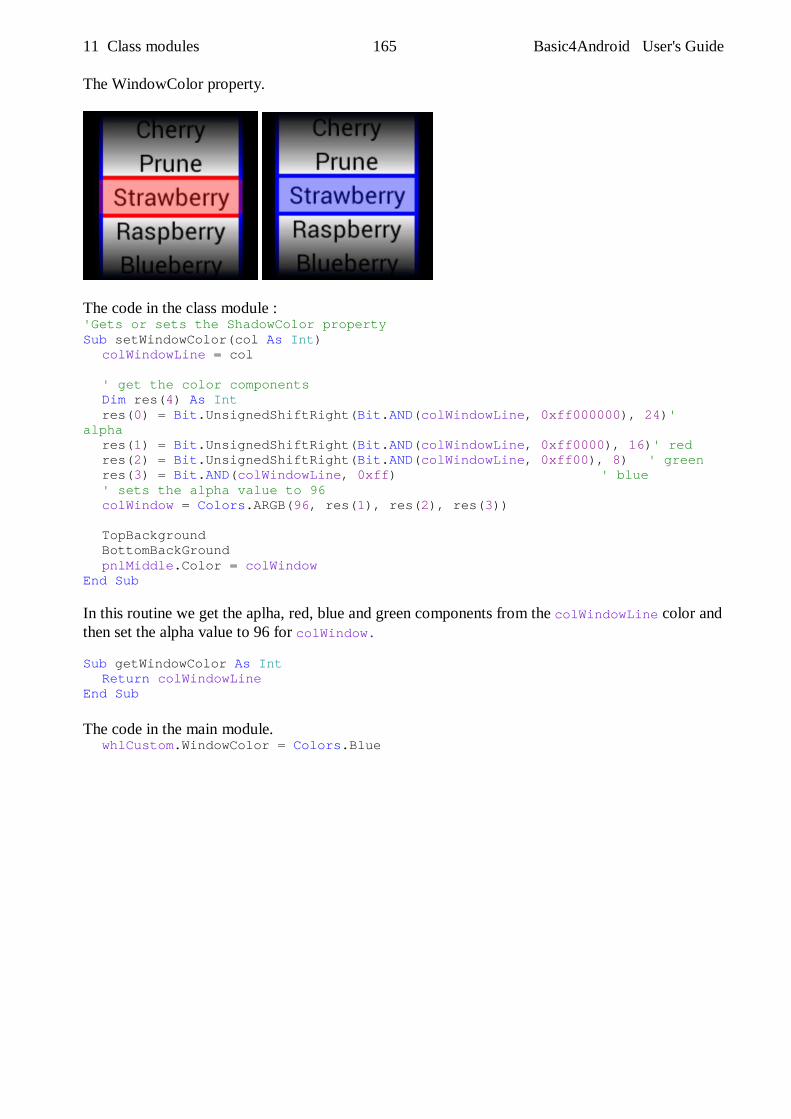
11 Class modules 165 Basic4Android User's Guide
The WindowColor property.
The code in the class module : 'Gets or sets the ShadowColor property Sub setWindowColor(col As Int) colWindowLine = col ' get the color components Dim res(4) As Int res(0) = Bit.UnsignedShiftRight(Bit.AND(colWindowLine, 0xff000000), 24)' alpha res(1) = Bit.UnsignedShiftRight(Bit.AND(colWindowLine, 0xff0000), 16)' red res(2) = Bit.UnsignedShiftRight(Bit.AND(colWindowLine, 0xff00), 8) ' green res(3) = Bit.AND(colWindowLine, 0xff) ' blue ' sets the alpha value to 96 colWindow = Colors.ARGB(96, res(1), res(2), res(3)) TopBackground BottomBackGround pnlMiddle.Color = colWindow End Sub In this routine we get the aplha, red, blue and green components from the colWindowLine color and then set the alpha value to 96 for colWindow. Sub getWindowColor As Int Return colWindowLine End Sub The code in the main module. whlCustom.WindowColor = Colors.Blue
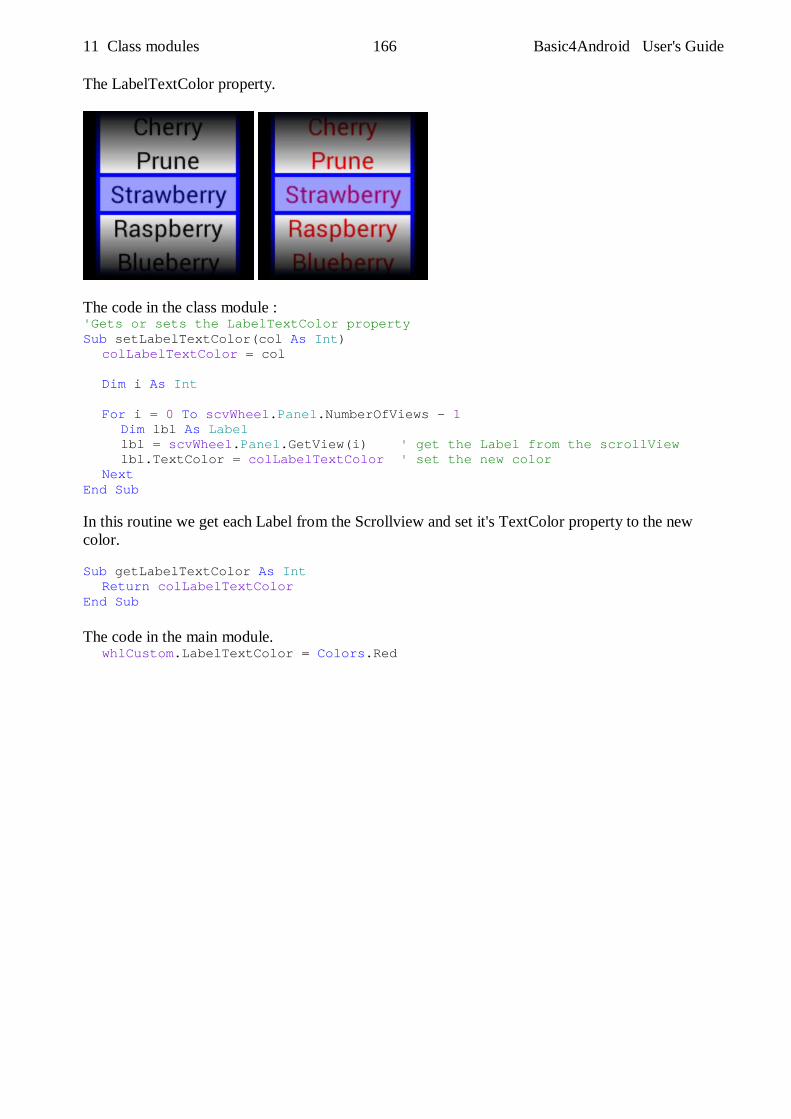
11 Class modules 166 Basic4Android User's Guide
The LabelTextColor property.
The code in the class module : 'Gets or sets the LabelTextColor property Sub setLabelTextColor(col As Int) colLabelTextColor = col Dim i As Int For i = 0 To scvWheel.Panel.NumberOfViews - 1 Dim lbl As Label lbl = scvWheel.Panel.GetView(i) ' get the Label from the scrollView lbl.TextColor = colLabelTextColor ' set the new color Next End Sub In this routine we get each Label from the Scrollview and set it's TextColor property to the new color. Sub getLabelTextColor As Int Return colLabelTextColor End Sub The code in the main module. whlCustom.LabelTextColor = Colors.Red
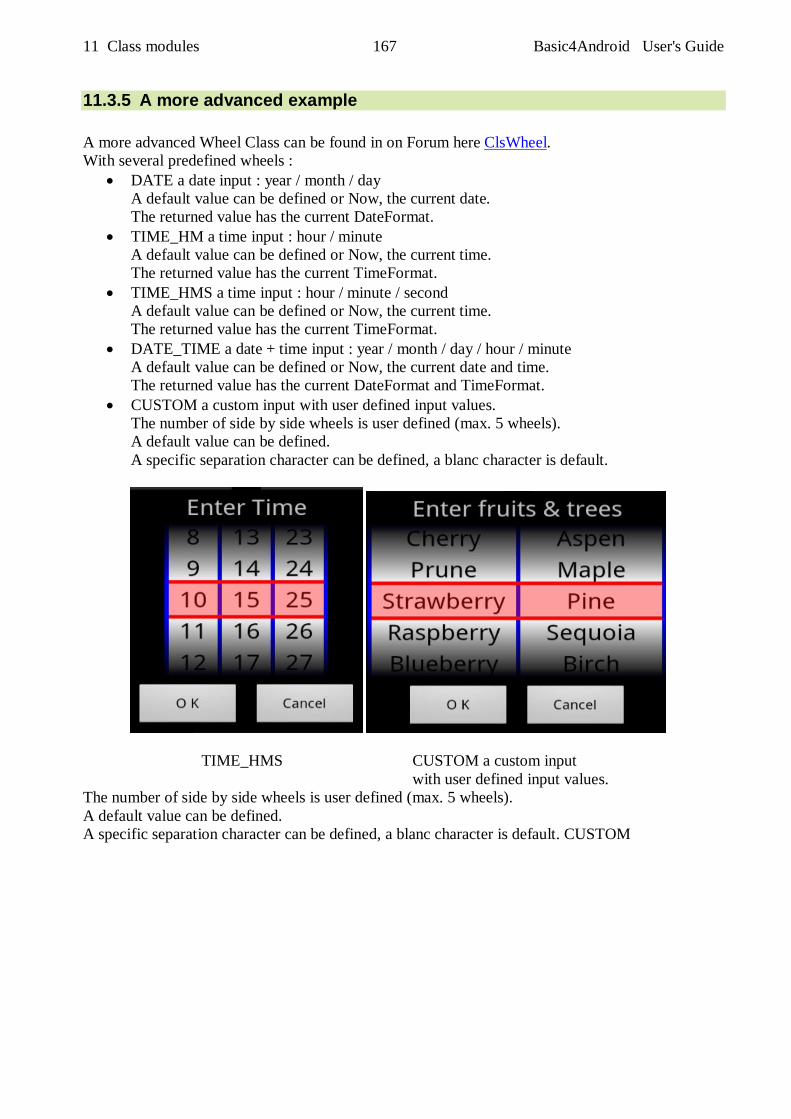
11 Class modules 167 Basic4Android User's Guide
11.3.5 A more advanced example A more advanced Wheel Class can be found in on Forum here ClsWheel. With several predefined wheels :
DATE a date input : year / month / day A default value can be defined or Now, the current date. The returned value has the current DateFormat.
TIME_HM a time input : hour / minute A default value can be defined or Now, the current time. The returned value has the current TimeFormat.
TIME_HMS a time input : hour / minute / second A default value can be defined or Now, the current time. The returned value has the current TimeFormat.
DATE_TIME a date + time input : year / month / day / hour / minute A default value can be defined or Now, the current date and time. The returned value has the current DateFormat and TimeFormat.
CUSTOM a custom input with user defined input values. The number of side by side wheels is user defined (max. 5 wheels). A default value can be defined. A specific separation character can be defined, a blanc character is default.
TIME_HMS CUSTOM a custom input with user defined input values. The number of side by side wheels is user defined (max. 5 wheels). A default value can be defined. A specific separation character can be defined, a blanc character is default. CUSTOM
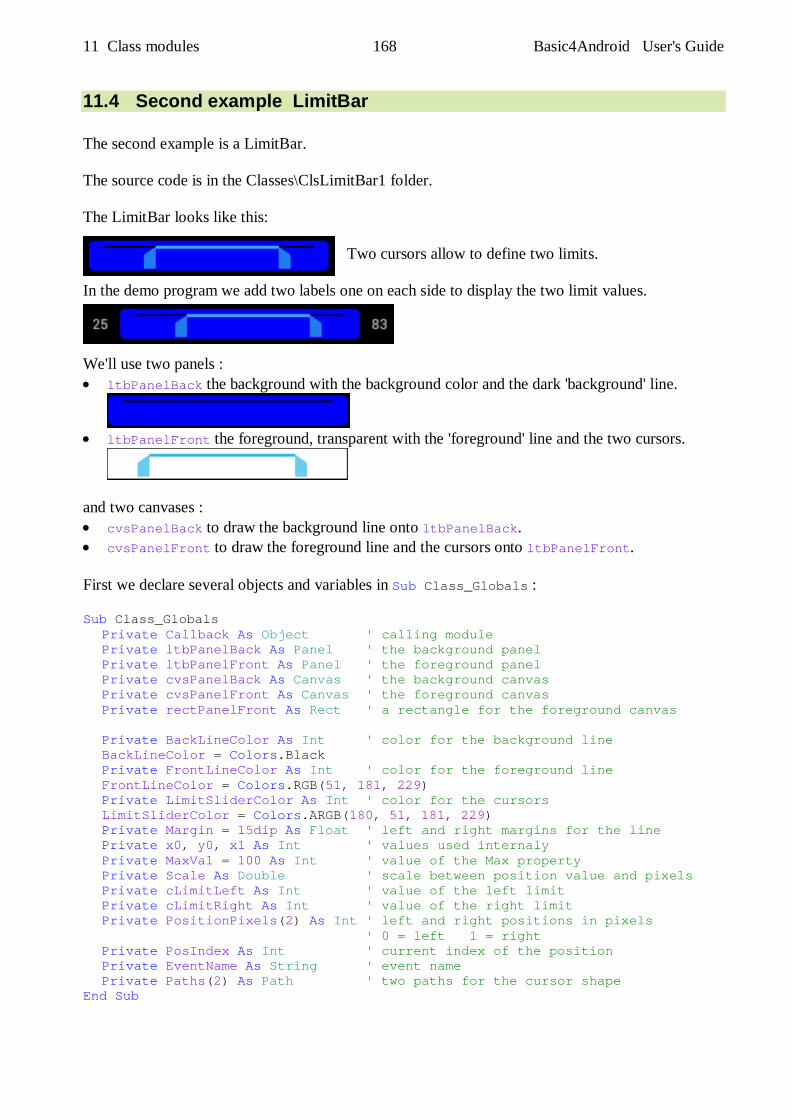
11 Class modules 168 Basic4Android User's Guide
11.4 Second example LimitBar The second example is a LimitBar. The source code is in the Classes\ClsLimitBar1 folder. The LimitBar looks like this:
Two cursors allow to define two limits.
In the demo program we add two labels one on each side to display the two limit values.
We'll use two panels : ltbPanelBack the background with the background color and the dark 'background' line.
ltbPanelFront the foreground, transparent with the 'foreground' line and the two cursors.
and two canvases : cvsPanelBack to draw the background line onto ltbPanelBack. cvsPanelFront to draw the foreground line and the cursors onto ltbPanelFront. First we declare several objects and variables in Sub Class_Globals : Sub Class_Globals Private Callback As Object ' calling module Private ltbPanelBack As Panel ' the background panel Private ltbPanelFront As Panel ' the foreground panel Private cvsPanelBack As Canvas ' the background canvas Private cvsPanelFront As Canvas ' the foreground canvas Private rectPanelFront As Rect ' a rectangle for the foreground canvas Private BackLineColor As Int ' color for the background line BackLineColor = Colors.Black Private FrontLineColor As Int ' color for the foreground line FrontLineColor = Colors.RGB(51, 181, 229) Private LimitSliderColor As Int ' color for the cursors LimitSliderColor = Colors.ARGB(180, 51, 181, 229) Private Margin = 15dip As Float ' left and right margins for the line Private x0, y0, x1 As Int ' values used internaly Private MaxVal = 100 As Int ' value of the Max property Private Scale As Double ' scale between position value and pixels Private cLimitLeft As Int ' value of the left limit Private cLimitRight As Int ' value of the right limit Private PositionPixels(2) As Int ' left and right positions in pixels ' 0 = left 1 = right Private PosIndex As Int ' current index of the position Private EventName As String ' event name Private Paths(2) As Path ' two paths for the cursor shape End Sub
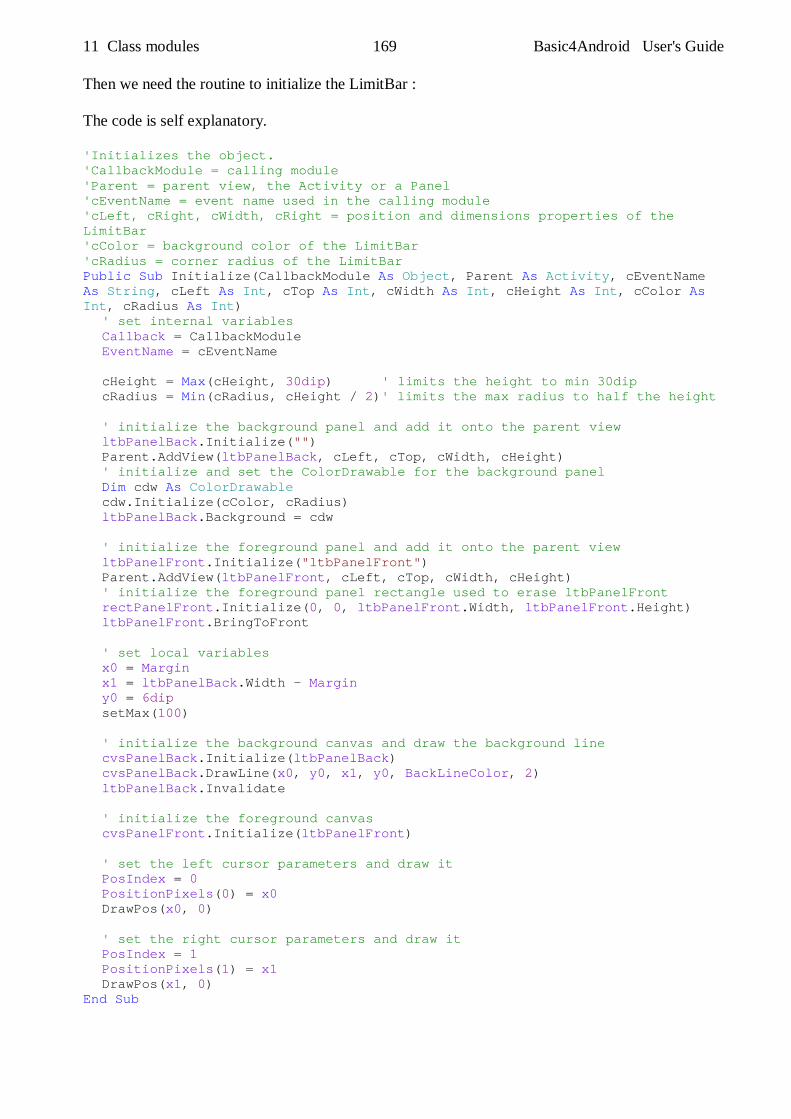
11 Class modules 169 Basic4Android User's Guide
Then we need the routine to initialize the LimitBar : The code is self explanatory. 'Initializes the object. 'CallbackModule = calling module 'Parent = parent view, the Activity or a Panel 'cEventName = event name used in the calling module 'cLeft, cRight, cWidth, cRight = position and dimensions properties of the LimitBar 'cColor = background color of the LimitBar 'cRadius = corner radius of the LimitBar Public Sub Initialize(CallbackModule As Object, Parent As Activity, cEventName As String, cLeft As Int, cTop As Int, cWidth As Int, cHeight As Int, cColor As Int, cRadius As Int) ' set internal variables Callback = CallbackModule EventName = cEventName cHeight = Max(cHeight, 30dip) ' limits the height to min 30dip cRadius = Min(cRadius, cHeight / 2)' limits the max radius to half the height ' initialize the background panel and add it onto the parent view ltbPanelBack.Initialize("") Parent.AddView(ltbPanelBack, cLeft, cTop, cWidth, cHeight) ' initialize and set the ColorDrawable for the background panel Dim cdw As ColorDrawable cdw.Initialize(cColor, cRadius) ltbPanelBack.Background = cdw ' initialize the foreground panel and add it onto the parent view ltbPanelFront.Initialize("ltbPanelFront") Parent.AddView(ltbPanelFront, cLeft, cTop, cWidth, cHeight) ' initialize the foreground panel rectangle used to erase ltbPanelFront rectPanelFront.Initialize(0, 0, ltbPanelFront.Width, ltbPanelFront.Height) ltbPanelFront.BringToFront ' set local variables x0 = Margin x1 = ltbPanelBack.Width - Margin y0 = 6dip setMax(100) ' initialize the background canvas and draw the background line cvsPanelBack.Initialize(ltbPanelBack) cvsPanelBack.DrawLine(x0, y0, x1, y0, BackLineColor, 2) ltbPanelBack.Invalidate ' initialize the foreground canvas cvsPanelFront.Initialize(ltbPanelFront) ' set the left cursor parameters and draw it PosIndex = 0 PositionPixels(0) = x0 DrawPos(x0, 0) ' set the right cursor parameters and draw it PosIndex = 1 PositionPixels(1) = x1 DrawPos(x1, 0) End Sub
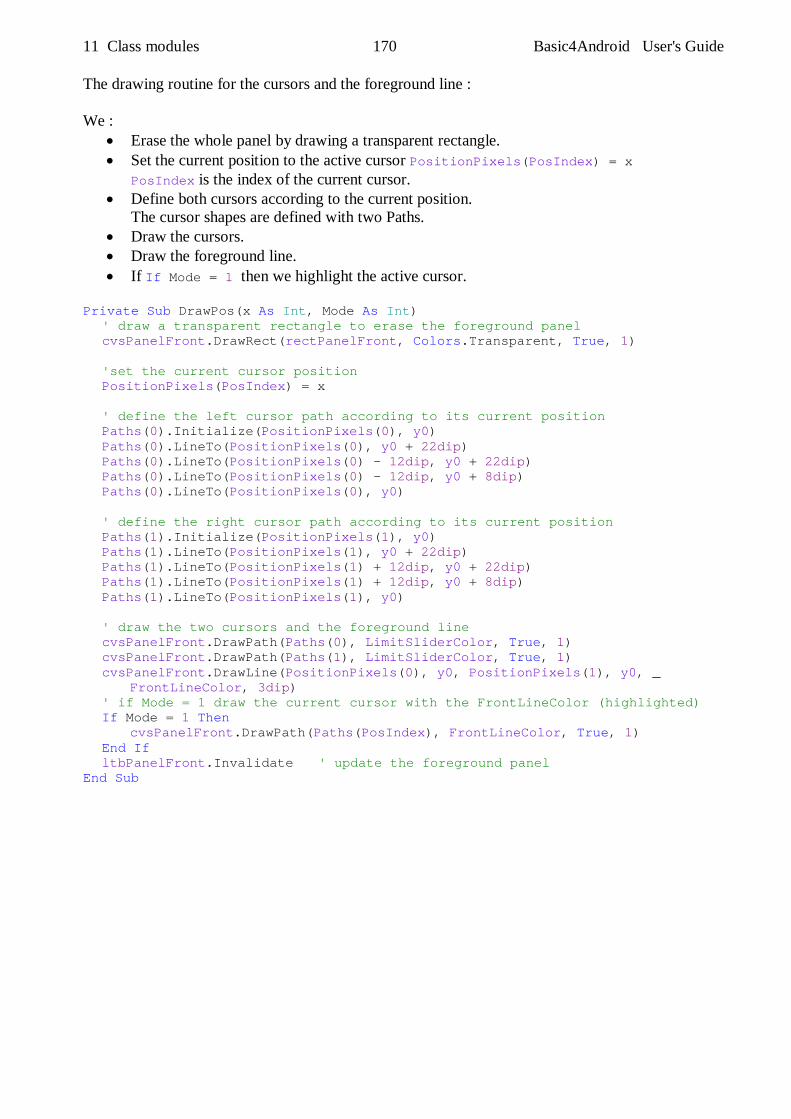
11 Class modules 170 Basic4Android User's Guide
The drawing routine for the cursors and the foreground line : We :
Erase the whole panel by drawing a transparent rectangle. Set the current position to the active cursor PositionPixels(PosIndex) = x
PosIndex is the index of the current cursor. Define both cursors according to the current position.
The cursor shapes are defined with two Paths. Draw the cursors. Draw the foreground line. If If Mode = 1 then we highlight the active cursor.
Private Sub DrawPos(x As Int, Mode As Int) ' draw a transparent rectangle to erase the foreground panel cvsPanelFront.DrawRect(rectPanelFront, Colors.Transparent, True, 1) 'set the current cursor position PositionPixels(PosIndex) = x ' define the left cursor path according to its current position Paths(0).Initialize(PositionPixels(0), y0) Paths(0).LineTo(PositionPixels(0), y0 + 22dip) Paths(0).LineTo(PositionPixels(0) - 12dip, y0 + 22dip) Paths(0).LineTo(PositionPixels(0) - 12dip, y0 + 8dip) Paths(0).LineTo(PositionPixels(0), y0) ' define the right cursor path according to its current position Paths(1).Initialize(PositionPixels(1), y0) Paths(1).LineTo(PositionPixels(1), y0 + 22dip) Paths(1).LineTo(PositionPixels(1) + 12dip, y0 + 22dip) Paths(1).LineTo(PositionPixels(1) + 12dip, y0 + 8dip) Paths(1).LineTo(PositionPixels(1), y0) ' draw the two cursors and the foreground line cvsPanelFront.DrawPath(Paths(0), LimitSliderColor, True, 1) cvsPanelFront.DrawPath(Paths(1), LimitSliderColor, True, 1) cvsPanelFront.DrawLine(PositionPixels(0), y0, PositionPixels(1), y0, _ FrontLineColor, 3dip) ' if Mode = 1 draw the current cursor with the FrontLineColor (highlighted) If Mode = 1 Then cvsPanelFront.DrawPath(Paths(PosIndex), FrontLineColor, True, 1) End If ltbPanelFront.Invalidate ' update the foreground panel End Sub

11 Class modules 171 Basic4Android User's Guide
To detect cursor moves we use the touch event of the foreground panel : Private Sub ltbPanelFront_Touch (Action As Int, X As Float, Y As Float) ' check if the cursor is outsides the limits X = Max(x0, X) X = Min(x1, X) ' select the Action type Select Action Case 0 'DOWN If X < Abs(PositionPixels(0) + PositionPixels(1)) / 2 Then ' if X is closer to the left cursor we choose it PosIndex = 0 Else ' otherwise we choose the right cursor PosIndex = 1 End If DrawPos(X, 1) ' we draw the current cursor highlighted Case 2 ' MOVE DrawPos(X, 1) ' we draw the current cursor highlighted Case 1 ' UP DrawPos(X, 0) ' we draw the current cursor not highlighted End Select ' we calculate the current limit value from the X position in pixels If PosIndex = 0 Then cLimitLeft = Floor((X - x0) / Scale + .5) Else cLimitRight = Floor((X - x0) / Scale + .5) End If ' when Action is UP check if cLimitLeft > cLimitRight ' if yes we invert the limit values and redraw the cursors If Action = 1 AND cLimitLeft > cLimitRight Then Dim val As Int val = cLimitLeft cLimitLeft = cLimitRight cLimitRight = val PosIndex = 0 X = cLimitLeft * Scale + x0 DrawPos(X, 0) PosIndex = 1 X = cLimitRight * Scale + x0 DrawPos(X, 0) End If ' if a callback routine exists in the calling module we call it If SubExists(Callback, EventName & "_ValuesChanged") Then CallSub3(Callback, EventName & "_ValuesChanged", cLimitLeft, cLimitRight) End If End Sub
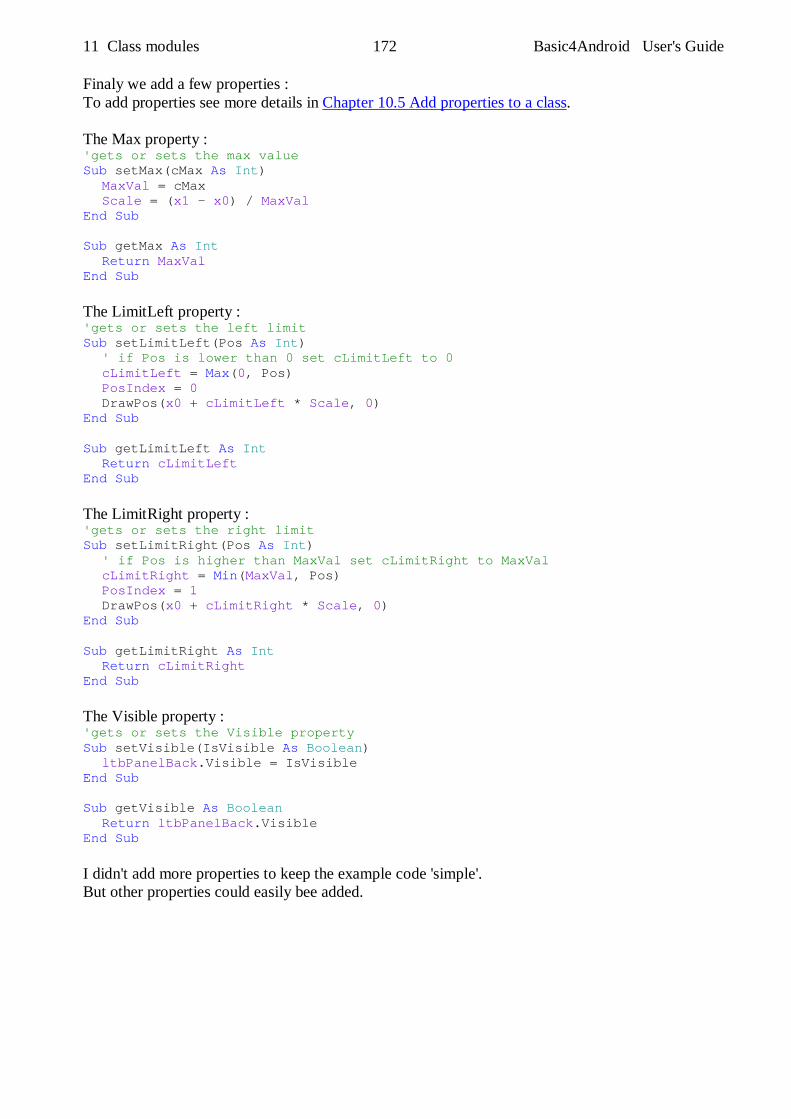
11 Class modules 172 Basic4Android User's Guide
Finaly we add a few properties : To add properties see more details in Chapter 10.5 Add properties to a class. The Max property : 'gets or sets the max value Sub setMax(cMax As Int) MaxVal = cMax Scale = (x1 - x0) / MaxVal End Sub Sub getMax As Int Return MaxVal End Sub The LimitLeft property : 'gets or sets the left limit Sub setLimitLeft(Pos As Int) ' if Pos is lower than 0 set cLimitLeft to 0 cLimitLeft = Max(0, Pos) PosIndex = 0 DrawPos(x0 + cLimitLeft * Scale, 0) End Sub Sub getLimitLeft As Int Return cLimitLeft End Sub The LimitRight property : 'gets or sets the right limit Sub setLimitRight(Pos As Int) ' if Pos is higher than MaxVal set cLimitRight to MaxVal cLimitRight = Min(MaxVal, Pos) PosIndex = 1 DrawPos(x0 + cLimitRight * Scale, 0) End Sub Sub getLimitRight As Int Return cLimitRight End Sub The Visible property : 'gets or sets the Visible property Sub setVisible(IsVisible As Boolean) ltbPanelBack.Visible = IsVisible End Sub Sub getVisible As Boolean Return ltbPanelBack.Visible End Sub I didn't add more properties to keep the example code 'simple'. But other properties could easily bee added.
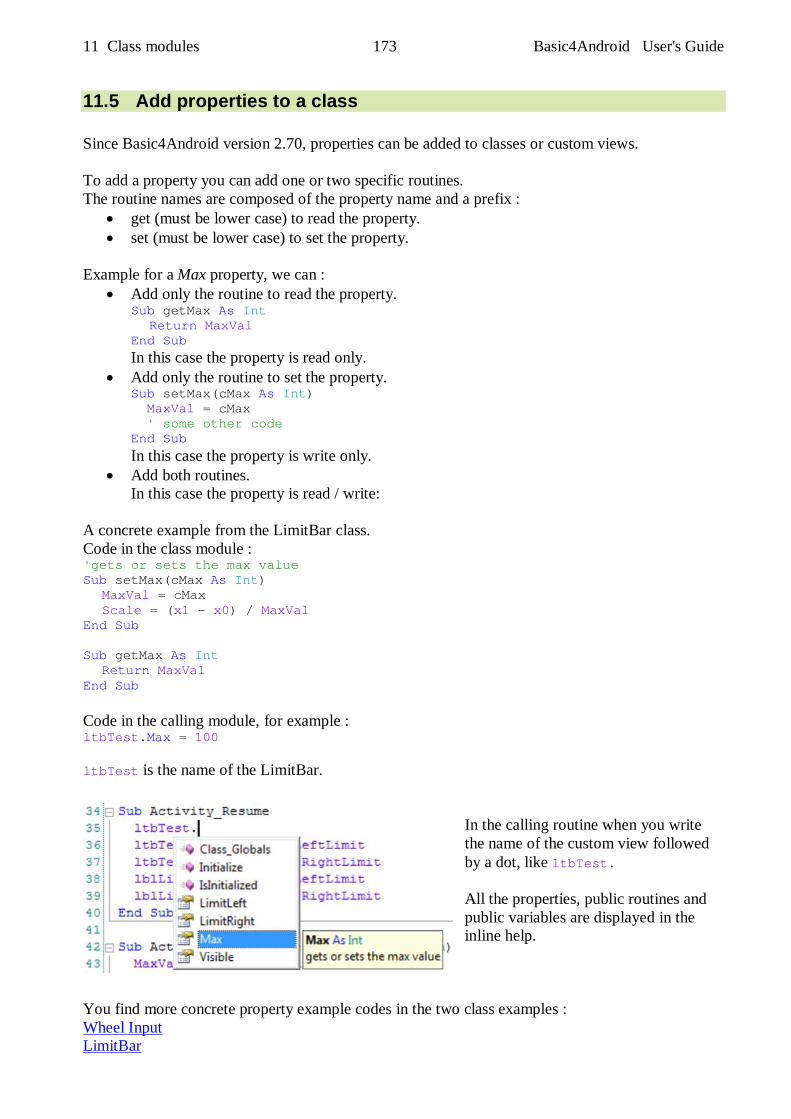
11 Class modules 173 Basic4Android User's Guide
11.5 Add properties to a class Since Basic4Android version 2.70, properties can be added to classes or custom views. To add a property you can add one or two specific routines. The routine names are composed of the property name and a prefix :
get (must be lower case) to read the property. set (must be lower case) to set the property.
Example for a Max property, we can :
Add only the routine to read the property. Sub getMax As Int Return MaxVal End Sub In this case the property is read only.
Add only the routine to set the property. Sub setMax(cMax As Int) MaxVal = cMax ' some other code End Sub In this case the property is write only.
Add both routines. In this case the property is read / write:
A concrete example from the LimitBar class. Code in the class module : 'gets or sets the max value Sub setMax(cMax As Int) MaxVal = cMax Scale = (x1 - x0) / MaxVal End Sub Sub getMax As Int Return MaxVal End Sub Code in the calling module, for example : ltbTest.Max = 100 ltbTest is the name of the LimitBar.
In the calling routine when you write the name of the custom view followed by a dot, like ltbTest. All the properties, public routines and public variables are displayed in the inline help.
You find more concrete property example codes in the two class examples : Wheel Input LimitBar
11 Class modules 174 Basic4Android User's Guide
11.6 Display a custom view in the Designer Starting from v2.70, the visual designer supports custom views. Note that the WYSIWYG designer (which runs on a real device / emulator) shows a place-holder instead of the custom view. Adding the custom views with the designer is simpler and allows the developer to build and maintain the complete UI with the visual designer and designer script. Custom views with designer support can be implemented as a class or inside a library. The example below is taken from Erels' tutoriel. The source is in the Classes \CustomViewDemo folder. To make a custom view available in the Designer we must add two routines in the class module, events can also be declared :
Public Sub Initialize(CallbackModule As Object, cEventName As String) The custom view is defined in the Designer and this routine is needed to get back the calling module object and the event name from the Designer.
Public Sub DesignerCreateView(Base As Panel, Lbl As Label, Props As Map) Three parameters are sent back from the Designer : A Panel Base is used as a placeholder to show the custom view in the Designer. This Panel can either be used or not. The panel properties are defined in the Designer. A Label Lbl is used to hold all text related properties beeing set in the Designer. This Label can either be used or not. The label will not appear unless you explicitely add it. A Map Props with additional entries. Currently the only entry is an "activity" key that holds a reference to the parent Activity object.
Events can be declared at the top of the class code: If the event routine contains parameters, these must also be declared. The Event declarations below are used by the Dim and Event Generator. 'Events declaration #Event: DoubleClick #Event: SingleClick #Event: ItemClick(Position As Int, Value As Object) 'Class module Sub Class_Globals
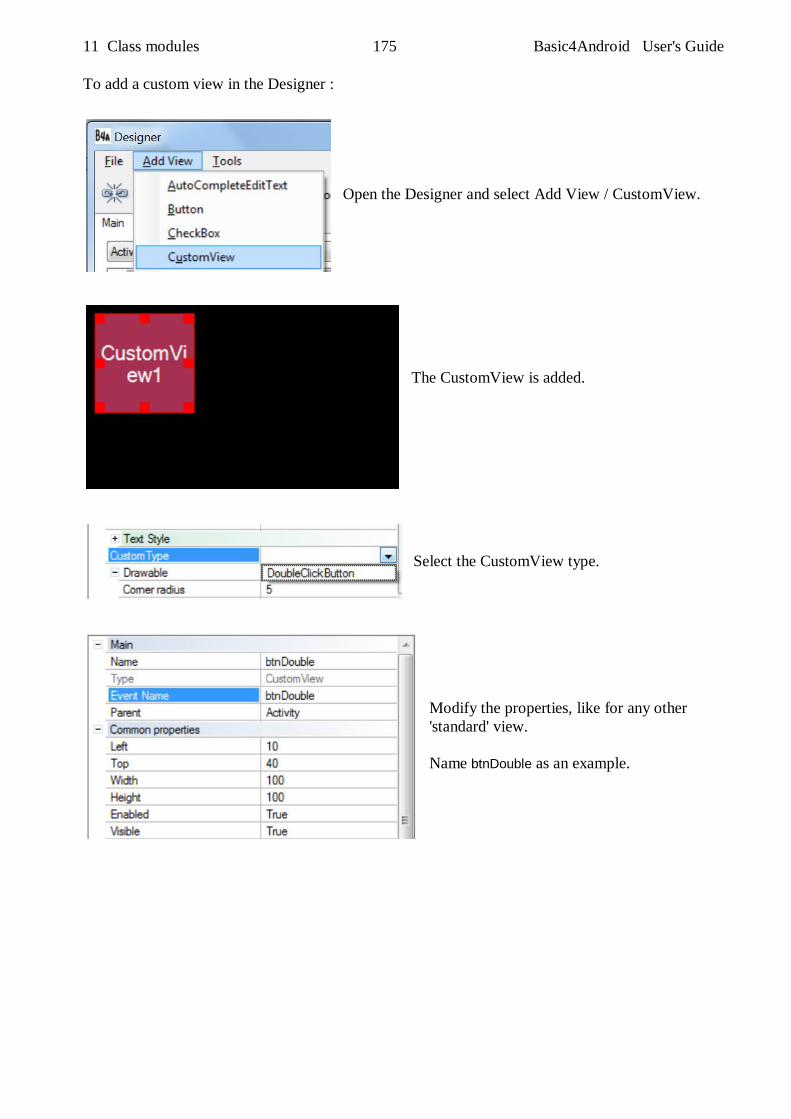
11 Class modules 175 Basic4Android User's Guide
To add a custom view in the Designer :
Open the Designer and select Add View / CustomView.
The CustomView is added.
Select the CustomView type.
Modify the properties, like for any other 'standard' view. Name btnDouble as an example.
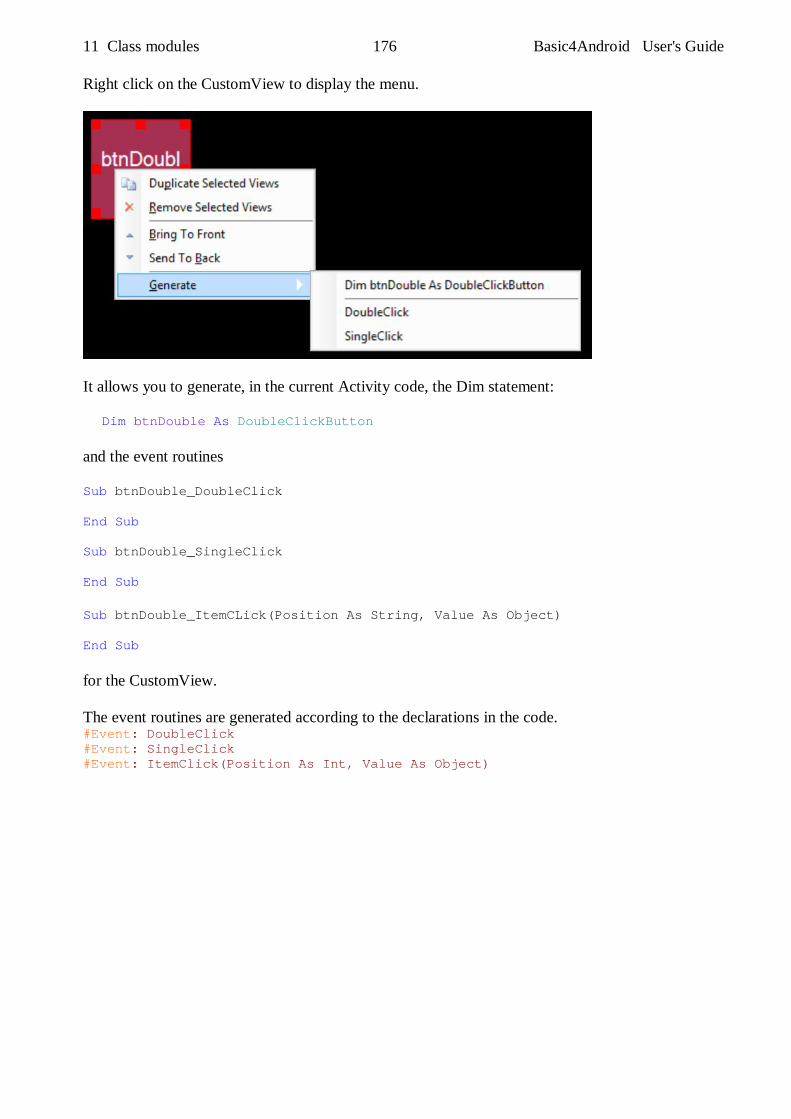
11 Class modules 176 Basic4Android User's Guide
Right click on the CustomView to display the menu.
It allows you to generate, in the current Activity code, the Dim statement: Dim btnDouble As DoubleClickButton and the event routines Sub btnDouble_DoubleClick End Sub Sub btnDouble_SingleClick End Sub Sub btnDouble_ItemCLick(Position As String, Value As Object) End Sub for the CustomView. The event routines are generated according to the declarations in the code. #Event: DoubleClick #Event: SingleClick #Event: ItemClick(Position As Int, Value As Object)
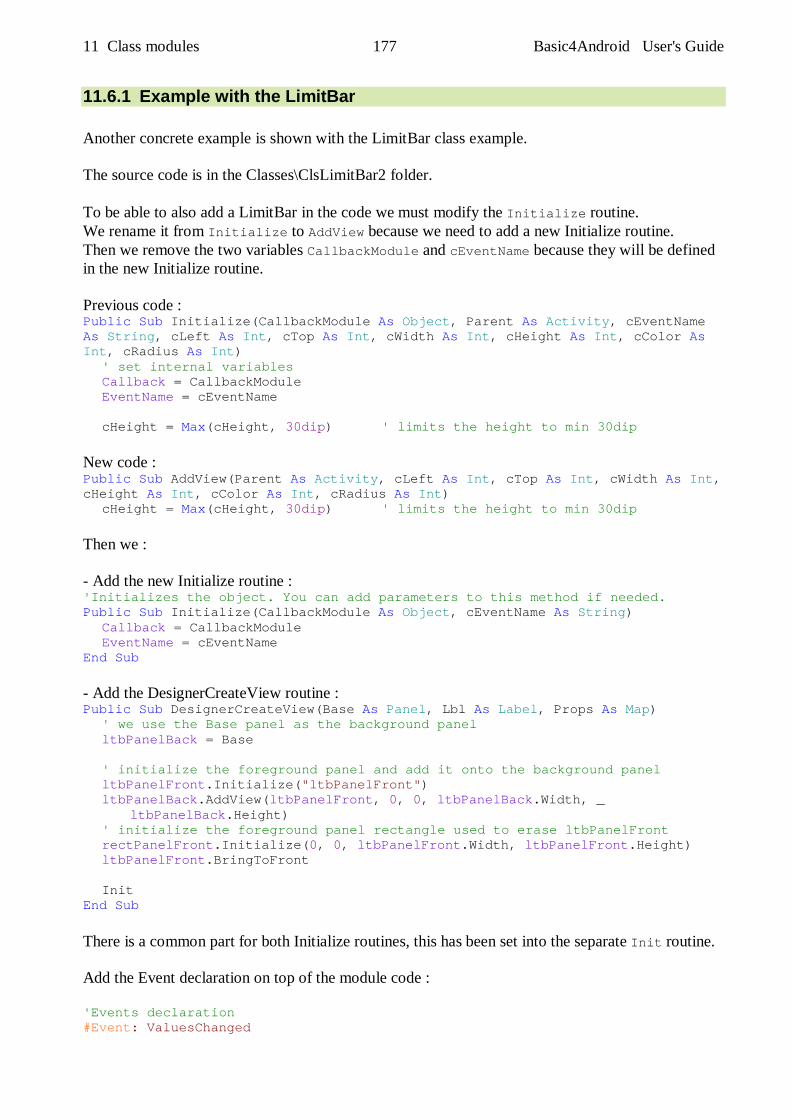
11 Class modules 177 Basic4Android User's Guide
11.6.1 Example with the LimitBar Another concrete example is shown with the LimitBar class example. The source code is in the Classes\ClsLimitBar2 folder. To be able to also add a LimitBar in the code we must modify the Initialize routine. We rename it from Initialize to AddView because we need to add a new Initialize routine. Then we remove the two variables CallbackModule and cEventName because they will be defined in the new Initialize routine. Previous code : Public Sub Initialize(CallbackModule As Object, Parent As Activity, cEventName As String, cLeft As Int, cTop As Int, cWidth As Int, cHeight As Int, cColor As Int, cRadius As Int) ' set internal variables Callback = CallbackModule EventName = cEventName cHeight = Max(cHeight, 30dip) ' limits the height to min 30dip New code : Public Sub AddView(Parent As Activity, cLeft As Int, cTop As Int, cWidth As Int, cHeight As Int, cColor As Int, cRadius As Int) cHeight = Max(cHeight, 30dip) ' limits the height to min 30dip Then we : - Add the new Initialize routine : 'Initializes the object. You can add parameters to this method if needed. Public Sub Initialize(CallbackModule As Object, cEventName As String) Callback = CallbackModule EventName = cEventName End Sub - Add the DesignerCreateView routine : Public Sub DesignerCreateView(Base As Panel, Lbl As Label, Props As Map) ' we use the Base panel as the background panel ltbPanelBack = Base ' initialize the foreground panel and add it onto the background panel ltbPanelFront.Initialize("ltbPanelFront") ltbPanelBack.AddView(ltbPanelFront, 0, 0, ltbPanelBack.Width, _ ltbPanelBack.Height) ' initialize the foreground panel rectangle used to erase ltbPanelFront rectPanelFront.Initialize(0, 0, ltbPanelFront.Width, ltbPanelFront.Height) ltbPanelFront.BringToFront Init End Sub There is a common part for both Initialize routines, this has been set into the separate Init routine. Add the Event declaration on top of the module code : 'Events declaration #Event: ValuesChanged
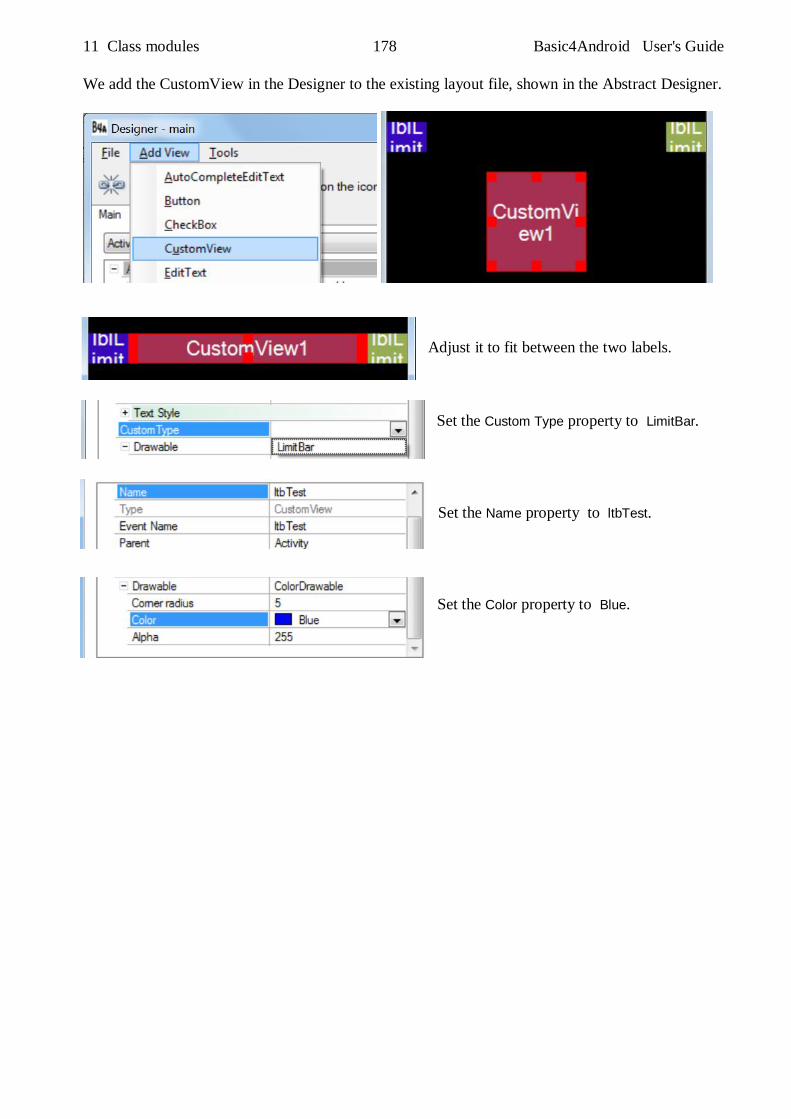
11 Class modules 178 Basic4Android User's Guide
We add the CustomView in the Designer to the existing layout file, shown in the Abstract Designer.
Adjust it to fit between the two labels.
Set the Custom Type property to LimitBar. Set the Name property to ltbTest.
Set the Color property to Blue.
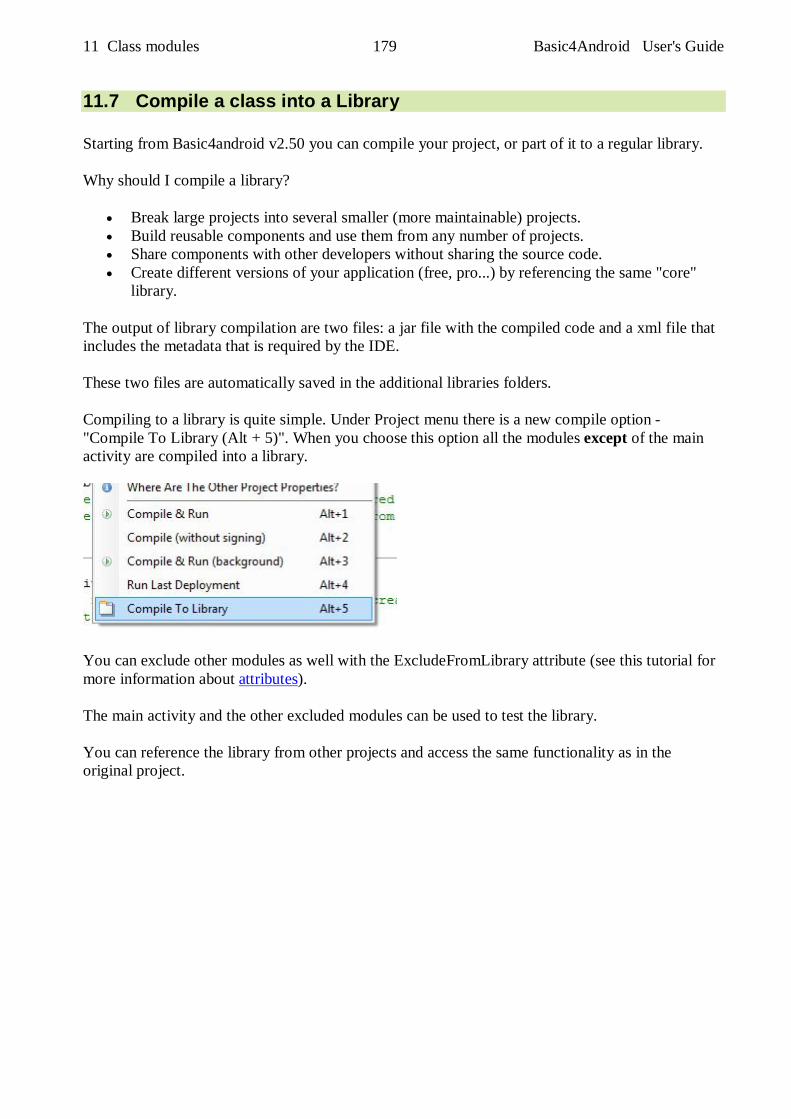
11 Class modules 179 Basic4Android User's Guide
11.7 Compile a class into a Library Starting from Basic4android v2.50 you can compile your project, or part of it to a regular library. Why should I compile a library?
Break large projects into several smaller (more maintainable) projects. Build reusable components and use them from any number of projects. Share components with other developers without sharing the source code. Create different versions of your application (free, pro...) by referencing the same "core"
library.
The output of library compilation are two files: a jar file with the compiled code and a xml file that includes the metadata that is required by the IDE. These two files are automatically saved in the additional libraries folders. Compiling to a library is quite simple. Under Project menu there is a new compile option - "Compile To Library (Alt + 5)". When you choose this option all the modules except of the main activity are compiled into a library.
You can exclude other modules as well with the ExcludeFromLibrary attribute (see this tutorial for more information about attributes). The main activity and the other excluded modules can be used to test the library. You can reference the library from other projects and access the same functionality as in the original project.
11 Class modules 180 Basic4Android User's Guide
Library specific attributes The following attributes are specific for library compilation: Project attributes (placed in the main activity): LibraryVersion - A number that represents the library version. This number will appear next to the library name in the libraries list. LibraryAuthor - The library author. This value is added to the library xml file. LibraryName (B4A v2.70) - The compiled library name. Sets the library name instead of showing the save dialog. All modules: ExcludeFromLibrary - Whether to exclude this module during library compilation. Values: True or False. Note that the Main activity is always excluded. Classes: Event - Adds an event to the list of events. This attribute can be used multiple times. Note that the events list only affects the IDE events autocompletion feature. Example : In the Main module #Region Project Attributes #ApplicationLabel: LimitBarDemo2 #VersionCode: 1 #VersionName: 'SupportedOrientations possible values: unspecified, landscape or portrait. #SupportedOrientations: unspecified #CanInstallToExternalStorage: False #LibraryVersion: 1.0 #LibraryName: LimitBar #LibraryAuthor: Klaus Christl #End Region In a code module : #ExcludeFromLibrary Notes - You should right click on the libraries list and choose Refresh after a library update. - CallSub / CallSubDelayed - The first parameter for these keywords is a reference to the target module. When working with modules that reside in a library you should pass the module reference and not the module name as string (this is the better way to reference all modules in all cases). - Code obfuscation - Libraries can be obfuscated during library compilation. Strings will not be obfuscated in this mode. - Services that host home screen widgets cannot be compiled into a library.

11 Class modules 181 Basic4Android User's Guide
11.7.1 Example with the LimitBar class example We take the LimtBarDemo2 program to show the principle. Source code in the Classes\ClsLimtBar2 folder. In the Project Attributes Region in the Main module we add following new attributes : #Region Project Attributes #ApplicationLabel: LimitBarDemo2 #VersionCode: 1 #VersionName: 'SupportedOrientations possible values: unspecified, landscape or portrait. #SupportedOrientations: unspecified #CanInstallToExternalStorage: False #LibraryVersion: 1.0 #LibraryName: LimitBar #LibraryAuthor: Klaus Christl #End Region
Then click on to compile the library.
A screen similar to this one is displayed showing that the library has been sucessfully compiled.
Two files are automaticaly added in the additional library folder. In our example : LimitBar.xml LimitBar.jar
Right click in the Libs tab and click on Refresh.
The new library is now available.
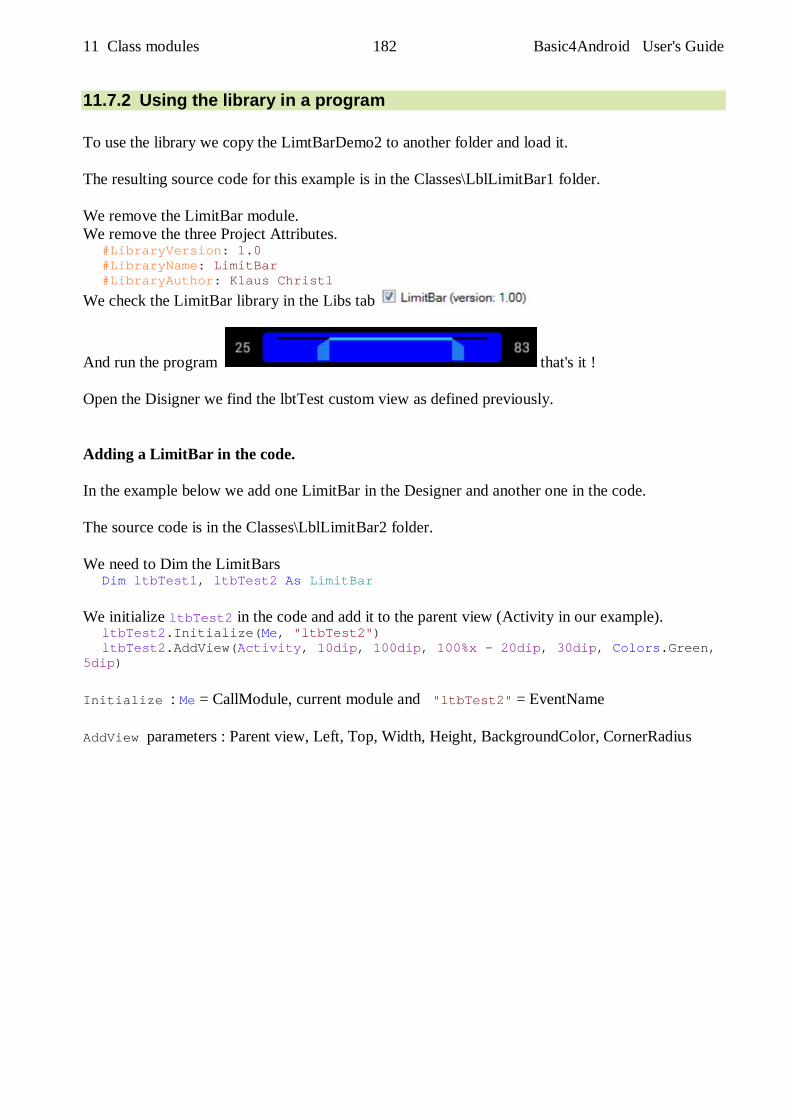
11 Class modules 182 Basic4Android User's Guide
11.7.2 Using the library in a program To use the library we copy the LimtBarDemo2 to another folder and load it. The resulting source code for this example is in the Classes\LblLimitBar1 folder. We remove the LimitBar module. We remove the three Project Attributes. #LibraryVersion: 1.0 #LibraryName: LimitBar #LibraryAuthor: Klaus Christl
We check the LimitBar library in the Libs tab
And run the program that's it ! Open the Disigner we find the lbtTest custom view as defined previously. Adding a LimitBar in the code. In the example below we add one LimitBar in the Designer and another one in the code. The source code is in the Classes\LblLimitBar2 folder. We need to Dim the LimitBars Dim ltbTest1, ltbTest2 As LimitBar We initialize ltbTest2 in the code and add it to the parent view (Activity in our example). ltbTest2.Initialize(Me, "ltbTest2") ltbTest2.AddView(Activity, 10dip, 100dip, 100%x - 20dip, 30dip, Colors.Green, 5dip) Initialize : Me = CallModule, current module and "ltbTest2" = EventName AddView parameters : Parent view, Left, Top, Width, Height, BackgroundColor, CornerRadius