1 hyper-text markup language html. 2 references chapter 9, introduction to hypertext markup language...
TRANSCRIPT

1
Hyper-Text Markup LanguageHTML

2
References
• Chapter 9, Introduction to HyperText Markup Language 4 (HTML4) from e-Business & e-Commerce: How to Program by Dietel, Dietel and Nieto.
• Chapter 10, Intermediate HTML from e-Business & e-Commerce: How to Program by Dietel, Dietel and Nieto.

3
HyperText Markup Language• Not a procedural but a markup language.
– Does not instruct the computer to perform actions in a designated manner.
– Used to format text and information to be displayed.– Uses tags to identify elements of a page to be
displayed in a specific manner.– A browser interprets the markup tags and renders
the page on the screen as per the tag specifications.
• Components of an HTML page,– Elements: Information to be displayed.– Tags: Keywords within angular brackets used to
delineate elements.

4
HTML Basics• HTML files are text files.
– Can be prepared and edited using a simple text editor.
• HTML files have extensions .htm or .html– e.g., my_html_page.html
• The name of the first page of any website is index.html– e.g., the page shown on www.google.com is actually
www.google.com/index.html
• HTML tags are case insensitive but writing them in uppercase improves source code readability.
• Tags exist in pairs,– Each start tag is accompanied with an end tag.
• e.g., <HTML> is a start tag and its accompanying end tag is </HTML>.
5
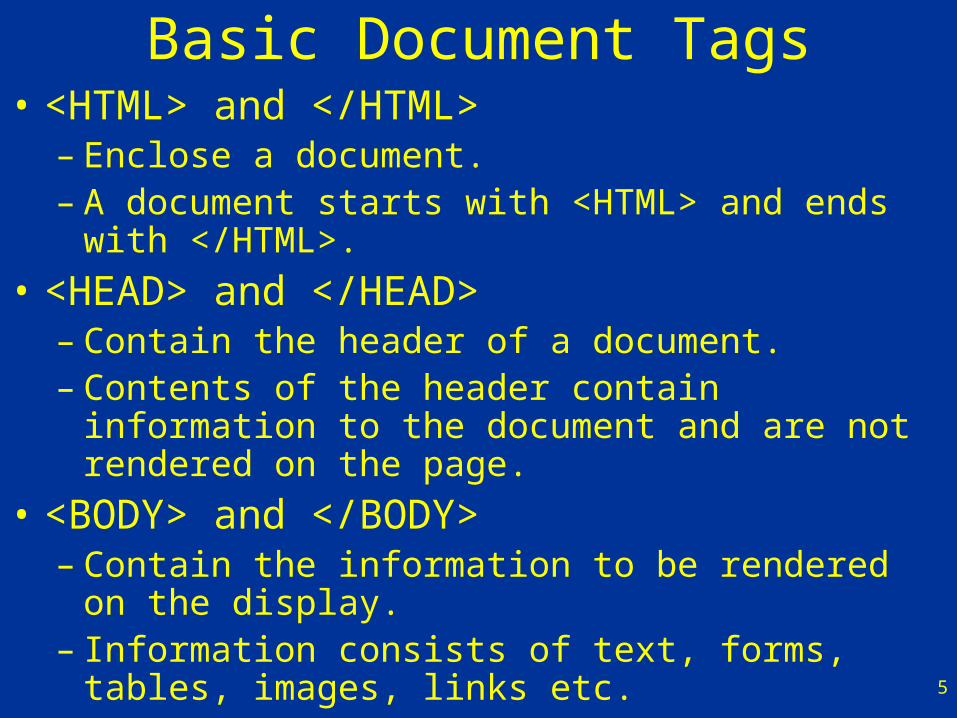
Basic Document Tags• <HTML> and </HTML>
– Enclose a document.– A document starts with <HTML> and ends with
</HTML>.
• <HEAD> and </HEAD>– Contain the header of a document.– Contents of the header contain information to the
document and are not rendered on the page.
• <BODY> and </BODY>– Contain the information to be rendered on the
display.– Information consists of text, forms, tables, images,
links etc.
6
Basic Document Tags (Contd.)
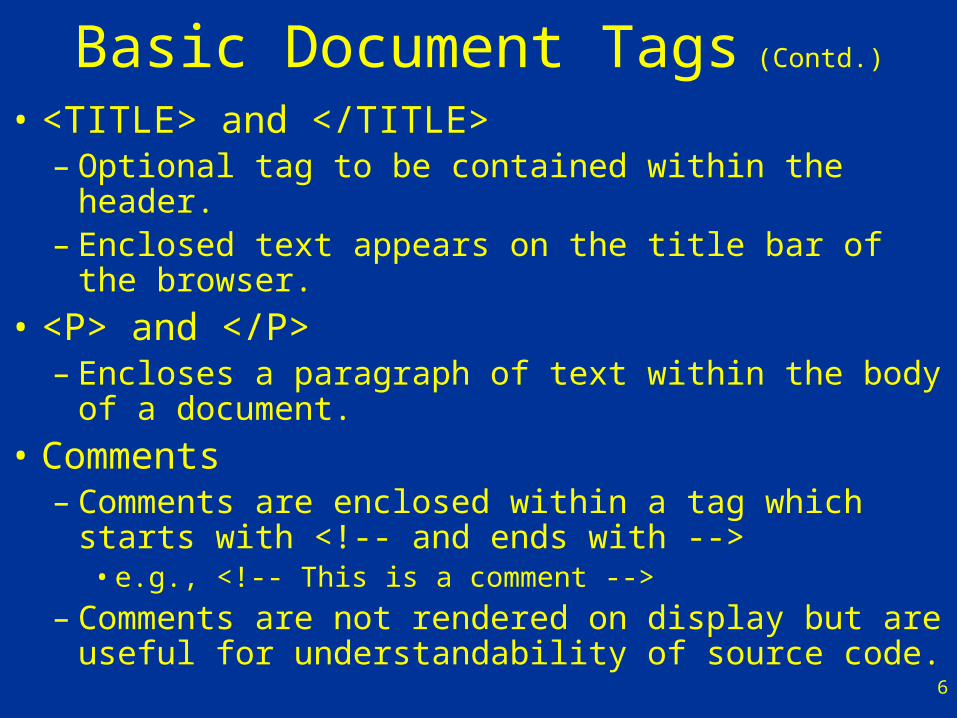
• <TITLE> and </TITLE>– Optional tag to be contained within the header.– Enclosed text appears on the title bar of the
browser.
• <P> and </P>– Encloses a paragraph of text within the body of a
document.
• Comments– Comments are enclosed within a tag which starts
with <!-- and ends with -->• e.g., <!-- This is a comment -->
– Comments are not rendered on display but are useful for understandability of source code.

7
Example: A Simple HTML Page
<HTML><!-- Example of a simple HTML page -->
<HEAD><TITLE> A Simple HTML Page </TITLE>
</HEAD>
<BODY><P> This is an example of the e-Commerce course </P><P> This is the simplest webpage of the entire course </P>
</BODY>
</HTML>
8
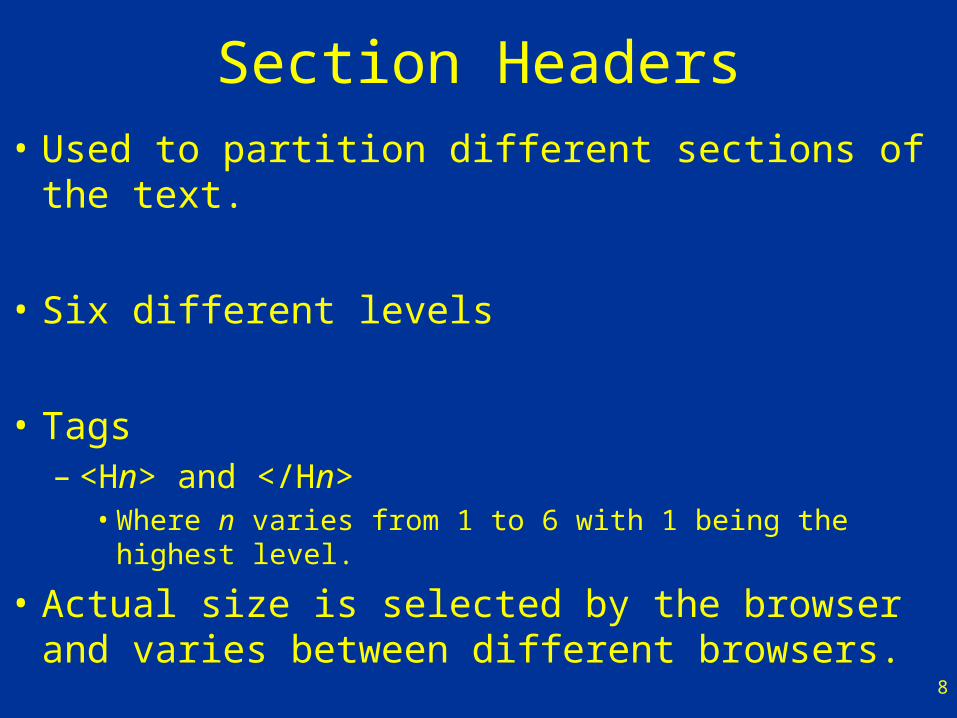
Section Headers
• Used to partition different sections of the text.
• Six different levels
• Tags– <Hn> and </Hn>
• Where n varies from 1 to 6 with 1 being the highest level.
• Actual size is selected by the browser and varies between different browsers.

9
Example: Section Headers<HTML>
<!-- Example of HTML page containing headers --><HEAD>
<TITLE> Example of section headers </TITLE></HEAD><BODY>
<H1>Header level 1</H1><P> This text is under level 1 header </P>
<H2>Header level 2 </H2><P> This text is under level 2 header </P>
<H3>Header level 3 </H3><P> This text is under level 3 header </P>
<H4>Header level 4 </H4><P> This text is under level 4 header </P>
</BODY></HTML>

10
Text Alignment
• Alignment Tags– <CENTER> and </CENTER> to place enclosed text
in the center of the display.
• Alignment using the ALIGN attribute– e.g., <P ALIGN=“center”> A Paragraph </P>
• A Paragraph is placed in the center.
– e.g., <P ALIGN=“left”> A Paragraph </P> • A Paragraph is placed to the left.
– e.g., <P ALIGN=“right”> A Paragraph </P> • A Paragraph is placed to the right.
11
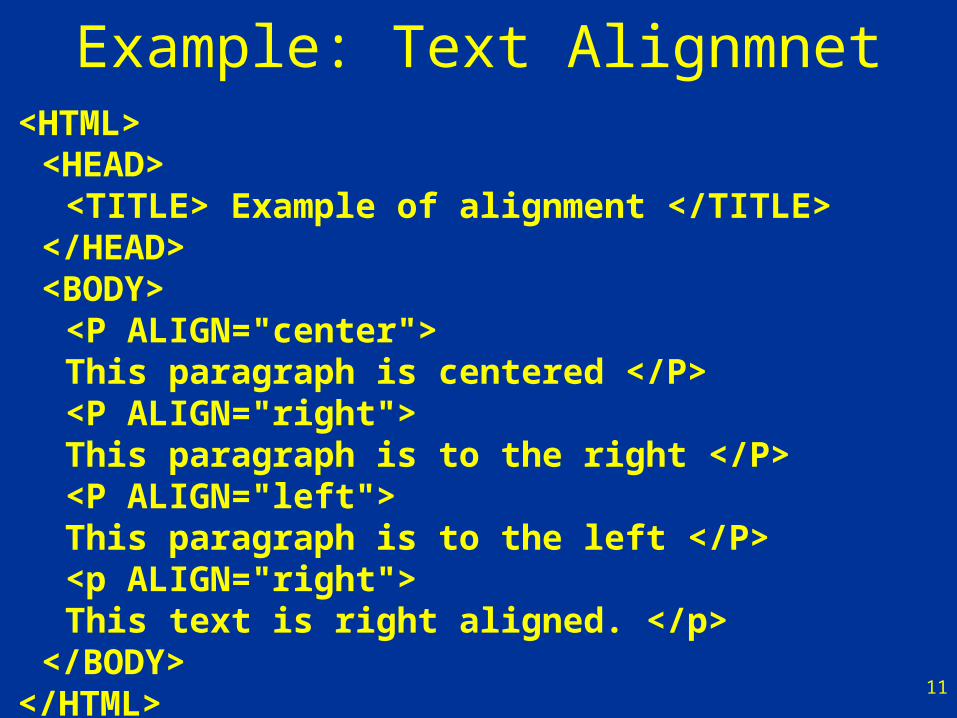
Example: Text Alignmnet<HTML>
<HEAD><TITLE> Example of alignment </TITLE>
</HEAD><BODY>
<P ALIGN="center">This paragraph is centered </P><P ALIGN="right">This paragraph is to the right </P><P ALIGN="left">This paragraph is to the left </P><p ALIGN="right">This text is right aligned. </p>
</BODY></HTML>

12
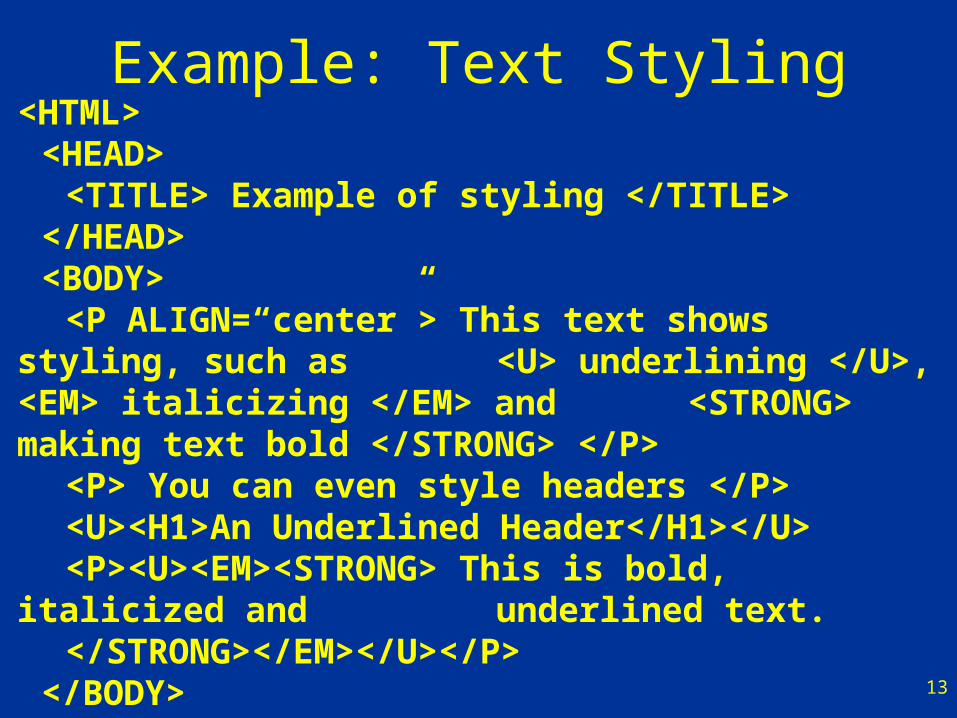
Text Styling• Underlying text
– Tags <U> and </U>
• Highlighting or italicizing text– Tags <EM> and </EM>
• Making text bold– Tags <STRONG> and </STRONG>
• Older versions of HTML use <B> and <I> to display text in bold and in italics.– These tags have been deprecated.
13
Example: Text Styling<HTML>
<HEAD><TITLE> Example of styling </TITLE>
</HEAD><BODY>
<P ALIGN=“center”> This text shows styling, such as <U> underlining </U>, <EM> italicizing </EM> and <STRONG> making text bold </STRONG> </P><P> You can even style headers </P><U><H1>An Underlined Header</H1></U><P><U><EM><STRONG> This is bold, italicized and underlined text.</STRONG></EM></U></P>
</BODY></HTML>

14
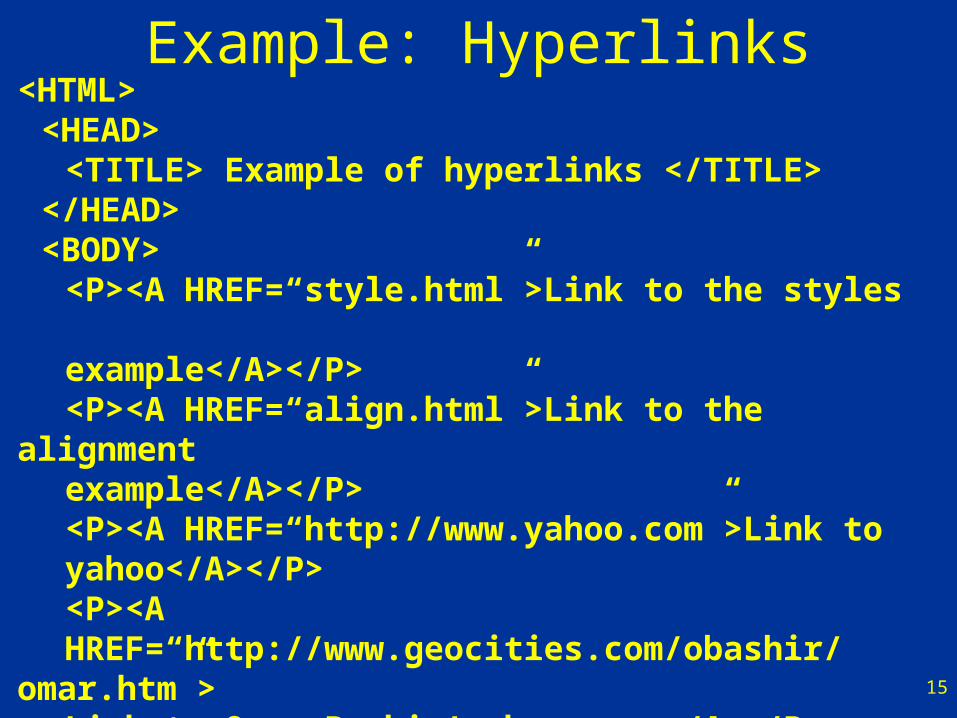
Links• HTML allows creating links from one document
to other documents, – within the same server or servers across the
Internet.
• Both text and images can act as anchors to links to other pages.
• Links are inserted using the anchor element.– Tag is A.– Starting tag has an HREF attribute, the value of
which specifies the location of the page being linked, i.e., it is a hyperlink.
– The element within the tags is activated as an anchor to link to the indicated address.
15
Example: Hyperlinks<HTML>
<HEAD><TITLE> Example of hyperlinks </TITLE>
</HEAD><BODY>
<P><A HREF=“style.html”>Link to the styles example</A></P><P><A HREF=“align.html”>Link to the alignment example</A></P><P><A HREF=“http://www.yahoo.com”>Link to yahoo</A></P><P><A HREF=“http://www.geocities.com/obashir/omar.htm”>Link to Omar Bashir’s homepage</A></P>
</BODY></HTML>

16
Links to E-mail Addresses
• Form of an e-mail anchor– <A HREF=“mailto:[email protected]”> E-mail the
author </A>
• Clicking on the linked anchored to an e-mail address causes the default e-mail program to initiate an e-mail to the linked email address.

17
Example: Link to Email Address
<HTML><HEAD>
<TITLE> Example of hyperlinks </TITLE></HEAD><BODY>
<P><A HREF=“mailto:[email protected]”> Author’s e-mail address </A></P>
</BODY></HTML>

18
Manipulating Background• A background image can be inserted using the
BACKGROUND attribute in the BODY tag.– E.g., <BODY BACKGROUND=“teymour2.bmp”>
• Background image can be of any size.– Browser tiles smaller images.
• Instead of the background image background colour can be specified using BGCOLOR attributed in the BODY tag.– E.g., <BODY BGCOLOR=“#4FB5AA”>– Value of BGCOLOR attribute is hexadecimal representation
of RGB colour.• #FF0000 is red• #00FF00 is green• #0000FF is blue

19
Example: Document Background
<HTML><!-- Example of a simple HTML page with a background image-->
<HEAD><TITLE> A Simple HTML Page </TITLE>
</HEAD>
<BODY BACKGROUND=“teymour2.bmp”><P> This is an example of the e-Commerce course </P><P> This is the simplest webpage of the entire course </P>
</BODY>
</HTML>

20
Example: Document Background
<HTML><!-- Example of a simple HTML page with background colour-->
<HEAD><TITLE> A Simple HTML Page </TITLE>
</HEAD>
<BODY BGCOLOR=“#4FB5AA”><P> This is an example of the e-Commerce course </P><P> This is the simplest webpage of the entire course </P>
</BODY>
</HTML>

21
Including Images in HTML Pages• IMG Tag
– One tag only– Attributes (Only SRC is mandatory)
• SRC specifies the image file.• BORDER specifies a black border around the image.• HEIGHT specifies the height of the image in pixels.• WIDTH specifies the width of the image in pixels.• ALT specifies text to be displayed if image cannot be
displayed.– Browser setup– Deleted file
• Example– <IMG SRC=“teymour.bmp” HEIGHT=“200”
WIDTH=“100” ALT=“Teymour Omar”>

22
Example: Images<HTML>
<HEAD><TITLE> A Simple HTML Page </TITLE></HEAD>
<BODY BGCOLOR=“#4FB5AA”><P> This is an example of the e-Commerce course </P><P> This is the simplest webpage of the entire course </P><P><IMG SRC=“teymour.bmp” HEIGHT=“200” WIDTH=“100” ALT=“TEYMOUR”></P><P><IMG SRC=“teymour.bmp” HEIGHT=“400” WIDTH=“200” ALT=“TEYMOUR AGAIN”></P></BODY>
</HTML>

23
Example: Images as Anchors<HTML><HEAD><TITLE> Example of images as anchors </TITLE></HEAD><BODY><A HREF=“style.html”><IMG SRC=“style.bmp” HEIGHT=“100” WIDTH=“100”></A><BR><A HREF=“align.html”><IMG SRC=“align.bmp” HEIGHT=“100” WIDTH=“100”></A><BR><A HREF=“http://www.yahoo.com”><IMG SRC=“yahoo.bmp” HEIGHT=“100” WIDTH=“100”</A><BR><A HREF=“http://www.geocities.com/obashir/omar.htm”><IMG SRC=“dromer.jpg” HEIGHT=“100” WIDTH=“100”></A></P></BODY></HTML>

24
Change Text Fonts Sizes and Colours• <FONT> and </FONT> tags.• Attributes
– COLOR to specify the text color.• Specified as preset values or as hexadecimal values.
– SIZE to increase or decrease text size from default value.
• Value specified as +n to increment text size and as –n to decrement text size.
– FACE to specify the font of text.• Specified as preset text font.
• One or all attributes can be specified.• Effect specified in <FONT> is invalid after the
corresponding </FONT>.

25
Example: Manipulating Fonts<HTML><HEAD><TITLE> Example of Font Manipulation </TITLE></HEAD><BODY BGCOLOR=“#007F00”><H1 ALIGN=“center”><U>Font Manipulation</U></H1><P><FONT COLOR=“yellow”>This is text in yellow color </FONT> <FONT COLOR=“yellow” SIZE=“+2”> with size incremented by 2 </FONT> <FONT COLOR=“yellow” SIZE=“+2” FACE=“Helvetica”> and in font Helvetica. </FONT></P><P>Normal Text</P><P><STRONG><FONT COLOR=“red” SIZE=“-2” FACE=“Courier”>Now this text is in red size decremented by 2 and with font Courier.</STRONG></FONT></P.</BODY></HTML>

26
Special Tags• Line Feed
– <BR>
• Strikethrough – <DEL> and </DEL>
• Subscript– <SUB> and </SUB>
• Superscript– <SUP> and </SUP>

27
Example: Special Tags
<HTML><HEAD><TITLE> Example of Special Tags </TITLE></HEAD><BODY><H1 ALIGN=“center”><U>Special Tags</U></H1><P><DEL> This text is strikethrough </DEL> <BR>This text of the same paragraph starts at a new line. <SUP> This text appears as superscript </SUP> and <SUB> this text appears as subscript</SUB></P></BODY></HTML>

28
Special Characters
• Special symbols, e.g., copyright or ampersand have to be displayed using a special code preceded by the & sign.– E.g., © produces the copyright symbol.– E.g., & produces the ampersand symbol.
• Hexadecimal codes of special characters can also be used.– E.g.,   produces a space.– E.g., ™ produces the trademark symbol.

29
Example: Special Characters<HTML><HEAD><TITLE> Example of Special Characters </TITLE></HEAD><BODY><H1 ALIGN=“center”><U>Special Characters</U></H1><P>© is the copyright symbol. <BR>& is the ampersand symbol. <BR>There are 5 spaces in code before the period .<BR>There are 5 coded spaces before the period          . <BR>™ is the trademark symbol.</P></BODY></HTML>

30
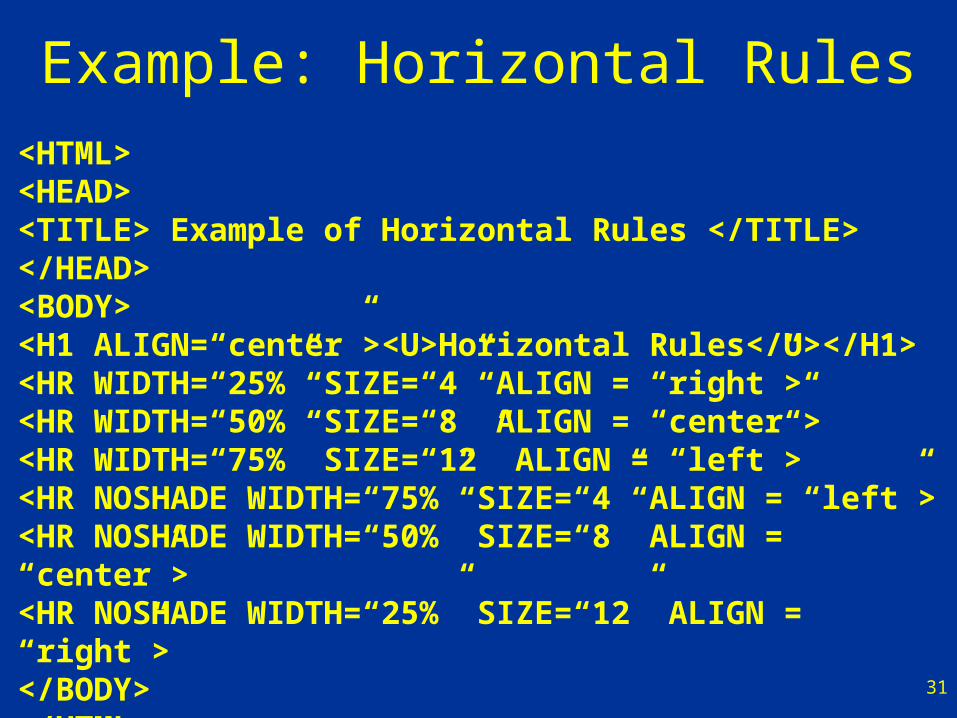
Horizontal Rules• Straight line passing horizontally through the
page.• Used to indicate separations in a document.• Tag <HR>• Attributes
– WIDTH in percentage indicates the horizontal length of the rule.
• E.g., WIDTH=“25%” produces a rule of 160 pixels in a 640x480 pixels.
– SIZE specifies the height of the rule in pixels.– NOSHADE displays the rule as a solid bar.– ALIGN specifies the alignment of the bar.
31
Example: Horizontal Rules<HTML><HEAD><TITLE> Example of Horizontal Rules </TITLE></HEAD><BODY><H1 ALIGN=“center”><U>Horizontal Rules</U></H1><HR WIDTH=“25%” SIZE=“4” ALIGN = “right”><HR WIDTH=“50%” SIZE=“8” ALIGN = “center”> <HR WIDTH=“75%” SIZE=“12” ALIGN = “left”> <HR NOSHADE WIDTH=“75%” SIZE=“4” ALIGN = “left”><HR NOSHADE WIDTH=“50%” SIZE=“8” ALIGN = “center”> <HR NOSHADE WIDTH=“25%” SIZE=“12” ALIGN = “right”> </BODY></HTML>

32
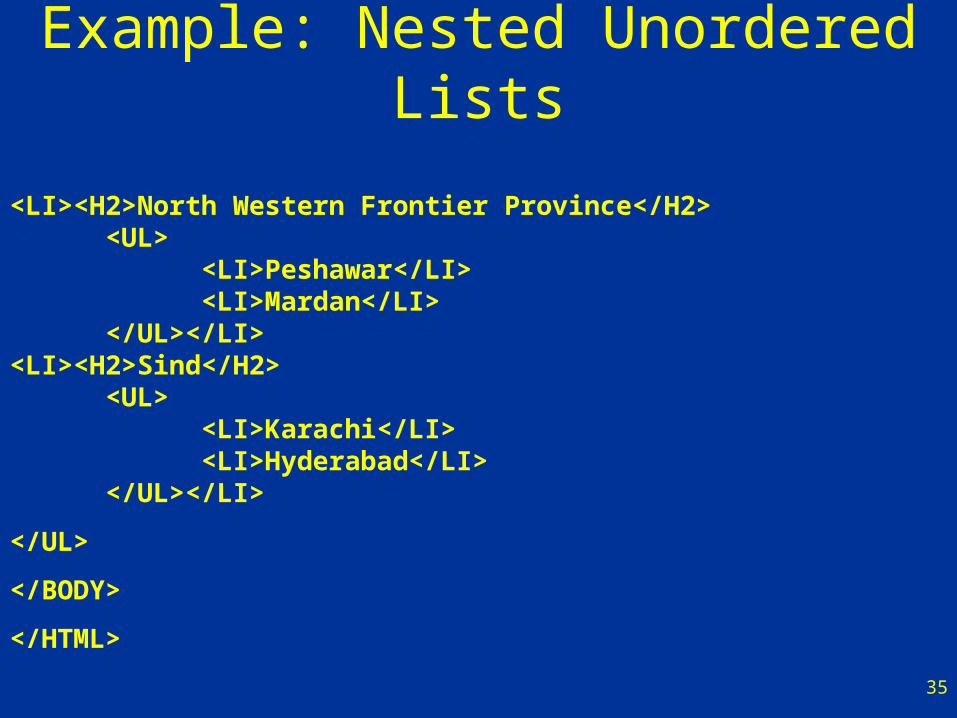
Unordered Lists
• Every element of an unordered list is preceded by a bullet mark.
• An unordered list is enclosed between <UL> and </UL> tags.
• Each list element is enclosed between <LI> and </LI> tags.
• Unordered lists can be nested.

33
Example: Unordered List
<HTML><HEAD><TITLE> Example of Unordered List </TITLE></HEAD><BODY><H1 ALIGN=“center”><U>Universities in Islamabad</U></H1><UL><LI><H2>Quaid-e-Azam Univerisity</H2><P>Oldest university of Islamabad. </P></LI><LI><H2><A HREF=“http://www.nust.edu.pk”>National University of Sciences and Technology</A> </H2><P>Largest technical university of Pakistan with countrywide campuses. </P></LI><LI><H2>National University of Computer and Emerging Sciences </H2><P>Offers a comprehensive BCS program</P></LI></UL></BODY></HTML>

34
Example: Nested Unordered Lists<HTML><HEAD><TITLE> Example of Nested Unordered List </TITLE></HEAD><BODY><H1 ALIGN=“center”><U>Provinces and Cities of Pakistan</U></H1><UL><LI><H2>Baluchistan</H2>
<UL><LI>Quetta</LI><LI>Gwadar</LI>
</UL></LI><LI><H2>Punjab</H2>
<UL><LI>Lahore</LI><LI>Multan</LI>
</UL></LI>
35
Example: Nested Unordered Lists
<LI><H2>North Western Frontier Province</H2><UL>
<LI>Peshawar</LI><LI>Mardan</LI>
</UL></LI><LI><H2>Sind</H2>
<UL><LI>Karachi</LI><LI>Hyderabad</LI>
</UL></LI>
</UL>
</BODY>
</HTML>

36
Ordered Lists• Ordered lists have numbered elements.• An ordered list is enclosed between <OL> and
</OL> tags.• Elements of ordered lists are enclosed between
<LI> and </LI> tags.• Ordered lists can have ordered as well as
unordered lists nested between them.• Type of numbering, i.e., numeric, alphabetic or
Roman can be specified by the attribute TYPE in the OL tag.– “1” for numeric, “a” and “A” for alphabetic, “I” and “i”
for Roman.– Default type is numeric.

37
Example: Ordered List<HTML><HEAD><TITLE> Example of Ordered List </TITLE></HEAD><BODY><H1 ALIGN=“center”><U>Universities in Islamabad</U></H1><OL><LI><H2>Quaid-e-Azam Univerisity</H2><P>Oldest university of Islamabad. </P></LI><LI><H2><A HREF=“http://www.nust.edu.pk”>National University of Sciences and Technology</A> </H2><P>Largest technical university of Pakistan with countrywide campuses. </P></LI><LI><H2>National University of Computer and Emerging Sciences </H2><P>Offers a comprehensive BCS program</P></LI></OL></BODY></HTML>

38
Example: Nested Ordered List<HTML><HEAD><TITLE> Example of Nested Unordered List </TITLE></HEAD><BODY><H1 ALIGN=“center”><U>Provinces and Cities of Pakistan</U></H1><OL><LI><H2>Baluchistan</H2>
<OL TYPE=“a”><LI>Quetta</LI><LI>Gwadar</LI>
</OL></LI><LI><H2>Punjab</H2>
<OL TYPE=“a”><LI>Lahore</LI><LI>Multan</LI>
</OL></LI>

39
Example: Nested Ordered List
<LI><H2>North Western Frontier Province</H2><OL TYPE=“a”>
<LI>Peshawar</LI><LI>Mardan</LI>
</OL></LI><LI><H2>Sind</H2>
<OL TYPE=“a”><LI>Karachi</LI><LI>Hyderabad</LI>
</OL></LI>
</OL>
</BODY>
</HTML>

40
Tables
• Tables are enclosed between <TABLE> and </TABLE> tags.
• Attributes include– BORDER specified as number of pixels.– ALIGN specified as “left”, “center” or “right”.– WIDTH specified as number of pixels or percentage
of display width.
• A caption for the table can be specified between <CAPTION> and </CAPTION> tags.– Caption text appears directly above the table.
41
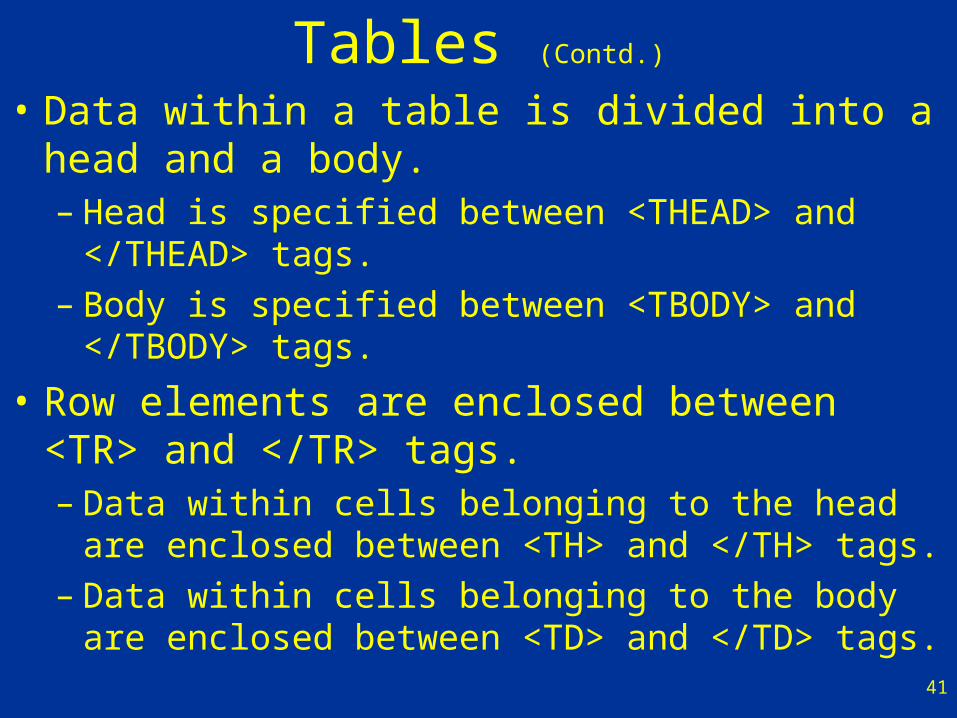
Tables (Contd.)
• Data within a table is divided into a head and a body.– Head is specified between <THEAD> and
</THEAD> tags.– Body is specified between <TBODY> and
</TBODY> tags.
• Row elements are enclosed between <TR> and </TR> tags.– Data within cells belonging to the head are
enclosed between <TH> and </TH> tags.– Data within cells belonging to the body are enclosed
between <TD> and </TD> tags.

42
Example: Single Row Table<HTML><HEAD><TITLE> Example of a single row table </TITLE></HEAD><BODY><TABLE BORDER=“2” WIDTH=“50%”><CAPTION>Provinces of Pakistan</CAPTION><THEAD><TR><TH>Province Name</TH></TR></THEAD><TBODY><TR><TD>Baluchistan</TD></TR><TR><TD>Punjab</TD></TR><TR><TD>North West Frontier Province</TD></TR><TR><TD>Sind</TD></TR></TBODY></TABLE></BODY></HTML>

43
Multi-Column Tables• Columns within a table are specified within the
<COLGROUP> and </COLGROUP> tags.– Attributes of <COL> tags are used to specify the
columns.• ALIGN specifies the alignment of text.• WIDTH specifies the width of the column.
– Multiple columns can be formatted together by specifying their number in the SPAN attribute.
• Data is inserted in the table for every column within a row.– I.e., For the first row (within TR tags) data (within
TH or TD tags) is inserted columnwise.

44
Example: Multi-Column Tables<HTML><HEAD><TITLE> Example of a single row table </TITLE></HEAD><BODY><TABLE BORDER=“2” WIDTH=“50%”>
<CAPTION>Provinces of Pakistan</CAPTION><COLGROUP>
<COL ALIGN=“center”><COL ALIGN=“center”>
</COLGROUP><THEAD>
<TR><TH>Province Name</TH><TH>Capital</TH></TR>
</THEAD><TBODY>
<TR><TD>Baluchistan</TD><TD>Quetta</TD></TR>

45
Example: Multi-Column Tables
<TR><TD>Punjab</TD><TD>Lahore</TD></TR>
<TR><TD>North West Frontier Province</TD><TD>Peshawar</TD></TR>
<TR><TD>Sind</TD><TD>Karachi</TD></TR>
</TBODY></TABLE></BODY></HTML>

46
HTML Forms• Forms are used to allow users to enter data for
or to make query to web-based information services.
• Information entered in the forms are returned to the web-server.
• Forms are defined within <FORM> and </FORM> tags.
• Attributes include– METHOD to specify whether the information
entered in the form is a query or a submission.– ACTION to specify the path to the script to handle
the information submitted.
47
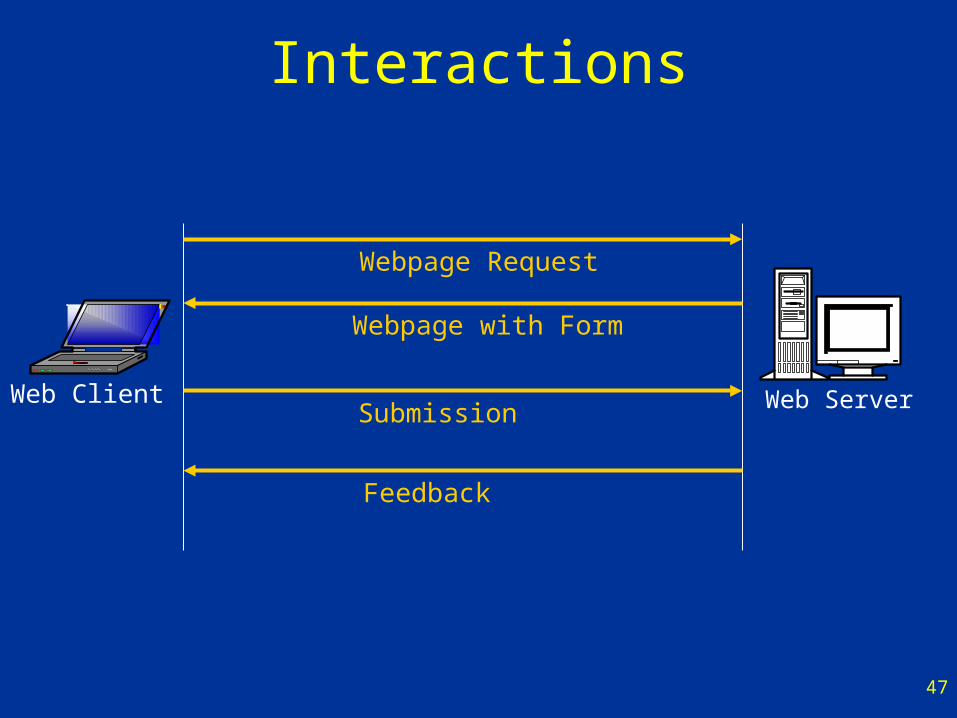
Interactions
Web ServerWeb Client
Webpage Request
Webpage with Form
Submission
Feedback
48
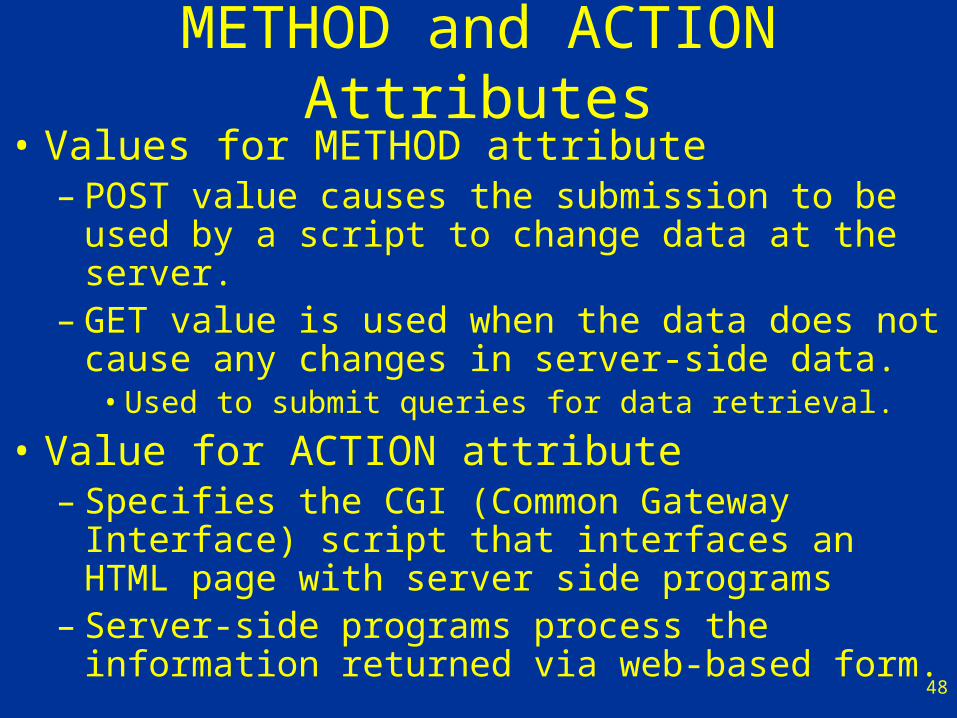
METHOD and ACTION Attributes• Values for METHOD attribute
– POST value causes the submission to be used by a script to change data at the server.
– GET value is used when the data does not cause any changes in server-side data.
• Used to submit queries for data retrieval.
• Value for ACTION attribute– Specifies the CGI (Common Gateway Interface)
script that interfaces an HTML page with server side programs
– Server-side programs process the information returned via web-based form.

49
Simple Form Elements
• Simple form elements specified using INPUT tag.
• Attributes of INPUT tags– TYPE to define the type of elements.– NAME name of the element, e.g., name of variables
and element groups (i.e., checkbox and radio button groups).
– VALUE value of the element.• Caption of buttons• Value of textboxes and variables.

50
Values of Attribute TYPE• hidden
– Name value pairs not displayed to the user.
• text– Textbox. – Requires further attributes,
• SIZE defines the visible area of the textbox.• MAXLENGTH defines the maximum number of
characters a user can enter in the textbox.
• submit– Button to send form data to the web-server.
• Reset– Button to reload default values into form elements.
51
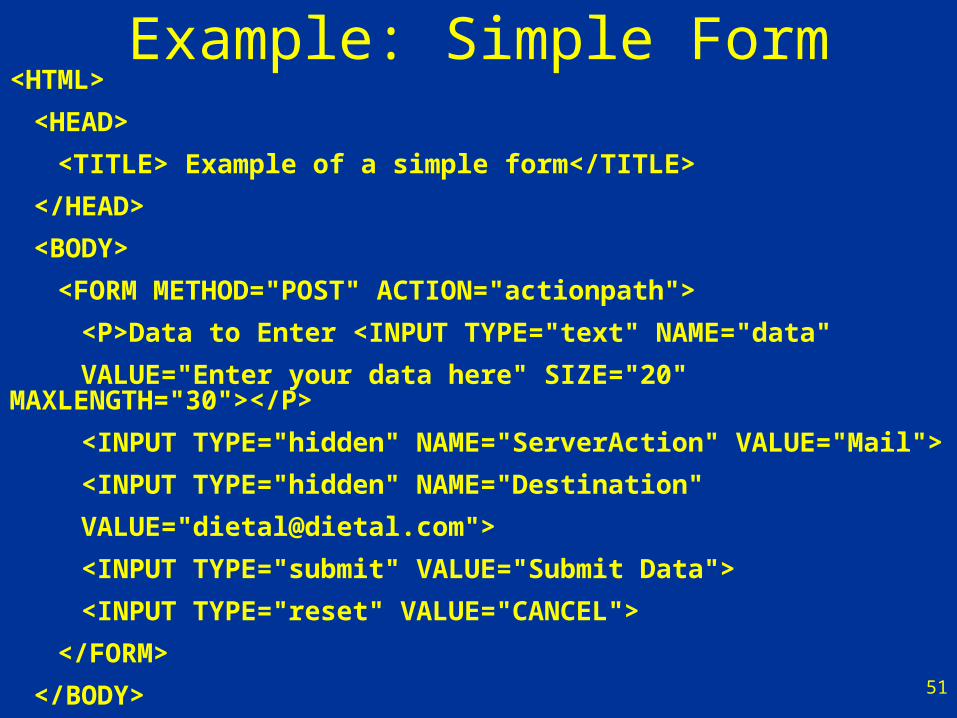
Example: Simple Form<HTML>
<HEAD>
<TITLE> Example of a simple form</TITLE>
</HEAD>
<BODY>
<FORM METHOD="POST" ACTION="actionpath">
<P>Data to Enter <INPUT TYPE="text" NAME="data"
VALUE="Enter your data here" SIZE="20" MAXLENGTH="30"></P>
<INPUT TYPE="hidden" NAME="ServerAction" VALUE="Mail">
<INPUT TYPE="hidden" NAME="Destination"
VALUE="[email protected]">
<INPUT TYPE="submit" VALUE="Submit Data">
<INPUT TYPE="reset" VALUE="CANCEL">
</FORM>
</BODY>
</HTML>

52
Text Areas
• Text area specified by <TEXTAREA> and </TEXTAREA> Tags.
• Text between these tags specifies the default text appearing in the text area.
• Attributes– NAME specifies the name of the variable to which
the text in the text area is assigned.– ROWS specifies the number of rows to be shown.– COLS specifies the number of characters allowed
per row.

53
Checkboxes and Radio Buttons• Checkboxes are INPUT elements with TYPE
specified as “checkbox”.• Radio buttons are INPUT elements with TYPE
specified as “radio”.• All checkboxes and radio buttons in the same
group should have the same name.• Value of the VALUE attribute is returned for
checkboxes and radio buttons that are selected.• Attribute CHECKED for a radio button specifies
the radio button selected by default.– This attribute has no value.

54
Combo Boxes• Combo boxes are specified between
<SELECT> and </SELECT> tags.• Attributes
– NAME specifies the name of the variable to which the value selected in the combo box is assigned.
• Values in the combo box are specified using the <OPTION> tag.– Attribute
• SELECTED• Only one OPTION element can have this attribute.• Contains no value.• Specifies the combo box value shown on the combo box
by default.

55
Example: A Complex Form<HTML>
<HEAD>
<TITLE> Example of a simple form</TITLE>
</HEAD>
<BODY>
<FORM METHOD="POST" ACTION="actionpath">
<P>Data to Enter <INPUT TYPE="text" NAME="data"
VALUE="Your Name" SIZE="20" MAXLENGTH="30"></P>
<P>Select your course
<SELECT NAME="course">
<OPTION SELECTED>Finalist
<OPTION> Second year
<OPTION> First year
</SELECT></P>
56
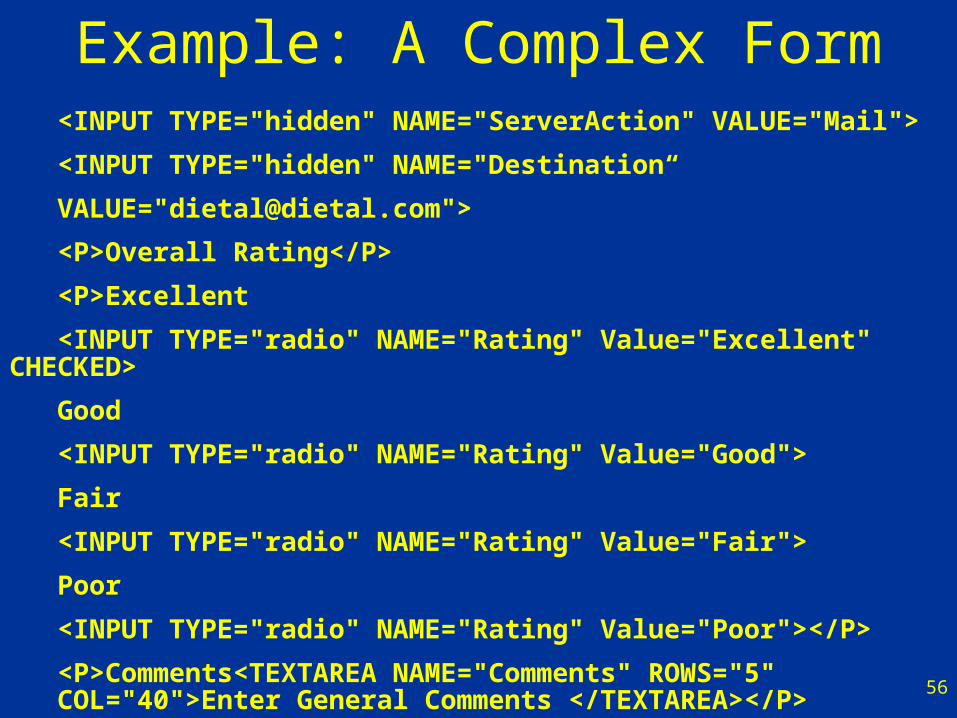
Example: A Complex Form<INPUT TYPE="hidden" NAME="ServerAction" VALUE="Mail">
<INPUT TYPE="hidden" NAME="Destination“
VALUE="[email protected]">
<P>Overall Rating</P>
<P>Excellent
<INPUT TYPE="radio" NAME="Rating" Value="Excellent" CHECKED>
Good
<INPUT TYPE="radio" NAME="Rating" Value="Good">
Fair
<INPUT TYPE="radio" NAME="Rating" Value="Fair">
Poor
<INPUT TYPE="radio" NAME="Rating" Value="Poor"></P>
<P>Comments<TEXTAREA NAME="Comments" ROWS="5" COL="40">Enter General Comments </TEXTAREA></P>
57
Example: A Complex Form<P>Suggestions</P>
<P>More labs
<INPUT TYPE="checkbox" NAME="Suggestions" VALUE="labs">
More assignments
<INPUT TYPE="checkbox" NAME="Suggestions" VALUE="assign">
Course assignments
<INPUT TYPE="checkbox" NAME="Suggestions“
VALUE="course assign">
</P>
<INPUT TYPE="submit" VALUE="Submit Data">
<INPUT TYPE="reset" VALUE="CANCEL">
</FORM>
</BODY>
</HTML>

58
Internal Links• Links within a page.• Location within a page is marked by <A> and
</A> tags with the name attribute identifying the location.
• Links to the location are specified by <A> and </A> tags with the HREF attribute specifying the location within the page preceded by #.
• Example– Location: <A NAME=“ALocation”>I am here</A>– Link: <A HREF=“#ALocation”>Go there</A>– Link from a different file to a location within another
file• <A HREF=“File.html#ALocation”>Go there</A>

59
Example: Internal Linking
<HTML>
<HEAD>
<TITLE> Example of Nested Unordered List </TITLE>
</HEAD>
<BODY>
<H1 ALIGN="center"><U>Provinces and Cities of Pakistan</U></H1>
<A HREF="#baluchistan">Baluchistan</A><BR>
<A HREF="#punjab">Punjab</A><BR>
<A HREF="#nwfp">North Western Frontier Province</A><BR>
<A HREF="#sind">Sind</A><BR>
<UL>

60
Example: Internal Linking
<LI><H2><A NAME="baluchistan">Baluchistan</A></H2>
<UL>
<LI>Quetta</LI>
<LI>Gwadar</LI>
</UL></LI>
<LI><H2><A NAME="punjab">Punjab</A></H2>
<UL>
<LI>Lahore</LI>
<LI>Multan</LI>
</UL></LI>

61
Example: Internal Linking<LI><H2><A NAME="nwfp">North Western Frontier Province</A></H2>
<UL>
<LI>Peshawar</LI>
<LI>Mardan</LI>
</UL></LI>
<LI><H2><A NAME="sind">Sind</A></H2>
<UL>
<LI>Karachi</LI>
<LI>Hyderabad</LI>
</UL></LI>
</UL>
</BODY>
</HTML>

62
Self Study
• Chapter 12, Microsoft FrontPage Express from e-Business & e-Commerce: How to Program by Dietel, Dietel and Nieto.