1 2 3 4 5 6 7 8 9sanitationequipmentlimited.com/images/2000-21french.pdfmode d’emploi: attention:...
TRANSCRIPT

OPERATING INSTRUCTIONS:
CAUTIONS: Changes in altitude while travelling, or other conditions, may cause pressure build-up in the waste holding tank. Before use, always check for pressure build-up by first opening and closing the flush valve with the lid and seat in the closed position. NEVER ADD WASTE HOLDING TANK CHEMICALS TO THE FRESH WATER SUPPLY. When adding chemical to the waste holding tank, first open the flush valve fully. Never add chemical into the bowl and then flush into the holding tank.
1. How To Separate The Water Tank & Holding Tank Sections: On models with a single spring lock clip, pull out slightly on the single spring lock clip located at the rear of the fresh water tank. Lift up on the rear of the water tank to disengage the front clasp, then lift vertically. To reassemble the two sections, align and engage the front clasp then press down gently on the rear of the water tank until the spring lock clip engages.On models with two spring lock clips, pull out slightly on the spring lock clips located on either side of the water tank then lift vertically. To reassemble the two sections, align the recesses in the water tank with the locating pins on the holding tank and press down gently on the top of the toilet until the spring lock clips engage.
2. Filling and Adding Fresh Water Additives to the Fresh Water Supply Tank: Remove the water fill cap located at the top rear right-hand corner by grasping the edge of the cap and pulling up. If using a fresh water additive, read the directions on the package for the proper amount to use. Fill the fresh water tank with water to the bottom of the fill tube. DO NOT OVERFILL. Replace the water fill cap by pressing onto the water fill spout.Operating the Water Pump: To add water to the bowl prior to use, operate the pump in an up-and-down stroking motion. Periodically lubricate the pump tube shaft with vaseline or silicone grease.
3. Flushing: To flush after use, open the flush valve by pulling the handle located at the front of the toilet straight out. Push the handle back in all the way to close the valve. When the valve is closed, the holding tank is sealed. It is not necessary to have water in the bowl after it has been flushed, but water should be added before use to ensure a proper flush. It is also useful to operate the pump when flushing in order to rinse the bowl.
4. To Add Chemical Deodorizer to the Waste Holding Tank: Be sure the flush valve is FULLY OPEN before pouring chemical into the waste holding tank. Read the directions on the package for the proper amount to use. Open the flush valve fully as shown in Fig. 3. Pour chemical through the bowl opening into the waste holding tank. Pump sufficient water through the bowl to cover the bottom surface of the holding tank. Close the flush valve fully and agitate the toilet to thoroughly mix the water and chemical.
5. Waste Level Indicator: All models have a waste level indicator located on the front left-hand side of the lower holding tank. As the tank becomes full, a dark indicator line will appear in the centre of the window. When the line reaches the top, this is an indication that the tank should be emptied.
6 & 7. How to Empty the Waste Holding Tank: Separate the holding tank as previously described. Carry the tank to any permanent toilet waste disposal facility. For splash-free disposal, there is a pour spout stored in a recess in the bottom of the waste holding tank. Remove the spout by pulling on its front end where the finger recess is located. Remove the plug and threaded cap from each respective end of the spout. Remove the sealing cap from the holding tank outlet. Position the spout on the tank outlet as shown and attach by tightening the threaded collar ring onto the tank. Pull up on the air vent valve (red cap) located on the top front left-hand corner of the tank. This will permit air flow through the tank for a smooth discharge of the tank contents while emptying. Carefully empty the tank by gripping the rear handle and the finger recess in the bottom of the tank at the front. Gradually tilt up the front corner of the tank nearest to you and pour out the spout on the diagonal. After emptying the tank, rinse with fresh water. Remove the spout and rinse if necessary. Replace the cap on the emptying outlet and push down on the air vent valve to close. Replace the cap and end plug on the spout and press into the storage cavity. Reassemble and recharge the unit as previously described.
8. To Replace the Rubber Gasket Seal: If the bowl does not hold water or there is leakage from the waste holding tank through the flush valve, first check to see if there is some impediment on the outer or inner sealing surfaces of the gasket that needs to be removed. If not, the gasket should be replaced. For ease of installation immerse the replacement gasket in warm water for five minutes prior to installation. When replaced, ensure that the gasket is in the proper position inside the holding tank with the sealing surface vertical as shown.
1- Clapper Gasket 2- Clapper Seal Opening 3- Inside Lip of Holding Tank 4- Correct Position 5- Incorrect Position
9. To Prevent Leakage Out Flush Valve Shaft: First pull out the flush valve handle to expose the plastic ring at the front of the bottom tank. Adjust the tightness of the valve shaft “O” ring seal until leakage stops by using long-nose pliers and turning the plastic ring CLOCKWISE as shown. If leakage persists, the holding tank should be returned for inspection and repair or possible replacement. 1- Turn to Tighten 2- Lubricate (vaseline or silicone grease)
CLEANING AND MAINTENANCE: Regularly clean the bowl with Visa Toilet Bowl and Waste Holding Tank Cleaner and Freshener or BIO-SAN® Rinse. Also recommended to clean and fresh-en the bowl and tank for between-use storage. Other members of the Visa and BIO-SAN® family of Toilet Care Products include; Waste holding tank deodorizers in liquid or powder concentrate form and rapidly disintegrating, biodegradable VisaToilet Tissue. Periodically apply petroleum jelly to the surface of the flush valve rubber gasket seal. For cold weather use add a NON-TOXIC anti-freeze to the fresh water supply tank. To prepare for storage, empty the water tank (including pump chamber) and holding tank. Rinse out the holding tank using Visa Toilet Bowl and Waste Holding Tank Cleaner and Freshener or BIO-SAN® Rinse, or use one cup of bleach (5% solution) per 5 litres (1 Gallon) of water. Never use abrasive brushes, cleaners or harsh chemicals or solvents that can scratch the finish or damage plastic surfaces and rubber seals.
1 2 3 4 5 6 7 8 9
PARTS1. Lid Cover & Seat2. Pump Assembly3. Check Valve4. Nozzle Assembly5. Water Fill Cap6. Fresh Water Tank7. Spring lock(s)8. Flush Gasket Seal9. Tank/ Spout Cap10. Waste Tank11. Pour Spout Ass’y12. Spout End Plug
Have the followinginformation avail-able when ordering replacement parts(a) Brand Name(b) Model Number(c) Part name(d) Part Color
Parts may be obtained from your local dealer, place of purchase or contact:
® Registered Trademark of:Sanitation Equipment Limited
R2000-21G
Visa ChemicalsWaste HoldingTank DeodorizerAvailable in:16 fl. oz. (437ml)32 fl. oz. (947ml)67 fl. oz. (2L)•Eliminates odor causing molecules• Non staining• Non corrosive• Pleasant fragrance
Visa ChemicalsWaste Holding Tank Deodorizer CrystalsAvailable in:16 oz. (454g)• Non dusting granules•Eliminates odor causing molecules• Non staining• Non corrosive• Pleasant fragrance
Visa ChemicalsBiodgradable Toilet TissueAvailable in: 2 Pack1000 sheets/ roll• For R.V./ Marine & portable toilets•Rapidly disintegrat- ing biodegradable paper • Resists clogging• Superior strength• Safe for septic use
Visa ChemicalsToilet Bowl & Holding Tank CleanerAvailable in: 33 fl. oz. (1 Litre)• Special formulation for RV/ Marine, portable or perma- nent holding tanks• Cleans & freshens• Non abrasive
BIO-SAN®
Sanitary FluidAvailable in: 67.6 fl. oz. (2 Litre)• Eliminates odors• Non staining• Non corrosize• Pleasant fragrance
BIO-SAN® RinseAvailable in: 67.6 fl. oz. (2 Litre)• Keeps water sup- ply reservoir fresh/ inhibits algae • Lubricates bowl surface & flush valve for easier flushing• Leaves stain resist- ant film• Fresh scent
OUTSIDE NORTH AMERICAGo to www.sanitationequipmentlimited.comfor the dealer/ distributor nearest you
UNITED STATESSanitation Equipment Limited225 Main St. C-104 Edwards, CO, 81632Phone: (970) 569-2276, Fax: (970) 569-2272
MODE D’EMPLOI:
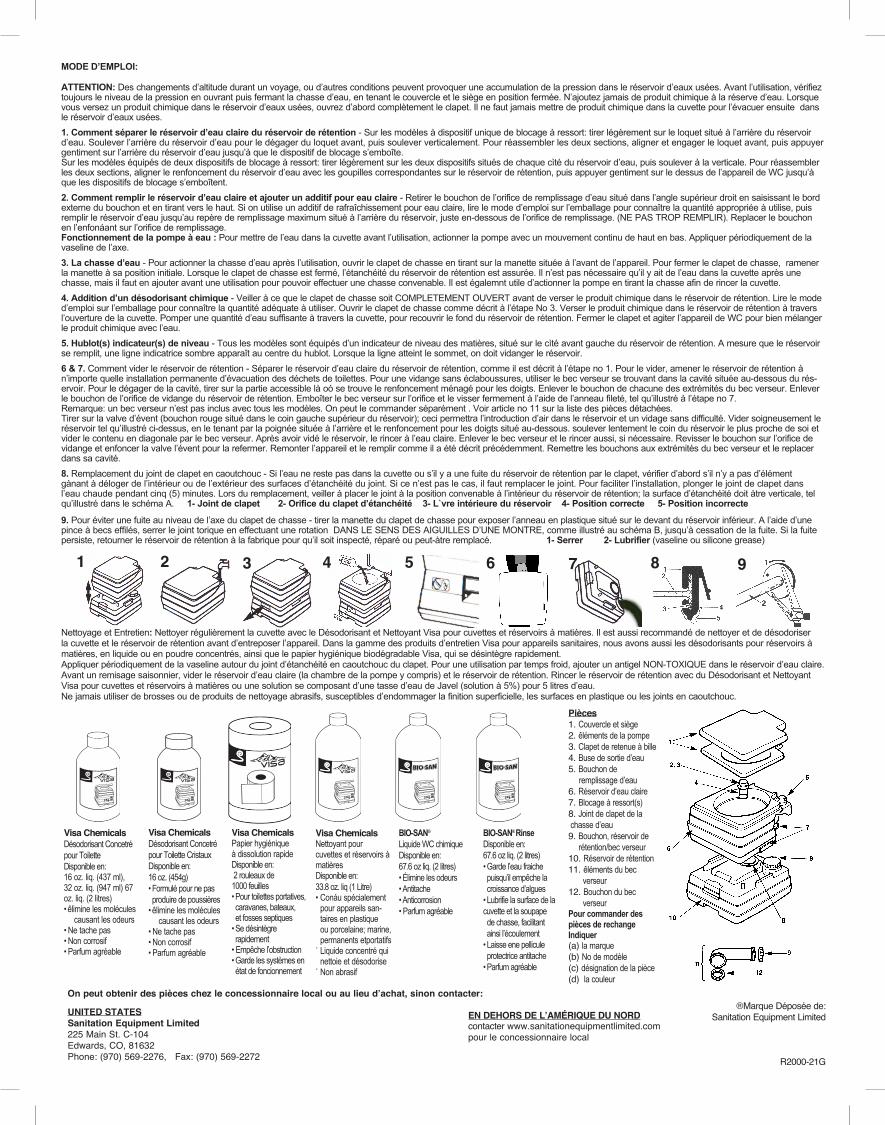
ATTENTION: Des changements d’altitude durant un voyage, ou d’autres conditions peuvent provoquer une accumulation de la pression dans le réservoir d’eaux usées. Avant l’utilisation, vérifiez toujours le niveau de la pression en ouvrant puis fermant la chasse d’eau, en tenant le couvercle et le siège en position fermée. N’ajoutez jamais de produit chimique à la réserve d’eau. Lorsque vous versez un produit chimique dans le réservoir d’eaux usées, ouvrez d’abord complètement le clapet. Il ne faut jamais mettre de produit chimique dans la cuvette pour l’évacuer ensuite dans le réservoir d’eaux usées.1. Comment séparer le réservoir d’eau claire du réservoir de rétention - Sur les modèles à dispositif unique de blocage à ressort: tirer légèrement sur le loquet situé à l’arrière du réservoir d’eau. Soulever l’arrière du réservoir d’eau pour le dégager du loquet avant, puis soulever verticalement. Pour réassembler les deux sections, aligner et engager le loquet avant, puis appuyer gentiment sur l’arrière du réservoir d’eau jusqu’à que le dispositif de blocage s’emboîte.Sur les modèles équipés de deux dispositifs de blocage à ressort: tirer légèrement sur les deux dispositifs situés de chaque cìté du réservoir d’eau, puis soulever à la verticale. Pour réassembler les deux sections, aligner le renfoncement du réservoir d’eau avec les goupilles correspondantes sur le réservoir de rétention, puis appuyer gentiment sur le dessus de l’appareil de WC jusqu’à que les dispositifs de blocage s’emboîtent.2. Comment remplir le réservoir d’eau claire et ajouter un additif pour eau claire - Retirer le bouchon de l’orifice de remplissage d’eau situé dans l’angle supérieur droit en saisissant le bord externe du bouchon et en tirant vers le haut. Si on utilise un additif de rafraîchissement pour eau claire, lire le mode d’emploi sur l’emballage pour connaître la quantité appropriée à utilise, puis remplir le réservoir d’eau jusqu’au repère de remplissage maximum situé à l’arrière du réservoir, juste en-dessous de l’orifice de remplissage. (NE PAS TROP REMPLIR). Replacer le bouchon en l’enfonáant sur l’orifice de remplissage.Fonctionnement de la pompe à eau : Pour mettre de l’eau dans la cuvette avant l’utilisation, actionner la pompe avec un mouvement continu de haut en bas. Appliquer périodiquement de la vaseline de l’axe.3. La chasse d’eau - Pour actionner la chasse d’eau après l’utilisation, ouvrir le clapet de chasse en tirant sur la manette située à l’avant de l’appareil. Pour fermer le clapet de chasse, ramener la manette à sa position initiale. Lorsque le clapet de chasse est fermé, l’étanchéité du réservoir de rétention est assurée. Il n’est pas nécessaire qu’il y ait de l’eau dans la cuvette après une chasse, mais il faut en ajouter avant une utilisation pour pouvoir effectuer une chasse convenable. Il est égalemnt utile d’actionner la pompe en tirant la chasse afin de rincer la cuvette.4. Addition d’un désodorisant chimique - Veiller à ce que le clapet de chasse soit COMPLETEMENT OUVERT avant de verser le produit chimique dans le réservoir de rétention. Lire le mode d’emploi sur l’emballage pour connaître la quantité adéquate à utiliser. Ouvrir le clapet de chasse comme décrit à l’étape No 3. Verser le produit chimique dans le réservoir de rétention à travers l’ouverture de la cuvette. Pomper une quantité d’eau suffisante à travers la cuvette, pour recouvrir le fond du réservoir de rétention. Fermer le clapet et agiter l’appareil de WC pour bien mélanger le produit chimique avec l’eau.5. Hublot(s) indicateur(s) de niveau - Tous les modèles sont équipés d’un indicateur de niveau des matières, situé sur le cìté avant gauche du réservoir de rétention. A mesure que le réservoir se remplit, une ligne indicatrice sombre apparaît au centre du hublot. Lorsque la ligne atteint le sommet, on doit vidanger le réservoir.6 & 7. Comment vider le réservoir de rétention - Séparer le réservoir d’eau claire du réservoir de rétention, comme il est décrit à l’étape no 1. Pour le vider, amener le réservoir de rétention à n’importe quelle installation permanente d’évacuation des déchets de toilettes. Pour une vidange sans éclaboussures, utiliser le bec verseur se trouvant dans la cavité située au-dessous du rés-ervoir. Pour le dégager de la cavité, tirer sur la partie accessible là oó se trouve le renfoncement ménagé pour les doigts. Enlever le bouchon de chacune des extrémités du bec verseur. Enlever le bouchon de l’orifice de vidange du réservoir de rétention. Emboîter le bec verseur sur l’orifice et le visser fermement à l’aide de l’anneau fileté, tel qu’illustré à l’étape no 7.Remarque: un bec verseur n’est pas inclus avec tous les modèles. On peut le commander séparément . Voir article no 11 sur la liste des pièces détachées.Tirer sur la valve d’évent (bouchon rouge situé dans le coin gauche supérieur du réservoir); ceci permettra l’introduction d’air dans le réservoir et un vidage sans difficulté. Vider soigneusement le réservoir tel qu’illustré ci-dessus, en le tenant par la poignée située à l’arrière et le renfoncement pour les doigts situé au-dessous. soulever lentement le coin du réservoir le plus proche de soi et vider le contenu en diagonale par le bec verseur. Après avoir vidé le réservoir, le rincer à l’eau claire. Enlever le bec verseur et le rincer aussi, si nécessaire. Revisser le bouchon sur l’orifice de vidange et enfoncer la valve l’évent pour la refermer. Remonter l’appareil et le remplir comme il a été décrit précédemment. Remettre les bouchons aux extrémités du bec verseur et le replacer dans sa cavité.8. Remplacement du joint de clapet en caoutchouc - Si l’eau ne reste pas dans la cuvette ou s’il y a une fuite du réservoir de rétention par le clapet, vérifier d’abord s’il n’y a pas d’élément gànant à déloger de l’intérieur ou de l’extérieur des surfaces d’étanchéité du joint. Si ce n’est pas le cas, il faut remplacer le joint. Pour faciliter l’installation, plonger le joint de clapet dans l’eau chaude pendant cinq (5) minutes. Lors du remplacement, veiller à placer le joint à la position convenable à l’intérieur du réservoir de rétention; la surface d’étanchéité doit àtre verticale, tel qu’illustré dans le schéma A. 1- Joint de clapet 2- Orifice du clapet d’étanchéité 3- L`vre intérieure du réservoir 4- Position correcte 5- Position incorrecte
9. Pour éviter une fuite au niveau de l’axe du clapet de chasse - tirer la manette du clapet de chasse pour exposer l’anneau en plastique situé sur le devant du réservoir inférieur. A l’aide d’une pince à becs effilés, serrer le joint torique en effectuant une rotation DANS LE SENS DES AIGUILLES D’UNE MONTRE, comme illustré au schéma B, jusqu’à cessation de la fuite. Si la fuite persiste, retourner le réservoir de rétention à la fabrique pour qu’il soit inspecté, réparé ou peut-àtre remplacé. 1- Serrer 2- Lubrifier (vaseline ou silicone grease)
Nettoyage et Entretien: Nettoyer régulièrement la cuvette avec le Désodorisant et Nettoyant Visa pour cuvettes et réservoirs à matières. Il est aussi recommandé de nettoyer et de désodoriser la cuvette et le réservoir de rétention avant d’entreposer l’appareil. Dans la gamme des produits d’entretien Visa pour appareils sanitaires, nous avons aussi les désodorisants pour réservoirs à matières, en liquide ou en poudre concentrés, ainsi que le papier hygiénique biodégradable Visa, qui se désintègre rapidement.Appliquer périodiquement de la vaseline autour du joint d’étanchéité en caoutchouc du clapet. Pour une utilisation par temps froid, ajouter un antigel NON-TOXIQUE dans le réservoir d’eau claire. Avant un remisage saisonnier, vider le réservoir d’eau claire (la chambre de la pompe y compris) et le réservoir de rétention. Rincer le réservoir de rétention avec du Désodorisant et Nettoyant Visa pour cuvettes et réservoirs à matières ou une solution se composant d’une tasse d’eau de Javel (solution à 5%) pour 5 litres d’eau. Ne jamais utiliser de brosses ou de produits de nettoyage abrasifs, susceptibles d’endommager la finition superficielle, les surfaces en plastique ou les joints en caoutchouc.
Pièces1. Couvercle et siège2. êléments de la pompe3. Clapet de retenue à bille4. Buse de sortie d’eau5. Bouchon de remplissage d’eau6. Réservoir d’eau claire7. Blocage à ressort(s)8. Joint de clapet de la chasse d’eau9. Bouchon, réservoir de rétention/bec verseur10. Réservoir de rétention11. êléments du bec verseur12. Bouchon du bec verseurPour commander des pièces de rechange Indiquer(a) la marque(b) No de modèle(c) désignation de la pièce(d) la couleur
EN DEHORS DE L’AMÉRIQUE DU NORDcontacter www.sanitationequipmentlimited.compour le concessionnaire local
®Marque Déposée de:Sanitation Equipment Limited
R2000-21G
On peut obtenir des pièces chez le concessionnaire local ou au lieu d’achat, sinon contacter:
UNITED STATESSanitation Equipment Limited225 Main St. C-104Edwards, CO, 81632Phone: (970) 569-2276, Fax: (970) 569-2272
1 2 3 4 5 6 7 8 9
Visa ChemicalsDésodorisant Concetré pour Toilette Disponible en:16 oz. liq. (437 ml),32 oz. liq. (947 ml) 67 oz. liq. (2 litres)• êlimine les molécules causant les odeurs• Ne tache pas• Non corrosif• Parfum agréable
Visa ChemicalsDésodorisant Concetré pour Toilette CristauxDisponible en:16 oz. (454g)• Formulé pour ne pas produire de poussières• êlimine les molécules causant les odeurs• Ne tache pas• Non corrosif• Parfum agréable
Visa ChemicalsPapier hygiéniqueà dissolution rapide Disponible en: 2 rouleaux de1000 feuilles• Pour toilettes portatives, caravanes, bateaux, et fosses septiques• Se désintègre rapidement • Empêche l’obstruction• Garde les systèmes en état de foncionnement
Visa ChemicalsNettoyant pourcuvettes et réservoirs à matières Disponible en: 33.8 oz. liq (1 Litre)• Conáu spécialement pour appareils san- taires en plastique ou porcelaine; marine, permanents etportatifs˙ Liquide concentré qui nettoie et désodorise˙ Non abrasif
BIO-SAN®
Liquide WC chimiqueDisponible en: 67.6 oz liq. (2 litres)• Élimine les odeurs• Antitache• Anticorrosion• Parfum agréable
BIO-SAN® RinseDisponible en: 67.6 oz liq. (2 litres)• Garde l’eau fraiche puisqu’il empêche la croissance d’algues • Lubrifie la surface de la cuvette et la soupape de chasse, facilitant ainsi l’écoulement• Laisse ene pellicule protectrice antitache• Parfum agréable